
CTA9500 - Multifunction tool EGO - Free user manual and instructions
Find the device manual for free CTA9500 EGO in PDF.


| Product type | Cordless oscillating multi-tool |
| Brand | EGO |
| Model | CTA9500 |
| Dimensions (L×W×H) | 30 × 8 × 10 cm |
| Weight (with battery) | 1.2 kg |
| Power supply | Lithium-ion battery 56V, 2.5 Ah |
| Main functions | Cutting, sanding, scraping, plunge sawing |
| No-load speed | 5,000 - 20,000 oscillations/min |
| Oscillation angle | 3.2° |
| Accessory change | Tool-free (Quick-Release) |
| Sound level | 85 dB(A) |
| Vibration level | 10 m/s² |
| Warranty | 5 years |
| Box contents | Tool, 56V 2.5Ah battery, charger, 3 accessories, user manual |
| Maintenance | Clean with a damp cloth, no solvents |
| Safety | Motor brake, switch lock |
| Repairability | Spare parts available on the EGO website |
Frequently Asked Questions - CTA9500 EGO
User questions about CTA9500 EGO
0 question about this device. Answer the ones you know or ask your own.
Ask a new question about this device
Download the instructions for your Multifunction tool in PDF format for free! Find your manual CTA9500 - EGO and take your electronic device back in hand. On this page are published all the documents necessary for the use of your device. CTA9500 by EGO.
USER MANUAL CTA9500 EGO
natural_image
Line drawing of a hand tool gripping a mechanical component (no text or symbols)OPERATOR'S MANUAL
CULTIVATOR ATTACHMENT
MODEL NUMBER CTA9500
natural_image
Illustration of a person spraying a field with a tool, surrounded by grass and irrigation equipment (no text or symbols)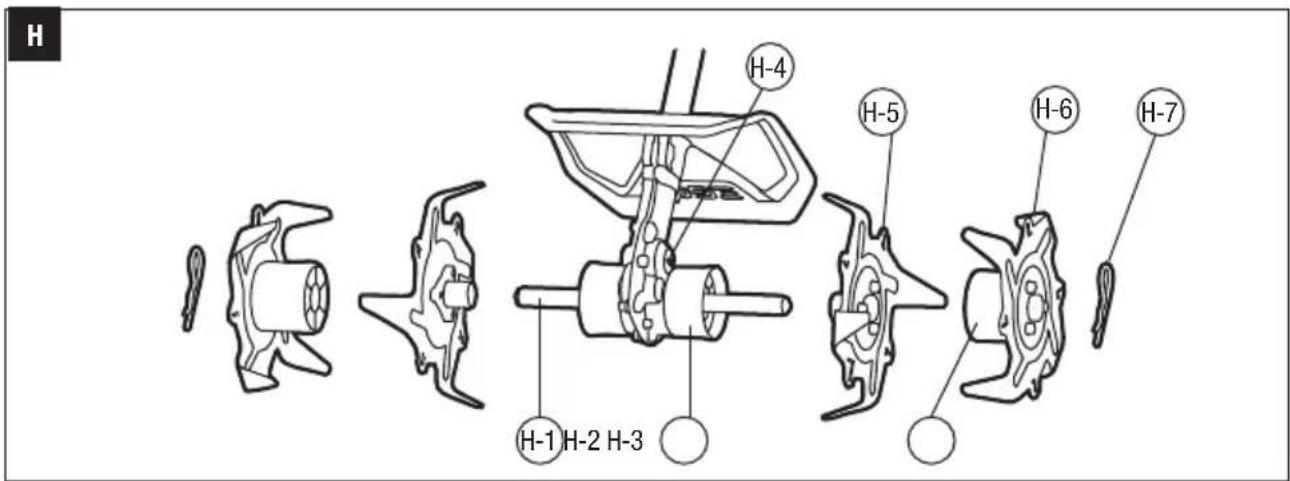


natural_image
Diagram of a mechanical device with a tool inserted, showing a gear mechanism (no text or symbols present)
natural_image
Line drawing of a hand using a tool to clean or inspect a mechanical component (no text or symbols)

natural_image
Illustration of hands using a tool to adjust or install a mechanical component, with no visible text or symbols.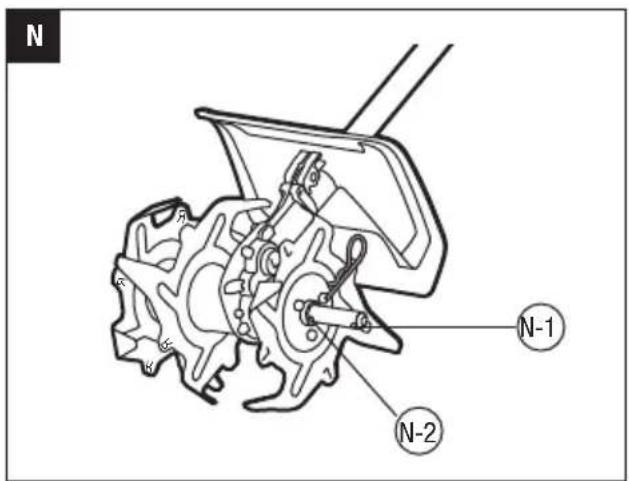

natural_image
Technical line drawing of a mechanical component with no visible text or symbolsREAD ALL INSTRUCTIONS!

READ OPERATOR'S MANUAL
⚠️ Residual risk! People with electronic devices, such as pacemakers, should consult their physician(s) before using this product. Operation of electrical equipment in close proximity to a heart pacemaker could cause interference or failure of the pacemaker.
WARNING: To ensure safety and reliability, all repairs and replacements should be performed by a qualified service technicia.
SAFETY SYMBOLS
The purpose of safety symbols is to attract your attention to possible dangers. The safety symbols and the explanations with them deserve your careful attention and understanding. The symbol warnings do not, by themselves, eliminate any danger. The instructions and warnings they give are no substitutes for proper accident prevention measures.
WARNING: Be sure to read and understand all safety instructions in this Operator's Manual, including all safety alert symbols such as "DANGER," "WARNING," and "CAUTION" before using this tool. Failure to follow all instructions listed below may result in electric shock, fire, and/or serious personal injury.
SYMBOL MEANING
SAFETY ALERT SYMBOL: Indicates DANGER, WARNING, OR CAUTION. May be used in conjunction with other symbols or pictographs.

WARNING: The operation of any power tools can result in foreign objects being thrown into your eyes, which can result in severe eye damage. Before beginning power tool operation, always wear safety goggles or safety glasses with side shield and a full face shield when needed. We recommend a Wide Vision Safety Mask for use over eyeglasses or standard safety glasses with side shields.
SAFETY INSTRUCTIONS
This page depicts and describes safety symbols that may appear on this product. Read, understand, and follow all instructions on the machine before attempting to assemble and operate it.
 | Safety Alert | Indicates a potential personal injury hazard. |
 | Read Operator's Manual | To reduce the risk of injury, user must read and understand operator's manual before using this product. |
 | Wear Ear protection | Always wear ear protection when operating this product. |
 | Wear Eye Protection | Always wear safety goggles or safety glasses with side shields when operating this product. |
 | Wear Protective Gloves | Protect your hands with gloves when handling blades. Heavy-duty, nonslip gloves improve your grip and protect your hands. |
 | Wear Safety Footwear | Wear Safety Footwear Wear non-slip safety foot-wear when using this equipment. |
 | Ricochet | Thrown objects can ricochet and result in personal injury or property damage. |
 | Keep Feet Away | To reduce the risk of cut injuries, keep feet away from the rotating blades. |
 | CE | This product is in accordance with applicable EC directives. |
 | WEEE | Waste electrical products should not be disposed of with household waste. Take to an authorized recycler. |
 | Noise | Guaranteed sound power level. |
EN
| Do Not Expose To Rain | Do not use in the rain or leave outdoors while it is raining. | |
| V Volt Voltage | ||
| mm Millimeter Length | or size | |
| kg Kilogram Weight | ||
GENERAL POWER TOOL SAFETY WARNINGS
WARNING! Read all safety warnings, instructions, illustrations and specifications provided with this power tool. Failure to follow all instructions listed below may result in electric shock, fire and/or serious injury.
Save all warnings and instructions for future reference.
WORK AREA SAFETY
- Keep work area clean and well lit. Cluttered or dark areas invite accidents.
■ Do not operate power tools in explosive atmospheres, such as in the presence of flammable liquids, gases or dust. Power tools create sparks which may ignite the dust or fumes. - Keep children and bystanders away while operating a power tool. Distractions can cause you to lose control.
ELECTRICAL SAFETY
■ Do not expose power tools to rain or wet conditions. Water entering a power tool will increase the risk of electric shock.
PERSONAL SAFETY
■ Stay alert, watch what you are doing and use common sense when operating a power tool. Do not use a power tool while you are tired or under the influence of drugs, alcohol or medication. A moment of inattention while operating power tools may result in serious personal injury.
■ Always use personal protective equipment. Personal protective equipment such as eye protection, dust mask, non-skid safety shoes, hard hat and/or hearing protection used for appropriate conditions will reduce personal injuries.
■ Prevent unintentional starting. Ensure the switch is in the off-position before connecting to the battery, picking up or carrying the tool. Carrying power tools with your finger on the switch or energising power tools that have the switch on invites accidents.
■ Remove any adjusting key or wrench before turning the power tool on. A wrench or a key left attached to a moving part of the power tool may result in personal injury.
- Do not overreach. Keep proper footing and balance at all times. This enables better control of the power tool in unexpected situations.
■ Dress properly. Do not wear loose clothing or jewellery. Keep your hair and clothing away from moving parts. Loose clothes, jewellery or long hair can be caught in moving parts.
■ If devices are provided for the connection of dust extraction and collection facilities, ensure these are connected and properly used. Use of dust collection can reduce dust-related hazards.
- Do not let familiarity gained from frequent use of tools allow you to become complacent and ignore tool safety principles. A careless action can cause severe injury within a fraction of a second.
POWER TOOL USE AND CARE
- Do not force the power tool. Use the correct power tool for your application. The correct power tool will do the job better and safer at the rate for which it was designed.
- Do not use the power tool if the switch does not turn it on and off. Any power tool that cannot be controlled with the switch is dangerous and must be repaired.
■ Remove the battery pack, if detachable, from the power tool and/or activate any battery disabling device before clearing jammed material, making any adjustments, changing accessories, cleaning, or storing power tools. Such preventive safety measures reduce the risk of starting the power tool accidentally.
■ Store idle power tools out of the reach of children and do not allow persons unfamiliar with the power tool or these instructions to operate the power tool. Power tools are dangerous in the hands of untrained users. - Maintain power tools and accessories. Check for misalignment or binding of moving parts, breakage of parts and any other condition that may affect the power tool's operation. If damaged, have the power tool repaired before use. Many accidents are caused by poorly maintained power tools and accessories.
Keep cutting tools sharp and clean. Properly maintained cutting tools with sharp cutting edges are less likely to bind and are easier to control.
■ Use the power tool, accessories and tool bits etc. in accordance with these instructions, taking into account the working conditions and the work to be performed. Use of the power tool for operations different from those intended could result in a hazardous situation.
- Keep handles and grasping surfaces dry, clean and free from oil and grease. Slippery handles and grasping surfaces may lead to unsafe handling and/or loss of control of the tool.
- Keep cables away from the working area of the tool. During operation cables may be hidden from view and can be accidentally damaged by the tool.
BATTERY TOOL USE AND CARE
■ Recharge only with the charger specified by the manufacturer. A charger that is suitable for one type of battery pack may create a risk of fire when used with another battery pack.
■ Use power tools only with specifically designated battery packs. Use of any other battery packs may create a risk of injury and fire.
- When battery pack is not in use, keep it away from other metal objects, like paper clips, coins, keys, nails, screws or other small metal objects, that can make a connection from one terminal to another.
Shorting the battery terminals together may cause burns or a fire.
■ Under abusive conditions, liquid may be ejected from the battery; avoid contact. If contact accidentally occurs, flush with water. If liquid contacts eyes, additionally seek medical help. Liquid ejected from the battery may cause irritation or burns.
■ Do not use a battery pack or tool that is damaged or modified. Damaged or modified batteries may exhibit unpredictable behaviour resulting in fire, explosion or risk of injury.
■ Do not expose a battery pack or tool to fire or excessive temperature. Exposure to fire or temperature above 130 °C may cause explosion.
■ Follow all charging instructions and do not charge the battery pack or tool outside the temperature range specified in the instructions. Charging improperly or at temperatures outside the specified range may damage the battery and increase the risk of fire.
OTHER SAFETY WARNINGS
Training
- Read the instructions carefully. Be familiar with the controls and the proper use of the machine.
■ Never allow people unfamiliar with these instructions or children to use the machine. Local regulations can restrict the age of the operator.
■ Never work while people, especial children or pets are nearby. - Keep in mind that the operator or user is responsible for accidents or hazards occurring to other people or their property.
Preparation
■ While working, always wear substantial footwear and long trousers. Do not operate the equipment when barefoot or wearing open sandals.
■ Thoroughly inspect the area where the equipment is to be used and remove all objects which can be thrown up by machine
■ Before using, always visually inspect to see that the tools are not worn out or damaged. Replace worn out or damaged elements and bolts in sets to preserve balance.
Operation
■ Do not operate the engine in the confined space where dangerous carbon monoxide fumes can collect
■ Work only in daylight or in good artificial light
■ Always be sure of your footing on slopes
■ Walk, never run with the machine.
■ For wheeled rotary machines, work across the slopes, never up and down.
■ Exercise extreme caution when changing direction on slopes.
■ Do not work on excessively sleep slopes.
■ Use extreme caution when reversing or pulling the machine towards you.
■ Do not change the engine governor settings or over speed the engine.
■ Start the engine carefully according to manufacturer instructions and with feet well away from tool.
■ Do not put your hands or feet near or under rotating parts.
■ Never pick up or carry a machine while the engine is running.
- Use only with EGO's battery packs and chargers listed below:
EN
EN
| BATTERY PACK CHARGER | |
| BA1120E, BA1400, BA2240E, BA2800, BA3360, BA4200, BA1400T, BA2800T, BA4200T | CH2100ECH5500E |
Slopes are a major factor related to slip-and-fall accidents, which can result in severe injury. Always be sure of your footing on slopes. Operation on slopes requires extra caution. If you feel uneasy on a slope, do not use it.
■ Watch for holes, ruts, rocks, hidden objects, or bumps which can cause you to slip or trip. Tall grass can hide obstacles.
SERVICE
■ Have your power tool serviced by a qualified repair person using only identical replacement parts.
This will ensure that the safety of the power tool is maintained.
■ Never service damaged battery packs. Service of battery packs should only be performed by the manufacturer or authorized service providers.

WARNING: Read all safety warnings, instructions, strations and specifications provided with this
power tool. Failure to follow all instructions listed below may result in electric shock, fire and/or serious injury. Save all warnings and instructions for future reference.
SAVE THESE INSTRUCTIONS
SPECIFICATIONS
| Tilling Width 240 mm | ||
| Tilling Depth 215 mm | ||
| Blade Size 215 mm | ||
| Operating Temperature 0°C-40°C | ||
| Storage Temperature -20°C-70°C | ||
| Weight (including the guard) 3.9 kg | ||
| Measured sound power level L_WA | 87.6 dB(A)K=2.02 dB(A) | |
| Sound pressure level at operator's ear L_PA | 77.0 dB(A)K=3 dB(A) | |
| Guaranteed sound power level L_WA (measured according to 2000/14/EC) | 90 dB(A) | |
| Valuation of vibration a_h | Front-assist handle | 0.94 m/s ^2 K=1.5 m/s ^2 |
| Rear handle | 1.24 m/s ^2 K=1.5 m/s ^2 | |
■ The above parameters are tested and measured equipped with power head PH1400E.
■ The declared vibration total value has been measured in accordance with a standard test method and may be used for comparing one tool with another;
■ The declared vibration total value may also be used in a preliminary assessment of exposure.
NOTICE: The vibration emission during actual use of the power tool can differ from the declared value in which the tool is used; In order to protect the operator, user should wear gloves and ear protectors in the actual conditions of use.
PACKING LIST
| PART NAME QUANTITY | |
| Cultivator Attachment | 1 |
| Guard (with bolt) | 1 |
| Allen Key | 1 |
| Operator's Manual | 1 |
DESCRIPTION
KNOW YOUR EDGER ATTACHMENT (Fig.A)
- End Cup
- Cultivator Attachment Shaft
- Gear Box
- Sleeve
- Outer Blades
- Inner Blades
- Hitch Pin
- Guard
- Allen Key
ASSEMBLY
WARNING: If any parts are damaged or missing, do not operate this product until the parts are replaced. Use of this product with damaged or missing parts could result in serious personal injury.
WARNING: Do not attempt to modify this product or create accessories not recommended for use with this product. Any such alteration or modification is misuse and could result in a hazardous condition leading to possibly serious personal injury.
WARNING: Always wear heavy gloves when installing or removing the blade or doing any maintenance on the blade. Be careful of the blade and protect your hands from being injured by the blade.
WARNING: Do not connect the cultivator to the power head until assembly is complete. Failure to comply could result in accidental starting and possible serious personal injury.
MOUNTING THE GUARD
WARNING: Install the guard before the cultivator attachment is connected to the power head.
- Loosen and remove the bolt from the guard with the Allen key (Fig. B).
- Lift the cultivator attachment shaft and remove the end cap from the shaft.
- Aligned the slot in the guard with metal tab on the end of the shaft, pass the guard through the shaft until the screw holes in the guard and in the metal tab are aligned (Fig. C & D).
- Use Allen key to tighten the bolt clockwise to lock the guard securely.
Fig. D parts description see below:
D-1 Bolt
CONNECTING THE CULTIVATOR ATTACHMENT TO THE POWER HEAD
WARNING: Never attach or adjust any attachment while the power head is running or with the battery installed. Failure to stop the motor and remove the battery may cause serious personal injury.
This cultivator attachment is designed for use with EGO Power Head PH1400E
- Stop the motor and remove the battery pack
- Loosen the wing nut on the power head coupler.
- If the end cap is on the attachment shaft, remove it and save it in a safe place for later use.
Align the arrow on the cultivator shaft with the arrow on the coupler (Fig. E) and push the cultivator shaft into the coupler until you hear a clear “CLICK” sound(Fig. F).
Fig. E parts description see below:
| E-1 Shaft-Release Button |
| E-2 Arrow on the Coupler |
| E-3 Wing Nut |
| E-4 Arrow on the Attachment Shaft |
| E-5 Red Line |
Fig. F parts description see below:
F-1 Red Line
-
Slightly pull the shaft of the cultivator attachment to verify that it is securely locked into the coupler. If not, move the cultivator shaft back and forth in the coupler until a clear "CLICK" sound indicates that it is engaged.
-
Tighten the wing nut securely.
WARNING: Be sure the wing nut on the coupler is fully tightened before operating the equipment; check it periodically for tightness during use to avoid serious personal injury.
REMOVING THE ATTACHMENT FROM THE POWER HEAD
- Stop the motor and remove the battery pack.
- Loosen the wing nut.
- With the shaft-release button depressed, pull or twist the cultivator attachment shaft out of the coupler to remove it from the power head
EN
OPERATION
⚠ WARNING: Do not allow familiarity with this product to make you careless. Remember that a careless fraction of a second is sufficient to inflict serious injury.
WARNING: Always wear eye protection. along with hearing protection. Failure to do so could result in objects being thrown into your eyes and other possible serious injuries.
WARNING: Do not use any attachments or accessories not recommended by the manufacturer of this product. The use of attachments or accessories not recommended can result in serious personal injury.
APPLICATIONS
You may use this product for the purpose listed below:
■ Breaking up garden soil to prepare seed beds for re-planting.
■ Shallow cultivating to uproot weeds or loosen soil around plants, making it easier for the air or water to penetrate, deep into the soil.
■ Top dressing soil with compost, leaves or other organic fertilizers. Shallow cultivation will loosen the top crust of soil and integrate the added nutrients.
■ Trenching or furrowing in loosened soil.
NOTICE: To avoid any damage to the cultivator or trees, take care not to catch the blades on large roots of trees. Avoid cultivating too deeply, as this could damage the shallow roots of some plants.
USING THE CULTIVATOR ATTACHMENT WITH POWER HEAD
WARNING: Dress properly to reduce the risk of injury when operating this tool. Do not wear loose clothing or jewelry. Wear eye protection. Wear safety shoes. Wear heavy, long pants, boots, and gloves. Do not wear short pants or sandals or go barefoot. Hold the cultivator with one hand on the rear handle and the other hand on the front-assist handle. Keep a firm grip with both hands while operating the cultivator. The cultivator should be held at a comfortable position, with the rear handle about hip height.
Maintain your grip, and balance on both feet (Fig. G).
You can work by moving the cultivator forward or backward, from left to right, right to left, or in a circular motion. Choose the best method to suit your purpose, which will depend on the shape and size of the area and soil conditions.
Working in an alternating backward and forward motion is particularly suitable for loosening packed soil.
When trenching or furrowing, walk slowly backward and pull the cultivator to create the furrow. Repeat as necessary to obtain deeper furrows.
NOTICE: Pulling the cultivator carefully toward you while it is digging into the soil will reduce your effort and make the tilling easier.
Thrown materials may seriously injure the operator or bystander. To reduce the risk of personal injury, it is essential to take the following precautions:
- Inspect and clear the area of any hidden objects such as glass, stones, rocks, concrete, fence wire, pieces of metal, etc., which can be thrown or entangled in the blades. Avoid contact with hard or solid foreign objects.
- Inspect the blades regularly and often for signs of damage or after hitting a hard object. Do not continue working with a damaged blade.
■ Always hold the cultivator with both hands when operating. Use a firm grip on both handles.
■ Move the cultivator to the work area before starting and start the cultivator at a lower speed.
Before each use check for damaged and/or worn parts. Check the blades, guard, and front-assist handle and replace any parts that are cracked, warped, bent, or damaged in any way.
Clean the cultivator after each use
TO START/STOP THE TOOL
See "STARTING/STOPPING THE POWER HEAD" section in the power head PH1400E
MAINTENANCE
WARNING: When servicing, use only identical replacement parts. Use of any other parts may create a hazard or cause product damage. To ensure safety and reliability, all repairs should be performed by a qualified service technician.
WARNING: Battery tools do not have to be plugged into an electrical outlet; therefore, they are always in operating condition. To prevent serious personal injury, take extra precautions and care when performing maintenance, service or for changing the cutting attachment or other attachments.
⚠ WARNING: To prevent serious personal injury, remove the battery pack from the power head and wait for all blades to stop before servicing, cleaning, changing add-on attachments or when the product is not in use.
WARNING: Always wear heavy gloves when installing or removing the blade or performing any maintenance on the blade. Be careful of the blade and protect your hands from being injured by the blade.
GENERAL MAINTENANCE
WARNING: Do not at any time let brake fluids, gasoline, petroleum-based products, penetrating oils, etc., come in contact with plastic parts. Chemicals can damage, weaken, or destroy plastic, which may result in serious personal injury.
WARNING: When cleaning the cultivator attachment, DO NOT immerse it in water or other liquids. Do not clean your machine with a pressure washer. The solid jet of water may damage parts of the machine.
- Keep all nuts, bolts and screws tight to ensure the equipment is in safe working condition.
■ To reduce the fire hazard, keep the engine, silencer, battery compartment free of vegetative material and excessive grease.
■ Replace worn or damaged parts for safety.
BLADE MAINTENCE
■ Maintain the blades with anti-rust oil regularly.
■ If any of the blades needs replacing due to wear, replace all four blades for best performance.
All cultivator service, other than the items listed in these maintenance instructions, should be performed by an authorized service personnel.
To Replace
The cultivator has four blades – two inner blades and two outer blades. For correct operation of the cultivator, the blades must be installed in the correct orientation. Symbols L and R are stamped on the blades (Fig. H & I).
Fig. H & I parts description see below:
| H-1 Driven Shaft H-7 Hitch Pin | |||
| H-2 Inner Sleeve I-1 Hitch Pin | |||
| H-3 Outer Sleeve I-2 | Outer Blade Stamped "R" | ||
| H-4 Symbol L I-3 | Inner Blade Stamped "R" | ||
| H-5 | Inner Blade Stamped "L" | I-4 Symbol R | |
| H-6 | Outer Blade Stamped "L" | ||
NOTICE: THE BLADES THAT HAVE TINES FACING IN BOTH DIRECTIONS MUST BE MOUNTED ON THE INSIDE, CLOSEST TO THE GEAR BO.
- Wear gloves.
- Place the inner blade, stamped "L", which has tines facing in both directions, to the left of the gear box.
- Place the outer blade, stamped "L", (tines face one way only) on the same side. with the outer sleeve against the inner blade.
- To secure the blade to the drive shaft, insert the hitch pin into the locking hole-1. See Fig. J, K, L and N for reference.
- Turn over the tool with the installed blade resting against the ground.
- Place the inner blade stamped "R", which has tines facing in both directions, to the right of the gear box.
- Place the outer blade, stamped "R", (tines face one way only) on the same side. with the outer sleeve against the inner blade.
- To secure the blade to the drive shaft, insert the hitch pin into the locking hole-1 and then turn the hitch pin for 90°. See Fig. J, K, L and N for reference.
WARNING: The unit will not operate properly or may cause danger to the operator or bystanders if the blades are installed incorrectly. If you notice a problem with the cultivating operation of the unit, check for proper blade positioning.
THE BLADES THAT HAVE TINES FACING IN BOTH DIRECTIONS MUST BE MOUNTED ON THE INSIDE, CLOSEST TO THE GEAR CASE.
To Adjust
When tilling in a confined area or between rows, the cultivator may be used with only the inner blades installed.
Wear gloves and remove the two hitch pins to remove the two outer blades (Fig. M), and then insert the hitch pins into the locking hole-2 (Fig. N & O).
Fig. N parts description see below:
| N-1 Locking Hole-1 |
| N-2 Locking Hole-2 |
NOTICE: Do not force the blades on or off the drive shaft. If you experience difficulty when removing the blades, apply some penetrating oil on the shaft. When reinstalling the blades, make sure to clean and oil the drive shaft and the blades.
EN
CLEAN THE UNIT
Parts of plants, such as roots, can become tightly wrapped around or between the rotating blades during operating. To clean the rotating blades:
■ Remove the battery.
■ Wear gloves. Clean the pieces of roots, clogged soils or plants on the blade, guard or the gear box. For thorough cleaning, remove the blades and guard to wash them thoroughly. For detailed replacement steps please see above section
"REPLACING OR ADJUSTING THE BLADES".
■ Wipe the tool surface with a clean cloth moistened with a mild soap solution
STORING THE UNIT
■ Remove the battery pack from the tool.
■ Remove the cultivator attachment from the power head and cover the attachment shaft with end cap to avoid dirt getting into the coupling.
■ Store the tool in a dry, well-ventilated area, out of the reach of children. Do not store the unit on or adjacent to fertilizers, gasoline, or other chemicals.
Protecting the environment

Do not dispose of electrical equipment, battery charger and batteries/rechargeable batteries into household waste! According to the European law 2012/19/EU, electrical and electronic equipment that is no longer usable, and according to the European law 2006/66/EC, defective or used battery packs/batteries, must be collected separately. If electrical appliances are disposed of in landfills or dumps, hazardous substances can leak into the groundwater and get into the food chain, damaging your health and well-being.
TROUBLE SHOOTING
| PROBLEM | CAUSE SOLUTION | |
| Cultivator fails to start. | ■ The battery pack is not properly attached to the power head.■ No electrical contact between the power head and the battery pack.■ The battery pack is depleted.■ The lock-off lever and trigger are not depressed simultaneously. | ■ Attach the battery pack to the power head.■ Remove battery, check contacts and reinstall the battery pack so that it snaps into place.■ Charge the battery pack with an EGO charger listed in this manual.■ Press the lock-off lever and hold it, then depress the trigger to turn on the unit. |
| Cultivator stops while tilling. | ■ The motor is overloaded.■ The battery pack is too hot.■ The blades are jammed.■ The battery pack is disconnected from the tool | ■ The motor will recover when the load is removed. For continuous work, decrease the load on the cultivator and avoid deep tilling; instead, make progressively deeper cuts.■ Allow the battery pack or to cool until the its temperature drops below 67°C.■ Remove the battery from the power head, manually rotate the blades back and forth to remove the stones or other obstacles between the blades or between the blade and the gear box.■ Re-install the battery pack. |
| ■ The battery pack is depleted | ■ Charge the battery pack with an EGO charger listed in this manual. |
WARRANTY
EGO WARRANTY POLICY
Please visit the website egopowerplus.com for full terms and conditions of the EGO Warranty policy.
EN
| N-1 Loch 1 |
| N-2 Loch 2 |
WAARSCHUWING! Lees alle
ANDERE VEILIGHEIDSWAARSCHUWINGEN
TRAINING
WAARSCHUWING: Lees alle
KEN UW CULTIVATOR (afb. 4)
HET APPARAAT SCHOONMAKEN
HET APPARAAT OPBERGEN
RENG∅RING AF APPARATET
OPBEVARING AF APPARATET
SIKKERHET I ARBEIDSOMRÅDET
BRUK OG VEDLIKEHOLD AV ELEKTROVERKT∅Y
GENERELT VEDLIKEHOLD
VEDLIKEHOLD AV KNIVBLAD
BEZPIECZEŃSTWO W MIEJSCU PRACY
POLITYKA GWARANCYJNA EGO
OSTALA SIGURNOSNA UPOZORENJA
OBUKA
■ Pozorno pročitajte upute. Upoznajte se s upravljačkim elementima i propisnom uporabom stroja.
Nikada nemojte dopustiti da osobe koje nisu upoznate s ovim uputama ili djeca koriste stroj. Lokalni propisi mogu ograničavati starosnu dob rukovatelja.
gāngdōngyān yuāngmāngdō


- CULTIVATOR ATTACHMENT
- READ ALL INSTRUCTIONS!
- READ OPERATOR'S MANUAL
- SAFETY SYMBOLS
- SYMBOL MEANING
- SAFETY INSTRUCTIONS
- EN
- GENERAL POWER TOOL SAFETY WARNINGS
- WORK AREA SAFETY
- ELECTRICAL SAFETY
- PERSONAL SAFETY
- POWER TOOL USE AND CARE
- BATTERY TOOL USE AND CARE
- OTHER SAFETY WARNINGS
- Training
- Preparation
- Operation
- SERVICE
- SAVE THESE INSTRUCTIONS
- DESCRIPTION
- KNOW YOUR EDGER ATTACHMENT (Fig.A)
- ASSEMBLY
- MOUNTING THE GUARD
- CONNECTING THE CULTIVATOR ATTACHMENT TO THE POWER HEAD
- REMOVING THE ATTACHMENT FROM THE POWER HEAD
- APPLICATIONS
- USING THE CULTIVATOR ATTACHMENT WITH POWER HEAD
- Clean the cultivator after each use
- TO START/STOP THE TOOL
- See "STARTING/STOPPING THE POWER HEAD" section in the power head PH1400E
- MAINTENANCE
- GENERAL MAINTENANCE
- BLADE MAINTENCE
- To Replace
- To Adjust
- CLEAN THE UNIT
- STORING THE UNIT
- Protecting the environment
- WARRANTY
- EGO WARRANTY POLICY
- WAARSCHUWING! Lees alle
- ANDERE VEILIGHEIDSWAARSCHUWINGEN
- WAARSCHUWING: Lees alle
- KEN UW CULTIVATOR (afb. 4)
- HET APPARAAT SCHOONMAKEN
- HET APPARAAT OPBERGEN
- RENG∅RING AF APPARATET
- OPBEVARING AF APPARATET
- SIKKERHET I ARBEIDSOMRÅDET
- BRUK OG VEDLIKEHOLD AV ELEKTROVERKT∅Y
- GENERELT VEDLIKEHOLD
- VEDLIKEHOLD AV KNIVBLAD
- BEZPIECZEŃSTWO W MIEJSCU PRACY
- POLITYKA GWARANCYJNA EGO
- OSTALA SIGURNOSNA UPOZORENJA
- OBUKA
- gāngdōngyān yuāngmāngdō
Brand : EGO
Model : CTA9500
Category : Multifunction tool