
H50DW - Humidifier GORENJE - Free user manual and instructions
Find the device manual for free H50DW GORENJE in PDF.

| Product Type | Ultrasonic Humidifier |
| Brand | Gorenje |
| Model | H50DW |
| Water Tank Capacity | 5 L |
| Humidification Rate | Approx. 300 ml/h |
| Noise Level | ≤ 35 dB(A) |
| Power Supply | 220-240 V ~ 50 Hz |
| Power Consumption | 25 W |
| Dimensions (H x W x D) | 400 x 250 x 250 mm |
| Weight | 3.5 kg |
| Operating Modes | Standard, Intelligent, Sleep |
| Timer | 1-12 hours |
| Humidity Setting Range | 40-80% RH |
| Ionizer | Yes (Anion function) |
| Filters | Water softening filter (on tank lid) & Active carbon filter (bottom) |
| Filter Replacement Interval | Every 6 months |
| Safety Features | Automatic shut-off when water low; auto mist stop |
| Cleaning and Descaling | Weekly cleaning; descaling with vinegar solution |
| Mist Outlet | Rotatable cover for directional mist |
| Additional Features | Fragrance box for essential oils (not in water tank) |
Frequently Asked Questions - H50DW GORENJE
User questions about H50DW GORENJE
0 question about this device. Answer the ones you know or ask your own.
Ask a new question about this device
Download the instructions for your Humidifier in PDF format for free! Find your manual H50DW - GORENJE and take your electronic device back in hand. On this page are published all the documents necessary for the use of your device. H50DW by GORENJE.
USER MANUAL H50DW GORENJE

Pomembno
Pred uporabo aparata pozorno preberite ta priročnik za uporabo. Priročnik shranite, će bi ga v prihodnje še potrebovali.
natural_image
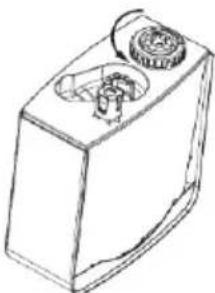
Simple line drawing of a device with an upward arrow, no text or symbols present- Obrnite rezervoar za vodo naokrog. Obrnite zamašek rezervoarja v nasprotni smeri urinega kazalca, da ga odstranite. Nato napolnite rezervoar s približno 5 l čiste vode.

natural_image
Line drawing of a rectangular electronic device with a circular top and internal components (no text or symbols)Nasvet: Uporabljajte hladno prevreto vodo ali destilirano vodo. Temperatura vode ne sme biti višja od 40°C.
V rezervoar za vodo dodajajte samo vodo.
natural_image
Line drawing of a rectangular electronic component with a circular top and internal cavity (no text or symbols)natural_image
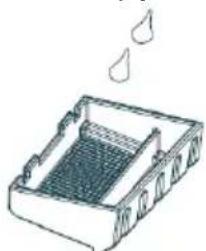
Simple line drawing of a rectangular container with internal compartments and two droplets above it (no text or symbols)- Ponovno namestite zamašek na rezervoar, obrnite zamašek v smeri urinega kazalca in ga trdno privijte, da voda ne bo uhajala iz rezervoarja.

natural_image
Line drawing of a rectangular mechanical component with a cylindrical top and internal features (no text or symbols)natural_image
Diagram of a mechanical device with a downward arrow indicating force or direction (no text or symbols present)Opozorilo: Bodite previdni, da boste rezervoar pravilno postavili na podstavek.
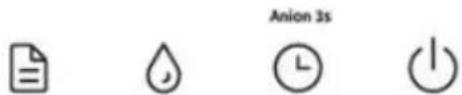

| “ON/OFF” | |
| “TIMER/ANION” | |
| “HUMIDITY” | |
| “—......+” | |
| “MODE”: |
• Gumb za "ON/OFF":
natural_image
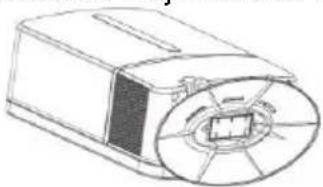
Mechanical component diagram showing a cylindrical shaft with flanged end caps and a rotating arrow indicating rotation (no text or symbols)Twist clockwise to install a new water softener
Drugi filter je na dnu aparata. To je ogleni filter na vhodu zraka v aparat. Ta filter odstranjuje prašne in ostale majhne delce iz zraka.
natural_image
Technical line drawing of a mechanical component with a circular housing and central shaft (no text or symbols)Remove the active carbon filter from the bottom

natural_image
Technical line drawing of a mechanical component with internal gear-like structure (no text or symbols)Install a new filter.
natural_image
Diagram of a mechanical device with an upward arrow indicating motion or force (no text or symbols present)- Preokrenite spremnik za vodu naopačke. Čep spremnika zavrtite u suprotnom smjeru od kazaljki na satu i skinite ga. Zatim spremnik napunite dolijevanjem otprilike 5 litara čiste vode.
natural_image
Line drawing of a rectangular electronic device with a circular top and internal components (no text or symbols)natural_image
Simple line drawing of a rectangular container with a circular top and internal components, no text or symbols present.Upozorenje: u spremnik za vodu nemojte nikad dodavati bilo kakve dodatke (aditive), kao što su primjerice eterična ulja ili sredstva za udisanje. Njih možete dodavati u prostor za arome koji se nalazi na donjoj strani uređaja. Otvorite prostor i pažljivo dodajte samo nekoliko kapljica arome.
natural_image
Isometric line drawing of a rectangular container with internal structure and two hanging droplets (no text or symbols)natural_image
Line drawing of a rectangular mechanical component with a central knob and a side knob (no text or symbols)- Spremnik za vodu sada stavite natrag u kućište na podnožje, u njegov prvobitan položaj. Voda će odmah početi curiti u kadu.

natural_image
Simple line drawing of a mechanical device with a downward arrow indicating force or motion (no text or symbols)natural_image
Simple line drawing of a closed book with a small screen and a cross mark (no text or symbols)Water tank is locked wrongly
natural_image
Simple line drawing of a digital device with a checkmark and arrow (no text or symbols)Water tank is locked correctly
| “ON/OFF” | |
| “TIMER/ANION” | |
| “HUMIDITY” | |
| “—......+” | |
| “MODE”: |
natural_image
Mechanical component diagram showing a cylindrical shaft with flanged end and rotating arrow (no text or symbols)Twist clockwise to install a new water softener
Drugi filtar nalazi se na dnu uređaja. To je ugljeni filtar na ulazu zraka u uređaj. Taj filtar odstranjuje prašnjave i ostale sitne djeliće iz zraka.
natural_image
Technical line drawing of a mechanical component with a circular housing and central slot (no text or symbols)Remove the active carbon filter from the bottom

natural_image
Technical line drawing of a mechanical component with no visible text or symbolsInstall a new filter.
Za postizanje najboljih uvjeta vlaženja i ionizacije, savjetujemo vam da oba filtra mijenjate približno svakih pola godine. Time ćete i produžiti životni vijek vašeg uređaja.
Okolina
Važno!
Pre upotrebe aparata pažljivo pročitajte ovaj priručnik za upotrebu. Priručnik sačuvajte kako biste mogli i kasnije da ga koristite.
Opasnost
natural_image
Line drawing of a mechanical device with an upward arrow indicating motion (no text or symbols)- Preokrenite rezervoar za vodu naopačke. Zatvarač rezervoara odšrafite u suprotnom smeru od kazaljki na satu i skinite ga. Zatim u rezervoar sipajte otprilike 5 litara čiste vode.
natural_image
Line drawing of a mechanical device with gears and housing (no text or symbols)natural_image
Line drawing of a rectangular container with a circular top and internal components, no text or symbols present.natural_image
Line drawing of a rectangular container with internal structure and two droplets above (no text or symbols)natural_image
Line drawing of a mechanical device with a knob and housing (no text or symbols)natural_image
Line drawing of a mechanical device with a downward arrow indicating motion (no text or symbols)Upozorenje: proverite da li ste rezervoar ispravno stavili na njegovo postolje.
natural_image
Simple line drawing of a device with a label and directional arrows, no text or symbols present.Water tank is
locked wrongly
natural_image
Simple line drawing of a digital device with a screen and buttons, no text or symbols present.Water tank is
locked correctly
-
Ponovno stavite poklopac na otvor za ispuštanje pare. Taj poklopac možete obrtanjem usmeravati i time ispuštati paru u željenom smeru.
-
Priključite aparat na električnu instalaciju. Nemojte koristiti produžne strujne kablove. Začuje se pisak, to znači da je aparat spreman za upotrebu. Na ekranu zasvetli crvena ikona s natpisom »pow er« (napajanje), što znači da je aparat priključen na električnu instalaciju.
-
Aparat uključite (ili isključite) pritiskom na taster ON/OFF na kontrolnom panelu ovlaživača vazduha. Kada ste aparat uputili u rad, odaberite režim rada koji vam odgovara (SLEEP, INTELLIGENT, STANDARD). Detaljnije obrazloženje pojedinih mogućnosti načina rada obrazloženo je u nastavku.
Upozorenje: kada aparat koristite po prvi puta, ostavite ga da bude na sobnoj temperaturi barem pola sata.
Savet: vodu u rezervoaru zamenite svaki dan. Tako ćete sprečiti nastanak bakterija u rezervoaru.
- Kada ste aparat isključili, izvucite utikač iz utičnice.
- Ispraznite rezervoar sa vodom i kadu u podnožju aparata. Ukoliko ovlaživač ne nameravate koristiti u narednih nekoliko dana, obrišite ga suvom krpom.
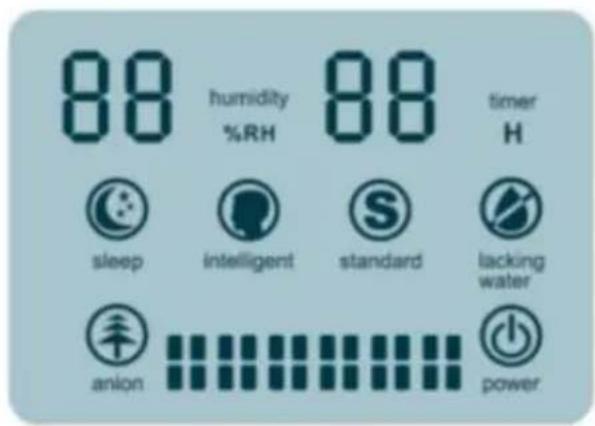
Kontrolni panel sa LCD ekranom
| “ON/OFF” | |
| “TIMER/ANION” | |
| “HUMIDITY” | |
| “—......+” | |
| “MODE”: |
- Dugme za uključenje/isključenje "ON/OFF": Kada pritisnete dugme za uključenje/isključenje, aparat se automatski uputi u rad (u standardnom režimu rada, dok je intenziteta vlaženja na srednjoj vrednosti).
Na ekranu svetli plava ikona STANDARD (standardni način). Narandžastom bojom je u obliku
procenta % prikazana i relativna vlažnost u prostoriji. Intenziteta raspršivanja spreja prikazana je plavim stupcima, i kao što je već spomenuto, na dodeljenim postavkama intenziteta je na srednjoj vrednosti.
• Dugme "TIMER/ANION":
natural_image
Mechanical component diagram showing a rotating shaft and housing (no text or symbols)Twist clockwise to install a new water softener
Drugi filter nalazi se na dnu aparata. To je ugljeni filter na ulazu vazduha u aparat. Taj filter odstranjuje prašinu i ostale sitne deliće iz vazduha.
natural_image
Technical line drawing of a mechanical component with a circular housing and central slot (no text or symbols)Remove the active carbon filter from the bottom
natural_image
Technical line drawing of a mechanical component with a circular housing and internal components (no text or symbols)Install a new filter.
Важно
natural_image
Technical line drawing of a mechanical device with an upward arrow indicating motion (no text or symbols)natural_image
Line drawing of a rectangular device with a circular top and internal mechanism (no text or symbols)natural_image
Line drawing of a rectangular container with a circular top and internal components, no text or symbols present.natural_image
Line drawing of a rectangular container with internal mesh and two droplets above it (no text or symbols)natural_image
Line drawing of a rectangular electronic device with a knob and internal components (no text or symbols)natural_image
Line drawing of a mechanical device with an arrow indicating downward motion (no text or symbols)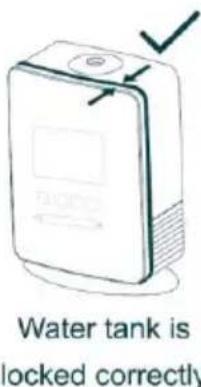
 | “ON/OFF” | |
 | “TIMER/ANION” | |
 | “HUMIDITY” | |
 | “—......+” | |
 | “MODE”: |
- Копче „ВКЛУЧИ/ИСКЛУЧИ“ (“ON/OFF”):
natural_image
Technical line drawing of a mechanical component with no visible text or symbolsTwist clockwise to install a new water softener
natural_image
Technical line drawing of a mechanical component with a circular housing and central slot (no text or symbols)Remove the active carbon filter from the bottom
natural_image
Technical line drawing of a mechanical component with no visible text or symbolsinstall a new filter.
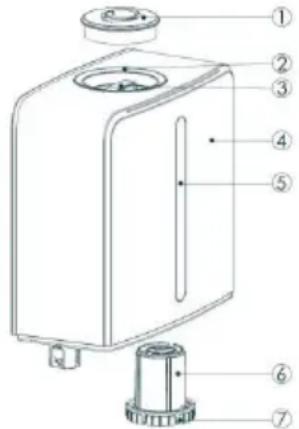
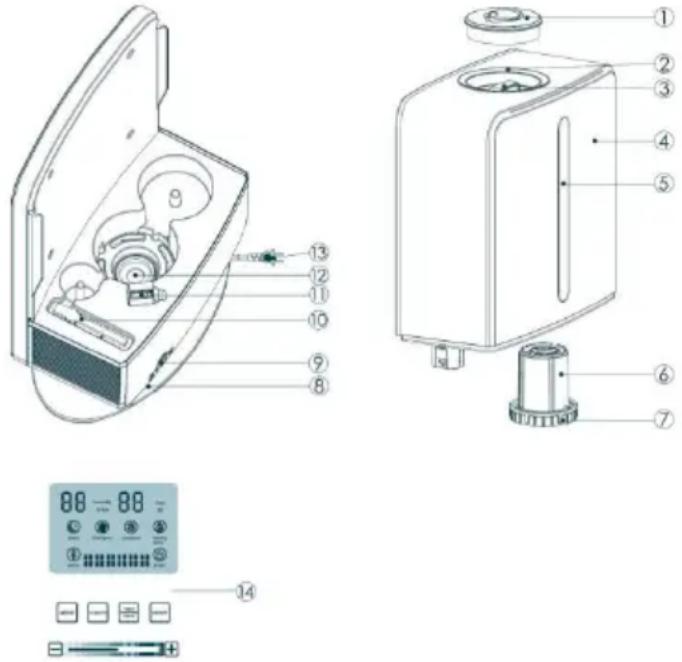
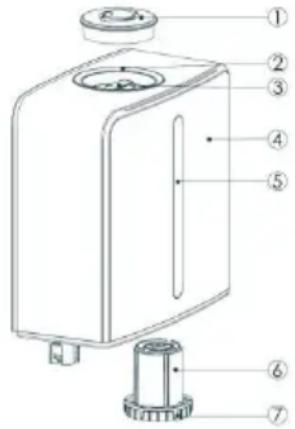
- Mist outlet cover
- Opening for spray
- Handle
- Reservoir
- Water level w indow
- Water softening filter
- Lid / water outlet
- Active carbon filter (bottom of housing)
- Fragrance box
- Cleaning brush for atomizer
- Air outlet
- Atomizer assy
- Power cord
- Functional panel with LCD
Important
Read this user manual carefully before you use the appliance and save it for future reference.
This appliance is marked according to the European directive 2012/19/EU on Waste Electrical and Electronic Equipment (W EEE). This guideline is the frame of a European-wide validity of return and recycling on Waste Electrical and Electronic Equipment.
Danger
Do not immerse the base of the humidifier in water and do not let water run into the base.
To prevent electric shock, newer open the base.
Warning
- Check if the voltage indicated on the type plate corresponds to the local mains voltage before you connect the appliance.
- The appliance is suitable for voltages from 220 to 240V.
- If the cord is damaged, have it replaced by Gorenje, a service centre authorised by Gorenje or similarly qualified persons in order to avoid a hazard.
- Keep the cord away from hot surfaces.
- This appliance is not intended for use by persons (including children) with reduced physical, sensory or mental capabilities, or lack of experience and knowledge, unless they have been given supervision or instruction concerning use of the appliance by a person responsible for their safety.
- This appliance can be used by children aged from 8 years and above and persons with reduced physical, sensory or mental capabilities or lack of experience and knowledge if they have been given supervision or instruction concerning use of the appliance in a safe way and understand the hazards involved.
Children shall not play with the appliance.
Cleaning and maintenance shall not be made by children unless they are older than 8 and supervised. - Do not touch the steam generator when it is connected to electricity.
Caution
- Switch off the appliance and unplug it produces a strange smell or an abnormal noise.
- Switch off the humidifier and unplug it before you move, clean or fill it.
- Do not turn on the humidifier when there is no water in the water tank.
- Do not use any metal or hard objects to clean the steam generator.
- Do not direct the mist output at furniture or electrical appliances.
- Make sure the humidifier and the mains cord are always out of reach of the baby (at least one metre away).
- Do not use the humidifier in damp places or close to water.
- Do not use the humidifier in places where the humidity level is more than 50%.
- Do not expose the humidifier to extreme heat or cold or to direct sunlight.
- Do not use the humidifier outdoors.
- The humidifier is only intended for household use.
- Never move or empty the humidifier while it is operating.
• Unplug the humidifier after each use. - Never cover the humidifier with a towel or blanket.
- Noise level: Lc < 35 dB(A)
Using the appliance
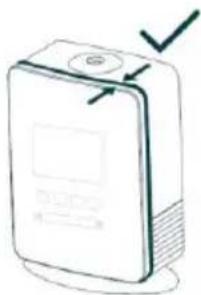
- Make sure that the humidifier is 'off' and upluged.
- Remove the mist outlet cover.
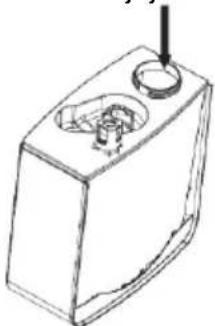
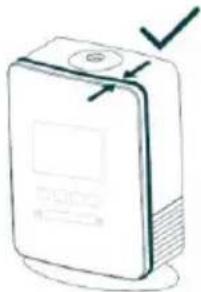
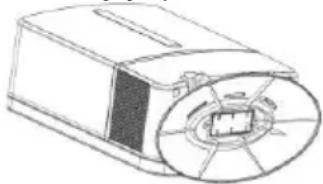
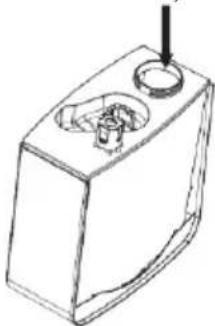
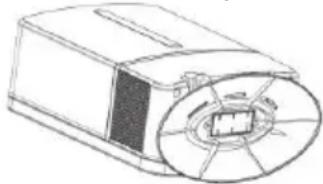
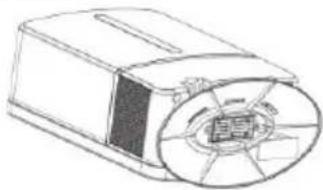
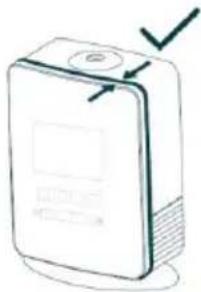
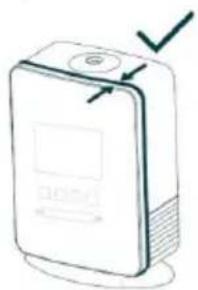
- Use the handle of the water tank to lift it vertically from the base.
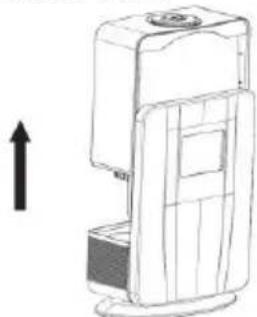
natural_image
Line drawing of a mechanical device with an upward arrow indicating motion (no text or symbols)- Turn the water tank upside down. Turn the tank cap anticlockwise to remove it and fill the tank with approx. 5 litres of clean water.

natural_image
Line drawing of a rectangular electronic device with a circular component on top (no text or symbols)Tip: Use cold boiled water or distilled water. Make sure that the water temperature is not more than 40^ C.
Put water only in the reservoir. Never put any additives, e.g. inhalants or oils, in the water tank.
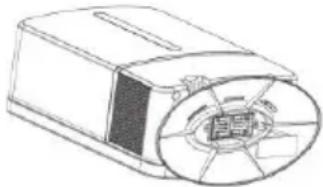
natural_image
Simple line drawing of a rectangular container with a circular top and internal components (no text or symbols)Warning: Never put any additives, e.g. inhalants or essential oils, in the reservoir. Fragrances add into fragrance box at the bottom of humidifier. Open box and carefully add a drop or few.

natural_image
Isometric line drawing of a rectangular container with internal structure and two droplets above (no text or symbols)- Put the lid back on the reservoir, turn the tank cap clockwise and tiglithy back it. Take care that water will not drip out of reservoir.
natural_image
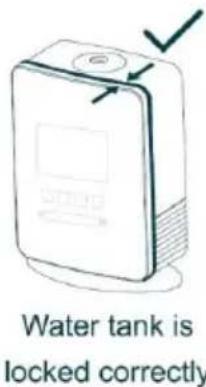
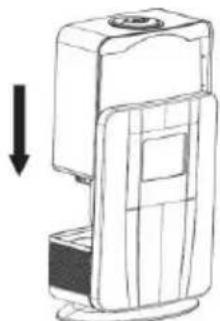
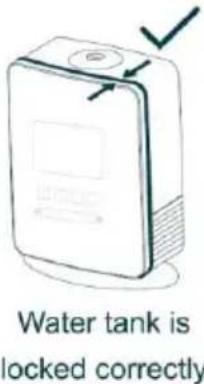
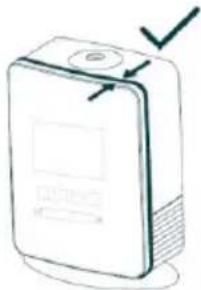
Line drawing of a mechanical device with a knob and base (no text or symbols)- Put the water tank back onto the base its original position.
Water will start running into the water basin right away.
natural_image
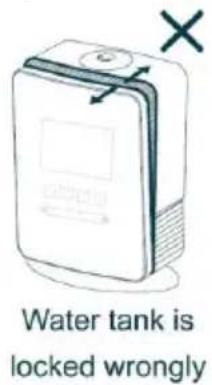
Line drawing of a mechanical device with a downward arrow indicating motion (no text or symbols)Warning: Be careful that you will put reservoir back correctly on the base.
- Put the mist outlet cover back onto the unit. You can rotate mentioned cover to place the mist outlet in the required position.
- Put the plug in the wall socket. Do not use an extension cord.
You will hear a beep which means that your appliance is ready for usage. At the same time you will see on the display red icon with word »pow er«.
- For turning on and off your appliance you must push ON/OFF button on the functional panel of the humidifier.
When your appliance is sw itched on you can choose among three modes of working (SLEEP, INTELLIGENT, STANDARD). A more detailed explanation is below.
Warning: When using your humidifier for the first time, place it in the room temperature for at least half an hour.
Tip: Replace water in the reservoir every day in order to prevent formation of bacteria in it.
- After sw itching off remove the plug from the w all socket.
- Empty the reservoir and base. If you are not going to use the humidifier for two or more days, wipe it with a cloth.
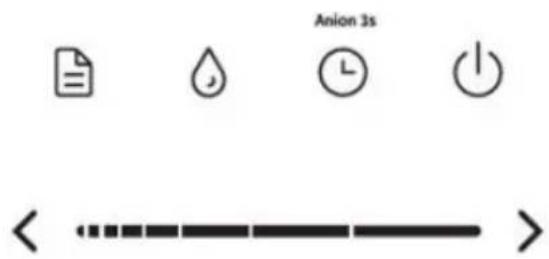
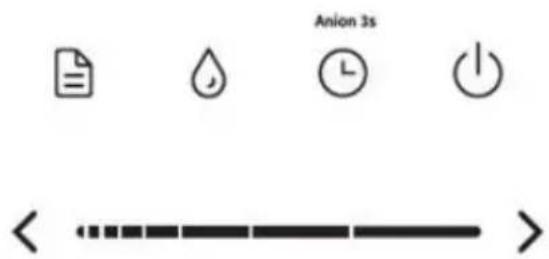
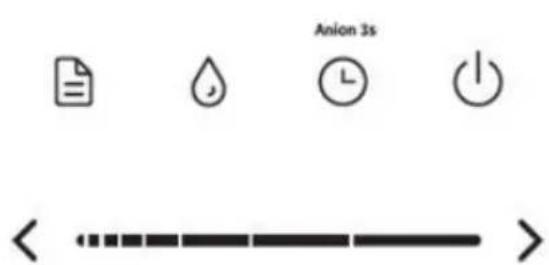
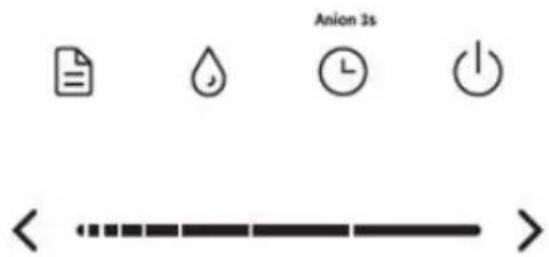
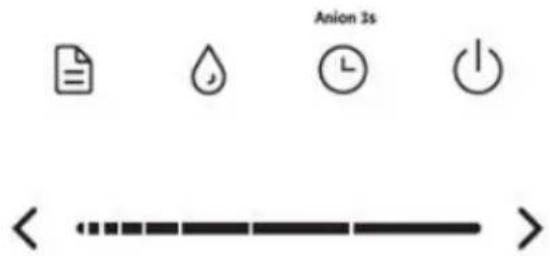
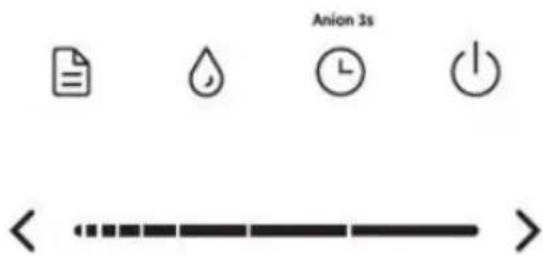
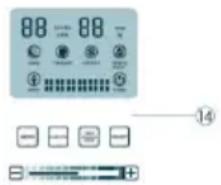
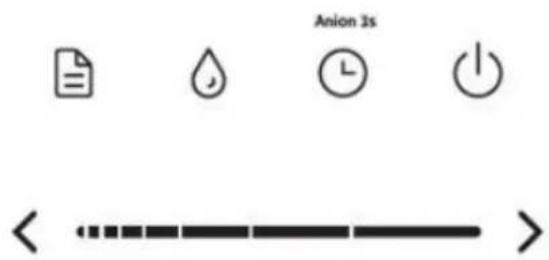
Functional panel with LCD
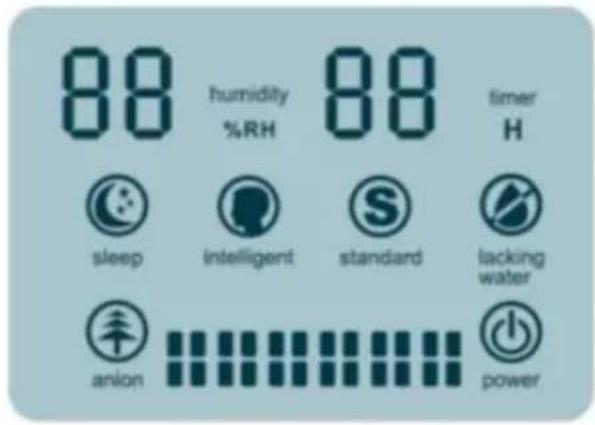
| “ON/OFF” | |
| “TIMER/ANION” | |
| “HUMIDITY” | |
| “—......+” | |
| “MODE”: |
- "ON/OFF" button:
When you press button for switching ON/OFF the appliance will automatically start working (in standard mode, the intensity of humidifying is on medium).
The display lights up blue icon STANDARD (standard mode). The % in orange show the relative humidity in the room. Intensity of spraying mist is shown by blue columns.
• "TIMER/ANION" button:
By pressing this button you can ajust time w hen the appliance w ill be turned off automatically.
Press this key to adjust the time:

flowchart
graph LR
    A["1h"] --> B["2h"]
    B --> C["3h"]
    C --> D["4h"]
    D --> E["5h"]
    E --> F["6h"]
    F --> G["7h"]
    G --> H["8h"]
    H --> I["cancel"]
    I --> J["12h"]
    J --> K["11h"]
    K --> L["10h"]
    L --> M["9h"]
Each time you press button, the timer will increase for 1h. If there is no operation for 5 seconds, the timer starts with timer indicator on. Max. setting time for timer is 12 hours.
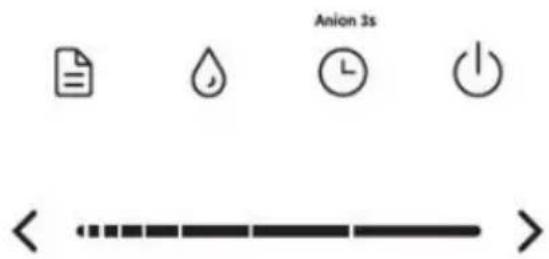
When pressing and holding this button for 2-3 seconds, you will turn on/off ionizer. Ionization is process of producing negative ions which are called anions. When this function is activated, the display lights up blue icon labeled "anion".
- "HUMIDITY" button:
With that button you are setting required relative humidity (RH) in a room. Humidity is adjusted from 40-80%. It displays “oL” (means without setting) when humidity is not set. Each time you press the button humidity increases for 10%.
If there is no operation for 5 seconds, humidity setting will be off.
When your set relative humidity in room is reached, the appliance will automatically reduces intensity of spraying. In that case, the setting of intensity is not possible. When relative humidity in room is lower than being set, appliance will start working as intensity of humiditying has been set before.
- Button & sliding bar “—.....+”:
With this button you are setting intensity of humidifying. You can choose among six levels of spraying. When pressing – you decreae spraying of mist, when pressing + you increase spraying. Instead of pressing + or – you can slide on the control bar with a finger. Left for decreasing and right for increasing intensity.
Intensity of humidifying can be operated under all three modes.
- "MODE" button:
You can choose between three modes of working. These are STANDARD, INTELLIGENT in SLEEP. By pressing this button you follow all three modes.
"standard" mode;
This is default mode. You set the intensity of spraying and also relative humidity in room. The same is for functions of timer and ionization.
"intelligent" mode;
Your humidifier operates at a pre-set humidity under that mode. It is 40-60% RH. When relative humidity in room is at least 60%, appliance decreases intensity of spraying automatically. When relative humidity is lower than 40%, appliance increases intensity of spraying automatically. Under that mode you can set intensity of spraying, but can not set humidity in a room. Like at standard mode also here you can set timer and ionization.
"sleep" mode;
Your humidifier operates at a pre-set humidity under that mode. It is 40-60% RH. When relative humidity in room is at least 60%, appliance decreases intensity of spraying automatically. When relative humidity is lower than 40%, appliance increases intensity of spraying automatically.
If there is no press on the buttons for at least 1 minute, all the icons except "pow er" will be shut off automatically. In this case, you may press any button to activate the display again.
The default working time for SLEEP mode is 8 hrs. After that, the unit turns off automatically.
Under that mode you can set intensity of spraying, but can not set humidity in a room. Like at standard mode also here you can set timer and ionization.
Note:
- Always unplug the appliance before you refill the water tank.
- automatic mist stop protects the steam generator from overheating. In both cases, the humidifier is still on and the fan continues to operate.
- The safety switch automatically switches off the steam generator to stop the mist output when the water level is too low. Or if you lift the water tank. In both cases the red icon labeled »water lacking« starts flashing. If you add water within 15 minutes and reinstall reservoir correctly, the humidifier will continue to operate under set mode. Under water-lacking protecting status, 15 mins later, unit will come into standby status automatically.
Cleaning
Do not use any extra purifiers.
Do not immerse the base, mains cord or mains plug in water or any other liquid.
Do not use any metal or hard objects to clean the steam generator.
- Unpug the humidifier from the mains and set the on/off knob to 'off'.
- Clean the water tank and the tank cover with hot water. You can use some basic washing-up liquid or a dishwasher.
- For the cleaning the inside of the water tank, fill in water, firmly tighten the tank cap and repeatedly shake the water tank.
Note: Make sure that you do not leave any washing up liquid in the water tank or tank cover.
- Clean the base with a damp cloth.
Tip: Regular cleaning reduces jam.
Descalling
Tips to avoid scale
Nevertheless your humidifier and ionizer includes water softening filer we strongly recommend you to use cold boiled, filtered or distilled water. Make sure that the water temperature is lower 40^ C. Clean the tank cover, the water tank, the steam generator and the water basin every week. Use cleanign brush which is added. Fill the water tank with fresh water every time you use the humidifier.
Clean all parts of the humidifier, empty the water tank and the water basin and dry all parts with a soft, dry cloth when you are not going to use your humidifier for a long time
Descaling the humidifier
- Disconnect the humidifier and set the on/off knob to 'off'.
- Fill the water basin with 100ml of vinegar (4% acetic acid) per 200ml of water and let is soak for at least four hours.
So leave the water and vinegar in the water basin for at least 4 hours (preferably overnight).
Empty the water basin and wipe it also with a soft cloth. - Empty the water basin and wipe it also with a soft cloth.
- Put some w hite vinegar 4% acetic acid also on the steam generator and then w ipe it aw ay with a moist cloth.
- Wash all other parts with clean water.
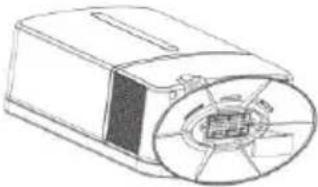
Changing filters
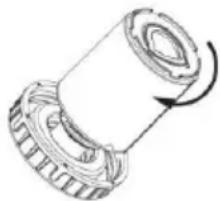
There are two filters in your appliance.
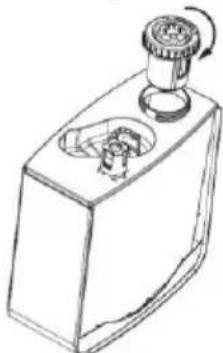
First one is called filter for w ater softening and is attached to the lid of w ater tank. That filter makes w ater softer and minimizes formation of w ater scale into humidifier.
natural_image
Mechanical component diagram showing a rotating shaft and housing (no text or symbols)Twist clockwise to install a new water softener
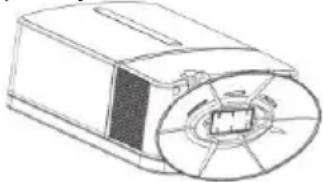
Second filter is called active carbon filer and is located on the bottom of appliance w here air comes into humidifier. That filters removes dust and other small particles from the air.
natural_image
Technical line drawing of a mechanical component with a circular housing and central slot (no text or symbols)Remove the active carbon filter from the bottom

natural_image
Technical line drawing of a mechanical component with internal gear-like structure (no text or symbols)Install a new filter.
To achieve best possible results of humidifying
and ionizing w e strongly recommend you to replace both filters each six months. That w ay you w ill also extend life of your appliance.
Environment
Do not throw away the appliance with the normal household waste at the end of its life, but hand it in at an official collection point for recycling. By doing this, you help to preserve the environment.
Guarantee & service
If you need information or if you have a problem, please contact the Gorenje Customer Care Centre in your country (you find its phone number in the worldwide guarantee leaflet). If there is no Customer Care Centre in your country, go to your local Gorenje dealer or contact the Service department of Gorenje domestic appliances.
For personal use only!
GORENJE
WISHES YOU A LOT OF PLEASURE WHEN USING YOUR APPLIANCE
Important
natural_image
Technical line drawing of a mechanical device with an upward arrow indicator (no text or symbols present)natural_image
Line drawing of a rectangular electronic device with two ports and a central hub (no text or symbols)natural_image
Line drawing of a rectangular container with a circular top and internal components, no text or symbols present.natural_image
Line drawing of a rectangular container with internal mesh and two hanging droplets (no text or symbols)natural_image
Line drawing of a rectangular electronic device with a circular top and internal components (no text or symbols)natural_image
Line drawing of a device with a downward arrow indicating compression or disassembly (no text or symbols)natural_image
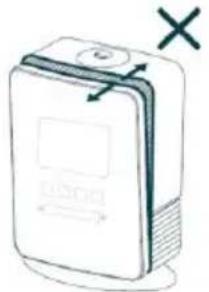
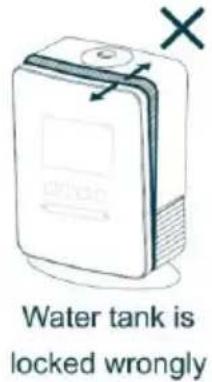
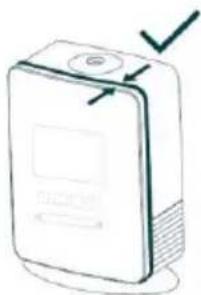
Simple line drawing of a portable electronic device with a 'X' mark and arrow, no text or symbols present.Water tank is
locked wrongly
natural_image
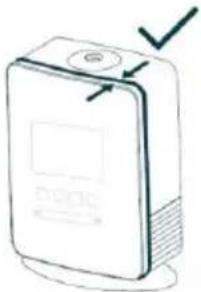
Simple line drawing of a handheld electronic device with a circular button and a checkmark (no text or symbols)Water tank is
locked correctly
| “ON/OFF” | |
| “TIMER/ANION” | |
| “HUMIDITY” | |
| “-......+” | |
| “MODE”: |
- Butonul "ON/OFF":
- Buton & bară glis are “—.....+”:
natural_image
Mechanical component diagram showing a cylindrical shaft with flanged ends and a rotating arrow indicating rotation (no text or symbols)Twist clockwise to install a new water softener
natural_image
Technical line drawing of a mechanical component with a circular housing and central slot (no text or symbols)Remove the active carbon filter from the bottom

natural_image
Technical line drawing of a mechanical component with internal components (no text or symbols)Install a new filter.
natural_image
Technical line drawing of a mechanical device with an upward arrow indicating motion (no text or symbols)natural_image
Line drawing of a rectangular electronic device with a cylindrical component and internal components (no text or symbols)natural_image
Simple line drawing of a rectangular container with a circular top and internal components (no text or symbols)natural_image
Line drawing of a rectangular container with internal mesh and two droplets above it (no text or symbols)natural_image
Line drawing of a rectangular container with a knob and internal components (no text or symbols)natural_image
Diagram of a mechanical device with a downward arrow indicating force or direction (no text or symbols present)natural_image
Simple line drawing of a closed book with a cross mark and arrow, no text or symbols presentWater tank is
locked wrongly
natural_image
Simple line drawing of a digital device with a checkmark and a circular button (no text or symbols)Water tank is
locked correctly
| “ON/OFF” | |
| “TIMER/ANION” | |
| “HUMIDITY” | |
| “—......+” | |
| “MODE”: |
• Tlačítko „ON/OFF“:
natural_image
Mechanical component diagram showing a cylindrical shaft with flanged end and rotating arrow (no text or symbols)Twist clockwise to install a new water softener
natural_image
Technical line drawing of a mechanical component with a circular housing and central slot (no text or symbols)Remove the active carbon filter from the bottom

natural_image
Technical line drawing of a mechanical component with internal gear-like structure (no text or symbols)Install a new filter.
Dôležité
natural_image
Technical line drawing of a mechanical device with an upward arrow indicating motion (no text or symbols)natural_image
Line drawing of a rectangular battery with two internal components (no text or symbols)natural_image
Line drawing of a rectangular container with a circular top and internal compartments, no text or symbols present.natural_image
Line drawing of a rectangular container with internal compartments and two hanging droplets (no text or symbols)natural_image
Line drawing of a rectangular container with a knob and internal components (no text or symbols)natural_image
Technical line drawing of a mechanical device with a downward arrow indicating motion (no text or symbols)natural_image
Simple line drawing of a device with a 'X' mark and directional arrows, no text or symbols present.Water tank is
locked wrongly
natural_image
Simple line drawing of a portable electronic device with a screen and buttons, no text or symbols present.Water tank is
locked correctly

| “ON/OFF” | |
| “TIMER/ANION” | |
| “HUMIDITY” | |
| “—......+” | |
| “MODE”: |
natural_image
Mechanical component diagram showing a cylindrical shaft with flanged end and rotational arrow indicating motion (no text or symbols)Twist clockwise to install a new water softener
natural_image
Technical line drawing of a mechanical component with a circular housing and central slot (no text or symbols)Remove the active carbon filter from the bottom

natural_image
Technical line drawing of a mechanical component with a central circular housing and radial slots (no text or symbols)Install a new filter.
Ważne
natural_image
Line drawing of a mechanical device with an upward arrow indicating motion (no text or symbols)natural_image
Line drawing of a rectangular electronic device with a circular top and internal components (no text or symbols)natural_image
Line drawing of a rectangular electronic component with a circular top and internal cavity (no text or symbols)natural_image
Line drawing of a rectangular container with internal structure and two droplets above it (no text or symbols)natural_image
Line drawing of a rectangular electronic device with a knob and internal components (no text or symbols)natural_image
Diagram of a mechanical device with a downward arrow indicating force or direction (no text or symbols present)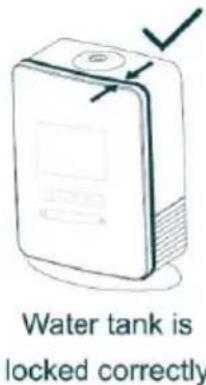
| “ON/OFF” | |
| “TIMER/ANION” | |
| “HUMIDITY” | |
| “—......+” | |
| “MODE”: |
natural_image
Technical line drawing of a mechanical component with rotational arrow (no text or symbols)Twist clockwise to install a new water softener
natural_image
Technical line drawing of a mechanical component with a circular housing and central square component (no text or symbols)Remove the active carbon filter from the bottom
natural_image
Technical line drawing of a mechanical component with internal components (no text or symbols)Install a new filter.
Fontos
natural_image
Line drawing of a mechanical device with an upward arrow indicating motion (no text or symbols)natural_image
Line drawing of a rectangular electronic device with a coiled component and internal components (no text or symbols)natural_image
Line drawing of a rectangular electronic component with a circular top and internal components (no text or symbols)natural_image
Line drawing of a rectangular container with internal mesh and two droplets above it (no text or symbols)natural_image
Line drawing of a rectangular mechanical component with a central knob and a side outlet (no text or symbols)natural_image
Diagram of a mechanical device with a downward arrow indicating force or direction (no text or symbols present)natural_image
Simple line drawing of a closed book with a 'X' mark and arrow, no text or symbols presentWater tank is locked wrongly
natural_image
Simple line drawing of a device with a checkmark and arrow, no text or symbols presentWater tank is locked correctly
| “ON/OFF” | |
| “TIMER/ANION” | |
| “HUMIDITY” | |
| “—......+” | |
| “MODE”: |
- "ON/OFF" gomb:
natural_image
Mechanical component diagram showing a rotating shaft and housing (no text or symbols)Twist clockwise to install a new water softener
natural_image
Technical line drawing of a mechanical component with a circular housing and central hole (no text or symbols)Remove the active carbon filter from the bottom
natural_image
Technical line drawing of a mechanical component with internal components (no text or symbols)Install a new filter.
natural_image
Simple line drawing of a mechanical device with an upward arrow, no text or symbols presentnatural_image
Line drawing of a rectangular electronic device with a circular top and internal components (no text or symbols)natural_image
Simple line drawing of a rectangular container with a circular top and a small protrusion, no text or symbols present.natural_image
Line drawing of a rectangular container with internal mesh and two droplets above it (no text or symbols)natural_image
Line drawing of a rectangular mechanical device with a knob and handle (no text or symbols)natural_image
Line drawing of a device with a downward arrow indicating compression or disassembly (no text or symbols)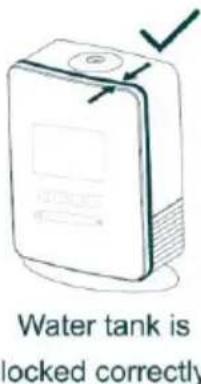

 | “ON/OFF” |
 | “TIMER/ANION” |
 | “HUMIDITY” |
 | “—......+” |
 | “MODE”: |
- Бутон ON/OFF:
natural_image
Mechanical component diagram showing a cylindrical shaft with flanged ends and a rotating arrow indicating rotation (no text or symbols)Twist clockwise to install a new water softener
natural_image
Technical line drawing of a mechanical component with a circular housing and central shaft (no text or symbols)Remove the active carbon filter from the bottom
natural_image
Technical line drawing of a mechanical component with internal gear-like structure (no text or symbols)install a new filter.
natural_image
Line drawing of a device with an upward arrow, no text or symbols presentnatural_image
Line drawing of a rectangular box with internal gears and a handle (no text or symbols)natural_image
Line drawing of a rectangular electronic component with a circular top and internal components (no text or symbols)natural_image
Line drawing of a rectangular container with internal grating and two hanging droplets above it (no text or symbols)natural_image
Line drawing of a rectangular electronic device with a knob and internal components (no text or symbols)natural_image
Diagram of a device with a downward arrow indicating compression or disassembly (no text or symbols present)natural_image
Simple line drawing of a portable electronic device with a close button and a 'X' mark, no text or symbols present.Water tank is
locked wrongly
natural_image
Simple line drawing of a device with a checkmark and arrow, no text or symbols present.Water tank is
locked correctly


 | “ON/OFF” |
 | “TIMER/ANION” |
 | “HUMIDITY” |
 | “—......+” |
 | “MODE”: |
- Кнопка ON/OFF (УВИМК./ВИМК.)
natural_image
Mechanical component diagram showing a rotating shaft and housing (no text or symbols)Twist clockwise to install a new water softener
natural_image
Line drawing of a rectangular electronic device with a circular housing and internal components (no text or symbols)Remove the active carbon filter from the bottom
natural_image
Technical line drawing of a mechanical device with internal components (no text or symbols)install a new filter.
natural_image
Technical line drawing of a mechanical device with an upward arrow indicator (no text or symbols present)natural_image
Line drawing of a rectangular electronic device with a button and internal components (no text or symbols)natural_image
Simple line drawing of a rectangular container with a circular top and internal structure, no text or symbols present.natural_image
Simple line drawing of a rectangular container with internal structure and two droplets above (no text or symbols)natural_image
Line drawing of a mechanical device with a cylindrical top and internal components (no text or symbols)natural_image
Line drawing of a mechanical device with a downward arrow indicating motion (no text or symbols)natural_image
Illustration of a device with a plus sign and arrow, no readable text or symbols presentnatural_image
Simple line drawing of a device with a checkmark and arrow pointing to the top panel (no text or symbols)

| “ON/OFF” | |
| “TIMER/ANION” | |
| “HUMIDITY” | |
| “—......+” | |
| “MODE”: |
- Кнопка ON/OFF (ВКЛ./ВЫКЛ.)
natural_image
Technical line drawing of a mechanical component with rotational arrow indicating motion (no text or symbols)Twist clockwise to install a new water softener
natural_image
Technical line drawing of a mechanical component with a circular housing and central hub (no text or symbols)Remove the active carbon filter from the bottom

natural_image
Technical line drawing of a mechanical component with internal gear and housing (no text or symbols)Install a new filter.
Wichtig
natural_image
Technical line drawing of a mechanical device with an upward arrow indicator (no text or symbols present)natural_image
Line drawing of a rectangular electronic device with a mechanical component on top (no text or symbols)natural_image
Line drawing of a rectangular electronic component with a circular top and internal components (no text or symbols)natural_image
Line drawing of a rectangular container with internal structure and two droplets above (no text or symbols)natural_image
Line drawing of a mechanical device with a knob and housing (no text or symbols)natural_image
Line drawing of a mechanical device with an arrow indicating downward motion (no text or symbols)natural_image
Simple line drawing of a portable electronic device with a 'X' mark and control panel (no text or symbols on the device itself)Water tank is
locked wrongly
natural_image
Simple line drawing of a medical device with a checkmark and arrow (no text or symbols)Water tank is
locked correctly


Anion 3s


 | “ON/OFF” | |
 | “TIMER/ANION” | |
 | “HUMIDITY” | |
 | “—......+” | |
| < > | “MODE”: |

• „ON/OFF“-Taste
natural_image
Mechanical component diagram showing a cylindrical shaft with flanged end and rotational arrow indicating motion (no text or symbols)Twist clockwise to install a new water softener
natural_image
Technical line drawing of a mechanical component with a circular housing and central hub (no text or symbols)Remove the active carbon filter from the bottom

natural_image
Technical line drawing of a mechanical component with internal gear mechanism (no text or symbols)Install a new filter.


- Pomembno
- • Gumb za "ON/OFF":
- Okolina
- Važno!
- Opasnost
- • Dugme "TIMER/ANION":
- Важно
- - Копче „ВКЛУЧИ/ИСКЛУЧИ“ (“ON/OFF”):
- Important
- Danger
- Warning
- Caution
- Using the appliance
- Functional panel with LCD
- - "ON/OFF" button:
- • "TIMER/ANION" button:
- - "HUMIDITY" button:
- - Button & sliding bar “—.....+”:
- - "MODE" button:
- "standard" mode;
- "intelligent" mode;
- "sleep" mode;
- Note:
- Cleaning
- Descalling
- Tips to avoid scale
- Descaling the humidifier
- Changing filters
- Environment
- Guarantee & service
- GORENJE
- WISHES YOU A LOT OF PLEASURE WHEN USING YOUR APPLIANCE
- - Butonul "ON/OFF":
- - Buton & bară glis are “—.....+”:
- • Tlačítko „ON/OFF“:
- Dôležité
- Ważne
- Fontos
- - "ON/OFF" gomb:
- - Бутон ON/OFF:
- - Кнопка ON/OFF (УВИМК./ВИМК.)
- - Кнопка ON/OFF (ВКЛ./ВЫКЛ.)
- Wichtig
- • „ON/OFF“-Taste
Brand : GORENJE
Model : H50DW
Category : Humidifier