H17G - Humidifier GORENJE - Free user manual and instructions
Find the device manual for free H17G GORENJE in PDF.

| Product Type | Ultrasonic Humidifier |
| Model | H17G |
| Brand | Gorenje |
| Suitable Room Size | Up to 30 m² |
| Water Tank Capacity | 4 L |
| Mist Output | 300 ml/h |
| Runtime | Up to 12 hours |
| Noise Level | < 30 dB |
| Dimensions (W x D x H) | 240 x 240 x 350 mm |
| Weight | 2.5 kg |
| Power Supply | 220-240 V, 50 Hz |
| Power Consumption | 25 W |
| Humidification Type | Ultrasonic |
| Filter | Demineralization cartridge (optional) |
| Functions | Auto shut-off, adjustable mist output, night mode |
| Safety | Auto shut-off when water tank empty |
| Cleaning | Weekly cleaning recommended; descale monthly |
| Warranty | 2 years |
Frequently Asked Questions - H17G GORENJE
User questions about H17G GORENJE
0 question about this device. Answer the ones you know or ask your own.
Ask a new question about this device
Download the instructions for your Humidifier in PDF format for free! Find your manual H17G - GORENJE and take your electronic device back in hand. On this page are published all the documents necessary for the use of your device. H17G by GORENJE.
USER MANUAL H17G GORENJE
natural_image
Exterior view of a beige gorenje appliance with a white control knob (no text or symbols visible on the device body)H 17 G
H 17 Y
| Navodila za uporabo | SI |
| Upute za uporabu | BIH HR |
| Uputstvo za upotrebu | BIH SRB MNE |
| Упатства за употреба | MK |
| Instruction manual | EN |
| Інструкція з експлуатації | UA |
| Návod na obsluhu | SK |
| Instrukcja obsługi | PL |
| Instrucțiuni de utilizare | RO |
| Használati útmutató | HU |
| Инструкции за употреба | BG |
| Руководство по эксплуатации | RUS |
| Návod k obsluze | CZ |
| Gebrauchsanweisung | DE |
| Istruzioni d'uso | IT |
SI Navodila za uporabo 3
natural_image
Technical line drawing of a mechanical device with three views and a rotating knob (no text or symbols)Nasvet: Uporabite hladno predhodno prekuhano vodo, ali pa destilirano vodo. Prepričajte se, da temperatura vode, ki jo dodajate v rezervoar, ne presega 40 °C.
natural_image
Technical line drawing showing a mechanical component with rotation and assembly views (no text or symbols)natural_image
Simple line drawing of a device casing with a circular button and directional arrow (no text or symbols)UPUTE ZA UPORABU HR, BIH

natural_image
Technical line drawing of a mechanical device showing front, side, and top views with internal components (no text or symbols)Savjet: koristite hladnu, prethodno prekuhanu vodu, ili destiliranu vodu. Pazite da temperatura vode koju ulijevate u rezervoar ne premašuje 40°C.
U rezervoar ulijevajte isključivo vodu. Nikad ne smijete u rezervoar dodavati bilo kakve dodatke, kao što su eterična ulja ili druga aromatizirana sredstva za udisanje.
- Čepom zatvorite rezervoar, okrenite ga u smjeru kazaljki na satu i čvrsto ga privijte.
natural_image
Technical line drawing showing a mechanical component with rotation and assembly views (no text or symbols)natural_image
Line drawing of a device casing with a circular button and directional arrow (no text or symbols)- Nakon isključenja uređaja iskopčajte utikač iz utičnice.
- Ispraznite rezervoar i spremnik u podnožju. Ako uređaj ne namjeravate koristiti u slijedećih nekoliko dana, obrišite ga krpom.
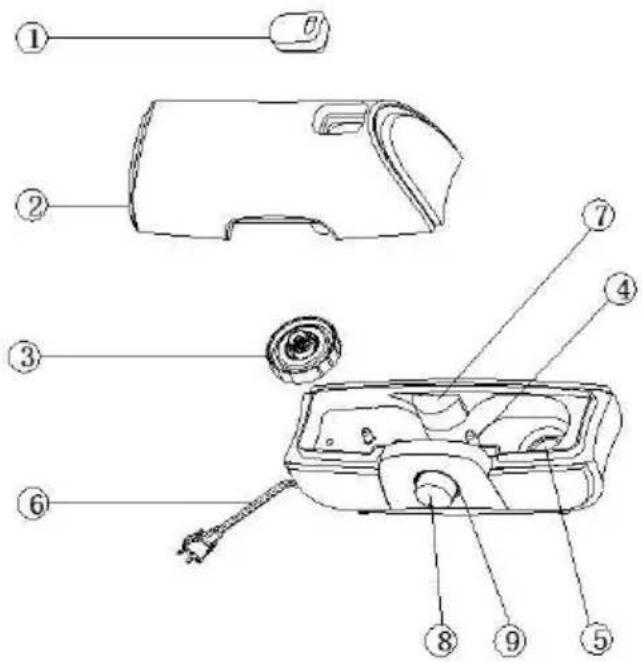
- Otvor za raspršivanje
- Rezervoar
- Zapušač/otvor za pražnjenje vode
- Zaštitni prekidač za nivo vode
- Komplet raspršivača
- Priključni kabl
- Otvor za vazduh
- Dugme prekidača
- indikator rada
Važno!
Pre upotrebe aparata pažljivo pročitajte ovaj priručnik za upotrebu. Priručnik sačuvajte kako biste mogli i kasnije da ga koristite.
Opasnost
natural_image
Technical line drawing of a mechanical device with three views and a handle, showing assembly steps (no text or symbols)natural_image
Technical line drawing showing a mechanical component with rotation and assembly views (no text or symbols)- Rezervoar za vodu ponovno stavite na podnožje u prvobitni položaj. Voda odmah počinje teći u spremište.
- Vratite nazad poklopac rezervoara
- Ukopčajte aparat u električnu mrežu. Ne smete koristiti produžne kablove.
- Dugme za uključenje okrenite u smeru kazaljki na satu. Ovlaživač je uključen kad začujete klik. Upali se signalna lampica za rad aparata.
- Jačinu raspršivanja regulišete obrtanjem dugmeta za uključenje/isključenje u smeru kazaljki na satu, odnosno u suprotnom smeru.

natural_image
Simple line drawing of a device casing with a circular button and a curved arrow indicating rotation (no text or symbols)- Nakon isključenja aparata iskopčajte utikač iz utičnice.
- Ispraznite rezervoar i spremište vode podnožju. Ako aparat ne nameravate koristiti u sledećih nekoliko dana, obrišite ga krpom.
natural_image
Technical line drawing of a mechanical device with exploded and assembled views (no text or symbols)natural_image
Technical line drawing showing a mechanical assembly with labeled components (no text or symbols)natural_image
Simple line drawing of a car hood with a circular button and directional arrow (no text or symbols)- Mist outlet
- Reservoir
- Lid / water outlet
- Water level protection switch
- Atomizer assy
- Power cord
- Air outlet
- switch knob
- Power indicator
Important
Read this user manual carefully before you use the appliance and save it for future reference.
This appliance is marked according to the European directive 2012/19/EU on Waste Electrical and Electronic Equipment (WEEE). This guideline is the frame of a European-wide validity of return and recycling on Waste Electrical and Electronic Equipment.
Danger
Do not immerse the base of the humidifier in water and do not let water run into the base.
To prevent electric shock, newer open the base.
Warning
- Check if the voltage indicated on the type plate corresponds to the local mains voltage before you connect the appliance.
-
The appliance is suitable for voltages from 220 to 240V.
-
If the cord is damaged, have it replaced by Gorenje, a service centre authorised by Gorenje or similarly qualified persons in order to avoid a hazard.
- Keep the cord away from hot surfaces.
- This appliance is not intended for use by persons (including children) with reduced physical, sensory or mental capabilities, or lack of experience and knowledge, unless they have been given supervision or instruction concerning use of the appliance by a person responsible for their safety.
• Children not play with the appliance. - Do not touch the steam generator when it is connected to electricity.
- This appliance can be used by children aged from 8 years and above and persons with reduced physical, sensory or mental capabilities or lack of experience and knowledge if they have been given supervision or instruction concerning use of the appliance in a safe way and understand the hazards involved. Children shall not play with the appliance. Cleaning and maintenance shall not be made by children unless they are older than 8 and supervised.
Caution
- Switch off the appliance and unplug it produces a strange smell or an abnormal noise.
- Switch off the humidifier and unplug it before you move, clean or fill it.
- Do not turn on the humidifier when there is no water in the water tank.
- Do not use any metal or hard objects to clean the steam generator.
- Do not direct the mist output at furniture or electrical appliances.
- Make sure the humidifier and the mains cord are always out of reach of the baby (at least one metre away).
- Do not use the humidifier in damp places or close to water.
- Do not use the humidifier in places where the humidity level is more than 50%.
- Do not expose the humidifier to extreme heat or cold or to direct sunlight.
- Do not use the humidifier outdoors.
- The humidifier is only intended for household use.
-
Never move or empty the humidifier while it is operating.
-
Unplug the humidifier after each use.
- Never cover the humidifier with a towel or blanket.
- Noise level: Lc < 35 dB(A)
Using the appliance
- Make sure that the humidifier is 'off' and upluged..
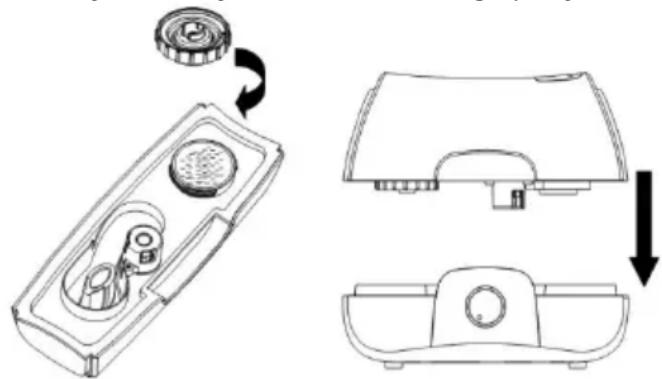
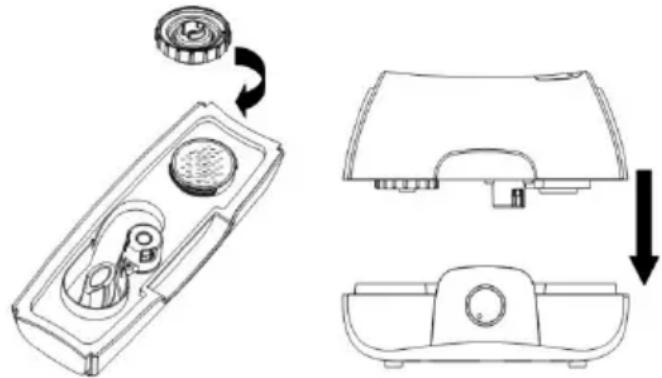
- Remove the tank cover from the water tank.
- Use the handle of the water tank to lift it vertically from the base.
- Turn the water tank upside down. Turn the tank cap anticlockwise to remove it and fill the tank with approx. 1,7 litres of clean water.
natural_image
Technical line drawing of a mechanical device with three views and a rotating button (no text or symbols)Tip: Use cold boiled water or distilled water. Make sure that the water temperature is not more than 40^ C.
Put water only in the water tank. Never put any additives, e.g. inhalants or oils, in the water tank.
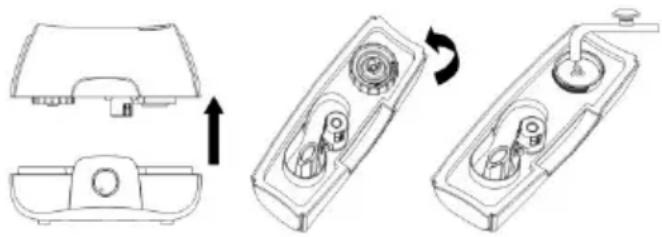
5. Put the tank cap back on the water tank turn the tank cap clockwise and tiglithy back it.
natural_image
Technical line drawing showing a mechanical assembly with three views: top view, front view, and side view (no text or symbols)- Put the water tank back onto the base its original position.
Water will start running into the water basin right away.
- Put the tank cover back onto the water tank.
- Put the plug in the wall socket.
Do not use an extension cord.
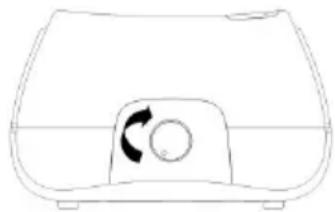
- Turn the on/off knob clockwise. The humidifier is on, when you hear a click.
The power-on light goes on. - Select the desired mist output by turning the on/off knob clock or anticlockwise.
natural_image
Line drawing of a device casing with a circular button and directional arrow (no text or symbols)- After switching off remove the plug from the wall socket.
- Empty the water tank and base. If you are not going to use the humidifier for two or more days, wipe it with a cloth.
Note: Always unplug the appliance before you refill the water tank.
Automatic mist stop
The safety switch automatically turns off the steam generator to stop the mist output when the water level is too low.
The tip-over switch automatically turns off the steam generator to stop the mist output when the humidifier is tilted.
Note: The automatic mist stop protects the steam generator from overheating. In both cases, the humidifier is still on and the fan continues to operate.
Cleaning
Do not use any extra purifiers.
Do not immerse the base, mains cord or mains plug in water or any other liquid.
Do not use any metal or hard objects to clean the steam generator.
- Unpug the humidifier from the mains and set the on/off knob to 'off'.
- Clean the water tank and the tank cover with hot water. You can use some basic washing-up liquid or a dishwasher.
- For the cleaning the inside of the water tank, fill in water, firmly tighten the tank cap and repeatedly shake the water tank.
Note: Make sure that you do not leave any washing-up liquid in the water tank or tank cover.
- Clean the base with a damp cloth.
Tip: Regular cleaning reduces jam.
Descalling
Tips to avoid scale
Use cold boiled, filtered or distilled water. Make sure that the water temperature is lower 40^ C. Clean the tank cover, the water tank, the steam
generator and the water basin every week. Fill the water tank with fresh water every time you use the humidifier.
Clean all parts of the humidifier, empty the water tank and the water basin and dry all parts with a soft, dry cloth when you are not going to use your humidifier for a long time.
Unplug the humidifier
- Disconnect the humidifier and set the on/off knob to 'off'.
- Fill the water basin with 100ml of vinegar (4% acetic acid) per 200ml of water and let is soak for at least four hours.
So leave the water and vinegar in the water basin for at least 4 hours (preferably overnight). - Empty the water basin and wipe it also with a soft cloth.
- Put some white vinegar 4% acetic acid also on the steam generator and then wipe it away with a moist cloth.
- Wash all other parts with clean water.
Environment
Do not throw away the appliance with the normal household waste at the end of its life, but hand it in at an official collection point for recycling. By doing this, you help to preserve the environment.
Guarantee & service
If you need information or if you have a problem, please contact the Gorenje Customer Care Centre in your country (you find its phone number in the worldwide guarantee leaflet). If there is no Customer Care Centre in your country, go to your local Gorenje dealer or contact the Service department of Gorenje domestic appliances.
For personal use only!
GORENJE WISHES YOU A LOT OF PLEASURE WHEN USING YOUR APPLIANCE