
Mirror View - Cooker Xblitz - Free user manual and instructions
Find the device manual for free Mirror View Xblitz in PDF.


| Product Type | Car Dash Camera / Rear View Mirror Camera |
| Brand | Xblitz |
| Model | Mirror View |
| Processor | JL 5603 |
| Sensor (Front) | SC2368 |
| Sensor (Rear) | V06 |
| Lens | 4G |
| Recording Resolution (Front) | Full HD 1920x1080p |
| Recording Resolution (Rear) | 640x480p |
| Viewing Angle (Front) | 130° |
| Viewing Angle (Rear) | 120° |
| HDR Mode | Yes |
| Loop Recording | Yes (adjustable duration) |
| Motion Detection | Yes |
| Parking Mode | Yes |
| G-Sensor | Yes (adjustable sensitivity) |
| Maximum Memory Card Capacity | Micro SD up to 64 GB, Class 10 |
| Recording Format | MOV |
| Power Supply | 5V/1.5A DC (via cigarette lighter charger) |
| Battery | Built-in (allows recording up to 5 minutes without external power) |
| Dimensions | 315 x 75 x 35 mm |
| Weight | 250 g |
| Rear Camera Waterproof Rating | IP67 (dustproof, immersion up to 1m for 30 min) |
| Operating Temperature | 0 to 35°C |
| Storage Temperature | +5 to +45°C |
| Humidity Tolerance | 5-90% (non-condensing) |
Frequently Asked Questions - Mirror View Xblitz
User questions about Mirror View Xblitz
0 question about this device. Answer the ones you know or ask your own.
Ask a new question about this device
Download the instructions for your Cooker in PDF format for free! Find your manual Mirror View - Xblitz and take your electronic device back in hand. On this page are published all the documents necessary for the use of your device. Mirror View by Xblitz.
USER MANUAL Mirror View Xblitz
natural_image
Side-by-side comparison of a car driving on a scenic road with blue sky and greenery, shown in a transparent rounded frame (no text or symbols visible)natural_image
Product catalog image showing seven electronic devices and accessories (no visible text or labels)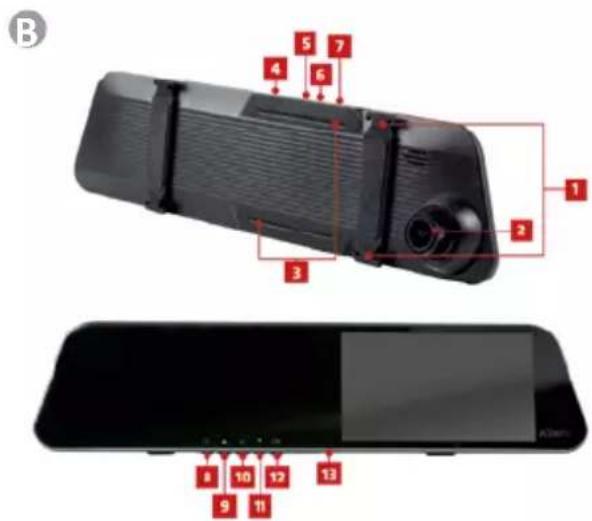
©
flowchart
graph TD
    A["Player 1"] --> B["Player 2"]
    B --> C["Player 3"]
    C --> D["Player 4"]
    D --> E["Player 5"]
    E --> F["Player 6"]
    F --> G["Player 7"]
    G --> H["Player 8"]
    H --> I["Player 9"]
    I --> J["Player 10"]
    J --> K["Player 11"]
    K --> L["Player 12"]
    L --> M["Player 13"]
    M --> N["Player 14"]
    N --> O["Player 15"]
    O --> P["Player 16"]
    P --> Q["Player 17"]
    Q --> R["Player 18"]
    R --> S["Player 19"]
    S --> T["Player 20"]
    T --> U["Player 21"]
    U --> V["Player 22"]
    V --> W["Player 23"]
    W --> X["Player 24"]
    X --> Y["Player 25"]
    Y --> Z["Player 26"]
    Z --> AA["Player 27"]
    AA --> AB["Player 28"]
    AB --> AC["Player 29"]
    AC --> AD["Player 30"]
    AD --> AE["Player 31"]
    AE --> AF["Player 32"]
    AF --> AG["Player 33"]
    AG --> AH["Player 34"]
    AH --> AI["Player 35"]
    AI --> AJ["Player 36"]
    AJ --> AK["Player 37"]
    AK --> AL["Player 38"]
    AL --> AM["Player 39"]
    AM --> AN["Player 40"]
    AN --> AO["Player 41"]
    AO --> AP["Player 42"]
    AP --> AQ["Player 43"]
    AQ --> AR["Player 44"]
    AR --> AS["Player 45"]
D
flowchart
graph TD
    A["Player 1"] --> B["Player 2"]
    B --> C["Player 3"]
    C --> D["Player 4"]
    D --> E["Player 5"]
    E --> F["Player 6"]
    F --> G["Player 7"]
    G --> H["Player 8"]
    H --> I["Player 9"]
    I --> J["Player 10"]
    J --> K["Player 11"]
    K --> L["Player 12"]
    L --> M["Player 13"]
    M --> N["Player 14"]
    N --> O["Player 15"]
    O --> P["Player 16"]
    P --> Q["Player 17"]
    Q --> R["Player 18"]
    R --> S["Player 19"]
    S --> T["Player 20"]
    T --> U["Player 21"]
E
flowchart
graph TD
    A["00:00:27"] --> B["1"]
    B --> C["2"]
    C --> D["3"]
    D --> E["4"]
    E --> F["5"]
    F --> G["7"]
    G --> H["8"]
    H --> I["11"]
    I --> J["10"]
    J --> K["11"]
    K --> L["11"]
    style A fill:#f9f,stroke:#333
    style B fill:#f9f,stroke:#333
    style C fill:#f9f,stroke:#333
    style D fill:#f9f,stroke:#333
    style E fill:#f9f,stroke:#333
    style F fill:#f9f,stroke:#333
    style G fill:#f9f,stroke:#333
    style H fill:#f9f,stroke:#333
    style I fill:#f9f,stroke:#333
    style J fill:#f9f,stroke:#333
    style K fill:#f9f,stroke:#333
    style L fill:#f9f,stroke:#333
F
natural_image
Interior view of a car dashboard and steering wheel (no text or symbols)PL
INSTRUKCJA OBSŁUGI
WIDEOREJESTRATOR
Before use, please read the enclosed operating instructions and safety notes carefully to avoid accidental damage to the equipment or unintentional injury.
PURPOSE OF THE PRODUCT
The Xblitz Mirror View car camera is a camera built into the rear view mirror, it allows you to monitor the route of your vehicle and record any traffic incidents, in addition, the device comes with a second camera that can be used, for example, as a reversing camera. The video recorder is made of the highest quality components.
01. CONTENTS OF THE KIT
SEE FIG. A
-
Camera
-
Rear-view camera
- Back-up camera connection cable
- Memory card reader
- Instructions
- Charger
- Fastening elastics
02. BEFORE USE
- It is recommended to use original micro SD cards of class 10 or higher.
- Before inserting the card into the recorder, it must be formatted in the computer in the FAT32 or exFAT file system (depending on the card) and then in the recorder.
- The memory card must be installed when the device is switched off otherwise the card and the device may be damaged. The same applies when removing the card.
- A fully charged battery allows recording without power for max. 5 minutes.
- When the memory card fills up, the oldest unprotected recordings will be overwritten if the RECORDING IN BAND function is activated.
- Use the functions of the device according to their intended use, i.e. do not use the MOVEMENT DETECTION and PARKING MODE while driving. This may cause the device to switch on and off automatically, e.g. when stopping at an intersection.
- The G-Sensor option is recommended to be set to the lowest possible value in order to avoid securing recordings that may be caused by unevenness on the road.
- Sound: the device has a condenser microphone that records all ambient sounds. Sounds may overlap causing distortion.
- The camera will start recording automatically when connected to power.
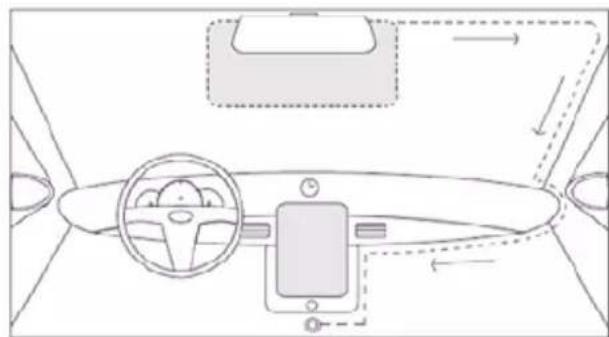
03. CAMERA INSTALLATION
SEE FIG. A
- Insert the memory card into the camera.
- Attach the camera to the rear-view mirror.
- Attach the camera using the rubber bands supplied with the camera in the kit.
- Route the power cable and the reversing camera cable.
- Connect the power cable and the reversing camera cable.
- Connect the power supply to the cigarette lighter socket.
The mounting location of the rear camera depends on your preference. The
camera complies with waterproofing standards IP67 (completely dustproof and protected against immersion in water - max. 30 minutes at a depth of up to 1 metre).
Back-up camera installation:
- Connect the black cable supplied with the kit to the AVIN port on the main unit, drag it to the mounting location and plug it in. Ensure that the main unit can see the secondary camera (if not, check that the cable is correctly inserted into both ports).
- To use the rear view camera as a reversing camera before connecting it to the DVR, it must be connected to the reverse light supply wires (red = plus).
- The installation carried out outdoors should be well insulated and should not be mechanically stressed.
04. PRODUCT DESCRIPTION
SEE FIG. B
- Location of rubber bands
- Lens
- Loudspeaker
- RESET button
- Micro SD card port
- AV input (connection point for rear camera)
- Mini USB port (camera power supply)
- MODE button
- UP button
- POWER button
- Down button
- OK button
- Microphone
05. GETTING STARTED
- Mount and connect the camera to the power supply.
- Insert micro SD memory card.
NOTE: Please only insert and remove the memory card when the device is switched off. - Set in the menu:
a. Date and time.
b. Loop recording (adjust recording time). If you turn off loop recording, the files will not be overwritten.
c. Set your preferred resolution (it is recommended to use the
highest available).
d. Activate the G-sensor shock sensor.
- Ensure that motion detection and parking mode are switched off while driving. If they remain on during normal use it will affect recordings. Enabling these modes is recommended only when leaving the vehicle parked.
- The camera will start recording automatically each time it is switched on or connected to the power supply. If your car has a constant supply of power at the cigarette lighter socket, it is recommended that you manually switch the camera on and off to avoid discharging the battery while the vehicle is parked.
06. PRECAUTIONS
- Do not disassemble the camera yourself or interfere with its construction. In the event of a malfunction, contact the service department.
- Use only original accessories.
- Only use the original charger supplied. The use of any other power supply may adversely affect battery performance.
- The device may not be used in contravention of the laws of your country or region.
- Permissible operating temperatures are 0-35 °C, storage: +5 to +45 °C, humidity: 5-90 °C without condensation.
- Do not subject the device to damage or impacts.
- Take care of the cleanliness of the product, especially the lens. Do not use detergents or chemicals when cleaning.
- Clean only when the unit is unplugged.
- Keep the device out of the reach of children.
- Do not expose the device to very high temperatures or fire.
07. DESCRIPTION OF THE KEYS
MODE (M) - A short press moves between video/photo/playback modes. Longer press opens the context menu (unless the camera is recording). Another longer press takes you to the general menu. During video recording, a short press protects the current recording from being overwritten later.
UP - In menu and playback mode, it is responsible for navigating through the individual items. During recording playback, a short press on the button is responsible for rewinding. A longer press on the button switches between front and rear camera recordings. Outside the menu and playback mode, as well as in recording mode, the button is used to switch the view between the front and rear cameras, as well as the two-camera view mode (rear camera view in the top right corner or split screen).
POWER - Hold down 3 sec to switch the camera on or off. Short press to blank/awake the screen.
DOWN - In menu and playback mode, it is responsible for navigating through the individual items. During playback of a recording, a short press of the button is responsible for fast-forwarding.
OK- In video mode, pressing switches recording on and off. In menu and playback mode, approves individual actions. During video playback, acts as play/pause.
RESET - Pressing resets the camera and restores the default settings on the camera.
08. MENU
A. VIDEO MODE
1. Resolution
Set the resolution in which the camera will record. The higher the resolution, the better the quality of the recordings (Note: the higher the resolution, the more the files will take up on the memory card).
2. Loop recording
Selection of the length of the loop in which the device will record.
3. HDR image
HDR (High Dynamic Range) image on/off. In this mode, the recorder takes additional shots of the same frame for better exposure of the image.
4. Exposure
Video exposure settings.
5. Motion detection
Enable/disable motion detection.
6. Sound recording
Enable/disable audio recording.
7. Date stamp
Activation/deactivation of recording and date display on video recordings.
8. Shock sensor (G-sensor)
Switching off and on and selecting the sensitivity of the G-sensor shock sensor.
9. Parking mode
Activate/deactivate parking mode.
10. Car number
Entering the registration number to be displayed in the recordings and on the DVR screen.
B. PHOTO MODE
1. Capture mode
Photo delay settings.
2. Resolution
Selection of image resolution.
3. Continuous shooting
Enable/disable continuous shooting mode. When this mode is activated, the camera takes three high-speed pictures in approximately one second.
4. Quality
Picture quality settings.
5. Focus
Photo focus settings.
6. White balance
White balance settings.
7. Colour
Image colour settings (normal, black and white, sepia).
8. ISO
Matrix sensitivity settings.
9. Exposure
Exposure settings.
10. Stabilisation
Image stabilisation on/off.
11. Date stamp
Activation/deactivation of the recording and date display of video recordings.
C. PLAYBACK MODE
1. Delete
Deletion of a single, or all, files.
2. Security of recordings
Securing or unprotecting a single or all files.
3. Slideshow
Presentation of slides at selected intervals.
D. GENERAL MENU
1. Screen saver
Settings for the time after which the display is automatically extinguished.
1. Automatic switch-off
Settings for the time after which the device automatically switches off while not recording.
2. Frequency
Selection of recording frequency 50Hz or 60Hz - recommended setting: 50Hz.
3. Menu sound
Enable/disable the audible signal when navigating through the menu.
4. Language
Selection of menu language.
5. Date/time
Date and time settings.
6. Format
Micro SD card formatting.
7. Default settings
Restore the device to default settings.
8. Version
Information on the software version of the device.
09. SCREEN AND ICONS
A. VIDEO MODE
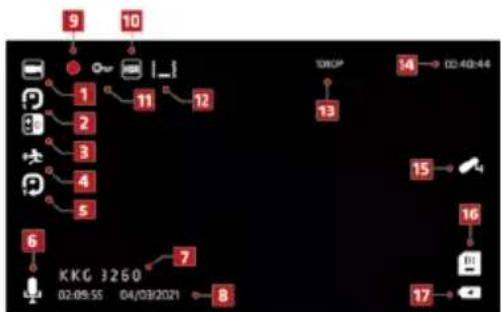
SEE FIG. C
-
Information on the mode of operation of the camera (here: video mode)
-
Length of recorded loop
-
Information on exposure settings
-
Information on enabled motion detection mode
-
Information about time-lapse recording on
-
Information on whether audio recording is on or off
-
Car registration number (optional)
-
Date and time
-
Video recording icon (if active and flashing it means the camera is recording)
-
HDR mode enabled information
-
Information on active protection of the recording
-
Information about the activated G-Sensor shock sensor
-
Video recording resolution set
-
Recording time (or if the camera is not recording the remaining recording time on the memory card)
-
Information on activated parking mode
-
Information on inserted memory card
-
Information on connected power supply
B. PHOTO MODE
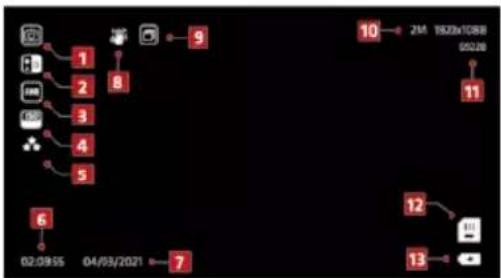
SEE FIG. D
- Information on the mode of operation of the camera (here: photo mode)
- Information on exposure settings
- Information about the set white balance (the icon changes according to the settings)
- Information on the ISO sensitivity setting
- Information about the set image quality (one star - worst; three stars - best)
- Hour
- Date
- Information on anti-shock mode activated
- Continuous shooting mode information
- Information about the set resolution
- Information on the number of photos that can be stored on the memory card at any one time
- Information on inserted memory card
- Information on connected charging
C. PLAYBACK MODE
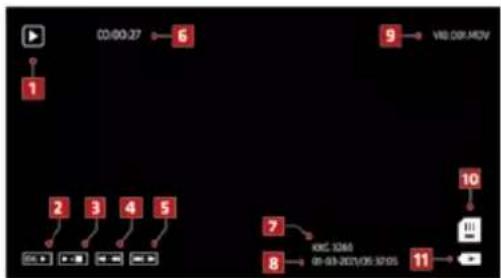
SEE FIG. E
- Information on the mode in which the camera is operating (here: playback mode)
- Video playback (operation via OK button)
- Stopping playback (operation via OK button)
- Rewind (operation via UP button)
- Fast forward (operated via the DOWN button)
- Recording time
- Car registration number (optional)
- Date of recording
- Recording file name
- Information on inserted memory card
- Information on connecting the device for charging
10. MAIN FEATURES OF THE CAMERA
1. Camera modes
The camera has 3 modes of operation:
Recording mode. In this mode, the camera records video.
Photo mode. In this mode, the camera takes photos.
Playback mode. View footage recorded by the camera.
2. Loop recording
The camera divides the recordings according to the selected time
settings.
3. Resolution
The camera can record in several resolutions. The higher the resolution, the better the recording quality. Note: the better the quality of the recording, the more space will be used on the memory card.
4. G-sensor
Gravity sensor. When the sensor is activated at the time of a collision, the recording file is protected from being overwritten. It is recommended to set the lowest available value, as at a higher value the camera may pick up shocks caused by unevenness of the road.
5. Parking mode
When it is switched on, the camera left in the car under power picks up the shock of the car (for example, during a parking bump), switches on and starts recording (recordings are automatically protected against overwriting). When driving, it is recommended that parking mode is switched off.
6. Motion detection mode
When switched on and left in active power mode, the camera will record a short video when motion is detected.
7. Audio recording
The camera has a built-in microphone for recording ambient sounds.
8. Rear-view camera
The included rear-view camera can be used as a reversing camera. When properly connected, the image will automatically switch to the view from the additional camera when reverse gear is engaged.
11. FAQ
- Device does not switch on/off
The reason for this behaviour may be the constant power supply in the car's cigarette lighter socket.
- The device restarts while driving.
It is recommended to check the power source.
- The device does not record in a loop (it records randomly).
Check the setting of the ,motion detection' function - it should be off.
- The device shows the message „card full”.
Check the „G-sensor“ and „parking mode“ functions and set them to minimum. The card must be formatted in FAT32 or exFAT format (depending on the type of card) first on the computer and then on the recorder.
- The device records noisy, distorted, unclear sound:
The device has a highly sensitive microphone that records any am-
bient noises. The recorded sounds may overlap. Windscreen air vents may also distort the sound.
12. SPECIFICATION
Processor: JL 5603
Sensor: Front: SC2368 Rear: V06
Lens: 4G
Recording resolution: Front: Full HD 1920x1080p; Rear: 640x480p
Viewing angle: Front 130°, Rear: 120°
HDR mode: Yes
Loop recording: Yes
Motion detection: Yes
Parking mode: Yes
Memory: Micro SD cards up to 64 GB class 10
Recording format: MOV
Charger: 5V/1.5 A
USB: Mini USB 2.0
Microphone/loudspeaker: Built-in
Battery: Built-in
Dimensions: 315 x 75 x 35 mm
Weight: 250g
CAUTION: Use only the original charger with a charging current of 1.5 A. (Do not plug directly into a 220/230V outlet.) Failure to follow the instructions may cause damage to the camera or lead to dangerous situations.
13. WARRANTY/ COMPLAINTS CARD
The product comes with a 24-month warranty. Warranty conditions can be found at: https://xblitz.pl/gwarancja/
Complaints should be made using the complaint form found at:
Details, contact and address of the service can be found at: www.xblitz.pl Specifications and contents are subject to change without notice. We apologise for any inconvenience.
DE
BEDIENUNGSANLEITUNG
VIDEO-RECORDER
04. PRODUKTA APRAKSTS
SKATIT B ATTELA
Videovalgustuse seaded.
Foto fookuse seaded.
6. Valge tasakaal
Valge tasakaalu seaded.
7. Värv
Loop salvestamine: Jah
The crossed out trash can symbol indicates that unusable electrical or electronic devices, its accessories (such as power supplies, cords) or components (for example batteries, if included) cannot be disposed of alongside with household waste. In order to dispose of the devices or its components (for example, batteries) deliver the device to the collection point, where it will be accepted free of disposal is subject to the recast version of the WEEE Directive 19/ EU) and the Directive on batteries and accumulators [2006/66] proper disposal of the device prevents degradation of the natural movement. Information about the collection points of the facilities is by the competent local authorities. Incorrect disposal of waste is to penalties provided for by the law in force in the given area.
DE

KGK TREND Sp. z o.o.
(dawniej KGK Trade Sp. z o.o. Sp. K.)
ul. Ujastek 5b, 31-752 Kraków, Polska.
Wyprodukowano w PRC
Manufacturer:
KGK TREND Sp. z o. o.
(formerly KGK Trade Sp. z o.o. Sp. K.)
st. Ujastek 5b, 31-752 Cracow, Poland.
Made in PRC



- PL
- INSTRUKCJA OBSŁUGI
- WIDEOREJESTRATOR
- PURPOSE OF THE PRODUCT
- CONTENTS OF THE KIT
- SEE FIG. A
- BEFORE USE
- CAMERA INSTALLATION
- Back-up camera installation:
- PRODUCT DESCRIPTION
- SEE FIG. B
- GETTING STARTED
- PRECAUTIONS
- DESCRIPTION OF THE KEYS
- MENU
- VIDEO MODE
- Resolution
- Loop recording
- HDR image
- Exposure
- Motion detection
- Sound recording
- Date stamp
- Shock sensor (G-sensor)
- Parking mode
- Car number
- PHOTO MODE
- Capture mode
- Resolution
- Continuous shooting
- Quality
- Focus
- White balance
- Colour
- ISO
- Exposure
- Stabilisation
- Date stamp
- PLAYBACK MODE
- Delete
- Security of recordings
- Slideshow
- GENERAL MENU
- Screen saver
- Automatic switch-off
- Frequency
- Menu sound
- Language
- Date/time
- Format
- Default settings
- Version
- SCREEN AND ICONS
- SEE FIG. C
- SEE FIG. D
- SEE FIG. E
- MAIN FEATURES OF THE CAMERA
- Camera modes
- Resolution
- G-sensor
- Parking mode
- Motion detection mode
- Audio recording
- Rear-view camera
- FAQ
- SPECIFICATION
- WARRANTY/ COMPLAINTS CARD
- DE
- BEDIENUNGSANLEITUNG
- VIDEO-RECORDER
- PRODUKTA APRAKSTS
- SKATIT B ATTELA
- Valge tasakaal
- Värv
- Manufacturer:
Brand : Xblitz
Model : Mirror View
Category : Cooker