
Go Ride - Cooker Xblitz - Free user manual and instructions
Find the device manual for free Go Ride Xblitz in PDF.


| Product Type | Dashboard Camera (Dashcam) |
| Brand | Xblitz |
| Model | Go Ride |
| Dimensions (without bracket) | 53 x 40 x 53 mm |
| Weight | 56 g |
| Power Supply | 12V car charger (included); built-in 300mAh battery (for settings only, ~5 min backup) |
| Processor | GP5168 |
| Image Sensor | Sony Starvis IMX307 |
| Recording Resolution | 1920x1080 Full HD |
| Memory Card Support | Micro SD up to 64 GB, Class 10 or higher, FAT32 format |
| Loop Recording | Yes, selectable file length |
| Wide Dynamic Range (WDR) | Yes |
| Motion Detection | Yes (recommended off while driving) |
| Parking Mode | Yes (shock-activated, recommended off while driving) |
| G-Sensor (Gravity Sensor) | Yes, adjustable sensitivity (lowest recommended) |
| Audio Recording | Built-in microphone, can be disabled |
| Display | Built-in screen |
| Mounting | Suction cup bracket |
| HDMI Port | Present but inactive |
| Date/Time Stamp | Yes, can be enabled/disabled |
| License Plate Tag | Yes, programmable |
| Operating Temperature | 0 °C to 35 °C |
| Storage Temperature | 5 °C to 45 °C |
| Humidity Range | 5% to 90% |
| Included Accessories | Camera, suction bracket, car charger, USB cable, Micro SD card reader |
| Warranty | 24 months (see manufacturer website for details) |
Frequently Asked Questions - Go Ride Xblitz
User questions about Go Ride Xblitz
0 question about this device. Answer the ones you know or ask your own.
Ask a new question about this device
Download the instructions for your Cooker in PDF format for free! Find your manual Go Ride - Xblitz and take your electronic device back in hand. On this page are published all the documents necessary for the use of your device. Go Ride by Xblitz.
USER MANUAL Go Ride Xblitz
User's manual in English lanugage - EN
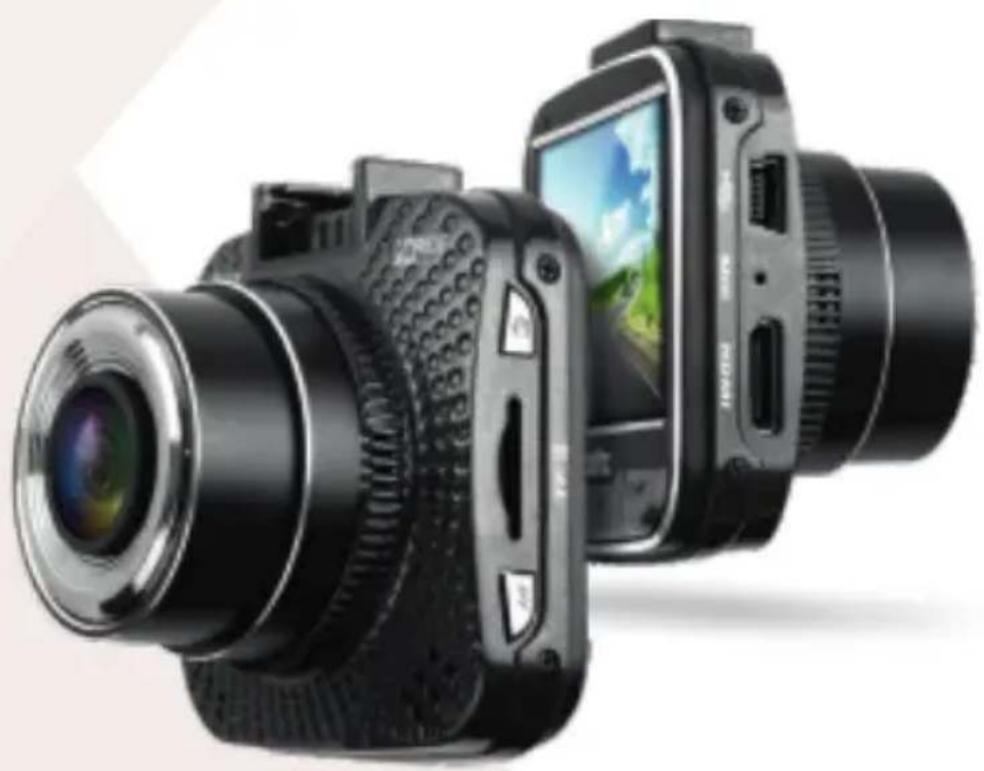
natural_image
Black digital camera with lens and screen, shown from front and side (no visible text or symbols)


natural_image
Abstract geometric shape with diagonal light and white gradient, no text or symbols presentXblitz®
[GO ^RIDE ]
INSTRUKCJA OBSŁUGI
PL
![Xblitz Go Ride - [GO ^RIDE ] - 1](/content/2026/05/835635/images/eef07832faebf8b87b132f9535eda37646774a0e5c01a93a3db1fd779941be2d.jpg)
natural_image
Xblitz digital road driver with a black camera and screen displaying a scenic rural landscape (no text or symbols on the device itself)Szanowny Kliencie,
natural_image
Xblitz digital road driver with a remote camera displaying a scenic landscape (no text or symbols on the device itself)EN
Dear Customer,
Thank you for purchasing the Xblitz GoRide dashboard camera. The product you have purchased is a video device designed to record any activity from the dashboard of your vehicle and record the routes taken by your vehicle.
BEFORE USE
- It's recommended to use branded 10 SD cards with a capacity between 8 and 64GB.
- Before inserting the memory card in the recorder, it must first be formatted to the FAT32 file system on the computer, and then in the recorder.
- Only insert the memory card into the device when the device is turned off. Inserting the memory card in the switched-on recorder may damage both the card and the device. This also applies when removing the card from the device.
- The built-in battery in the video recorder is primarily used to maintain the device settings. Once disconnected from a power supply, the recorder will function for no longer than 5 minutes.
- When the memory card becomes full, the oldest, unprotected footage will be overwritten by new video files.
- The device functions should only be used for their intended purposes. Do not activate the motion detection or parking mode functions while driving. This may result in the device turning on or off automatically.
- It is recommended that the sensitivity of the G-SENSOR function be set to the lowest level to prevent the device from protecting any unnecessary recordings, e.g. from driving on bumpy roads. Protected recordings will not be overwritten when the memory card is full.
- The device has a condenser microphone that records all ambient sounds. These recorded sounds may overlap with one another causing them to be distorted.
- ATTENTION! The HDMI port on the device is inactive.
KIT CONTENTS
- Xblitz GoRide car camera
- Suction cup mounting bracket
- Car charger
- USB cable
- Micro SD card reader
EN
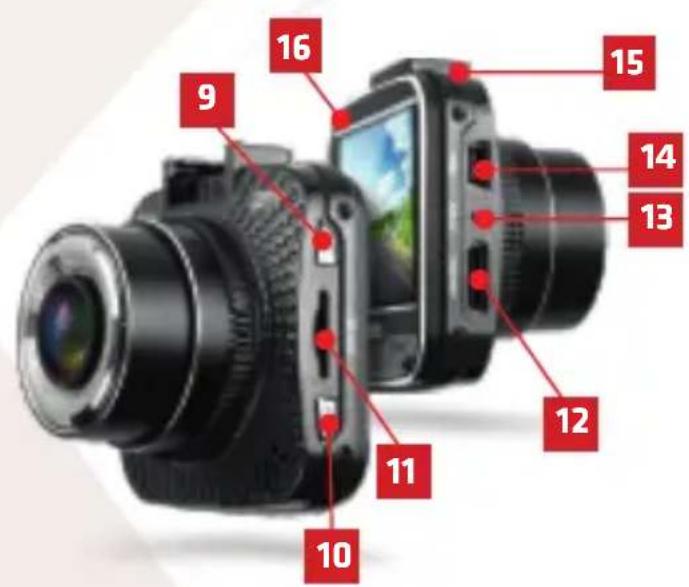
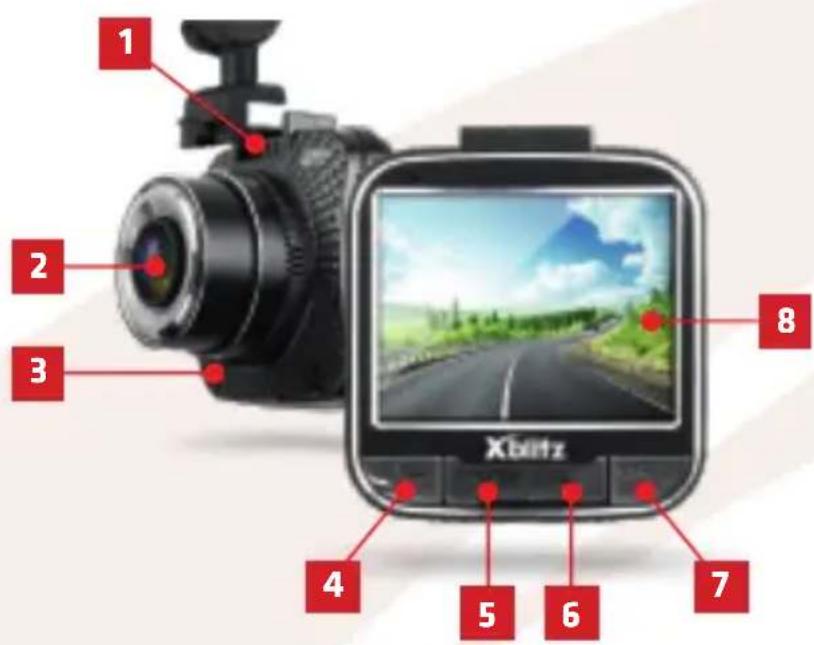
PRODUCT DESCRIPTION
- Handle mounting slot
- Camera lens
- Loudspeaker
- BACK button
- DOWN button
- UP button
- "OK - Confirm" button
-
Display Screen
-
Power button
- "MODE" button
- Micro SD memory card slot
- HDMI Port (inactive)
- MiCROPHONE
- USB port
- AV IN
- LED indicator light
01. MOUNTING YOUR CAMERA
- Select a designated place where you wish to install the camera. Be sure to check that the camera lens will not be obstructed.
- Thoroughly clean the designated installation place.
- Place and stick the camera mounting bracket in the designated location.
- Run the power cable to the device as shown in the image above.
- Insert the mini USB plug of the power cord into the port on the mounting bracket.
- Insert the device's power adapter into the vehicle's cigarette lighter socket.
- Insert the micro SD memory card into the memory card slot. Make sure that the device is turned off before inserting the memory card.
- Install the device in the mounting bracket.
02. GETTING STARTED WITH YOUR DEVICE
- Install the camera in the mounting bracket and connect it to the power supply (follow the instructions provided in the MOUNTING THE CAMERA section of the instruction manual).
- Insert the micro SD memory card in the designated memory card slot. Make sure that the card is formatted to the FAT32 file system.
- Setting the menu:
a. Time and date b. Loop recording (recording time). If the loop recording function is turned off, the files will not be overwritten by new recordings.
c. Set the highest resolution available in the menu.
d. Set the sensitivity of the G-SENSOR function to the lowest setting to ensure that the camera does not protect the recordings in the event of driving on bumpy roads.
e. Enable WDR wide dynamic range mode.
f. Make sure that the motion detection functions and parking mode are turned off. If these options are left on, they will harm the recordings. These features should only be enabled when your vehicle has been parked.
g. The camera will automatically begin recording when you move your vehicle provided that your car's cigarette socked maintains a constant power supply to the device.
h. The blue LED on the camera housing indicates that the device is connected to the power supply.
03. KEY DESCRIPTION
1. POWER
A quick push on this button will turn the display panel on and off. To turn the device on or off, the key needs to be pushed in and held for 3 seconds.
2. MODE
Pressing the “M” button will open the device's menu. This will allow you to navigate between the current device settings and the overall device settings. The “M” button is also used for selecting the files which you would like to delete or protect.
3. DOWN
This button allows you to navigate through any saved files found on the inserted memory card as well as the device menu. When playing a video file, this button will also activate the sound adjustment function by muting the video.
4. UP
While in the file browsing function, this button switches between the saved files on the current memory card. In the menu, pushing the button will change the currently selected item. In video recording mode, the button is used to switch audio recording on or off.
5. BACK
By pressing this button while recording, you prevent the current recording from being overwritten.
6. RESET
Pushing the reset button will reset the whole device and restore it to the default factory setting.
7. OK
A quick press of the OK button will activate video recording or take a photo while in photo mode. It is also used to confirm options in the devices menu.
04. DEVICE FUNCTIONS
1. LOOP RECORDING
This feature allows you to set the length of the video files. If this feature is disabled, any new recordings will not overwrite the existing or old video files once the memory card is full.
2. WDR (Wide Dynamic Range)
The function allows you to record both in the dark and in bright, often blinding light. Special algorithms analyze the image exposure.
3. MOTION DETECTION
This function allows you to enable/disable motion detection mode. When this mode is on, the camera automatically starts recording a video file when it detects any moving object in front of an object (e.g. a person or approaching a car). These recordings are protected from being overwritten by the device.
4. PARKING MODE
This function causes the camera to automatically turn on and make a short video recording after detecting a shock (e.g. caused by a bump in a parking lot). Recordings made in this mode are protected from being overwritten.
5. AUDIO RECORDING
Audio recording allows you to enable or disable audio recording while recording a video file.
6. G-SENSOR
This will allow you to set the sensitivity of the gravity sensor. The function allows the camera to automatically record a video after detecting a shock (e.g. caused by a crash or bump in the road) and protect the recording from being overwritten.
7. FORMAT
Is responsible for the format of the memory card inserted in the device. NOTE: Formatting will delete all data and files stored on the memory card.
8. SCREENSAVER
A function that allows you to set the time after which the display of the device automatically turns off.
9. TIME STAMP
This feature allows you to activate or deactivate the time and date of any given photograph from being displayed.
10. LICENSE PLATE TAG
This feature allows you to set your car's license plate number. The registration number that you enter and save will be visible on all of your captured videos and photos.
05. PRECAUTIONS
- Do not disassemble or modify the device yourself. In the event of failure or error, contact the designated service center.
- Only use original accessories for the device.
- Only use the original charger provided in the kit for the device. Using a different charger may damage or harm the device.
- The device may not and should not be used in a manner that is illegal or inappropriate in the given country or region.
- The device should be stored in temperatures from 5 °C to 45 °C.
The device can operate in temperatures ranging from 0 °C to 35 °C.
The permissible humidity for the device to function correctly is 5-90%. - Do not drop the device on the ground or subject it to other physical damage.
- It's important to keep the device clean, especially the lens of the device. Do not use detergents or other chemicals to clean the device.
- Keep the device out of reach of children.
- Do not expose the device to high temperatures or open flames.
06. SPECIFICATIONS
Processor: GP5168
Recording resolution: 1920x1080
Sensor: Sony Starvis IMX307
Memory: Micro SD cards up to 32 GB, class 10, max 64 GB
USB: Mini USB
Microphone/Speakers: Built-in
Battery: Built-in 300mAh
Dimensions (without handle): 53x40x53 mm
Weight: 56 g
07. WARRANTY / CLAIMS
This product is covered by a 24-month warranty. The warranty conditions are available on the website: https://xblitz.pl/warranty/
Complaints should be submitted with the complaint form which can be found at http://reklamacje.kgktrade.pl/
Contact details and the address of the service can be found on the website: www.xblitz.pl
Specifications and contents of the kit are subject to change without notice. We apologise for any inconvenience.
For the full version of the manual, please visit www.xblitz.pl
The crossed out trash can symbol indicates that unusable electrical or electronic devices, its accessories (such as power supplies, cords) or components (for example batteries, if included) cannot be disposed of alongside with household waste. In order to dispose of the devices or its components (for example, batteries) deliver the device to the collection point, where it will be accepted free of charge. Disposal is subject to the recast version of the WEEE Directive (2012/19 / EU) and the Directive on batteries and accumulators (2006/66 / EC). Proper disposal of the device prevents degradation of the natural environment. Information about the collection points of the facilities is issued by the competent local authorities. Incorrect disposal of waste is subject to penalties provided for by the law in force in the given area.

Manufacturer:
KGK Trade sp. z o.o. sp. k.
Ujastek 5b
31-752 Cracow
Poland
Made in P.R.C.

natural_image
Abstract beige gradient shape on white background, no text or symbols presentXblitz®


- Xblitz®
- [GO RIDE ]
- Szanowny Kliencie,
- Dear Customer,
- BEFORE USE
- KIT CONTENTS
- PRODUCT DESCRIPTION
- MOUNTING YOUR CAMERA
- GETTING STARTED WITH YOUR DEVICE
- KEY DESCRIPTION
- POWER
- MODE
- DOWN
- UP
- BACK
- RESET
- OK
- DEVICE FUNCTIONS
- LOOP RECORDING
- WDR (Wide Dynamic Range)
- MOTION DETECTION
- PARKING MODE
- AUDIO RECORDING
- G-SENSOR
- FORMAT
- SCREENSAVER
- TIME STAMP
- LICENSE PLATE TAG
- PRECAUTIONS
- SPECIFICATIONS
- WARRANTY / CLAIMS
- Manufacturer:
Brand : Xblitz
Model : Go Ride
Category : Cooker