
LD 326501 - TV Stand ECG - Free user manual and instructions
Find the device manual for free LD 326501 ECG in PDF.


| Product Type | TV Stand |
| Brand | ECG |
| Model | LD 326501 |
| Recommended TV Size | Up to 65 inches |
| Maximum Weight Capacity | 50 kg |
| Material | MDF and Particle Board |
| Dimensions (W x D x H) | 140 x 40 x 50 cm |
| Weight | 20 kg |
| Number of Shelves | 3 |
| Color | Black |
| Assembly Required | Yes |
| Power Source | None (Passive Stand) |
| Safety Features | Anti-Tip Strap Included |
| Cleaning Instructions | Wipe with a soft, dry cloth |
| Spare Parts Availability | Not available individually |
| Repairability | Not repairable; replacement recommended |
| Warranty | 2 years |
| Intended Use | Indoor use only |
| Package Contents | TV stand, hardware, anti-tip kit, instructions |
Frequently Asked Questions - LD 326501 ECG
User questions about LD 326501 ECG
0 question about this device. Answer the ones you know or ask your own.
Ask a new question about this device
Download the instructions for your TV Stand in PDF format for free! Find your manual LD 326501 - ECG and take your electronic device back in hand. On this page are published all the documents necessary for the use of your device. LD 326501 by ECG.
USER MANUAL LD 326501 ECG
TILTING LED TV WALL MOUNT
INSTRUCTION MANUAL
DÖNTHETÖ LED TV TARTÓ
HASZNÁLATI ÚTMUTATÓ
UCHYLNY UCHWYT NA TELEWIZOR LED
INSTRUKCJA OBSŁUGI
SUPPORT DE PERETE PENTRU TELEVIZOR CU LED CU ÎNCLINARE
INSTRUCTIUNI DE UTILIZARE
NAKLÁPACÍ DRŽIAK LED TV
NÁVOD NA OBSLUHU
ZLOŽLJIV TV LED NOSILEC
NAVODILA
SAGIBLJIVI DRŽAČ ZA LED TELEVIZOR
UPUTSTVO ZA UPOTREBU
Read carefully and save for future use!
Please refer to a qualified professional to install the wall mount properly. Prior to the wall mount installation, check the contents of the assembly set and inform your vendor in case you discover any components are missing or are defective. Do not use defective components!! Use the wall mount solely for the purpose intended by the manufacturer. Make sure the wall is capable of supporting (especially in terms of weight) the wall mount prior to installing. Also make sure no power, water, gas or other lines are located behind the wall in the installation area. Keep the specified distance between the TV and wall (depends on the TV model). Install the wall mount to a safe location, which does not present a risk to anyone. Once the wall mount and flat screen TV are mounted, ensure that the stability and safety are sufficient. This inspection shall be repeated on a regular basis, every 2 months.
The equipment is intended to be installed on wooden crossbars or solid concrete walls. Prior to the installation, make sure the assembly surface has he necessary loading capacity to carry the total weight of the TV and mount. Never exceed the maximum capacity of the holder 75 kg including cables.
This product is designed for household use only. Using the product outdoors can result in product failure or injury.
The manufacturer is not liable for damages to the equipment and health caused by improper installation of the wall mount.
- Read all instructions and make sure you understand them prior to the installation. If you are not sure about any part of the installation process, contact a professional technician for support.
- The wall or surface on which the mount will be anchored to shall be capable of carrying the entire weight of the wall mount and TV. Reinforcement will be required otherwise.
-
The installation requires the cooperation of at least two people and the use of a mechanical security mechanism and suitable tools. Otherwise it could result in damage to property or serious injury or fatal injury.
-
Follow all instructions and recommendations concerning adequate ventilation and selecting a suitable location for anchoring the TV. See the your TV user's manual for more information.
- The product contains smaller pieces, which upon being inhaled or swallowed can lead to choking. Keep these pieces away from children!
DESCRIPTION
Assembly set
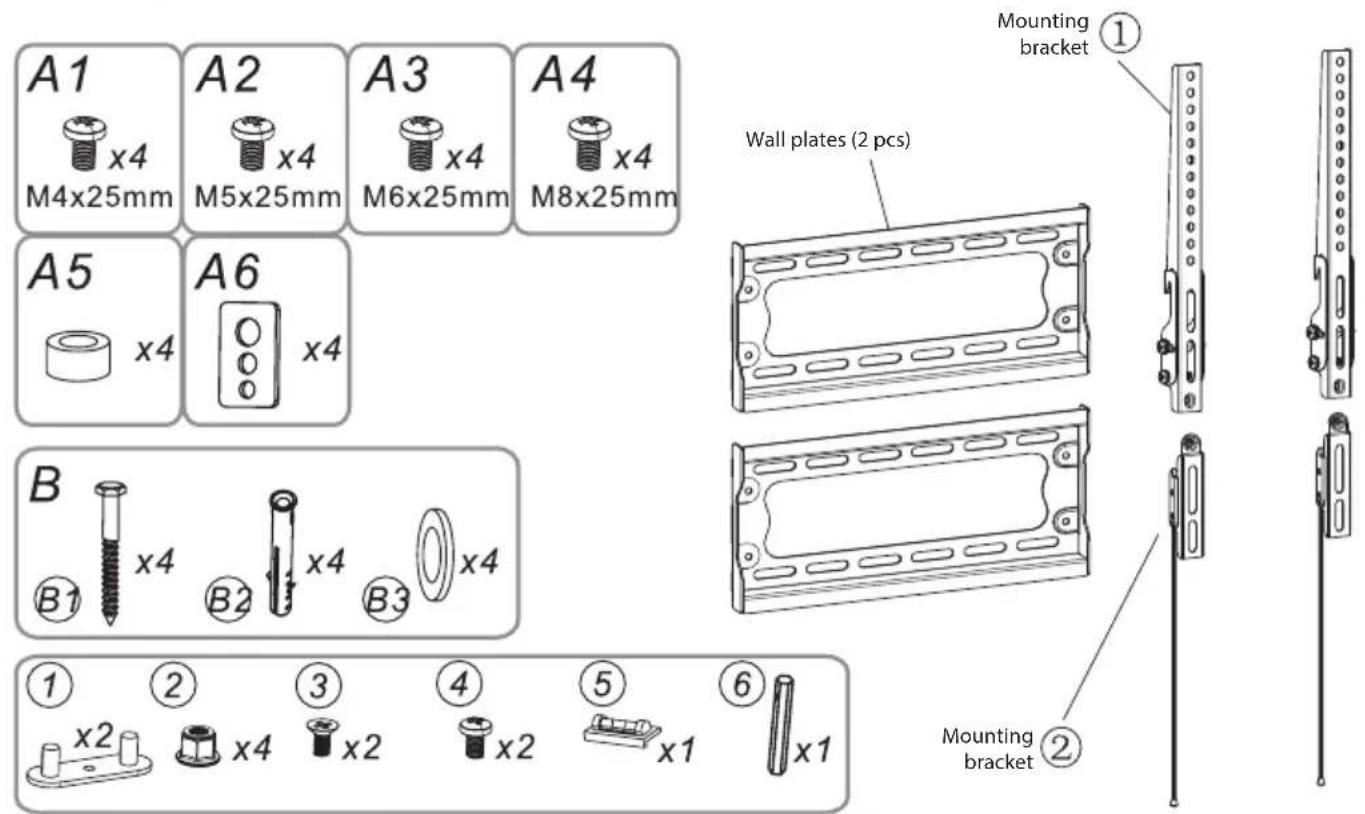
| Identification Unit(s) Description | |
| A1 4 Bolt M4 × 25 mm | |
| A2 4 Bolt M5 × 25 mm | |
| A3 4 Bolt M6 × 25 mm | |
| A4 4 Bolt M8 × 25 mm | |
| A5 4 Spacer | |
| A6 4 Washer for short bolt | |
| B1 4 Long bolt | |
| B2 4 Dowel | |
| B3 4 Washer for long bolt | |
| 1 2 Plastic insert | |
| 2 4 Nut M6 | |
| 3 2 Bolt M5 × 10 mm | |
| 4 2 Bolt M5 × 6 mm | |
| 5 1 Magnetic level | |
| 6 1 Pin M6 |
ASSEMBLY
1 - Assembling the wall plate and mounting brackets
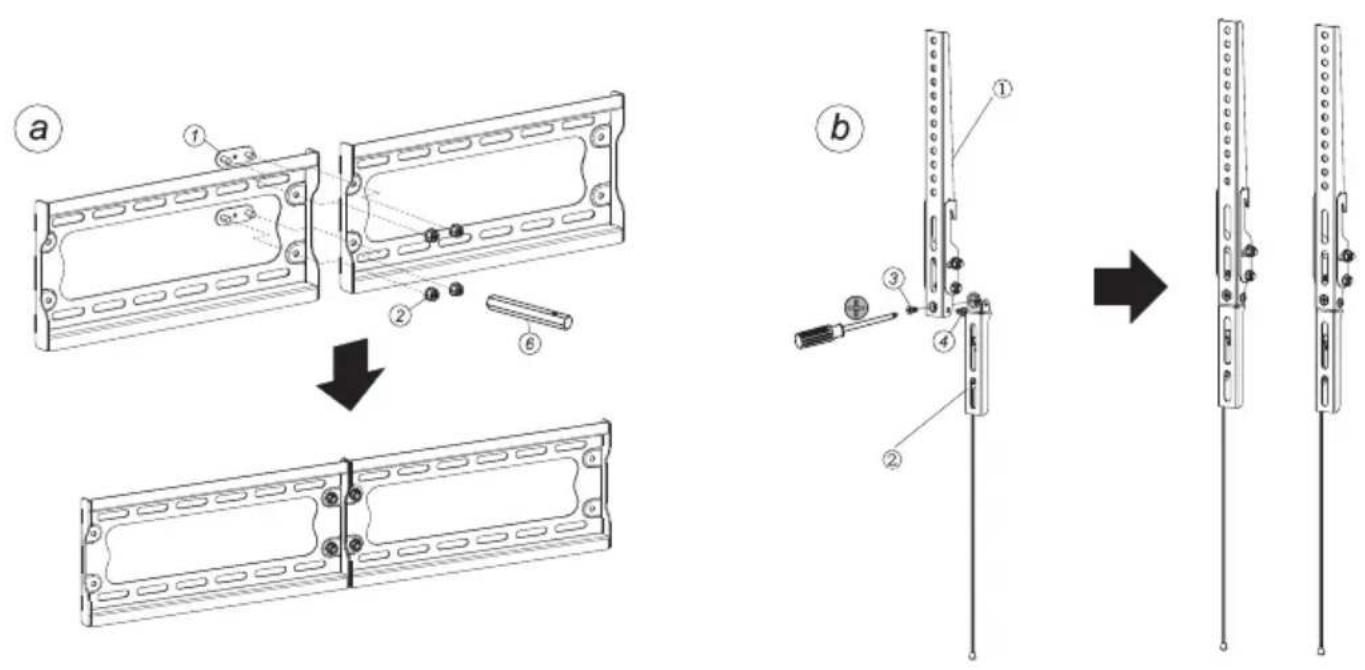
According to the instructions in the figure below, assemble the wall plate, which consists of two parts. Place both parts together, secure with plastic inserts (1), nuts (2) and M6 pins (6).
The two parts also consist of mounting brackets, which are connected by screws (3) and (4) and a Phillips screwdriver.
2A - Concrete wall assembly
Apply the wall board to the wall, align into a level position and use it as a template to mark four holes. Drill four holes 10 mm in diameter and 60 mm deep. Insert four dowels (B2) into the holes and fixate the wall board to the wall using long screws (B1) and washers (B3). Tighten the bolts firmly, but not too much.
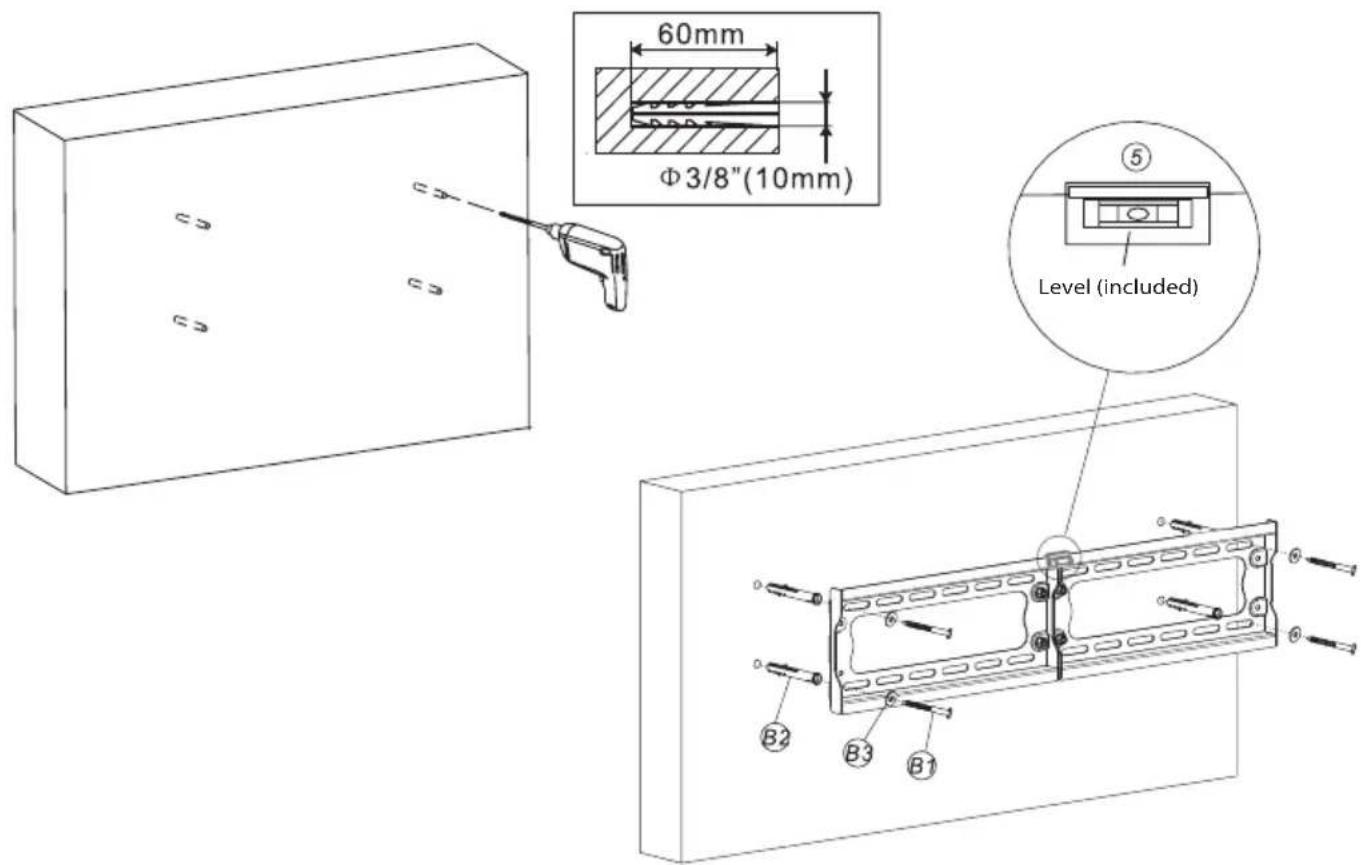
Warning: Use self-tapping screws to keep the wall plate perfectly aligned with the wall. Ensure that the self-tapping screws are fully inserted into the dowel without any gap. This ensures a stable mounting of the bracket and prevents damage to property or injury.
2B - Wooden crossbar assembly
Use the wall board as a template. Make sure that it is level, mark four mounting holes into the wooden post. Drill four holes 5 mm in diameter and 60 mm deep. Apply the wall board horizontally and fixate to the wall using four long bolts (B1) and washers (B3). Tighten the bolts firmly, but not too much.
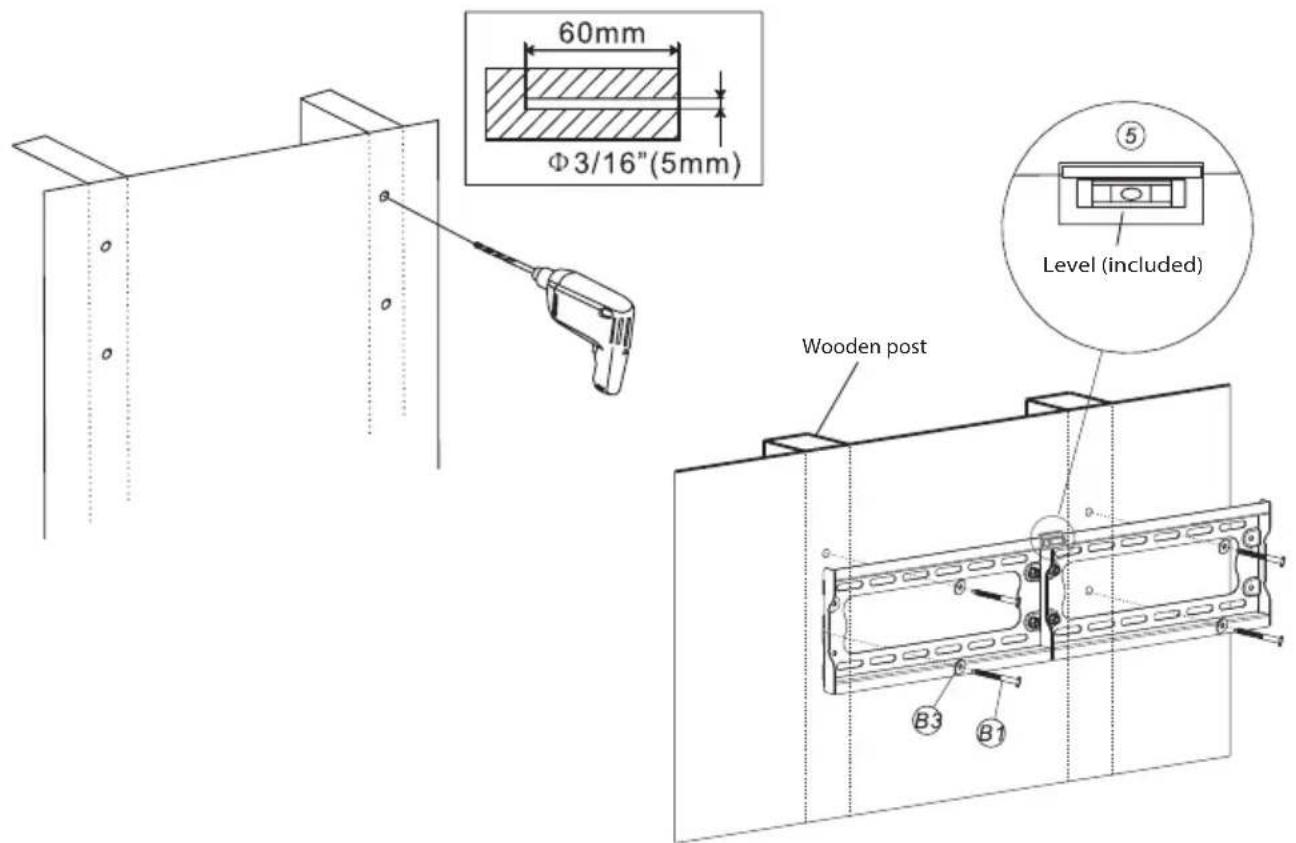
Warning: Use self-tapping screws to keep the wall plate perfectly aligned with the wall. Ensure that the self-tapping screws are fully inserted into the dowel without any gap. This ensures a stable mounting of the bracket and prevents damage to property or injury.
3 - Attaching the mounting brackets to the TV
Check to see how the mounting holes are arranged on the back side of your television set. Select the proper bolts for your TV. Attach both mounting brackets to the TV with two screws (A1–A4), spacer (A5) and washer (A6). Tighten the bolts firmly, but not too much.
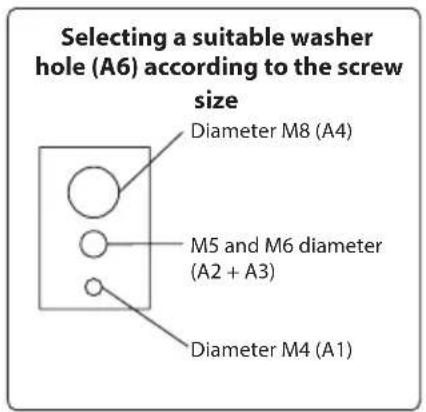
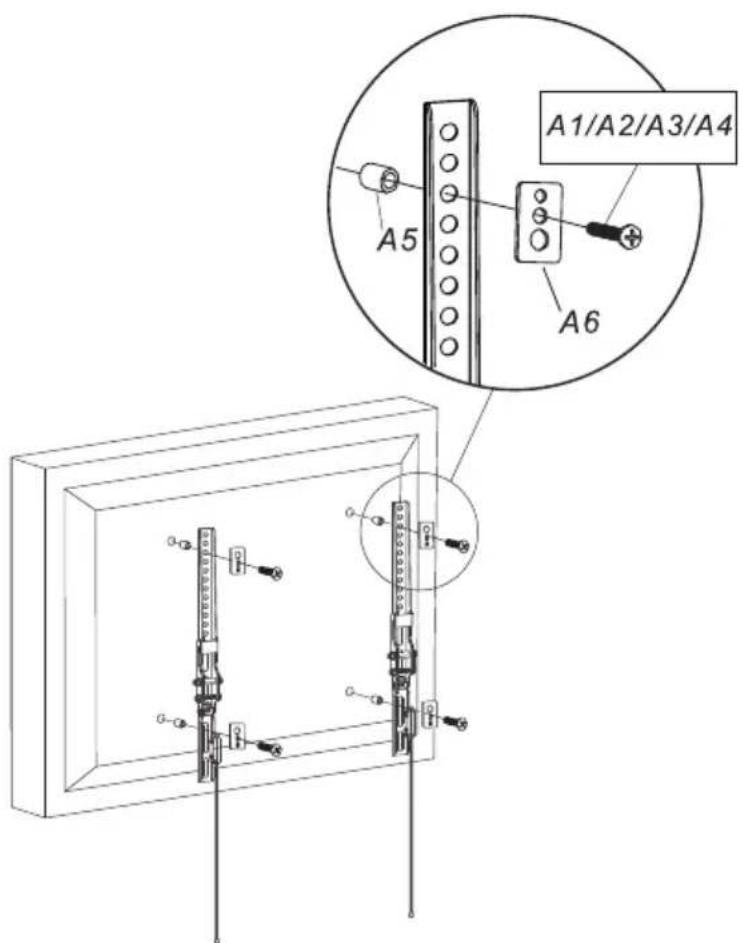
Warning: If the holes on the back of your TV are too shallow and none of the included screws fit into them, use the appropriate screws of your choice.
4 – Installing the brackets to the wall board
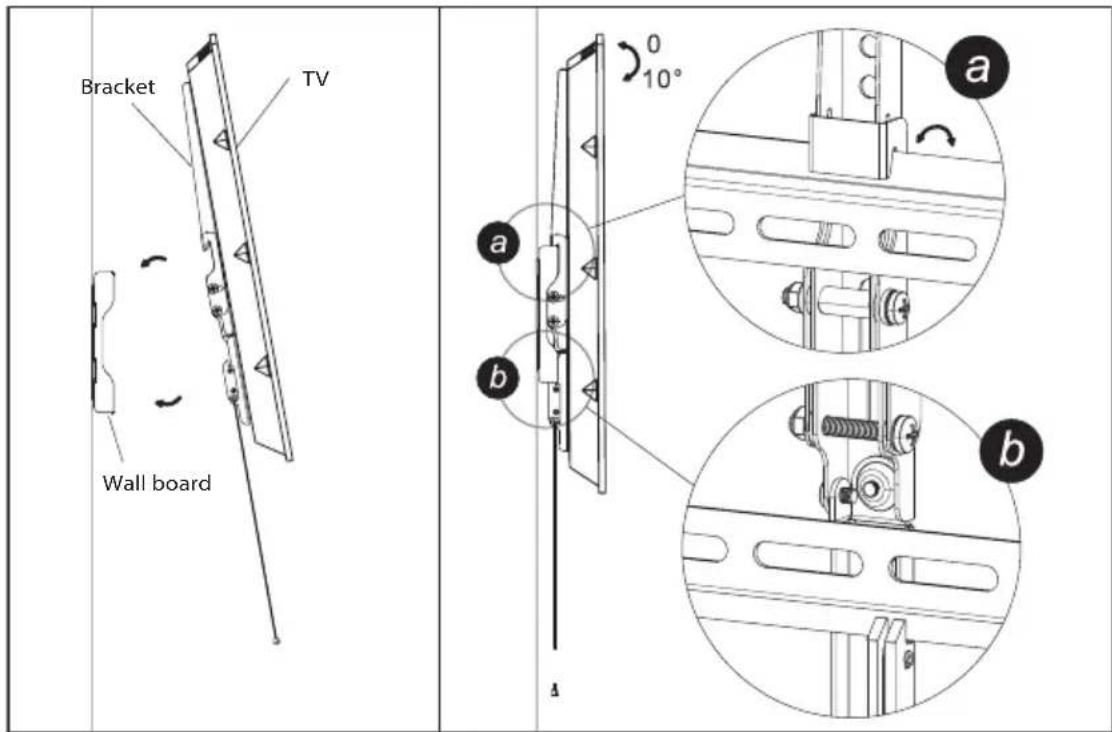
Mount the brackets to the wall board so that the adapter flange is placed on the wall board rails. Tighten the security bolt on the rails on each bracket. Tighten the bolt firmly, but not too much. Before tightening the screw, you can adjust the tilt angle of the TV.
TECHNICAL SPECIFICATIONS
Panel size: 32" to 65"
Maximum TV weight: 75 kg
Compatibility: VESA 600×400
forward/back tilt: 0^ to +10^
Minimum distance from the wall: 33 mm
USE AND DISPOSAL OF WASTE
Wrapping paper and corrugated paperboard – deliver to scrapyard. Packing foil, PE bags, plastic elements – throw into plastic recycling containers.
DISPOSAL OF PRODUCTS AT THE END OF LIFETIME
The represented symbol on the product or package means the product shall not be treated as domestic waste. Hand over the product to the specified location for recycling. Prevent negative impacts on human health and the environment by properly recycling your product. Recycling contributes to preserving natural resources. For more information on the recycling of this product, refer to your local authority, domestic waste processing organization or store, where you purchased the product.
The operating manual is available on internet at www.ecg-electro.eu.
Changes of text and technical parameters are reserved.
08/05
SICHERHEITSHINWEISE
Upozorenje: Ako su rupe na stražnjoj strani televizora previše plitke i nijedan od priloženih vijaka ne stane, upotrijebite odgovarajuće vijke po vašem izboru.
Panela lielums: 32–65 collas
Maksimālais televizora svars: 75 kg
Saderiba: VESA 600 × 400
2A – Montaža na betonsko steno
BEZBEDNOSNA UPUTSTVA
2A – Montaža na betonski zid
Stavite zidnu tablu uz zid, poravnajte je i upotrebite kao predložak za označavanje četiri rupe. Izbušite četiri rupe prečnika 10 mm i dubine 60 mm. U rupe umetnite četiri tiple (B2) i pričvrstite zidnu tablu na zid dugim vijcima (B1) sa podloškama (B3). Stegnite zavrtnje čvrsto, ali ne stežite prejako.
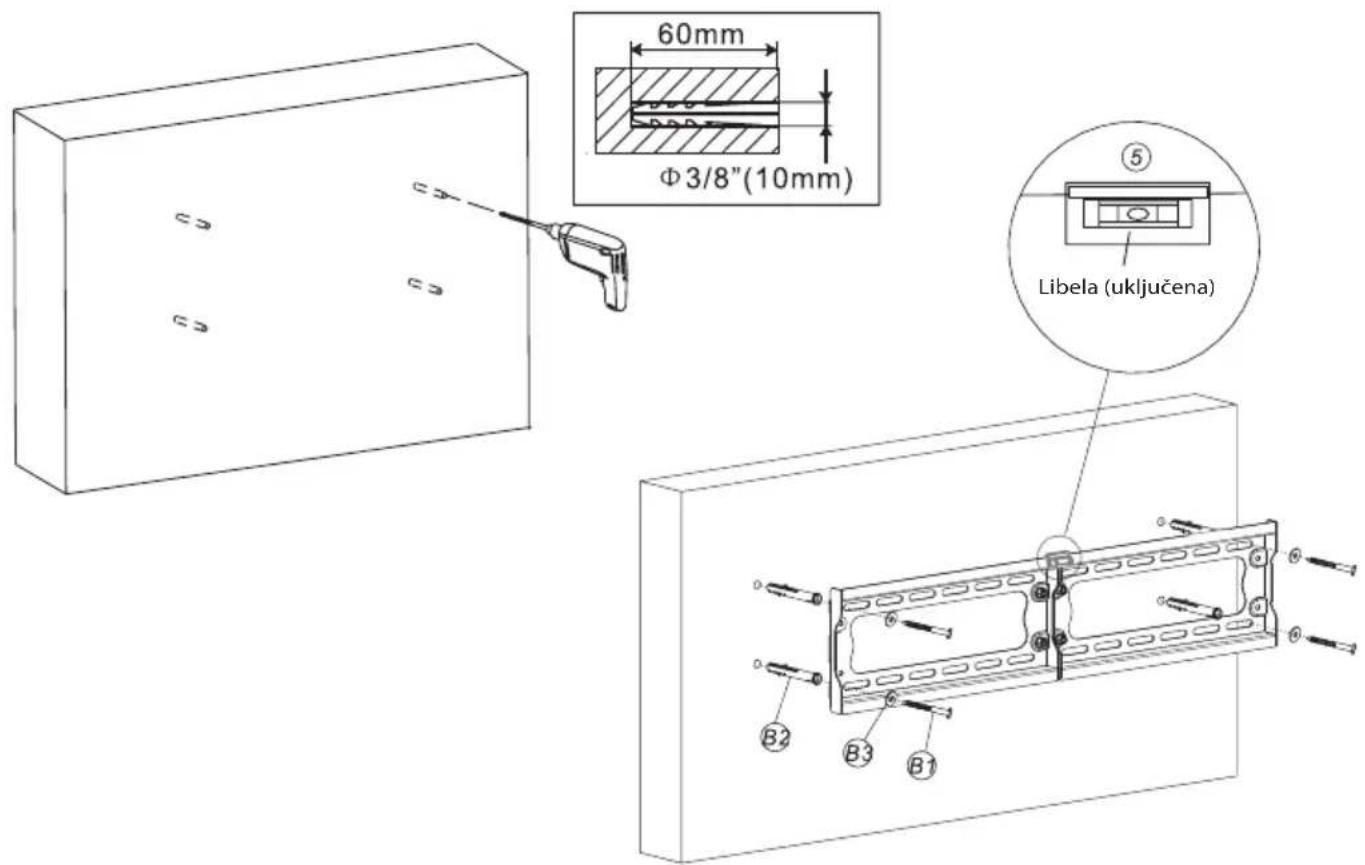
Pažnja: Upotrebite samorezne vijke kako biste zidnu tablu savršeno poravnali sa zidom. Pazite da su samorezni vijci u potpunosti umetnuti u tiple bez ikakvog razmaka. To će obezbediti stabilno pritezanje držača i sprečiti materijalnu štetu ili povrede.
2B - Montaža u drvenu pregradu
Zidnu tablu koristite kao šablon. Proverite da li stoji vodoravno i označite četiri rupe za pričvršćivanje na drvenom stupu. Izbušite četiri rupe prečnika 5 mm i dubine 60 mm. Postavite zidnu tablu vodoravno i pričvrstite je na zid sa četiri dugačka vijka (B1) i podloškama (B3). Stegnite zavrtnje čvrsto, ali ne stežite prejako.
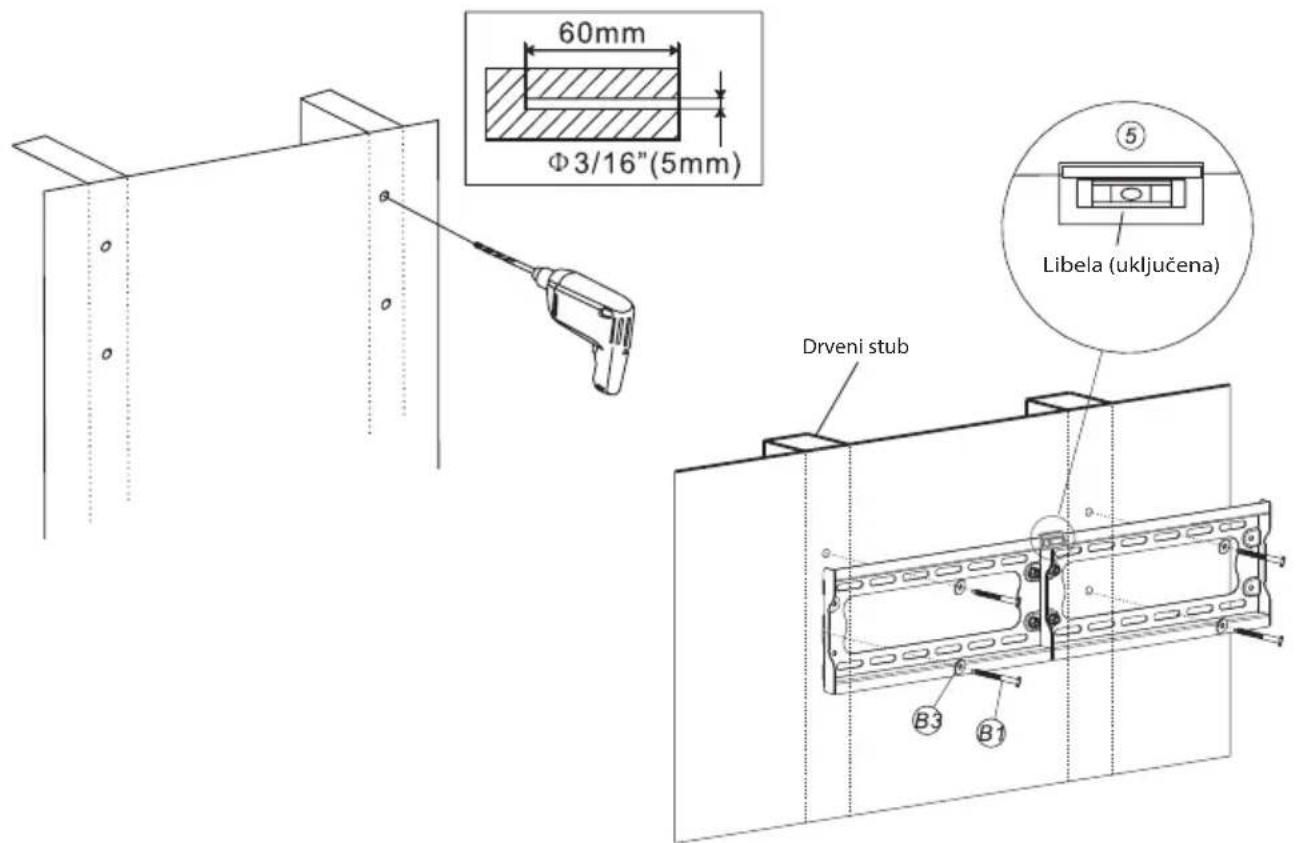
Pažnja: Upotrebite samorezne vijke kako biste zidnu tablu savršeno poravnali sa zidom. Pazite da su samorezni vijci u potpunosti umetnuti u tiple bez ikakvog razmaka. To će obezbediti stabilno pritezanje držača i sprečiti materijalnu štetu ili povrede.
3 – Pričvršćivanje konzola za montiranje na televizor
Pogledajte raspored montažnih rupa na zadnjoj strani TV uređaja. Izaberite zavrtnje koji odgovaraju vašem TV uređaju. Pomoću dva vijka pričvrstite obe konzole za pričvršćivanje na televizor (A1–A4), odstojnika (A5) i podloške (A6). Stegnite zavrtnje čvrsto, ali ne stežite prejako.
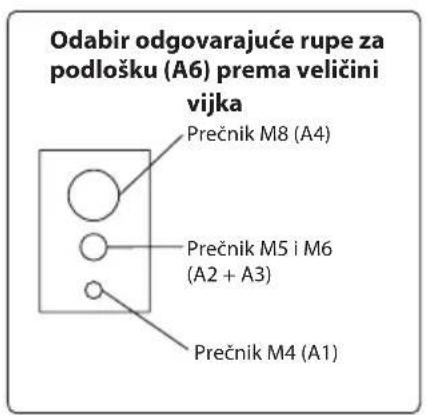
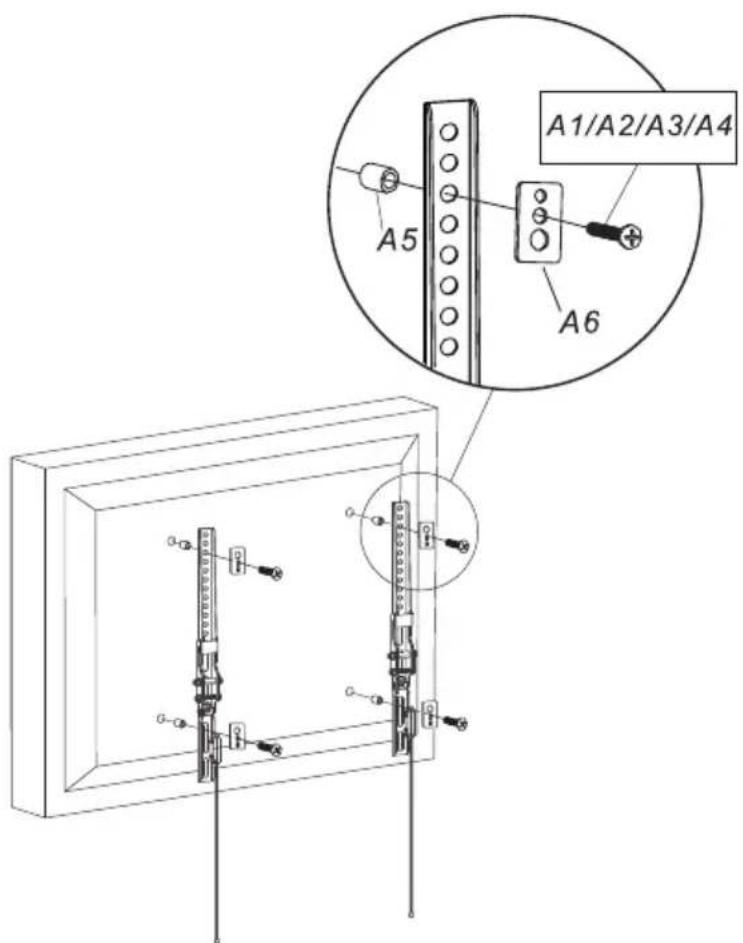
Pažnja: Ako su rupe na stražnjoj strani televizora previše plitke i nijedan od priloženih vijaka ne stane, upotrebite odgovarajuće vijke po vašem izboru.
250 69 Klíčany, Czech Rep. e-post: ECG@kbexpert.cz
Hrvatski
K+B Progres, a.s.
U Expertu 91 tel.: +420 272 122 111
250 69 Klíčany, Czech Rep. e-mail: informacije@kbprogres.cz
Bosanski
K+B Progres, a.s.
U Expertu 91 tel.: +420 272 122 111
250 69 Kličany, Czech Rep. e-mail: informacije@kbprogres.cz
Latviešu valoda
K+B Progres, a.s.
U Expertu 91 tel.: +420 272 122 111
250 69 Klíčany, Czech Rep. e-pasts: ECG@kbexpert.cz
Lietuvių kalba
K+B Progres, a.s.
U Expertu 91 tel.: +420 272 122 111
250 69 Kličany, Czech Rep. el. paštas: ECG@kbexpert.cz
Magyar
K+B Progres, a.s.
U Expertu 91 tel.: +420 272 122 111
250 69 Kličany, Czech Rep. e-mail: ECG@kbexpert.cz
Polski
K+B Progres, a.s.
U Expertu 91 tel.: +420 272 122 111
250 69 Kličany, Czech Rep. e-mail: ECG@kbexpert.cz
Română
K+B Progres, a.s.
U Expertu 91 tel.: +420 272 122 111
250 69 Klíčany, Czech Rep. e-mail: ECG@kbexpert.cz
Slovenčina

- TILTING LED TV WALL MOUNT
- DÖNTHETÖ LED TV TARTÓ
- UCHYLNY UCHWYT NA TELEWIZOR LED
- SUPPORT DE PERETE PENTRU TELEVIZOR CU LED CU ÎNCLINARE
- NAKLÁPACÍ DRŽIAK LED TV
- ZLOŽLJIV TV LED NOSILEC
- SAGIBLJIVI DRŽAČ ZA LED TELEVIZOR
- Read carefully and save for future use!
- DESCRIPTION
- ASSEMBLY
- - Assembling the wall plate and mounting brackets
- 2A - Concrete wall assembly
- 2B - Wooden crossbar assembly
- - Attaching the mounting brackets to the TV
- – Installing the brackets to the wall board
- TECHNICAL SPECIFICATIONS
- USE AND DISPOSAL OF WASTE
- DISPOSAL OF PRODUCTS AT THE END OF LIFETIME
- SICHERHEITSHINWEISE
- 2A – Montaža na betonsko steno
- BEZBEDNOSNA UPUTSTVA
- 2A – Montaža na betonski zid
- 2B - Montaža u drvenu pregradu
- – Pričvršćivanje konzola za montiranje na televizor
- Hrvatski
- Bosanski
- Latviešu valoda
- Lietuvių kalba
- Magyar
- Polski
- Română
- Slovenčina
Brand : ECG
Model : LD 326501
Category : TV Stand