PGI 1200 B2 - Generator PARKSIDE - Free user manual and instructions
Find the device manual for free PGI 1200 B2 PARKSIDE in PDF.

| Product type | Inverter generator |
| Brand | Parkside |
| Model | PGI 1200 B2 |
| Continuous power (S1) | 1000 W |
| Maximum power (S2 5s) | 1200 W |
| Output voltage | 230 V ~ (alternating current) |
| Rated current | 4.3 A |
| Frequency | 50 Hz |
| Engine type | 4-stroke, air-cooled |
| Displacement | 53.5 cm³ |
| Fuel | Unleaded petrol |
| Tank capacity | Approx. 4.5 L |
| Engine oil | 15W-40, approx. 0.25 L |
| Consumption (2/3 load) | Approx. 0.68 L/h |
| Weight | Approx. 13 kg |
| Protection rating | IP23M |
| Sound pressure level (LpA at 1 m) | 80.2 dB(A) |
| Guaranteed sound power level (LWA) | 95 dB(A) |
| Spark plug | TORCH A7RTC |
| Main functions | Manual start, Eco mode, overload protection, automatic low oil shutdown, inverter (stable output) |
| Maintenance | Oil change every 50 h, air filter cleaning, spark plug check every 20 h |
| Safety | Earthing mandatory, do not use in rain, ventilation required, stop engine before refueling |
| Warranty | 3 years (private use) |
| After-sales service France | 0800 919270 |
Frequently Asked Questions - PGI 1200 B2 PARKSIDE
User questions about PGI 1200 B2 PARKSIDE
0 question about this device. Answer the ones you know or ask your own.
Ask a new question about this device
Download the instructions for your Generator in PDF format for free! Find your manual PGI 1200 B2 - PARKSIDE and take your electronic device back in hand. On this page are published all the documents necessary for the use of your device. PGI 1200 B2 by PARKSIDE.
USER MANUAL PGI 1200 B2 PARKSIDE
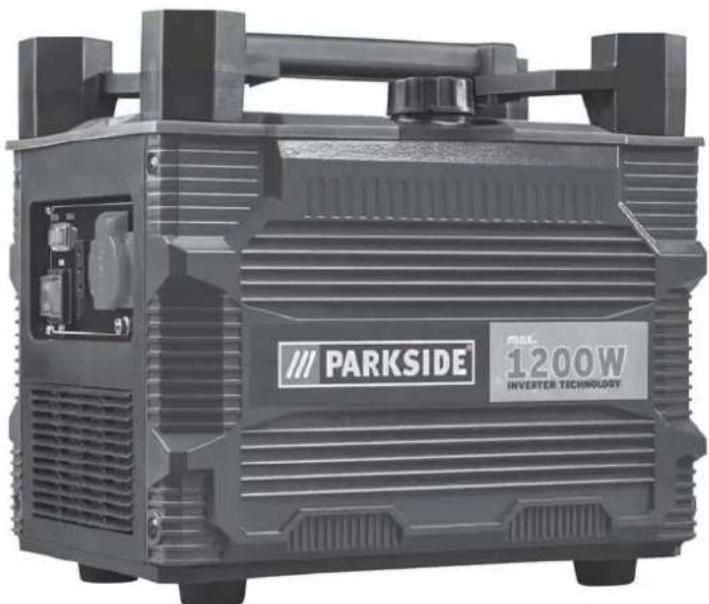
INVERTER-STROMERZEUGER, INVERTER GENERATOR, GROUPE ÉLECTROGÈNE INVERTER PGI 1200 B2
DE AT CH
INVERTER-STROMERZEUGER
Translation of the original instructions
WARNING! READ THE OPERATING INSTRUCTIONS BEFORE USING THE MACHINE/APPLIANCE.
NL BE
INVERTER-STROOMGENERATOR
Before reading, unfold both pages containing illustrations and familiarise yourself with all functions of the device.
FR BE
GB/IE Translation of the original instructions Page 11

natural_image
Line drawing of a funnel-shaped object with a handle and circular opening, labeled with number 20 (no text or symbols on the object itself)
natural_image
Line drawing of a screwdriver with a handle and spout, labeled with number 21 (no text or symbols on the object itself)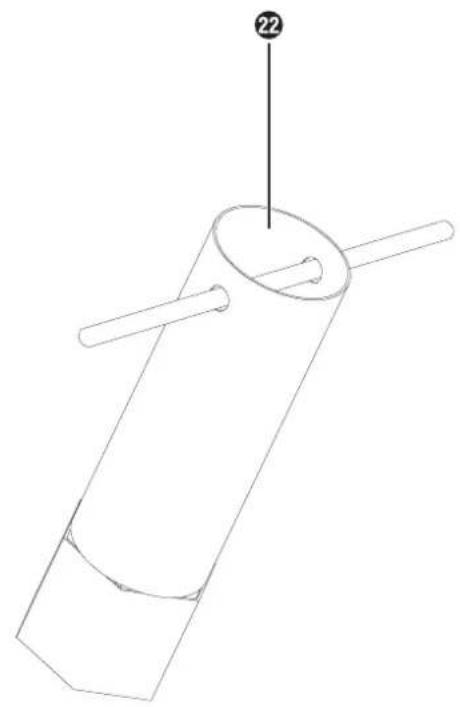
natural_image
3D diagram of a cylindrical object with two protruding rods and a labeled point (22), no text or symbols present.
natural_image
Black rectangular object with a numbered label '23' pointing to its top surface (no other text or symbols visible)Inhaltsverzeichnis
Einleitung 2
▶ Alternative Zündkerze: TORCH A7RTC
Benzinfilter:
HINWEIS
KOMPERNASS HANDELS GMBH
BURGSTRASSE 21
44867 BOCHUM
GERMANY
www.kompernass.com
Fehlerplan
Semi Uguzlu
Electrical safety 15
Earthing 15
Adding oil 15
Adding fuel 15
Use 16
Starting the engine 16
Load of the power generator....16
Turning the engine off 16
Overload protection 230 V \~ socket ....16
Eco mode 16
Cleaning and maintenance.... 16
Cleaning 16
Storage 17
Preparation for storage 17
Transport 17
Preparation for transport 17
Kompernass Handels GmbH warranty.... 18
Service....18
Importer.... 18
Troubleshooting.... 19
Maintenance schedule 19
Disposal 20
Ordering spare parts 20
Translation of the original Conformity Declaration 20
INVERTER GENERATOR PGI 1200 B2
Introduction
Congratulations on the purchase of your new appliance. You have chosen a high-quality product. The operating instructions are a part of this product. They contain important information about safety, usage and disposal.
Before using the product, please familiarise yourself with all operating and safety instructions. Use the product only as described and for the range of applications specified. Please also pass these operating instructions on to any future owner.

CAUTION!
A number of safety instructions must be observed when using appliances, in order to avoid injuries or damage. Therefore, read these operating instructions/safety instructions carefully.
We assume no liability for accidents or damages arising due to a failure to observe this manual and the safety instructions.
Intended use
This generator is suitable for appliances that require an AC supply of 230 V. For household appliance and electronic devices, please check the suitability according to the respective manufacturer's information. The machine may only be used in accordance with its designation. Any use beyond this is deemed as improper.
The user, not the manufacturer, is liable for any resulting damage or injuries of any kind. Please note that this appliance is not designed for commercial use according to its intended purpose. We accept no warranty liability if the appliance is used in commercial, manual trade or industrial operations or equivalent activities.
Hazard levels

DANGER!
▶ For an imminently dangerous situation which will result in serious bodily injury or death.

WARNING!
For a potentially dangerous situation which could result in serious bodily injury or death.

ATTENTION!
- Indicates a potentially dangerous situation that can result in minor injury.

CAUTION!
- Indicates a potentially dangerous situation that can result in property damage.
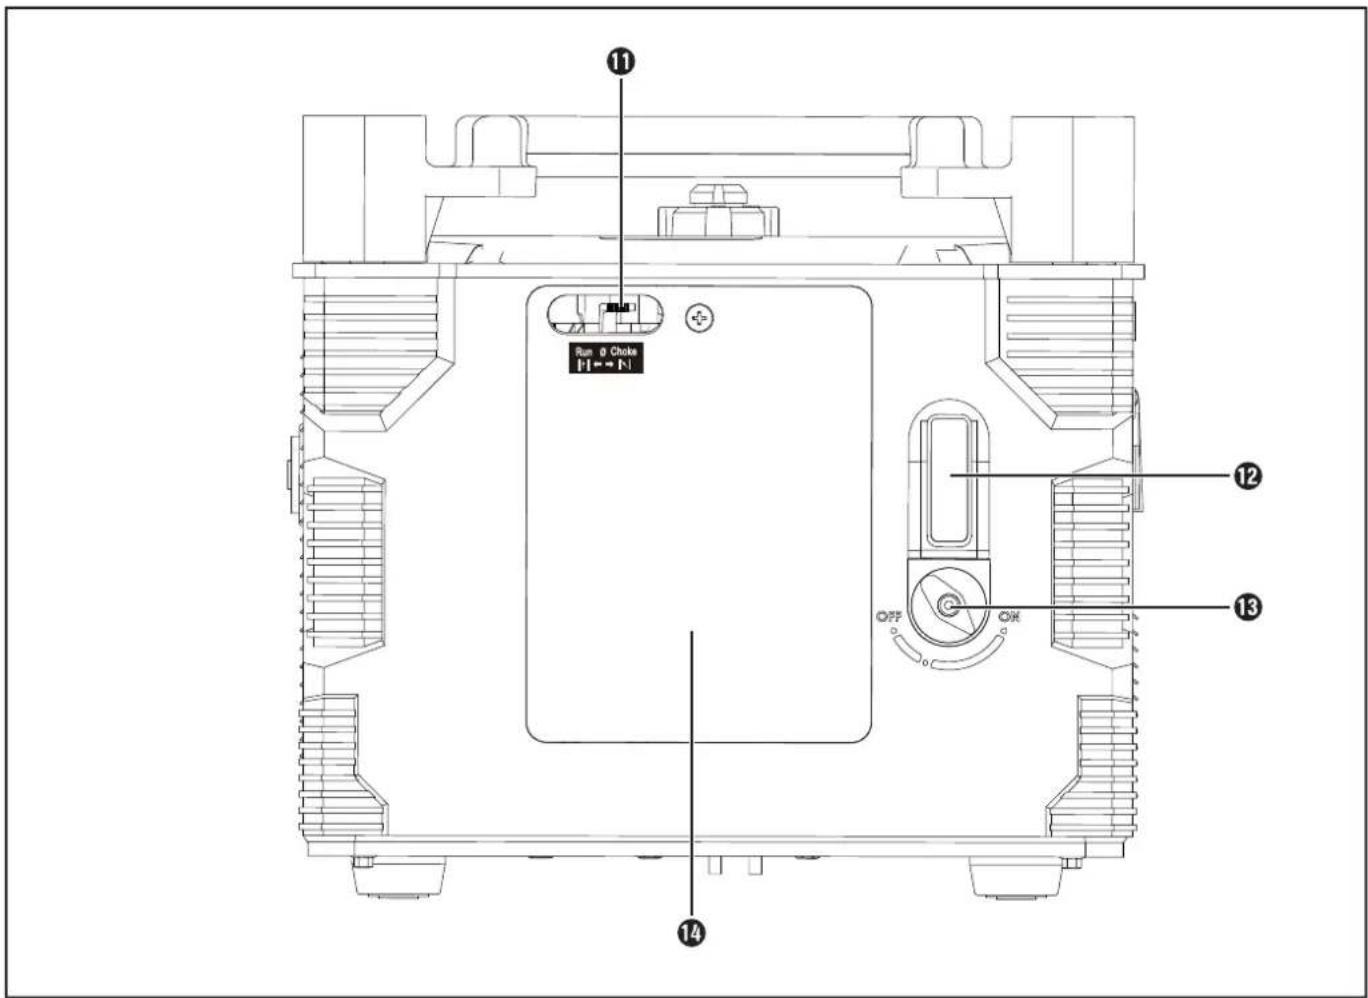
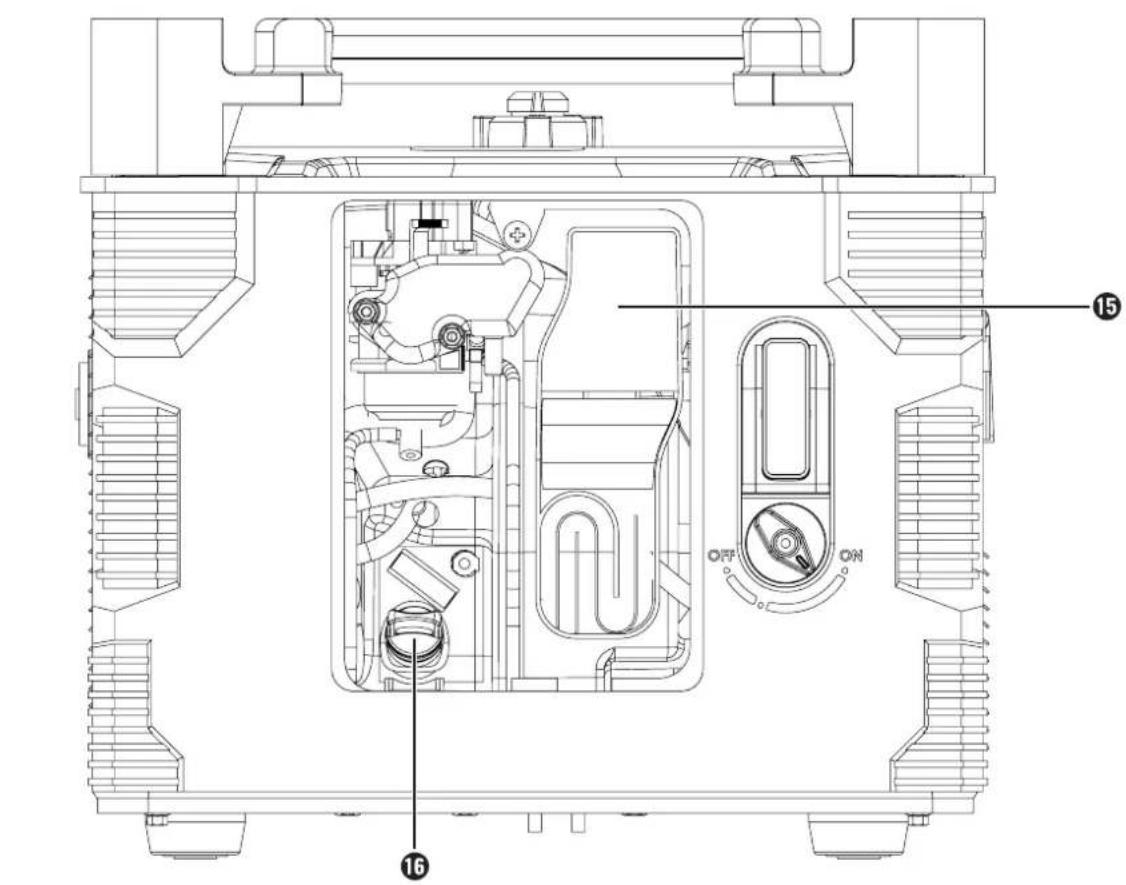
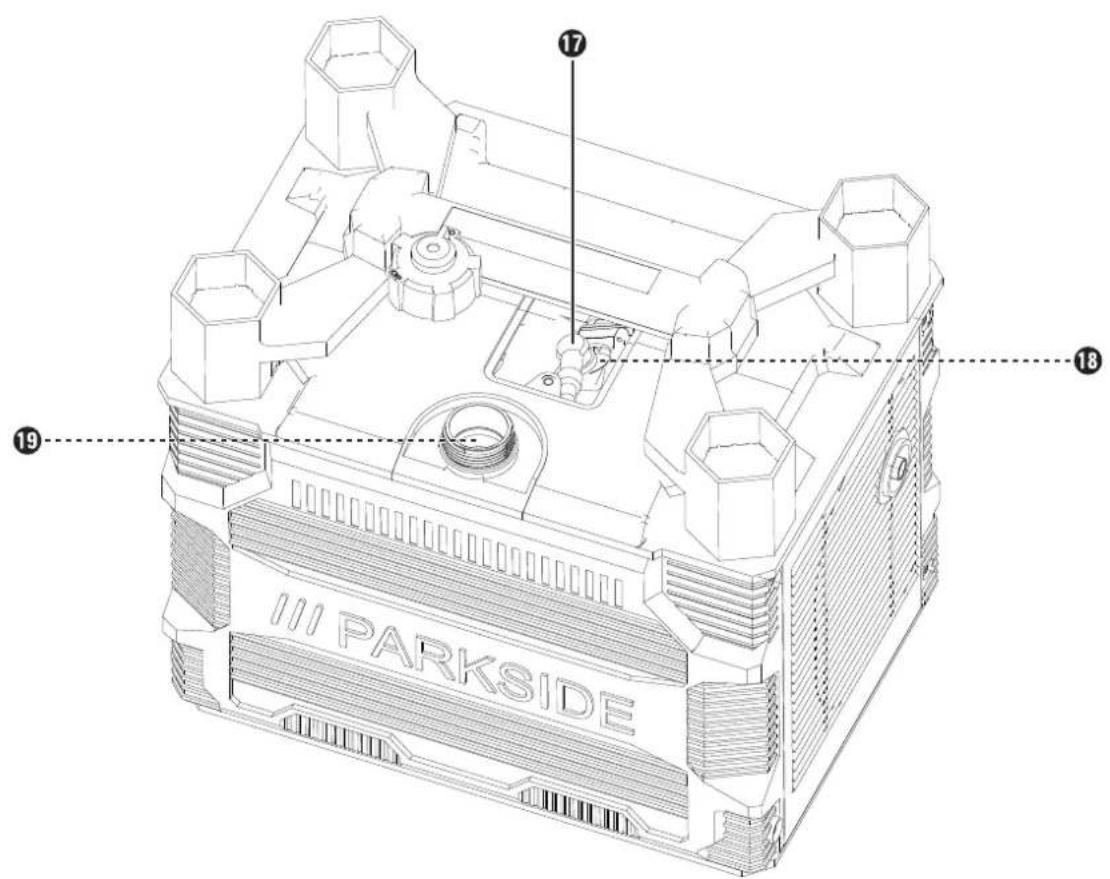
Appliance description
1 Handle
② Filler cap
3 230 V \~ socket
4 Earth connection
5 Stand
6 Operating light
⑦ Overload indicate
8 Low oil indicator
9 On/off switch
10 Eco mode switch
⑪ Choke lever
12 Starter pull cord
⑬ Fuel tap
14 Air filter cover
15 Air filter
16 Oil filling plug/dipstick
⑰ Spark plug connector
18 Spark plug
19 Fuel filter
20 Oil filler funnel
21 Screwdriver
22 Spark plug spanner
23 Tool bag
Package contents
1 inverter generator
1 oil filler funnel
1 spark plug spanner
1 screwdriver
1 tool bag
1 set of operating instructions
Technical data
| Inverter generator | |
| Protection class: IP23M | |
| Continuous output P_nom (S1): | 1000 W |
| Maximum output P_max (S2 5s): | 1200 W |
| Rated voltage U_nom : 230 V | ~(alternating current) |
| Rated current I_nom : 4.3 A | |
| Frequency F_nom : 50 Hz | |
| Engine type: 4-stroke air-cooled | |
| Cylinder capacity: 53.5 cm | ^3 |
| Maximum output (engine): 1.5 kW/2.04 hp | |
| Fuel: petrol | |
| Fuel tank capacity: approx. 4.5 l | |
| Engine oil: approx. 0.25 l (15W-40) | |
| Consumption at ^2/_3 load: approx. 0.68 l/h | |
| Weight: approx. 13 kg | |
| Sound pressure level L_pA(1m) : 8 | 0.2 dB(A) |
| Sound power level L_WA : | 95 dB(A) |
| Uncertainty K: | 2 dB |
| Power factor cos φ: | 1 |
| Performance class: G1 | |
| Quality class: | A |
| Spark plug: | TORCH A7RTC |
Operating mode S1 (continuous operation):
The machine can be operated continuously at the specified output level.
Operating mode S2 (short-term operation):
The machine can be operated for short periods (5 s) at the specified output level.
Permissible ambient temperature:
-10^ to +40^
Height: 1,000 m above sea level
Rel. humidity: 90% (non-condensing)
The following symbols are used in these operating instructions/ on the appliance:


Read this instruction manual. Before using the appliance, always check the corresponding section in the user manual.
Important. Hot parts. Keep your distance.
Important. Switch off the engine before topping up the fuel. Do not refuel while the engine is running.
Important. The exhaust gases are toxic. Do not operate the engine in unventilated spaces.
Wear hearing protection. Wear protective gloves.
Only for EU countries
Do not dispose of power tools in your normal domestic waste! In accordance with European Directive 2012/19/EU on Waste Electrical and Electronic Equipment and its implementation into national law, used power tools must be collected separately and recycled in an environmentally friendly manner.
Add oil before first use!
Remove the ignition cable before carrying out any maintenance work and read the instructions.
Do not expose the appliance to rain.
Sparks are created when starting the engine.
These could ignite any inflammable gases that are present nearby.
Open flames or smoking near the appliance is strictly prohibited!
Guaranteed sound power level of the appliance.
Open / Close
Add oil / Check oil level
Do not use the appliance if there is no oil visible in the oil tank.
Safety information
WARNING!
- Read all safety warnings and all instructions. Failure to follow the safety instructions and other instructions may result in electric shock, fire and/or serious injuries.
Save all warnings and instructions for future reference.
Before using the device for the first time, read the operating instructions and pay close attention to the safety instructions.
- The warning and safety signs on the appliance provide important information for safe operation.
–In addition to the notices in these operating instructions, all general safety and accident prevention legislation must also be complied with.
- Keep plastic wrapping away from children. There is a risk of suffocation!
■ No alterations or modifications may be made to the power generator.
■ The manufacturer's preset speed must not be changed. The generator or connected appliances could be damaged.
■ RISK OF POISONING! Exhaust gases, fuels and lubricants are toxic. Do not inhale exhaust gases.
■ FIRE RISK! Petrol and petrol vapours are highly inflammable/explosive.
■The power generator may not be used in unventilated spaces or in highly inflammable environments. If the power generator is to be used in well-ventilated rooms, the exhaust gases should be led directly out into the open via an exhaust hose.
■ Even when using an exhaust hose, toxic gases can still be released. Due to the risk of fire, the exhaust hose must never be aimed towards inflammable substances.
■ Never operate the power generator in rooms containing inflammable materials.
■ HOT SURFACES! Risk of burns. Do not touch the exhaust system or the drive unit.
■ Do not touch any of the moving or hot parts. Do not remove any protective covers.
■ PROTECTIVE EQUIPMENT! Use suitable hearing protection when you are in the vicinity of the appliance.
■ Only original parts may be used for maintenance and accessories.
■ Repairs, installation and adjustment work may only be carried out by authorised and qualified personnel.
■ Protect yourself from electrical hazards.
■ Never touch the power generator with wet hands. Use only suitably certified and labelled extension cords (H07RN) outdoors.
■ When using extension cords, their total length must never exceed 50 m for a 1.5-mm ^2 cord or 100 m for a 2.5-mm ^2 cord.
■ Never operate the power generator in rain or snow.
■ Always switch off the engine during transport and refuelling.
■ Ensure that no fuel is spilt onto the engine or exhaust pipe while refuelling.
■ Do not refuel or drain the tank in the vicinity of open lights, flame or sparks. Do not smoke!
■ Set up the power generator in a safe, level location. Turning, tipping or moving the appliance during operation is forbidden.
■ Set up the power generator at least 1 m away from walls or connected appliances.
- Keep children away from the power generator.
■ Generators can be loaded up to their rated power only under given operating conditions. If the generator is not operated under the conditions as described in ISO 8525 and if the engine or generator cooling is impaired, e.g. as a result of operation in confined spaces, the load must be reduced.
The load must be reduced if the temperature, altitude and/or humidity are higher than the specified operating conditions.
■ The values given in the technical data for sound power level (LWA) and sound pressure level (LpA) represent emission levels and are not necessarily safe working levels.
As there is a correlation between the emission and exposure levels, this cannot be used reliably to determine whether or not further precautions may be required. Factors that influence the current exposure levels of the worker include the characteristics of the room, other sources of noise, airborne noise, etc., such as the number of machines and other neighbouring processes and the period for which the operator is exposed to the noise. The permissible emission level can also vary from country to country. Nevertheless, this information allows the operator to arrive at a better assessment of the risks and hazards.
On a case-by-case basis, acoustic measurements should be carried out after installation to determine the sound pressure level.
■ If the use of highly volatile fuels as a starting aid is appropriate, then proceed with extreme caution.
■ Ensure that any connected electrical appliances (incl. power cord and plug connections) are not defective.
■ Some parts of the combustion engine are hot and can cause burns. Observe the warnings on the generator.
■ Do not refuel during operation. Do not refuel while someone is smoking nearby or if there are open flames in the vicinity.
■ During operation in well-ventilated rooms, additional measures must be taken to prevent fires and explosions.
CAUTION!
▶ Use only lead-free standard petrol as fuel.
▶ Stop the engine when refuelling.
Hot parts. Maintain a safe distance.
Before use
Electrical safety
Electrical cables and connected appliances must be in fault-free condition. Never connect the generator to the mains supply (socket). Keep the length of the cables to the consumer as short as possible.
Earthing
It is necessary to earth the housing to dissipate static charges.
To do so, connect one end of a cable to the earth connection ^4 on the power generator and the other end to an external earth connection.
CAUTION!
▶ Before first use, add engine oil (15W–40, approx. 0.25 l) and fuel (regular unleaded petrol). Check the fuel and engine oil levels; top up as necessary.
Provide adequate ventilation for the appliance. Ensure that the ignition cable is connected to the spark plug 18. Disconnect any electrical appliance that is connected to the power generator.
Adding oil
■ Check the oil level before each use.
- Do not use the appliance if there is no oil visible on the dipstick ^16 .
■ Add oil as required. Use only engine oil (15W-40).
◆ Place the appliance on a flat and stable surface.
◆ Use the supplied screwdriver ^21 to unscrew the side housing.
◆ Remove all dirt from around the oil filling plug/dipstick ^16 .
◆ Unscrew the oil filling plug ^16 .
Use the supplied oil filler funnel ^20 to add 0.25l engine oil (15W-40).
◆ Use the dipstick ^16 to measure the oil level.
Unscrew the dipstick 16 and wipe it clean with a cloth. Put the dipstick 16 back into the oil inlet without screwing it in. Pull the dipstick 18 back out and check the oil level.
Check that the oil level is somewhere between the minimum and maximum levels (marked as L for low and H for high on the dipstick 16).
♦ Screw the oil filling plug ^16 back on.
Adding fuel
CAUTION!
▶ Keep away from any sources of ignition!
▶ Refuel only in well-ventilated rooms or outside!
♦ Unscrew the filler cap ^2 .
Using the filler neck, add a maximum of 4.5l unleaded petrol to the tank. Make sure that you do not overfill the tank and do not spill any petrol. Use a fuel filter 19.
◆ Wipe up any spilt petrol and wait until the petrol fumes have dissipated. RISK OF IGNITION!
♦ Replace the filler cap ^2 .
Use
Starting the engine
CAUTION!
- When starting using the starter pull cord ^12 , there can be a kickback that can cause injuries to your hand.
▶ Wear protective gloves when starting.
♦ Turn the fuel tap ^13 downwards to open it.
◆ Set the On/Off switch9 into the "ON" position.
◆ Move the choke lever⑪ into the right position.

♦ Start the engine with the starter pull cord ^12 Pull firmly on the handle to do this.
If the engine does not start, pull the handle again.
After starting the engine, move the choke lever back into the left position.
Load of the power generator
◆ Connect appliances to the 230 V \~ socket ^3
CAUTION!
This socke3 can support a continuous load (S1) of 1000 W or a short-term load (S2) of 1200 W for max. 5 seconds.
NOTE
▶ Some electrical appliances (jigsaws, drills, etc.) may have a higher power consumption when working under difficult conditions.
Turning the engine off
◆ Run the power generator for a short while without load before you switch it off so that the appliance can cool down.
♦ Set the On/Off switch9 into the "OFF" position.
◆ Close the fuel tap ^13 by turning to position "OFF".
Overload protection 230 V \~ socket
NOTE
▶ The power generator is equipped with an overload protection device.
■ The overload protection switches off the socke3.
■ The red overload indicator ^7 starts flashing when the appliance is overloading.
■ Switching off the engine and restarting it can reactivate the socke3 after the overload protection has been triggered (see "Turning the engine off" and "Starting the engine").
CAUTION!
▶ If this occurs, reduce the electrical output that you take from the power generator or remove defective appliances that are connected. The red overload indicator 7 lights up.
CAUTION!
▶ Defective overload switches may only be replaced by overload switches of identical design and which have the same performance data. Contact customer service for this purpose.
Eco mode
Eco mode is useful for reducing fuel consumption.
■ Eco: In eco mode, the engine speed is lowered and thus fuel consumption reduced.
■ MAX: The full engine speed is used.
Cleaning and maintenance
CAUTION!
▶ Switch off the engine and pull the spark plug connector ^17 off the spark plug ^18 before all cleaning and maintenance work.
▶ Switch off the appliance immediately and contact your customer service hotline:
- If you notice unusual vibrations or noises.
- If the engine seems overloaded or misfires.
Cleaning
- Keep all protective equipment, air vents and the engine housing as free of dust and dirt as possible. Wipe the appliance with a clean cloth or blow it out with low-pressure compressed air.
■ We recommend cleaning the appliance after every use.
■ Clean the appliance regularly with a damp cloth and a little soft soap. Do not use any cleaning agents or solvents as these can damage the plastic surfaces of the appliance. Make sure that no water can penetrate into the interior of the appliance.
Air filter:
■ Clean the air filter ^15 regularly; replace if necessary.
■ Open the air filter cover ^14 by removing the crosshead screw.
■ Remove the air filter ^15 .
■ Do not use any aggressive cleaning agents or petrol to clean the air filter 15
■ Clean the elements by knocking them out on a flat surface. In the event of severe soiling, wash with a soap solution and then rinse in clear water and allow to dry.
■ Assembly is done in the reverse order.
Spark plug:
Check the spark plug ^18 for contamination after the first 20 hours of operation and clean it with a copper wire brush if required. Afterwards, service the spark plug ^18 after every 50 hours of operation.
♦ Pull off the spark plug connector ^17 with a twisting motion.
◆ Remove the spark plug ^18 with the supplied spark plug spanner ^22
◆ Assembly is done in the reverse order.
NOTE
▶ Alternative spark plug: TORCH A7RTC
Fuel filter:
NOTE
The fuel filter 19 is a filter cup that is located directly under the filler cap 2 and filters all fuel that is added.
♦ Set the On/Off switch⑨ into the "OFF" position.
◆ Open the filler cap②.
◆ Remove the fuel filter ^19 and clean it using a non-flammable solvent.
♦ Replace the fuel filter ^19 .
◆ Close the filler cap ^2 .
Oil change:
The engine oil should be changed with the engine at operating temperature.
◆ Use only engine oil (15W-40).
- Open the oil filling plug ^16 and drain the warm engine oil into a collection container by tilting the generator.
♦ Top up with new engine oil (approx. 0.25 l).
◆ Close the oil filling plug ^16 .
◆ Place the generator back on a stable, flat surface.
Automatic oil switch-off:
The automatic oil switch-off is triggered when there is too little engine oil. The low oil indicator 8 starts flashing if there is too little oil in the engine. The control lamp lights up when the oil quantity has fallen below the safety limit. After a short while, the engine switches off automatically. A restart is only possible after the oil has been topped up (see section "Oil change").
Storage
Preparation for storage
◆ Empty the fuel tank using a petrol suction pump.
WARNING!
- Do not remove the fuel in closed rooms, in the vicinity of fire or while smoking. Gas vapours can cause explosions or fire.
- Start the engine and leave it running until the remaining petrol has been used up.
Change the oil after every season (see section "Maintenance schedule"). To do this, drain the old engine oil from the warm engine and refill with new oil.
Remove the spark plug18. Use an oil can to fill approx. 20 ml oil in the cylinder. Pull the starter pull cord 12 slowly so that the oil coats the inside of the cylinder. Screw the spark plug 11 back in.
◆ Store the appliance in a well-ventilated location.
Transport
Preparation for transport
◆ Empty the fuel tank using a petrol suction pump.
- If operational, allow the engine to run until the remaining petrol is used up.
♦ Remove the engine oil from the warm engine (see section "Cleaning and maintenance").
◆ Remove the spark plug connector ^17 from the spark plug ^18
◆ Secure the appliance against slipping using securing straps.
◆ Transport the appliance holding it by its handle①.
This appliance has a 3-year warranty valid from the date of purchase. If this product has any faults, you, the buyer, have certain statutory rights. Your statutory rights are not restricted in any way by the warranty described below.
Warranty conditions
The validity period of the warranty starts from the date of purchase. Please keep your original receipt in a safe place. This document will be required as proof of purchase.
If any material or production fault occurs within three years of the date of purchase of the product, we will either repair or replace the product for you at our discretion. This warranty service is dependent on you presenting the defective appliance and the proof of purchase (receipt) and a short written description of the fault and its time of occurrence.
If the defect is covered by the warranty, your product will either be repaired or replaced by us. The repair or replacement of a product does not signify the beginning of a new warranty period.
Warranty period and statutory claims for defects
The warranty period is not prolonged by repairs effected under the warranty. This also applies to replaced and repaired components. Any damage and defects present at the time of purchase must be reported immediately after unpacking. Repairs carried out after expiry of the warranty period shall be subject to a fee.
Scope of the warranty
This appliance has been manufactured in accordance with strict quality guidelines and inspected meticulously prior to delivery.
The warranty covers material faults or production faults. The warranty does not extend to product parts subject to normal wear and tear or fragile parts such as switches, batteries, baking moulds or parts made of glass.
The warranty does not apply if the product has been damaged, improperly used or improperly maintained. The directions in the operating instructions for the product regarding proper use of the product are to be strictly followed. Uses and actions that are discouraged in the operating instructions or which are warned against must be avoided.
This product is intended solely for private use and not for commercial purposes. The warranty shall be deemed void in cases of misuse or improper handling, use of force and modifications / repairs which have not been carried out by one of our authorised Service centres.
Warranty claim procedure
To ensure quick processing of your case, please observe the following instructions:
■ Please have the till receipt and the item number (e.g. IAN 12345) available as proof of purchase.
- You will find the item number on the type plate, an engraving on the front page of the instructions (bottom left), or as a sticker on the rear or bottom of the appliance.
If functional or other defects occur, please contact the service department listed either by telephone or by e-mail.
■ You can return a defective product to us free of charge to the service address that will be provided to you. Ensure that you enclose the proof of purchase (till receipt) and information about what the defect is and when it occurred.
NOTE
For Parkside and Florabest tools, please send us only the defective item without the accessories (e.g. battery, storage case, assembly tools, etc.).

You can download these instructions along with many other manuals, product videos and software on www.lidl-service.com.
Service

Service Great Britain
Tel.: 0871 5000 720 (£ 0.10/Min.)
E-Mail: kompernass@lidl.co.uk
IAN 281598
Importer
Please note that the following address is not the service address. Please use the service address provided in the operating instructions.
KOMPERNASS HANDELS GMBH
BURGSTRASSE 21
44867 BOCHUM
GERMANY
www.kompernass.com
Troubleshooting
| Fault Cause Measure | ||
| Engine cannot be started. Automatic oil switch-off activates. Check oil level, add engine oil. | ||
| No fuel. | Add fuel / check fuel tap 13. | |
| Generator has too little or no voltage. Electronics defective. Contact specialist retailer. | ||
Maintenance schedule
The following maintenance schedule must be complied with to ensure trouble-free operation.
CAUTION!
▶ Before first use, engine oil and fuel must be filled in.
| Before every use after 20 hours of operation | after 50 hours of operation | after 100 hours of operation | after 300 hours of operation | |
| Check the engine oil | X | |||
| Change the engine oil | for the first time, and then every 50 hours | X | ||
| Check the air filter 15 | X | replace filter pad if necessary | ||
| Clean the air filter 15 | X | |||
| Clean the fuel filter 19 | X | |||
| Visual inspection of the appliance | X | |||
| Clean the spark plug 18 | Gap: 0.6 mm, replace if necessary | |||
| Check and adjust the throttle valve | X* | |||
| Clean the cylinder head | X* | |||
| Set the valve clearance | X* |
ATTENTION: Points marked "X*" may only be carried out by an authorised specialist workshop.
Disposal

The packaging is made from environmentally friendly mater and can be disposed of at your local recycling plant. The appliance and its accessories are made from various materials, such as metal and plastic.
Your local community or municipal authorities can provide information on how to dispose of the appliance.

it dispose of electrical appliances in household waste!
In accordance with European Guideline 2012/19/EU, worn-out electrical appliances must be collected separately and recycled in an environmentally compatible manner. Your local community or municipal authorities can provide information on how to dispose of the appliance.
Environmental protection
- Carefully empty the petrol and oil tank and dispose of your appliance at a recycling plant. The plastic and metal parts used can be separated and recycled.
■ Dispose of waste oil and petrol at a waste collection centre and do not dump these into the sewerage or drainage system.
■ Dispose of contaminated maintenance material and working materials at a collection point provided for this purpose.
■ Remaining fuel must not be poured out, but must be stored or disposed of properly. Contact the waste management office of your local community or municipal authorities for information on proper fuel disposal and disposal of your appliance.
Ordering spare parts
Ordering spare parts
The following information should be provided when ordering spare parts:
■ Type of appliance
■ Item number of the appliance
Current price and information is available on
www.kompernass.com
■ Use only spare parts that have been approved by the manufacturer. Original spare parts and accessories offer a better guarantee that the appliance can be operated safely and reliably.
NOTE
▶ Replacement parts can be ordered directly from the service centre. Please provide the following details when making an order: machine type and item number.
Translation of the original Conformity Declaration
We, KOMPERNASS HANDELS GMBH, document officer:
Mr. Semi Uguzlu, BURGSTR. 21, 44867 BOCHUM, GERMANY, hereby declare that this appliance complies with the following standards, normative documents and EC directives:
Machinery directive (2006/42/EC)
EMC (Electromagnetic Compatibility) (2014/30/EU)
Directives on noise emission (2000/14/EC) (2005/88/EC)
Notified body: No. 0036
TÜV SÜD Industrie Service GmbH, Westendstraße 199, 80686 Munich, Germany Evaluation procedure for conformity as per appendix VI.
Sound power level LWA:
Measured: 92.9 dB(A)
Guaranteed: 95 dB(A)
Directive on exhaust emissions (2012/46/EU)
RoHs directive (2011/65/EU) \*
*The manufacturer bears the full responsibility for compliance with this conformity declaration. The object of the declaration described above complies with the requirements of Directive 2011/65/EU of the European Parliament and Council of 8 June 2011 on the limitations of use of certain dangerous substances in electrical and electronic appliances.
Applied harmonised standards:
EN 12601:2010
EN 55012:2007/A1:2009
EN 61000-6-1:2007
Type/appliance designation:
Inverter generator PGI 1200 B2
Year of manufacture: 11 - 2016
Serial number: IAN 281598
Bochum, 27/10/2016

Semi Uguzlu
- Quality Manager -
We reserve the right to make technical changes in the context of further product development.
Table des matières
Introduction 22
KOMPERNASS HANDELS GMBH
BURGSTRASSE 21
44867 BOCHUM
GERMANY
www.kompernass.com
Dépannage
Directive relative aux machines (2006/42/EC)
Semi Uguzlu
KOMPERNASS HANDELS GMBH
BURGSTRASSE 21
44867 BOCHUM
GERMANY
www.kompernass.com
Storingen oplossen
KOMPERNASS HANDELS GMBH
BURGSTRASSE 21
44867 BOCHUM
GERMANY
www.kompernass.com
Přehled poruch
KOMPERNASS HANDELS GMBH
BURGSTRASSE 21
44867 BOCHUM
GERMANY
www.kompernass.com
Plan de errores
KOMPERNASS HANDELS GMBH
BURGSTRASSE 21
44867 BOCHUM
GERMANY
www.kompernass.com
Plano de falhas
KOMPERNASS HANDELS GMBH
BURGSTRASSE 21
44867 BOCHUM
DEUTSCHLAND / GERMANY
www.kompernass.com
Stand der Informationen · Last Information Update · Version des informations
Stand van de informatie · Stav informací · Estado de las informaciones