
Power+ IF1600E - Cordless inflator EGO - Free user manual and instructions
Find the device manual for free Power+ IF1600E EGO in PDF.

User questions about Power+ IF1600E EGO
0 question about this device. Answer the ones you know or ask your own.
Ask a new question about this device
Download the instructions for your Cordless inflator in PDF format for free! Find your manual Power+ IF1600E - EGO and take your electronic device back in hand. On this page are published all the documents necessary for the use of your device. Power+ IF1600E by EGO.
USER MANUAL Power+ IF1600E EGO
natural_image
Line drawing of a power camera with control panel and display (no text or symbols)IF1600E
56 VOLT LITHIUM-ION CORDLESS INFLATOR
EN 56V lithium-ion cordless inflator 4
natural_image
Technical line drawing of a mechanical component with an arrow indicating a downward motion (no text or symbols present)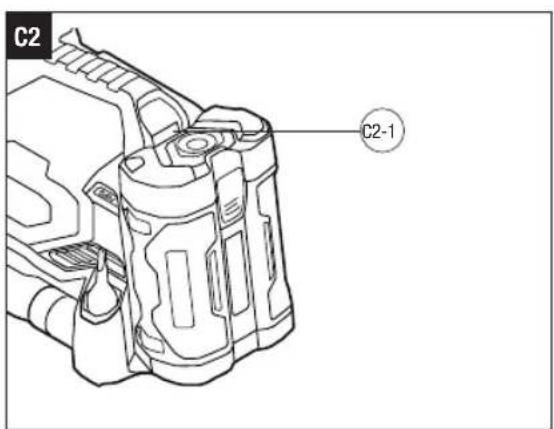
The Anchorage, 34 Bridge Street Reading, RG1 2LU, United Kingdom
READ ALL INSTRUCTIONS!

READ OPERATOR'S MANUAL
WARNING: To ensure safety and reliability, all repairs should be performed by a qualified service technician.
SAFETY SYMBOLS
The purpose of safety symbols is to attract your attention to possible dangers. The safety symbols and the explanations with them deserve your careful attention and understanding. The symbol warnings do not, by themselves, eliminate any danger. The instructions and warnings they give are no substitutes for proper accident prevention measures.
WARNING: Be sure to read and understand all safety instructions in this Operator's Manual, including all safety alert symbols such as "DANGER", "WARNING", and "CAUTION" before using this machine. Failure to follow all instructions listed below may result in electric shock, fire, and/or serious personal injury.
SYMBOL MEANING
SAFETY ALERT SYMBOL: Indicates DANGER, WARNING or CAUTION, may be used in conjunction with other symbols or pictographs.
SAFETY INSTRUCTIONS
This page depicts and describes safety symbols that may appear on this product. Read, understand, and follow all instructions on the machine before attempting to assemble and operate.

Safety Alert
CE This product is in accordance with applicable EC directives.

To reduce the risk of injury, user must read the operator's manual.
UK Conformity Assessed

Do not stare into the light beam.
Waste electrical products should not be disposed of with household waste. Take to an authorized recycler.
V Voltage
Direct Current
L Liter kg Kilogram
°C Celsius L/min Litres per Minute

Do not use in the rain or leave outdoors while it is raining.
Wear Ear Protection - Always wear ear protection when operating this product.
GENERAL POWER TOOL SAFETY WARNINGS
WARNING: READ ALL SAFETY WARNINGS, INSTRUCTIONS, ILLUSTRATIONS AND SPECIFICATIONS PROVIDED WITH THIS POWER TOOL. Failure to follow all instructions listed below may result in electric shock, fire and/or serious injury.
SAVE ALL WARNINGS AND INSTRUCTIONS FOR FUTURE REFERENCE.
The term "power tool" in the warnings refers to your mains-operated (corded) power tool or battery-operated (cordless) power tool.
WORK AREA SAFETY
- Keep work area clean and well lit. Cluttered or dark areas invite accidents.
- Do not operate power tools in explosive atmospheres, such as in the presence of flammable liquids, gases or dust. Power tools create sparks which may ignite the dust or fumes.
- Keep children and bystanders away while operating a power tool. Distractions can cause you to lose control.
ELECTRICAL SAFETY
■ Power tool plugs must match the outlet. Never modify the plug in any way. Do not use any adapter plugs with earthed (grounded) power tools. Unmodified plugs and matching outlets will reduce risk of electric shock.
■ Avoid body contact with earthed or grounded surfaces, such as pipes, radiators, ranges and refrigerators. There is an increased risk of electric shock if your body is earthed or grounded.
■ Do not expose power tools to rain or wet conditions. Water entering a power tool will increase the risk of electric shock.
- Do not abuse the cord. Never use the cord for carrying, pulling or unplugging the power tool. Keep cord away from heat, oil, sharp edges or moving parts. Damaged or entangled cords increase the risk of electric shock.
- When operating a power tool outdoors, use an extension cord suitable for outdoor use. Use of a cord suitable for outdoor use reduces the risk of electric shock.
- If operating a power tool in a damp location is unavoidable, use a Ground-fault circuit interrupter protected supply. Use of GFCI reduces the risk of electric shock.
PERSONAL SAFETY
■ Stay alert, watch what you are doing and use common sense when operating a power tool. Do not use a power tool while you are tired or under the influence of drugs, alcohol medication. A moment of inattention while operating power tools may result in serious personal injury.
■ Use personal protective equipment. Always wear eye protection. Protective equipment such as a dust mask, non-skid safety shoes, hard hat or hearing protection used for appropriate conditions will reduce personal injuries.
■ Prevent unintentional starting. Ensure the switch is in the off-position before connecting to power source and/or battery pack, picking up or carrying the tool. Carrying power tools with your finger on the switch or energizing power tools that have the switch on invites accidents.
■ Remove any adjusting key or wrench before turning the power tool on. A wrench or a key left attached to a rotating part of the power tool may result in personal injury.
■ Do not overreach. Keep proper footing and balance at all times. This enables better control of the power tool in unexpected situations.
■ Dress properly. Do not wear loose clothing or jewellery. Keep your hair, clothing away from moving parts. Loose clothes, jewellery or long hair can be caught in moving parts.
- If devices are provided for the connection of dust extraction and collection facilities, ensure these are connected and properly used. Use of dust devices can reduce dust-related hazards.
- Do not let familiarity gained from frequent use of tools allow you to become complacent and ignore tool safety principles. A careless action can cause severe injury with a fraction of a second.
POWER TOOL USE AND CARE
- Do not force the power tool. Use the correct power tool for your application. The correct power tool will do the job better and safer at the rate for which it was designed.
- Do not use the power tool if the switch does not turn it on and off. Any power tool that cannot be controlled with the switch is dangerous and must be repaired.
EN
三GO
- Disconnect the plug from the power source and/or the battery pack from the power tool before making any adjustments, changing accessories, or storing power tools. Such preventive safety measures reduce the risk of starting the power tool accidentally.
■ Store idle power tools out of the reach of children and do not allow persons unfamiliar with the power tool or these instructions to operate the power tool. Power tools are dangerous in the hands of untrained users. - Maintain power tools and accessories. Check for misalignment or binding of moving parts, breakage of parts and any other condition that may affect the power tools operation. If damaged, have the power tool repaired before use. Many accidents are caused by poorly maintained power tools.
- Keep cutting tools sharp and clean. Properly maintained cutting tools with sharp cutting edges are less likely to bind and are easier to control.
- Use the power tool, accessories and tool bits etc. in accordance with these instructions, taking into account the working conditions and the work to be performed. Use of the power tool for operations different from those intended could result in a hazardous situation.
- Keep handles and grasping surfaces dry, clean and free from oil and grease. Slippery handles and grasping surfaces do not allow for safe handling and control of the tool in unexpected situations.
BATTERY TOOL USE AND CARE
■ Recharge only with the charger specified by the manufacturer. A charger that is suitable for one type of battery pack may create a risk of fire when used with another battery pack.
■ Use power tools only with specifically designated battery packs. Use of any other battery packs may create a risk of injury and fire.
- When battery pack is not in use, keep it away from other metal objects, like paper clips, coins, keys, nails, screws or other small metal objects, that can make a connection from one terminal to another. Shorting the battery terminals together may cause burns or a fire.
■ Under abusive conditions, liquid may be ejected from the battery; avoid contact. If contact accidentally occurs, flush with water. If liquid contacts eyes, additionally seek medical help.
Liquid ejected from the battery may cause irritation or burns.
■ Do not use a battery pack or tool that is damaged
or modified. Damaged or modified batteries may exhibit unpredictable behavior resulting in fire, explosion or risk of injury.
■ Do not expose a battery pack or tool to fire or excessive temperature. Exposure to fire or temperature above 130°C may cause explosion.
- Follow all charging instructions and do not charge the battery pack or tool outside the temperature range specified in the instructions. Charging improperly or at temperatures outside the specified range may damage the battery and increase the risk of fire.
SERVICE
■ Have your power tool serviced by a qualified repair person using only identical replacement parts.
This will ensure that the safety of the power tool is maintained.
■ Never service damaged battery packs. Service of battery packs should only be performed by the manufacturer or authorized service providers.
INFLATOR SAFETY WARNINGS
■ Children should be supervised to ensure that they do not play with the appliance.
■ Do not expose the appliance or battery to excessive temperatures.
■ Be aware of the risk of terminals of the battery-operated appliance or battery being short-circuited by metal objects.
■ Rechargeable batteries are to be removed from the appliance before being charged.
■ Different types of batteries or new and used batteries are not to be mixed.
■ Exhausted batteries are to be removed from the appliance and safely disposed of.
■ If the appliance is to be stored unused for a long period, the batteries should be removed.
■ Do not use non-rechargeable batteries in place of rechargeable batteries.
■ Do not use modified or damaged batteries.
■ Use only with the specified battery packs and chargers
SAVE THESE INSTRUCTIONS. Refer to them frequently and use them to instruct others who may use this machine. If you lend someone this machine, lend them these instructions also to prevent misuse of the product and possible injury.
EN
SPECIFICATIONS
| Voltage 56 V | --- | |
| High Pressure Mode - Maximum Pressure | 11 Bar | |
| LED Light | Rated Input Voltage 5V 1A | |
| Recommended Discharging Temperature | -20°C - 45°C | |
| Recommended Charging Temperature | 0°C - 45°C | |
| Weight (without battery pack) 2.8 kg | ||
| Recommended Operating Temperature | -5°C - 40°C | |
| Recommended Storage Temperature | -20°C - 70°C | |
| Measured sound power level L_WA | 95 dB(A)K=3 dB(A) | |
| Sound pressure level L_PA | 83 dB(A)K=3 dB(A) | |
PACKING LIST (FIG. A1)
DESCRIPTION
KNOW THE INFLATOR (Fig. A1)
- Air Vent
- High-Pressure Hose
- High-Volume Hose
- High-Volume Inflation Port
- Handle
- LCD Screen
- Switch Button
- High-Pressure Adjustment Buttons
- Memory Mode Button
- Start/Stop Button
- Power Button
- LED Light
- LED Light Indicator
- Light Color Adjustment Button
- Light On/Off Button
- Light Brightness Adjustment Buttons
- Light Hook
- Magnet Surface
- Battery-Release Button
-
High-Volume Hose Nozzle
-
High-Volume Deflation Port
- High-Pressure Adapter Storage Compartment
- Sport Needle Adapter
- Tapered Adapter
- Presta Valve Adapter
KNOW THE LCD SCREEN (Fig. A2)
- Memory Mode Indicators
- High-Volume Mode Indicator
- Over Temperature Alert
- Fault Warning
- Low Power Alert
- Preset Pressure Indicator
- Pressure Unit Indicator
- Working Status Indicator
- Actual Pressure Indicator
ASSEMBLY
INSTALLING NOZZLE/ADAPTER
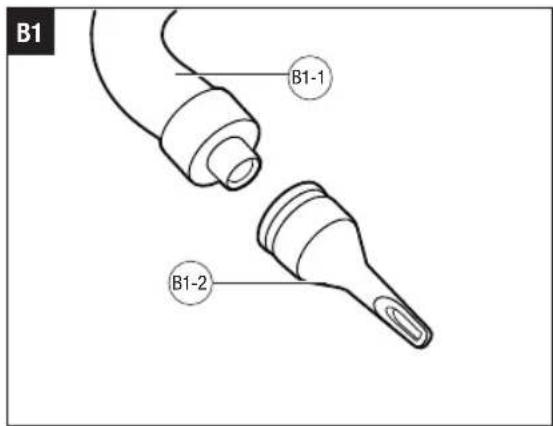
To Install High-Volume Hose Nozzle (Fig. B1)
- Remove the high-volume hose from its storage slot under the inflator, and insert one end of the hose into the inflation or deflation port according to intended use.
- Insert the nozzle into the other end of the hose until it stops.
| B1-1 | High-Volume Hose B1-2 | High-Volume Hose Nozzle |
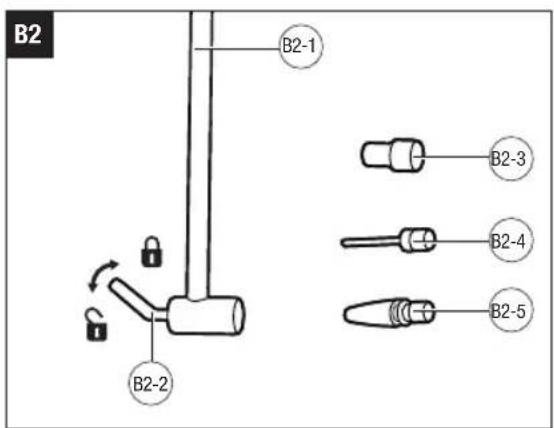
To Install High-Pressure Hose Adapter (Fig. B2)
- Remove the high-pressure hose from its storage slot on the side of the inflator.
- Raise the clamp lever of the hose to the released (unlocked) position.
- Insert desired hose adapter into the end of the hose.
- Press the lever clamp to the locked position so that the adapter is securely installed in place.
- To remove the adapter, raise the clamp lever and remove the adapter.
| B2-1 | High-Pressure Hose B | 2-2 Clamp Lever | |
| B2-3 | Presta Valve Adapter | B2-4 | Sport Needle Adapter |
| B2-5 | Tapered Adapter | ||
EN
OPERATION
APPLICATION
You may use this product for the purposes listed below:
■ Inflate items using the high-volume inflation port/hose ^4 or high-pressure hose.
■ Deflate items using the high-volume deflation port.
ATTACHING/DETACHING THE BATTERY PACK
Use only with EGO's battery packs and chargers listed in Fig. A3.
Refer to corresponding battery packs and chargers manuals for more details.
Fully charge before first use.
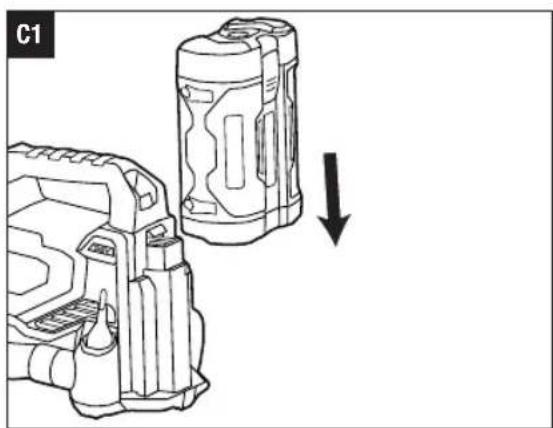
To attach (Fig. C1)
Align the battery ribs with the mounting slots on the inflator and slide the battery pack onto the inflator until you hear a "click".
To Detach (Fig. C2)
Depress the battery-release button and pull the battery pack out.
| C2-1 | Battery-Release Button |
STARTING/STOPPING THE INFLATOR
WARNING: Do not use the product if it cannot be turned on and off by button. Any product that cannot be controlled with button is dangerous and must be repaired.
WARNING: To avoid the risk of bursting, never leave the product unattended during operation. In case the product cannot stop running or other emergency occurs, remove the battery pack immediately and contact EGO customer service for help.
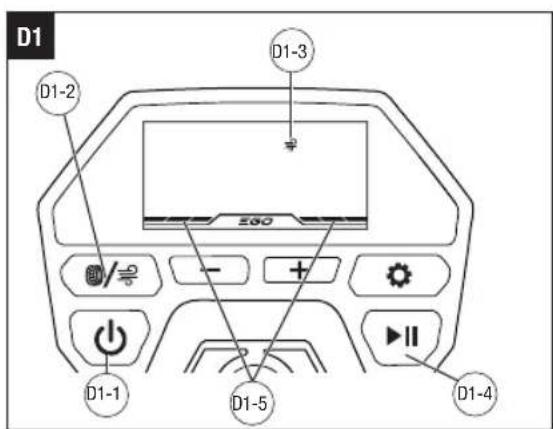
To Inflate/Deflate Using High-Volume (Fig. D1)
The high-volume mode is used for items that hold large amounts of air, such as mattresses, rafts, and swimming pool floats.
NOTE: When in high-volume mode, the inflator will turn off after working for 10 minutes continuously. Press the power button to restart the inflator, if needed.
- Remove the high-volume hose from its storage slot under the inflator.
- Make sure the high-volume hose is securely inserted
into the desired inflation or deflation port, and disconnect the high-volume hose from the other port.
- Install the high-volume hose nozzle onto the hose, if needed.
- Attach the high-volume hose, or its nozzle, to the item being inflated or deflated.
- Install the battery pack onto the inflator.
- Press the power button to power up the inflator.
- Press the switch button to select high-volume mode. The high-volume mode indicator will display on the LCD screen.
- Press the start/stop button to start inflation or deflation. The working status indicator will display in running style on the LCD screen.
| D1-1 | Power Button D1-2 Switch Button | ||
| D1-3 | High-Volume Mode Indicator | D1-4 | Start/Stop Button |
| D1-5 | Working Status Indicator | ||
To Inflate Using High-Pressure (Fig. D2)
The high-pressure mode is used for items that need more air pressure, such as tires and basketballs.
NOTE: When in high-pressure mode, the inflator will automatically stop working when the preset pressure value is reached.
- Remove the high-pressure hose from its storage slot on the side of the inflator.
- Attach the desired adapter onto the hose, if needed.
- Attach the hose, or its adapter, to the item being inflated.
- Press the power button to power up the inflator.
- Press the switch button to select high-pressure mode.
NOTE: You can also press and hold the switch button to toggle the high-pressure unit between PSI, KPA, and BAR.
- Press the high-pressure adjustment buttons to set the desired preset pressure value, or press the memory mode button to select one of the saved memory modes M1-M4. Refer to the sections "HIGH-PRESSURE ADJUSTMENT BUTTONS" and "MEMORY MODE BUTTON" for more information.
- Press the start/stop button to start inflation. The actual pressure value will gradually increase to the preset pressure value.
EN
| D2-1 | High-Pressure Adjustment Buttons | D2-2 | Actual Pressure Value |
| D2-3 | Memory Mode Indicator | D2-4 | Preset Pressure Valve |
| D2-5 | Memory Mode Button |
To Stop the Inflator
- Once the inflation or deflation is completed, press the start/stop button to stop working.
- Press the power button to power down the inflator completely.
- Remove the battery pack.
NOTE: Whenever in high-volume mode or in high-pressure mode, the LCD screen will turn off after 5 minutes of inactivity.
HIGH-PRESSURE ADJUSTMENT BUTTONS
Allow the operator to decrease or increase the high-pressure output to the desired value.
high-pressure value by 0.5 PSI/5 KPA/0.05 BAR.
- Press and hold the “+” / “-” button to increase or decrease the high-pressure value continuously.
■ Press the “+” / “-” button to increase or decrease the LED Light Buttons
MEMORY MODE BUTTON
Allows the operator to set four frequently used high-pressure values and inflate items at the saved memory settings.
■ Press the memory mode button to toggle the high-pressure value between M1, M2, M3, M4, and custom mode.
NOTE: The pressure values of memory modes M1, M2, M3, and M4 are factory set at 36 PSI, 45 PSI, 8 PSI, and 0 PSI, respectively.
■ To reset the memory value:
1) Press the memory mode button to enter the desired memory mode of M1-M4.
2) Press the high-pressure adjustment button(s) to increase or decrease the value of the selected memory mode.
3) Press and hold the memory mode button until the pressure value and memory mode indicator flash on the LCD screen, indicating that the setting has been saved successfully.
LED LIGHT
The light can be removed from the inflator for portable lighting:
■ The magnet surface of the LED light allows the operator to mount the LED light on metal surfaces.
■ The light hook allows the operator to hook the LED light in a desired position.
When the LED light power is lower than 90%, the light will be charged automatically by the battery pack installed on the inflator.
NOTE:
■ If fully charged, the LED light can light for approximately 2 hours when removed from the inflator.
■ The LED light will turn off automatically after lighting for 6 hours when installed in the inflator.
- When overheated during charging, the LED light will flash red and can not be charged; when overheated during discharging, the LED light will flash red for several seconds and turn off automatically. Wait until the LED light cools down and then the light will work normally.
■ Press the light on/off button to turn the LED light ON and OFF.
■ Press and hold the light on/off button to make the LED light flash continuously, allowing it to be used as a SOS signal. Press and hold the light on/off button again to exit SOS mode.
- Press the light brightness adjustment buttons “+” / “-” to adjust the LED light between low, medium, or high brightness.
■ Press the light color adjustment button to select one of three light colors.
LED Light Indicator
| Indicator Meaning | |
| Illuminates green,gradually fading in and out. | The LED light is being charged by the battery pack installed on the inflator. |
| Illuminates solid yellow. The | LED light power is low. |
EN
EGO
Illuminates solid red. The LED light power is nearly depleted.
MAINTENANCE
WARNING: To prevent serious personal injury, remove the battery pack from the product before servicing, cleaning, changing attachments, or removing material from the unit.
GENERAL MAINTENANCE
Avoid using solvents when cleaning plastic parts. Most plastics are susceptible to damage from various types of commercial solvents and may be damaged by their use. Use a clean cloth to remove dirt, dust, oil, grease, etc.
WARNING: Do not at any time allow brake fluids, gasoline, petroleum-based products, penetrating oils, etc. to come in contact with plastic parts. Chemicals can damage, weaken or destroy plastic which may result in serious personal injury.
WARNING: To reduce the risk of fire, personal injury, and product damage due to a short circuit, never immerse your machine, battery pack or charger in fluid or allow a fluid to flow inside them. Corrosive or conductive fluids, such as seawater, certain industrial chemicals, and bleach or bleach containing products, etc., can cause a short circuit.
STORING THE INFLATOR
- Remove the battery pack from the inflator.
- Clean the inflator thoroughly before storing it.
- Store the inflator in a dry, well-ventilated area, locked-up or up high, out of the reach of children. Do not store the inflator on or adjacent to fertilizers, gasoline, or other chemicals.
PROTECTING THE ENVIRONMENT
Do not dispose of electrical equipment, used battery and charger into household waste! Take this product to an authorized recycler and make it available for separate collection. Electric tools must be returned to an environmentally compatible recycling facility.
TROUBLESHOOTING
| PROBLEM CAUSE SOLUTION | ||
| The inflator fails to start. | ■ Battery pack charge is low.■ Battery pack is not installed properly. | ■ Charge the battery pack.■ Slide the battery pack onto the inflator until it snaps into position. |
| The inflator stops working. | ■ The preset pressure value is reached when inflating in high-pressure mode.■ The inflator was working for 10 minutes continuously in high-volume mode.■ The inflator is over-heated or too cold and the temperature alert displays on the LCD screen.■ Battery pack charge is low and the low power alert flashes on the LCD screen.■ There is a battery pack fault and the fault warning displays on the LCD screen.■ There is an inflator fault and the fault warning displays on the LCD screen. | ■ The inflation is completed. Increase the pressure value if further inflation is required.■ Restart the inflator.■ Wait until the inflator returns to norm temperature and then restart the inflator.■ Charge the battery pack.■ Replace with a functional battery pack■ Contact EGO customer service for repair. |
| The inflation/deflation power in high-volume mode is weak. | ■ There is a blockage in the unused port. | ■ Check and clear the blockage in the port. |
| The LED light indicator illuminates solid yellow or red. | ■ The light power is low or nearly depleted. | ■ Insert the light into the inflator and the light will be charged automatically by the battery pack installed on the inflator. |
| The LED light turns off automatically. | ■ The light has been lighting for 6 hours when installed in the inflator. | ■ Check and make sure the battery pack charge on the inflator is sufficient to charge the LED light. Then turn on the light again. |
| The LED light flashes red. | ■ The light is overheated during charging or discharging. | ■ Wait until the light cool down and the light will work normally. |
| The LED light keeps flikering on and off when the light is installed and turned on in the inflator. | ■ The battery pack is over temperature.■ The battery pack charge is low.■ There is communication fault(s) between the battery pack and the LED light. | ■ Wait until the battery pack return to normal working temperature.■ Charge the battery pack.■ Contact EGO customer service for repair. |
WARRANTY
EGO WARRANTY POLICY
Please visit the website egopowerplus.eu for full terms and conditions of the EGO Warranty policy.
LISTA DE PEÇAS (IMAGEM A1)
DESCRIÇÃO
CONHEÇA A BOMBA DE AR ELÉTRICA (Imagem A1)
⚠ WAARSCHUWING: LEES ALLE VEILIGHEIDSWAARSCHUWINGEN, INSTRUCTIES, ILLUSTRATIES EN SPECIFICATIES DIE MET DIT ELEKTRISCH GEREEDSCHAP ZIJN MEEGELEVERD.
HUKOMMELSESFUNKTIONSKNAP
SIKKERHET I ARBEIDSOMRÅDET
GENERELT VEDLIKEHOLD
BEZPIECZEŃSTWO W MIEJSCU PRACY
POLITYKA GWARANCYJNA EGO
A CSOMAG TARTALMA (A1 ÁBRA)
LEÍRÁS
d)SMERKEDJEN MEG A KOMPRESSZORRAL (A1 ÁBRA)
CITIȚI MANUALUL DE INSTRUCTIUNI
ATMINTIES REŽIMO MYGTUKAS
LUGEGE KASUTUSJUHENDIT
led 36509000000000000000
| உஞஞஞஞஞஞஞஞஞஞஞஞஞஞஞஞஞஞஞஞஞஞஞஞஞஞஞஞஞஞஞஞஞஞஞஞஞஞஞஞஞஞஞஞஞஞஞஞஞஞஞஞஞஞஞஞஞஞஞஞஞஞஞஞஞஞஞஞஞஞஞஞஞஞஞஞஞஞஞஞஞஞஞஞஞஞஞஞஞஞஞஞஞஞஞஞஞஞஞஞஞஞஞஞஞஞஞஞஞஞஞஞஞஞஞஞஞஞஞஞஞஞஞஞஞஞஞஞஞஞஞஞஞஞஞஞஞஞஞஞஞஞஞஞஞஞஞஞடஞஞஞஞஞஞஞஞஞஞஞஞஞஞஞஞஞஞஞஞஞஞஞஞஞஞஞஞஞஞஞஞஞஞஞஞஞஞஞஞஞஞஞஞஞஞஞஞஞஉஞஞஞஞஞஞஞஞஞஞஞஞஞஞஞஞஞஞஞஞஞஞஞஞஞஞஞஞஞஞஞஞஞஞஞஞஞஞஞஞஞஞஞஞஞஞஞஞஉஞஞஞஞஞஞஞஞஞஞஞஞஞஞஞஞஞஞஞஞஞஞஞஞஞஞஞஞஞஞஞஞஞஞஞஞஞஞஞஞஞஞஞஞஞஞஞஞஉஉஞஞஞஞஞஞஞஞஞஞஞஞஞஞஞஞஞஞஞஞஞஞஞஞஞஞஞஞஞஞஞஞஞஞஞஞஞஞஞஞஞஞஞஞஞஞஞஞஉஞஞஞஞஞஞஞஞஞஞஞஞஞஞஞஞஞஞஞஞஞஞஞஞஞஞஞஞஞஞஞஞஞஞஞஞஞஞஞஞஞஞஞஞஞஞஞஞசஞஞஞஞஞஞஞஞஞஞஞஞஞஞஞஞஞஞஞஞஞஞஞஞஞஞஞஞஞஞஞஞஞஞஞஞஞஞஞஞஞஞஞஞஞஞஞஞஞஜஞஞஞஞஞஞஞஞஞஞஞஞஞஞஞஞஞஞஞஞஞஞஞஞஞஞஞஞஞஞஞஞஞஞஞஞஞஞஞஞஞஞஞஞஞஞஞஞஞகாஞஞஞஞஞஞஞஞஞஞஞஞஞஞஞஞஞஞஞஞஞஞஞஞஞஞஞஞஞஞஞஞஞஞஞஞஞஞஞஞஞஞஞஞஞஞஞஞஞஎஞஞஞஞஞஞஞஞஞஞஞஞஞஞஞஞஞஞஞஞஞஞஞஞஞஞஞஞஞஞஞஞஞஞஞஞஞஞஞஞஞஞஞஞஞஞஞஞஞசஉஞஞஞஞஞஞஞஞஞஞஞஞஞஞஞஞஞஞஞஞஞஞஞஞஞஞஞஞஞஞஞஞஞஞஞஞஞஞஞஞஞஞஞஞஞஞஞஞடஉஞஞஞஞஞஞஞஞஞஞஞஞஞஞஞஞஞஞஞஞஞஞஞஞஞஞஞஞஞஞஞஞஞஞஞஞஞஞஞஞஞஞஞஞஞஞஞஞஜஉஉஉஉஉஉஉஉஉஉஉஉஉஉஉஉஉஉஉஉஉஉஉஉஉஉஉஉஉஉஉஉஉஉஉஉஉஉஉஉஉஉஉஉஉஉஉஉஉஉஎஉஉஉஉஉஉஉஉஉஉஉஉஉஉஉஉஉஉஉஉஉஉஉஉஉஉஉஉஉஉஉஉஉஉஉஉஉஉஉஉஉஉஉஉஉஉஉஉஉஅஉஉஉஉஉஉஉஉஉஉஉஉஉஉஉஉஉஉஉஉஉஉஉஉஉஉஉஉஉஉஉஉஉஉஉஉஉஉஉஉஉஉஉஉஉஉஉஉஉஞஞஞஞஞஞஞஞஞஞஞஞஞஞஞஞஞஞஞஞஞஞஞஞஞஞஞஞஞஞஞஞஞஞஞஞஞஞஞஞஞஞஞஞஞஞஞஞஞஏஞஞஞஞஞஞஞஞஞஞஞஞஞஞஞஞஞஞஞஞஞஞஞஞஞஞஞஞஞஞஞஞஞஞஞஞஞஞஞஞஞஞஞஞஞஞஞஞஞஞஞஞஞஞஞஞஞஞஞஞஞஞஞஞஞஞஞஞஞஞஞஞஞஞஞஞஞஞஞஞஞஞஞஞஞஞஞஞஞஞஞஞஞஞஞஞஞஞங்பூ | LED 600712121212121212121212121212121212121212121212121212121212121212121212121212121212121212121212121212121 |
| sbsmsgdsb sbsmsgds, sbsmsgsmsbsmdons gbsgdspsgsgds, sbsmsgsmsbsmdons gbsgdspsgsgds, sbsmsgsmsbsmdons gbsgdspsgsgds, sbsmsgsmsbsmdons gbsgdspsgsgds, sbsmsgsmsbsmdons gbsgdspsgsgds, sbsmsgsmsbsmdons gbsgdspsgsgds, sbsmsgsmsbssgds, sbsmsgsmsbsmdons gbsgdspsgsgds, sbsmsgsmsbssgds, sbsmsgsmsbsmdons gbsgdspsgsgds, sbsmsgsmsbssgds, sbsmsgsmsbsmdons gbsgdspsgsgds, sbsmsgsmsbssgds, sbsmsgsmsbsmdons gbsggsmsbssgds, sbsmsgsmsbssgds, sbsmsgsmsbssgds, sbsmsgsmsbssgds, sbsmsgsmsbssgds, sbsmsgsmsbssgds, sbsmsgsmsbssgds, sbsmsgsmsbssgds, sbsmsgsmsbssgds, sbsmsgsmsbssgds, sbsmsgsmsbssgds, sbsmgsmsbssgds, sbsmsgsmsbssgds, sbsmsgsmsbssgds, sbsmsgsmsbssgds, sbsmsgsmsbssgds, sbsmsgsmsbssgds, sbsmsgsmsbssgds, sbsmsgsmsbssgds, sbsmsgsmsbssgds, sbsmsgsmsbssgds, sbsmmgsmsbssgds, sbsmmgsmsbssgds, sbsmmgsmsbssgds, sbsmmgsmsbssgds, sbsmmgsmsbssgds, sbsmmgsmsbssgds, sbsmmgsmsbssgds, sbsmmgsmsbssgds, sbsmmgsmsbssgds, sbsmmgsmsbssgds, sbsmgsmsbssgds, sbsmmgsmsbssgds, sbsmmgsmsbssgds, sbsmmgsmsbssgds, sbsmmgsmsbssgds, sbsmmgsmsbssgds, sbsmmgsmsbssgds, sbsmmgsmsbssgds, sbsmmgsmsbssgds, sbsmmgsmsbssgds, sbssmgsmsbssgds, sbssmgsmsbssgds, sbssmgsmsbssgds, sbssmgsmsbssgds, sbssmgsmsbssgds, sbssmgsmsbssgds, sbssmgsmsbssgds, sbssmgsmsbssgds, sbssmgsmsbssgds, sbssmgsmsbssgds, sbsmmgsmsbssgds, sbsmmgsmsbssgds, sbsmmgsmsbssgds, sbsmmgsmsbssgds, sbsmmgsmsbssgds, sbsmmgsmsbssgds, sbsmmgsmsbssgds, sbsmmgsmsbssgds, sbsmmgsmsbssgds, sbs mmgsmsbssgds, sbsmmgsmsbssgds, sbsmmgsmsbssgds, sbsmmgsmsbssgds, sbsmmgsmsbssgds, sbsmmgsmsbssgds, sbsmmgsmsbssgds, sbsmmgsmsbssgds, sbsmmgsmsbssgds, sbsmmgsmsbssgds, sbsrmgsmsbssgds, sbsrmgsmsbssgds, sbsrmgsmsbssgds, sbsrmgsmsbssgds, sbsrmgsmsbssgds, sbsrmgsmsbssgds, sbsrmgsmsbssgds, sbsrmgsmsbssgds, sbsrmgsmsbssgds, sbsrmgsmsbssgds, sbsmmgsmsbssgds, sbsmmgsmsbssgds, sbsmmgsmsbssgds, sbsmmgsmsbssgds, sbsmmgsmsbssgds, sbsmmgsmsbssgds, sbsmmgsmsbssgds, sbsmmgsmsbssgds, sbsmmgsmsbssgds, sbsnmgsmsbssgds, sbsmmgsmsbssgds, sbsmmgsmsbssgds, sbsmmgsmsbssgds, sbsmmgsmsbssgds, sbsmmgsmsbssgds, sbsmmgsmsbssgds, sbsmmgsmsbssgds, sbsmmgsmsbssgds, sbsmmgsmsbssgds, sbsmmmgsmsbssgds, sbsmmgsmsbssgds, sbsmmgsmsbssgds, sbsmmgsmsbssgds, sbsmmgsmsbssgds, sbsmmgsmsbssgds, sbsmmgsmsbssgds, sbsmmgsmsbssgds, sbsmmgsmsbssgds, sbsmmgsmsbssgds, sbsttggmsmsbssgds, sbsmmgsmsbssgds, sbsmmgsmsbssgds, sbsmmgsmsbssgds, sbsmmgsmsbssgds, sbsmmgsmsbssgds, sbsmmgsmsbssgds, sbsmmgsmsbssgds, sbsmmgsmsbssgds, sbsmmgsmsbssgds, sbsmmgaatsbssgdsbssgds, sbsmmgaatsbssgdsbssgds, sbsmmgaatsbssgdsbssgds, sbsmmgaatsbssgdsbssgds, sbsmmgaatsbssgdsbssgds, sbsmmgaatsbssgdsbssgds, sbsmmgaatsbssgdsbssgds, sbsmmgaatsbssgdsbSSGDSGDSGDSGDSGDSGDSGDSGDSGDSGDSGDSGDSGDSGDSGDSGDSGDSGDSGDSGDSGDSGDSGDSGDSGDSGDSGDSGDSGDSGDSGDSGDSGDSGDSGDSGDSGDSGDSGDSGDSGDSGDSGDSGDSGDSGDSGDSGDSGDSGDSG |
∂mʒmʊ
zinjunjunjunjunjunjunjunjunjunjunjunjunjunjunjunjunjunjunjunjunjunjunjunjunjunjunjunjunjunjunjunjunjunjunjunjunjunjunjunjunjunjunjunjunjunjunjunjunjunjunj
KA
zsyydsmomnolun qnsz6mluqni3s qos smdmbzmi
,הכלההוּרָה,הכלההוּרָה,הכלההוּרָה.4
| 6. | just except until |
| 10 |
| הכלהה.11 |
| LED 019 .12 |
| LED 039 μιμμ .13 |
| 14 |
| 15 |
| 16 |
| 039 11 .17 |
| الله.18 |
HE
三GO
natural_image
Line drawing of a power camera with display and control panel (no text or symbols)IF1600E