
FN1800E - Uncategorized EGO - Free user manual and instructions
Find the device manual for free FN1800E EGO in PDF.


| Product Type | Cordless Pole Saw |
| Brand | EGO |
| Model | FN1800E |
| Voltage | 56 V |
| Battery Type | Lithium-ion (compatible with EGO 56V) |
| Bar Length | 20 cm (8 inches) |
| Chain Speed | Variable (0–3000 rpm) |
| Max Cutting Capacity | 20 cm diameter |
| Total Length | 2.4 m (with extension) |
| Weight | 4.5 kg (with battery) |
| Power Supply | 56 V Li-ion battery (not included) |
| Main Functions | High branch trimming, precise cutting, adjustable head |
| Maintenance and Cleaning | Clean after use, oil chain regularly, check tension |
| Safety | Safety trigger, kickback protection, auto stop |
| Spare Parts and Repairability | Bar, chain, battery, charger available at ego-power.fr |
| General Information | 276-page user manual included |
Frequently Asked Questions - FN1800E EGO
User questions about FN1800E EGO
0 question about this device. Answer the ones you know or ask your own.
Ask a new question about this device
Download the instructions for your Uncategorized in PDF format for free! Find your manual FN1800E - EGO and take your electronic device back in hand. On this page are published all the documents necessary for the use of your device. FN1800E by EGO.
USER MANUAL FN1800E EGO
natural_image
Technical line drawing of a circular mechanical fan or fan assembly with internal grid patterns and labeled 'EGO' (no text or symbols beyond branding)FN1800E
56 VOLT LITHIUM-ION CORDLESS MISTING FAN
EN 56 Volt lithium-ion cordless misting fan 7
BA1400, BA2800, CH2100E, CH3200E, BA4200, BA1400T, CH5500E, CH7000E
BA2240T, BA2242T, BA2800T, BA3360T, BA4200T, BA5600T, BA6720T
natural_image
Line drawing of a mechanical device with no visible text or symbols
natural_image
Line drawing of a portable electronic device with control panel and ventilation slots (no text or symbols)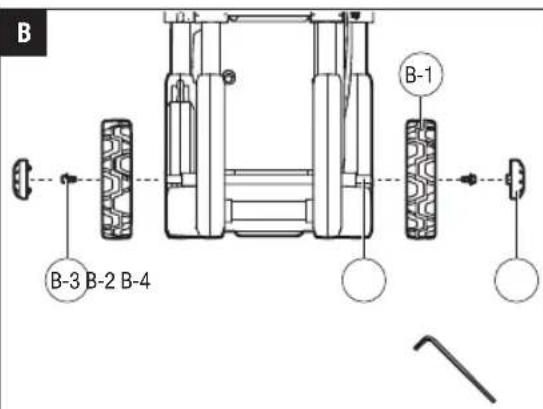



natural_image
Technical line drawing of a mechanical fan assembly with a cylindrical base and connecting pipe (no text or symbols)


natural_image
Technical line drawing of a mechanical fan assembly with directional arrows indicating motion (no text or symbols)
natural_image
Technical line drawing of a mechanical fan assembly (no text or symbols)
natural_image
Technical line drawing of a mechanical fan assembly (no text or symbols)READ ALL INSTRUCTIONS!

READ OPERATOR'S MANUAL
WARNING: To ensure safety and reliability, all repairs and replacements should be performed by a qualified service technician.
SAFETY SYMBOLS
The purpose of safety symbols is to attract your attention to possible dangers. The safety symbols and the explanations with them deserve your careful attention and understanding. The symbol warnings do not, by themselves, eliminate any danger. The instructions and warnings they give are no substitutes for proper accident prevention measures.
WARNING: Be sure to read and understand all safety instructions in this Operator's Manual, including all safety alert symbols such as "DANGER", "WARNING", and "CAUTION" before using this tool. Failure to follow all instructions listed below may result in electric shock, fire, and/or serious personal injury.
 | Safety Alert | Precautions that involve your safety |
 | Read & Understand Operator's Manual | To reduce the risk of injury, user must read and understand operator's manual before using this product. |
 | Rain Condition | Do not expose to rain. |
 | CE | This product is in accordance with applicable EC directives. |
 | UKCA | This product is in accordance with applicable UK legislation. |
 | WEEE | Waste electrical products should not be disposed of with household waste. Take to an authorized recycler. |
| IPX4 | Ingress Protection Degree | Protection from splashing water |
| Direct Current | Type or a characteristic of current | |
| V Volt Voltage | ||
| cm Centimeter Length | or size | |
| m/s | Meters Per Second | Speed |
| L/h | Liter Per Hour | Flow Rate |
| °C Celsius Temperature | ||
| kg Kilogram Weight | ||
EN
GENERAL SAFETY WARNINGS
⚠ WARNING: To reduce risk of fire, electric shock, or injury:
- Know your misting fan. Read the instruction manual carefully. Learn the fan's applications and limitations as well as the specific potential hazards related to this fan. Following this rule will reduce the risk of electric shock, fire or serious injury.
This appliance is not intended for use by persons (including children) with reduced physical, sensory or mental capabilities, or lack of experience and knowledge, unless they have been given supervision or instruction concerning use of the appliance by a person responsible for their safety.
■ Children should be supervised to ensure that they do not play with the appliance.
WORK AREA SAFETY
■ Do not operate fan in explosive atmospheres, such as in the presence of flammable liquids, gases or dust.
- Keep children and bystanders away while operating an appliance. Distractions can cause you to lose control.
■ Use caution when using in windy conditions. Winds may carry mists into electrical wiring or devices.
- Do not expose appliance to rain or wet conditions. Water entering an appliance will increase the risk of electric shock.
EN
PERSONAL SAFETY
■ Stay alert, watch what you are doing and use common sense when operating appliance. Do not use the appliance while tired, upset, or under the influence of drugs, alcohol, or medication. A moment of inattention while operating appliance may result in serious personal injury.
■ Prevent unintentional starting. Ensure the switch is in the off-position before connecting to battery pack, picking up or carrying the appliance. Carrying appliance with your finger on the switch or energizing appliance that have the switch on invites accidents.
■ Remove any adjusting key or wrench before turning the appliance on. A wrench or a key left attached to a rotating part of the appliance may result in personal injury.
■ Do not overreach. Keep proper footing and balance at all times. This enables better control of the appliance in unexpected situations.
■ Dress properly. Do not wear loose clothing or jewelry. Keep your hair and clothing away from moving parts. Loose clothes, jewelry or long hair can be caught in moving parts.
■ Verify that all connections are secure before operating the appliance.
- Do not let familiarity gained from frequent use of appliances allow you to become complacent and ignore the appliance safety principles. A careless action can cause severe injury within a fraction of a second.
USE AND CARE
- Do not use the appliance if the switch does not turn it on and off. Any appliance that cannot be controlled with the switch is dangerous and must be repaired.
■ Disconnect the battery pack from the appliance before making any adjustments, changing accessories, or storing appliance. Such preventive safely measures reduce the risk of starting the appliance accidentally.
■ Store idle appliance out of the reach of children and do not allow persons unfamiliar with the appliance or these instructions to operate the appliance. Appliances are dangerous in the hands of untrained users. - Maintain appliance and accessories. Check for misalignment or binding of moving parts, breakage of parts and any other condition that may affect the appliance's operation. If damaged, have the appliance repaired before use. Many accidents are caused by poorly maintained appliance.
■ Use the appliance and accessories etc. in accordance with these instructions, taking into account the working conditions and the work to be performed. Use of the appliance for operations different from those intended could result in a hazardous situation.
- Keep handles and grasping surfaces dry, clean and free from oil and grease. Slippery handles and grasping surfaces do not allow for safe handling and control of the tool in unexpected situations.
⚠ WARNING: To reduce the risk of fire or electric shock, do not use this fan with any solid-state speed control device.
BATTERY TOOL USE AND CARE
■ Recharge only with the charger specified by the manufacturer. A charger that is suitable for one type of battery pack may create a risk of fire when used with another battery pack.
■ Use appliance only with specifically designated battery packs. Use of any other battery packs may create a risk of injury and fire.
- When battery pack is not in use, keep it away from other metal objects, like paper clips, coins, keys, nails, screws or other small metal objects, that can make a connection from one terminal to another. Shorting the battery terminals together may cause burns or a fire.
■ Under abusive conditions, liquid may be ejected from the battery; avoid contact. If contact accidentally occurs, flush with water. If liquid contacts eyes, additionally seek medical help.
Liquid ejected from the battery may cause irritation or burns.
- Do not use a battery pack or appliance that is damaged or modified. Damaged or modified batteries may exhibit unpredictable behavior resulting in fire, explosion or risk of injury.
■ Do not expose a battery pack or appliance to fire or excessive temperature. Exposure to fire or temperature above 130°C may cause explosion.
■ Follow all charging Instructions and do not charge the battery pack or appliance outside the temperature range specified in the instructions.
Charging improperly or at temperatures outside the specified range may damage the battery and increase the risk of fire.
SERVICE
■ Have your appliance serviced by a qualified repair person using only identical replacement parts.
This will ensure that the safety of the appliance is maintained.
■ Never service damaged battery packs. Service of battery packs should only be performed by the manufacturer or authorized service providers.
SAFETY INSTRUCTIONS FOR CORDLESS MISTING FAN
- Do not allow the fan to be used as a toy. Close attention is necessary when used by or near children.
■ Children can fall into buckets and drown. Keep children away from buckets with even a small amount of liquid.
■ ONLY use clean, cold water.
- Do not use this misting fan to spray pesticides, liquid fertilizers, chemicals, or any liquids other than clean water. Spraying these substances could result in serious injury or illness to the operator or bystanders.
■ Never direct mist or water toward any electrical wiring or devices.
■ Ensure that the battery compartment cover is completely closed to prevent water from contacting battery or entering battery port.
- Keep the appliance and its handle dry, clean and free from oil and grease. Always use a clean cloth when cleaning. Never use brake fluids, gasoline, petroleum-based products, or any strong solvents to clean your fan. Following this rule will reduce the risk of loss of control and deterioration of the enclosure plastic.
■ Batteries can explode in the presence of a source of ignition, such as a pilot light. To reduce the risk of serious personal injury, never use any cordless product in the presence of open flame. An exploded battery can propel debris and chemicals. If exposed, flush with water immediately.
■ Save these instructions. Refer to them frequently and use them to instruct others who may use this fan. If you loan this fan to someone else, also loan these instructions to them to prevent misuse of the product and possible injury.
■ Be aware that high humidity levels may encourage the growth of biological organisms in the environment.
■ Do not permit the area around the misting fan to become damp or wet. If dampness occurs, turn the output of the misting fan down. If the misting fan output volume cannot be turned down, use the humidifier intermittently. Do not allow absorbent materials, such as carpeting, curtains, drapes, or tablecloths, to become damp.
■ Never leave water in the reservoir when the appliance is not in use.
■ Empty and clean the misting fan before storage. Clean the humidifier before next use.
WARNING: Micro-organisms that may be present in the water or in the environment where the appliance is used or stored, can grow in the water reservoir and be blown in the air causing very serious health risks when the water is not renewed and the tank is not cleaned properly every 3 days.
■ Rechargeable batteries are to be removed from the appliance before being charged
■ Exhausted batteries are to be removed from the appliance and safely disposed of
■ If the appliance is to be stored unused for a long period, the batteries should be removed
■ The supply terminals are not to be short-circuited.
SAVE THESE INSTRUCTIONS
SPECIFICATIONS
| Voltage | 56 V |
| Fan Blade Diameter 45.7 cm | |
| Fan Speed Settings 6 (including “Turbo”) | |
| Max. Air Volume 7000 m | ^3/h |
| Max. Air Speed 10.3 m/s | |
| Misting Water Volume | I: 4.5 L/h |
| II: 11.4 L/h | |
| Recommended Storage Temperature | -20°C ~ 70°C |
| Weight (without battery pack) | 10.4 kg |
PACKING LIST
| PART NAME QUANTITY | ||
| Misting Fan 1 | ||
| Wheel Assembly | Wheel 2 | |
| Hubcap 2 | ||
| Screw with washer 2 | ||
| Top Handle Assembly | Top Handle | 1 |
| Screw with washer 4 | ||
| Wrench | 1 | |
| Spare Nozzle | 1 | |
| Operator's Manual | 1 | |
EN DESCRIPTION
KNOW YOUR MISTING FAN (Fig. A & Fig. A1)
- Top Handle
- Fan Enclosure
- Fan Enclosure Lock Knob
- Wheel (x2)
- Misting Nozzle (x4)
- Telescopic Handle
- Battery Compartment
- Intake Tube
- Filter
- Control Interface
- Power Button
- Air Speed Indicator
- TURBO Indicator
- TURBO Button
- Air Speed Adjustment Button
- Misting Mode Selection Button
- Misting Indicator
ASSEMBLY
WARNING: If any parts are damaged or missing, do not operate this product until the parts are replaced. Use of this product with damaged or missing parts could result in serious personal injury.
WARNING: Do not attempt to modify this product or create accessories not recommended for use with this fan. Any such alteration or modification is misuse and could result in a hazardous condition leading to possible serious personal injury.
WARNING: Always remove the battery pack from the product when you are assembling parts, making adjustments, cleaning, or when the product is not in use. Removing the battery pack will prevent accidental starting that could cause serious personal injury..
ASSEMBLING THE WHEELS (Fig. B)
- Align the hole of one of the wheels with the wheel axle of the fan, and mount the wheel onto the axle.
- Thread one of the wheel screws through the hole of the wheel into the wheel axle, then tighten the screw with the supplied wrench.
- Snap the hubcap onto the wheel.
- Assemble the other wheel following above steps 1 - 3.
ATTACHING THE TOP HANDLE (Fig. C)
-
Align four supplied screws with the holes in the top handle and the holes in the fan enclosure.
-
Insert the screws and then tighten them with the supplied wrench.
Fig. B and Fig. C parts description see below:
| B-1 Wheel (2) B-3 | Screw with Washer (2) | |
| B-2 Wheel Axle (2) B-4 Hubcap (2) | ||
| C-1 Top handle C-2 | Screw With Washer(4) | |
| C-3 Screw Hole | ||
OPERATION
WARNING: Do not allow familiarity with this product to make you careless. Remember that a careless fraction of a second is sufficient to inflict serious injury.
WARNING: Do not use any attachments or accessories not recommended by the manufacturer of this product. The use of attachments or accessories not recommended can result in serious personal injury.
Before each use, inspect the entire product for damaged, missing, or loose parts, such as screws, nuts, bolts, caps, etc. Tighten securely all fasteners and caps and do not operate this product until all missing or damaged parts are replaced.
WARNING: Always remove the battery pack from the product when you are assembling parts, making adjustments, cleaning, or when it is not in use. Removing the battery pack will prevent accidental starting that could cause serious personal injury.
APPLICATIONS
You may use this product for the purposes listed below:
■ General ventilation in most household applications
■ Outdoor cooling while connected to a water source
ADJUSTING THE FAN ANGLE (Fig. D)
- Grasp the top handle to hold the fan enclosure.
- Rotate the fan enclosure lock knob COUNTERCLOCKWISE to loosen the adjustable fan enclosure.
- Tilt the adjustable fan enclosure forward or backward to your desired angle. The fan can pivot up to 90^ forward up to 135^ backward.
- Rotate the lock knob CLOCKWISE to secure the fan enclosure at your desired angle.
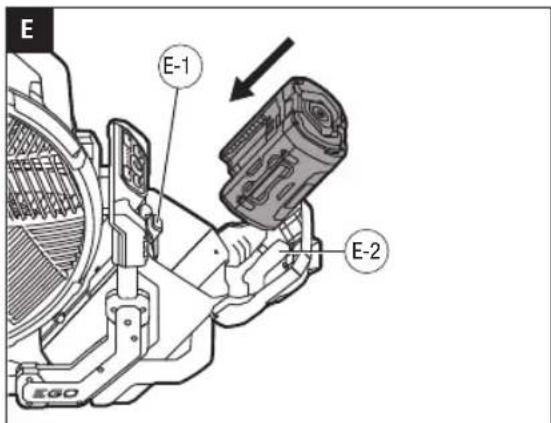
TO ATTACH/DETACH THE BATTERY PACK (Fig. E)
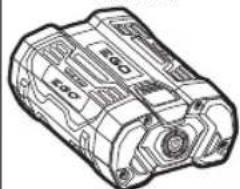
Use only with EGO's battery packs and chargers listed in Fig. A2.
Fully charge before first use.
To attach
- Pull the battery compartment cover to open it.
- Align the battery ribs with the mounting slots and press the battery pack down until you hear a "click".
To detach
- Depress the battery-release button and lift the battery pack out.
- Push the battery compartment cover to close it. Ensure that it is completely closed to prevent water from contacting battery or entering battery port.
Fig. E parts description see below
| E-1 Battery Release Button |
| E-2 Battery Compartment Cover |
TO START/STOP THE MISTING FAN
NOTICE: The initial factory setting for the air speed is level 3. The fan will save the last used air speed setting and will revert to it upon restart.
IMPORTANT: Turbo setting will not be saved.
NOTICE: The misting setting will not be saved, and by default will be off every time the fan is turned on.
POWER BUTTON
■ Press the power button briefly to turn the fan ON.
■ Press the power button briefly again to turn the fan OFF.
AIR SPEED ADJUSTMENT
Normal Air Speed
- Press the “+” button to accelerate the air speed and press the “-” button to decrease the air speed. There are 5 speed levels.
■ The air speed indicator displays green lights corresponding to the current speed levels.
TURBO Mode
- Press the "TURBO" button, the TURBO indicator will light up green and the fan will shift into "TURBO" mode, i.e. the highest air speed.
- When in "TURBO" mode, press "TURBO" button again, the TURBO indicator will turn off and the fan will resume the previously active air speed.
- When in "TURBO" mode, press "-" button, the TURB indicator will turn off and the fan will shift to the air speed level 5.
EN
MISTING FUNCTION
USING THE FAN WITH A WATER BUCKET (NOT INCLUDED) (Fig. F)
WARNING: Children can fall into buckets and drown. Keep children away from buckets containing even a small amount of liquid.
NOTICE: Clean the bucket with soap and water before each use.
- Disconnect the battery pack.
- Place the bucket on a flat, level surface.
- Add ONLY clean, cold water into the bucket. Do not overfill.
- Immerse the filter end of the intake tube down into the water bucket.
NOTICE: Do not bend the intake tube, and always make sure the water flows smoothly through the tube.
- Install the battery pack and close the battery compartment cover.
- Press the power button to turn the fan ON.
- Press the misting mode selection button to start misting:
- Press the misting mode selection button once and the misting indicator will light up two green lights which indicates the 'continuous' misting mode - misting all the time without stopping.
NOTICE: It may take around 15 seconds before you actually see the mist coming out of the misting nozzles the first time. This delay is due to the time it takes for water to flow from the water bucket to the nozzles.
- Press the misting mode selection button again and the misting indicator will light up one green light which indicates the 'intermittent' misting mode - misting for 5s every 10s.
- When the misting is in intermittent mode, press the misting mode selection button again and the misting indicator lights will turn off and the misting will stop.
EN
NOTICE: When the misting operation is finished, pull the intake tube out of the water and run the fan in misting mode until all the water clears from the tube. This helps prevent the residual water in the tube from causing unexpected misting when the fan is started again.
USING THE FAN WITHOUT MISTING
If desired, this product may be used as a fan only, when not connected to a water source. When not in use, always place the intake tube in its storage area (See section "STORAGE" in this manual) to protect it from damage and contamination.
INTERNAL PROTECTION
When the misting function is activated but no water mist is coming out:
■ The water pump will keep running for a short while, and then stop automatically to protect internal electronics.
■ Depending on misting mode, the misting indicator will display one or two solid green lights for a short while, and then flash green light(s) continuously as an alert for the operator to:
a. Check if the intake tube is properly immersed into water.
b. Check if the misting nozzle(s) is clogged, and clean according to the "NOZZLE MAINTENANCE" chapter.
c. Press the misting mode selection button to restart misting.
MAINTENANCE
WARNING: When servicing, use only identical replacement parts. Use of any other parts may create a hazard or cause product damage. To ensure safety and reliability, all repairs should be performed by a qualified service technician.
WARNING: To avoid serious personal injury, always remove the battery pack from the product when cleaning or performing any maintenance.
GENERAL MAINTENANCE
Avoid using solvents when cleaning plastic parts. Most plastics are susceptible to damage from various types of commercial solvents and may be damaged by their use. Use clean cloths to remove dirt, dust, oil, grease, etc.
WARNING: Do not at any time let brake fluids, gasoline, petroleum-based products, penetrating oils, etc., come in contact with plastic parts. Chemicals can damage, weaken or destroy plastic which may result in serious personal injury.
NOZZLE MAINTENANCE (Fig. G)
WARNING: Ensure that all misting nozzle maintenance is performed properly to prevent water leaks. The leaks can result in a slippery surface creating a slip and fall hazard or cause property damage.
To clear the nozzles
- Turn off the fan and remove the battery pack.
- Remove the clogged brass misting nozzles by rotating them in a COUNTERCLOCKWISE direction.
- Disassemble each affected nozzle into parts.
- To remove any foreign particles clogging or restricting the nozzles, flush the nozzle parts with water. To remove scale (mineral) buildup, clean the nozzle parts with white vinegar or other de-scaling agent as necessary.
- Reassemble the nozzles.
NOTICE: To prevent clogging, make sure that the nozzle is assembled exactly as shown as Fig. G.
6. Reattach the clean nozzles.
FILTER MAINTENANCE (Fig. H)
Periodically examine the filter at the end of the intake tube to make sure that it is in good condition.
- Pull the filter off from the intake tube.
- Unscrew the filter into parts and take out the sponge mesh.
- Rinse the sponge mesh or replace it if necessary.
- Reassemble the filter and reconnect it to the intake tube.
Fig. H parts description see below
| H-1 Filter H-3 Sponge Mesh | ||
| H-2 Upper Part H-4 Lower Part |
FAN ENCLOSURE MAINTENANCE (Fig. I1 & Fig. I2)
WARNING: Ensure the battery packs are removed from the product before removing the guard.
- Loosen and remove the six screws to PARTIALLY lift the front grill guard off from the fan enclosure.
CAUTION: To prevent damage, do not remove the front grill guard completely without disconnecting the intake tube FIRST.
- Depress the black rubber at end of the nut to pull out the intake tube.
- Remove the front grill guard completely.
- Rotate the fan blade lock cover clockwise to release the fan blade from the shaft.
- Remove the fan blade.
- Clean the fan blade and the enclosure interior as necessary.
- Reassemble them in reverse order, and make sure:
■ the intake tube is properly connected to the nut.
■ the intake tube is placed properly into the slot on the grill guard.
Fig. I1 and I2 parts description see below
| I1-1 Front Grill Guard I1-4 | Black Rubber | |
| I1-2 Screw(6) I1-5 Intake Tube | ||
| I1-3 Nut I2-1 Lock Cover | ||
| I2-2 Fan Blade | ||
PROTECTING THE ENVIRONMENT

Do not dispose of electrical equipment, used battery and charger into household waste! Take this product to an authorized recycler and make it available for separate collection. Electric tools must be returned to an environmentally compatible recycling facility.
TRANSPORTING
■ The fan is equipped with a top handle for carrying the fan for short-distance trips or crossing rough surface/terrain.
- For long-distance transport, use the telescopic handle to roll the fan. Use the top handle to tilt the fan and then pull out the telescopic handle until you hear a "click". When the telescopic handle is not used, push it into the tool (Fig. J).
STORAGE
- Remove the battery pack.
- Clean the fan thoroughly.
- Empty the intake tube and filter.
- Place the intake tube into either storage position located at the back of the fan (Fig. K1 & Fig. K2).
- Store the fan in a dry, well-ventilated area, out of the reach of the children. Do not store the fan on or adjacent to fertilizers, gasoline, or other chemicals.
EN TROUBLESHOOTING
| PROBLEM | CAUSE SOLUTION | |
| Tool does not work. | Low battery pack capacity.The battery pack or the fan is too hot. | Charge the battery pack.Turn off the fan and allow the fan and battery pack to cool. |
| There is no water misting and the misting indicator flashes two green lights. | The intake tube suctions no water, activating internal protection for the water pump inside the tool.The misting nozzle(s) got clogged during operation, activating the internal protection for the water pump. | Check and ensure that there is enough water in the bucket and the intake tube is properly immersed into the water.Clean the nozzle(s) according to the “NOZZLE MAINTENANCE” chapter and reassemble them as instructed. |
| Water leakage happens after fan enclosure maintenance. | The nut connecting with the intake tube got loose unexpectedly. | Open the fan enclosure according to the “FAN ENCLOSURE MAINTENANCE” chapter. Inspect and ensure that the nut is fully tightened. |
WARRANTY
EGO WARRANTY POLICY
Please visit the website egopowerplus.com for full terms and conditions of the EGO Warranty policy.
ALGEMENE VEILIGHEIDSWAARSCHUWINGEN
SIKKERHET I ARBEIDSOMRÅDET
GENERELT VEDLIKEHOLD
VEDLIKEHOLD AV DYSE (Fig. G)
VEDLIKEHOLD AV VIFTEKASSE (Fig. I1 & Fig. I2)
BEZPIECZEŃSTWO W MIEJSCU PRACY
POLITYKA GWARANCYJNA EGO
USCHOVEJTE SI TYTO POKYNY
TECHNICKÉ ÚDAJE
CITIȚI MANUALUL DE INSTRUCTIUNI
FILTRA APKOPE (H att.)
LUGEGE KASUTUSJUHENDIT
ÜLDISED OHUTUSHOIATUSED
g_2g_3g_5b_0m d_0d_1b_0d_5c_0g_0d_0m_0 l_0b_0g_0m_0d_0d_5c_0g_0d_5m_0
30g6n5 b32p0n5 b6m6d6m7m0 l0h6m6g
■ qssfomgym “+” qomsb 3sgm bgsqom lohjsmou zlsbngqmsq os qssfomgym “-” qomsb 3sgm bgsqom lohjsmou dgusdgmgdmsq. lohjsmou 5 qmbgs.
■ 3590163340110875010833678200 SH336781087501087501,6m4m4m4m4m4m4m4m4m4m4m4m4m4m4m4m4m4m4m4m4m4m4m4m4m4m4m4m4m4m4m4m4m4m4m4m4m4m4m4m4m4m4m4m4m4m4m4m4m4m4m
උපිකාන ප්රානය
.הכלההוּרָהוּרָהוּרָהוּרָהוּרָהוּרָהוּרָהוּרָהוּרָהוּרָהוּרָהוּרָהוּרָהוּרָהוּרָהsf .1. .הכלההוּרָהוּרָהוּרָהוּרָהוּרָהוּרָהוּרָהוּרָהוּרָהוּרָהוּרָהוּרָהוּרָהוּש .2. .הכלההוּרָהוּרָהוּרָהוּרָהוּרָהוּרָהוּרָהוּרָהוּרָהוּש .3. .בְבַע
natural_image
Technical line drawing of a circular mechanical fan or fan assembly with internal grid patterns and labeled EGO branding (no text beyond logo)FN1800E
- FN1800E
- VOLT LITHIUM-ION CORDLESS MISTING FAN
- READ ALL INSTRUCTIONS!
- READ OPERATOR'S MANUAL
- SAFETY SYMBOLS
- GENERAL SAFETY WARNINGS
- WORK AREA SAFETY
- EN
- PERSONAL SAFETY
- USE AND CARE
- BATTERY TOOL USE AND CARE
- SERVICE
- SAFETY INSTRUCTIONS FOR CORDLESS MISTING FAN
- SAVE THESE INSTRUCTIONS
- SPECIFICATIONS
- PACKING LIST
- EN DESCRIPTION
- KNOW YOUR MISTING FAN (Fig. A & Fig. A1)
- ASSEMBLY
- ASSEMBLING THE WHEELS (Fig. B)
- ATTACHING THE TOP HANDLE (Fig. C)
- OPERATION
- APPLICATIONS
- ADJUSTING THE FAN ANGLE (Fig. D)
- TO ATTACH/DETACH THE BATTERY PACK (Fig. E)
- Fully charge before first use.
- To attach
- To detach
- TO START/STOP THE MISTING FAN
- POWER BUTTON
- AIR SPEED ADJUSTMENT
- Normal Air Speed
- TURBO Mode
- MISTING FUNCTION
- USING THE FAN WITH A WATER BUCKET (NOT INCLUDED) (Fig. F)
- USING THE FAN WITHOUT MISTING
- INTERNAL PROTECTION
- MAINTENANCE
- GENERAL MAINTENANCE
- NOZZLE MAINTENANCE (Fig. G)
- To clear the nozzles
- FILTER MAINTENANCE (Fig. H)
- FAN ENCLOSURE MAINTENANCE (Fig. I1 & Fig. I2)
- PROTECTING THE ENVIRONMENT
- TRANSPORTING
- STORAGE
- EN TROUBLESHOOTING
- WARRANTY
- EGO WARRANTY POLICY
- ALGEMENE VEILIGHEIDSWAARSCHUWINGEN
- SIKKERHET I ARBEIDSOMRÅDET
- GENERELT VEDLIKEHOLD
- VEDLIKEHOLD AV DYSE (Fig. G)
- VEDLIKEHOLD AV VIFTEKASSE (Fig. I1 & Fig. I2)
- BEZPIECZEŃSTWO W MIEJSCU PRACY
- POLITYKA GWARANCYJNA EGO
- USCHOVEJTE SI TYTO POKYNY
- TECHNICKÉ ÚDAJE
- CITIȚI MANUALUL DE INSTRUCTIUNI
- FILTRA APKOPE (H att.)
- LUGEGE KASUTUSJUHENDIT
- ÜLDISED OHUTUSHOIATUSED
- 30g6n5 b32p0n5 b6m6d6m7m0 l0h6m6g
- උපිකාන ප්රානය
Brand : EGO
Model : FN1800E
Category : Uncategorized