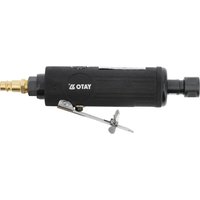
YT-0965 - Grinder Yato - Free user manual and instructions
Find the device manual for free YT-0965 Yato in PDF.


| Product type | Straight pneumatic die grinder (straight grinder) |
| Brand | Yato |
| Model | YT-0965 |
| Weight | 0.57 kg |
| Air connection (PT) | 6.3 mm / 1/4" |
| Supply hose inner diameter | 10 mm / 3/8" |
| No-load speed | 20 000 min⁻¹ |
| Tool holder diameter | 3 and 6 mm |
| Maximum equipment diameter | 40 mm |
| Maximum working pressure | 0.70 MPa |
| Recommended working pressure | 0.62 MPa |
| Required air flow (at 6.2 bar) | 160 L/min |
| Sound pressure level | 98.5 ± 3.0 dB(A) |
| Sound power level | 109.5 ± 3.0 dB(A) |
| Vibration | 1.6 ± 1.2 m/s² |
| Operating mode | Intermittent S2 5 min (5 min work, 30 min cooling) |
| Power source | Compressed air |
| Recommended lubrication | SAE 10 pneumatic tool oil |
| Required protective equipment | Safety glasses, ear protectors, protective gloves |
| Routine maintenance | Lubricate before each use with WD-40 then SAE 10 oil |
| Inspection frequency | Every 6 months or after 100 hours of use |
Frequently Asked Questions - YT-0965 Yato
User questions about YT-0965 Yato
0 question about this device. Answer the ones you know or ask your own.
Ask a new question about this device
Download the instructions for your Grinder in PDF format for free! Find your manual YT-0965 - Yato and take your electronic device back in hand. On this page are published all the documents necessary for the use of your device. YT-0965 by Yato.
USER MANUAL YT-0965 Yato
natural_image
Black YATO air-pooling tool with attached metal clamp (no visible text or symbols)CE
INSTRUKCJA ORYGINALNA
PL EN DE RU UA LT LV CZ SK HU RO ES FR IT NL GR
natural_image
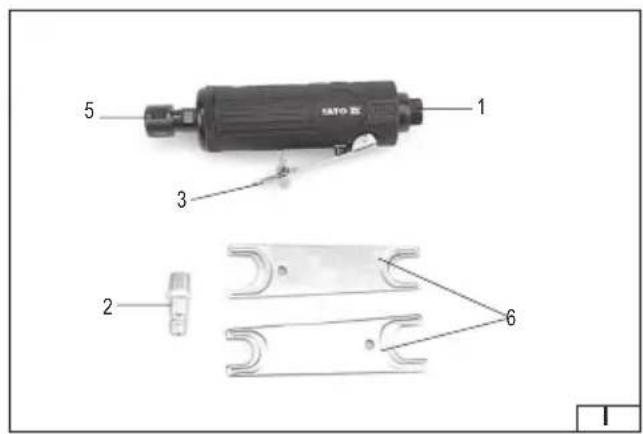
Close-up of a mechanical component with a metallic handle and metal fitting (no visible text or symbols)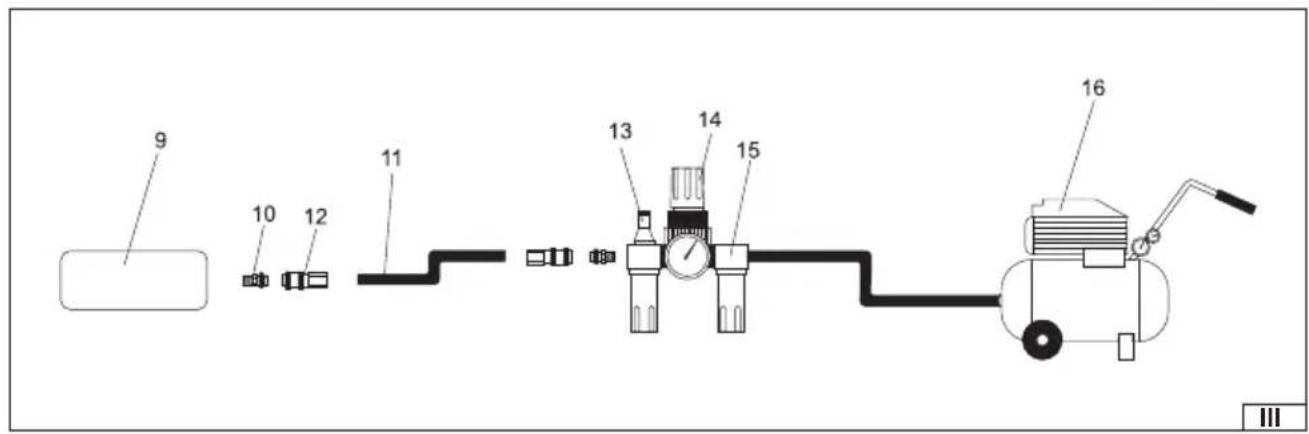
natural_image
Close-up of hands using a YATO soldering iron with a pointed tip tool (no visible text or symbols)- air fi lter
- air inlet connector
- trigger
- tool handle
- keys to the tool holder
- tool
- hose socket
- hose
- hose connector
- grease gun
- reducer
- fi Iter
- compressor
DE
Read the operating instruction
Wear protective goggles
Schutzbrille tragen
Wear hearing protectors
Gehörschutz tragen
Oil application place
Öl-Anwendungsstelle
Место подачи масла
PRODUCT CHARACTERISTICS
A pneumatic straight grinder is a tool powered by a stream of compressed air at the appropriate pressure. Using cutters and grinding stones, various materials can be processed. These tools are designed for indoor use and should not be exposed to moisture or precipitation. The tool is not intended for continuous operation. The recommended operating mode is 5 minutes of intermittent use, followed by a 30-minute cooling period. Correct, reliable, and safe tool operation depends on proper use, therefore:
Before using the tool, read the entire manual and keep it.
The supplier is not liable for any damage or injury resulting from using the tool for purposes other than its intended use, or failure to follow safety regulations or the instructions in this manual. Using the tool for purposes other than its intended use also voids the user's warranty rights and any non-conformity with the contract.
EQUIPMENT
The grinder is equipped with a connector for connecting to a pneumatic system. It also comes with wrenches for securing accessories to the handle.
TECHNICAL DATA
| Parameter Unit of measurement Value | ||
| Catalog number YT-0965 | ||
| Libra [kg] 0,57 | ||
| Air connection diameter (PT) [mm / " ] 6,3 / 1/4 | ||
| Air supply hose diameter (internal) [mm / " ] 10/ 3/8 | ||
| Turnover [min] | ^-1 20 000 | |
| Tool holder diameter [mm] 3; 6 | ||
| Maximum equipment diameter | [mm] | 40 |
| Maximum operating pressure | [MPa] | 0,70 |
| Recommended working pressure | [MPa] | 0,62 |
| Required air flow (at 6.2 bar) | [l/min] | 160 |
| Sound pressure (EN ISO 3744) | [dB(A)] | 98,5 ± 3,0 |
| Sound power (EN ISO 3744) | [dB(A)] | 109,5 ± 3,0 |
| Vibration (ISO 28927-4) | [m/s ^2 ] 1,6 ± 1,2 | |
| Operating mode | casual, S2 5 min |
GENERAL SAFETY CONDITIONS
WARNING! When using a pneumatic tool, always follow basic safety precautions, including the following, to reduce the risk of fire, electric shock, and injury.
Before using this tool, read the entire manual and keep it.
WARNING! Read all instructions below. Failure to follow them may result in electric shock, fire, or personal injury. The term „pneumatic tool" used in these instructions refers to all tools powered by compressed air at a suitable pressure.
FOLLOW THESE INSTRUCTIONS
General safety rules
Before starting installation, operation, repair, maintenance, or changing accessories, or when working near a pneumatic tool, due to the multiple hazards involved, read and understand the safety instructions. Failure to follow these instructions could result in serious injury. Installation,
EN
adjustment, and assembly of pneumatic tools should only be performed by qualified and trained personnel. Do not modify the pneumatic tool. Modifications may reduce the tool's effectiveness and safety level and increase the risk to the tool operator. Do not throw away the safety instructions; they should be given to the tool operator. Do not use the pneumatic tool if damaged. The tool should be inspected periodically to ensure the data required by ISO 11148 is visible. The employer/user should contact the manufacturer to replace the nameplate whenever necessary.
Throwaway parts hazards
Damage to the workpiece, accessories, or even the insertion tool itself can cause parts to be ejected at high speed. Always wear impact-resistant eye protection. Select the appropriate level of protection based on the job being performed. Ensure the workpiece is securely fastened. Regularly check that the tool's rotational speed does not exceed the value indicated on the nameplate. This inspection should be performed without the insertion tool installed and in accordance with the manufacturer's recommendations. Ensure that sparks and debris generated during operation do not create a hazard. Disconnect the tool from the power source before changing the insertion tool or performing maintenance. Always consider the risk to bystanders.
Entanglement Hazards
Entanglement hazard can cause choking, scalping and/or lacerations if loose clothing, jewelry, hair or gloves are not kept away from the tool or accessories.
Work-related hazards
To prevent cutting of hands and other body parts, avoid contact with the rotating spindle and insertion tool. Using the tool can expose the operator's hands to hazards such as crushing, impact, shearing, abrasion, and heat. Appropriate gloves should be worn to protect hands. The operator and maintenance personnel should be physically capable of handling the volume, weight, and power of the tool. Hold the tool correctly. Be prepared to resist normal or unexpected movements and keep both hands available at all times. Maintain balance and a safe footing. Wear safety glasses; close-fitting gloves and protective clothing are recommended. Do not operate the rotary file at speeds exceeding the rated speed. Wear a safety helmet when working overhead. Be careful because the insertion tool continues to rotate for some time after the trigger is released. Depending on the material being processed, consider explosion or fire hazards.
Hazards associated with repetitive movements
When using a pneumatic tool for repetitive work, the operator is likely to experience discomfort in the hands, arms, shoulders, neck, or other parts of the body. When using a pneumatic tool, the operator should adopt a comfortable posture that ensures proper foot positioning and avoid awkward or unbalanced postures. Changing posture during prolonged work will help avoid discomfort and fatigue. If the operator experiences symptoms such as persistent or recurring discomfort, pain, throbbing pain, tingling, numbness, burning, or stiffness, they should not ignore them, they should report them to their employer and consult a doctor.
Dangers associated with accessories
Disconnect the tool from the power source before changing the inserted tool or accessories.
Only use accessories and consumables of sizes and types recommended by the manufacturer. Do not use accessories of other sizes and types. Avoid direct contact with the inserted tool during and after use; it may be hot or sharp.
Verify that the maximum operating speed of the inserted tool is greater than the rated speed of the grinder or polisher. Verify that the maximum operating speed of the inserted tool is greater than the rated speed of the tool. Never mount an abrasive wheel, cutting wheel, or cutter on a grinder. A damaged grinding wheel can cause serious injury or death. Do not use cracked or broken wheels, or wheels that have been dropped. Use only approved inserted tools with the correct shank diameter. Note that the rotational speed of the mounting point must be reduced due to the increased shaft length between the end of the sleeve and the mounting point. Ensure that the minimum length of the shank clamped in the tool holder is at least 10 mm (also consider the recommendations of the insert tool manufacturer). Avoid errors when matching the shank diameter of the inserted tool and the air tool clamp.
Workplace hazards
Slips, trips, and falls are major causes of injury. Beware of slippery surfaces caused by tool use and tripping hazards caused by air lines. Proceed with caution in unfamiliar surroundings. Hidden hazards may exist, such as electricity or other utility lines. The air tool is not intended for use in explosive atmospheres and is not insulated from contact with electricity. Ensure there are no electrical wires, gas pipes, etc., that could cause a hazard if damaged by the tool.
EN
Hazards related to fumes and dust
Dust and fumes generated by using a pneumatic tool can cause ill health (for example, cancer, birth defects, asthma, and/or dermatitis). Risk assessment and implementation of appropriate control measures for these hazards are essential. The risk assessment should include the impact of dust generated by the tool and the potential for stirring up existing dust. Air exhaust should be directed to minimize dust agitation in a dusty environment. Where dust or fumes are generated, priority should be given to controlling them at the source. All integrated features and equipment for collecting, extracting, or reducing dust or fumes should be properly used and maintained in accordance with the manufacturer's recommendations. Respiratory protection should be worn in accordance with the employer's instructions and in accordance with health and safety requirements. The pneumatic tool should be operated and maintained in accordance with the instructions in the user manual to minimize fume and dust emissions. Select, maintain, and replace insertion tools as recommended in the user manual to prevent fume and dust buildup. Processing certain materials can create fumes and dust that can create an explosion hazard.
Noise hazard
Unprotected exposure to high noise levels can cause permanent and irreversible hearing loss and other problems, such as tinnitus (ringing, buzzing, whistling, or humming in the ears). Risk assessment and implementation of appropriate control measures for these hazards are essential. Appropriate controls to reduce risk may include measures such as: using mufflers to prevent workpiece „ringing." Wear hearing protection in accordance with your employer's instructions and in accordance with health and safety requirements. Air tool operation and maintenance should be carried out according to the instructions in the operating manual to avoid unnecessary increases in noise levels. If the air tool has a muffler, always ensure it is properly fitted during use. Select, maintain, and replace worn and inserted tools according to the operating manual's recommendations. This will prevent unnecessary increases in noise levels.
Vibration hazard
Exposure to vibration can cause permanent damage to the nerves and blood supply to the hands and arms. Keep hands away from screwdriver sockets. Dress warmly when working in cold temperatures and keep your hands warm and dry. If you experience numbness, tingling, pain, or skin whitening in your fingers or palms, stop using the pneumatic tool, inform your employer, and consult a doctor. Operating and maintaining the pneumatic tool according to the instructions in the manual will help avoid unnecessary increases in vibration levels. Do not use worn or poorly fitting attachments, as this can significantly increase vibration levels. Select, maintain, and replace worn insertion tools according to the instructions in the manual. This will help avoid unnecessary increases in vibration levels. A shielded mounting should be used where possible. Where possible, support the weight of the tool with a stand, tensioner, or balancer. Hold the tool with a light but firm grip, taking into account the required reaction forces, as the vibration hazard is usually greater when the grip force is higher. An incorrectly mounted or damaged insertion tool may cause increased vibration levels.
Additional safety instructions for air tools
Warning: Pressurized air can cause serious injury.
Caution! Always place the tool in a safe place on a flat surface, turn off the air supply, relieve air pressure from the hose, and disconnect the tool from the air supply when: not in use, before changing accessories, or before making repairs.
Caution! Never direct the air flow at yourself or other people.
Maintain a safe workspace. Do not operate the tool in an area where there is no room to keep your hands safe.
Hose impacts can cause serious injury. Always inspect for damaged or loose hoses and couplings. Direct cold air away from hands. Do not use quick-disconnect couplings on the inlet of impact or air-hydraulic tools. Use threaded couplings made of hardened steel (or a material of equivalent strength). Whenever universal screw connections (claw couplings) are used, locking pins and safety couplers must be used to prevent damage to the connections between hoses and between the hose and the tool. Do not exceed the maximum air pressure specified for the tool. Air pressure is critical to safety and affects performance in torque-controlled systems and continuous-speed tools. In these cases, hose length and diameter requirements should be maintained. Never carry the tool by the hose.
OPERATING CONDITIONS
Ensure that the compressed air source can generate the proper operating pressure and provide the required airflow. If the supply air pressure is too high, a pressure reducer with a safety valve should be used. The pneumatic tool should be supplied through a filter and lubricator system. This ensures both air purity and lubrication with oil. The condition of the filter and lubricator should be checked before each use and, if necessary, cleaned or the lubricator should be refilled. This will ensure proper tool operation and extend its service life. When using additional holders or support stands, ensure that the tool is properly and securely attached.
EN
Adopt a suitable posture to counteract normal or unexpected tool movement caused by torque.
Be careful with your work environment, the grinder can easily cut through.
Do not use grinding wheels and tools intended for grinding the side surface for cutting.
Do not use cutting discs or milling discs.
Self-clamping sanding discs should be placed concentrically on the sanding pad.
After turning off the grinder, wait until the rotating tool has come to a complete stop before putting it down.
Before installing additional accessories, ensure that the maximum speed of the accessory is higher than the grinder's speed. Do not use accessories with holders of different dimensions than those specified in the instructions. The inserted tool must be firmly and securely fastened in the tool holder.
Do not use sleeves or reduction rings to adjust the tool spindle and grinding wheel diameters.
Store and use the abrasive according to the equipment manufacturer's instructions. Do not use damaged equipment. Equipment with any defects must be replaced immediately with new, functional equipment. Inspect the spindle and tool holders for wear or damage.
Do not operate the grinder in areas with a high risk of explosion. Sparks generated during operation may cause a fire.
After mounting the grinding wheel, run the tool for approximately 30 seconds in a safe position. Stop the tool immediately if you notice excessive vibration or other abnormalities in the grinder's behavior.
Any irregularities must be corrected before the next operation of the grinder.
Make sure that the rotational speed of the grinder is not greater than that stated on the nameplate.
Processing some materials may produce toxic or flammable dust and fumes. Work in well-ventilated areas and wear personal protective equipment.
When choosing protective measures, the type of material being processed should be taken into account.
Make sure that sparks and debris generated during operation do not pose a hazard.
Use personal protective equipment such as gloves, apron, helmet.
If the tool is dropped with the grinding wheel attached, carefully check the condition of the grinding wheel before switching it on again.
USING THE TOOL
Before each use of the tool, ensure that no pneumatic components are damaged. If damage is observed, replace the system components immediately with new, undamaged ones.
Before each use of the pneumatic system, dry any moisture condensed inside the tool, compressor and hoses.
Connecting the tool to the pneumatic system
The illustration shows the recommended method of connecting the tool to the pneumatic system. This method will ensure the most efficient use of the tool and will also extend the tool's life.
Put a few drops of SAE 10 viscosity oil into the air intake.
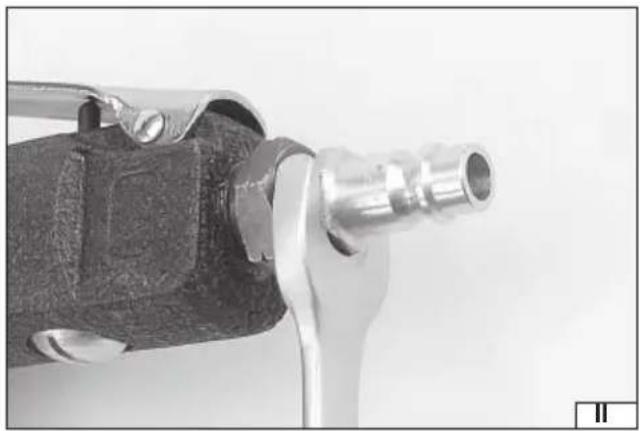
Screw the appropriate end for connecting the air supply hose (II) firmly and securely onto the air inlet thread.
Attach the appropriate attachment to the tool's driver.
Where possible, adjust pressure (torque).
Connect the tool to the air system using a hose with an internal diameter of 10 mm / 3/8". Make sure that the hose strength is at least 1,38 MPa (III).
Run the tool for a few seconds, making sure there are no unusual sounds or vibrations coming from it.
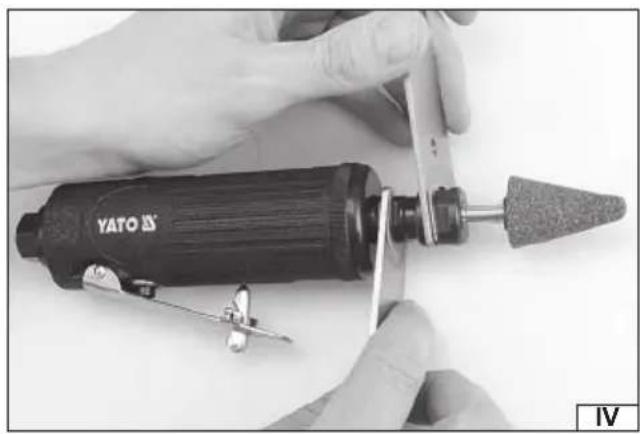
Installation and replacement of equipment (IV)
Make sure the maximum speed of the equipment is higher than the speed of the grinder. Follow the grinding wheel manufacturer's recommendations regarding the speed and length of the arbor to be used in the spindle.
Grasp the spindle and unscrew the retaining nut until the handle allows the accessory to be attached.
Install the accessory so that there is at least 10 mm of shank in the spindle.
Using the wrenches, securely and firmly tighten the mounting nut onto the spindle.
Working with a grinder
Select the appropriate tool for the intended application. Before starting work, allow the grinding wheel to reach full speed. Only apply the rotating grinding wheel to the material.
Apply only the amount of pressure required to cut the material. Excessive pressure can damage the grinding wheel and increase the risk of injury.
During operation, sparks may be generated and fragments of the workpiece may be detached. Care must be taken to ensure that sparks and detached fragments do not create a hazard in the workplace.
EN
After finishing work, place the device in a safe place on a flat surface, disassemble the pneumatic system and preserve the tool.
MAINTENANCE
Never use gasoline, thinner, or other flammable liquids to clean the tool. Fumes may ignite, causing the tool to explode and causing serious injury. Solvents used to clean the tool holder and body can cause the seals to soften. Dry the tool thoroughly before use.
If any irregularities in the operation of the tool are observed, the tool must be immediately disconnected from the pneumatic system.
All pneumatic system components must be protected from contamination. Contaminants entering the pneumatic system can damage the tool and other pneumatic components.
Tool maintenance before each use
Disconnect the tool from the pneumatic system.
Before each use, inject a small amount of maintenance fluid (e.g. WD-40) through the air inlet.
Connect the tool to the air system and run it for approximately 30 seconds. This will distribute the preservative fluid throughout the tool and clean it.
Disconnect the tool from the pneumatic system again.
Apply a small amount of SAE 10 oil to the tool through the air intake port and the designated ports. SAE 10 oil designed for air tool maintenance is recommended. Plug in the tool and run it briefly.
Note: WD-40 cannot be used as a proper lubricant.
Wipe away any excess oil that escapes through the exhaust ports. Any remaining oil may damage the tool's seals.
Other maintenance activities
Before each use, inspect the tool for any visible signs of damage. Keep the drivers, tool holders, and spindles clean.
Every 6 months or after 100 hours of operation, have the tool inspected by qualified personnel at a repair shop. If the tool has been used without the recommended air supply system, the tool inspection frequency should be increased.
Troubleshooting
Stop using the tool immediately if any defect is detected. Operating a faulty tool can cause injury. Any repairs or replacement of tool components must be performed by qualified personnel at an authorized repair facility.
| Fault Possible solution | |
| The tool is running too slow or won't start | Inject a small amount of WD-40 through the air intake hole. Run the tool for a few seconds. The blades may be stuck to the rotor. Run the tool for about 30 seconds. Lubricate the tool with a small amount of oil. Caution! Excess oil can reduce the tool's power. If this happens, clean the drive. |
| The tool starts and then slows down | The compressor is not providing adequate air supply. The tool is powered by the air stored in the compressor's tank. As the tank empties, the compressor cannot keep up with the air supply. Connect the device to a more powerful compressor. |
| Insufficient power | Make sure your hoses have an internal diameter at least as large as the one specified in the table in step 3. Check the pressure setting to ensure it is set to the maximum. Make sure the tool is properly cleaned and lubricated. If this doesn't work, have the tool serviced. |
Spare parts
For information about spare parts for pneumatic tools, contact the manufacturer or its representative.
After finishing work, clean the housing, ventilation slots, switches, auxiliary handle, and guards, for example, with an air jet (pressure no greater than 0.3 MPa), a brush, or a dry cloth without using chemicals or cleaning fluids. Clean tools and handles with a dry, clean cloth.
Used tools are recyclable materials - they should not be disposed of in household waste, as they contain substances hazardous to human health and the environment! Please actively help us manage natural resources and protect the environment by taking your used device to a recycling center. To reduce the amount of waste disposed of, it is essential to reuse, recycle, or recover it in some other way.
DE
PRODUKTA RAKSTUROJUMS
E R E D E T I U T A S Í T Á S
HU
CARACTÉRISTIQUES DU PRODUIT
DEKLARACJA ZGODNOŚCI DECLARATION OF CONFORMITY DECLARATIE DE CONFORMITATE
1025/YT-0965/EC/2025
We declare and guarantee with full responsibility that the following products:
meet requirements of the following European Standards / Technical Specifications:
and fulfill requirements of the following European Directives:
2006/42/EC Machinery and safety elements
Serial number: concern all serials numbers of item(s) mentioned in this declaration
The person authorized to compile the technical file:


- DE
- PRODUCT CHARACTERISTICS
- Before using the tool, read the entire manual and keep it.
- EQUIPMENT
- GENERAL SAFETY CONDITIONS
- Before using this tool, read the entire manual and keep it.
- FOLLOW THESE INSTRUCTIONS
- General safety rules
- EN
- Throwaway parts hazards
- Entanglement Hazards
- Work-related hazards
- Hazards associated with repetitive movements
- Dangers associated with accessories
- Workplace hazards
- Hazards related to fumes and dust
- Noise hazard
- Vibration hazard
- OPERATING CONDITIONS
- USING THE TOOL
- MAINTENANCE
- Tool maintenance before each use
- Other maintenance activities
- Troubleshooting
- Spare parts
- PRODUKTA RAKSTUROJUMS
- HU
- CARACTÉRISTIQUES DU PRODUIT
- DEKLARACJA ZGODNOŚCI DECLARATION OF CONFORMITY DECLARATIE DE CONFORMITATE
Brand : Yato
Model : YT-0965
Category : Grinder