
BXWSH2001E - Electric heating BLACK & DECKER - Free user manual and instructions
Find the device manual for free BXWSH2001E BLACK & DECKER in PDF.

User questions about BXWSH2001E BLACK & DECKER
0 question about this device. Answer the ones you know or ask your own.
Ask a new question about this device
Download the instructions for your Electric heating in PDF format for free! Find your manual BXWSH2001E - BLACK & DECKER and take your electronic device back in hand. On this page are published all the documents necessary for the use of your device. BXWSH2001E by BLACK & DECKER.
USER MANUAL BXWSH2001E BLACK & DECKER
EN. Instructions for use
FR. Mode d'emploi
natural_image
Simple line drawing of a rectangular frame with a circular hole on top (no text or symbols)BXWSH2001E
EN This product is only suitable for well insulated spaces or occasional use.
flowchart
graph TD
    D["● D"] --> a["a"]
    D --> d["d"]
    d --> k["k"]
    d --> l["l"]
    k --> b["b"]
    l --> h["h"]
    i["i"] --> c["c"]
    j["j"] --> f["f"]
    g["g"] --> e["e"]
    a --> c
    d --> f
    k --> f
    l --> f
    b --> f
    h --> f
    c --> j
    f --> g
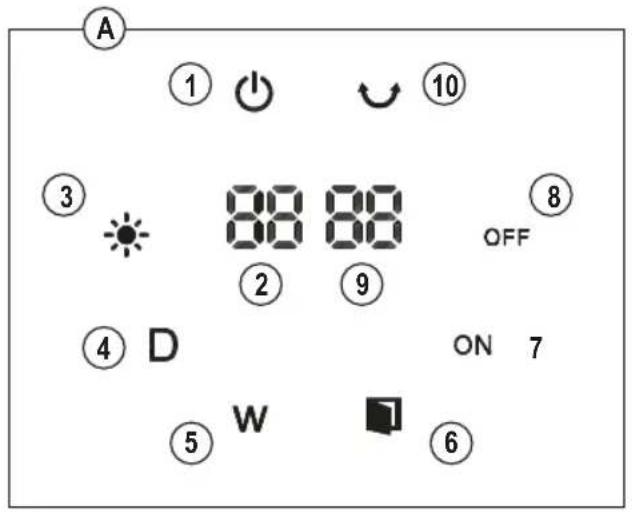
Fig. 1
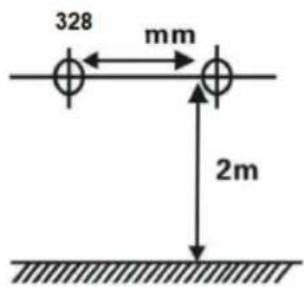
Fig. 2

WALL MOUNTED HEATER BXWSH2001E
Dear customer,
Many thanks for choosing to purchase a Black+Decker brand product.
Thanks to its technology, design and operation and the fact that it exceeds the strictest quality standards, a fully satisfactory use and long product life can be assured.
SAFETY ADVICE AND WARNINGS
- CAUTION: Some parts of this product can become very hot and cause burns. Particular attention has to be given where children and vulnerable people are present.
- Read these instructions carefully before switching on the appliance and keep them for future reference. Failure to follow and observe these instructions could lead to an accident.
- This appliance can be used by children aged from 8 years and above and persons with reduced physical, sensory or mental capabilities or lack of experience and knowledge if they have been given supervision or instruction concerning use of the appliance in a safe way and understand the hazards involved. Children shall not play with the appliance. Cleaning and user maintenance shall not be made by children without supervision.
• Children of less than 3 years should be kept away unless continuously supervised.
• Children aged from 3 years and less than 8 years shall only switch
on/off the appliance provided that it has been placed or installed in its intended normal operating position and they have been given supervision or instruction concerning use of the appliance in a safe way and understand the hazards involved.
- Children aged from 3 years and less than 8 years shall not plug in, regulate and clean the appliance or perform user maintenance.
- This heater must be installed at least 1,8 m above the floor.
- This heater is to be installed so that switches and other controls cannot be touched by a person in the bath or shower.
- This heater must not be located immediately below a socket-outlet.
- If the supply cord is damaged, it must be replaced by the manufacturer, its service agent or similarly qualified persons in order to avoid a hazard.
- This appliance is for household use only, not professional or industrial use.
- Ensure that the voltage indicated on the rating label matches the mains voltage before plugging in the appliance.
- Connect the appliance to a mains socket rated at least 10 amperes.
- The appliance's plug must fit into the mains socket properly. Do not alter the plug. Do not use plug adaptors.
- Do not use the appliance if the supply cord or the plug is damaged.
- Do not pull on the supply cord. Never use the supply cord to lift up, carry or unplug the appliance.
- Do not wrap the supply cord around the appliance.
-
Check the state of the supply cord. If it is damaged it will increase the risk of electric shock.
-
Do not allow the supply cord to hang freely or to come into contact with the appliance's hot surfaces.
- If the appliance enclosure breaks, immediately disconnect the appliance from the mains to prevent the possibility of an electric shock.
- Do not touch the plug with wet hands.
- Do not use or store the appliance outdoors.
- Do not leave the appliance out in the rain or exposed to moisture. If water gets into the appliance, this will increase the risk of electric shock.
- The temperature of the accessible surfaces may be high when the appliance is in use.
- Do not touch any heated part, as this may cause serious burns.
- This battery is non-rechargeable. Non-rechargeable batteries are not to be recharged.
- Different types of batteries or new and used batteries are not to be mixed.
- Batteries are to be inserted with the correct polarity.
- Exhausted batteries are to be removed from the appliance and safely disposed of.
- If the appliance is to be stored unused for a long period, the batteries should be removed.
- The supply terminals are not to be short-circuited.
- Do not dismantle, open or shred the batteries.
- WARNING: Keep batteries out of the reach of children. Battery usage by children should be supervised. Especially keep small batteries out of reach of small children.
- Seek medical assistance immediately if a cell or a battery has been swallowed.
- If you think batteries might have been swallowed or placed inside any part of the body, seek immediate medical attention. Swallowing may lead to burns, perforation of soft tissue, and death. Severe burns can occur within 2 h of ingestion.
- If the battery compartment does not close securely, stop using the product and keep it away from children.
- Do not expose cells or batteries to heat or fire. Avoid storage in direct sunlight.
- Do not short-circuit a cell or a battery. Do not store cells or batteries haphazardly in a box or drawer where they may short-circuit each other or be short-circuited by other metal objects.
- Do not subject cells or batteries to mechanical shock.
-
In the event of a cell leaking, do not allow the liquid to come in contact with the skin or eyes. If contact has been made, wash the affected area with copious amounts of water and seek medical advice.
-
Observe the plus (+) and minus (−) marks on the cell, battery and equipment and ensure correct use.
- Do not use any cell or battery which is not designed for use with the equipment.
USE AND CARE
- Fully extend the appliance's supply cord before each use.
- Do not use the appliance if the on/off button or the power switch do not work.
- Do not move the appliance while in use.
- Disconnect the appliance from the mains when not in use and before undertaking any cleaning task.
- Keep the appliance in a dry, dust-free place, out of direct sunlight.
- Make sure that dust, dirt or other foreign objects do not block the fan grill on the appliance.
- Keep the appliance in good condition. Check that the moving parts are not misaligned or jammed and make sure there are no broken parts or anomalies that may prevent the appliance from operating correctly.
- Never leave the appliance connected and unattended if is not in use. This saves energy and prolongs the life of the appliance.
- Do not use the appliance to dry pets or animals.
- Do not use the appliance to dry textiles of any kind.
- Do not use this heater in the immediate surroundings of a bath, a shower or a swimming pool.
- If the appliance is installed on a bathroom wall, it must be positioned in such a way that the socket, power supply cable, switches or other controls are not within the reach a person in the bath, shower or at the wash-hand basin.
- If you use the appliance in a bathroom or similar place, unplug the appliance from the mains when it is not in use, even if it is only for a short while, as proximity to water involves a risk, even if the appliance is disconnected.
- This appliance must be fixed into a wall. The minimum distance between the floor and the lower part of the appliance is 2 m. (Fig.1).
- Do not cover or obstruct the sides of the appliance, leave a minimum space of 0.25 cm around the appliance.
- Do not cover or obstruct any of the openings of the appliance.
- The plug must be easily accessible so it can be disconnected in an emergency.
DESCRIPTION
A Control panel
B Grill air outlet
C ON/OFF button
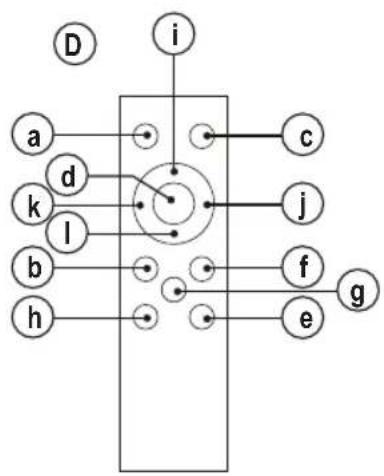
D Remote control
CONTROL PANEL
- Power indicator
- Current temperature
- Heating level indicator
- White - Low
- Red - High
- 24h timer indicator
- Weekly timer indicator
- Window open sensor indicator
- Function open indicator
- Function close indicator
- Set temperature
- Swing indicator
REMOTE CONTROL
a. ON/OFF" button
b. 24 hours timer button
c. Mode button
d. Swing button
e. Lock function button
f. Open window function button
g. Display real time button
h. Delay button
i. Weekly timer button
j. Increase button
k. Decrease button
I. Set real time button
If the model of your appliance does not have the accessories described above, they can also be bought separately from the Technical Assistance Service.
ASSEMBLING THE WALL BRACKET
- The appliance has a built-in wall mount on which it can be supported.
- Fix the appliance as you think appropriate, using plugs, screws ...
- Taking the above-mentioned separation distances into account, place the wall support in the required position and mark the drilling points on the wall. (Fig.2).
- Drill into the wall where marked and insert the rawlplugs and the screws.
- Place the appliance by matching the holes with the screws.
- Make sure that the appliance is firmly fixed; it should be able to support twice the weight of the appliance.
ASSEMBLING THE BATTERY/S OF THE REMOTE CONTROL
- This appliance uses a pair of 1,5V AAA batteries.
- Caution: During the handling of batteries, do not touch both poles at the same time, as this will provoke the partial discharge of the stocked energy therefore affecting longevity.
- Remove the cover of the battery compartment.
- Check that the plastic covering that protects the battery has been removed (some batteries are sold with a protective covering)
- Put the battery in its compartment, respecting the polarity.
- Replace the cover of the battery compartment.
- It is essential that the batteries should always be the same kind and the same charge. Never mix alkaline batteries with Carbon-Zinc ones and/or rechargeable ones.
• Non-rechargeable batteries are not to be recharged - DO NOT charge rechargeable batteries while they are still in the appliance as it may cause internal gas or heat generation, resulting in an explosion or possibly a fire that could cause serious injury or property damage.
- To preserve battery life, remove the batteries when it's not being used, and is not expected to be used for extended periods of time.
- When the battery is fully charged disconnect the charger from the mains supply.
INSTRUCTIONS FOR USE
BEFORE USE
- Make sure that all product's packaging has been removed.
- Please read carefully the "Safety advice and warnings" booklet before first use
- Prepare the appliance according to the function you wish to use.
USE
- Extend the supply cord completely before plugging it in.
- Connect the appliance to the mains.
- Turn on the appliance by using the On/off button. The appliance starts to blow cold air.
- Pressing Mode button once, appliance starts to blow warm air and the heating level indicator becomes white.
- Pressing Mode button again the air becomes hot and the light turns red.
Note: When the appliances is Off, pressing the On/off button, it starts working in hot air blowing mode.
SWING FUNCTION
- Start this function by pressing the swing button.
TIMER FUNCTION
- Turn on the appliance and select the desired mode.
- Use the timer button to adjust the timer (00-24h)
TEMPERATURE SETTINGS
- To set the desired temperature, use the increase and decrease buttons. The temperature can be set between 10^ to 49^ .
- The appliance will start to blow hot air when the current temperature is 2 degrees lower than the set temperature and starts tot blow cold air when it is 1 degree higher than it.
WEEKLY SETTING
- Turn on the appliance
• We need to set real time first.
WEEK SETTING
- Push "Set real time" button and number 1 (monday) will appear. Push increase or decrease buttons to set the current week day from 1-7 (Monday to Sunday) and push "Set real time" button again to confirm day.
HOUR SETTING
- Press "Set real time" button again, LED display front "00" twinkle, press Push increase or decrease buttons to set the current hour from 01-00 (1 to 24h)
MINUTE SETTING
- Press "Set real time" button once more, in display will appear "00" for minutes. Press increase or decrease buttons to set the minutes (0 to 59 minutes)
NOTE: " Set real time" button will twinkle for 5 seconds, you should operate before those 5 seconds, otherwise appliance will get back to standby.
(Appliance will keep the right time until power off)
WEEKLY TIMER SETTING
SETTING OPEN TIMER
WEEK
Press "weekly timer" button 1 time and "1" will appear on screen (Monday). Use increase or decrease buttons to set the desired time. (1=Monday...7=Sunday)
HOUR
Press “weekly timer” 2 times. Display will show “00” twinkle, Use increase or decrease buttons to set the desired hour from 01-00 (1 to 24h)
MINUTE
Press "weekly timer" button 3 times, LED. display will show "00" twinkle. Use increase or decrease buttons to set the desired minutes from (0 to 59 minutes)
With the "function open indicator" on display, it means time is set.
SETTING CLOSING TIMER
HOUR
Press "weekly timer" button 4 times, LED display shows "00" twinkle.
Press increase or decrease buttons to set the hours from 01-00 (1 to 24h)
MINUTE
Press weekly timer" button 5 times. Display will show "00" twinkle. Use increase or decrease to set the minutes from (0 to 59 minutes)
With the "function close indicator" light on on display, it means timer it's off.
ADD ADDITIONAL PROGRAMMING DAYS
- Press "weekly timer" button once more (6 times)
- Push increase or decrease buttons to set the desired day of the week from 1-7 (Monday to Sunday)
SET TEMPERATURE ON WEEK TIMER
- Push “delay” button to set the desired day of the week from 1-7 (Monday to Sunday)
- Use increase or decrease buttons to select the temperature you need (10°C to 49°C).
OPEN WINDOW FUNCTION
- Press "Open window function" button. The appliance is working as smart saving energy models. (In this function, the appliance is check and record environment temperature. It will stop working when the device detects a temperature drop of 3^ or more in 1 minute.
- The user should restart the appliance with "ON/OFF" button)
- To unset the function, press "Open window function" again.
CHILD-LOCK FUNCTION
- This function allows you lock the buttons on the remote control.
- Press lock function button to turn on this function. All lights on display are closed except power indicator.
- Press lock function button again to turn off this function.
ONCE YOU HAVE FINISHED USING THE APPLIANCE
- Turn the appliance off, using the on/off button.
- Unplug the appliance from the mains.
- Allow to cool down.
- Clean the appliance.
SAFETY THERMAL PROTECTOR
- The appliance has a safety device, which protects the appliance from overheating.
- If the appliance turns itself off and does not switch itself on again, disconnect it from the mains supply, and wait for approximately 15 minutes before reconnecting. If the machine does not start again seek authorised technical assistance.
CLEANING
- Disconnect the appliance from the mains and allow it to cool before undertaking any cleaning task.
- Clean the equipment with a damp cloth with a few drops of washing-up liquid and then dry.
- Do not use solvents, or products with an acid or base pH such as bleach, or abrasive products, for cleaning the appliance.
-
Do not let water or any other liquid get into the air vents to avoid damage to the inner parts of the appliance.
-
Never immerse the appliance in water or any other liquid or place it under running water.
- If the appliance is not clean and in good condition, its surface may degrade, which will affect its useful life and could make it unsafe to use.
SERVICE
- Any misuse or failure to follow the instructions for use renders the guarantee and the manufacturer's liability null and void.
ANOMALIES AND REPAIR
• Take the appliance to an authorised technical support service if problems arise. Do not try to dismantle or repair without assistance, as this may be dangerous.
WARRANTY AND TECHNICAL ASSISTANCE
This product enjoys the recognition and protection of the legal guarantee in accordance with current legislation. To enforce your rights or interests, you must go to any of our official technical assistance services.
You can find the closest one by accessing the following web link: https://www.blackanddecker.eu//
You can also request related information by contacting us.
You can download this instruction manual and its updates at https://www.blackanddecker.eu//
FOR EU PRODUCT VERSIONS AND/OR IN THE CASE THAT IT IS REQUESTED IN YOUR COUNTRY: ECOLOGY AND RECYCLABILITY OF THE PRODUCT
- The materials of which the packaging of this appliance consists are included in a collection, classification and recycling system. Should you wish to dispose of them, use the appropriate public containers for each type of material.
- The product does not contain concentrations of substances that could be considered harmful to the environment.
This symbol means that in case you wish to dispose of the product once its working life has ended, take it to an authorised waste agent for the selective collection of waste electrical and electronic equipment
(WEEE).
- This appliance complies with Directive 2014/35/EU on Low Voltage, Directive 2014/30/EU on Electromagnetic Compatibility, Directive 2011/65/EU on the restrictions of the use of certain hazardous substances in electrical and
electronic equipment and Directive 2009/125/EC on the ecodesign requirements for energy-related products.
- The following table details the information requirements for electric local space heaters according to Commission Regulation (EU) 2024/1103 of 18 April 2024 implementing Directive 2009/125/EC of the European Parliament and of the Council as regards ecodesign requirements for local space heaters.
| Contact details Engineering and Technology for life, S.L. | Avda. Barcelona, s/n, 25790 Oliana, Lleida (Spain) | ||
| Model identifier(s): BXWSH2001E | |||
| Item Symbol Value Unit | |||
| Heat output | |||
| Nominal heat output P | nom | 2,000 kW | |
| Minimum heat output (indicative) P | min | 1,151 kW | |
| Maximum continuous heat output P | max.c | 1,938 kW | |
| Power consumption | |||
| In off mode P | o | N.A. W | |
| In standby mode P | sm | 0,43 W | |
| In idle mode P | idle | 0,43 W | |
| In network standby P | nsm | N.A. W | |
| Standby mode with display of information or status | yes | ||
| Seasonal space heating energy efficiency in active mode | n_s,on | 92,0 % | |
| Type of heat output/room temperature control (select one) | |||
| Single stage heat output and no room temperature control | no | ||
| Two or more manual stages, no room temperature control | no | ||
| With mechanic thermostat room temperature control | no | ||
| With electronic room temperature control | no | ||
| Electronic room temperature control plus day timer | no | ||
| Electronic room temperature control plus week timer | yes | ||
| Other control options (multiple selections possible) | |||
| Room temperature control, with presence detection | no | ||
| Room temperature control, with open window detection | yes | ||
| Distance control option | no | ||
| Adaptive start control | no | ||
| Working time limitation | yes | ||
| Black bulb sensor | no | ||
| Self-learning functionality | no | ||
| Control accuracy | no | ||
Black & Decker® and BLACK+DECKER™ and the Black & Decker® and BLACK+DECKER™ logos are registered trademarks of The Black & Decker® Corporation and are used under licence. All rights reserved. Imported and Distributed by ENGINEERING AND TECHNOLOGY FOR LIFE, S.L. Avda. Barcelona s/n Oliana, 25790, Spain
Oliana, 25790, Spain
Oliana, 25790, Spain
Oliana, 25790, Spain
VEILIGHEIDSADVIES EN WAARSCHUWINGEN
VENSTERFUNCTIE OPENEN
ALS U KLAAR BENT MET HET APPARAAT
NIEPRAWIDŁOWOŚCI I NAPRAWY
Oliana, 25790, Spain
Oliana, 25790, Spain
ENGINEERING AND TECHNOLOGY FOR LIFE, S.L.
Avda. Barcelona s/n Oliana, 25790, Spain
ÎNCĂLZITOR MONTAT PE PERETE BXWSH2001E
Stimate client,
FOR EU-PRODUKTVERSIONER OG/ELLER I TILFÆLDE AF, AT DER ANMODES OM DET I DIT LAND: PRODUKTETS ∅KOLOGI OG GENANVENDELIGHED
HVER UKESINNSTILLING
ENGINEERING AND TECHNOLOGY FOR LIFE, SL
Oliana, 25790, Spain
ENGINEERING AND TECHNOL-
OGY FOR LIFE, SL Avda. Barcelona s/n Oliana,
25790, Spain
.הכלההוּרָהוּרָהוּרָהוּרָהוּרָהוּרָהוּרָהוּרָהוּרָהוּרָהוּרָהוּרָהוּרָהוּרָהוּרָה
ENGINEERING AND TECHNOLOGY FOR LIFE, S.L.
Avda. Barcelona s/n, Oliana, 25790, Spain
www.blackanddecker.eu
- WALL MOUNTED HEATER BXWSH2001E
- SAFETY ADVICE AND WARNINGS
- USE AND CARE
- DESCRIPTION
- CONTROL PANEL
- REMOTE CONTROL
- ASSEMBLING THE WALL BRACKET
- ASSEMBLING THE BATTERY/S OF THE REMOTE CONTROL
- INSTRUCTIONS FOR USE
- BEFORE USE
- USE
- SWING FUNCTION
- TIMER FUNCTION
- TEMPERATURE SETTINGS
- WEEKLY SETTING
- WEEK SETTING
- HOUR SETTING
- MINUTE SETTING
- WEEKLY TIMER SETTING
- SETTING OPEN TIMER
- WEEK
- HOUR
- MINUTE
- SETTING CLOSING TIMER
- ADD ADDITIONAL PROGRAMMING DAYS
- SET TEMPERATURE ON WEEK TIMER
- OPEN WINDOW FUNCTION
- CHILD-LOCK FUNCTION
- ONCE YOU HAVE FINISHED USING THE APPLIANCE
- SAFETY THERMAL PROTECTOR
- CLEANING
- SERVICE
- ANOMALIES AND REPAIR
- WARRANTY AND TECHNICAL ASSISTANCE
- FOR EU PRODUCT VERSIONS AND/OR IN THE CASE THAT IT IS REQUESTED IN YOUR COUNTRY: ECOLOGY AND RECYCLABILITY OF THE PRODUCT
- VEILIGHEIDSADVIES EN WAARSCHUWINGEN
- VENSTERFUNCTIE OPENEN
- ALS U KLAAR BENT MET HET APPARAAT
- NIEPRAWIDŁOWOŚCI I NAPRAWY
- ÎNCĂLZITOR MONTAT PE PERETE BXWSH2001E
- FOR EU-PRODUKTVERSIONER OG/ELLER I TILFÆLDE AF, AT DER ANMODES OM DET I DIT LAND: PRODUKTETS ∅KOLOGI OG GENANVENDELIGHED
- HVER UKESINNSTILLING
Brand : BLACK & DECKER
Model : BXWSH2001E
Category : Electric heating