
Terrenator E7 Liberty Z Plus - Lawn mower CECOTEC - Free user manual and instructions
Find the device manual for free Terrenator E7 Liberty Z Plus CECOTEC in PDF.

| Product Type | Cordless Lawn Mower |
| Brand | Cecotec |
| Model | Terrenator E7 Liberty Z Plus (EU01_108038) |
| Power Source | 21V Lithium-ion Battery |
| Battery Capacity | 4 Ah (80 Wh) |
| Motor Power | 800 W |
| Grass Bag Capacity | 45 L |
| Net Weight | 14 kg |
| Sound Pressure Level | 78.5 dB(A) (uncertainty 3 dB) |
| Sound Power Level | 90.0 dB(A) (uncertainty 2.08 dB) |
| IP Protection | IPX1 (protected against vertical water drops) |
| Cutting Height Adjustment | Yes, multiple positions (by side lever) |
| Mulching System | Yes (mulching bag included) |
| Safety Device | Removable safety piece (safety switch) |
| Charger Type | DH-21x-002 (220-240 V, 50-60 Hz) |
| Maintenance and Cleaning | Clean after each use with a brush; do not use water |
| Safety | Double insulation (class II), automatic motor stop, blade still rotates after stopping |
| Spare Parts and Repairability | Blade, battery, charger; repairs by Cecotec authorized center |
| General Information | Made in China, designed in Spain; warranty and after-sales service: +34 96 321 07 28 |
Frequently Asked Questions - Terrenator E7 Liberty Z Plus CECOTEC
User questions about Terrenator E7 Liberty Z Plus CECOTEC
0 question about this device. Answer the ones you know or ask your own.
Ask a new question about this device
Download the instructions for your Lawn mower in PDF format for free! Find your manual Terrenator E7 Liberty Z Plus - CECOTEC and take your electronic device back in hand. On this page are published all the documents necessary for the use of your device. Terrenator E7 Liberty Z Plus by CECOTEC.
USER MANUAL Terrenator E7 Liberty Z Plus CECOTEC
Safety instructions 15
-
Parts and components 163
-
Before using 164
-
Assembly 164
-
Operation 169
-
Cleaning and maintenance 173
-
Troubleshooting 177
-
Technical Specifications 179
-
Recycling of electrical and
electronic equipment 180
-
Warranty and SAT 180
-
Copyright 180
-
Declaration of Conformity 180
INDEX
EN · The coding in this manual is generic and applies to all code variants of the appliance.
Warning! Read all safety warnings, instructions, illustrations and specifications provided with this power tool. Failure to follow all instructions listed below may result in electric shock, fire and/or serious injury. Save all warnings and instructions for future reference.
1. Safety in the work area
a) Keep the work area clean and well lit. Cluttered or dark areas invite accidents.
b) Do not operate power tools in explosive atmospheres, such as in the presence of flammable liquids, gases or dust. Power tools generate sparks that can ignite dust or fumes.
c) Keep children and bystanders away while operating a power tool. Distractions can cause you to lose control.
2. Electrical safety
a) Power tool plugs must match the outlet. Never modify the plug in any way. Do not use adapter plugs with
grounded power tools. Unmodified plugs and matching outlets will reduce the risk of electric shock.
b) Avoid body contact with grounded surfaces such as pipes, radiators, stoves and refrigerators. There is an increased risk of electric shock if your body is grounded.
c) Do not operate the mower in rain or wet conditions. This may increase the risk of electric shock.
d) Do not abuse the cord. Never use the cord for carrying, pulling or unplugging the power tool. Keep cord away from heat, oil, sharp edges or moving parts. Damaged or entangled cords increase the risk of electric shock.
e) If operating a power tool in a wet location is unavoidable, use a supply protected by a residual current device (RCD). The use of an RCD reduces the risk of electric shock.
3. Personal safety
a) Stay alert, watch what you are doing and use common sense when operating a power tool. Do not operate a power tool while you are tired or under the influence of drugs, alcohol or medication. A moment of inattention while operating power tools may result in serious personal injury.
b) Wear personal protective equipment. Always wear eye protection. Protective equipment, such as a dust mask, non-skid safety shoes, hard hat or hearing protection, used under proper conditions, will reduce personal injury.
c) Prevent accidental starting. Make sure the switch is in the off position before connecting to the power source and/or battery pack, lifting or carrying the tool. Carrying power tools with your finger on the switch or energizing power tools with the switch on invites accidents.
d) Remove any adjusting key or wrench before turning the power tool on. A wrench or adjusting key left on a rotating part of the power tool may result in personal injury.
e) Do not stretch too much. Always maintain proper posture and balance. This allows better control of the power tool in unexpected situations.
f) Dress appropriately. Do not wear loose clothing or jewellery. Keep your hair and clothing away from moving parts. Loose clothing, jewellery or long hair can get caught in moving parts.
g) If devices are provided for the connection of dust extraction and collection facilities, ensure that they are connected and used correctly. The use of dust collection can reduce dust-related hazards.
h) Do not allow familiarity gained from frequent tool use to cause you to become complacent and ignore the principles of tool safety. One careless action can cause serious injury in a split second.
4. Use and maintenance of power tools
a) Do not force the power tool. Use the correct power tool for your application. The correct power tool will do the job better and safer at the rate for which it was designed.
b) Do not use the power tool if the switch does not turn it on and off. Any power tool that cannot be controlled with the switch is dangerous and must be repaired.
c) Disconnect the plug from the power source and/or remove the battery pack, if detachable, from the power tool before making any adjustments, changing accessories or storing power tools. These preventive safety measures reduce the risk of accidentally turning on the power tool.
d) Store idle power tools out of the reach of children and do not allow persons unfamiliar with the power tool or these instructions to operate the power tool. Power tools are dangerous in the hands of untrained users.
e) Maintain power tools and accessories. Check for misalignment or binding of moving parts, breakage of parts, and any other condition that may affect the power tool's operation. If damaged, have the power tool repaired before use. Many accidents are caused by poorly maintained power tools.
f) Keep cutting tools sharp and clean. Properly maintained cutting tools with sharp cutting edges are less likely to jam and are easier to control.
g) Use the power tool, accessories, etc., in accordance with these instructions, taking into account the working conditions and the work to be performed. Use of the power tool for operations other than those intended could result in a hazardous situation.
h) Keep handles and gripping surfaces dry, clean and free of oil and grease. Slippery handles and gripping surfaces do not allow safe handling and control of the tool in unexpected situations.
5. Use and maintenance of battery-powered tools
a) Recharge only with the charger specified by the manufacturer. A charger suitable for one type of battery pack may create a fire hazard if used with another battery pack.
b) Use power tools only with specifically designated battery packs. Use of any other battery pack may create a risk of injury and fire.
c) When the battery pack is not in use, keep it away from
other metal objects, such as paper clips, coins, keys, nails, screws or other small metal objects that can create a connection between one terminal and another. Short-circuiting the battery terminals can cause burns or fire.
d) Under abusive conditions, liquid may be ejected from the battery; avoid contact. If accidental contact occurs, flush with water. If liquid comes in contact with eyes, seek additional medical attention. Liquid ejected from the battery may cause irritation or burns.
e) Do not use a damaged or modified battery pack or tool. Damaged or modified batteries may exhibit unpredictable behaviour, resulting in fire, explosion or risk of injury.
f) Do not expose a battery pack or the tool to fire or excessive temperatures. Exposure to fire or temperatures above 130^ C may cause an explosion.
g) Follow all charging instructions and do not charge the battery pack or tool outside the temperature range specified in the instructions. Charging incorrectly or at temperatures outside the specified range may damage the battery pack and increase the risk of fire.
6. Service
a) Have your power tool repaired by a qualified person using only identical replacement parts. This will ensure that the safety of the power tool is maintained.
b) Never repair damaged battery packs. Service of battery packs should only be performed by the manufacturer or authorized service providers.
If the power cord of this power tool is damaged, it must be
replaced with a specially prepared power cord, please contact the official Cecotec Technical Assistance Service.
Safety warnings for lawn mowers
a) Do not use the mower in adverse weather conditions, especially when there is a risk of thunderstorms. This reduces the risk of being struck by lightning.
b) Thoroughly inspect the area for wildlife where the mower is to be used. Wildlife can be injured by the mower during operation.
c) Thoroughly inspect the area where the mower is to be used and remove all rocks, sticks, wires, bones and other foreign objects. Thrown objects can cause personal injury.
d) Before using the mower, visually inspect to make sure the blade and blade assembly are not worn or damaged. Worn or damaged parts increase the risk of injury.
e) Check the grass catcher frequently for wear or deterioration. A worn or damaged grass catcher can increase the risk of personal injury.
f) Keep guards in place. Guards must be in good working order and mounted correctly. A guard that is loose, damaged or not functioning properly may result in personal injury.
g) Keep all cooling air inlets free of debris. Blocked air inlets and debris can result in overheating or fire hazard.
h) While operating the mower, always wear non-skid, protective footwear. Do not operate the mower barefoot or wearing open sandals. This reduces the possibility of foot injury from contact with the moving blade.
i) While operating the mower, always wear long pants. Exposed skin increases the likelihood of injury from thrown objects.
j) Do not operate the mower on wet grass. Walk, never run.
This reduces the risk of slips and falls that can result in personal injury.
k) Do not operate the mower on excessively steep slopes. This reduces the risk of loss of control, slips and falls that can result in personal injury.
l) When working on slopes, always make sure you have good footing, always work along the face of slopes, never up or down, and use extreme caution when changing direction. This reduces the risk of loss of control, slips and falls that can result in personal injury.
m) Use extreme caution when backing up or pulling the mower toward you. Always be aware of your surroundings. This reduces the risk of tripping during operation.
n) Do not touch blades and other dangerous moving parts while in motion. This reduces the risk of injury from moving parts.
- When clearing clogged material or cleaning the mower, make sure all power switches are turned off and the battery pack is disconnected. Unexpected operation of the mower can result in serious personal injury.
p) When clearing clogged material or cleaning the mower, make sure all power switches are turned off and remove (or activate) the disabling device. Unexpected operation of the mower can result in serious personal injury.
Do not tilt the machine when starting the motor, except if it is necessary to tilt it for starting. In this case, do not tilt it more than absolutely necessary and lift only the part that is away from the operator.
Stop the machine, operate the disabling device or remove the battery pack, as appropriate, and ensure that all moving parts have come to a complete stop in the following cases:
- After striking a foreign object and inspect the machine for damage and make repairs before restarting and operating the machine.
- If the machine begins to vibrate abnormally, and immediately inspect for damage, replace or repair any damaged parts and check and tighten any loose parts.
We recommend the use of a residual current device with a tripping current of 30 mA or less.
Be sure to empty the grass catcher before storing the mower. Improper maintenance and use of unsuitable components can reduce performance, increase safety hazards, damage the machine and void the warranty. Always use official spare parts. Replace worn or damaged components in sets to maintain proper machine balance, when necessary.
Use care during machine adjustment to avoid entrapment of fingers between moving cutting media and fixed parts of the machine.
Always allow the machine to cool down before storing.
Warning: when servicing the cutting media, remember that they can move even with the power supply off.
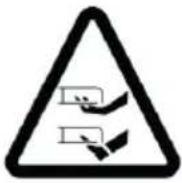
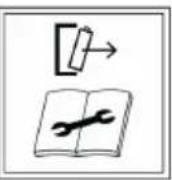
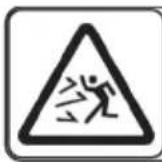
These symbols can be found on the product. Pay attention to them.
| Icon Meaning | ||
 | Read this instruction manual before using the product. | |
 | WARNING - Keep hands and feet away from the blades. | |
 |  | WARNING - Disconnect the battery before maintenance.WARNING - Remove the disabling device before maintenance. |
 | 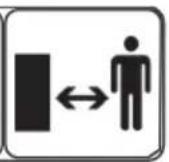 | WARNING: Keep a safe distance from the machine when operating it. Keep hands and feet away from rotating cutting blades. |
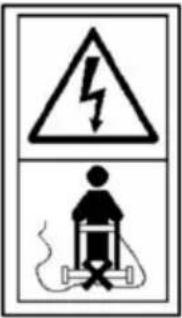 | WARNING: Do not ride or sit on the machine. Never put your hands or feet near or under the machine. | |
 | Do not expose the mower to moisture.Do not work in the rain and do not mow wet grass. | |
 | Caution! The mower blade continues to rotate after the mower is turned off. | |
 | Wear eye and ear protection. | |
 | Specification of the LWA noise level in dB. | |
 | Protection class II (Double Insulation) | |
 | Switching on the machine - safety lock button (1) - switch lever (2) | |
AVERTISSEMENTS GÉNÉRAUX DE SÉCURITÉ POUR LES OUTILS ÉLECTRIQUES
natural_image
Two identical line drawings of a trash bin with cross-bracing, no text or symbols present.A. Parts and components for references EU01\_108037 - Terrenator E3 Liberty Z Plus and EU01\_108038 - Terrenator E7 Liberty Z Plus
Fig. 1-1a
- Unlock button
- Actuator
-
- Grass tank
-
- Cutting height regulator
- Battery compartment
-
- Grass outlet cover
- Fasteners
- Mulching System
- Safety part
b. Washer (x 2)
c. Fixing lever (x 4)
a. M8 round head screw (x 2)
B. Parts and components for reference EU01\_108036 - Terrenator E1 Liberty
Fig. 26-40
- Switching bar
- Upper push rod
- Lower push rod
- Carrying handle
- Grass tank
- Side discharge cover
- Safety switch
- Grass tank, upper part of the casing
- Grass tank, lower part of the casing
- Grass tank handle
- Fixing screws for the upper push rod
- Nuts for upper and lower push rod
- Cable clips
- Safety plug
- Battery
- Battery charger
ENGLISH
NOTE:
The graphics in this manual are schematic representations and may not exactly match those of the product.
2. BEFORE USING
- This unit is packaged in a package designed to protect it during transport. Remove the unit from its carton and remove all packing material. You can store the original box and other packaging in a safe place to prevent damage to the unit if you need to transport it in the future. If you wish to dispose of the original packaging, be sure to recycle all items properly.
- Make sure that all parts and components are included and in good condition. If any of them are missing or not in good condition, please contact the official Cecotec Technical Service immediately.
Box contents
- Lawn mower
- Battery
- Instruction Manual
- Do not remove the serial number of the product, in order to keep a correct traceability of your equipment in case of requesting assistance.
3. ASSEMBLY
A. Mounting for references EU01\_108037 - Terrenator E3 Liberty Z Plus and EU01\_108038 - Terrenator E7 Liberty Z Plus
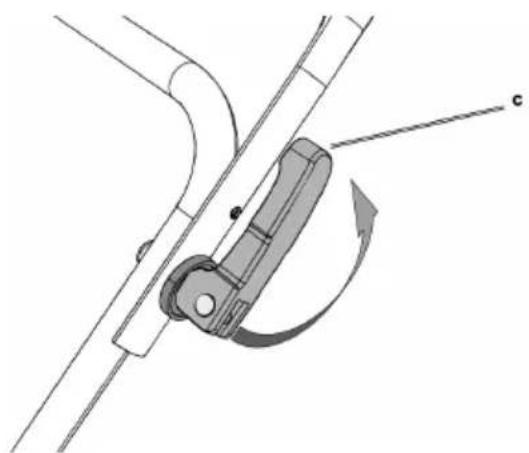
- Attach the bottom bar by placing a clamping lever (c) on each side as shown in figures 4 and 5.
- Attach the actuator by placing a screw (a), washer (b) and locking lever (c) on each side of the mower. Make sure that the cables, which will be attached later, are not pinched (Fig. 2-3).
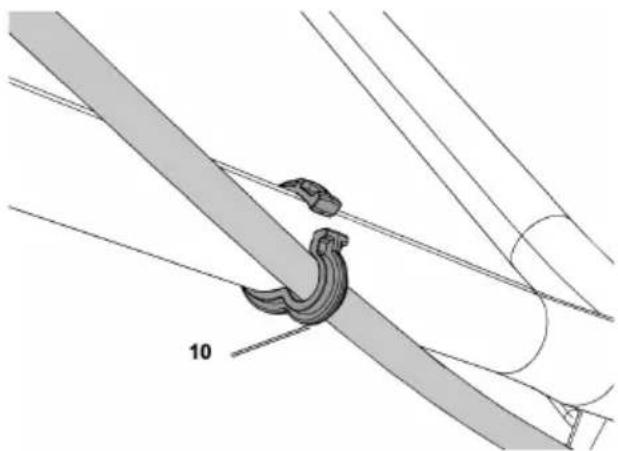
- Attach the cables to the actuator with the corresponding parts (10) supplied (Fig. 7).
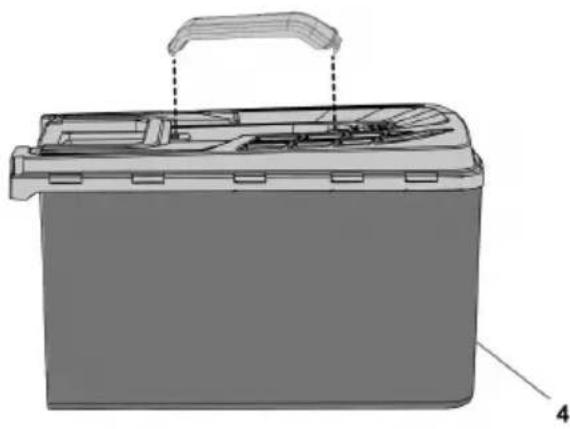
- Open the grass catcher (4) and attach the corresponding parts (Fig. 8).
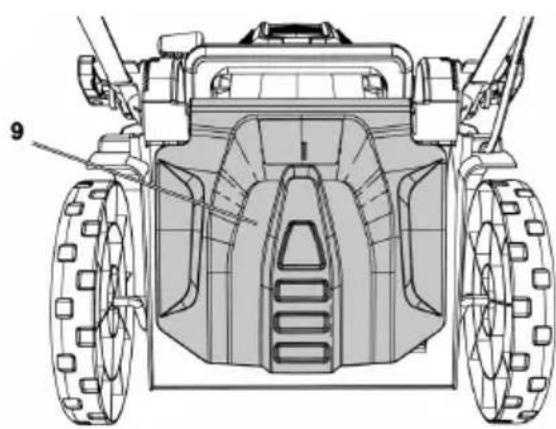
- To operate the mower with the grass catcher: lift the grass outlet cover (9) with one hand and position the grass catcher (4) as shown in Figure 9.
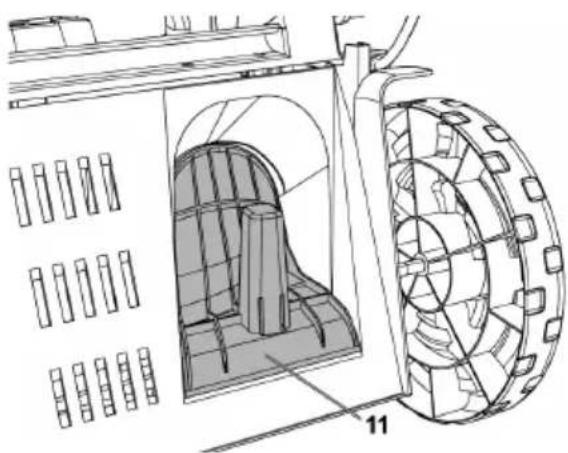
- To use the Mulching System: if the grass catcher (4) is in place, remove it and replace it with the Mulching System (11) as shown in Figures 10 and 11.
Warning: The side outlet cover must not be in place when the Mulching system is in use.
Insert the grass tank (Fig. 9).
- Open the grass outlet cover (9).
- Place the grass catcher (4) on the mower.
Insert the battery (Fig. 19)
Open the battery compartment cover (7). Then insert the battery into the compartment as shown in Figure 19.
Note: Make sure that the batteries have the same charge level. Do not combine a charged battery with an uncharged battery. Always charge both batteries at the same time.
The autonomy of the machine depends on the battery with the lowest charge. Both batteries must be fully charged before use. Close the battery compartment cover.
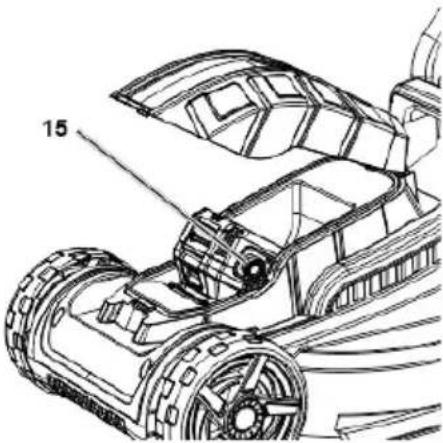
Safety part (Fig. 17)
- The mower can only be started if the safety part (12) is inserted.
- When you have finished using the mower, remove this part.
Switching on the mower (Fig. 14)
- Press and hold the unlock button (1).
- Press the actuator (2). The motor will start.
Switching off the mower (Fig. 14)
Release the actuator (2).
Handlebar height adjustment (Fig. 15)
- Loosen the clamping lever on the lower part of the handlebar (left and right).
- Move the handlebar to the desired position and retighten the clamping levers.
- The handlebar height can be adjusted to three different positions.
Risk of injury: Be aware that when you release the actuator, the blade will not immediately stop rotating.
Adjusting the cutting height (Fig. 13)
Warning: Do not change the cutting height until the motor has stopped and the safety part has been removed. Before you start mowing, check that the blade is sharp and that the securing parts are not damaged.
Replace the blade if it is dull and the securing parts if they are damaged. Before checking, turn off the motor and remove the safety part.
ENGLISH
Push out the cutting height adjuster (6). Select the desired cutting height by moving the adjuster (6) to the right or left and then let it click into one of the slots.
Make sure that the adjuster (6) fits correctly in the desired position.
Removing and emptying the grass tank
If you notice that the mower does not pick up grass, remove the tank and empty it.
- Turn off the motor.
- Wait until the blade has come to a complete stop.
- Lift the weed outlet cover.
- Remove the tank.
- Lower the lid.
- Empty the tank.
- Before putting the grass catcher back in place, remove any possible obstruction in the blade.
Using the mower without the grass catcher
When the tank is removed, the grass outlet cover must be lowered.
B. Mounting for reference EU01\_108036 - Terrenator E1 Liberty
- The mower is delivered partially assembled.
- The push bar and grass catcher must be assembled before using the mower. Follow the step-by-step instructions and refer to the figures at the end of the manual when assembling.
Important! Parts required for assembly (screws, cable guides, etc.) or functional parts (e.g. plugs, keys, etc.) can be found in the moulded parts of the packaging or on the mower.
Warning! Always remove the safety plug before making adjustments to the equipment.
Mounting the push rod (Fig. 28 to 30)
- Take a lower push rod (Fig. 27/Element 3) and fix it with the nut (Fig. 27/Element c) as shown in Fig. 28.
- Proceed in the same way on the other side. Screw the upper push rod (Fig. 27/Element 2) to the lower push rod (Fig. 27/Element 3) as shown in Fig. 29.
- Then attach the power cable to the push rod (Fig. 2/Element 14) using the cable clips (Fig. 30).
- Make sure that the cable and cable clips do not obstruct the push rod when it is turned over.
Mounting of the grass tank (Fig. 31 to 33)
- Before placing the grass catcher, you must make sure that the motor is turned off and the blade is not rotating.
-
Push the grass box handle (Fig. 31/Element 11) into the openings of the grass box. Check that the handle is secure and correctly positioned.
-
Then connect the bottom and top of the grass box (Fig. 32/Element 9, 10). Make sure that all plastic tabs fit properly.
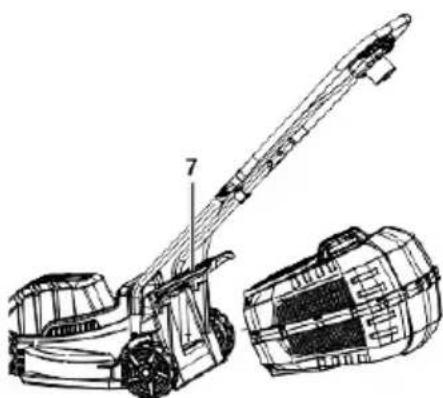
- The grass box must be attached to the two hooks on the mower. To do this, open the ejection flap with one hand (Fig. 33/Element 7) and hold the grass box with the other hand. The ejection flap is held against the grass box by a spring.
Cutting height adjustment
Warning!
Adjust the cutting height only when the motor is off, and the safety plug is disconnected.
- Before starting to cut, check that the blade is not dull and that none of the fasteners are damaged. To avoid any imbalance, replace blunt and/or damaged blades. To perform this check, first turn off the motor and remove the safety plug.
- The cutting height is adjusted as shown in Figure 34. To do this, turn the unit upside down or tilt it to one side. Place both the front and rear axles in the same notch so that the cutting blade is parallel to the turf.
Position Depth of cut
1 - 60 mm
2 - 40 mm
3 - 20 mm
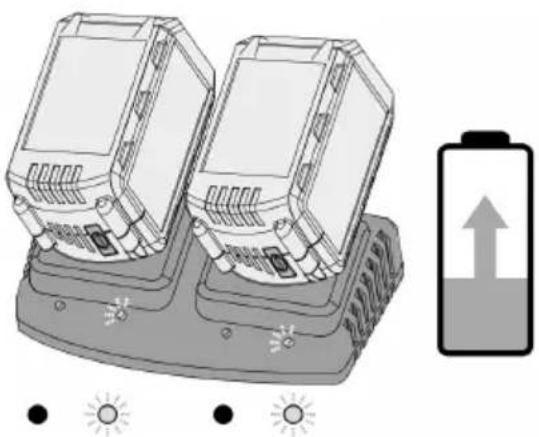
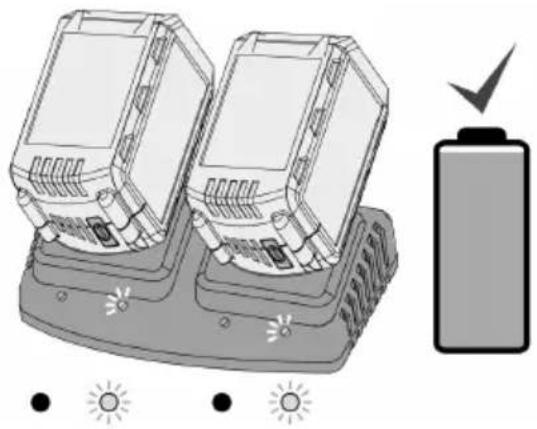
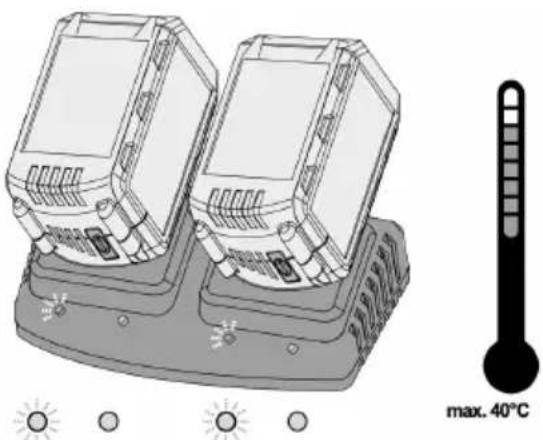
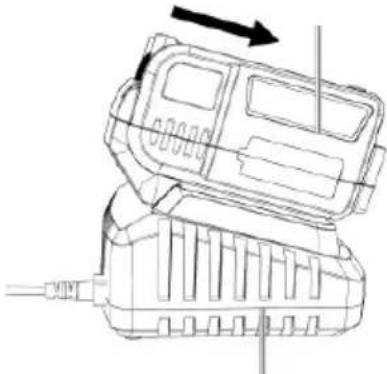
Charging the battery (Fig. 35)
- Remove the battery pack from the mower. Do this by pressing the side lock buttons.
- Verify that the voltage of your electrical network is the same as the one marked on the nameplate of the battery charger. Insert the charger plug (17) into the socket. The green LED will start flashing.
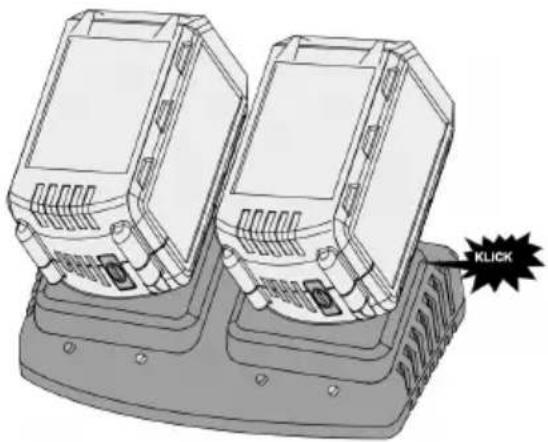
- Insert the battery pack (16) into the battery charger (17).
- An explanation of the LED indicator on the charger can be found in the table below:
ENGLISH
| Battery Green LED Red LED Action | |||
| ● Green light | ○ Red light | ||
| Without battery | On - solid Shut | down Ready | to charge the battery pack. |
| With battery On | - solid Shut | wn Remove the battery. NOTICE: if the fuel gauge on the battery is not full, then the battery is too hot to charge, allow the battery to cool for 30 minutes and charge again. | |
| ○ Green light | ● Red light | ||
| With battery Shut | Shutdown Ignition - solid | The battery is charging. | |
- The battery pack may get a little warm during charging. This is normal.
If the battery pack does not charge, check:
- If there is voltage at the outlet.
- If there is good contact at the load contacts.
- If the battery pack still does not charge, please contact the official Cecotec Technical Support Service.
- To ensure that the battery pack has a long service life, you should recharge it on a timely basis. You should recharge the battery pack when you notice that the performance of the device decreases. Never allow the battery pack to become completely discharged. This will cause it to develop a defect.
Battery capacity indicator (Fig. 36)
Press the button for the battery capacity indicator (A). The battery capacity indicator (B) shows the battery charge status using 3 LEDs.
- All 3 LEDs are lit: The battery is fully charged.
- 2 or 1 LED(s) are lit: The battery has adequate charge remaining.
- 1 LED flashes: The battery is discharged, recharge the battery.
- All LEDs are flashing: The battery temperature is too low. Remove the battery from the mower, keep it at room temperature for one day. If the fault is repeated, this means that the rechargeable battery has been exhaustively discharged and is defective. Never use or charge a defective battery.
Battery installation (Fig. 37/38)
- Open the battery cover.
- Insert the battery pack (16) into the holder.
- Close the battery cover by lowering the cover.
4. OPERATION
A. Operation for references EU01\_108037 - Terrenator E3 Liberty Z Plus and EU01\_108038
- Terrenator E7 Liberty Z Plus
Tips for the correct use of the lawn mower
- Never open the grass outlet cover when the tank is being emptied, and the motor is still running. The blade can cause injury.
- Always make sure that the grass outlet cover is in the correct position and that the grass catcher is correctly positioned. Switch off the motor before removing the grass catcher.
- Keep clear of the blade. Be especially careful when using the mower on embankments or slopes. Be sure to take firm steps, wear shoes with non-skid soles and good grip, and long pants.
- For safety reasons, do not operate the mower on slopes steeper than 15 degrees.
- Be especially careful with the mower when backing up; you could trip.
Using the Mulching System
As the mower passes over the lawn, the grass is shredded and then ejected onto the freshly mowed lawn. In this way, there is no need to use the grass catcher.
Note: This system can only be used when the grass height is not too high.
To use the Mulching system, remove the grass container (4) and slide the corresponding adapter (Fig. 10-11/19) towards the part where the grass comes out. Then close the cover (9).
Mowing the lawn
- You can mow the lawn with the grass catcher (4) in place or using the side outlet system (for the latter, you will need to attach the Mulching system adapter).
- Make sure that the blades are always clean and sharp.
- For optimum performance, try to keep the path of the mower as straight as possible. Make sure that no grass is left uncut.
- Keep the underside of the mower housing clean and remove accumulated grass. Failure to do so will cause the mower to have trouble starting and discharging grass. In addition, performance will also suffer. If the mower is to be used on slopes, cut the grass perpendicular to the slope. If the mower wheels slip, raise the mower slightly. Adjust the
ENGLISH
cutting height according to the actual length of the lawn. Make several passes and do not reduce the height of the grass by more than 4 cm at one time.
- Turn off the motor before performing any checks on the blade.
- Remember that the blade will continue to rotate for a few seconds after the motor is turned off. Do not try to stop it.
- Periodically check that the blade is securely fastened, in good condition and sharp. If it is not, sharpen it. If the mower is running and the blade hits an object, turn it off immediately and wait for the blade to stop. Then check the condition of the blade and blade holder. If it is damaged, it must be replaced.
Emptying the grass tank
- The grass catcher (4) has a level indicator. It is opened by the air flow generated by the mower during operation. If the lid closes while the mower is running, the grass container (4) is full and must be emptied. The holes under the lid must always be clean for the level indicator to function properly.
- If you notice that, when mowing, grass remains on the ground, the tank may be full. If this is the case, empty it.
- Warning: Before removing the tank (4), stop the motor and wait for the blade to come to a complete stop.
- To remove the catcher (4), lift the grass outlet cover (9) with one hand and remove the catcher (4) with the other hand (Fig. 9). Note that the weed outlet cover (9) is lowered when the catcher is removed and closes the rear opening.
- If grass remains in the opening, move the mower back about 3 feet to make it easier to restart the mower. Do not remove any grass that may have remained in the machine by hand or foot. Use a suitable tool for this purpose, such as a brush.
- To ensure that the cut grass can be collected properly, clean the tank (4) and the ventilation grill after using the machine.
- Place the grass catcher (4) when the motor and blade are completely stopped.
- To attach it, lift the grass outlet cover (9) with one hand and hold the catcher (4) by the handle with the other hand. Hook it in from above (Fig. 9).
After using the mower
- Check all bolts and nuts before next use. Tighten all loose screws.
- Empty the grass catcher (4) before using the mower again.
- Make sure the mower is not near anything that could pose a hazard.
- Only original parts or parts authorized by the manufacturer may be used for repairs.
Lawn care tips
- A lawn is composed of different types of grass. If it is mowed frequently, mostly grass with strong roots will grow. If it is mowed infrequently, the grass will be too tall and weeds will grow.
- The normal height of a lawn is about 4 - 5 cm.
- Please note that the height of the lawn should not be less than 4 cm.
- If the grass has not been mowed for a long time and is growing too high, do not mow it to the desired height all at once, but do it in phases.
- Make cross passes when using the mower.
B. Functioning for reference EU01\_108036 - Terrenator E1 Liberty
Caution! Safety plug
The mower is equipped with a safety circuit to prevent unauthorized use. Just before turning on the mower, insert the safety plug (Fig. 38/Element 15) and remove it again whenever you interrupt or finish your work.
Important!
To prevent the mower from being switched on accidentally, the mower is equipped with a safety switch (Fig. 39/Element 8) which must be pressed before the switch bar (Fig. 39/
Element 1) can be activated. The mower is switched off when the switch bar is released.
The start time may be several seconds. Repeat this process several times to ensure that the machine operates correctly.
Before performing any repair or maintenance work on the equipment, make sure that the blade is not rotating and that the safety plug is disconnected.
Caution!
- Never open the ejection cover when the grass catcher has been removed (to empty it) and the motor is still running. A rotating blade can cause serious injury!
- Always carefully secure the ejection cover and the grass catcher. Turn off the motor before emptying the grass catcher.
- Always be sure to maintain a safe distance between the user and the mower deck. Be especially careful when mowing and changing direction on slopes and inclines. Maintain solid footing and wear sturdy, slip-resistant footwear and long pants.
- Always mow along the slope (not up and down). For safety reasons, the mower should not be used to cut slopes whose gradient exceeds 15 degrees.
- Use extra caution when backing up and pulling the mower - trip hazard!
Tips for proper cutting
- It is recommended that you overlap the cutting strips.
- Use only a sharp blade that is in good condition. This will prevent the grass blades from fraying and the grass from turning yellow.
ENGLISH
- Try to cut in straight lines for a clean, neat appearance. The stripes should overlap each other by a few centimetres to avoid streaks.
- The operating time of the rechargeable batteries and thus the area in square meters that can be covered with a single battery charge is highly dependent on the condition of the turf (e.g. density, moisture, height, cutting height, etc.) and the mowing speed (walking speed). To adjust the area coverage to your individual requirements, it is recommended to mow the lawn more frequently, with a higher cutting height and at an appropriate speed. Turning the equipment on and off frequently while mowing will also reduce the amount of area you can cover.
- How often you should mow your lawn is determined primarily by the rate at which the grass grows. In the main growing season, you will probably need to mow twice a week, otherwise only once a week. The mowing height should be between 4 - 6 cm and the amount of growth before mowing again should be 4 - 5 cm. If the grass is allowed to grow a little longer for any reason, do not make the mistake of mowing it back to the normal height all at once. This will damage the grass. Never cut it more than half the height at one time.
- Keep the underside of the mower deck clean and remove grass buildup. Deposits not only make it difficult to start the mower; they decrease the quality of the cut and make it difficult for the mower to pick up the grass.
- Always mow along the slopes (not up and down). You can prevent the mower from sliding down by maintaining an upward angle position.
- Select the cutting height according to the length of the lawn. Make several passes so that no more than 4 cm of grass is cut at a time. Turn off the motor before making any checks on the blade. Note that the blade continues to rotate for a few seconds after the motor has been turned off. Never attempt to stop the blade manually. Regularly check to see if the blade is securely fastened, in good condition and sharp. If not, sharpen the blade or replace it. In case the blade hits an object, immediately turn off the mower and wait for the blade to come to a complete stop. Then inspect the condition of the blade and blade holder. Replace any damaged parts.
- As soon as the grass clippings begin to follow the mower, it is time to empty the grass catcher.
Emptying the grass tank
Important!
Before removing the grass catcher, turn off the motor and wait until the blade stops.
- To remove the grass catcher, use one hand to lift the ejection lid and the other hand to grasp the catcher handle. Remove the catcher. For safety reasons, the ejection cover automatically drops down after the grass catcher is removed and closes the rear ejection opening. If grass remains in the opening, it will be easier to restart the motor if you pull the mower back about 1 m (3 ft).
- Do not use your hands or feet to remove clippings in or on the mower housing but use suitable tools such as a brush or hand broom.
- To ensure that most grass clippings are collected, the inside of the grass catcher should be cleaned after each use.
- Replace the grass catcher only when the motor is off, and the blade has stopped.
- Lift the ejection lid with one hand and holding the herb catcher by its handle with the other hand, hang the catcher from the top.
5. CLEANING AND MAINTENANCE
A. Cleaning and maintenance for references EU01\_108037 - Terrenator E3 Liberty Z Plus and EU01\_108038 - Terrenator E7 Liberty Z Plus
Warning: Remove the battery from the machine before performing any repair or maintenance operation. The blade is sharp. If you are going to handle it, wear safety gloves.
General maintenance
- Make sure that all nuts, bolts and screws are tightened securely.
- Do not attempt to repair the mower yourself.
- Keep the mower dry and out of the reach of children.
- Handle the mower with care.
- Wear protective gloves when changing the blade.
- Periodically check the mower parts for wear. For safety reasons, replace damaged or worn parts. When adjusting the blade, be careful not to pinch your fingers.
- When performing any maintenance operation on the blade, make sure that the blade cannot move.
- Allow the motor to cool before storing the mower.
- Replace worn or damaged parts. Use only original spare parts and accessories.
Mower maintenance
Warning: Check the condition of the mower before each use. If any part of the mower is damaged, do not operate the mower until the part has been replaced or repaired by an authorised service centre. Use only genuine replacement parts and accessories.
Always clean the mower immediately after use.
- Remove the battery.
- Remove the tank.
- To clean the mower after use, you can use a hand brush.
- Carefully remove grass debris from the cutting area. To do this, you can use a brush or a wooden stick.
- Keep ventilation openings free of dust and dirt.
ENGLISH
- Never use water to clean the machine. Clean the motor housing with a damp cloth. Do not use solvents or abrasive cleaning agents. Doing so may damage the plastic parts of the machine. After cleaning the motor housing, wipe it dry with a cloth.
- Check the condition of the blade.
Grass tank maintenance
You can use a hose to clean the grass tank.
Removing/sharpening the blade
If you notice that the cutting performance of the blade decreases, remove the blade and take it to an authorised service centre for sharpening.
Make sure that the blade area is always clean.
Tighten the clamp (Fig. 7).
Spare parts must meet the requirements specified by the manufacturer.
Repairs
Check the machine for damage. Repairs should only be carried out by an authorised service centre.
Storage
- Remove the safety part before storing the mower.
- Store the mower in a dry place with an ambient temperature between 10 and 25 °C (50 and 77 °F).
- Store the battery and mower separately.
- Charge the battery before storing it.
- Keep the lawn mower away from products such as brake fluid, gasoline, penetrating oil, etc. These contain chemicals that can damage or destroy plastic parts.
- Fertilizers and other garden chemicals contain substances that can have a very corrosive effect on metal parts. Do not store the mower near these substances.
Transportation
- Before transporting the mower, remove the battery.
- The actuator (2) can be folded by loosening the two nuts.
- You can transport the mower using the carrying handle.
B. Cleaning and maintenance for reference EU01\_108036 - Terrenator E1 Liberty
Danger!
Remove the safety plug before performing any cleaning work (Fig. 38).
Cleaning
- Keep all safety devices, ventilation grills and motor housing free of dirt and dust as far
as possible. Clean the equipment with a clean cloth or blow it with compressed air at low pressure.
- Do not clean the mower with running water, especially high-pressure water.
- We recommend cleaning the device immediately after each use.
- Clean the unit regularly with a damp cloth and a little mild soap. Do not use cleaning agents or solvents; these could damage the plastic parts of the device. Make sure that no water can seep into the device.
- For best results, clean the mower with a brush or rag.
Maintenance
- Worn or damaged blades, blade holders and bolts should be replaced as a set by an authorized professional to maintain the balance of the equipment.
- Ensure that all mounting components (i.e. screws, bolts, nuts, etc.) are always tightened so that the equipment can be always operated safely.
- Check the grass catcher assembly frequently for signs of wear.
- Replace excessively worn or damaged parts immediately.
- To ensure years of enjoyment of the equipment, all bolted parts, as well as wheels and axles, should be cleaned and lubricated.
- Keeping your mower in good condition not only ensures long life and high performance but also allows the equipment to cut your lawn thoroughly with minimal effort.
- The blade is subject to more wear than any other component. Therefore, routinely check the condition of the blade and make sure it is securely fastened. If the blade is completely worn out, it should be replaced immediately or resharpened. A mower that vibrates excessively means that the blade is not properly balanced or has been deformed by striking an object. In this case, the blade must be repaired or replaced.
- There are no parts inside the equipment that require additional maintenance.
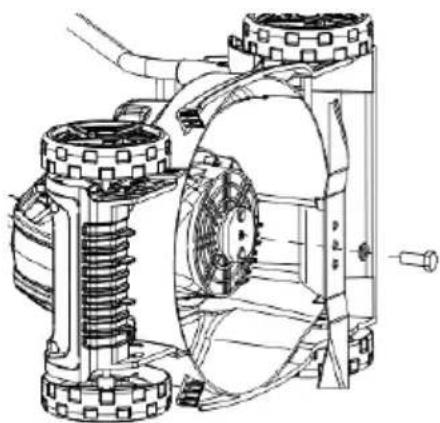
Blade replacement
Remove the rechargeable battery. For safety reasons, we recommend that the blade be replaced by an authorized professional.
Important!
Wear work gloves!
- The blade should only be replaced with a high-quality original replacement blade, as this will ensure the best performance and safety in all conditions.
-
The following describes the process for replacing the blade:
-
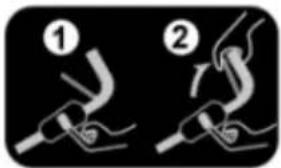
Unscrew the set screw as shown in figure 40.
- Remove the blade and replace it with a new one.
- When installing the blade, make sure that it is installed in the correct direction. The air fins on the blade should project into the motor compartment (see Fig. 40). The
ENGLISH
dome brackets provided on the equipment should align with the drill holes provided on the blade (see Fig. 40).
- Then retighten the set screw with a wrench. The tightening torque should be approximately 25 Nm.
- At the end of the season, perform a general inspection of the mower and remove any grass and dirt that may have accumulated. At the beginning of each season, be sure to check the condition of the blade. If repairs are needed, contact the official Cecotec Technical Support Service. Only original spare parts should be used.
Storage and transportation
Before storing or transporting the mower, remove the rechargeable battery.
Storage
Store the equipment and accessories out of the reach of children in a dark, dry place at a temperature above freezing point.
The ideal storage temperature is between 5 and 30 °C. We recommend that you store the machine in its original packaging.
Transportation
- For ease of transport and/or storage, open the wing nuts (Fig. 29 / Item 13) sufficiently to allow the push rods to fold down at this point. Be careful not to damage the push rod cable and tubes.
- Protect the machine from damage and strong vibrations that can occur especially when transported in vehicles.
- Secure the machine against slipping and tipping over.
6. TROUBLESHOOTING
A. Troubleshooting for part numbers EU01_108037 - Terrenator E3 Liberty Z Plus and EU01_108038 - Terrenator E7 Liberty Z Plus
| Problem Possible cause | Solution | |
| The mower does not start. | The battery is discharged. Check the battery charge level. | |
| The unlocking button (1) is faulty. Please contact Cecotec Customer Service. | ||
| The motor is faulty. Please contact Cecotec Customer Service. | ||
| The safety part (12) is not inserted. Insert the safety piece (12). | ||
| The motor stops during operation. | The battery is discharged. Charge the battery. | |
| The battery is not inserted correctly. | Insert the battery correctly. | |
| The battery is faulty. Replace the battery. | ||
| Mower performance has decreased. | Battery level is low. Replace the battery. | |
| The battery is not fully charged. Charge the battery. | ||
| The grass is too long. Mow the lawn in several phases. | ||
| The mower vibrates too much. | The blade is incorrectly positioned. Check the position of the blade. | |
| There is a foreign object obstructing the blade. | Clean the blade. | |
| The blade is damaged. Replace the blade. | ||
| The mower does not pick up the grass. | The grass tank is full. Empty the tank. | |
| The part where the grass comes out is obstructed. | Remove the grass. | |
| You have selected a cutting height that is too low. | Change the cutting height. | |
| The grass is cut unevenly. | The blade is not sharp. Have the blade professionally sharpened or replaced. | |
| The grass is too long. Mow the lawn in several phases. | ||
B. Troubleshooting for part number EU01_108036 - Terrenator E1 Liberty
| Problem Possible | cause Solution | |
| The motor does not start. | The connectors have been separated from the motor. | Please contact the official Cecotec Technical Assistance Service. |
| The mower is on tall grass. Start in low grass or in an area that has already been mowed; change the mowing height if necessary. | ||
| The mower housing is clogged. Clean the housing to allow the blade to move freely. | ||
| The safety switch is not inserted. | Insert the safety switch. | |
| The battery is not correctly inserted. | Remove the battery and reinsert it. | |
| Motor performance decreases. | The grass is too high. Correct the cutting height. | |
| The mower housing is clogged. Clean the housing. | ||
| The blade is severely worn. The blade must be replaced. | ||
| Battery performance is decreasing. | Check battery performance and charge if necessary. | |
| The cut is irregular. | The blade is worn. The blade must be replaced or sharpened. | |
| Incorrect cutting height. Correct the cutting height. | ||
| Motor stops suddenly | The battery is overcharged. Turn the equipment off and on again. | |
| The battery is empty. Use a charged battery. | ||
- TECHNICAL SPECIFICATIONS
| Reference EU01_108036 | EU01_108037 | EU01_108038 | |
| Product Terrenator E1 | Liberty Terrenator E3 | Liberty Z Plus | Terrenator E7 Liberty Z Plus |
| Power 440 W 680 W 800 W | |||
| Battery 21 V, 4 Ah, 80 Wh 21 V, 4 Ah, 80 Wh 21 V, 4 Ah, 80 Wh | |||
| Charger model DH-21x-001 DH-21x-002 DH-21x-002 | |||
| Charger voltage | 220-240V - 1.5A | 220-240 V, 1.5 A | 220-240 V, 1.5 A |
| Charger frequency | 50-60 Hz | 50-60 Hz | 50-60 Hz |
| Grass tank capacity | 30 L | 40 L | 45 L |
| Hand-arm vibration level | < 2.5 m/s2 | ≤ 2.5 m/s2 | < 2.5 m/s2 |
| Uncertainty 1.5 m/s | 2 | 1.5 m/s2 | 1.5 m/s2 |
| Sound pressure level | 82.9 dB | 79.2 dB | 78.5 dB |
| Uncertainty 3 dB | 3 dB | 3 dB | |
| Sound power level | 93,1 | 90.3 dB | 90.0 dB |
| Uncertainty 2,24 | 2.37 dB | 2.08 dB | |
| Net weight | 7.7 kg | 12.4 kg | 14 kg |
| IP protection | IPX1 | IPX1 | IPX1 |
The declared total vibration value and the declared noise emission value have been measured according to a standard test method and can be used to compare one tool with another.
Total declared vibration values and declared noise emission values can also be used in a preliminary exposure assessment.
Warning:
Vibration and noise emissions during actual use of the power tool may differ from the stated value depending on how the tool is used, especially on the type of workpiece being processed
Technical specifications may change without prior notification to improve product quality.
Manufactured in China | Designed in Spain
8. RECYCLING OF ELECTRICAL AND ELECTRONIC EQUIPMENT

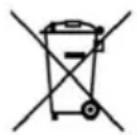
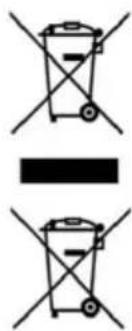
This symbol indicates that, in accordance with applicable regulations, the product and/or battery must be disposed of separately from household waste. When this product reaches the end of its useful life, you should remove the batteries/accumulators and take it to a collection point designated by the local authorities.
For detailed information on how to properly dispose of electrical and electronic equipment and/or batteries, consumers should contact their local authorities. Compliance with the above guidelines will help protect the environment.
9. WARRANTY AND SAT
Cecotec shall be liable to the end user or consumer for any lack of conformity that exists at the time of delivery of the product under the terms, conditions and deadlines set forth in the applicable regulations.
It is recommended that repairs be carried out by specialized personnel.
If you detect an incident with the product or have any questions, please contact the official Cecotec Technical Assistance Service at +34 96 321 07 28.
10. COPYRIGHT
The intellectual property rights on the texts of this manual belong to CECOTEC INNOVACIONES, S.L. All rights reserved. The contents of this publication may not, in whole or in part, be reproduced, stored in a retrieval system, transmitted or distributed by any means (electronic, mechanical, photocopying, recording or similar) without the prior authorization of CECOTEC INNOVACIONES, S.L.
11. DECLARATION OF CONFORMITY
MANUFACTURER: CECOTEC INNOVACIONES S.L
ADDRESS: Av. Reyes Católicos, 60, 46910, Alfafar, Valencia (Spain)
DESCRIPTION: Lawn mower
MACHINE IDENTIFICATION: Terrenator E1 Liberty / Terrenator E3 Liberty Z Plus / Terrenator E7 Liberty Z Plus
FUNCTION: Battery-powered gardening tool for mowing lawns
MODEL: EU01_108036 / EU01_108037 / EU01_108038
Certifies that the described product has been designed, manufactured and tested and complies with all applicable regulations.
EU DIRECTIVES APPLIED:
- Machinery Directive 2006/42/EC.
- Directive 2014/30/EU on the harmonization of the laws of the Member States relating to electromagnetic compatibility.
- Directive 2011/65/EU and Delegated Directive 2015/863 on the restriction of the use of certain hazardous substances in electrical and electronic equipment.
HARMONIZED STANDARDS APPLIED:
- EN 62841-1:2015 +A11:2022
- EN IEC 62841-4-3:2021+A11:2021
- EN IEC 55014-1:2021
- EN IEC 55014-2:2021
- IEC 62321-1:2013; EN IEC 62321-2:2021; IEC 62321-3-1:2013; IEC 62321-4:2013+A1:2017; IEC 62321-5:2013; IEC 62321-6:2015; IEC 62321-7-1:2015; IEC 62321-7-2:2017; IEC 62321-8:2017.
FRANÇAIS
1. PIÈCES ET COMPOSANTS
natural_image
Two identical line diagrams of a trash bin with diagonal lines crossing it, no text or symbols present.natural_image
Two identical line-drawn icons of a trash bin with 'No' and 'Yes' signs, no text or symbols present.PRODUTTORE: CECOTEC INNOVACIONES S.L.
INDIRIZZO: Av. Reyes Católicos, 60, 46910, Alfafar, Valencia (Spagna)
6. PROBLEEMOPLOSSING
natural_image
Two identical line drawings of a trash bin with cross-bracing, no text or symbols present.WDROŻONE DYREKTYWY UE:
natural_image
Two identical line-drawn icons of a trash bin with 'No' and 'Yes' signs, no text or symbols present.natural_image
Two identical line-drawn icons of a trash bin with 'No' and 'Yes' signs, no text or symbols present.Made in China | Designed in Spain
8. ELEKTROMOS ÉS ELEKTRONIKUS BERENDEZÉSEK ÚJRAHASZNOSÍTÁSA
natural_image
Two identical line-drawn icons of a trash bin with crossbones, one blank and one crossed (no text or symbols)Fig./Img./Abb./Afb./Rys.1
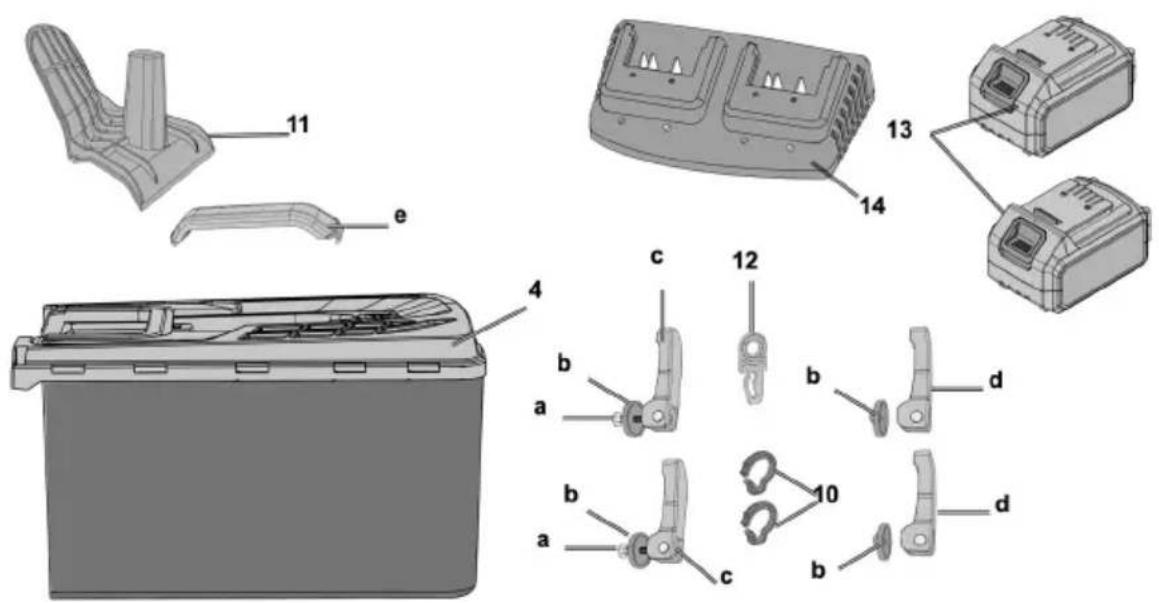
Fig./Img./Abb./Afb./Rys. 1. A
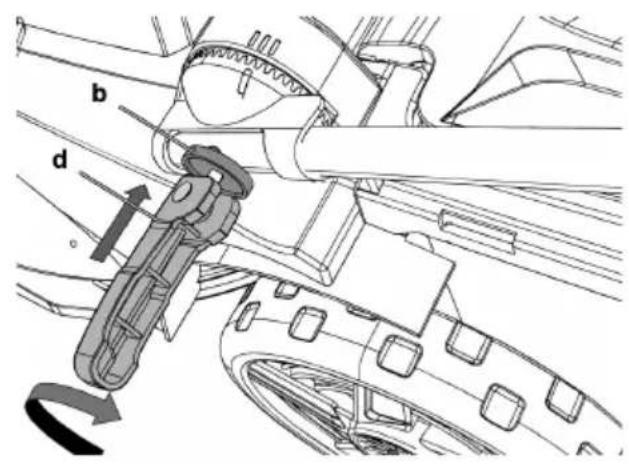
Fig./Img./Abb./Afb./Rys.2
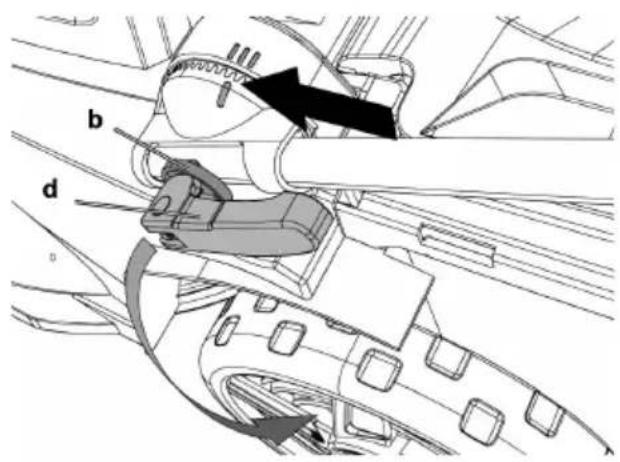
Fig./Img./Abb./Afb./Rys. 3

Fig./Img./Abb./Afb./Rys. 4
natural_image
Mechanical assembly diagram showing a lever mechanism with rotational motion indicated by arrows (no text or symbols)Fig./Img./Abb./Afb./Rys. 5
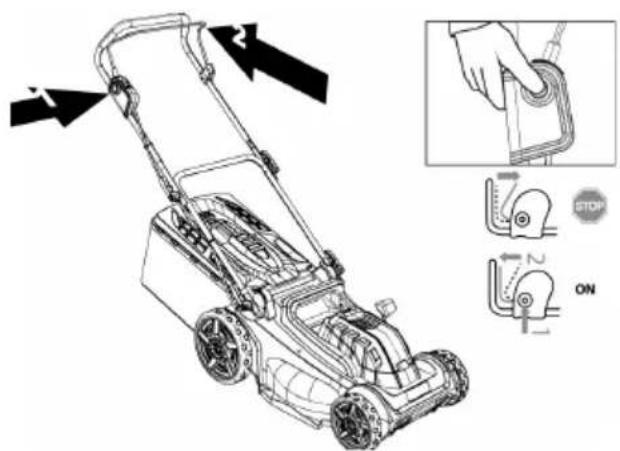
Fig./Img./Abb./Afb./Rys. 6
natural_image
Technical diagram showing a mechanical clamp or bracket assembly with diagonal lines and angle markings (no text or symbols)Fig./Img./Abb./Afb./Rys. 7
natural_image
3D diagram of a toolbox with handle and internal compartments, labeled with number 4 (no text or symbols on the diagram itself)Fig./Img./Abb./Afb./Rys. 8
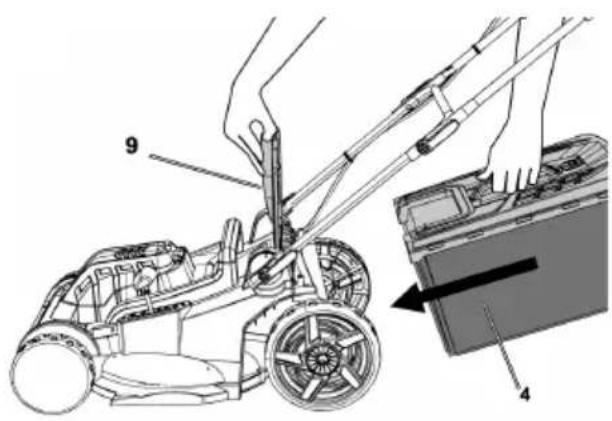
Fig./Img./Abb./Afb./Rys. 9

natural_image
Illustration of a hand inserting a component into a device (no text or symbols visible)Fig./Img./Abb./Afb./Rys. 10
natural_image
Technical line drawing of a mechanical device with internal components and labeled part (11), no readable text or symbols present.Fig./Img./Abb./Afb./Rys. 11
natural_image
Technical line drawing of a tractor's front view showing wheel tracks and structural components (no text or symbols)Fig./Img./Abb./Afb./Rys. 12
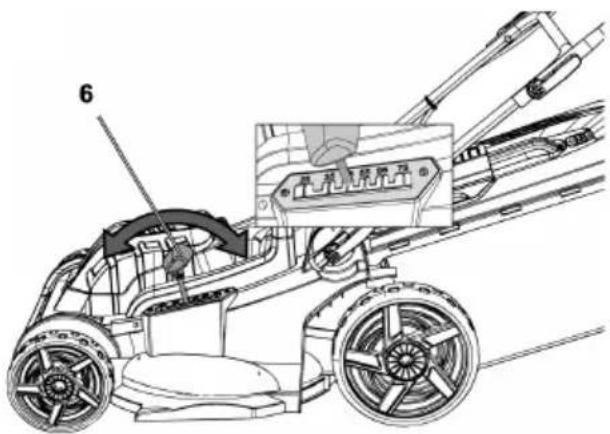
Fig./Img./Abb./Afb./Rys. 13
Fig./Img./Abb./Afb./Rys. 14
natural_image
Mechanical assembly diagram showing two views of a device with directional arrows indicating motion (no text or symbols present)Fig./Img./Abb./Afb./Rys. 15
natural_image
Technical illustration of a mechanical assembly with hands operating a wheel and a side panel (no text or symbols)Fig./Img./Abb./Afb./Rys. 16
natural_image
Technical line drawing of a mechanical assembly with a hand adjusting a component (no text or symbols visible)Fig./Img./Abb./Afb./Rys. 17
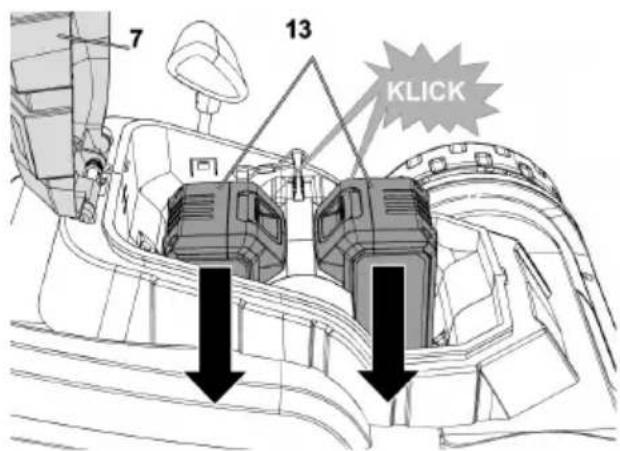
Fig./Img./Abb./Afb./Rys. 18
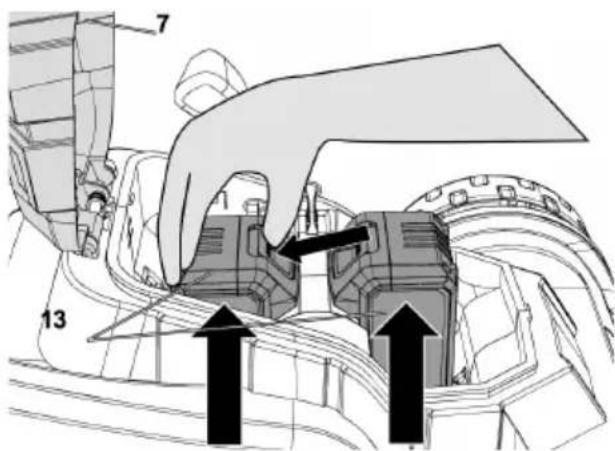
Fig./Img./Abb./Afb./Rys. 19
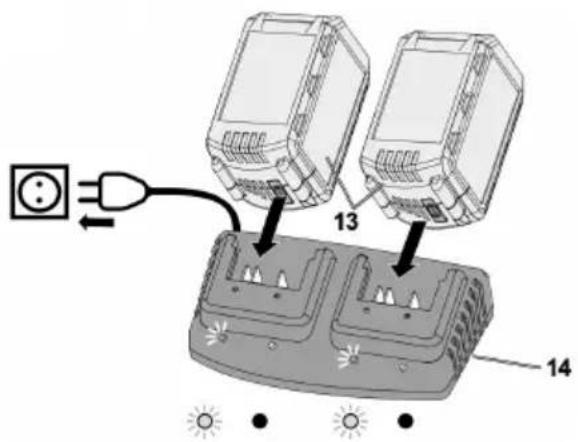
Fig./Img./Abb./Afb./Rys. 20
natural_image
Illustration of two identical electrical meters mounted on a base with a 'CLICK' label pointing to one (no text or symbols on the devices themselves)Fig./Img./Abb./Afb./Rys. 21
natural_image
Illustration of two battery charging units with a battery symbol and indicator lights, no text or labels present.Fig./Img./Abb./Afb./Rys. 22
natural_image
Illustration of two charging stations with a battery and lightning bolt symbol (no text or labels)Fig./Img./Abb./Afb./Rys. 23

natural_image
Illustration of two electric shock absorbers mounted on a base with three sun icons below (no text or symbols)Fig./Img./Abb./Afb./Rys. 24
natural_image
Illustration of two thermoseters mounted on a base with a thermometer showing maximum temperature (no text or symbols on the devices themselves)Fig./Img./Abb./Afb./Rys. 25
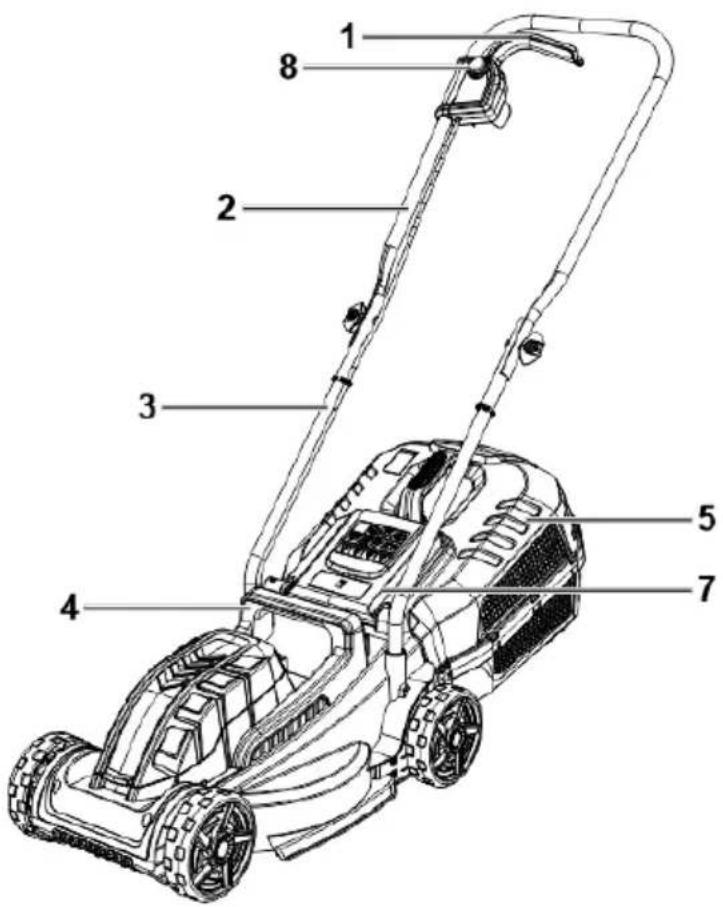
Fig./Img./Abb./Afb./Rys. 26
Fig./Img./Abb./Afb./Rys. 27
natural_image
Technical line drawing of a lawn mower assembly (no text or symbols)Fig./Img./Abb./Afb./Rys. 28
Fig./Img./Abb./Afb./Rys. 29
natural_image
Technical line drawing of two mechanical components with labeled parts (no text or symbols present)Fig./Img./Abb./Afb./Rys. 30
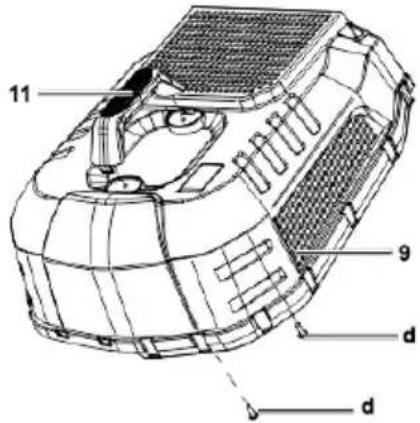
Fig./Img./Abb./Afb./Rys. 31
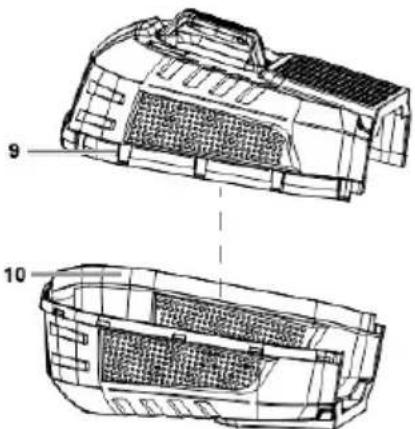
Fig./Img./Abb./Afb./Rys. 32
natural_image
Technical line drawing of a crane lifting a box, with no visible text or symbolsFig./Img./Abb./Afb./Rys. 33
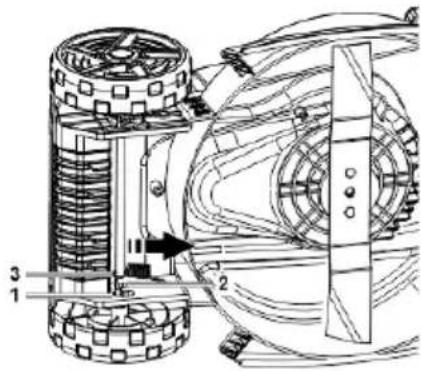
Fig./Img./Abb./Afb./Rys. 34
natural_image
Technical line drawing of a mechanical device with no visible text or symbolsFig./Img./Abb./Afb./Rys. 35
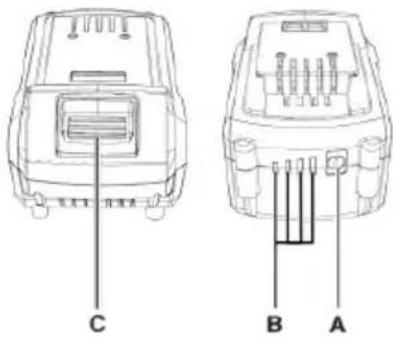
Fig./Img./Abb./Afb./Rys. 36
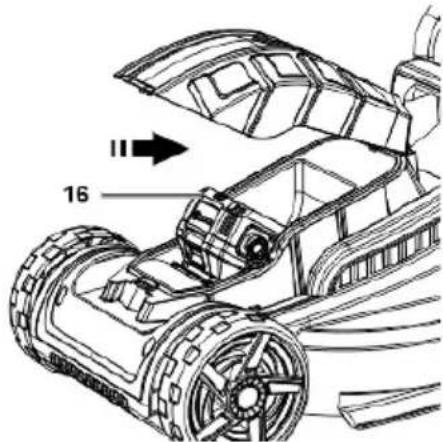
Fig./Img./Abb./Afb./Rys. 37
natural_image
Technical line drawing of a robotic car with visible wheels and structural components (no text or symbols)Fig./Img./Abb./Afb./Rys. 38
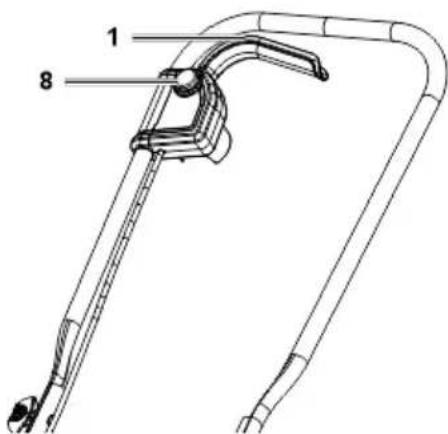
Fig./Img./Abb./Afb./Rys. 39
natural_image
Technical line drawing of a mechanical assembly with springs and gears (no text or symbols)Fig./Img./Abb./Afb./Rys. 40
www.cecotec.es


- INDEX
- Safety in the work area
- Electrical safety
- Personal safety
- Use and maintenance of power tools
- Use and maintenance of battery-powered tools
- Service
- Safety warnings for lawn mowers
- AVERTISSEMENTS GÉNÉRAUX DE SÉCURITÉ POUR LES OUTILS ÉLECTRIQUES
- Parts and components for references EU01\_108037 - Terrenator E3 Liberty Z Plus and EU01\_108038 - Terrenator E7 Liberty Z Plus
- Parts and components for reference EU01\_108036 - Terrenator E1 Liberty
- Fig. 26-40
- ENGLISH
- NOTE:
- BEFORE USING
- Box contents
- ASSEMBLY
- Mounting for references EU01\_108037 - Terrenator E3 Liberty Z Plus and EU01\_108038 - Terrenator E7 Liberty Z Plus
- Insert the grass tank (Fig. 9).
- Insert the battery (Fig. 19)
- Safety part (Fig. 17)
- Switching on the mower (Fig. 14)
- Switching off the mower (Fig. 14)
- Handlebar height adjustment (Fig. 15)
- Adjusting the cutting height (Fig. 13)
- Removing and emptying the grass tank
- Using the mower without the grass catcher
- Mounting for reference EU01\_108036 - Terrenator E1 Liberty
- Mounting the push rod (Fig. 28 to 30)
- Mounting of the grass tank (Fig. 31 to 33)
- Cutting height adjustment
- Position Depth of cut
- Charging the battery (Fig. 35)
- Battery capacity indicator (Fig. 36)
- Battery installation (Fig. 37/38)
- OPERATION
- Operation for references EU01\_108037 - Terrenator E3 Liberty Z Plus and EU01\_108038
- - Terrenator E7 Liberty Z Plus
- Tips for the correct use of the lawn mower
- Using the Mulching System
- Mowing the lawn
- Emptying the grass tank
- After using the mower
- Lawn care tips
- Functioning for reference EU01\_108036 - Terrenator E1 Liberty
- Caution! Safety plug
- Important!
- Caution!
- Tips for proper cutting
- CLEANING AND MAINTENANCE
- Cleaning and maintenance for references EU01\_108037 - Terrenator E3 Liberty Z Plus and EU01\_108038 - Terrenator E7 Liberty Z Plus
- General maintenance
- Mower maintenance
- Grass tank maintenance
- Removing/sharpening the blade
- Repairs
- Storage
- Transportation
- Cleaning and maintenance for reference EU01\_108036 - Terrenator E1 Liberty
- Cleaning
- Maintenance
- Blade replacement
- Storage and transportation
- TROUBLESHOOTING
- Warning:
- RECYCLING OF ELECTRICAL AND ELECTRONIC EQUIPMENT
- WARRANTY AND SAT
- COPYRIGHT
- DECLARATION OF CONFORMITY
- EU DIRECTIVES APPLIED:
- HARMONIZED STANDARDS APPLIED:
- FRANÇAIS
- PIÈCES ET COMPOSANTS
- PROBLEEMOPLOSSING
- WDROŻONE DYREKTYWY UE:
- ELEKTROMOS ÉS ELEKTRONIKUS BERENDEZÉSEK ÚJRAHASZNOSÍTÁSA
Brand : CECOTEC
Model : Terrenator E7 Liberty Z Plus
Category : Lawn mower