Total Iron 10100 Pro - Iron CECOTEC - Free user manual and instructions
Find the device manual for free Total Iron 10100 Pro CECOTEC in PDF.

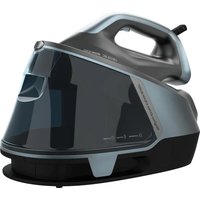
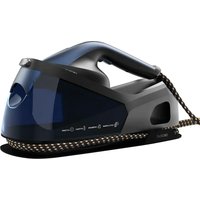
| Product type | Steam station with integrated ironing board and steamer |
| Model | Total Iron 10100 Pro |
| Reference | 05086 |
| Power supply | 2200 W, 220-240 V, 50/60 Hz |
| Standby consumption | 0.9 W |
| Main functions | Steam ironing, inflation, suction, vertical steamer, self-cleaning, auto-off |
| Temperature settings | Nylon, Silk, Wool, Cotton, Linen (via control panel) |
| Water tank | Removable |
| Dirty water tank | Yes, for self-cleaning |
| Self-cleaning | Automatic after 2 liters of water used |
| Auto-off | After 15 minutes of inactivity |
| Included accessories | Small ironing board, covers (table and small table), steamer brush, iron rest, grille, coat rack, supports |
| Soleplate | With coating for delicate fabrics (removable) |
| Recommended water type | Tap water at room temperature; avoid distilled water alone |
| Safety | Auto-off, overheat protection, do not immerse |
| Cleaning and maintenance | Soleplate: damp cloth and vinegar; covers machine washable (delicate cycle) |
| Warranty | Contact official Cecotec after-sales service |
| Country of manufacture | China, designed in Spain |
Frequently Asked Questions - Total Iron 10100 Pro CECOTEC
User questions about Total Iron 10100 Pro CECOTEC
0 question about this device. Answer the ones you know or ask your own.
Ask a new question about this device
Download the instructions for your Iron in PDF format for free! Find your manual Total Iron 10100 Pro - CECOTEC and take your electronic device back in hand. On this page are published all the documents necessary for the use of your device. Total Iron 10100 Pro by CECOTEC.
USER MANUAL Total Iron 10100 Pro CECOTEC
natural_image
Front view of a modern robotic device with articulated arms and a vertical support structure (no visible text or symbols)Safety instructions 6
-
Parts and components 33
-
Before use 34
-
Installation 35
-
Operation 35
-
Cleaning and maintenance 37
-
Troubleshooting 38
-
Technical specifications 39
-
Disposal of old electrical
and electronic appliances 39
-
Technical support and warranty 39
-
Copyright 40
SOMMAIRE
Read these instructions thoroughly before using the appliance. Keep this instruction manual for future reference or new users.
- Ensure that the mains voltage matches the voltage specified on the appliance rating label and that the plug is earthed.
- This appliance is designed for domestic use only and is not intended for bars, restaurants, farmhouses, hotels, motels, and offices. Do not use the appliance for industrial or commercial purposes.
- Do not use the iron if it has been dropped, shows visible damage, or is leaking.
- Do not immerse the cable, plug, or any other non-removable part of the appliance in water or any other liquid or expose electrical connections to water. Make sure your hands are dry before handling the plug or switching on the appliance.
- Check the power cable regularly for visible damage. If the power cable is damaged, it must be replaced by the Technical Support Service of Cecotec or similar qualified personnel to avoid risks.
- Do not leave the iron unattended while connected to the power supply.
- Never let the power cable and steam tube to come into contact with the hot soleplate of the iron.
- Never remove the ironing board cover while ironing or immediately after use. Always let the appliance cool down sufficiently before removing the cover.
- The appliance will reach very high temperatures during and after use, especially the soleplate. Do not touch the soleplate to avoid burns.
- Unplug the appliance from the power supply as soon as you have finished using it, before cleaning it, or before leaving it unattended.
- Unplug the appliance before filling up the water tank.
- Openings subject to pressure (filling, descaling, etc.) must remain closed during use.
- Do not move the appliance during use.
- Do not use the appliance to iron wet fabrics.
- The iron must be used and placed on a stable, flat surface.
- Make sure the support base of the iron is stable before placing it on top.
- Do not cover the appliance with any cloth or plastic immediately after use.
- Always transport the appliance with its components stored and with the ironing board folded. Make sure transportation is safe.
- Do not pull on the power cable to disconnect the appliance from the socket. Pull on the plug instead.
- This appliance can be used by children aged 8 years and above and persons with reduced physical, sensory, or mental capabilities or lack of experience and knowledge if they have been given supervision or instruction concerning use of the appliance in a safe way and understand the hazards involved. Children must not play with the appliance. Cleaning and user maintenance should not be carried out by unsupervised children.
- Supervise children to prevent them from playing with the appliance. Close supervision is necessary when the appliance is being used by or near children.
- Keep the appliance and its power cable out of reach of children under 8 years old when plugged in or cooling down.
INSTRUCTIONS DE SÉCURITÉ
Ironing station. Fig. 1-2
- Ironing board
- Small ironing board
- Hanger
- Garment steamer
- Height adjustment lock
- Hanger holder
- Iron
- Iron and garment steamer storage compartment
- Power-cable storage compartment
- Waste-water tank
- Water tank
- Water tank handle
- Ironing board handle
- Fan
- Fixing bracket
- Right-hand folding button
- Left-hand folding button
- Power button
- Control panel
- Front cover
- Wheels
- Pedal
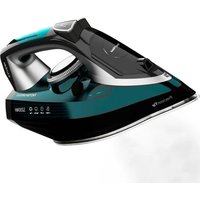
Iron and garment steamer. Fig. 3
- Iron Ready indicator light: the red light will come on during heating of the iron and will change to blue when ready for use.
- Blowing and vacuum function switch button.
- Steam button.
- Soleplate for delicate fabrics: to iron nylon and silk.
- Soleplate fixing element.
- Steam trigger: the red light will come on during heating of the iron and will change to blue when ready for use.
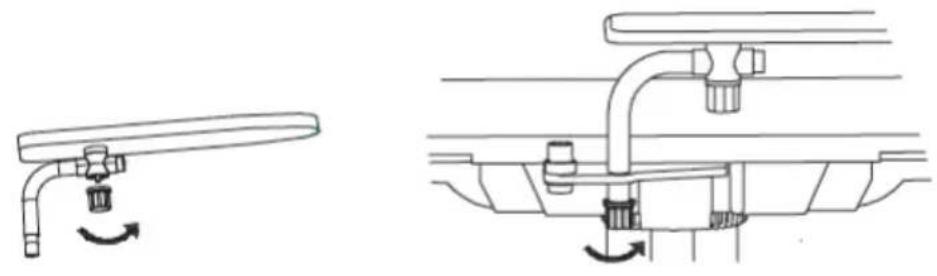
- Garment-steamer brush
ENGLISH
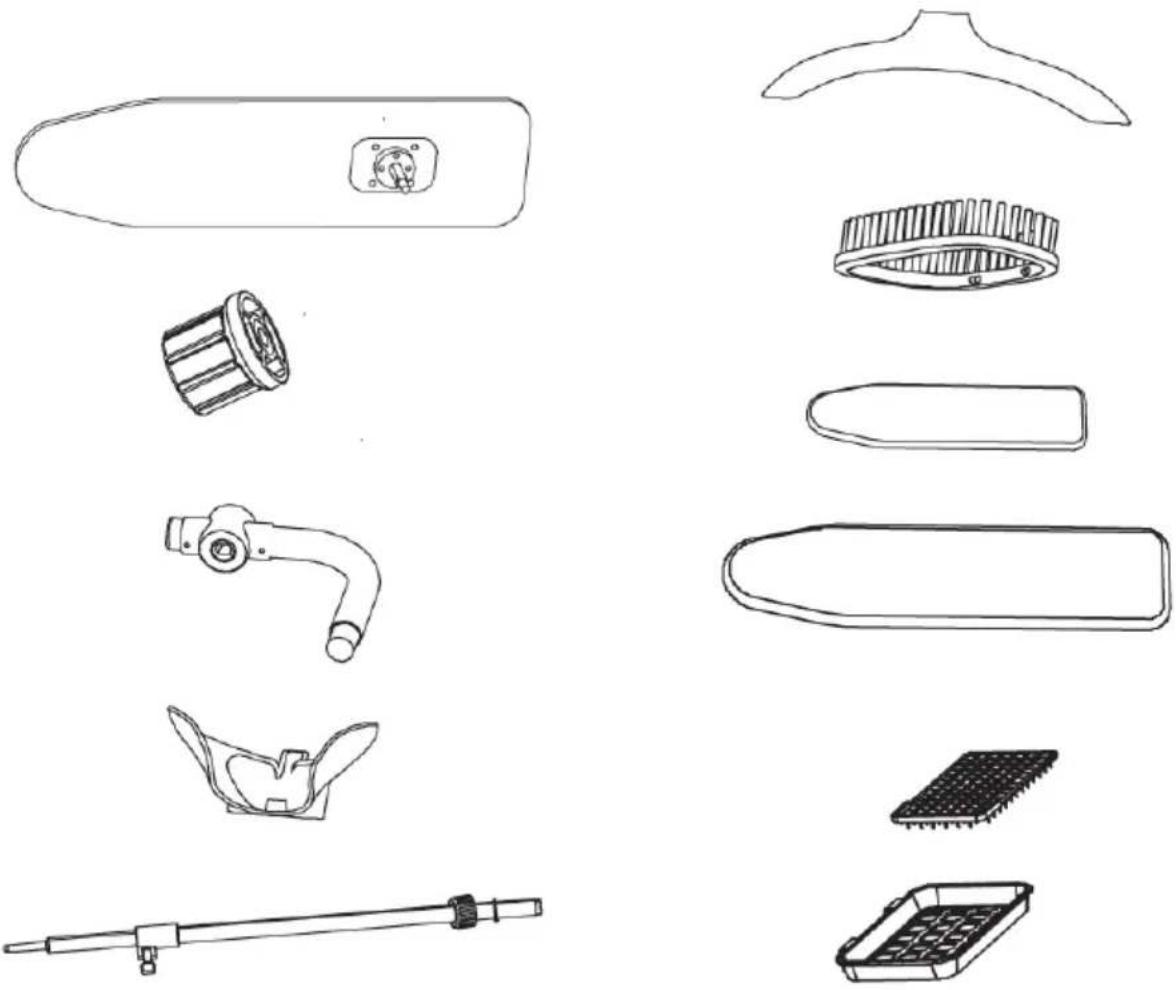
Accessories. Fig. 4
| Description Amount | |
| Small ironing board 1 | |
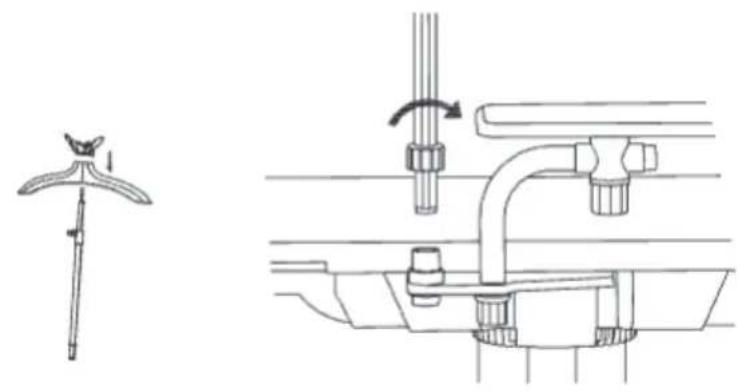
| Nuts for bending the steam tube and the small ironing board 2 | |
| Small ironing board support 1 | |
| Garment-steamer support 1 | |
| Hanger holder 1 |
Accessories. Fig. 5.
| Description Amount | |
| Hanger 1 | |
| Garment-steamer brush 1 | |
| Small ironing board cover 1 | |
| Ironing board cover 1 | |
| Iron rest 1 | |
| Iron grille 1 |
NOTE
The graphics in this manual are schematic representations and may not exactly match the appliance.
2. BEFORE USE
- This appliance is packaged in a way as to protect it during transport. Take the appliance out of its box and remove all packaging materials. You can keep the original box and other packaging elements in a safe place. This will help you prevent damage to the machine when transporting it in the future. In case the original packaging is disposed of, make sure all packaging materials are recycled accordingly.
- Make sure all parts and components are included and in good conditions. If there is any piece missing or in bad conditions, contact the official Cecotec Technical Support Service immediately.
- Take the appliance out of the box.
- Clean the iron's soleplate with a soft cloth.
- Note: you may notice a slight burning smell or smoke when using the appliance for the first time, caused by the excess of lubricants from the manufacturing process. Smoke will disappear after a short time.
3. INSTALLATION
Product assembly
- Attach the soleplate for delicate fabrics if ironing nylon or silk. Fig. 6.
- Place the iron grille inside the rest. Fig. 7.
- Attach the garment-steamer brush. Fig. 8.
- Install and securely fix the small ironing board. Fig. 9.
- Install and securely fix the hanger. Fig. 10.
4. OPERATION
Control panel
Fig. 11.
Top: from left to right
- Self-cleaning indicator light
- Iron
- Blow function
- Vacuum function
- Voice (enabled/disabled)
- Garment steamer
- Empty-tank indicator light
Bottom: from left to right
- Nylon
- Silk
- Wool
- Cotton
- Linen
- Power icon
Middle: from left to right
- Preheating indicator light: lights up during pre-heating of the appliance.
- End-of-preheating indicator light: lights up at the end of the preheating process.
Water type
- It is recommended to use tap water at room temperature to use the appliance.
- Do not use hot water, perfume, vinegar, starch, detergent, additives, or other chemical products.
- If water in your area has a high limescale concentration, mix weakly mineralised or distilled water with a little tap water.
ENGLISH
- Note: do not use distilled, descaled, or perfumed water only.
Fabric type
- Fabrics with this symbol are suitable for ironing, e.g.: linen, cotton, polyester, silk, wool, viscose, or rayon. Fig. 12.
- Fabrics with this symbol are not suitable for ironing.
- Such fabrics include: lycra, elastene, lycra blended fabrics, polyolefin (e.g., polypropylene), and screen-printed garments. Fig. 13.
Using the iron
- Connect the adapter to a plug outlet. Fig. 14.
- Remove the water tank, fill it with lukewarm tap water, and install it back into the appliance. Fig. 15.
- Unfold the board and lay it flat. Fig. 16.
- Press down on the pedal to adjust the ironing board to the desired height. Fig. 17.
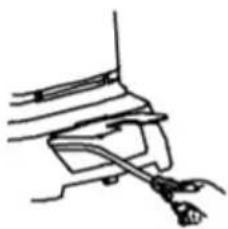
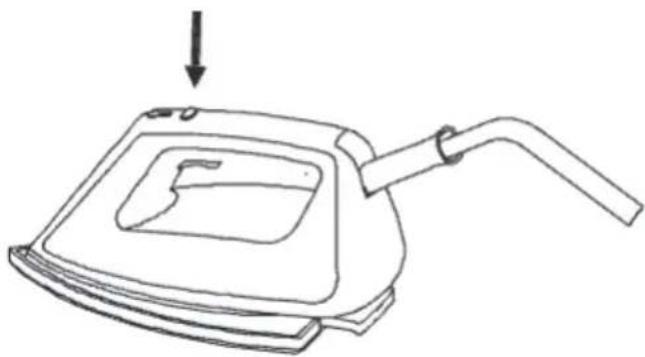
- Remove both irons from the storage compartment. Fig. 18.
- Press the power button.
- Press the Power button.
- Select fabric type to start the appliance. The preheating indicator light will flash.
- After approximately 2 minutes, the preheating indicator light will stop flashing, indicating that the appliance is ready for use.
- The end-of-preheating indicator light will flash.
- The Iron Ready indicator light will light up red during heating.
-
The same indicator light will change to blue when the iron is ready for use. Fig. 19.
-
Press the steam trigger to activate steam ironing.
- Note: do not direct steam at people.
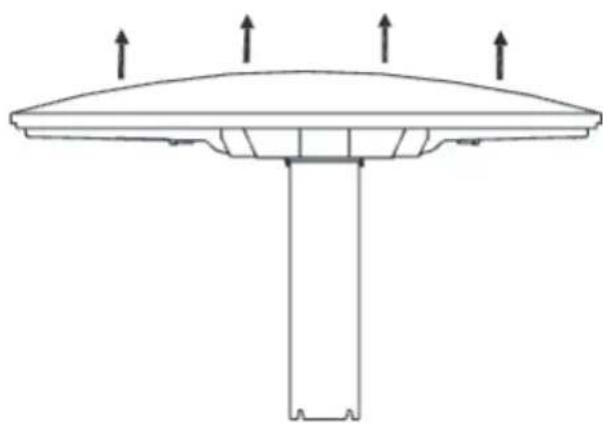
- To activate the ironing board Blowing function, press the switch button on the iron or press the Blowing Mode button on the control panel. Fig. 20.
- Air will be blown inside the board cover, making ironing easier. This mode is ideal for ironing the most difficult parts of garments. Fig. 21.
- Press the Blowing Mode button on the control panel or press the Switch button on the iron again to disable the mode.
-
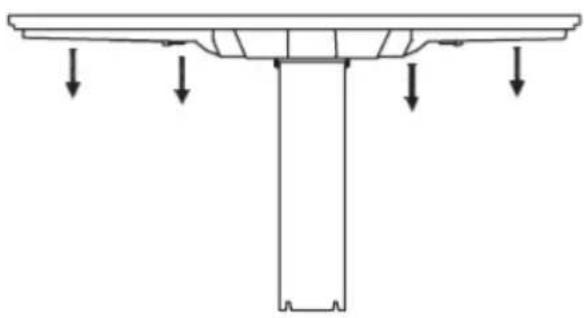
To activate the ironing board Vacuum function, press the switch button on the iron or press the Vacuum Mode button on the control panel. Fig. 22.
-
Vacuum mode keeps garments smooth and glued to the board and allows to perfectly flatten down any crease.
- Press the Vacuum Mode button on the control panel or press the Switch button on the iron again to disable the mode.
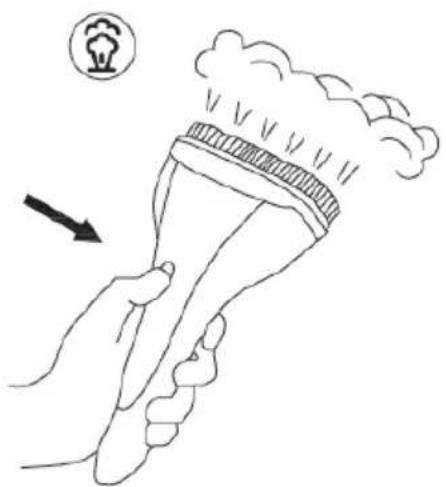
Using the garment steamer. Fig. 23.
- The garment steamer allows for efficient crease removal with just a few shots of steam. Its
intuitive and safe use is ideal to steam-iron all types of garments, and it's a great solution for delicate fabrics such as silk.
- Press the power button on the garment steamer or on the control panel to turn it on.
- The power indicator light will light up red, and change to blue to indicate that the garment steamer is ready for use.
- Press the steam trigger to activate steam ironing.
Self-cleaning
Note:
- Do not try to use the appliance during the self-cleaning process. Do not interrupt the self-cleaning process.
- The self-cleaning process will be automatically activated every time 2 litres of water have been used.
- The self-cleaning indicator light on the control panel will light up red during the self-cleaning process. This process may take approximately 3 minutes. The appliance may make noises when dispensing water and during the self-cleaning process.
- After approximately 3 minutes, the cleaning water will flow directly into the waste-water tank.
- Remove the waste-water tank and empty it.
- Slide the water tank back into the appliance.
Auto switch-off. Fig. 24.
This appliance features an auto switch-off function, thanks to which it enters Standby mode after approximately 15 minutes of steam-trigger inactivity.
Storage
- Fold the ironing board and lower the hanger holder.
- Store the cable in the cable compartment.
- Store both the iron and the garment steamer in their compartment.
- Use the handle to carry or move the iron.
Tip: after a long ironing session, it is recommended to keep the ironing board unfolded and let it dry completely before storing it.
5. CLEANING AND MAINTENANCE
- Turn off, unplug the appliance from the power supply, empty the water tank, and allow it to cool down completely.
- In case fabric is adhered to the soleplate due to heat, use a damp cloth and vinegar to detach it.
- Do not use abrasive cleaners or scouring pads to clean the appliance.
6. TROUBLESHOOTING
| Question Answer | |
| Why doesn't the iron or garment steamer heat up? | The iron or garment steamer is not switched on. Press the power button on the iron or the garment steamer. |
| Self-cleaning may still be in progress. Wait for the self-cleaning process to finish, then switch the appliance back on. | |
| The auto switch-off function may have activated. The appliance switches off automatically after 15 minutes of inactivity. Press the power button once to restart the appliance. You can proceed to ironing once the indicator light on the iron or the garment steamer lights up blue. | |
| Why doesn't the iron or garment steamer generate steam? | There may not be enough water in the tank or the tank may not be installed correctly. Fill up the water tank and correctly install it in position. |
| The appliance may not be hot enough to generate steam. Pre-heating will approximately take 2 minutes. Wait until the indicator light on the iron or the garment steamer turns blue. Press the steam trigger to enable steam ironing or press the Steam-ironing Mode button on the control panel. | |
| You may not have pressed the trigger or enabled the mode on the control panel. Press the steam trigger to enable steam ironing or press the Steam-ironing Mode button on the control panel. | |
| The auto switch-off function may have activated. The appliance switches off automatically after 15 minutes of inactivity. Press the power button once to restart the appliance. You can proceed to ironing once the indicator light on the iron or the garment steamer lights up blue. | |
| Why does the appliance make noise? | Pumping noises are normal. When intermittently pumping water from the water tank to the water boiler, noises will be heard. |
| If you hear a prolonged pumping sound, this means that the self-cleaning process has been activated: this is normal. | |
| It is possible that the noise you hear is coming from the fan. The appliance features a fan that runs continuously during operation. The fan optimises the performance of the appliance and cannot be switched off. | |
| If the pumping sound does not stop, first check that the water tank is correctly installed. If the problem persists, contact the official Cecotec Technical Support Service. | |
| Why does the iron leak? | Water accumulates in the steam tube and the garment steamer, and comes out as water droplets during steam ironing, at the beginning or when resuming ironing after a break. |
| Is it possible to wash the board cover and the plush underneath? | The board cover can be washed in the washing machine, provided that a programme for delicate garments is used. Do not wash the plush in the washing machine. Wash it by hand. |
7. TECHNICAL SPECIFICATIONS
Model: Total Iron 10100 Pro
Product reference: 05086
2200 W, 220-240 V, 50/60 Hz
Power consumption when the appliance displays operating information is 0.9W, according to the guidelines of EN 50564:2011 and European regulations 1275/2008/EC and 801/2013/EC.
The appliance stays on until operating information is displayed.
Technical specifications may change without prior notification to improve product quality.
Made in China | Designed in Spain
8. DISPOSAL OF OLD ELECTRICAL AND ELECTRONIC APPLIANCES
This symbol indicates that, according to the applicable regulations, the product and/or batteries must be disposed of separately from household waste. When this product reaches the end of its shelf life, you should dispose of the cells/batteries/accumulators and take them to a collection point designated by the local authorities.
Consumers must contact their local authorities or retailer for information concerning the correct disposal of old appliances and/or their batteries.
Compliance with the above guidelines will help protecting the environment.
9. TECHNICAL SUPPORT AND WARRANTY
Cecotec shall be liable to the end user or consumer for any lack of conformity that exists at the time of delivery of the product under the terms, conditions, and deadlines established by the applicable regulations.
It is recommended that repairs be carried out by qualified personnel.
If at any moment you detect any problem with your product or have any doubt, do not hesitate to contact the official Cecotec Technical Support Service at +34 963 210 728.
ENGLISH
10. COPYRIGHT
The intellectual property rights over the texts in this manual belong to CECOTEC INNOVACIONES, S.L. All rights reserved. The contents of this publication may not, in whole or in part, be reproduced, stored in a retrieval system, transmitted, or distributed by any means (electronic, mechanical, photocopying, recording or similar) without the prior authorization of CECOTEC INNOVACIONES, S.L.
1. PIÈCES ET COMPOSANTS
Centrale vapeur. Img. 1-2
Accessories. Img. 5.
6. PROBLEEMOPLOSSING
Fig./Img./Abb./Afb./Rys.1
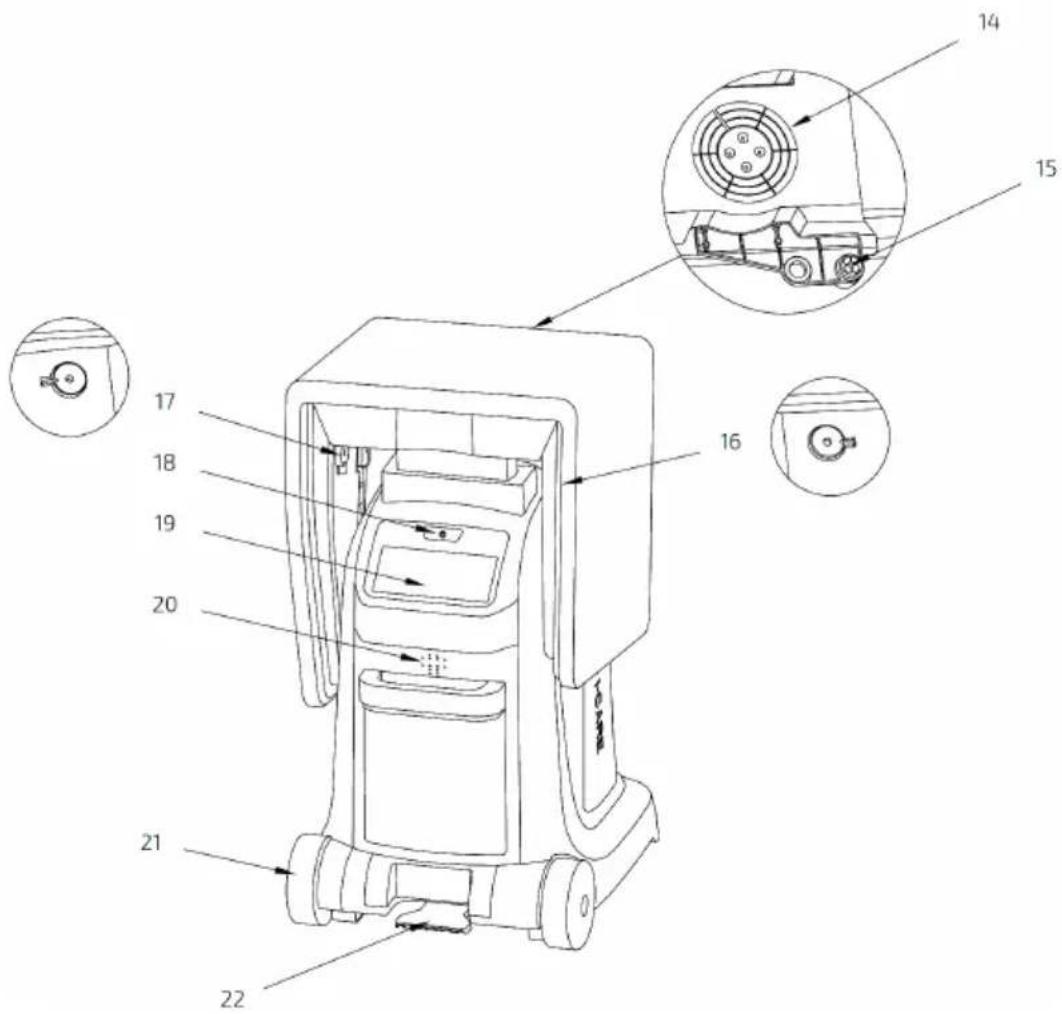
Fig./Img./Abb./Afb./Rys.2
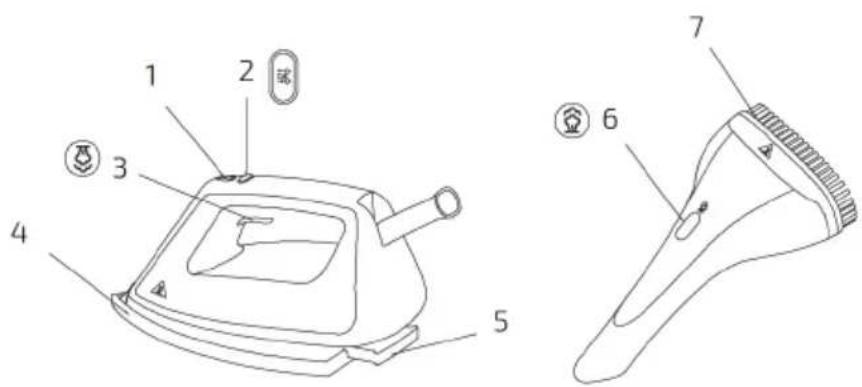
Fig./Img./Abb./Afb./Rys. 3
natural_image
Exploded view diagram of a cleaning tool set including handle, screwdriver, and brush (no text or labels)Fig./Img./Abb./Afb./Rys. 4 Fig./Img./Abb./Afb./Rys. 5
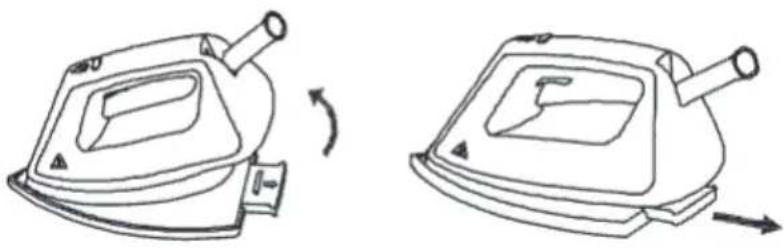
Fig./Img./Abb./Afb./Rys. 6
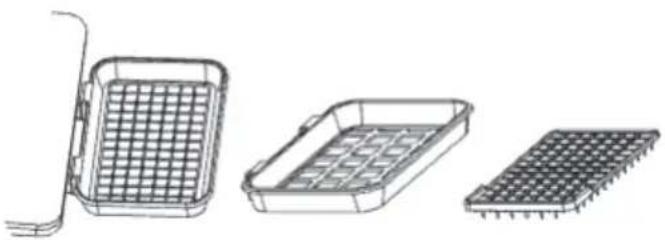
Fig./Img./Abb./Afb./Rys. 7
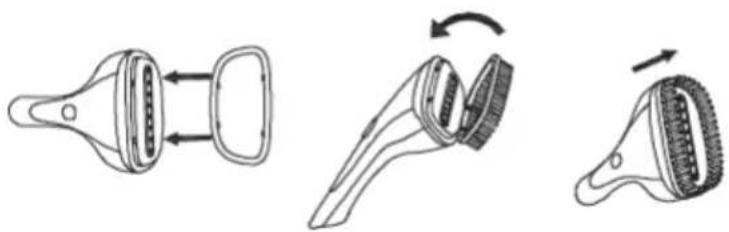
Fig./Img./Abb./Afb./Rys. 8
natural_image
Technical line drawing showing two mechanical assembly configurations with no visible text or symbolsFig./Img./Abb./Afb./Rys. 9
natural_image
Technical line drawing of a mechanical assembly with no visible text or symbolsFig./Img./Abb./Afb./Rys. 10
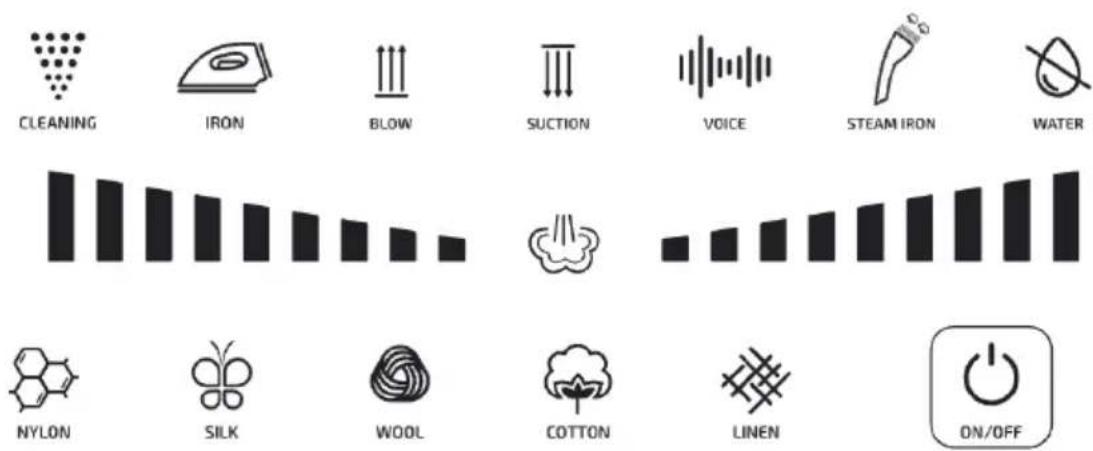
Fig./Img./Abb./Afb./Rys. 11

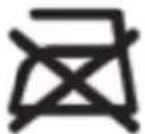
Fig./Img./Abb./Afb./Rys. 13
Fig./Img./Abb./Afb./Rys. 12
natural_image
Simple line drawing of a mechanical component or tool (no text or symbols)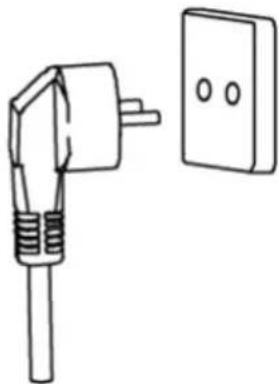
natural_image
Simple line drawing of a plug and a wall-mounted electrical outlet (no text or symbols)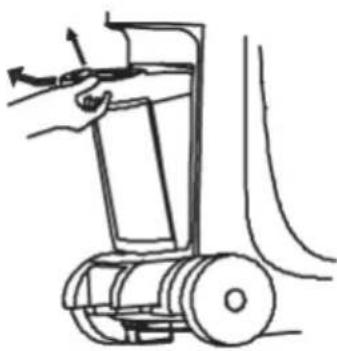
natural_image
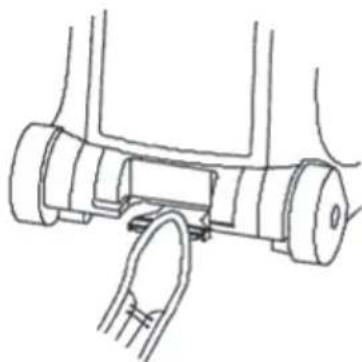
Line drawing of a mechanical device with a hand operating it, no text or symbols presentFig./Img./Abb./Afb./Rys. 15
Fig./Img./Abb./Afb./Rys. 14
natural_image
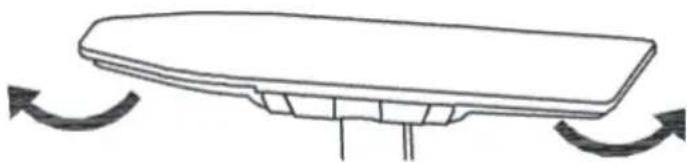
Simple line drawing of a flatboard with curved arrows indicating rotation or motion (no text or symbols)Fig./Img./Abb./Afb./Rys. 16
natural_image
Technical line drawing of a mechanical component with no visible text or symbolsFig./Img./Abb./Afb./Rys. 17
natural_image
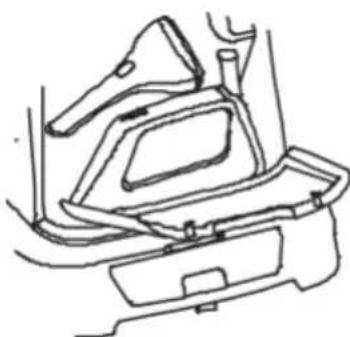
Line drawing of a car interior showing dashboard, seat, and dashboard frame (no text or symbols)Fig./Img./Abb./Afb./Rys. 18
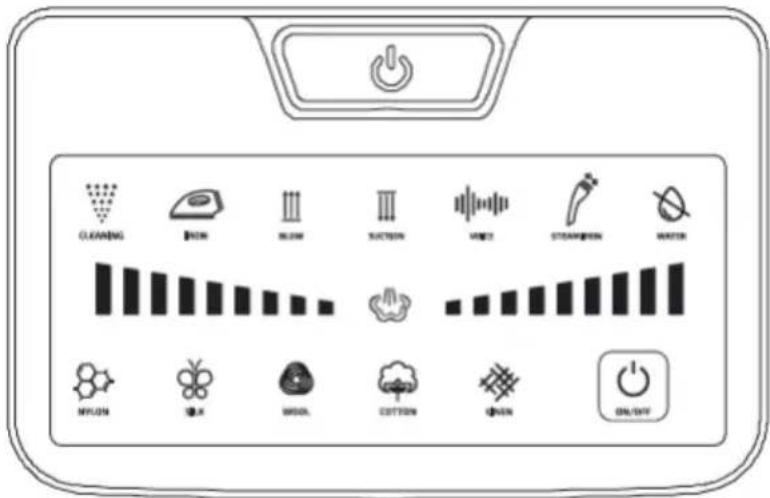
Fig./Img./Abb./Afb./Rys. 19
natural_image
Line drawing of a mechanical device with a handle and internal cavity, no text or symbols presentFig./Img./Abb./Afb./Rys. 20
natural_image
Simple line drawing of a curved structure with four upward arrows indicating direction (no text or symbols)Fig./Img./Abb./Afb./Rys. 21
natural_image
Pure technical diagram of a structural component with downward arrows indicating force or direction (no text or symbols)Fig./Img./Abb./Afb./Rys. 22
natural_image
Illustration of a hand holding a torch emitting smoke or vapor, with an arrow pointing to it (no text or symbols present)Fig./Img./Abb./Afb./Rys. 23
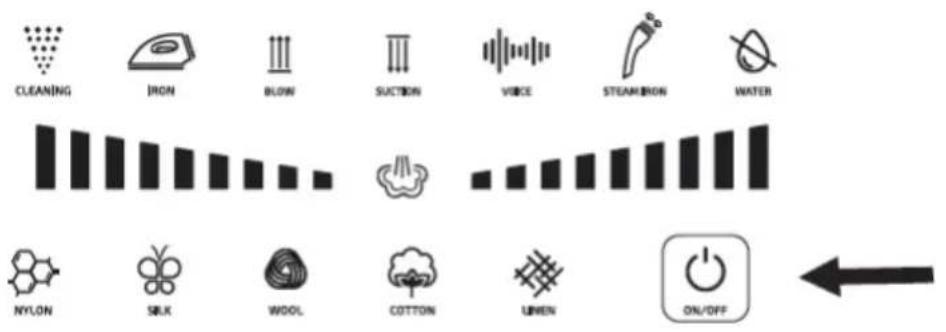
Fig./Img./Abb./Afb./Rys. 24
www.cecotec.es