
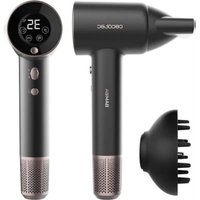
DryGlam Waves i-Sensor Pro - Hair Dryers CECOTEC - Free user manual and instructions
Find the device manual for free DryGlam Waves i-Sensor Pro CECOTEC in PDF.

| Product type | Hair dryer with styling accessories |
| Brand | Cecotec |
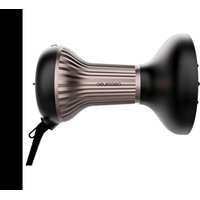
| Model | DryGlam Waves i-Sensor Pro |
| Power | 1600 W (estimated) |
| Supply voltage | 230 V ~ 50/60 Hz (estimated) |
| Drying modes | AI, constant temperature, long hair, short hair, baby, pet |
| Air temperatures | Warm, hot, cold, alternating warm/cold |
| Motor speed | Up to 80,000 rpm |
| Infrared technology | Yes, 650 nm |
| Grip sensor | Yes (auto shut-off if released) |
| Self-cleaning function | Yes, air flow reversal for 10 seconds |
| LCD screen | Yes |
| Included accessories | 6 attachments: straightener, styling, diffuser, anti-frizz, curling cylinders left and right |
| Air inlet filter | Removable metal filter |
| Weight | Approximately 500 g (estimated) |
| Dimensions (L x W x H) | Approximately 28 x 8 x 8 cm (estimated) |
| Cable length | Approximately 1.8 m (estimated) |
| Main material | ABS plastic, stainless steel (estimated) |
| Maintenance | Clean the filter regularly with a dry cloth; do not use water |
| Safety | Automatic shut-off via sensor, overheat protection, low voltage and NTC error warnings |
| Certification | CE, EU declaration of conformity available online |
Frequently Asked Questions - DryGlam Waves i-Sensor Pro CECOTEC
User questions about DryGlam Waves i-Sensor Pro CECOTEC
0 question about this device. Answer the ones you know or ask your own.
Ask a new question about this device
Download the instructions for your Hair Dryers in PDF format for free! Find your manual DryGlam Waves i-Sensor Pro - CECOTEC and take your electronic device back in hand. On this page are published all the documents necessary for the use of your device. DryGlam Waves i-Sensor Pro by CECOTEC.
USER MANUAL DryGlam Waves i-Sensor Pro CECOTEC
| 1. Parts and components | 41 |
| 2. Before use | 41 |
| 3. Operation | 42 |
| 4. Cleaning and maintenance | 46 |
| 5. Troubleshooting 48 | |
| 6. Disposal of old electrical and electronic appliances | 47 |
| 7. Copyright | 47 |
| 8. Simplified EU Declaration of Conformity | 47 |
INHALT
Read the following instructions carefully before using the appliance. Keep this instruction manual for future reference or new users.
- Make sure that the mains voltage matches the voltage stated on the rating label of the appliance and that the wall outlet is grounded.
- This appliance is designed for domestic use only and is not intended for bars, restaurants, farmhouses, hotels, motels, and offices.
- If the appliance is to be used in a bathroom, it must be unplugged from the wall socket after use, as the proximity to water could be a risk even with the appliance switched off.
- As additional protection, it is recommended that a Residual Current Device (RCD) having a rated operating fault current not exceeding 30 mA be installed in the electrical circuit supplying the bathroom. We recommend you ask a qualified installer for advice.
- This appliance can be used by children aged from 8 years and above and people with reduced physical, sensory or mental capabilities or lack of experience and knowledge if they have been given supervision or instruction concerning use of the appliance in a safe way and understand the hazards involved. Children must not play with the appliance. Cleaning and user maintenance must not be carried out by unsupervised children.
- This symbol means: Do not use this appliance in a bathtub, shower or near water.
-
WARNING: do not use this appliance near bathtubs, showers, sinks or other containers filled with water.
-
Do not immerse the cord, plug, or any other non-removable part of the appliance in water or any other liquid or expose electrical connections to water. Make sure your hands are dry before handling the plug or switching on the appliance.
- Check the power cord regularly for visible damage. If the cord is damaged, it must be replaced by Cecotec's Official Technical Support Service to avoid any danger.
- Ensure that the air inlets and outlets are not blocked.
- Turn off and unplug the appliance from the power supply immediately after use.
- Unplug the appliance immediately under the following circumstances: abnormal operation, needs cleaning, and/or after use.
- Do not insert metal objects through the air inlets to avoid electric shocks.
- Do not wind the power cord around the appliance.
- Keep your face, neck, and scalp away from the appliance.
- Do not leave the appliance on any surface while in operation.
- Do not use the appliance to dry wigs, natural hair extensions, fake hair or animal hair.
- The air inlet ensures good ventilation of the appliance. Do not cover or obstruct it, as this may cause overheating.
- Do not insert objects in the air inlet.
INSTRUCTIONS DE SÉCURITÉ
-
Power/airflow speed control switch
-
Mode selection button
-
Airflow temperature control button
-
LCD display
-
Indicator light
-
Air outlet
-
Air inlet filter
B. Handle air inlet grille
-
Main body
-
Straightening nozzle
-
Styling nozzle
-
Left curling nozzle
-
Right curling nozzle
-
Anti-frizz nozzle
-
Diffuser nozzle
-
Power cord
Note:
The graphics in this manual are schematic representations and may not exactly match the product.
2. BEFORE USE
- This appliance comes in a packaging designed to protect it during transport. Remove the appliance from its box. You can keep the original box and other packaging materials in a safe place to prevent damage to the appliance if you need to transport it in the future. If you wish to dispose of the original packaging, make sure all items are recycled properly.
- Check that all parts and components are included and in good condition. If any of them are missing or damaged, please contact Cecotec's Official Technical Support Service immediately.
Box content:
- Product
- 6 attachments
- Premium case
- Instruction manual
- Do not remove the product's serial number in order to keep proper traceability if technical assistance is required.
ENGLISHENGLISH
3. OPERATION
Buttons
Mode selection button (2)
- Short press: changes mode.
- Long press (2 seconds): activates/deactivates the "Infrared light".
Power and airflow speed control switch (1)
Slide up/down to switch on/off and adjust the airflow speed.
Airflow temperature control button (3)
- Press to change the airflow temperature.
- Press and hold to activate/deactivate the "grip sensor".
Reverse cleaning function
With the hair dryer switched off, while holding down the Mode selection button (2), slide up the Power/airflow speed control switch (1) to switch on and activate the reverse dust elimination for 10 seconds. The function stops automatically.
Switching On/Off
-
After washing your hair, towel-dry to remove excess water.
-
Connect the power cord (16) to a compatible mains socket.
-
Switch on the appliance and adjust the desired speed using the Power/airflow speed control switch (1).
Changing the airflow temperature and mode
- Changing the airflow temperature: Press the Airflow temperature control button (3).
- Changing the mode: Press the Mode selection button (2) to select the desired mode.
LED indicator lights
- Warm airflow: Orange LED on the indicator light (5).
- Hot airflow: Red LED on the indicator light (5).
- Cool airflow: Blue LED on the indicator light (5).
Operating modes
Constant temperature mode
- Dries quickly while maintaining constant the selected airflow temperature.
- Select the desired airflow temperature: warm, hot and cool (ambient temperature).
- Smart memory: when switched on again, the device starts with the last temperature setting.
- Mode selection using the Mode selection button (2). The temperature is adjusted using the Airflow temperature control button (3). The corresponding icon is shown on the LCD display (4).
Al mode
- Automatically adjusts the temperature according to the distance to maintain stable the airflow temperature reaching the scalp. The status is shown on the LCD display (4).
- In AI mode, pressing the Airflow temperature control button (3) does not change the temperature; to modify it, first change the mode using the Mode selection button (2).
Long hair mode
- This mode is designed for drying long hair, using appropriate temperature and time to minimise damage.
- Operating sequence: 1 minute hot air → 3 minutes warm/cool alternating mode → 2 minutes warm air → 1 minute cool air → warm/cool alternating mode.
- After completing the sequence, it remains in the last state of warm/cool alternating mode. The status is shown on the LCD display (4).
- Select this mode using the Mode selection button (2).
Short hair mode
- This mode is designed for drying short hair, optimising the temperature and time to minimise damage.
- Operating sequence: 1 minute hot air → 1 minute warm/cool alternating mode → 1 minute warm air → 1 minute cool air → warm/cool alternating mode.
- After completing the sequence, it remains in the last state of warm/cool alternating mode.
- Select this mode using the Mode selection button (2). The status is shown on the LCD display (4).
Baby mode
- Airflow is emitted at a lower speed and temperature than on normal mode, making it suitable for children, pets or styling sessions.
- The rotation speed is reduced within the range 80,000 rpm (max.) to 65,000 rpm (min.).
- You can select the desired temperature using the Airflow temperature control button (3).
- Smart memory function: After switching off and on, the appliance starts operating with the last airflow temperature setting.
Pet mode
- Provides airflow at a low speed and temperature, suitable for drying the fur of animals with different coat types, whose skin temperature is higher than human.
- Quiet operation with rotation speed between 65,000 and 75,000 rpm.
- You can select the desired temperature using the Airflow temperature control button (3).
- Smart memory function: After switching off and on, the appliance starts operating with the last airflow temperature setting.
ENGLISHENGLISH
Special functions
Grip sensor
- To activate/deactivate this function, press and hold the Airflow temperature control button (3).
- With the function activated, the device begins operating when the hand touches the main body (9): when the hand is removed from the main body (9), operation stops automatically.
Infrared light
- To activate/deactivate this function, press and hold for 2 seconds to switch the infrared light on/off.
- When this function is activated, the device uses 650 nm Infrared technology that penetrates the lower layer of the scalp, inhibits excessive sebum secretion, maintains the water/oil balance of the scalp and promotes a healthy hair environment.
Self-cleaning mode
- To activate this function, press and hold the Mode selection button (2) and slide up the Power/airflow speed control switch (1). Reverse dust elimination is activated for 10 seconds at high airflow speed; afterwards, the function stops automatically.
- If the Power/airflow speed control switch (1) does not return to the off position, the device will switch on at that speed on the next start-up.
Styling attachments
Diffuser nozzle (15)
- Function: Disperses airflow to achieve gentler, more even drying, helps reduce frizz and define curls and waves; suitable for drying curly hair, creating voluminous styles and heating hair evenly after colouring.
- Instructions for use:
- Place the diffuser nozzle (15) onto the air outlet (6).
- Low speed and medium or low temperature are recommended for best results.
- Place the hair over the diffuser, dry from bottom to top and gently support curls with fingers to enhance them.
Styling nozzle (11)
- Function: Concentrates airflow for precise styling; suitable for straight hair, inward curls, outward curls and other styles.
- Instructions for use:
- Attach the styling nozzle (11) to the air outlet (6).
- High speed and high temperature are recommended; direct the nozzle towards the area you wish to style and use a comb to straighten or curl.
- Adjust the angle of the nozzle as necessary to achieve different styling effects.
Straightening nozzle (10)
- Function: Concentrates airflow to minimise flyaway hairs, dry with precision and smooth frizz; helps "seal" the cuticle for a glossy finish.
- Instructions for use:
- Attach the straightening nozzle (10) to the air outlet (6).
- Techniques:
- Basic drying: Hold the nozzle 10 cm to 15 cm from the scalp and dry from roots to ends.
- Section drying: Secure the upper layers with clips and work in sections from lower layers to upper layers.
- Polished straightening: Take a section, comb with a wide-bristle comb or boar bristle brush; place the nozzle just below the comb, orient the outlet at approximately 45° and slide slowly downwards following the direction of the hair shaft.
- Frizz reduction: When drying is complete, switch to cool air using the Airflow temperature control button (3) and pass the nozzle from crown to ends 1 to 2 times.
Anti-frizz nozzle (14)
- Function: Specialised airflow design to direct air and control frizz, preventing ends from turning upwards; ideal for achieving smooth, polished hairstyles.
- Instructions for use:
- Attach the anti-frizz nozzle (14) to the air outlet (6).
- Place the nozzle close to the hair and dry from top to bottom following the direction of hair growth.
- Use medium temperature and medium speed; slide the nozzle slowly to straighten hair and effectively reduce flyaway hairs and frizz.
Left curling nozzle (12)
- Function: Designed to create left-oriented curls, guiding airflow so hair curls inwards. Helps to form natural inward curls or spiral curls.
- Instructions for use:
- Attach the left curling nozzle (12) to the air outlet (6).
- Take a section of hair and wrap it around the nozzle; or place the nozzle at the ends to allow hair to curl automatically around it.
- For curling, select high temperature using the Airflow temperature control button (3); for setting, use low temperature. You will achieve a long-lasting left-oriented curl effect.
Right curling nozzle (13)
- Function: Designed to create right-oriented curls, guiding airflow so hair curls outwards. Suitable for flicked-out ends or wavy hairstyles.
- Instructions for use:
- Attach the right curling nozzle (13) to the air outlet (6).
- Take a section of hair and wrap it around the nozzle; or place the nozzle at the ends to allow hair to curl automatically around it.
ENGLISHENGLISH
- For curling, select high temperature using the Airflow temperature control button (3); for setting, use low temperature, achieving a long-lasting right-oriented curl effect.
Related usage tips
- We recommend using hot air when hair is damp after washing.
- To avoid damage from hot air when hair is already dry and ambient humidity is low, use cool air or warm air with the Airflow temperature control button (3), or a "circulation mode" if available via the Mode selection button (2).
4. CLEANING AND MAINTENANCE
- Switch off and unplug the device from the mains before cleaning.
- Use a soft, slightly dampened cloth to clean the surface of the device.
- Do not immerse the device in water or any other liquid.
Cleaning the air filter
We recommend periodically cleaning the filter (7) to remove accumulated dust and ensure proper operation.
Procedure
-
Switch off the device using the Power/airflow speed control switch (1) and unplug the power cord (16) before cleaning. Let the device cool down.
-
Rotate the rear cover of the air inlet filter (7), remove the cover and access the metal filter.
-
Using a dry lint-free cloth, soft brush or toothbrush, remove any debris on the inlet grille and internal stainless steel filter.
-
Do not use water to clean the stainless steel filter or the main body (9), as this may cause malfunction.
5. TROUBLESHOOTING
Note
Low voltage
- This warning appears when there is low voltage due to a poor plug contact.
- The LED indicator (5) lights up orange.
- Solution: Ensure the power cord (16) is firmly plugged in; disconnect it and reconnect it.
NTC failure
- Description: This warning appears when the device's NTC is damaged.
- The LED indicator (5) lights up blue
- Solution: Contact Cecotec's Official Technical Support Service.
Overtemperature
- Description: This warning appears when the device overheats.
- The LED indicator (5) lights up red.
- Solution: Clean the air inlet grille and filter (7). If necessary, use the handle air inlet grille (8) to access the filter.
Note: if the warning continues to appear after applying the indicated solution, please contact Cecotec's official Technical Support Service.
6. DISPOSAL OF OLD ELECTRICAL AND ELECTRONIC APPLIANCES

This symbol indicates that, according to the applicable regulations, the product and/or battery must be disposed of separately from household waste. When this product reaches the end of its shelf life, you should dispose of the batteries/accumulators and take them to a collection point designated by the local authorities.
For detailed information on how to properly dispose of electrical and electronic equipment and/or the corresponding batteries, consumers should contact their local authorities. Information regarding national packaging recycling systems and their marking can be found on our website.
Compliance with the above guidelines will help protect the environment.
7. COPYRIGHT
The intellectual property rights over the texts in this manual belong to CECOTEC INNOVACIONES, S.L. All rights reserved. The content of this publication may not, either in part or in its entirety, be reproduced, stored in a retrieval system, transmitted or distributed by any means (electronic, mechanical, photocopying, recording or similar) without prior authorisation from CECOTEC INNOVACIONES, S.L.
8. SIMPLIFIED EU DECLARATION OF CONFORMITY
CE Cecotec Innovaciones hereby declares that this appliance complies with the essential requirements and other relevant provisions of the regulations applicable in the European Union. This appliance has been designed, manufactured and tested in compliance with required safety and quality standards. The full text of the EU Declaration of Conformity can be found on the following website: https://cecotec.es/es/information/declaration-of-conformity
FRANÇAISFRANÇAIS
1. PIÈCES ET COMPOSANTS
Image 1
5. PROBLEEMOPLOSSING
Mededelingen
Lage spanning
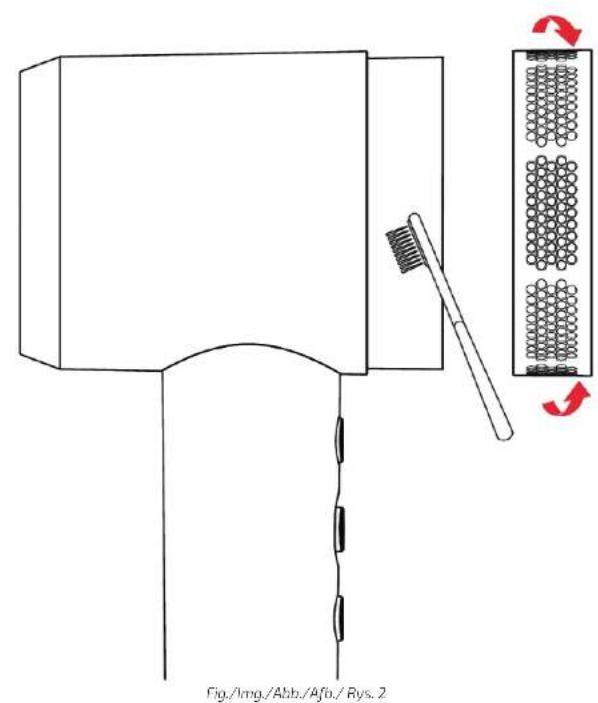
Fig./Img./Abb./Afb./Rys.1
www.cecotec.es

- INHALT
- INSTRUCTIONS DE SÉCURITÉ
- BEFORE USE
- Box content:
- ENGLISHENGLISH
- OPERATION
- Buttons
- Mode selection button (2)
- Power and airflow speed control switch (1)
- Airflow temperature control button (3)
- Reverse cleaning function
- Switching On/Off
- Changing the airflow temperature and mode
- LED indicator lights
- Operating modes
- Constant temperature mode
- Al mode
- Long hair mode
- Short hair mode
- Baby mode
- Pet mode
- Special functions
- Grip sensor
- Infrared light
- Self-cleaning mode
- Styling attachments
- Diffuser nozzle (15)
- Styling nozzle (11)
- Straightening nozzle (10)
- Anti-frizz nozzle (14)
- Left curling nozzle (12)
- Right curling nozzle (13)
- Related usage tips
- CLEANING AND MAINTENANCE
- Cleaning the air filter
- TROUBLESHOOTING
- Note
- Low voltage
- NTC failure
- Overtemperature
- DISPOSAL OF OLD ELECTRICAL AND ELECTRONIC APPLIANCES
- COPYRIGHT
- SIMPLIFIED EU DECLARATION OF CONFORMITY
- FRANÇAISFRANÇAIS
- PIÈCES ET COMPOSANTS
- PROBLEEMOPLOSSING
- Mededelingen
- Lage spanning
Brand : CECOTEC
Model : DryGlam Waves i-Sensor Pro
Category : Hair Dryers