AD 7086 - Vacuum Cleaner ADLER - Free user manual and instructions
Find the device manual for free AD 7086 ADLER in PDF.

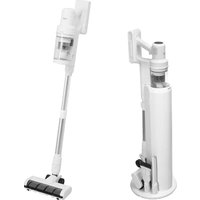
| Product type | Cordless stick vacuum cleaner |
| Brand | Adler |
| Model | AD 7086 |
| Dimensions (estimation) | Height: 105 cm, Width: 25 cm, Depth: 25 cm |
| Weight (estimation) | 2.5 kg |
| Power supply | Lithium-ion battery 22.2 V / 2200 mAh / 48.84 Wh; charger 27 V / 500 mA |
| Motor power | 140 W (DC motor) |
| Charging time | 4.5 to 5 hours |
| Runtime | High speed: up to 17 min; Low speed: up to 35 min |
| Suction power | High speed: 11,000 Pa; Low speed: 6,000 Pa |
| Dustbin capacity | 500 ml |
| Filters | HEPA filter + sponge filter + metal pre-filter |
| Main brush | Electric floor brush with removable roller |
| Included accessories | Aluminum tube, electric floor brush, 2-in-1 dusting brush, charger, wall mount |
| Noise level | Not specified |
| Spare parts available | Replacement filter AD 7086.1; replacement roller AD 7086.4 |
| Maintenance | Clean the dustbin and filters with cold water; clean the electric brush roller after each use |
| Safety | Use on 220-240 V ~ 50/60 Hz outlet; do not immerse; keep out of reach of children |
| Warranty | Manufacturer's warranty (see manual) |
| Usage | Indoor or car; household use only |
Frequently Asked Questions - AD 7086 ADLER
User questions about AD 7086 ADLER
0 question about this device. Answer the ones you know or ask your own.
Ask a new question about this device
Download the instructions for your Vacuum Cleaner in PDF format for free! Find your manual AD 7086 - ADLER and take your electronic device back in hand. On this page are published all the documents necessary for the use of your device. AD 7086 by ADLER.
USER MANUAL AD 7086 ADLER
natural_image
Exterior view of a black and gold robotic vacuum cleaner with purple head cover (no text or symbols visible)| AD 7086 | |||||
| EN | User Manual | 4 | PL | Instrukcja obsługi | 89 |
| DE | Bedienungsanleitung | 9 | IT | Manuale d'uso | 95 |
| FR | Mode d'emploi | 14 | SV | Bruksanvisning | 100 |
| ES | Manual de usuario | 20 | BG | Ръководство за употреба | 105 |
| PT | Manual de Instruções | 25 | DA | Brugsanvisning | 111 |
| LT | Naudojimo instrukcija | 31 | SK | Používatel'ská príručka | 116 |
| LV | Lietošanas instrukcija | 36 | BS | Korisnički priručnik | 121 |
| ET | Kasutusjuhend | 41 | MK | Упатство за употреба | 126 |
| HU | Használati útmutató | 46 | HR | Korisnički priručnik | 132 |
| RO | Manual de utilizare | 51 | UK | Керівництво користувача | 137 |
| CS | Návod k použití | 56 | SR | Упутство за употребу | 143 |
| RU | Руководство пользователя | 61 | AR | دليل المستخدم | 148 |
| EL | Еүхειρίδιο хрήσης | 67 | AZ | İstifadəçi tõlimatı | 151 |
| NL | Gebruikershandleiding | 73 | SQ | Manuali i përdorimit | 156 |
| SL | Navodila za uporabo | 79 | KA | Общегزطلاوي | 161 |
| FI | Käyttöohje | 84 | |||

natural_image
Line drawing of a mechanical device with a labeled component (A), no text or symbols present.B
natural_image
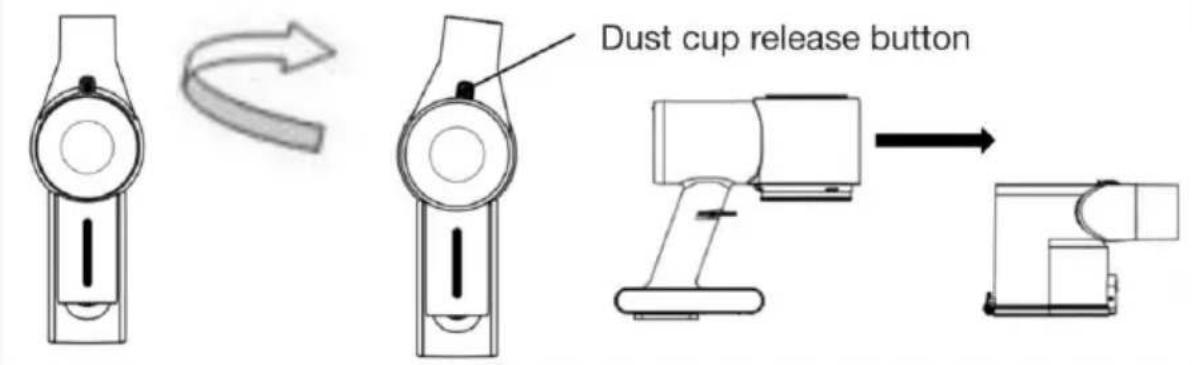
Technical line drawings of mechanical components including a tool, bracket, and housing (no text or symbols)30° then remove the whole dust container.
C
D
natural_image
Line drawings of various office appliances including a desktop, cup, and monitor (no text or symbols)E
natural_image
Technical line drawing of a mechanical device with internal components and directional arrows indicating motion (no text or symbols)User Manual (EN)
GENERAL SAFETY CONDITIONS IMPORTANT SAFETY INSTRUCTIONS FOR USE READ CAREFULLY AND KEEP FOR FUTURE REFERENCE
- Before using the device, read the operating instructions and follow the instructions contained therein. The manufacturer is not responsible for damage caused by using the device contrary to its intended use or improper operation.
- The device is for domestic use only. Do not use for other purposes incompatible with its intended use.
- Connect the power supply of the device only to a 220-240 V \~ 50/60 Hz outlet.
In order to increase the safety of use, do not connect multiple electrical appliances to a single circuit at the same time. - Take special care when using the device when children are around. Do not allow children to play with the appliance do not allow children or persons unfamiliar with the appliance to use it.
- WARNING: This equipment may be used by children over 8 years of age and persons with limited physical, sensory or mental ability, or persons without experience or familiarity with the equipment, if this is done under the supervision of a person responsible for their safety or they have been given instructions on the safe use of the equipment and are aware of the dangers associated with its use. Children should not play with the equipment. Cleaning and maintenance of the equipment should not be performed by children unless they are over 8 years of age and these activities are performed under supervision.
- Always remove the power plug from the power outlet after using the power adapter by holding the outlet with your hand. DO NOT pull on the power cord.
- Do not immerse the cord, plug and the entire unit in water or
other liquid. Do not expose the unit to weather conditions (rain, sun, etc.) or use in high humidity conditions (bathrooms, damp camping houses).
-
Periodically check the condition of the power cord. If the power cord is damaged, it should be replaced by a specialized repair facility to avoid danger.
-
Do not use the device with a damaged power cord or if it has been dropped or damaged in any other way or is not working properly. Do not repair the device yourself, as there is a risk of electric shock. Take the damaged device to a competent service center for inspection or repair. All repairs may be carried out only by authorized service centers. Improper repair may cause serious danger to the user.
-
Do not use the device near flammable materials.
-
The power cord must not touch hot surfaces.
-
Do not leave the power supply plugged into an outlet unattended.
-
To provide additional protection, it is advisable to install in the electrical circuit, a residual current device (RCD) with a rated residual current not exceeding 30 mA. In this regard, you should consult a specialist electrician.
-
Do not allow the motor part of the device to get wet.
-
Use indoors or inside the car.
-
Do not use the vacuum cleaner to collect any substances including flammable ones
-
Do not vacuum sharp-edged objects (such as glass shards).
-
Do not point the suction tube of the vacuum cleaner towards other people or animals.
-
Use only accessories designed for this device.
-
Be especially careful when vacuuming up stairs, take care of your safety.
-
Do not block any ventilation holes of the vacuum cleaner.
-
Do not run the vacuum cleaner without the filter in place.
- Do not vacuum dust and construction debris, the residue of such debris will immediately void the warranty.
- Do not leave the device unattended during operation.
- Always disconnect the unit from the power supply if left unattended, and before folding, unfolding or cleaning.
- Always turn the device off with the button before unplugging.
- WARNING: if the washing tip is stepped on the power cord from another appliance, there is a danger of damaging the cord and causing a short circuit in the electrical system
- WARNING: use only the original supplied power adapter with model: BZ015-270050-AG
- WARNING: the device uses a lithium-ion battery, 22.2V
2200mAh 48.84Wh. Use off the original battery pack. - WARNING: only charge the battery with the charger supplied with the product.
- WARNING: keep the battery pack out of the reach of children. The battery pack should not be heated, opened, punctured, destroyed or thrown into a fire.
- Old depleted or used batteries should be removed from the device and disposed of or recycled in accordance with national waste disposal regulations.
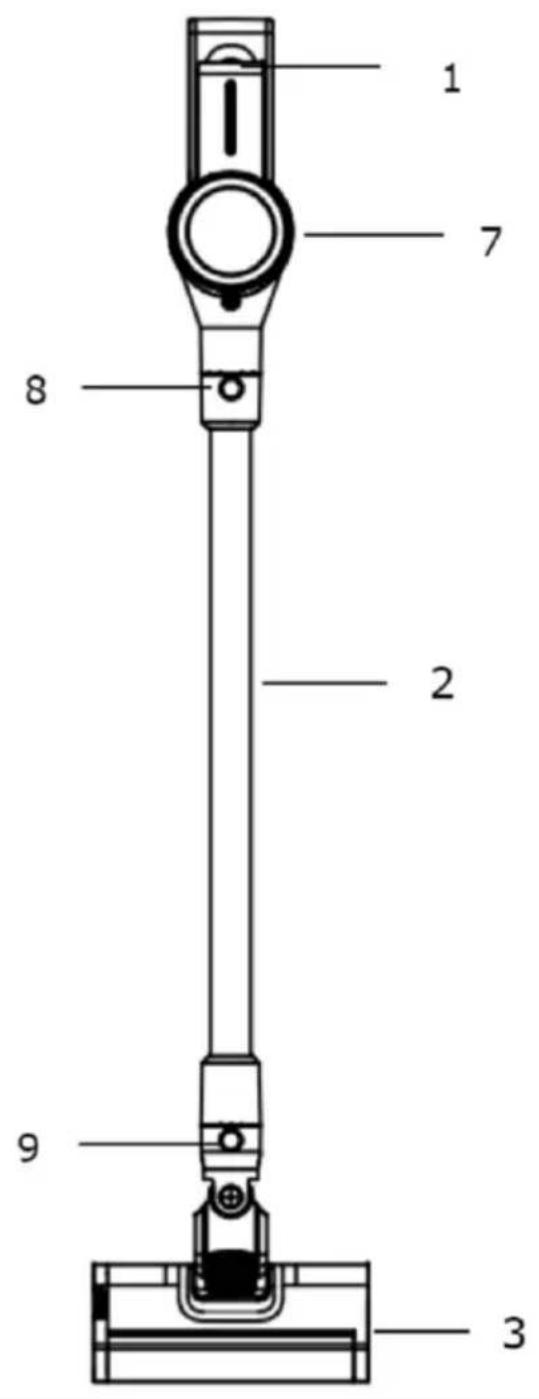
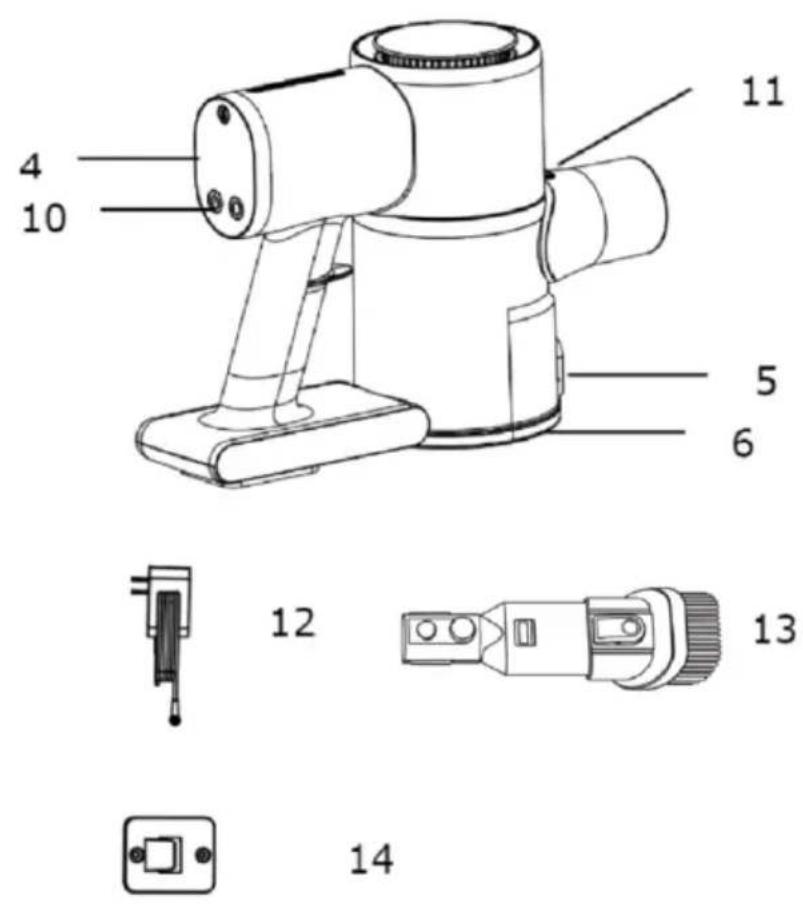
Description of the AD 7086 vacuum cleaner:
-
Battery level indicator
-
Aluminum tube
-
Electro floor brush
-
Control panel
-
Dust container release button
-
Dust container flap
-
Motor
-
Aluminum tube release button
-
Floor brush release button
-
Switch/speed button
-
Dust container release button
-
Charger
-
Two-in-one squeegee
-
Wall hanger
Before first use:
-
Remove any packing materials.
-
Using a damp cloth, wipe all surfaces of the unit.
Operating the device:
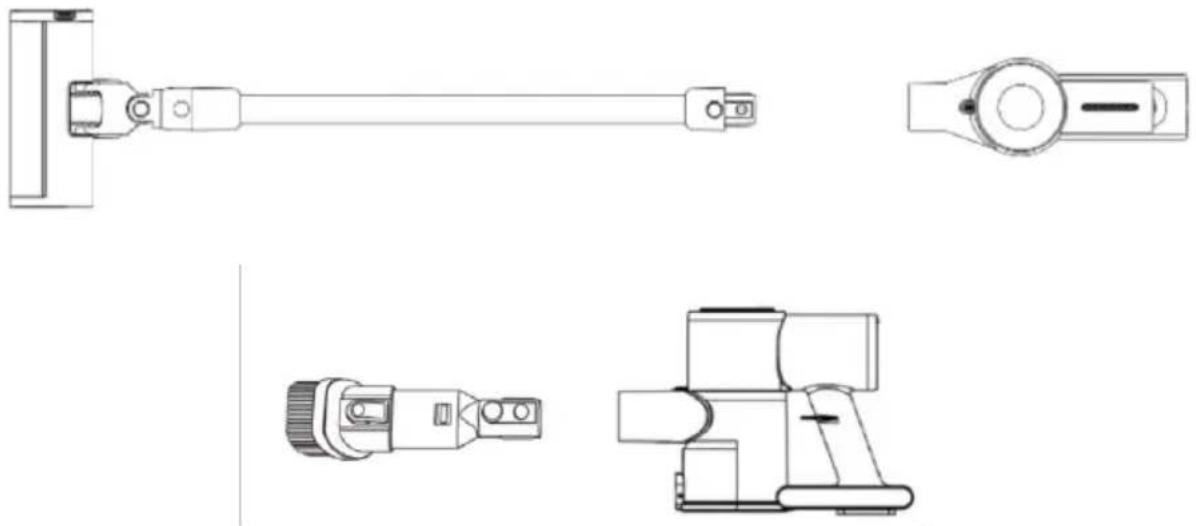
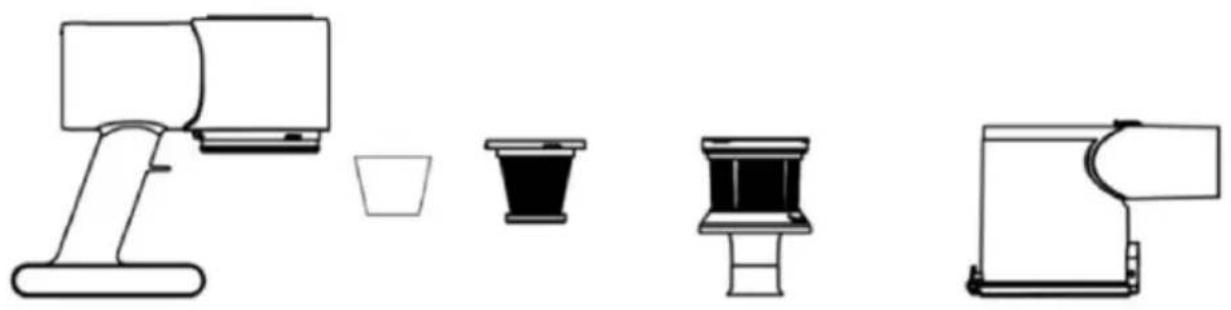
- Connect either an aluminum tube to the main unit (7) and an electro brush or other suction nozzle to it. You can also connect the electro brush and suction cups directly to the main unit. See Illustration B page 3.
- On the control panel, press the On/Off button to turn the unit on.
- The display will show the following information:
a. Battery level
b. Current mode of operation: Minimum RPM or Maximum RPM - With the right mode selection button, you can change the current operation mode by pressing it.
- Always empty the dust container after operation by pressing the dust container release button (5).
Charging the device:
- Turn off the device.
- Connect the charger (12) to the charging port on the device. It is located above the control panel behind a special silicone cap. See photo A page 2.
- Plug the charger into a wall outlet.
-
The display will show the charging process.
-
It takes up to 5 hours to fully charge.
NOTE: THE DEVICE MUST NOT BE USED WHILE CHARGING.
Cleaning and maintenance:
Cleaning the dust container and filter:
- Disconnect the electro brush or tube from the unit.
- Press the dust container release button (11) and while holding it, turn the dust container to the right. See illustration C page 3.
- Then disconnect the container from the device by pulling the container down.
- Wipe the removed dust container first with a damp cloth and then with a dry cloth or paper towel wipe it clean.
- If the suction power has not improved after cleaning and emptying the dust container, clean the filter assembly. To disconnect the filter assembly from the motor part, turn the unit upside down and grab the metal filter with a firm grip, being careful not to crush it, turn the filter to the left.
-
Pull the filter assembly upwards to disconnect it from the motor part.
-
Inside the filter assembly is a sponge filter and a HEPA filter.
-
To clean the filters, remove the HEPA filter and sponge filter from the metal pre-filter.
-
Turn the HEPA filter holder which is inside the metal filter towards the open padlock icon and then pull upward to remove the HEPA and sponge filter.
-
Remove the sponge filter from the HEPA filter.
-
Using clean cold water, clean all 3 filters.
NOTE. DO NOT USE HOT WATER, DETERGENT OR ANY ABRASIVE MATERIALS LIKE BRUSHES, SPONGES, ETC. TO CLEAN THE HEPA AND SPONGE FILTERS.
- Set the filters aside to dry completely in a dry and airy place away from heat sources. Do not dry filters on radiators and avoid direct sunlight.
NOTE: DO NOT USE WET OR DAMP FILTERS. USE OF FILTERS THAT ARE NOT FULLY DRY WILL RESULT IN DAMAGE TO THE DEVICE AND WILL EXCLUDE THE DEVICE FROM THE RIGHT TO REPAIR UNDER THE MANUFACTURER'S WARRANTY.
- After the filters are dry, put them back into the unit and the unit should be put back together.
NOTE: DO NOT USE THE DEVICE WITHOUT FILTERS. THIS RESULTS IN DAMAGE TO THE DEVICE AND EXCLUDES THE DEVICE FROM THE RIGHT TO REPAIR UNDER THE MANUFACTURER'S WARRANTY.
- If no improvement in suction power is noticed after cleaning the filters, replace the filters with new ones. To do this, contact your dealer and purchase a set of filters: AD 7086.1.
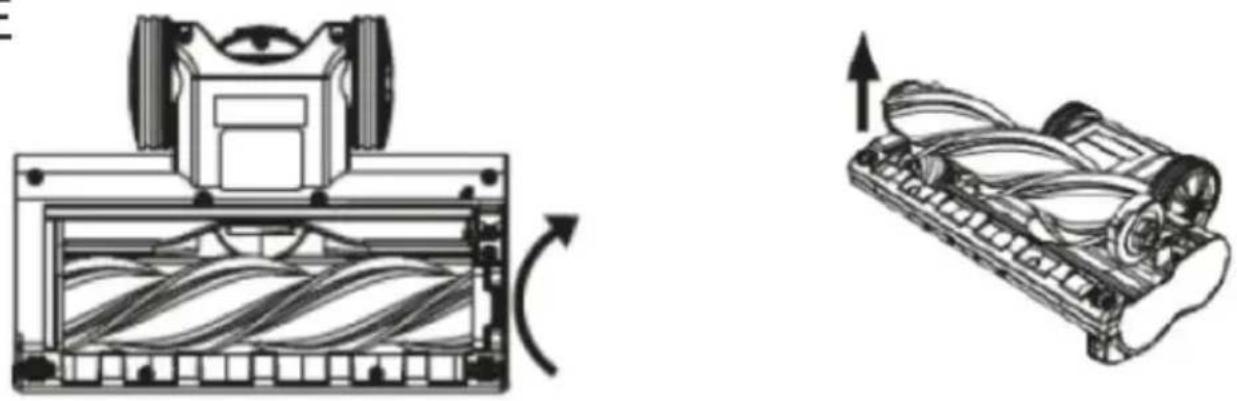
Cleaning the electro brush. ILLUSTRATION E PAGE 3:
Clean the electro brush after each use to remove stuck and entangled threads and hair. If this is not done regularly, the electro brush motor will be damaged. Damage to the electro brush caused by lack of maintenance (not properly cleaning the roller) is not subject to warranty repair.
Al to clean the electro brush you should:
-
Disconnect the electro brush from the main unit.
-
Using a damp cloth, wipe the outside of the electro brush.
-
To clean the roller, turn the electro brush upside down.
- On the right side there is a lock which you need to slide to the right to unlock the roller.
- The roller should be removed.
- Then clean the roller from threads and hair.
- Clean the inside of the electro brush from hair and thread.
- Put the roller back in place by first inserting the left side of the roller into the hole and drive and then the right side of the roller into the lock hole.
- The locking mechanism should then be moved to the left.
If the roller is dirty you can wash it under a stream of tap water and then leave it to dry completely before installing it. If the roller is damaged or no longer usable, contact your dealer and purchase an additional roller: AD 7086.4
TECHNICAL SPECIFICATIONS:
DC motor power: 140W Brush motor
Battery: 22.2V Li-ion 2200mAh
Power supply:
Input: 100-240V,50-60Hz,0.4A MAX
Output: 27V 500mA
Charging time: 4.5-5 hours
Operating time:
High speed: up to 17 minutes,
Low speed : up to 35 minutes
Suction power:
High speed : 11,000 pa,
Low speed : 6,000 pa
Dust container capacity : 500mL
Replacement filter model: AD 7086.1
Spare roller model: AD 7086.4

For the sake of the environment. Information about waste electrical and electronic equipment In accordance with Article 13(1) and (2) of the Law of September 11, 2015 on waste electrical and electronic equipment, we inform you about the proper handling of waste electrical and electronic equipment:
- It is forbidden to place waste electrical and electronic equipment together with other waste - this is confirmed by marking in the form of a "crossed out basket", ordering selective collection of this type of waste.
- Electrical and electronic equipment may contain hazardous substances, mixtures and components that, when released into the environment, can cause serious danger to the health and life of humans and living organisms. They can lead to numerous health ailments, such as vision, hearing and speech disorders, and can also damage the kidneys, liver and heart, and cause skin diseases. Harmful substances, can also have adverse effects on the respiratory and reproductive systems and lead to cancerous changes. Consumption of plants growing on contaminated soils, and products made from them, can risk the aforementioned health effects.
- Waste electrical and electronic equipment should be handed over only to authorized collection points, a list of which should be included on each Municipality's website.
- The household plays an important role, in contributing to the reuse and recovery, including recycling, of waste equipment. It also plays a key role in the waste electrical and electronic equipment management system due to the possibility of direct delivery to authorized collection points and the elimination of undesirable social habits resulting in leaving waste equipment in places not intended for it.
In addition, Donate waste electrical and electronic equipment at the point of delivery. A distributor, when supplying equipment intended for households to a purchaser, is obliged to take back used household equipment free of charge at the place of delivery of such equipment, provided the used equipment is of the same type and performed the same functions as the supplied equipment.
Cardboard packaging and polyethylene (PE) bags should be placed in the appropriate containers for separate collection of municipal waste according to their description. If there are batteries in the equipment, remove them and separately dispose of them at a collection and storage facility.
Do not dispose of the device in the municipal waste container!!!
Service If you wish to purchase spare parts or report any complaints, please contact directly with the seller who issued the receipt.
Akumulators: 22.2V Li-ion 2200mAh
Barošanas avots:
Iebüve: 100-240 V, 50-60 Hz, 0,4 A MAX
Izeja: 27V 500mA
Input: 100-240V,50-60Hz,0.4A MAX
Output: 27V 500mA
natural_image
Abstract geometric star symbol enclosed in a circle (no text or labels)

x_1x_2x_3x_4x_5x_6x_7x_8x_9x_10x_11x_12x_13x_14x_15x_16x_17x_18x_19x_20x_21x_22x_23x_24x_25x_26x_27x_28x_29x_30
4: -27.0 V 5: 0.5 A 6: 13.5 W
7: 86,1 % 8: 78,8 % 9: 0,09 W
GB
1:Model identifier
2:Input voltage
3:Input AC frequency
4:Output voltage
5:Output current
6:Output power
7:Average active efficiency
8:Efficiency at low load (10 %)
9:No-load power consumption
ES
1: identificator model