TRC 2 A1 - Battery charger TRONIC - Free user manual and instructions
Find the device manual for free TRC 2 A1 TRONIC in PDF.

| Product Type | Battery Charger |
| Brand | Tronic |
| Model | TRC 2 A1 |
| Dimensions (W × H × D) | Approx. 67.9 × 68.1 × 121.6 mm |
| Weight | Approx. 114 g |
| Power Supply | 100 - 240 V~, 50 - 60 Hz, 7 W |
| Output Voltage | 2 × 2.8 V |
| Charge Current (AA) | 2 × 450 mA |
| Charge Current (AAA) | 2 × 200 mA |
| Maximum Battery Capacity | AA: 2500 mAh, AAA: 1000 mAh |
| Rechargeable Battery Types | Ni-MH (AA/AAA) |
| Number of Charging Slots | 2 (independent charging per pair) |
| Charge Indicator | Blue LED (on while charging, off when complete, flashing if error) |
| Protection | Detection of defective batteries, short circuit, overcharge (7h timer), trickle charge |
| Special Features | Automatic shut-off via -ΔV detection, trickle charge |
| Protection Class | II (double insulation) |
| Operating Temperature | 0 °C to 30 °C |
| Storage Temperature | -20 °C to 40 °C |
| Allowable Humidity | 5 to 80 % (non-condensing) |
| Maintenance and Cleaning | Unplug before cleaning; use a soft dry cloth; do not clean the inside of the slots with a damp cloth |
| Safety | Do not charge non-rechargeable batteries; do not immerse; do not open; observe polarity |
| Warranty | 3 years from date of purchase |
| After-Sales Service (France) | Tel.: 0800904879, E-mail: owim@lidl.fr |
| After-Sales Service (Belgium) | Tel.: 080071011, E-mail: owim@lidl.be |
| Spare Parts and Repairability | Essential spare parts available during the warranty period; repair or replacement under warranty |
| General Information | For domestic use only; recycling according to local regulations; contents: charger + manual |
Frequently Asked Questions - TRC 2 A1 TRONIC
User questions about TRC 2 A1 TRONIC
0 question about this device. Answer the ones you know or ask your own.
Ask a new question about this device
Download the instructions for your Battery charger in PDF format for free! Find your manual TRC 2 A1 - TRONIC and take your electronic device back in hand. On this page are published all the documents necessary for the use of your device. TRC 2 A1 by TRONIC.
USER MANUAL TRC 2 A1 TRONIC
OWIM GmbH & Co. KG
Stiftsbergstraße 1
74167 Neckarsulm
GERMANY
Model No.: HG11107
Version: 01/2024
natural_image
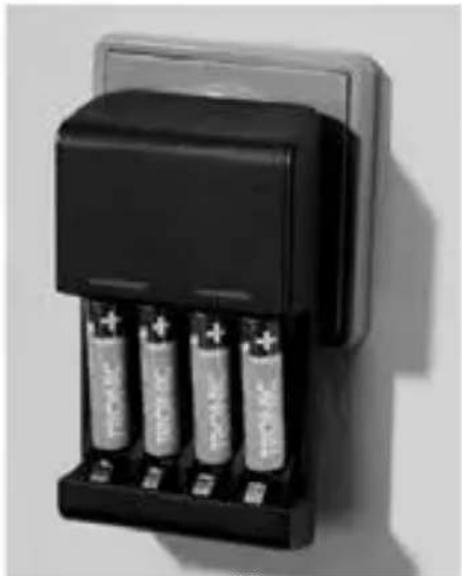
Black-and-white photo of four cylindrical batteries mounted on a wall-mounted battery pack (no visible text or symbols)AKKU-LADEGERÄT / BATTERY CHARGER/ CHARGEUR DE PILES TRC 2 A1
DE AT CH
AKKU-LADEGERÄT
Operation and safety notes
FR BE
CHARGEUR DE PILES
Operation and safety notes Page 32
FR/BE
natural_image
Technical line drawing of a mechanical component with mounting holes and a central housing (no text or symbols)EXPLOSIONS- GEFAHR! Laden
Abb. 2

Abb. 3

Intended use..... Page 34
Part description ...... Page 35
Technical data ...... Page 35
Included items ...... Page 36
General safety
instructions.... Page 36
Safety instructions for rechargeable batteries..... Page 39
Initial use.... Page 44
Handling and operation ... Page 44
Charging rechargeable batteries.... Page 44
Bad cell/ Short circuit protection ..... Page 47
Cleaning and care .... Page 48
Cleaning the housing ..... Page 49
Troubleshooting ...... Page 49
Disposal..... Page 50
Warranty Page 52
Warranty claim procedure... Page 53
Service.... Page 54
| List of pictograms used | |
 | This symbol means that the operating instructions must be observed when using the product. |
 | Only use the product in dry indoor rooms. |
 | Alternating current/voltage |
 | Protection class II. The power adaptor has a double insulation. |
 | Observe the warnings and safety instructions! |
 | Direct current/voltage |
 | CE mark indicates conformity with relevant EU directives applicable for this product. |
 | Safety information Instructions for use |
BATTERY CHARGER

Introduction

We congratulate you on the purchase of your new product. You have chosen a high quality product. The instructions for use are part of the product. They contain important information concerning safety, use and disposal. Before using the product, please familiarise yourself with all of the safety information and instructions for use. Only use the product as described and for the specified applications. If you pass the product on to anyone else, please ensure that you also pass on all the documentation with it.

Intended use
This product is intended exclusively for non-commercial use in the charging of rechargeable Ni-MH batteries (AA/AAA) with standard rated capacities. Any other use or uses beyond those mentioned are considered to be unintended use. Claims of any kind for damage resulting from unintended use will not be accepted. The operator alone bears the liability.
Only use the product in dry indoor rooms.
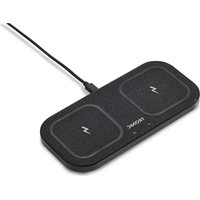
Part description
1 Loading slots for type AA/AAA
2 LED indicator
- Technical data
Input voltage: 100-240 V\~ 50-60 Hz
Power consumption: 7 W
Protection class: II/☐ (The power adaptor has a double insulation.)
Operating temperature: 0^ - 30^ C
Storage Temperature: -20°-40 °C
Humidity (no condensation): 5–80 %
Output voltages: 2 x 2.8 V (Loading slots 2 or 4 for Type AA/AAA)
Charge currents: 2 × 450 ~mA (Type AA) or 2 × 200 ~mA (Type AAA)
Maximum
assessment AAA: 1000 mAh
capacity: AA: 2500 mAh
Measurements Approx. 67.9 x 68.1 x
(W x H x D): 121.6 mm
Weight: Approx. 114 g

Included items
1 Battery charger
1 Operating manual
General safety instructions
BEFORE USING THE PRODUCT, PLEASE FAMILIARISE YOURSELF WITH ALL OF THE SAFETY INFORMATION AND INSTRUCTIONS FOR USE! WHEN PASSING THIS PRODUCT ON TO OTHERS, PLEASE ALSO INCLUDE ALL THE DOCUMENTS!
■ WARNING! Packaging material should not be used as a play thing. There is a risk of suffocation!
■ Before use check the product for visible external damage. Do not put into operation a product that is damaged or has been dropped.
If the power plug is damaged, it must be replaced by a qualified persons in order to avoid a hazard.
This product may be used by children aged 8 over and by persons with reduced physical, sensory or mental capabilities or lack of experience and knowledge, provided that
they are under supervision or have been told how to use of the product safety and are aware of the potential risks. Children must not play with the product. Cleaning and user maintenance tasks must not be carried out by children unless they are supervised.
■ Do not make any changes or modifications to the product yourself.
■ Protect the product from moisture and liquid penetration. Never submerge the product in water, do not place the product in the vicinity of water and do not stand any object filled with liquid (i.e. vases) on the product.
■ Do not operate the product in the vicinity of open flames (e.g. candles).
■ Unplug this product from wall outlet when not in use.
Safety instructions for rechargeable batteries
■ DANGER TO LIFE! Keep
rechargeable batteries out of reach of children. If accidentally swallowed seek immediate medical attention.
■ Swallowing may lead to burns, perforation of soft tissue, and death. Severe burns can occur within 2 hours of ingestion.
DANGER OF EXPLOSION!
Never recharge non- rechargeable batteries.
Do not short-circuit rechargeable batteries and/or open them.
Overheating, fire or bursting can be the result.
■ Never throw rechargeable batteries into fire or water.
Never burn or incinerate any
battery/ Never pierce, attempt to disassemble or short-circuit/ Always observe polarity (+/-) and charging times.
■ Do not exert mechanical loads to rechargeable batteries.
Risk of leakage of rechargeable batteries
■ Avoid extreme environmental conditions and temperatures, which could affect rechargeable batteries, e.g. radiators/direct sunlight.
If rechargeable batteries have leaked, avoid contact with skin, eyes and mucous membranes with the chemicals!
■ Flush immediately the affected areas with fresh water and seek medical attention!

WEAR PROTECTIVE
GLOVES! Leaked or damaged rechargeable batteries can cause burns on contact with the skin. Wear suitable protective gloves at all times if such an event occurs.
In the event of a leakage of rechargeable batteries, immediately remove them from the product to prevent damage.
■ Only use the same type of rechargeable batteries. Do not mix used and new rechargeable batteries.
■ Remove rechargeable batteries if the product will not be used for a longer period.
Risk of damage of the product
■ Only use the specified type of rechargeable batteries!
■ Insert rechargeable batteries according to polarity marks (+) and (-) on the rechargeable battery and the product.
■ Use a dry lint-free cloth or cotton swab to clean the contacts on the rechargeable battery and in the rechargeable battery compartment before inserting!
■ Remove defective rechargeable batteries from the product immediately.
Initial use
Note: Remove all packaging materials from the product.
☐ Check the contents to make sure everything is there and for visible damage.
☐ Remove the product and the operating instructions from the packaging.
● Handling and operation
■ WARNING! Do not charge non-rechargeable batteries. Charge only Ni-MH rechargeable battery.
● Charging rechargeable batteries
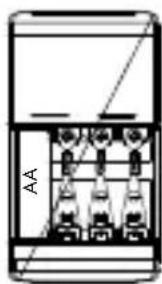
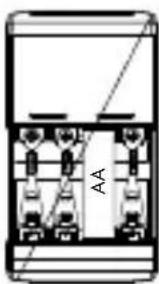
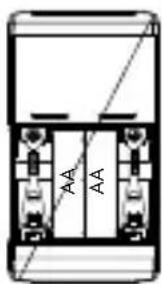
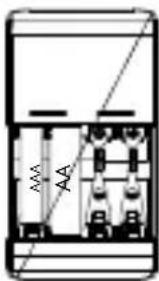
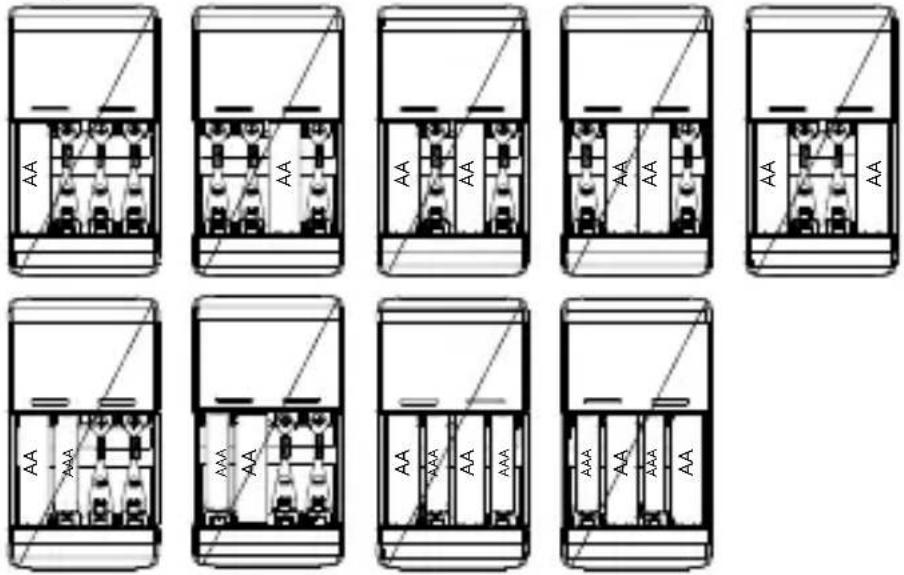
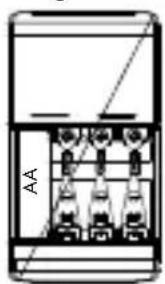
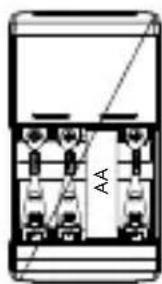
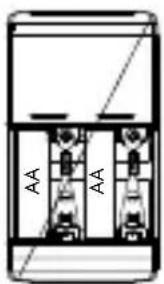
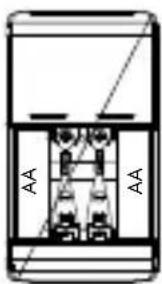
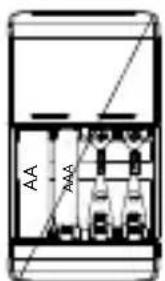
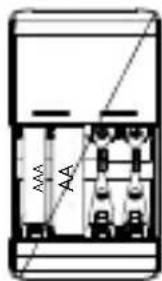
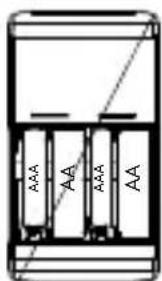
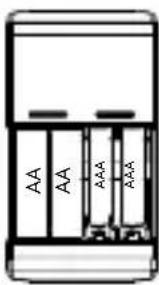
- Insert 2 or 4 pieces of same size and same capacity rechargeable Ni-MH batteries (AA/AAA) into the loading slots 1 pairwise; make correct contact for polarity (+ and -); according to the sign in the loading slots 1.
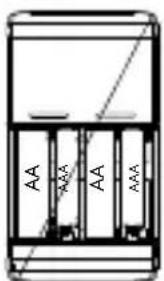
Note 1: For charging 2 pieces or 4 pieces of same size and same capacity rechargeable batteries (AA/AAA), insert the batteries to the left side or right side of charging slots as Fig.1 and Fig.2.
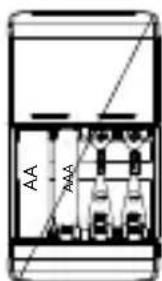
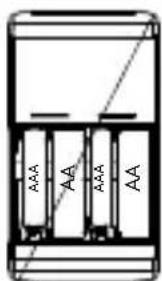
Note 2: Do not mix up different sizes and different capacities rechargeable batteries (AA/AAA) to pairs charging slots; do not insert single piece of rechargeable battery (AA/AAA) to pairs charging slots as Fig 3.
Fig. 1
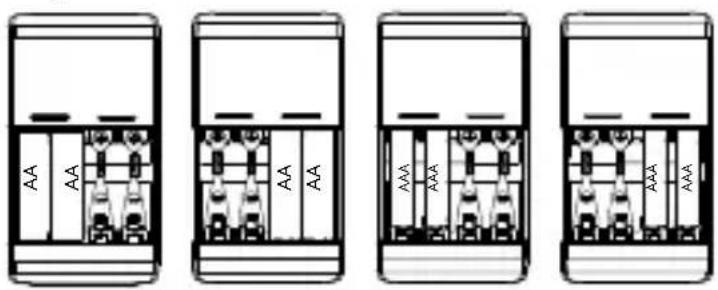
Fig. 2
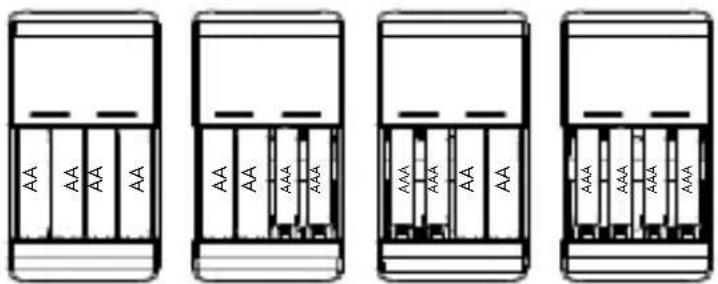
Fig. 3
-
Plug the product into a correct household electric outlet.
-
When batteries charging are started, the blue LED indicator 2 will light up.
Note: The left side blue LED indicator lights up, left side charging pair slots batteries are under charging; the right side blue LED indicator lights up, right side charging pair slots batteries are under charging.
- When the rechargeable batteries are fully charged and completed, the blue LED indicator 2 will get off.
Note: The left side blue LED indicator gets off, left side charging pair slots batteries are fully charged and completed; the right side blue LED indicator gets off, right side charging pair slots batteries are fully charged and completed.
- Unplug and re-plug the product each time when you recharge the empty batteries.
● Bad cell/Short circuit protection
The corresponding blue LED indicators 2 will be flashing to indicate the rechargeable battery is either alkaline battery or the rechargeable battery is not suitable for charging. Please remove the rechargeable battery from the loading slots 1.
Calculating the average charging time
Depending on the type, age and remaining charge in the batteries, the charging process can take various lengths of time. The average charge time can be calculated using the following formula. Take note however that the times given are only guiding values.
Charging Time (min) = Battery capacity (mAh) × 1.2 × 60: Charging current of the product (mA)
Automatic charging control/ Retention charging
This product controls the charging time for Ni-MH rechargeable batteries separately. This control is based on the - V ("Minus Delta V") calculation. In mathematics, with Delta differences are indicated. In this case, "Minus Delta V" means a negative
voltage difference. This charge identification makes itself useful in the following effects: Should a rechargeable battery be charged with a constant current, its voltage rises continuously. When a rechargeable battery is full, its voltage reaches a maximum but falls again slightly with further current flow. This light fall in voltage is recognised by the charging electronics and the charge process is terminated. The product automatically switches to "Retention charging". This means that the batteries are no longer being loaded with constant current, instead, with short current pulses. This counteracts the selfdischarge and the batteries are kept in a state of full charge.
Timer control
In addition, this product has a timer control which automatically switches over to retention charging after 7 hours. This serves as an additional protection against overcharging should the charge termination not respond due to a possibly defective rechargeable battery.
● Cleaning and care
■ DANGER! Always remove the plug before cleaning the product. There is the risk of an electric shock!
- When you are cleaning the product ensure that no moisture gets inside it, so as to avoid irreparable damage to it.
IMPORTANT! Do not use aggressive or abrasive cleaning agents, as these can damage the upper surfaces.
- Cleaning the housing
□ Clean the surfaces of the product with a soft, dry cloth. For stubborn soiling use a lightly moistened cloth.
■ Never clean the insides of the loading Slot 1 with moist cloths. Instead, use a clean soft brush to clean them.
☐ If soiled, clean the charging contacts with a dry cloth.
● Troubleshooting
● = Problem
= Cause
O = Solution
● = The product is not functioning.
◎ = Mains power socket is not supplying power.
O = Check the circuit fuse.
● = The inserted rechargeable batteries are not being charged.
= The rechargeable batteries are not inserted as per their polarity.
O = Insert the batteries as per their polarity (see marking in the charging slot).
◎ = The inserted rechargeable batteries are not suitable for charging.
O = Insert exclusively rechargeable Ni-MH rechargeable batteries of the types AA/AAA batteries.
● Disposal
The packaging is made entirely of recyclable materials, which you may dispose of at local recycling facilities.
Observe the marking of the packaging materials for waste separation, which are marked with abbreviations (a) and numbers (b) with following meaning: 1–7: plastics/20–22: paper and fibreboard/80–98: composite materials.
Product:
The product incl. accessories and packaging materials are recyclable and are subject to extended producer responsibility.
Dispose them separately, following the illustrated Info-tri (sorting information), for better waste treatment.
The Triman logo is valid in France only.
Contact your local refuse disposal authority for more details of how to dispose of your wornout product.
To help protect the environment, please dispose of the product properly when it has reached the end of its useful life and not in the household waste. Information on collection points and their opening hours can be obtained from your local authority.
Faulty or used batteries / rechargeable batteries must be recycled in accordance with Directive 2006/66/EC and its amendments. Please return the batteries / rechargeable batteries and / or the product to the available collection points.
● Warranty
The product has been manufactured to strict quality guidelines and meticulously examined before delivery. In the event of material or manufacturing defects you have legal rights against the retailer of this product. Your legal rights are not limited in any way by our warranty detailed below.
The warranty for this product is 3 years from the date of purchase. The warranty period begins on the date of purchase. Keep the original sales receipt in a safe location as this document is required as proof of purchase.
Any damage or defects already present at the time of purchase must be reported without delay after unpacking the product.
Should the product show any fault in materials or manufacture within 3 years from the date of purchase, we will repair or replace it – at our choice – free of charge to you. The warranty period is not extended as a result of a claim being granted. This also applies to replaced and repaired parts.
This warranty becomes void if the product has been damaged, or used or maintained improperly.
The warranty covers material or manufacturing defects. This warranty does not cover product parts subject to normal wear and tear, thus considered consumables (e.g. batteries, rechargeable batteries, tubes, cartridges), nor damage to fragile parts, e.g. switches or glass parts.
● Warranty claim procedure
To ensure quick processing of your claim, observe the following instructions:
Make sure to have the original sales receipt and the item number (IAN 445761_2307) available as proof of purchase.
You can find the item number on the rating plate, an engraving on the product, on the front page of the instruction manual (bottom left), or as a sticker on the rear or bottom of the product.
If functional or other defects occur, contact the service department listed below either by telephone or by e-mail.
Once the product has been recorded as defective you can return it free of charge to the service address that will be provided to you. Ensure to enclose the proof of purchase (sales receipt) and a short, written description outlining the details of the defect and when it occurred.
Service
GB Service Great Britain
Tel.:08000569216
E-Mail:owim@lidl.co.uk
IE Service Ireland
Tel.:1800200736
E-Mail:owim@lidl.ie
CE
Charger des piles rechargeables .... Page 68
- Insert 2 or 4 pieces of same size and same capacity rechargeable Ni-MH batteries (AA/AAA) into the loading slots 1 pairwise; make correct contact for polarity (+ and -); according to the sign in the loading slots 1.
Note 1: For charging 2 pieces or 4 pieces of same size and same capacity rechargeable batteries (AA/AAA), insert the batteries to the left side or right side of charging slots as Fig.1 and Fig.2.
Note 2: Do not mix up different sizes and different capacities rechargeable batteries (AA/AAA) to pairs charging slots; do not insert single piece of rechargeable battery (AA/AAA) to pairs charging slots as Fig 3.
Fig. 1
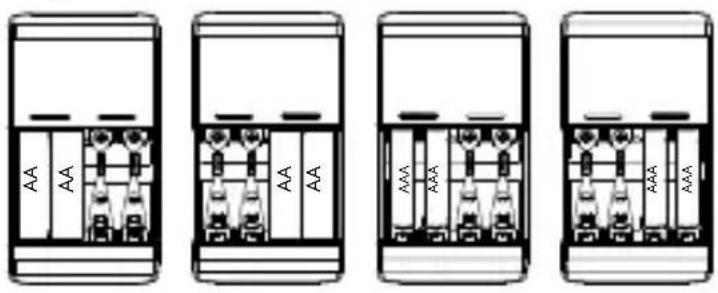
Fig. 2

Fig. 3
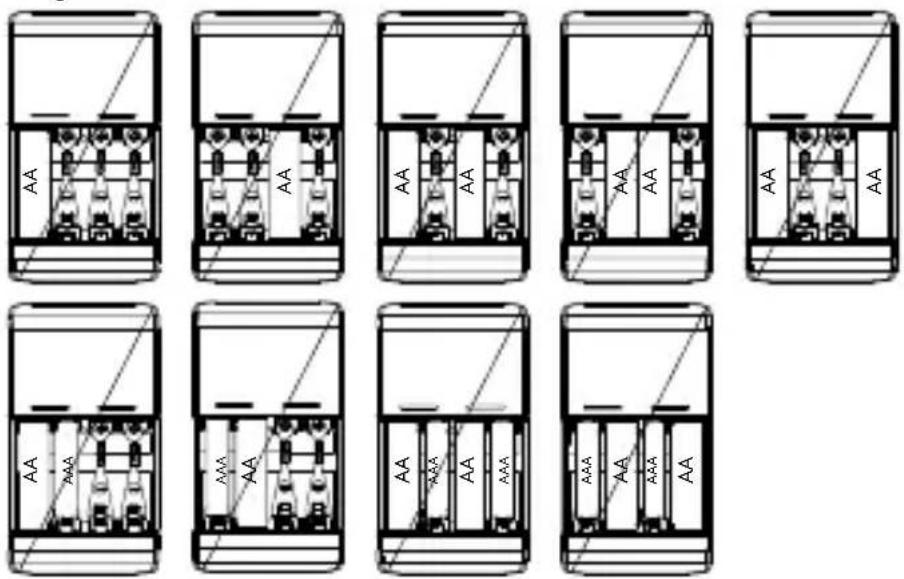
Fig. 2

Fig. 3

NOŚ RĘKAWICE OCHRONNE!
● Manipulace a obsluha
Obr. 2

Obr. 3

Fig. 2
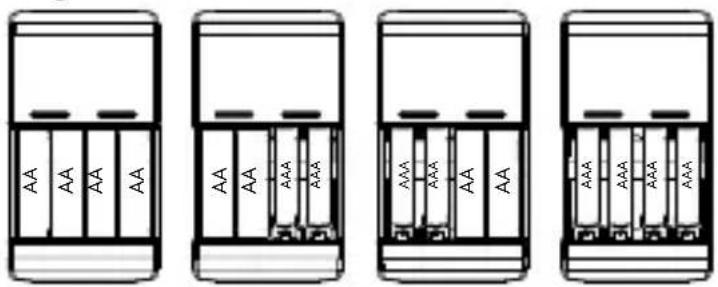
Fig. 3

(L x H x P): 121,6 mm circa
Peso: 114 g circa
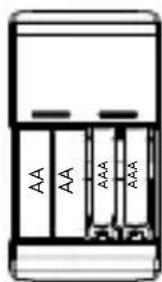
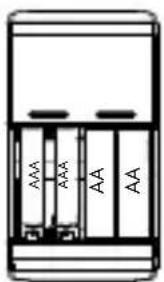

Fig. 3


2 × 200 mA (AAA
típus)
Maximális
Measurements Approx. 67.9 x 68.1 x
(W x H x D): 121.6 mm
Weight: Approx. 114 g


- ábra