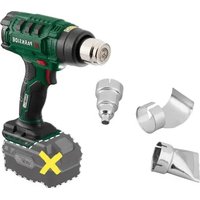
PHLGA 20-Li D3 - Heat gun PARKSIDE - Free user manual and instructions
Find the device manual for free PHLGA 20-Li D3 PARKSIDE in PDF.


| Product type | Cordless heat gun |
| Brand | Parkside |
| Model | PHLGA 20-Li D3 |
| Weight (with 4 Ah battery) | ≈ 1.22 kg |
| Temperature Level 1 | ≤ 250 °C |
| Temperature Level 2 | ≤ 550 °C |
| Air flow Level 1 | 100 l/min |
| Air flow Level 2 | 170 l/min |
| Power supply | Li-Ion battery 20 V (X 20 V TEAM range) |
| Runtime (170 l/min) | 8 min (2 Ah battery), 16 min (4 Ah battery) |
| Main functions | Heat, shape, and weld plastics; remove adhesive joints; thaw water pipes |
| Included accessories | Flat nozzle, reflector nozzle, reducer nozzle, storage case |
| LED work light | Yes |
| Cool-Down function | Automatic cooling after shutdown |
| Power on/off | Switch with trigger lock |
| Safety | Do not use in rain or explosive atmosphere; do not point at people/animals; do not touch hot nozzle |
| Maintenance and cleaning | Clean with a damp cloth; do not use chemicals; do not clean with water jet |
| Storage | In the case, out of reach of children, protected from dust; battery between 0 and 45 °C |
| Spare parts available | Flat nozzle (ref. 91105119), reflector nozzle (91105124), reducer nozzle (91105123) |
| Warranty | 3 years (France and Belgium) |
Frequently Asked Questions - PHLGA 20-Li D3 PARKSIDE
User questions about PHLGA 20-Li D3 PARKSIDE
0 question about this device. Answer the ones you know or ask your own.
Ask a new question about this device
Download the instructions for your Heat gun in PDF format for free! Find your manual PHLGA 20-Li D3 - PARKSIDE and take your electronic device back in hand. On this page are published all the documents necessary for the use of your device. PHLGA 20-Li D3 by PARKSIDE.
USER MANUAL PHLGA 20-Li D3 PARKSIDE


Translation of the original instructions
NL BE
Accu-heteluchtventilator
Before reading, unfold the page containing the illustrations and familiarise yourself with all functions of the device.
FR BE
Recyclingsymbol: Wellpappe
Introduction......19
Proper use....19
Scope of delivery/accessories....20
Overview.... 20
Description of functions...... 20
Technical data.... 20
Safety information...... 21
Meaning of the safety information.... 21
Pictograms and symbols......22
General safety instructions.....22
Special safety instructions for battery-powered devices...... 25
Preparation......25
Initial start-up.... 25
Control elements......25
Use as a free-standing tool...... 26
Using the adapter nozzles......26
Checking the battery charge level.... 26
Charging the battery.... 27
Operation....27
Inserting and removing the battery into/from the cordless device....27
Switching on and off...... 27
Used batteries....28
Cleaning, maintenance and storage....28
Cleaning.... 28
Maintenance....28
Storage....28
Disposal/environmental protection....29
Disposal instructions for rechargeable batteries....29
Service....29
Guarantee....29
Repair service....31
Service Centre....31
Importer....31
Spare parts and accessories......31
Translation of the original EU declaration of conformity....32
Exploded view....169
Introduction
Congratulations on purchasing your new hot air blower (hereafter referred to as device or power tool).
You have chosen a high-quality device. This device was quality-tested and subjected to a final inspection during production, therefore ensuring proper functioning of your device.

The instruction manual forms part of this device. It contains important information on safety, use and disposal. Read the instruction manual carefully. Familiarise yourself with the controls and how to use the device correctly. Use the device only as described and for the stated fields of application. Store the instruction manual carefully and ensure that all documents are handed over in the event that the device is passed on to another user.
Proper use
This device is only intended for the following uses:
- Heating, moulding and welding of plastics
- Loosening adhesive bonds
• Defrosting water pipes
Use of the device in the rain or a damp environment is prohibited.
Any other use that is not expressly permitted in this instruction manual may pose a serious hazard to the user and result in damage to the device. The operator or user of the machine is responsible for any acci-
dents or personal injury and/or material damage to third parties or their property. The machine is intended to be used by do-it-yourselfers. It was not designed for heavy commercial use. The warranty is void in the case of commercial use. The manufacturer is not liable for damage caused by improper use or incorrect operation. The device is part of the
X 20 V TEAM series and can be operated with batteries of the X 20 V TEAM series. Batteries of the X 20 V TEAM series may only be charged using chargers of the X 20 V TEAM series.
Scope of delivery/accessories
Unpack the device and check that everything is present.
Dispose of the packaging material properly.
- Cordless Hot Air Gun
- Restrictor nozzle
- Surface nozzle
- Reflector nozzle
- Storage case
- Translation of the original instructions
The rechargeable battery and charger are not included in delivery.
Overview
The illustrations for the device can be found on the front fold-out page.
1 Blow-off pipe
2 Air inlet
3 On/Off switch
4 Switch lock
5 Surface nozzle
6 Reflector nozzle
7 Restrictor nozzle
8 Storage case
9 Battery release
10 Battery
11 Charge level indicator
12 Button (Charge level indicator)
13 Control display (green)
14 Control display (red)
15 Charger
16 Charging slot
(Fig. A)
17 LED work light
18 Base
(Fig. B)
19 LEDs
20 Button Temperature Level 1
21 Button Air volume/COOLDOWN
22 Button Temperature Level 2
Description of functions
The hot air blower is a universal tool for stripping, moulding or heating.
Please refer to the descriptions below for information on how the operating elements work.
Technical data
Cordless Hot Air Gun
PHLGA 20-Li D3
Rated voltage U 20 V =
Protection class .... III
No-load rotation speed n0 16500 min -1
Weight with battery (20 V, 4 Ah)
.....≈1.22 kg
Temperature range
-level 1 ≤ 250°C
-level 2 ≤ 550°C
Air volume
– level 1 ....100 l/min
– level 2 ......170 l/min
Use time (170 l/min)
-Battery 2 Ah 8 min
- Battery 4 Ah ....16 min
Battery Li-Ion
Temperature .... ≤50 °C
- Charging 4-40 °C
- Operation ......-20-50 °C
- Storage 0-45 °C
PARKSIDE Performance Smart battery Smart PAPS 204 A1/Smart PAPS 208 A1
- Frequency f .....2400 - 2483.5 MHz
- transmitted power ....≤20 dBm
Charging time
We recommend that you operate this appliance with the fol-
lowing batteries only: PAP 20 B1, PAP 20 B3, Smart PAPS 204 A1, Smart PAPS 208 A1
We recommend charging these batteries with the following chargers:
PLG 20 A3, PLG 20 A4, PLG 20 C1, PLG 20 C2, PLG 20 C3, PLG 201 A1, PDSLG 20 A1, PDSLG 20 B1,
Smart PLGS 2012 A1
Rechargeable battery and charger technical data: See separate manual.
The charging time is influenced by factors such as the temperature of the environment and the battery, as well as the mains voltage applied, and may therefore deviate from the specified values.
| Charging time (min.) | PAP 20 A1PAP 20 A2PAP 20 B1 | PAP 20 A3PAP 20 B3SmartPAPS 204 A1 | SmartPAPS 208 A1 |
| PLG 20 A1PLG 20 A4PLG 20 C1 | 60 120 240 | ||
| PLG 20 C2 45 80 165 | |||
| PLG 20 A2PLG 20 A3PLG 20 C3PDSLG 20 A1PDSLG 20 B1 | 35 60 120 | ||
| PLG 201 A1 135 250 500 | |||
| SmartPLGS 2012 A1 | 35 45 50 |
Safety information
This section deals with the basic safety instructions for using the device.
⚠ WARNING! Injury and property damage due to improper handling of battery. Observe the safety information and notes on charging and proper use as shown in the instruction
manual for your battery and charger from the series X 20 V TEAM. A detailed description of the charging process and further information can be found in these separate operating instructions.
Meaning of the safety information
⚠️ DANGER! If you do not observe this safety instruction, an accident will
occur. The result of which is severe bodily injury or death.
⚠ WARNING! If you do not observe this safety instruction, an accident may occur. The result of which is likely severe bodily injury or death.
CAUTION! If you do not observe this safety instruction, an accident will occur. The result of which is likely minor or moderate bodily injury. NOTICE! If you do not observe this safety instruction, an accident will occur. The result of which is possible damage to property.
Pictograms and symbols
Symbols on the device

The device is part of the X 20 V TEAM series and can be operated with batteries of the X 20 V TEAM series. Batteries of the X 20 V TEAM series may only be charged using chargers of the X 20 V TEAM series.

Read the instruction manual carefully. Familiarise yourself with the controls and how to use the device correctly.

Use of the device in the rain or a damp environment is prohibited.

Direct voltage
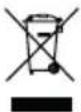
Waste electrical and electronic equipment (WEEE) must not be disposed of with domestic waste.

Temperature Level 1

Temperature Level 2

Increase air volume/Reduce air volume/ COOLDOWN
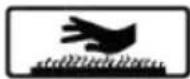
Caution! Hot surfaces, burn risk!

Automatic function for cooling the tool after use
Symbols on the packaging

Dispose of the packaging in an environmentally friendly manner.

Recycling symbol: Corrugated cardboard
General safety instructions

Attention! The following basic safety precautions must be observed while using electrical devices to protect against electric shock, injury and risk of fire:
General Information
- Read the instruction manual carefully. Familiarise yourself with the controls and how to use the device correctly.
- Persons with reduced physical, sensory or mental capabilities or persons who lack experience and knowledge can use this device if they have been
given supervision or in- struction concerning use of the device in a safe way and understand the hazards involved.
• Children must never play with the device. Keep the device and its power cord away from children.
• Note that the user is responsible for any accidents or risks to others and their property.
- Only use spare parts and accessories which are supplied and recommended by the manufacturer. Using externally produced parts results in the immediate loss of any warranty claim.
- The device must always be kept clean, dry and free of oil or lubricating greases.
- The machine must not be used at altitudes over 2000 m.
Electrical safety
- Switch off the device and remove the battery (10). Make sure that all moving parts have come to a complete stop.
- Remove the battery from the device before charging the battery.
- Do not short-circuit the connection terminals.
Operation
- Use of the device in the rain or a damp environment is prohibited.
- Only work in daylight or with good artificial lighting.
- Pay attention, be aware of what you are doing and take the utmost care when working with the device. Do not use the device if you are tired or you are under the influence of drugs, alcohol or medication.
- Do not leave the device unattended during operation.
-
Remove the battery from the device:
-
when not in use
• during work breaks - before carrying out any work on the device (e.g. changing the nozzle)
• A fire can develop if the device is not handled carefully.
- Be careful when using equipment near flammable materials.
- Do not point at the same location for an extended period of time.
- Do not use in the presence of an explosive atmosphere.
- Heat can be passed to flammable materials that are hidden.
• After using the device, put it on the base and allow it to cool down before it is packed away.
- Do not leave the device unattended as long as it is in operation.
- Never use the device as a hair dryer.
- Never direct the hot air flow at people or animals.
- Do not look directly into the nozzle opening on the blow-off pipe.
- Do not touch the nozzle when it is hot.
- Maintain distance between the nozzle outlet and the surface or workpiece you are working on. The device could over-heat.
Cleaning, maintenance and storage
- Allow the motor to cool down before storing the device for a longer period.
- Replace worn or damaged parts in the interests of safety. Use only original spare parts and accessories. Using externally produced parts results in the immedi-ate loss of any warranty claim.
- The device may only be opened by an authorised electrician. Always contact our service centre for repairs.
- Switch the drive off, remove the battery and allow the device to cool off if you want to clean, adjust, store the device or to exchange an access-ory part.
- Handle the device with care and keep it clean.
- Store the device out of reach of children.
Special safety instructions for battery-powered devices
- Ensure that the device is switched off before inserting the battery. Inserting a battery into a device that is switched on can lead to accidents.
- Only use accessories recommended by PARKSIDE. Unsuitable accessories may cause electric shock or fire.
⚠ WARNING! Injury and property damage due to improper handling of battery. Observe the safety information and notes on charging and proper use as shown in the instruction manual for your battery and charger from the series X 20 V TEAM. A detailed description of the charging process and further information can be found in these separate operating instructions.
Preparation
⚠ WARNING! Risk of injury due to unintentional start-up. Only insert the battery into the device once the device is fully prepared for use.
Initial start-up
Smoke may escape during the first application. The smoke is produced by binding agents that are released from the insulating foil of the heater by the heat when it is first used.
Be sure to ventilate the working environment during first use. Move
the initial start-up outdoors if the smoke/odour is too strong.
Procedure
- Place the tool on the base (18) to achieve a quick exit (see Use as a free-standing tool, p. 26).
- Set the highest temperature and air volume.
- Let the tool run for 1–2 minutes.
Control elements
Familiarise yourself with the operating elements before using the device for the first time.
- On/Off switch (3)
- Switching on: Press
- Switching off: Release
- Switch lock (4)
- Locks the on/off switch against unintentional operation.
- Unlocking: Press
Temperature and air volume
The device saves the last setting in which you were working and restarts in this setting.
- Button (20) Temperature Level 1: 250 °C
- Button (22) Temperature Level 2: 550 °C
- Button (21)
- Reduce air volume: 100 l/min
- Increase air volume: 170 l/min
- COOLDOWN
Procedure (Fig. B)
-
Switch on the device.
-
Press button (20) or button (22) for the desired temperature.
-
Press button (21) 1 or 2 times for the desired air volume.
• Meaning of the LEDs
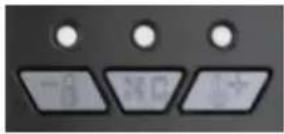
| LED-Display (19) | Temper-ature | Air volume | ||
| lights up | lights up | -250 °C | 100 l/min | |
| lights up | --250 °C | 170 l/min | ||
| - | lights up | lights up | 550 °C | 100 l/min |
| - | - | lights up | 550 °C | 170 l/min |
| - | lights up | -COOLDOWN | ||
Cool down function
The cool-down function starts automatically as soon as the device is switched off after use and the battery is not removed.
- The device is cooled down to 50 °C.
- The centre LED lights up during the cool-down phase.
- Press button (21) to end the process prematurely (see Symbols on the device, p. 22).
Use as a free-standing tool
Procedure (Fig. A)
- Place the tool on the base (18) for use as a free-standing tool.
- Ensure a stable, secure stand and a heat-resistant surface.
Using the tool in free-standing mode is ideal for cooling it down after use.
Using the adapter nozzles
⚠️ CAUTION! Risk of injury! Avoid burns. Allow the adapter nozzles and blow-off pipe to cool down before replacing them.
Notes
- The adapter nozzles (5/6/7) are attached to the blow-off pipe (1).
- The adapter nozzles can be used in various ways.
- Observe the safety instructions and use the tool with care and caution.
Surface nozzle (5)
- Use: Achieving heat over a wide area
- NOTICE! Overheating of neighbouring components. When using the surface nozzle, pay particular attention to the heat development at neighbouring areas of the processing point.
Reflector nozzle (6)
- Use: Soldering, pipe tinning and shrinking of heat-shrink tubing
Restrictor (7)
• Use: Achieving localised heat.
- NOTICE! Overheating of the workpiece. When using the restrictor, pay particular attention to heat development at point being worked; do not linger too long in one place.
Checking the battery charge level
LEDs Meaning
red, orange, green Battery charged red, orange Battery partially charged
red Battery needs to be charged
-
Press the button (12) next to the charge level indicator button (11) on the battery (10). The LEDs of the charge level indicator show how much charge remains in the battery.
-
Charge the battery (10) when only the red LED on the charge level indicator (11) is illuminated.
Charging the battery
See also the charger instruction manual.
Notes
- If warm, allow the battery to cool before charging.
- Do not expose the battery to direct sunlight for long periods and do not place it on a radiator (max. 50°C).
Procedure
- If necessary, remove the battery (10) from the cordless device.
- Slide the battery (10) into the charging slot (16) of the charger (15).
- Plug the charger (15) into an power outlet.
- Once charging is complete, disconnect the charger (15) from the mains supply.
- Pull the battery (10) charging slot out (16).
Control LEDs on the charger (15):
| green red Meaning | ||
| lights up | — • Battery is fully charged• stand-by (No battery inserted) | |
| — lights up | Battery is charging | |
| — flashes | Battery is over-heated | |
| flashes flashes | Battery is defective | |
Operation
Inserting and removing the battery into/from the cordless device
⚠ WARNING! Risk of injury due to unintentional start-up. Only insert the battery into the device once the device is fully prepared for use. NOTICE! Risk of damage! An incorrect battery can damage the device and battery.
Inserting the battery
- Push the battery (10) along the guide into the battery holder. You will hear the battery click into place.
Removing the battery
- Press and hold the battery release (9) on the battery (10).
- Pull the battery out of the battery holder.
Switching on and off
Preparation
Prepare the device for the desired function. Select the appropriate adapter nozzle (5/6/7).
Notes
- The device has a switch lock (4) that protects it against unintentional operation.
- The device saves the last setting in which you were working and re-starts in this setting.
Switching on
- Press and hold the switch lock (4).
- Press and hold the on/off switch (3).
- Release the switch lock (4).
-
The LED work light (17) lights up, the device is unlocked.
-
Set the temperature and air volume (see Temperature and air volume, p. 25)
Switching off
- Release the on/off switch (3).
- The LED work light goes out, the tool is locked
- Use the cool down function (see Cool down function, p. 26).
- Remove the battery (10) from the device if you are leaving the device unattended or if you have finished working.
Used batteries
- If the operating time is considerably shortened despite charging, this shows that the rechargeable battery is depleted and must be replaced. Only use an original replacement battery of the series X 20 V TEAM, which can be purchased from the online shop (see Spare parts and accessories, p. 31).
- Always observe the safety information in addition to the regulations and information about environmental protection (see Disposal/environmental protection, p. 29).
Cleaning, maintenance and storage
⚠ WARNING! Risk of injury due to unintentional start-up. Protect yourself when performing maintenance or cleaning work. Switch off the device and remove the battery (10).
You should have any repair and maintenance work that is not described in these instructions carried out by our Service Centre. Only use original replacement parts.
⚠ WARNING! Risk of burn injury! Allow the tool to cool down before carrying out any maintenance or cleaning work.
Cleaning
⚠ WARNING! Electric shock! Never spray down the device with water.
NOTICE! Risk of damage. Chemical substances may attack the plastic parts of the machine. Do not use any cleaning agents or solvents.
- Keep the ventilation slits, motor housing and handles of the machine clean. Use a damp cloth or brush to do this.
Maintenance
The device is maintenance free.
Storage
Always store the device and accessories:
- clean
- dry
- protected against dust
• In the case provided (8)
• out of the reach of children - cooled down
The storage temperature for the battery is between 0° C and 45° C. Avoid extreme cold or heat during storage. This would adversely affect battery performance.
Remove the battery before storing the device for a long period of time (e.g. winter storage).
Disposal/ environmental protection
Remove the battery from the device and recycle the device, battery, accessories and packaging in an environmentally-friendly manner.
Waste electrical and electronic equipment (WEEE) must not be disposed of with domestic waste.
The symbol of the crossed-out wheeled bin means that this product must not be disposed of as unsorted municipal waste at the end of its useful life.
Directive 2012/19/EU on waste electrical and electronic equipment:
Consumers are legally obliged to recycle electrical and electronic equipment in an environmentally sound manner at the end of its life. In this way, environmentally friendly and resource-saving recycling is ensured. Depending on the implementation in national law, you may have the following options:
- Return to a shop,
- Hand over to an official collection point,
- Return to the manufacturer/distributor.
This does not affect accessories enclosed with the old devices or tools without any electrical components.
Disposal instructions for rechargeable batteries
Do not throw batteries into domestic waste, fire (risk of explosion) or water. Damaged batteries can harm the environment and your health if poisonous fumes or liquids escape.
Dispose of the batteries according to local standards. Defective or used batteries must be recycled. Hand in the batteries at a used battery collection point where they are recycled in an environmentally friendly manner. For more information, please contact your local waste management provider or our service centre. Dispose of batteries in a discharged state. We recommend covering the contacts with an adhesive strip to protect against short circuits. Do not open the battery.
Service
Guarantee
Dear Customer,
This product is provided with a 3 year guarantee from the date of purchase. In case of defects, you have statutory rights against the seller of the product. These statutory rights are not restricted by our guarantee presented below.
Terms of Guarantee
The guarantee period begins on the date of purchase. Please retain the original receipt. This document is required as proof of purchase. If a material or manufacturing defect occurs within three years of the date of purchase of this product, we will repair or replace – at our choice – the product for you free of charge. This guarantee requires the defective product and proof of purchase to be presen-
ted within the three-year period with a brief written description of what constitutes the defect and when it occurred.
If the defect is covered by our guarantee, you will receive either the repaired product or a new product. No new guarantee period begins on repair or replacement of the product.
Guarantee Period and Statutory Claims for Defects
The guarantee period is not extended by the guarantee service. This also applies for replaced or repaired parts. Any damages and defects already present at the time of purchase must be reported immediately after unpacking. Repairs arising after expiry of the guarantee period are chargeable.
Guarantee Cover
The product has been carefully produced in accordance with strict quality guidelines and conscientiously checked prior to delivery.
The guarantee applies for all material and manufacturing defects. This guarantee does not extend to cover product parts that are subject to normal wear and may therefore be considered as wearing parts or to cover damage to breakable parts.
This guarantee shall be invalid if the product has been damaged, used incorrectly or not maintained. Precise adherence to all of the instructions specified in the operating manual is required for proper use of the product. Intended uses and actions against which the operating manual advises or warns must be categorically avoided.
The product is designed only for private and not commercial use.
The guarantee will be invalidated in case of misuse or improper handling, use of force, or interventions not undertaken by our authorised service branch.
Processing in Case of Guarantee
To ensure efficient handling of your query, please follow the directions below:
- Please have the receipt and product number (IAN 465576_2404) ready as proof of purchase for all enquiries.
- Please refer for the product number to the type plate on the product, an engraving on the product, the title page of the operating instructions (bottom left) or the sticker on the back or underside of the product.
- Should functional errors or other defects occur, please initially contact the service centre specified below by telephone or use the contact form available on parkside-diy.com in the category Service.
- After consultation with our customer service, a product recorded as defective can be sent postage paid to the service address communicated to you, with the proof of purchase (receipt) and specification of what constitutes the defect and when it occurred. In order to avoid acceptance problems and additional costs, please be sure to use only the address communicated to you. Ensure that the consignment is not sent carriage forward or by bulky goods, express or other special freight. Please send the appliance inc. all accessories supplied at the time of purchase and ensure adequate, safe transport packaging.

You can view and download these and many other manuals on parkside-diy.com. This QR code will take you directly to parkside-diy.com. Select your country and search for the operating instructions via the search mask. You can open your operating instructions by entering the article number (IAN) 465576_2404.
Repair service
For repairs that are not covered by warranty, contact the service centre. They will gladly create a cost estimate for you.
• We can only work on devices which are sent in properly packed and with postage paid.
Note: Please send your device cleaned and with an indication of
the defect to the address named for the service centre.
- The following are not accepted: devices sent in without prepaid postage, sent as bulky goods, sent as an Express shipment, or devices sent as any other form of special freight.
• We will dispose of defective devices you ship to us free of charge.
Service Centre
GB Service Great Britain Tel.: 0800 051 8970 Contact form on parkside-diy.com IAN 465576_2404
MT Service Malta Tel.: 800 65168 Contact form on parkside-diy.com IAN 465576_2404
Importer
Please note that the address below is not a service address. Contact the service centre named above first.
Spare parts and accessories
You can get spare parts and accessories from www.grizzlytools.shop. If you have any problems with your order, contact us via our online shop. If you have any other questions, contact: Service Centre, p. 31
Pos. nr. Name Order No.
5 Surface nozzle 91105119
6 Reflector nozzle 91105124
7 Restrictor nozzle 91105123
Translation of the original EU declaration of conformity
Product: Cordless Hot Air Gun
Model: PHLGA 20-Li D3
Serial number: 000001 - 080000
The object of the declaration described above is in conformity with the relevant Union harmonisation legislation:
2001/95/EC & (EU) 2023/988 • 2014/30/EU • 2011/65/EU & (EU) 2015/863 Product with battery Smart PAPS 204 A1/Smart PAPS 208 A1: 2014/53/EU
The object of the declaration described above is in conformity with Directive 2011/65/EU of the European Parliament and of the Council of 8 June 2011 on the restriction of the use of certain hazardous substances in electrical and electronic equipment.
To ensure conformity, the following harmonised standards and national standards and regulations have been applied:
EN 60335-1:2012/A16:2023 • EN 60335-2-45:2002/A11:2023
EN IEC 55014-1:2021 • EN IEC 55014-2:2021
IEC 62471:2006 • EN 62233:2008 • EN IEC 63000:2018
Product with battery Smart PAPS 204 A1/Smart PAPS 208 A1:
EN 301 489-1 V2.2.3:2019 • Final draft EN 301 489-17 V3.3.0:2024
EN 300 328 V2.2.2:2019 • EN 50663:2017
This declaration of conformity is issued under the sole responsibility of the manufacturer:

Authorised representative of documentation
Sommaire
Introduction......33
Garantie (France)......46
PDF ONLINE parkside-diy.com
Reparationsservice......165
Service-Center 166
Importør......166
informativ • informative • informatif • informatief • informativo • informatív • informacyjny • informační • informatívny

GRIZZLY TOOLS GMBH & CO. KG





- ACCU-HETELUCHTVENTILATOR
- FR BE
- INTRODUCTION
- PROPER USE
- SCOPE OF DELIVERY/ACCESSORIES
- OVERVIEW
- (FIG. A)
- (FIG. B)
- DESCRIPTION OF FUNCTIONS
- TECHNICAL DATA
- CORDLESS HOT AIR GUN
- CHARGING TIME
- SAFETY INFORMATION
- MEANING OF THE SAFETY INFORMATION
- PICTOGRAMS AND SYMBOLS
- SYMBOLS ON THE PACKAGING
- GENERAL SAFETY INSTRUCTIONS
- GENERAL INFORMATION
- ELECTRICAL SAFETY
- OPERATION
- CLEANING, MAINTENANCE AND STORAGE
- SPECIAL SAFETY INSTRUCTIONS FOR BATTERY-POWERED DEVICES
- PREPARATION
- INITIAL START-UP
- THE INITIAL START-UP OUTDOORS IF THE SMOKE/ODOUR IS TOO STRONG
- PROCEDURE
- CONTROL ELEMENTS
- TEMPERATURE AND AIR VOLUME
- PROCEDURE (FIG. B)
- MEANING OF THE LEDS
- COOL DOWN FUNCTION
- USE AS A FREE-STANDING TOOL
- PROCEDURE (FIG. A)
- USING THE ADAPTER NOZZLES
- NOTES
- SURFACE NOZZLE (5)
- REFLECTOR NOZZLE (6)
- RESTRICTOR (7)
- CHECKING THE BATTERY CHARGE LEVEL
- LEDS MEANING
- CHARGING THE BATTERY
- INSERTING AND REMOVING THE BATTERY INTO/FROM THE CORDLESS DEVICE
- INSERTING THE BATTERY
- REMOVING THE BATTERY
- SWITCHING ON AND OFF
- SWITCHING ON
- SWITCHING OFF
- USED BATTERIES
- CLEANING
- MAINTENANCE
- STORAGE
- DISPOSAL/ ENVIRONMENTAL PROTECTION
- DIRECTIVE 2012/19/EU ON WASTE ELECTRICAL AND ELECTRONIC EQUIPMENT
- DISPOSAL INSTRUCTIONS FOR RECHARGEABLE BATTERIES
- SERVICE
- GUARANTEE
- TERMS OF GUARANTEE
- GUARANTEE PERIOD AND STATUTORY CLAIMS FOR DEFECTS
- GUARANTEE COVER
- PROCESSING IN CASE OF GUARANTEE
- REPAIR SERVICE
- SERVICE CENTRE
- IMPORTER
- SPARE PARTS AND ACCESSORIES
- POS. NR. NAME ORDER NO
- TRANSLATION OF THE ORIGINAL EU DECLARATION OF CONFORMITY
- SOMMAIRE
- INTRODUCTION......33
- GRIZZLY TOOLS GMBH & CO. KG
Brand : PARKSIDE
Model : PHLGA 20-Li D3
Category : Heat gun