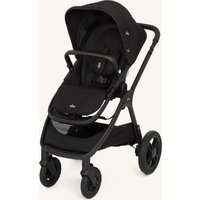
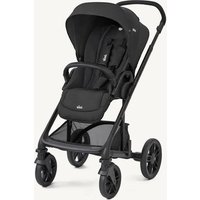
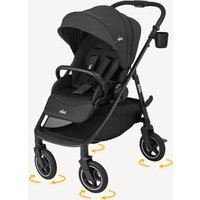
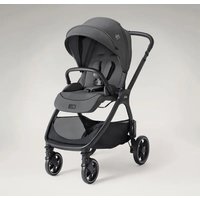
Elara - Stroller Joie - Free user manual and instructions
Find the device manual for free Elara Joie in PDF.

| Product type | Stroller |
| Brand | Joie |
| Model | Elara |
| Maximum child weight | Up to 22 kg or 4 years (whichever comes first) |
| Safety standard | EN 1888-2:2018-A1:2022 |
| Number of recline positions | 5 |
| Storage basket capacity | 4.5 kg max |
| Storage bag capacity | 1.5 kg max |
| Back pocket capacity | 0.45 kg max |
| Number of handle positions | 4 |
| Front wheel types | Swivel with lock |
| Brake | Brake lever with red (locked) and green (released) indicator |
| Reversible seat | Yes, forward-facing or parent-facing |
| Canopy | Retractable with viewing window |
| Harness | 5-point height-adjustable |
| Fold | One-hand, with secondary lock |
| Assembly | Tool-free |
| Main materials | Metal frame, plastic parts, polyester fabric |
| Frame maintenance | Household soap and warm water |
| Soft parts maintenance | Machine washable, no bleach |
| Accessories (depending on region) | Car seat adapter, rain cover, storage bag, transport strap |
| Use with carry cot | Compatible with Joie Ramble, Ramble XL, Calmi |
| Use with car seat | Compatible with i-Snug 2, i-Gemm 3, i-Level Pro, i-Jemini, Sprint |
| Product weight | Approximately 10.5 kg (estimation) |
Frequently Asked Questions - Elara Joie
User questions about Elara Joie
0 question about this device. Answer the ones you know or ask your own.
Ask a new question about this device
Download the instructions for your Stroller in PDF format for free! Find your manual Elara - Joie and take your electronic device back in hand. On this page are published all the documents necessary for the use of your device. Elara by Joie.
USER MANUAL Elara Joie
IMPORTANT - READ CAREFULLY AND KEEP FOR FUTURE REFERENCE.
Stroller Assembly
natural_image
Line drawing of a car interior with an arrow indicating motion (no text or symbols)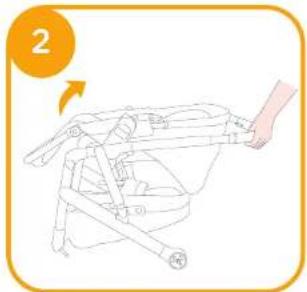
natural_image
Illustration of a hand holding a baby seatbelt device, no text or symbols present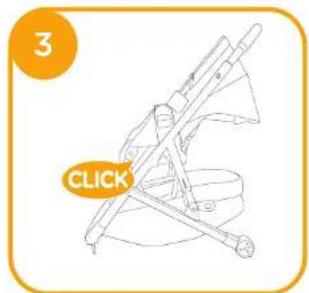

natural_image
Diagram of a vehicle's wheel assembly with a highlighted component (no text or symbols)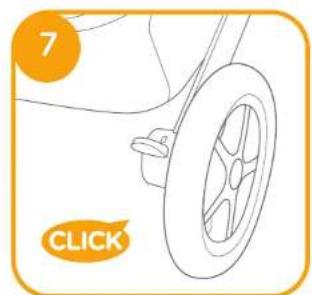
natural_image
Line drawing of a car's wheel and side panel, no text or symbols present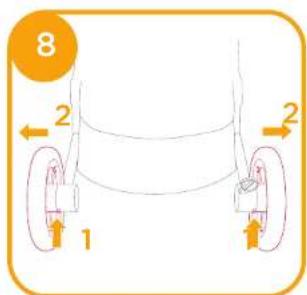

Stroller Operation
natural_image
Line drawing of a stroller with four wheels and a back cover, no text or symbols present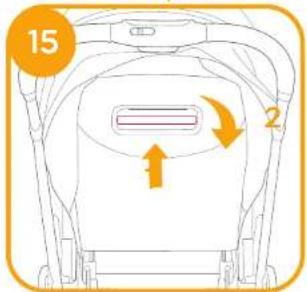
18
19

natural_image
Line drawing of a baby stroller with a curved arrow indicating motion (no text or symbols)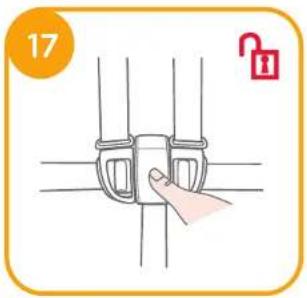
22
natural_image
Line drawing of a car interior showing seatbelt and dashboard (no text or symbols)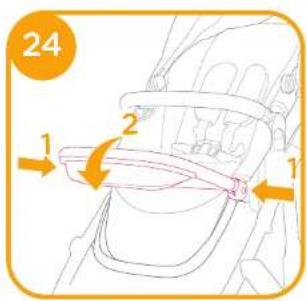
natural_image
Illustration of a mechanical device with a fan and lever mechanism (no text or symbols)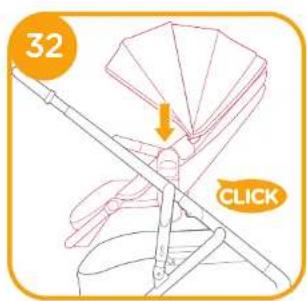
Accessories (May not be included in purchase)
Accessories may be sold separately or may not be available depending on region.
natural_image
Illustration of a person wearing a headlamp and holding a device, with an arrow indicating motion (no text or symbols)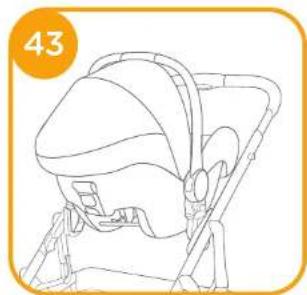
natural_image
Line drawing of a car seat with a seatbelt and seatbelt device, no text or symbols present
natural_image
Line drawing of a baby walker with a labeled button 'CLICK' and page number 48 (no text or symbols on the diagram itself)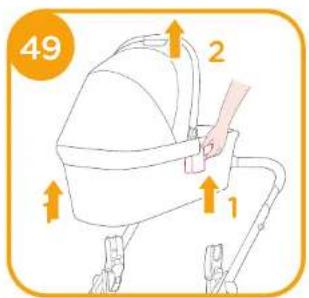
natural_image
Line drawing of a baby stroller with wheels and a seat cover (no text or symbols)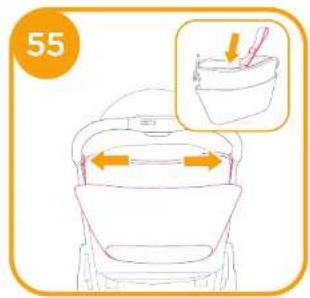
Detach & Assemble Soft Goods
natural_image
Illustration of a person wearing a seatbelt with a highlighted seatbelt and orange arrow indicating upward motion (no text or symbols)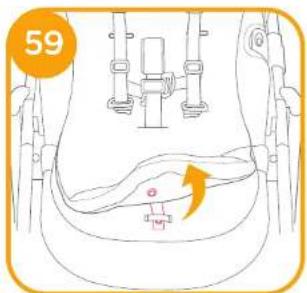
natural_image
Diagram of a human head with internal organs and highlighted areas, no text or symbols present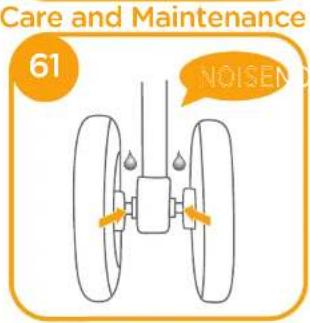
GB
Welcome to Joie ^TM
Congratulations on becoming part of the Jolie family! We are so excited to be part of your journey with your little one. While traveling with the 'Jolie elara' you are using a high quality, fully certified stroller, approved to European safety standards EN 1888-2:2018+A1:2022. This product is suitable for children up to 22kg or 4 years whichever comes first. Please carefully read this manual and follow each step to ensure a comfortable ride and best protection for your child.
IMPORTANT - READ CAREFULLY AND KEEP FOR FUTURE REFERENCE.
Visit us at joiebaby.com to download manuals and see more exciting Joie products!
For warranty information, please visit our website at jolebaby.com
Emergency
In case of emergency or accident, it is most important to have your child taken care of with first aid and medical treatment immediately.
Parts List
Make sure all parts are available before assembly. If any part is missing, please contact local retailer. No tools are required for assembly.
- Stroller Frame
2 Canopy
3 Front Wheel
4 Rear Wheel
5 Canopy
6 Seat Pad
7 Armbar
8 Calf Support
9 Front Wheel
10 Storage Basket
11 Buckle
12 Shoulder Harness
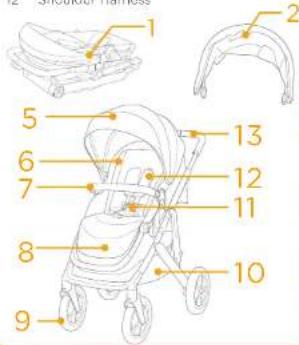
13 Handle
14 Canopy Window
15 Seat Release Button
16 Swivel Lock
17 Storage Latch
18 Rear Wheel
19 Brake Lever
20 Recline Handle
21 Handle Adjustment Button/
One-Hand-Fold Handle
22 Secondary Lock
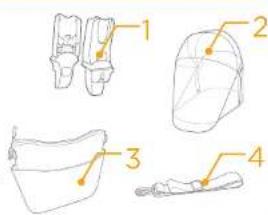
Accessories
(May not be included)
1 Adapter (on certain models)
2. Rain Cover (on certain models)
3. Storage Bag (on certain models)
4 Carry Bolt (on certain models)
Accessories may be sold separately or may not be available depending on region.
WARNING
! Always use the restraint system.
! Ensure that all the locking devices are engaged before use.
! Do not let the child play with this product.
! Check that the pram body or seat unit or car seat attachment devices are correctly engaged before use.
! Adult assembly required.
! This product is suitable for children up to 22kg or 4 years whichever comes first.
! To prevent a hazardous, unstable condition, do not place more than 4.5kg in the storage basket.
! Never leave the child unattended.
! Use the stroller with only one child at a time. Never place purses, shopping bags, parcels or accessory items on the handle or canopy.
! Accessories which are not approved by the manufacturer shall not be used.
! Only replacement parts supplied or recommended by the manufacturer shall be used.
! To avoid injury ensure that the child is kept away when unfolding and folding this product.
! This product is not suitable for running or skating.
! Pushchair designed to be used from birth shall recommend the use of the most reclined position for new born babies.
! The parking device shall be engaged when placing and removing the children.
! For car seats used in conjunction with a chassis, this vehicle does not replace a cot or a bed. Should your child need to sleep, then it should be placed in a suitable pram body, cot or bed.
! Carry cot shall not be used, as soon as the child is able to sit by himself, roll over and can push itself up on its hands and knees. Maximum weight of the child: 9kg.
! No additional mattress shall be added unless recommended by the manufacturer.
! Any load attached to the handle and/or on the back of the backrest and/or on the sides of the vehicle will affect the stability of the vehicle.
! The maximum load of storage bag is 1.5kg (3lb).
! Do not leave the long shoulder strap hanging while the bag is on the stroller to avoid the risk of suffocation.
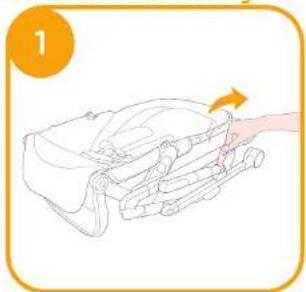
Stroller Assembly
(Please refer to figures on page 1-11)
Please read all the instructions in this manual before assembling and using this product.
Open Stroller
see images 1 - 9
Separate storage latch from storage mount, and then lift the handle upwards, a click sound means the stroller is open completely.
I Check that the stroller is completely latched before continuing to use.
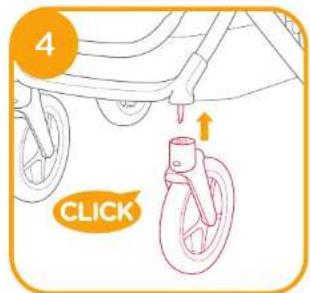
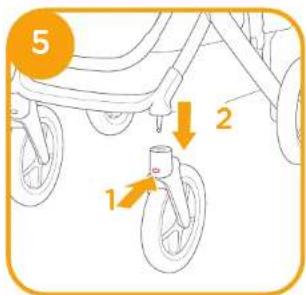
Assemble & Detach Front Wheels
see images
Assemble & Detach Rear Wheels
see images
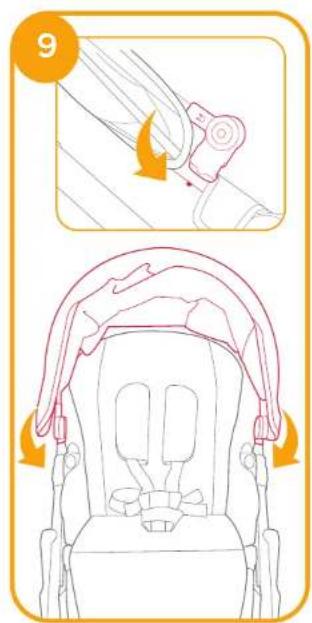
Assemble Canopy
see images 6 -
Assemble & Detach Armbar
see images
The completely assembled stroller is shown as
Stroller Operation
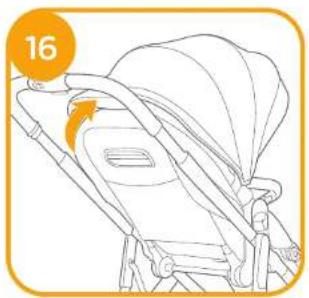
Adjust Backrest
see images 19 - 19
There are 5 recline angles for the backrest.
Recline Backrest
To recline the backrest, squeeze the recline handle on the back of the seat, pull down on the backrest.
Raise Backrest
To raise the backrost, push up.
Make sure the recline is set properly for use.
The maximum load of storage pocket on the back of backrest is 0.45kg.
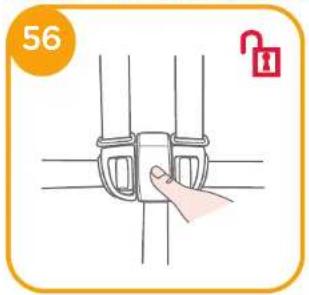
Use Buckle
see images
Release Buckle
Press the center button to release the buckle.
Lock Buckle
Match the waist belt buckle with the shoulder buckle - 1, and click into the center buckle.
A "click" sound means the buckle is locked completely.
To avoid serious injury from falling or sliding out, always secure your child with harness.
Make sure your child is snugly secured. The space between the child and the shoulder harness is about the thickness of one hand.
Do not cross the shoulder belts. This will cause pressure on a child's neck.
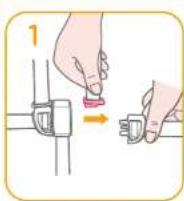
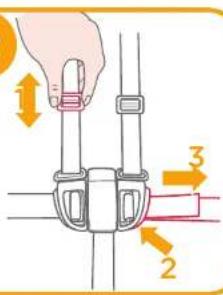
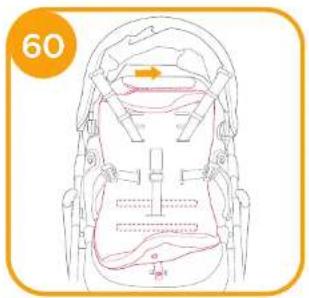
Use Shoulder & Waist Harnesses
see images ① ②
In order to protect your child from falling out, after your child is placed into the seat, check whether the shoulder and waist harnesses are at proper height and length.
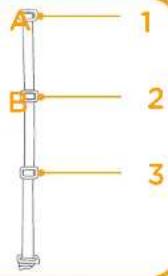
-1 Shoulder harness anchor A
12-2 Shoulder harness anchor B
2 - 3 Slide adjuster
For larger child, use shoulder harness anchor A and the highest shoulder slots. For smaller child, use shoulder harness anchor B and the lowest shoulder slots.
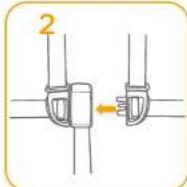
The position of the shoulder belt anchor can be adjusted from above opening or below pocket.
To adjust the position of the shoulder harness anchor, turn the anchor to be level with the side facing forward. Thread it through the shoulder harness slot from back to front. Retread it through the slot that is closest to child's shoulder height.
Use slide adjuster to change the harness length.
Press the button - 2 while pulling the waist harness to proper length. - 3
Adjust Calf Support
see Images -
The calf support has 2 positions.
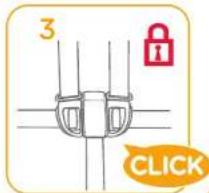
To raise the calf support, push it upwards. A "click" sound means the calf is locked completely.
To lower calf support, press the adjustment buttons on both sides of the calf support, 1, and rotate the calf support downwards. 2 - 2
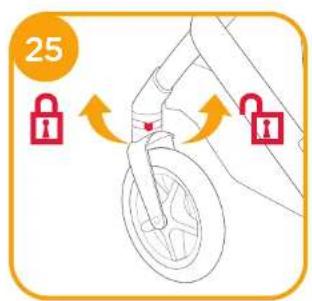
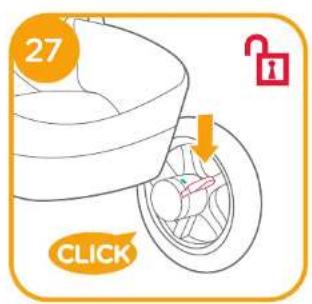
Use Front Swivel Lock
see image
Front wheel locked or unlocked status as
Tip It is recommended to use swivel locks on uneven surfaces.
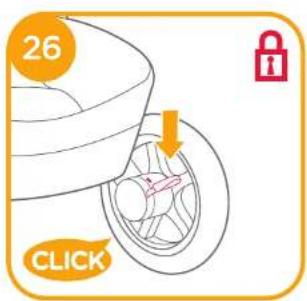
Use Brake
see images ② - ③
To lock wheels, step the brake lever downwards, the indicator will show red
To release wheels, step the brake lever downwards again, the indicator will show green?
Tip Always set the parking brake when stroller is not moving.
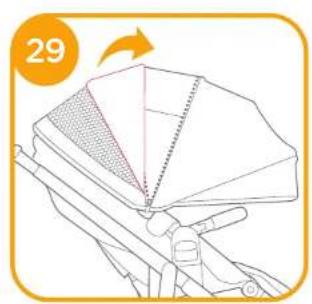
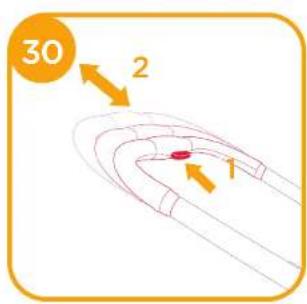
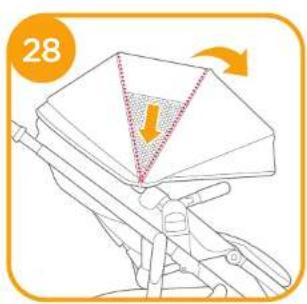
Use Canopy
see Images
The canopy can be opened or folded, pull it toward front or back.
The canopy can be opened completely to protect your child from the sun uttermostly, just unzip the zip, and then pull the canopy toward front.
There is a window on the canopy, through which you can view your baby.
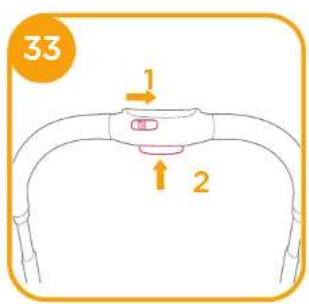
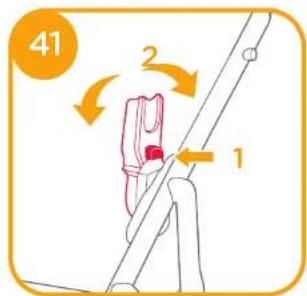
Adjust Handle
see image
The handle has 4 positions.
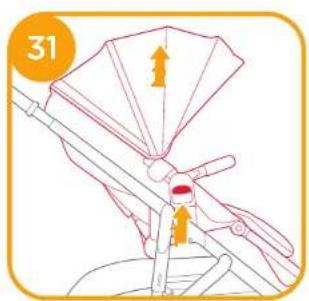
Switch Seat
see images 3 -
The seat can be switched which makes mother and child can face to face with each.
Squeeze the seat release buttons while lifting the seat. Turn the seat to reverse direction and then insert the seat to seat mounts.
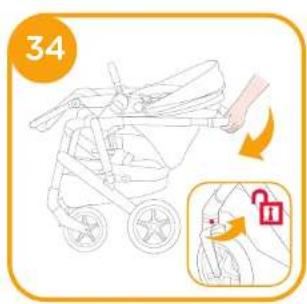
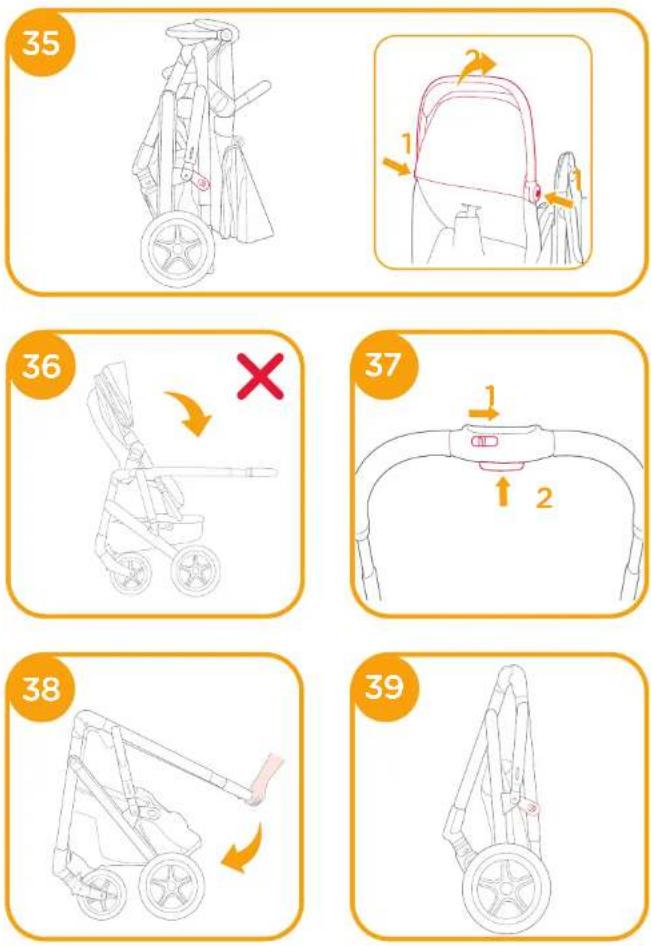
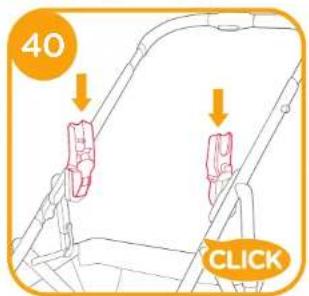
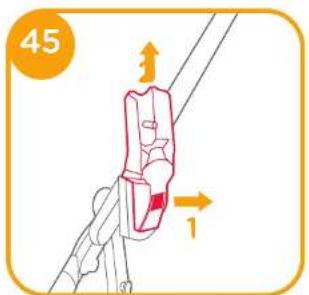
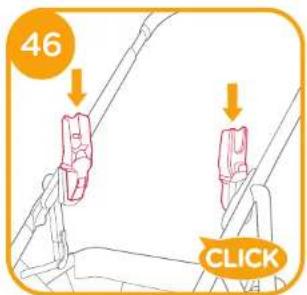
Fold Stroller
see images
Please fold the canopy before folding the stroller.
Slide the secondary lock to the right -1 and press the folding button -2, then rotate the handle downwards, the fold latch can lock automatically.
Please do not fold the frame when the seat is facing rearwards.
Please do not fold the frame when front wheel swivel lock is locked.
The stroller with forward-facing seat can stand when the handle is in the highest position.
! The storage latch will automatically hook onto the storage mount, then the stroller is folded and locked completely.
Use Accessories
Accessories may be sold separately or may not be available depending on region.
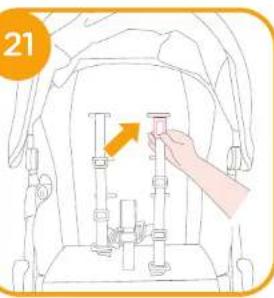
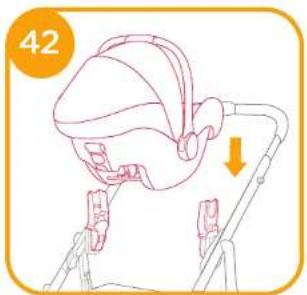
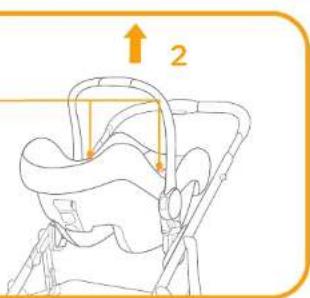
Use with Infant Child Restraint
see images ① - ②
When using with Jole infant child restraint | Snug 2 & i-Gemm 3 & i-Level Pro & i-Jemini & Sprint, please refer to the following instructions.
A "click" sound means the adapter is locked completely.
The infant child restraint angle can be adjusted with our adjustable adaptors.
! The adapter has 3 positions. Please do not use the product when the baby's head is lower than feet after attached infant child restraint.
If you have any problems about using the infant child restraint, please refer to their own instruction manuals.
Please do not fold the stroller when the infant child restraint is still attached.
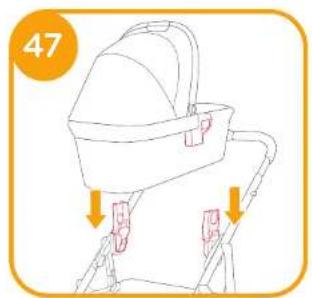
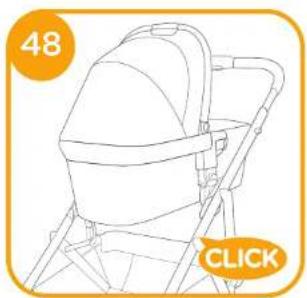
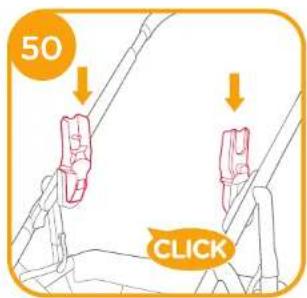
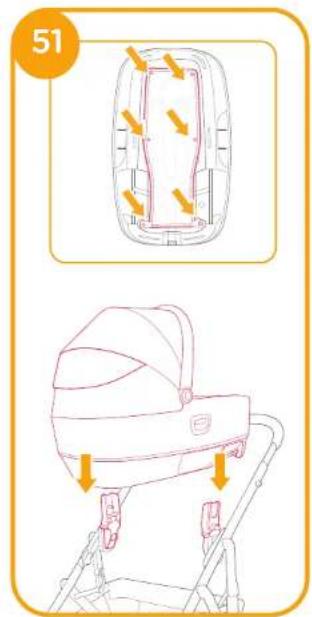
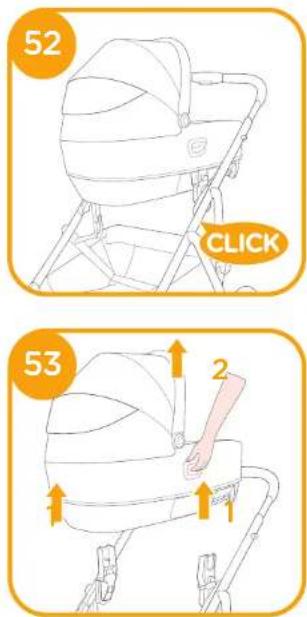
Use with Joie Ramble, Ramble XL Carry Cot
see images 26 - 29
When using with Jole carry cot Ramble, Ramble xl, please refer to the following instructions.
If you have any problems about using the carry cot, please refer to their own instruction manuals.
Please do not use the product when the baby's head is lower than feet after attached carry cot.
I Always use the mattress when using the carry cot.
I Please don't fold stroller when attaching the carry cot.
Use with Joie Calmi Carry Cot
see images
When using with Joe Calmi carry cot, please refer to the following instructions.
A "click" sound means the adapter is locked completely.
I Always use the mattress when using the carry cot.
Please check that the mesh at the bottom of the carry cot is properly fixed before installing carry cot.
If you have any problems about using the carry cot, please refer to their own instruction manuals.
Please do not fold the stroller when the carry cot is still attached.
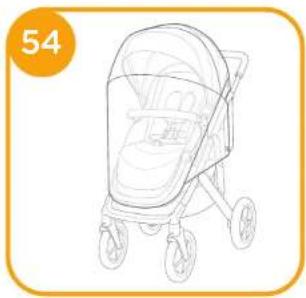
Use Rain Cover
see Image
To assemble the rain cover, place it over the seat.
When using the rain cover, please always check its ventilation.
When not in use, please check that the rain cover has been cleaned and dried before folding.
Do not fold the stroller after assembling the rain cover.
Do not place your child into the stroller assembled with rain cover during hot weather.
Use Storage Bag
see Image
When using the storage bag on the stroller, please store the carrying belt in the storage bag.
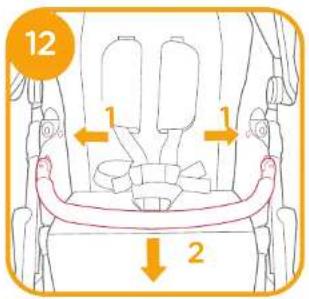
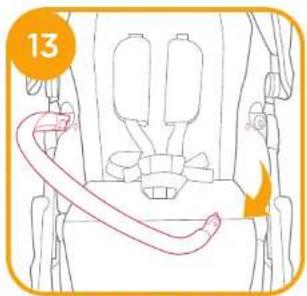
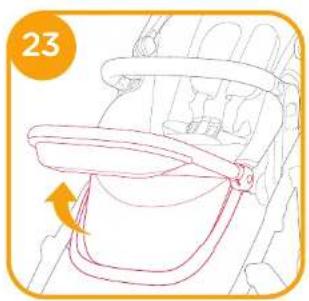
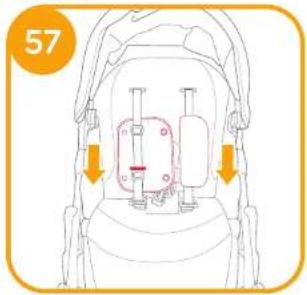
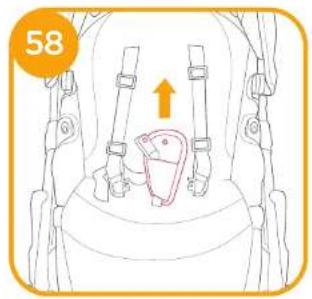
Detach & Assemble Soft Goods
see images -
Remove armbar shown as
Open the buckle which is on the bottom of seat.
To re-assemble seat soft goods, follow the steps above in reverse
Cleaning and Maintenance
see image
To clean stroller frame, use only household soap and warm water. No bleach or detergent. Please refer to the care label for instructions on cleaning the fabric parts of the stroller.
Removable soft goods can be washed by machine. No bleach. Do not twist the seat cover and inner padding to dry with great force. It may leave the seat cover and inner padding with wrinkles.
From time to time, check your stroller for loose screws, worn parts torn material or stitching.
Replace or repair the parts as needed. Periodically wipe clean plastic parts with a soft damp cloth. Always dry the metal parts to prevent the formation of rust if the stroller has come into contact with water.
Excessive exposure to sun or heat could cause fading or warming of parts.
If stroller becomes wet, open canopy and allow to dry thoroughly before storing.
If wheels squeak, use a light oil (e.g., Silicon Spray, antirust oil, or sewing machine oil), it is important to get the oil into the axle and wheel assembly.
When using your stroller at the beach or other sandy/dusty environments, completely clean your stroller after use to remove sand and salt from mechanisms and wheel assemblies.

AVERTISSEMENT
WAARSCHUWING
- Controloer of de helling good is ingesteld.
AVVERTENZA
ADVERTENCIA
Trocar a cadeira Ver Imagens © -
OSTRZEŻENIE
VAROVÁNÍ
VÝSTRAHA
OPOZORILO
ВНИМАНИЕ
ADVARSEL
FIGYELEM
AVERTIZARE
UYARI
الملحقات
(قد لا تكون مرفقة)
m = 311
The following table provides the information in English:
عَدِ الْإِنْتُذِمِ مِعِ بِنَّطُمْ تَفَيْدِ حَرِكَةِ الْتَّلَّلِ 2 Jolic — Jolic — Jolic — Jolic — Jolic — Jolic — Jolic — Jolic — Jolic — Jolic — Jolic — Jolic — Jolic — Jolic — Jolic — Jolic — Jolic — Jolic — Jolic — Jolic — Jolic — Jolic — Jolic — Jolic — Jolic — Jolic —
WARNING
ADVARSEL
VAROITUS
Allison Baby UK Ltd, Venture Point, Towers Business Park Rugeley, Staffordshire, WS15 1UZ
NUNA International B.V. Van der Valk Boumanweg 178 C, 2352 JD Leiderdorp, The Netherlands