SS-16190 - Vacuum Cleaner Sogo - Free user manual and instructions
Find the device manual for free SS-16190 Sogo in PDF.

User questions about SS-16190 Sogo
0 question about this device. Answer the ones you know or ask your own.
Ask a new question about this device
Download the instructions for your Vacuum Cleaner in PDF format for free! Find your manual SS-16190 - Sogo and take your electronic device back in hand. On this page are published all the documents necessary for the use of your device. SS-16190 by Sogo.
USER MANUAL SS-16190 Sogo
natural_image
Black vacuum cleaner with attached handle and base (no visible text or symbols)
Descarga tu manual
Download your manual
Téléchargez votre manuel
Baixe seu manual
Laden Sie Ihr Handbuch herunter
Scarica il tuo manuale
Stáhněte si manuál
Download din manual
Prenesite svoj priročnik
Preuzmite svoj priručnik
Pobierz swoją instrukcję
Descărcati manualul dvs
Завантажте посібник
Descàrrega el teu manual
ASPIRADOR RECARGABLE SECO Y HÚMEDO CON FREGONA
CORDLESS, WET & DRY VACUUM CLEANER AND MOP
ASPIRATEUR SANS FIL, MOUILLÉ ET SEC AVEC SERPENTIN
ASPIRADOR SEM FIO, MOLHADO E SECO COM ESFREGÃO
ASPIRADOR SEM FIO, MOLHADO E SECO COM ESFREGÃO
ASPIRAPOLVERE SENZA FILO, PER SOLI E UMIDI CON MOCCIO
BEZDRÁTOVÝ VYSÁVAČ NA MOKRO I NASUCHO S MOPEM
TRÅDL∅S, VÅD- OG T∅RRST∅VSUGER MED MOPPE
BREZŽIČNI SESALNIK ZA MOKRO IN SUHO SESANJE Z MOPOM
BEŽIČNI USISIVAČ ZA MOKRO I SUHO USISAVANJE S MOPOM
BEZPRZEWODOWY ODKURZACZ DO CZYSZCZENIA NA MOKRO I NA SUCHO Z MOPEM
ASPIRATOR FĂRĂ CABLU, PENTRU MURDĂRIE UMEDĂ ȘI USCATĂ, CU MOP
Declaration of conformity, Responsibility of Electronic products disposal, Importers Details and After-sales service on the last pages.


FUNCIONES DE LA PANTALLA
natural_image
Two identical line drawings of a handheld device with a left-hand rule, showing the process (no text or symbols)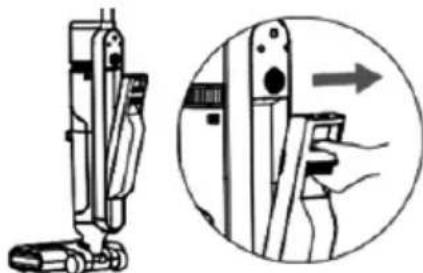
natural_image
Technical illustration of a mechanical device with an inset showing a hand holding a tool, no text or symbols present.
natural_image
Technical illustration of a mechanical device with a close-up view showing a hand holding a tool (no text or symbols present)natural_image
Diagram of a mechanical assembly with hands holding a component, showing an upward arrow (no text or symbols)natural_image
Line drawing of a hand using a tool to press or install a rolled-up sheet, with a downward arrow indicating compression (no text or symbols present)INSTRUCCIONES DE DESMONTAJE Y MONTAJE DEL CEPILLO DE RODILLO
natural_image
Diagram of a mechanical component with a directional arrow indicating movement (no text or symbols present)natural_image
Diagram of a mechanical component with directional arrow indicating movement (no text or symbols)natural_image
Simple line drawing of a mechanical device with an upward arrow indicating motion (no text or symbols)natural_image
Illustration of a hand using a handheld device to press or install a cylindrical object, with an arrow indicating motion (no text or symbols present)natural_image
Line drawing of a vacuum cleaner's base with attached electrical outlet (no text or symbols)natural_image
Illustration of a vacuum cleaner with power button and hand gesture (no text or symbols)LIMPIEZA Y MANTENIMIENTO
LIMPIEZA DEL CUERPO
natural_image
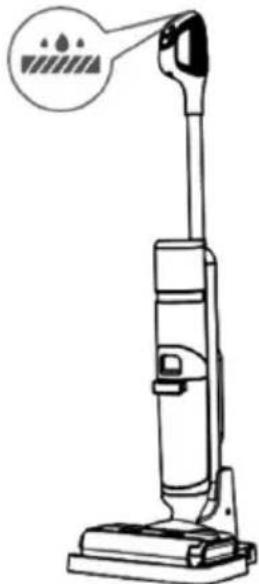
Line drawing of a vacuum cleaner with a circular icon and warning label (no text or symbols on the device itself)MODO DE AUTOLIMPIEZA
natural_image
Diagram of a hand pressing down on a mechanical component with directional arrows indicating movement (no text or symbols)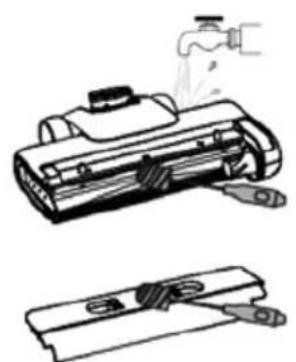
natural_image
Illustration of a hand washing a water bottle with a drain, and a close-up of the same device (no text or symbols present)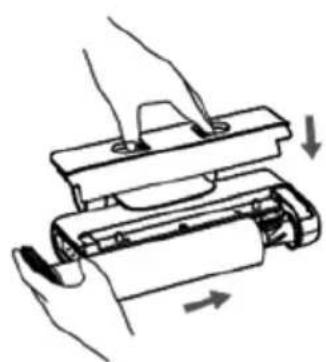
natural_image
Illustration of a hand holding a mechanical device with arrows indicating motion or force (no text or symbols)CONSEJOS
• Always read the instruction manual carefully before use.
- This manual can be downloaded from our website www.sogo.es.
- Keep these instructions for future reference.
2. Safety instructions for the user
GENERAL
PRECAUTIONS
General precautions during the use of electrical equipment
- Do not use or store the appliance outdoors.
- This product is designed for indoor domestic, non-industrial and non-commercial use. Do not use the item outdoors or for any other purpose. Misuse or improper handling may cause problems with the appliance and may cause injury to the user.
- The unit must only be used for its intended purpose. No liability is accepted for damage resulting from improper use or incorrect handling.
- Make sure that the voltage indicated on the nameplate matches the mains voltage before plugging in the appliance.
- Always remove the plug from the socket when the appliance is not in use. Do not leave the appliance unattended when it is switched on.
- It is necessary to supervise when any electrical appliance is being used by or near children.
- Before cleaning or storing your appliance, always unplug the appliance from the power supply and allow it to cool down.
- The device is not completely disconnected from the power supply, even after it has been switched off. To disconnect it completely, unplug it from the mains socket.
- The appliances are not designed to be operated by an external timer or a separate remote-control system.

Restrictions on use to avoid personal injury
- Do not leave the appliance unattended.
- Do not place or use this appliance near water sources.
- Do not place or use the appliance and its power cord on or near hot surfaces (e.g., hotplates) or open flames.
- Do not leave the power cord hanging over sharp edges and keep it away from hot objects and naked flames. Do not coil the cord around the appliance or bend it.
- Never use accessories not recommended by the manufacturer.
- The use of accessories not recommended or sold by the appliance manufacturer may result in fire, electric shock or injury to persons.
- To avoid electric shock, make sure your hands are dry before plugging or unplugging the appliance.
- Do not use the appliance with wet hands, on wet floors or when the
environment is damp, there is a risk of electric shock.
- Never immerse the appliance or the plug-in water or any other liquid. Should the appliance fall into water, disconnect it immediately from the mains and take it to an authorised service centre for repair before using it again.
- Do not use the appliance if it has fallen on the floor, if it shows visible signs of damage or if it is leaking.
- Do not use the appliance if the cable or plug is damaged. In the event of damage to the cord, it must be replaced only by the manufacturer, its service agent or similarly qualified persons in order to avoid hazards.
- In case of malfunction of the appliance, or if it has been damaged in any way, return the appliance to the nearest authorised service centre for examination, repair or adjustment.
- To avoid overloading the circuit when using this product, do not operate another high voltage product on the same electrical circuit.
- It is not recommended to use an extension cord with this product, but if an extension cord should be used:
- The marked electrical rating of the cable must be at least as good as that of the product.
- Arrange the extension cord so that it does not hang down where it can be tripped over or pulled unintentionally.

Restrictions for use with children and the elderly
- This appliance is not intended for use by persons (including children) with reduced physical, sensory or mental capabilities, or lack of experience and knowledge, unless they have been given supervision or instruction.
- Children should be supervised to ensure that they do not play with the appliance.
- Cleaning and maintenance of the user must not be carried out by children without supervision.
• Children must not play with the appliance. - This appliance can be used by children aged from 8 years and above and persons with reduced physical, sensory or mental capabilities or lack of experience and knowledge if they have been given supervision or instruction concerning use of the appliance in a safe way and understand the hazards involved.9
- Keep the appliance and its cord out of the reach of children under 8 years of age.

Instructions to be follow while using appliance
- Incorrect operation and misuse can damage the appliance and cause injury to the user. This appliance is supplied with a detachable power supply unit and only to be used with power supply adaptor provided.
- This vacuum cleaner incorporates rotating brushes or similar
devices, and water-suction cleaning appliances. Therefore, for the user safety, please ensure that the plug must be removed from the socket-outlet before cleaning or maintaining the appliance.
- Appliance must be used with its provided rotating brushes.
- The instructions for appliance with a liquid dispensing system specify the amount and type of the liquid to be used.
- Use only indoors on multiple floor surfaces such as vinyl, tile, sealed wood, etc. Be careful not to run over loose objects or carpet edges.
- Use only the battery pack and charger specified by the manufacturer Using any other battery pack may cause personal injury and ire risk.
- Do not touch the charger and the plug with wet hands.
- Do not use this appliance without the filter.
- Be extra careful when cleaning on the stairs.
- Do not use this appliance when the water depth exceeds 5 mm.
- Turn off this appliance before making any adjustments, replacing accessories, or storing this appliance.
- This appliance can only be used, charged, and stored in a dry room where the temperature is higher than 4, and lower than 35.
- If you accidentally drop the battery; liquid may run out of the battery. Avoid touching it. If touched accidentally, rinse with water. If liquid gets into your eyes, seek medical help.
- If this appliance overheats, makes abnormal noise, produces abnormal smell or leaks, stop using it immediately.
- For long-term storage, please turn off this appliance and disconnect the power from the socket.
- Be sure to clean the dirty water tank after each use to avoid clogging, which will result in poor suction, motor overheating or shortened service life of this appliance.
- Never use this unit near a bathtub, shower, wash basin or other receptacles containing water.
- Caution! Do not allow small children to play with the foil: DANGER OF SUFFOCATION!
- Never move the appliance by pulling on the cord. Make sure that the cable cannot be trapped in any way.
- Never coil the cable around the appliance and do not bend it.
- Be sure to unplug the appliance before cleaning the waste containers or filters.
- It may cause fire and injury to persons if the vacuum cleaner sucks up the following items:
- Heat source: charcoal fire, cigarette butts
- Large sharp fragment: piece of broken glass.
- Liquid: dangerous goods (solvent, corrosive), acidic agent, cleaner and water.
- Flammable and explosive goods: petrol and alcoholic products.
- Construction and cement waste.
- Keep the air outlet of the appliance away from hair, loose clothing, fingers or other parts. Do not use the suction tube, tube extension handles or other tool point in eyes, ears or place in mouth.
- If large pieces of paper, paper balls, plastic sheets or sharp objects, and anything thicker than a straw are found, remove them in advance in case the suction tube is blocked and affects the use of the product.
- Keep the air outlet unblocked to avoid loss of suction power, heating of the motor which can lead to reduced vacuum cleaner life.
⚠️ Instructions related to charger and battery
- It is recommended to use the supplied charging adaptor. Check the voltage of unit and the charger, make sure it is consistent.
- Charger shall be placed on dry surface, do not leave it unattended during charging.
- Never use any other charger than the provided.
- Do not throw away the battery unit, it must be recycled as per local regulations.
- The battery unit can only be used provided with this vacuum cleaner, do not use it for other purposes. It can only be charged with the adapter given with this vacuum cleaner.
- Do not disassemble the battery unit to avoid damage or short circuit.
- Do not place the battery unit near high temperature objects or fire.
- Do not insert sharp objects into the battery unit or the battery will break in case of electric shock.
- To replace the damaged battery, make sure to replace it by authorized person or after-sales service.
- Do not immerse the motor part or battery in the water as it may cause short circuit or property damage.
- WARNING: In case of replacing the damaged battery always use the batteries recommended or sold by the manufacturer, The use of batteries not recommended or sold by the appliance manufacturer may result in fire, electric shock or injury to persons.
- Do not try disassembling or repairing this products / charger yourself, please call professionals for any repair or replacement for original parts/unit
- Please make sure that products can no longer be used before you discard it, the battery pack must be removed from product for further safe recycle disposal.
CLEANING AND MAINTENANCE
See the cleaning and maintenance section for details on how to clean the appliance.
3. TECHNICAL SPECIFICATIONS
| Voltage Frequency Power | Battery Specifications | Clean water tank capacity | Dirty water tank capacity | ||
| 100-240V 50-60Hz 230W | 28.8V, 2600mA | mAh 0.65L 0.5L | |||
This product complies with EU regulation 2023/826 under directive 2009/125/EC on the Eco design requirements.
Power consumption in off mode: <0.5W
Power consumption in standby mode: <0.8W
Time after which the product enters into off mode: 5 min
PRODUCT SPECIFICATIONS
| Function Especificación | |
| BLDC Brushless motor | |
| Voice Broadcast function English, Spanish, French, Portuguese, German, Italian | |
| Battery 28.8V, 2600mAh | |
| Charging time 6 Hrs Max. | |
| Working time 50 min. (std. speed) / 22 min. (High speed) | |
| Motor 28.8V, 150W, 1500RPM | |
| Brush Speed | 560 RPM Max. |
| Working power | 120W (Std. Speed) / 230W (High Speed) |
| Vacuum power | 7Kpa (Std. Speed) / 13 Kpa (High Speed) |
| Air flow | 30ml / min(Std. speed) / 50ml / min. (High Speed) |
| Dual filter system | Strainer + Hepa filter |
| Dirt sensor Aperture | Yes |
| LED light Display | Yes |
| Auto cleaning function | Yes |
| Noise level | ≤78dBA |
| Water indicator light | Yes |
| Clean water tank capacity | 630ml max. |
| Dirty water tank capacity | 500 ml Max. |
| Low battery indicator | Yes |
| Add water indicator | Yes |
| Dirty water full indicator | Yes |
| Roller brush blockage indicator | Yes |
| Input | AC 100-240V~50/60Hz, 0.5 A(Adaptor) |
| Output | DC 36V, 0.5A |
| Working surface | Marble, Wooden, Tiles, Vinyl, Etc. |
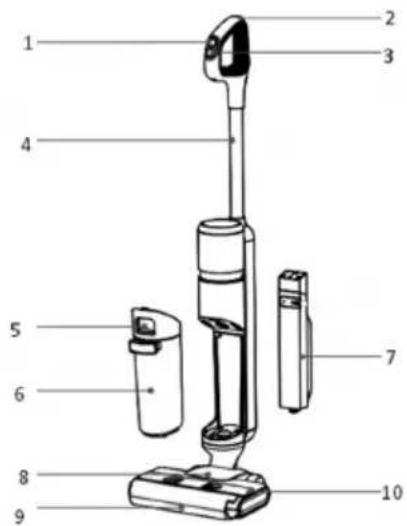
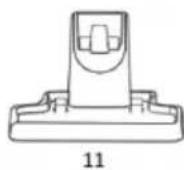
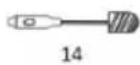
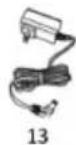
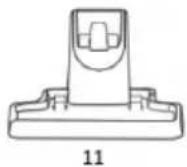
4. PARTS DESCRIPTION
- On/ Off button
- Auto cleaning button
- Mode switch button
- Handle
- Dirty water tank release button
- Dirty water tank
- Clean water tank
- Floor brush
- Roller brush
- Roller brush cover
- Charging dock
- Adaptor
- Cleaning solution
- Cleaning brush
- Hepa filter


DISPLAY FUNCTIONS
- Dirt sensing aperture
- Smart mode
- Max. mode
- Vac / Water absorption mode
- Silent mode
- Product image display
- Auto cleaning indicator
- Add water indication
- Dirty water indicator
- Roller brush blockage
- Battery capacity

5. FUNCTION DESCRIPTION
On/Off button: Press the ON/OFF button to turn the cleaner on/off.
Smart mode: After turning on, the cleaner is in the smart mode, and automatically senses the dirt on the ground and adjusts the suction according to the dirt. This mode is suitable for daily cleaning in the home.
Max. Mode: Press the Mode switch button, and switch the mode to the MAX mode. The mode is suitable for removing stubborn stains and water accumulation.
Water absorption mode: This mode only absorbs water and is suitable for bathrooms to absorb excess water.
Auto cleaning: In the charging state, press the Auto Cleaning button, and the cleaner will automatically clean the roller brush and pipeline.
Low battery reminder: If the battery capacity is less than 20%, the red aperture light above the "battery capacity" of the battery pack start flashing. It is recommended to put the cleaner back into the charging dock to charge.
Dirty water pouring reminder: If the dirty water tank is full of dirty water, the dirty water tank indicator light start flashing, and the cleaner will automatically shut down. Please throw out the dirty water. Reinstall the dirty water tank onto the cleaner, and then start the cleaner.
Water add reminder: If the water in the clear water tank is used up, the clean water tank indicator light of the cleaner start flashing. Please turn off the cleaner and remove clear water tank to add clear water. Reinstall the clear water tank to the cleaner before starting again.
Roller brush blockage reminder: If the roller brush is blocked by hair and other objects, the floor brush indicator light of the cleaner start flashing, and the cleaner will automatically shut down. Please remove the roller brush and clean it. Then reinstall the roller brush and roller brush cover before starting the cleaner.
6. INSTRUCTIONS FOR USE
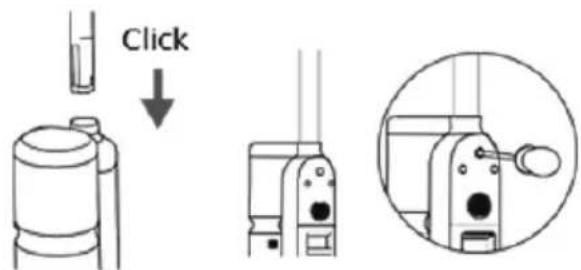
DISASSEMBLY AND ASSEMBLY INSTRUCTIONS
natural_image
Two identical illustrations of a handheld device with a left-hand rule, showing the process (no text or symbols)
natural_image
Technical illustration of a mechanical device with a magnified inset showing hand positioning (no text or symbols)-
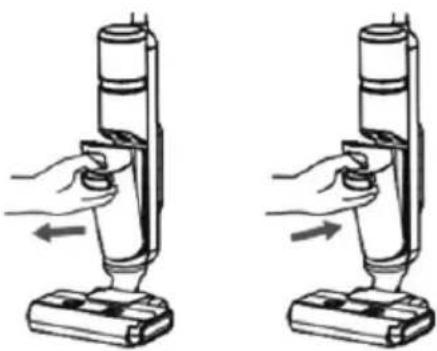
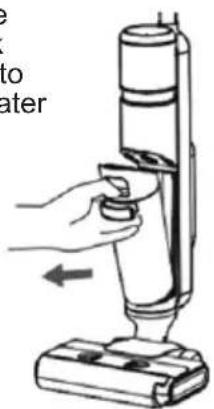
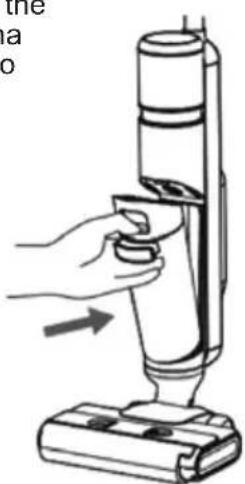
Insert the other side of the handle into the main unit port along the direction as shown in the figure, and a click sound can be heared, when the end reaches the bottom of the main unit. Moreover, keep the port flush with the schematic line of the handle to ensure that the handle is tight and not loose. At the moment, the handle is installed.
-
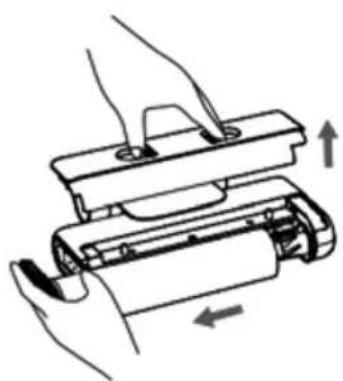
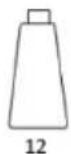
To disassemble the main unit, use a hard object to stretch into the hole on the back of the cleaner body and press the spring, and pull out the handle upwards.
-
Hold the handle of the dirty water tank, press the dirty water tank release button, and pull the dirty water tank outward to remove it.
-
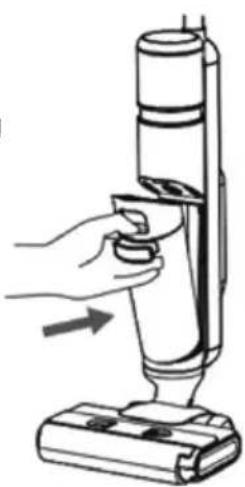
First put the bottom of the dirty water tank into the opening support position in front of the cleaner body, gently push the dirty water tank, and the dirty water tank is installed when you hear a clicking sound.
-
Hold the cleaner body with one hand and push the clean water tank button with the other hand, and then pull the clean water tank outward to take out it.
-
First place the bottom of the clean water tank into the opening position on the back of the cleaner body, gently push the clean water tank, and the clean water tank is installed with a clicking sound.
PRODUCT USE
DISASSEMBLY AND ASSEMBLY INSTRUCTIONS OF ROLLER BRUSH COVER
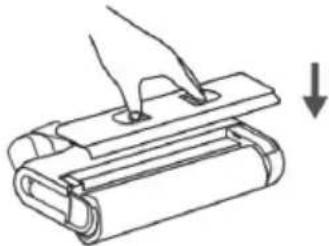
I. Press the button, and pull the roller brush cover upwards to remove it.

natural_image
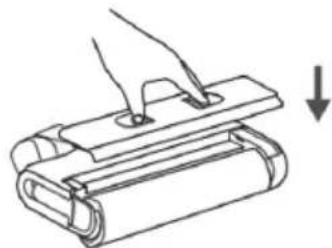
Diagram of a battery pack being inserted into a slot, showing hand placement and upward arrow (no text or symbols)II. Align the roller brush cover with the floor brush, press it down, and the roller brush cover is installed when a clicking sound is heard.
natural_image
Line drawing of a hand using a tool to press or install a rectangular object, with an arrow indicating downward motion (no text or symbols)DISASSEMBLY AND ASSEMBLY INSTRUCTIONS OF ROLLER BRUSH
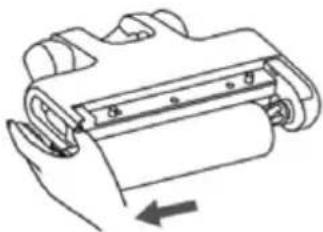
I. Grasp the side handle of the roller brush, pull it outward and remove the roller brush.
natural_image
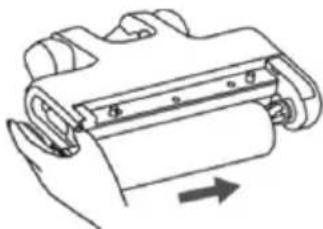
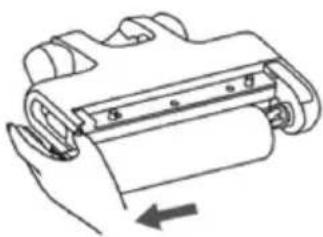
Line drawing of a hand holding a cylindrical object with a ruler and an arrow indicating left motion (no text or symbols)II. Align the right end of the roller brush with the right end of the floor brush, push it to the right, and insert the left handle into the corresponding position. At the moment, the roller bush is installed.
natural_image
Diagram of a hand holding a cylindrical object with an arrow indicating direction (no text or symbols)OPERATING INSTRUCTIONS
PREPARATION:
I. Before use, please check whether the cleaner is fully charged. If the power is insufficient, please charge it in time and use it after fully charging.
2. Smart mode is default power on mode. With the help of switch model button appropriate mode and function can be selected and switched according to the actual situation.
3. Add water to the clean water tank
1. Remove the clean water tank.
2. Open the rubber plug of the clean water tank and inject clean water (below 30.) to the water level.
3. Close the clean water tank cover to ensure it is tight.
4. Reinstall the clean water tank onto the cleaner body till you hear a clicking sound.
START TO WORK
I. The cleaner is equipped with a vertical ON button. Please tilt the cleaner for use after turning it on. Do not tilt it more than 140° to avoid leakage of the wastewater tank.
2. Tilt the main unit and start the cleaner.

VOICE BROADCAST FUNCTION
Requirement: The machine has to be in upright position before the voice can be turned off or on.
Press and hold the self-cleaning button for 3 seconds to turn on/off the voice. When the voice is turned off, the screen will display a mute status.
LANGUAGE SWITCH BUTTON
Requirement: The machine has to be in upright standby before the language can be switched.
Press and hold the function button for 3 seconds to enter language switch mode. The screen will display a breathing state. Press the function button briefly to switch between languages (languages available: English, German, French, Italian, Spanish and Portuguese). Once the switch is complete, wait for 3 seconds to exit the language switch mode.
DIRTY WATER POURING FUNCTION INSTRUCTIONS
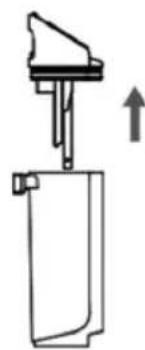
- Gently press the dirty water tank release button to remove dirty water tank.
- Hold the tank body with one hand and pull out the dirty water tank upwards with the other hand.
natural_image
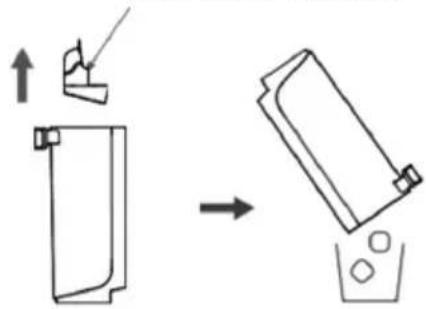
Simple line drawing of a mechanical device with an upward arrow, no text or symbols present- Take out the solid-liquid separator, pour the solid waste into the trash can and pour out the dirty water.
Solid- liquid separator
- Reinstall the dirty water tank onto the cleaner in place after hearing a clicking sound.
natural_image
Illustration of a hand using a handheld device to press or install a cylindrical object (no text or symbols visible)CHARGING INSTRUCTIONS
natural_image
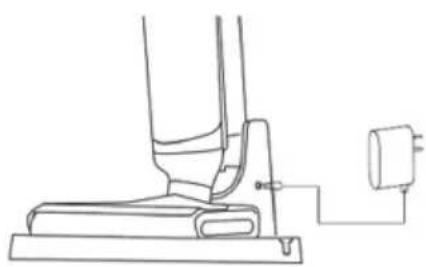
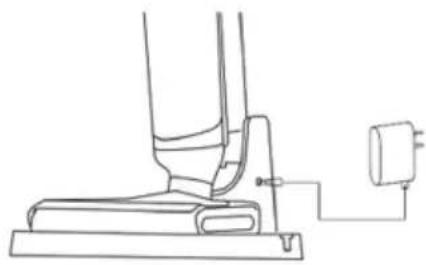
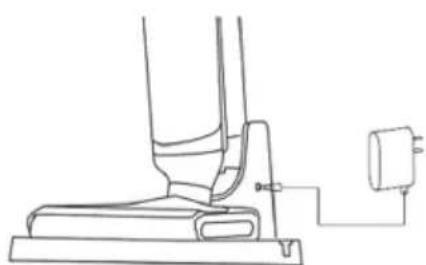
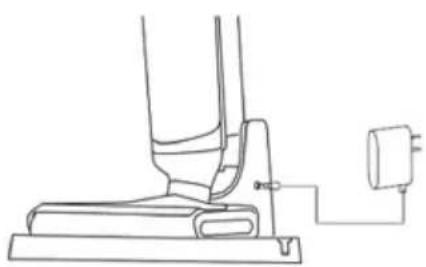
Line drawing of a vacuum cleaner's base with attached electrical outlet (no text or symbols)-
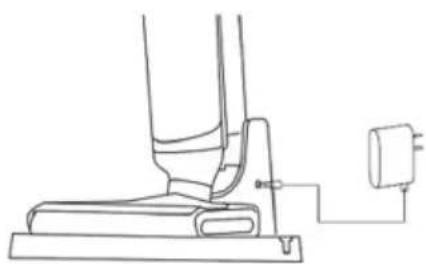
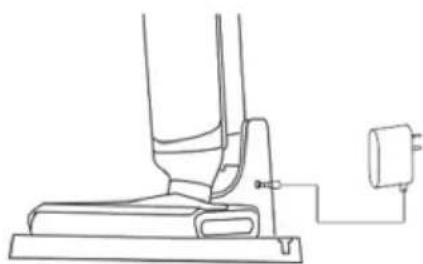
After use, place the cleaner vertically on the charging station, insert one end of the adapter into the charging dock, and connect the other end to a socket in the home. During charging, keep the cleaner upright and close to the toe of the wall to avoid tripping and other injuries.
-
The power indicator flashes during charging.
-
Once the unit is charged completely, the power indicator light remains on and will go out after 1 hour.
NOTE:
- Generally, 10-50% of the battery capacity is reserved when the product leaves the factory. It is recommended to fully charge the product when using it for the first time to ensure the effect and duration of use.
- Please fully charge the battery before use if it has not been fully charged for a long time.
- It takes 6 hours for the battery to be fully charged at room temperature. The actual charging time varies depending on the ambient temperature and voltage.
- After fully charged, if there is no other operation, the cleaner will automatically shut down and all indicator lights remains off.
- If the product is not used for a long time after purchase, please use the special charging dock provided by us to charge the battery for at least 3 hours every 3 months (without full charging).
natural_image
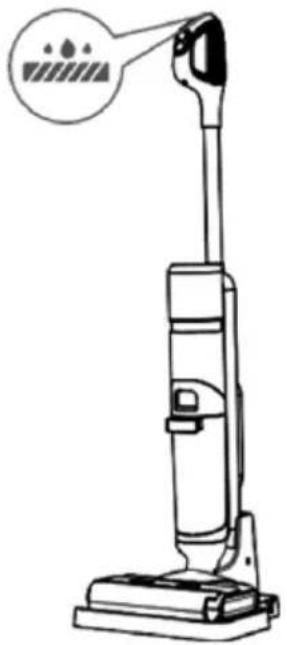
Illustration of a vacuum cleaner with power button and hand tool (no text or symbols)CLEANING AND MAINTENANCE
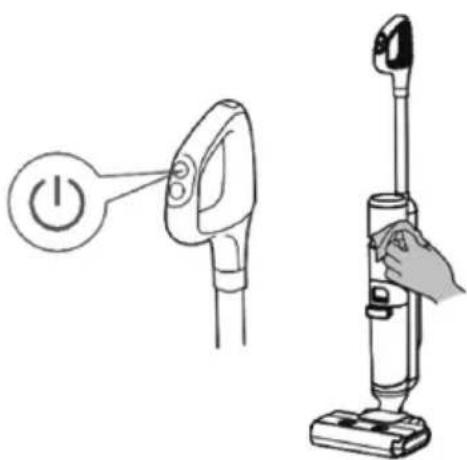
CLEAN THE BODY
- Before cleaning, make sure that the machine is switched off.
- Wipe the body with water or neutral detergent. Before wiping, ensure that the cleaning cloth is dry, and do not let water flow into the machine.
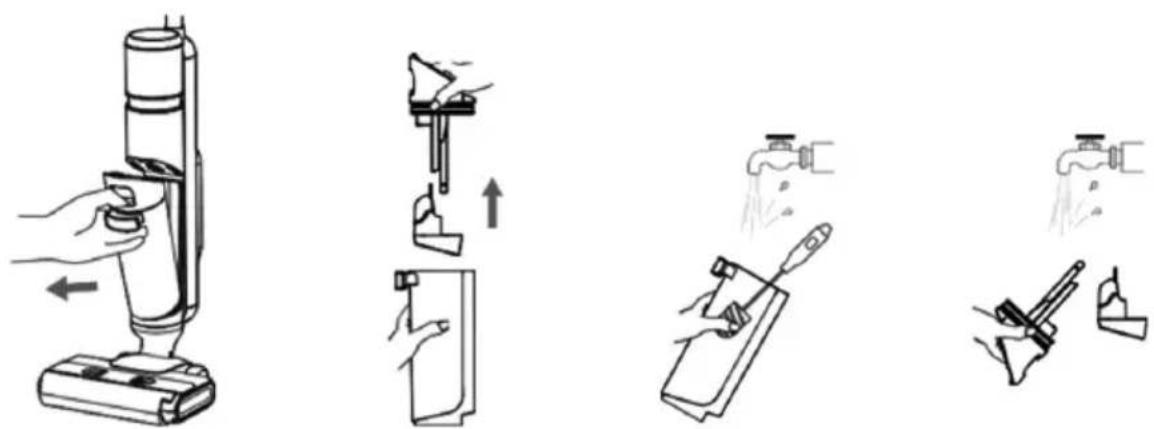
CLEAN DIRTY WATER TANK
- When the dirty water tank is full or the machine is shut down, remove the dirty water tank.
- Throw out dirty water from the dirty water tank and wash the dirty water tank with clean water.
- Wash the dirty water tank cover, HEPA and solid-liquid separator.
- Once dirty water tank cover and the HEPA get dried, assemble them and place them back into the appliance.
natural_image
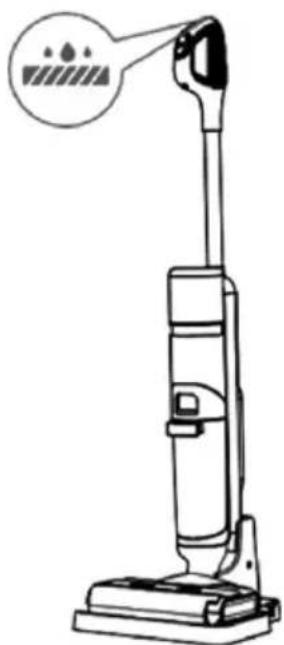
Line drawing of a vacuum cleaner with a circular icon and warning symbol (no text or labels)AUTO CLEANING MODE
- Please put the machine back to the base in time after use.
- Make sure that the water volume of the clean water tank exceeds the auto cleaning minimum water level, and the dirty water tank has no dirty water. Then press the auto cleaning button, and the machine will start auto cleaning.
- After auto cleaning, please clean the dirty water tank and dry the roller brush and HEPA in the air.
CLEANING OF SUCTION PORT OF FLOOR BRUSH AND ROLLER BRUSH COVER
- Clean the suction port of the floor brush with a cleaning brush.
- Clean the roller brush cover with a cleaning brush.
- After cleaning, reinstall the roller brush and its cover onto the machine.
natural_image
Diagram of a hand operating a mechanical device with arrows indicating motion (no text or symbols)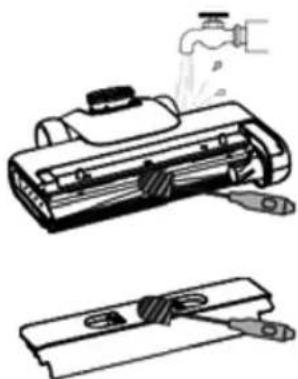
natural_image
Technical line drawing of a mechanical device with spray and clamping mechanism (no text or symbols)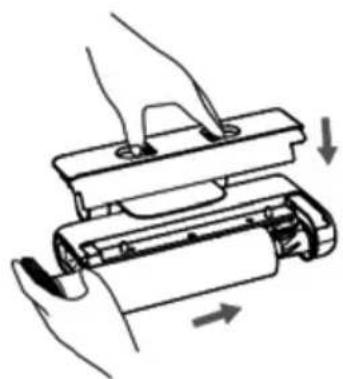
natural_image
Diagram of a hand using a mechanical device to press or install a component, showing motion arrows (no text or symbols)TIPS
- t is recommended to clean the roller brush, roller brush cover, suction port and pipeline regularly.
- After the heavy oil stains are removed by the roller brush, it is recommended to start the auto cleaning function many times to clean the roller brush and pipeline. You can also take down the roller brush after auto cleaning and soak or wash the roller brush with warm water.
7. TROUBLE SHOOTING
| Problem Possible Cause Solution | ||
| Poor working of roller brush | The roller brush is blocked Please clean | the roller brush |
| The roller brush is damaged | Please contact the authorized after-sales service center to replace the roller brush | |
| The drive belt is damaged | Please contact the authorized after-sales service center to replace the drive belt | |
| Abnormal operation of the vacuum cleaner | The roller brush, roller brush cover and dirty water tank are not installed in place | Please reinstall them |
| The suction port or pipe is blocked | Please clean the suction port or pipe | |
| The dirty water tank is full | Please take out the dirty water tank to pour out wastewater | |
| The filter port above the dirty water sensor is dirty | Please clean the filter port | |
| The HEPA is dirty or missing Please clean or install the HEPA | ||
| The roller brush is entangled by objects such as hair | Please clean the roller brush | |
| Abnormal noise when the machine is running | The dirty water tank if full | Please take out the dirty water tank to pour out wastewater |
| The suction port is blocked Please clean the suction port | ||
| The floor brush is not installed in place | Please reinstall the floor brush | |
| No water comes out when the machine is working | Water shortage in the clean water tank | Add water to the clean water tank |
| The clean water tank is not installed in place | Please reinstall it | |
| The roller brush automatically stops working | The floor brush protection device is running | Please check whether there is any foreign matter hindering the operation of the roller brush. Remove the foreign matter and reinstall it before use |
| Air outlet leakage | The HEPA is not dried after cleaning Please dry the HEPA | |
| The HEPA is not installed Please install the HEPA | ||
| Water leakage at the bottom of the roller brush | The dirty water tank or HEPA is not installed | Please install the dirty water tank or HEPA |
| The water pump is damaged | Please contact the authorized after-sales service center to replace the water pump | |
| Auto cleaning fails to start | The machine is not correctly placed in the charging dock | Please correctly place the machine to the charging dock and correctly connect the adapter |
| Clean water tank leakage | The clean water tank is damaged | Please contact the authorized after-sales service center to replace the clean water tank |
| No voice function | The voice function is turned off | Press and hold the gear switch key for 3 seconds in the Power On state |
| The speaker is damaged | Please contact the authorized after-sales service center to repair the speaker | |
| The display doesn’t lit up and there is no display | The display is damaged | Please contact the authorized after-sales service center to repair the display |
| Error: Waste Water Tank is Full | When the machine is tilted too much during operation, the waste water level exceeds the max line. | The waste water level has reached the max line, and the machine has stopped. Clean the waste water tank immediately to prevent fan damage. |
| Too much foam due to the use of non-dedicated detergent or too much detergent. | Always use the recommended detergent and measure it correctly (one capful). Too much foam can ill the waste water tank, triggering the full tank warning. | |
| Ingestion of iron-containing liquid (such as soy sauce) can lead to inaccurate water level detection. | Clean the waste water tank and the cover contacts normally, and reassemble to resume normal operation. | |
| Water entering the waste water tank cover. | Don't soak or rinse the waste water tank cover under water. Prolonged water exposure can weaken the waterproof seal, causing water to enter the cover and trigger a false full-tank error. Shake out any excess water, let the cover dry in the sun for 24 hours, and then use it again. | |

VIS IMPORTANT :
General precautions during the use of electrical equipment
CARACTÉRISTIQUES DU PRODUIT


FONCTIONS D'AFFICHAGE
natural_image
Two identical illustrations of a handheld vacuum cleaner with a left-hand rule, shown from different angles (no text or symbols)
natural_image
Technical illustration of a mechanical device with an inset showing a hand holding a tool, no text or symbols present.
natural_image
Technical illustration of a mechanical device with an inset showing a hand holding a tool, no text or symbols present.natural_image
Diagram of a mechanical assembly with hands holding a component, showing an upward arrow (no text or symbols)natural_image
Illustration of a hand using a tool to press or install a rolled document, with a downward arrow indicating compression (no text or symbols present)INSTRUCTIONS DE DÉMONTAGE ET DE REMONTAGE DE LA BROSSE À ROULEAU
natural_image
Diagram of a hand holding a cylindrical object with a directional arrow indicating movement (no text or symbols present)natural_image
Diagram of a mechanical component with directional arrows indicating movement (no text or symbols)INSTRUCTIONS D'UTILISATION
PRÉPARATION :
natural_image
Diagram of a mechanical device with an upward arrow indicating motion or force (no text or symbols present)natural_image
Illustration of a hand using a vacuum cleaner to lift a cylindrical device (no text or symbols visible)INSTRUCTIONS DE CHARGEMENT
natural_image
Technical line drawing of a mechanical assembly with a base and mounting bracket (no text or symbols)natural_image
Illustration of a vacuum cleaner with power button and hand tool (no text or symbols)NETTOYAGE ET ENTRETIEN
NETTOYAGE DU CORPS

natural_image
Line drawing of a vacuum cleaner with a circular icon and warning symbol (no text or labels)MODE NETTOYAGE AUTOMATIQUE
natural_image
Diagram of a hand pressing down on a mechanical component with directional arrows indicating movement (no text or symbols)
natural_image
Technical line drawing of a mechanical device with two views: top shows a spray bottle and internal components, bottom shows a clamping tool (no text or symbols)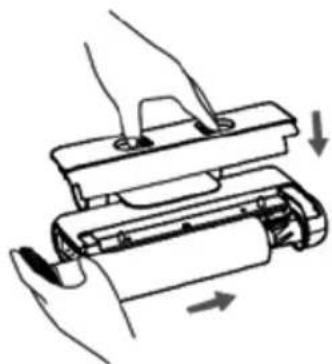
natural_image
Diagram of a hand holding a battery pack with arrows indicating motion (no text or symbols)CONSEILS


FUNÇÕES DO ECRÃ
natural_image
Two identical illustrations of a handheld vacuum cleaner with a left-hand rule, shown from different angles (no text or symbols)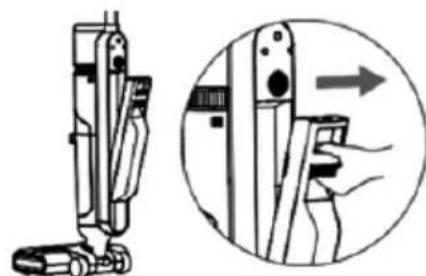
natural_image
Technical illustration of a mechanical device with an inset showing a hand holding a tool, no text or symbols present.
natural_image
Technical illustration of a mechanical device with an inset showing a hand holding a tool, no text or symbols present.natural_image
Diagram of a mechanical assembly with hands holding a component, showing an upward arrow (no text or symbols)natural_image
Line drawing of a hand using a tool to press or install a rolled-up sheet, with a downward arrow indicating compression (no text or symbols present)INSTRUÇÕES DE DESMONTAGEM E MONTAGEM DA ESCOVA DE ROLO
natural_image
Diagram of a mechanical component with a directional arrow indicating movement (no text or symbols present)natural_image
Diagram of a mechanical component with directional arrow indicating movement (no text or symbols)natural_image
Diagram of a mechanical device with an upward arrow indicating motion or force (no text or symbols present)natural_image
Illustration of a hand using a vacuum cleaner to lift a cylindrical device (no text or symbols visible)natural_image
Technical line drawing of a mechanical assembly with a base and mounting bracket (no text or symbols)natural_image
Illustration of a vacuum cleaner with power button and hand tool (no text or symbols)
natural_image
Line drawing of a vacuum cleaner with a circular icon and warning symbol (no text or labels)MODO DE LIMPEZA AUTOMÁTICA
natural_image
Diagram of a hand pressing down on a mechanical component with directional arrows indicating movement (no text or symbols)
natural_image
Technical line drawing of a mechanical device with two views: top shows a spray bottle and internal components, bottom shows a clamping tool (no text or symbols)
natural_image
Diagram of a hand holding a battery pack with arrows indicating motion (no text or symbols)DICAS


DISPLAY-FUNKTIONEN
natural_image
Two identical illustrations of a handheld vacuum cleaner with a left-hand rule, shown from different angles (no text or symbols)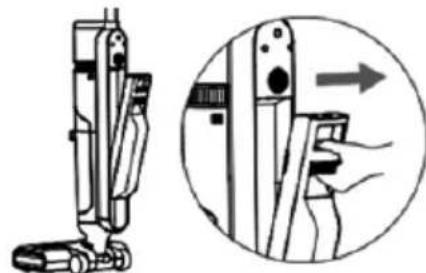
natural_image
Technical illustration of a mechanical device with an inset showing a hand holding a tool, no text or symbols present.
natural_image
Technical illustration of a mechanical device with an inset showing a hand holding a tool, no text or symbols present.natural_image
Diagram of a hand pressing down on a rolled document or paper sheet, with an upward arrow indicating motion (no text or symbols present)natural_image
Illustration of a hand using a tool to press or install a rolled document, with a downward arrow indicating compression (no text or symbols present)ANLEITUNG ZUR DEMONTAGE UND MONTAGE DER ROLLENBÜRSTE
natural_image
Diagram of a hand holding a cylindrical object with a directional arrow indicating movement (no text or symbols present)natural_image
Diagram of a mechanical component with a rotating arrow indicating motion (no text or symbols)BEDIENUNGSANLEITUNG
VORBEREITUNG:
natural_image
Illustration of a hand holding a cylindrical device with an arrow pointing to it, next to a base (no text or symbols)natural_image
Diagram of a mechanical device with an upward arrow indicating motion or force (no text or symbols present)natural_image
Technical line drawing of a mechanical assembly with a base and mounting bracket (no text or symbols)natural_image
Illustration of a vacuum cleaner with power button and hand tool (no text or symbols)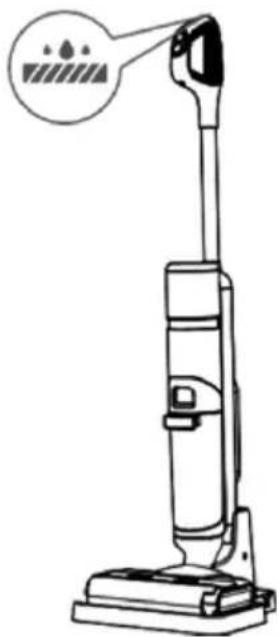
natural_image
Line drawing of a vacuum cleaner with a circular icon and warning symbol (no text or labels)natural_image
Diagram of a hand holding a mechanical device with directional arrows indicating movement (no text or symbols)
natural_image
Technical line drawing of a mechanical device with two views: top shows a spray bottle pouring liquid into a housing, bottom shows a close-up of a component with slots and a handle (no text or symbols)
natural_image
Diagram of hands assembling a battery pack with arrows indicating motion (no text or symbols)TIPPS


natural_image
Two identical line drawings of a vacuum cleaner with hands operating the lever (no text or symbols)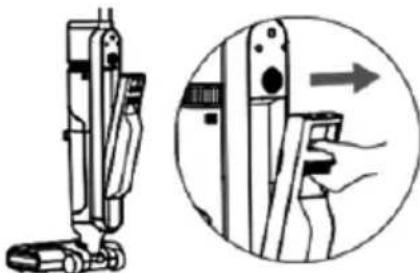
natural_image
Technical illustration of a mechanical device with an inset showing a hand holding a tool, no text or symbols present.
natural_image
Technical illustration of a mechanical device with an inset showing a close-up of its internal components (no text or symbols present)natural_image
Diagram of a mechanical assembly with a hand pressing down on a rectangular component, showing an upward arrow (no text or symbols)natural_image
Line drawing of a hand using a tool to lift a rectangular object, with an arrow indicating downward motion (no text or symbols)ISTRUZIONI DI SMONTAGGIO E MONTAGGIO DELLA SPAZZOLA A RULLO
natural_image
Diagram of a mechanical component with a directional arrow indicating movement (no text or symbols present)natural_image
Diagram of a mechanical component with directional arrows indicating movement (no text or symbols)ISTRUZIONI PER L'USO
PREPARAZIONE:
natural_image
Illustration of a hand holding a cylindrical device with an arrow indicating left motion (no text or symbols)natural_image
Diagram of a mechanical device with an upward arrow indicating motion or force (no text or symbols present)natural_image
Technical line drawing of a mechanical assembly with a base and mounting bracket (no text or symbols)natural_image
Illustration of a vacuum cleaner with power button and hand tool (no text or symbols)
natural_image
Line drawing of a vacuum cleaner with a circular icon and warning symbol (no text or labels)MODALITÀ DI AUTOPULIZIA
natural_image
Diagram of a hand holding a mechanical device with directional arrows indicating movement (no text or symbols)
natural_image
Technical line drawing of a mechanical device with two views: top shows a spray bottle pouring liquid into a housing, bottom shows a close-up of a component with slots and a handle (no text or symbols)
natural_image
Illustration of a hand using a battery pack to move or rotate (no text or symbols present)CONSIGLI


FUNKCE DISPLEJE
natural_image
Two identical illustrations of a handheld device with arrows indicating movement or force (no text or symbols)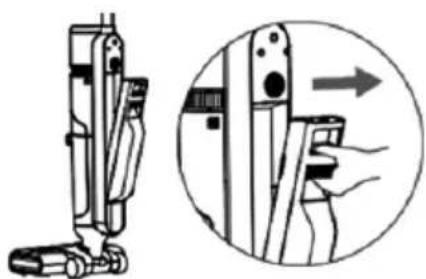
natural_image
Technical illustration of a mechanical device with a close-up view showing a hand holding a component (no text or symbols present)natural_image
Diagram of a mechanical device with hands holding a clip, showing a fold and a pull-up arrow (no text or symbols)natural_image
Line drawing of a hand pressing down on a mechanical component with a downward arrow indicating compression (no text or symbols)POKYNY PRO DEMONTÁŽ A MONTÁŽ VÁLCOVÉHO KARTÁČE
natural_image
Line drawing of a hand holding a cylindrical object with a directional arrow indicating movement (no text or symbols)
natural_image
Diagram of a hand pressing down on a cylindrical object with an arrow indicating motion (no text or symbols)NÁVOD K POUŽITÍ
PŘÍPRAVA:
natural_image
Simple line drawing of a mechanical component with an upward arrow, no text or symbols present.natural_image
Illustration of a hand using a vacuum cleaner to lift a cylindrical device (no text or symbols visible)POKYNY PRO NABÍJENÍ
natural_image
Line drawing of a mechanical assembly with a base and mounting bracket, connected to a power outlet (no text or symbols)natural_image
Illustration of a vacuum cleaner with power button and hand tool (no text or symbols)ČIŠTĚNÍ A ÚDRŽBA
ČIŠTĚNÍ TĚLA
natural_image
Line drawing of a vacuum cleaner with a circular icon and warning symbol (no text or labels)REŽIM AUTOMATICKÉHO ČIŠTĚNÍ
natural_image
Three-step diagram showing hand positioning of a battery pack, with arrows indicating movement direction (no text or symbols)TIP


DISPLAYFUNKTIONER
natural_image
Two identical illustrations of a hand using a tool to press or install a cylindrical object, with no text or symbols present.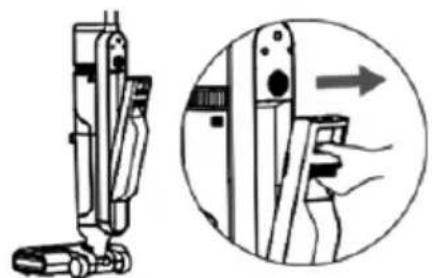
natural_image
Technical illustration of a mechanical device with an inset showing a hand holding a clip (no text or symbols present)natural_image
Diagram of a battery pack being inserted into a slot, showing internal structure and upward arrow (no text or symbols)natural_image
Line drawing of a hand pressing down on a rolled-up sheet of paper with a downward arrow indicating compression (no text or symbols)MONTERINGS- OG DEMONTERINGSINSTRUKTIONER FOR RULLEB∅RSTE
natural_image
Diagram of a mechanical component with a directional arrow indicating movement (no text or symbols present)natural_image
Diagram of a mechanical component with directional arrow indicating motion (no text or symbols)BRUGSANVISNING
FORBEREDELSE:
natural_image
Diagram of a mechanical device with an upward arrow indicating motion or force (no text or symbols present)natural_image
Technical line drawing of a mechanical assembly with a base and mounting bracket (no text or symbols)natural_image
Illustration of a vacuum cleaner with power button and hand tool (no text or symbols)RENG∅RING OG VEDLIGEHOLDELSE
RENG∅RING AF KABINET

natural_image
Line drawing of a vacuum cleaner with a circular icon and warning symbol (no text or labels)AUTOMATISK RENG∅RING
natural_image
Diagram of a hand using a mechanical device to press or install a component, showing motion arrows (no text or symbols)
natural_image
Technical line drawings of a mechanical device with spray and clamping components (no text or symbols)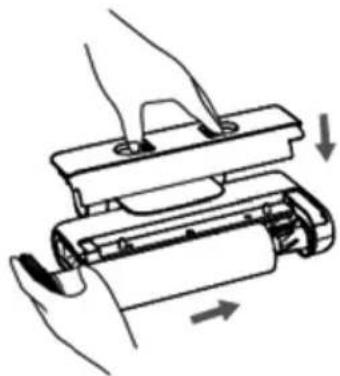
natural_image
Diagram of a hand holding a battery pack with arrows indicating motion (no text or symbols)TIPS


FUNKCIJE ZASLONA
natural_image
Two identical illustrations of a hand using a tool to press or adjust a cylindrical object, with no text or symbols present.
natural_image
Technical illustration of a mechanical device with an inset showing a hand holding a clip (no text or symbols present)natural_image
Line drawing of a mechanical device with hands operating a component, showing an upward arrow (no text or symbols)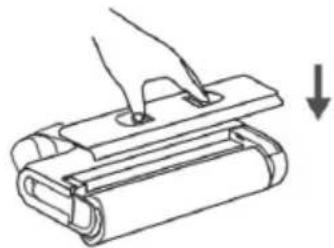
natural_image
Line drawing of a hand pressing down on a rolled document or scroll, with a downward arrow indicating compression (no text or symbols present)NAVODILA ZA RAZSTAVLJANJE IN MONTAŽO VALJČNE ŠČETKE
natural_image
Line drawing of a mechanical component with an arrow indicating direction (no text or symbols)
natural_image
Diagram of a mechanical component with an arrow indicating direction (no text or symbols present)NAVODILA ZA UPORABO
PRIPRAVA:
natural_image
Simple line drawing of a mechanical component with an upward arrow, no text or symbols presentnatural_image
Illustration of a hand holding a cylindrical device with an arrow indicating motion (no text or symbols)NAVODILA ZA POLNJENJE
natural_image
Line drawing of a mechanical assembly with a base and mounting bracket (no text or symbols)natural_image
Illustration of a vacuum cleaner with power button and hand tool (no text or symbols)ČIŠČENJE IN VZDRŽEVANJE
ČIŠČENJE OHIŠJA
- Pred čiščenjem se prepričajte, da je naprava izklopljena.
- Ohišje obrišite z vodo ali nevtralnim detergentom. Pred brisanjem se prepričajte, da je krpa suha, in ne dopustite, da bi voda pronicala v napravo.
ČIŠČENJE ZAŠČITNE POSODE ZA UMASNO VODO
- Ko je rezervoar za umazano vodo poln ali je naprava izklopljena, odstranite rezervoar za umazano vodo.
- Izpraznite umazano vodo iz rezervoarja za umazano vodo in rezervoar za umazano vodo operite s čisto vodo.
- Oprite pokrov rezervoarja za umazano vodo, HEPA filter in ločevalnik trdnih delcev in tekočin.
- Ko se pokrov rezervoarja za umazano vodo in HEPA filter posušita, ju sestavite in ponovno namestite v aparat.

natural_image
Illustration of four different cleaning or cleaning techniques using a handheld device, showing step-by-step actions (no text or symbols present)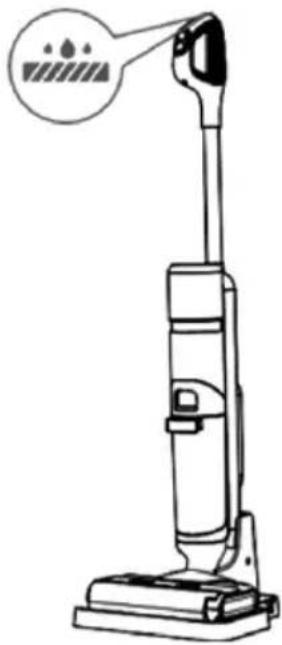
natural_image
Line drawing of a vacuum cleaner with a circular icon and warning symbol (no text or labels)NAČIN SAMODEJNEGA ČIŠČENJA
natural_image
Diagram of a hand holding a mechanical component with directional arrows indicating movement (no text or symbols)
natural_image
Technical line drawing of a mechanical device with spray and clamping mechanism (no text or symbols)
natural_image
Diagram of a hand holding a mechanical device with arrows indicating motion or force direction (no text or symbols)NASVET
natural_image
Two identical line drawings of a vacuum cleaner with hands operating the lever (no text or symbols)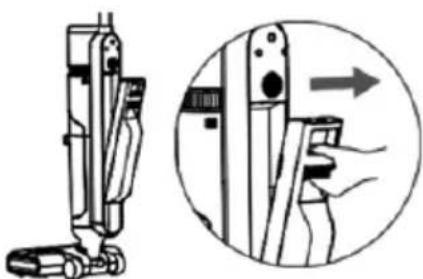
natural_image
Technical illustration of a mechanical device with an inset showing a hand holding a tool, no text or symbols present.natural_image
Diagram of a battery pack being inserted into a slot, showing internal structure and upward arrow (no text or symbols)II. Poravnaj the valjak četka poklopac s the četka za pod, pritisnite to dolje, i the valjak poklopac četke je instaliran kada jedan klikanje zvuk se čuje.
natural_image
Line drawing of a hand using a tool to lift a rectangular object on a flat surface, with a downward arrow indicating motion (no text or symbols)UPUTE ZA RASTAVLJANJE I SASTAVLJANJE VALJKASTE ČETKE
I. Shvatiti the strana ručka od the valjak četka, povlačenje to prema van i ukloniti the valjak četka.
natural_image
Diagram of a mechanical component with a directional arrow indicating movement (no text or symbols)natural_image
Diagram of a mechanical component with directional arrow indicating motion (no text or symbols)UPUTE ZA RAD
PRIPREMA:
natural_image
Simple line drawing of a mechanical component with an upward arrow, no text or symbols present.- Ponovno instaliraj the prljav voda tenk na čistač/ica u mjesto nakon sluh jedan zvuk klika.
natural_image
Illustration of a hand using a vacuum cleaner to press down a cylindrical device (no text or symbols visible)UPUTE ZA PUNJENJE
natural_image
Line drawing of a mechanical assembly with a base and mounting bracket, connected to a power outlet (no text or symbols)natural_image
Illustration of a vacuum cleaner with power button and hand tool (no text or symbols)ČIŠĆENJE I ODRŽAVANJE
OČISTITE TIJELO

natural_image
Line drawing of a vacuum cleaner with a circular icon and warning symbol (no text or labels)AUTOMATSKI NAČIN ČIŠĆENJA
- Molim staviti the stroj nazad do the baza u vrijeme nakon koristiti.
- Napraviti Naravno da the voda volumen od the čist voda tenk premašuje auto čišćenje minimum voda razina, i the prljav voda tenk ima Ne prljav voda. Zatim pritisnite the auto čišćenje gumb, i Uređaj će započeti automatsko čišćenje.
- Nakon automatskog čišćenja, očistite spremnik za prljavu vodu i osušite valjak četka i HEPA u the zrak.
ČIŠĆENJE USISNOG OTVORA ČETKE ZA POD I POKLOPCA VALJKASTE ČETKE
natural_image
Illustration of a hand holding a mechanical device with arrows indicating motion (no text or symbols)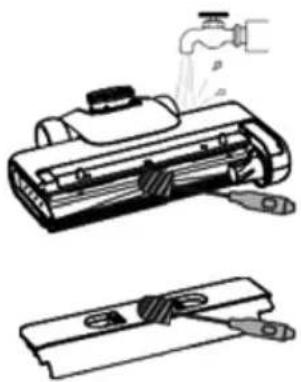
natural_image
Illustration of a cleaning tool with a faucet spraying water and a close-up of the handle (no text or symbols)
natural_image
Diagram of a hand using a mechanical device to press or install a component, showing motion arrows (no text or symbols)SAVJETI
- It je preporučeno do čist the valjak četka, valjak četka poklopac, usisavanje luka i cjevovod redovito.
- Nakon the težak ulje mrlje su uklonjeno po the valjak četka, to je preporučeno do start the automatsko čišćenje funkcija mnogi puta do čist the valjak četka i cjevovod. Vas može također uzeti dolje valjak četka nakon auto čišćenje i upiti ili pranje the valjak četka s toplo voda.
7. ORJEŠAVANJE PROBLEMA
| Problem Moguće Uzrok Otopina | ||
| Siromašno radni valjka četka | The valjak četka je blokiran Molim čist | the valjak četka |
| The valjak četka oštećen je | Molim kontakt the ovlašten postprodajna usluga centar do zamijeniti the valjak četka | |
| The pogon pojas je oštećen | Molim kontakt the ovlašten postprodajna usluga centar do zamijeniti the pogon pojas | |
| Nenormalan rad od vakuum čistač | The valjak četka, valjak poklopac četke i prljav voda tenk nisu instaliran u mjesto | Molimo vas da ih ponovno instalirate |
| The usisavanje luka ili cijev je blokiran | Molim čist the usisavanje luka ili cijev | |
| The prljav voda tenk je pun | Molim uzeti van the prljav voda tenk do sipati otpadne vode | |
| The filter luka iznad the prljava voda senzor je prljav | Molim čist the filter luka | |
| The HEPA je prljav ili nedostaje Molim | čist ili instalirati the HEPA | |
| The valjak četka je zapetljan po objektima takav kao dlaka | Molim čist the valjak četka | |
| Abnormalno buka kada the stroj je trčanje | The prljav voda tenk ako je pun | Molim uzeti van the prljav voda tenk do sipati otpadne vode |
| The usisavanje luka je blokiran Molim čist the usisavanje luka | ||
| The kat četka je ne instaliran na mjestu | Molim ponovno instaliraj the kat četka | |
| Nema vode dolazi van kada the stroj radi | Voda nedostatak u the čista voda tenk | Dodati voda do the čist voda tenk |
| The čist voda tenk je nije instalirano u mjesto | Molimo vas da ponovno instalirate | |
| The valjak četka se automatski zaustavlja radni | The kat četka zaštitni uređaj je trčanje | Molim provjeriti da li tamo je bilo koji strana tvar ometanje the operacija od the valjkasta četka. Ukloniti the strani stvar i ponovno instalirajte prije koristiti |
| Zrak utičnica propuštanje | The HEPA je ne osušen nakon čišćenja | Molim suho the HEPA |
| The HEPA je ne instaliran Molim instal | rati the HEPA | |
| Voda propuštanje na dno od valjak četka | The prljav voda tenk ili HEPA nije instaliran | Molim instalirati the prljav voda tenk ili HEPA |
| The voda pumpa je oštećen | Molim kontakt the ovlašten postprodajna usluga centar do zamijeniti the voda pumpa | |
| Auto čišćenje ne uspijeva do start | The stroj je ne ispravno postavljeno u the punjenje pristanište | Molim ispravno mjesto the stroj do punjenje pristanište i ispravno povezati adapter |
| Čist spremnik za vodu propuštanje | The čist voda tenk oštećen je | Molim kontakt the ovlašten postprodajna usluga centar do zamijeniti the čist voda tenk |
| Ne glas funkcija | The glas funkcija je okrenuo isključeno | Pritisnite i držati the oprema prekidač ključ za 3 sekunde u the Vlast Na stanje |
| The zvučnik je oštećen | Molim kontakt the ovlašten postprodajna usluga centar do popravak the zvučnik | |
| The prikaz ne svijetli i tamo je bez prikaza | The prikaz je oštećen | Molim kontakt the ovlašten postprodajna usluga centar do popravak the prikaz |
| Pogreška: Otpadne vode Tenk je Puno | Kada the stroj je nagnut previše tijekom operacija, otpad voda razina premašuje maksimum linija. | The gubljenje voda razina ima dosegao the maksimalna linija, i the stroj ima zaustavljen. Čist otpad voda tenk odmah do spriječiti oštećenje ventilatora . |
| Previše mnogo pjena zbog do the koristiti neposvećenih deterdžent ili previše mnogo deterdžent. | Uvijek koristiti the preporučeno deterdžent i mjeri to ispravno (jedan puna kapa). Previše puno pjene može bolestan the gubljenje voda tenk, pokretanje pun tenk upozorenje. | |
| Gutanje od tekućina koja sadrži željezo (kao što kao soja umak) može voditi do netočan voda detekcija razine. | Čist the gubljenje voda tenk i the kontaktne ploče za pokrivanje normalno, i ponovno sastaviti do nastaviti normalno operacija. | |
| Voda ulazak the otpadne vode tenk poklopac. | Nemoj upiti ili ispiranje the gubljenje voda poklopac spremnika pod voda. Dugotrajno voda izloženost može oslabiti the vodootporan pečat, uzrokujući vodu do ući the poklopac i okidač jedan lažni puni spremnik pogreška. Tresti van bilo koji višak voda, neka poklopac suho u the sunce za 24 sati, i zatim upotrijebite to opet. | |

AŻNA UWAGA:


FUNKCJE WYŚWIETLACZA
natural_image
Two identical line drawings of a vacuum cleaner with hands operating the lever (no text or symbols)
natural_image
Technical illustration of a mechanical device with an inset showing a hand holding a tool, no text or symbols present.
natural_image
Technical illustration of a mechanical device with an inset showing a close-up of its internal components (no text or symbols present)natural_image
Diagram of a mechanical assembly with hands holding a component, showing an upward arrow (no text or symbols)natural_image
Illustration of a hand using a tool to press or install a rolled document, with a downward arrow indicating compression (no text or symbols present)INSTRUKCJA DEMONTAŻU I MONTAŻU SZCZOTKI ROLKOWEJ
natural_image
Diagram of a mechanical component with a directional arrow indicating movement (no text or symbols present)natural_image
Diagram of a mechanical component with directional arrow indicating movement (no text or symbols)INSTRUKCJA OBSŁUGI
PRZYGOTOWANIE:
natural_image
Illustration of a hand using a handheld device to press or install a cylindrical object, with no visible text or symbols.natural_image
Diagram of a mechanical device with an upward arrow indicating motion or force (no text or symbols present)natural_image
Illustration of a hand using a handheld device to press or install a cylindrical object, with an arrow indicating motion (no text or symbols present)INSTRUKCJA LADOWANIA

natural_image
Technical line drawing of a mechanical assembly with a base and mounting bracket (no text or symbols)natural_image
Illustration of a vacuum cleaner with power button and hand tool (no text or symbols)CZYSZCZENIE I KONSERWACJA
CZYSZCZENIE KORPUSU

natural_image
Line drawing of a vacuum cleaner with a circular icon and warning symbol (no text or labels)TRYB AUTOMATYCZNEGO CZYSZCZENIA
natural_image
Diagram of a hand pressing down on a mechanical component with directional arrows indicating movement (no text or symbols)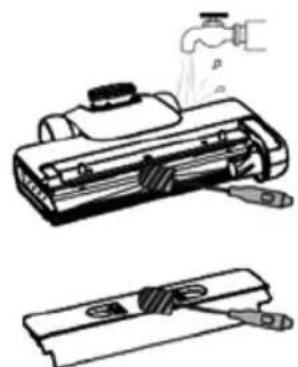
natural_image
Technical line drawing of a mechanical device with two views: top shows a spray bottle and internal components, bottom shows a cutaway view of a component (no text or symbols)
natural_image
Diagram of hands assembling a battery pack with arrows indicating motion (no text or symbols)WSKAZÓWKI
natural_image
Two identical line drawings of a vacuum cleaner with hands operating the lever (no text or symbols)
natural_image
Technical illustration of a mechanical device with an inset showing a hand holding a tool, no text or symbols present.
natural_image
Technical illustration of a mechanical device with an inset showing a close-up of its internal components (no text or symbols present)natural_image
Diagram of a mechanical assembly with a hand pressing down on a rectangular component, showing an upward arrow (no text or symbols)natural_image
Line drawing of a hand using a tool to lift a rectangular object, with a downward arrow indicating motion (no text or symbols)INSTRUCTIUNI DE DEMONTARE SI ASAMBLARE A PERIEI CU ROL
natural_image
Diagram of a mechanical component with a directional arrow indicating movement (no text or symbols present)natural_image
Diagram of a mechanical component with directional arrows indicating movement (no text or symbols)INSTRUCTIUNI DE UTILIZARE
PREGĂTIRE:
natural_image
Diagram of a mechanical device with an upward arrow indicating motion or force (no text or symbols present)natural_image
Illustration of a hand using a handheld device to press or install a cylindrical device (no text or symbols visible)INSTRUCTIUNI DE INCARCARE

natural_image
Line drawing of a mechanical assembly with a base and mounting bracket, connected to a power outlet (no text or symbols)natural_image
Illustration of a vacuum cleaner with power button and hand tool (no text or symbols)
natural_image
Line drawing of a vacuum cleaner with a circular icon and warning symbol (no text or labels)MOD DE CURĂȚARE AUTOMATĂ
natural_image
Diagram of a hand pressing down on a mechanical component with directional arrows indicating movement (no text or symbols)
natural_image
Technical illustration of a mechanical device with a spray bottle and two views of the component (no text or symbols)
natural_image
Diagram of a hand using a battery pack to move or rotate, showing internal components and directional arrows (no text or symbols)SFATURI


ФУНКЦІЇ ДИСПЛЕЯ
natural_image
Two identical line drawings of a vacuum cleaner with hands operating the lever (no text or symbols)
natural_image
Technical illustration of a mechanical device with an inset showing a hand holding a tool, no text or symbols present.
natural_image
Technical illustration of a mechanical device with an inset showing a close-up of its internal components (no text or symbols present)natural_image
Diagram of a mechanical assembly with hands holding a component, showing an upward arrow (no text or symbols)natural_image
Line drawing of a hand pressing down on a rolled document or scroll, with a downward arrow indicating compression (no text or symbols present)natural_image
Diagram of a mechanical component with a directional arrow indicating movement (no text or symbols present)natural_image
Diagram of a mechanical component with directional arrow indicating movement (no text or symbols)natural_image
Illustration of a hand holding a cylindrical device with an arrow indicating left motion (no text or symbols)natural_image
Diagram of a mechanical device with an upward arrow indicating motion or force (no text or symbols present)natural_image
Diagram showing a mechanical device before and after assembly, with no visible text or symbolsnatural_image
Line drawing of a mechanical assembly with a base and mounting bracket (no text or symbols)natural_image
Illustration of a vacuum cleaner with power button and hand tool (no text or symbols)
natural_image
Line drawing of a vacuum cleaner with a circular icon and warning symbol (no text or labels)natural_image
Diagram of a hand pressing down on a mechanical component with directional arrows indicating movement (no text or symbols)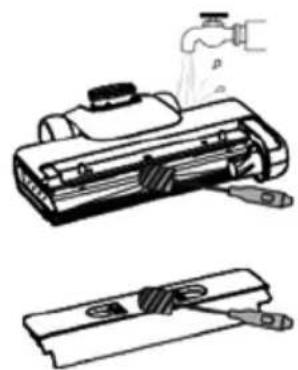
natural_image
Technical line drawing of a mechanical device with two views: top shows a spray bottle and internal components, bottom shows a flat plate assembly (no text or symbols)
natural_image
Diagram of a hand pressing down on a mechanical component with directional arrows indicating motion (no text or symbols)ПІДКАЗКИ
natural_image
Two identical line drawings of a handheld device with a left-hand rule, showing the process (no text or symbols)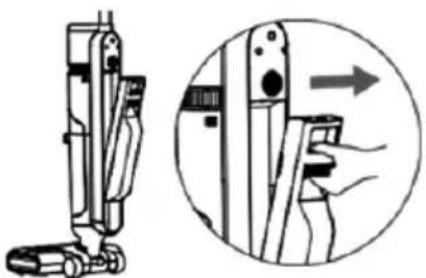
natural_image
Technical illustration of a mechanical device with an inset showing a hand holding a tool, no text or symbols present.natural_image
Diagram of a mechanical assembly with hands holding a component, showing an upward arrow (no text or symbols)natural_image
Line drawing of a hand using a tool to lift a rectangular object on a flat surface, with a downward arrow indicating motion (no text or symbols)INSTRUCCIONS DE DESMUNTATGE I MUNTATGE DEL RASPALL DE CORRÓ
I. Subjecti el mànec lateral del raspall giratori, tiri d'ell cap a fora i retiri el raspall giratori.

natural_image
Diagram of a mechanical component with a directional arrow indicating movement (no text or symbols present)natural_image
Diagram of a mechanical component with directional arrow indicating motion (no text or symbols)natural_image
Illustration of a hand using a handheld device to press or install a cylindrical object, with no visible text or symbols.natural_image
Diagram of a mechanical device with an upward arrow indicating motion or force (no text or symbols present)natural_image
Illustration of a hand using a vacuum cleaner to press or install a cylindrical device (no text or symbols visible)INSTRUCCIONS DE CÀRREGA
natural_image
Technical line drawing of a mechanical assembly with a base and mounting bracket (no text or symbols)natural_image
Illustration of a vacuum cleaner with power button and hand holding tip (no text or symbols)NETEJA I MANTENIMENT
NETEJA DEL COS

natural_image
Line drawing of a vacuum cleaner with a circular icon and warning symbol (no text or labels)MODE D'Autoneteja
natural_image
Illustration of three-step battery assembly process showing hand positioning, valve insertion, and disassembly (no text or symbols)CONSELLS
DÉCLARATION DE CONFORMITÉ
DECLARATION OF CONFORMITY
This device complies with EU Low Voltage Directive 2014/35/EC.
Electromagnetic Compatibility Directive 2014/30/EU. Directive 2015/863/EU on the restriction of the use of certain hazardous substances in electrical.
Directive 2009/125/EC on the eco-design requirements applicable to energy-related products.

This symbol on the product or on the packaging indicates that this product can't be disposed as normal rubbish or household waste. All the electrical, electronic equipment's and battery-operated units must recycle in proper manner and according to the local municipal laws. You can recycle them by taking them to government authorized disposal centres or specialized bins which you can find in any nearby big super markets, electronics or electro domestics products stores or malls who have these types of facilities available.
Designed by: SOGO based on European quality standards Imported by: Sanysan Appliances S.L, NIF: B98753056, C/ Barcas 2, 2, 46002 Valencia, Spain Product manufactured in CHINA. After-sales service: www.sogosat.com sogosat@sogosat.com / 0034 902 222 161