
SS-16010 - Vacuum Cleaner Sogo - Free user manual and instructions
Find the device manual for free SS-16010 Sogo in PDF.


| Type | Handheld Vacuum Cleaner |
| Brand | Sogo |
| Model | SS-16010 |
| Power | 50 W |
| Battery Type | 7.2 V Ni-MH rechargeable |
| Charging Time | 10 hours (minimum) |
| Adapter Input | 230 V~50 Hz |
| Adapter Output | 9 V DC, 200 mA |
| Suction Type | Wet and dry |
| Accessories Included | Brush tool, Crevice tool, Squeegee |
| Filter Type | Washable cloth filter |
| Filter Maintenance | Shake or wash with water; dry thoroughly before reassembly |
| Cordless | Yes |
| Rechargeable | Yes |
| Handheld Design | Yes |
| Suitable For | Home, car, and similar places |
| Safety Features | Do not immerse in water; do not vacuum hot ashes or flammable liquids |
| Charger Mounting | Wall-mountable or table stand |
Frequently Asked Questions - SS-16010 Sogo
User questions about SS-16010 Sogo
0 question about this device. Answer the ones you know or ask your own.
Ask a new question about this device
Download the instructions for your Vacuum Cleaner in PDF format for free! Find your manual SS-16010 - Sogo and take your electronic device back in hand. On this page are published all the documents necessary for the use of your device. SS-16010 by Sogo.
USER MANUAL SS-16010 Sogo

manual de instrucciones instructions for use
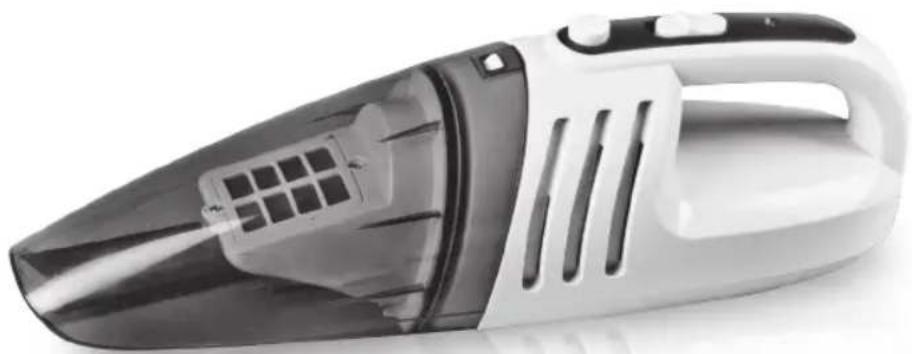
Aspirador de mano Handheld vacuum cleaner
(Fig. 2)

(Fig. 3)
(Fig. 4)

(Fig. 5)
(Fig. 7)
Aspirar el líquido
(Fig. 11)

(Fig. 12)
ALMACENAMIENTO
MEDIO AMBIENTE
Instructions for use
Dear Customer, Please read this instruction manual carefully.
It is a cordless handy rechargeable vacuum cleaner.
It is wet and dry, can suck up dust and water easily.
It is very convenient for home, car or any similar places.
GENERAL DESCRIPTION

A. Dust compartment
B. Dust compartment release button.
C. On/off slide
D. Charging light(LED)
E. Exhaust air openings
F. Charge base
G. Filter unit
H. Brush tool
I. Crevice tool
J. Squeegee
k. AC Adaptor
TECHNICAL INFORMATION
Battery used in this unit: 7.2 V Ni-MH 50W Power
Adapter AC input: 230V\~50Hz Output: 9V = 200mA
IMPORTANT
Read this user manual carefully before you use the appliance and save it for future reference.
Danger
- Never suck up flammable substances or corrosive liquids and do not suck up ashes until they are cold.
- Never immerse the vacuum cleaner or the charger in water.
Warning
- Check if the voltage indicated on the appliance corresponds to the local mains voltage before you connect the appliance.
- Do not use the appliance if the plug, the mains cord or other parts are damaged.
- If the cord of the adaptor is damaged, it cannot be replaced and the adaptor must be discarded.
- The adaptor and the charger of this appliance cannot be replaced. If the adaptor or charger is damaged, the appliance must be discarded.
- This appliance is not intended for use by persons (including children) with reduced physical, sensory or mental capabilities or lack of experience and knowledge, unless they have been given supervision or instruction concerning use of the appliance by a person responsible for their safety.
- Children should be supervised to ensure that they do not play with the appliance
Caution
- Remove the adaptor from the wall socket before you clean the charger.
- Only charge the vacuum cleaner with the adaptor and the charger supplied. During charging, the adaptor feels warm to the touch. This is normal.
- Do not hold the appliance with the dust compartment pointing upwards and do not tilt the appliance to one side when you suck up liquids.
- Always switch off the vacuum cleaner after use.
- The voltage on the contact strips in the charger is low and therefore not dangerous.
- Never block the exhaust air openings during vacuuming.
- Switch off the appliance when you recharge it.
- Always use the vacuum cleaner with the filter unit assembled.
- When you have used the appliance to suck up liquids, empty and dry the dust compartment before you store the appliance in the charger.
- To avoid the risk of electric shock, be careful when you drill holes in the wall to attach the charger, specially close to a wall socket.
PREPARING FOR USE
Installing the charger
-
Attach the charger to the wall as shown(Fig.2). If you attach the charger to the wall, the space between the screw holes has to be 3.7 cm.
-
You can also place the charger on a horizontal surface(e.g.a table or desk)(Fig. 3)

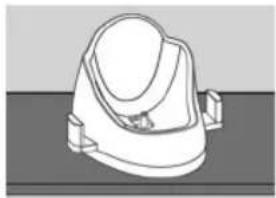
(Fig. 3)(Fig. 2)
Charging the appliance
Charge the appliance for at least 10 hours every time when the appliance runs out of power.
-
Make sure the appliance is switched off.
-
Put the adaptor in the wall socket.
-
Place the vacuum cleaner on the charger (Fig.4). The charging light goes on to indicate that the appliance is in charging(Fig.5)
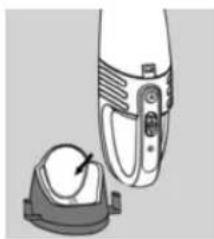

(Fig. 5)(Fig. 4)
Note: The charging light stays on as long as the appliance is in the plugged-in charger. Note: The charging light does not give any information about the battery charge level of the vacuum cleaner.
(Fig. 6)
USING THE APPLIANCE
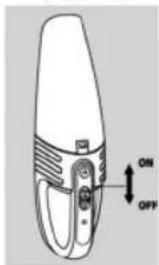
- Push the on/off slide forwards to the switch on the appliance.
- Push the on/off slider backwards to switch off the appliance (Fig.6).
Accessories
The appliance comes with the following accessories:
- a brush tool to clean delicate surfaces; - a crevice tool to vacuum corners or narrow
gaps;
- a squeegee to suck up liquid.
- Take the accessory you want to use.
- Attach the accessory to the nozzle of the appliance. (Fig.7)

(Fig. 7)
Sucking up liquid
Connect the squeegee to the appliance.
- Hold the appliance with the nozzle pointing downwards at an angle of 30° .
Note: Never hold the appliance with the nozzle pointing upwards when there is liquid in the dust compartment.
Note: Do not tilt the appliance to one side or shake the appliance when there's liquid in the dust compartment.
- Place the squeegee on the surface to be cleaned.
Make sure the squeegee stays in contact with the surface.
-
Suck up liquid: Stop sucking up liquid when the liquid level inside the dust compartment has reached the maximum indication.
-
Empty and dry the dust compartment each time you have used the appliance to suck up a liquid.
Cleaning
When you have used the appliance to suck up liquid always empty and dry the dust compartment after use. Clean the appliance with a damp cloth.
- Hold the appliance over a dust bin, press the dust compartment release button(1) and remove the dust compartment(2). (Fig.8)
-
Remove the filter unit from the main body(Fig.9).
-
Empty the dust compartment by shaking it with the free hand(Fig.10). If necessary, clean the dust compartment with a damp cloth. Make sure you empty and clean the dust compartment regularly.
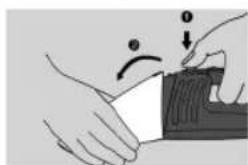
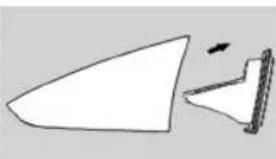
(Fig. 8) (Fig. 9)

(Fig. 10)
Note: If there is liquid in the dust compartment, empty the dust compartment and wipe it dry.
- Clean the filter unit: Take out the filter unit from the dust compartment shake it over a dust bin to release the dust. If necessary, clean the filter unit with a damp cloth, clean the filter unit with a brush or with a normal vacuum cleaner if it is very dirty.
Note: If necessary, you can clean the filter unit in cold or lukewarm water. Dry the filter thoroughly before you assemble it to the dust compartment.
-
Put the filter unit back to the dust compartment (Fig.11).
-
To re-attach the dust compartment, align the slot on the dust compartment with the projection on the appliance. First attach the bottom of the dust compartment(1) and then push the top of the dust compartment towards the appliance(2) until it locks into place("click")(Fig.12)

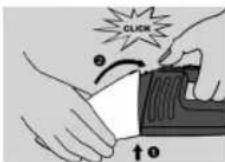
(Fig. 11) (Fig. 12)
STORAGE
You can store the vacuum cleaner and the accessories on the charger.
REPLACEMENT
The filter cloth is everlasting. You can wash it. But after long time use, maybe the filtration is not that good. You can replace the filter cloth after a prolonged period of use or if you can no longer clean it properly.
Replacing the filter cloth
-
Remove the filter unit from the dust compartment.
-
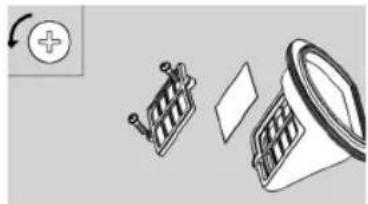
Undo the screw of the filter plastic cover. (Fig 13)
-
Gently take off the filter cloth and place a new filter cloth.
-
Do the screw of the filter cover back and fix it properly.
-
Put the filter unit back into the dust compartment.
Note: Make sure you screw the filter cover in right position and insert the filter unit in correct way.
ENVIRONMENT
- Do not throw away the appliance with the normal household waste at the end of its life, but hand it in at an official collection point for recycling. By doing this, you help to preserve the environment.
- The built-in rechargeable batteries contain substances that may pollute the environment. Remove the batteries when you discard the appliance. Do not throw away the batteries with the normal household waste, but hand them in at an official collection point.
Saving energy
If you are not going to use the appliance for a longer period of time, remove the adaptor from the wall socket to save energy.
Disposing of the rechargeable batteries
Ni-MH batteries may explode when exposed to high temperatures or fire.
Only remove the rechargeable batteries if they are completely empty.
Remove the rechargeable batteries in the following way:
- Let the vacuum cleaner run until it stops, undo the screws and open the vacuum cleaner.(Fig 14)
- Cut the connecting wires one by one and remove the batteries.(Fig 15)
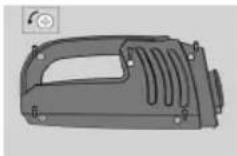
(Fig. 14)
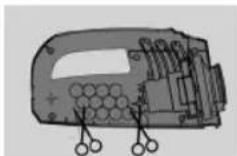
(Fig. 15)
TROUBLE SHOOTING
This chapter summarizes the most common problems you could encounter with your vacuum cleaner. Please read the different sections for more details.
| Problem | Solution |
| The appliance does not work The You may not have put socket. Put the adaptor prop the charger. Make sure the appl | batteries may be low. Recharge the batteries. |
| the adaptor properly in the wall erly in the wall socket. | |
| The appliance may have been switched on while it wa you charge it. | |
| The charging light does Make sure that the adaptor is inserted properly in not go on the wall socket and that the appliance is switched off. | |
| The vacuum cleaner does The dust compartment may not be attached properly not vacuum properly to the appliance. Attach the dust compartment properly to the appliance. and the outer filter(See the chapter "Cleaning") | |
| Dust escapes from the dust compartment may be full. Empty the dust compartment. | |
| The dust compartment may be full. Empty the dust compartment. | |
| The dust compartment may not be attached properly to the appliance. Attach the dust compartment properly to the appliance. | |
| Perpahs the filter unit is not placed properly in the dust compartment. Place the filter unit properly in the dust compartment. | |
| The dust compartment may be full. Empty the dust compartment. | |
| The dust compartment may be full. Empty the dust compartment. | |
| The dust compartment may be full. Empty the dust compartment. | |
| The dust compartment may be full. Empty the dust compartment. | |
| Theracceosory is clogged. Remove the obstructio from the accessory. | |
| The dust compartment may be full. Empty the dust compartment. | |
| The dust compartment may be full. Empty the dust compartment. | |
| The dust compartment may be full. Empty the dust compartment. | |
| The dust compartment may be full. Empty the dust compartment. | |
| The dust compartment may be full. Empty the dust compartment. | |
| The dust compartment may be full. Empty the dust compartment. | |
| The dust compartment may be full. Empty the dust compartment. | |
| The dust compartment may be full. Empty the dust compartment. | |
| The dust compartment may be full. Empty the dust compartment. | |
| The dust compartment may be full. Empty the dust compartment. | |
| The dust compartment may be full. Empty the dust compartment. | |
| The dust compartment may be full. Empty the dust compartment. | |
| The dust compartment may be full. Empty the dust compartment. | |
| The dust compartment may be full. Empty the dust compartment. | |
| The dust compartment may be full. Empty 100% of the dust compartment. | |
| The dust compartment may be full. Empty 100% of the dust compartment. | |
| The dust compartment may be full. Empty 100% of the dust compartment. | |
| The dust compartment may have been switched on while it was not being connected. Empty the dust compartment is not being connected. Empty the dust compartment is not being connected. Empty the dust compartment is not being connected. Empty the dust compartment is not being connected. Empty the dust compartment is not being connected. Empty the dust compartment is not being connected. Empty the dust compartment is not being connected. Empty the dust compartment is not being connected. Empty the dust compartment is not being connected. Empty the dust compartment is not being connected. Empty the dust compartment is not being connected. Empty the dust compartment is no longer. Empty the dust compartment is no longer. Empty the dust compartment is no longer. Empty the dust compartment is no longer. Empty the dust compartment is no longer. Empty the dust compartment is no longer. Empty the dust compartment is no longer. Empty the dust compartment is no longer. Empty the dust compartment is no longer. Empty the dust compartment is no longer. Empty the dust compartment is no longer. Empty the dust compartment is no longer. Empty the dust compartment is no longer. Empty the dusty compartment is no longer. Empty the dust compartment is no longer. Empty the dust compartment is no longer. Empty the dust compartment is no longer. Empty the dust compartment is no longer. Empty the dust compartment is no longer. Empty the dust compartment is no longer. Empty the dust compartment is no longer. Empty the dust compartment is no longer. Empty the dust compartment is no longer. Empty the dust compartment is no longer. Empty the dust compartment is no longer. Empty the dust compartment is no Longer. Empty the dust compartment is no longer. Empty the dust compartment is no longer. Empty the dust compartment is no longer. Empty the dust compartment is no longer. Empty the dust compartment is no longer. Empty the dust compartment is no longer. Empty the dust compartment is no longer. Empty the dust compartment is no longer. Empty the dust compartment is no longer. Empty the dust compartment is no longer. Empty the dust compartment is no longer. Empty the dust compartment is no longer. Empty the Dust compartment is no longer. Empty the dust compartment is no longer. Empty the dust compartment is no longer. Empty the dust compartment is no longer. Empty the dust compartment is no longer. Empty the dust compartment is no longer. Empty the dust compartment is no longer. Empty the dust compartment is no longer. Empty the dust compartment is no longer. Empty the dust compartment is no longer. Empty the dust compartment is no longer. Empty the dust compartment is no longer. Empty the dust compartment is no shorter. Empty the dust compartment is no longer. Empty the dust compartment is no longer. Empty the dust compartment is no longer. Empty the dust compartment is no longer. Empty the dust compartment is no longer. Empty the dust compartment is no longer. Empty the dust compartment is no longer. Empty the dust compartment is no longer. Empty the dust compartment is no longer. Empty the dust compartment is no longer. Empty the dust compartment is no longer. Empty the dust compartment is no longer. Empty the dust compartment is no longer. Empty the dust compartment is no longer. Empty the dust compartment is no longer. Empty the dust compartment is no longer. Empty the dust compartment is no longer. Empty the dust compartment is no longer. Empty the dust compartment is no longer. Empty the dust compartment is no longer. Empty the dust compartment is no longer. Empty the dust compartment is no longer. Empty the dust compartment is no longer. Empty the dust compartment is no longer. Empty the dust compartment is no long. Empty the dust compartment is no longer. Empty the dust compartment is no longer. Empty the dust compartment is no longer. Empty the dust compartment is no longer. Empty the dust compartment is no longer. Empty the dust compartment is no longer. Empty the dust compartment is no longer. Empty the dust compartment is no longer. Empty the dust compartment is no longer. Empty the dust compartment is no longer. Empty the dust compartment is no longer. Empty the dust compartment is no longer. Empty the dist compartment is no longer. Empty the dust compartment is no longer. Empty the dust compartment is no longer. Empty the dust compartment is no longer. Empty the dust compartment is no longer. Empty the dust compartment is no longer. Empty the dust compartment is no longer. Empty the dust compartment is no longer. Empty the dust compartment is no longer. Empty the dust compartment is no longer. Empty the dust compartment is no longer. Empty the dust compartment is no longer. Empty the dust compartment is no longest. Empty the dust compartment is no longer. Empty the dust compartment is no longer. Empty the dust compartment is no longer. Empty the dust compartment is no longer. Empty the dust compartment is no longer. Empty the dust compartment is no longer. Empty the dust compartment is no longer. Empty the dust compartment is no longer. Empty the dust compartment is no longer. Empty the dust compartment is no longer. Empty the dust compartment is no longer. Empty the dust compartment is no longer. Empty the duct compartment is no longer. Empty the dust compartment is no longer. Empty the dust compartment is no longer. Empty the dust compartment is no longer. Empty the dust compartment is no longer. Empty the dust compartment is no longer. Empty the dust compartment is no longer. Empty the dust compartment is no longer. Empty the dust compartment is no longer. Empty the dust compartment is no longer. Empty the dust compartment is no longer. Empty the dust compartment is no longer. Empty the dust compartment is no larger. Empty the dust compartment is no larger. Empty the dust compartment is no larger. Empty the dust compartment is no larger. Empty the dust compartment is no larger. Empty the dust compartment is no larger. Empty the dust compartment is no larger. Empty the dust compartment is no larger. Empty the dust compartment is no larger. Empty the dust compartment is no larger. Empty the dust compartment is no larger. Empty the dust compartment is no larger. Empty the dust compartment is no larger. Empty the dust compartment is no longer. Empty the dust compartment is no longer. Empty the dust compartment is no longer. Empty the dust compartment is no longer. Empty the dust compartment is no longer. Empty the dust compartment is no longer. Empty the dust compartment is no longer. Empty the dust compartment is no longer. Empty the dust compartment is no longer. Empty the dust compartment is no longer. Empty the dust compartment is no longer. Empty the dust compartment is no longer. Empty 100% of the dust compartment is no longer. Empty the dust compartment is no longer. Empty the dust compartment is no longer. Empty the dust compartment is no longer. Empty the dust compartment is no longer. Empty the dust compartment is no longer. Empty the dust compartment is no longer. Empty the dust compartment is no longer. Empty the dust compartment is no longer. Empty the dust compartment is no longer. Empty the dust compartment is no longer. Empty the dust compartment is no longer. Empty the dust compartment (no longer) Empty the dust compartment is no longer. Empty the dust compartment is no longer. Empty the dust compartment is no longer. Empty the dust compartment is no longer. Empty the dust compartment is no longer. Empty the dust compartment is no longer. Empty the dust compartment is no longer. Empty the dust compartment is no longer. Empty the dust compartment is no longer. Empty the dust compartment is no longer. Empty the dust compartment is no longer. Empty the dust compartment is no longer. Empty the dust, | |
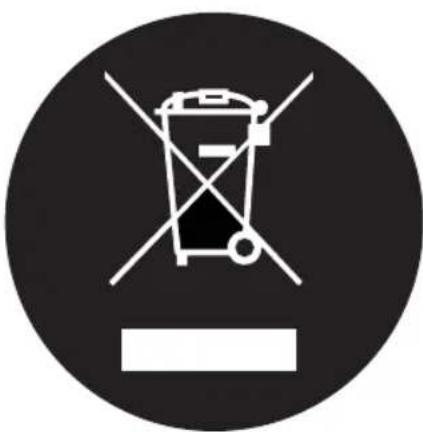
"The Disposal of Electrical and Electronic Equipment Waste Products on the part of Final users in The European Union"
This symbol on the product or on the container indicates that this product cannot be eliminated with the general waste. The user is responsible for eliminating this kind of waste by throwing them away at a “recycling point” specifically for electrical and electronic waste. Selective collection and electrical equipment recycling contribute to preserve natural resources and warrant waste recycling to protect environment and health. In order to receive further information about electrical and electronic waste collecting and recycling, contact your Local Council, the service of household waste or the establishment where the product was acquired.”
SOGO®
Human Technology

- MANUAL DE INSTRUCCIONES INSTRUCTIONS FOR USE
- ASPIRADOR DE MANO HANDHELD VACUUM CLEANER
- ASPIRAR EL LÍQUIDO
- ALMACENAMIENTO
- MEDIO AMBIENTE
- INSTRUCTIONS FOR USE
- TECHNICAL INFORMATION
- IMPORTANT
- DANGER
- WARNING
- CAUTION
- PREPARING FOR USE
- INSTALLING THE CHARGER
- CHARGING THE APPLIANCE
- USING THE APPLIANCE
- ACCESSORIES
- SUCKING UP LIQUID
- CLEANING
- STORAGE
- REPLACEMENT
- REPLACING THE FILTER CLOTH
- ENVIRONMENT
- SAVING ENERGY
- DISPOSING OF THE RECHARGEABLE BATTERIES
- TROUBLE SHOOTING
- THE DISPOSAL OF ELECTRICAL AND ELECTRONIC EQUIPMENT WASTE PRODUCTS ON THE PART OF FINAL USERS IN THE EUROPEAN UNION
- SOGO®
Brand : Sogo
Model : SS-16010
Category : Vacuum Cleaner