
RoQuick 35957 - Welding machine ROTHENBERGER - Free user manual and instructions
Find the device manual for free RoQuick 35957 ROTHENBERGER in PDF.

| Product type | Soldering gun (soldering machine) |
| Brand | Rothenberger |
| Model | RoQuick 35957 |
| Rated power | 100 W |
| Rated voltage | 230 V ~ / 50 Hz |
| Weight | Approximately 1 kg |
| Protection class | II |
| Lighting lamp | 2.2 V / 0.5 W |
| Tip material | Metal (not specified, but standard copper) |
| Main applications | Soldering of electrical cables, printed circuit boards, repair of small electronic devices, desoldering, tinning, models |
| Maximum heating time | 30 seconds, then 30 seconds of cooling |
| Starting system | Trigger (trigger switch) |
| Soldering tips | Interchangeable, nozzle screw fixing |
| Maintenance | Regular cleaning of the tip on a wet sponge; cleaning the machine with a soft cloth, no aggressive detergents |
| Repairability | Only the manufacturer or a qualified electrician can replace the cable or perform repairs |
| Available spare parts | Soldering tips, power cable |
| Safety | Wear goggles and gloves; do not touch hot metal parts; use in a ventilated area; do not immerse the tip in water; respect the heating/cooling cycles |
| Recommended solder type | Multi-core solder |
| Indoor use only | Yes |
| Country of manufacture | Not specified (probably China or EU) |
| EU directives | 2006/95/EC (low voltage), 2004/108/EC (EMC), RoHS |
| Harmonized standards | EN 60335-1:2002+A11+A1+A12+A2+A13:2008; EN 60335-2-45:2002+A1:2008; EN 62233:2008 |
Frequently Asked Questions - RoQuick 35957 ROTHENBERGER
User questions about RoQuick 35957 ROTHENBERGER
0 question about this device. Answer the ones you know or ask your own.
Ask a new question about this device
Download the instructions for your Welding machine in PDF format for free! Find your manual RoQuick 35957 - ROTHENBERGER and take your electronic device back in hand. On this page are published all the documents necessary for the use of your device. RoQuick 35957 by ROTHENBERGER.
USER MANUAL RoQuick 35957 ROTHENBERGER
VERWENDUNGSZWECK
natural_image
Close-up of a mechanical component with a black arrow pointing to a curved line (no text or symbols visible)natural_image
Close-up of a mechanical component with an arrow pointing to a curved section (no visible text or symbols)Read carefully and keep for future reference

100 W Soldering gun set
art. no. 035957
SYMBOLS USED IN THIS MANUAL


= Wear eye protection

= Wear protective gloves

= Read the operating Manual
Safety instructions for the soldering gun


- The metal parts of the machine become extremely hot during operation. Never touch the metal parts and hold the machine only by the handle.
- Ensure that the tip is securely fastened in the tip holders before starting work. Check that the tip holder screws are tight.
- Plan your work carefully and prepare a safe place to put the machine down after work. Never place the machine on an inflammable surface.
- The tip must be allowed to cool down to room temperature after finishing work. Never cool the tip by immersing it in water - danger of electric shock!
- Do not store the machine or leave the machine unattended until it has cooled down completely.
- Use the machine only in well-ventilated rooms. Toxic fumes can be produced when using the machine which can damage your health. Use a fan or ventilator if required. Seek expert advice if necessary.
- Many types of solder consist largely of lead, which is poisonous. Do not eat, smoke or drink while using the machine. Always wash your hands thoroughly after finishing work.
- To avoid the risk of overheating the soldering gun may only be heated for 12 seconds max. The soldering gun must then be allowed to cool for 48 seconds.
- The cable is not heat-resistant. Always lead the cable away towards the rear of the machine and ensure that the hot soldering tip does not come into contact with the cable. Damaged cables may only be replaced by the manufacturer or a qualified electrician.
- Store the machine out of the reach of children, do not allow children to use the machine and keep children out of the area when using the machine.
- Be aware that toxic fumes may be produced when using the cutting tip to cut plastic, especially PVC. Do not inhale the fumes. Work only in well ventilated rooms.
BEFORE USING THE MACHINE


TECHNICAL SPECIFICATIONS FOR FL-98
| Rated voltage 230 V ~ / 50 Hz | |
| Rated power 100 W | |
| ON 30 seconds | |
| OFF 30 seconds | |
| Lamp 2,2V / 0,5W | |
| Weight 1 kg approx. | |
 Protection category II Protection category II | |
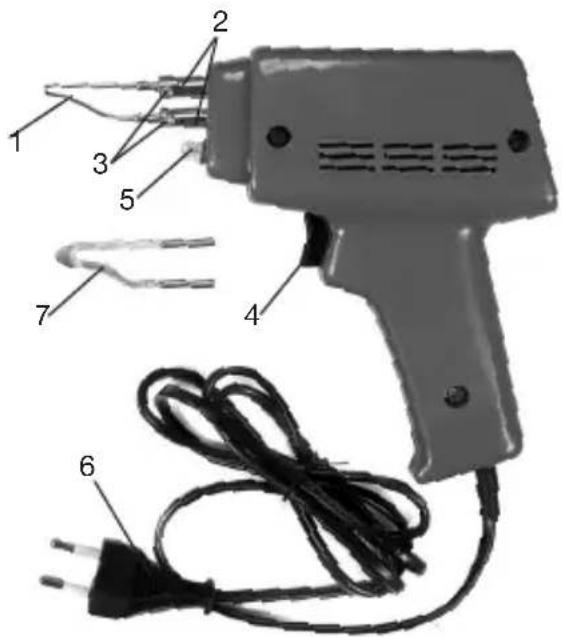
FEATURES
- Tip
- Tip holders
- Tip holder screws
- Trigger
- Spotlight
- Cable
- Tip

SCOPE OF USE
The machine is designed for soldering electrical wires and circuit boards, repairing small electronic appliances, de-soldering, tinning wire and model making. The machine is for indoor use only and may not be used outdoors. The machine may not be used for any other purpose.
CONNECTING TO THE MAINS
The unit may only be connected to a single-phase mains outlet with as the same voltage as given on the machine's rating plate. 230 V machines can also be connected to 220 V mains outlets. The mains circuit must be equipped with a 16 Amp fuse.
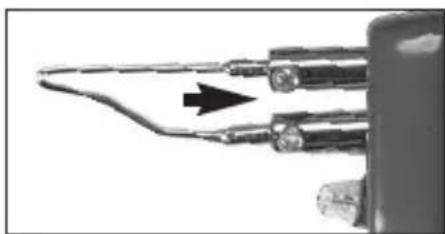
FITTING / CHANGING TIPS
Caution! Soldering tips become extremely hot. Ensure that the tip and the tip holders have cooled down completely before attempting to change the tip.
- Loosen the tip holder screws and remove the tip.
- Insert the new tip and re-tighten the tip holder screws.
natural_image
Close-up of a pen tip with an arrow pointing to it, no visible text or symbolsWORKING WITH THE SOLDERING GUN

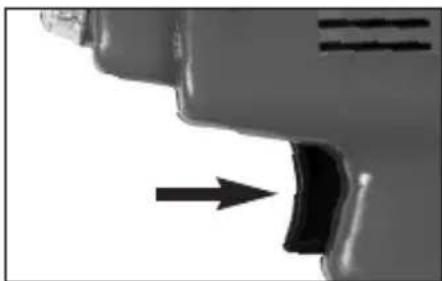
SWICHING ON AND OFF
- Pull the trigger to switch the machine ON.
- Release the trigger to switch the machine OFF.
Caution! To avoid the risk of overheating, the soldering gun may only be heated for 30 seconds max. The soldering gun must then be allowed to cool for 30 seconds.
natural_image
Close-up of a mechanical component with an arrow pointing to a small black part (no visible text or symbols)30 seconds heat up is usually sufficient to solder 2-3 joints.
SOLDER AND FLUX
Soldering is the process of a making a sound electrical and mechanical joint between certain metals by joining them with a 'soft' solder. This is usually a low temperature melting point alloy of lead and tin.
Solder
Solder for the DIY market is produced almost exclusively in the form of wire. There are two types of solder wire on the market.
-
Simple, unfilled solder wire.
-
Solder wire with flux core.
For best results use a good quality multicore solder.
Flux
Flux is a chemical which removes oxide residue on the workpieces and prevents oxide residue forming on the joint during the soldering. Oxide residue can prevent the formation of a clean joint. Flux is most commonly contained in the cores of multicore solder but is also available separately in paste or liquid form.
SPOTLIGHT
- The machine is fitted with a spotlight which lights up when the trigger is pressed.
- The spotlight is particularly useful when soldering in darker, inaccessible areas.
SOLDERING
Preparation
- The parts you wish to solder must be clean in order to ensure that a sound electrical and mechanical joint is produced. Remove any oxidisation using a file or spatula or a chemical solution.
Caution! Do not use aggressive acids such as hydrochloric, sulphuric or nitric acid unless you are an expert.
- An oxide residue can form on the tip. This should be removed by rubbing the tip on a soldering stone.
- Coat the tip lightly with flux and tin it lightly with solder wire.
- The correct temperature is reached when the solder melts to a filmy consistency. If lumps are formed the tip is not hot enough. If beads are formed the tip should be cleaned.
Soldering
- Ensure that both parts of the joint are clean and heat the joint with the soldering gun. Hold the solder to the joint until it flows onto the joint.
-
Remove the soldering iron from the joint.
-
Ensure that the parts cannot move until the solder has set.
- Flux residue should be removed from the joint after cooling, except when using multicore solder. The resin residue produced when using multicore solder should not be removed.
Note Soldering takes practice. Familiarise yourself with the procedure and make trial runs on waste material before starting work. Seek training or assistance from an expert if required.

De-soldering
The machine can be used for de-soldering in combination with a de-soldering pump or de-soldering braid.
- Heat the joint and soak up the solder using de-soldering braid or de-soldering pump.
MAINTENANCE
MAINTENANCE
The machine requires very little maintenance but should be kept clean and free of dust. Do not use aggressive cleaning agents to clean the plastic parts of the machine.
The tips should be cleaned regularly according to the instructions in this manual. Repairs and the fitting of replacement mains cables may only be carried out by the manufacturer or a qualified electrician.
WASTE ELECTRICAL AND ELECTRONIC EQUIPMENT

Waste electrical and electronic equipment must be recycled and may not be disposed of with household waste. Contact your local authority for details of recycling facilities.


EC Declaration of Conformity
declare that the design and construction of the following machine, in the form supplied by us, comply with the requirements of the appropriate EC directives.
Product description:
Soldering gun set
Model:
FL-98
Appropriate EC directives:
☑ EC - Low voltage directive 2006/95/EC
☑ EC – Directive on electromagnetic compatibility (EMC) 2004/108/EEC
☑ ROHS
Applicable harmonised norms:
EN 60335-1:2002+A11+A1+A12+A2+A13:2008;
EN 60335-2-45:2002+A1:2008; EN 62233:2008
Anif, 01.08.2012

Ben Shields Alexander Reischl
Head of Product Management Product Manager and person responsible for technical documentation

Mode d'emploi

DOMAINES D'APPLICATION
natural_image
Close-up of a mechanical component with a black arrow pointing to a curved surface (no text or symbols visible)natural_image
Close-up of a mechanical component with an arrow pointing to a small black component (no visible text or symbols)
OBLAST POUŽITÍ
MONTÁŽ / VÝMĚNA HROTŮ
natural_image
Close-up of a pen tip with an arrow pointing to it, next to a smartphone (no visible text or symbols)PRÁCE S PÁJECÍ PISTOLÍ
ZAPNUTÍ A VYPNUTÍ
natural_image
Close-up of a mechanical component with an arrow pointing to a curved section (no visible text or symbols)
SYMBOLER, ANVENDT I DENNE MANUAL
F∅R APPARATET BRUGES


TEKNISKE SPECIFICATIONER FOR FL-98
DK
BRUGSOMFANG
natural_image
Close-up of a pen tip with an arrow pointing to it, next to a smartphone (no visible text or symbols)BRUG AF LODDEPISTOLEN
TÄENDE OG SLUKKE
natural_image
Close-up of a mechanical component with an arrow pointing to a small black part (no visible text or symbols)LODDETIN OG FLUSSMIDDEL

USO PREVISTO
natural_image
Close-up of a mechanical component with a black arrow pointing to a curved surface (no text or symbols visible)TRABAJAR CON LA PISTOLA DE SOLDAR
natural_image
Close-up of a mechanical component with an arrow pointing to a curved section (no visible text or symbols)FL-98 TEKNISET TIEDOT
KÄYTTÖTARKOITUS
natural_image
Close-up of a mechanical tool with an arrow pointing to a tip (no visible text or symbols)JUOTOSPISTOOLIN KANSSA TYÖSKENTELEMINEN

natural_image
Three circular icons representing a person wearing headgear, hand gesture, and holding a book (no text or symbols)KYTKEMINEN PÄÄLLE JA POIS PÄÄLTÄ
natural_image
Close-up of a mechanical component with an arrow pointing to a small black component (no visible text or symbols)Πεδίο χρήσης
natural_image
Close-up of a mechanical component with a curved metallic rod and a black arrow pointing to it (no visible text or symbols)
natural_image
Close-up of a mechanical component with an arrow pointing to a curved section (no visible text or symbols)RENDELTETÉSE
natural_image
Close-up of a mechanical tool tip with an arrow pointing to it, no visible text or symbols
MUNKA
A FORRASZTÓPISZTOLLYAL
BE- ÉS KIKAPCSOLÁS
natural_image
Close-up of a mechanical component with an arrow pointing to a curved section (no visible text or symbols)NAMJENA
Uređaj je namijenjen za lemljenje električnih vodova i štampanih ploča te za popravke na malim električnim uređajima, završno lemljenje, odlemljivanje žice i za izradu modela. Uređaj se smije koristiti isključivo u zatvorenim prostorijama, ali ne na otvorenom prostoru. Uređaj se smije koristiti isključivo za svoju namjenu.
PRIKLJUČAK NA STRUJNU MREŽU
natural_image
Close-up of a pen tip with an arrow pointing to it, next to a smartphone (no visible text or symbols)
RAD S PIŠTOLJEM ZA LEMLJENJE
UKLJUČIVANJE I ISKLJUČIVANJE
natural_image
Close-up of a mechanical component with an arrow pointing to a section (no visible text or symbols)Zagrijavanje od 30 sekundi u pravilu je dovoljno za lemljenje 2-3 spoja.
LEM I SREDSTVA ZA TOPLJENJE
Kod lemljenja se radi o postupku kod kojeg se uz pomoć "mekog" lema uspostavlja besprijekoran električni i mehanički spoj između odgovarajućih metala. Pri tome se u pravilu radi o leguri olova i kositra s niskim talištem.
Lem
ROTHENBERGER Industrial
Sodener Strasse 47

- VERWENDUNGSZWECK
- W Soldering gun set
- SYMBOLS USED IN THIS MANUAL
- Safety instructions for the soldering gun
- BEFORE USING THE MACHINE
- TECHNICAL SPECIFICATIONS FOR FL-98
- FEATURES
- SCOPE OF USE
- CONNECTING TO THE MAINS
- FITTING / CHANGING TIPS
- WORKING WITH THE SOLDERING GUN
- SWICHING ON AND OFF
- SOLDER AND FLUX
- Solder
- Flux
- SPOTLIGHT
- SOLDERING
- Preparation
- Caution! Do not use aggressive acids such as hydrochloric, sulphuric or nitric acid unless you are an expert.
- De-soldering
- MAINTENANCE
- WASTE ELECTRICAL AND ELECTRONIC EQUIPMENT
- EC Declaration of Conformity
- Mode d'emploi
- DOMAINES D'APPLICATION
- OBLAST POUŽITÍ
- MONTÁŽ / VÝMĚNA HROTŮ
- PRÁCE S PÁJECÍ PISTOLÍ
- ZAPNUTÍ A VYPNUTÍ
- SYMBOLER, ANVENDT I DENNE MANUAL
- F∅R APPARATET BRUGES
- TEKNISKE SPECIFICATIONER FOR FL-98
- BRUGSOMFANG
- BRUG AF LODDEPISTOLEN
- TÄENDE OG SLUKKE
- LODDETIN OG FLUSSMIDDEL
- USO PREVISTO
- TRABAJAR CON LA PISTOLA DE SOLDAR
- KÄYTTÖTARKOITUS
- JUOTOSPISTOOLIN KANSSA TYÖSKENTELEMINEN
- KYTKEMINEN PÄÄLLE JA POIS PÄÄLTÄ
- Πεδίο χρήσης
- RENDELTETÉSE
- MUNKA
- A FORRASZTÓPISZTOLLYAL
- BE- ÉS KIKAPCSOLÁS
- NAMJENA
- PRIKLJUČAK NA STRUJNU MREŽU
- RAD S PIŠTOLJEM ZA LEMLJENJE
- UKLJUČIVANJE I ISKLJUČIVANJE
- LEM I SREDSTVA ZA TOPLJENJE
- Lem
Brand : ROTHENBERGER
Model : RoQuick 35957
Category : Welding machine