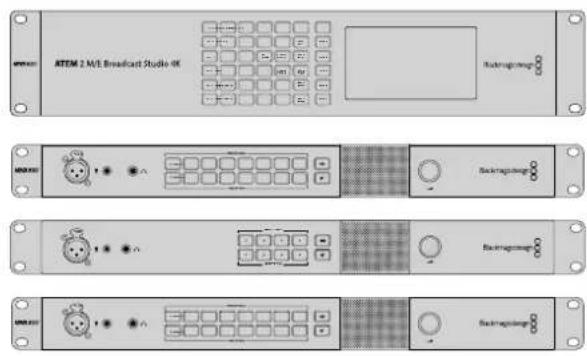
ATEM Microphone Converter - Audio/video converter Blackmagic Design - Free user manual and instructions
Find the device manual for free ATEM Microphone Converter Blackmagic Design in PDF.

| Product Type | Audio/video converter with talkback and tally |
| Model | ATEM Microphone Converter (part of ATEM Converters series) |
| Video Inputs | 1 x SDI, 1 x HDMI |
| Video Outputs | 1 x SDI, 1 x HDMI |
| Audio Inputs | 2 x balanced 1/4" TRS (microphone level), 1 x 3.5mm headset microphone |
| Audio Outputs | 1 x 3.5mm headphone, embedded SDI/HDMI audio |
| Optical Fiber | 1 x SFP slot (duplex LC single-mode) |
| Supported Video Formats | SD, HD, 3G-SDI |
| Power Supply | Internal rechargeable battery (over 2 hours) or external 12V-31V DC |
| Power Connector | 12V-31V DC input |
| Talkback | 3.5mm headset with PTT button, supports intercom with ATEM Studio Converter or Talkback Converter |
| Tally | Red tally lights on sides, tally border on monitor output via software setting |
| Camera Number Setting | Up to 99, via button on unit or Blackmagic Converters Setup software |
| Control Panel | Buttons for PTT, headphone volume, mic volume, PGM/Camera toggle, power, camera number |
| Status Indicators | Battery level (4 LEDs), optical signal, video signal, tally |
| Mounting | Belt clip, 1/4" and 3/8" tripod threads, rubber feet for desk use |
| Dimensions | Approx. 140 x 80 x 40 mm (estimated) |
| Weight | Approx. 0.5 kg (estimated) |
| Software | Blackmagic Converters Setup (USB connection for updates and settings) |
| Compatible Switchers | ATEM switchers for tally and talkback integration |
| Warranty | 12 months limited |
Frequently Asked Questions - ATEM Microphone Converter Blackmagic Design
User questions about ATEM Microphone Converter Blackmagic Design
0 question about this device. Answer the ones you know or ask your own.
Ask a new question about this device
Download the instructions for your Audio/video converter in PDF format for free! Find your manual ATEM Microphone Converter - Blackmagic Design and take your electronic device back in hand. On this page are published all the documents necessary for the use of your device. ATEM Microphone Converter by Blackmagic Design.
USER MANUAL ATEM Microphone Converter Blackmagic Design
Installation and Operation Manual
ATEM Converters
March 2020
English, 日本語, Français, Deutsch, Español, 中文, 한국어, Русский, Italiano, Português and Türkçe.
Languages
To go directly to your preferred language, simply click on the hyperlinks listed in the contents below.
English 3
日本語 28
Français 54
Deutsch 80
Español 106
中文 132
한국어 158
Русский184
Italiano 210
Português 236
Türkçe 262
natural_image
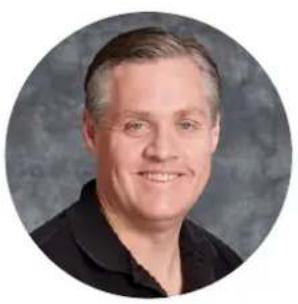
Circular portrait photo of a smiling man in a black shirt against a gray background (no text or symbols)Welcome
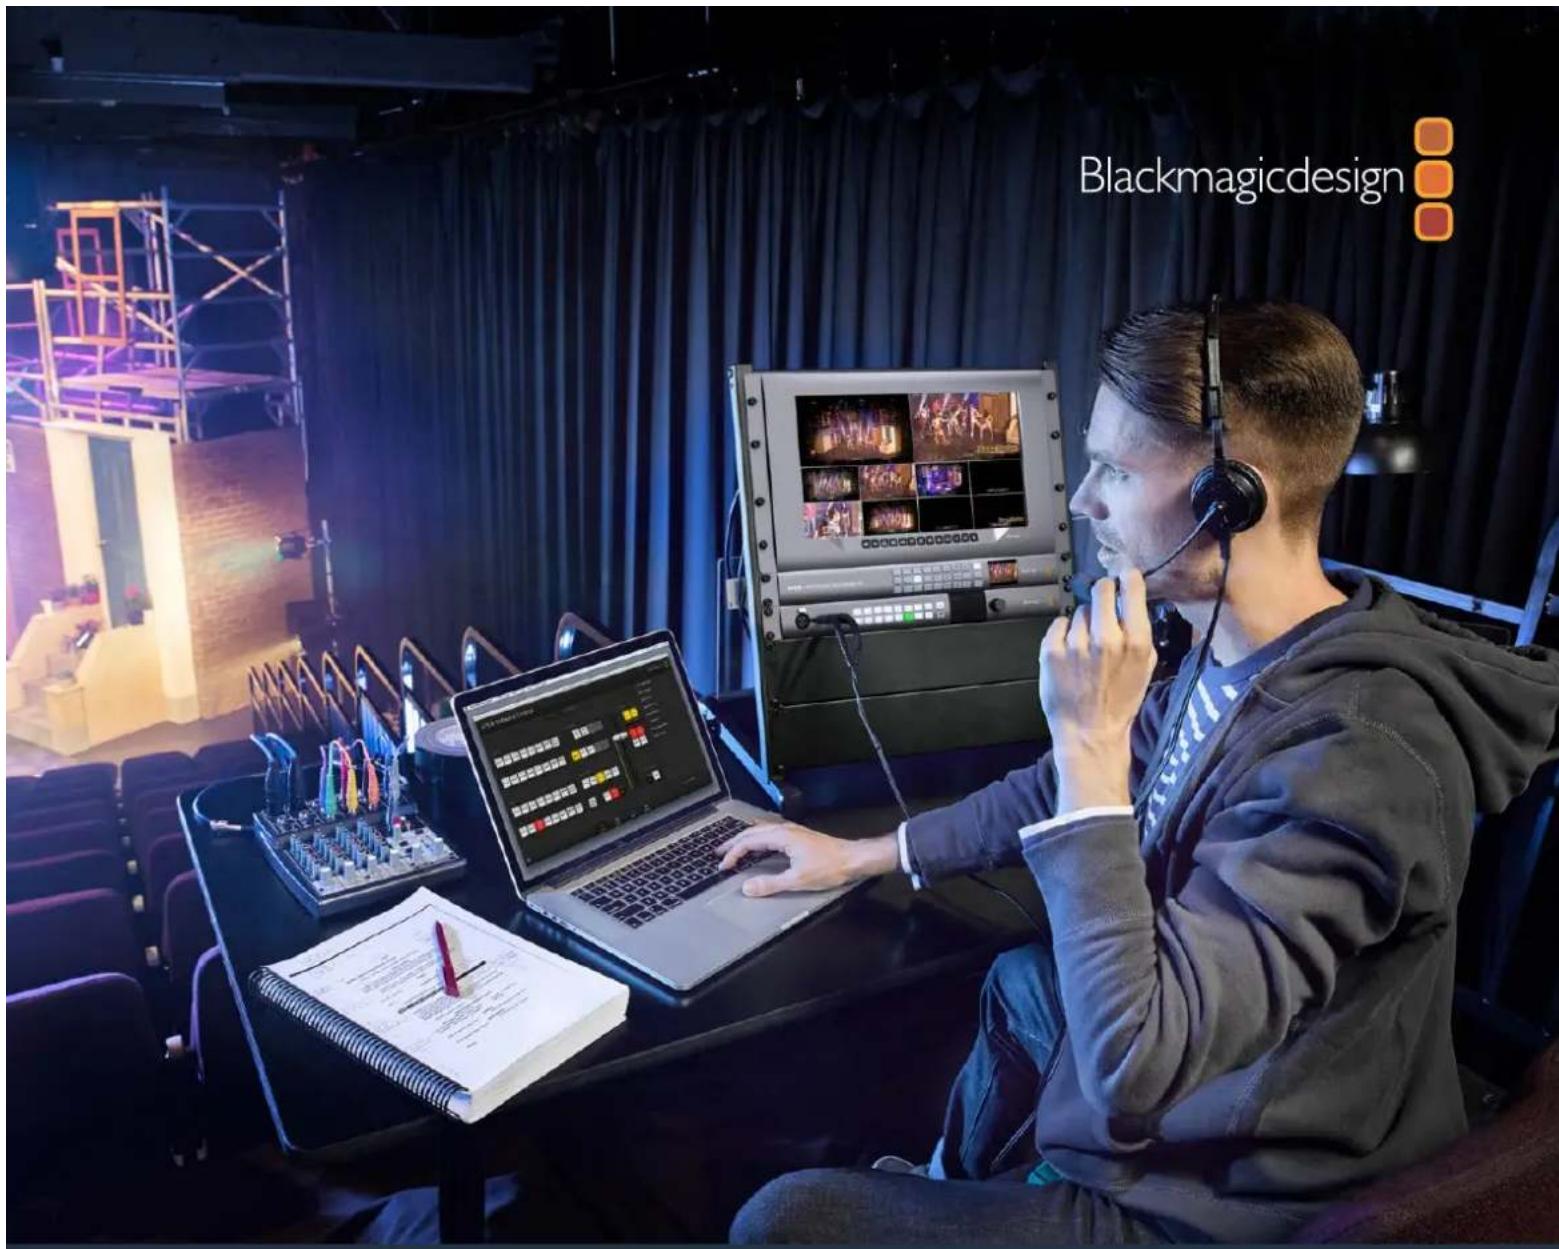
Thank you for purchasing a Blackmagic Design converter for your live production work!
ATEM Camera Converter and ATEM Studio Converter allows you to extend your broadcast SDI and consumer HDMI cameras using low cost optical fiber! Imagine connecting to cameras at remote locations on racing tracks, live sporting venues or even massive golf courses! With ATEM Camera Converter you can have more cameras closer to the action for the most amazing shots in live production! ATEM Camera Converter not only converts your camera to optical fiber, but it also includes talkback, external microphone input, program return feed, tally and built in battery power source! You can place cameras in multiple locations miles away from your switcher while keeping full broadcast HD video quality!
ATEM Studio Converter is the perfect partner for your ATEM Camera Converters for internally distributed program output and talkback support. Multiple ATEM Studio Converters can be looped to allow talkback support to more than 4 cameras. ATEM Talkback Converter 4K gives you even more camera connections with the option to install optical fiber SFPs if you need long cable lengths, plus you get 12G-SDI support for Ultra HD 2160p60 video. When using ATEM Converters with ATEM Switchers and Blackmagic Studio Cameras, you get professional video equipment designed to work together for an amazing live production experience!
Blackmagic Converters Setup is used to change settings and update the internal software in your ATEM converter. The latest version of Blackmagic Converters Setup can always be downloaded from our website at www.blackmagicdesign.com/support. We think it should take you approximately 5 minutes to complete installation. Before you install Blackmagic Converters Setup, please check our website and click the support page to download the latest updates to this manual and Blackmagic Converters Setup software or you can follow us on Twitter to get notifications of any software updates. Lastly, please register your ATEM Camera Converter or ATEM Studio Converter when downloading software updates.
We would love to keep you updated on new software updates and new features for your ATEM converters. Perhaps you can even send us any suggestions for improvements to the converters. We are constantly working on new features and improvements, so we would love to hear from you!
Grant Petty
Grant Petty
CEO Blackmagic Design
Contents
ATEM Converters
Getting Started 5
Introducing ATEM Converters 5
Connecting ATEM Camera Converter 6
Connecting ATEM Studio Converter 8
Connecting ATEM Talkback Converter 4K 11
Confirming your ATEM Converter Set Up 12
Using ATEM Camera Converter 14
Front Control Panel 14
Status Indicators 14
Control Panel Buttons 15
Setting the Camera Number 16
Mounting ATEM Camera Converter 16
Using ATEM Studio Converter 17
Using ATEM Talkback Converter 4K 18
Using Blackmagic Converters Setup 19
Installing Blackmagic Converters Setup 19
Removing Blackmagic Converters Setup 20
Updating your ATEM Converter's Software 20
Setting the Tally Border and Camera Number 20
Connection Diagrams 21
Connecting to an ATEM Switcher via ATEM Talkback Converter 4K 21
Connecting to an ATEM Switcher via ATEM Camera and Studio Converters 22
Looping Multiple ATEM Converters 23
Help 24
Regulatory Notices 25
Safety Information 26
Warranty 27
Getting Started
Introducing ATEM Converters
ATEM Camera Converter, ATEM Studio Converter and ATEM Talkback Converter 4K connect to switchers, such as ATEM and provide a complete studio talkback and tally solution, including the option of connecting over long distances using low cost fiber optic cable.
ATEM Camera Converter
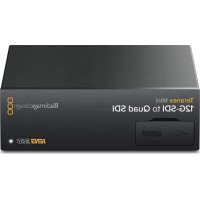
ATEM Camera Converter is a portable converter that connects to any SDI or HDMI camera. The ATEM Camera Converter sends video, audio, tally and talkback signals via bi-directional optical fiber between itself and a remote unit, for example an ATEM Studio Converter, which then sends the signal to a switcher. ATEM Camera Converter supports SD, HD and 3G-SDI formats and can be powered using the internal rechargeable battery or by using mains power.
When paired with another ATEM Camera Converter, ATEM Studio Converter or ATEM Talkback Converter 4K you get a complete talkback solution for live production. Tally lights are also enabled when connected to ATEM switchers.
natural_image
Front view of a network device with ports and connectors (no visible text or symbols)ATEM Camera Converter.
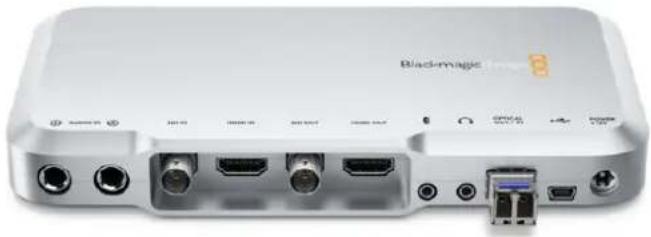
ATEM Studio Converter
ATEM Studio Converter can be partnered with ATEM Camera Converters via optical fiber for talkback support with any SDI or HDMI cameras. This lets you convert up to 4 cameras to optical fiber SDI when you need to run video over long cable lengths.
Single mode optical fiber cable with LC connectors are used to connect ATEM Camera Converter to ATEM Studio Converter. If you are using Blackmagic Studio Cameras, you can plug your video in directly via optical fiber. The SDI connections, including the fiber optic inputs, support SD, HD and 6G-SDI video.
You can easily connect your camera audio outputs to an external mixing desk by plugging into the balanced XLR analog outputs on the ATEM Studio Converter's rear panel.
When more than 4 cameras are required, you can loop multiple ATEM Studio Converters and ATEM Talkback Converter 4Ks together.
natural_image
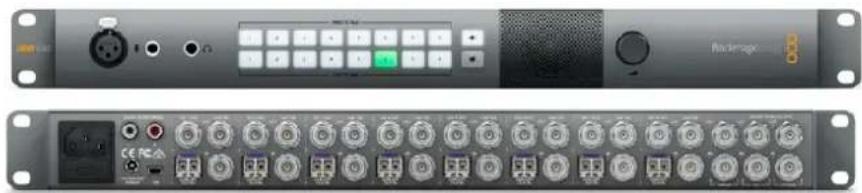
Front and back view of a black audio equipment rack with ports, buttons, and connectors (no readable text or symbols)ATEM Studio Converter.
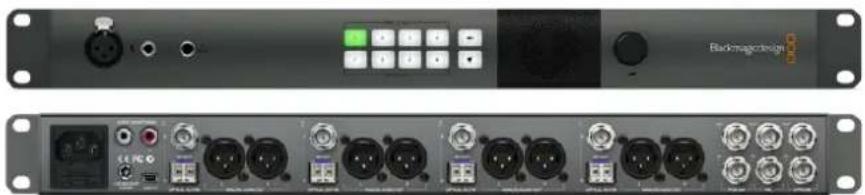
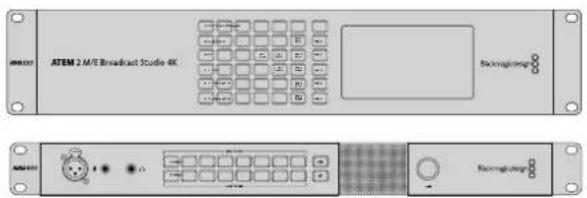
ATEM Talkback Converter 4K
ATEM Talkback Converter 4K is used to connect up to 8 cameras to a switcher via coaxial cable up to 12G-SDI. When connected to an ATEM switcher you also get tally, plus you can also connect to ATEM Camera Converters via optical fiber to add talkback.
Blackmagic Studio Camera can connect to your ATEM Talkback Converter 4K via BNC or optional optical fiber modules. You also get talkback and tally when connected to an ATEM switcher.
If you need to connect more cameras, additional ATEM Talkback Converter 4Ks can be looped together. ATEM Talkback Converter 4K supports SD, HD and Ultra HD video up to 2160p60.
natural_image
Front and back view of a rack-mounted audio equipment unit (no visible text or labels)ATEM Talkback Converter 4K with 8 optional SFP modules installed.
Connecting ATEM Camera Converter
The first thing you'll want to do is power your ATEM Camera Converter, plug in your camera, headset and a monitor.
Plugging in your Power
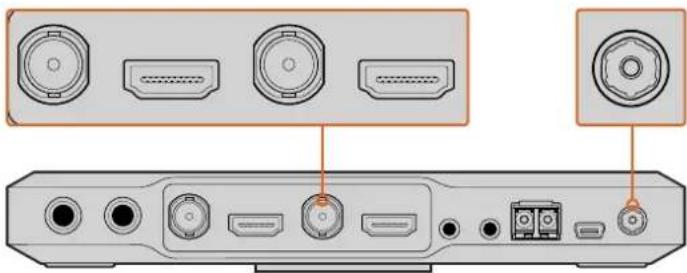
ATEM Camera Converter features both an internal rechargeable battery which gives you mobility in the field, and a connector for plugging in the power adaptor supplied with ATEM Camera Converter. ATEM Camera Converter's power connector supports an input range of 12V to 31V so you can even use an external camera battery. The internal battery will charge when a power source is connected.
natural_image
Back panel of a computer interface showing ports and connectors (no text or symbols visible)Plug in your power source and charge the internal battery via the 12V to 31V power connector. Connect your camera via the SDI or HDMI input, and your monitor via the SDI or HDMI output. By default, ATEM Camera Converter uses embedded SDI or HDMI audio from your camera.
Plugging in your Camera
Plug your camera into your ATEM Camera Converter's HDMI or SDI connector.
Make sure your camera output is set to a format supported by your live production switcher. If you're connecting to an ATEM switcher, check the switcher video standard and then set the camera to the same video standard, e.g., 1080i59.94.
Plugging in your Headset
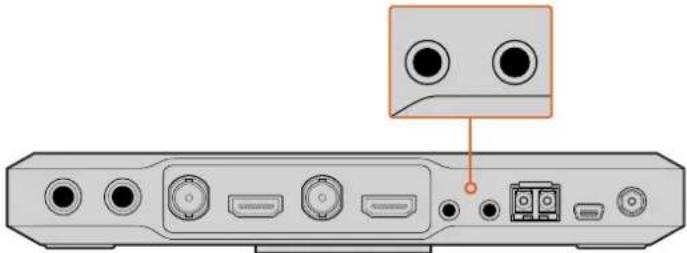
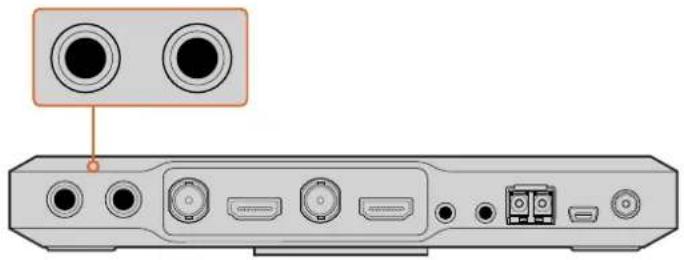
Plug your talkback headset into ATEM Camera Converter's standard 3.5mm stereo analog microphone and headphone inputs. An iPhone or Android compatible headset can be connected using only the headphone jack. However, if you have an external microphone connected at the same time, only the external microphone will be used.
natural_image
Back panel of a computer interface showing ports and connectors (no text or symbols visible)Connect your headset to ATEM Camera Converter via the standard 3.5mm headphone output and microphone input.
Plugging in your Monitor
Plug your monitor into ATEM Camera Converter's SDI or HDMI output. Using a monitor lets you view the camera output or the program output from a switcher. If you are connecting to an ATEM Switcher, you'll need to set the camera number on your ATEM Camera Converter so the tally light will illuminate when the camera is switched to the program output. For more information, refer to the 'Using ATEM Camera Converter/Setting the Camera Number' section.
Connecting via Optical Fiber
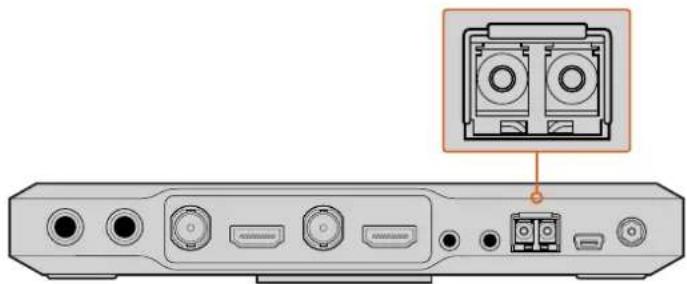
You'll now want to connect your ATEM Camera Converter to either a second Camera Converter, an ATEM Talkback Converter 4K, or an ATEM Studio Converter, via duplex single mode optical fiber cables with LC connectors. A pair of optical fiber cables are typically known as a patch cord.
natural_image
Back panel of a computer monitor showing ports and an inset image of two speakers (no text or symbols visible)ATEM Camera Converter's optical fiber SFP module.
Plugging in Optical Fiber LC Connectors
To plug optical fiber connectors into your ATEM Converters:
1 Plug one end of the patch cord to your ATEM Camera Converter's SFP module.
2 Plug the other end of your patch cord to the SFP module on the second ATEM Camera Converter. If you are connecting multiple cameras to an ATEM Talkback Converter 4K or ATEM Studio Converter, choose SFP modules appropriate for each camera.
For example, when connecting camera 1, connect to the camera 1 SFP module.

natural_image
Diagram of a dual-core cable connector with two connectors (no text or symbols)Optical fiber patch cord with two LC connectors.
Plugging in your Audio
ATEM Camera Converter supports 2 channels of camera audio, which are carried on audio channels 1 & 2 of the optical fiber SDI connection. By default, ATEM Camera Converter uses the embedded audio from your camera's microphone. However, if you want to plug in an external audio source, connect your audio equipment to ATEM Camera Converter's two balanced 1/4" TRS inputs. When external audio is connected it will be used instead of the embedded camera audio.
The 1/4" TRS connectors accept stereo analog audio at microphone level and are carried on audio channels 1 & 2 of the optical fiber SDI connection.
natural_image
Back panel of a computer interface showing two circular ports and labeled ports (no text or symbols visible)Connect external audio equipment to ATEM Camera Converter via TRS connectors.
Confirming Your Video Signal
When your ATEM Camera Converter is powered, a camera is plugged in, and a valid SDI or HDMI signal is present, you'll see the control panel 'video' status indicator illuminated.
Additionally, if you have your monitor connected and the PGM button set for camera video, your camera output will be displayed and you'll know your ATEM Camera Converter is working.
When a valid video signal is detected via SDI or HDMI, you'll see ATEM Camera Converter's 'video' status indicator illuminated. The 'optical' Indicator will illuminate when a valid SDI signal is detected via the optical fiber input.
Connecting ATEM Studio Converter
The first thing to do is plug in power, plug in your cameras, a headset, and connect to a switcher. You can also plug in an external microphone, such as a gooseneck microphone if you want to use talkback without using a headset. You can even output each camera's audio to a mixer via balanced analog XLR connectors.
Plugging in Power
Plug in your power via your ATEM Converter's mains power input using a standard IEC cable. You can also connect a power adaptor or external camera battery to the 12V to 31V power input.
2 power inputs give you the option of a redundant power connection in case one supply fails or is accidentally disconnected.
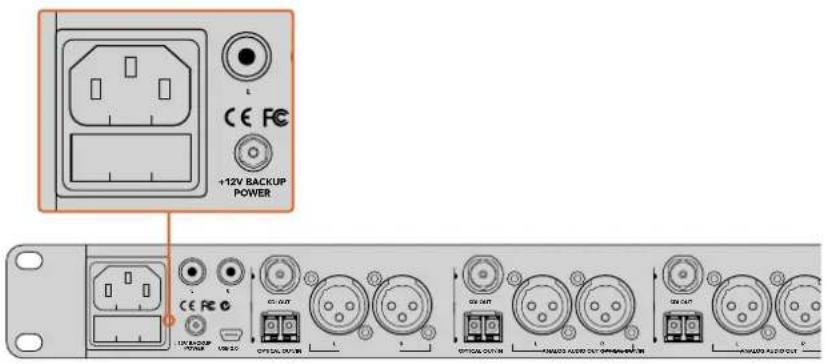
Plug in power via the mains power, or the 12V power connector.
Plugging in Cameras
On the back panel of your ATEM Studio Converter, you'll see 4 groups of connectors numbered 1 to 4.
1 Plug your cameras into each optical fiber SFP module.
2 The second LC connector plugged into the SFP module is used to connect the program video back to your Blackmagic Studio Camera or ATEM Camera Converter.
3 Plug each camera SDI output from your ATEM Studio Converter to the corresponding camera inputs in your switcher.
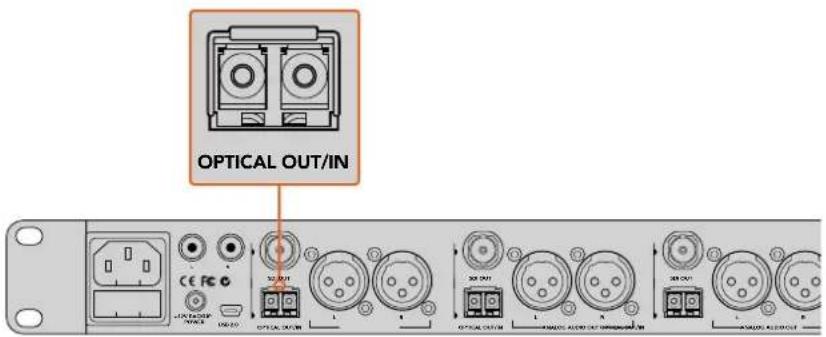
Plug your cameras into ATEM Studio Converter's optical fiber inputs.
Plugging in the Program Feed from your Switcher
Connect the program output from your switcher to your ATEM Studio Converter's 'PGM SDI in' connector. When connecting the program output from an ATEM switcher, tally is also embedded in the SDI signal. This will enable tally lights when connected to ATEM Camera Converters via optical fiber and Blackmagic Studio Cameras.
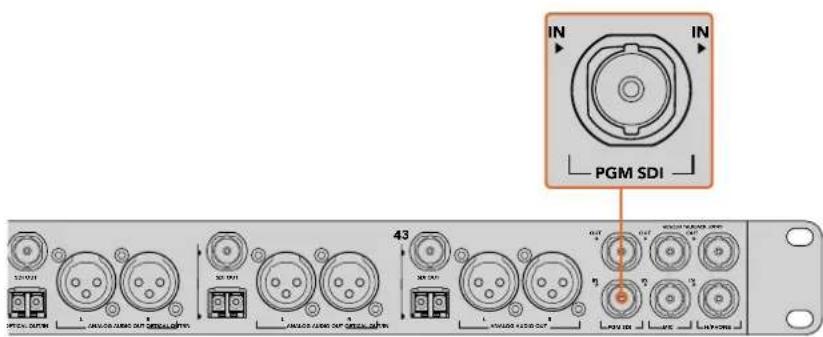
Plug the program SDI output from your switcher into your ATEM Studio Converter's 'PGM SDI' input.
Plugging in your Headset
Your ATEM Studio Converter uses aviation headsets that plug in via the 1/4" TRS headphone and 0.206" microphone jacks. If both a headset and an external microphone are plugged in, only the headset will be used. Talkback audio is embedded into audio channels 15 & 16 of the SDI signal.

Connect your aviation headset via your ATEM Studio Converter front panel TRS connectors. You can also plug in an external microphone via the balanced XLR analog input.
Plugging in your External Microphone
If you want to use an external microphone, plug in via the balanced XLR analog input on your ATEM Studio Converter's front control panel.
Outputting Camera Audio
You can easily connect your camera audio outputs to an external mixing desk by plugging into the balanced XLR analog outputs on the rear panel.
Monitoring your Audio
If you want to monitor your program or talkback audio on external audio equipment such as a Blackmagic Audio Monitor, connect via the RCA outputs on your ATEM Studio Converter's rear panel. Plus, you can easily connect your camera's audio to a mixer using the XLR analog audio outputs.
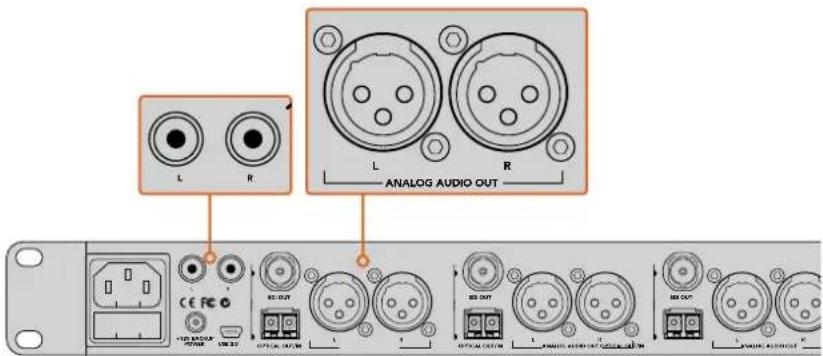
Monitor your program or talkback audio on external equipment by connecting to ATEM Studio Converter's RCA outputs.
Connecting ATEM Talkback Converter 4K
The first thing to do is plug in power, your cameras, a headset and connect to a switcher. You can also plug in an external microphone, such as a gooseneck microphone if you want to use talkback without using a headset.
Plugging in Power
Plug in your power via your ATEM Talkback Converter 4K's mains power input using a standard IEC cable. You can also connect a power adaptor or external camera battery to the 12V to 31V power input. 2 power inputs give you the option of a redundant power connection in case one supply fails or is accidentally disconnected.
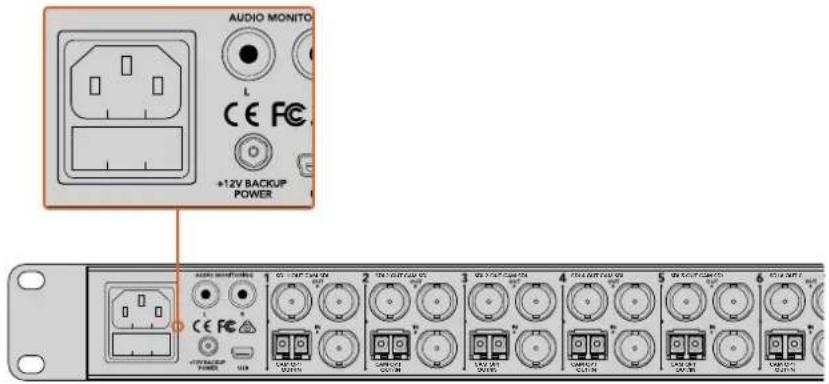
Plug in power via the mains power, or the 12V or 31V power connector.
Plugging in Cameras
On the back panel of your ATEM Talkback Converter 4K, you'll see 8 groups of connectors that are assigned to camera numbers 1 to 8.
1 Plug your cameras into each 'Cam SDI in' connector.
2 Plug your ATEM Talkback Converter 4K's 'Cam SDI out' into your camera's program SDI input.
When using ATEM Camera Converters with ATEM Talkback Converter 4K, it is important to note that talkback and tally are embedded in the SDI signal via optical fiber only.
3 Plug the numbered SDI outputs, for example 'SDI 1 Out', to the corresponding camera inputs in your switcher.
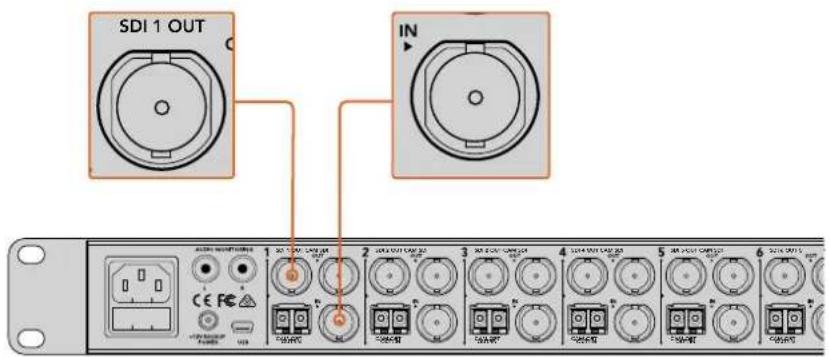
Plug your cameras into ATEM Talkback Converter 4K's camera SDI Inputs. When optical fiber SFP modules are installed, you can also plug cameras into your ATEM Talkback Converter 4K via optical fiber. Plug your ATEM Talkback Converter 4K's 'SDI out' into your switcher.
Plugging in the Program Feed from your Switcher
Connect the program output from your switcher to your ATEM Talkback Converter 4K's 'PGM SDI in' connector. When connecting the program output from an ATEM switcher, tally is also embedded in the SDI signal. This will enable tally lights when connected to ATEM Camera Converters, Blackmagic Studio Cameras and Blackmagic URSA Broadcast Cameras.
Plug the program SDI output from your switcher into your ATEM Talkback Converter 4K's 'PGM SDI' input.
Plugging in your Headset
Your ATEM Talkback Converter 4K uses aviation headsets that plug in via the 1/4" TRS headphone and 0.206" microphone jacks.
If both a headset and an external microphone are plugged in, only the headset will be used.
Talkback audio is embedded into audio channels 15 & 16 of the SDI signal.

Connect your aviation headset via your ATEM Talkback Converter 4K front panel TRS connectors. You can also plug in an external microphone via the balanced XLR analog input if you want to use talkback without a headset.
Plugging in your External Microphone
If you want to use an external microphone, plug in via the balanced XLR analog input on your ATEM Converter's front control panel.
Monitoring your Audio
If you want to monitor your program or talkback audio on external audio equipment such as a Blackmagic Audio Monitor, connect via the RCA outputs on your ATEM Talkback Converter 4K or ATEM Studio Converter's rear panel.
Confirming your ATEM Converter Set Up
After connecting your ATEM Converters to a live production switcher you'll want to confirm that everything is working.
Check the switcher is getting a valid signal from your cameras by having the switcher operator switch each camera to the preview or program output. If all your camera signals can be seen on the switcher's preview or program output, you'll know your ATEM Converters are working.
Next, check your talkback. Have the switcher operator and camera operators speak to each other using their 'press to talk' buttons and headsets.
If you are using an ATEM switcher, tally signals are sent over the SDI connection. To make sure tally is working, check the camera number on ATEM Camera Converters and make sure they match the camera numbers on the ATEM switcher. For more information, refer to the 'Using ATEM Camera Converter/Setting the Camera number' section of this manual.
If you experience any trouble setting up your ATEM Converters, please visit the Blackmagic Design support center at www.blackmagicdesign.com/support where you can often find answers quickly by browsing the Blackmagic Forum. Here you can read information and comments from other experienced users and Blackmagic Design staff. You can also find contact information for your local Blackmagic Design support team.
flowchart
graph TD
    A["ATEM 1 M/E Production Studio 4K"] --> B["ATEM 1 M/E Production Studio 4K"]
    B --> C["ATEM Telkback Converter 4K"]
    C --> D["Blackmagic Studio Camera"]
    D --> E["HDMI Camera"]
    E --> F["Monitor"]
    G["ATEM Camera Converter"] --> E
    H["Blackmagic Studio Camera"] --> D
Refer to the 'Connection Diagrams' section for more information on how to connect your ATEM Converters.
Using ATEM Camera Converter
Front Control Panel
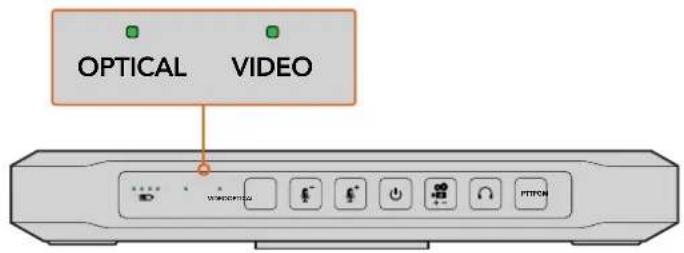
ATEM Camera Converter's control panel features buttons for adjusting headset and microphone volume, activating talkback, program/camera monitoring, powering on and off, and setting the camera number. There are also 5 status indicators for battery level, optical signal, SDI or HDMI signal, and tally.
Status Indicators
Battery level
On the far left of the control panel are four green battery level indicators. The number of illuminated indicators decrease as the battery level decreases. When the remaining single indicator starts flashing, there's approximately 10 minutes of battery power left, so you should plug in an external power source or switch to another charged ATEM Camera Converter. The battery will last for over 2 hours of continuous use and requires approximately 8 hours for a complete recharge.
Optical
Next to the battery level LEDs is the 'optical' indicator. This lights up when an optical fiber SDI video signal is detected by ATEM Camera Converter. Use this indicator to confirm a valid optical SDI signal is being sent or received.
Video
The 'video' indicator lights up when a valid SDI or HDMI video signal is detected by ATEM Camera Converter. Use this indicator to confirm that your camera input signal is present.
Tally lights
These lights illuminate when a tally signal is received from the program output of an ATEM switcher. By watching the two red tally lights on opposite sides of ATEM Camera Converter, your talent and camera operator can see when they are on air.
Battery level, optical, and video signal status indicators.
natural_image
Simple diagram showing a red circle above a gray rectangular base with a vertical line and a small dot at the bottom (no text or symbols)The tally lights on each side of the ATEM Camera Converter glow red when your camera is live on the program output of an ATEM switcher.
Control Panel Buttons
PGM
Pressing the PGM button toggles between the program video signal and the camera input signal. The program input is the signal connected via optical fiber.
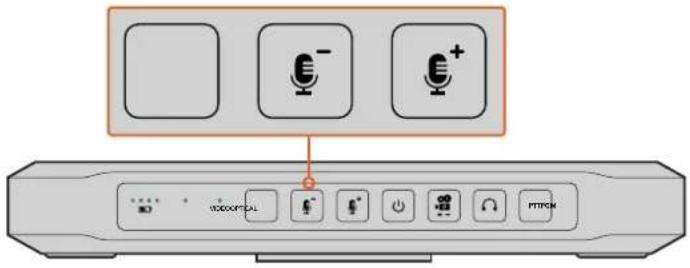
PGM button and microphone volume level buttons.
The buttons will illuminate when pressed or activated.
Microphone Volume Down/Up
The microphone volume buttons provide a quick way to adjust external audio levels. Each press of the microphone volume buttons provide a smooth increase or decrease in volume over 1 second. When maximum or minimum microphone volume is reached, or if at maximum or minimum volume at power up, the relevant button will illuminate for 3 seconds. These buttons do not affect embedded SDI and HDMI audio levels received directly from the camera.
Power On/Off
Press and release to instantly power on. Hold for 1 second to power off.
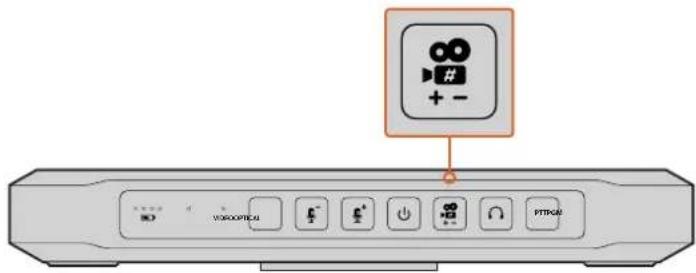
Camera Number
This button is used to set the camera number on your ATEM Camera Converter so your tally lights function correctly. Refer to the 'setting the camera number' section in this manual for a detailed description.
Talkback Headphone Volume
Press this button to increase the volume of the talkback headphones. When maximum volume is reached, or if at maximum volume at power up, the button will illuminate for 3 seconds. The next press will reduce the volume to minimum before the volume is increased again.
PTT
Press to talk allows camera operators to talk to the switcher operator. Hold the button down while talking. If the PTT button is pressed twice in quick succession, it will stay on to allow hands free communication. If PTT is pressed again, it will revert to normal press to talk behavior.
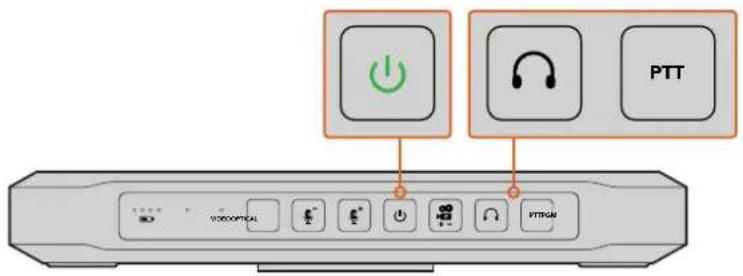
The power button will illuminate when ATEM Camera Converter is powered on. Press the PTT button to engage talkback with another ATEM Camera Converter, ATEM Talkback Converter 4K, or ATEM Studio Converter. Press the talkback headphone button to adjust the talkback volume.
Setting the Camera Number
If you want your ATEM Camera Converter to receive tally signals from an ATEM switcher, you'll need to set the camera number on your ATEM Camera Converter. This ensures the switcher sends the tally signal to the correct ATEM Camera Converter. The camera number can be set from 1 to 99.
To set the camera number with the camera number button, press and hold the button until its button light flashes 3 times. This will reset the camera number to camera 1. Each subsequent press of the button will increment the camera number by 1. For example, if you want to set your ATEM Camera Converter to camera number 5, reset the camera number to 1 and then add 4 button presses.
To test if camera number 5 is set correctly, have the ATEM switcher operator switch camera number 5 to the program output. If your camera number is set correctly, the tally lights will illuminate on your ATEM Camera Converter.
Similarly, if you want to test what camera number your ATEM Camera Converter is set to, ask the ATEM switcher operator to switch camera inputs to the program output until your tally lights illuminate. The switcher operator can then confirm your camera number.
'Camera number' button.
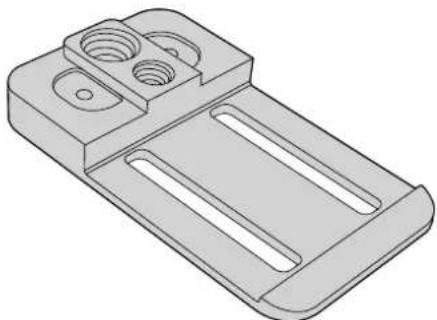
Mounting ATEM Camera Converter
When your camera needs to be mobile, connect your cables to ATEM Camera Converter and then snap the integrated belt clip on to your belt. For stationary shots, ATEM Camera Converter can be mounted on a tripod arm with either of its standard 3/8" or 1/4" thread inserts. If you want to sit ATEM Camera Converter on a desk using its rubber feet, undo the two 2.5 hex socket screws and remove the belt clip.
natural_image
3D technical drawing of a mechanical component with three circular holes and two parallel slots (no text or symbols)ATEM Camera Converter can be clipped to your bell, mounted on a tripod arm, or placed on its rubber feet on a desk.
Using ATEM Studio Converter
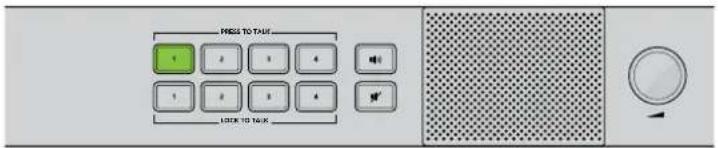
Your ATEM Studio Converter's front control panel features two rows of talkback buttons, including 'PTT' and 'LTT', or, 'press to talk' and 'lock to talk', for each of the camera inputs. Next to the talkback buttons are PGM 🎨 and Mute 🔊 buttons. All buttons are illuminated white and change to green when selected.
PTT 1-4 The 'press to talk' buttons let you communicate with each camera operator independently. The PTT button illuminates green and activates your external or headset microphone while the button is pressed.
LTT 1-4 The 'lock to talk' buttons lock your external or headset microphone open until you press them again. You can even lock your microphone open for all cameras if you want to communicate with all camera operators simultaneously. Cameras can be communicated with independently using PTT even if all LTT buttons are selected.
PGM 📋 Pressing the program button enables program audio with talkback. When a camera operator uses talkback, your ATEM Studio Converter's program audio level is decreased so talkback can be heard clearly. When PGM is deselected only talkback audio is heard.
Mute ✗ Pressing the 'mute' button will quickly fade the built in speaker to silence. Pressing mute again, or increasing the volume, will restore audio. This button only affects the speaker output and will not affect your program or talkback audio output.
Built in Speaker and Volume Control — You can hear program audio and talkback via the control panel speaker, or with headphones via the 1/4" TRS headphones input. Adjust the volume for the speaker or headphones by turning the volume knob on the control panel clockwise or counterclockwise.
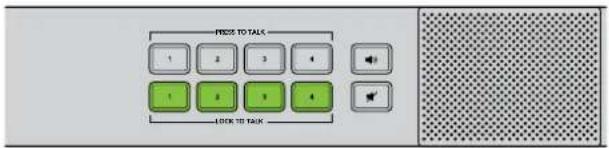
ATEM Studio Converter's control panel buttons are used for talkback, enabling or disabling program audio, and muting the speaker. The above illustration shows all the LTT buttons activated.

You can communicate with a single camera operator even when LTT is selected for all cameras. All LTT buttons are deactivated while PTT is pressed.
Volume is easily adjusted by turning the volume control clockwise and anticlockwise.
Using ATEM Talkback Converter 4K
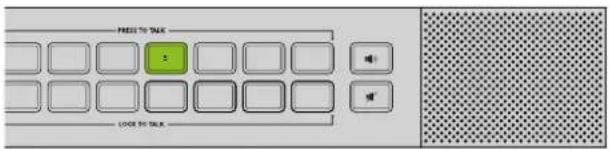
Your ATEM Talkback Converter 4K's front control panel features two rows of talkback buttons, including 'PTT' and 'LTT', or, 'press to talk' and 'lock to talk', for each of the camera inputs. Next to the talkback buttons are PGM 🎨 and Mute 🔍 buttons. All buttons are illuminated white and change to green when selected.
A numbered 'press to talk' button on the front panel of ATEM Talkback Converter 4K flashes red when a camera operator presses the 'call' button on the left side of a Blackmagic Camera Fiber Converter attached to a camera. This indicates when a camera operator needs to get your attention.
The 'press to talk' button illuminates red when a camera is on the ATEM Switcher's Program output. You can see at a glance which cameras are on air because the numbered 'press to talk' buttons for those cameras are red.
PTT 1-8 The 'press to talk' buttons let you communicate with each camera operator independently. The PTT button illuminates green and activates your external or headset microphone while the button is pressed.
LTT 1-8 The 'lock to talk' buttons lock your external or headset microphone open until you press them again. You can even lock your microphone open for all cameras if you want to communicate with all camera operators simultaneously. Cameras can be communicated with independently using PTT even if all LTT buttons are selected.
PGM 📋 Pressing the program button enables program audio with talkback. When a camera operator uses talkback, your ATEM Talkback Converter 4K's program audio level is decreased so talkback can be heard clearly. When PGM is deselected only talkback audio is heard.
Mute ✪ Pressing the 'mute' button will quickly fade the built in speaker to silence. Pressing mute again, or increasing the volume, will restore audio. This button only affects the speaker output and will not affect your program or talkback audio output.

ATEM Talkback Converter 4K's control panel buttons are used for talkback, enabling or disabling program audio, and muting the speaker. The above illustration shows LTT buttons 5, 6, 7 and 8 activated.
You can communicate with a single camera operator even when LTT is selected for all cameras. All LTT buttons are deactivated while PTT is pressed.

Volume is easily adjusted by turning the volume control clockwise and anticlockwise.
Built in Speaker and Volume Control — You can hear program audio and talkback via the control panel speaker, or with headphones via the 1/4" TRS headphones input. Adjust the volume for the speaker or headphones by turning the volume knob on the control panel clockwise or counterclockwise.
Using Blackmagic Converters Setup
Blackmagic Converters Setup is used to configure settings and update the internal software in your ATEM Camera Converter, ATEM Talkback Converter 4K or ATEM Studio Converter.
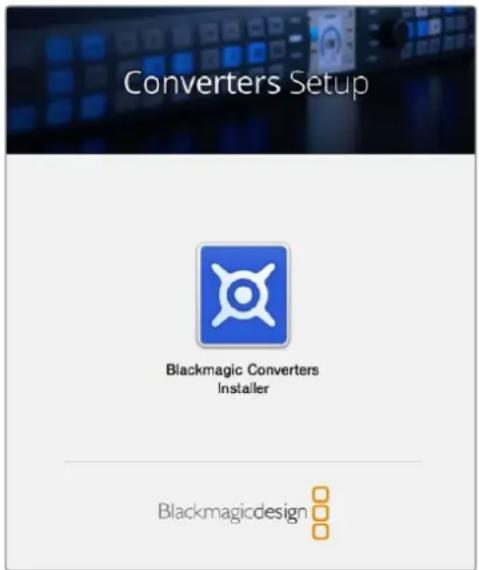
Installing Blackmagic Converters Setup
The Blackmagic Converters utility software can be used to update your converter to new video standards, add compatibility with new hardware or adjust video and audio levels.
Installation on Mac OS X
1 Download the Blackmagic Converters Setup software from www.blackmagicdesign.com
2 Unzip the downloaded file and open the resulting disk image to reveal its contents.
3 Double click the installer and follow the prompts to complete the installation.
4 When the installation has finished, it will prompt you to restart your computer. Click 'restart' to complete the installation. Blackmagic Converters Setup is now installed.
Installation on Windows
1 Download Blackmagic Converters Setup from www.blackmagicdesign.com
2 Unzip the downloaded file. You should see a Blackmagic Converters Setup folder containing this PDF manual and the Blackmagic Converters Setup installer.
3 Double click the installer and follow the prompts to complete the installation.
4 When the installation has finished, it will prompt you to restart your computer. Click 'restart' to complete the installation.
Once the computer has restarted, Blackmagic Converters Setup will be ready to use.
Removing Blackmagic Converters Setup
To remove the Blackmagic Converters software on Mac OS X, launch the Blackmagic Converters.dmg installation file, double click on 'Uninstall Converters' and simply follow the prompts.
To remove the Blackmagic Converters software on Windows, open the Windows control panel and click on 'Programs and Features'. Select 'Blackmagic Converters' from the list, click on 'Uninstall' and follow the prompts.
Updating your ATEM Converter's Software
After installing Blackmagic Converters Setup on your computer, connect a USB cable between the computer and your ATEM Converter. Launch Blackmagic Converters Setup and follow any onscreen prompt to update the internal software in your ATEM converter. If no prompt appears, the internal software is up to date and there is nothing further you need to do.
Setting the Tally Border and Camera Number
In addition to tally lights, you can also display a tally border on an SDI or HDMI monitor connected to your ATEM Camera Converter. This option is set using Blackmagic Converters Setup, where you can also set the camera number.
1 Connect an ATEM Camera Converter to your computer via USB.
2 Launch Blackmagic Converters Setup, select your ATEM Camera Converter and click the 'settings' tab.
3 Set the camera number and also choose whether to show a tally border on the monitor attached to the ATEM Camera Converter. Click 'save' to confirm your settings and exit Blackmagic Converters Setup.
If you chose not to display a tally border, the tally lights on the ATEM Camera Converter will still illuminate when your camera is live on the program output of the ATEM switcher.
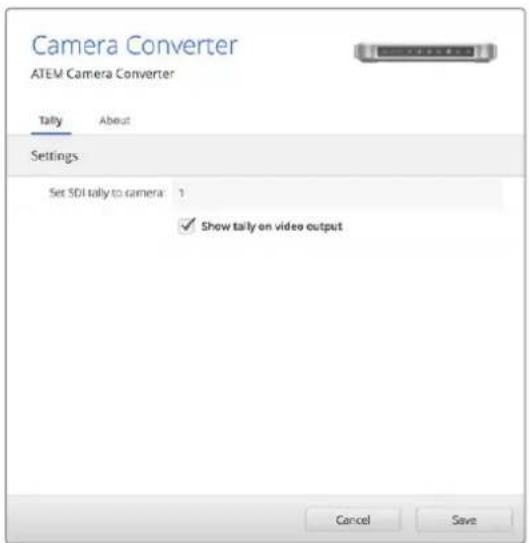
You can easily change the 'camera number' setting for your ATEM Camera Converter using Blackmagic Converters Setup. You can also choose whether or not to display a tally border around your connected monitor by checking or unchecking the 'show tally on my video output' checkbox.
Connection Diagrams
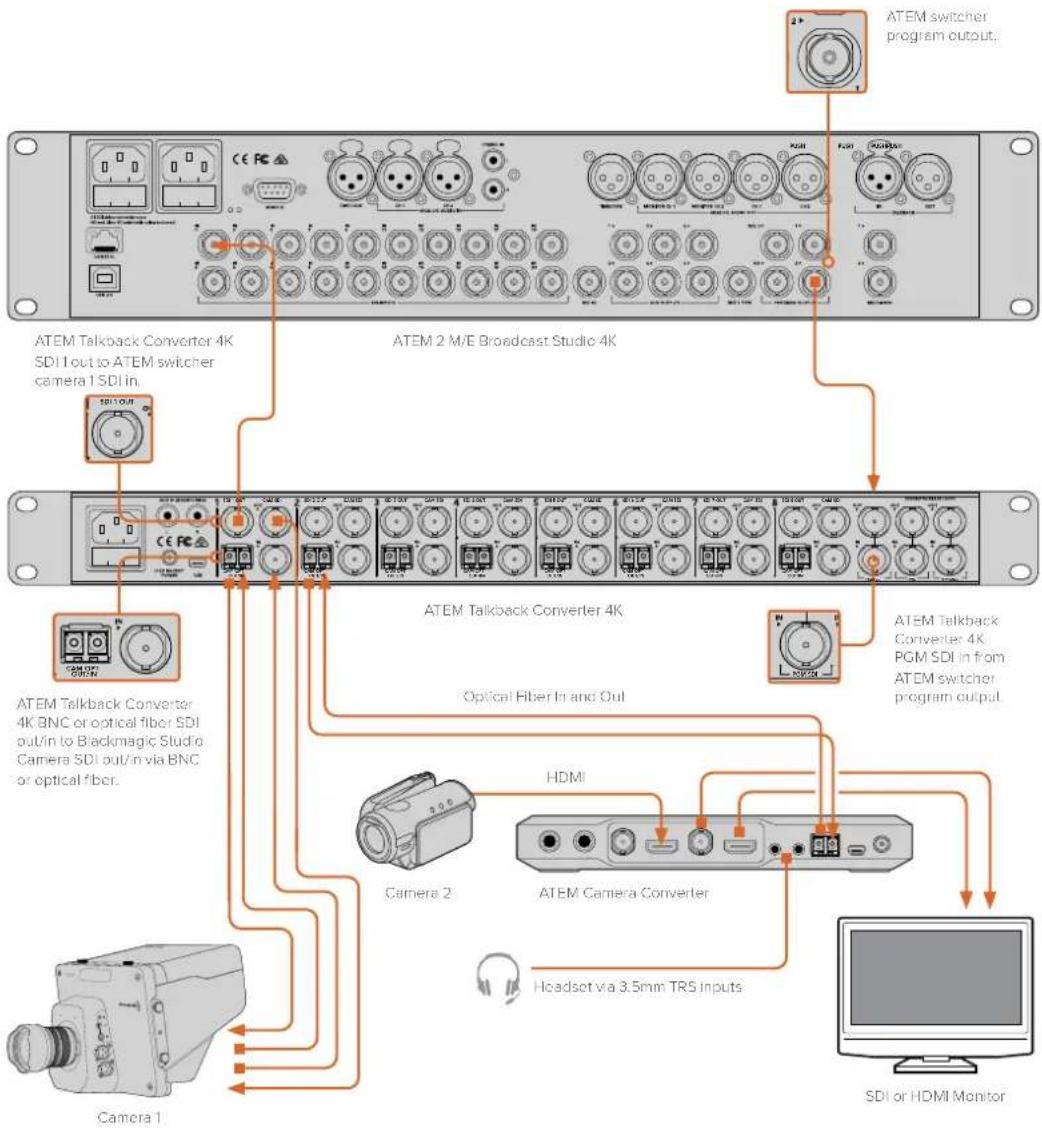
Connecting to an ATEM Switcher via ATEM Talkback Converter 4K
Using an ATEM Talkback Converter 4K with an ATEM switcher gives you talkback control with tally for up to 8 cameras simultaneously. The example below shows an HD workflow using an HDMI camera connected via optical fiber using an ATEM Camera Converter, plus a Blackmagic Studio Camera via optical fiber or BNC.
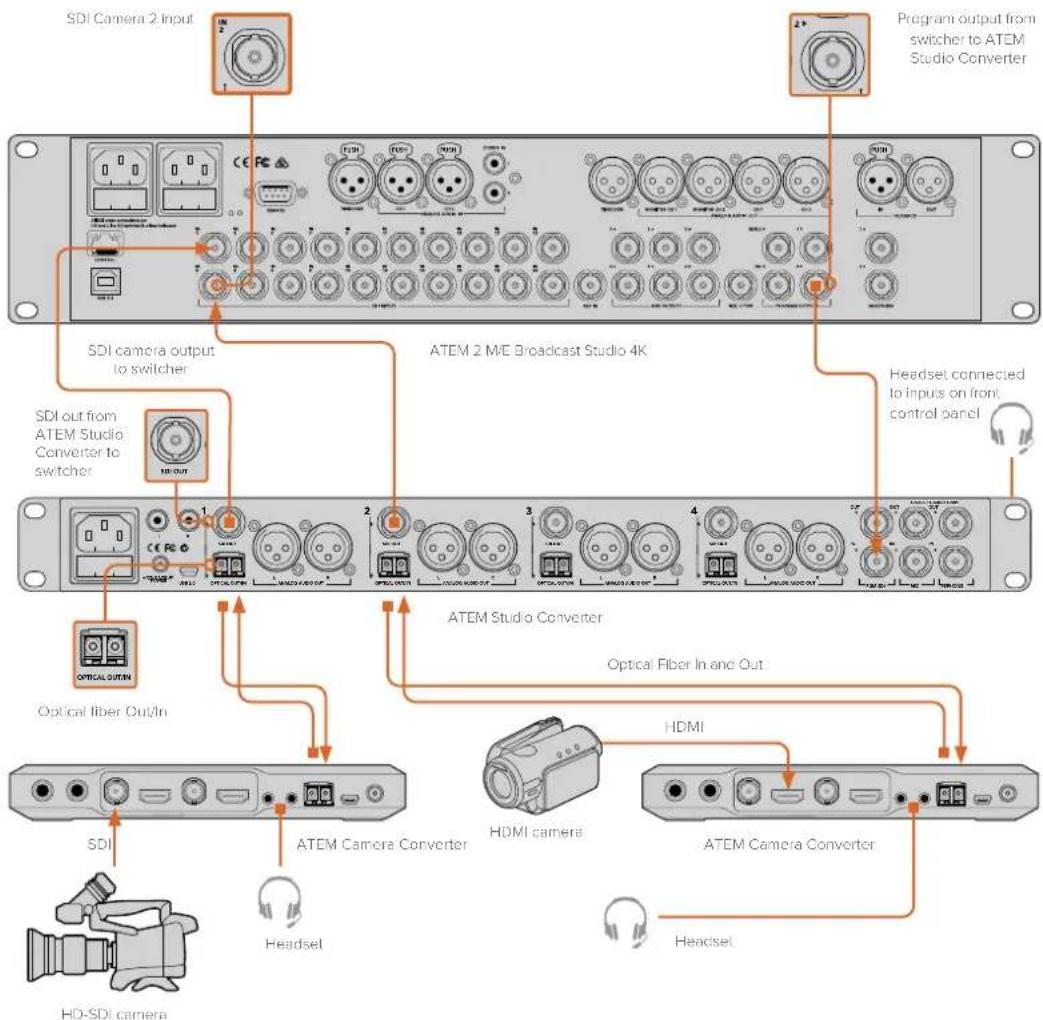
Connecting to an ATEM Switcher via ATEM Camera and Studio Converters
This example shows a 3G-SDI workflow using two cameras connected to an ATEM 2 M/E Broadcast Studio 4K via two ATEM Camera Converters partnered with an ATEM Studio Converter. You can use ATEM Studio Converter's XLR analog outputs to send each camera's audio to a mixing desk. ATEM Camera Converters can be used to convert HDMI cameras to SDI so you can connect them to a switcher over long distances and get tally and talkback via optical fiber.


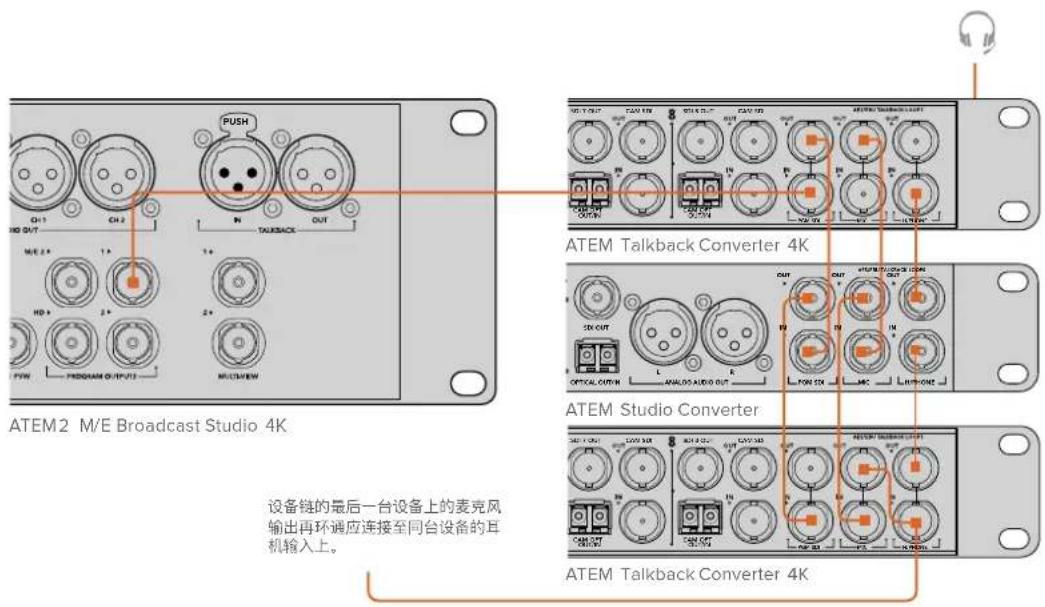
Looping Multiple ATEM Converters
If you have more cameras than a single ATEM Talkback Converter 4K or ATEM Studio Converter can support, you can expand the number of camera connections by linking ATEM Converters together. This example shows two ATEM Talkback Converter 4K's and an ATEM Studio Converter connected together so up to 20 cameras can be used. The first unit receives the program output from the switcher. The talkback headset or external microphone should be connected to the front panel of the first unit. The first unit's program and microphone outputs are then looped to the corresponding inputs of the next unit. The last unit in the chain should loop its microphone output back to its own headphone input. The headphone output should be connected to the headphone input of each previous unit in turn until the first unit is connected. This completes the loop so that all ATEM Converters can share talkback.

Help
Getting Help
The fastest way to obtain help is to go to the Blackmagic Design online support pages and check the latest support material available for your ATEM converter.
Blackmagic Design Online Support Pages
The latest manual, software and support notes can be found at the Blackmagic Design Support Center at www.blackmagicdesign.com/support.
Contacting Blackmagic Design Support
If you can't find the help you need in our support material, please use the "Send us an email" button, on the support page for your ATEM converter model, to email a support request. Alternatively, click on the "Find your local support team" button on the support page and call your nearest Blackmagic Design support office.
Using the Blackmagic Design Forum
The Blackmagic Design online forum on our website is another resource you can visit for help. This can be a faster way of getting help as there may already be answers you can find on the forum which will keep you moving forward. You can visit the forum at https://forum.blackmagicdesign.com
Checking the Version Currently Installed
To check which version of Blackmagic Converters Setup software is installed on your computer, open the About Blackmagic Converters Setup window.
- On Mac OS X, open Blackmagic Converters Setup from the Applications folder. Select About Blackmagic Converters Setup from the application menu to reveal the version number.
- On Windows 7, open Blackmagic Converters Setup from your Start menu. Click on the Help menu and select About Blackmagic Converters Setup to reveal the version number.
- On Windows 8, open Blackmagic Converters Setup from the Blackmagic Converters Setup tile on your Start page. Click on the Help menu and select About Blackmagic Converters Setup to reveal the version number.
- On Windows 10, open Blackmagic Converters Setup from your Start menu or click the Blackmagic Converters Setup tile on your Start page. Click the Help menu and Select About Blackmagic Converters Setup to reveal the version number.
How to Get the Latest Software Updates
After checking the version of Blackmagic Converters Setup software installed on your computer, please visit the Blackmagic Support Center at www.blackmagicdesign.com/support to check for the latest updates. While it is usually a good idea to run the latest updates, it is a wise practice to avoid updating any software if you are in the middle of an important project.
Regulatory Notices

Disposal of Waste of Electrical and Electronic Equipment Within the European Union.
The symbol on the product indicates that this equipment must not be disposed of with other waste materials. In order to dispose of your waste equipment, it must be handed over to a designated collection point for recycling. The separate collection and recycling of your waste equipment at the time of disposal will help conserve natural resources and ensure that it is recycled in a manner that protects human health and the environment. For more information about where you can drop off your waste equipment for recycling, please contact your local city recycling office or the dealer from whom you purchased the product.

This equipment has been tested and found to comply with the limits for a Class A digital device, pursuant to Part 15 of the FCC rules. These limits are designed to provide reasonable protection against harmful interference when the equipment is operated in a commercial environment. This equipment generates, uses, and can radiate radio frequency energy and, if not installed and used in accordance with the instructions, may cause harmful interference to radio communications. Operation of this product in a residential area is likely to cause harmful interference, in which case the user will be required to correct the interference at personal expense.
Operation is subject to the following two conditions:
1 This device may not cause harmful interference.
2 This device must accept any interference received, including interference that may cause undesired operation.
Connection to HDMI interfaces must be made with high quality shielded HDMI cables.
This equipment has been tested for compliance with the intended use in a commercial environment. If the equipment is used in a domestic environment, it may cause radio interference.

KCC-REM-BMD-ATEMCameraConv
MSIP-REM-BMD-201602002
KCC-REM-BMD-ATEMStudioConv
ISED Canada Statement
This device complies with Canadian standards for Class A digital apparatus.
Any modifications or use of this product outside its intended use could void compliance to these standards.
Connection to HDMI interfaces must be made with high quality shielded HDMI cables. This equipment has been tested for compliance with the intended use in a commercial environment. If the equipment is used in a domestic environment, it may cause radio interference.
Safety Information
The following safety information applies to mains powered products.
This equipment must be connected to a mains socket outlet with a protective earth connection.
To reduce the risk of electric shock, do not expose this equipment to dripping or splashing.
This equipment is suitable for use in tropical locations with an ambient temperature of up to 40^ C.
Ensure that adequate ventilation is provided around the product and is not restricted. When rack mounting, ensure the ventilation is not restricted by adjacent equipment.
No operator serviceable parts inside. Refer servicing to your local Blackmagic Design service centre.
Use only at altitudes not more than 2000m above sea level.
Some products have the facility to connect small form-factor transceiver (SFP) optical fibre modules. Only use Laser class 1 optical SFP modules.
Recommended Blackmagic Design SFP modules:
- 3G-SDI: PL-4F20-311C
- 6G-SDI: PL-8F10-311C
-12G-SDI: PL-TG10-311C
State of California statement
This product can expose you to chemicals such as trace amounts of polybrominated biphenyls within plastic parts, which is known to the state of California to cause cancer and birth defects or other reproductive harm.
For more information go to www.P65Warnings.ca.gov.
Warning for Authorized Service Personnel
Caution — Double Pole/Neutral Fusing
The power supply contained in this equipment has a fuse in both line and neutral conductors and is suitable for connection to the IT power distribution system in Norway.

Warranty
12 Month Limited Warranty
Blackmagic Design warrants that this product will be free from defects in materials and workmanship for a period of 12 months from the date of purchase. If a product proves to be defective during this warranty period, Blackmagic Design, at its option, either will repair the defective product without charge for parts and labor, or will provide a replacement in exchange for the defective product.
In order to obtain service under this warranty, you the Customer, must notify Blackmagic Design of the defect before the expiration of the warranty period and make suitable arrangements for the performance of service. The Customer shall be responsible for packaging and shipping the defective product to a designated service center nominated by Blackmagic Design, with shipping charges pre paid. Customer shall be responsible for paying all shipping charges, insurance, duties, taxes, and any other charges for products returned to us for any reason.
This warranty shall not apply to any defect, failure or damage caused by improper use or improper or inadequate maintenance and care. Blackmagic Design shall not be obligated to furnish service under this warranty: a) to repair damage resulting from attempts by personnel other than Blackmagic Design representatives to install, repair or service the product, b) to repair damage resulting from improper use or connection to incompatible equipment, c) to repair any damage or malfunction caused by the use of non Blackmagic Design parts or supplies, or d) to service a product that has been modified or integrated with other products when the effect of such a modification or integration increases the time or difficulty of servicing the product.
THIS WARRANTY IS GIVEN BY BLACKMAGIC DESIGN IN LIEU OF ANY OTHER WARRANTIES, EXPRESS OR IMPLIED. BLACKMAGIC DESIGN AND ITS VENDORS DISCLAIM ANY IMPLIED WARRANTIES OF MERCHANTABILITY OR FITNESS FOR A PARTICULAR PURPOSE. BLACKMAGIC DESIGN'S RESPONSIBILITY TO REPAIR OR REPLACE DEFECTIVE PRODUCTS IS THE WHOLE AND EXCLUSIVE REMEDY PROVIDED TO THE CUSTOMER FOR ANY INDIRECT, SPECIAL, INCIDENTAL OR CONSEQUENTIAL DAMAGES IRRESPECTIVE OF WHETHER BLACKMAGIC DESIGN OR THE VENDOR HAS ADVANCE NOTICE OF THE POSSIBILITY OF SUCH DAMAGES. BLACKMAGIC DESIGN IS NOT LIABLE FOR ANY ILLEGAL USE OF EQUIPMENT BY CUSTOMER. BLACKMAGIC IS NOT LIABLE FOR ANY DAMAGES RESULTING FROM USE OF THIS PRODUCT. USER OPERATES THIS PRODUCT AT OWN RISK.
© Copyright 2020 Blackmagic Design. All rights reserved. 'Blackmagic Design', 'DeckLink', 'HDLink', 'Workgroup Videohub', 'Multibridge Pro', 'Multibridge Extreme', 'Intensity' and 'Leading the creative video revolution' are registered trademarks in the US and other countries. All other company and product names may be trade marks of their respective companies with which they are associated.
インストール/オペレーションマニュアル
ATEM
コンバーター
2020年3月
日本語

natural_image
Circular portrait photo of a smiling man in a dark shirt against a gray background (no text or symbols)ようこそ
Blackmagic Design CEO
グラント・ペティ
目次
ATEMコンバーター
はじめに 31
ATEMコンバーターについて 31
ATEM Camera Converterの接続 32
natural_image
Front view of a network device with ports and connectors (no visible text or symbols)ATEM Camera Converter
ATEM Studio Converter
natural_image
Front and back view of a black audio equipment rack with multiple ports and control buttons (no readable text or symbols)ATEM Studio Converter
ATEM Talkback Converter 4K
natural_image
Front and back view of a black industrial rack-mounted server unit with ports, buttons, and connectors (no visible text or labels)natural_image
Back panel of a computer interface showing ports and connectors (no text or symbols visible)natural_image
Back panel of a computer interface showing ports and buttons with an orange annotation pointing to two circular features (no text or symbols present)natural_image
Back panel of a computer interface showing ports and connectors, with an inset diagram of two speakers (no text or labels visible)natural_image
Diagram of a dual-pin electrical connector with black and gray casing (no text or symbols)natural_image
Back panel of a computer interface showing two circular ports and labeled buttons (no text or symbols visible)natural_image
Simple diagram showing a red circle above a gray rectangular block with a downward arrow (no text or symbols)カメラ番号ボタン。
natural_image
3D technical drawing of a mechanical component with two circular holes and a rectangular base (no text or symbols)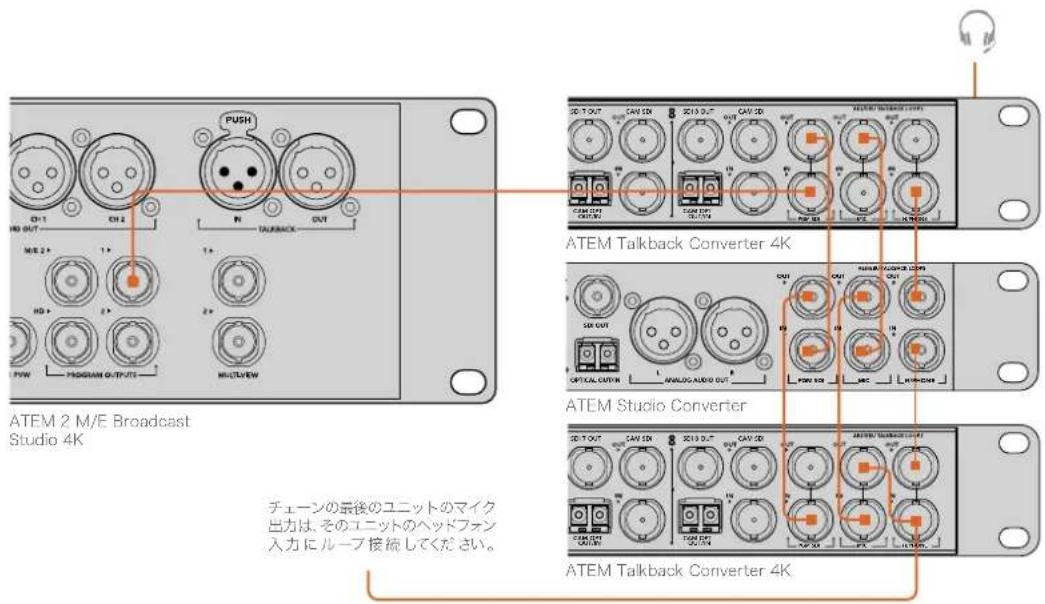
- 3G-SDI: PL-4F20-311C
- 6G-SDI:PL-8F10-311C
- 12G-SDI: PL-TG10-311C
カリフォルニア州ステートメント
natural_image
Circular portrait photo of a smiling man in a black shirt against a gray background (no text or symbols)Bienvenue
Connector I'ATEM Talkback Converter 4K 63
natural_image
Front view of a white wireless router with ports and connectors (no visible text or symbols)ATEM Camera Converter
ATEM Studio Converter
natural_image
Front and back view of a black audio equipment rack with multiple ports and buttons (no readable text or symbols)ATEM Studio Converter
ATEM Talkback Converter 4K
natural_image
Front and back view of a rack-mounted audio equipment unit with ports, buttons, and connectors (no visible text or labels)natural_image
Back panel of a computer interface showing ports and connectors (no text or symbols visible)natural_image
Back panel of a computer interface showing ports and buttons with an orange annotation pointing to a pair of circular eyes (no text or symbols present)natural_image
Back panel of a computer monitor showing ports and connectors, with an inset diagram of two speakers (no text or labels)Module SFP fibre optique de l'ATEM Camera Converter.
natural_image
Diagram of a dual-core cable connector with two connectors (no text or symbols)natural_image
Back panel of a computer interface showing two circular ports and labeled ports (no text or symbols visible)natural_image
Simple diagram showing a red circle above a gray rectangular base with a vertical line and a small dot at the bottom (no text or symbols)natural_image
3D technical drawing of a mechanical component with multiple circular holes and rectangular bases (no text or symbols)
natural_image
Circular portrait photo of a smiling man with short hair, wearing a dark collared shirt (no text or symbols visible)Willkommen
CEO Blackmagic Design
Inhaltsverzeichnis
ATEM Converter
Erste Schritte 83
natural_image
Front view of a blackrock device with ports and connectors (no visible text or symbols)ATEM Camera Converter
ATEM Studio Converter
natural_image
Front and back view of a black industrial rack-mounted device with ports, buttons, and connectors (no visible text or labels)ATEM Studio Converter
ATEM Talkback Converter 4K
natural_image
Front and back view of a black electronic device rack with ports, buttons, and connectors (no readable text or symbols)natural_image
Back panel of a computer interface showing ports and connectors (no text or symbols visible)natural_image
Back panel of a computer monitor showing ports and buttons (no text or labels visible)natural_image
Back panel of a computer monitor showing ports and an inset diagram of two speakers (no text or labels)natural_image
Diagram of a dual-pin electrical connector (no text or symbols)natural_image
Back panel of a computer interface showing two circular ports and various ports (no text or labels visible)natural_image
Simple diagram showing a red circle above a gray rectangular base with a downward arrow, no text or symbols present.Kameranummerntaste
ATEM Camera Converter anbringen
natural_image
3D technical drawing of a mechanical component with two circular holes and a rectangular base (no text or symbols)California Proposition
natural_image
Circular portrait photo of a smiling man in a dark shirt against a gray background (no text or symbols)Bienvenido
natural_image
Front view of a black-and-white network device with ports and connectors (no visible text or symbols)ATEM Camera Converter
ATEM Studio Converter
natural_image
Front and back view of a rack-mounted audio equipment unit (no visible text or labels)ATEM Studio Converter
ATEM Talkback Converter 4K
natural_image
Front and back view of a rack-mounted audio equipment unit with ports, knobs, and a power connector (no visible text or labels)Modelo ATEM Talkback Converter 4K con ocho transceptores ópticos SFP instalados
natural_image
Back panel of a computer drive showing ports and connectors (no text or symbols visible)natural_image
Back panel of a computer interface showing ports and buttons with an orange annotation pointing to a pair of circular buttons (no text or symbols present)natural_image
Back panel of a computer interface showing ports and connectors, with an inset diagram of two speakers (no text or labels)natural_image
Diagram of a dual-core cable connector with two connectors (no text or symbols)Cable de red con dos conectores LC
natural_image
Back panel of a computer interface showing two circular ports and labeled ports (no text or symbols visible)natural_image
Simple diagram showing a red circle above a gray rectangular base with a downward arrow pointing to it (no text or symbols)natural_image
3D technical drawing of a mechanical component with three circular holes and two parallel slots (no text or symbols)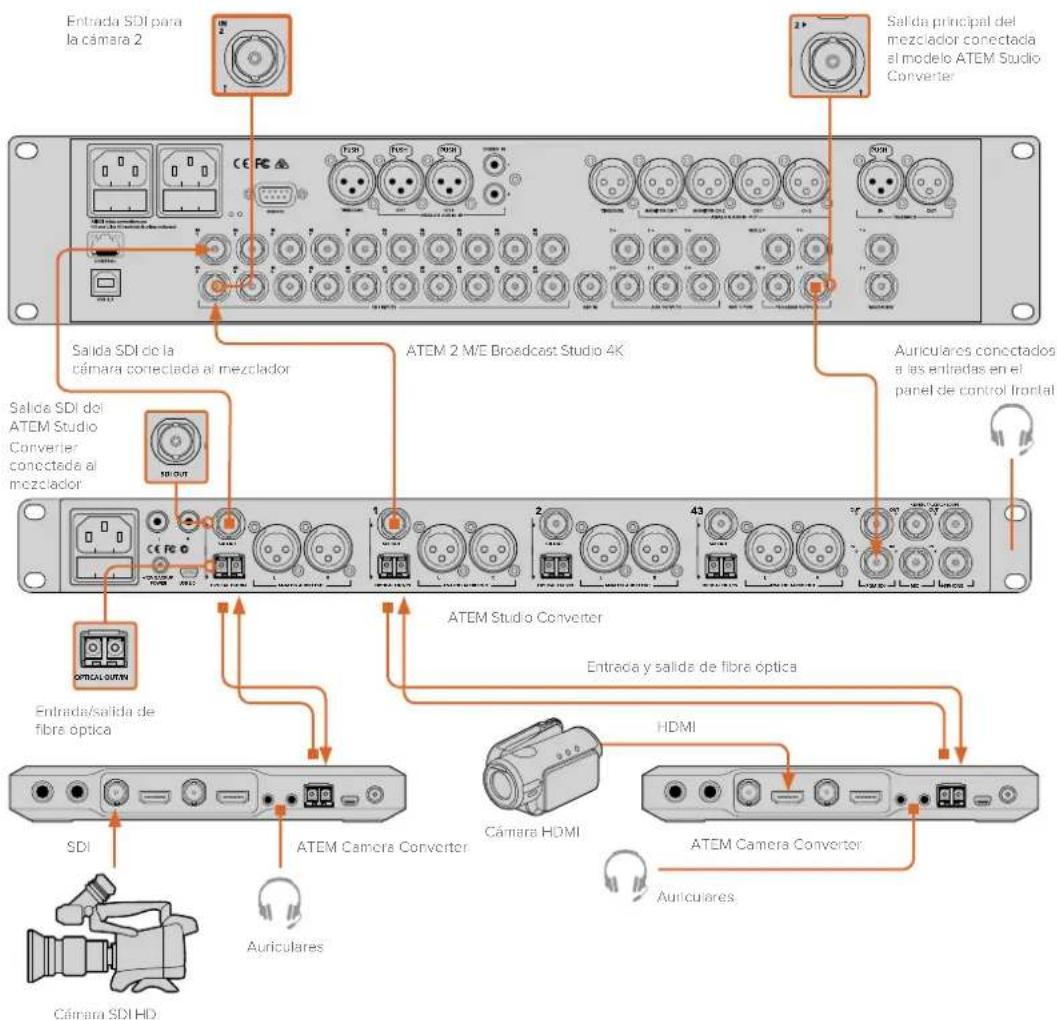
- SDI 3G: PL-4F20-311C
- SDI 6G: PL-8F10-311C
- SDI 12G; PL-TG10-311C
安装操作手册
ATEM 转换器系列
2020年3月
中文
natural_image
Circular portrait photo of a smiling man in a dark shirt against a textured gray background (no text or symbols)欢迎辞
natural_image
Front view of a white electronic device with ports and connectors (no visible text or symbols)ATEM Camera Converter
ATEM Studio Converter
natural_image
Front and back view of a rack-mounted audio equipment unit (no visible text or labels)ATEM Studio Converter
ATEM Talkback Converter 4K
natural_image
Front and back view of a black audio workstation interface with ports, buttons, and connectors (no readable text or symbols)natural_image
Back panel of a computer interface showing ports and connectors (no text or symbols visible)natural_image
Back panel of a computer interface showing ports and buttons with a highlighted screen (no text or symbols)natural_image
Back panel of a computer interface showing ports and connectors, with an inset diagram of two speakers (no text or labels)natural_image
Diagram of two black cables connected to a gray connector (no text or symbols)带有两个LC连接头的光纤跳线
连接音频
natural_image
Back panel of a computer interface showing two circular ports and labeled ports (no text or symbols visible)natural_image
Simple diagram showing a red circle above a gray rectangular block with a downward arrow, no text or symbols present.图为摄影机编号按钮。
安装ATEM Camera Converter
natural_image
3D technical drawing of a mechanical component with three circular holes and two parallel slots (no text or symbols)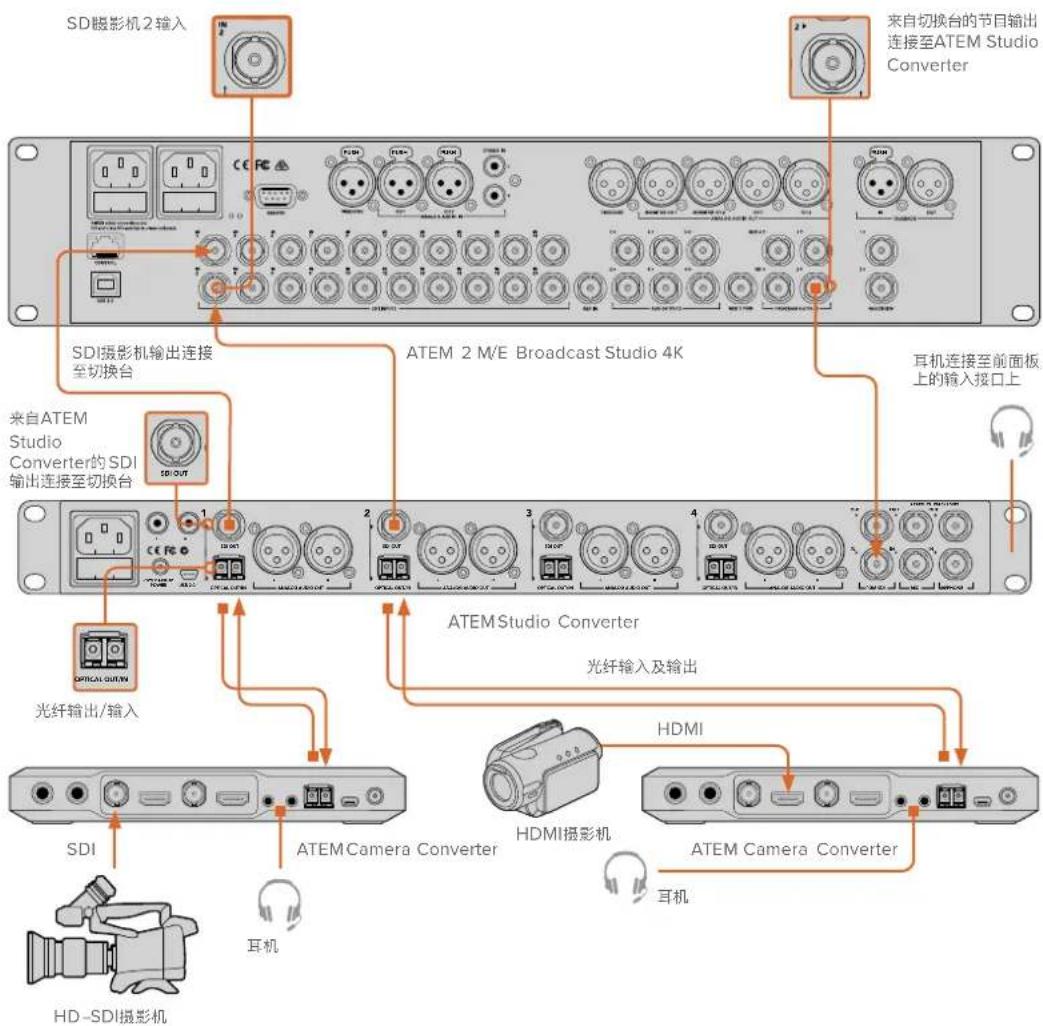
설치 및 사용 설명서
ATEM 컨버터
2020년 3월
한국어
natural_image
Circular portrait photo of a smiling man in a black shirt against a gray background (no text or symbols)환영합니다
natural_image
White wireless router device with ports and connectors (no visible text or symbols)ATEM Camera Converter
ATEM Studio Converter
natural_image
Front and back view of a black audio workstation rack with multiple ports and indicator lights (no visible text or labels)ATEM Studio Converter
ATEM Talkback Converter 4K
natural_image
Front and back view of a black audio equipment rack with multiple ports and control buttons (no visible text or labels)natural_image
Back panel of a computer drive showing ports and connectors (no text or symbols visible)natural_image
Back panel of a computer monitor showing ports, buttons, and a close-up of two circular eyes (no text or symbols visible)natural_image
Back panel of a computer interface showing ports and connectors, with an inset diagram highlighting two ports (no text or symbols present)natural_image
Diagram of a dual-core cable connector with two leads (no text or symbols)natural_image
Back panel of a computer interface showing two circular ports and labeled ports (no text or symbols visible)natural_image
Simple diagram showing a red circle above a gray rectangular base with a downward arrow, no text or symbols present.PTT(Press tp Talk) 버튼
카메라 번호 버튼
natural_image
3D rendering of a mechanical component with three circular holes and two parallel slots (no text or symbols)natural_image
Circular portrait photo of a smiling man in a black shirt against a gray background (no text or symbols)natural_image
Front view of a white electronic device with ports and connectors (no visible text or symbols)ATEM Camera Converter
ATEM Studio Converter
natural_image
Front and back view of a black audio recording equipment rack with ports and control buttons (no visible text or symbols)ATEM Studio Converter
ATEM Talkback Converter 4K
natural_image
Front and back view of a black audio workstation (no visible text or labels)natural_image
Back panel of a computer interface showing ports and connectors (no text or symbols visible)natural_image
Back panel of a computer interface showing ports and buttons with an orange annotation pointing to a pair of circular eyes (no text or symbols present)natural_image
Back panel of a computer monitor showing ports and connectors, with an inset diagram of two speakers (no text or labels)natural_image
Diagram of a dual-core cable connector with two leads (no text or symbols)natural_image
Back panel of a computer interface showing two circular ports and labeled buttons (no text or symbols visible)natural_image
Simple diagram showing a red circle above a gray rectangular base with a downward arrow, no text or symbols present.natural_image
3D technical drawing of a mechanical component with three circular holes and two parallel slots (no text or symbols)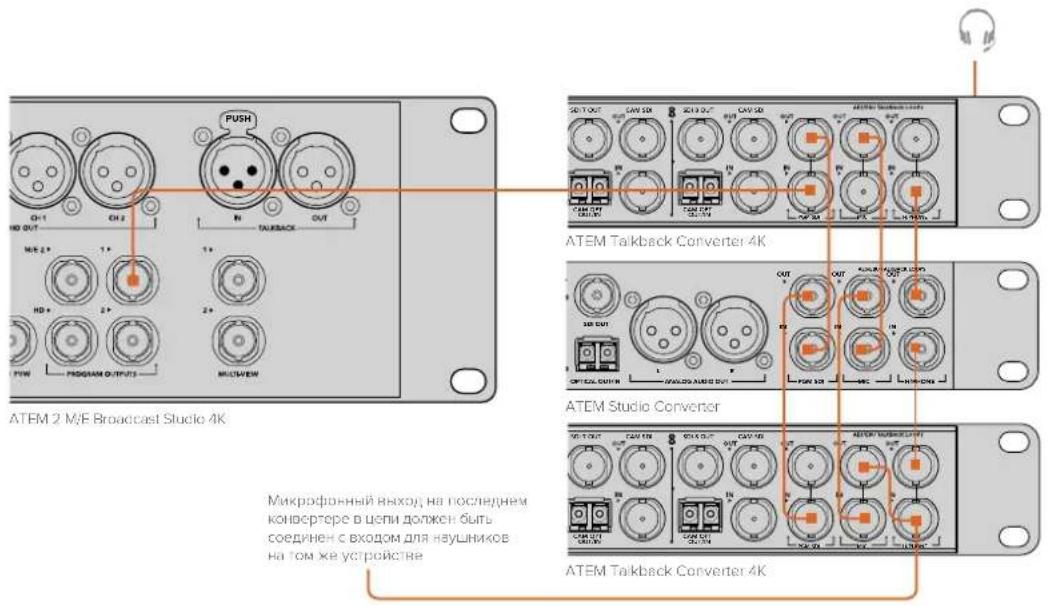
-12G-SDI: PL-TG10-311C
natural_image
Circular portrait photo of a smiling man in a dark shirt against a gray background (no text or symbols)natural_image
Front view of a white electronic device with ports and connectors (no visible text or symbols)ATEM Camera Converter
ATEM Studio Converter
natural_image
Front and back view of a black audio equipment rack with multiple ports and indicator lights (no readable text or symbols)ATEM Studio Converter
ATEM Talkback Converter 4K
natural_image
Front and back view of a black audio equipment rack with ports, buttons, and connectors (no visible text or symbols)ATEM Talkback Converter 4K con 8 moduli SFP opzlonali Installati
Connettere ATEM Camera Converter
natural_image
Back panel of a computer drive showing ports and connectors (no text or symbols visible)natural_image
Back panel of a computer interface showing ports and buttons with an orange annotation pointing to a pair of circular eyes (no text or symbols present)natural_image
Back panel of a computer interface showing ports and connectors, with an inset diagram of two speakers (no text or labels visible)ATEM Camera Converter con un modulo SFP
natural_image
Diagram of a dual-pin electrical connector with black and gray wires (no text or symbols)natural_image
Back panel of a computer interface showing two circular buttons and ports (no text or labels visible)natural_image
Simple diagram showing a red circle above a gray rectangular block with a downward arrow (no text or symbols)natural_image
3D technical drawing of a mechanical component with multiple holes and slots (no text or symbols)natural_image
Circular portrait photo of a smiling man in a black shirt against a gray background (no text or symbols)Bem-vindo
natural_image
Front view of a network device with ports and connectors (no visible text or symbols)ATEM Camera Converter.
ATEM Studio Converter
natural_image
Front and back view of a black audio equipment rack with multiple ports and indicator lights (no visible text or labels)ATEM Studio Converter.
ATEM Talkback Converter 4K
natural_image
Front and back view of a black industrial control panel with buttons, ports, and connectors (no visible text or labels)ATEM Talkback Converter 4K com 8 módulos SFP opcionais instalados.
Conectar ATEM Camera Converter
natural_image
Back panel of a computer interface showing ports and connectors (no text or symbols visible)Conectar Seu Headset
natural_image
Back panel of a computer monitor showing ports and buttons (no text or labels visible)Conectar Seu Monitor
natural_image
Back panel of a computer interface showing ports and connectors, with an inset diagram of two speakers (no text or labels visible)Módulo SFP de fibra óptica do ATEM Camera Converter.
natural_image
Diagram of a dual-core cable connector with two connectors (no text or symbols)natural_image
Back panel of a computer interface showing two circular ports and labeled ports (no text or symbols visible)Conecte a saída de programa SDI do seu switcher à entrada "PGM SDI" do seu ATEM Studio Converter.
Conectar Seu Headset
Conecte a saída de programa SDI do seu switcher à entrada "PGM SDI" do seu ATEM Talkback Converter 4K.
Conectar Seu Headset
Seu ATEM Talkback Converter 4K utiliza headsets aeronáuticos que são plugados via conectores TRS de 1/4" para fones de ouvido e 0,206" para microfones.
natural_image
Simple diagram showing a red circle above a gray rectangular base with an orange arrow pointing downward (no text or symbols)natural_image
3D technical drawing of a mechanical component with two circular holes and a rectangular base (no text or symbols)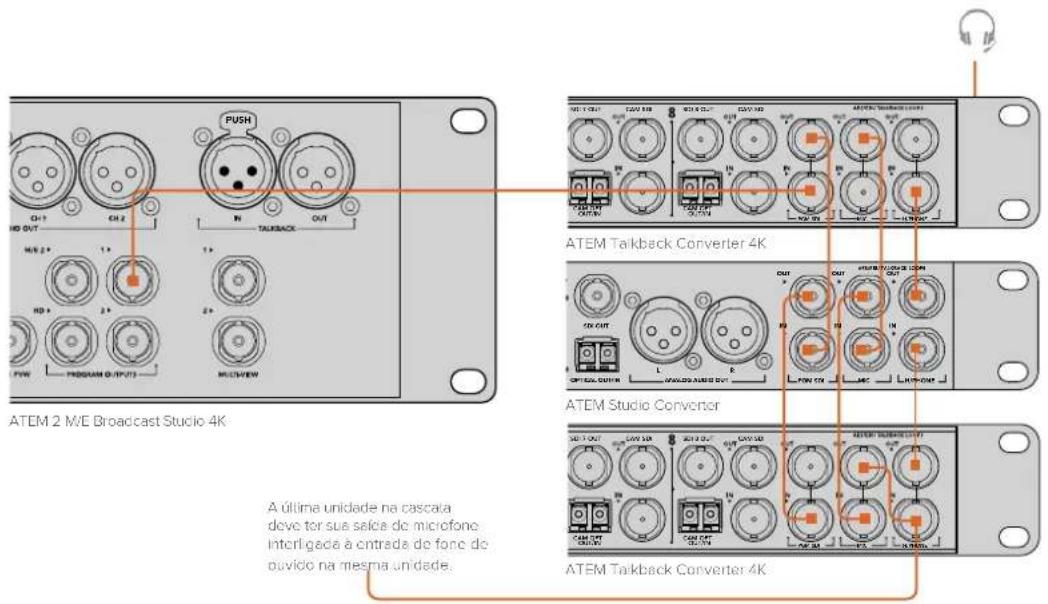
Ajuda
Obter Ajuda
natural_image
Circular portrait photo of a smiling man in a black shirt against a gray background (no text or symbols)Hoş Geldiniz
Blackmagic Design CEO
İçindekiler
ATEM Çeviricileri
Başlarken
natural_image
Front view of a white electronic device with ports and connectors (no visible text or symbols)ATEM Camera Converter
ATEM Studio Converter
natural_image
Front and back view of a black audio equipment rack with multiple ports and connectors (no visible text or symbols)ATEM Studio Converter.
ATEM Talkback Converter 4K
natural_image
Front and back view of a black audio equipment rack with multiple ports and control buttons (no visible text or labels)natural_image
Back panel of a computer interface showing ports and a close-up of two circular components (no text or symbols visible)natural_image
Back panel diagram showing ports and connectors with an inset diagram of two speakers (no text or labels)natural_image
Pure diagram of two black cables connected to a gray connector (no text or symbols)natural_image
Back panel of a computer interface showing two circular ports and various ports (no text or labels visible)natural_image
Simple diagram showing a red circle above a gray rectangular block with a downward arrow, no text or symbols present.Talkback Headphone Volume (Talkback Kulaklığı Ses Seviyesi)
Kamera numarası butonu.