Teranex Mini 1 - Audio/video converter Blackmagic Design - Free user manual and instructions
Find the device manual for free Teranex Mini 1 Blackmagic Design in PDF.

| Product Type | Professional audio/video converter |
| Brand and Model | Blackmagic Design Teranex Mini 1 |
| Dimensions (approx) | 140 x 171 x 48 mm (L x W x H) |
| Weight (approx) | 0.5 kg |
| Power Supply | AC 90-240 V via IEC connector or PoE+ (Power over Ethernet+) |
| Power Consumption | Approximately 30 W |
| Supported Video Formats | SD, HD, Ultra HD up to 2160p60 and 8K (depending on model), SD/HD/3G/6G/12G-SDI |
| Connectivity | SDI BNC inputs/outputs, HDMI, component, composite, S-Video, XLR audio, RCA, optical TOSLINK, Ethernet, USB |
| Main Functions | Bidirectional SDI/HDMI/analog/optical conversion, audio embedding/de-embedding, 3D LUT support (33 points), scopes (waveform, vectorscope, histogram, parade), monitor calibration with probe |
| Audio Functions | SDI audio de-embedding up to 16 channels, balanced/unbalanced analog input/output, AES/EBU, timecode, gain control |
| Network Management | Static or dynamic IP configuration via Ethernet, Teranex Setup utility (USB or network), optional Smart Panel |
| Maintenance and Cleaning | Clean with a soft, dry cloth. Do not use liquids or abrasive products. |
| Safety | Connect to an outlet with a protective conductor. Do not expose to liquids. Use indoors, altitude <2000 m, ambient temperature <40°C. |
| Spare Parts and Repairability | No user-serviceable parts. Contact Blackmagic Design support for any repairs. |
| Warranty | 36 months for the chassis, 12 months for connectors, cables, fans, fiber modules, fuses, keypads, and batteries |
| General Information | High-quality broadcast converter with 12G-SDI technology, rack-mount compatible (Teranex Mini Rack Shelf), optional Smart Panel |
Frequently Asked Questions - Teranex Mini 1 Blackmagic Design
User questions about Teranex Mini 1 Blackmagic Design
0 question about this device. Answer the ones you know or ask your own.
Ask a new question about this device
Download the instructions for your Audio/video converter in PDF format for free! Find your manual Teranex Mini 1 - Blackmagic Design and take your electronic device back in hand. On this page are published all the documents necessary for the use of your device. Teranex Mini 1 by Blackmagic Design.
USER MANUAL Teranex Mini 1 Blackmagic Design
Installation and Operation Manual
Teranex Mini
Converters
April 2020
English, 日本語, Français, Deutsch, Espanol, 中文, français, Pycckn, Italiano, Portuguès and Türkce.
Languages
To go directly to your preferred language, simply click on the hyperlinks listed in the contents below.
English 3
日本語 113
Français 224
Deutsch.335
Espanol.446
中文 557
668
Pycckn.779
Italiano 890
Portugues 1001
Türkce 1112

Welcome
Thank you for purchasing Teranex Mini Converters.
Teranex Minis are 12G-SDI converters that let you convert video and audio for broadcast and production work in the field, on your desk, or mounted in a rack.
With an efficient, compact design, they are not much bigger than Mini Converters and can be placed into any production environment, from single operator post production studios, to large rack based SDI workflows. We're excited to introduce Teranex Mini SDI to DisplayPort 8K HDR to complement Teranex Mini SDI to HDMI 8K HDR. Both of these 8K Mini Converters feature dual on screen scopes and monitor calibration for color accurate monitoring.
This instruction manual contains all the information you need to start using your Teranex Mini Converters.
Please check the support page on our website at www.blackmagicdesign.com for the latest version of this manual and for updates to your Teranex Mini converter's software. Keeping your software up to date will ensure you get all the latest features as well as support for any new SDI formats that might be invented in the future! When downloading software, please register with your information so we can keep you updated when new software is released or you can follow us on twitter to get notifications of any software updates. We are continually working on new features and improvements, so we would love to hear from you!

Grant Petty
CEO Blackmagic Design
Contents
Teranex Mini Converters
Getting Started 5 Teranex Mini - SDI to HDMI 8K HDR 27
Plugging in Power 5 Teranex Mini - IP Video 12G 37
Plugging in Video 5 Teranex Mini - SDI to HDMI 12G 37
Plugging in Audio 5 Teranex Mini-HDMI to SDI 12G 43
Installing Administration Software 6 Teranex Mini - SDI to Analog 12G 47
Installling Blackmagic Teranex Setup 6 Teranex MinI - Analog to SDI 12G 53
Installing Teranex Mini Smart Panel 7 Teranex Mini - SDI to Audio 12G 58
Smart Panel Features 8 Teranex Mini - Audio to SDI 12G 62
Changing Settings 10 Teranex Mini - 12G-SDI to Quad SDI 67
Changing Settings using Switches 10 Teranex Mini - Quad SDI to 12G-SDI
Changing Settings using Teranex Mini - SDI Distribution 12G 76
Blackmagic Teranex Setup 10 Teranex Mini - Optical to HDMI 12G 77
Changing Settings using Teranex Mini-HDMI to Optical 12G 83
Teranex Mini Smart Panel 12
Changing Network Settings 13
Changing Network Settings via USB 13
Changing Network Settings Teneroy Minie Aredio to Optio/132 102
using Teranex Mini Smart Panel 13 Teranex Mini - Audio to Optical 12G 103
Teranex Mini Rack Shelf 14
Teranex Mini Models 14 Regulatory Notices H
Safety Information 111
8K HDR 14 Warranty 112
Getting Started
Plugging in Power
Getting started is as simple as plugging in power and connecting your signal input and output.
To supply power, plug in a standard IEC power cable to your Teranex Mini converter's power input on the rear panel. You can also power your Teranex Mini via Ethernet by plugging into a compatible Ethernet switch that supports PoE+, or 'power over Ethernet plus'.
Teranex Mini Converters support 12G-SDI data rates so will automatically switch between SD, HD and Ultra HD all the way up to 2160p60.
Connect power to your Teranex Mini converter using a standard IEC power cable. Power can also be supplied via a PoE+ compatible Ethernet switch.
Plugging in Video
Plug your source video into your Teranex Mini converter's video input and plug the video output into your destination equipment. Video input and output varies by converter. Depending on your Teranex Mini model, you may have the option of SDI, HDMI, component, composite or S-video input or output.
Plugging in Audio
If you're using embedded audio in SDI or HDMI, audio is already transported via the video input. If using external digital or analog audio, plug into the XLR connectors. The 'R' channel XLR connector can be used for timecode. Some Teranex Mini devices support RCA analog audio or optical audio. Refer to the individual converters detailed in this manual for more information.
Connect analog or digital audio to your Teranex Mini converter's optical audio, RCA, or balanced XLR connectors.
That's all there is to getting started! Now you can change your conversion settings and start using your Teranex Mini. See the 'changing settings' section to learn more.
Installing Administration Software
Installing Blackmagic Teranex Setup
The Teranex setup software is used to update your Teranex Mini and to change video, audio and network settings.
Blackmagic Teranex Setup can be Installed on Mac and Windows computers.
Installation on Mac
1 Download the Blackmagic Teranex Setup software from www.blackmagicdesign.com
2 Unzip the downloaded file and open the resulting disk image to reveal its contents.
3 Double click the installer and follow the prompts to complete the installation.
The Teranex setup utility is now installed.
Installation on Windows
1 Download Blackmagic Teranex Setup from www.blackmagicdesign.com
2 Unzip the downloaded file. You should see a Blackmagic Teranex Setup folder containing this PDF manual and the Teranex setup utility installer.
3 Double click the installer and follow the prompts to complete the installation.
4 When the installation has finished, it will prompt you to restart your computer. Click 'restart' to complete the installation.
Once the computer has restarted, Blackmagic Teranex Setup will be ready to use.
Updating the Internal Software
It is important to ensure that power is connected to the Teranex Mini before connecting a USB cable between the computer and converter.
1 Power your converter.
2 Attach a USB cable from the computer to the converter or connect via Ethernet launch the Teranex setup utility.
If the converter is missing or not detected, Blackmagic Teranex Setup will report, "No converter connected" in the title bar. Otherwise, it will report the model name of your Teranex Mini.
If Blackmagic Teranex Setup contains newer internal software than that currently installed in your Teranex Mini, it will prompt you to update. Just follow the on screen instructions to complete the update. Once the internal software update is complete, you will be able to make adjustments to your Teranex Mini using the Teranex setup utility.

If you have previously set your Teranex Mini to use a static IP address, you can find it on your network by entering the IP Address from the Teranex setup utility home screen.
Installing Teranex Mini Smart Panel
You can also change settings using the optional Teranex Mini Smart Panel. This control panel mounts to the front of your Teranex Mini and replaces the original basic panel that shipped with the converter. You get fast access to your settings using buttons and a rotary knob and you can see the input on the built in LCD.
Installing your optional Smart Panel is easy and because the panels are hot swappable you don't even need to turn off your Teranex Mini converter when installing it.
1 Remove the two M3 screws on each side of your converter's basic front panel using a Pozidriv 2 screwdriver and gently pull the panel away from the front of your Teranex Mini.
2 On the inside of the basic panel, you'll notice a small clear plastic tube attached to the bottom corner. This tube directs light from the LED inside the unit to illuminate the status indicator on the basic panel. This tube should stay attached to the basic front panel.
TIP If reattaching the basic front panel, make sure the light tube is aligned with the slot in the front of the unit.
3 Align the connector on the rear of the Smart Panel with the adjoining connector on the face of your Teranex Mini converter and gently push the Smart Panel towards your converter until the connectors are firmly seated. The Smart Panel should make a firm connection and fit neatly inside the face of your Teranex Mini converter.
4 Re-insert the M3 screws from the original panel.
If your Teranex Mini is installed in a Teranex Mini Rack Shelf, you will need to remove the mini converter from the rack shelf to access the front panel screws.
See the 'Teranex Mini Rack Shelf' section for more information.
The Teranex Mini's USB port is still accessible with the Smart Panel attached. To access the port, simply open the rubber USB dust cover. With the Smart Panel installed, the front panel small switches are covered up and no longer used and this is because all the switch settings and more are now in the menu on the Teranex Smart Panel and can be set using the LCD. The settings available will vary between Teranex Mini's because the features are different between models, but navigation layout on screen is the same, so it's easy to move between models to make changes to settings.
Refer to the 'changing settings' section for information on changing settings using an optional Teranex Mini Smart Panel. The original basic panel is very strong, so if you need to mount your Teranex Mini in the back of a rack system or in areas where there are lots of cables or activity, you can always reinstall the original basic panel.
When installing the Teranex Mini Smart Panel to your Teranex Mini, holding the panel with your fingers and thumb aligned with the panel's rear connector will help guide it into place.
NOTE Some models of Teranex Mini have an integrated Smart Panel preinstalled instead of a basic panel with a set of small switches. The integrated Smart Panel is not detachable, though it functions just like an optional Teranex Mini Smart Panel.
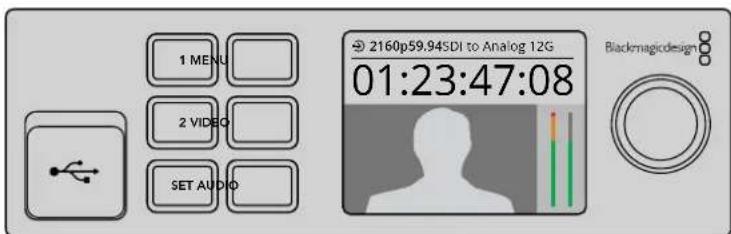
Smart Panel Features
LCD Display
The home screen is the first feature you'll see on your Teranex Mini Smart Panel's LCD display. The home screen shows you important information, including:
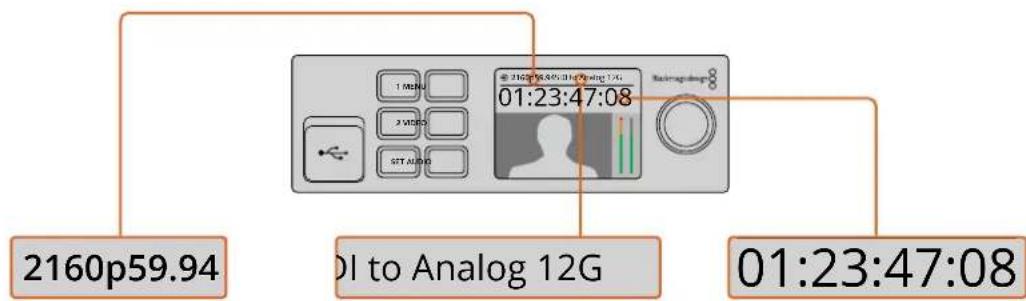
Input video format - The format and frame rate of your video source connected to your Teranex Mini converter.
Converter model - The model of Teranex Mini converter currently connected to the Teranex Mini Smart Panel.
Timecode - The timecode embedded in the video input, or external timecode via the Teranex mini converter's XLR connector.
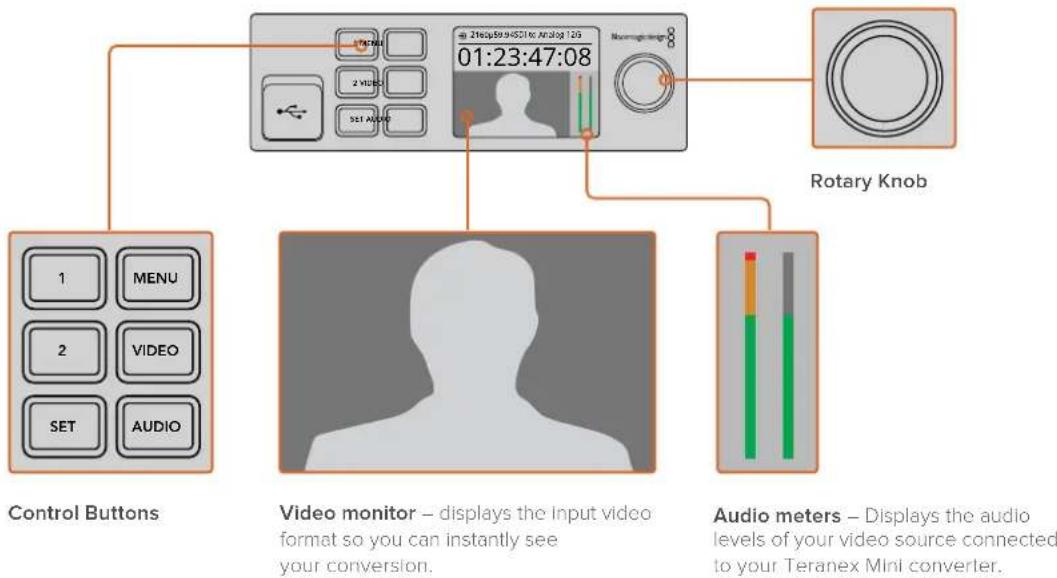
Control Buttons and Rotary Knob
Your Teranex Mini Smart Panel has a set of buttons and a rotary knob that are used to navigate your Teranex Mini Converter's settings menu.
1 and 2 buttons
Press these buttons to increase or decrease numeric setting values, or to move up or down through menu settings.
Set
After changing a setting using the 1 and 2 buttons, press the 'set' button to confirm your setting.
Menu
Press to enter the settings menu for your Teranex Mini converter. You can also press the menu button to step back through menu items.
Video and Audio Buttons
Press the 'video' and 'audio' buttons to take you directly to your Teranex Mini converter's video or audio settings. The settings available will depend on which model your Smart Panel is connected to.
Rotary Knob
Turn the rotary knob clockwise or counter clockwise to navigate through the menu settings and adjust numeric setting values.
Changing Settings
There are three ways to change settings on your Teranex Mini. You can use the switches on the front panel, the Blackmagic Teranex Setup utility, or by mounting a Teranex Mini Smart Panel which lets you change settings using control buttons, a rotary knob and LCD.
Changing Settings using Switches
On the original basic panel of your Teranex Mini you'll see a rubber dust cover which protects a set of small switches used for settings on your converter. The 'on/off' switches are used to configure internal settings and you can easily change them using the tip of a pen.
You'll find a switch settings diagram printed on the base of your converter. Ensure your switch settings correspond to the legend by observing the switch numbers from 1 to 8, left to right. When using the optional Teranex Mini Smart Panel, the switch settings will be overridden by the Smart Panel settings. Your Teranex Mini will retain its last settings whether applied via switch, Smart Panel or Blackmagic Teranex Setup software. If reverting to switch control after removing the Smart Panel or updating your converter's settings via software, you may need to toggle individual switches for new settings to take effect.
For a full description of the switches and their settings, refer to your converter model in this manual. Even though switch settings are printed on the base of your converter, new features in later updates can add new settings so it's worth checking the latest version of this manual for the most up to date information. You can download the latest version from the Blackmagic Design support center at www.blackmagicdesign.com/support
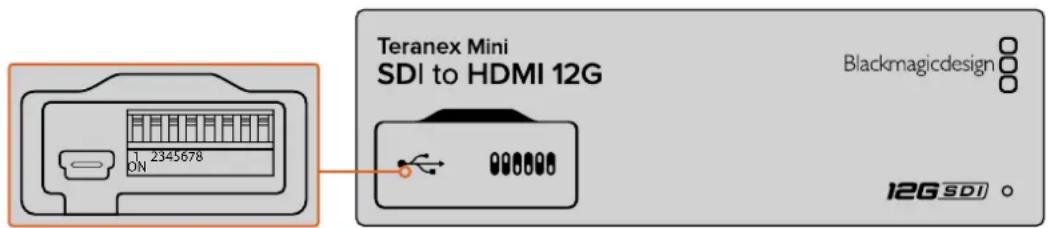
Change settings by adjusting the switches with a pen.
Changing Settings using Blackmagic Teranex Setup
Once installed on your computer, connect the setup utility to your Teranex Mini via USB or Ethernet. If you can't find your Teranex Mini via Ethernet, you may first need to configure it using a USB connection as detailed in the section 'changing network settings.'
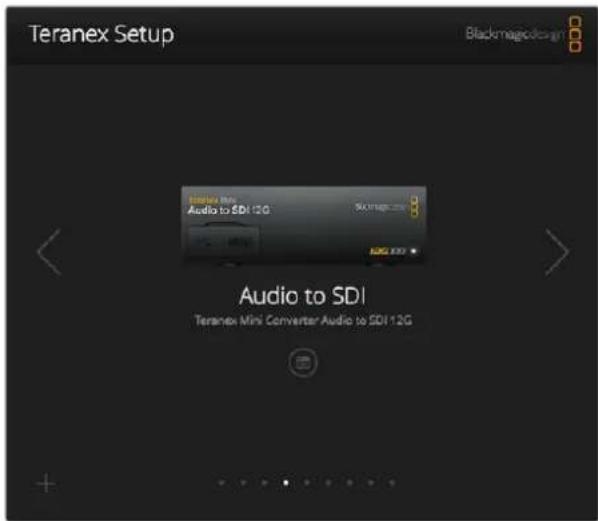
The first thing you'll see when launching the software is the home page. Here you can select the Teranex Mini you want to configure. To change settings, click on the 'settings' icon below the image of your Teranex Mini.
If you have more than one Teranex Mini connected to your network, only the relevant settings for your selected Teranex Mini will be visible. Select your desired converter by clicking the arrows on the left and right side of the Blackmagic Teranex Setup home page.
Adjustments will be immediately saved to your Teranex Mini. This means if power is lost, your settings will be re-established as soon as power is restored.
The Teranex setup utility lets you update your Teranex Mini's internal software and adjust your settings using a Mac or Windows computer.
The configure and about tabs in Blackmagic Teranex Setup are common across all Teranex Mini models.
Configure Tab
The 'configure' tab is the same for all Teranex Minis and contains your converter's network settings. Here you can toggle your converter between dynamic and static network addresses, as well as set up the IP address, subnet mask, and gateway for your Teranex Mini. See the 'changing network settings' section for more detail.
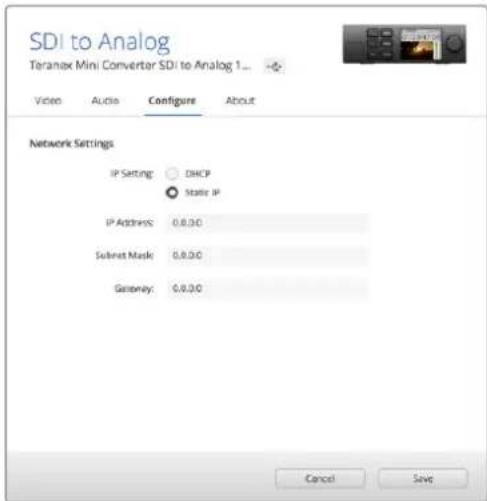
Use the 'configure' tab in Blackmagic Teranex Setup to access network settings.
About Tab
You can use the settings in this tab to name your Teranex Mini, and to identify individual converters. To name your Teranex Mini converter, simply click in the 'name' text box and type your desired converter name. Click 'save' to confirm the change. To easily identify your selected Teranex Mini converter, click on the 'identify' checkbox. This will flash the multi use indicator on your converter's basic Teranex Mini panel. If you have a Teranex Mini Smart Panel installed, you will see the model name in the LCD turn from grey to red. Deselect the checkbox to turn off the identification indicators.
The 'software settings' menu in the 'about' tab identifies which software version your Teranex Mini is running. If your converter's internal software is older than the current version that comes with Blackmagic Teranex Setup, an update button will be present here that allows you to bring your converter's software up to date.
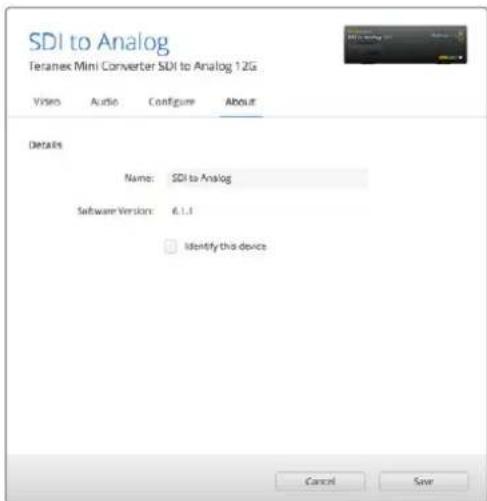
The 'about' tab in Blackmagic Teranex Setup is used to name and identify your Teranex Mini. You can also check the version of the setup software.
Changing Settings using Teranex Mini Smart Panel
You can also change settings using the optional Teranex Mini Smart Panel. This control panel mounts to the front of your Teranex Mini and replaces the original basic front panel that shipped with the converter. You get fast access to your settings using buttons and a rotary knob and you can see the input on the built in LCD.
The converter's USB port is still accessible with the Teranex Smart Panel attached. To access the port, simply open the rubber USB dust cover. With the Teranex Smart Panel installed, the front panel small switches are covered up and no longer used and this is because all the switch settings and more are now in the menu on the Teranex Smart Panel and can be set using the LCD. The settings available will vary between Teranex Mini converters because the features are different between models, but navigation layout on screen is the same, so it's easy to move between models to make changes to settings.
You can quickly check your settings and set new ones using an optional Teranex Mini Smart Panel. The Smart Panel easily mounts to the front of your Teranex Mini converter.
Changing Network Settings
Accessing your Teranex Minis over a network is the easiest way to manage multiple converters. You can do this using Blackmagic Teranex Setup. By default, your Teranex Minis are configured to automatically acquire a network address, making it easy to immediately select them from the Blackmagic Teranex Setup splash screen, as detailed in the section 'changing settings using Blackmagic Teranex Setup.'
If you are having trouble finding a Teranex Mini on your network, or you have previously set it to use a static address incompatible with your current network, you may need to change its network settings locally. You can do this via USB or the Teranex Mini Smart Panel.
Changing Network Settings via USB
To change network settings via USB, connect your Teranex Mini to a computer running the Teranex setup utility with a USB cable. You can find your Teranex Mini's USB connector on its front panel, regardless of whether you are using the original basic panel or the Smart Panel.
Once connected, select your Teranex Mini from the Teranex setup utility splash screen, and navigate to the 'configure' tab. Here you can toggle your converter between dynamic and static network addresses. If you select a static IP, you can manually configure your converter's IP address, subnet mask, and gateway.
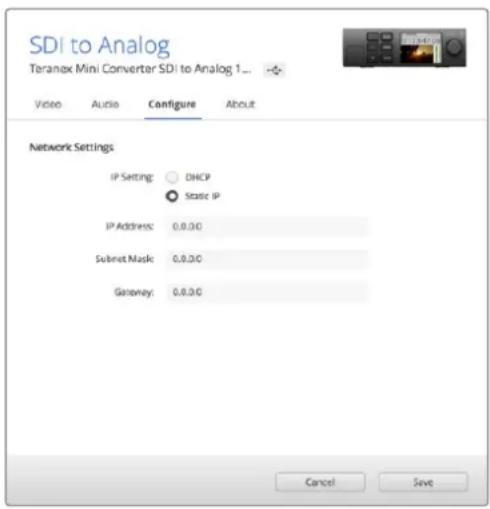
Use the 'configure' tab in Blackmagic Teranex Setup to change network settings via USB
Changing Network Settings using Teranex Mini Smart Panel
A useful feature of Teranex Mini Smart Panel is locally changing network settings. To do this:
1 Press the 'menu' button to open the settings menu.
2 Select 'network' using the rotary knob or 1 and 2 buttons, and press 'set.'
3 Select 'configure IP' by using the rotary knob or 1 and 2 buttons, and press 'set.'
4 Select 'manually' by using the rotary knob or 1 and 2 buttons, and press set. Then follow the same procedure to select 'IP address.'
5 Use the rotary knob or 1 and 2 buttons to cycle through the available numbers for your IP address and confirm them by pressing 'set.' Repeat the procedure for ' subnet' and 'gateway' settings.
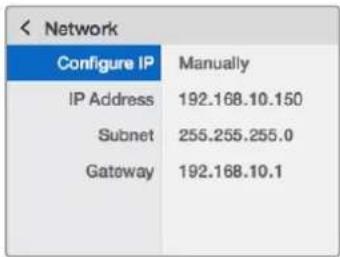
Use the network menu on Teranex Mini Smart Panel to change network settings on your mini coverter.
Teranex Mini Rack Shelf
If you're running multiple Teranex Minis, you can use Teranex Mini Rack Shelf to install your converters into a broadcast rack or road case. Up to three Teranex Minis can fit neatly onto each 1RU Teranex Mini Rack Shelf. Installing your converters into a Teranex Mini Rack Shelf is as easy as removing your converter's rubber feet, if installed, and screwing each converter into the base of the shelf using the mounting holes on bottom of your converters. The Teranex Mini Rack Shelf ships with two original blank panels which you can use to cover gaps if you don't need to install additional Teranex Minis.
For more information check the Blackmagic Design website at www.blackmagicdesign.com

Teranex Mini Models
There is a broad range of Teranex Mini converters with specific features for each conversion type and different settings between models.
In the following sections in this manual, you can find the latest information for your Teranex Mini model including any new settings that may have been added in the latest version of your Teranex Mini's internal software.
Teranex Mini – SDI to DisplayPort 8K HDR
Teranex Mini SDI to DisplayPort 8K HDR converts 8K SDI signals to DisplayPort for connecting to DisplayPort monitors, televisions and projectors. It scales 8K SDI inputs to the native resolution of DisplayPort monitors that don't support 8K. Two on screen scopes can be overlaid on the DisplayPort output so you monitor the waveform, vectorscope, histogram or parade.
The monitor calibration feature helps you generate 3D LUTs for accurate reference monitoring on DisplayPort monitors. You can also load 3D LUTs for adding looks to your converted output.
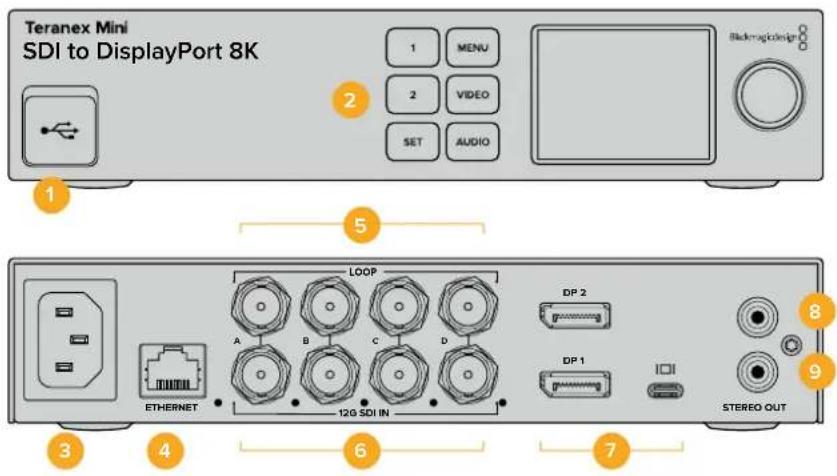
Connectors
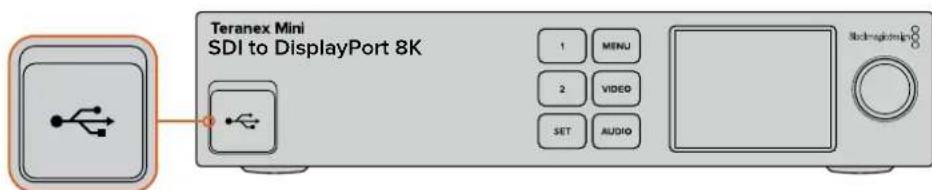
1 USB-C Port
Connects to the Blackmagic Teranex Setup software via a Mac or Windows computer for adjusting settings and updating your Teranex Mini's internal software. Plug your monitor calibration probe into the USB-C port.
2 Front Panel
The LCD display shows important information, and you can use the control buttons and rotary knob to navigate settings menus.
3 Power
Standard built in IEC C14 connector for 90 - 240 volt AC power supply.
4 Ethernet
Connects to a network switch or computer so you can change settings using the Teranex setup utility. A white 'link' LED is to the right of the Ethernet port.
5 SDI Loop Out
SDI video loop output BNC connectors.
6 SDIn
Use these BNC connectors to plug in your SDI source video. A white LED to the right of each 'SDI IN' BNC connector indicates video input lock. 8K inputs can be quad square division or quad 2SI 12G-SDI up to 8Kp60 or dual link 12G-SDI up to 8Kp30 on SDI In A and B. HD and Ultra HD video up to 2160p60 can be input to SDI In A by single link 12G-SDI.
7 DisplayPort Outputs
Teranex SDI to DisplayPort 8K outputs to one monitor and has three DisplayPort connections for compatibly with 8K standards on a variety of monitors. DisplayPort 1 and DisplayPort 2 are full size DisplayPort connectors. The USB-C port is for DisplayPort over USB-C. It is important to note that this requires a certified DisplayPort over USB-C cable, which is different to a generic USB-C cable or a Thunderbolt cable.
When connecting your monitor to Teranex SDI to DisplayPort 8K, consult the specifications for your monitor. Most 8K monitors can use a single DisplayPort connection to DP1 or DisplayPort over USB-C. Some 8K monitors require a dual DisplayPort connection to the DP1 and DP2 connectors to show 8K content. Dual link high frame rate 8K content is shown in 8 bit color to be compatible with your DisplayPort monitor. For 4K or HD video, you can use DP1 or DisplayPort over USB-C.
8 L-Analog
Left channel analog audio output RCA connector.
9 R-Analog
Right channel analog audio output RCA connector.
Blackmagic Teranex Setup Settings
The Teranex setup utility can change all the same settings that are available using the front panel, plus additional settings. You can access these settings by moving between the 'video', 'scopes', audio', 'configure' and 'about' tabs.
The 'about' and 'configure' tabs are detailed in the 'changing settings' section in this manual.
Blackmagic Teranex Setup lets you adjust settings such as DisplayPort instant lock to instantly resync the video signal when changing or routing sources, load 3D LUT files, changing the RCA analog audio output levels and more.
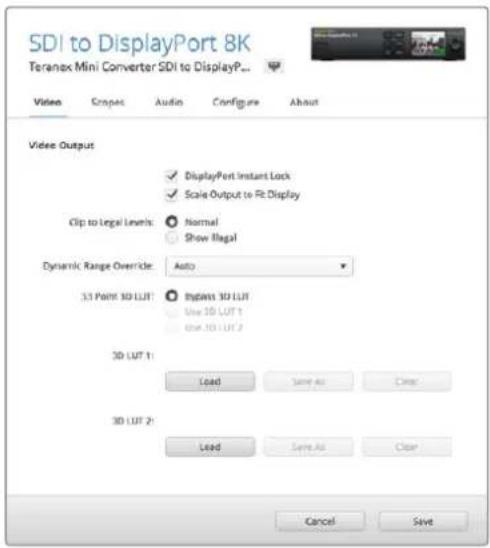
Video Tab
DisplayPort Instant Lock
Select this checkbox to enable DisplayPort instant lock so changing sources using the same format is clean and glitch free. When DisplayPort instant lock is enabled, the DisplayPort output signal is kept active even when changing sources. This means your converter does not have to wait for the DisplayPort television or monitor to lock before displaying the video output as the DisplayPort signal is already locked. It's important to note that this feature only works when changing sources using the same video standard.
The DisplayPort instant lock feature can introduce a small delay in video and audio, so if you need zero delay in your converted output you can bypass the DisplayPort instant lock feature by deselecting the checkbox.
Clip to Legal Levels
'Clip to legal levels' describes the converter's input range because DisplayPort monitors always display full range video. When 'normal' is selected, Teranex Mini SDI to DisplayPort 8K expands the input to match the monitor. If you select 'show illegal' the input range is sent to your monitor unexpanded.
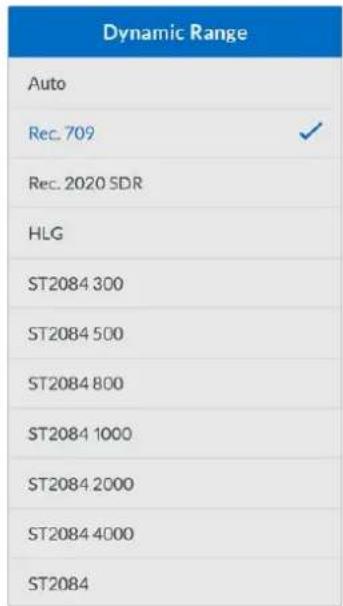
Dynamic Range Override
This setting lets you select a color profile for your monitor, such as Rec. 709, or choose 'auto' to keep the original dynamic range of the source.
33 Point 3D LUT
Your Teranex Mini SDI to DisplayPort 8K HDR supports .cube 3D LUT files that can be created in any color correction software such as DaVinci Resolve. DaVinci Resolve can save color grades as 3D LUTs.
You can load two separate 3D LUTs by clicking on the 'load' button for each 3D LUT slot, selecting the desired .cube file from your computer, and clicking 'Open'. Click 'save' to confirm your settings. The 3D LUT filename will appear above each 'load' button so you know which 3D LUT is being used for 3D LUT 1 or 3D LUT 2.
To turn a 3D LUT on, simply click the 'use 3D LUT 1' or 'use 3D LUT 2' options. To turn the 3D LUT off, click the 'bypass 3D LUT' option.
Tip You can also enable a 3D LUT by pressing the 1 or 2 buttons on the unit's front panel. Press the buttons again to turn a 3D LUT off.
Bypass 3D LUT
Click on this button disable all 3D LUTs so the DisplayPort output does not have a 3D LUT applied.
Clear
Click on this button to remove 3D LUT 1 or 3D LUT 2 from your converter's internal memory.
Load
Click on the 'load' button to load a 3D LUT from your computer.
Save As
Click on the 'save as' button to save a loaded 3D LUT to a folder on your computer. After you generate a calibration 3D LUT, it is important to save it your computer.
What is a 3D LUT?
A 3D LUT, or '3D Lookup Table', is a file containing table of values that are used to modify the video colorspace to a new set of RGB values in a 3D cube space.
The color cube contains all the variations between the mix of each primary color, defined within three x, y, z spatial dimensions. This means the RGB channels in the SDI input video can be remapped to any other RGB output color in the DisplayPort video output.
This is very powerful as it means any color can be mapped to any other color so you can perform very precise color adjustments for calibrating displays, or loading log gamma curves for display when working with different types of raw camera files on set where you want to see linear gamma.
To show how powerful 3D LUTs can be, one of the default LUTs loaded can convert your input video to black and white. This shows that all the input RGB colors are remapped via the 3D LUT to black and white RGB output values via the DisplayPort output.
You can create your own 3D LUTs and upload them via the admin software and DaVinci Resolve even allows you to convert a color grade setting to a 3D LUT that you can then upload to your Teranex Mini SDI to DisplayPort 8K. The 3D LUT on the DisplayPort output is optional, and the SDI video loop output is a clean feed.
For more information on how to create a 3D LUT .cube file, refer to the DaVinci Resolve manual which you can download from the Blackmagic Design website at www.blackmagicdesign.com/support.
Scopes Tab
Configure Scope Overlays
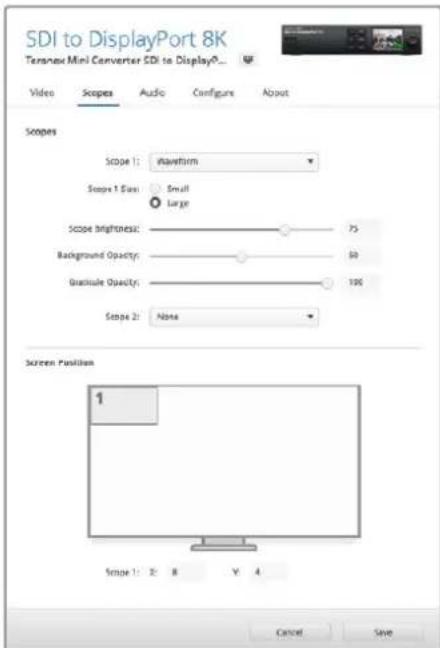
Teranex Mini SDI to DisplayPort 8K can show up to two scopes as overlays on the footage on the DisplayPort output. In the 'scopes' menu, select the 'large' option to make a scope occupy 1/16 of the screen area, or select the 'small' option to set the scope size to 1/64 of the screen.
You can use Teranex Setup software to configure the scopes, or use the 'scopes' menu and rotary knob on the front panel. Options include scope types, size, horizontal and vertical position, background opacity and scope brightness. When you select the types of scopes, you can choose waveform, vectorscope 100% , vectorscope 75% , histogram, RGB parade or YUV parade. Note that the vectorscope is available only on scope 1.
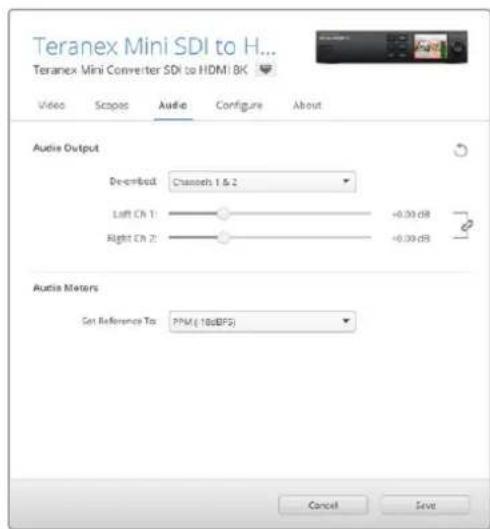
Audio Tab
Set RCA Output
The 'audio output' settings let you adjust the gain for the left and right channel of analog audio together or independently. In the 'stereo de-embed' menu, select a pair of audio channels, such as channels 1 & 2, to output from the RCA ports.
Your Teranex Mini retains its last settings applied using the control panel or Teranex setup utility.
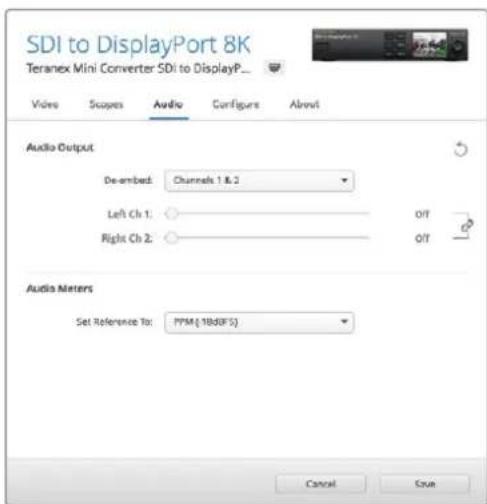
Disable the channel link icon if you want to decrease or increase the level of each channel independently.
Configure Audio Meter
The 'audio meters' option lets you select the type of audio meter to display. Choose from VU -18dBFS, VU -20dBFS, PPM -18dBFS or PPM -20dBFS reference levels.
Monitor Calibration Procedure
If you have a supported monitor and monitor calibration probe, you can use your Teranex Mini SDI to DisplayPort 8K HDR to generate a calibration 3D LUT for your DisplayPort monitor. Teranex Mini SDI to DisplayPort 8K supports Klein Instruments K10-A, SpectraCal C6 and X-Rite iDisplay Pro. This process can allow you to display accurate color and luminance even on consumer DisplayPort televisions.
A calibration probe is a small device that contains a light sensor. When facing the screen of your monitor or television, the probe scans color and luminance data so your Teranex Mini can optimize the DisplayPort output for your monitor.
Display settings on your television, monitor, or computer's display settings will need to be adjusted in steps as you progress through the calibration process. It's very simple and doesn't take long. If at any time a mistake is made, you can easily select 'back' and repeat a step.
1 Optimizing Monitor Settings
Before starting the calibration procedure, you will need to open your monitor or television's display settings and change a few settings.
1.1 In the settings for your monitor, switch off all options for dynamic contrast and brightness. Many TV manufacturers include a mode called motion smoothing, motion flow or motion interpolation. Please disable this mode.
1.2 Set the gamma to 2.4 for Rec. 709 or 2.6 for DCI-P3. These two color spaces are designed for standard home television viewing and digital cinema distribution, so your choice will depend on your project's delivery requirements. For example, if you are delivering to YouTube for home television viewing, set the gamma to 2.4. If monitoring for cinema distribution via DCP delivery, set the gamma to 2.6.
2 Connecting the Calibration Probe
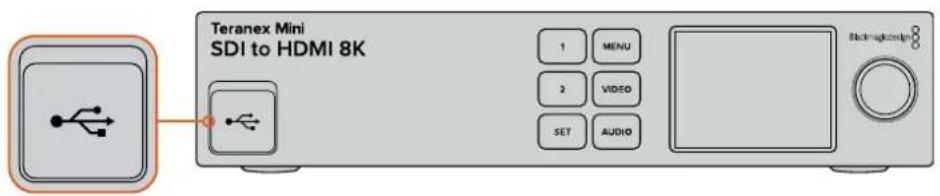
Now that your monitor or television has its settings optimized for calibration, connect the calibration probe to your Teranex Mini SDI to DisplayPort 8K HDR's USB-C port. Lift the rubber dust cover to access the USB-C port.
3 Starting the Calibration Process
3.1 On the 'home' screen, press the 'menu' button. Use the rotary knob to scroll to the 'calibration' menu and press 'set'.
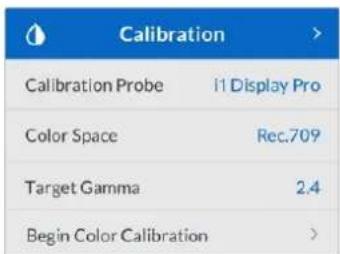
3.2 Press 'set' to see the list of supported calibration probes. Options are 'i1 Display Pro', 'SpectraCal C6' and 'Klein K-10-A'. Use the rotary knob to scroll through the list and highlight your probe, then press 'set' to confirm your selection.
3.3 On the 'calibration' menu, use the rotary knob to highlight 'color space' and press 'set'. Select a color space based on your monitor type and press 'set'.
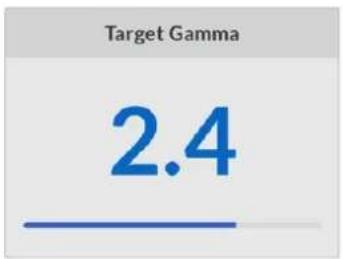
3.4 On the 'calibration' menu, scroll down to the 'target gamma' option and press 'set'. Specify the 'target gamma' value to match your monitor or TV and press 'set'. Gamma 2.4 is recommended for Rec. 709 and 2.6 is recommended for DCI-P3.
3.5 On the 'calibration' menu, scroll to 'begin color calibration' and press 'set'.
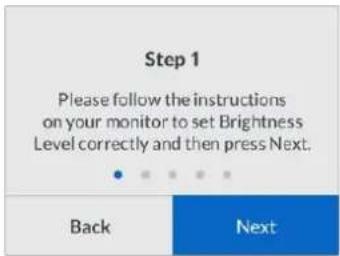
3.6 This step adjusts your monitor's brightness to show shadow detail without crushing the blacks. If your system doesn't have an option to adjust the brightness, select 'next' and press 'set' to skip this step. Increase the brightness level so all the dark squares become visible. Decrease the brightness level so the indicated square just blends into the background. Press 'next' on your Teranex Mini SDI to DisplayPort 8K HDR.
Brightness level calibration Instructions on the LCD
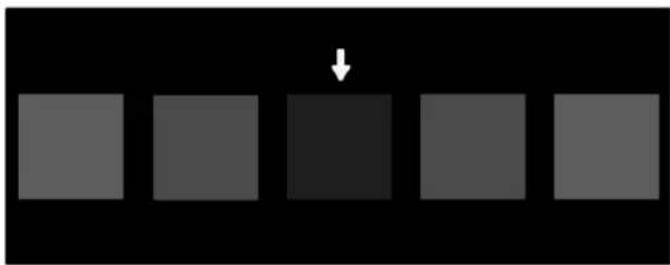
Test pattern on your DisplayPort monitor for calibrating shadow detail.
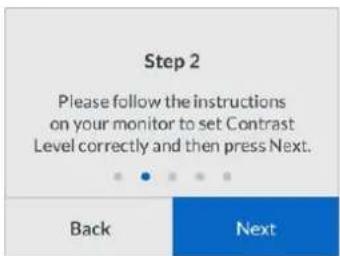
3.7 This step adjusts your monitor's contrast to show highlight detail without clipping the whites. If your system doesn't have an option to adjust the contrast, select 'next' and press 'set' to skip this step. Increase the contrast level so all the light squares become visible. Decrease the contrast level so the indicated square just blends into the background. Press 'next' on your Teranex Mini SDI to DisplayPort 8K HDR.
Contrast level calibration instructions on the Teranex LCD.
Test pattern on your DisplayPort monitor for calibrating highlight detail.
3.8 It's important to note that these two steps are repeated to verify your monitor's settings for brightness and contrast and make further fine adjustments if necessary.
3.9 The LCD on your Teranex Mini SDI to DisplayPort 8K HDR should say 'calibration probe detected'. Select 'choose' and press 'set'. The LCD shows a list of preconfigured spectral profiles of supported display types. Select a profile to match your display. If you are unsure or your screen type is not on the list, select 'generic'. Press 'set'.
If the status message on the Teranex LCD says 'no calibration probe detected', confirm your probe is a compatible model and is connected properly to the USB-C port on the front panel.
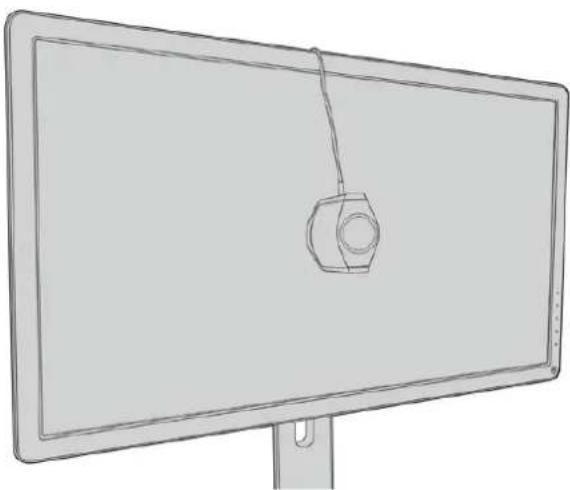
3.10 If your probe has a protective cover, remove it. Place the calibration probe in front of the monitor with the opening of the probe's sensor parallel to the screen and gently touching the middle of the white square displayed in the center of the screen.
We recommend you stabilize the calibration probe with a small tripod or mounting method provided with the probe.
3.11 Consult the specifications in the manual for your monitor and use the monitor settings to select the widest color space setting available. Manufacturers use different terminology for this setting such as 'native', 'extended' or 'wide'. This makes the 3D LUT fully and accurately cover the target color space you selected in the 'color space' menu.
3.12 A white test patch is shown so the probe can measure the color temperature of the display. Use your monitor's display settings to set the color temperature so the reading is as close as possible to 6500K. Select 'next' and press 'set' to continue.
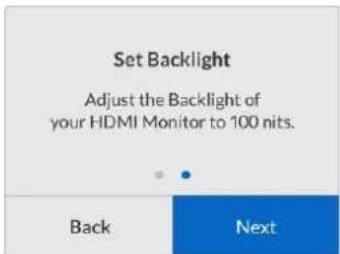
3.13 Your DisplayPort monitor now shows the luminous intensity of the test patch in nits. Use your monitor's display settings to set its backlight or contrast so the reading is as close as possible to 100 nits for SDR or 400 nits for HDR. Select 'next' and press 'set'.
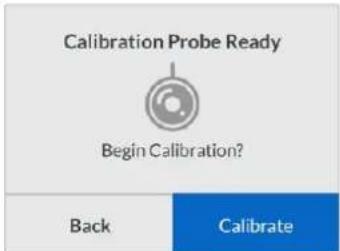
3.14 When your Teranex Mini SDI to DisplayPort 8K HDR says 'calibration probe ready', select 'Calibrate' and press 'set' to start the automated color calibration sequence.
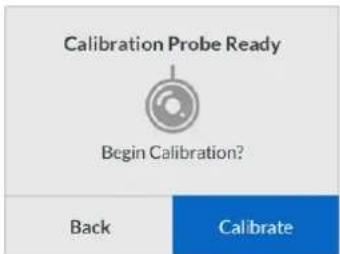
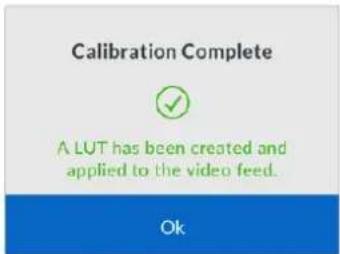
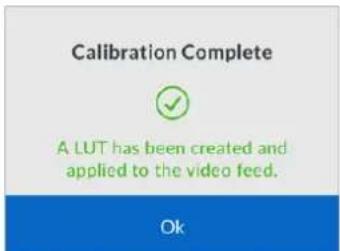
3.15 The calibration process takes 10-15 minutes. Teranex Mini SDI to DisplayPort 8K HDR generates and measures a wide range of colors at varying luminance values, comparing the measured results against the expected values. When the procedure concludes, it generates a calibration 3D LUT and shows a confirmation message.
Press 'set' to return to the 'calibration' menu. Press 'menu' to return to the home screen.
The generated 3D LUT is assigned '3D LUT 1' and enabled. By default, the 3D LUT is named 'calibration LUT'.
NOTE This 3D LUT is stored in your converter's internal memory, and we recommend you use Blackmagic Teranex Setup to save it to your computer. For more information on how to manage 3D LUTs, see the 'Blackmagic Teranex Setup Settings' section.
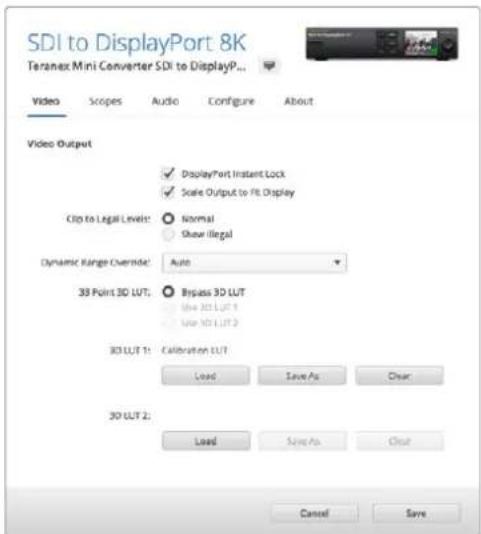
The monitor calibration 3D LUT is always assigned to '3D LUT 1' by default.
Control Panel Settings
The 'home' screen shows a video preview of the SDI input with format and frame rate information.
The LCD menu lets you change settings for 'video', 'audio output', 'scopes', 'network', 'calibration' and 'setup'. Keep reading for information about each setting.
Video Menu
The 'video' menu has options for 'dynamic range', 'DisplayPort instant lock' and 'clip to legal levels'.
'Dynamic range' lets you select a color profile for your monitor, such as Rec. 709.
DisplayPort instant lock keeps the DisplayPort signal active when changing sources so the converter does not have to wait for the DisplayPort television or monitor to lock before displaying the video output.
'Clip to legal levels' describes the converter's input range because DisplayPort monitors always display full range video. When 'normal' is selected, Teranex Mini SDI to DisplayPort 8K expands the input to match the monitor. If you select 'show illegal' the input range is sent to your monitor unexpanded.
Display Menu
The 'display' menu has settings for 'scale to fit', 'brightness', 'contrast' and 'preset'.
'Scale to fit' scales the input resolution to the native resolution of the monitor to display it full screen. When 'scale to fit' is switched off, the monitor displays a pixel for pixel representation of the input. For example, if you send HD or 4K video to Teranex Mini SDI to DisplayPort 8K and output to an 8K monitor, you can scale up the video to fill the screen. If you switch off 'scale to fit', the video is presented at its original resolution in the middle of the screen and surrounded by a black border.
'Brightness' and 'contrast' settings, when available, let you adjust shadow detail and highlight detail.
'Preset' options are available for Apple Pro Display XDR and include a range of display profiles.
| Preset |
| Pro Display XDR (P3-1600 nits) √ |
| Apple Display (P3-500 nits) |
| HDR Video (P3-ST 2084) |
| HDTV Video (BT.709-BT.1886) |
| NTSC Video (BT.601 SMPTE-C) |
| PAL & SECAM Video (BT.601 EBU) |
| Digital Cinema (P3-DCI) |
| Digital Cinema (P3-D65) |
| Design & Print (P3-D50) |
| Photography (P3-D65) |
| Internet & Web (sRGB) |
Audio Menu
The 'audio' menu lets you select a stereo pair of channels to de-embed and adjust the gain.
Scopes Menu
The 'scopes' menu lets you enable one or two scope overlays. You can set the type of scopes, as well as their size, position, brightness and the opacity of the scope background and graticule. When you select the types of scopes, you can choose waveform, vectorscope 100% , vectorscope 75% , histogram, RGB parade or YUV parade.
| Scopes | |
| Scope1 | |
| Scope 1 | Waveform |
| Size | Large |
| X Position | 8 |
| Y Position | 4 |
| Scope Brightness | 75% |
| Background Opacity | 50% |
| Graticule Opacity | 100% |
The front panel gives you access to the same settings provided in the Blackmagic Teranex Setup utility.
Network Menu
The 'network' menu configures Teranex Mini SDI to DisplayPort 8K to connect and communicate on your LAN. For more information, see the 'Changing Network Settings using Teranex Mini Smart Panel' section.
Calibration Menu
The 'calibration' menu is for initiating and controlling the monitor calibration process. For more information see the 'monitor calibration procedure' section.
Setup Menu
The 'setup' menu lets you configure audio and set the language for the LCD menus. The 'audio meters' menu lets you select the type of audio meter to display. Choose from VU-18dBFS, VU-20dBFS, PPM-18dBFS or PPM-20dBFS reference levels. You can use the 'language' menu to select the language for menus on the control panel LCD. Teranex Mini SDI to DisplayPort 8K supports 11 popular languages: English, Chinese, Japanese, Korean, Spanish, German, French, Russian, Italian, Portuguese and Turkish. The language menu also appears on initial start up.
Warnings Menu
If your monitor sends a warning to Teranex Mini SDI to DisplayPort 8K, a warning icon appears on the LCD on the front panel. If you see the warning icon, go to the ' warnings' menu for more information.
Teranex Mini - SDI to DisplayPort 8K Block Diagram
Teranex Mini – SDI to HDMI 8K HDR
Teranex Mini SDI to HDMI 8K HDR converts 8K SDI signals to HDMI for connecting to 8K HDMI monitors, televisions and projectors. Two on screen scopes can be overlaid on the HDMI output so you monitor the waveform, vectorscope, histogram or parade.
The monitor calibration feature helps you generate 3D LUTs for accurate reference monitoring on HDMI televisions. You can also load 3D LUTs for adding looks to your converted output.
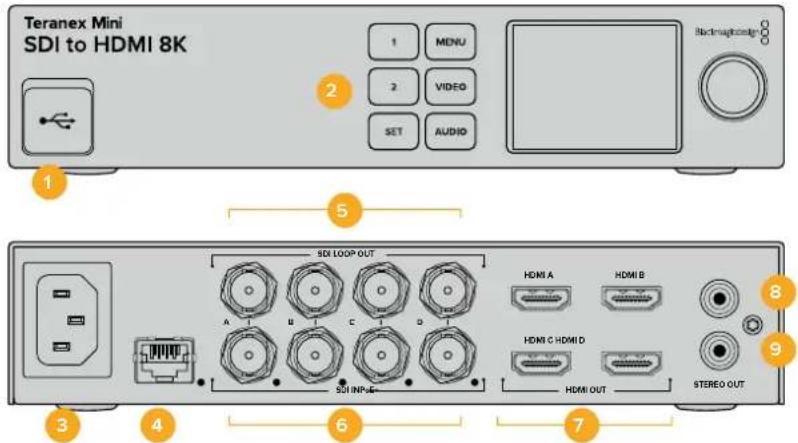
Connectors
1 USB-C Port
Connects to the Blackmagic Teranex Setup software via a Mac or Windows computer for adjusting settings and updating your Teranex Mini's internal software. Plug your monitor calibration probe into the USB-C port.
2 Front Panel
The LCD display shows important information, and you can use the control buttons and rotary knob to navigate settings menus.
3 Power
Standard built in IEC C14 connector for 90 - 240 volt AC power supply.
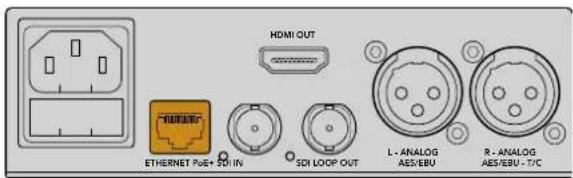
4 Ethernet PoE+
Connects to a network switch or computer so you can change settings using the Teranex setup utility. A white 'link' LED is to the right of the Ethernet port. The Ethernet port also supports Power over Ethernet Plus.
5 SDI Loop Out
SDI video loop output BNC connectors.
6 SDIn
Use these BNC connectors to plug in your SDI source video. A white LED to the right of each 'SDI IN' BNC connector indicates video input lock. 8K inputs can be quad square division or quad 2SI 12G-SDI up to 8Kp60 or dual link 12G-SDI up to 8Kp30 on SDI In A and B. HD and Ultra HD video up to 2160p60 can be input to SDI In A by single link 12G-SDI.
7 HDMI Out
HDMI outputs support quad square division HDMI in 8K. HD and Ultra HD video up to 2160p60 is sent from HDMI A. If you have an HD or Ultra HD monitor or TV connected to the HDMI A output and an Ultra HD or 8K input, the source video is automatically frame rate converted and down scaled to HD or Ultra HD to match the capabilities of your display. Frame rate conversion is a factor of the source frame rate, for example 60 to 30 frames per second or 59.94 to 29.97 frames per second.
8 L-Analog
Left channel analog audio output RCA connector.
9 R-Analog
Right channel analog audio output RCA connector.
Blackmagic Teranex Setup Settings
The Teranex setup utility can change all the same settings that are available using the front panel, plus additional settings. You can access these settings by moving between the 'video', 'scopes', audio', 'configure' and 'about' tabs.
The 'about' and 'configure' tabs are detailed in the 'changing settings' section in this manual.
Blackmagic Teranex Setup lets you adjust settings such as HDMI Instant lock to instantly resync the video signal when changing or routing sources, load 3D LUT files, change the RCA analog audio output levels and more.
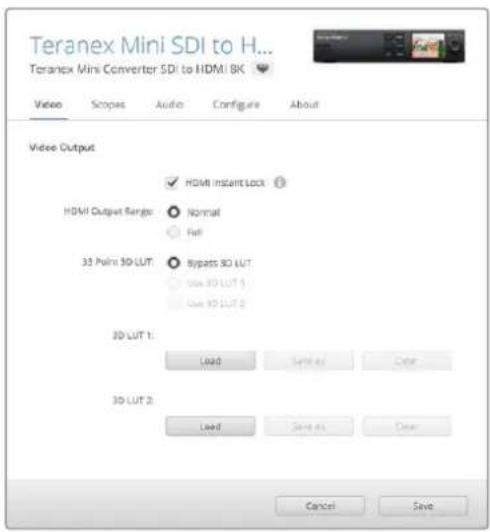
Video Output Tab
HDMI Instant Lock
Select this checkbox to enable HDMI instant lock so changing sources using the same format is clean and glitch free. When HDMI instant lock is enabled, the HDMI output signal is kept active even when changing sources. This means your converter does not have to wait for the HDMI television or monitor to lock before displaying the video output as the HDMI signal is already locked. It's important to note that this feature only works when changing sources using the same video standard.
The HDMI instant lock feature can introduce a small delay in video and audio, so if you need zero delay in your converted output you can bypass the HDMI instant lock feature by deselecting the checkbox.
HDMI Output Range
This option controls the HDMI output so it stays within HDMI legal levels and should be kept on by default. Select 'normal' to set the HDMI output to legal limits.
33 Point 3D LUT
Your Teranex Mini SDI to HDMI 8K HDR supports .cube 3D LUT files that can be created in any color correction software such as DaVinci Resolve. DaVinci Resolve can save color grades as 3D LUTs.
You can load two separate 3D LUTs by clicking on the 'load' button for each 3D LUT slot, selecting the desired .cube file from your computer, and clicking 'Open'. Click 'save' to confirm your settings. The 3D LUT filename will appear above each 'load' button so you know which 3D LUT is being used for 3D LUT 1 or 3D LUT 2.
To turn a 3D LUT on, simply click the 'use 3D LUT 1' or 'use 3D LUT 2' options. To turn the 3D LUT off, click the 'bypass 3D LUT' option.
TIP You can also enable a 3D LUT by pressing the 1 or 2 buttons on the unit's front panel. Press the buttons again to turn a 3D LUT off.
Bypass 3D LUT
Click on this button disable all 3D LUTs so the HDMI output does not have a 3D LUT applied.
Clear
Click on this button to remove 3D LUT 1 or 3D LUT 2 from your converter's internal memory.
Load
Click on the 'load' button to load a 3D LUT from your computer.
Save As
Click on the 'save as' button to save a loaded 3D LUT to a folder on your computer. After you generate a calibration 3D LUT, it is important to save it your computer.
What is a 3D LUT?
A 3D LUT, or '3D Lookup Table', is a file containing table of values that are used to modify the video colorspace to a new set of RGB values in a 3D cube space.
The color cube contains all the variations between the mix of each primary color, defined within three x, y, z spatial dimensions. This means the RGB channels in the SDI input video can be remapped to any other RGB output color in the HDMI video output.
This is very powerful as it means any color can be mapped to any other color so you can perform very precise color adjustments for calibrating displays, or loading log gamma curves for display when working with different types of raw camera files on set where you want to see linear gamma.
To show how powerful 3D LUTs can be, one of the default LUTs loaded can convert your input video to black and white. This shows that all the input RGB colors are remapped via the 3D LUT to black and white RGB output values via the HDMI output.
You can create your own 3D LUTs and upload them via the admin software and DaVinci Resolve even allows you to convert a color grade setting to a 3D LUT that you can then upload to your Teranex Mini SDI to HDMI 8K. The 3D LUT on the HDMI output is optional, and the SDI video loop output is a clean feed.
For more information on how to create a 3D LUT .cube file, refer to the DaVinci Resolve manual which you can download from the Blackmagic Design website at www.blackmagicdesign.com/support.
Scopes Tab
Configure Scope Overlays
Teranex Mini SDI to HDMI 8K can show up to two scopes as overlays on the footage on the HDMI outputs. In the 'scopes' menu, select the 'large' option to make a scope occupy 1/16 of the screen area, or select the 'small' option to set the scope size to 1/64 of the screen.
You can use Teranex Setup software to configure the scopes, or use the 'scopes' menu and rotary knob on the front panel. Options include scope types, size, horizontal and vertical position, background opacity and scope brightness. When you select the types of scopes, you can choose waveform, vectorscope 100% , vectorscope 75% , histogram, RGB parade or YUV parade. Note that the vectorscope is available only on scope 1.
Audio Tab
Set RCA Output
The 'audio output' settings let you adjust the gain for the left and right channel of analog audio together or independently. In the 'stereo de-embed' menu, select a pair of audio channels, such as channels 1 & 2, to output from the RCA ports.
Your Teranex Mini retains its last settings applied using the control panel or Teranex setup utility.
Disable the channel link icon if you want to decrease or increase the level of each channel independently.
Configure Audio Meter
The 'audio meters' option lets you select the type of audio meter to display. Choose from VU -18dBFS, VU -20dBFS, PPM -18dBFS or PPM -20dBFS reference levels.
Monitor Calibration Procedure
If you have a monitor calibration probe, you can use your Teranex Mini SDI to HDMI 8K HDR to generate a calibration 3D LUT for your HDMI monitor. Teranex Mini SDI to HDMI 8K supports Klein Instruments K10-A, SpectraCal C6 and X-Rite iDisplay Pro. This process can allow you to display accurate color and luminance even on consumer HDMI televisions.
A calibration probe is a small device that contains a light sensor. When facing the screen of your monitor or television, the probe scans color and luminance data so your Teranex Mini can optimize the HDMI output for your monitor.
Display settings on your television or monitor will need to be adjusted in steps as you progress through the calibration process. It's very simple and doesn't take long. If at any time a mistake is made, you can easily select 'back' and repeat a step.
1 Optimizing Monitor Settings
Before starting the calibration procedure, you will need to open your monitor or television's menu and change a few settings.
1.1 In the menus on your monitor, switch off all options for dynamic contrast and brightness. Many TV manufacturers include a mode called motion smoothing, motion flow or motion interpolation. Please disable this mode.
1.2 Set the gamma to 2.4 for Rec. 709 or 2.6 for DCI-P3. These two color spaces are designed for standard home television viewing and digital cinema distribution, so your choice will depend on your project's delivery requirements. For example, if you are delivering to YouTube for home television viewing, set the gamma to 2.4. If monitoring for cinema distribution via DCP delivery, set the gamma to 2.6.
2 Connecting the Calibration Probe
Now that your monitor or television has its settings optimized for calibration, connect the calibration probe to your Teranex Mini SDI to HDMI 8K HDR's USB-C port. Lift the rubber dust cover to access the USB-C port.
3 Starting the Calibration Process
3.1 On the 'home' screen, press the 'menu' button. Use the rotary knob to scroll to the 'color calibration' menu and press 'set'.
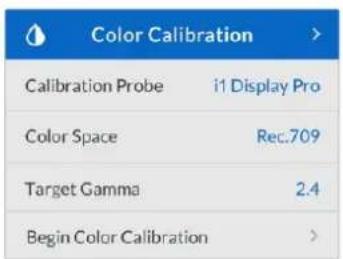
3.2 Press 'set' to see the list of supported calibration probes. Options are 'i1 Display Pro', 'SpectraCal C6' and 'Klein K-10-A'. Use the rotary knob to scroll through the list and highlight your probe, then press 'set' to confirm your selection.
3.3 On the 'color calibration' menu, use the rotary knob to highlight 'color space' and press 'set'. Select a color space based on your monitor type and press 'set'.
3.4 On the 'color calibration' menu, scroll down to the 'target gamma' option and press 'set'. Specify the 'target gamma' value to match your monitor or TV and press 'set'. Gamma 2.4 is recommended for Rec. 709 and 2.6 is recommended for DCI-P3.
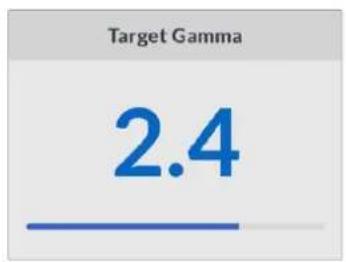
3.5 On the 'color calibration' menu, scroll to 'begin color calibration' and press 'set'.
3.6 This step adjusts your monitor's brightness to show shadow detail without crushing the blacks. Increase the brightness level so all the dark squares become visible. Decrease the brightness level so the indicated square just blends into the background. Press 'next' on your Teranex Mini SDI to HDMI 8K HDR.
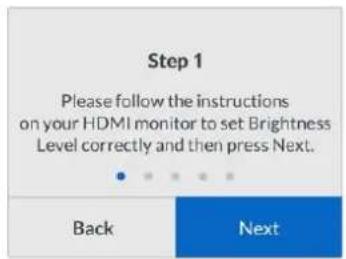
Brightness level calibration instructions on the LCD

Test pattern on your HDMI monitor for calibrating shadow detail.
3.7 This step adjusts your monitor's contrast to show highlight detail without clipping the whites. Increase the contrast level so all the light squares become visible. Decrease the contrast level so the indicated square just blends into the background. Press 'next' on your Teranex Mini SDI to HDMI 8K HDR.
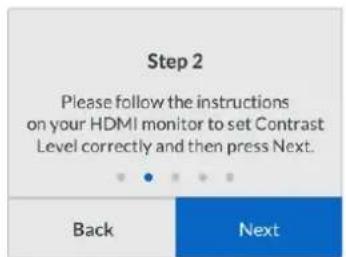
Contrast level calibration instructions on the Teranex LCD.
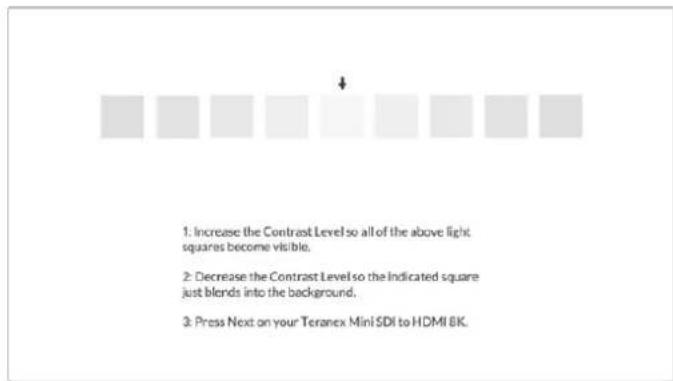
Test pattern on your HDMI monitor for calibrating highlight detail.
3.8 It's important to note that these two steps are repeated to verify your monitor's settings for brightness and contrast and make further fine adjustments if necessary.
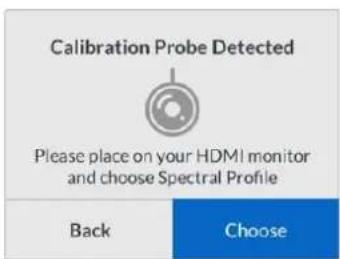
3.9 The LCD on your Teranex Mini SDI to HDMI 8K HDR should say 'calibration probe detected'. Select 'choose' and press 'set'. The LCD shows a list of preconfigured spectral profiles of supported display types. Select a profile to match your display. If you are unsure or your screen type is not on the list, select 'generic'. Press 'set'.
If the status message on the Teranex LCD says 'no calibration probe detected', confirm your probe is a compatible model and is connected properly to the USB-C port on the front panel.
3.10 If your probe has a protective cover, remove it. Place the calibration probe in front of the monitor with the opening of the probe's sensor parallel to the screen and gently touching the middle of the white square displayed in the center of the screen.
We recommend you stabilize the calibration probe with a small tripod or mounting method provided with the probe.
3.11 Consult the specifications in the manual for your monitor and use the monitor menu to select the widest color space setting available. Manufacturers use different terminology for this setting such as 'native', 'extended' or 'wide'. This makes the 3D LUT fully and accurately cover the target color space you selected in the 'color space' menu.
3.12 A white test patch is shown so the probe can measure the color temperature of the display. Use your monitor's menu to set the color temperature so the reading is as close as possible to 6500K. Select 'next' and press 'set' to continue.
3.13 Your HDMI monitor now shows the luminous intensity of the test patch in nits. Use your monitor's menu to set its backlight or contrast so the reading is as close as possible to 100 nits for SDR or 400 nits for HDR. Select 'next' and press 'set'.
3.14 When your Teranex Mini SDI to HDMI 8K HDR says 'calibration probe ready', select 'Calibrate' and press 'set' to start the automated color calibration sequence.
3.15 The calibration process takes 10-15 minutes. Teranex Mini SDI to HDMI 8K HDR generates and measures a wide range of colors at varying luminance values, comparing the measured results against the expected values. When the procedure concludes, it generates a calibration 3D LUT and shows a confirmation message.
Press 'set' to return to the 'color calibration' menu. Press 'menu' to return to the home screen.
The generated 3D LUT is assigned '3D LUT 1' and enabled. By default, the 3D LUT is named 'calibration LUT'.
NOTE This 3D LUT is stored in your converter's internal memory, and we recommend you use Blackmagic Teranex Setup to save it to your computer. For more information on how to manage 3D LUTs, see the 'Blackmagic Teranex Setup Settings' section.

The monitor calibration 3D LUT is always assigned to '3D LUT' by default.
Control Panel Settings
The 'home' screen shows a video preview of the SDI input with format and frame rate information.
The LCD menu lets you change settings for 'video', 'audio output', 'scopes', 'network', 'color calibration' and 'setup'. Keep reading for information about each setting.
Video Menu
The 'video' menu has options for 'HDMI instant lock' and 'HDMI output range'. HDMI instant lock keeps the HDMI signal active when changing sources so the converter does not have to wait for the HDMI television or monitor to lock before displaying the video output. HDMI output range keeps the output within HDMI legal levels.
Audio Output Menu
The 'audio output' menu lets you select a stereo pair of channels to de-embed and adjust the gain.
Scopes Menu
The 'scopes' menu lets you enable one or two scope overlays. You can set the type of scopes, as well as their size, position, brightness and the opacity of the scope background and graticule. When you select the types of scopes, you can choose waveform, vectorscope 100% , vectorscope 75% , histogram, RGB parade or YUV parade.
The front panel gives you access to the same settings provided in the Blackmagic Teranex Setup utility.
Network Menu
The 'network' menu configures Teranex Mini SDI to HDMI 8K to connect and communicate on your LAN. For more information, see the 'Changing Network Settings using Teranex Mini Smart Panel' section.
Color Calibration Menu
The 'color calibration' menu is for initiating and controlling the monitor calibration process. For more information see the 'monitor calibration procedure' section.
Setup Menu
The 'setup' menu lets you configure audio. The 'audio meters' menu lets you select the type of audio meter to display. Choose from VU -18dBFS, VU -20dBFS, PPM -18dBFS or PPM -20dBFS reference levels.
Teranex Mini - SDI to HDMI 8K Block Diagram

Teranex Mini - IP Video 12G
If you are looking for information on the installation and operation of Blackmagic Teranex Mini IP Video 12G, refer to the Blackmagic Teranex Mini IP Video 12G manual which can be downloaded from www.blackmagicdesign.com/support.
Teranex Mini - SDI to HDMI 12G
Your Teranex Mini - SDI to HDMI 12G model can be used to connect a huge range of HDMI displays and video projectors to SDI video equipment. Your converter automatically switches between SD SDI, HD-SDI, 3G-SDI, 6G-SDI and 12G-SDI input sources and converts to HDMI with embedded audio, plus balanced AES/EBU or analog audio out. The 'R analog' XLR connector can also be set to output timecode.
The HDMI instant lock feature lets you lock the HDMI output so that changing sources using the same format is clean and glitch free. If your converter detects a HD monitor or TV connected to the HDMI output and has Ultra HD connected to the SDI input, the Ultra HD source will be automatically down converted so you can view the Ultra HD source on an HD monitor.
You can also load 3D LUTs for adding looks, grades, and color profiles to your converted output. The 3D LUT is a full 33 point hardware lookup table for greater accuracy with color manipulation and can even be used to accurately color calibrate consumer televisions so they can be used for critical color correction work.
The 3D LUT also allows color space conversions so different color spaces can be used with various displays.
Your Teranex Mini - SDI to HDMI 12G comes with two default LUTs, including color to monochrome and Blackmagic camera default color space to Rec. 709.

Connectors
1 Mini-B USB Port
Connects to the Blackmagic Teranex Setup software via a Mac or Windows computer for adjusting settings and updating your Teranex Mini's internal software.
2 Switches
Adjustable switches for changing settings.
3 LED Status Indicator
Glows white when the converter is receiving power and green when a valid video input signal is detected. Will flash on/off to identify individual converters via Blackmagic Teranex Setup.
4 Power
Standard built in IEC C14 connector for 90 - 240 volt AC power supply.
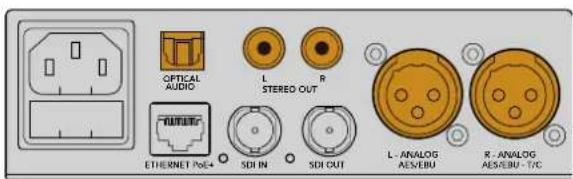
5 HDMI
HDMI video output.
6 Ethernet PoE+
Connects to a network switch or computer so you can change settings using the Teranex setup utility. The Ethernet port also supports power over Ethernet plus.
7 SDI In
SDI video input BNC connector.
8 SDI Loop Out
SDI video loop output BNC connector.
9 L-Analog or AES/EBU
Balanced left channel analog audio, or digital AES/EBU audio output XLR connector.
10 R-Analog,AES/EBU or Timecode
Balanced right channel analog audio, or digital AES/EBU audio output XLR connector. Can also be configured for timecode output.
Switches
Teranex Mini - SDI to HDMI 12G's switches provide the following settings:
Switch 8 - Analog Audio, AES/EBU Audio
Set switch 8 to 'off' to output balanced analog audio. Set to 'on' for digital AES/EBU audio.
Switch 7 - Output Audio/Timecode
Set switch 7 to 'on' to output timecode via the R channel audio XLR connector. Set to 'off' to output audio.
Switches 4,3,2-SDI Audio De-Embed Bit 2,1,0
Switches 4, 3 and 2 are represented as bits 2, 1, and 0 respectively. This simply means that by setting various on/off combinations for switches 4, 3, and 2, you can choose which pair of audio channels from your SDI input you would like to output to HDMI, analog or AES/EBU audio.
The switch legend on the base of your converter gives you all the information you need to change conversion settings.
SDI Audio Selection Table
By using the following combinations of switch settings, you can select which SDI audio channels to embed into your Teranex Mini - SDI to HDMI 12G's output signal.
| Analog Audio Channels Switch | 4 Switch 3 Switch | Switch 2 Switch | Diagram | |
| 1 and 2 OFF OFF OFF | ON OFF 8 7 6 5 4 3 2 1 | |||
| 3 and 4 OFF OFF ON | ON OFF 8 7 6 5 4 3 2 1 | |||
| 5 and 6 OFF ON OFF | ON OFF 8 7 6 5 4 3 2 1 | |||
| 7 and 8 OFF ON OFF | ON OFF 8 7 6 5 4 3 2 1 | |||
| 9 and 10 ON OFF OFF | ON OFF 8 7 6 5 4 3 2 1 | |||
| 11 and 12 ON OFF ON | ON OFF 8 7 6 5 4 3 2 1 | |||
| 13 and 14 ON ON OFF | ON OFF 8 7 6 5 4 3 2 1 | |||
| 15 and 16 ON ON ON | ON OFF 8 7 6 5 4 3 2 1 | |||
| AES/EBU Audio Channels Switch | 4 Switch 3 Switch | Switch 2 Switch | Diagram | |
| 1-4 OFF OFF OFF | ON OFF 8 7 6 5 4 3 2 1 | |||
| 5-8 | OFF OFF ON | ON OFF 8 7 6 5 4 3 2 1 | ||
| 9-12 | OFF ON OFF | ON OFF 8 7 6 5 4 3 2 1 | ||
| 13-16 | OFF ON ON | ON OFF 8 7 6 5 4 3 2 1 |
Blackmagic Teranex Setup Settings
The Teranex setup utility can change all the same settings that are available using the switches, plus additional settings. You can access these settings by moving between the 'video,' 'audio,' 'configure,' and 'about' tabs.
The 'about' and 'configure' tabs are detailed in the 'changing settings' section in this manual. The 'video' tab for Teranex Mini - SDI to HDMI 12G contains the following settings.
Video Output Menu
Clip HDMI Output to Legal Levels
This checkbox controls clipping of your SDI input to ensure that it stays within HDMI legal levels and should be kept on by default.
HDMI Instant Lock
Select this checkbox to enable the HDMI instant lock feature. When HDMI instant lock is enabled, the HDMI output signal is kept active even when changing sources. This means your converter does not have to wait for the HDMI television or monitor to lock before displaying the video output as the HDMI signal is already locked. It's important to note that this feature only works when changing sources using the same video standard.
The HDMI instant lock feature can introduce a small delay in video and audio, so if you need zero delay in your converted output you can bypass the HDMI instant lock feature by deselecting the checkbox.
33 Point 3D LUT
Your Blackmagic Teranex Mini - SDI to HDMI 12G supports .cube LUT files that can be created using DaVinci Resolve software, or other color correction software that can export .cube files.
You can load 2 separate LUTs by clicking on the 'load' button for each LUT slot, selecting the desired .cube file from your computer, and clicking 'OK'. Click 'save' to confirm your settings. The LUT filename will appear next to each 'load' button so you know which LUT is being used for LUT 1 or LUT 2.
To turn a LUT on, simply click the 'use LUT 1' or 'use LUT 2' checkboxes. To turn the LUT off, click the 'bypass LUT' checkbox.
The 3D LUT can also be applied to your converter's loop output by checking the 'enable 3D LUT on loop SDI output' checkbox. If you don't want the LUT applied to the loop output simply deselect the checkbox.
If you have a Smart Panel installed, you can easily enable a LUT by pressing the 1 or 2 control panel buttons. Press the buttons again to turn a LUT off.
What is a 3D LUT?
A 3D LUT, or '3D Lookup Table', is a file containing table of values that are used to modify the video colorspace to a new set of color values in a 3D cube space.
The color cube contains all the variations between the mix of each primary color, defined within three x, y, z spatial dimensions. This means the RGB channels in the SDI input video can be remapped to any other RGB output color in the HDMI video output. This is very powerful as it means any color can be mapped to any other color so you can perform very precise color adjustments for calibrating displays, or loading log gamma curves for display when working with different types of raw camera files on set where you want to see linear gamma.
To show how powerful 3D LUTs can be, one of the default LUTs loaded can convert your input video to black and white. This shows that all the input RGB colors are remapped via the 3D LUT to black and white RGB output values via the HDMI output. You can create your own 3D LUTs and upload them via the admin software and DaVinci Resolve even allows you to convert a color grade setting to a 3D LUT that you can then upload to your Teranex Mini - SDI to HDMI 12G. You can output the 3D LUT on the SDI video loop output so you could even use your Teranex Mini as a dedicated 3D LUT color processor even if you don't use the HDMI output!
For more information on how to create a 3D LUT .cube file, refer to the DaVinci Resolve manual which you can download from the Blackmagic Design website at www.blackmagicdesign.com/support.
The 'audio' tab for Teranex Mini - SDI to HDMI 12G contains the following settings.
Audio Output Menu
Set XLR Output
You can choose between analog and AES/EBU output by highlighting the 'analog,' 'AES/EBU,' or 'timecode' buttons in the 'audio output' menu. When you select 'timecode' the left XLR connector will output analog audio, while the right XLR output will provide a timecode signal.
Depending on which audio output option you select, you can then pick which audio channels of your SDI input to send to your HDMI, AES/EBU, or Analog audio output, as well as adjusting their gain per channel or channel pair. If you are outputting AES/EBU audio via both XLR connectors, you can select up to four channels. If you are outputting analog audio, you can select up to two channels. If you are using the right XLR connector to output a timecode signal, the left XLR connector will output one channel of analog audio.
Your Teranex Mini will retain its last settings whether applied via switch, Smart Panel or Teranex setup utility. If reverting to switch control after removing the Smart Panel or updating your converter's settings via software, you may need to toggle individual switches for new settings to take effect.
Blackmagic Teranex Setup lets you adjust settings such as HDMI Instant lock to instantly resync the video signal when changing or routing sources, load 3D LUT files, change the XLR analog audio output levels, and more.
Teranex Mini Smart Panel Settings
If you have installed the optional Teranex Mini Smart Panel on your SDI to HDMI 12G converter, the following menus will be available – 'video,' 'audio,' and 'network.' The settings available in these menus are identical to those detailed in the 'Blackmagic Teranex Setup settings' section above. For more information on changing settings using the Teranex Mini Smart Panel, refer to the 'changing settings' section.

Teranex Mini Smart Panel gives you access to the same settings as Blackmagic Teranex Setup.
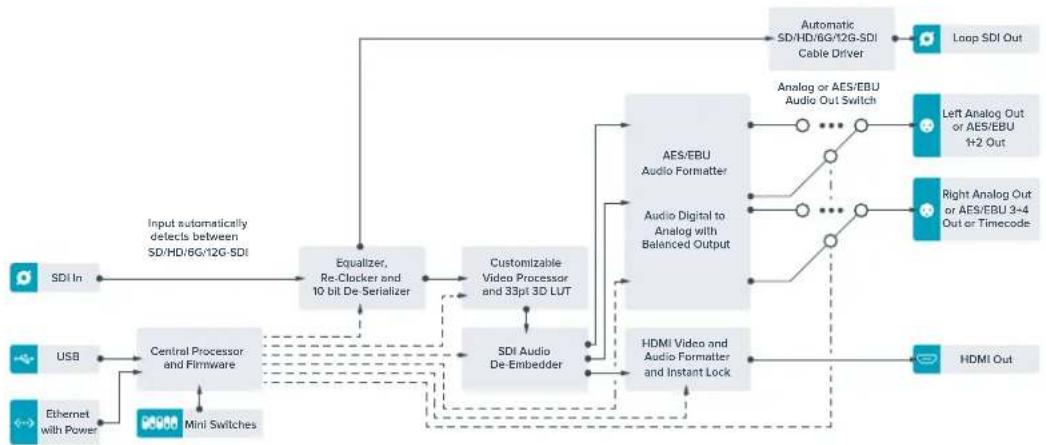
Teranex Mini - SDI to HDMI 12G Block Diagram
Teranex Mini – HDMI to SDI 12G
Your Teranex Mini – HDMI to SDI 12G converts HDMI devices such as HDV cameras, Ultra HD cameras and game consoles to 12G-SDI BNC up to 2160p60, with the choice to embed audio from HDMI, AES/EBU or balanced analog audio inputs. This means you can send HDMI signals over longer distances. It is ideal for converting HDMI consumer cameras or computers with HDMI outputs to SDI.
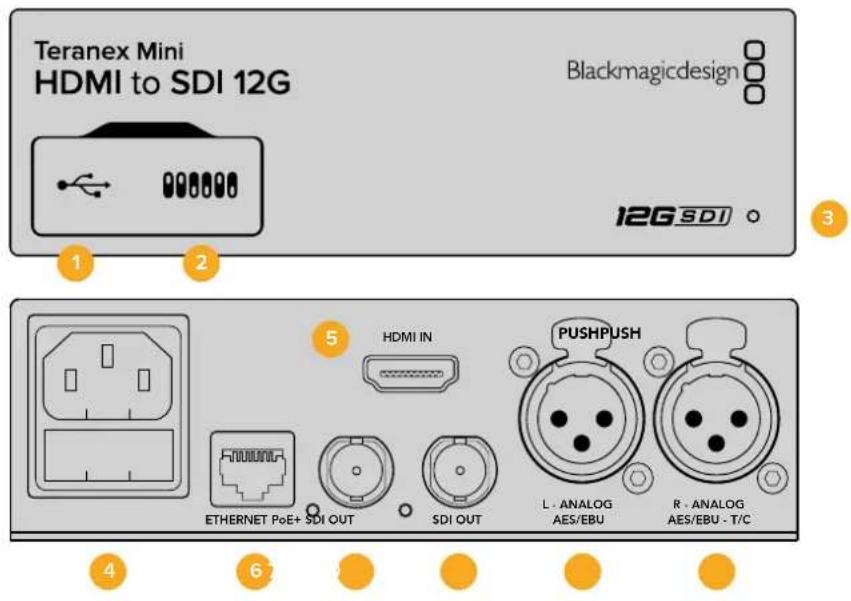
Connectors
1 Mini-B USB Port
Connects to Blackmagic Teranex Setup via a Mac or Windows computer for changing settings and updating your Teranex Mini's internal software.
2 Switches
Adjustable switches for changing settings.
3 LED Status Indicator
Glows white when the converter is receiving power and green when a valid video input signal is detected. Will flash on/off to identify individual converters via Blackmagic Teranex Setup.
4 Power
Standard built in IEC C14 connector for 90 - 240 volt AC power supply.
5 HDMI
HDMI video input.
6 Ethernet PoE+
Connects to a network switch or computer so you can change settings using Blackmagic Teranex Setup. The Ethernet port also supports power over Ethernet plus.
7 SDI Out
SDI video output BNC connector.
8 SDI Out
Secondary SDI output BNC connector.
9 L-Analog or AES/EBU
Balanced left channel analog audio, or digital AES/EBU audio input XLR connector.
10 R-Analog,AES/EBU or Timecode
Balanced right channel analog audio, or digital AES/EBU audio input XLR connector. Can also be configured for timecode input.
Switches
Teranex Mini – HDMI to SDI 12G's switches provide the following settings:
Switch 8 - Analog Audio, AES/EBU Audio
Set switch 8 to 'off' to embed balanced analog audio. Set to 'on' for digital AES/EBU audio. To use these inputs switch 7 must also be set to 'on'.
Switch 7-HDMI Audio, Input Audio
Set switch 7 to 'off' to select embedded HDMI audio, or to 'on' for analog or AES/EBU audio.
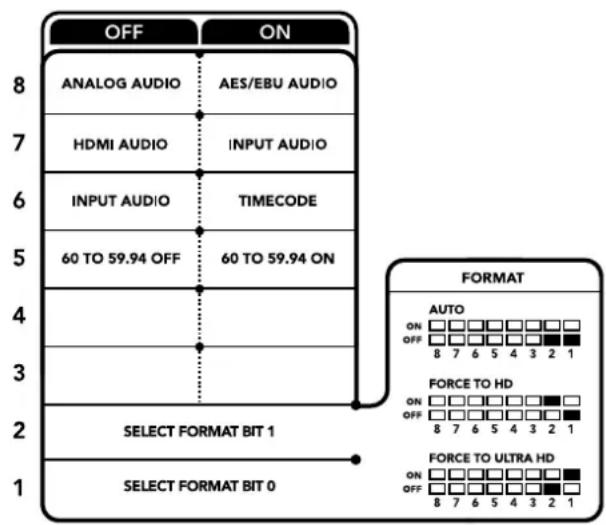
The switch legend on the base of your converter gives you all the information you need to change conversion settings.
Switch 6 - Input Audio/Timecode
Set switch 6 to 'on' to input timecode via the R channel audio XLR connector. Set to 'off' to input audio.
Switch 5 - 60 to 59.94 Off/On
When set to 'on', this setting will allow your converter to detect any HDMI source video running 1080p at 60 frames per second and automatically convert it to interlaced video at 59.94 fields per second.
For example, you may need to connect a computer's HDMI output to a switcher using the standard 1080i 59.94 frame rate. Some computers output 60 frames per second, so by setting switch 5 to 'on' your converter will always detect 1080p at 60 frames per second and convert it to 1080i at 59.94 fields per second.
Switches 2,1-Select Format Bit 1,0
When connecting an HDMI source that can output Ultra HD and HD, you can set your converter to force the source output to one or the other. This can be helpful when you want to record or display your computer's desktop on SDI equipment in HD so it is larger and easy to view.
While it may appear like it's an up or down conversion setting, what your converter is actually doing is telling your source equipment to output Ultra HD or HD video so that your converter can then output the source video's native HD or Ultra HD resolution without up or down conversion.
To force your source video to HD, Ultra HD, or to let your converter automatically negotiate the optimum resolution with your source equipment, simply use combinations of switches 1 and 2. The combination settings are shown below.
- Auto-Switch 1 to OFF, Switch 2 to OFF.
Your converter will negotiate an optimum HD or Ultra HD resolution with your source equipment based on its output capabilities.
- Force to HD - Switch 1 to OFF, Switch 2 to ON.
If your HDMI source equipment is capable of outputting HD and Ultra HD, your converter will instruct the source equipment to output HD video.
- Force to Ultra HD - Switch 1 to ON, Switch 2 to OFF.
If your HDMI source equipment is capable of outputting HD and Ultra HD, your converter will instruct the source to output Ultra HD video.
Blackmagic Teranex Setup Settings
The Teranex setup utility can change all the same settings that are available using the switches, plus additional settings. You can access these settings by moving between the 'video,' 'audio,' 'configure,' and 'about' tabs.
The 'about' and 'configure' tabs are detailed in the 'changing settings' section in this manual.
The 'video' tab for Teranex Mini – HDMI to SDI 12G contains the following settings.
Video Processing Menu
Conversion
Click on the 'conversion' drop down menu to select conversion settings for your SDI output. Setting this to 'auto' will negotiate an optimum HD or Ultra HD resolution with your source equipment based on its output capabilities, while 'Force HD' and 'Force Ultra HD' will output HD and Ultra HD video respectively, regardless of the HDMI input. However, SD will remain SD.
Frame Rate
This is for 1080p60 to 1080i59.94 conversion only. When enabled, the frame rate feature tells your converter to detect a 1080p video source using 60 frames per second and automatically convert it to 1080i at 59.94 frames per second. Select or deselect the checkbox to enable or disable the feature.
This feature is helpful when you want to connect an HDMI source outputting 1080p at 60 frames per second to SDI equipment using a standard 1080i 59.94 frames per second format.
3G Output
This lets you change the 3G-SDI output standard to maintain compatibility with equipment that can only receive level A or level B 3G-SDI video. Level B is the default setting. These settings only apply when outputting 3G-SDI video.
The 'audio' tab for Teranex Mini – HDMI to SDI 12G contains the following settings.
Audio Input Menu
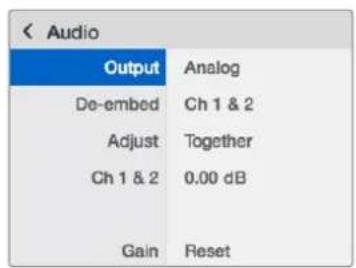
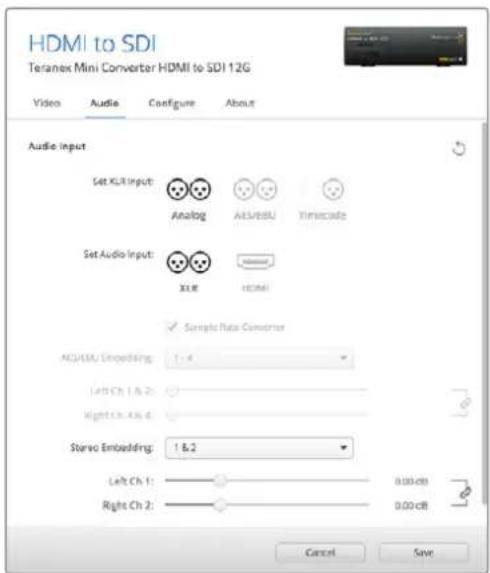
Set XLR Input / Set Audio input
This menu allows you to select between XLR and HDMI audio input. Selecting HDMI will embed the HDMI audio into the SDI video output. Selecting 'XLR' lets you choose between analog, AES/EBU, and timecode inputs, as well as which channels of your SDI audio output you wish to embed these into. You can also adjust the gain on the audio signal.
Selecting AES/EBU allows the additional option of checking 'sample rate converter.' When this is selected, the sample rate of your SDI audio output will be forced to 48kHz , the correct sample rate for television.
If you need to convert Dolby audio via an AES/EBU source that is sample locked to a reference, make sure you disable the sample rate converter by deselecting the checkbox, otherwise it may interfere with your Dolby audio conversion.

Select between 'auto', 'force to HD', or 'force to Ultra HD' conversion settings using the 'video' settings page in Blackmagic Teranex Setup. You can also set your converter to detect 60 frames per second video and automatically convert it to 59.94 frames per second for when connecting to video equipment using the standard 59.94 frame rate.
Adjust your analog audio levels and AES/EBU levels using the 'audio' settings.
Your Teranex Mini will retain its last settings whether applied via switch, Smart Panel or Teranex setup utility. If reverting to switch control after removing the Smart Panel or updating your converter's settings via software, you may need to toggle individual switches for new settings to take effect.
Teranex Mini Smart Panel Settings
If you have installed the optional Teranex Mini Smart Panel on your HDMI to SDI 12G converter, the following menus will be available – 'video,' 'audio,' and 'network.' The settings available in these menus are identical to those detailed in the section above.
For more information on changing settings using the Teranex Mini Smart Panel, refer to the 'changing settings' section in this manual.
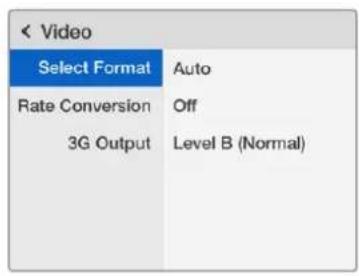
Using Teranex Mini Smart Panel gives you access to the same settings as Blackmagic Teranex Setup.
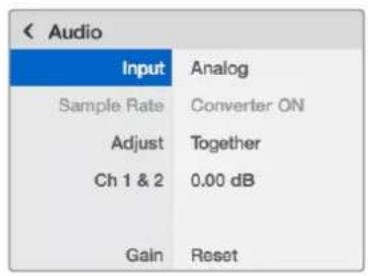
Teranex Mini - HDMI to SDI 12G Block Diagram
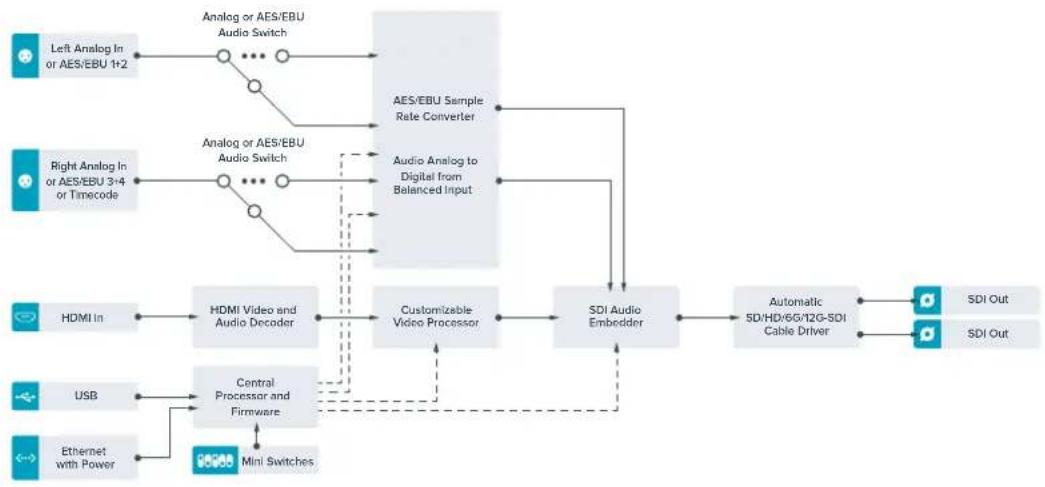
Teranex Mini – SDI to Analog 12G
Your Teranex Mini - SDI to Analog 12G lets you convert from SD SDI, HD-SDI, 3G-SDI, 6G-SDI and 12G-SDI input sources to analog component, NTSC and PAL video out, plus balanced AES/EBU and analog audio out. The built in down converter lets you connect 12G-SDI video to SD and HD analog equipment and easily connects to video monitors and decks such as Betacam SP and VHS. You can even output pairs of analog audio from 16 de-embedded SDI audio channels.
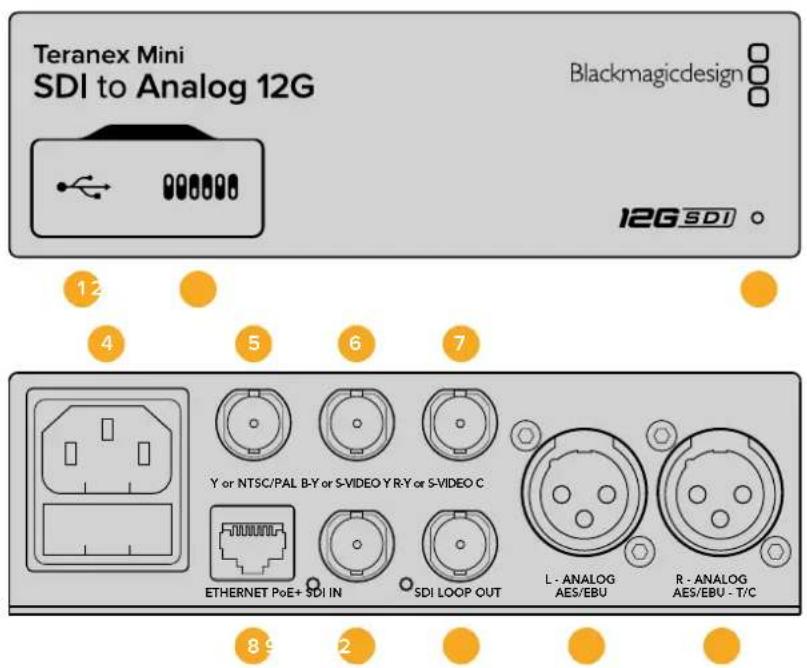
Connectors
1 Mini-B USB Port
Connects to the Blackmagic Teranex Setup software via a Mac or Windows computer for adjusting settings and updating your Teranex Mini's internal software.
2 Switches
Adjustable switches for changing settings.
3 LED Status Indicator
Glows white when the converter is receiving power and green when a valid video input signal is detected. Will flash on/off to identify individual converters via Blackmagic Teranex Setup.
4 Power
Standard built in IEC C14 connector for 90 - 240 volt AC power supply.
5 Y or NTSC/PAL
Analog component Y, NTSC or PAL composite output BNC connector.
6 B-Y or S-VIDEO Y
Analog component B-Y, or S-Video Y output BNC connector.
7 R-Y or S-VIDEO C
Analog component R-Y, or S-Video C output BNC connector.
8 Ethernet PoE+
Connects to a network switch or computer so you can change settings using Blackmagic Teranex Setup. The Ethernet port also supports power over Ethernet plus.
9 SDl In
SDI video input BNC connector.
10 SDI Loop Out
SDI video loop output BNC connector.
11 L - Analog or AES/EBU
Balanced left channel analog audio, or digital AES/EBU audio output XLR connector.
12 R-Analog,AES/EBU or Timecode
Balanced right channel analog audio, or digital AES/EBU audio output XLR connector. Can also be configured for timecode output.
Switches
Teranex Mini - SDI to Analog 12G's switches provide the following settings:
Switch 8 - Analog Audio, AES/EBU Audio
Set switch 8 to 'off' to select balanced analog audio, or to 'on' for digital AES/EBU audio output.
Switch 7-7.5 IRE,0.0IRE
The USA and countries using NTSC with 7.5 setup should set switch 7 to 'off'. If you're working in countries not using 7.5 setup, for example Japan, set switch 7 to 'on'. This setting only affects composite or S-Video outputs.
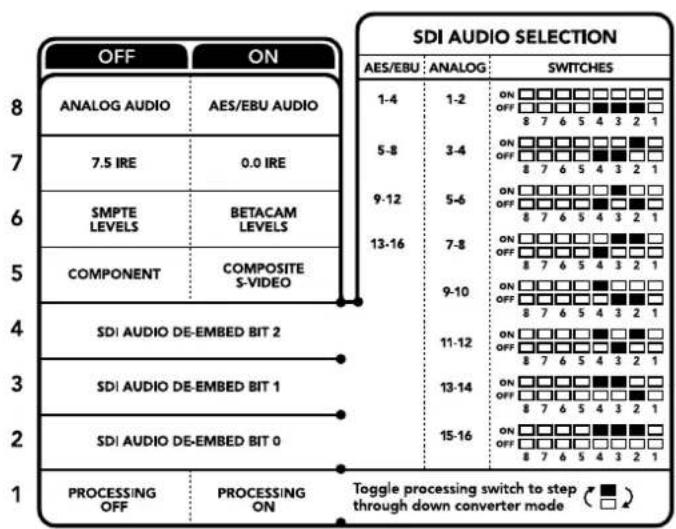
The switch legend on the base of your converter gives you all the information you need to change conversion settings.
Switch 6 - SMPTE Levels, Betacam Levels
Set switch 6 to 'off' for SMPTE levels, or 'on' for Betacam levels. SMPTE levels are more common and even Betacam SP decks can use SMPTE levels, so only switch this to Betacam if you are sure that Betacam levels are being used.
Switch 5 - Component, Composite or S-Video
Set switch 5 to 'off' to select analog component video output, or 'on' for composite and S-Video outputs.
To display the HD video input as SD on the S-Video and composite outputs, down conversion must be set to 'on' by toggling switch 1. Component analog video supports both HD and SD video.
Switch 4, 3 and 2 - SDI Audio De-Embed
Switches 4, 3 and 2 are represented as bits 2, 1, and 0 respectively. This simply means that by setting various on/off combinations for switches 4, 3, and 2, you can choose which pair of audio channels from your SDI input you would like to output to analog or AES/EBU audio.
Switch 1 - Processing Off - Processing On
Switch 1 lets you change the aspect ratio conversion that occurs when down converting Ultra HD or HD inputs to SD analog outputs. This occurs because Ultra HD and HD formats are presented in a 16:9 widenscreen ratio of width to height, whereas SD is a taller 4:3 ratio.
The three options for aspect ratio conversion you can toggle through here are anamorphic, center cut and letterbox. These stretch, crop, and add black bars to the top and bottom of your image, respectively. To switch between these, simply toggle switch 1 on and off to move through the available options. Each time switch 1 is set to 'on,' the aspect ratio type will move ahead one option.
The behavior of switch 1 also changes depending on the analog output format you are using. Composite video is always standard definition, so setting switch 1 to 'off' simply leaves the last aspect ratio conversion option in place. However, component video can support a HD signal, so when you are converting video from an SD source to a component output, setting switch 1 to 'off' will output a widescreen HD analog signal, with no aspect ratio conversion.
SDI Audio Selection Table
By using the following combinations of switch settings, you can select which SDI audio channels to output as analog or digital AES/EBU audio with your Teranex Mini - SDI to Analog 12G.
| Analog Audio Channels Switch | 4 Switch 3 Switch | Switch 2 Switch | Diagram | |
| 1 and 2 OFF OFF OFF | ON OFF 8 7 6 5 4 3 2 1 | |||
| 3 and 4 OFF OFF ON | ON OFF 8 7 6 5 4 3 2 1 | |||
| 5 and 6 OFF ON OFF | ON OFF 8 7 6 5 4 3 2 1 | |||
| 7 and 8 OFF ON ON | ON OFF 8 7 6 5 4 3 2 1 | |||
| 9 and 10 ON OFF OFF | ON OFF 8 7 6 5 4 3 2 1 | |||
| 11 and 12 ON OFF ON | ON OFF 8 7 6 5 4 3 2 1 | |||
| 13 and 14 ON ON OFF | ON OFF 8 7 6 5 4 3 2 1 | |||
| 15 and 16 ON ON ON | ON OFF 8 7 6 5 4 3 2 1 |
| AES/EBU Audio Channels | Switch 4 Switch 3 Switch 2 Switch Diagram | ||
| 1-4 | OFF OFF OFF | ON OFF 8 7 6 5 4 3 2 1 | |
| 5-8 | OFF OFF ON | ON OFF 8 7 6 5 4 3 2 1 | |
| 9-12 | OFF ON OFF | ON OFF 8 7 6 5 4 3 2 1 | |
| 13-16 | OFF ON ON | ON OFF 8 7 6 5 4 3 2 1 | |
Blackmagic Teranex Setup Settings
The Teranex setup utility can change all the same settings that are available using the switches, plus additional settings.
You can access these settings by moving between the 'video,' 'audio,' 'configure,' and 'about' tabs.
The 'about' and 'configure' tabs are detailed in the 'changing settings' section in this manual.
The 'video' tab for Teranex Mini - SDI to Analog 12G contains the following settings.
Video Output Menu
This lets you pick between component, or s-video and composite video output as well as setting the luminance and chroma levels, and the B-Y and R-Y component levels independently.
If you have selected s-video and composite output, you can additionally choose between 7.5 IRE and 0.0 IRE black levels, depending on the region you are working in. If you have selected component video, you can switch between SMPTE and Betacam levels. SMPTE levels are more common and even Betacam SP decks can use SMPTE levels, so only switch this to Betacam if you are sure that Betacam levels are being used.
Video Processing Menu
This menu allows you to set the aspect ratio of down converted video. The options are letterbox, anamorphic, center cut or no processing.
The 'audio' tab for Teranex Mini - SDI to Analog 12G contains the following settings.
Audio Output Menu
This menu allows you to select between analog, AES/EBU, and timecode audio outputs, as well as which channels of your SDI audio input you wish to de-embed. You can also adjust the gain on the audio output.
Your Teranex Mini will retain its last settings whether applied via switch, Smart Panel or Teranex setup utility. If reverting to switch control after removing the Smart Panel or updating your converter's settings via software, you may need to toggle individual switches for new settings to take effect.
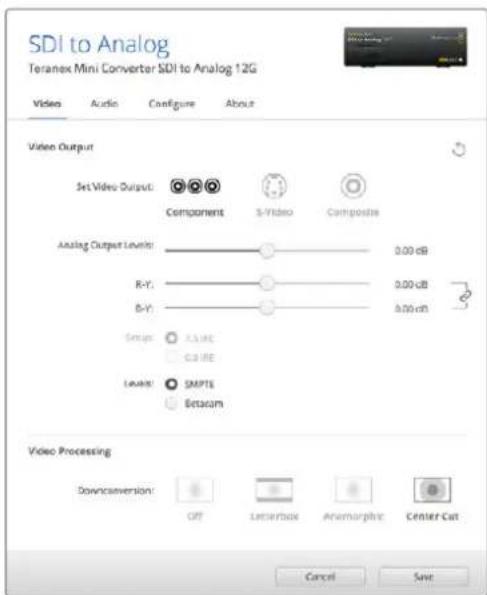
Adjust your video luminance and chroma levels and component chroma levels using the 'video' settings page in Blackmagic Teranex Setup.
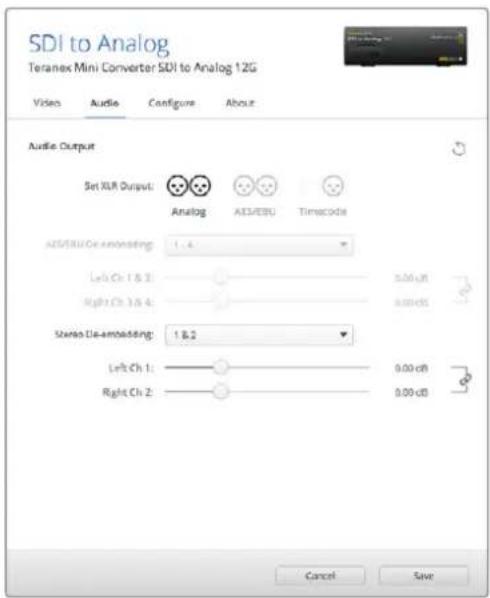
Adjust your analog audio levels and AES/EBU
levels using the 'audio' settings page.
Teranex Mini Smart Panel Settings
If you have installed the optional Teranex Mini Smart Panel on your SDI to Analog 12G converter, the following menus will be available – 'video,' 'audio,' and 'network.' The settings available in these menus are identical to those detailed in the 'Blackmagic Teranex Setup settings' section above. For more information on changing settings using the Teranex Mini Smart Panel, refer to the 'changing settings' section in this manual.
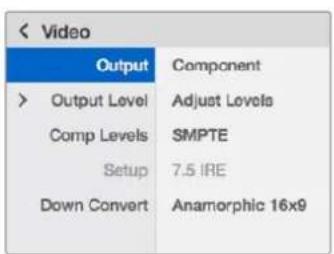
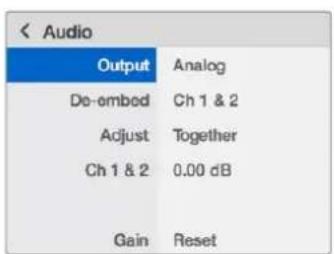
Using Teranex Mini Smart Panel gives you access to the same settings as Blackmagic Teranex Setup.

Teranex Mini - SDI to Analog 12G Block Diagram
Teranex Mini – Analog to SDI 12G
Your Teranex Mini Analog to SDI 12G lets you convert video and audio from analog equipment such as Betacam SP decks, HDV cameras and game consoles to SD-HDI, HD-SDI and 12G-SDI video. A choice of analog input formats is supported, including component SD/HD, S-Video, or composite NTSC and PAL. The converter's 12G-SDI outputs include the option to embed digital AES/EBU or analog audio.
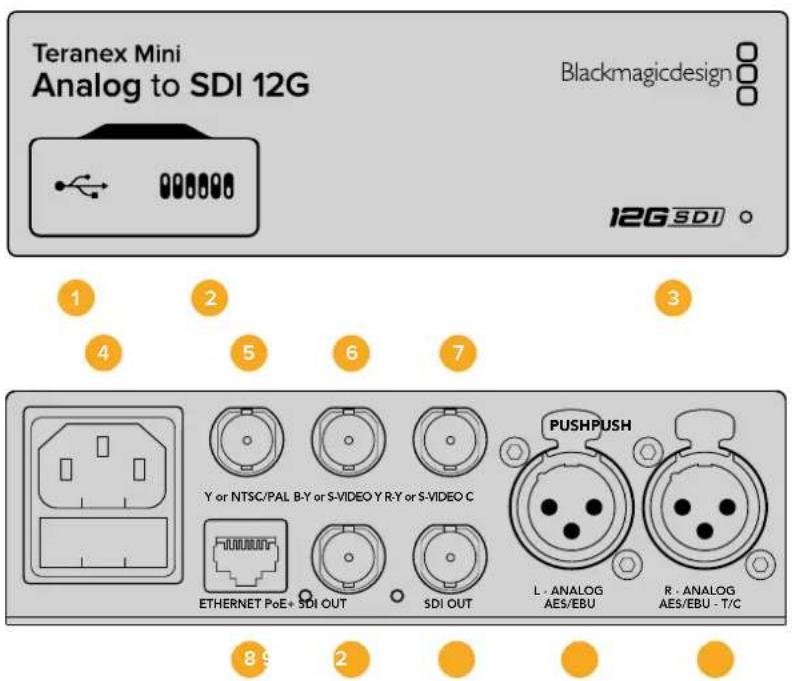
Connectors
1 Mini-B USB Port
Connects to the Teranex setup utility via a Mac or Windows computer for adjusting settings and updating your Teranex Mini's internal software.
2 Switches
Adjustable switches for changing settings.
3 LED Status Indicator
Glows white when the converter is receiving power and green when a valid video input signal is detected. Will flash on/off to identify individual converters via Blackmagic Teranex Setup.
4 Power
Standard built in IEC C14 connector for 90 - 240 volt AC power supply.
5 Y or NTSC/PAL
Analog component Y, NTSC or PAL composite input BNC connector.
6 B-Y or S-VIDEO Y
Analog component B-Y, or S-Video Y input BNC connector.
7 R-Y or S-VIDEO C
Analog component R-Y, or S-Video C input BNC connector.
8 Ethernet PoE+
Connects to a network switch or computer so you can change settings using Blackmagic Teranex Setup. The Ethernet port also supports power over Ethernet plus.
9 SDI Out
SDI video output BNC connector.
10 SDI Out
SDI video output BNC connector.
11 L - Analog or AES/EBU
Balanced left channel analog audio, or digital AES/EBU audio input XLR connector.
12 R-Analog,AES/EBU or Timecode
Balanced right channel analog audio, or digital AES/EBU audio input XLR connector. Can also be configured for timecode input.
Switches
Teranex Mini Analog to SDI 12G's switches provide the following settings:
Switch 8 - Analog Audio, AES/EBU Audio
Set switch 8 to OFF to select balanced analog audio, or to ON for digital AES/EBU audio input.
Switch 7-7.5 IRE -0.0 IRE
The USA and countries using NTSC with 7.5 setup should set switch 7 to OFF. If you're working in countries not using 7.5 setup, set switch 7 to ON. This setting only affects composite or NTSC S-Video outputs.
Switch 6 - SMPTE Levels - Betacam Levels
This setting selects between SMPTE or Betacam video levels. Set switch 6 to OFF for SMPTE levels, or to ON for Betacam levels. SMPTE levels are more common and even Betacam SP decks can use SMPTE levels so only switch this to Betacam if you are sure that Betacam levels are being used.
Switch 5 - Component, Composite or S-Video
Set switch 5 to OFF to select analog component video input, or to ON for composite video and S-Video analog inputs.
Switch 4 - Composite - S-Video
Set switch 4 to OFF to select composite video input, or to ON for S-Video input.
Switch 3 - SD to HD
Set switch 3 to 'on' to up convert the SDI output resolution from SD to HD if the Composite, S-Video or Component inputs are SD. Set to 'off' to match the input resolution.
Switch 2-HD to UHD
Set switch 2 to 'on' to up convert SDI output resolution to Ultra HD if the Component video input is HD. Set to 'off' to match the input resolution.
Switch 1 - Input Audio / Timecode
Set switch 1 to 'on' to input timecode via the R channel audio XLR connector. Set to 'off' to input audio.
| OFF | ON |
| ANALOG AUDIO | AES/EBU AUDIO |
| 7.5 IRE | 0.0 IRE |
| SMPTE LEVELS | BETACAM LEVELS |
| COMPONENT | COMPOSITE or S-VIDEO |
| COMPOSITE | S-VIDEO |
| SD TO HD OFF | SD TO HD ON |
| HD TO UHD OFF | HD TO UHD ON |
| INPUT AUDIO | TIMECODE |
The switch legend on the base of your Teranex Mini gives you all the information you need to change conversion settings.
Blackmagic Teranex Setup Settings
The Teranex setup utility can change all the same settings that are available using the switches, plus additional settings.
You can access these settings by moving between the 'video,' 'audio,' 'configure,' and 'about' tabs.
The 'about' and 'configure' tabs are detailed in the 'changing settings' section in this manual.
The 'video' tab for Teranex Mini Analog to SDI 12G contains the following settings.
Video Input Menu
This lets you pick between component, s-video, and composite video input as well as setting the luminance and chroma levels, and the B-Y and R-Y component levels independently.
If you have selected S-Video or composite input, you can additionally choose between 7.5 IRE and 0.0 IRE black levels, depending on the region you are working in.
If you have selected component video, you can switch between SMPTE and Betacam levels. SMPTE levels are more common and even Betacam SP decks can use SMPTE levels, so only switch this to Betacam if you are sure that Betacam levels are being used.
Video Processing Menu
This menu allows you to set up conversion options, dependent on your analog video input. Component video inputs can be converted from SD to HD, and HD to Ultra HD. S-Video and composite inputs can only be converted from SD to HD.
The 'audio' tab for Teranex Mini Analog to SDI 12G contains the following settings.
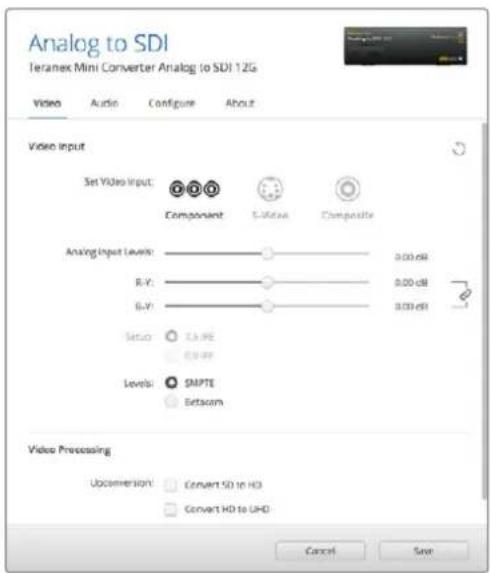
Adjust your video luminance and chroma levels and component chroma levels using the 'video' settings page in Blackmagic Teranex Setup.
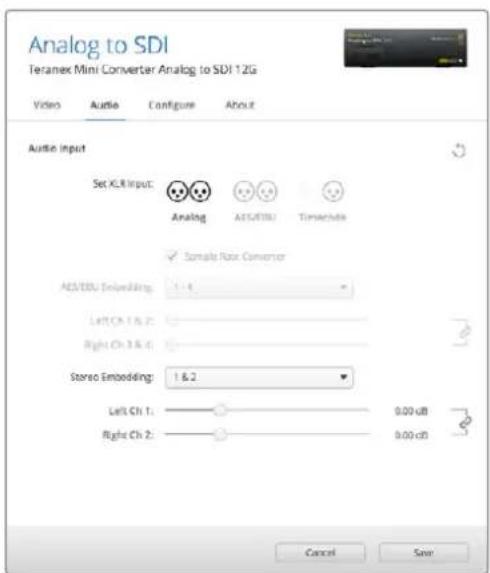
Adjust your analog audio levels and AES/EBU levels using the 'audio' settings page.
Audio Input Menu
This menu allows you to select between analog, AES/EBU, and timecode audio inputs, as well as which channels of your SDI audio output you wish to embed these into. You can also adjust the gain on the audio signal.
Selecting AES/EBU allows the additional option of checking 'sample rate conversion.' When this is selected, the sample rate of your SDI audio output will be up- or down- converted to 24-bit, 48kHz .
Your Teranex Mini will retain its last settings whether applied via switch, Smart Panel or Teranex setup utility. If reverting to switch control after removing the Smart Panel or updating your converter's settings via software, you may need to toggle individual switches for new settings to take effect.
Teranex Mini Smart Panel Settings
If you have installed the optional Teranex Mini Smart Panel on your Analog to SDI 12G to converter, the following menus will be available – 'video,' 'audio,' and 'network.' The settings available in these menus are identical to those detailed in the 'Blackmagic Teranex Setup settings' section above.
For more information on changing settings using the Teranex Mini Smart Panel, refer to the 'changing settings' section in this manual.
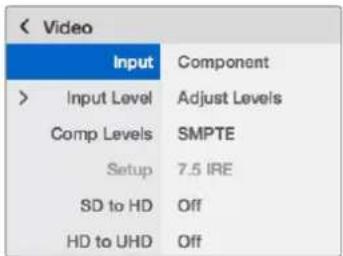

Using Teranex Mini Smart Panel gives you access to the same settings as Blackmagic Teranex Setup.
Teranex Mini - Analog to SDI 12G Block Diagram
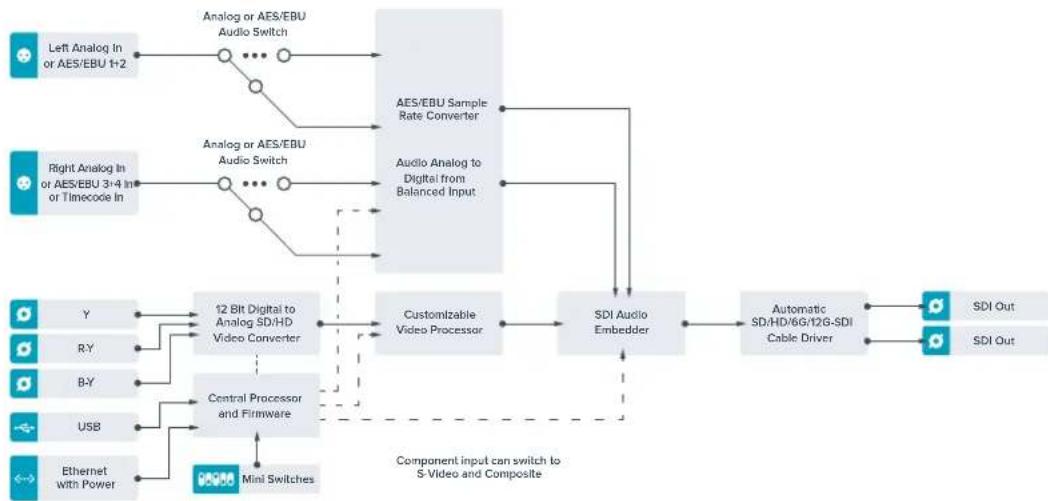
Teranex Mini – SDI to Audio 12G
With Teranex Mini SDI to Audio 12G you can de-embed audio from any SDI video connection and output to two channels of analog audio or four channels of AES/EBU digital. Output to audio equipment such as audio mixers, analog decks and reference monitors.
Additional SDI audio channels can be de-embedded by daisy chaining another Teranex Mini SDI to Audio 12G to your converter's SDI output.
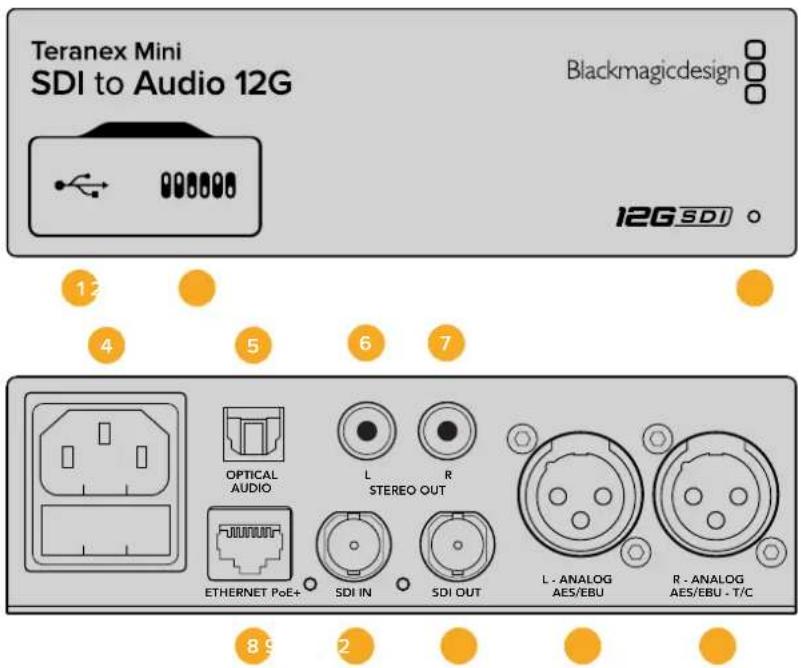
Connectors
1 Mini-B USB Port
Connects to the Teranex setup utility via a Mac or Windows computer for adjusting settings and updating your Teranex Mini's internal software.
2 Switches
Adjustable switches for changing settings.
3 LED Status Indicator
Glows white when the converter is receiving power and green when a valid video input signal is detected. Will flash on/off to identify individual converters via Blackmagic Teranex Setup.
4 Power
Standard built in IEC C14 connector for 90 - 240 volt AC power supply.
5 Optical S/PDIF Audio Output
S/PDIF Signal with TOSLINK Connector.
6 L - Unbalanced HiFi Analog Line Level Output
Unbalanced left channel analog audio output RCA connector.
7 R - Unbalanced HiFi Analog Line Level Output
Unbalanced right channel analog audio output RCA connector.
8 Ethernet PoE+
Connects to a network switch or computer so you can change settings using Blackmagic Teranex Setup. The Ethernet port also supports power over Ethernet.
9 SDIn
SDI video input BNC connector.
10 SDI Loop Out
SDI video loop output BNC connector.
11 L-Analog or AES/EBU
Balanced left channel analog audio, or digital AES/EBU audio output XLR connector.
12 R-Analog,AES/EBU or Timecode
Balanced right channel analog audio, or digital AES/EBU audio output XLR connector. Can also be configured for timecode output.
Switches
Teranex Mini SDI to Audio 12G's switches provide the following settings:
Switch 8 - Analog Audio, AES/EBU Audio
Set switch 8 to OFF to select balanced analog audio, or to ON for digital AES/EBU audio output.
Switch 7 - Output Audio/Timecode
Set switch 7 to 'on' to output timecode via the R channel audio XLR connector. Set to 'off' to output audio.
Switches 6, 5, 4 - SDI Audio De-Embed Bit 2, 1, 0
Switches 6, 5 and 4 are represented as bits 2, 1 and 0 respectively. This simply means that by setting various on/off combinations for switches 6, 5 and 4, you can choose which audio channels to de-embed from the SDI input signal into your audio output.
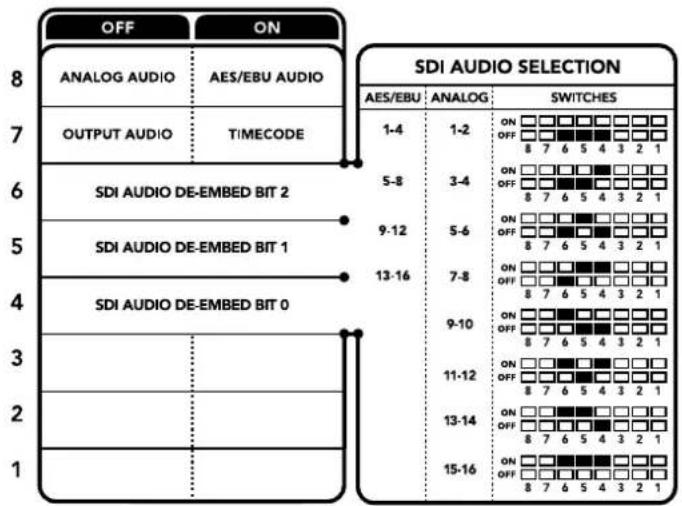
The switch legend on the base of your converter gives you all the information you need to change conversion settings.
SDI Audio De-Embed Table
| Analog Audio Channels Switch | Switch 5 Switch 4 Switch | Diagram | |
| 1-2 OFF OFF OFF | ONOFF87654321 | ||
| 3-4 OFF ON | ONOFF87654321 | ||
| 5-6 OFF ON OFF | ONOFF87654321 | ||
| 7-8 OFF ON ON | ONOFF87654321 | ||
| 9-10 ON OFF OFF | ONOFF87654321 | ||
| 11-12 ON OFF ON | ONOFF87654321 | ||
| 13-14 ON ON OFF | ONOFF87654321 | ||
| 15-16 ON ON ON | ONOFF87654321 |
| AES/EBU Audio Channels Switch 6 Switch 5 Switch 4 Switch Diagram | |||
| 1-4 | OFF OFF OFF | ON OFF 8 7 6 5 4 3 2 1 | |
| 5-8 | OFF OFF ON | ON OFF 8 7 6 5 4 3 2 1 | |
| 9-12 OFF ON OFF | ON OFF 8 7 6 5 4 3 2 1 | ||
| 13-16 | OFF ON ON | ON OFF 8 7 6 5 4 3 2 1 | |
Blackmagic Teranex Setup Settings
The Teranex setup utility can change all the same settings that are available using the switches, plus additional settings.
You can access these settings by moving between the 'audio,' 'configure,' and 'about' tabs.
The 'about' and 'configure' tabs are detailed in the 'changing settings' section in this manual.
The 'audio' tab for Teranex Mini SDI to Audio 12G contains the following settings.
Audio Output Menu
This menu allows you to select between analog, AES/EBU, and timecode audio outputs, as well as which channels of your SDI audio input you wish to de-embed. You can also adjust the gain on the audio output.
Your Teranex Mini will retain its last settings whether applied via switch, Smart Panel or Teranex setup utility. If reverting to switch control after removing the Smart Panel or updating your converter's settings via software, you may need to toggle individual switches for new settings to take effect.
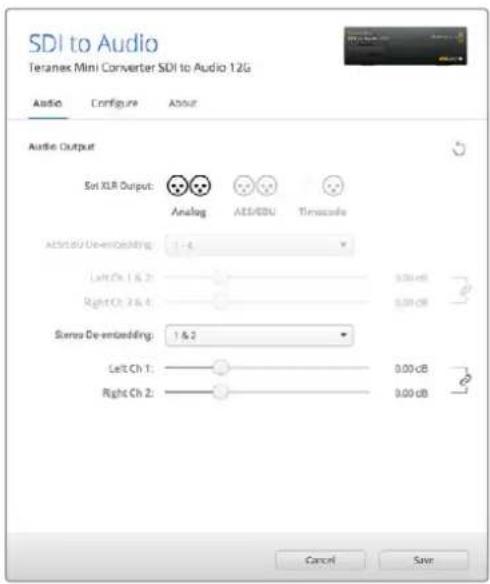
Adjust your analog audio levels and AES/EBU levels using the 'audio' settings page in Blackmagic Teranex Setup.
Teranex Mini Smart Panel Settings
If you have installed the optional Teranex Mini Smart Panel on your SDI to Audio 12G converter, the following menus will be available – 'audio,' and 'network.' The settings available in these menus are identical to those detailed in the 'Blackmagic Teranex Setup settings' section above. For more information on changing settings using the Teranex Mini Smart Panel, refer to the 'changing settings' section in this manual.
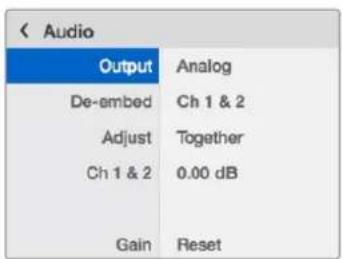
Using Teranex Mini Smart Panel gives you access to the same settings as Blackmagic Teranex Setup.
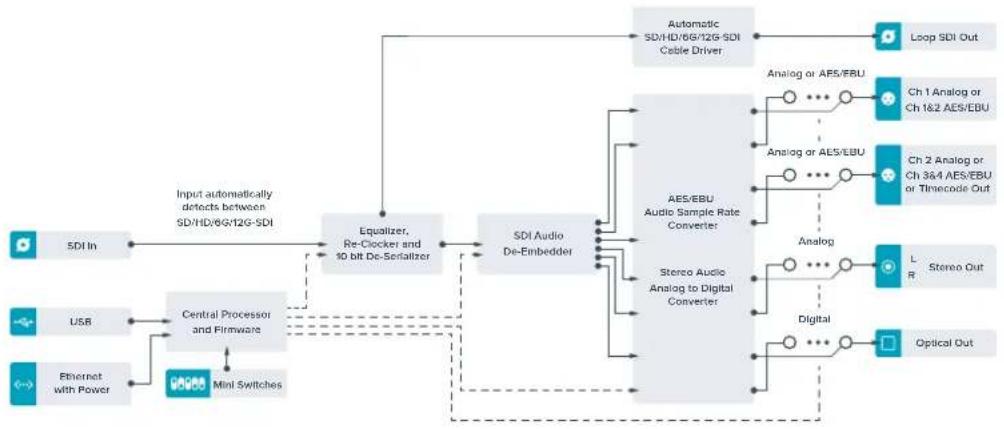
Teranex Mini - SDI to Audio 12G Block Diagram
Teranex Mini – Audio to SDI 12G
With Teranex Mini Audio to SDI 12G, you can embed two channels of analog audio, or four channels of AES/EBU digital audio into any SDI video connection. You can use this Teranex Mini to embed audio from equipment, such as audio mixers and analog decks, into SDI video connections for use with SDI routers and decks. Additional SDI audio channels can be embedded by daisy chaining another Teranex Mini Audio to SDI 12G to your converter's SDI output.
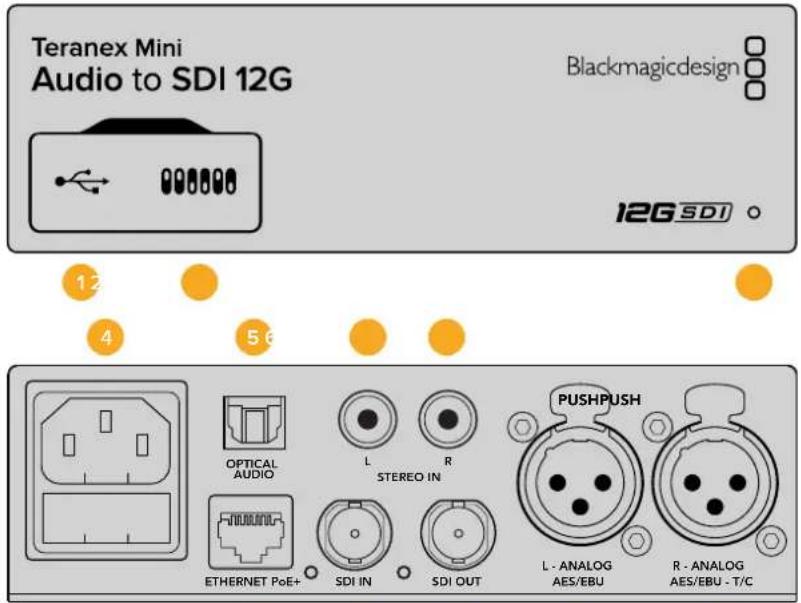
89
2
Connectors
1 Mini-B USB Port
Connects to the Blackmagic Teranex Setup software via a Mac or Windows computer for adjusting settings and updating your Teranex Mini's internal software.
2 Switches
Adjustable switches for changing settings.
3 LED Status Indicator
Glows white when the converter is receiving power and green when a valid video input signal is detected. Will flash on/off to identify individual converters via Blackmagic Teranex Setup.
4 Power
Standard built in IEC C14 connector for 90 - 240 volt AC power supply.
5 Optical S/PDIF Audio Input
S/PDIF Signal with TOSLINK Connector.
6 L - Unbalanced HiFi Analog Line Level Input
Unbalanced left channel analog audio input RCA connector.
7 R - Unbalanced HiFi Analog Line Level Input
Unbalanced right channel analog audio input RCA connector.
8 Ethernet PoE+
Connects to a network switch or computer so you can change settings using Blackmagic Teranex Setup. The Ethernet port also supports power over Ethernet.
9 SDIn
SDI video input BNC connector.
10 SDI Out
SDI video output BNC connector.
11 L - Analog or AES/EBU
Balanced left channel analog audio, or digital AES/EBU audio input XLR connector.
12 R-Analog,AES/EBU or Timecode
Balanced right channel analog audio, or digital AES/EBU audio input XLR connector. Can also be configured for timecode input.
Switches
Teranex Mini Audio to SDI 12G's switches provide the following settings:
Switch 8, 7 - Input Audio Selection Bit 1, 0
Switches 8 and 7 are represented as bits 1 and 0, respectively. This simply means that by setting various on/off combinations for switches 8 and 7 you can select from four input audio options.
Switch 6, 5, 4 - Embed Audio Bit 2, 1, 0
Switches 6, 5, and 4 are represented as bits 2, 1, and 0, respectively. This simply means that by setting various on/off combinations for switches 6, 5, and 4 you can select which channels of your SDI signal you wish to embed audio into.
If you are embedding analog audio, there are eight combinations, allowing you to embed audio into the channel pairs from 1-2 through to 15-16.
If you are embedding AES/EBU audio, there are four combinations. You can select between embedding audio into channels 1 to 4, 5 - 8, 9 - 12, or 13 - 16

The switch legend on the base of your converter gives you all the information you need to change conversion settings.
Switch 3 - Sample Rate Conversion, No Sample Rate Conversion
Set switch 3 to OFF to enable sample rate conversion, or ON to disable sample rate conversion. This switch should almost always be set to OFF to ensure audio is embedded at the correct sample rate for television.
When switch 3 is set to OFF this setting converts the sample rate of your analog or AES/EBU audio and embeds audio into the SDI output at a sample rate of 48kHz .
Switch 2-Ch 2 or AES/EBU 3 + 4 Embed/Bypass
Once you have selected your audio channels, use switches 2 and 1 to select which channels to embed or disable. The disable setting lets you avoid overwriting audio channels you wish to keep in the audio signal.
Set switch 2 to ON to bypass channel 2, or AES/EBU channels 3 and 4. Set switch 1 to ON to bypass channel 1, or AES/EBU channels 1 and 2.
Switch 1-Ch 1 or AES/EBU 1 + 2 Embed/Bypass
See switch 2 description.
Audio Selection Tables
| Input Audio Source Switch 8 Switch 7 Switch Diagram | |||
| XLR Analog OFF OFF | ON OFF 8 7 6 5 4 3 2 1 | ||
| XLR AES/EBU OFF ON | ON OFF 8 7 6 5 4 3 2 1 | ||
| Rca Analog ON OFF | ON OFF 8 7 6 5 4 3 2 1 | ||
| Optical ON ON | ON OFF 8 7 6 5 4 3 2 1 | ||
SDI Channel Tables
| Analog Audio Channels Switch | Switch 5 Switch 4 Switch | Diagram | |
| 1-2 OFF OFF OFF | ON OFF 8 7 6 5 4 3 2 1 | ||
| 3-4 OFF OFF ON | ON OFF 8 7 6 5 4 3 2 1 | ||
| 5-6 OFF ON OFF | ON OFF 8 7 6 5 4 3 2 1 | ||
| 7-8 OFF ON ON | ON OFF 8 7 6 5 4 3 2 1 | ||
| 9-10 ON OFF OFF | ON OFF 8 7 6 5 4 3 2 1 | ||
| 11-12 ON OFF ON | ON OFF 8 7 6 5 4 3 2 1 | ||
| 13-14 ON ON OFF | ON OFF 8 7 6 5 4 3 2 1 | ||
| 15-16 ON ON ON | ON OFF 8 7 6 5 4 3 2 1 |
| AES/EBU Audio Channels | Switch 6 Switch 5 Switch 4 Switch Diagram | ||
| 1-4 | OFF OFF OFF | ON OFF 8 7 6 5 4 3 2 1 | |
| 5-8 | OFF OFF ON | ON OFF 8 7 6 5 4 3 2 1 | |
| 9-12 | OFF ON OFF | ON OFF 8 7 6 5 4 3 2 1 | |
| 13-16 | OFF ON ON | ON OFF 8 7 6 5 4 3 2 1 | |
Blackmagic Teranex Setup Settings
The Teranex setup utility can change all the same settings that are available using the switches, plus additional settings. You can access these settings by moving between the 'audio,' 'configure,' and 'about' tabs in Blackmagic Teranex Setup. The 'about' and 'configure' tabs are detailed in the 'changing settings' section in this manual.
The 'audio' tab for Teranex Mini Audio to SDI 12G contains the following settings.
Audio Input Menu
This menu allows you to select between RCA, XLR, and optical inputs.
If you have selected XLR, you can further select between analog, AES/EBU, and timecode inputs.
Selecting AES/EBU allows the additional option of checking 'sample rate conversion.' When this is selected, the sample rate of your SDI audio output will be forced to 48kHz , the correct sample rate for television.
The audio input menu also allows you to chose which channel pair, or channel quad in the case of AES/EBU audio, of your SDI signal you wish to embed audio into, as well as adjusting the audio gain.
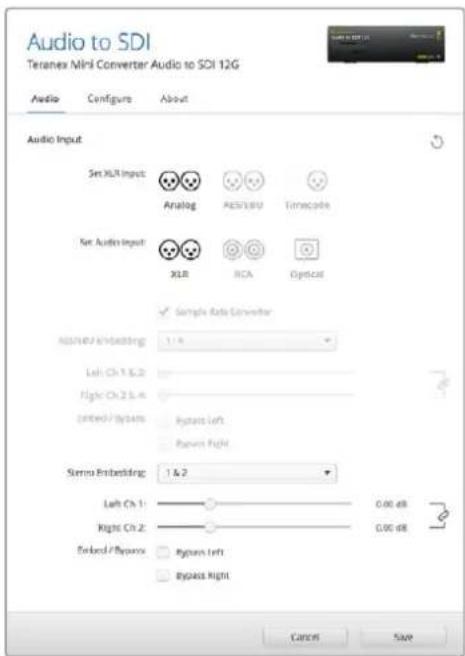
Adjust your analog audio levels and AES/EBU levels using the 'audio' settings page in Blackmagic Teranex Setup.
You can bypass channels or channel pairs if you want to avoid overwriting audio in your SDI signal.
Your Teranex Mini will retain its last settings whether applied via switch, Smart Panel or Blackmagic Teranex Setup. If reverting to switch control after removing the Smart Panel or updating your converter's settings via software, you may need to toggle individual switches for new settings to take effect.
Teranex Mini Smart Panel Settings
If you have installed the optional Teranex Mini Smart Panel on your Audio to SDI 12G converter, the following menus will be available – 'audio,' and 'network.' The settings available in these menus are identical to those detailed in the 'Blackmagic Teranex Setup settings' section above.
For more information on changing settings using the Teranex Mini Smart Panel, refer to the 'changing settings' section in this manual.
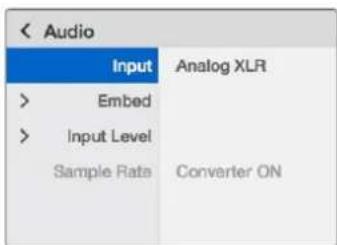
Using Teranex Mini Smart Panel gives you access to the same settings as Blackmagic Teranex Setup.
Teranex Mini - Audio to SDI 12G Block Diagram
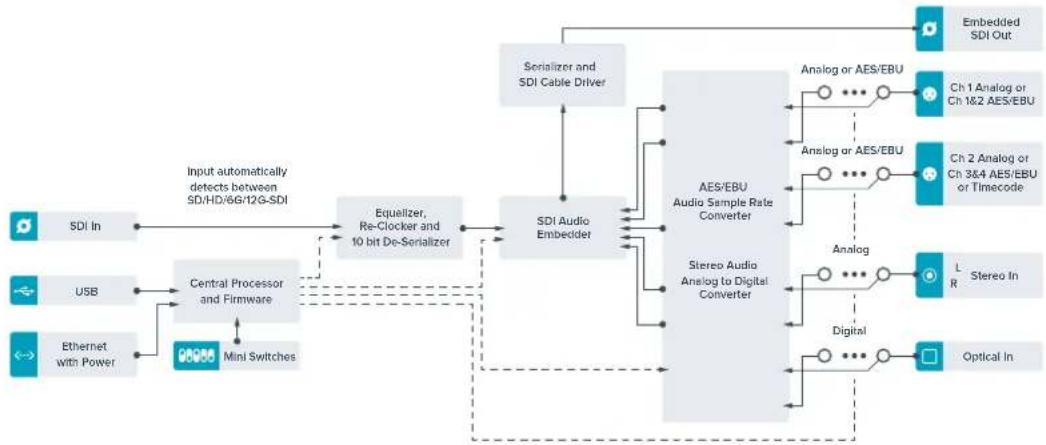
Teranex Mini – 12G-SDI to Quad SDI
Teranex Mini 12G-SDI to Quad SDI lets you convert a 12G-SDI signal to quad link SDI so you can connect to Ultra HD equipment that use four separate BNC connectors. This conversion is perfect if you need to connect 12G-SDI Ultra HD signals to four separate HD monitors, for example large video wall displays. Your Teranex Mini includes a 12G-SDI loop through connector and support for both level A and level B 3G-SDI equipment.
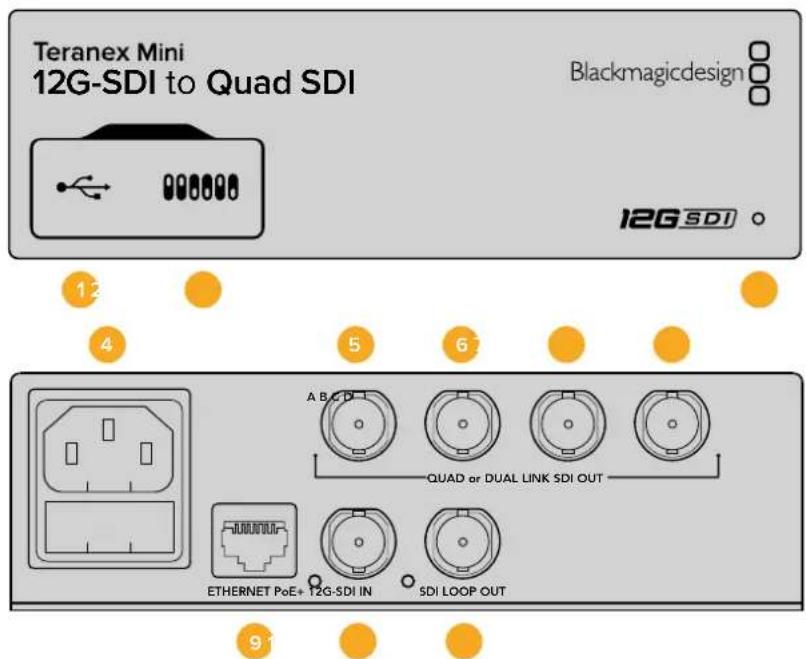
Connectors
1 Mini-B USB Port
The USB port lets you connect your converter to a Mac or Windows computer so you can adjust settings and update your converter's internal software.
2 Switches
Switches on the front of your Teranex Mini let you change settings using the tip of a pen.
3 LED Status Indicator
The LED glows white when the converter is receiving power and green when a valid video input signal is detected. When more than one Teranex Mini is connected to your computer, you can identify your converter using the 'identify' checkbox in Blackmagic Teranex Setup. When the checkbox is enabled, your converter's LED will flash on and off.
4 Power
Standard built in IEC C14 connector for 90 - 240 volt AC power supply.
5 SDI Out A
This BNC connector outputs the following signals:
-SD/HD-SDI
- Single link 3G-SDI
- Single link 6G-SDI
Dual link HD-SDI channel A
Dual link 3G-SDI Ultra HD channel A
- Quad link HD-SDI Ultra HD channel A
6 SDI Out B
This SDI video output BNC connector outputs the following signals:
Dual link HD-SDI channel B
Dual link 3G-SDI Ultra HD channel B
- Quad link HD-SDI Ultra HD channel B
7 SDI Out C
The 'SDI Out C' BNC connector outputs quad link HD-SDI Ultra HD channel C.
8 SDI Out D
This BNC connector is used to output quad link HD-SDI Ultra HD channel D.
9 Ethernet PoE+
The Ethernet connector lets you plug your Teranex Mini into a network switch or computer so you can change settings using Blackmagic Teranex Setup. The Ethernet port also supports power over Ethernet plus.
10 12G-SDI In
This input supports a 12G-SDI signal on a BNC connector.
11 SDI Loop Out
This BNC connector outputs the incoming 12G-SDI signal so you can feed it through to other 12G-SDI equipment.
Quad HD split
Your Teranex Mini 12G SDI to Quad SDI converter has multiple ways of sending high bandwidth image data over relatively low bandwidth connections.
This diagram represents the difference between quad link SDI, where image information is split between four 3G-SDI cables to form a single Ultra HD image, and quadrant HD split, where each of four HD screens receives one quarter of a complete image as part of a video wall.
Dual link 6G SDI operates in the same way as quad link, in that one complete signal is split across multiple cables, except that only two 3G-SDI outputs are used.
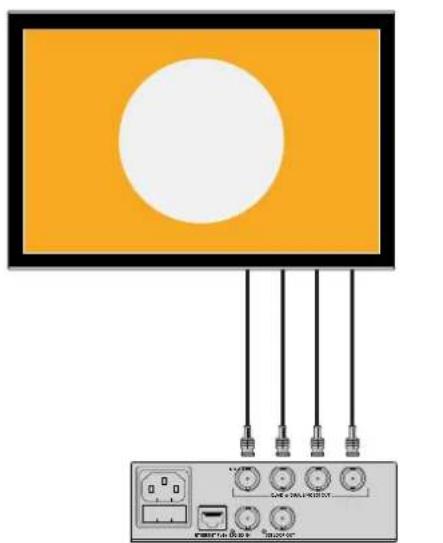
Quad Link Quadrant HD
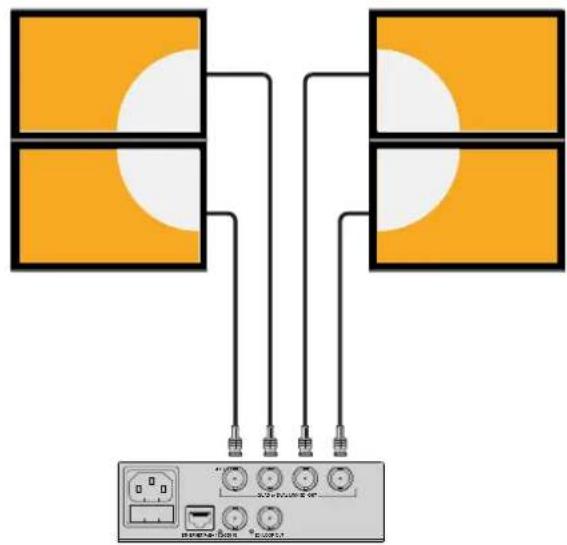
Switches
Teranex Mini - 12G-SDI to Quad SDI's switches provide the following settings:
Switches 8 & 7 - Quad SDI Output
Switches 8 and 7 are represented as bits 1 and 0, respectively. This simply means that by setting various on off combinations of switches 8 and 7, you can choose how an 12G-SDI Ultra HD signal is split among your Teranex Mini converter's four outputs.
Below are some example configurations for converting an Ultra HD signal to quad link, dual link or quad HD split mode.
If the input is 12G-SDI and switches 8 and 7 are set to 'off', the output will be interleaved quad link.
If the input is 12G-SDI, switch 8 is set to 'off', and 7 is set to 'on', the output will be 4 HD quadrants.
If the input is 6G-SDI, switch 8 is set to 'on' and switches 7 and 6 are set to 'off' the output will be dual link 3G-SDI level B.
If the input is 6G-SDI, switch 8 is set to 'on', switch 7 is set to 'off' and switch 6 to 'on', the output will be dual link 3G-SDI level A.
When the converter is in Quad HD split mode, the 4 outputs will carry 4 independent HD quadrants to form the complete Ultra HD image.

The switch legend on the base of your converter gives you all the information you need to change conversion settings.
Switch 6-3G Level B/A
This setting lets you change the 3G-SDI output standard to maintain compatibility with equipment that can only receive level A or level B 3G-SDI video. Level B is the default setting, and is accessed by setting switch 6 to 'off.' To output Level A video, set switch 6 to 'on.' These settings only apply when outputting 3G-SDI video.
Quad Link Selection Table
| Quad SDI Output Switch 8 Switch 7 Switch Diagram | |||
| Quad HD Split OFF ON | ON OFF 8 7 6 5 4 3 2 1 | ||
| Quad Link OFF OFF | ON OFF 8 7 6 5 4 3 2 1 | ||
| Dual Link ON OFF | ON OFF 8 7 6 5 4 3 2 1 | ||
| Single Link ON ON | ON OFF 8 7 6 5 4 3 2 1 |
Blackmagic Teranex Setup Settings
The Teranex setup utility can change all the same settings that are available using the switches, plus additional settings. You can access these settings by moving between the 'video,' 'configure,' and 'about' tabs.
The 'about' and 'configure' tabs are detailed in the 'changing settings' section in this manual.
The 'video' tab for Teranex Mini 12G-SDI to Quad SDI contains the following settings.
Video Processing Menu
SDI Output
Use this menu to select between SDI output options. The available options are single link, dual link, quad HD split and quad link. These dictate how an 12G-SDI Ultra HD signal is split between your converter's four SDI outputs.
While a 12G-SDI input signal can be output as quad link or quad HD split, 6G inputs can be split into four 1.5G outputs, or two pairs 3G outputs. Lower bitrate inputs, such as 3G-SDI or 1.5G-SDI, can be duplicated across all four outputs by choosing 'single link.'
3G Output
This lets you change the 3G-SDI output standard to maintain compatibility with equipment that can only receive level A or level B 3G-SDI video. Level B is the default setting. These settings only apply when outputting 3G-SDI video.
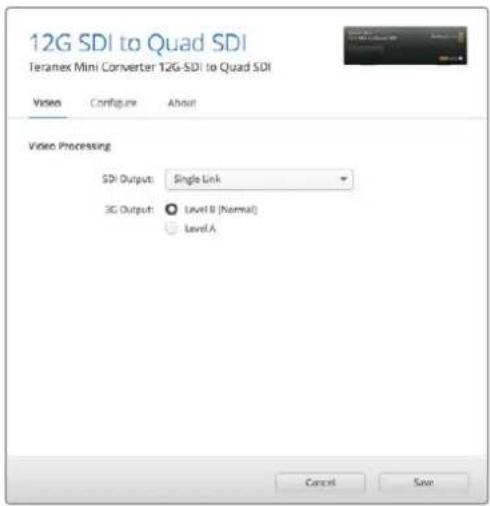
Adjust your SDI output settings using the 'video' settings page in Blackmagic Teranex Setup.
Teranex Mini Smart Panel Settings
The 'video' and 'network' settings can be changed from the front panel if you have the optional Teranex Mini Smart Panel installed. The settings available in these menus are identical to those detailed in the 'Blackmagic Teranex Setup settings' section. For more information on changing settings using the Teranex Mini Smart Panel, refer to the 'changing settings' section in this manual.
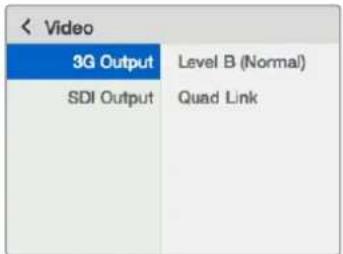
Using Teranex Mini Smart Panel gives you access to the same settings as Blackmagic Teranex Setup.
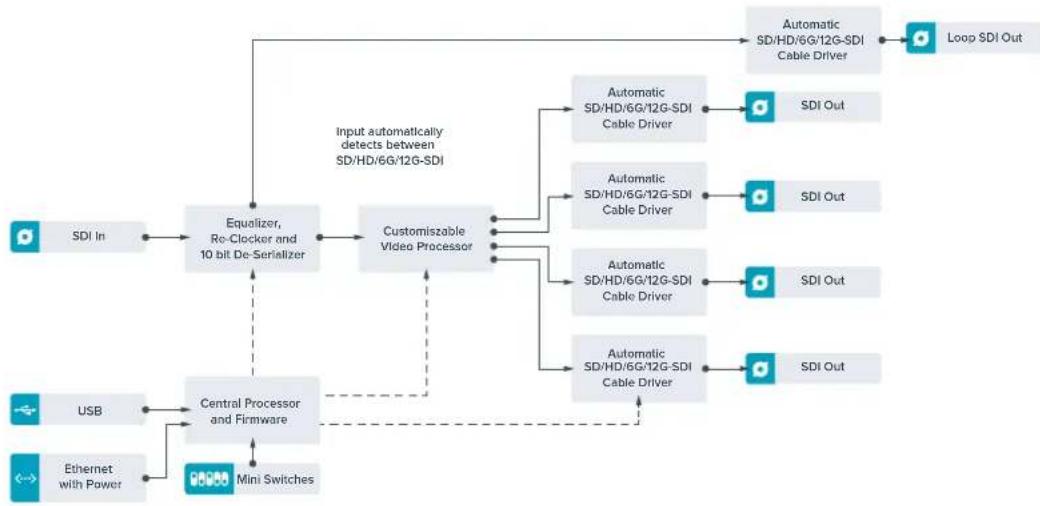
Teranex Mini - 12G-SDI to Quad SDI Block Diagram
Teranex Mini - Quad SDI to 12G-SDI
Teranex Mini Quad SDI to 12G-SDI lets you connect quad link Ultra HD equipment to the latest 12G-SDI equipment. This means you can convert Ultra HD outputs that use four separate BNC cables into a single 12G-SDI BNC cable so you can plug into the latest 12G-SDI routers, switchers, projectors and more! Supports both Level A and Level B 3G-SDI.
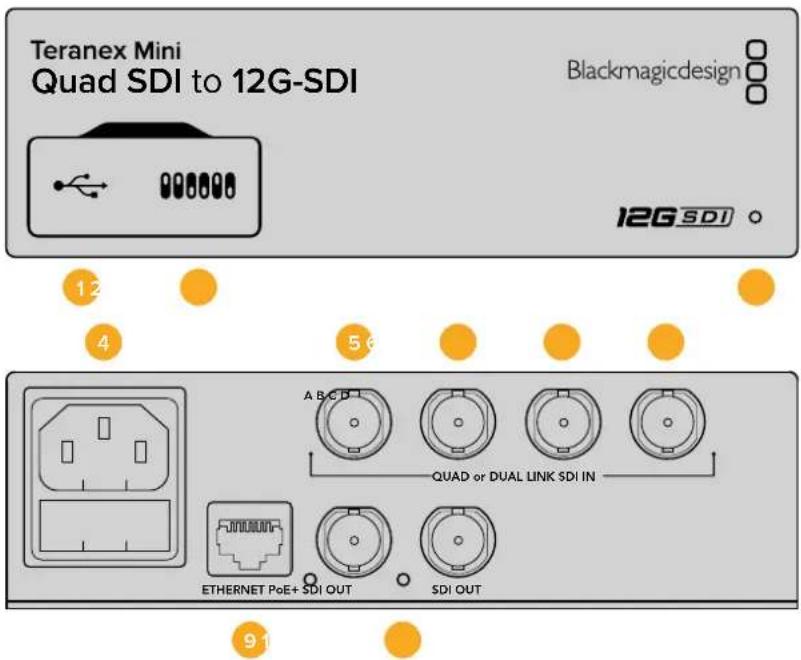
Connectors
1 Mini-B USB Port
The USB port lets you connect your converter to a Mac or Windows computer so you can adjust settings and update your converter's internal software.
2 Switches
Switches on the front of your Teranex Mini let you change settings using the tip of a pen.
3 LED Status Indicator
The LED glows white when the converter is receiving power and green when a valid video input signal is detected. When more than one Teranex Mini is connected to your computer, you can identify your converter using the 'identify' checkbox in Blackmagic Teranex Setup. When the checkbox is enabled, your converter's LED will flash on and off.
4 Power
Standard built in IEC C14 connector for 90 - 240 volt AC power supply.
5 SDIn A
This BNC connector accepts the following input signals:
-SD/HD-SDI
- Single link 3G-SDI
- Single link 6G-SDI
Dual link HD-SDI channel A
Dual link 3G-SDI Ultra HD channel A
- Quad link HD-SDI Ultra HD channel A
6 SDIn B
This BNC connector accepts the following input signals:
Dual link HD-SDI channel B
Dual link 3G-SDI Ultra HD channel B
- Quad link HD-SDI Ultra HD channel B
7 SDI In C
The 'SDI In C' BNC connector is used to plug in quad link HD-SDI Ultra HD channel C.
8 SDIn D
Use this BNC connector to plug in quad link HD-SDI Ultra HD channel D.
9 Ethernet PoE+
The Ethernet connector lets you plug your Teranex Mini into a network switch or computer so you can change settings using Blackmagic Teranex Setup. The Ethernet port also supports power over Ethernet plus.
10 SDI Outputs
These two BNC connectors let you output two separate 12G-SDI signals.
Switches
The switch 6 'on/off' setting lets you change the 3G-SDI output standard to maintain compatibility with equipment that can only receive level A or level B 3G-SDI video. Level B is the default setting, and is accessed by setting switch 6 to 'off'. To output Level A video, set switch 6 to 'on.' These settings only apply when outputting 3G-SDI video.
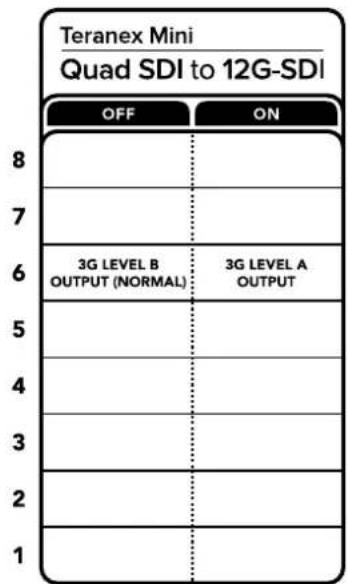
The switch legend on the base of your converter gives you all the Information you need to change conversion settings.
Blackmagic Teranex Setup Settings
The Teranex setup utility can change all the same settings that are available using the switches, plus additional settings. You can access these settings by moving between the 'video,' 'configure,' and 'about' tabs.
The 'about' and 'configure' tabs are detailed in the 'changing settings' section in this manual.
The 'video' tab for Teranex Mini - SDI to Analog 12G contains the following settings.
Video Processing Menu
3G Output
This lets you change the 3G-SDI output standard to maintain compatibility with equipment that can only receive level A or level B 3G-SDI video. Level B is the default setting. These settings only apply when outputting 3G-SDI video.
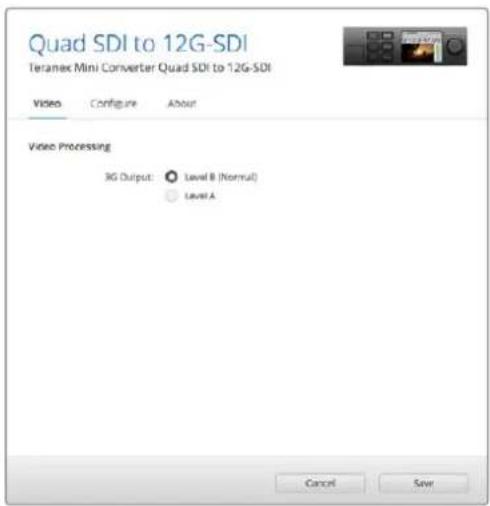
Adjust your SDI output settings using the 'video' settings page in Blackmagic Teranex Setup
Teranex Mini Smart Panel Settings
The 'video' and 'network' settings can be changed from the front panel if you have the optional Teranex Mini Smart Panel installed. The settings available in these menus are identical to those detailed in the 'Blackmagic Teranex Setup settings' section above. For more information on changing settings using the Teranex Mini Smart Panel, refer to the 'changing settings' section in this manual.
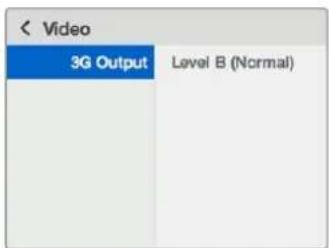
Using Teranex Mini Smart Panel gives you access to the same settings as Blackmagic Teranex Setup.
Teranex Mini - Quad SDI to 12G-SDI Block Diagram
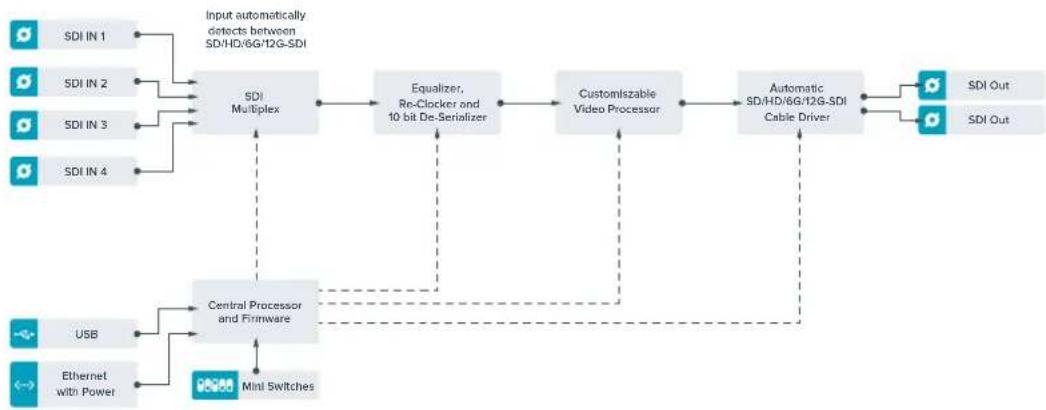
Teranex Mini - SDI Distribution 12G
With Teranex Mini - SDI Distribution 12G you can distribute a single SDI video input to up to eight SDI outputs. Your Teranex Mini features the latest multi rate 12G-SDI connections with full SDI re-clocking allowing the converter to automatically switch between all SD, HD and Ultra HD formats up to 2160p60. Your Teranex Mini - SDI Distribution 12G is perfect for distributing a single SDI signal to multiple devices such as monitors, switchers and encoders.

Connectors
1 Mini-B USB Port
The USB port lets you connect your converter to a Mac or Windows computer so you can adjust settings and update your converter's internal software.
2 Switches
Switches on the front of your Teranex Mini let you change settings using the tip of a pen.
3 LED Status Indicator
The LED glows white when the converter is receiving power and green when a valid video input signal is detected. When more than one Teranex Mini is connected to your computer, you can identify your converter using the 'identify' checkbox in Blackmagic Teranex Setup. When the checkbox is enabled, your converter's LED will flash on and off.
4 Power
Standard built in IEC C14 connector for 90 - 240 volt AC power supply.
5 SDI Out
The 8 BNC connectors labeled 'SDI Out' let you connect 8 independent outputs to SDI video equipment.
6 Ethernet PoE+
The Ethernet connector lets you plug your Teranex Mini into a network switch or computer so you can change settings using Blackmagic Teranex Setup. The Ethernet port also supports power over Ethernet plus.
7 SDIn
Use this BNC connector to plug in your SDI source video.
Switches
There are no user settings required for Teranex Mini - SDI Distribution 12G.
Teranex Mini - SDI Distribution 12G Block Diagram
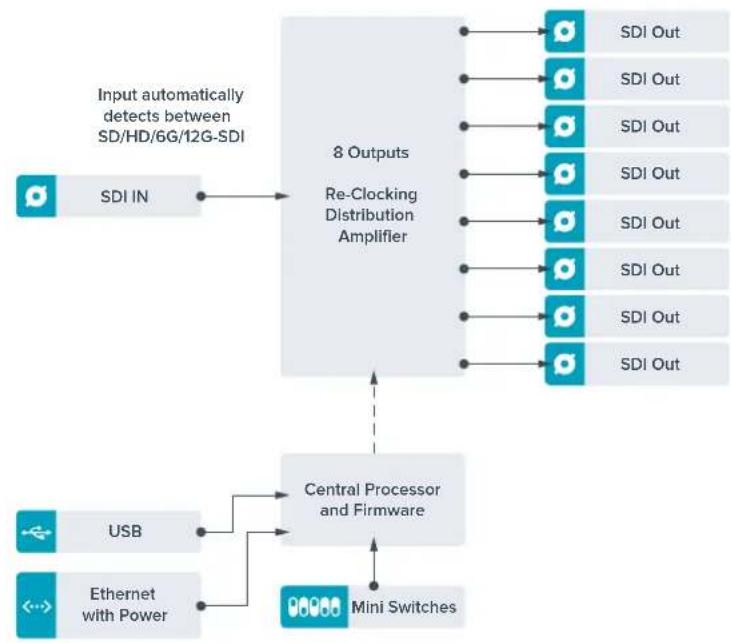
Teranex Mini - Optical to HDMI 12G
Your Teranex Mini - Optical to HDMI 12G model can be used to connect a huge range of HDMI displays and video projectors to equipment that supports SDI video via optical fiber. Your converter automatically switches between SD SDI, HD-SDI, 3G-SDI, 6G-SDI and 12G-SDI input sources and converts to HDMI with embedded audio, plus balanced AES/EBU or analog audio out. The 'R analog' XLR connector can also be set to output timecode.
The HDMI instant lock feature lets you lock the HDMI output so that changing sources using the same format is clean and glitch free. If your converter detects a HD monitor or TV connected to the HDMI output and has Ultra HD connected to the SDI or Optical input, the Ultra HD source will be automatically down converted so you can view the Ultra HD source on an HD monitor.
You can also load 3D LUTs for adding looks, grades, and color profiles to your converted output. The 3D LUT is a full 33 point hardware lookup table for greater accuracy with color manipulation and can even be used to accurately color calibrate consumer televisions so they can be used for critical color correction work.
The 3D LUT also allows color space conversions so different color spaces can be used with various displays.
Your Teranex Mini - Optical to HDMI 12G comes with two default LUTs, including color to monochrome and Blackmagic camera default color space to Rec. 709.
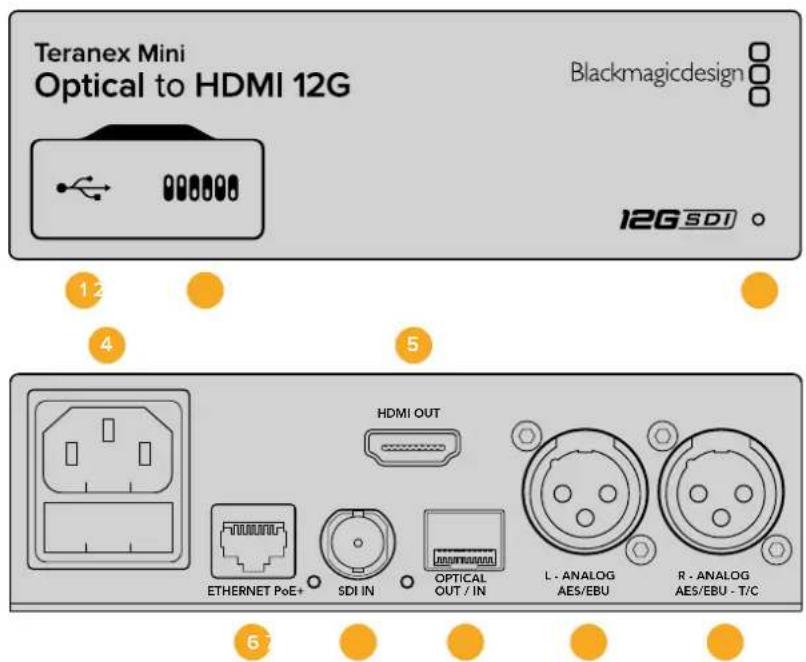
Connectors
1 Mini-B USB Port
Connects to the Blackmagic Teranex Setup software via a Mac or Windows computer for adjusting settings and updating your Teranex Mini's internal software.
2 Switches
Adjustable switches for changing settings.
3 LED Status Indicator
Glows white when the converter is receiving power and green when a valid video input signal is detected. Will flash on/off to identify individual converters via Blackmagic Teranex Setup.
4 Power
Standard built in IEC C14 connector for 90 - 240 volt AC power supply.
5 HDMI Out
HDMI video output.
6 Ethernet PoE+
Connects to a network switch or computer so you can change settings using the Teranex setup utility. The Ethernet port also supports power over Ethernet plus.
7 SDIn
SDI video input BNC connector.
8 Optical Input and Output
Optical video input and output LC connectors via optional SMPTE compatible SDI optical fiber module. The optical input automatically detects between SD/HD/6G/12G-SDI. The optical output can be used as a loop through output.
9 L-Analog or AES/EBU
Balanced left channel analog audio, or digital AES/EBU audio output XLR connector.
10 R- Analog, AES/EBU or Timecode
Balanced right channel analog audio, or digital AES/EBU audio output XLR connector. Can also be configured for timecode output.
Switches
Teranex Mini - Optical to HDMI 12G's switches provide the following settings:
Switches 8 - Analog Audio, AES/EBU Audio
Set switch 8 to 'off' to output balanced analog audio. Set to 'on' for digital AES/EBU audio.
Switches 7 - Output Audio/Timecode
Set switch 7 to 'on' to output timecode via the R channel audio XLR connector. Set to 'off to' output audio.
Switches 4,3,2-SDI Audio De-Embed Bit 2,1,0
Switches 4, 3 and 2 are represented as bits 2, 1, and 0 respectively. This simply means that by setting various on/off combinations for switches 4, 3, and 2, you can choose which pair of audio channels from your SDI or Optical input you would like to output to HDMI, analog or AES/EBU audio.
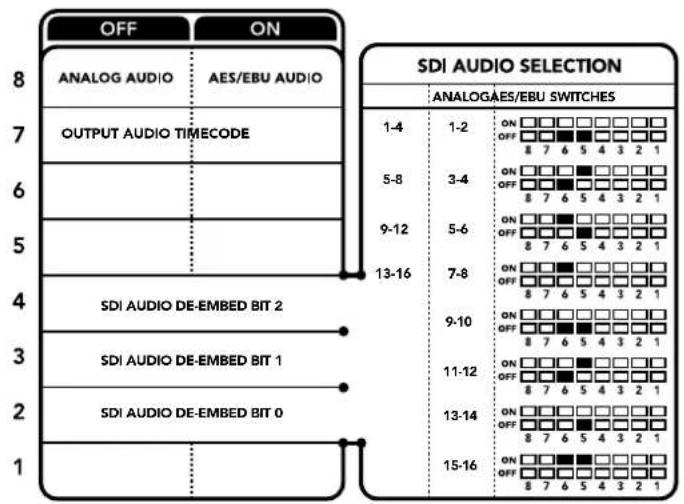
The switch legend on the base of your converter gives you all the information you need to change conversion settings.
SDI Audio Selection Table
By using the following combinations of switch settings, you can select which SDI or Optical audio channels to embed into your Teranex Mini - Optical to HDMI 12G's output signal.
| Analog Audio Channels Switch 4 | Switch 3 Switch | 2 Switch Diagram | |
| 1 and 2 OFF OFF OFF | ON OFF 8 7 6 5 4 3 2 1 | ||
| 3 and 4 OFF ON | ON OFF 8 7 6 5 4 3 2 1 |
| AES/EBU Audio Channels Switch | 4 Switch 3 Switch | Switch 2 Switch | Diagram | |
| 1-4 OFF OFF OFF | ON OFF 8 7 6 5 4 3 2 1 | |||
| 5-8 OFF ON | ON OFF 8 7 6 5 4 3 2 1 | |||
| 9-12 OFF ON OFF | ON OFF 8 7 6 5 4 3 2 1 | |||
| 13-16 OFF ON ON | ON OFF 8 7 6 5 4 3 2 1 | |||
| Analog Audio Channels Switch 4 | Switch 3 Switch | Switch 2 Switch Diagram | ||
| 5 and 6 OFF ON OFF | ON OFF 8 7 6 5 4 3 2 1 | |||
| 7 and 8 OFF ON OFF | ON OFF 8 7 6 5 4 3 2 1 | |||
| 9 and 10 ON OFF OFF | ON OFF 8 7 6 5 4 3 2 1 | |||
| 11 and 12 ON OFF ON | ON OFF 8 7 6 5 4 3 2 1 | |||
| 13 and 14 ON ON OFF | ON OFF 8 7 6 5 4 3 2 1 | |||
| 15 and 16 | ON ON ON | ON OFF 8 7 6 5 4 3 2 1 | ||
Blackmagic Teranex Setup Settings
The Teranex setup utility can change all the same settings that are available using the switches, plus additional settings. You can access these settings by moving between the 'video,' 'audio,' 'configure,' and 'about' tabs.
The 'about' and 'configure' tabs are detailed in the 'changing settings' section in this manual. The 'video' tab for Teranex Mini - Optical to HDMI 12G contains the following settings.
Video Output Menu
Clip HDMI Output to Legal Levels
This checkbox controls clipping of your SDI and Optical input to ensure that it stays within HDMI legal levels and should be kept on by default.
HDMI Instant Lock
Select this checkbox to enable the HDMI instant lock feature. When HDMI instant lock is enabled, the HDMI output signal is kept active even when changing sources. This means your converter does not have to wait for the HDMI television or monitor to lock before displaying the video output as the HDMI signal is already locked. It's important to note that this feature only works when changing sources using the same video standard.
The HDMI instant lock feature can introduce a small delay in video and audio, so if you need zero delay in your converted output you can bypass the HDMI instant lock feature by deselecting the checkbox.
33 Point 3D LUT
Your Blackmagic Teranex Mini - Optical to HDMI 12G supports .cube LUT files that can be created using DaVinci Resolve software, or other color correction software that can export . cube files.
You can load 2 separate LUTs by clicking on the 'load' button for each LUT slot, selecting the desired .cube file from your computer, and clicking 'OK'. Click 'save' to confirm your settings. The LUT filename will appear next to each 'load' button so you know which LUT is being used for LUT 1 or LUT 2.
To turn a LUT on, simply click the 'use LUT 1' or 'use LUT 2' checkboxes. To turn the LUT off, click the 'bypass LUT' checkbox.
The 3D LUT can also be applied to your converter's loop output by checking the 'enable 3D LUT on loop SDI output' checkbox. If you don't want the LUT applied to the loop output simply deselect the checkbox.
If you have a Smart Panel installed, you can easily enable a LUT by pressing the 1 or 2 control panel buttons. Press the buttons again to turn a LUT off.
What is a 3D LUT?
A 3D LUT, or '3D Lookup Table', is a file containing table of values that are used to modify the video colorspace to a new set of color values in a 3D cube space.
The color cube contains all the variations between the mix of each primary color, defined within three x, y, z spatial dimensions. This means the RGB channels in the SDI or Optical input video can be remapped to any other RGB output color in the HDMI video output. This is very powerful as it means any color can be mapped to any other color so you can perform very precise color adjustments for calibrating displays, or loading log gamma curves for display when working with different types of raw camera files on set where you want to see linear gamma.
To show how powerful 3D LUTs can be, one of the default LUTs loaded can convert your input video to black and white. This shows that all the input RGB colors are remapped via the 3D LUT to black and white RGB output values via the HDMI output. You can create your own 3D LUTs and upload them via the admin software and DaVinci Resolve even allows you to convert a color grade setting to a 3D LUT that you can then upload to your Teranex Mini - Optical to HDMI 12G. You can output the 3D LUT on the optical video loop output so you could even use your Teranex Mini as a dedicated 3D LUT color processor even if you don't use the HDMI output!
For more information on how to create a 3D LUT .cube file, refer to the DaVinci Resolve manual which you can download from the Blackmagic Design website at www.blackmagicdesign.com/support.
The 'audio' tab for Teranex Mini - Optical to HDMI 12G contains the following settings.
Audio Output Menu
Set XLR Output
You can choose between analog and AES/EBU output by highlighting the 'analog,' 'AES/EBU,' or 'timecode' buttons in the 'audio output' menu. When you select 'timecode' the left XLR connector will output analog audio, while the right XLR output will provide a timecode signal.
Depending on which audio output option you select, you can then pick which audio channels of your SDI or optical input to send to your HDMI, AES/EBU, or Analog audio output, as well as adjusting their gain per channel or channel pair. If you are outputting AES/EBU audio via both XLR connectors, you can select up to four channels. If you are outputting analog audio, you can select up to two channels. If you are using the right XLR connector to output a timecode signal, the left XLR connector will output one channel of analog audio.
Your Teranex Mini will retain its last settings whether applied via switch, Smart Panel or Teranex setup utility. If reverting to switch control after removing the Smart Panel or updating your converter's settings via software, you may need to toggle individual switches for new settings to take effect.

Blackmagic Teranex Setup lets you adjust settings such as HDMI Instant lock to instantly resync the video signal when changing or routing sources, load 3D LUT files, change the XLR analog audio output levels, and more.
Teranex Mini Smart Panel Settings
If you have installed the optional Teranex Mini Smart Panel on your Optical to HDMI 12G converter, the following menus will be available – 'video,' 'audio,' and 'network.' The settings available in these menus are identical to those detailed in the 'Blackmagic Teranex Setup settings' section above. For more information on changing settings using the Teranex Mini Smart Panel, refer to the 'changing settings' section.
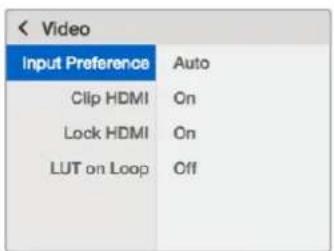
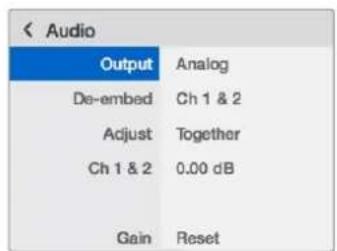
Teranex Mini Smart Panel gives you access to the same settings as Blackmagic Teranex Setup.
Teranex Mini - Optical to HDMI 12G Block Diagram

Teranex Mini – HDMI to Optical 12G
Your Teranex Mini – HDMI to Optical 12G converts HDMI devices such as HDV cameras, Ultra HD cameras and game consoles to 12G-SDI BNC or optical fiber up to 2160p60, with the choice to embed audio from HDMI, AES/EBU or balanced analog audio inputs. This means you can send HDMI signals over long optical cable runs. It is ideal for converting HDMI consumer cameras or computers with HDMI outputs to SDI or optical fiber.
Connectors
1 Mini-B USB Port
Connects to the Blackmagic Teranex Setup software via a Mac or Windows computer for adjusting settings and updating your Teranex Mini's internal software.
2 Switches
Adjustable switches for changing settings.
3 LED Status Indicator
Glows white when the converter is receiving power and green when a valid video input signal is detected. Will flash on/off to identify individual converters via Blackmagic Teranex Setup.
4 Power
Standard built in IEC C14 connector for 90 - 240 volt AC power supply.
5HDMI In
HDMI video input.
6 Ethernet PoE+
Connects to a network switch or computer so you can change settings using the Teranex setup utility. The Ethernet port also supports power over Ethernet plus.
7 SDI Out
SDI video output BNC connector.
8 Optical Output
Optical video output LC connector via optional SMPTE compatible SDI optical fiber module. The optical output automatically matches the input video.
9 L-Analog or AES/EBU
Balanced left channel analog audio, or digital AES/EBU audio output XLR connector.
10 R- Analog, AES/EBU or Timecode
Balanced right channel analog audio, or digital AES/EBU audio output XLR connector. Can also be configured for timecode output.
Switches
Teranex Mini – HDMI to Optical 12G's switches provide the following settings:
Switches 8 - Analog Audio, AES/EBU Audio
Set switch 8 to 'off' to embed balanced analog audio. Set to 'on' for digital AES/EBU audio. To use these inputs switch 7 must also be set to 'on'.
Switches 7-HDMI Audio, Input Audio
Set switch 7 to 'off' to select embedded HDMI audio, or to 'on' for analog or AES/EBU audio.
Switch 6 - Input Audio/Timecode
Set switch 6 to 'on' to input timecode via the R channel audio XLR connector. Set to 'off' to input audio.
Switch 5-60 to 59.94 Off/On
When set to 'on', this setting will allow your converter to detect any HDMI source video running 1080p at 60 frames per second and automatically convert it to interlaced video at 59.94 fields per second.
For example, you may need to connect a computer's HDMI output to a switcher using the standard 1080i 59.94 frame rate. Some computers output 60 frames per second, so by setting switch 5 to 'on' your converter will always detect 1080p at 60 frames per second and convert it to 1080i at 59.94 fields per second.
Switches 2, 1 - Select Format Bit 1, 0
When connecting an HDMI source that can output Ultra HD and HD, you can set your converter to force the source output to one or the other. This can be helpful when you want to record or display your computer's desktop on SDI or Optical equipment in HD so it is larger and easy to view.
While it may appear like it's an up or down conversion setting, what your converter is actually doing is telling your source equipment to output Ultra HD or HD video so that your converter can then output the source video's native HD or Ultra HD resolution without up or down conversion.
To force your source video to HD, Ultra HD, or to let your converter automatically negotiate the optimum resolution with your source equipment, simply use combinations of switches 1 and 2. The combination settings are shown below.
- Auto-Switch 1 to OFF, Switch 2 to OFF.
Your converter will negotiate an optimum HD or Ultra HD resolution with your source equipment based on its output capabilities. - Force to HD - Switch 1 to OFF, Switch 2 to ON.
If your HDMI source equipment is capable of outputting HD and Ultra HD, your converter will instruct the source equipment to output HD video.
- Force to Ultra HD - Switch 1 to ON, Switch 2 to OFF.
If your HDMI source equipment is capable of outputting HD and Ultra HD, your converter will instruct the source to output Ultra HD video.
The switch legend on the base of your converter gives you all the information you need to change conversion settings.
Blackmagic Teranex Setup Settings
The Teranex setup utility can change all the same settings that are available using the switches, plus additional settings. You can access these settings by moving between the 'video,' 'audio,' 'configure,' and 'about' tabs.
The 'about' and 'configure' tabs are detailed in the 'changing settings' section in this manual.
The 'video' tab for Teranex Mini - HDMI to Optical 12G contains the following settings.
Video Processing Menu
Conversion
Click on the 'conversion' drop down menu to select conversion settings for your SDI or Optical output. Setting this to 'auto' will negotiate an optimum HD or Ultra HD resolution with your source equipment based on its output capabilities, while 'Force HD' and 'Force Ultra HD' will output HD and Ultra HD video respectively, regardless of the HDMI input. However, SD will remain SD.
Frame Rate
When enabled, the frame rate feature tells your converter to detect a video source using 60 frames per second and automatically convert it to 59.94 frames per second. Select or deselect the checkbox to enable or disable the feature.
This feature is helpful when you want to connect an HDMI source outputting 60 frames per second to SDI or Optical equipment using a standard HD 59.94 frames per second format.
3G Output
The '3G Output' setting lets you select between Level A or Level B 3G-SDI via optical. This changes the 3G-SDI output standard to maintain compatibility with equipment that can receive only level A or level B 3G-SDI video. The default setting is Level B.
Select between 'auto', 'force to HD', or 'force to Ultra HD' conversion settings using the 'video' settings page in Blackmagic Teranex Setup. You can also set your converter to detect 60 frames per second video and automatically convert it to 59.94 frames per second for when connecting to video equipment using the standard 59.94 frame rate.
The 'audio' tab for Teranex Mini - HDMI to Optical 12G contains the following settings.
Audio Input Menu
Set XLR Input / Set Audio input
This menu allows you to select between XLR and HDMI audio input. Selecting HDMI will embed the HDMI audio into the SDI or optical video output. Selecting 'XLR' lets you choose between analog, AES/EBU, and timecode inputs, as well as which channels of your SDI or optical audio output you wish to embed these into. You can also adjust the gain on the audio signal.
Selecting AES/EBU allows the additional option of checking 'sample rate converter.' When this is selected, the sample rate of your SDI or Optical audio output will be forced to 48kHz , the correct sample rate for television.
If you need to convert Dolby audio via an AES/EBU source that is sample locked to a reference, make sure you disable the sample rate converter by deselecting the checkbox, otherwise it may interfere with your Dolby audio conversion.
Your Teranex Mini will retain its last settings whether applied via switch, Smart Panel or Teranex setup utility. If reverting to switch control after removing the Smart Panel or updating your converter's settings via software, you may need to toggle individual switches for new settings to take effect.
Adjust your analog audio levels and AES/EBU levels using the 'audio' settings page in Blackmagic Teran5x Setup.
Teranex Mini Smart Panel Settings
If you have installed the optional Teranex Mini Smart Panel on your HDMI to Optical 12G converter, the following menus will be available – 'video,' 'audio,' and 'network.' The settings available in these menus are identical to those detailed in the section above.
For more information on changing settings using the Teranex Mini Smart Panel, refer to the 'changing settings' section in this manual.
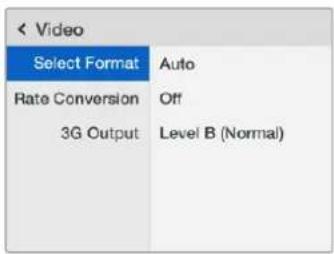
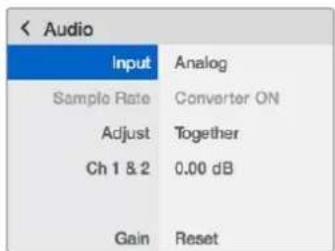
Using Teranex Mini Smart Panel gives you access to the same settings as Blackmagic Teranex Setup.
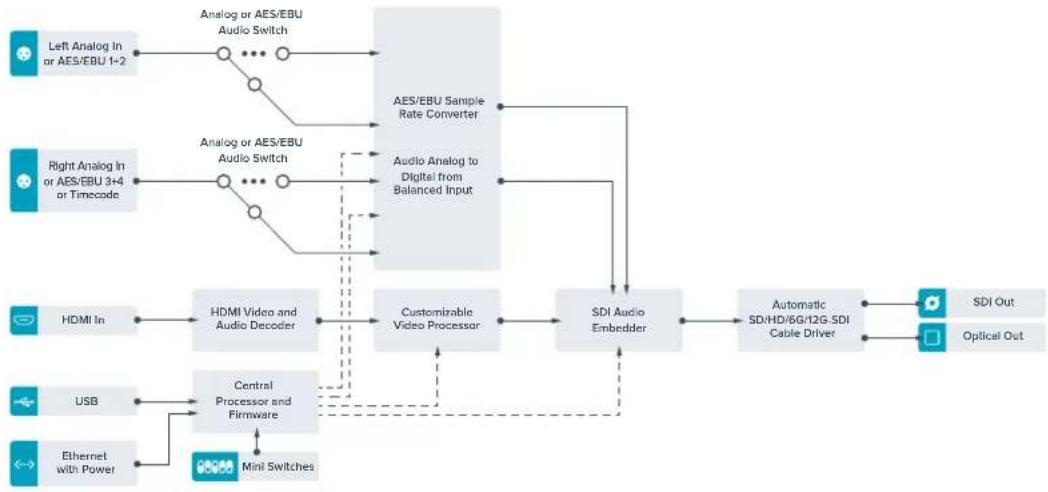
Teranex Mini – HDMI to Optical 12G Block Diagram
Teranex Mini – Optical to Analog 12G
Your Teranex Mini - Optical to Analog 12G lets you convert from SD SDI, HD-SDI, 3G-SDI, 6G-SDI and 12G-SDI and Optical fiber input sources to analog component, NTSC and PAL video out, plus balanced AES/EBU and analog audio out. The built in down converter lets you connect 12G-SDI video via BNC or optical fiber inputs to SD and HD analog equipment and easily connects to video monitors and decks such as Betacam SP and VHS. You can even output pairs of analog audio from 16 de-embedded SDI and optical audio channels.
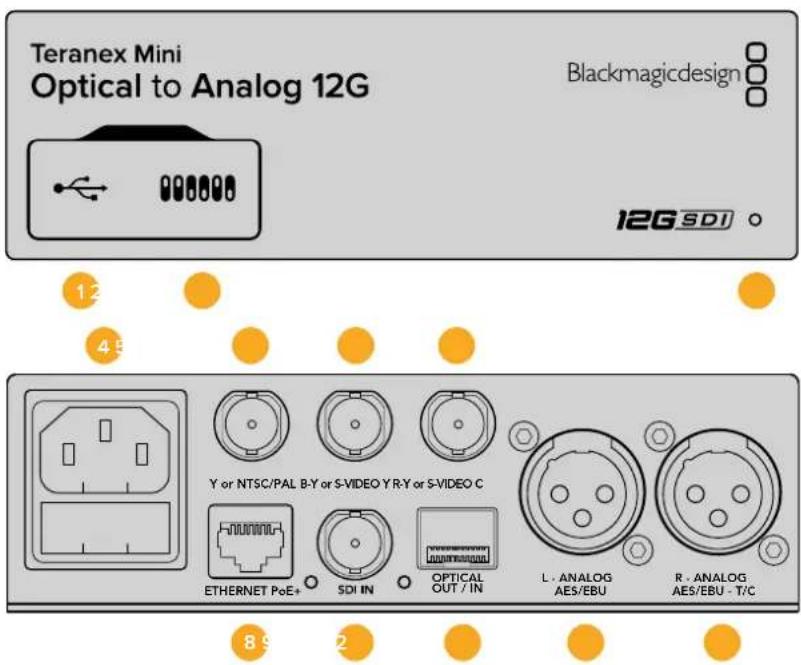
Connectors
1 Mini-B USB Port
Connects to the Blackmagic Teranex Setup software via a Mac or Windows computer for adjusting settings and updating your Teranex Mini's internal software.
2 Switches
Adjustable switches for changing settings.
3 LED Status Indicator
Glows white when the converter is receiving power and green when a valid video input signal is detected. Will flash on/off to identify individual converters via Blackmagic Teranex Setup.
4 Power
Standard built in IEC C14 connector for 90 - 240 volt AC power supply.
5 Y or NTSC/PAL
Analog component Y, NTSC or PAL composite output BNC connector.
6 B-Y or S-VIDEO Y
Analog component B-Y, or S-Video Y output BNC connector.
7 R-Y or S-VIDEO C
Analog component R-Y, or S-Video C output BNC connector.
8 Ethernet PoE+
Connects to a network switch or computer so you can change settings using Blackmagic Teranex Setup. The Ethernet port also supports power over Ethernet plus.
9 SDIn
SDI video input BNC connector.
10 Optical Input and Output
Optical video input and output LC connectors via optional SMPTE compatible SDI optical fiber module. The optical input automatically detects between SD/HD/6G/12G-SDI. The optical output can be used as a loop through output.
11 L - Analog or AES/EBU
Balanced left channel analog audio, or digital AES/EBU audio output XLR connector.
12 R-Analog,AES/EBU or Timecode
Balanced right channel analog audio, or digital AES/EBU audio output XLR connector. Can also be configured for timecode output.
Switches
Teranex Mini - Optical to Analog 12G's switches provide the following settings:
Switch 8 - Analog Audio, AES/EBU Audio
Set switch 8 to 'off' to select balanced analog audio, or to 'on' for digital AES/EBU audio output.
Switch 7-7.5 IRE,0.0IRE
The USA and countries using NTSC with 7.5 setup should set switch 7 to 'off'. If you're working in countries not using 7.5 setup, for example Japan, set switch 7 to 'on'. This setting only affects composite or S-Video outputs.
Switch 6 - SMPTE Levels, Betacam Levels
Set switch 6 to 'off' for SMPTE levels, or 'on' for Betacam levels. SMPTE levels are more common and even Betacam SP decks can use SMPTE levels, so only switch this to Betacam if you are sure that Betacam levels are being used.
Switch 5 - Component, Composite or S-Video
Set switch 5 to 'off' to select analog component video output, or 'on' for composite and S-Video outputs. To display the HD video input as SD on the S-Video and composite outputs, down conversion must be set to 'on' by toggling switch 1. Component analog video supports both HD and SD video.
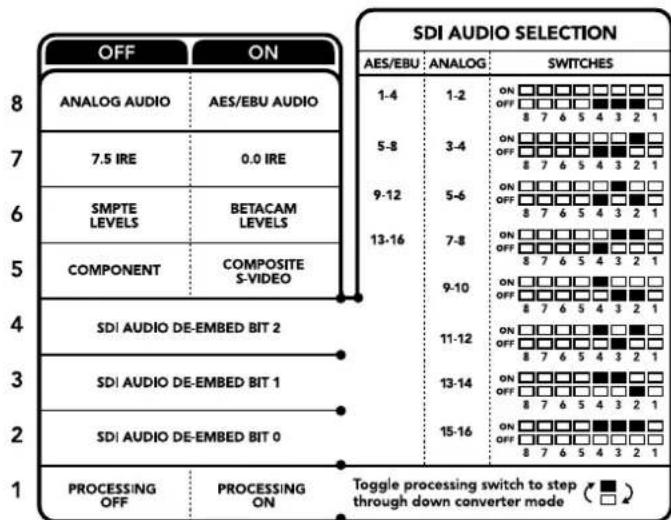
The switch legend on the base of your converter gives you all the information you need to change conversion settings.
Switch 4, 3 and 2 - SDI Audio De-Embed
Switches 4, 3 and 2 are represented as bits 2, 1, and 0 respectively. This simply means that by setting various on/off combinations for switches 4, 3, and 2, you can choose which pair of audio channels from your SDI or optical input you would like to output to analog or AES/EBU audio.
Switch 1 - Processing Off - Processing On
Switch 1 lets you change the aspect ratio conversion that occurs when down converting Ultra HD or HD inputs to SD analog outputs. This occurs because Ultra HD and HD formats are presented in a 16:9 widescreen ratio of width to height, whereas SD is a taller 4:3 ratio.
The three options for aspect ratio conversion you can toggle through here are anamorphic, center cut and letterbox. These stretch, crop, and add black bars to the top and bottom of your image, respectively. To switch between these, simply toggle switch 1 on and off to move through the available options. Each time switch 1 is set to 'on,' the aspect ratio type will move ahead one option.
The behavior of switch 1 also changes depending on the analog output format you are using. Composite video is always standard definition, so setting switch 1 to 'off' simply leaves the last aspect ratio conversion option in place. However, component video can support a HD signal, so when you are converting video from an SD source to a component output, setting switch 1 to 'off' will output a widescreen HD analog signal, with no aspect ratio conversion.
SDI Audio Selection Table
By using the following combinations of switch settings, you can select which SDI audio channels to output as analog or digital AES/EBU audio with your Teranex Mini - Optical to Analog 12G.
| Analog Audio Channels Switch 4 | Switch 3 Switch | 2 Switch Diagram | |
| 1 and 2 OFF OFF OFF | ON OFF 8 7 6 5 4 3 2 1 | ||
| 3 and 4 OFF OFF ON | ON OFF 8 7 6 5 4 3 2 1 | ||
| 5 and 6 OFF ON OFF | ON OFF 8 7 6 5 4 3 2 1 | ||
| 7 and 8 OFF ON ON | ON OFF 8 7 6 5 4 3 2 1 | ||
| 9 and 10 ON OFF OFF | ON OFF 8 7 6 5 4 3 2 1 | ||
| 11 and 12 ON OFF ON | ON OFF 8 7 6 5 4 3 2 1 | ||
| 13 and 14 ON ON OFF | ON OFF 8 7 6 5 4 3 2 1 | ||
| 15 and 16 ON ON ON | ON OFF 8 7 6 5 4 3 2 1 | ||
| AES/EBU Audio Channels Switch | 4 Switch 3 Switch | 2 Switch Diagram | |
| 1-4 | OFF OFF OFF | ON OFF 8 7 6 5 4 3 2 1 | |
| 5-8 | OFF OFF ON | ON OFF 8 7 6 5 4 3 2 1 | |
| 9-12 | OFF ON OFF | ON OFF 8 7 6 5 4 3 2 1 | |
| 13-16 | OFF ON ON | ON OFF 8 7 6 5 4 3 2 1 |
Blackmagic Teranex Setup Settings
The Teranex setup utility can change all the same settings that are available using the switches, plus additional settings.
You can access these settings by moving between the 'video,' 'audio,' 'configure,' and 'about' tabs.
The 'about' and 'configure' tabs are detailed in the 'changing settings' section in this manual.
The 'video' tab for Teranex Mini - Optical to Analog 12G contains the following settings.
Video Output Menu
This lets you pick between component, or s-video and composite video output as well as setting the luminance and chroma levels, and the B-Y and R-Y component levels independently.
If you have selected s-video and composite output, you can additionally choose between 7.5 IRE and 0.0 IRE black levels, depending on the region you are working in. If you have selected component video, you can switch between SMPTE and Betacam levels. SMPTE levels are more common and even Betacam SP decks can use SMPTE levels, so only switch this to Betacam if you are sure that Betacam levels are being used.
Video Processing Menu
This menu allows you to set the aspect ratio of down converted video. The options are letterbox, anamorphic, center cut or no processing.
The 'audio' tab for Teranex Mini - Optical to Analog 12G contains the following settings.
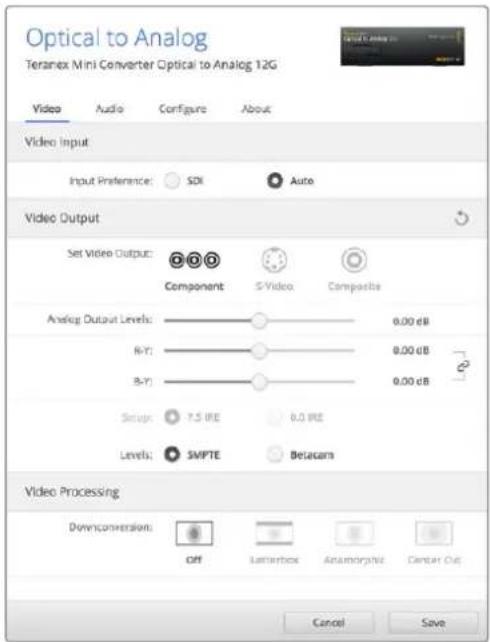
Adjust your video luminance and chroma levels and component chroma levels using the 'video' settings page in Blackmagic Teranex Setup.
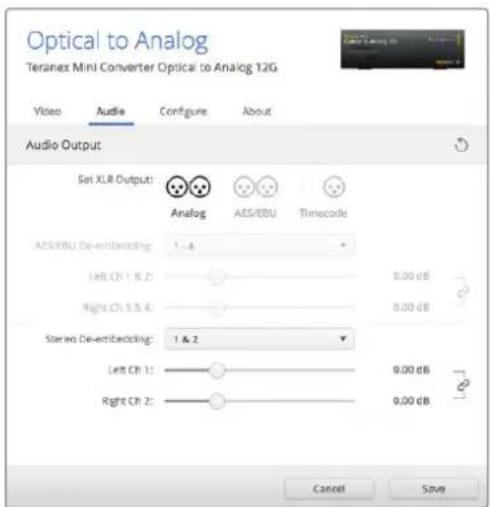
Adjust your analog audio levels and AES/EBU levels using the 'audio' settings page.
Audio Output Menu
This menu allows you to select between analog, AES/EBU, and timecode audio outputs, as well as which channels of your SDI audio input you wish to de-embed. You can also adjust the gain on the audio output.
Your Teranex Mini will retain its last settings whether applied via switch, Smart Panel or Teranex setup utility. If reverting to switch control after removing the Smart Panel or updating your converter's settings via software, you may need to toggle individual switches for new settings to take effect.
Teranex Mini Smart Panel Settings
If you have installed the optional Teranex Mini Smart Panel on your Optical to Analog 12G converter, the following menus will be available – 'video,' 'audio,' and 'network.' The settings available in these menus are identical to those detailed in the 'Blackmagic Teranex Setup settings' section above. For more information on changing settings using the Teranex Mini Smart Panel, refer to the 'changing settings' section in this manual.
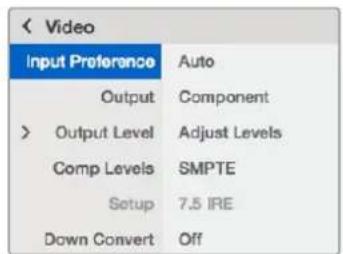
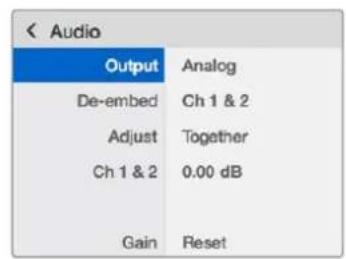
Using Teranex Mini Smart Panel gives you access to the same settings as Blackmagic Teranex Setup.
Teranex Mini - Optical to Analog 12G Block Diagram
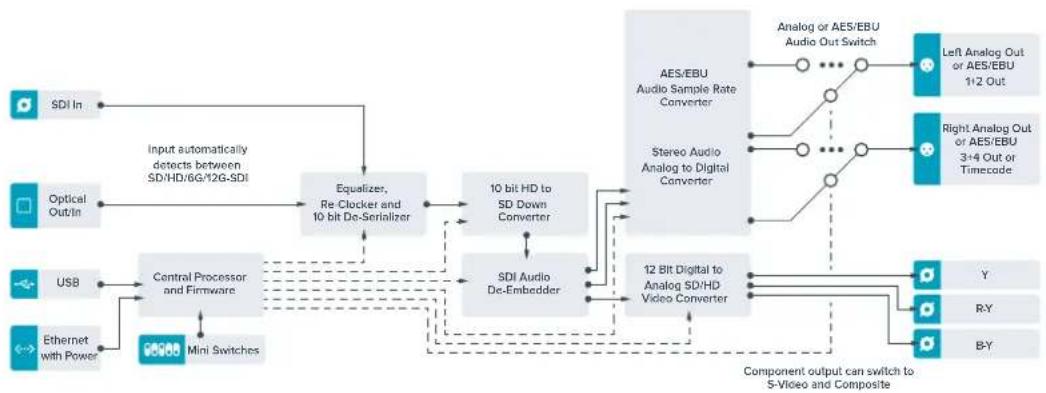
Teranex Mini – Analog to Optical 12G
Your Teranex Mini Analog to Optical 12G lets you convert video and audio from analog equipment such as Betacam SP decks, HDV cameras and game consoles to 12G-SDI via BNC or optical fiber outputs. A choice of analog input formats is supported, including component SD/ HD, S-Video, or composite NTSC and PAL. The converter's 12G-SDI and optical outputs include the option to embed digital AES/EBU or analog audio.
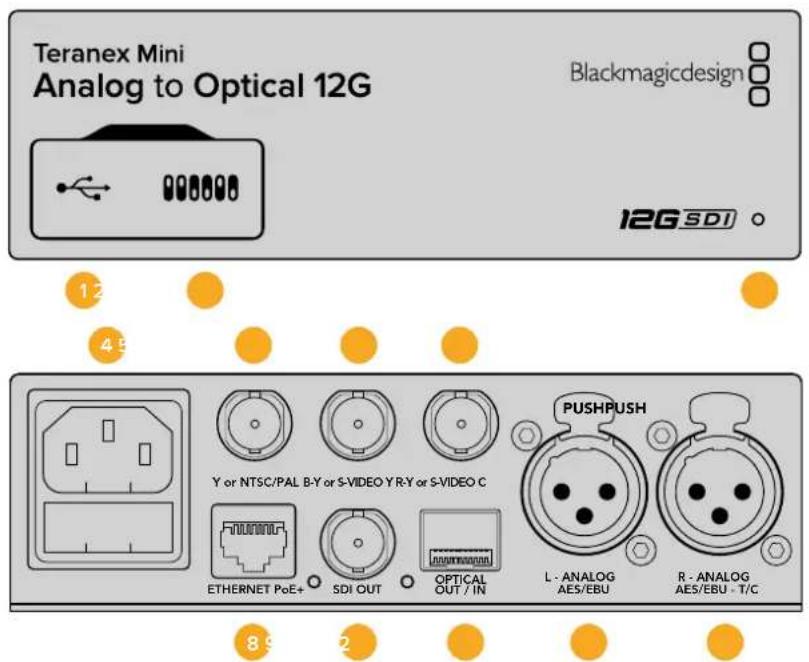
Connectors
1 Mini-B USB Port
Connects to the Teranex setup utility via a Mac or Windows computer for adjusting settings and updating your Teranex Mini's internal software.
2 Switches
Adjustable switches for changing settings.
3 LED Status Indicator
Glows white when the converter is receiving power and green when a valid video inputsignal is detected. Will flash on/off to identify individual converters via Blackmagic Teranex Setup.
4 Power
Standard built in IEC C14 connector for 90 - 240 volt AC power supply.
5 Y or NTSC/PAL
Analog component Y, NTSC or PAL composite input BNC connector.
6 B-Y or S-VIDEO Y
Analog component B-Y, or S-Video Y input BNC connector.
7 R-Y or S-VIDEO C
Analog component R-Y, or S-Video C input BNC connector.
3 Ethernet PoE+
Connects to a network switch or computer so you can change settings using
Blackmagic Teranex Setup. The Ethernet port also supports power over Ethernet plus.
9 SDI Out
SDI video output BNC connector.
10 Optical Output
Optical video output LC connector via optional SMPTE compatible SDI optical fiber module. The optical output automatically matches the input video.
11 L - Analog or AES/EBU
Balanced left channel analog audio, or digital AES/EBU audio input XLR connector.
12 R - Analog, AES/EBU or Timecode
Balanced right channel analog audio, or digital AES/EBU audio input XLR connector. Can also be configured for timecode input.
Switches
Teranex Mini - Analog to Optical 12G's switches provide the following settings:
Switch 8 - Analog Audio, AES/EBU Audio
Set switch 8 to OFF to select balanced analog audio, or to ON for digital AES/EBU audio input.
Switch 7-7.5 IRE -0.0 IRE
The USA and countries using NTSC with 7.5 setup should set switch 7 to OFF. If you're working in countries not using 7.5 setup, set switch 7 to ON. This setting only affects composite or NTSC S-Video outputs.
Switch 6 - SMPTE Levels - Betacam Levels
This setting selects between SMPTE or Betacam video levels. Set switch 6 to OFF for SMPTE levels, or to ON for Betacam levels. SMPTE levels are more common and even Betacam SP decks can use SMPTE levels so only switch this to Betacam if you are sure that Betacam levels are being used.
| OFF | ON |
| ANALOG AUDIO | AES/EBU AUDIO |
| 7.5 IRE | 0.0 IRE |
| SMPTE LEVELS | BETACAM LEVELS |
| COMPONENT | COMPOSITE or S-VIDEO |
| COMPOSITE | S-VIDEO |
| SD TO HD OFF | SD TO HD ON |
| HD TO UHD OFF | HD TO UHD ON |
| INPUT AUDIO | TIMECODE |
The switch legend on the base of your Teranex Mini gives you all the information you need to change conversion settings.
Switch 5 - Component, Composite or S-Video
Set switch 5 to OFF to select analog component video input, or to ON for composite video and S-Video analog inputs.
Switch 4 - Composite - S-Video
Set switch 4 to OFF to select composite video input, or to ON for S-Video input.
Switch 3 - SD to HD
Set switch 3 to 'on' to up convert the SDI or Optical output resolution from SD to HD if the Composite, S-Video or Component inputs are SD. Set to 'off' to match the input resolution.
Switch 2-HD to UHD
Set switch 2 to 'on' to up convert SDI or Optical output resolution to Ultra HD if the Component video input is HD. Set to 'off' to match the input resolution.
Switch 1 - Input Audio / Timecode
Set switch 1 to 'on' to input timecode via the R channel audio XLR connector. Set to 'off' to input audio.
Blackmagic Teranex Setup Settings
The Teranex setup utility can change all the same settings that are available using the switches, plus additional settings.
You can access these settings by moving between the 'video,' 'audio,' 'configure,' and 'about' tabs.
The 'about' and 'configure' tabs are detailed in the 'changing settings' section in this manual. The 'video' tab for Teranex Mini Analog to Optical 12G contains the following settings.
Video Input Menu
This lets you pick between component, s-video, and composite video input as well as setting the luminance and chroma levels, and the B-Y and R-Y component levels independently.
If you have selected S-Video or composite input, you can additionally choose between 7.5 IRE and 0.0 IRE black levels, depending on the region you are working in.
If you have selected component video, you can switch between SMPTE and Betacam levels. SMPTE levels are more common and even Betacam SP decks can use SMPTE levels, so only switch this to Betacam if you are sure that Betacam levels are being used.
Video Processing Menu
This menu allows you to set up conversion options, dependent on your analog video input.
Component video inputs can be converted from SD to HD, and HD to Ultra HD. S-Video and composite inputs can only be converted from SD to HD.
The 'audio' tab for Teranex Mini Analog to Optical 12G contains the following settings.

Adjust your video luminance and chroma levels and component chroma levels using the 'video' settings page in Blackmagic Teranex Setup.
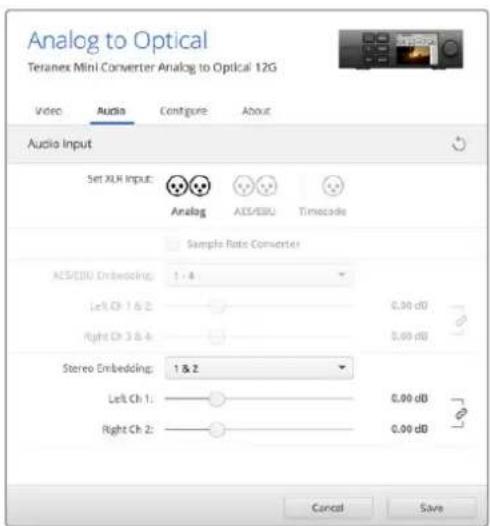
Adjust your analog audio levels and AES/EBU levels using the 'audio' settings page.
Audio Input Menu
This menu allows you to select between analog, AES/EBU, and timecode audio inputs, as well as which channels of your SDI or optical audio output you wish to embed these into. You can also adjust the gain on the audio signal.
Selecting AES/EBU allows the additional option of checking 'sample rate conversion.' When this is selected, the sample rate of your SDI or optical audio output will be up or down converted to 24-bit, 48kHz .
Your Teranex Mini will retain its last settings whether applied via switch, Smart Panel or Teranex setup utility. If reverting to switch control after removing the Smart Panel or updating your converter's settings via software, you may need to toggle individual switches for new settings to take effect.
Teranex Mini Smart Panel Settings
If you have installed the optional Teranex Mini Smart Panel on your Analog to Optical 12G to converter, the following menus will be available – 'video,' 'audio,' and 'network.' The settings available in these menus are identical to those detailed in the 'Blackmagic Teranex Setup settings' section above.
For more information on changing settings using the Teranex Mini Smart Panel, refer to the 'changing settings' section in this manual.
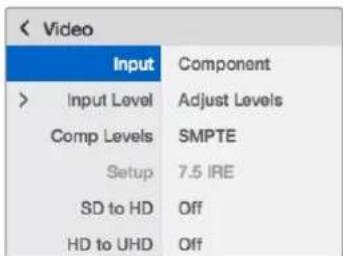
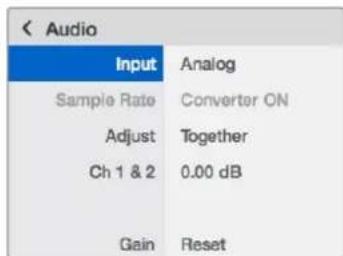
Using Teranex Mini Smart Panel gives you access to the same settings as Blackmagic Teranex Setup.
Teranex Mini - Analog to Optical 12G Block Diagram
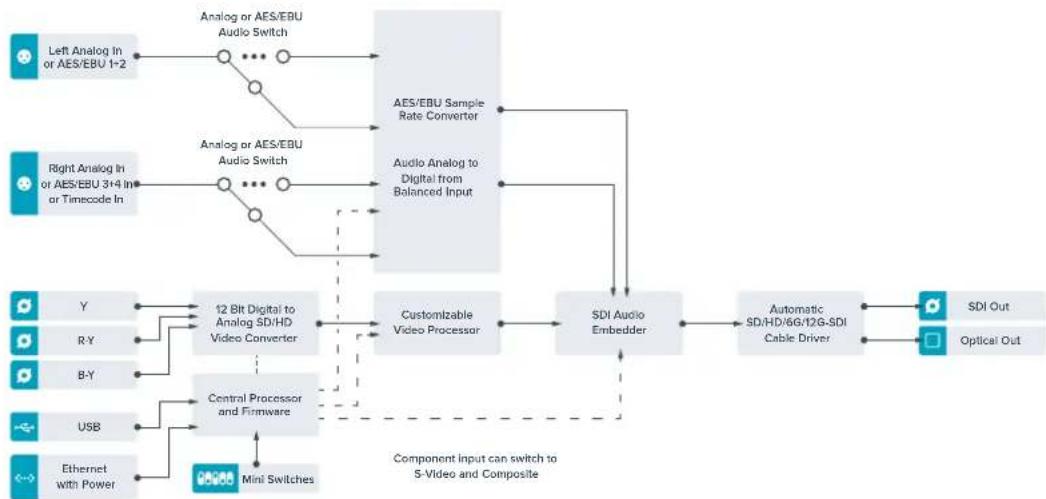
Teranex Mini – Optical to Audio 12G
With Teranex Mini Optical to Audio 12G you can de-embed audio from any SD, HD or Ultra HD Optical fiber or 12G-SDI video connection and output to two channels of analog audio or four channels of AES/EBU digital. Output to audio equipment such as audio mixers, analog decks and reference monitors.
Additional SDI audio channels can be de-embedded by daisy chaining another Teranex Mini SDI to Audio 12G to your converter's SDI output.
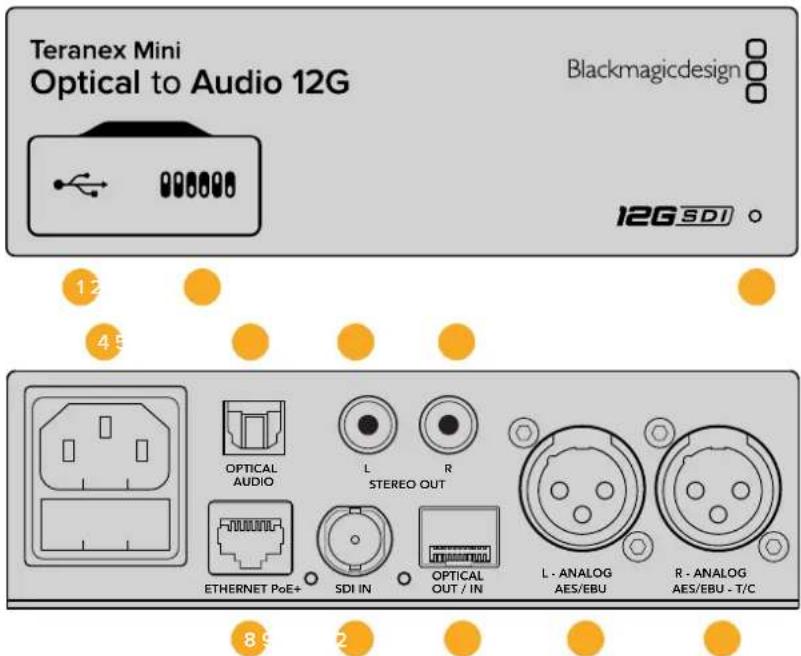
Connectors
1 Mini-B USB Port
Connects to the Blackmagic Teranex Setup software via a Mac or Windows computer for adjusting settings and updating your Teranex Mini's internal software.
2 Switches
Adjustable switches for changing settings.
3 LED Status Indicator
Glows white when the converter is receiving power and green when a valid video input signal is detected. Will flash on/off to identify individual converters via Blackmagic Teranex Setup.
4 Power
Standard built in IEC C14 connector for 90 - 240 volt AC power supply.
5 Optical S/PDIF Audio Output
S/PDIF Signal with TOSLINK Connector.
6 L - Unbalanced HiFi Analog Line Level Output
Unbalanced left channel analog audio output RCA connector.
7 R – Unbalanced HiFi Analog Line Level Output
Unbalanced right channel analog audio output RCA connector.
8 Ethernet PoE+
Connects to a network switch or computer so you can change settings using Blackmagic Teranex Setup. The Ethernet port also supports power over Ethernet.
9 SDl In
SDI video input BNC connector.
10 Optical Input and Output
Optical video input and output LC connectors via optional SMPTE compatible SDI optical fiber module. The optical input automatically detects between SD/HD/6G/12G-SDI. The optical output can be used as a loop through output.
11 L-Analog or AES/EBU
Balanced left channel analog audio, or digital AES/EBU audio output XLR connector.
12 R-Analog,AES/EBU or Timecode
Balanced right channel analog audio, or digital AES/EBU audio output XLR connector. Can also be configured for timecode output.
Switches
Teranex Mini Optical to Audio 12G's switches provide the following settings:
Switch 8 - Analog Audio, AES/EBU Audio
Set switch 8 to OFF to select balanced analog audio, or to ON for digital AES/EBU audio output.
Switch 7 - Output Audio/Timecode
Set switch 7 to 'on' to output timecode via the R channel audio XLR connector. Set to 'off' to output audio.
Switches 6, 5, 4 - SDI Audio De-Embed Bit 2, 1, 0
Switches 6, 5 and 4 are represented as bits 2, 1 and 0 respectively. This simply means that by setting various on/off combinations for switches 6, 5 and 4, you can choose which audio channels to de-embed from the SDI or optical input signal into your audio output.
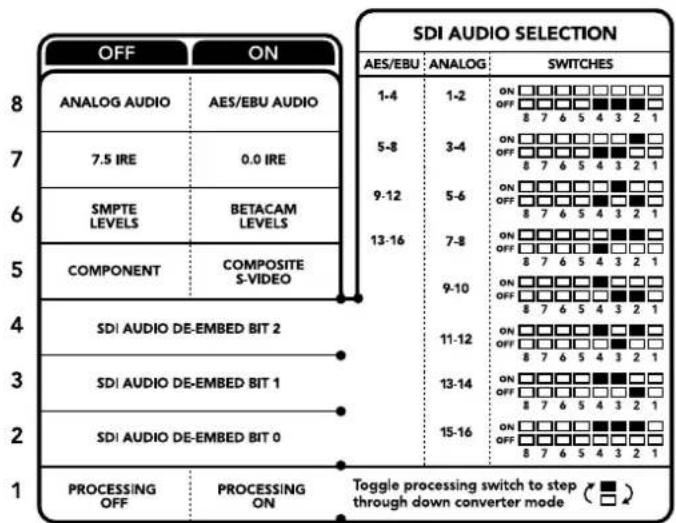
The switch legend on the base of your converter gives you all the information you need to change conversion settings.
SDI Audio De-Embed Table
| Analog Audio Channels Switch 6 | Switch 5 Switch 4 Switch Diagram | |||
| 1-2 OFF OFF OFF | ON OFF 8 7 6 5 4 3 2 1 | |||
| 3-4 OFF OFF ON | ON OFF 8 7 6 5 4 3 2 1 | |||
| 5-6 OFF ON OFF | ON OFF 8 7 6 5 4 3 2 1 | |||
| 7-8 OFF ON ON | ON OFF 8 7 6 5 4 3 2 1 | |||
| 9-10 ON OFF OFF | ON OFF 8 7 6 5 4 3 2 1 | |||
| 11-12 ON OFF ON | ON OFF 8 7 6 5 4 3 2 1 | |||
| 13-14 ON ON OFF | ON OFF 8 7 6 5 4 3 2 1 | |||
| 15-16 ON ON ON | ON OFF 8 7 6 5 4 3 2 1 | |||
| AES/EBU Audio Channels Switch | 6 Switch 5 Switch 4 Switch | Diagram | |
| 1-4 | OFF OFF OFF | ON OFF 8 7 6 5 4 3 2 1 | |
| 5-8 | OFF OFF ON | ON OFF 8 7 6 5 4 3 2 1 | |
| 9-12 OFF ON OFF | ON OFF 8 7 6 5 4 3 2 1 | ||
| 13-16 | OFF ON ON | ON OFF 8 7 6 5 4 3 2 1 |
Blackmagic Teranex Setup Settings
The Teranex setup utility can change all the same settings that are available using the switches, plus additional settings.
You can access these settings by moving between the 'audio,' 'configure,' and 'about' tabs.
The 'about' and 'configure' tabs are detailed in the 'changing settings' section in this manual.
The 'audio' tab for Teranex Mini Optical to Audio 12G contains the following settings.
Audio Output Menu
This menu allows you to select between analog, AES/EBU, and timecode audio outputs, as well as which channels of your SDI or optical audio input you wish to de-embed. You can also adjust the gain on the audio output.
Your Teranex Mini will retain its last settings whether applied via switch, Smart Panel or Teranex setup utility. If reverting to switch control after removing the Smart Panel or updating your converter's settings via software, you may need to toggle individual switches for new settings to take effect.
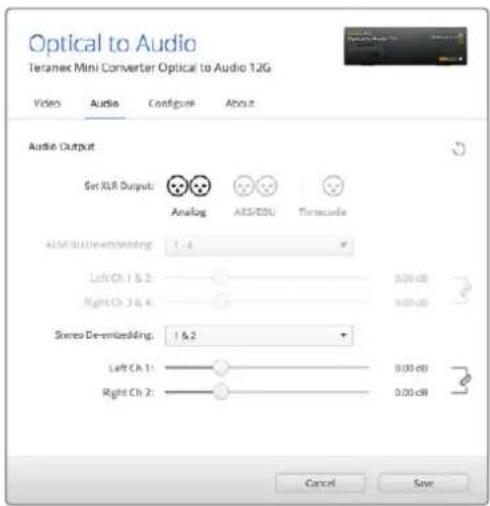
Adjust your analog audio levels and AES/EBU levels using the 'audio' settings page In Blackmagic Teranex Setup.
Teranex Mini Smart Panel Settings
If you have installed the optional Teranex Mini Smart Panel on your Optical to Audio 12G converter, the following menus will be available – 'audio,' and 'network.' The settings available in these menus are identical to those detailed in the 'Blackmagic Teranex Setup settings' section above. For more information on changing settings using the Teranex Mini Smart Panel, refer to the 'changing settings' section in this manual.
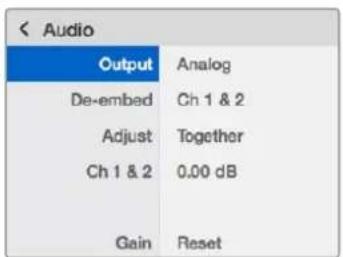
Using Teranex Mini Smart Panel gives you access to the same settings as Blackmagic Teranex Setup.
Teranex Mini - Optical to Audio 12G Block Diagram
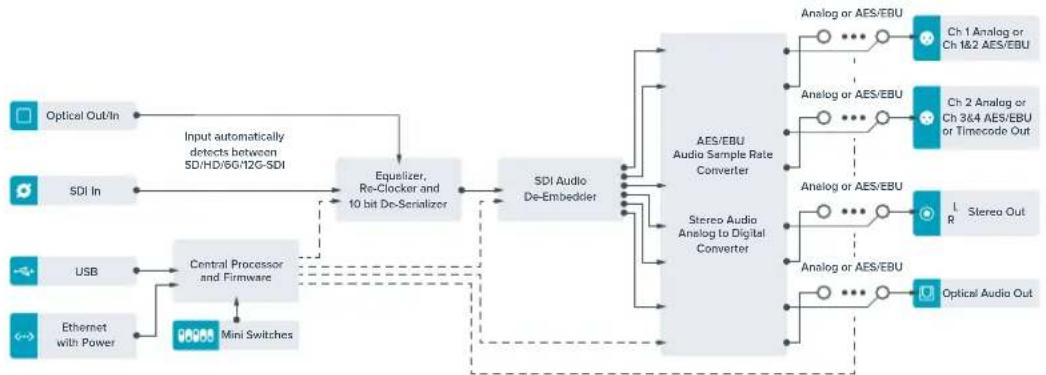
Teranex Mini – Audio to Optical 12G
With Teranex Mini Audio to Optical 12G, you can embed two channels of analog audio, or four channels of AES/EBU digital audio into any SD, HD, Ultra HD or DCI 4K SDI video connection. You can use this Teranex Mini to embed audio from equipment, such as audio mixers and analog decks to optical fiber so you can connect across longer distances. Additional SDI audio channels can be embedded by daisy chaining another Teranex Mini Audio to Optical 12G to your converter's optical or SDI output.
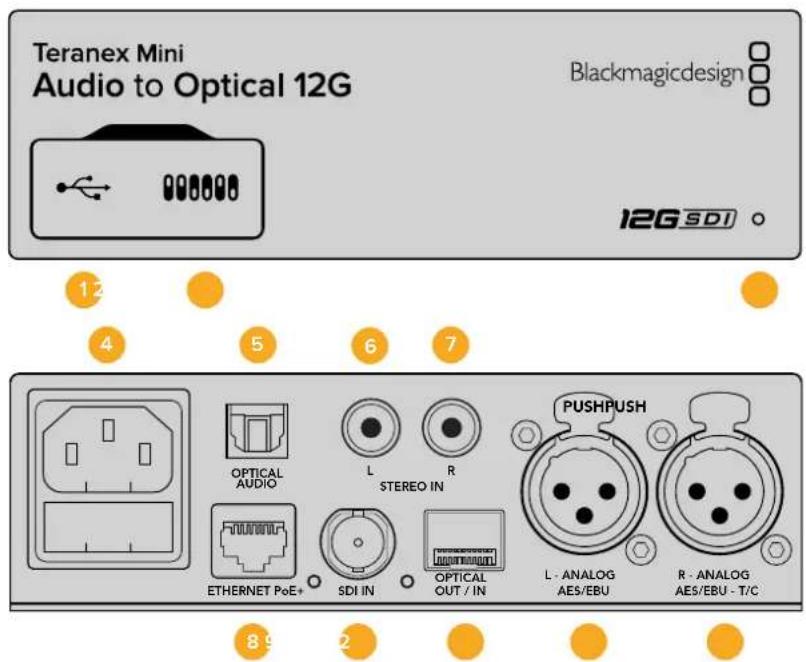
Connectors
1 Mini-B USB Port
Connects to the Blackmagic Teranex Setup software via a Mac or Windows computer for adjusting settings and updating your Teranex Mini's internal software.
2 Switches
Adjustable switches for changing settings.
3 LED Status Indicator
Glows white when the converter is receiving power and green when a valid video input signal is detected. Will flash on/off to identify individual converters via Blackmagic Teranex Setup.
4 Power
Standard built in IEC C14 connector for 90 - 240 volt AC power supply.
5 Optical S/PDIF Audio Input
S/PDIF Signal with TOSLINK Connector.
6 L - Unbalanced HiFi Analog Line Level Input
Unbalanced left channel analog audio input RCA connector.
7 R - Unbalanced HiFi Analog Line Level Input
Unbalanced right channel analog audio input RCA connector.
3 Ethernet PoE+
Connects to a network switch or computer so you can change settings using Blackmagic Teranex Setup. The Ethernet port also supports power over Ethernet.
9 SDI In
SDI video input BNC connector.
10 Optical Input and Output
Optical video input and output LC connectors via optional SMPTE compatible SDI optical fiber module. The optical input automatically detects between SD/HD/6G/12G-SDI. The optical output provides the converted video with embedded audio.
11 L - Analog or AES/EBU
Balanced left channel analog audio, or digital AES/EBU audio input XLR connector.
12 R-Analog,AES/EBU or Timecode
Balanced right channel analog audio, or digital AES/EBU audio input XLR connector. Can also be configured for timecode input.
Switches
Teranex Mini Audio to Optical 12G's switches provide the following settings:
Switch 8, 7 - Input Audio Selection Bit 1, 0
Switches 8 and 7 are represented as bits 1 and 0, respectively. This simply means that by setting various on/off combinations for switches 8 and 7 you can select from four input audio options.
Switch 6, 5, 4 - Embed Audio Bit 2, 1, 0
Switches 6, 5, and 4 are represented as bits 2, 1, and 0, respectively. This simply means that by setting various on/off combinations for switches 6, 5, and 4 you can select which channels of your SDI or optical signal you wish to embed audio into.
If you are embedding analog audio, there are eight combinations, allowing you to embed audio into the channel pairs from 1-2 through to 15-16.
If you are embedding AES/EBU audio, there are four combinations. You can select between embedding audio into channels 1 to 4, 5 - 8, 9 - 12, or 13 - 16.
Switch 3 - Sample Rate Conversion, No Sample Rate Conversion
Set switch 3 to OFF to enable sample rate conversion, or ON to disable sample rate conversion. This switch should almost always be set to OFF to ensure audio is embedded at the correct sample rate for television.
When switch 3 is set to OFF this setting converts the sample rate of your analog or AES/EBU audio and embeds audio into the optical output at a sample rate of 48kHz
Switch 2 - Ch 2 or AES/EBU 3+4 Embed / Bypass
Once you have selected your audio channels, use switches 2 and 1 to select which channels to embed or disable. The disable setting lets you avoid overwriting audio channels you wish to keep in the audio signal.
Set switch 2 to ON to bypass channel 2, or AES/EBU channels 3 and 4. Set switch 1 to ON to bypass channel 1, or AES/EBU channels 1 and 2.
Switch 1 - Ch 1 or AES/EBU 1+2 Embed/Bypass
See switch 2 description.

The switch legend on the base of your converter gives you all the information you need to change conversion settings.
Audio Selection Tables
| Input Audio Channels Switch 8 Switch 7 Switch Diagram | |||
| XLR Analog OFF OFF | ON OFF 3 7 6 5 4 3 2 1 | ||
| XLR AES/EBU OFF ON | ON OFF 3 7 6 5 4 3 2 1 | ||
| RCA Analog ON OFF | ON OFF 3 7 6 5 4 3 2 1 | ||
| Optical ON ON | ON OFF 3 7 6 5 4 3 2 1 |
SDI Channel Tables
| Analog Audio Channels Switch 6 | Switch 5 Switch 4 Switch Diagram | |||
| 1-2 OFF OFF OFF | ON OFF 8 7 6 5 4 3 2 1 | |||
| 3-4 OFF OFF ON | ON OFF 8 7 6 5 4 3 2 1 | |||
| 5-6 OFF ON OFF | ON OFF 8 7 6 5 4 3 2 1 | |||
| 7-8 OFF ON ON | ON OFF 8 7 6 5 4 3 2 1 | |||
| 9-10 ON OFF OFF | ON OFF 8 7 6 5 4 3 2 1 | |||
| 11-12 ON OFF ON | ON OFF 8 7 6 5 4 3 2 1 | |||
| 13-14 ON ON OFF | ON OFF 8 7 6 5 4 3 2 1 | |||
| 15-16 ON ON ON | ON OFF 8 7 6 5 4 3 2 1 | |||
| AES/EBU Audio Channels Switch | 6 Switch 5 Switch 4 Switch Diagram | |||
| 1-4 OFF OFF OFF | ON OFF 8 7 6 5 4 3 2 1 | |||
| 5-8 OFF OFF ON | ON OFF 8 7 6 5 4 3 2 1 | |||
| 9-12 OFF ON OFF | ON OFF 8 7 6 5 4 3 2 1 | |||
| 13-16 OFF ON ON | ON OFF 8 7 6 5 4 3 2 1 | |||
Blackmagic Teranex Setup Settings
The Teranex setup utility can change all the same settings that are available using the switches, plus additional settings. You can access these settings by moving between the 'audio', 'configure,' and 'about' tabs in Blackmagic Teranex Setup. The 'about' and 'configure' tabs are detailed in the 'changing settings' section in this manual.
The 'audio' tab for Teranex Mini Audio to Optical 12G contains the following settings.
Audio Input Menu
This menu allows you to select between RCA, XLR, and optical inputs.
If you have selected XLR, you can further select between analog, AES/EBU, and timecode inputs.
Selecting AES/EBU allows the additional option of checking 'sample rate conversion.' When this is selected, the sample rate of your optical audio output will be forced to 48kHz , the correct sample rate for television.
The audio input menu also allows you to chose which channel pair, or channel quad in the case of AES/EBU audio, of your SDI or optical signal you wish to embed audio into, as well as adjusting the audio gain.
You can bypass channels or channel pairs if you want to avoid overwriting audio in your SDI or optical signal.
Your Teranex Mini will retain its last settings whether applied via switch, Smart Panel or Blackmagic Teranex Setup. If reverting to switch control after removing the Smart Panel or updating your converter's settings via software, you may need to toggle individual switches for new settings to take effect.
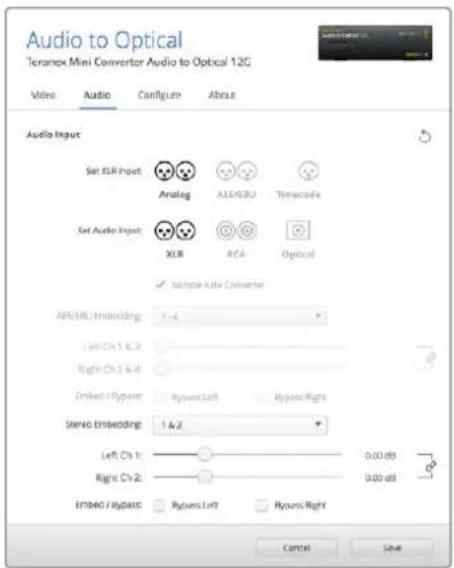
Adjust your analog audio levels and AES/EBU levels using the 'audio' settings page in Blackmagic Teranex Setup.
Teranex Mini Smart Panel Settings
If you have installed the optional Teranex Mini Smart Panel on your Audio to Optical 12G converter, the following menus will be available – 'audio,' and 'network.' The settings available in these menus are identical to those detailed in the 'Blackmagic Teranex Setup settings' section above.
For more information on changing settings using the Teranex Mini Smart Panel, refer to the 'changing settings' section in this manual.
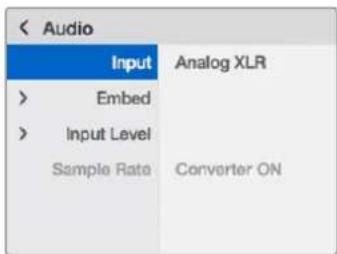
Using Teranex Mini Smart Panel gives you access to the same settings as Blackmagic Teranex Setup.
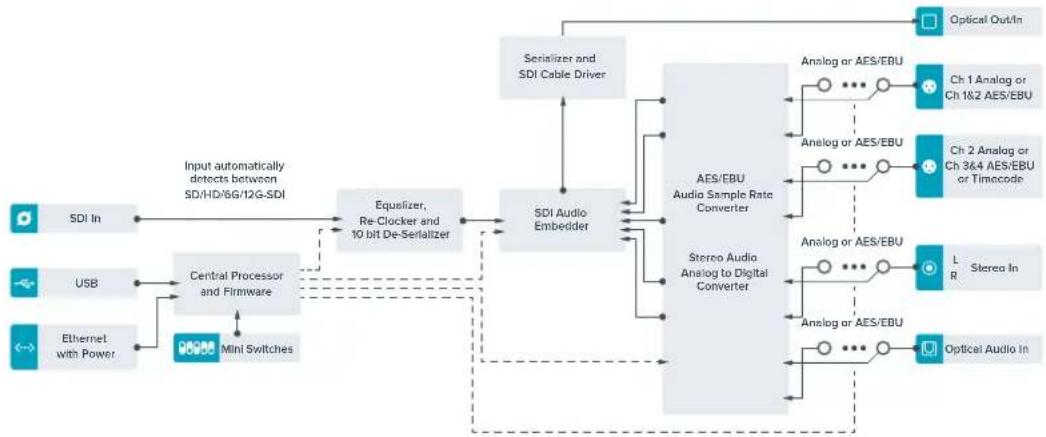
Teranex Mini - Audio to Optical 12G Block Diagram
Help
Getting Help
The fastest way to obtain help is to go to the Blackmagic Design online support pages and check the latest support material available for your Teranex Mini.
Blackmagic Design Online Support Pages
The latest manual, software and support notes can be found at the Blackmagic Design support center at www.blackmagicdesign.com/support.
Contacting Blackmagic Design Support
If you can't find the help you need in our support material, please use the "Send us an email" button on the support page to email a support request. Alternatively, click on the "Find your local support team" button on the support page and call your nearest Blackmagic Design support office.
Checking the Software Version Currently Installed
To check which version of Blackmagic Teranex Setup software is installed on your computer, open the About Blackmagic Teranex Setup window.
On macOS, open Blackmagic Teranex Setup from the Applications folder. Select About Blackmagic Teranex Setup from the application menu to reveal the version number.
On Windows 10, open Blackmagic Teranex Setup from your Start menu. Click on the Help menu and select About Blackmagic Teranex Setup to reveal the version number.
How to Get the Latest Software Updates
After checking the version of Blackmagic Teranex Setup software installed on your computer, please visit the Blackmagic Design support center at www.blackmagicdesign.com/support to check for the latest updates. While it is usually a good idea to run the latest updates, it is wise to avoid updating any software if you are in the middle of an important project.
Regulatory Notices

osal of waste of electrical and electronic equipment within the European union.
The symbol on the product indicates that this equipment must not be disposed of with other waste materials. In order to dispose of your waste equipment, it must be handed over to a designated collection point for recycling. The separate collection and recycling of your waste equipment at the time of disposal will help conserve natural resources and ensure that it is recycled in a manner that protects human health and the environment. For more information about where you can drop off your waste equipment for recycling, please contact your local city recycling office or the dealer from whom you purchased the product.

This equipment has been tested and found to comply with the limits for a Class A digital device, pursuant to Part 15 of the FCC rules. These limits are designed to provide reasonable protection against harmful interference when the equipment is operated in a commercial environment. This equipment generates, uses, and can radiate radio frequency energy and, if not installed and used in accordance with the instructions, may cause harmful interference to radio communications. Operation of this product in a residential area is likely to cause harmful interference, in which case the user will be required to correct the interference at personal expense.
Operation is subject to the following two conditions:
1 This device may not cause harmful interference.
2 This device must accept any interference received, including interference that may cause undesired operation.

MSIP-REM-BMD-201509012, MSIP-REM-BMD-201509010, MSIP-REM-BMD-201511005, MSIP-REM-BMD-201511003, MSIP-REM-BMD-201509011, MSIP-REM-BMD-201509009, MSIP-REM-BMD-201602003, MSIP-REM-BMD-201602004, MSIP-REM-BMD-201602005, R-REM-BMD-201804006, MSIP-REM-BMD-201611008, MSIP-REM-BMD-201611005, MSIP-REM-BMD-201611006, MSIP-REM-BMD-201611003, MSIP-REM-BMD-201611007, MSIP-REM-BMD-201611004, R-R-BMD-201909005, MSIP-REM-BMD-201509013
ISED Canada Statement
This device complies with Canadian standards for Class A digital apparatus.
Any modifications or use of this product outside its intended use could void compliance to these standards.
Connection to HDMI interfaces must be made with high quality shielded HDMI cables.
State of California Statement
This product can expose you to chemicals such as trace amounts of polybrominated biphenyls within plastic parts, which is known to the state of California to cause cancer and birth defects or other reproductive harm.
For more information go to www.P65Warnings.ca.gov.
Safety Information
This equipment must be connected to a mains socket outlet with a protective earth connection.
To reduce the risk of electric shock, do not expose this equipment to dripping or splashing.
This equipment is suitable for use in tropical locations with an ambient temperature of up to 40^ .
Ensure that adequate ventilation is provided around the product and is not restricted.
When rack mounting, ensure the ventilation is not restricted by adjacent equipment.
No operator serviceable parts inside. Refer servicing to your local Blackmagic Design service centre.

Use only at altitudes not more than 2000m above sea level.
This product has the facility to connect small form-factor transceiver (SFP) optical fibre modules. Only use Laser class 1 optical SFP modules.
Recommended Blackmagic Design SFP modules:
-3G-SDI:PL-4F20-311C-BMD
-6G-SDI:PL-8F10-311C-BMD
-12G-SDI:PL-TG10-311C-BMD
Warranty
36 Month Limited Warranty
Blackmagic Design warrants that Teranex Minis will be free from defects in materials and workmanship for a period of 36 months from the date of purchase excluding connectors, cables, fiber optic modules, fuses and batteries which will be free from defects in materials and workmanship for a period of 12 months from the date of purchase. If a product proves to be defective during this warranty period, Blackmagic Design, at its option, either will repair the defective product without charge for parts and labor, or will provide a replacement in exchange for the defective product.
In order to obtain service under this warranty, you the Customer, must notify Blackmagic Design of the defect before the expiration of the warranty period and make suitable arrangements for the performance of service. The Customer shall be responsible for packaging and shipping the defective product to a designated service center nominated by Blackmagic Design, with shipping charges pre paid. Customer shall be responsible for paying all shipping charges, insurance, duties, taxes, and any other charges for products returned to us for any reason.
This warranty shall not apply to any defect, failure or damage caused by improper use or improper or inadequate maintenance and care. Blackmagic Design shall not be obligated to furnish service under this warranty: a) to repair damage resulting from attempts by personnel other than Blackmagic Design representatives to install, repair or service the product, b) to repair damage resulting from improper use or connection to incompatible equipment, c) to repair any damage or malfunction caused by the use of non Blackmagic Design parts or supplies, or d) to service a product that has been modified or integrated with other products when the effect of such a modification or integration increases the time or difficulty of servicing the product.
THIS WARRANTY IS GIVEN BY BLACKMAGIC DESIGN IN LIEU OF ANY OTHER WARRANTYES, EXPRESS OR IMPLIED. BLACKMAGIC DESIGN AND ITS VENDORS DISCLAIM ANY IMPLIED WARRANTYES OF MERCHANTABILITY OR FITNESS FOR A PARTICULAR PURPOSE. BLACKMAGIC DESIGN'S RESPONSIBILITY TO REPAIR OR REPLACE DEFECTIVE PRODUCTS IS THE WHOLE AND EXCLUSIVE REMEDY PROVIDED TO THE CUSTOMER FOR ANY INDIRECT, SPECIAL, INCIDENTAL OR CONSEQUENTIAL DAMAGES IRRESPECTIVE OF WHETHER BLACKMAGIC DESIGN OR THE VENDOR HAS ADVANCE NOTICE OF THE POSSIBILITY OF SUCH DAMAGES. BLACKMAGIC DESIGN IS NOT LIABLE FOR ANY ILLEGAL USE OF EQUIPMENT BY CUSTOMER. BLACKMAGIC IS NOT LIABLE FOR ANY DAMAGES RESULTING FROM USE OF THIS PRODUCT. USER OPERATES THIS PRODUCT AT OWN RISK.
Copyright 2020 Blackmagic Design. All rights reserved. 'Blackmagic Design', 'DeckLink', 'HDLink', 'Workgroup Videohub', 'Multibridge Pro', 'Multibridge Extreme', 'Intensity' and 'Leading the creative video revolution' are registered trademarks in the US and other countries. All other company and product names may be trade marks of their respective companies with which they are associated.

Blackmagic Design CEO
G兰卜·卡
目次
Teranex Mini Converters
はしだに 116 Teranex Mini - SDI to HDMI 8K HDR 138
CONBUN-UNIUNUNUNUNUNUNUNUNUNUNUNUNUNUNUNUNUNUNUNUNUNUNUNUNUNUNUNUNUNUNUNUNUNUNUNUNUNUNUNUNUNUNUNUNUNUNUNUNUNUNUNUNUNUNUNUNUNUNUNUNUNUNUNUNUNUNUNUNUNUNUNUNUNUNUNUNUNUNUNUNUNUNUNUNUNUNUNUNUNUNUNUNUNUNUNUNUNUNUNUN UNNURUANURUANURUANURUANURUANURUANURUANURUANURUANURUANURUANURUANURUANURUANURUANURUANURUANURUANURUANURUANURUANURUANURUANURUANURUANURUANURUANURUANURUANURUANURUANURUANURUANURUAN
33 Point 3D LUT (33PNT3D LUT)
Bypass 3D LUT (3D LUTを)//(ス)
Convert 60p to 59.94i (60p左59.94i(变换)
An口GonP-NEHNTY、NTSC/PALONPJHT入力用的BNCP-
6 B-Y、S比才Y
SvI78-APo才一T才AES/EBU才一T才
33 Point 3D LUT (33Poinb3D LUT)
This is the first example of the use of the formula. It is a general form of the following formula. The formula is used to describe how the light and sound are related to each other. This formula is used to describe how the sound and light are related to each other.
Convert 60p to 59.94i (60p=59.94i|変換)
| AES/EBUOne-DYEOTONKEL | SIVHT 4 SIVHT 3 SIVHT 2 SIVHT | 略圆 |
| 1-4 | OFIOFIOF | |
| 5-8 | OFIOFIOF | |
| 9-12 | OFIOFIOF | |
| 13-16 | OFIOFIOF |
Blackmagic Teranex Setupの設定
```csharp ```csharp ```csharp ```csharp ```csharp ```csharp ```csharp ```csharp ```csharp ```csharp ```csharp ```csharp ```csharp ```csharp ```csharp ```csharp ```csharp ```csharp ```csharp ```csharp ```csharp ```csharp ```csharp ```csharp ```csharp ```csharp
Sti3T 3T 3T 3T 3T 3T 3T 3T 3T 3T 3T 3T 3T 3T 3T 3T 3T 3T 3T 3T 3T 3T 3T 3T 3T 3T 3T 3T 3T 3T 3T 3T 3T 3T 000000000000000000000000000000000000000000000000000000000000000000000000000000000
-3G-SDI:PL-4F20-311C-BMD
-6G-SDI:PL-8F10-311C-BMD
-12G-SDI:PL-TG10-311C-BMD
保证
36ケ月限 定保證
This is a proof of the following theorem. The proof is based on the fact that the product has been tested in the market. This is because it is possible to test the product in the market.
Clip to Legal Levels
Dynamic Range Override
-3G-SDI:PL-4F20-311C-BMD
-6G-SDI:PL-8F10-311C-BMD
-12G-SDI:PL-TG10-311C-BMD
Garantie
CEO Blackmagic Design
Inhaltsverzeichnis
Teranex Mini Converters
Erste Schritte 338 Teranex Mini - SDI to HDMI 8K HDR 360
Dynamic Range Override
"Color Calibration"-Menu
Switch 8 - ANALOG AUDIO, AES/EBU AUDIO
Clip HDMI Output to Legal Levels
Switch 8 - ANALOG AUDIO, AES/EBU AUDIO
Switch 5 - 60 TO 59.94 OFF/ON
Switches 2,1-SELECT FORMAT BIT 1,0
Switch 8 - ANALOG AUDIO, AES/EBU AUDIO
Switch 7-7.5 IRE,0.0IRE
Switch 1 - PROCESSING OFF, PROCESSING ON
Switch 8 - ANALOG AUDIO, AES/EBU AUDIO
Switch 7-7.5 IRE,0.0IRE
11 L - ANALOG or AES/EBU
Switch 8 - ANALOG AUDIO, AES/EBU AUDIO
11 L - ANALOG or AES/EBU
Switch 8 - ANALOG AUDIO, AES/EBU AUDIO
"Clip HDMI Output to Legal Levels"
Switch 8 - ANALOG AUDIO, AES/EBU AUDIO
Switch 5 - 60 TO 59.94 OFF/ON
Switches 2,1-SELECT FORMAT BIT 1,0
Switch 8 - ANALOG AUDIO, AES/EBU AUDIO
Switch 7-7.5 IRE,0.0IRE
Switch 1 - PROCESSING OFF, PROCESSING ON
Switch 8 - ANALOG AUDIO, AES/EBU AUDIO
Switch 7-7.5 IRE,0.0IRE
11 L - ANALOG or AES/EBU
Switch 8 - ANALOG AUDIO, AES/EBU AUDIO
11 L - ANALOG OR AES/EBU
California Proposition 65
-3G-SDI:PL-4F20-311C-BMD
-6G-SDI:PL-8F10-311C-BMD
-12G-SDI:PL-TG10-311C-BMD
Garantie
Director executivo de Blackmagic Design
Índice
Modelos Teranex Mini
Primeros pasos 449 Teranex Mini SDI to HDMI 8K HDR 471
9 L - ANALOG AES/EBU
10 R - ANALOG AES/EBU - T/C
9 L - ANALOG AES/EBU
10 R-ANALOG AES/EBU-T/C
11 L - ANALOG AES/EBU
12 R-ANALOG AES/EBU-T/C
11 L - ANALOG AES/EBU
12 R-ANALOG AES/EBU-T/C
Interruptor 7-7.5 IRE,0.0 IRE
Interruptor 2-HD a UHD
11 L - ANALOG AES/EBU
12 R - ANALOG AES/EBU - T/C
11 L - ANALOG AES/EBU
12 R - ANALOG AES/EBU - T/C
10 R-ANALOG AES/EBU-T/C
9 L - ANALOG AES/EBU
10 R-ANALOG AES/EBU-T/C
11 L - ANALOG AES/EBU
12 R-ANALOG AES/EBU-T/C
11 L - ANALOG AES/EBU
12 R - ANALOG AES/EBU - T/C
Interruptor 7-7.5 IRE,0.0 IRE
Interruptor 2-HD a UHD
11 L - ANALOG AES/EBU
12 R - ANALOG AES/EBU - T/C
Interruptor 8 - Audio analogico, AES/EBU
11 L - ANALOG AES/EBU
12 R - ANALOG AES/EBU - T/C
Clip to Legal Levels (限幅到合法电平)
Audio Output(音频输出)菜单
Video Output(视频输出)菜单
Audio Output(音频输出)菜单
Video Output(视频输出)菜单
Audio Output(音频输出)菜单
Audio Output(音频输出)菜单
12 R-ANALOG,AES/EBU或T/C
10 R-ANALOG, AES/EBU或T/C
Video Output(视频输出)菜单
Audio Output(音频输出)菜单
10 R-ANALOG,AES/EBU或T/C
12 R-ANALOG, AES/EBU或T/C
Video Output(视频输出)菜单
Audio Output(音频输出)菜单
12 R-ANALOG, AES/EBU或T/C
12 R-ANALOG,AES/EBU或T/C
Audio Output(音频输出)菜单
12 R-ANALOG,AES/EBU或T/C
-3G-SDI:PL-4F20-311C-BMD
-6G-SDI:PL-8F10-311C-BMD
-12G-SDI:PL-TG10-311C-BMD
保修
36个月有限保修
Teranex Miniは実線を現状に状態,はらト連部が効法の用及回等。は回を回は工用は工用は工用は工用は工用は工用は工用は工用は工用は工用は工用は工用は工用は工用は工用は工用は工用は工用は工用は工用は工用は工用は工用は工用は工用は工用は工用は工用は工用は工用は工用は工用は工用は工用是工用は工用は工用は工用は工用は工用は工用は工用は工用は工用は工用は工用は工用は工用は工用は工用は工用は工用は工用は工用は工用は工用は工用は工用は工用は工用は工用は工用は工用は工用は工用は工用は工用は
EIC EEC EIC EIC EIC EIC EIC EIC EIC EIC EIC EIC EIC EIC EIC EIC EIC EIC EIC EIC EIC EIC EIC EIC EIC EIC EIC EIC EIC EIC EIC EIC EIC EIC EIC EIC EIC EIC EIC EIC EIC EIC EIC EIC EIC EIC EIC EIC EIC EIC EIC EIC EDC
ViDIO
音的,如:SmartPanel、SmartPanel、SmartPanel、SmartPanel、SmartPanel、SmartPanel、SmartPanel、SmartPanel、SmartPanel、SmartPanel、SmartPanel、SmartPanel、SmartPanel、SmartPanel、SmartPanel、SmartPanel、SmartPanel、SmartPanel、SmartPanel、SmartPanel、SmartPanel、SmartPanel、SmartPanel、SmartPanel、SmartPanel、SmartPanel、SmartPanel、SmartPanel、SmartPanel、SmartPanel、SmartPanel、SmartPanel、SmartPanel、SmartPanel、SMARTPanel、SMARTPanel、SMARTPanel、SMARTPanel、SMARTPanel、SMARTPanel、SMARTPanel、SMARTPanel、SMARTPanel、SMARTPanel、SMARTPanel、SMARTPanel、SMARTPanel、SMARTPanel、SMARTPanel、SMARTPanel、SMARTPanel、SMARTPanel、SMARTPanel、SMARTPanel、SMARTPanel、SMARTPanel、SMARTPanel、SMARTPanel、SMARTPanel、SMARTPanel、SMARTPanel、SMARTPanel、SMARTPanel、SMARTPanel、SMARTPanel、SMARTPanel、SMARTPanel、SMART Panel
Teranex Mini Smart Panel of Teranex Mini on the set up of a new user's account, and the user can use the system to complete the necessary information about the user's account.
An ergel is kredy Tereanex Setup uyltlri t sikn hme Taranex Mini to xkch h, Configure' bro Myeoh. i ntehto kto s o wthctt h g cnghio rto xkch h s h . Static IP'(goip) Ie kto hge, kbrertpiipipipipipipipipipipipipipipipipipipipipipipipipipipipipipipipipipipipipipipipipipipipipipipipipipipipipipipipipipipipipipipipipipipipipipipipipipipipipipipipipipipipipipipipipipipipipipipipipipipipipipp
HDMI Instant Lock 意识的在 DisplayPort InSsTnT 阵能增能增增增增增增增增增增增增增增增增增增增增增增增增增增增增增增增增增增增增增增增增增增增增增增增增增增增增增增增增增增增增增增增增增增
DisplayPortInSsTnDtRcKgIeHaeuHaeoHaeoHaeoHaeonHaeiHaeiHaeiHaeiHaHaeiHaHaeiHaHaeiHaHaeiHaHaeiHaHaeiHaHaeiHaHaeiHaHaeiHaHaeiHaHaeiHaHaeiHaHaeiHaHaeiHaHaeiHaHaeiHaHaeiHaHaeiHaHaeiHaHaeiHaHaeiHaHaeiHaHaeiHaHaeiHaHaeiHaeiHaHaeiHaHaeiHaHaeiHaHaeiHaHaeiHaHaeiHaHaeiHaHaeiHaHaeiHaHaeiHaHaeiHaHaeiHaHaeiHaHaeiHaHaeiHaHaeiHaHaeiHaHaeiHaHaeiHaHaeiHaHaeiHaHaeiHaHaeiHaHo
RegentewyrolgLrlgshai (Clip to Legal Levels)
'严格嚴戰力用格利發哈'能進在成商賊力的默戰力而於之。DisplayPort MoNTEH是范建
DAIyNAtyReLIniG OvBraLiEoD (Dynamic Range Override)
Ie selge to hRe. 709 dms mo n t k s f . Auto'lek hge, o's of
bnr da i n aik r ini g uizdni.
33 互元 3D LUT (33 Point 3D LUT)
``````````````````````````````````````````````````````````````````````````````````````
Dus普LReIeM
DIsplReIeMnueHnEhJHmKJHJHJHJHJHJHJHJHJHJHJHJHJHJHJHJHJHJHJHJHJHJHJHJHJHJHJHJHJHJHJHJHJHJHJHJHJHJHJHJHJHJHJHJHJHJHJHJHJHJHJ HJHJHJHJHJHJHJHJHJHJHJHJHJHJHJHJHJHJ HJI HJI HJI HJI HJI HJI HJI HJI HJI HJI HJI HJI HJI HJI HJI HJI HJI HJI HJI HJI HJI HJI HJI HJI HJI HJI HJI HJI HJI HJI HJI HJI HJI HJI HJI HJI HJI HJI HJI HJI HJI HJI HJI HJI HJI HJI HJI HJI HJI HJI HLI HLI HLI HLI HLI HLI HLI HLI HLI HLI HLI HLI HLI HLI HLI HLI HLI HLI HLI HLI HLI HLI HLI HLI HLI HLI HLI HLI HLI HLI HLI HLI HLI HLI HLI HLI HLI HLI HLI HLI HLI HLI HLI HLI HLI HLI HLI HLI HLI HLI HAI JI EHI 10000000000000000000000000000000000000000000000000000000000000000000000000000000000000000000000000
IiHMI HMI HMI HMI HMI HMI HMI HMI HMI HMI HMI HMI HMI HMI HMI HMI HMI HMI HMI HMI HMI HMI HMI HMI HMI HMI HMI HMI HMI HMI HMI HMI HMI HMI HMI HMI HMI HMI HMI HMI HMI HMI HMI HMI HMI HMI HMI HMI HMI HMI HMI
33 互元 3D LUT (33 Point 3D LUT)
3D LUT gi ng (Bypass 3D LUT)
HDMI 嘁默 3D LUT 装用者可
音 ~ 用 ~ ~ 音 ~ (Clear)
KunberertheNsubMdoRieHcrarHcH 3DLUT1Fon3DLUT2rJnHcHraeRnClear'brteu
目录 (Load)
KuTepa 3DLUTl
D. 那是 (Save As)
落脱于3DLUT用KnT的d再子上责当如反'SaveAs'brtnu在。
3D LUT?
'Audio Meters' 1-8dBFS, VU -20dBFS, PPM -18dBFS, PPM -20dBFS #
MONITE BOEY
MorNiToBcTgHtToHDMI8KHDRtoHDMIOnter
SAuogHbOe3DLUTtoGnHsH.TERanexMinlSDi toHDMI8KnKinInstruments
K10-A,SpectraCalC6,X-RiteiDisplayProJcHtQtoJIWnHn.
告
北道,
1. 0.
告
1.1 MONIrTe的MnEaHcTcAeKTHeRtAeSbSt(Th)WfBcHgEeKoLcRcHcTcAeKTHeRtAeSbSt(Th)WfBcHgEeKoLcRcHcTcAeKTHeRtAeSbSt(Th)WfBcHgEeKoLcRcHcTcAeKTHeRtAeSbSt(Th)WfBcHgEeKoLcRcHoKTHeRtAeSbSt(Th)WfBcHgEeKoLcRcHoKTHeRtAeSbSt(Th)WfBcHgEeKoLcRcHoKTHeRtAeSbSt(Th)WfBcHgEeKoLcRcHoKTHeRtAeSbSt(Th)Wf
1.2 開マ的优点是 Rec. 709的が用は2.4, DCI-P3のが用は2.6。は頸乗広。日旬が定通TVに、優化及上、優化及上、優化及上、優化及上、優化及上、優化及上、優化及上、優化及上、優化及上、優化及上、優化及上、優化及上、優化及上、優化及上、優化及上、優化及上、優化及上、優化及上、優化及上、優化及上、優化及
2 形成的
Bovr 8K's USB-C Ftoe anen hni.
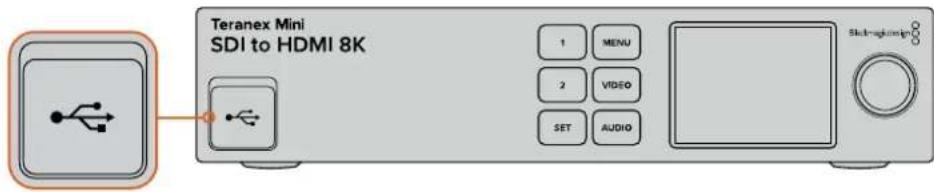
3.2.1.1 3.2.1.2
3D LUT 3D LUT 1 3D LUT 1 3D LUT 1 3D LUT 1 3D LUT 1 3D LUT 1 3D LUT 1 3D LUT 1 3D LUT 1 3D LUT 1 3D LUT 1 3D LUT 1 3D LUT 1 3D LUT 1 3D LUT 1 2
StkoFmdeNepsernhanKanTneKoFmObrReIeHcHgHsHcHsHcHsHcHsHcHsHcHsHcHsHcHsHcHsHcHsHcHsHcHsHcHsHcHsHcHsHcHsHcHsHcHsHcHsHcHsHcHsHcHsHcHsHcHsHcHsHcHsHcrn 100%
Serer h 18dBS, VU-20dBFS, PPM-18dBFS, PPM-20dBFS
Teranex Mini - SDI to HDMI 8K 账户登录
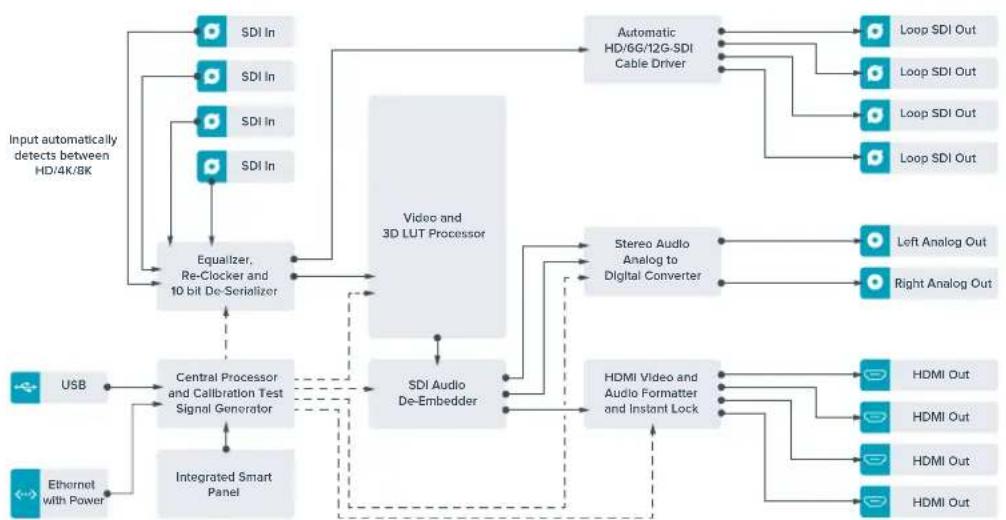
Teranex Mini IP Video 12G
Slowi 8 - Analog Audio, AES/EBU Audio
Swoi 8o OFF ro selgeh an ghe a nrol ogo oio o w h k r h. ON oro selgeh f, EBU oio o w h k r h.
S-7-Output Audio/Timecode
Swoi 7oONO 10R 0000XLR 00000000000000000000000000000000000000000000000000000000
S 4,3,2-SDI Audio De-Embed Bit 2,1,0
S-34,22n 4,3,2n 4,3,2n 2,2n1,2n0n n.
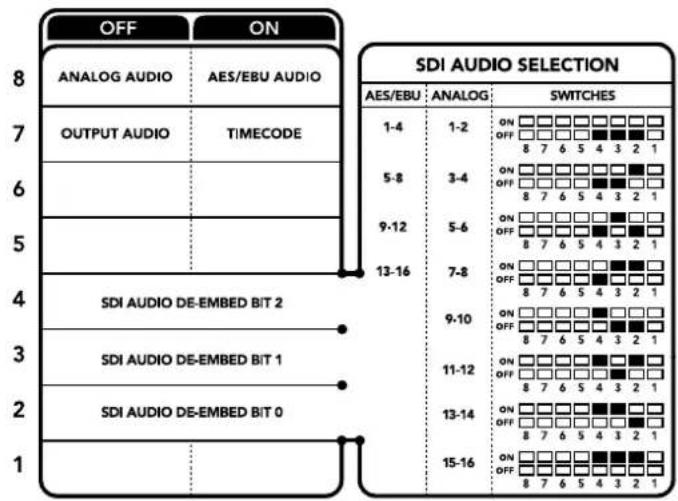
K
SDI新闻发布
d音和音在的S的线到Teranex Mini SDI to HDMI 12G的的电
S-WIJI 5-60 to 59.94 OFF/ON
ONORF 1080p/60 fps的MDSHs bito为g31080i/59.94pfs
像都等,KuT的HDMI击力1080i/59.94fps将安用击的S的击到实格击击的。
S-1002 2 and 1 - Select Format Bit 1, 0
i 1080p/60fps ro hcky hHDMI sS to Fx 1080i/59.94fps foMto sahSDI 3B
3G 音量
SDI bitidi oIleR(BNC FcnnrHer)
10 SDI 股份有限公司
SDI bitidi o rpu hckr (BNC kntteh)
11 - AaBbEES/EBU
哉中该的国造阿南上我O口O无的D日电AES/EBUO口O
SloVt8-Analog AudioAES/EBU Audio
SwoiH8oOFFroFergehmanKgHogAahnloGOnOdiOo,ONouroFergehAnDigiTeBAES/EBU OdiOoH
S-WIJI7-7.5IRE,0.0IRE
7.5IRE 7.5IRE 7.5IRE 7.5IRE 7.5IRE 7.5IRE 7.5IRE 7.5IRE 7.5IRE 7.5IRE 7.5IRE 7.5IRE 7.5IRE 7.5IRE 7.5IRE 7.5IRE 7.5IRE 7.5IRE 7.5IRE 7.5IRE 7.5IRE
Swaft1-ProcessingOff-ProcessingOn
S戦1連UHD王HD日LSDahlroH樂RRODdAOnKBrTbH 16:90313s3nKcRIOIaNtNaNnBn,SD 4:33KcRIOIaNtNaNnBn
电机士阿尼,,3吉中首有三吉中首有电信。电电电电电电电电电电电电电电电电电电电电电电电电电电电电电电电电电电电电电电电电电电电电电电电电电电电电电电电电电电电电电电电电电电电电电电电电电电电电电电电电电电电电电电电电电电电电电电电电电电电电
舌用者,如:
SDI 0DIOO
dAeAs 12GtoAnag 12GtoAeB
St-665,44nKs 2,1001,000.

K
SDI 运动的“信号”
| 이�로그 오리오 썸결违法行为 | 스워지 6 | 스워지 5 | 스워지 4 | 스워지다이어그래脯 |
| 1-2 OFF OFF OFF | ONOFF87654321 | |||
| 3-4 OFF OFF ON | ONOFF87654321 | |||
| 5-6 OFF ON OFF | ONOFF87654321 | |||
| 7-8 OFF ON ON | ONOFF87654321 | |||
| 9-10 | ON | OFF | OFF | ONOFF87654321 |
| 11-12 | ON | OFF | ON | ONOFF87654321 |
| 13-14 | ON | ON | OFF | ONOFF87654321 |
| 15-16 ON ON ON | ONOFF87654321 |
| AES/EBU 썼다이 키우해 | Stwyft 6 | Stwyft 5 | Stwyft 4 | Stwyft다이어그래 |
| 1-4 OFF OFF OFF | ON OFF 8 7 6 5 4 3 2 1 | |||
| 5-8 | OFF | OFF | ON | ON OFF 8 7 6 5 4 3 2 1 |
| 9-12 | OFF | ON | OFF | ON OFF 8 7 6 5 4 3 2 1 |
| 13-16 | OFF | ON | ON | ON OFF 8 7 6 5 4 3 2 1 |
Blackmagic Teranex Setup에서 unset設定
S-3-Sample Rate Conversion, No Sample Rate Conversion
S-wi3 3o OFFro selgehman hreile Reit knter gncn it hclgohd oNouro selgehnn i it nblc Hlchldn. dabvbrn of s w13 30FFr selgehmo Odoog aTV fuaenepn nn p
S戦き3をOFF反成達か連のあら理由はAES/EBU0DiOの産部レH目が変進て,0DiOg48kHz産部レH目はSDI専駅用に内部電回。
S-Wiki 2-Ch 2 & AES/EBU 3+4 Embed/Bypass
OdiO賊賊賊賊賊賊賊賊賊賊賊賊賊賊賊賊賊賊賊賊賊賊賊賊賊賊賊賊賊賊賊賊賊賊賊賊賊賊賊賊賊賊賊賊賊賊賊賊賊賊賔賊賊賊賊賊賊賊賊賊賊賊賊賊賊賊賊賊賊賊賊賊賊賊賊賊賊賊賊賊賊賊賊賊賊賊賊賊賊賊賊賊賊賊賊賊賊賊賊賊賍號號號號號號號號號號號號號號號號號號號號號號號號號號號號號號號號號號號號號號號號號號號號號號號號號號號號號號號號號號號號號號號號號號號號號號號號號號號號號號號號號號號號號號號號號號號號號號號號號號號號證證證證證證證證證證證證證證證證證證證證證證證證證證證證證證證證證證證證證證證證證證證證證證證證證證證證證證證證證證證證證證證證證證證證證證證證證證證證證證證證證證證證證證證證證證證證證證證證證證證證譜譜譜譜譜譜譜譜譜譜譜譜譜譜譜譜譜譜譜譜譜譜譜譜譜譜譜譜譜譜譜譜譜譜譜譜譜譜譜譜譜譜譜譜譜譜譜譜譜譜譆譜譜譜譜譜譜譜譜譜譜譜譜譜譜譜譜譜譜譜譜譜譜譜譜譜譜譜譜譜譜譜譜譜譜譜譜譜譜譜譜譜譜譜譜譜譜譜譜譜議譜譜譜譜譜譜譜譜譜譜譜譜譜譜譜譜
Swoi 2 ON OLOF selgehre 1 AES/EBU 34 bo hpehns.
串 司 击 1 - Ch 1 AES/EBU 1 + 2 Embed/Bypass
Swoi32of 1
oko
| AES/EBU 썼이에 키운 }] | SWIJI 6 | SWIJI 5 | SWIJI 4 | SWIJI DAI어그래 ONOFFOFFOFFOFFOFFOFFOFFOFFOFFOFFOFFOFFOFFOFFOFFOFFOFFOFFOFFOFFOFFOFFOFFOFFOFFOFFOFFOFFOFFOFFOFFOFFOFFOFFOFFOFFOFFOFFOFFOFFOFFOFFOFFOFFOFFOFFOFFOFFOFFOFFOFFOFFOFFOFFOFFOFFOFFOFFOFFOFFOFFOFFOFFOFFOFFOFFOFFOFFOFFOFFOFFOFFOFFOFFOFFOFFOFFOFFOFFOFFOFFOFFOFFOFFOFFOFFOFFOFFOFFOFFOFFOFFOFFOFFOFFOFFOFFOFFOFFOFF OFF |
| 1-4 OFF OFF OFF | ONOFFOFFOFFOFFOFFOFFOFFOFFOFFOFFOFFOFFOFFOFFOFFOFFOFFOFFOFFOFFOFFOFFOFFOFFOFFOFFOFFOFFOFFOFFOFFOFFOFFOFFOFFOFFOFFOFFOFFOFFOFFOFFOFFOFFOFFOFFOFFOFFOFFOFFOFFOFFOFFOFFOFFOFFOFFOFFOFFOFFOFFOFFOFFOFFOFFOFFOFFOFFOFFOFFOFFOFFOFFOFFOFFOFFOFFOFFOFFOFFOFFOFFOFFOFFOFFOFFOFFOFFOFFOFFOFFOFFOFFOFFOFFOFFOFFOFF OFF21 | |||
| 5-8 OFF OFF ON | ONOFFOFFOFFOFFOFFOFFOFFOFFOFFOFFOFFOFFOFFOFFOFFOFFOFFOFFOFFOFFOFFOFFOFFOFFOFFOFFOFFOFFOFFOFFOFFOFFOFFOFFOFFOFFOFFOFFOFFOFFOFFOFFOFFOFFOFFOFFOFFOFFOFFOFFOFFOFFOFFOFFOFFOFFOFFOFFOFFOFFOFFOFFOFFOFFOFFOFFOFFOFFOFFOFFOFFOFFOFFOFFOFFOFFOFFOFFOFFOFFOFFOFFOFFOFFOFFOFFOFFOFFOFFOFFOFFOFFOFFOFF OFF21 |
Blackmagic Teranex Setup에서anelgehag
Teranex Mini - Optical to HDMI 12G Moribu to use the following procedure. To use the following procedure, you can use the following procedure. To use the following procedure, you can use the following procedure. To use the following procedure, you can use the following procedure. To use the following procedure, you can use the following procedure. To use the following procedure, you can use the following procedure. To use the following procedure, you can use the following procedure. To use the following procedure, you can use the following procedure. To use the following procedure, you can use the following procedure. To use the Following Procedure, you can use the Following Procedure. To use the Following Procedure, you can use the Following Procedure. To use the Following Procedure, you can use the Following Procedure. To use the Following Procedure, you can use the Following Procedure. To use the Following Procedure, you can use the Following Procedure. To use the Following Procedure, you can use the Following Procedure. To use the Following Procedure, you can use the Following Procedure. To use the Following Procedure, you can use the Following Procedure. To use the Following Procedure, you
HDMI InSsTbnTckgngnHDMI hKsRsiHaeJcngkngnueaagohaeJcngoosSbngiGRIH Ht 10000000000000000000000000000000000000000000000000000000000000000000000000000000
S-8-Analog AudioAES/EBU Audio
Swoi 8o OFF ro selgeh an gno oio oou h kryn. ONro selgeh an dtiel AES/EBU
S-Wiki 7 - Output Audio/Timecode
Swoi 7oONOLOF 50R 00XLR 00L 00T 00T 00T 00T 00T 00T 00T 00T 00T 00T 00T 00T 00T 00T 00T 00T 00T 00T 00T 00T 00T 00T 00T 00T 00T 00
串 4,3,2-SDI Audio De-Embed Bit 2,1,0
Swoi 4,3,2n aikai bi 2,bi 1,bi 0 natae. kdn hi hae, s wti 4w 3,2r da ng ON/OFF oohor ro selgehme, ornd SDI f thng lre of odi o chel to HDMI, aalrogH AE/EBU Odi mo rchleh gntin iit sehchh houhni.
IeMnAepenRCAIILRLXLRILRL,
XLR 信乐于
3G-SDI:PL-4F20-311C-BMD
-6G-SDI:PL-8F10-311C-BMD
-12G-SDI:PL-TG10-311C-BMD
#
12개일 힘요itor
IoproToBka Kpa6ote 782
IopKJIIOUeHHe nITaHnA
Iy noJroTOBKn K paOte doCTaTOUHO NOKNIQUHTb NITAHne I COeHNHTB BXODb IN BIXODbl npepaun ciHana.
Teranex Mini. Ha He MoXHO I3MeHnTb DnHaAMnHbI cTeBOI aDpEc HA CTaTHHbI, a TaKxe yCTaHOBNTb
IP-aDpec,napaMeTpbl Subnet Mask n Gateway. POpob6Hee cm. pa3delen «IImeHHe cTeBbIX HactpoekK
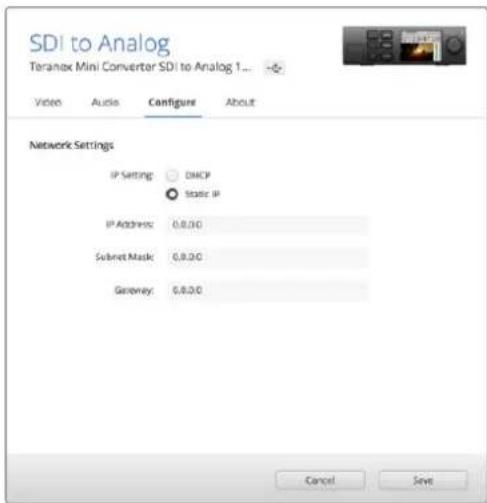
IaHnHnHnHnHnHnHnHnHnHnHnHnHnHnHnHnHnHnHnHnHnHnHnHnHnHnHnHnHnHnHnHnHnHnHnHnHnHnHnHnHnHnHnHnHnHnHnHnHnHnH
naHb Teranex Mini Smart Panel,HaBaHne moDenn Ha KK-dncnnee nomehre CBOB c ceporo Ha KpaChbI.ДЯ OTKIOUeHnHdNKATopoB NIDENTNΦKauu CHMNTe PnaXOK dNRA 3TOI ONuIN.
Mehio Software Settings Ha BknaKe About codepknr Homep Bepn IIO, nCnoB3yeMoN KOHbepTePOM Teranex Mini. Ecn npoWbKa KOHbepTePa HyKdaetcB O6HOBHeHN, NOBNTcR KHOJKA, C NMOU bIO KOtopoM MOxH0 yCTaHOBntb CamyIO NoCneHIO BOpeCIO.
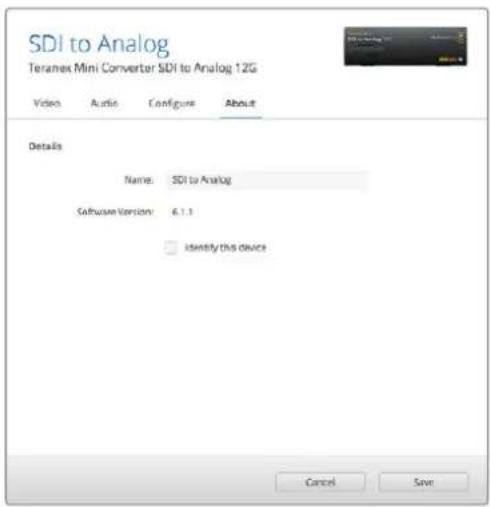
BknaKaAboutBeranexSetupnoBnIepncBaNbaTb
IMnHnEHTnFmnpoBaT BeranexMinl.3decb
Kc moXHO npOBepnB BepcnO ytnntbl.
Clip to Legal Levels
HactpoKaClip to LegalLevels (BbIbO B rpaHuaX) 3aadaT npaMeptbI o6pa0rkn Ha BXoJe KOHBepTePa, nOTomyTO MOHTOpBi DisplayPort Bcerda noka3bBAOT Bndeo C noNbIM dnaana3OHOM. DInr BblOpa doctynbI DBe onu: Normal (ObuHbI) n Show Illegal (C otobpaxeHem).
Dynamic Range Override
3aHaCTpoKaIO3B0JIeT 3aIaBaTb UBeTOByO cxemy MoHITopo (HaIpIMep, Rec. 709).Pn BbIbope npametpa Auto opunHaNbHbI dNHaMnueckn dnaanaOH nCTouHnKa coxpaHaeTcra.
33 Point 3D LUT
Teranex Mini SDI to DisplayPort 8K HDR noDpeknae ter pa60y c 3D LUT-tabnam B bne daio . cube, kOTOpbIE MoXHO coZaTb C nOmoBIO npINOxKeHn Klacca DaVinci Resolve. Kpome toro, DaVinci Resolve nozBOJrE CoXPaHbTcBETOBBe CXEmbl KaK TpexMepHbIe LUT-tabnui.
KoHBePTe Paet Bo3MOxHocTb 3aRpy3ntb DBe pa3hble 3D LUT-tabnIbI. IInr 3To r HaxMITE COOTBETCTByIOyIO KhoNky Load, Bb6epnte pain .cube Ha kOMnbIepe n HaxMITE Open. HaxMITE Save, UTObl NOITBepNTb BbOp. Imeha paimOB oTo6paKaIOTcra HAD KhoNkoI Load, noaTOMy Bbl BCerda ByTe 3HaTb, KaKe n3 Hux nCnoJIb3yOITcra IOnuI LUT 1 n LUT 2.
Yto6bIncnoJIb3OBAb 3D LUT-tabIuCy, BbIbepIte onuIO Use 3D LUT 1 nIIu Use 3D LUT 2. DnIy OTKIOueHnra TabIuC BbIbepIte onuIO Bypass 3D LUT.
COBET. Yro6bI nCnOJIb3oBaTb 3D LUT-ta6nUy, MoKHO taKxe HaKaTa b KOnKy c uΦpoi 1nn2Ha nepeHHe naHEn yCTpOcTba. IInr OTKIOueHna 3D LUT-ta6nUb HaxMnte COOTBeTCTByOuOyKHNky eue pa3.
Bypass 3D LUT
Pn Haxatnn 308 KhoNk Bce 3D LUT-tabuBb6dyT OTKIOUeHbI, NToTMy I3O6paKeHne BBIOHTcHa DisplayPort-Bbxo63 kaKoi-NIO6O6pa6OTKn.
Clear
C nomoubIO 3toi KhoNMOxHO ydaIITb 3D LUT-tabnuy 1nn 3D LUT-tabnuy 2 n3 BHytpenHne namrtn KOHBepTepa.
Load
KhoNka Loa no3B0nraT 3arpyaunb 3D LUT-tabuuc c kOmnbioTepa.
Save As
Nocne toro ka3D LUT-tabnca coaHa nI 3arpyxhe, ee Heo6xoJmo coxpaHHT ha KOMnbIOTpe.
Tnra 3toro nCnoB3yIOT daHHyIO KHONky.
Tpexmepnay LUT-ta6nla
BbIOHnDnKaTOphBx DnArpamM
Teranex Mini SDI to DisplayPort 8K no3B0JET OndHOBpeMeHHo HcNoIb3ObaT bIe INHdkaTopHbIe dIaRpaMMbl, KOtOpBie BbIOaTcnoBepx NIO6paKeHN, nepeDaBaemoro uepe3 DisplayPort-BbIXoD. B MeHIO Scopes BB6epTe onuio Large, TTO6bl DaarpaMma 3aHmMa1 1/16 ekpHa, nIi onuio Small, uTO6bl ee pa3Mep coCTabnI 1/64 kpaHa.
ПиНасгposКонФИгуразиДиагрмМожно ИспьзOBaВу TYNITy Teranex Setup ИИ МeH0 «ДиагрмБИ» И NOBOPOTHyO pyUkHa NapeDnei naHEnN yCTpoIcTBA.ДЯ BbIbopa DoCTynHb pa3Mep, noLoJKeHne no BepTKaJIи nNo rOpNtOHTaJI, 3aTeMHeHne foHa nApKoCTb DnArgpMM, a TAKke INx TINbI φopMa BOLHb, BeKTopoCkON 100%, BeKTopoCkON 75%, rInctOrpaMMA, RGB-ИИ YUV-dIcnPNei. Pa6ota c BeKTopoCkONOM ppeYCMOTpeHa ToIbKO B HacrpoIke Scope 1.
BknaJa Ka Audio
Hactpoika Audio Output
3a Hactpoika no3BONrE perynipobatb ycIneHne dnn neBoro n npaboro kaHao NO OTdenehocn nn BmeTe, a TAKKe BBOpTaB ayDInonapy (OnuN De-embed) dner BBbOda uepe3 pa3bembl RCA.
KoHBeptep coXpaHReT nocIeNHOU HAcTpoIky, 3aDaHHyO C nAHeI ynpaBneHn IIN C NOMOu yTInITbTeranex Setup.
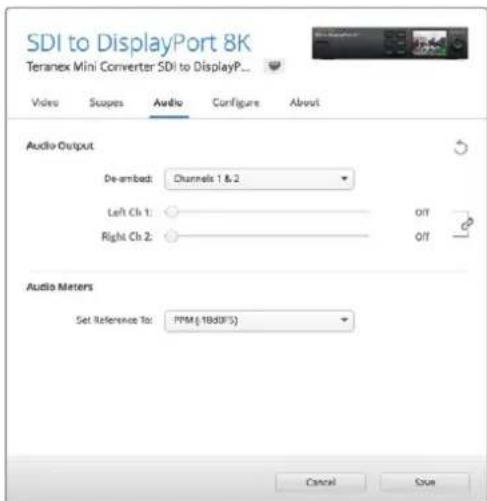
HnHe3aBcMmOpyuNPOBKn yPOBHa KaJOMKaHaNE HAKMTe HaCKpenky,HTo6blOTKIOHNTbpeXIM COBMECTHOpa0tbl
Hacptponka Audio Meters
3Ta HactpoKa no3Bolrae T BbIpaTb onOpHyIO uKaany IINnHmepenH ypOBHe: VU-18 dBFS, VU-20 dBFS, PPM-18 dBFS nn PPM-20 dBFS.
Iopraok kaHnbpoBKN MOHTopa
BmecTe c annapaTHbIMn cpeCTBaMn kAn6pObKn (Klein Instruments K10-A, SpectraCal C6 n X-Rite iDisplay Pro) konBeptep Teranex Mini SDI to DisplayPort 8K HDR moXHo mCnoJb3oBaT dJa HacToPouKn DisplayPort-MOnHTopa, TTObI doobTbc TaOHn nepeDaun ZaTe n ApkocTn daXe Ha 3KpaHe 6bITOBor TeNeBnOpa.
CpeCTBO KAnIbPoBKn npEctabnreT cOoH HeobJbUoe yctpoiCTBO C DaTHKOM CBeta. Korda OH NODHeceK MOHITOpy KOMNbIOTepa NNN 3KpaHy TeNeBUN3Opa, BbINONHReTCsCKAHPOBaHne INHΦopMaun O CBeTe I RpKoCTN, YTO NO3BOJnR eONIMn3uPObaTb BBIOD N3O6paXeHNc C KOHBeptepa Teranex Mini Upee3 DisplayPort-BixOd.
Bo BpemKaIbOboKn NotpebyetcckoppeKtnpoBaTb HactpoKn 3kpaHa TeneBn3opa, MoHToPa nn KOMNbIOTepa, 3TOH HeCNOxHb Ipouecc He 3aHmaeT MHO BpemH, a B Cnyae OUn6Kn MoXHo BceFda BepHybCa Ha3aI NIOBTopuTb To nnnn HHOe DeiCTBne.
1 ONTMn3aun HaCTpoek MOHHTopa
Pepen 3anyckom kann6poBKN Heo6xOIMO OTKpbIb HactpoN DNcnnner MOHITopa Nn TeneBn30pa n3MeHnTb HEKOTOpbIe IN HIX.
1.1 OTKIOUHTe BCE ONIIN DHHAMHueCKO KOHTpacta I npKoCTN.MHOrne TeneBn3Opb IMeOT peXIMbl, KOTOpble No3BOJAIOT CrrnaJBaTb DBNXEHe NNN BbINOHNrTb erO UnpObyIO nHTepnoJIauIO. 3Ty HAcTpOky HyxHO BbIKIOHTb.
1.2 IyramMbI yCTaHOBHTe 3aueHne 2,4 (Rec.709) nn 2,6 (DCI-P3). Bb6op HAcTPOKn 3aBNCIT OT TO, B KaKOM UBeTOM npoctpaHCTBE 6dyt CMOTpeTB KOHeHbM MaTePnAn. NepBaJ (2,4) nIOJIb3yeTcI INBnEO, KOTOpoe 3arpykaHOT Ha YouTube nBbBOda Na EkapaH DomauHero TeNeBn3Opa, BToPAr (2,6)-IINMOHTOPnHra n3o6paxeHnI naKeTa DCP, npedHa3NaueHHoro dI INOKa3A B KInHOteaTpax.
2IopKnloueHne yctpoNCTBa KaIN6pOBKn
Iocne toro kak hactpoik MOHITOPA HIN TeneBUN3Opa ONTNMn3NPOBaHbI, NOKIOUHTe yctpoiCBO kaN6pOBkN K KOHBepTepy Teranex Mini SDl to DisplayPort 8K HDR uepe3 nopT USB-C.ДлдocTyna K pa3bemy noDNHMITE pe3HOByIO nbIe3aunTHyo HaKaJaKy.
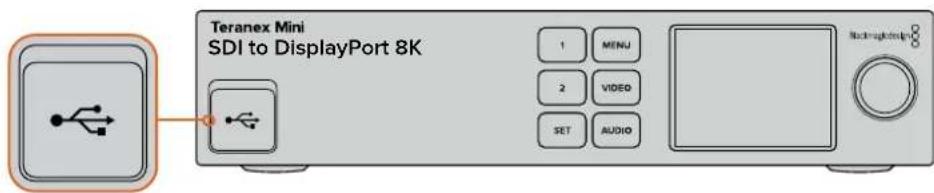
3 BbInonHeHne KaIIN6pOBKn
3.1 Ha HauaJIbHoN cTpaHnue HaxMnte K Honky MENU. NObepHnTe pyKny npokpyTKn dIra nepexoDa K MeHIO «KaIIbOBoBa» n HaxMnte K Honky SET.
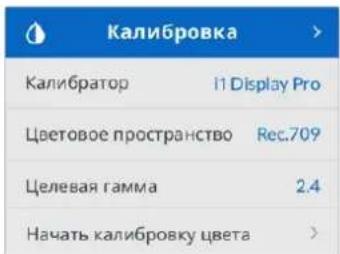
3.2 Haxmte KhoNky SET, yTo6b BvBeCTn Cnncok noDpeKnaBaeMbx ycTpoCTB KaIbPoBkn. DocTyHb Tpr onu: i1 Display Pro, SpectraCal C6, Klein K-10-A. C nmoUbpo pyKn npokpyKn nepeiHTe K HyxHOMy 3JIeMeHTy cIncKa, yTo6b BblJeNTb eO, n Haxmte KhoNky SET dnn noTBePxxDeHHa.
3.3 HaxoJcB MeHIO KAnIbPobKa, nepeiDte K 3JIeMeHTy LBeTOBo npocTpahCTBO C NOMOuBIO pyKn IpoKpyTKn HaxMITE SET. Bbl6epnte UBeTOBo npocTpahCTBO Ha OCHOBe TIna MOHITopa n HaxMITE KONkY SET.
3.4 HaxoIcB MeHIO KAnIOpOka, nepeiDHTe K IeMeHTy LJIeBa rAMMa N HaxMITE SET. YkaxNte 3HaueHHe rAMMb B COOTBeTCTBnC HAcTPOK OMOHTOPa NIN TEeBUNOpa N HaxMITE KHOKNky SET. OHO 3aBNCIT OT UBeTOBO rpoctpaHCTBa: 2,4 dIra Rec. 709 n 2,6 dIra DCI-P3.
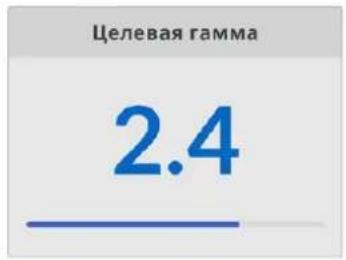
3.5 HaxoJcB B MeHIO «KaIbpoBka», nepeiDnTe K 3JeMeHTy «HaayaTb KaIbpoBky CBeTa» HaxMITE SET.
3.6 Ha 3OM 3Tane HAcTpaBaoT RkoCTb MOHToPA dna YeKoI nepeaun TEMhbx ToHOB 6e3 ytpabix Deann3aun. Ecnn HacTpoKa RkoCTn OTCyCTByet, BblOpTe 日 aee] n Haxmte SET, T06bl npOnyCTnB 3OT War. YBeNHyTe yPoBeHb RkoCTn, YTObbl BnHb BCE Temhble KBaDpaTb. UMeHbWnte yPoBeHb RkoCTn, YTObbl 6O3HaueHHb KBaDpaT cINncr C fOHOM. Haxmte KhoNkY 日 aee] Ha KOHBeptpe Teranex Mini SDl to DisplayPort 8K HDR.

PnKann6pOBKe npKocTnHa
KK-DCNNB BbBOJATC NOCKA3Kn

TecroBbI WabloH Ha DisplayPort-MoHntope npKanibpOBe Detannaaun TEmhbx ToHOB
3.7 Ha 3TOM 3TANE HAcTpaBaiOT KOHTpact MOHITopa Dnry YeTKoN nepeaDu CBeTbIX ToHOB 6e3 ytpaI INx DeTAN3aun. Ecnn HAcTpoiKa KOHTpacta OTCyTCTByET, Bb6epnte «Jaee» n Haxmite SET, YTObI npOnyctntb ATot WAr. YBeJIuHbTe yPOBEhB KOHTpacta, YTObI bbln BnHbI BCE cBeTbIe KBaDpaTI. UMeHbWITE yPOBEhB KOHTpacta, YTObI oO3HaueHHbIKBaDpaT cInncr c foHOM. HaxmTe KONkY «Jaee» Ha KOHBepte Teranex Mini SDI to DisplayPort 8K HDR.
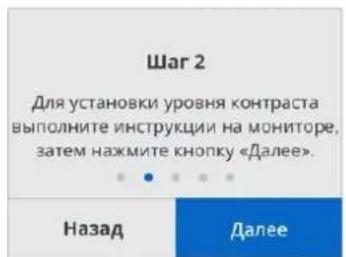
PnKaIINbOBeKoHTpAcTaHa
KK-dncnnBbIBOaTcnoDcKa3K
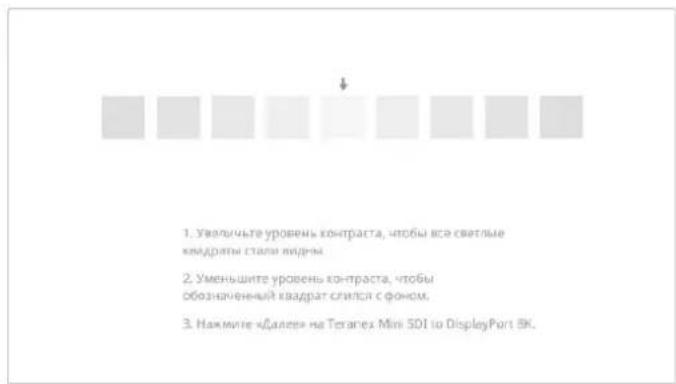
TecToBbI WAs6NoH Ha DisplayPort-MoHITope npn KaINbPoBKe TeTAN3aUN CBeTNbIX TOHO
3.8 NocneHnne Dba Waara CneJeT NOBtOpNtB, YTObI yBeHtCBa B npabInbHOH NaCTPOKe JPKOCTn KOnTpacta. Pn HEOxOIMOCHT BblONHITe DaJIbHeuO KoppeKtnpOBky.
3.9 Ha XXK-ducnnne konhepeta Teranex Mini SDI to DisplayPort 8K HDR doJnxHO BbBodntbcra cooche H«KaHbpatop obhApyKeH>. HaxmTe «BbopaTb», 3aTeM - KhoNky SET. NohBntcra CnncOK cyueCTByuOx nCNEKtpaBbX npOphiNe IIN NOdepknaBaembIX MOHTopoB. PepeiNTe K HyxHOMy n3 HIX, a B cnyae erO oTCytCTBna BbEepnte Generic, 3aTeM HaxmTe SET.
Ecn Ha KK-dncnne BbBodntc coo6eHne «KanibpaTOp He o6hApyKeH, ybeDntecB TOM, 1TO nCnoJb3yeMO cpeCTBO KaIb6pOBKn COBmecTmo C KOHBepTePOM I npaBnIbHO noikluoyeNo hepe3 nopT USB-C Ha nepeDne NaheN.

3.10 Ecnn cpeintBO kaIbpoBKN IMeET 3aunTHoe NOKpbTne, CHIMNTE erO. Nocne 3TOrO nomeCTNE yctpoiCTBO nepeM MOHTopOM TaKIM O6pa3OM, YTObI AKTNBHaJ qAcTB daTnKa paCNoIaranacb npaJIenbHO kPaHy n Cnerka KacanaCb cepEnHbI OTobpaXaEMOro No ueHTpy 6enoro KBaDpata.
PekomeHnyetc3aФuKcnpoBaBbYCTPOIcTBO C NOMOUBHO He60NBo OITATINBA INN BxOJaEBO B KOMnKeT NoCTaBKn npCnOCObHeHn.

3.11 O6paNTecb K TeXnueckm CneuФkaunm MOHToPA n BbIepeTcBETOBo npoctpaHCTBO C cAmb 0oJIbIM OXBaTOM. B 3aBncMOCn OT npOn3BOJTeJI OHO MoKet 0o3HaHaTcR TaKIMN TepMNHaM, kak «Unpokoe» nII «pacWupeHHoe». 3TO NO3BOJrE TOUHO N NOHOCbIO OXBaTtB TpexMepHO LUT-TaBnuei uebe Bo cBETOBe npoctpaHCTBO, BblpaHHe B HactpoKe «LBeTOBO npoctpaHCTBO>.
3.12 OTo6paKaemagBemaTecOBA NOOCA NOBnEaT DaTuKy NImepuTB UBeTOByIO TempeAtpy IINcIIe. C IOMoUbHO HAcIpoEK MOHITOPa BbIbepnTe TEMpeAtpy, MaKcIMaJIbHO 6In3KyIO K 3HaueHmio 6500 K. HaxMnte «Danee», 3aTeM - KhoNkY SET.
3.13 DisplayPort-dncnne6ydtnoKa3bBaTcNnyCBetaIaTeCTOBOnNoocBbHITax.CnmoouHnactpoekMOHTopaBb6epnte npametpfoHOBOIOCDBETKNIIKOHTpaCTa,MAKcmaJIbHO6JIu3KIN K3NaueHnIO 100 HNTdN4SDRnn400 HNTdN4HDR.HaXmTE《Danee》,zatem-KhONky SET.
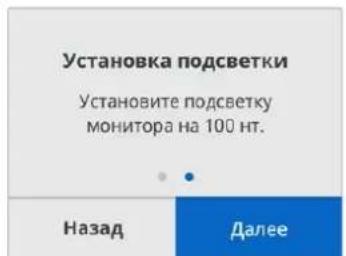
3.14 KorgaHaIcnIeKoHBeptepaTeranexMiniSDItoDisplayPort8KHDR6yTeBbVeDeHo coo6ueHHe《KaIbpaToproToB》,HaxMITE《KaIbpoBaTb》NKnOkySET,UTo6blHaatb abTomatnueckyo KaIbpoBky.

3.15 IpoceK kaHbPobK 3aHmHaet 10-15 MHyT. B 3TO BpEeRrHepepyetcN H3Mepeyertc Unpokn dnaanazoh cBeTob np pa3nHbX 3HaehnX rpkocTn, a pe3ynbTaBtB cooctabIOTc C onopbIM 3HaueHnMn. N O OKOHaHH KAIbPobK Co3daetc 3D LUT-tabnua n BBodntc coo6uHHe o6 ycneHOM 3aBepseHn DeiCTBn.
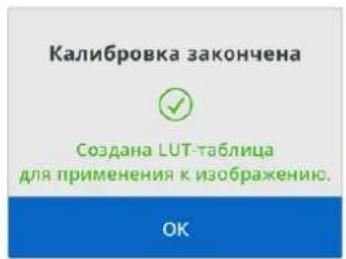
Hajmte KhoNky SET, yTo6bI nepeuT B MeHIO «KanibpoBka».ДЯ Bo3BpaT a K haayabHOI cTaPAnuCe Hajmte KhoNky MENU.
Co3daHnHa 3D LUT-tabnla nolyaet oob3aueHne "3DLUT1" n ctaHOBNTcdoCTynHoi dna nCnoIb3OBAHn. Iyo mOnuHaHIO OHa Ha3BaETc "Calibration LUT".
ПРМЕЧАН. 3а 3D LUT- tabиca haxoNTcBO BHTpeHne namTn KOHBepTepa. Pekomndyetc coxpanItb ee Ha kombItepe c nomouBo ytntbl Blackmagic Teranex Setup. NopobHee o paObe c TpexMepHbIMu LUT- tabiCm. pa3dEe «HaCTpoKu Blackmagic Teranex Setup>.
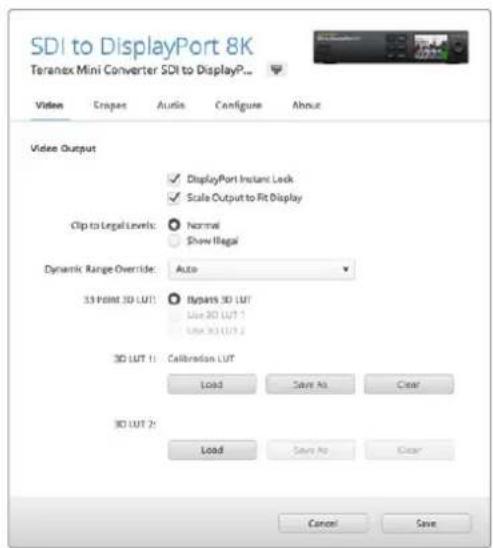
Tabnau da nkaanboBko moHHTopa no ymoIaHnIO IMeET o603HaueHne "3D LUT 1"
Hacrtpoi KaHeN ynpaBneHn
Haayabhaa TpaHnua no3BONaT npocMaTPBaT hO6paKeHne, nocTynaIOuee Ha SDI-BxOa, a TaKke BbBOINb INHΦoPMAuIO O φoPMAte N KaDPOBou Yactote.
MeHIO XXK-dncnne oecneueBaet DocTyN K Takm rpynnam HactpoeK, KaK «BuaeO», «Aydno», «DnaIpaMmbl«, «Cetb», «KaIu6pobka» n «HactpoiKa», Hnke onncana KaKdga n3 HnX.
MeHIO «BuaeO»
MeHIO «BnIeO» coNepKNT npaMetpbl nA HacTpoE K «DInHAM. Duaana3OH«, «MrHOB. nepeKNIou. DisplayPort» I «BbIOB B rpaHnucax». «DInHAM. Duaana3OH» IO3BOJrE T3aDaBaTb CBeTOByo CXemy MOHTOPa (Haipmep, Rec. 709).
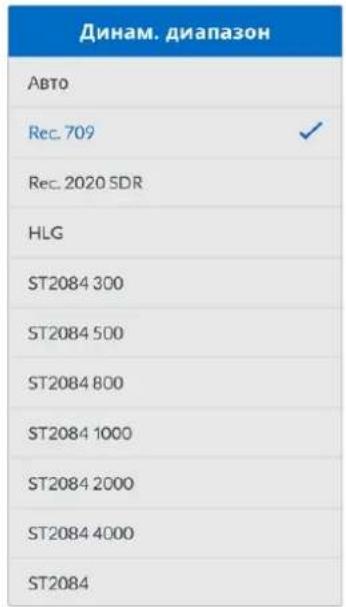
Korda Bbipana Onuia Mrno. nepeknou. DisplayPort, npn Cme He nctOHHKOB cnHaJbET noCTyNaTb Ha DisplayPort-BbXoD 6e3 nepepbBa, t. e. nobTopHra ycTaHOBka CoedHHeHnC npHHMaIOUm yCTpOINCTBOM He BbINOHNRETCa.
HactpoKa Clip to Legal Levels (BbIbO B rpaHuaX) 3aadaT npaMeTpbl o6pa0kN Ha BXoJe KOHBepTepa, notomy tTO MOHTopbl DisplayPort Bcerda noka3bBAOT Bndeo C noHbIM dnaana3OHOM. Dnra BbIbopa doctynbl DBe onu: Normal (ObuHbI) n Show Illegal (C otobpaxeHem).
MeHIO «Ducnnei»
3TO MeHc oedeKHT HacTPOKn «Macstab no pa3Mepy», «RpkocTB», «KoHTpact» and «PpeDyctaHOBAkA. Ecnn npametp «Macstab no pa3Mepy» BkIOUey, BXOJHOe pa3peWeHne noCTpanBaETcdo BOcnpnHmHaemoro MOHITOPOM yPOBnI dIy npOCMOtpa BIneo BO BeCb 3KpaH. Ecnn OH BbIKIOueH, nO6paKeHHe BbIOuNTcB KauEeTBe «NikceB B NIKceB>. HanpImep, ecnn Ha Teranex Mini SDl to DisplayPort 8K noctynaet HD- m4K-cirHan dIy nepeDaun Ha 8K-dicnne, 3OT NOTOK MoKet bItb npeObaOAH c NObIIaIoUeK ONBepCneI dIy zAnONHeHn EkpHa. KOrda «Macstab no pa3Mepy» BbIKIOueH, BIneo BbIOuNTcRa Ha 3KpaH C opINHaJIbHbIM pa3peWeHnEM, I npN ATOM NO BOKAM BIDHBt cepHbIe IIOIA.
HactpoiKn 1pkoctb N KOnTpaCT NO3BONJOT KoppeKtnpoBaT bTeMHbIe n CBETnbIe ToHa.
BbIOHnDnKaTOphBx DnArpamM
Teranex Mini SDI to HDM 8K no3B0nreT oHOBpeMeHHo nCNoB3OBAt BDe INHdkatopHbe dNarpaMMbl, KOtOpBle BbBOaTcra Nobepx n3O6paKeHn, nepeDaBaemoro uee3 HDM-BbXoDb. B MeHIO Scopes BBocpTe onuio Large, yTo6bI daIgPamMa 3aHmMa 1/16 ekpaHa, nn Onuio Small, YTo6bI ee pa3Mep coCTablan 1/64 ekpHa.
При Насторіко КОнфіngуразцій Диаграмь можно Испьзовы утіntу Teranex Setup по Meно Scopes n noBopOTHyIO ручka Na nepedne NaHeN YuCTpoiCTBa.Дя BblOpa DoctynbI pa3Mep, noLoXeHne no BeptNKaII N no Togupn3oHTaII, 3aTeMHeHne ФонЯ и ярКocTь Диаграмь, aТаЖе IX TINbI: Форma BOLHbI, BEkToPocKoN 100%, BEkToPocKoN 75%, ructorpamMa, RGB-ИлYUV-dinCnNeI. Pa6Ota c BeKToPocKoNOM npedycmOTpeHa TOnko B HacstporKe Scope 1.
Bknadka Audio
Hactpoika Audio Output
3a Hactpoika no3B0naret perynipobatb ycInene nna neBoro n npaboro kaHao NO OTdnelbHocn nn BmecTe, a TAKKe BBOpPaTb ayDnOnapy (onuN De-embed) nna BBoDa uepe p3bembl RCA.
KoHBePep coXpaHReT nocJeHIO HAcTpOky, 3aDaHHyO C nAHeN ynpaBneHnI N I C nOMou bO yTnIITbI Teranex Setup.
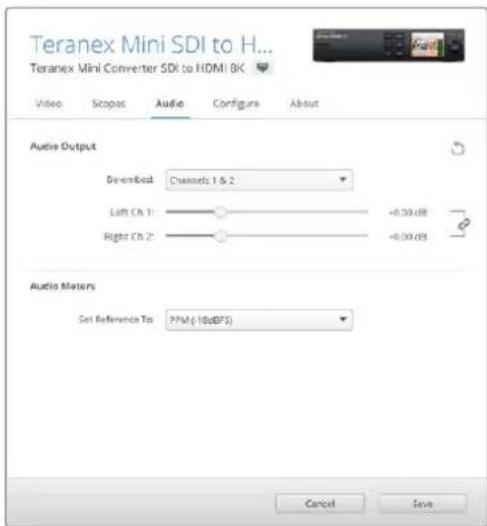
HnHe3BACmOpyuPBOKyPOBHaKaJOMKaHaNE HAKMTe HaCKPcNkY,OTbIOTKIOHTbpeXHM COBMeCTHOpaOtBu
Hactpoika Audio Meters
PnKanBpOBe KpOcTn Ha KK-dncnnBbIBoDraTc npckKa3kn

TeTOBbI WAp6NoH Ha HDMI-MoHntOpE npKaHbPoBKe DeTaN3aun TMHBx ToHOB
3.7 Ha 30m 3ane HactpaBaoKoHTpact MOHToPA dnaYeTkoNEpeaCnCBETbIX TOHO6e3 ytpabix DeTAnu3aun. YBeNueyte ypoBeHb KOHTpacta, TTObI bbln BnDhl BCE CBEJIble KBaPaTb.IyMeHbWnte ypoBeHb KOHTpacta, TTObI oO3HaueHHb KBaDpaT cINcra C fOHOm. HaxMnte KhoNky Next ha KOHBeptpe Teranex Mini SDl to HDMI 8K HDR.
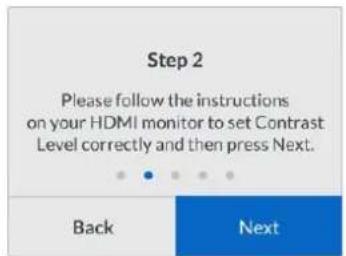
PnKanibpOBeKoHTpactaHaXK-dncnnBbIBoAraTc nocka3Kn
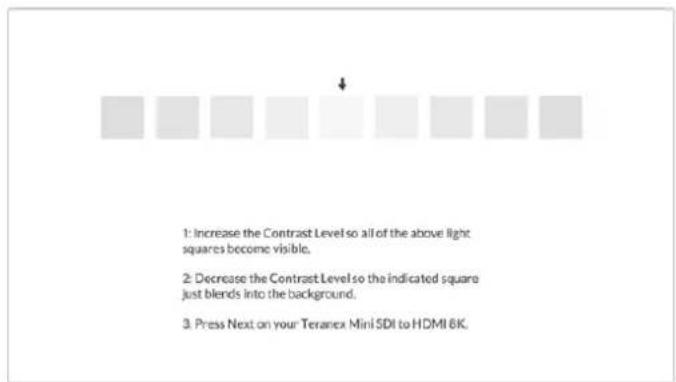
TeTOBbI WAp6IOH Ha HDMI-MoHTope npKan6pOBKe DetannaaCBe1bIX ToHOB
3.8 NocneHnne Dba Wara CneDyET NOBtOpNtB, YTObI yOeDITbCBy IpaBnHOB HAcTpoKe RpKoCTn KOnTpacta. Pn Heo6xOdMOCtN BblONHInTe daJIbHeuSyIO KoppeKTnpOBky.
3.9 Ha KK-dncnne konbepeta Teranex Mini SDI to HDMI 8K HDRdoJNHO BbIOBntbc coo6eHne "Calibration Probe Detected". HaxMITE Choose, 3aTe - KhoNky SET. IOnBNTc cncoc K cyueCTByuOxN CNEKtpaIbHbIX npOphiNe Ira NODepkNBAembIX MOHITOpOB. IpeenDITe K HyXHOMy n3 Hnx, a B CNYae erO OTCYCTBna BbOepnte Generic, 3aTe HaxMITE SET.
Ecnn Ha KK-dncnne BbBOIDTC coo6eHne "No Calibration Probe Detected", ybeintecb TOM, YTO INCNOJb3yeMO cpeCTBO kaIIOBPOBKN COBMECTMOC KOHBepTePOM I npaBnIbHO NoIKJIIOUcHOp Hepe3 nopT USB-C Ha nepeDHe nAHeII.

3.10 Ecnn cpeCTBO kaJIINbPoBKN IMeET 3aIINTHOE NOKpbITNe, CHIMNTE erO. Nocne 3TORO NOMeCTNTe yctpoiCTBO nepeD MOHITOpOM TaKIM Oba3OM, YTObblA KTHINHAR qACTb DaTHNK paCnOLarA1acb npapannelbHO ekpaHny Cnerka kacanaCb cepenHHb OTobpaXaEMORo NO CEHTpy BcNOrO KBaPaTa.
PekomeHnyetc3aФнкspOBaTByCTPOIcTBO C NOMOuBHe6oBbUoro WtATnBa HIN BXODJIeRO B KOMNKeT NOCTaBKn npCnOCOJIeHn.
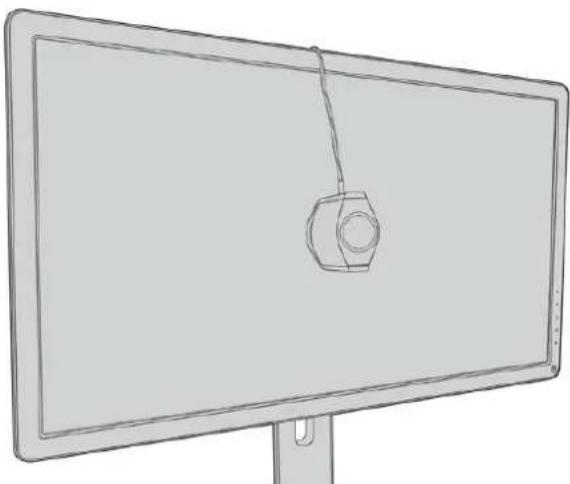
3.11 O6paTnteck K TexHueckm CneuФkaunm MOHITopa N Bb6epnTe ZBeTOBoe npoctpaHCTBO Ccambl BoIbIIM OXBaTOM.B 3abncmOCTn OT npou3BOJNTeR OHO MoKET o6o3HaVaTbCra TAKIMN TePMHaMn, KaK «UInpOKoe» INN «PaCUnpeHHOE». 3To NO3BOJRAET TOHNO IINHOCTbIO OXBaTtB TpexMepHOn LUT-tabIuIeIcneEBo UBeTOBoe npoctpaHCTBO, Bb6paHHe B HactpoIke Color Space.
3.12 OTo6paKaemagBemaTeTc0BaNoIocaNo3BOnJeTaTHKUH3MePnTBcBeTOyUToTEmpeAtpy DnCIIeA.CnMOoBuMeHO MOHTopa Bb6epnte TEmpeatpy,MAKcImaJIbHO 6NI3KyIO K3NaueHHIO 6500K.HakmTe Next,3aTeM-KHONky SET.
3.13HDMI-dncnnne bdyet nokaibaBcny cbeta Iy TecBOB noIocb B Hntax.CnOmoIbMoMeIO MOHTOPa BBepHe HactpoKy fOHOBOn IOCBETKn Nn KOHTpAcTa, MaKcMaJIbHO 6IIN3kyIO K 3NaueHNO 100 Ht dN SDR nn 400 Hnt dN HDR.HaxMnte Next, 3aTeM -KhONky SET.
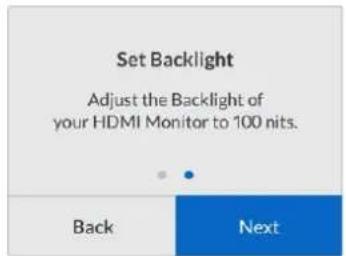
3.14 KorgaHaIcnneKoHBeptepaTeranexMiniSDItoHDMl8KHDR6yTeBbVeJeHocoOeHnE "Calibration Probe Ready",Haxmte Calibrate nKnOnKy SET,HTo6bHaHaTbABToMaTuYeckyU KaIIbOpBky.

3.15 IpoceK kaHbPobK 3aHmaeT 10-15 MnHyT. B aTO BpEeRrHeepuPyETcN H3MepeTcN shIpokn dHaana3OH cBeTOB npi pa3nnhBix 3HaueHnX rpkocT, a pe3yIbTaTbI cOnOCTabJIOTcC onOpHbIM 3HaueHnMn. P O OKoHuaHH KaHbPobK co3daetc 3D LUT-ta6nua N BBODNTc coo6eHne o6 ycneHOM 3aBepseHn DeJCTBn.
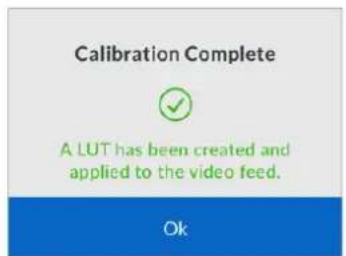
Hajmte KhoNky SET, yTo6bI nepeTn B MeHIO «Kann6pOBAkA>.ДЯ Bo3BpaT a K haayabHoI cTaPAnuCe Haxmte KhoNky MENU.
Co3aHnHa 3D LUT-tabnIa nOyauet oob3naueHne "3DLUT1" n ctaHOBntcdoCTynHoi dna nCnoB30BaHn. Io ymoJuaHIO OHa Ha3bIbaTcRCalibration LUT".
PIMMEAHNE. 3Ta 3D LUT-TaBnua haoiHTcB O BHTpeHHe namrN KOHbepTepa. PekomeHyETc coxpanhtb ee Ha KOMIbOtepe c IMOUBo yTInntbl Blackmagic Teranex Setup. Nopobhee o paote c TpexMepHbIMn LUT-TaBnuaamn cm. pa3dEn «HaCTpoiKn Blackmagic Teranex Setup>.
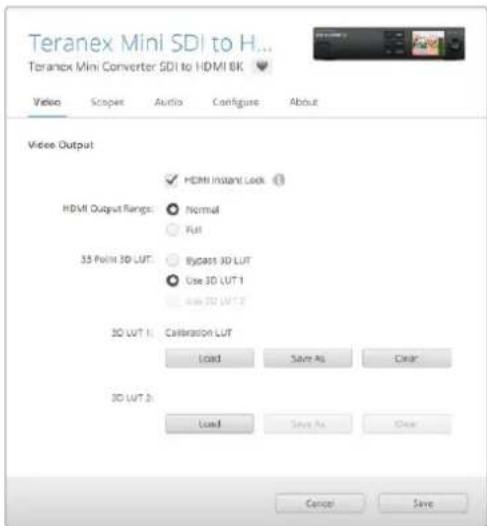
TaBnnaDnKaHbOPOBKnMOHTopoNo yMonHaHIO IMeT o6o3HaueHne "3DLUT1"
HacrtpoKn paHeN ynpaBneHn
Haayabhaa ctpanu aonboaet npocmatpmbahtn06paqene, noctynaoee ha SDI-Bxo, a taKke BbBOHt bHFPOMAUO O fopMaTe N kaDPOBoi Yactote.
KK-dncnnne oecneuBaet doctyn k taKIM rpynnam HacTpoek, kaK Video, Audio Output, Scopes, Network, Color Calibration n Setup. Hxke oncaHa KaKdAa n3 Hnx.
MeHIO Video
MeHIO Video coepknt Hactpokn HDMI Instant Lock n HDMI Output Range. B nepbOM cnyae npn CmeHe nCTOuHikOB cnHaI 6ydt NocTyNaTb Ha HDMI-BbXoD 6e3 nepepbBa, T.e. NOBTOphA yCTaHOBka coedInHeNc npHHMaIOUm yCTpoiCTbOM He BblONHReTc, Bo BTOpOM cnyae CNrHaI, BbIOHMbl uee3 HDMI-nHTepFeic, ocraetcB rpaHuaX yctAHOBHeHHO DnaHaHa.
MeHIO Audio Output
Meio Audio Output no3B0n8 T Bb6paTb Ctepeonapy KaHaoB dIy BbIeJIeHry n3 notoka yctaHOBKn Ix ypOBHei.
MeHIO Scopes
MeHIO Scopes no3B0JAEr Bb6paTb OndHy nIe INnKaTOpHbI eNarPamMbI dIy BbOda NOBepx I3o6paKeHH. MoKHO 3aDAtb 3aTeMHeHne fOHa N uKaJIbI, pa3Mep npacnoLoXeHne 3TNX INCTpyMeHTOB, a TAKKHe IHApKocTB HINbI: fOpMa BOnHbI, BeKTOpOcKON 100%, BeKTOpOcKON 75%, rNCTOrpAmMa, RGBuNN YUV-ducnnie.
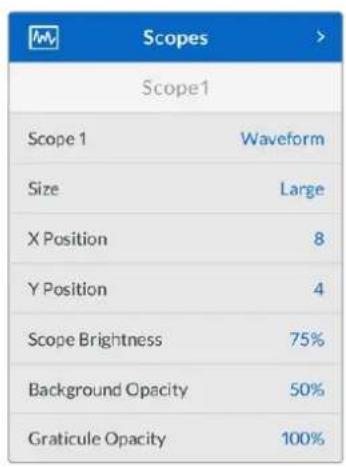
Ipeepnnae noaonre npabotb c temn ke hactpoikamn, kotophe doctynblc nmoouy ytntbl Blackmagic Teranex Setup

MeHIO Network
MeHIO Network no3B0JAEt hAcTpoNTb KOHBePTeP Teranex Mini SDI to HDMI 8K dJa pa6oTB b NokaIbHOI cTeN. DOnOHNteBHyIO INΦopMaUIO oNcNoJIb3OBaHIn Teranex Mini Smart Panel cm. B pa3dene «I3meHeHne cTeBbIX HAcTpoEK'.
Mehio Color Calibration
MeHIO Color Calibration npedHa3NaeHO nIy BbIOnHeHH zBeTobOa KaN6pOBKMOHTopa. NopobHee cm. pa3dE IopraDOK kaN6pOBKMOHTopa
Mehio Setup
MeHIO Setup cnjxnt nla paobtoI co 3ykom. Hactponka Audio Meters no3bOJareT b6npaTb onOpHyo kany dna nmepeHHa ypOBHe: VU -18 dBFS, VU -20 dBFS, PPM -18 dBFS nnPPM -20 dBFS.
Cxema coeHHen Teranex Mini - SDI to HDMI 8K
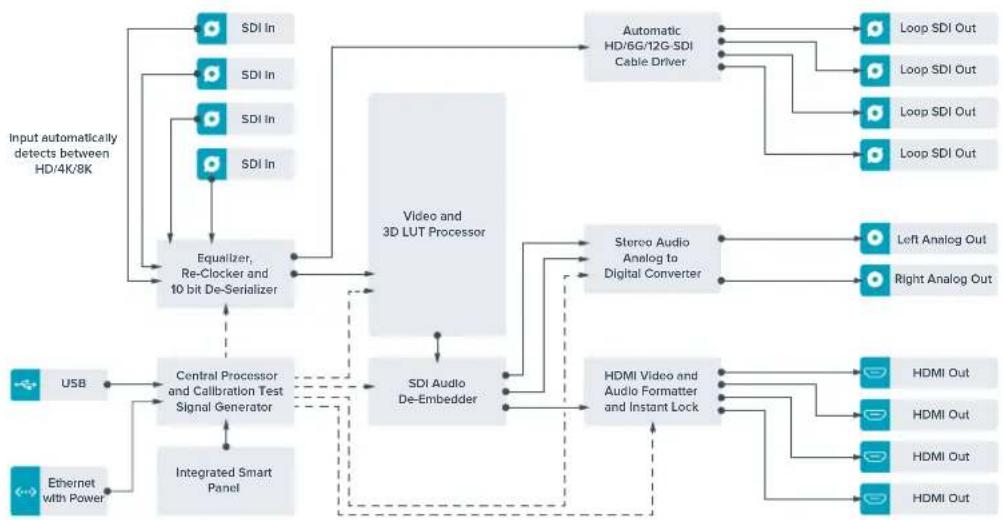
Teranex Mini – IP Video 12G
Iopno6Hee o paOte c moJeBIO Blackmagic Teranex Mini IP Video 12G cm. COOTBeTCTByKUoee pykoBOdCTBO no 3KcNpyaTuIN, KOtOpoe DocTyHNO Ha Be6-caTe www.blackmagicdesign.com/ru/support.
Teranex Mini - SDI to HDMI 12G
3Ta MoDJIb N03BONJAE TByBOINr N3OBpaKeHHe C npOpeccnHaJIbHOro SD-OBOpyOBAHn Ha HDMI-dcnnen n ppoekTopb. KOHBeTep AToMaTnueeckn nepeKIOuAeTc MExNy SD-SDI, HD-SDI, 3G-SDI, 6G-SDI n 12G-SDI Ha BxOe, oEocneuBaN ppeobpazOBaHne B HDMI-cunHan co BCTpoEHbIM 3ByKom, a TaXke BByODIT ayINO Ha banaHChb AES/EBU-nIn anAHOBb BbIXoD, XLR-pa3bEm npaboro KaHana (R ANALOG) MoXHo NaCTpOHTb DnBvBOda TaM-KoDa.
ФункшнHDMI instant lock obecneuBaet nIcToe nepeKIOHe HnHDMI-BbIXOpe npCmeHnCTOHHKOB C OINHaKOBbIM FOpMaTOM BInDeo. Ecn Ha SDI-BxOJ noctynaert cnHnB Ultra HD, a K HDMl-BbIXOy NOkHouen HD-MoHHTOp nI INeBn3Op, 6yJeT AITOMaTueCKn BblONHeHa nONHXaOJIa JOKBepcN. 3TO N0BOLaET npOCMaTpBaTb I3O6paxEHe CBePXBICOKO YEtKocn Ha HD-3KpaHc.
ДяцьETOBооботксгнанаHa BbIXOde moXHO nCNoIb3OBAbTpexMepHbE LUT-taBnUcbl. OHH npedctabJIOT cooM MaTpIcbl Ha oCHObe 33 KoOpDnHaTHbIX ToeK, KOtOpBle no3BOJAIOT Ha annapathom ypoBHe BbINONHЯrMb MaHInyIaun C zuBETOM N pOBODITb KaIIb6PbOBy kblTObIX TeneBn3OpOB neped rpeiINHROM.
C nomoouko 3D LUT-tabnue lyerko BbinoHnhtb npeo6pa3ObaHne ubetoboro npoctpaHCTBa dna pa60tbc pa3HbIMn duCnnneMn.
Teranex Mini - SDI to HDMI 12G IMeET DBe npedyctaHOBnHbE LUT-tabniz: IJn npeo6pa30BaHHu CBETHOIO 3O6paKeHHN B cepHo-6eJe I Jn KOHBPnPOBaHHB Ndeo C kamep Blackmagic B cBeTOBOe npoctpaHCTBO Rec. 709.
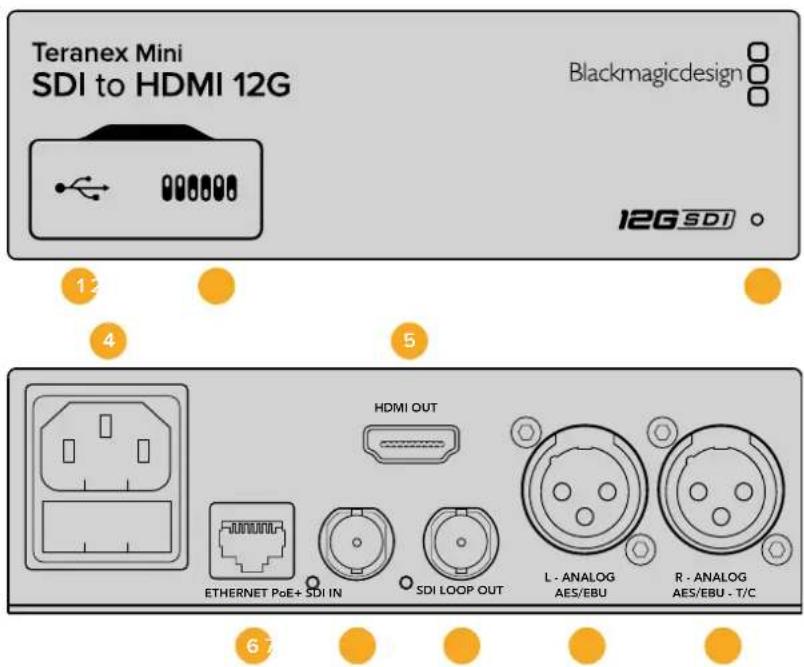
Pa3beMbl
1 Flopt Mini-B USB
IcnoB3yETcIgI I3MeHHeHn HAcTpoE K O6HOBHeHn PpOuINBk Teranex Mini c nOmoBIO yTNiNbI Blackmagic Teranex Setup, yctaHOBHeHNo Ha KOMNbIOTpe C nPaTfOpMoI Mac nn Windows.
2 Pepeknlouatae
HactpanBaemble nepeKluoyateIIN dIy I3MeHeHnHaCtpoeK.
3 CBeToIONoHbI INHdNKaTOP COCTOHHN
TOpNT 6eIbIM CBeTOM npn NpOKnIoyeHm K cTeN n3eNeHbIM CBeTOM npn ObHApYKeHm CnRHaHa.
Pp naBoTe CytuHToB Blackmagic Teranex Setup eTOT INDnKaTOp Mraet, IeHTnΦnCupy BblpaHHb C ee NOMoCbKOHBepTep.
Питане
CtAndapThoe rHe3do IEC C14 nIy noKIOUoyHnK nCTOuHky nepemehoro ToKa 90-240 B.
5 HDMI
BnuDeoBixoH HDMI.
6 Ethernet PoE+
Pa3bEm nIЯ NOIKNIOUeHnK CTeBOMy KOMMByTAtOpy NII NKOMNbIeTpY; IcNoJIb3YeTcR nIaIIMeHHeHn HAcTpoE K cIIMOuBIO yTInIITbI Teranex Setup. Iopr taKxpe obecneuBaET noaay nIITAHn (PoE+).
7 SDIN
BnDoeOBxOg SDIC BNC-pa3bEmOM.
8 SDI LOOP OUT
CkBO3HOB BnDeObblXoJ SDI C BNC-pa3bemOM.
9 L-ANALOG nnn AES/EBU
BanaHcHb ananorobb ayinobbxoJ (neBb KaH) nnnn cnpboa ayinobbxoJ AES/EBUC XLR-pa3beMOM.
10 R-ANALOG,AES/EBU nn Timecode
Baanchb ananorobb aynoobixo (npaBk KaHn) nIu cnpoBo aynoobixo AES/EBUC XLR-pa3bemOM. TaKxe donyckaet BBOD taM-KOda.
Pepeklouatei
Teranex Mini - SDI to HDM1 12G Imeet nepekkuataTei, c nOmoUkoKOTopbIX MOxHO BbOpaTb pa3nHbHe hactpoKn KOHBepcN.
IpeeknouateB8-Analog Audio,AES/EBU Audio
YcTaHOBnTe nepeKIOUATEb 8 B noIOxKeHne OFF (BbIK).TTObI bIBoNDt bOaIaHCHbI aHaIorOBbI 3Byk.ДЯ paBoTBc UΦpObIM AES/EBU-3BykOM BbIePHTe noIOxKeHne ON (BKn.).
IpeeknouateIb 7 - Output Audio/Timecode
YcTaHOBnTe nepeKIOUaTeNb 7 B noJoxeHne ON (BKn.), TTO6bI bIBoNDt TaIM-KoD uepe3 XLR-pa3bEm npaboro aydnoKaHaJa. Ira BbIODa 3Byka Bb6epnte noJoxeHne OFF (BbKn.).
Ipeeknouatei 4,3,2-SDI Audio De-Embed Bit 2,1,0
IpeeknIOuATEEN 4,3 n 2 cooTBeCTByOT 6ntam 2,1 n 0. IcnoNb3yra pa3nnuHbe KOMbHaun ON/OFF nIe peeknIOUATeEN 4,3 n 2, moKHO BbOpaTb, kaKyIO npay aydNOkHaNoB BXoJaero SDI-noToKa BBIOaHTb Ha BbIXoDbHDMI, aHaIorOBoro nn AES/EBU-3Byka.
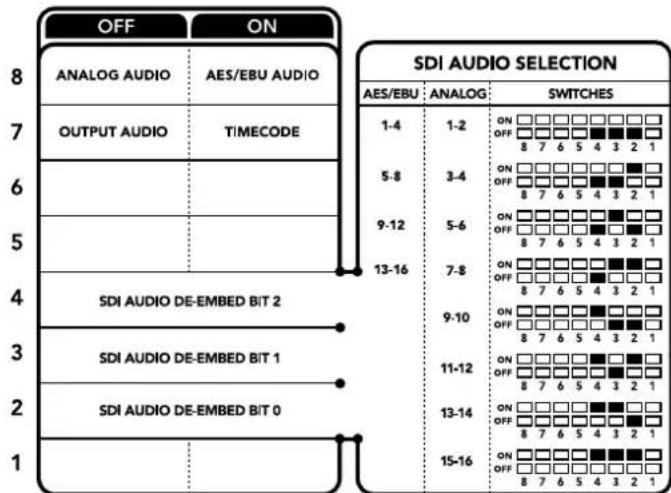
CxemaHa HnXHeH NOBepxHOCTK KopIyCa coJepXIT ONCAHWE HAcTpoek, COOTBCCTByIOUx pa3HbIM NOnOKeCHNm NepeKIOvateLcN
AydnokaHaJIbSI-DcHana
Kombu npy hactpoynnepeknouatele, moxho Bbipabay aynoka Hanb xoadnro SDI-notoka, kotope Teranex Mini - SDI to HDM1 12G bcyet BCTpanBaB CnHn Ha BbxOe.
| Аналоговы щадиоканны | П配电лочател 4 | П配电лочател 3 | П配电лочател 2 | Положения щ配电лочател |
| 1 и 2 OFF OFF | ON OFF 8 7 6 5 4 3 2 1 | |||
| 3 и 4 OFF ON | ON OFF 8 7 6 5 4 3 2 1 | |||
| 5 и 6 OFF ON OFF | ON OFF 8 7 6 5 4 3 2 1 | |||
| 7 и 8 OFF ON OFF | ON OFF 8 7 6 5 4 3 2 1 | |||
| 9 и 10 ON OFF OFF | ON OFF 8 7 6 5 4 3 2 1 | |||
| 11 и 12 ON OFF ON | ON OFF 8 7 6 5 4 3 2 1 | |||
| 13 и 14 ON ON OFF | ON OFF 8 7 6 5 4 3 2 1 | |||
| 15 и 16 ON ON ON | ON OFF 8 7 6 5 4 3 2 1 |
| Аudносаны AES/EBU Пеклочаел 4 Пеклочаел 3 Пеклочаел 2 Плиоженияпеклочаел | ||||
| 1-4 OFF OFF OFF | ON OFF 8 7 6 5 4 3 2 1 | |||
| 5-8 | OFF OFF ON | ON OFF 8 7 6 5 4 3 2 1 | ||
| 9-12 | OFF ON OFF | ON OFF 8 7 6 5 4 3 2 1 | ||
| 13-16 OFF ON ON | ON OFF 8 7 6 5 4 3 2 1 | |||
Hac troponi Blackmagic Teranex Setup
Ytnta Teranex Setup no3B0n8e n3MeHHTb HAcTpoKn, yCTaHaBnBaemble c NOMOuIIO nepekIoUaTeNei, a TaKxe dOnoHHTeNbHbIe npaMeTpbl. Ira doctyna K 3TNm HAcTpoKaM NcNoJIb3yIOT BklaKn Video, Audio, Configure n About.
PaBToC BknaKamn About n Configure onicaHa B pa3dene «IImeHHeHne HactpoeK» daHHoro pykoBOcTb. BknaKa Video dIra Teranex Mini - SDI to HDMI 12G daet BO3MOXHOCTb BblpaTb ONCAHHbIe HIXe ONUIN.
MeHIO Video Output
Clip HDMI output to legal levels
3Ta onu na noBnnae aadantnpoBaB BxoJaun SDI-cnrHn dnn BBBoa uepe3 HDM-nteppeic.
No ymoJauHIO OHa DOnKHa 6bItb BKIOueHa.
HDMI Instant Lock
IocTaBbTe fIaXoK, TTo6bI akTbIbIpaBb cyHKcIIO HDMl instant lock. NocLe 3tOrO daxe npi cMeHe nCTouHKnOB CnHaI bdyet NoctyIaTb Ha HDMl-BbIXoD be3 nepepbBa, T. e. npi BbIOpe n3o6paxhenHa hEkpan HDMl-TeJIeBn3Opa IIN MoHITopa NOBTOPbA yCTaHOBA coEduHEHc pNHHMaIOUIM UCTpoIcTBOM He BblONHJeTC. FyHKsIpaOtaET ToIbKO B Tex CnyaAx, KOrDa BVIDeo I3 NcNoNb3yeMbIX nCTouHKnOB IMeET ODNHaKOBbI CTaHdApT.
KordaФункцнHDMI instant lock actinbupobaHa,Bo3nHKaeT He6oJIbwoe OTCaBaHne 3Byka OT n3OpaKeHH. Ecn Ha BixOJe Heo6xOJMo IMTe bIOnHyIO CnHXPOHn3aCIO BnDeO I ayDIO, CHMNTe fnaok drr 3toi onu.
33 Point 3D LUT
3 CBeToIONoHbI INHdNkATOp COCTOHHa
Fopit 6eIbIM CBeTOM npn NpokKIOueHm K cetn H3eNEbIM CBeTOM npn OOBapyKeHm CnHaHa.
PnpaOte CytINrToB Blackmagic Teranex Setup 3OT INDnKaTOp Mraet, IeHTnФuCypy BbIpaHHbCee NOMoUbKOHBePTeP.
Питане
CTaHdapthoe rHe3do IEC C14 nIy noKIOUOeHnK NcTOuHky nepeMeHHoro ToKa 90-240 B.
5 HDMI
BnneOBxOHDMI.
6 Ethernet PoE+
Pa3bem nIIOKJIoueHnK cTeBOMy KOMMyTaOpTy nI N KOMNbIOTepy, nIIOJIb3yeTcI nI3MeHHeHn HAcTpoE c IIMOuBIO yTuINITbI Blackmagic Teranex Setup. Iopr Takke obecneuBaet noauy nIiHaHn (PoE+).
7 SDI OUT
BndeoBbixoSDIc BNC-pa3beMOM.
8 SDI OUT
DOnonHnTeBbHb BbIXoSDIcBNC-pa3beOM.
9 L - ANALOG nnn AES/EBU
BaanhcBn aHaIorObB ayIOOBxOJ (JeBb KaH) nnu npoB oayIOBxO AES/EBU c XLR-pa3bemOM.
IpeeknouateB8-Analog Audio,AES/EBU Audio
YctahOBtnepeeknIOuateB8NnoIoxeHne OFF(BbIKn.,YTO6bBCTpaNBaTBbaNAHCbHbAnAHOBB 3Byk.IIpa6OtbICnDpOBbIMAES/EBU-3BykomBbIEpTeNoIoxeHneON(BKn.,YTO6bpa6OtaTb C3TMMBXoAMn,peeknIOuateB7doJKeH6bTyCTAHOBHeNBOIOxoeHneON(BKn.)
Ipeeknouateb7-HDMI Audio,Input Audio
YcTaHOBtne nepeKnIOuATEb 7 bnoJooKeHHe OFF (BbIKn.), YTObblncNoJIb3OBA Tb 3ByK, BCTpoEHbI b HDMl-cnIHan. Iyra paBoTb c aHaIoroTObIM nII AES/EBU-ayDIO bIbEepnte noJooKeHHe ON (Bkn).
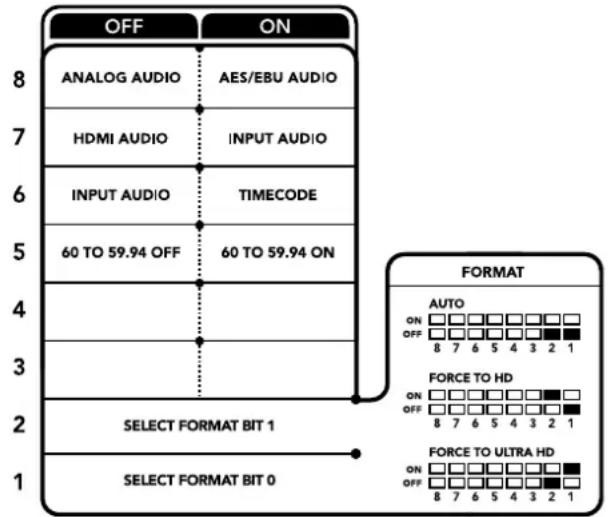
CxemaHa HnKHeH NOBepxHOCTN KOpnyCa cOePxyT ONnCAHHe NaCTPOeK, COOTBeTCTByIOUX pa3HbIM NIOJKeHNrM NpeKlIOuATEne
ПepekIoUaTeIb 6 - Input Audio/Timecode
YcTaHOBnTe nepeKIOUaTeNb 6 B noLoXeHne ON (BKnI. ,uTo6bI noLyuTaT TaIM-KoI uepe3 XLR-pa3bEm npaboro ayNoKaHaHa.ДЯ BBOda 3Byka Bb6epnte noLoXeHne OFF (BbKnI).
Переклочаль 5-60 to 59.94 OFF/ON
Korda BbIbpaHn HAcTpoNkA ON, nIy IIO6paXeHHa n3 HDMI-NCToUHnKa BblOnHHeTcABToMaTHueckoe npoeobpazOBAHne fOpMATA n3 1080p/60 B 1080i (yepecctpoHnpa zepTKa; 59,94 noJ/c).
3a fyHKnma MoKet bbl nOe3Ha npN BbIOpe rpaFNI C KOMNbIOTepa Ha BnDEoMNIkWep. B HeKOtOpbIX cnUyAaX cactota Ha HDMl-BbIXoede coCTabJIeT 60 KaPBOB/c. Korda nepeKeKnUaTeJIb 5 haxOuNTcB nIoXeHm ON, 6ydt co3dAnHO n3O6paXeHne c uactotOn 59,94 non/nc N BbInONHeNo ppeO6paZOBaHne n3 1080p B 1080i.
Ipeeknouateu 2,1-Select Format Bit 1,0
Pn noKnIOueHn HDMI-ntOuHnKa, cnocobHO rBbOaNTb Ultra HD n HD, 3a HactpoKa nomoraet npHynteHbHO nCnoB3OBaTb HyxHyTOeKoCTb. 3Ta onnau MoKeT 6b1b NOte3Ho, KOrda n3o6paKeHne c Komblotepa Heo6xoJMo 3annCaTb nN npocMOTpeTb Ha SDI-obOpdyobAHnn B HD-pa3peWeHHn.
XotnnoyamaBn 3oXnHa nobuiaOuyIO nn noHnkaiouyIO KOHBepCIO,Ha cAmOM deNe KOHBepTe pnpabJreNtOchNky KomAny BbIOaNbBvIeO B Ultra HD nn HD. B aTOM cnUae NOCTynauo CnHnpeadaTcna H bIXo6e3 DononHntelhoro npeo6pa0BaHnra.
IcnoIb3yOnpeJeHnyKoBnHaunuNepeKeKnUaTeJe12,MOxHO Bb6paTb npHyDnteHbHbBbBOd B HD nII Ultra HD nIO abTomatueckoe onpeJeHne ontmAbHorO pa3peHn. Hxke OncaHb BO3MOXHbE BapnaHTb HacTpOkiN.
AUTO - nepeknouateenn 1 n 2 B noonoxeenn OFF (Bbikn.)
KoHBePep aBtOMaTnueckn onpeDeneT onTmAbHoe pa3peWeHne (HD nnn Ultra HD) B 3aBNCIMOCTN OT TexHnuecknx XapaKTePncTnK nctOuHnKa cnHaJa.
- FORCE TO HD - nepekliouateIb 1 B noIoxeHn OFF (BblkI.), nepekliouateIb 2 B noIoxeHn ON (Bkn.)
EcnHDMI-ntouHnK noDepxNbaet BbBnB HD n Ultra HD, KOHBeptep 6ydt nonuatab HD-cunHan.
- FORCE TO ULTRA HD - nepekliouateIb 1 B noIoxeHnn ON (Bkn.), nepekliouateIb 2 B noIoxeHnn OFF (BblKn.).
EcnHDMI-ntouhNk noDepxuBaET BvBOD B HD n Ultra HD, KOHBepTepe 6ydt noNyatab Ultra HD-curhan.
Hac troponi Blackmagic Teranex Setup
Ytnta Teranex Setup n03B0n8ET n3MeHHTb HAcTPOkN, yCTaHaBnBaEmbIe C nOmoIbIe nepeKIOuATEnei, a TAKKe DOnONHITeNBHe IapAmeTpbl. IInr DoCTyNa K 3TmHAcTPOkAM NcNoJIb3yOT BknaKn Video, Audio, Configure n About.
Pabota c BknaKamn About n Configure onicaHa b pa3dene «I3meHHe HacTpoeK» daHHoro pykoBOcTBa.
BklaKa Video Tneranex Mini-HDMI to SDI 12G daet Bo3MOXHOCTb Bb6paTb OINCAHHBe Hnke onu.
MeHIO Video Processing
Conversion
PakpbBaHooeeecmHIO Conversion no3Bolrae Bb6paTb napaMeTpbl pneo6pa3ObaHnHa SDI-Bbxode. Pn HactpoKe Auto konBepTepe onpeEeTeonImalbHoe pa3peSeHne (HD nII Ultra HD) xcXoJa n3 texHuecknx xapaKTepeNtIK nctouHnka cnHana. Pn Bb6ope onuN Force HD nII Force Ultra HD bVdeo 6ydet BBoNTbcR a HD nII Ultra HD cootBeCTBeHHo, HezABncMo ot fOpMaHa HDMI-Bxode. IInr SD pneo6pa3ObaHne He BbONHETc, no3ToMy cHnH coxpaHre nCxOHOe pa3peHne.
Frame Rate
NcnoIb3yETcTolbKp np KOBeptnoBaaHn n3 1080p/60 B 1080i/59,94. Pnp BbOpe 3tofynKuIN BblONHaeTcABTOMaTHueckoe pneobpa3oBaHnE fopMaTa n3 1080p/60 B 1080i/59,94. NocTaBbTe nn CHIMITE pnaK DnB BKIOUeHn INN OTKIOUeHn ETOH NaCTPOKN.
DHaHnA yHKnIy nOle3Ha B Tex clyuayx, KOrda HDMl-ntOuHk 108Op c cactToTOn 60 KaIpoB/c hyXHOIOKJIouHTb K SDI-obOpdyoBaHHIO, INcNoIb3yUoEmy fOpMaT 1080i C cactToTOn 59,94 KaIpa/c.
3G Output
3Ta onu nO3BOJAEHACPTaBbBbIOID CnHaIa 3G-SDI IIN COBMecTUMoCTN O6OpyDobAHmE, KOtOpoe noAepKNaBcE BBoD 3G-SDI ToIbKO KaK Level A nn Nlevel B. No yMonuaHIO nCnoIb3yeTcA onu Level B. DaHhble HAcTpoKn npImeHoiTc TOnbKO npn pa6ote C cnHAnOM 3G-SDI.
BklaKa Audio nra Teranex Mini - HDMI to SDI 12G daet Bo3MOXHOCTb Bb6paTb ONCAHHBe Hnke onuH.
MeHIO Audio Input
Set XLR Input/Set Audio input
3a onu n03B0n8et ha3naatb pa3bem XLR nHDMI nBxOyJeero 3Byka. Ppi nCnoJIb3oBaHHn HactpoKn HDMl ayDIO n3 HDMI-nOToka bdyet BcTpoEHO B SDI-cirHaN Ha BbyXode. HAcTPOKa XLr daET BO3MOXHOCTb Bbipatb BxOD nAanorOBoro 3Byka, AES/EBU nn TaM-KoJa n 3aDaTb KaHaJIb IcxOJaero SDI-cirHana, B KOTOpBie bdyet BcTpoEH 3Byk. TaKke npedymOTpeHa perynipoBa KaYOBH aYdIO.
PnncnoIb3OBAHnHnACrpoKnAES/EBU MoXHO DOnoJIHnTeBHo AKTNBnPoBaTb onuio Sample Rate Converter. B 30m cnYae 3ByK Ha SDI-BbxOe 6ydet HMeTB npHHa H TeNeBnEHN uactoty nckpeTnaun 48 Kt.
Korda Dolby-3byk, noctyanaoum chpe3 pa3bem AES/EBU, cunxpoHn3npyETcno BHeuHemy nctouhky cnHana, onuio Sample Rate Converter hyxho otKnIOHTb. Ecn 3toro He cdenaT, ppeo6pa3oBaHne MOKeT obIb HeKOppeKTHbIM.
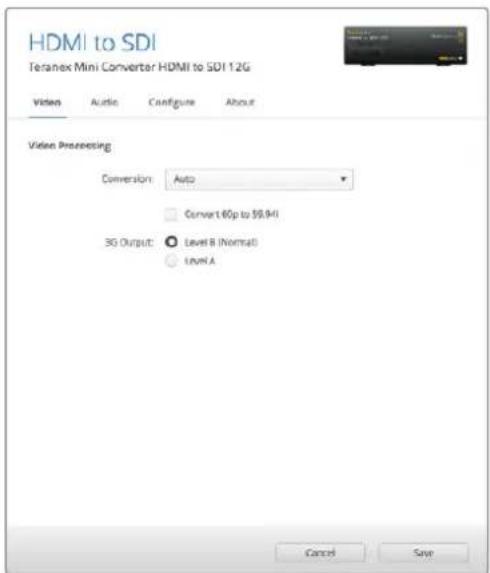
HaCtpoika Conversion Ha BknaKe Video yTuNTb Blackmagic Teranex Setup no3BnraT Bb6paT bOnu Auto, Force to HD nHr Force to Ultra HD. Ecnu cactota HbXode coCTabNRe 60 KaPob/c, eMooHn ppeo6paObaTb B 59,94 kaPa/c nnBaBoDa Ha o6opyDObaHne C NoIepKko CoOTBeCTByUioero foOpMaTa.

IaH3MeHHeYpOBeH aHaIorOBoRo n AES/ EBU-ayno nncnoBbayetc BknaAka Audio
Teranex Mini nCnoB3yET nocnEHH HeaTpoKn He3aBcHMO OT TORO, KaN ux yCTaHOBNI - C NOMOJIIO nepekIouateNei, Smart Panel nn Teranex Setup. Ecn nocne nporpaMMHoro 6OBHeHn napametpoB KOHBepTePa Hn CHrTaN Smart Panel HeoBXoIMo BepHybcra K pyHOn HAcTPOKe, MoXeT notpeboBaTbca NOBTopHaY cTaNHOBA kOrdHbIX nepeKIOUaTeNei.
Hactpoyn Teranex Mini Smart Panel
EcnKOBepTepHDMI to SDI 12G dononHntelho ochaue naneleTo Teranex Mini Smart Panel, Bydt DocTyHb MeHIO Video,Audio N Network, Ix npaMetpy yctaHabnBaOT TAK JKe, kak oncaHO B pa3dene Bblwe.
IOnonHntelHyIO INHOpMaUIO 6NcNoIb3ObaHn Teranex Mini Smart Panel cM. B pa3dene «IImeHeHne HacTpoE» daHHoro pyKOBoDCTBa.
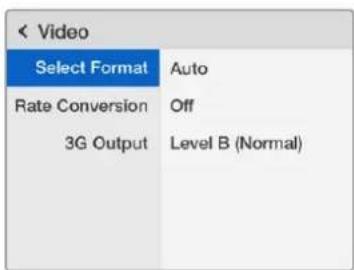
Teranex Mini Smart Panel n ytwnta Blackmagic Teranex Setup oecneuBAoiT doctyn K onHaKOBbIM HacToiKaM KOHBePepa
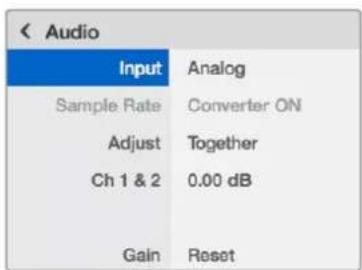
Cxema coeHHen Teranex Mini - HDMI to SDI 12G
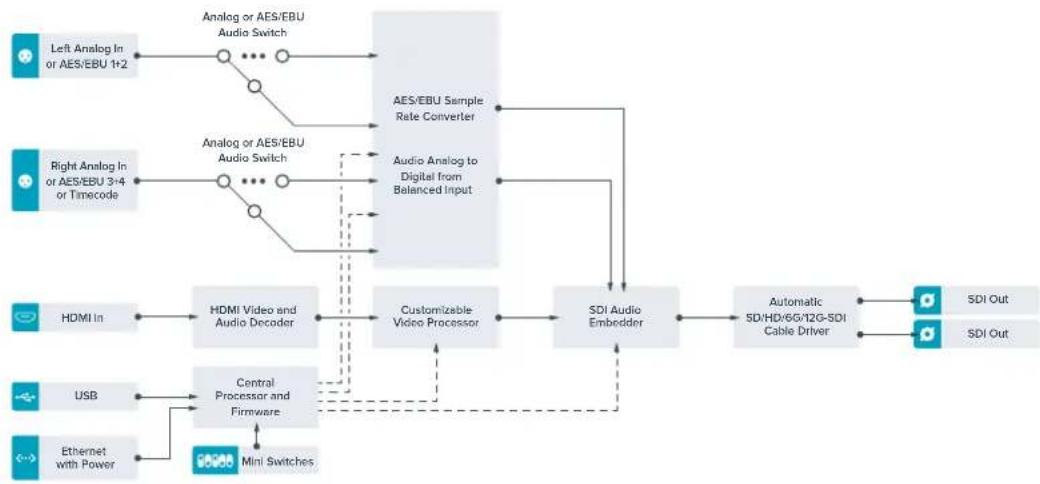
Teranex Mini – SDI to Analog 12G
Ia moJIb BblnoHReI neoobaoBaHHe BXOJxN CnHaIOB SD-SDI, HD-SDI, 3G-SDI, 6G-SDI n12G-SDI dR BbOda BnDeo Ha aHaNoRoBbE BnDeOBbXoDb (KOMnoHeHTbI, NTSC/PAL) n 3Byka Ha 6aIahChb AES/EBU-n aHaNoRoBb ayInoBbXoDb. NOnHKaIOuAa KOHepcra Ha annapathom ypOBHe no3BOJaT npedabTa 12G-SDI-crHaN Ha aHaNoRoBoe SD- n HD-obOpyObaHne, B TOM uCnle Ha Betacam SP n VHS-BndeomarHToΦoHb. TaKke MoXHo BblJeTb napbl ayDnOKaHAnOB n3 16-KaHaNbHor OByka, BcTpoEHHO B SD-noTOK.
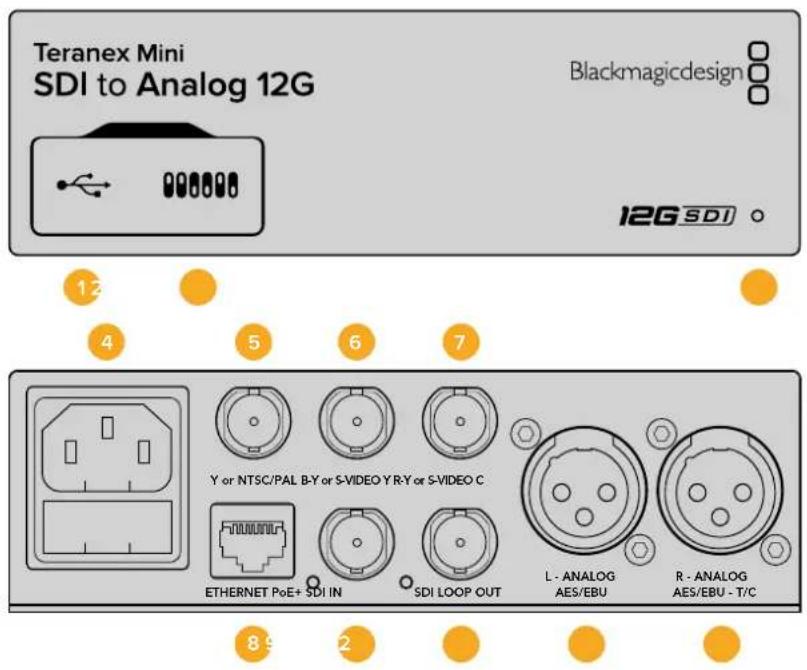
Pa3beMbl
1 Flopt Mini-B USB
IcnoIb3yETcIaI I3MeHHeHn HAcTpoE K OOBHeHn npOoBnKr Teranex Mini c nOmoBIO ytniBtBlackmagic Teranex Setup,yctahOBHeHnHa KOMNbTepe C nIaTfOpMoM Mac nn Windows.
2Ipeeknouatei
HactpanBaemble nepeknouateennIIN3mehenHaCtpoeK.
3 CBeToNDnHbI INHdNkATop COCTOHN
Topnt 6eBtOM npn noKIOueHnn K cETn n 3eneHbIM CBETOM npn oOBapyKeHH CnHaHa.
Pp npabote cytnltoB Blackmagic Teranex Setup 3OT INdkaTOp Miraet, nDEHTnDnpyra BbipahHbC ee nomoubIO KOHBPtep.
4Питаннe
Ctandapthoe tHe3do IEC C14 nIIOKJIIOHEnn K NCTOCHNky IpepeMeHHoro ToKa 90-240 B.
5 Ynn NTSC/PAL
BNC-pa3bem IJI BbIBOda aHaIoroBOrO KOMnOHeHTHOrO (Y) INI KOMnO3HtHOrO (NTSC/PAL) CnHaIOB.
6 B-Y nn S-VIDEO Y
BNC-pa3bemДЯ BbIbOda anHIOROBOKOMnoHETHHO (B-Y) cHana nS-Video (Y).
7 R-Y unu S-VIDEO C
BNC-pa3bemIy BbBOda aHAnorOBoro KOMnoHeHTHO (R-Y) cHana nn S-Video (C).
8 Ethernet PoE+
Pa3bEm nIe npKIOUeHn K cTeBOMy KOMMyTATOpy IIN KOMNbIOTepy; NcONb3yETcIg
I3MeHnHaCTpoEck nOmoBtu yTuNTbBlaCmig Teranex Setup. Ipot Takke oecneuBaet
Iooauy nITAHn (PoE+).
9 SDI IN
BndeobxodSDIC BNC-pa3bemom.
10 SDI LOOP OUT
CkBo3Hoi BnDeoBbIXoJ SDI c BNC-pa3beMOM.
11 L—ANALOG nnn AES/EBU
BanaHcHb anaIorobb ayuIOBbXoD (neBbKaHa) nnu uΦpOBo ayuIOBbXoD AES/EBU c XLR-pa3beMOM.
12 R - ANALOG, AES/EBU Timecode
BanaHcHb ananorobb aynoobbxo (npaBn KaHa) nnn cnpoB aynOBxO AES/EBU C XLR-pa3bemOM. TaKke donyckaet BBOD taM-KoJa.
Pepeknouatei
Teranex Mini - SDI to Analog 12G nmeetnepeKIOUATEJI, c nmoou KOtOpBIX MOXHO BbIpaTb pa3nHbIe HAcTpOIN KOHBepcnn.
IpeeknouateB8-Analog Audio,AES/EBU Audio
YcTaHOBtnepeKIOUATEb8NolOKeHHe OFF(BbIKn.),yTObblbBOIDITbBaIaHCHbI aHaIorOBbI 3ByK, nnON(BKn.)dIraNCnOJIb3OBAHnAES/EBU-BbIXoJa.
IpeeknouateIb 7-7.5IRE,0.0IRE
B CUSA n ctpaHax, nCnoIb3yUOx nCTaHapT NTSC (7.5 Setup), yctaHOBnTe nepeKIOuateJIb 7 B noLoXeHne OFF (BbIK). B cTpaHax, He noDcEpxBaIOx nNoObHb CTaHapT (HaNPmEp, B IIOHn), BB6epHTe noLoXeHne ON (Bkn.). 3Ta HAcTpOka BnReT ToIbKO Ha BbIXoDb KOMN03NTHORO CnHaHa n S-Video.
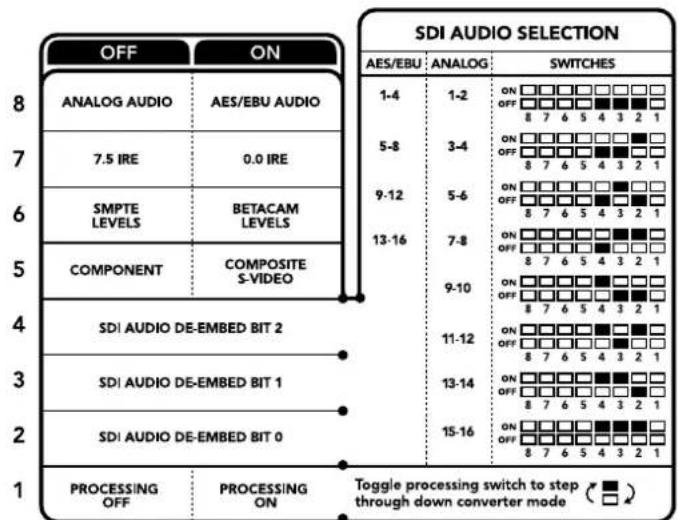
CxemaHa HnKHeH NOBepxHOCTN KOpnyCa CoepxHIT ONCAHHe HAcTpoE, COOTBeCTByIOUx paAHBm IIOJKeHnM IpeKJIouateIeI
IpeeknouateB6-SMPTELevels,BetacamLevels
Дя SMPTE yctahOBITE nepekIIOUaTeB 6 B noLoXeHne OFF (BbIKn.), dЯ Betacam - B noLoXeHne ON (Bkn.). HAnboJe qacTo ypoBeHb CnHaNa yctaHabNbaetcNo cTaHapTy SMPTE, pa6Oty c KOTOpbIM nOdepKINBAOT daxe yctpOYCTBa Betacam SP. HAcTpoKy dЯ Betacam SP cIeDyET bIbipatb NlMb B TOM clyuae, ecIn Bbl YbepeHb, YTO o6OpyDoBaHne nCnoJIb3yET ypoBeHb Betacam.
Ipeeknouateb5-Componentnnn Composite/S-Video
YcTaHOBtTe nepeKIOUaTeIb 5 B noLoXeHne OFF (BbKn.),yTObI bBbOINb BnDeo Ha aHaNoROBbI KOMnoHeHTbI BbIXoI.ДЯ nCOnb3OBAHnKOMnO3NTHOro BbIXoJa nnS-Video yCTaHOBtTe nepeKIOUaTeIb B noLoXeHne ON (Bkn.).
YTo6bBxOaHnHD-cnHaHnocTynHa pa3bemS-Video nI KOMnoTHbBbIXoBΦopMaTe SD, HeoXoIMOBKJIQUHTbNoHHaOuOykoHBepcNIO,yCTaHOVBnepeKIOUATEb1BnIOJOKeHHe ON(BKn). IaKOMnoHEThORo aHaIorOBOro BnDeo NoDaePknBaIoTc HnSD.
Ipeeknouateb1 - Processing Off/Processing On
3TOT nepeknioateIb no3Bolrae n3MeHnB nponopuN KaPra Bo BpEma npeoobpaObaHn 3 Ultra HD nHn HD h BxoDe B SD ha aHaNoROBom BbxOde. Ioo6Hoe npeoobpaObaHne Heo6xOdmo n3-3a pa3Horo cooTHouhenia cToPOh. B Ultra HD n HD oHO coCTaBnAET 16:9, B SD - 4:3.
Ipyem nocneobatebHoro nepeknoeHH moxHO Bb6paTb OndHy n3 Tpex onu: Anamorphic, Center Cut u Letterbox. B nepBOM cnyae n3o6paXeHne 6ydet BbITraHyTo, BO BTOpOM - o6pe3aHo, a B TpeTbeCbepxu cn33y doabnAOTc qepHbIe noLcbl. Ppi kaxdoY yctahOBKe nepeKIOUaTeJIa 1B noLoXeHne ON (Bkn.) BblonHReTc nepexoK K cneDuOe onuIN.
Hactpoika nepeeknouate1 Jaet pa3hny ephiekt B 3aBncmocnt O fopMaTa aHaIorOBoro BIndeo Ha BixOe. Komno3HTbI cRanBaCeTgA Meet SD-pa3peWeHne, no3ToMy B noIOxKeHN OFF (BbIK). IcNoJIb3yETcra nocJeHra onu, Bb6paHHa dna npeobpa3OBAHn nponOpun KaJa. KomnoHeHTbI cRanAnOnyckaet nepedaHy HD-BnDeo, no3ToMy npn noIOxKeHN OFF (BbIK). MoKHO BbINHtB npoeobpaoBaHne n3SD B HD C BbIBODom aHaIorOBoro n3O6paXeHn Ha uPOKn ekpan Bez n3MeHn nponopun KaJa.
AydnokaHaJIbSI-DcHana
KombinyapnHaactpoiknpeeklouatele,MOxHO Bb6pTaB aynoKaHbI SDI-notoka,KoTOpBteRanex Mini -SDI to Analog 12G 6ydt BBODntb Ha aHanoBb IINu cnpobO (AES/EBU) BbxObl.
| Аналоговы щадиоканны | П配电лочател 4 | П配电лочател 3 | П配电лочател 2 | Положения щ配电лочател |
| 1 и 2 OFF OFF | ON OFF 8 7 6 5 4 3 2 1 | |||
| 3 и 4 OFF ON | ON OFF 8 7 6 5 4 3 2 1 | |||
| 5 и 6 OFF ON OFF | ON OFF 8 7 6 5 4 3 2 1 | |||
| 7 и 8 OFF ON ON | ON OFF 8 7 6 5 4 3 2 1 | |||
| 9 и 10 ON OFF OFF | ON OFF 8 7 6 5 4 3 2 1 | |||
| 11 и 12 ON OFF ON | ON OFF 8 7 6 5 4 3 2 1 | |||
| 13 и 14 ON ON OFF | ON OFF 8 7 6 5 4 3 2 1 | |||
| 15 и 16 ON ON ON | ON OFF 8 7 6 5 4 3 2 1 |
| AydinoKaHaJIb AES/EBU Пеклочаел 4 Пеклочаел 3 Пеклочаел 2 Пложениpepeklnочаел | ||||
| 1-4 OFF OFF OFF | ONOFF87654321 | |||
| 5-8 | OFF OFF ON | ONOFF87654321 | ||
| 9-12 | OFF ON OFF | ONOFF87654321 | ||
| 13-16 OFF ON ON | ONOFF87654321 | |||
Hac troponi Blackmagic Teranex Setup
Ytnta Teranex Setup no3B0n8e H3MeHHTb HAcTPOK, YcTaHaBnBaEMbIe C NOMOIO nepeKnIOyateJe, a TAKKe DOnONHITeNbHbIe NapaMeTpbl.
MeHIO Video Processing
3To MeHIO No3B0JAE T BbIpaTb npOpOpuKaJaPa npn BbINOpHeHm noHxKaUeien KOHbpCm. MoKHO nCOnb3OBAbPexMlb Letterbox, Anamorphic, Center Cut nn onuio OFF.
Bknapa Audio Tera Teranex Mini - SDI to Analog 12G daet Bo3moXHOCTb Bb6paTb onncaHHhe Hnke onu.
MeHIO Audio Output
MeHIO no3B0JAE T Bb6paTb BbIXO dIa anAionorOBoro 3Byka, AES/EBU nIITaM-KoJa, a TaKKe 3aDAtb aynokKaHaJIb, KOToPbIE Heo6xOIMo I3BNeu b N3 BxoJeero SDI-cnHaJa. TaKKe MoKHo pErynipobatb ypOBeHb 3Byka Ha BbIXOe.
Teranex Mini nncnolb3yet nocneHnne HactpoKn He3aBNCMO OT TORO, KAK INX yCTaHOBNI - C NOMOIO nepeknoateNe, Smart Panel nn Teranex Setup. Ecnn noce nporpamMHO 6OBNEHnnapameTPOB KOHBepTePa nn ChTNA Smart Panel Heo6xOIMO BepHyTBcK pyHOn HactpoKe, MOKeT notpeboBaTcN NOBTOHPa YctaHOBA kOTdJIbHbIX nepeKIOHATENe,
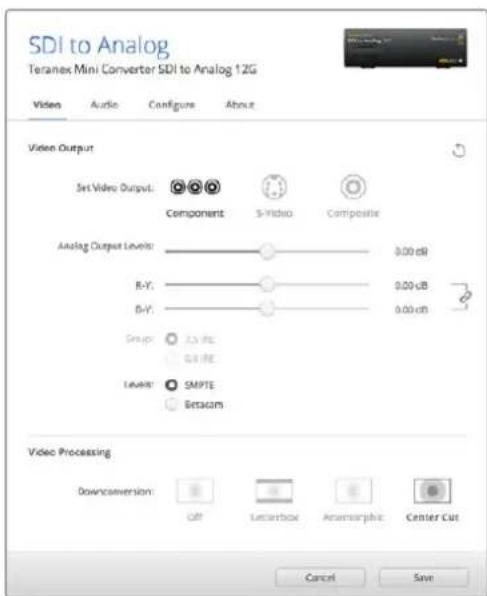
Bkndka Video ytnntb Blackmagic Teranex Setup no3bOJrHacTpanBaTb Rkoctb uBETHOCb n6o TOnbKO uBETHOCb (nla KOMnoHEHTHO CnHana)

IINMHeHn yPbHn aHaNoROrBOr n AES/EBU-aynO nnonb3yertc BknaKa Audio
HacrtpoKn Teranex Mini Smart Panel
Ecnn konheprep SDI to Analog 12G dononHntelho ochaen naHbTo Teranex Mini Smart Panel,dyntocnyhmeio Video,Audio n Network. Ix npametpbI yctaHaBnaIaOT Tak xe,kaK onncAo B pa3dene «Hactpoikn Blackmagic Teranex Setup» bIwe. DononHntelbHyu INΦopMaUIO o6 nCnoB3OBAHH Teranex Mini Smart Panel cm.B pa3dene «N3meHeHne Hactpoek» daHHOro pykoBODCTBa.

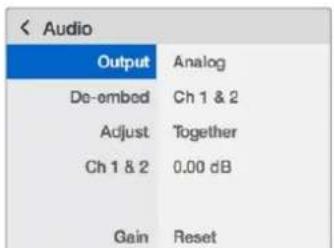
Teranex Mini Smart Panel nywnnta Blackmagic Teranex Setup obecncnBaiot Docyn K OdnHaKOBbM HacTpoiKaM KOHBCPepa
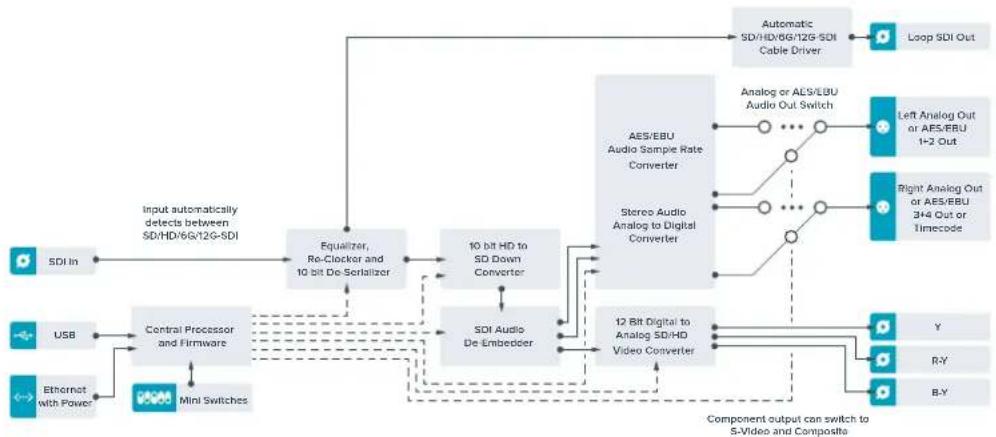
Cxema coeHHeHn Teranex Mini - SDI to Analog 12G
Teranex Mini – Analog to SDI 12G
3a moeIb npoeobpaayet Bndeo n aydno, noctyanoue c ananoroboro oobopyoBaHna (hnapmep, Betacam SP, HDV-kaempeBn irpoBle npictabKn), B cnHaBb SD-SDI, HD-SDI n 12G-SDI. Ira ananorobbix fopMaTOB npedymotpeHb KOMNoeHTBHe INHTepFeuCb S/HD n S-Video, KOMNo3HTBHe BXOdb NTSC n PAL. Ha bixode 12G-SDI B cnHan MoXHO BCTpAnBaTbc NfPpOBoA EAS/EBU-nn ananorobb 3Byk.
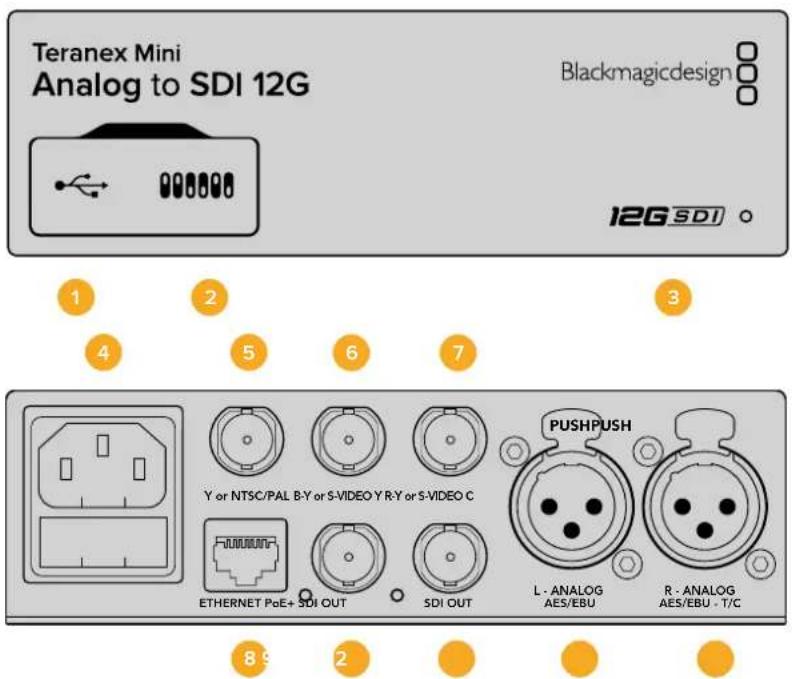
Pa3beMbl
1 Flopt Mini-B USB
VcnoIb3yETcra nnaHnmeHnHaCTpOeK n 6OBHbEnHn npouNkN Teranex Mini c nomoubIO yTINITBI Teranex Setup,ycTaHOBJIeHHoH Na KOMNbTepe C nlatfOpmoM Mac nn Windows.
2 NepekeKIOUaTeN
HactpanBaemble npeKIOUaTeIINJNIMHeHnHaCtpoeK.
3 CBeToIONoHbI INHdNkATOp COCTOHHa
Topit 6eIbIM CBeTOM npn NpokKIOueHm K cetn H3eneHbIM CBeTOM npn OOBapyKeHm CnHaHa.
PnpaBote c cytINrToB Blackmagic Teranex Setup eTOT INDnKaTOp Mraet, ndeHTnFncupy BblpaHHb C ee NMOUbKOHBepTeP.
4ПИТAHme
CtAndapThoe THe3do IEC C14 nIy nookJIOUOeHnK INCTouHnky nepemehHoro ToKa 90-240 B.
5 Ynnn NTSC/PAL
BNC-pa3bem nIy BxOJaIero aHaIorOBoro KOMnoHeHTHOrO (Y) IIN KOMnO3HTHOrO (NTSC/PAL) CnHAnOB.
6 B-Y nnn S-VIDEO Y
BNC-pa3bemДлЯ BXOДЯЦero anHOroBOrO KOMNoHENTHO (B-Y) cHana nS-Video (Y).
7 R-Y mnn S-VIDEO C
BNC-pa3bem nIy BxOJaIero aHaIorOBoro KOMNoHENTHO (R-Y) cHana nn S-Video (C).
8 Ethernet PoE+
Pa3bEm nIЯ NOdkIkyehnK CcTeBOMy KOMMyTaTOpy IIN KOMNbItepy, NcNoJIb3yeTcI yIaIeHHeHnaCTpoek c noMoUbIO yTuInuBl Blackmagic Teranex Setup. Iopr taKke obecneuBaet noDaay nITaHn (PoE+).
9 SDI OUT
BndeoBbixoSDIcBNC-pa3beMOM.
10 SDI OUT
BnneOBbIXoSDIc BNC-pa3beMOM.
11 L - ANALOG nnn AES/EBU
Baanchb aHaonobb aynoBxOa (neBb KaH) nnu npoB aynOBxOd AES/EBU c XLR-pa3bemOM.
IpeeknouateIb 8-Analog Audio, AES/EBU Audio
YctahOBtte nepeKIOUATEb 8 B noIOxKeHne OFF (BbIKn.), qTO6b bIbpaTb baIaHcHb aHaIorOBbI 3Byk, nn ON (Bkn.) drr nCnoNb3ObaHnA AES/EBU-BxoJa.
IpeeknouateIb 7-7.5IRE,0.0IRE
B CIIA n ctpaHax, nCnoIb3yIOxix cTAndapt NTSC (7.5 Setup), yCTaHOBtne nepeKIOuATEnb 7 B noLOXeHne OFF (BbIKn.). B cTpaHax, He noDcEPXBAIOxix nOIO6bH b TcHdapt, BbIEpnte noLOXeHne ON (Bkn.). 3Ta HAcTpOka BnIeTe TOnbKO Ha BbIXoDb KOMIO3NTHOrO CnIHana N S-Video (NTSC).
IpeeknouateB6-SMPTELevels,BetacamLevels
3a HactpoKa no3Bolraet nCnoB3oBaTb DBe onu: SMPTE uN Betacam. DnSMPTE yCTaHOBtne nepeKIOUATEb 6 B nOIOKeHne OFF (BbIKI), dNBAcam - B nOIOKeHne ON (BKn). Han6oJee cAto ypOBeH cnHaHa ycTaHaBnBaETcNo CTaHApTy SMPTE, paOToC KOTOpbIM NOdEpxJBaOT MHOrJe yCTPOCTBa Betacam SP. HAcTPOky dNBAcacam SP cNeDyET bIbipatb NmB B TOM CNYae, ecN Bbl yBepHe, tO o6OpydoBaHne nCnoB3yET ypOBeH Betacam.
IpekeKIOUaTeB 5 - Component nn Composite/S-Video
YcTaHOBtTe nepeKIOuATeNb 5 B noLoXeHne OFF (BbIKn.), yTO6bI BbIpaTb aHaIoroBbI KOMnoHEHTbI BxOJ. DnBa BbIbopa KOMNo3HTHO BxOJa N S-Video ycTaHOBtTe nepeKIOuATeNb B noLoXeHne ON (BKn.).
IpeeknouateIb 4 - Composite, S-Video
YctaHOBtne nepeKIOUATeNB 4 B noLOXeHNE OFF (BbIK.) dIra BBIOpa KOMno3nTHoro BmDEOBxOJa. YTO6bI cINH nocTynan ha pa3bem S-Video, yCTaHOBtne nepeKIOUATeNB noLOXeHNE ON (BKn.).
IpeeknouateB 3 - SD to HD
YcTaHOBtnepeKIOUaTeIb3BnoOKeHHeON(BkN.),yTObHaSDI-BbIXOeBbINnHrTbNOBbIaUoUo KOHBepcnIO n3 SD B HD, KOrdaHa KOMNo3HTbI, KOMNoHEThbI INn S-Video-BXoDbI noCTynae T SD-CnrHan. YcTaHOBtnepeKIOUaTeIbBnoOKeHHe OFF(BbIKn.),yTObClNRHaJIbHa BbIXOeN BxOe IMeiOnDAHakOBoe pa3peSeHHe.
IpeeknoyateIb 2-HD to UHD
YcTaHOBnTe nepeKlIOuATEb 2 B noLoXeHne ON (BKn.), TTo6bHa SDI-BbIXOe BInOnHrTb nobblauOyIO KOHBepCnIO B Ultra HD, KOrda Ha KOMNoHEnTHbI BxOd nocTynaET HD-cnHaN. YcTaHOBnTe nepeKlIOuATe b B noLoXeHne OFF (BbKn.), TTo6bCaHNaIb Ha BbIXOe N BxOde ImEn OdnHaKOBoe pa3peSeHne.
Ipeeknouateb1-Input Audio/Timecode
YcTaHOBtTe nepeKIOUaTeIb 1B noLoXeHne ON (BkN.), YTO6bI nOlyaTb TaIM-KoI uepe3 XLR-pa3bEm npaboro ayDnOKaHaHa. Iy BBOda 3Byka BbIepuTe noLoXeHne OFF (BbIK).
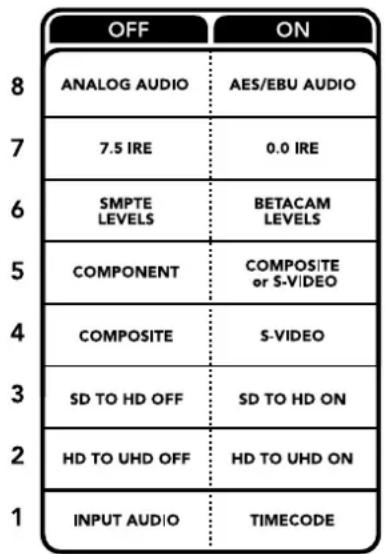
CxemaHaHnKHe CTopoHE Teranex Mini coepknt onncahne Hactpoek, COOTBeTCTByUOx pa3hBM nnoKeHNrM nepeKnouateNe
Hac troponi Blackmagic Teranex Setup
Ytnta Teranex Setup no3B0nReT n3MeHnTB hactpoyn, yCTaHABnBaembIe c nMOUBo nepeKIOuAtenei, a TAKKe dONoHNHTeNBHe npaMetpbl.
Длд дocупк STIMннсгpoikam nCnOlbayot BKladkn Video, Audio, Configure n About.
Pabota c Bklaqamn About n Configure onicaHa B pa3dene «IImeHHe HAcTpoE» daHHoro pyKOBOcTBa.
BknaKa Video nra Teranex Mini Analog to SDI 12G daet Bo3MOXKHOCTb Bb6paTb ONcaHbIe Hnke OOnm.
MeHIO Video Input
3TO MEHOIO3BOJAREBbIbpaTb BnDEOBXOD (KOMIOHEHTHbI, S-Video NIN KOMIO3NTHbI), a TAKKe HAcTPONTbApKoCTbNcBeTHOCTb, ypoBH N B-Y N R-Y KOMIOHEHTHO CnHana.
PnncnoIb3oBaHnS-Video nnn KOMIO3HTHO BXOa MoXHO DNOJHNTeJIbHO yCTaHOBt bypOBHe b cepHoro (7.5IRE nnn 0.0IRE) B 3abNCMOCTn OT BaWero perNoHa.
Komnoenthoe Bndeo no3B0nrae T bIpaTb ypoBeH cnHana no cTnAmpTy SMPTE nN Betacam. Hanboonee qacto ypoBeH cnHana yctaHaBnBaetcnao cTnAmpTy SMPTE,paoty cKOTOpBM noepkBAOT daKe ycTpoiCtBa Betacam SP.HacptpoKy dJa Betacam SP cneJyET bIbnpaTb NnBb TOM cnUyae,ecn Bbl yBpeHb, YTO oObpoyDobAHne nCnOlb3yEt ypoBeH Betacam.
MeHIO Video Processing
3TO MEHOIOBONHET BbIbnpaTb npametpbKoHBPcNnB 3abNCMOnCTNOT NCNOJIb3yEMOrO aHaIIOBOBOBxOJa.EcnCnHnNoctynaet Ha KOMnoHeHThBxOD,MOXHO BblonHtB pneobpa0BaHne n3 SD B HD n3 HD B Ultra HD.Korda CnHn Noctynaet Ha pa3bem S-Video IIN KOMno3HTbBxOd,doCTynHa KOHBPcNnToNbKO n3 SD B HD.
Bknapa Audio nTeranex Mini Analog to SDI 12G daet BO3MOXHOCTb Bb6paTb onncaHHbE Hnke onu.
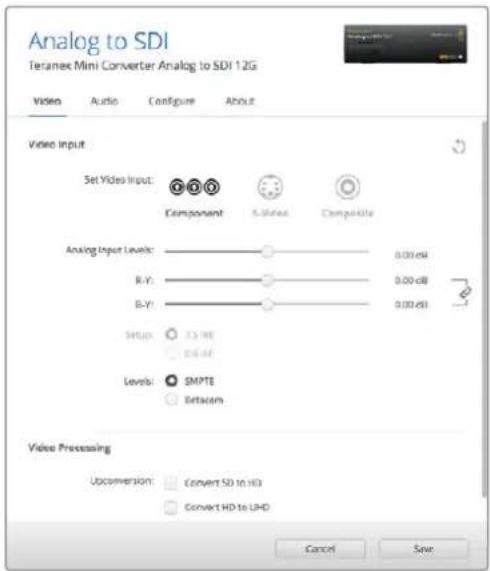
Bkna Video ytnnbl Blackmagic Teranex Setup noaBoniet HactpanBaT npKocb u BteHoctb nbo Tohko BteHoctb (nna KOMnoHeTHoro CunHana)
IaHnmeHnryyPbHeaHaIorOBOr nAES/ EBU-ayno nncnolbaeyetc BknaAka Audio
MeHIO Audio Input
MeHIO no3BONrE T Bb6paTb BXoI aHaIorOBO r 3Byka, AES/EBU nI TaM-KoJa n 3aIaTb KaHaIbI nCxOJaIero SDI-cnHana, B KOTOpIe 6ydt BcTpoEn 3Byk. TaKxe npedymotpeHa perynpobKa ypOBHryaNo.
Pn nCnoB3oBaHn HAcTpoKn AES/EBU MoXHO DOnoHInTeIbHo aKTHBnPoBaTb onuio Sample Rate Converter. Pn BbOpe 3toon onuHa SDI-BbIXode yactota dNckpeTnau 3Byka bytet coCTaBnTb 48 K, pa3pndoc7b 24 6nt.
Teranex Mini nCnoB3ayet noCneHnE HactpoKn He3aBcMmo OT TORO, KaN x yctaHOBNI - C NOMOIO nepekIouateNei, Smart Panel nn Teranex Setup. Ecn noCne nporpaMMHOro oBHOENrnapaETPOB KOHBepTePa nn ChTnR Smart Panel HeobxOAnMo BepHybC K pyHOn HactpoKe, MoKeT notpe6oBaTbcN NOBTOpHaY yCTaHOBA kOteNbHbIX nepeKIOUaTeNei.
HacrtpoKn Teranex Mini Smart Panel
Ecnn KOnBepTep Analog to SDI 12G dononHntelbHO ochaueh naHelenbTO Teranex Mini Smart Panel, oydtocnynHb MeHIO Video, Audio n Network. Nx npametpb yctahabnaioTak xe, kak onncAo B pa3dene «HactpoiKn Blackmagic Teranex Setup» bblse.
IOnoHnTeBHyO INΦopMauio 6NcNoJIb3OBaHm Teranex Mini Smart Panel cm. B pa3dene «IImeHHe HAcTpoE» DaHHoro pyKOBoCTBa.
Teranex Mini Smart Panel uyttna Blackmagic Teranex Setup oecncuBAoiT doTyk OOnHaKOBbIM HAcTpoiKaM KOHBePepa
Схета се闺ену Teranex Mini - Analog to SDI 12G
Teranex Mini - SDI to Audio 12G
3aMoDJIbNoBONrEt BIDeJIb 3ByK nIIOBOrSDI-BnDeo N BbIBOHTb erO uepe3 IBa KaHana aHaIorOBoro nIu Yetbipe KaHana Ucnpoboro AES/EBU-BbIXoJa. KoHBeTep dOnyckaet nepedauy 3ByKa Ha TAKoe ayuNooOpdyOBaHne, KaMkUePbI, aHaIorOBblE KeN N KOHTpOJIbHbIe MOHITOpbl.
IyBbIeHnHa3 SDI-nOToka DOnoHnTeBbX KaHAnOB 3ByKa MoXHO nCNoB3OaTb eue OdNH KOHeptep Teranex Mini SDI to Audio 12G, noKJIoueHHbIK SDI-BbIXOy c NOMOsbIO nocJeobatelhoro coeHNHeH.
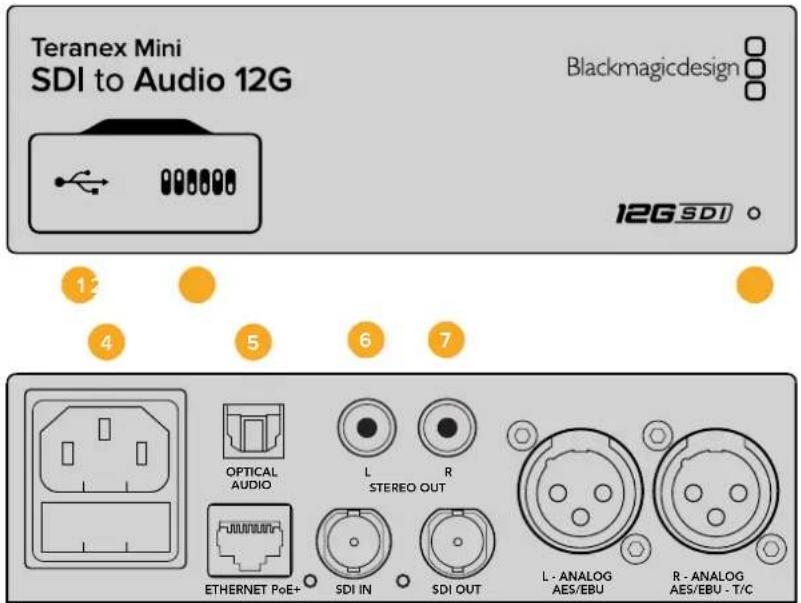


Pa3beMbl
1 Flopt Mini-B USB
IcnoB3yETc dIg IImMeHHeN HAcTpoE K O6HOBHeNHa PpOuBKn Teranex Mini c nOmoBIO yTnNTbI Teranex Setup, yCTaHOBHeHHo Ha KOMNbTepe C nlatΦopMo Mac nn Windows.
2 Pepeknlouataelen
HactpaBaaemblpepeekkuateIINI IN3MeHeHHaCTpoeK.
3 CBeToDnOaHbI INHdNkAToP cOCToHHNIA
Topnt 6eIbIM CBeTOM npn NpokKIOueHm K cTeN 3eNEbIM CBeTOM npn OOBaHpyKeHm CnHaHa.
Pnp paOte C cytINrToB Blackmagic Teranex Setup 3OT INDnKaTOp Mraet, IeHTnФuCypr BbIpaHHbI C ee NOMOsbKOHBepTep.
4 Ntahme
Ctahapthoe rHe3do IEC C14 nnoKIOUeHnK NCTOuHnky npemeHHoro ToKa 90-240 B.
5 Ontnueckn aydnoBbIXoS/PDIF
CunHan S/PDIF uepe3 pa3bem TOSLINK
6 L-He6aHcHbI aHaIorOBbI ayDIOBbIXoHi-Fi (JInHeHbI cRHaJI)
RCA-pa3bem He6aHaHcHoro ayuIOBbIXOda (NeBbI KaHaJI).
7 R-He6aHaHcBb anAionoBb yadnoobxO Hi-Fi (nHneHbCnHn)
RCA-pa3bEm He6baHcHOro aydnoOBbxOJa (npaBbKaHaJI).
8 Ethernet PoE+
Pa3bEm nIЯ noKIOUeHnK CTeBOMy KOMMyTaOpTy IIN KOMNbIeTpPy, IcNoJIb3yEtCЯ nI3MeHHeHn HAcTpoek C nomOu yTuInIbI Blackmagic Teranex Setup. Iopr taKxe obecneHbaet noaay nIiTaHn (PoE).
9 SDIN
BndeobxoadSDICBCN-pa3beomM.
10 SDI LOOP OUT
CKBO3HOI BnDeOBbIXoD SDI c BNC-pa3beMOM.
11 L-ANALOG nnn AES/EBU
BanaHcHb anaIorobb ayuIOBbIXoJ (neBb KaHaI) nnuΦpOBo ayuIOBbIXoJ AES/EBU c XLR-pa3bemOM.
12 R - ANALOG, AES/EBU ул Timecode
BanaHcHb anaIorobb ayinobixoD (npabb KaHa) nIu cIpboa oy aynOBbxOd AES/EBUC XLR-pa3bemOM. TaKke donyckaet BbBOd taM-KoJa.
Pepeknloatei
Teranex Mini SDI to Audio 12G IMeET npeeklouatei, c nOMOuKoTOpbIX MOXHO BbOpaTB pa3nHbIE NaCTPOKN KOHbpCNI.
IpeeknouateB8-Analog Audio,AES/EBU Audio
YcTaHOBnTe nepeKIOUATEb 8 nIonoXeHne OFF (BbIKn.), cyOb bBbIOHT b aHaONBOy 3Byk, INN ON (BKn.) dIa IcNoJIb3OBaHnIuΦpOBOr AOES/EBU-BbIXOa.
Ipeeknouateb7-Output Audio/Timecode
YcTaHOBInTe nepeKIOUaTeNb 7 B noLoXeHne ON (BKn.), YTO6bI BbIOuNTb TaM-KoD uepe3 XLR-pa3bEm npaboro aydnokahala.ДЯ BbIOda 3Byka Bb6epnte noLoXeHne OFF (BbKn.).
Ipeeknouatei 6,5,4-SDI Audio De-Embed Bit 2,1,0
Ipeeknloquatenn6,5n4cooBtctByot 6ntam2,1n0.IcnoJIb3yra pa3nnuHbe KOMbuHaun ON/OFF nI nepeklnouqatenn6,5n4,MoJHO BbIpaTb,KaKHe ayDnokaHaIb IbxOJaUero SDI-nOTOKa BbIeJeTb nI BbBOda Ha ayDNOBbXOD.

CxemaHaHnKHeNoBepXHOCTN KOpnyCa codepKNt ONnCAHne HAcTpoek, COOTBeCTBykUcNx pa3HbIM nOIOKeHNm NpeKKnOaTeNe
BbIeHHe 3Byka n3 SDI-nOToka
| Аналоговы щадиоканны | П配电лочател 6 | П配电лочател 5 | П配电лочател 4 | Положения п配电лочател |
| 1-2 OFF OFF | ONOFF87654321 | |||
| 3-4 OFF ON | ONOFF87654321 | |||
| 5-6 OFF ON OFF | ONOFF87654321 | |||
| 7-8 OFF ON ON | ONOFF87654321 | |||
| 9-10 ON OFF OFF | ONOFF87654321 | |||
| 11-12 ON OFF ON | ONOFF87654321 | |||
| 13-14 ON ON OFF | ONOFF87654321 | |||
| 15-16 ON ON ON | ONOFF87654321 |
| Аudноданы AES/EBU Пеклоча Temple 6 Пеклоча Temple 5 Пеклоча Temple 4 Побъенипеклоча Temple | |||
| 1-4 | OFF OFF OFF | ||
| 5-8 | OFF OFF ON | ||
| 9-12 OFF ON | OFF | ||
| 13-16 | OFF ON ON | ||
Hac troponi Blackmagic Teranex Setup
Ytnta Teranex Setup no3B0n8et n3MeHnTB HacptpOKn, yctahabnBaemble c nomoubIO nepekIouateNe, a TAKKe dONoHnTeNbIe npaMetpy.
Длд дocунктим Habcpoikam IncnoIb3yOT BknaKn Audio, Configure n About.
Pabota c Bklaikamn About n Configure onicaHa b pa3ene «I3meHHe HactpoeK» daHHoro pykoBODCTBa.
Bknaika Audio Дя Teranex Mini SDI to Audio 12G Даet BO3MOXKHOCTb BbIOpaTb ONICAHHbE Hnke ONTIN.
MeHIO Audio Output
MeHIO NO3BOJRE Bb6paT bBIXO IIN aHaIorOBoro 3Byka, AES/EBU nn TaM-KoJa, a TaKKe 3aIaTb ayDnOKaHaJIb, KOtOpBie Heo6xOIMo nBLeuY n3 BxoJrero SDI-cirHana. TaKKe MoXHO peryInpoBaTb yPOBeH 3ByKa Ha BbIXOJe.
Teranex Mini nCnoB3yET nocneHHe HactpoKn He3aBcMIO OTTO, Ka Kx yctaHOBNI - C NOMObI nepekIoUaTeNe, Smart Panel nn Teranex Setup. Ecn nocne nporpaMMHOro 6OBHeHnnapaMeTpO BONBePepa nn ChTna Smart Panel Heo6xoDmIO BepHyTBcK pyHOn HactpoKe, Moket notpe6oBaTbcN NOBtOpHaY cTaHOBA kOteNbHbIX nepeKIOuAteNe.
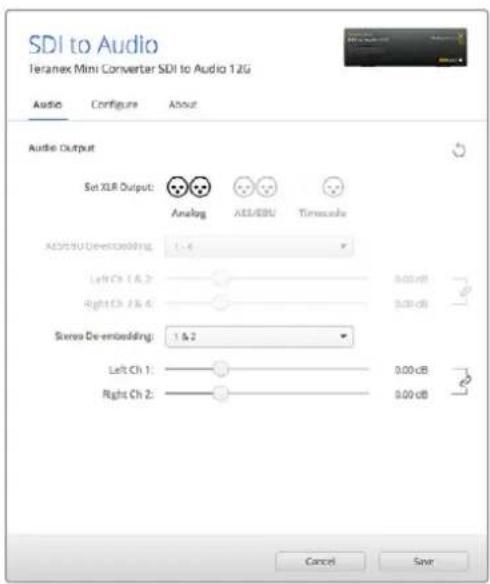
IaHMeHeHn yOBeH aHaNoRoBOro n AES/EBU-aynIOncNbEyerck BknaJaAioyTuNtBlkMaigcTeranex Setup
Hactpoikn Teranex Mini Smart Panel
Ecnn konbeprep SDI to Audio 12G dononHntelbno ochuen naHelenToeranex Mini Smart Panel,dyuTdoctyHbMeHIO Audio n Network. Ix npaametpbI yctahabnaBAt TAK JKe, KaK onucaHO B pa3dene «HactpoiKn Blackmagic Teranex Setup» BblSe. DononHntelbHyu HnFopMaqUO oNcNoB3OBAHIN Teranex Mini Smart Panel cm. B pa3dene «N3meHeHne HactpoeK» daHHoro pykoBOCTBa.
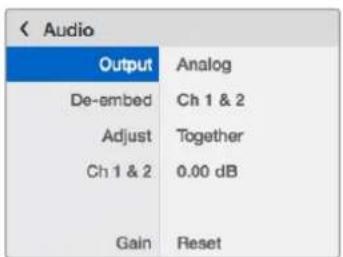
Teranex Mini Smart Panel n ytnnta Blackmagic Teranex Setup oecneuBAoiT doTyN K OdnHaKOBoBm HactpoiKaM KOHBePTepa
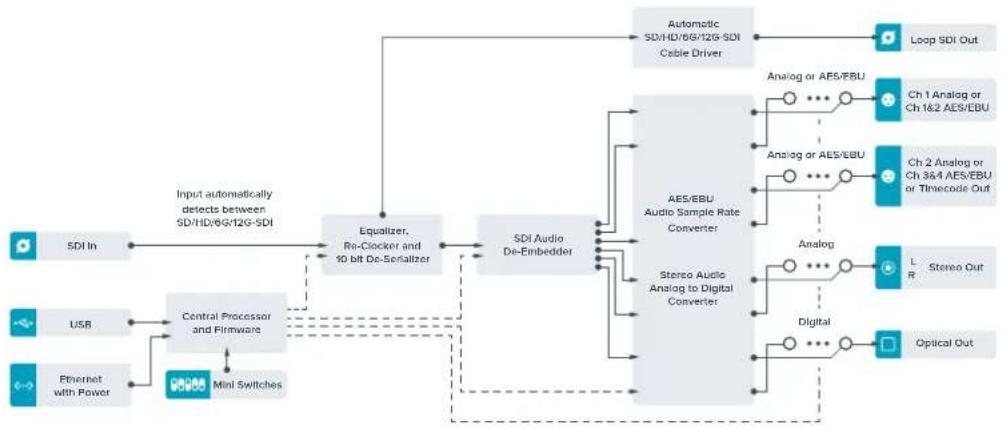
Cxema coeHHen Teranex Mini - SDI to Audio 12G
Teranex Mini – Audio to SDI 12G
3a moenb konhepepa noBONnet BCTpanBaT Da KaHana aHaIoroBO rnn yetbipe kaHana
uΦporo AES/EBU-aynoB nIOOe SDI-BnDc. C nomoubTo Teranex Mini 3Byk, noyueHHb c Mnkpepa
n aHaIorOBn deKn, bET BkNoueH B BnDeocnHaN SDI dner nepeaHn Ha SDI-KOMMyTaOpbl n deKn.
JnBCTpanBaHn B SDI-nOTOK DOnonHnTeNbHbX 3ByKOBbX KaHAnOB MoxHO nCOnb3OBaT eEne OdnH
koHeptep Teranex Mini Audio to SDI 12G, noKnIOueHHb K SDI-BbIXOy c NmOouBo nocJeobatbHoro
coeHNHeHn.

89
2
Pa3beMbl
1 Nopt Mini-B USB
NcnoB3yETcIgI N3MeHHeHn HAcTpoE K O6HOBHeHH npOuINBk Teranex Mini c NOMouBIO yTNInTbI Blackmagic Teranex Setup, yCTaHOBHeHHo HA KOMNbHOtepe C nlatpOpMoM Mac nn Windows.
2 PepeknlouataTei
HactpanBaemble nepeknouateennIy n3MeHeHHaCtpoeK.
3 CBetOIOHbI INHdkATOp COCTOAHNIA
TOpNT 6eJIbIM CBeTOM npn NpOdkIIOUeHmN K cETn H3eNEbIM CBeTOM npn OOBaHpyKeHm CnIHana.
PnpaBote c cytINrToB Blackmagic Teranex Setup aTOT nHdNKaTOp mraet, nJeHTnФuCy py BblpaHHbC ce IIMOoubKOHBeptep.
4Питане
CtAndapThoe rHe3do IEC C14 nIy noKIOUOeHnK INCTouHnky nepemehHoro ToKa 90-240 B.
5 OnTnueckn aydnOBxoS/PDIF
Cirhan S/PDIF uepe3 pa3bem TOSLINK
6 L-He6aHaHcHbI aHaIorOBbI ayDnOBxOJ HI-Fl (InneHbI cnRHaI)
RCA-pa3bem He6baHcHOro ayuINOBxOda (neBbI KaHaI).
7 R—He6aHaHcHbI aHaIorObIy aydnoBxOJ HI-Fl (nHHeHbI cRHaJI)
RCA-pa3bEm He6aHaHcHOro aydnoBxOJa (npaBbI KaHaJI).
8 Ethernet PoE+
Pa3bEm nIЯ noIckIoUeHnI K cTeBOMy KOMMyTaTOpY IIN KOMNbIOTepy, IcNoIb3yeTcIЯ nI3MeHHeHn HAcTpoEck NOMOu yTuInuBi Blackmagic Teranex Setup. Iopr TAKKe oBeceNeuBaet noaay niTaHnI (PoE).
9 SDIN
BnDoeOBxOaSDcBNC-pa3bEMOM.
10 SDI OUT
BndeobbixoSDICBCN-pa3bemom.
11 L-ANALOG nn AES/EBU
BanaHcHb aHaIorObI ayIOOBxOJ (JIeBb KaHaI) nnu cIuΦpOoi ayIOOBxOJ AES/EBU C XLR-pa3beMOM.
12 R - ANALOG, AES/EBU nn Timecode
BanaHcHbI anaIorOBbI ayDIOBXoD (npaBbI KaHaI) nIIu cIePpOBoI ayDIOBXoD AES/EBU C XLR-pa3bEmOM. TaKke dOnyckaet BBOI TaIM-KoJa.
Pepeklouatei
Teranex Mini Audio to SDI 12G nmeT nepeKIOUaTeN, c NOMOUI KOToPbIX MOXHO BblpaTb pa3nHbIe HacTpoiKn.
Ipeeknouatei 8,7-Input Audio Selection Bit 1,0
Ipeeklouateenn 8 n 7 cooBetCTbyot 6ntam 1 n 0. IcnoJb3yra pa3nHbte kombHaun ON/OFF dna nepekluoyateen 8 n 7, moKHO BbOpaTb IIOBOH n3 YeTbIePax aynOBxOdoB.
Ipeeknouatei 6,5,4 - Embed Audio Bit 2,1,0
Ipeeknioateen 6, 5 n 4 cooTBeCTByOT 6ntam 2, 1 n O. IcnoJIb3yra pa3NIuHbIe KOMHaUN ON/OFF dI nepeKIOUaTeen 6, 5 n 4, MoXHO BbIbPaT b KaHaN b KOtOpBie 6ydt BCTpoE h 3ByK.
PnB BCTpaBaan anAionorOBO 3ByKa DOCTyHbI BOCEMb BapnaHTOB, KOtOpbIE N03BOJHOIT BKJIIOHTb 3ByK B IIOby npay kaHaoB oT 1-2 do 15-16.
PnB BCTpaBaan AES/EBU-ayno doctyHbI YeTbpe KOMBuHaun. 3ByK MoXHO BKIOHTB KaHaJIbC1 no4,5-8,9-12 nn 13-16.
CxemaHaHnKHeNoBepXHOCTN KOpnyCa coepxHt ONnCAHHe HAcTpoEe, COOTBetCTByUOux pa3HbIM nONoKeHNrM nepeKnIOuateNei
Ipeekuateb 3 - Sample Rate Conversion, No Sample Rate Conversion
YcTaHOBtnepeKIOUATEb 4 B noJoxeHne OFF (BbIKn.), UTObI BbINOHHTb npeO6pa3OBaHne qactotbl Dcckpetnaun, nnB noJoxeHne ON (Bkn.), UTObI He nCNoJIb3OBaTb 3Ty onuHIO. PepeKIOUATeB noHTN BCERda dONJxHaxoITbcraB noJoxeHnN OFF (BbIKn.), UTObI BCTpauBaEMbI ayDInocrHaI mEm qactotry Dcckpetnaun TeneBUNIOHHOR cTaNapTa.
EcnnepeknioateInb 4 haxoHtCnB noIooKeHHN OFF (BbKn.),npoeobpaoBaHne aHaanorOBoro nn AES/EBU-aynno n BcTpaNaBaHne B SDI-cnHnHa Na bByxoJe BblonHReTc c acToTo n dckpeTnau 48 KU.
IpeeknouateB 2-Ch 2 nAES/EBU 3+4 Embed/Bypass
Pocne Bb6opa aydnokahanob nCnoB3yIte nepeknoyateenn 2 n1, yTo6bl Ha3HaHTb KaHabl dna BCTpaBnBaHn IIN OTKIOUHTb IN. OTKIOUeHHe N03BOJare N36ExaTb 3aNNc H aTe 3ByKOBoIe KaHabl, KOtOpBle Heo6xOIMO COxpaHNTB B aydnOCrHane.
YctahOBtne nepeKIOUaTeB 2 B noIOXeHne ON (BKnI), yTO6b He nCnoJIb3ObaTb KaHaN 2 IIIN KaHaNb 3n4 AES/EBU-3Byka. YCTAHOBtne nepeKIOUaTeB 1 B noIOXeHne ON (BKnI), yTO6b He nCnoJIb3ObaTb KaHaN 1 IIIN KaHaNb 1n2 AES/EBU-3Byka.
Переклочаль 1—Сн 1ил AES/EBU 1+2 Embed/Bypass
Cm. onncaHne nepeeknouateTn 2.
BbI6op aydnocnHaJa
Pp npapote c XLR-BXoOM MOxHO dONONHHTbHO Bb6paTb aHaIOROBbI, AES/EBU-cnHaN nn TaM-KoD.
PnncnoB3oBaHn HactpoKn AES/EBU MoXHO dononHntbHo akTbnpObaTb onuio Sample Rate Converter. B 3tOM cnYae 3ByK Ha SDI-BbxOe 6ydt MeTb npHrtyIO Ha TeNeBndeHn YacToTy nckpeTn3aun 48 Kt.
Meio Audio Input no3B0nIe Bb6paT npay nn DBe npa KaHaoB (nAES/EBU) nBCTpauBaHn B SDI-noToK, a TAKKe peryNupoBaT yPOBeH 3ByKOBOrO ciHaHa.
IINMHeHn yPbHn aHaNoR OBO r AES/EBU-aynIO nONbayetc Bkndka Audio ytnntbl Blackmagic Teranex Setup
Pn HeoXoDMOCTM MoXHO OTKIOHTb NcNoIb3OBaHHe KaHaIOB IIN KaHaIbHOI napbl, YTO6bI COxpaHITb IN B SDI-cuHaJIe.
Teranex Mini nCnoB3yET noCleHne HAcTpoKn HezABuCmO oT TOrO, KaK ux yCTaHOBUN - C NOMOuBIO nepeKIOUoATEeNe, Smart Panel nn Blackmagic Teranex Setup. Ecn noCne nporpaMMoro obHOBHeH naPamETPOB KOHBePTepa nn ChTnA Smart Panel HeoBXoDMo BepHybCk KpyHoH HAcTpoKe, MoKet notpeBOBaTcB NOBTOpHNa yCTaHOBKa OTdJIbHbIX nepeKIOUoATEeNe.
HacrtpoKn Teranex Mini Smart Panel
Ecn konhepep Audio to SDI 12G dononHnTeBHO ochaen naHbTo Teranex Mini Smart Panel, Bydt DocTyNHe MeHIO Audio n Network. Ix npaMeTpby yctHaBnBaIoT Tak Xe, KaK onncAo B pa3dene «HactpoKn Blackmagic Teranex Setup» bIwe.
Дононтельнуинфорmaциобинольэвану Teranex Mini Smart Panel cm.В раздene «Измehне Habpoek» дан Horo pykoBoDCTBa.
Teranex Mini Smart Panel uytinTa Blackmagic Teranex Setup oecneuBAKT Docyn K OINHaKOBHm HAcTPOKaM KOHBePTePa
Cxema coeHHen Teranex Mini - Audio to SDI 12G
Teranex Mini – 12G-SDI to Quad SDI
Moden Beranex Mini 12G-SDI to Quad SDI oecneuBaet npeoobaaBHe n3 12G-SDI B Quad Link SDI, HTO no3boJraT NOKIOUaTH Ultra HD-obopyoBAnHe C qtebpyMa pa3deJIbHbIMn BNC-pa3bemaMn. B ATOM clyueAe Ultra HD-n3obpaxHe, nocTyauOooee uepe3 nHTepFeic 12G-SDI, moXHO BBIOHT Ha qtebpe pa3hIX HD-MOHITopa. KoHBeptep Teranex Mini OcHauen CKBO3bIM npToM 12G-SDI n noDepxNBAET paBoTy c ciHaIom 3G-SDI oboxy ypOBHe (Level A n Level B).
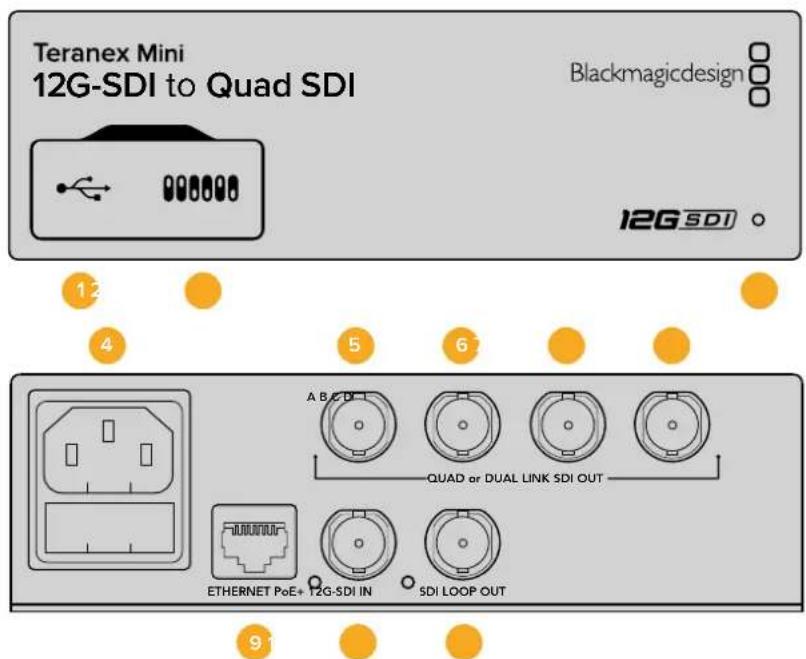
Pa3beMbl
1 Flopt Minl-B USB
IOnBONJET NOKJIQUaTH KOHBePTEK KOMTbOtepy c OpeauHOHcNCTeMoM Macnn Windows dYCTAHOBKn HAcTPOeK N O6HOBNeHn BHyTpHeHrero IporpaMMHOro oecneueHn.
2 Pepeknlouataelen
IpeeknouateHnapeedne TeraeX Mini no3BOJIO t3MeHraTb HacptpoKc nmoosu 7apNKOBnyu.
3 CBeToNoDhBn HmKATOp COCTOHHa
Hndkatop ropnt 6bim cBETOM npi noKIOeHN K cETN 3eNEbIM cBETOM npi oHapyKeHH cnHa. Korda nCnoJb3yETc HecKoJIbKO KOHBePTePOB, IaI NdeHTnOkaUN BkIOUHTe OOnIO Identify By yInnite Blackmagic Teranex Setup. Ecn 3a onuia AKTINBPOBaHa, CBToNDnOHDhnnHdkatop COOTBeTCTByIOUeO KOHBePepa oyet MrrA Tb.
4ПИТAHNE
CTaHapthoe rHe3do IEC C14 nIPOKJIIOUeHnK NCTOCHNky IpeMeHHoro ToKa 90-240 B.
5 SDI OUT A
Pa3bem BNC nIy BvBoa cIeNyUxN CnHaNoB:
-SD/HD-SDI
- Single Link 3G-SDI
- Single Link 6G-SDI
Dual Link HD-SDI (kaHAn A)
Dual Link 3G-SDI Ultra HD (kaHAn A)
- Quad Link HD-SDI Ultra HD (KaHan A)
6 SDI OUT B
Pazbem BNC dIy BBIOa cneDyOuXx SDI-cnHnaOB:
Dual Link HD-SDI (KaHAN B)
Dual Link 3G-SDI Ultra HD (KaHAN B)
- Quad Link HD-SDI Ultra HD (KaHan B)
7 SDI OUT C
Pazbem BNC dny BbIbOda Quad Link HD-SDI Ultra HD (kaHc C).
8 SDI OUT D
Pazbem BNC dnia BBbOda Quad Link HD-SDI Ultra HD (kaHAn D).
9 Ethernet PoE+
Iopr Ethernet no3BOnJrE TnoKlOuTaK KOHePTeR Teranex Mini K cTeBOMy KOMMyTaTOpY nnKOMnBIOtepy; nCNoJIb3eYcra dna IImMeHEnHaCTpoek C nomOu bO yTuNtBi BlaKmagic Teranex Setup. Iopr TaKke o6ecneuBaet noaCy nITaHn (PoE+).
10 12G-SDIN
Pazbem BNC dny BBoda cnHana 12G-SDI.
11 SDI LOOP OUT
Pa3bem BNC dnn BvBoda BxOJaIero ciHana 12G-SDI ha npyroe o6opyoBaHne c noDepKkO 3TOro Tnna INTepeJca.
Yetbipe HD-cnrghana
Teranex Mini 12G SDI to Quad SDI noDiepKnBaet Heckonko cnocobn nepaHn bOJbUoro oBema daHHbIX uepe3 INHTepFeuCbl C HNkO nponyckHO cnoc6HOCTbIO.
Ha cxeme Hnke nokazahbI dBa cnocoba BbOda Ultra HD-BuJeo. B nepBOM cnuyae (Quad Link) cHrHan nepeaetcno tbeipem kabeJAM 3G-SDI, BO BTOpOM (Quadrant HD) kaKdbI u3 cheTbipex HD-ekpaHOB nonyaert ONDy cheBepTyIO ueoCTHorO n3o6paKeHH.
IpeepaCnHana c nmoouBx Dual link 6G SDl ocyuectbnaetc no taKOMy Je npHHuNy, c Toi pa3Hnei, yTO nONb3yOTc TOnkO Da BvBixOda 3G-SDI.
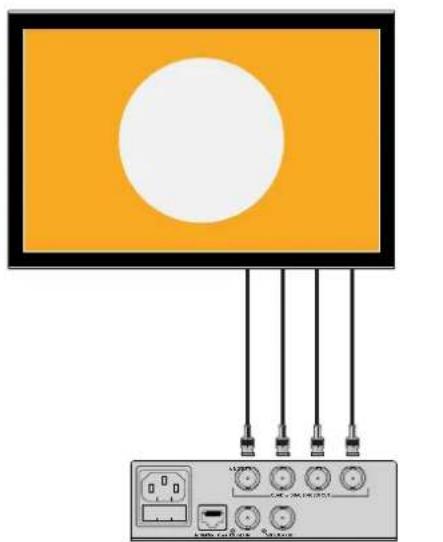
Quad Link Quadrant HD
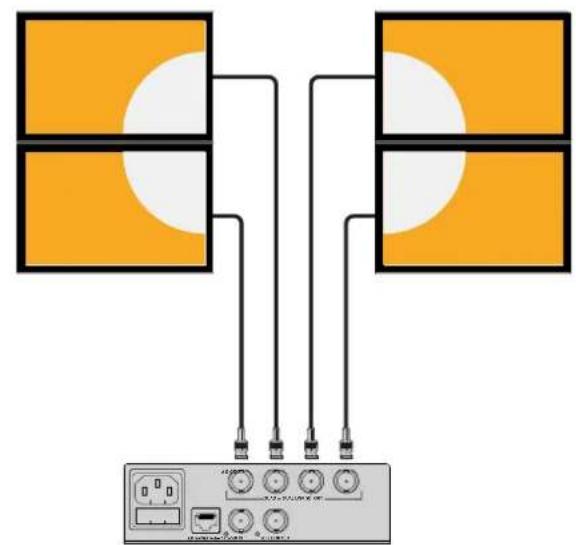
Nepeknouatei
Teranex Mini - 12G-SDI to Quad SDI nmeet nepeKIOUaTeIN, c NOMOuIO KOtOpbIX MOXHO BbIpaTb pa3nueHbI He NaCTpOIK.
IpeeknouateIe 8 n 7 - Quad SDI Output
Ipeeknioateen 8 n 7 cooBcTcByot 6ntam 1 n O. IcnoNb3yra paanuHbe KOMnHaun ON/OFF nna nepeknioateen 8 n 7, MoKHO BbIpaTB KOHpyaun BOxOIOB, IcNoIb3yEmbIX dnn BBBOda CnHana 12G-SDI Ultra HD.
Hnke npnbedeHO HeckoIbKO npimepoB npeo6pa3oBaHnra Ultra HD b YetbipexkaHaJIbHbI/ dByxKaHaJIbHi, a TaKKe B HcTbipexkaHaJIbHbI HD-cnHnA.
Ecnn ha Bxod noctynaet cnHan 12G-SDI, a nepeknioateenn 8 n 7 yctahOBneB b noJoxeHne OFF (BbKn.), NCXODaun CnHAn Byedet BBIODntbcn no YeTbpem KaHaanm.
Ecnn ha Bxod noctynaet ciHan 12G-SDI, nepeknoyateB 8 yctahOBneB noJIOXeHne OFF (BbKn.), a nepeknioyateB 7 - B noJIOXeHne ON (BKn.), nCxOJaun ciHan bdyet coCToRb n3 qETbipex kOMIOHETOB B HD-fOpMaTe.
Ecnn ha Bxod noctynaet ciHan 6G-SDI, nepekniouateB 8yctahOBHeB nnojxeHne ON (Bkn.), a nepekniouatei 7 i 6 - B noJoxeHne OFF (BbKn.), xcXoJaun ciHaN bYdET BBIOBDtbc KaK Dual Link 3G-SDI Level B.
Ecnn ha Bxod noctynaet ciHan 6G-SDI, nepeknioateenn 8 n 6 yctaHOBneHb nnonoxeHne ON (Bkn.), a nepeknIOyateNB 7 - B noLoXeHne OFF (BbIKn.). nCxOJaun ciHan oydet bIBoDntbcra kak Dual Link 3G-SDI Level A.
Korda BknoeH peKIM Quad HD Split, Ha yeTbIpe BbIXOa 6ydyT NoCTynaTb YeTbIpe He3aBnCmblx HD-curhana, KOtOpBle AByIOTc KOMNoHErTaM eINHO r Ultra HD-n3o6paXeHN.
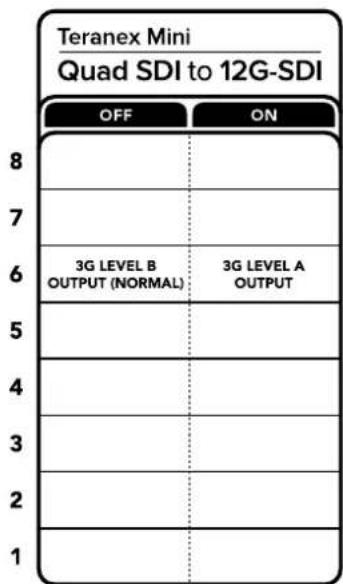
CxemaHaHnKHeNoBepxHOCTN KOpnyCa coepxHt ONnCAHHe HAcTPOeK, COOTBeTCTByIOUX pa3HbIM NoIOXeHNM NpeKIOUaTeNei
IpeeknouateB6-3G Level B/A
3a HactpoKa no3B0n8eT b6ipatb cnocob Bb0da cHrHa 3G-SDI ha o6opydoBaHne, KOtOpoe nOepKnaBae ToIbko OdnH ypOBeHb - Level A nn Level B. NoymuHnIOcnoNb3yEtca Level B (peeknOateB 6 B noLoXeHHN OFF). TIObI NCNOB3oBAtb Level A, yctahOBHTe nepeKIOUaTeB B noLoXeHne ON. DaHHBe HactpoKn npImHeHOTc Ta IbKO np paBoTe C cHrHanom 3G-SDI.
Pa6ota c Quad Link
| Выков Quad SDI Пеклоча差别ь 8 Пеклоча差别ь 7 Побъени里斯клоча差别я | |||
| Четыр HD-sсгнала OFF ON | ON 7 6 5 4 3 2 1 | ||
| Quad Link OFF OFF | ON 8 7 6 5 4 3 2 1 | ||
| Dual Link ON OFF | ON 8 7 6 5 4 3 2 1 | ||
| Single Link ON ON | ON 8 7 6 5 4 3 2 1 |
Hac troponi Blackmagic Teranex Setup
Ytuna Teranex Setup no3B0n8e TImeHb HacTPOKn, yCTaHaBnBaEMbIe C NOMOsbIO nepekIouateNe, a TaKke DOnoHHTeNBHe IapAMeTpbl. IInr Doctyna K 3TNM HAcTPOKaM NcNob3yOT BklaKn Video, Configure n About.
Pa60Ta C BknaKamn About n Configure onncaHa B pa3dene «I3MeHHe HactpoeK» daHHoro pykoBOcTBa.
BklaKa Video nIa Teranex Mini 12G-SDI to Quad SDI daet Bo3MoXHocTb BblpaTb onncaHHbIe Hxke onu.
MeHIO Video Processing
SDI Output
3To MeHIO No3BONrET Bb6paTb cnocob BbIbOa SDI-cnHana. DocTyNtbe onu: Single Link, Dual Link, Quad HD Split n Quad Link. OHH 3adaoT paCnpedeHne CnHana 12G-SDI Ultra HD mExdy cheTbPbMa SDI-BbIXoAMn KOHBepTepa.
Bxodn CnHa12G-SDI MoXHO BbIOHb NO YeTbIpem KaHaNm NIN B BVNe YeTbIpe KOMnoHeHOB HHD-OpMaTe, a CnHa1 6G-SDI -KaK YeTbPe CnHa1a 1.5G-SDI NIN DBe npbl 3G-SDI. Bxodn CnHa1b c 60one Hn3kMb OnTpEiTom (Takne KaK 3G-SDI NIN 1.5G-SDI) MoXHO dy6npoBaTb Ha BCEeTbPe BvXoDa c nOmoBIO onuN Single Link.
3G Output
3a onu npoBnep HactpanBaBbBIOcHana 3G-SDI nla coMecTmocn C o6OpyDobAHem, KOtopoae noepxnae BBD 3G-SDI tohko KaK Level A nn Level B. No yonuaHHIO nCnoB3yeTcra onuRlevel B.DaHbIe HactpouKn npImeHoiTc TOnk npnpaBoTe C cnHAnom 3G-SDI.

ДиИЗмЕнIHHACtpoek SDI Output IncnoIb3ayetcBkna Video yTInnItbI Blackmagic Teranex Setup
HacrtpoKn Teranex Mini Smart Panel
EcnKoHBeptep ochaen naneBIO Teranex Mini Smart Panel, 6dyT DocTyNbMeHIO Video u Network.
Ix npaMetpyi yctahabnBaotak je, kak onncano B pa3dene «HaCtpoiKn Blackmagic Teranex Setup>.
DOnonHHTeBHyIO INOpMaUIO ob nCnoJIb3OBAHN Teranex Mini Smart Panel cm. B pa3dene «IImeHeHne
HactpoekDaHHOrO pykoBoODCTBa.

Teranex Mini Smart Panel uytineta Blackmagic Teranex Setup oBecneHBAHOIOCTyn K OOnHaKOBbM HAcTPOKaKoHBePepa
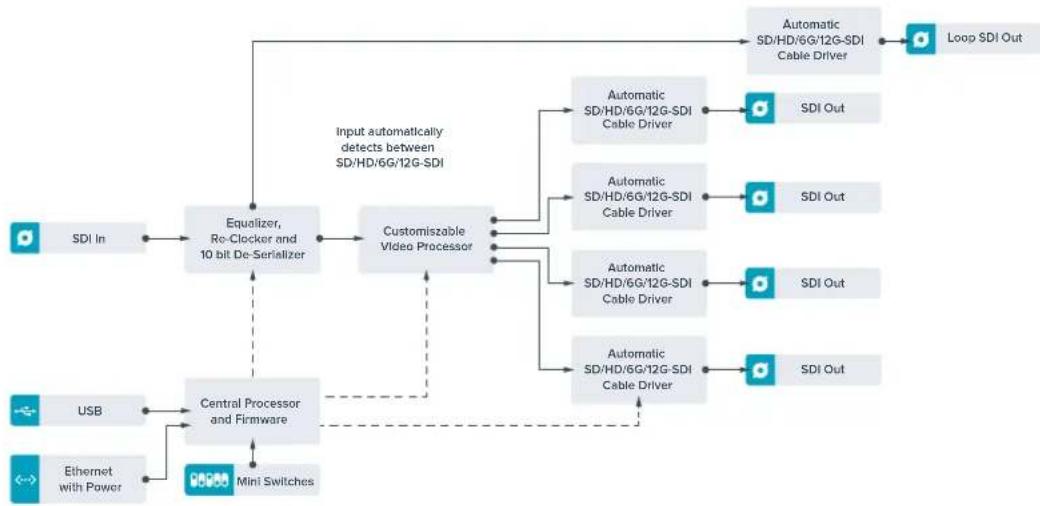
Cxema coeHHeH Teranex Mini - 12G-SDI to Quad SDI
Teranex Mini - Quad SDI to 12G-SDI
dAnHaa moeIb oOecneuBaet nHTerpaunIO Ultra HD-OBOpyObaHnHa OCHOBe Quad Link nTexnKc nHTeppeim 12G-SDI.3To no3BONaET npoeobpa0BbAtb Ultra HD-cnrHan, noctynaiou chpe3YeTbe pa3deIbHex BNC-pa3bema, dI nepeaun No eINHomy kAbelHO HA COBpeMeHHbIe KOMMyTaTOpbl,3fnpHe MnksepbI n pOeKTopbC noDepxko 12G-SDI. Moenb npedHa3NaueHa dIra paobtbcS c Hahom 3G-SDI obox ypOBHe (Level A n Level B).
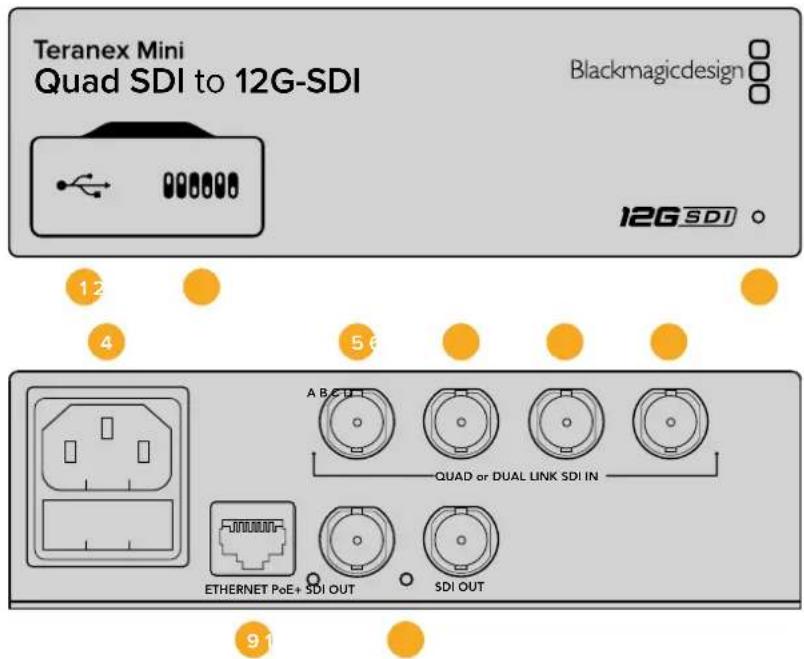
Pa3beMbl
1 Flopt Mini-B USB
I03B0JAEIT NOKJIQUaTb KOHBePTeP K KOMbIbOtepy cOnepauOnHOHcNCTeMoM MacnnWindows dIyUcTAHOBKn HAcTPOeK IN OOBNeHnBHyTpEHHero IporpamMHorO oecneueHn.
2 Pepeknlouataelen
IpeeknioateHnapeedne nanei Teranex Mini no3BOJIO n3MeHrTa HAcTPOIK C nOMOUbO 7apNKOBpyKN.
3 CBeToIONoHbI INHdNKaTOP COCTOHHN
Hdkatop ropnt 6bim cBtOM npn noKluueHH K cetn 3eHehIM cBtOM npn oHaupxehnn cnHana. Korda nCnoJb3yETc HecKoJIko KOHBePTePOB, IaI nJeHTNfHKaUN BkIOUHTe OUnIO Identify by tInne Blackmagic Teranex Setup. Ecn aTOna onuA kTINBnPoBaHa, CBToNDnOHDn Hdkatop coOTBeCTByIOUeRO KOHBePepa oyET MIRATb.
4ПИТAHNE
CtAndapThoe rHe3do IEC C14 nIy noKIOUeHnK nCTouHnky nepemehHoro Toka 90-240 B.
5 SDIN A
Pa3bem BNC dna BBoDa cneDyUox CNHaoB:
-SD/HD-SDI
- Single Link 3G-SDI
- Single Link 6G-SDI
Dual Link HD-SDI (kaHAn A)
Dual Link 3G-SDI Ultra HD (kaHAn A)
- Quad Link HD-SDI Ultra HD (KaHAN A)
6 SDIN B
Pazbem BNC DnB VBOda CneDyUOxN CNHAnOB:
Dual Link HD-SDI (kaHan B)
Dual Link 3G-SDI Ultra HD (KaHAN B)
- Quad Link HD-SDI Ultra HD (KaHAN B)
7 SDI IN C
Pazbem BNCдя Ввoda Quad Link HD-SDI Ultra HD (kaHAN C).
8 SDI IN D
Pazbem BNC nra BbOa Quad Link HD-SDI Ultra HD (kaHAn D).
9 Ethernet PoE+
Iopr Ethernet no3BONJET noKIOUaTb KOHBePTeR Teranex Mini K cTeBOMy KOMMyTaTopy nn KOMNbOtepy; nCNoJIb3yETc dIra IImMeHeHn HAcTpoE c nOmoU bO yTInNTbI Blackmagic Teranex Setup. Iopr taKke o6ecneuBaet noDaU ny nTuHa (PoE+).
10 BbIXOdbi SDI
Да pa3bema BNC Дя BBBOda DByX He3aBcIMbIX cnHAnOB 12G-SDI.
PepekloucteI
B 3aBnCIMocTn OT HacPoKn nepeKIOuateTena 6 (ON/OFF) moXHO 3aDaTb BbBOc cnHana 3G-SDI nna COBmecTImocTn C oObpyoBaHnEM, KOtOpoe noDepxNBAe T BBOd 3G-SDI tohko kak Level A nnN Level B. N O yMOnuHaHIO nCnoB3yETca Level B (nepeKIOUateTb 6 B nONoXeHNN OFF). YTObI nCnoB3oBaTb Level A, yCTaHOBInTe nepeKIOUateTb B nONoXeHNe ON. DaHHbIe HAcToPkn npImeHApOTc TOnkO npn paOte c cnHAnOM 3G-SDI.
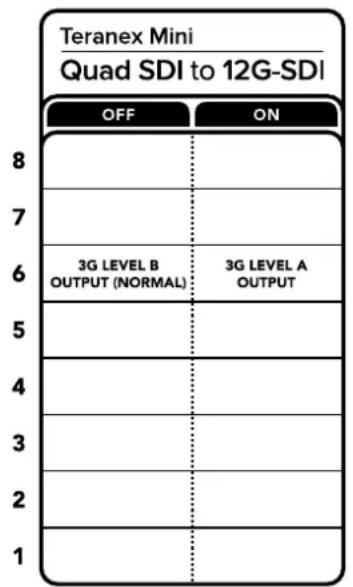
CxemaHaHnKHeNIOBepXHOCTN KOpnyCa coJepKNT ONnCAHHe HAcTpoek, COOTBeTCTByUOUX pa3HbIM NOnOKeHNrM nepeKlIOuATEneI
Hac troponi Blackmagic Teranex Setup
Ytnta Teranex Setup n03BolrE n3MeHnTB HAcTpoKn, yCTaHaBnBaembIe C NOMOuBIO nepeKnIOuATEnei, a TAKKe dONoHNTeJIbHbIe npaMetpbl. INa DOcTyNa K 3TNM HAcTpoKam NcNoJIb3yIOT BklaKn Video, Configure n About.
Pabota c Bklaikamn About n Configure onicaHa b pa3eJe «I3meHHe hactpoek» daHHoro pykoBOdCTBa.
BklaKa Video TeraNex Mini - SDI to Analog 12G daet BO3MOxHocb BblpaTb onncaHHie HIXe OOnu.
MeHIO Video Processing
3G Output
3Ta onu nO3BONaET HAcTpaNbA bBbOcHnA 3G-SDI nJr COBmecTUMocTc O6OpyDobAHnEM, KOtOpoe noDepKnaE BBOd 3G-SDI tohko kak Level A nn Level B. No yomuaHIO nCnoB3yeTcOnuR Level B. DaHbte HAcTpoKn npImeHOTcTohko npn paBoTe C cnHAnOM 3G-SDI.

ДиИЗмЕнIHHACtpoek SDI Output nCIOB3yETcBklnaKa Video yTINHTbI Blackmagic Teranex Setup
Hactpoikn Teranex Mini Smart Panel
Ecn konhepsep ochaen naHbTo Teranex Mini Smart Panel, 6dyT doctynMeHIO Video n Network.
Ix npametpby cTaHaBnBaIOT Tak je, kaONcaHO B pa3dene «HactpoKn Blackmagic Teranex Setup>
Bblie. DOnonHnteHyIO HfOpMaIOo 6ncnoJb3ObaHN Teranex Mini Smart Panel cm. B pa3dene
«N3meHHeHne HacPoEK DaHHOro pyKOBODtBa.

Teranex Mini Smart Panel n ytnnta Blackmagic Teranex Setup oecneHBAOT doctyn K onHaKOBbIM HactpoiKaM KOHepepa
Cxema coeHNHeH N Teranex Mini - Quad SDI to 12G-SDI
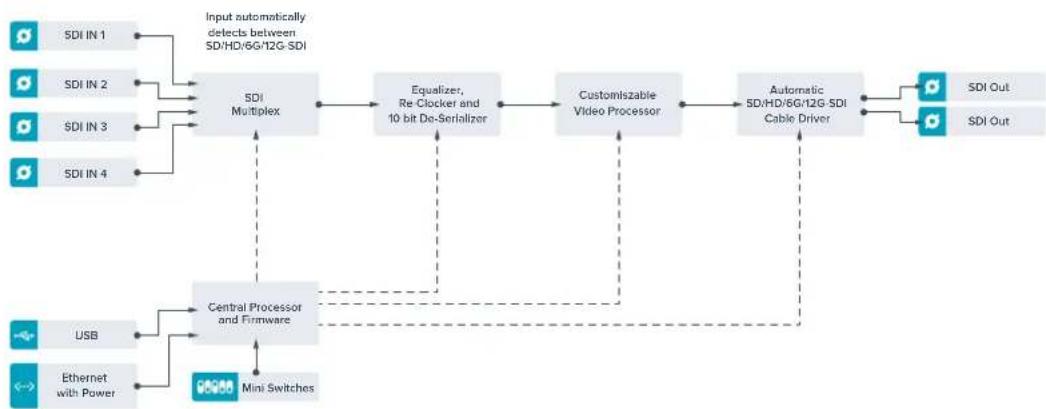
Teranex Mini - SDI Distribution 12G
Teranex Mini - SDI Distribution 12G no3Bolnert bVbOoHb OIN SDI-cunHa Ha BOCemb SDI-BbXoOB. Mhorocopocthon Hntepcnc 12G-SDI c noHOn cnHxpoHn3auee oecneuBaet aBTomatueckoe nepekIouchene MeJy BCem pa3HOuHocTmN SD-, HD-N Ultra HD-fOpMaTOB BnIOb do 2160p/60. 3Ta moDJIb bdyet ndeAIBHM peSeHnEM dJa pacnPepenEnna Ondoro SDI-cunHa ha Heckonko yctpoCTB, TAKNX KAK MOHToPbM, MKNWepbN KOINPOBUNK.
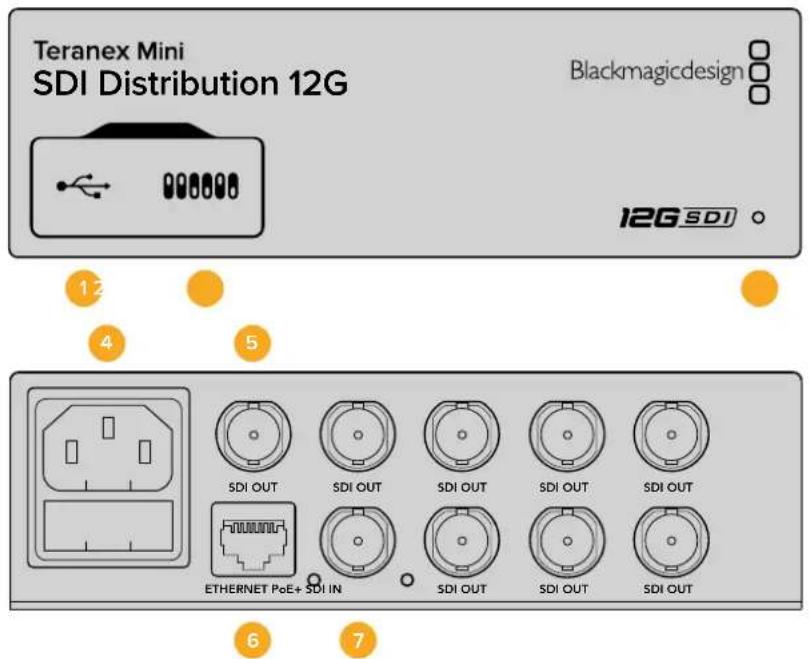
Pa3beMbI
1 Npt Mini-B USB
I03B0JnAeT noKKnUoyaTB KOHBePtep K KOMNbIOTepy cOnepauNoHHo CntEmoM Macnn Windows IaYcTaHOBKn HAcTePoE K N OOBHeHn BHyTppeHrero IporpaMMHOrO oecneHn.
2 Nepeknoatelen
IpeeknouateHnapeedne nanei Teranex Mini no3BOJIO NTMEHATb HAcTPOIKN C NOMOUBO ⅢapNKOBpyKN.
3 CBeToIOHbI INHdkaTOP COCTOHHN
HdkaTOp ropnt 6bim cBtOM npn noKluueHH K cetu n 3eneHbIM cBtOM npn o6hApyeHH cnHa. Korda nCnoNb3yETc HecKnIbKO KOHeBepTeOB, nna ndeHTnFkaUu BkIOUHTe OOnHO Identify By tInne Blackmagic Teranex Setup. Ecn 3ta onuia kAnBpObaHa, CBetoNDHBn INdkaTOp COOTBetCTByIOUero KOHeBepTepa bdyet Mrratb.
4Питаннe
CTaHdapthoeIHe3doIEC C14 nIy IIOKJIoucheHnK NCTOChNky IpeMeHHoro ToKa 90-240 B.
5 SDI OUT
Bocemb pa3beMOB BNC nIpoKluOeHnpa3nnuHoro SDI-6obopyoBaHna.
6 Ethernet PoE+
Iopr Ethernet no3BOnJrT noKlOuTaK KOHePTeR Teranex Mini K ceTeBOMy KOMMyTaOpTy nI KOMNbOtepy; IcNoJIb3yETc dIra NImeHEnHaCtPoEck C nOmoU bO yTuINITbI Blackmagic Teranex Setup. Iopr TakaKe oBecneuBaET noaay nIaHn (PoE+).
7 SDIN
Pa3bEm BNC nIpoKnIOUeHn IcTOuHnKa SDI-cnHaHa.
Pepeknouatei
Modenb Teranex Mini - SDI Distribution 12G He Tpebyet YctaHOBKn noB3oBaTeNbcknx Hactpoek.
Cxema coeHHen Teranex Mini - SDI Distribution 12G
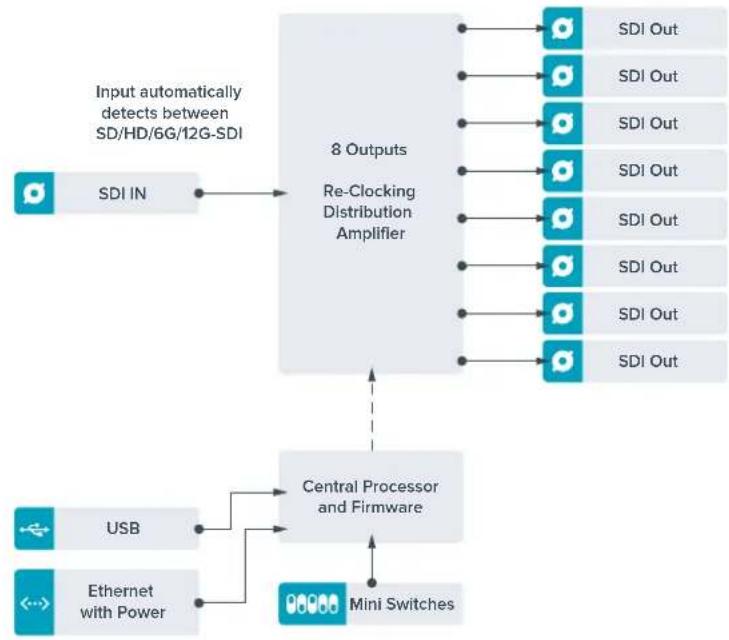
Teranex Mini - Optical to HDMI 12G
3a moeIb noBolraet uepeoontBOLOKOHoe coeHHe H BbOIObI hO6paKeHc C SDI-OBOpyDobAHn Ha uPOKn pRd HDMI-dncnneB n npoeKTOPOB. KOHeBepr aTOMaTHueckn nepeKIOuAeTc MeJxdy SD-SDI, HD-SDI, 3G-SDI, 6G-SDI n 12G-SDI Ha BXoJe, oBeCneuBa npeo6pa3OBaHne B HDMI-cirHan Co BCTpoEHbIM 3BykOM, a TaKke BbIOiayNo Ha banaHcBn AES/EBU-nnn ananorOBb I BbxO. XLR-pa3bem npaboro KaHana (R ANALOG) MoXHO HAcPToNT bIg BBIOda TaM-KoJa.
Функшин HDI instant lock obecneuBaet nuctoe nepeKIOUeHne Ha HDMI-BbIXOe npc smHe nCTOHyNKOB C OOnHaKOBbIM FopMaTOM BnDeo. Ecn Ha ONTNeCKn nn SDI-BxOD noCTyNaET cnHaB Ultra HD, a K HDMI-BbIXOdy noKnIOUeH HD-MOHITOp nII TeNEu3Op, oyTe ABToMaTHueCKn BbINOJIHeHa noHHaIOUaJ KOHBepCnA. 3TO no3BOJAEr npocMatpnaBt N3O6paXeHne CBepXBICOKOYeTKOCTN Ha HD-ekpaHe.
ДлгцьETOBои орабOTи сгнана Ha BbIXOde moXHO nCNoJIb3OBAt TpexMepHbIe LUT-TaBnUcI. OHH npedCTaBnIOT cooM MaTpuCbHa OCHObE 33 KoOpDnHaTHbIX ToeK, KOToPbIe No3BOJIoT Ha annapaTHOM yPoBHe BbINOJIrTaMaHInyIaunC cBETOM I pOBODntb KaIIb6pOBky bItOBbIX TeIeBn3OpOB nepei rpeiINHROM.
C nmoou3D LUT-Ta6nue bnerko BbinoHnHtB npeo6pa3OBaHne UBeTOBO rpoCTpaHCTBa dna pa6Otb Cpa3HbIMn DnCnneMa.
Teranex Mini - Optical to HDMI 12G HDMI to DBe npedctaHOBEnHbE LUT-tabnCbI: dI npeo6pa3ObaHHa CBeTHoro n06paKeHnB VepHo-6enoe I dI KOBepTnpoBaHnB BIndeo c KaMep Blackmagic B CBeToBOe npoctpaHCTBO Rec. 709.
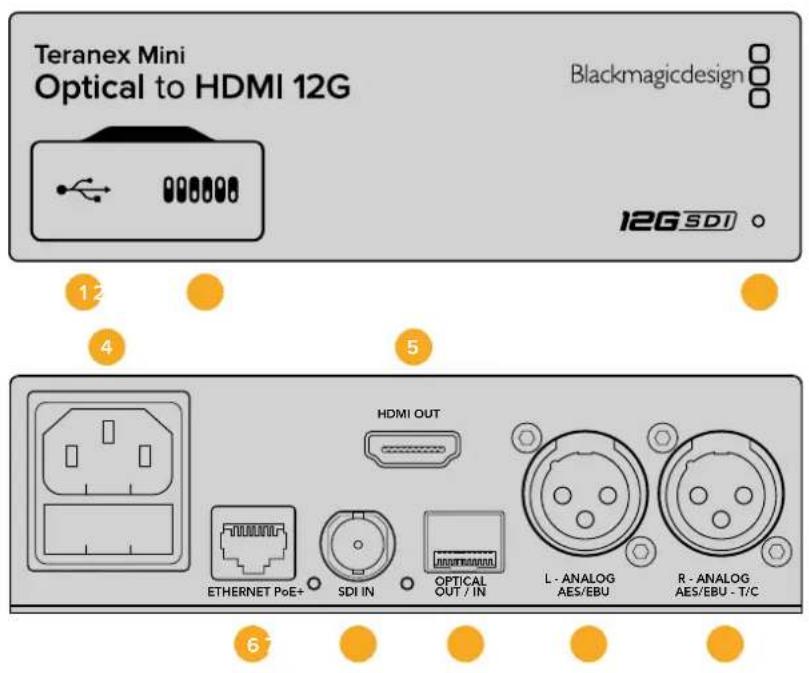
Pa3beMbl
1 Nopt Mini-B USB
IcnoB3yETc dnnn 3meHHe HAcTpoek N O6HOBHeHHN IpooWNK Teranex Mini c NOMOsbIO yTNINbI Blackmagic Teranex Setup, yCTaHOBHeHHo Ha KOMNbTepe C natafopmoi Mac nn Windows.
2 Pepeknioateenn
HactpanBaemble nepeeknouateIINI IN3MeHeHHaCTpoeK.
3 CBeToNDnOHDhINHdNkATOp COCToHHN
Topit 6eIbIM CBeTOM npn NpokKIOueHm K cTeu H3eNEbIM CBeTOM npn OOBapyKeHm CnHaHa.
PnpaOte C cytINrToB Blackmagic Teranex Setup 3OT INDnKaTOp Mraet, nDeHTnΦnCnpy BblpaHHb C ee NOMoCbIO KOHBeTpE.
4 Ntahme
CtAndapThoe rHe3do IEC C14 nIPOkJIoueHnK nCTouHnky nepemehoro Toka 90-240 B.
5HDMI OUT
BnuoeobixoHDMI.
6 Ethernet PoE+
Pa3bEm nI NaIOKJIQUeHnK CTeBOMy KOMMYTATOpY NII KOMNBIOTepy; IcNoJIb3yETcIaI
I3MeHHeHn HAcTpoE K c NMOUbIO yTNIITbI Teranex Setup. IpOrt TaKxpe ObecneuBaet noaay
nITAHn (PoE+).
7 SDIN
BnDoeBxOaSDiBCN-pa3bEmOM.
8 ONTHueckn BXoN BbIXoN
OnTnueckn BnDeoBxOu N BbXoD (LC-pa3bEmbl) nIepepaN SDI-cnrHana c nmooudoonnoHTenbHoro moyn no cTaNapTy SMPTE. AToMaTHueckoe onpepeHne SD, HD, 6G- n12G-SDI. OnTnueckn BbXoD TaKke MoXHO nCNoB3OBaT b KaK CKB03Ho npT.
9 L—ANALOG nnn AES/EBU
BanaHcHb anaIorobb ayuIOBbXoD (neBbKaHa) nnu ufoBo ayuIOBbXoD AES/EBU c XLR-pa3beMOM.
10 R-ANALOG,AES/EBU nn Timecode
BanaHcHb ananorobb aynoobbxo (npaBn KaHa) nnnu nppoB aynOBxO AES/EBU c XLR-pa3bemOM. TaKke donyckaet BBOD taM-KoJa.
Pepeknouatei
Teranex Mini - Optical to HDMI 12G UMeT nepeKIOUaTeI, c NOMOuKOToPbIX MOXHO BbIpaTb pa3nHbIe HAcTpOuK KOHBepcN.
IpeeknouateB8-Analog Audio, AES/EBU Audio
YcTaHOBtnepeKIOUATEb8bnoOKeHHe OFF (BbIKn),yTObblbBONDt bdaHCHbHaHAnorOBb3Byk.
Ipa6oTbCnΦpOBbIM AES/EBU-3BykOM BbEpHTe noOKeHHe ON (Bkn).
Ipeeknouateb7-Output Audio/Timecode
YcTaHOBInTe nepeKIOUaTeNb 7 B noLoXeHne ON (BKnL), YTO6bI BbIOuNTb TaIM-KoD uepe3 XLR-pa3bEm npaboro aydnokahana.ДЯ BbIOda 3Byka BbOcpnte noLoXeHne OFF (BbIK).
Ipeeklouatei 4,3,2-SDI Audio De-Embed Bit 2,1,0
IpeeknIOuATEeN 4,3 n 2 cooBETCTByOT 6ntam 2,1 n 0. IcnoNbEyra pa3nHbIe KOMNuHaIeON/OFF dI nepeKIOUaTeeN 4,3 n 2, moKnHO BbOpaTb, kaKyIO npay ayInokaHaNoB BXOJaero SDI- nnOnTnueckoro notoka BbBONDtB Ha BixOdbi HDMl, aHaAnorOBoro nn AES/EBU-3Byka.

CxemaHa HnKHeH NOBepxHOCT KOpnyca CoepkHT ONCAHHe HAcTpoE, COOTBETCTByIOxuX paAHBIM NONOKeHm NpeekTuOaTeNei
AydnokaHaBbI SDI-cnHana
Kombiny Hacpoi Knepeknoatee, MoXHO BbpaB ayIOKaHbB XOJaero ONTNUeCKo RNI SDI-notoka, Kotopte Teranex Mini - Optical to HDMI 12G byet BcpanBaB CnHn Ha BixOJe.
| Аналоговы щадиоканны | Пepeключател 4 | Пepeключател 3 | Пepeключател 2 | Положене пepeключател |
| 1 и 2 OFF OFF | ON OFF 8 7 6 5 4 3 2 1 | |||
| 3 и 4 OFF ON | ON OFF 8 7 6 5 4 3 2 1 | |||
| Aydinokanalb i AES/EBU Пеклоча差别 4 Пеклоча差别 3 Пеклоча差别 2 Паложене pekeklоча差别 | ||||
| 1-4 OFF OFF OFF | ONOFF87654321 | |||
| 5-8 OFF ON | ONOFF87654321 | |||
| 9-12 OFF ON | ONOFF87654321 | |||
| 13-16 OFF ON | ONOFF87654321 | |||
| Аналоговы щадиоканы | Пеклоча差别 4 | Пеклоча差别 3 | Пеклоча差别 2 | Паложене pekeklоча差别 |
| 5и6 OFF ON OFF | ONOFF87654321 | |||
| 7и8 OFF ON OFF | ONOFF87654321 | |||
| 9и10 ON OFF OFF | ONOFF87654321 | |||
| 11и12 ON OFF ON | ONOFF87654321 | |||
| 13и14 ON ON OFF | ONOFF87654321 | |||
| 15и16 | ON ON ON | ONOFF87654321 | ||
Hac troponi Blackmagic Teranex Setup
Ytnta Teranex Setup no3B0n8e n3MeHHTb HAcTpoKn, yCTaHaBnBaEMbIe C NOMOcIbO nepekIouateNei, a TaKxe DoONHInTeMbIe NapaMeTpbl. IJIa DOCTyNA K 3TNM HAcTpoKam NcNoJIb3yOT BklaKn Video, Audio, Configure n About.
PaBToC BkIaKamn About n Configure onicaHa B pa3dene «IImeHHeNHe HAcTpoE» daHHoro pykoBoOcTBa. BkIaKka Video dJa Teranex Mini - Optical to HDMI 12G daet BO3MOxHOctb Bb6paTb ONCaHHbIe HnKe OOnu.
MeHIO Video Output
Clip HDMI output to legal levels
3Ta onuia noBonaet adantnpobatb Bxoadn ontnuecknn n nn SDI-cnrnan bBbOa uepe3 HDMInHTEPcnc. IyoMOnuHaNIO OHa dOJIKHa 6bTb BKIOUeHa.
HDMI Instant Lock
NocTaBbTe pIaKoK, yTObI akTbIbpoBaT bFyHKUIO HDMl instant lock. Nocne 3TOrO daxe npn cmeHe nCTouHKnOB CnHAn 6ydtncTyNaTb Ha HDMl-BbIXoD 6e3 nepepbIbA, T. e. npn BbIOpe I3O6paXeHHa 3kpan HDMl-TeEbn3Op aIIIMOnHTopa nobToPbHa YcTAHOBA Ka coeINHeHHC n pInHMaiOuIm UcTPOiCBOM He BbINOHNReTc. FyHKUIN paobTaET ToIbKO B Tex clyuaX, KOrDa NoCTyNAIOuee IN CTouHKnOB BnDeo IMeet ODNHaKOBbI CTAHdApT.
KordaФункцнHDMI instant lock actinbupobaHa,Bo3nHkaet He6oJIbwoeOTcTaBaHne 3Byka OT n3O6paKeHH. Ecn Ha BixOde He6xOJMo IMetb NOnHyIO CnHXPOHN3aUIO BInDeO IN ayDNO,CHIMITE fIaxok dnn 3toi onu.
33 Point 3D LUT
Blackmagic Teranex Mini - Optical to HDMI 12G noДержьаert pa8oty c faIamn .cube, kToOpbIe moXHo co3dabc nmoosio DaVinci Resolve nI npnoxehn nI qBetokopkeu.
KoHBeptep no3BONJrE 3aRpy3nT bIe pa3HbIe LUT-tabNcIbI.ДЯ 3TOrO HaxMITE COOTBETCTBYIOUyIO KhoNky Load, Bb6epnte faJI . cube Ha KOMbItepe n HaxMITE OK. HaxMITE Save, YTObI NOITBepNTb BBOp. Imeha faINOB OTo6paXaHOTcP rAnOM C KHOKNoI Load, no3TOMy Bbl Bcerda 6yDeTe 3HaTb, KaKne I3 HIX NCIOJIb3yOITcI dIg ONiI LUT 1 n LUT 2.
TTo6b npimEnHb LUT-tabu, noctabte fnaXok dny onu Use LUT 1nn Use LUT 2. nny otknueHn Ta6nuc Bb6epnte onuBypass LUT.
TTo6b npimEnHb LUT-tabnuy K cnHany Ha cKBo3HOM BbxOJe, noCTaBbTe fnaKOK dny onuIN Enable 3D LUT on loop SDl output. Dny otKnIOueHn TaBnCbHa CKBo3HOM BbxOJe CHMInTe fnaKOK dny 301onOnuIN.
Ecn konhepcre ochaen dononHntelbno naHebio Smart Panel, aktnBnpoBaTbcNol3oBaHne LUT-tabniMoXHO c nOmoBIO KHONK 1 nn 2. Ira otKIOueHna HAXMITE COOTBETCTBYUky KhoNKy eue pa3.
Tpexmepha LUT-ta6nua
3D LUT - 3TO qain C trpexmepHou Ta6nuei 3HaueHn Ira n3MeHeHn cBeTOBOr npoctpaHCTBa.
MaccNB daHHbIX coDEPKNT TOKN, INcNoIb3yEmBle dNn npeOba0BaHnK kKaJIOrO OCHOBHO CBeta c NOMOsbIO KoOpDInHAT X, Y n Z. TaKIM oBa3OM, dNn cyUeCTByoUx 3NaueHn KpaCHoro, 3eNEHoro n CnHero KaHaONB Ha ONTNeCKOM nn SDI-BXoJe MOxHO 3aDaTb HOBBie 3NaueHnra HADMI-BbXoJe, IIOoBHAR FyHKsRABJeTc MouHbIM INHCTpyMeHTOM dNn NCKIOuHTeNbHO ToHOn KaINbObKn DncnPeeB n 3aRpy3Kn KpNBbIX rAMMa-pacpeDeHnN, KOrDa Heo6XODIMO OueHHT bNHeHyO rAMMy npn paBoTe C paZNIuHbIMn TnAmn paIIOB RAW.
Onda n3 3a rpykaembix no ymoIauHIO TpexmepbIX LUT-tabnIO NOBIONKOBEPINOBAT bETHOe BIndeo Ha BXode B cepHO-benoHa BbIXOe Ha BixOe. Bce 3NaueHna KpaCHoro, 3eneHoro n CnHero KaHOB INocTyNAIOUcEM CNHane NOnyauOT 3NaueHna, COOTBeTCTByIOUcne UepHO-6enomy IIO6paXeHHIO B NCXODAUMCnHane. PpINOxKeHne DaVinci Resolve daet BO3MOXHOCT coXpaHITb CBETobyIO CXemy B BInde 3D LUT-tabnIOIuNIMnpOpTPOBaTb ee Ha Teranex Mini -Optical to HDMl 12G c nomoubIO nporpamMHOyTNInMb. TaKxe DONYCKaeTc npimHeHne 3D LUT-tabnIOIha CKBO3HOM ONTIueckOM BbIXOe. B ATOM CUYae KOHBepTeP BblONIHRe TCBETobyIO O6pa6Otky 6e3 nCnONb3OBaHnHDMl-BbIXOda.
Iopobhe o co3aHn nn faJna .cube cm. pykoBoDcTBO no DaVinci Resolve, koTopoe moKHo Hau Tn Ha Be6-caTe Blackmagic Design no aDpecy www.blackmagicdesign.com/ru/support.
BknaKa Audio nT eranex Mini - Optical to HDMI 12G daet BO3MOxHocTB b6paTb oncaHHbe Hnke onu.
MeHIO Audio Output
Set XLR Output
Bb6pab 3aayok Analog nnn AES/EBU B MeHIO onuHn Audio Output, moKHO bBbOHTb aHaIorOBbI nn AES/EBU-3Byk. Ppi Bb6ope 3aauKa Timecode Ha IeBbI XLR-pa3bEm 6ydet Noctynatb aHaIorOBoe ayDNo, Ha npAByi - TaM-KoJ.
B 3aBnCmOCTN OT cnoCOba BbIOda 3Byka MoJHO Bb6paT KaHbI Ha SDI- nIN ONTneCKOM BXoDE, KOTOpBle 6ydy TBKlIOUeHb B CnHAn, NOcTyauoHn Ha HDMl-, AES/EBU- nIN aHaIorOBbI ayDIOBbIXoD. TaKxe npedymotpeHa perylnpOBKa yOBoHn Ira KaHana nIN KaHAbHO napbl. Ppi BBIOde AES/ EBU-3Byka uepe3 oBa XLR-pa3bema IOctyneH bIbOp Do qETbIeX KaHANOB, Ppi BBIOde aHaIorOBoro aydno -do IByX KaHANO. KOrDa IIpaBbY XLR-pa3bEM NcIIOnb3yeTcH Ira BBIOda TaIM-KODa, Ha NeBbY XLR-pa3bem NoCTyNaet ODHOKaHbHbI aHaIorOBbI 3Byk.
Teranex Mini nCnoB3yET nocnEHH HeaTpoKn He3aBcHMO OT TORO, KaN ux yCTaHOBNI - C NOMOJIIO nepekIouateNei, Smart Panel nn Teranex Setup. Ecn nocne nporpaMMHoro 6OBHeHn napametpoB KOHBepTePa Hn CHrTaN Smart Panel HeoBXODmO BepHybC K pyHOn HAcTPOKe, MoXeT notpeboBaTbcN IOBTopHaY cTaNHOBA kOrdNbHix nepeKIOUaTeNei.
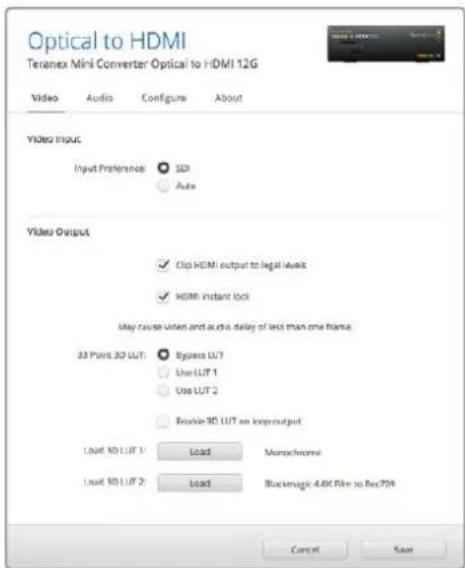
Blackmagic Teranex Setup no3BONJET nCOnb3oBaT bdyHKnIO HDMI Instant lock dnyuHCTORO nepeKniUeHn npcmeHe nCTOCHNKOB, 3aRpyKaTb 3D LUTa6nIbN yctahabNBATyPOBeHb aHaIOrOBOrO 3Byka Ha XLR-bixOJe
Hactpoyn Teranex Mini Smart Panel
Ecn KOnBepTep Optical to HDMI 12G dononHnTeBHO ochaen naHbTo Teranex Mini Smart Panel, bnyt DocTyNbMeHIO Video, Audio n Network. Nx npametpy yctaHabnBaOT Tak Ke, kak oncaHo B pa3dene «Hactponk Blackmagic Teranex Setup» Biue. DononHnTeBHyu nHΦopMaunio o6 nCnoIb3oBaHN Teranex Mini Smart Panel cm. B pa3dene «I3meHeHne Hactpoek>.
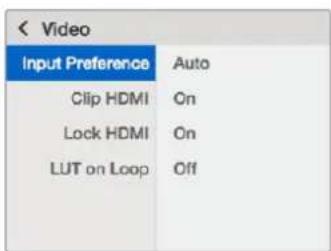
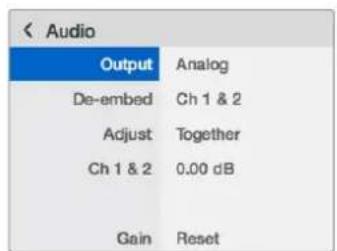
Teranex Mini Smart Panel n ytnnra Blackmagic Teranex Setup daIOT DCtyn K OdnHakOBbIM HAcTpoKAM KOHcpeTepa
Cxema coeHHen - Teranex Mini Optical to HDMI 12G
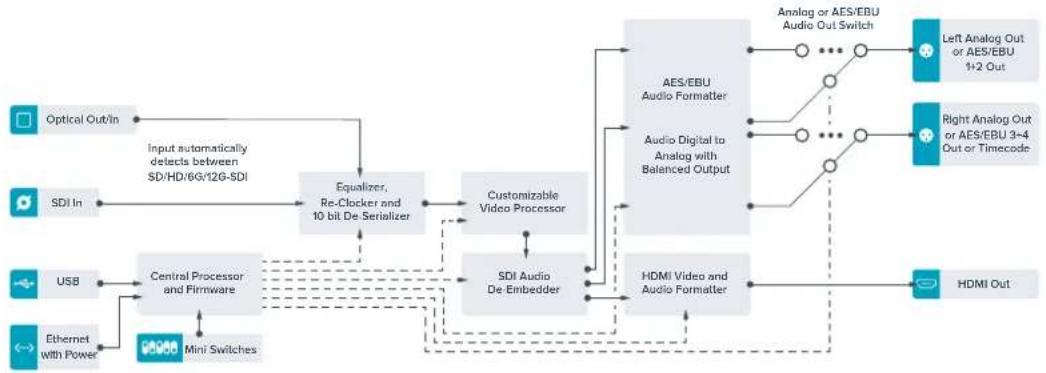
Teranex Mini – HDMI to Optical 12G
MoeIb oecneuBaet BvBOD HDMi-cnHana Bnnoto 2160p/60 c npOboBix KOhconei, HDV- n Ultra HD-Kamep Ha yctpojCTBa c onTtueckm nopTom nn nHTepfemc om 12G-SDI (BNC-pa3bEm), a taKke no3BOJAE T BCTpanBaT 3Byk, noLyuEHHb C HDMI-, AES/EBU- nn banaHCHoro aHaanorOBoro BXoDB. 3To daet BO3MOXHOCTb nepeDaBaT n3O6paXeHne n3 HDMI-nCTouHKnOB no ONTOBOLOKHy ha 6oJIbwoe pacCTOAHHe, a TAKKE KOHBePTupoBaT MaTePnA IIOBnteBcknx HDMI-BnDEokAmep nn rpaFky c KOMNBJTEPA dnn nepeDauH Ha SDI-texHky nn o6OpdyobAHne c onTtueckm nopTom.
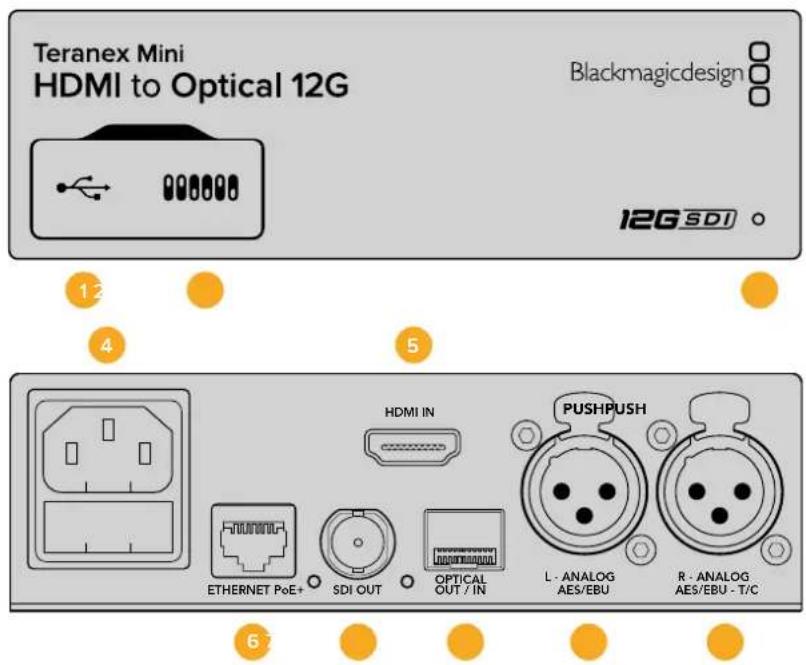
Pa3beMbl
1 Nopt Mini-B USB
IcnoB3yETcra nnaHMeHeHHaCTpoek N o6HOBnEHH npouuBk Teranex Mini c nomoBIO yTInbbl Blackmagic Teranex Setup, yctahOBnEHHO HA KOMNBoTepe C nlatfOpmoi Mac nn Windows.
2 Pepeknioateenn
HactpanBaemble npeeknquateIINJN3MeHeHHaCTpoeK.
3 CBeToNoDnHiNmHnKaTOp CoCToHHN
Topnt 6eIbIM cBETOM npn NODKIOUChEN K Cettn 3eneHbIM CBETOM npn OOBaHyKeHN CuRHaHa.
Ppna paOte c yTNInTOB Blackmagic Teranex Setup 3OT INDnKaTOP Mraet, ndeHTnPhiuPyy BbIpaHHbCee NOMOUsIO KOHBeTpE.
4 NHTaHne
CtAndapThoe rHe3do IEC C14 nIy noKIOUOeHnK nCTouHnky nepeMeHHoro ToKa 90-240 B.
5HDMI IN
BndeoBxoHDMI.
6 Ethernet PoE+
Pa3bem nna nocklouehn K cTeBOMy KOMMyTATOpy nn KOMNbiTopepy; nCnoJIb3yETcI nI3MeHHeHHaCTpoek c nOmoBtu ytnntb Teranex Setup. IopT takke o6ecneHBAe Tnauy nItaHn (PoE+).
7 SDI OUT
BndeobbixoSDIc BNC-pa3beOM.
8 ONTnueckn BbIXoD
Ontuueckn BixoL LC-paBem Iy BbIbOa SDI-CirHana C nOMOUIIO DOnONHITeHORo MOyIy I NO CTAnapTy SMPTE. AToMaTuueckn NoD6op fOpMaTbixOHorO CIRHana B COOTBeTCTBm CO BXOJUIM BVDeO.
9 L-ANALOG nnn AES/EBU
BaanhcBn anaIorobb ayuioobxod (neBbKaHa) nnu npoBo ayuioobxOd AES/EBU c XLR-pa3bemOM.
10 R-ANALOG,AES/EBU nn Timecode
Baanchb ananorobb aynoobixo (npaBk KaH) nnn cnpoB aynoobixo AES/EBUC XLR-pa3beom. TaKke donyckaet BBOID taM-KOda.
PepeklouaTei
Teranex Mini - HDMI to Optical 12G IMeET nepeKIOUaTeI, c IOMOuKOtOpbIX MOXHO BbIpaTb pa3nHbIe HAcTpoK KOBepcN.
IpeeknouateIb 8-Analog Audio, AES/EBU Audio
YctahOBtnepeeknIOuateB8NIOJoxHeNE OFF(BbIKL).YTO6bBCTpaNBaTBbanaHCHbn ananorOboB 3Byk.ДЯ pa6OtbIc uINΦpOBbIM AES/EBU-3Bykom bIbEpnte noJoxHeNE ON (BKn).YTO6bPa6oTaTb C3TMMBXODAMN,peeknIOuateB7doJIkeH6bITyCTAHOBInBnoJoxHeNE ON (BKn).
Переклочаль 7-HDMI Audio, Input Audio
YcTaHOBtne nepeKIOUaTeNb 7 B noIOJKeHHe OFF (BbIKl.), YTO6blncnoJIb3OBA Tb 3ByK, BCTpoEHbI bHDMi-cnHAn.ДЯ paBoTb c aHaNoIOrOBbIM mN AES/EBU-ayDIO bIbEpUte noIOJKeHHe ON (BkI).
IpeekkuateB6-Input Audio/Timecode
YcTahOBInTe nepeKIOUaTeNb 6 B noIooXeHne ON (BkN.),yTO6bI noIouaTb TaIM-KoI uepe3 XLR-pa3bEm npaboro aynokaHaA.ДЯ BBOda 3Byka Bb6epnte noIooXeHne OFF (BbIK).
IpeeknouateIb 5-60 to 59.94 OFF/ON
Korda BbIbpaHa HacToPoiKa On, nIa I3o6paKeHn I3 HDMI-ntOuHnKa BblOnHReTcA ABTomAtueeckoe npoeobpaoBaHne fOpMaTa I3 1080p/60 B 1080i (yepeccTpouHna paBepTkca; 59,94 noJ/c).
3TaФyHKUЯMOKET6bITbNoIe3Ha npn BbIOBe rpaΦnKc KOMNbIoTepeHa BInDeoMnKwep.B HeKOToBix cnyaX yactota Ha HDMI-BbIXOe coCTaBnaT 60 kaPob/c. Korda nepeKniouaTeNb 5 haxOnTCB B noLoKeHIN ON,6ydtco3dAnHO n3O6paXeHne C qactotoi 59,94 noJc/C n BbInonHeo ppeOpa3OBaHne n3 1080p B 1080i.
Ipeeknouatei 2,1-Select Format Bit 1,0
Pn npoknyen HDMI-ctouHka, cnoocbo BbBoNTb Ultra HD n HD, 3a hactpoKa nomoraet npHyntelho nCnoB3ObaTb HyxHyo YeTKoCTb. 3Ta onuia MoKet 6b1b noE3HO, KOrda n30paKeHne C Komblotepa Heo6xoJmo 3anncaTb nn npocmotpeTb Ha o6opydoBaHN C SDI-nnn ONtueckm INTEpfeom B HD-paapehen.
XotnnoyamaBn 3oXnHa nobuiaOuyIO nn noHnkaiouyIO KOHBepCIO,Ha cAmOM deNe KOHBepTe pnpabJreNtOchNky KomAny BbIOaNbBvIeO B Ultra HD nn HD. B aTOM cnUae NOCTynauo CnHnpeadaTcna H bIXo6e3 DononHntelhoro npeo6pa0BaHnra.
IcnoIb3yOnpeJeHnyKoBnHaunuNepeKeKnUaTeJe12,MOxHO Bb6paTb npHyDnteHbHbBbBOd B HD nII Ultra HD nIO abTomatueckoe onpeJeHne ontmAbHorO pa3peHn. Hxke OncaHb BO3MOXHbE BapnaHTb HacTpOkiN.
- AUTO - nepekniouateenn 1 n 2 B noonoxeenn OFF (Bbikn.)
KoHBePep aBOMaTnueckn onpeDeneT onTmAlbHoe pa3peWeHne (HD nnn Ultra HD) B 3aBNCIMOCTN OT TexHueeCKnx XapakTePncTnK nctouHnKa CnHaJa.
- FORCE TO HD — nepekliouateIb 1 B noIoxeHn OFF (BblKn.), nepekliouateIb 2 B noIoxeHn ON (Bkn.)
EcnHDMI-ntouHnK noDnepxNbAe TBbBn B HD n Ultra HD, KOHBeptep 6ydt nonuatab HD-cunHan.
- FORCE TO ULTRA HD - nepekliouateIb 1 B noIoxeHnn ON (Bkn.), nepekliouateIb 2 B noIoxeHnn OFF (BblKn.).
EcnHDMI-ntouhNk noDepxmbaET bIBoB v HD n Ultra HD, KOHBepTepe 6ydt noNyatab Ultra HD-curhan.
CxemaHa HnKHei NOBepxHocTKnopnyca codepkNT onncaHne Hactpoek, COOTBETCTByoUnx pa3HbIM NOnOKeHnM npeKnOuatele
Hac troponi Blackmagic Teranex Setup
Ytnta Teranex Setup no3BONrEt n3MeHHTb HAcTPOkN, yCTaHaBnBaEMbIe C NOMOuBIO nepeKlouatenei, a TAKKe DOnoHHTeNbHbIe NapaMeTpbl. IInr DocTyna K 3TmHAcTPOkAM NcNoJIb3yOT BklaKn Video, Audio, Configure n About.
Pabota c Bknaqamn About n Configure onncana B pa3dene «I3meHHeHne HactpoeK» daHHoro pykoBOcCTBa. Bknaqka Video dner Teranex Mini - HDMI to Optical 12G daet BO3MOxHocTB bblopTaONcaHbte Hnke OOnm.
MeHIO Video Processing
Conversion
PakpbBaiooeec MeHIO Conversion no3BolraBb6paTb npaMetpI ppeobpa0aHnHa SDI- nnn onTneckom BbIXOe. Pn Hacptoike Auto KOHBepTeP onpeDnEeOnTmAbHoe pa3peSeHne (HD nn Ultra HD) nCxOJa n3 texHuecknx xapakTePncnK nctouHnKa cnHana. Pn BbOpe OnuN Force HD nn Force Ultra HD BnDeo 6ydt BbOodTbcR B HD nn Ultra HD COOTBeCTBeHNO, He3aBNCmo OT fOpMaTa Ha HDMIBXOe. Dn SA ppeobpa0BaHne He BbONHReTc, no3tOMy CnHAn CoXpaHReT nCxOHOe pa3peSeHne.
Frame Rate
PnA kTBAaun 3ToI yHKun BblnoHreTc npoeopzOBaHne qactoBtBuJeoo n3 60 KaDpoB/c HbXOe B59,94 kaPa/c Ha BbIXOe. NocTabte nn CHmTe pnaKOK Ira BKIOueHn nn OTKnIOueHn 3ToI NaCTPOKN.
HnHn HynKnna nne3Ha B Tex cnyaax, KOrda HDMI-nctouHnC cactoto60 kaipob/c hkyHo NOkNIOHTb KOBOpyDObaHnO C SDI- nOnn ONTnueckm INTEpeEcom, NcNoJIb3yUoEmy fopMaTbIC aactoton 59,94 Kaipa/c.
3G Output
3Ta onuia no3Bolare Bb6paTb OINn 13 DByx ypOBHe nIra ONtueckoro npTa. OHa onpeJeAer cnoocB bVbOda Ia CnHana 3G-SDI, uOcbI oecneHTb COMeCTMOCCTb C oOpdyoBaHem, KOtOpoe noepKnaBae BbOD 3G-SDI toIbKO kak Level A nnN Level B. No ymoJuaHHIO nCnoJb3yETcOnuia Level B.

Hactpoika Conversion Ha BknaKe Video ytnntbl Blackmagic Teranex Setup no3B0n8e T b6paTb onu Auto, Force to HD nnn Force to Ultra HD. Ecnu hactota Ha BXoJe coCTaBn8et 60 kaPob/c, ee moxno pneo6pbaObTaB 59,94 KaPa/c dIra BBbOda Ha o6bopyoBaHne c noDepKko COOTBeTCTByIoUe fo fopMaTa.
BknaKa Audio Tneranex Mini-HDMI to Optical 12G daet BO3MOXHOCTb BbipaT onucaHHbe HIXe onu.
MeHIO Audio Input
Set XLR Input/Set Audio input
3Ta onu nO3B0nAET ha3Naatb pa3bEm XLR nHDMI nB BxOJaEro 3Byka. Ppi nCNoJIb3OBaHn HAcTpoKn HDMl ayDIO n3 HDMl-noToKa 6ydt BCTpoEHO B SDI- nNn ONtueckn CnHAn Ha BbIXoE. HAcTpoKa XLr daet BO3MOXnOcTB bblpaTb BXOD nIa anAnorOBOrO 3Byka, AES/EBU nII naM-KoDa n 3aDabTKaHbI NCxOJaEero SDI- nNn ONtueckoro CnHana, B KOTOpBle 6ydt BCTpoEH 3Byk. TaKxe npedymotpeHa perynipOBKa ypOBH aYdNO.
PnncnoB3oBaHn HacpoaN AES/EBU MoXHO dOnonHnteIbHO aKTHBnPoBaTb onuio Sample Rate Converter. B 3tOM cnyae 3Byk Ha SDI- nOn ONTNueckom BbIXOe 6yDet NMeTb npHHrTyO Ha TeNeBnDeHN hactoty nnckpeTn3aun 48 KfU.
Korda Dolby-3Byk, noctynauouiy cheepa3bem AES/EBU, cnHxpoHn3npyETcno BHeuHemy nctouhky cnHana, onuio Sample Rate Converter hyxho otKlouHTb. Ecn 3toro He cdenaTb, npeobpa0baHne MOKeT obIb HekoppekTHbIM.
Teranex Mini nCnoB3yET noCneHnne HactpoKn He3aBncMo OT TORO, KaNX yCTaHOBNI - C NOMOJIIO nepeKIOUcATEeN, Smart Panel nn Teranex Setup. Ecn noCne nporpaMMHOro 6bHOJIeHN naPametpoB KOHBepTePa nn CHrTna Smart Panel HeoBXODmO BepHyTBc K pyuHOHACTpOKe, MoXeT NOtpeBOBaTcR NOBTopHra yCTaHOBA kOnBbIX nepeKIOUcATEeN.
IINMHeHnYpOBHe aHaNoRoBOro n AES/EBU-aynIO nCnoIb3yETcBkAaJaA Audio ytnntbl Blackmagic Teranex Setup
Hactpoien Teranex Mini Smart Panel
Ecn konhepep HDMI to Optical 12G dononHnTeBHO ochaen naHbTo Teranex Mini Smart Panel, 6yuyT DocTyHb MeHIO Video, Audio N Network. Ix npaMeTpby yctaHaBnBaOT TAK Xe, kak onicaHo B pa3dene Bblwe.
IOnonHnTeBHyIO INOpMaUIO 6NcNoB3OBaHN Teranex Mini Smart Panel cm. B pa3dene «IImeHeHne HactpoE» daHHoro pyKOBoDCTBa.
Teranex Mini Smart Panel n ytniTa Blackmagic Teranex Setup o6ecneHBAHOt DOCTyn K OdnHaKOBbIM HAcTPOJKaM KOHBepTepa
Cxema coeHHeHn Teranex Mini - HDMI to Optical 12G
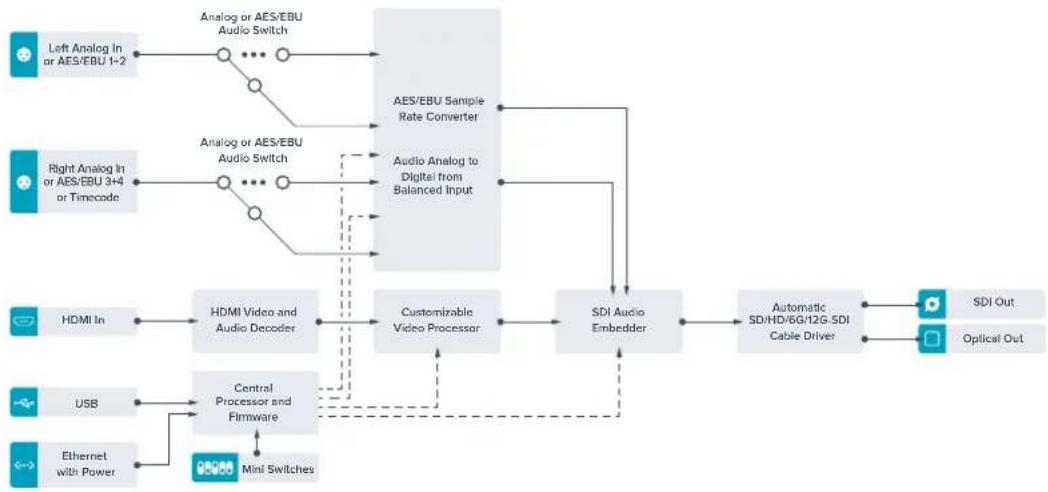
Teranex Mini – Optical to Analog 12G
3Ta MoIeIb BInonHReI ppeOpa3oBaHHe BxOJaIero ontueckoro CnHana, SD-SDI, HD-SDI, 3G-SDI, 6G-SDI nnn 12G-SDI dnn BvBODa BndeOHa aHaIorOBBe BndeOBXoDb (KOMnoHeHThB, NTSC/PAL) n 3Byka Ha balaHcHb AES/EBU- n aHaIorOBb ayDIOBbXoDb. NOnHXaIOuA KoHBepcnHa annapaTHom yPoBHe no3BOJrT npHmAtb CnHAn 12G-SDI ueE3 onTneckn BxOd nn BNC-pa3bEm nner nepeDaHn aHaIorOBoe SD- n HD-OBOpudBaHne, B Tom uNcNe Betacam SP n VHS-BnDeomarHntofoHb. TaKke MOxHO BbIeJIb Napbl ayDIOKaHANOB n3 16-KaHaJIbHOrO 3Byka, BCTPOEHORo B ONTueckn nnn SDI-notok.
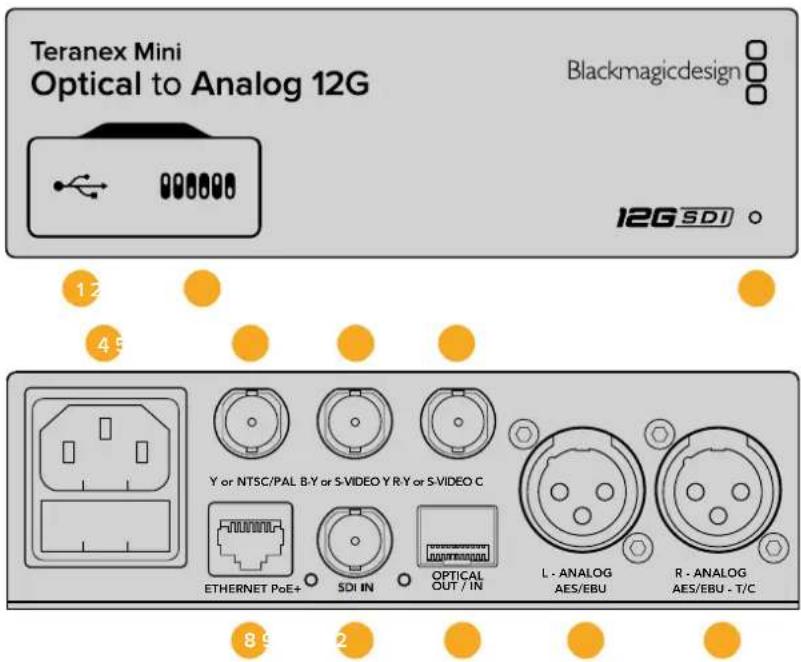
Pa3beMbl
1 Flopt Mini-B USB
IcnoJIb3yETcIgI I3MeHHeNHaCTpoE K O6HOBHeHHI pOoINBKN Teranex Mini c NOMOu yTInNTbl Blackmagic Teranex Setup, yctahOBHeHHoH Na KOMNbTepe C natafOpMoM Mac nn Windows.
2 Pepeknlouatae nn
HactpanBaemble nepeknouateennIy n3MeHenHaCTpoeK.
3 CBeToNDnOaHbI INdNkAToP coCToRHa
Fopnt 6eIbIM CBTOM npn PIOKJIIOUeHn K cETn 3eJIeHbIM CBTOM npn OOBaHpyKeHN CuHaHa.
Pp npaboTe cyTNIuToB Blackmagic Teranex Setup 3OT nHdNkATOp mraet, nJeHTnФuPyB bIbpaHHb C ee nOMOsBu KOHBeTpep.
4Питане
CTaHapTHoe rHe3do IEC C14 nI NOkJIIOUeHnK INCTOUYHKy nepeMeHHoro ToKa 90-240 B.
5 Ynn NTSC/PAL
BNC-pa3bem nIy BbIBOda aHaIorOBoro KOMnoeHTHO (Y) nn KOMno3uTHoro (NTSC/PAL) CnHAnOB.
6 B-Y u n s-VIDEO Y
BNC-pa3bem nIy BbOda aHaNoRoBOr KOmNoHeTHOrO (B-Y) cHana nn S-Video (Y).
7 R-Y mnn S-VIDEO C
BNC-pa3bemДЯВьОda aHAnorOBOrO KOMNoHeHTHOr (R-Y) cHnHa nN S-Video (C).
3 Ethernet PoE+
Pa3bEm nIy noIcklOHeHnK cTeBOMy KOMMyTaTOpy IIN KOMNbIeTpPy, IcNoIb3YeTCaIy
n3MeHnHaCTpoE K nOmoIbYtNITbI Blackmagic Teranex Setup. Ipot TaKke oBeecneuBaet
noaCy nItaHn (PoE+).
9 SDIN
BnneOBxOaSDiBCN-pa3bEmOM.
10OnTnueckn BxOaN BbIXoA
OnTnueckn BnDeoBxOJ n BixOg (LC-pa3bEmbl) IJI nepeaun SDI-cnrHana c nomoucbIO dononHntelbHoro moyn no cTaNapTy SMPTE. AToMaTneCckoe onpeJeeneHe S D, HD, 6G- n 12G-SDI. OnTnueckn BbIXoJ taKke MoXHO nCNoIb3OBaT b KaK CKB03Ho npT.
11 L - ANALOG nnn AES/EBU
BanaHcHbI aHaIorObI ayIOOBixoI (neBbI KaHaI) nnu cnpobOy ayIOOBxOJ AES/EBUC XLR-pa3beMOM.
IpeeknouateB8-Analog Audio,AES/EBU Audio
YctaHOBtne nepeKIOUATEb 8 b noLoXeHne OFF (BbIKn.), yTo6b bBbOoNTb 6aHaCHb aHaIOrOBb 3Byk, nn ON (BKn.) dIra nCnoNb3ObaHna AES/EBU-BbxOda.
IpeeknouateIb 7-7.5 IRE,0.0IRE
B CIIA u ctpaHax, nCnoIb3yIOxix cTAndapt NTSC (7.5 Setup), yCTaHOBITE nepeKIOUcATENB 7 B noIOXeHne OFF (BbIKn.). B cTpaHax, He noIDepKINBAIOxix nOIO6bH b CTAndapt (HaNPIMeP, B rONHN), BbIePeITe nOIOXeHne ON (BKn.). 3Ta hAcTPOJka BInreT ToIbKO Ha BbIXoBJI KOMN03NTHorO CInHana N S-Video.
IpeeknouateB6-SMPTELevels,BetacamLevels
Длг SMPTE yctahOBHTe nepeKluOaTeIb 6 b noLoXeHne OFF (BbIkn. ,дЯ Betacam - B noLoXeHne ON (Bkn.). Hanboone yacTo ypoBeHb cRrHana yctaHaBnBaETcNo cTaNdApTy SMPTE, paBoTy c KOTOpbIM noDepKmbAOT daKe yCtpoiCTBa Betacam SP. HAcTpoUky dJa Betacam SP cIeNyET BbIpaTb IuMb B TOM Cnyae, ecNn Bbl yBepHb, YTO obOpyDoBaHne nCnoNb3Eyet ypoBeHb Betacam.
Ipeeknouateb 5 - Component nnn Composite/S-Video
UcTaHOBInTe nepeKIOuATEb 5 B noLoXeHne OFF (BbIKn.), yTOb6y BbIBOaNTb BVIOe Ha aHaIorOBbIKOMNoHEHTbBbIXoJ.ДЯ nCOnb3OBAHnKOMNo3HTHO BVIXoJa nnS-Video ycTaHOBInTe nepeKIOuATe b B noLoXeHne ON (Bkn.). YTOb6y BxOJaun HD-cnHan noctynan Ha pa3bEm S-Video nnKOMNo3HTbBbIXoD BΦopMaTe SD, HeoBXoIMMo BKIOuHTb NOHkaioU KoHBepCIO, yCTaHOBINPepeKIOuATe b 1 B noLoXeHne ON (Bkn.).ДЯ KMNoHEHTHO aHaIorOBoro BVIOeNoIepKJBaOTc HDoSD.
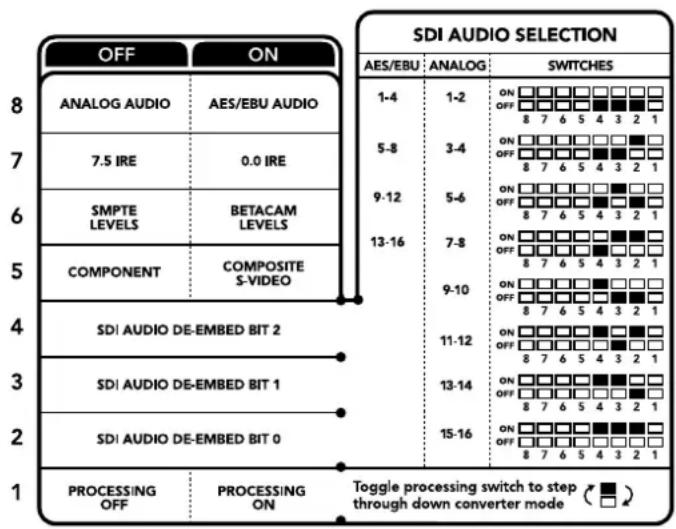
CxemaHa HnKHeH NoBepXHOCTN Kopnyca coepxHt onncahne Hactpoek, COOTBeTCTByOuNX pa3HbIM NOONKeHHM nepeKIOUaTeNei
Ipeeknouateb1 - Processing Off/Processing On
3TOT nepeknioateIb no3Bolnre nImeHnt nponopun KaPpBa BO BpeM npoeobpa0aHnna 13 Ultra HD nnn HD h BxOe B SD ha aHaNoROBom BixOe. POno6Hoe npoeobpa0aHnne Heo6xoDmIo H3-3a pa3Horo cooTHoWeHHn CTOpOH. B Ultra HD n HD oHO CoCTABnREt 16:9, B SD -4:3.
Ipyem nocneobatebHoro nepeKIOueHn moXHO bIBpaTaOHy n3 trpx onu: Anamorphic, Center Cut n Letterbox. B nepBOM cnyae n3o6paxeHne 6ydet BbITraHyTO, BO BTOPOm - o6pe3aHO, a B TpeTbeM cBepxuy cn33y doablaHOTc uehblie noocbl. Ppi kaoDoY yCTAHOBKe nepeKIOUaTeTn 1 B noLoXeHne ON (Bkn.) BblonHaeTc npexoK C Cleduooue onu.
Hactpoika nepeeknouate1 1 daet pa3hny 3aBNCMOCTN OT fOpMaT aHaIoroBO rBideo Ha BixOe. Komno3HTbI cRrHan bcerda nmeet SD-pa3peweHne, no3tomy B noLoXeHN OFF (BbIKn.) IcNoJIyETcnaocneHry onu, B6paHHa dna npeobpa3OBaHn npOnopcu KaDpa. KomnoHeHTbI cRrHan donyckaet nepedaay HD-BuDeo, no3tomy npn noLoXeHN OFF (BbIKn.) MoKHO BInOnHITb npeobpa3OBaHne n3 SD B HD C BbIBODom aHaIorOBTO n3O6paeHn Ha uipokn ekpan 6e3 n3MeHn nponopuc kadpa.
AydnookaHaJIbI SDI-cnHaJa
Kombu npy hactpoikn nepekniouateene, moxHO bbopaTa aynoKaHaBb SDI-noToKa, kToptbe Teranex Mini - Optical to Analog 12G byet BboDnTb Ha aHanoRbB nnu cnpboB (AES/EBU) BxObl.
| Аналоговы audиokанны | Переклочател 4 | Переклочател 3 | Переклочател 2 | Положения поштейки |
| 1 и 2 OFF OFF | ON OFF 8 7 6 5 4 3 2 1 | |||
| 3 и 4 OFF ON | ON OFF 8 7 6 5 4 3 2 1 | |||
| 5 и 6 OFF ON OFF | ON OFF 8 7 6 5 4 3 2 1 | |||
| 7 и 8 OFF ON | ON OFF 8 7 6 5 4 3 2 1 | |||
| 9 и 10 ON OFF OFF | ON OFF 8 7 6 5 4 3 2 1 | |||
| 11 и 12 ON OFF ON | ON OFF 8 7 6 5 4 3 2 1 | |||
| 13 и 14 ON ON OFF | ON OFF 8 7 6 5 4 3 2 1 | |||
| 15 и 16 ON ON ON | ON OFF 8 7 6 5 4 3 2 1 | |||
| Аudиokанны AES/EBU Переклочател 4 Переклочател 3 Переклочател 2 Положения поштейки | ||||
| 1-4 OFF OFF | ON OFF 8 7 6 5 4 3 2 1 | |||
| 5-8 OFF ON | ON OFF 8 7 6 5 4 3 2 1 | |||
| 9-12 | OFF ON OFF | ON OFF 8 7 6 5 4 3 2 1 | ||
| 13-16 OFF ON ON | ON OFF 8 7 6 5 4 3 2 1 | |||
Hac tropon Blackmagic Teranex Setup
Ytnta Teranex Setup no3B0JETn3MeHnTB HAcTPOKn, yCTaHaBnBaEmbIe C nOMOuBo nepeKIOUATEne, a TAKKe DOnONHITeNBHe NapaMeTpbl.
Длд дocунк STIM Hactpoikam IncnoIb3yOT BknaKn Video, Audio, Configure n About.
Pa6ota c Bklaikamn About n Configure onucaHa B pa3dene «IzmeHne Hactpoek» daHHoro pykoBOOCTBa.
Bklaika Video TeraX Mini - Optical to Analog 12G daet Bo3moKHOCTb Bb6paT onncaHhle Hxke onu.
MeHIO Video Output
3TO MEHO NO3BOJAE T Bb6paTb BxOd IJIa BBBOda BnDeo (KOMnoHENTBHy INIIN S-Video/KOMno3HTbI), a TaKke HAcTPOntb JPKOCTb NCBtHocTB, yPoBHN B-Y IN R-Y KOMNOeHTHOrO CnHana.
Пи Испьзовани S-Video/KOMоЗнTORO BixOДа мОжно ДОпОнHITeьНу yctaHOBtBu ypoBHe bepHOrO (7.5 IRE nnn 0.0 IRE)В завсимости OT Baшero PernoHa.KOMnoHENToe BIneo nO3BOJnReT bIbpaT ypoBHe cnHana no StAndapTy SMPTE nIN Betacam.HanboJee qacto ypoBHe cnHana ycTaHabnBaetcno StAndapTy SMPTE,paobTo cKOTOpbIM noDdePcknBAoi Tdxae yCTpoiCtBa Betacam SP. HAcTpoy dny Betacam SP cneDyET bIbupaT lyMb B Tom Cnyae,ecNn Bbl yBepHebl,HTO obopydobAHne IncnoB3yeT ypoBHe Betacam.
MeHIO Video Processing
3TO MeHIO No3BOJnEe BbIbnpaB nponopm Kaapn pnp BbINNoHEHm noHxKaUoe KOBepcm. MoXHO nCnoB3OBAtppeKIMb Letterbox, Anamorphic, Center Cut nnOnuOFF.
BklaKa Audio dIa Teranex Mini - Optical to Analog 12G daet Bo3MOXHOCTb Bb6paTb onucaHHbI Hxke onu.
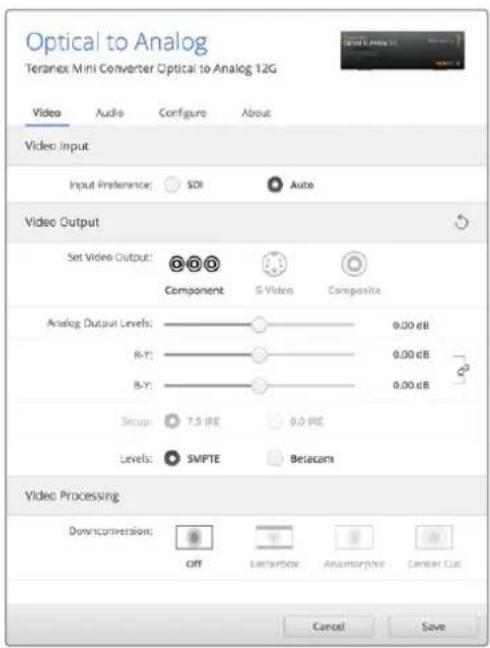
Bkna Video ytnnblt Blackmagic Teranex Setup noBonaet HactpanBaT npKocT nCBETHOCTb N60 toBko UeTHOCb (JIN KOMIOHHTHO CnHa)
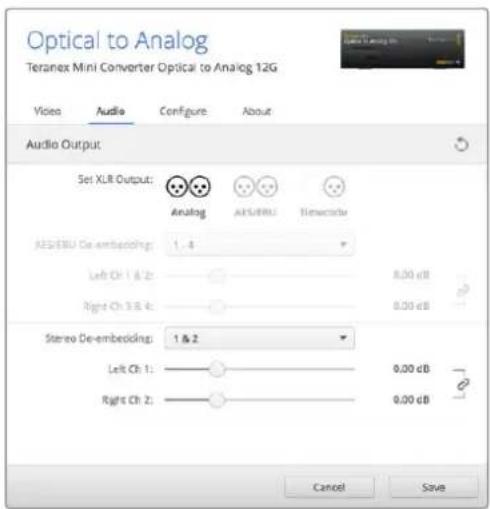
IINnHmEnHnYpOBHeaHAnorOBoRo nAES/EBU-ayduNcnonb3yeTcBklaJaAudi
MeHIO Audio Output
MeHIO nO3B0JRE Bb6paT bBixO dIra anaIaroroboro 3Byka, AES/EBU nn TaM-KoJa, a TaKKe 3aIaTb ayDnOKaHaJIb, KOtOpBie Heo6xOdmo n3BLeuY n3 BxoJrero SDI-cirHana. TaKKe moXHO peryInpoBaTb yPOBeH 3ByKa Ha BbIXOJe.
Teranex Mini nCnoB3yET nocneHHe HactpoKn He3aBcMIO OTTO, Ka Kx yctaHOBNI - C NOMObI nepekIoUaTeNe, Smart Panel nn Teranex Setup. Ecn nocne nporpaMMHOro 6OBHeHnnapaMeTpO BONBePepa nn ChTna Smart Panel Heo6xoDmIO BepHyTBcK pyHOn HactpoKe, MoKet notpe6oBaTbcN NOBTopHaY cTaHOBA kOTdNbHbIX nepeKIOuAteNe.
Hactpoyn Teranex Mini Smart Panel
Ecnn konhepdep Optical to Analog 12G donolntelbno ochuen nanelebo Teranex Mini Smart Panel, 6ydt doctynb MeHIO Video, Audio n Network. Ix npaMeTpbl yctahabnaTak je, kak onicaHO B pa3dene «Hactpoikn Blackmagic Teranex Setup» Bblwe. DonolntelbHyu HfOpmauio 6bncnB0BaHH Teranex Mini Smart Panel cm. B pa3dene «N3meHeHne Hactpoek» daHoro pykoBODCTBA.
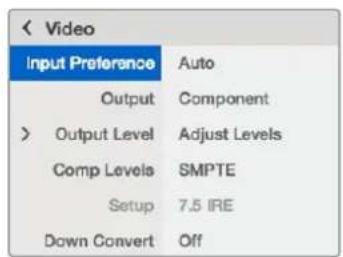
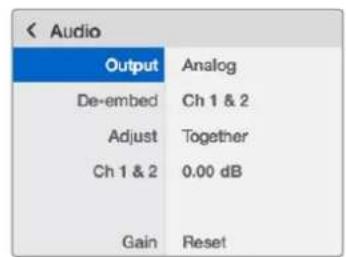
Teranex Mini Smart Panel n ytnnTa Blackmagic Teranex Setup oecneuaioTdoctyn K odHaKOBbIM HactpoKaM KOHeptepa
Cxema coeHHen Teranex Mini - Optical to Analog 12G

Teranex Mini – Analog to Optical 12G
3a moenb npoeobpa3yet Bndo n ayno, noctynaoune c ananoroboro obopyoaba (hanpimep, Betacam SP, HDV-kaempei n irpoobie npnctabkn), B cnHan 12G-SDI dnynepeaun Ha onntueckn nop Tnn BNC-pa3bem. Dna ananorobbx fopmatOB npecdymotpehki kOMNOeHTBHe NHTepceHc b SD/HD n S-Video, kOMNo3nTbte BxOdb NTSC n PAL. Ha onntueckom n 12G-SDI-bixode B cnHan moxho BCtpaanBaT uNfpoBoA AES/EBU- nn ananorobb 3Byk.
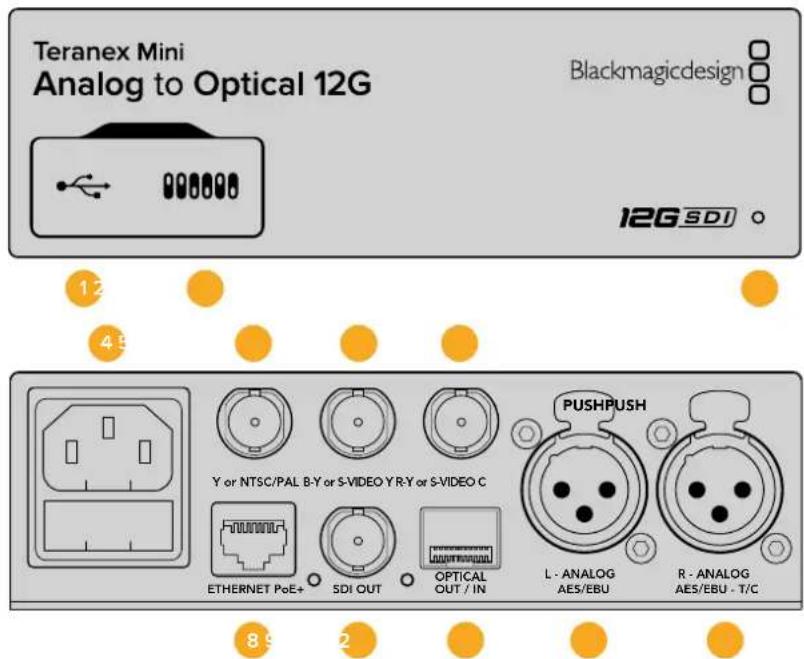
Pa3beMbl
1 Nopt Mini-B USB
NcnoB3yercn nIg nIeHn HAcTpoek nOboHneHn npoWbKn Teranex Mini c nOmoaBkyntnt Beranex Setup, yctahOBHeHHo Ha kOMNbTepe c nlatpOpMoMac nn Windows.
1peeknouatei
HactpanBaemble npeekKIOUaTeINI INI N3MeHeHn HAcTpoeK.
3 CBetOIOHbI INHdNkATOP COCTOHHA
Topnt 6eBtOM npn noKnueHn K cTeN n 3eJeHbIM 8eTOM npn oBapyKeHH CNHaHa.
Pp npaboTe CytInrToB Blackmagic Teranex Setup 3OT INDkaTop Mraet, IeHTnFncpy BbipaHbI C ee NOMOsbKOHBeTpE.
4Питаннe
CtAndapThoe rHe3do IEC C14 nIy noKIOUeyHnK nCTouHnky nepeMeHHoro Toka 90-240 B.
5 Ynn NTSC/PAL
BNC-pa3bem nI BxOJaIero aHaIorOBoro KOMIOHHTHO (Y) IIN KOMIO3HTHO (NTSC/ PAL) cIraHIOB.
6 B-Y nn S-VIDEO Y
BNC-pa3bem nIy BXoJzepero aHaororOBoro KOMnoHeHTHoro (B-Y) cnHaana nn S-Video (Y).
7 R-YnnS-VIDEO C
BNC-pa3bEm nIy BXoJzero aHaIorOBoro KOMnoHeHTHoro (R-Y) cnHaHa nn S-Video (C).
8 Ethernet PoE+
Pa3bEm nIЯ NOdklquHnK CteBOMy KOMMyTaTOpy IIN KOMNbIeTpPy, NcNoJIb3yETcra IINaMeHHeHn HAcTpoE K nOmoUy yTInNTbI Blackmagic Teranex Setup. Iopr taKke oBeceNeuBaet IOnaCy nITaHn (PoE+).
9 SDI OUT
BndeOboIxOD SDIC BNC-pa3beOM.
10 OnTnueckn BbIXoA
Ontuueckn BixoL LC-pa3bEm nIy BvBoda SDI-cirHana c NOMOUIIO DOnONHITeHORO MOyJn no cTAnapTy SMPTE.ABtomatueckn noD6op fOpMaTa BixoHoro CIRHana B COOTBeTCTBm CO BXOIAIM BVIDcE.
11 L - ANALOG nnn AES/EBU
BaanhcBn aHaNoRbB ayDIOBXoD (neBb KaHAn) nnu cnpoBoa ayDIOXoA EAS/EBUc XLR-pa3beom.
IpeeknouateB8-Analog Audio,AES/EBU Audio
YctahOBHTe nepeKIOUATEB 8 NnoXeHne OFF (BbIKn.), YTO6b BbIpaTb 6aHaHcHbI aHaIorOBbI 3ByK, INN ON (BKn.) drrncnonb3OBAHnA EAS/EBU-BxoJa.
IpeeknouateIb 7-7.5IRE,0.0IRE
B CIIA n ctpaHax, nCnoIb3yUOxN x CTanDapr NTSC (7.5 Setup), yCTaHOBnTe nepeKIOuataeIb 7 B noIOXeHne OFF (BblKn). B cTpaHax, He noIDepKINBAIOxN noIO6HbI CTAnDpAr, BblEpeIte noIOXeHne ON (Bkn.). 3Ta HAcToPouKa BInReT ToIbKO Ha BblXoDbI KOMNo3NTHOrO CnHana I S-Video (NTSC).
IpeeknouateB6-SMPTELevels,BetacamLevels
3a HactpoKa no3BolaretncnBzOBaTb DBe onu: SMPTE uN Betacam. DnA SMPTE yCTaHOBtne nepeKluatel 6 B noLoXeHne OFF (Bbl).DnA Betacam-B noLoXeHne ON (Bkn.).Haioonee qacto ypOBeH cnHaHa ycTaHaBnBaetcno cTaNapTy SMPTE,paOby C KOtOpbIM nOdepxNBaOT MHOrne yctpoCTBa Betacam SP.HacPoKy dJa Betacam SP cnDeyET BbIpaTb NlubB TOM cnUyae,eCnB bI yBepHe,HTOobopyoBaHne nCnlo3yETypoBeH Betacam.
| OFF | ON |
| ANALOG AUDIO | AES/EBU AUDIO |
| 7.5 IRE | 0.0 IRE |
| SMPTE LEVELS | BETACAM LEVELS |
| COMPONENT | COMPOSITE or S-VIDEO |
| COMPOSITE | S-VIDEO |
| SD TO HD OFF | SD TO HD ON |
| HD TO UHD OFF | HD TO UHD ON |
| INPUT AUDIO | TIMECODE |
CxemaHaHnKHei ctopoHeTeranex Mini coepknt onncane hactpoek, COOTBeTCTByIOxuNx pa3HbIM noIOXeHNm nepeKIOvateNei
Ipeeknouateb 5 - Component nn Composite/S-Video
YcTaHOBtTe nepeKIOUaTeIb 5 B noLoXeHne OFF (BbIKn.), yTo6bI bIbpaTb aHaIIOBbI KOMIOHeHTbI BxOJ. DnBa BbOpa KOMNo3HTHO BxOJa N S-Video ycTaHOBtTe nepeKIOUaTeIb B noLoXeHne ON (BKn.).
Переклочальь 4 - Compositie, S-Video
UcTaHOBnTe nepeKIOuOaTeIb 4 B noIOxKeHne OFF (BbIK).IINBaBbOpa KOMno3HTHO BInDeoBXOJa.HTobBi CnHnNoCTyNaHa pa3bEm S-Video,yctAHOBnTe nepeKIOuOaTeIb nnoIOxKeHne ON (BKn.).
IpeeknouateB 3 - SD to HD
YcTaHOBInTe nepeKIOUaTeIb 3 B noNoJKeHne ON (BKn.),TO6bHa SDI- nIN oTNueeCKOM BbIXOe BeINnHtB NOBbIaIOUkyo KOHBepcNIO I3 SD B HD, KOrDa Ha KOMno3HTbI, KOMnoHeHTbI nIN S-VideoBXOdbI NoCTyNAET SD-CrHaN. YcTaHOBInTe nepeKIOUaTeIb B noIOJKeHne OFF (BbIKn., TO6bCIrHaJIbHa BbIXOe IN BXOde IMeII ODNHaKOBoe pa3peSeHne.
IpeeklouateIb 2-HD to UHD
YcTaHOBnTe nepeKIOUATEb 2 B noLOXeHne ON (BKn), YTObI Ha SDI- nII nn onTnueckOM BixOde BInOnHrTb NOBIIaOuSyIO KOHBepCNIo B Ultra HD, KOrda H a KOMnoHeHTbI BxOd noCTynaeT HD-cnHaI. YcTaHOBnTe nepeKIOUATEb B noLOXeHne OFF (BbIKI), YTObI CnIHaJIb I Ha BIXOde n BXOde IMeIN ODNHakOBoe pa3peSeHne.
Ipeeknouateb1-Input Audio/Timecode
YctahOBtte nepeKIOUaTeIb 1B noLoXeHne ON (Bkn.), YTO6bl nOlyaTa b TaIM-KoD uepe3 XLR-pa3bem npaboro aynokahana.ДЯ BBOda 3Byka BbIbepnte noLoXeHne OFF (BbIK).
Hac troponi Blackmagic Teranex Setup
Ytnta Teranex Setup no3B0n8ET N3MeHHTb HAcTPOIK, yCTaHaBnBaEmbIe C nOMOIO nepeKIOuATenei, a TAKKe DOnONHITeNBHe I npaMeTpbl.
ДяdoctункэтимнсгposьуOTвлдkn Video,Audio,Configure nAbout.
Pabota c Bknaikamn About n Configure onicaHa B pa3ene «I3meHHeHne HactpoeK» daHHoro pykoBODCTBa.Bknaika Video dny Teranex Mini Analog to Optical 12G daet BO3MOxHocTb Bb6paTb ONcaHHbIe HIXe ONUIN.
MeHIO Video Input
3TO MeHIO NO3BOJnEe TBbIbpaTb BnDeoBXoD (KOMNoHeHTbH, S-Video NnN KOMNo3HTbH), a TaKKe HAcTPOITb JRPKocTB nCBETHOCTb, yPOBHn B-Y n R-Y KOMNoHeHTHOrO CnHana.
PnncnoB3oBaHnn S-Video nn KOMNo3nTHoro BxOda MoKHO dOnoHnTeNbHO yCTaHOBnTb ypoBeHb cepHoro (7.5IRE nn 0.0IRE) B 3abNCIMocTn OT BaWero perNoHa.
KOMHOENTHOE BINOEOI NO3BOJAEYBbpaTy ypoBeH cINHaI NO cTAndApTy SMPTE nIi Betacam. HanboJeue aacto ypoBeH cINHaI yCTaHaBnBaETcN o CTAndApTy SMPTE,paOToC KOtOpBM IIOePknBaHT daKe yctpOcTBa Betacam SP.HAcTPOky dIe Betacam SP cNeyEt bIbnpaTb Nlub B TOM cnUyae,ecnbl bYbeHb,tyoOBOpDobAHne nCNoJIb3Eyet ypoBeH Betacam.
MeHIO Video Processing
3TO MEHIOI0B0JAEET BbIbIpaTb IapaMeTpbl KOHBepCINB 3aBUNMOCTN O TNCIOJIb3yEMOHOHAIOROBO BXOJa.
Ecnn CnHn nocTynaeHa KOMnoHeHTbBxOa, MoXHO BblOnHnTb ppeo6pa3OBaHne HSD HND HA Ultra HD. Korda CnHn nocTynaeHa pa3bem S-Video nn KOMno3HTbBxOa, DoCTyHa KOHBepcna ToNbko n3 SD B HD.
BklaKa Audio TeraTeranex Mini - Analog to Optical 12G daet BO3MOXHOCTb BbIpaT bOncaHHbIe Hxke onu.
Bkna Video ytnnbl Blackmagic Teranex Setup nOaONaET HacpTaBaT npKocTb NBeTHOCb I60 TOnbko UeTHOCb (DnA KOMNoHHTHO CnHa)
IIN3MeHnYpOBHeaHAnorOBOrO nAES/EBU-aynoNcNoB3yETcBknaAudi
MeHIO Audio Input
MehIO no3BONJET Bb6paTb BXoI Ia anHanoRorO 3Byka, AES/EBU nIIT aTm-KoJa, a taKke 3aDaTb KaHaJIbI NCxOJaIeO ONtUeCKOrO IIN SDI-crHana, B KOToPbIe 6yIeT BCTpoE 3Byk. TaKke npedcMoTePa perynipOBKa ypOBH ayDnO.
PnncnoB3oBaHn HactpoKn AES/EBU moXHO doonHntelHo aKTHBnPoBaTb onuio Sample Rate Converter. Pn BbOpe 3toon onu Ha onTuWeckn nn SDI-BbXoN noctynaet 3Byk c cactotoi nckpTea4n 48 K, pa3paHoc7b 24 6nt.
Teranex Mini nCnoJIb3yET nOcneHHe HAcTPOKn He3aBNCMO OT TORO, KaKnx yCTaHOBNI - C NOMOJIbNOpeKIOUATENe, Smart Panel nn Teranex Setup. Ecn nocne nporpaMMHO rOobNEHn napametpoB KOHBepa nn CHrTHN Smart Panel Heo6xOIMo BepHyTBc KpyHn HAcTPOKe, MoXeT NotpeBOBaTcN NOBTOpHaY UCTAHOBKa OTdEhBbIX nepeKIOUATENe.
Hac troponi Teranex Mini Smart Panel
Ecnn KOnBepTep Analog to Optical 12G donoHntelbno ochuen naHelenToeranex Mini Smart Panel, Bynyt DocTyHm MeHIO Video, Audio n Network. Nx npaMetpy yctahabnBaIOT Tak Xe, KaK onncAo B pa3dene HactpoKn Blackmagic Teranex Setup> bIwe.
3 CBeToIOIaHbI INHdNkATOp COCTOHHa
TOpNT 6eIbIM CBeTOM npn NpOKnIOUeHm K cTeN n3eNeHbIM CBeTOM npn OOBaHpyKeHm CnHaHa.
Pp npabote c cytINrToB Blackmagic Teranex Setup eTOT INDnKaTOp Mraet, IeHTnФuCypr BbIpaHHbCce NOMOsbKOHBeptep.
4 Ntahme
CtAndapThoe rHe3do IEC C14 nIy noKJIouHEny K NCTOuyHKy nepemHHoro ToKa 90-240 B.
5 Ontnueckn aydnoBbIXoS/PDIF
CunHan S/PDIF uepe3 pa3bem TOSLINK
6 L-He6aHaHcHbI aHaIorOBbI ayDnOBbIXoH HI-Fl (JInHeHbI cRHaJI)
RCA-pa3bem He6aJIaHcHOrO ayuINOBbIXoJa (NeBbI KaHaJI).
7 R-He6aHcHbI aHaIorObIy ayDnOBbIXoHi-Fi (nHneHbI cnHrHan)
RCA-pa3bEm He6baHCHOro aydnoOBbxOJa (npaBbKaHa).
8 Ethernet PoE+
Pa3bem nIIOKJIoueHnK CetEBomy KOMMyTaTOpy IIN KOMNtBtEpy, NcIOJIb3yETcI INaMeHeHn HAcTpoek C NOMOu yTuNTbI Blackmagic Teranex Setup. Ipot Takke obecneuBaet noauy nITAHn (PoE).
SDIN
BndeoBxOaSDiBCN-pa3bEmOM.
10OnTnueckn BXoN BbIXoN
OnTnueckn BnDeoBxOuN BbXoD (LC-pa3bEmbl) nI nepeaun SDI-cnrHana c nOmoUdoonHntelhoro moyn no cTaNapTy SMPTE. AToMaTHueckoe onpeJeHene SD, HD, 6G-12G-SDI. OnTnueckn BbXoD TaKke MoXHO NcNoJIb3OBaTb KaK CKB03Ho IooT.
11 L-ANALOG nn AES/EBU
Baanchb ananorobb aynoobxod (neBbKaHa) nnu npoBo aynoobxod AES/EBU c XLR-pa3beMOM.
12 R - ANALOG, AES/EBU Timecode
BaHcHbI aHaIorOBbI ayIOBbIXoD (npaBb I KaHaI) IIIN cIePpOBoI ayIOBbIXoD AES/EBU C XLR-pa3bEmOM. TaKxe dOnyckaet BbBOd TaIM-KOJa.
Pepeknloatei
Teranex Mini - Optical to Audio 12G UMeet nepeKIOHateN, c NOMOuKOToPbIX MOXHO BbIpaTb pa3nHbHe HAcTpOKn KOHbepcnn.
IpeeknouateB8-Analog Audio, AES/EBU Audio
YctaHOBtne nepeKIOUATEB 8 nnoJKeHne OFF (BbIKn.), yTObI bIBoNDt b6aHaCHbI aHaIorOBbI 3ByK, nn ON (BKn.) dnnncnOsbOBAHn uNΦpOBOr AOES/EBU-BbIXOda.
Ipeeknouateb7-Output Audio/Timecode
YctahOBtne nepeKIOUATEb 7 B noIOxKeHne ON (BKn.),TTO6bI bIBoDnTb TaM-KoJ uepe3 XLR-pa3bEm npaboro aydnoKaHaJa.ДЯ bIBOda 3Byka bIBepeTe noIOxKeHne OFF (BbIKn.)
Ipeeknouatei 6,5,4-SDI Audio De-Embed Bit 2,1,0
Ipeeknioateen 6,5 n 4 cooBcTByOT 6ntam 2,1 n O. IcnoIb3yra pa3nnuHbIe kOmbHaun ON/OFF nI nepeeknioateen 6,5 n 4, moKHO BbIpaTb, kaKHe ayDIOKAHbI BxOJaero onTnueckoro nn SDI-noToKa BBdJIaTb DnR BBIODa Ha ayDIOBbIXoJ.
CxemaHa HnKHeH NOBepxHOCTN KOpnyca CoepkHT ONCAHHe HAcTpoek, COOTBeCTByOuNX pa3HBIM NOnOKeHnM NepeKIOUaTeNei
Быденине 3вукa n3 SDI-nOTOKa
| Аналоговы щадиоканы | П配电лочател 6 | П配电лочател 5 | П配电лочател 4 | Положения п配电лочател |
| 1-2 OFF OFF | ONOFF87654321 | |||
| 3-4 OFF ON | ONOFF87654321 | |||
| 5-6 OFF ON | ONOFF87654321 | |||
| 7-8 OFF ON | ONOFF87654321 | |||
| 9-10 ON OFF | ONOFF87654321 | |||
| 11-12 ON OFF | ONOFF87654321 | |||
| 13-14 ON ON | ONOFF87654321 | |||
| 15-16 ON ON | ONOFF87654321 |
| AydinoKaHaJIbAES/EBUПepeKIIIOuATEIb6ПepeKIIIOuATEIb5ПepeKIIIOuATEIb4ПoLoJXeHHepepeKIIIOuATEIa | ||||
| 1-4 OFF OFF OFF | ONOFF87654321 | |||
| 5-8 | OFF OFF ON | ONOFF87654321 | ||
| 9-12 OFFONOFF | ONOFF87654321 | |||
| 13-16 | OFF ON ON | ONOFF87654321 | ||
Hac troponi Blackmagic Teranex Setup
Ytnta Teranex Setup no3B0n8et n3MeHnTB HacTpoiKn, yCTaHaBnBaembIe C nOmoIbIO nepeKlouateNe, a TAKKe dONoHNHTeNBHe npaMaTePbl.
ДяdoctynaКэтнHасtpoикamИспьыIТВknädknAudio,ConfigureNAbout.
Pabota c BklaKamn About n Configure onicaHa b pa3ene «IImeHne Hactpoek» daHHoro pykoBOdCTBa.
BklaKa Audio nT eranex Mini - Optical to Audio 12G daet BO3MOXHOCTb BbIpaTb onncaHHbe HIXe onu.
MeHIO Audio Output
Meho no3b0nre T b6paT bixO dI aHanoRorO 3Byka, AES/EBU nI I TaM-KoA, a taKke 3aDaT ayNOKaHaJIb, KOTOpBIE HeoXoDIMO n3Bney I3 BxOJaero onTuYeCKoro nI NSDI-curHana. TaKxe MoKHO peYInuPoBaT yPoBeH 3Byka Ha BixOde.
Teranex Mini IncnoB3yET noCleHne HAcTpoKn He3aBcIMo OTTO, KaX yCTaHOBnI - C IOMOuB nepekIouateNe, Smart Panel nnn Teranex Setup. Ecn noCle nporpaMMHoro oOBLeHna napametpoB KOHePepa nn ChTnA Smart Panel Heo6xOaMn BepHytbc K pyHoi HAcTpoKe, MoKeT Notpe6oBaTbca NobTopHa yCTaHOBka OTdNbHbIX nepeKIOUaTeNe.
ДиИЗмЕнEHуPoBHeaHAnorOBoRoI AES/EBU-aynIOncnoJIbAyerC BkJaKa Audio yTInNtBi Blackmagic Teranex Setup
Hactpoikn Teranex Mini Smart Panel
EcnKoHBeptep Optical to Audio 12G dononHntelho ochaue naneBTo Teranex Mini Smart Panel, Bydt DocTynbl MeHIO Audio n Network. Ix npaMetpy UcTaHaBnBaIOT Tak Xe, KaK onncAHO B pa3dene «HactpoKn Blackmagic Teranex Setup» bIiJe. DononHntelbHyIO INΦopMaioo O6 nCnOlb3OBAHIN Teranex Mini Smart Panel cm. B pa3dene «IImeHHeHne Hactpoek» daHHoro pykOBODCTBa.
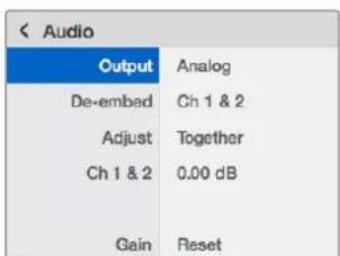
Teranex Mini Smart Panel n ytnnta Blackmagic Teranex Setup oecneuBAOT doctyn K OdnHakOBHM HactpoiKaM KOHepepa
Cxema coeHHeHn Teranex Mini Optical to Audio 12G
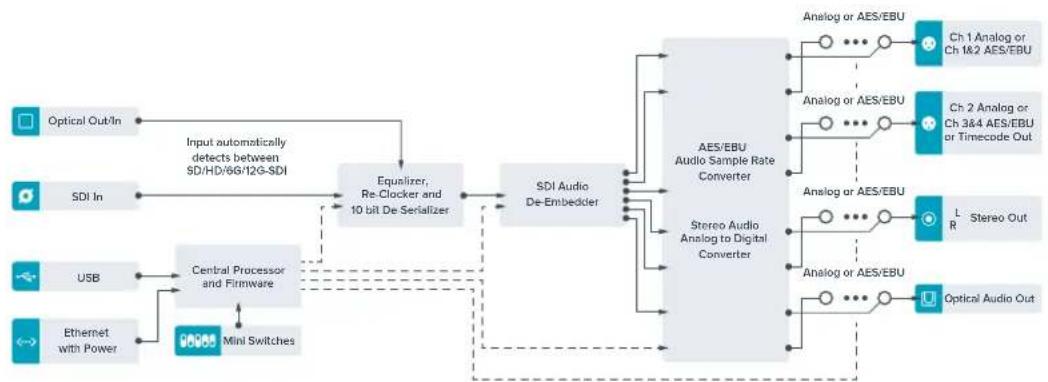
Teranex Mini – Audio to Optical 12G
JaHaa MoeB No3BOJAEET BCTpaBb Ta KaHaA aHaIIOBOrO nnn YeTbpe KaHaA uNpOBOr AOES/EBU-aynno B IIOoe SDI-Bndeo (SD, HD, Ultra HD nnn DCI 4K). 3To daet BoaMOXHOCTb BKIOuataB OINTueckn CnHn3Byk, noLyaeMbC MmKsepoB nnn aHaIIOBObIX DeK, n nepeDaBaTb eFo Ha60nbOoe paCCTOHnne. Dnra yBeHHeHnKaONueCTBa ayDnOKaHAnOB MOxHO nCNoJIb3OBA Tb eEe OdINH KOHBepTeR Teranex Mini Audio to Optical 12G, noKnoueHhB K ONtueckOMy nnn SDI-BbIXOyC NOMOsbio NocJeDoBaTeBHO CoeHNHeHn.
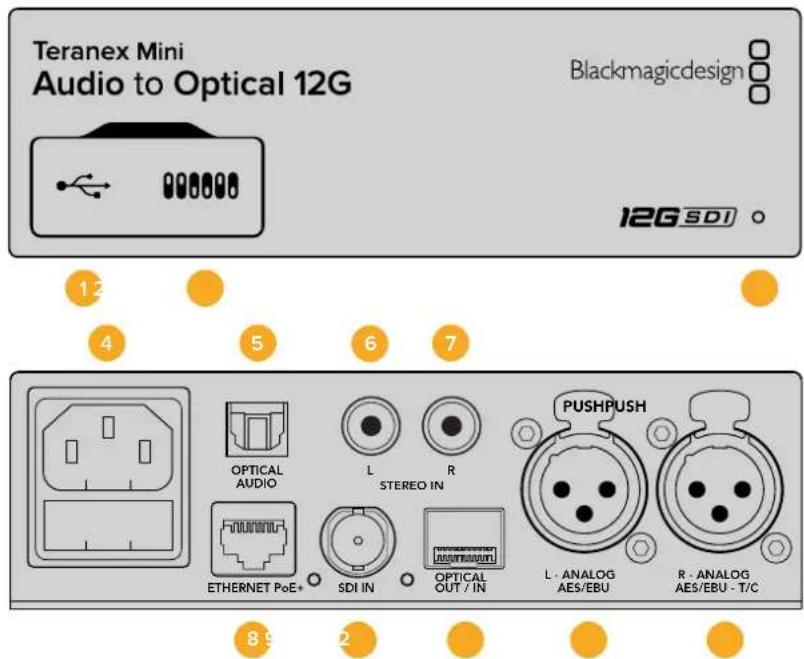
Pa3beMbl
1 Flopt Mini-B USB
IcnoB3yETcIg IImMeHnHaCTpoek N O6HOBHeHn PpOuBkN Teranex Mini C nmoUbO yTInMbI Blackmagic Teranex Setup,ycTaHOBHeHn Ha KOMNbIepe c nnatfOpMoM Mac nn Windows.
2 NepeknouateJIi
HactpanBaemble nepekKIOUaTeN IINI INMHeHn HAcTpoEK.
3 CBeToDnOaHbI INHdNKaTOp COCToHIN
Topnt 6eIbIM UBeTOM npn NpokKIOueHm K Cetu H3eNEbIM UCBETOM npn OOBapyKeHm CuRHaHa.
PnpaBote c cytINrToB Blackmagic Teranex Setup eTOT INDnKaTOp Mraet, IeHTnFncuPy BbOpaHHb C ee NOMoLbIO KOHBeTpE.
Питане
CTaHdapthoeIHe3doIEC C14 nIy IIOKJIoucheHnK NCTOChNky IpeMeHHoro ToKa 90-240 B.
5 ONTHUeCKn ayDnOBxOaS/PDIF
CnHnS/PDIF uepe3 pa3bem TOSLINK
6 L-He6aHaHcHbI aHaIorOBbI aydnoBxOHi-Fi (nHneHbI cRHaI)
RCA-pa3bEm He6baHCHOro aydnoBxOda (neBbI kaHaI).
7 R—He6aHaHcHbI aHaIorObbl ayDnOBxOg HI-Fl (InneHbI cHraJI)
RCA-pa3bEm He6anaHcHOro aydnoBxOda (npabn KaHaJI).
8 Ethernet PoE+
Pa3bEm nIЯ noIqKIIOUeHnI K cTeBOMy KOMMyTaTOpy IIN KOMNbIOTepy; nIcNoJIb3YeTCa IJI
nI3MeHHeHnI HAcTpoE K nOmoIbYtIInIbl Blackmagic Teranex Setup. IpOrt Takke obecneuBaet
noIaCy nITaHnI (PoE).
9 SDIN
BndeobxoadSDICBCN-pa3bemom.
10OnTnueckn BxOa N BbIXoA
Ontuueckn Bundeobxoad N Bbixod (LC-pa3bembl) dny npepaun SDI-cirhana c nomoucbio doonHntelbHoro moyn no cTanapTy SMPTE. AToomatueckoe onpeedeHne SD, HD, 6G- n 12G-SDI. Ha ontuueckn BbixoandocTynaet peoobpazOBaHhoe Bundeco BCtpoeHHbIM 3BykOM.
11 L-ANALOG nH AES/EBU
BaanhcBn aHaIorObB ayIOOBxOJ (neBb KaH) nnuΦpOoB ayIOOBxOJ AES/EBUC XLR-pa3beMOM.
12 R - ANALOG, AES/EBU ул Timecode
BanaHcHbI ananorobbI aynOBxOJ (npaBki KaHa) nIIN cNppoBoy aynOBxOJ AES/EBU C XLR-pa3bemOM. TaKxe dOnyckaet BBO TaIM-KoJa.
Pepeklouatei
Teranex Mini - Audio to Optical 12G HmeeTnepeKIOHateN, C NMOOJIIO KOToPbIX MOXHO BbIbIpTaB pa3nUHbHe NaCTpOIN KOBHepcN.
Ipeekuatei 8,7-Input Audio Selection Bit 1,0
Ipeeknioateen 8 n 7 cooBcTcByot 6ntam 1 n O. IcnoJIb3yra pa3NIuHbIe KOMbHaun ON/OFF dna nepeknioateen 8 n 7, moKHO BbIpaTB IIOBOI n3 YetbIpe axdIOXoDob.
Ipeeknouatei 6,5,4 - Embed Audio Bit 2,1,0
Ipeeknouateen 6,5 n4 cooBcTcByot 6ntam 2,1 n 0. Icnno3yra pa3nHbte KOMnHaucn ON/OFF nI nepeknouatenei 6,5 n 4, moxHO BbopaTa KaHaNb SDI- nn onTneckoro notoka, B kOtOpbe 6ydet BCtpoe H3Byk.
PnBCTpaanBaHn aHaIIOROBO 3ByKa IOCTyINbI BOCEMb BapNaHTOB, KOtOpbIE N03BOJIHOIT BKJIIOHTb 3ByK B IIOby npay kaHaoB oT 1-2 do 15-16.
PnB BCTpaBaHn AES/EBU-ayDIO DocTyNbI YeTbIpe KOMbHaun. 3ByK MoXHO BKIOHTb KaHaJIbI C1 no4,5-8,9-12 nn 13-16.
Ipeekuateb 3 - Sample Rate Conversion, No Sample Rate Conversion
UcTaHOBtne nepeKJIouOaTeNb 4 B noJooKeHne OFF (BbIKn.), UTObI bblonHrTb npeo6pa3ObaHne uactotb Dnckpetn3aun, nnB noJooKeHne ON (Bkn.), UTObI He nCnoNb3ObaTb 3Ty onuio. NpeeklOuaTeNb noTuB BCERda doJxhen HaxoITbcra B noJooKeHne OFF (BbIKn.), UTObI BCtpaNaBaembl aydnocnHaJI mEmeJ qactoty Dnckpetn3aun TeleBn3NoHHoro CTanDapTa.
EcnnepeeknouateIb 4 haoiunTcB noLoKeHHN OFF (BbIKl.), pneoobpa0BaHne aHaIorOBO rnn AES/ EBU-ayno n BCTpauBaHne B ONtueckn CnHn Ha BbIXoJe BbINOJIHReTcR c AcToTOJ dNCKpeTn3aun 48 KU.
IpeeknouateIb 2 - Ch 2 nIe AES/EBU 3+4 Embed/Bypass
Iocne BbIbopa aydnoKaHaNoB nCnOlb3yIte nepeKIOUaTeEN 2 I, TTo6bl Ha3HaHTb KaHaJIb dIra BCtpaBaHnI INI OTKnIOuHTb IX. OTKnIOUeHHe N03BOJAEITN36ExKaTb 3aIINc H a Te 3ByKObIe KaHaJIbI, KOtOpBle Heo6xOIMo COxpaHHTB a AyDIOcIRHaIe.
YcTaHOBtTe nepeKIOUaTeIb 2 B noJoxeHne ON (BKn.), yTo6bI He nCNoJIb3ObaTb KaHaI 2 nn KaHaIbI 3 I4 AES/EBU-3Byka. YcTaHOBtTe nepeKIOUaTeIb 1 B noJoxeHne ON (BKn.), yTo6bI He nCNoJIb3ObaTb KaHaI 1 nn KaHaIbI 1n 2 AES/EBU-3Byka.
Переклочаль 1—Сн 1ин AES/EBU 1+2 Embed/Bypass
CM. onicaHne nepeKnOuChaTeN 2.

CxemaHaHnKHeNoBepXHOCTN KOpnyCa cOePxyT ONCAHHe HAcTPOeK; COOTBeTCTByUOUX pa3HbIM NOIOxKeHNm NpekNOaTeNei
BbI6op aydnocnHaHa
| Aydinokanlby Bxodjuzero cnHana PepeknlouataIe 8 PepeknlouataIe 7 Паложение pepeknlouataIe | ||
| XLR-pa3bem (aHaJorOBy) OFF OFF | ON OFF 8 7 6 5 4 3 2 1 | |
| XLR-pa3bem (AES/EBU) OFF ON | ON OFF 8 7 6 5 4 3 2 1 | |
| RCA-pa3bem (aHaJorOBy) ON OFF | ON OFF 8 7 6 5 4 3 2 1 | |
| Опческий ON ON | ON OFF 8 7 6 5 4 3 2 1 | |
SDI-KaHaJIbI
| Аналоговы щадиоканны | Пepeключател 6 | Пepeключател 5 | Пepeключател 4 | Положене пepeключател |
| 1-2 OFF OFF | ON OFF 8 7 6 5 4 3 2 1 | |||
| 3-4 OFF ON | ON OFF 8 7 6 5 4 3 2 1 | |||
| 5-6 OFF ON OFF | ON OFF 8 7 6 5 4 3 2 1 | |||
| Аналоговы щадиokaимы | П配电лочател 6 | П配电лочател 5 | П配电лочател 4 | Положения щадиokaимы |
| 7-8 OFF ON ON | ON OFF 8 7 6 5 4 3 2 1 | |||
| 9-10 ON OFF OFF | ON OFF 8 7 6 5 4 3 2 1 | |||
| 11-12 ON OFF ON | ON OFF 8 7 6 5 4 3 2 1 | |||
| 13-14 ON ON OFF | ON OFF 8 7 6 5 4 3 2 1 | |||
| 15-16 ON ON ON | ON OFF 8 7 6 5 4 3 2 1 | |||
| Audiokanalb AES/EBU П配电лочател 6 П配电лочател 5 П配电лочател 4 Положения щадиokaимпя | ||||
| 1-4 OFF OFF OFF | ON OFF 8 7 6 5 4 3 2 1 | |||
| 5-8 OFF ON | ON OFF 8 7 6 5 4 3 2 1 | |||
| 9-12 OFF ON OFF | ON OFF 8 7 6 5 4 3 2 1 | |||
| 13-16 OFF ON ON | ON OFF 8 7 6 5 4 3 2 1 | |||
Hac troponi Blackmagic Teranex Setup
Ytnta Teranex Setup no3BONrEt n3MeHnTb HAcTpoKn, yCTaHaBnBaEMbIe C NOMOuBIO nepeknouateJe, a TaKxe DoonHnTeIbHBe Iapametpbl.ДЯ DoCTyNa K 3TNM HAcTpoKam NcIOnlb3yOT BknaAudi, Configure n About. Pa6ToC BknaKaMn About n Configure onncana B pa3dene «N3meHHeHnE HAcTpoE» daHOro pykoBODCTBa.
BknaKa Audio nT eranex Mini - Audio to Optical 12G daet BoaMoxHocb Bbipatb oncaHHbe Hxke onn.
MeHIO Audio Input
3TO MEHIO NO3BOJAEH H3HAaHT pa3bem IIN BxOJaIero 3Byka: RCA, XLR nIOnnueckn.
Pp pa6oTe c XLR-BxOOM MOXHO dONONHHTeBHO bIbpaTa b aHaONORBOB, AES/EBU-cnHaN nn TaM-KoN.
PnncnoIb3oBaHn HactpoKn AES/EBU MoXHO dOnonHnteHbNO AKTNBnPoBaT onuio Sample Rate Converter. B 3tOM cnyae 3ByK Ha ontueckom BixOe 6yDet IMeTb npHHa TeneBndeHn qactoty nckpeTna4nn 48 KU.
MeHIO Audio Input no3BONaET Bb6paT npay nIe npBkaHAnOB (nA AES/EBU) nIra BCTpanBaHnB B onTneckn SDI-notok, a taKke perynnpoBaT ypOBeHb 3BykoBOrO cnHaHa.
Pn HeoXOIOMOCTM MOXHO OTKIOUHTb NcNoIb3OBaHHe KaHaIOB IIN KaHaIbHOI napbl, YTO6bl COxpaHITb IN B ONTNUeCKOM SDI-CIRHAJIe.
Teranex Mini Incnohbyet noceHne HacpoKN HeaBcHMO OT TORO, KaX yCTaHOBNI - C NOMOIO nepekloateNe, Smart Panel nn Blackmagic Teranex Setup. Ecn noce nporpamMHoro oOBHeHnnapameTPOKOBepTepa nn ChTnA Smart Panel HeobxOIMO BepHyTBc K pyHOn HAcTPOKe, MoXeT nOTpeBOBaTbC NOBtOPHaY cTaHOBA OdEhbNx NepeKIOAteNe.
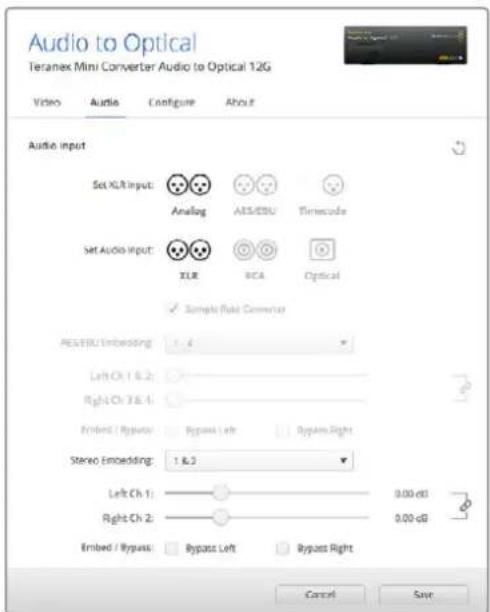
IINHIMENHn ypOBHe aHAnorOBOr n AES/EBU-aynIO nCNoIb3yETcBkAa Audio yTnntbl Blackmagic Teranex Setup
Hac troponi Teranex Mini Smart Panel
Ecn konheprep Audio to Optical 12G dononHnteNo ochaen naHentero Teranex Mini Smart Panel, 6dyT doctynb MeHIO Audio n Network. Ix npametpy yctahabnbaot Tak Jke, kak onncao B pa3dene «HaCtpoKn Blackmagic Teranex Setup» bIwe.
DOnonHInTeBHyIO INHOpMaIIO 6NcNoB3OBAHN Teranex Mini Smart Panel cm. B pa3dene «ИЗмehнe HAcTpoEk» daHHOrO pyKOBODCTBa.
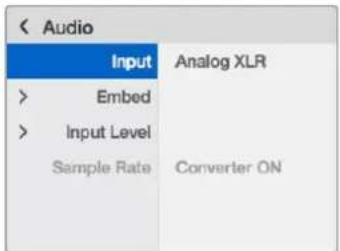
Teranex Mini Smart Panel n ytniHa Blackmagic Teranex Setup oecneHBAOT doCTyN K OdnHaKOBBm HAcTPOkAM KOHBePepa

Cxema coeHHen Teranex Mini - Audio to Optical 12G
Pomoucb
Kak noyuHTb nOmoa
Cambibicpbcnocobnoyntbnoo - o6paNTbcra K ctpnuaam noepkna ha caite Blackmagic Design n npOBepnb Hnue noceHnx cnpaOchbx MATEpnaNo KOHBepTepy Teranex Mini.
CtpaHnUbI noDpeKKn Ha caTe Blackmagic Design
IocneHnE Bepnn pykoBODCTBa no 3Knnyataun, nporpaMMHoro o6ecneueHn I dononHntbHyIO nHopMaUIO MoXHO hAIuB pa3dene noDpeKKn Blackmagic Design Ha cTpaHnue www.blackmagicdesign.com/ru/support.
COOTBETCTBNE Tpe6oBaHnI M ISED (KaHaJa)
ICES-3 (A) NMB-3 (A)
DahHoe obopyoBaHne COOTBETCTByeT KaHaDCKIM CTAHApTAM DnA LInpOBoBx yctPoIcTB KNaCa A.
IIO6a MoiNfkaIe IIN NcNoB3OBAHne I3denn He No Ha3HaueHIO MoryT NOBNeB 3a c0bO aHNIpOBaHne 3aRBeHn O COOTBETCTBn NTIM CTaNapTaM.
IopKIOUeHne K HDMI-INTeppeCy DoJXHO BbINOnHrTbcra C NOMOuBIO KaueCTBeHHoro 3kpaHnPOBaHHoro Ka6eJIa.
YBeDomHeHneIgXHTeNeWtataKaNΦopHnA
Pn pa6Ote C 3TmOBOpUOBaHHeM CyueCTBye T Bo3MOXHOCTb KOHTAKTa C codepKaUIMNcB IIactMacce MKNporpIpmecMn MHOrO6pOMNCTOO bHnla, KOTOpBn B Wtate KaINΦopHnI np3HaH KaHeporeHOM n yBeHNuHBaET PnCK BPOKDeHHbIX DeΦeKTOB n NopOKOBpePOnyKTHBHOI CNTEmbl.
Ioppo6Hyu INHOpMaunCm. Ha caTRe www.P65Warnings.ca.gov.
ПразвILA 6e3ОпасноCTN
3a3eMJIIOUO KoHTAKT.
YTo6bMIMHM3HPOBaTb OnaCHOCTb NopaxeHn 3NeKTPnueCKm TOKOM, n3dennHeo6xOIMO 3aunuATb OT nonadHn 6pb13r n Kanelb BODbl.
Donyckaetc3KcnpnyataaB ycnobnX TpOnnueckoro KInMaTa C TempepaTpoN OkpykaIouein cpebldo 40^
Дл рабовы усторь VA Heo6xOДМО oBecneuHT bdoCTaTOHy BOHTnIaIciIO.
Pny yctaHOBKe B cTouKy y6eNTecb B TOM,HTO He HApTuEN pntOK BO3dya.
BHytpn Kopnyca He copepkaTcA Detann, noIeKaaune oocnykBaHIO. Iy BbInonHeHH peMOHTbIX paObTob ObaPntecb B MeCTbI cepBncHbI ceHtp Blackmagic Design.
DonyckaetcaKcnnyataunB Mectax He BbIe 2000 MetpoB Hau ypOBHem MOpJ.
ObopydobAHne no3BONJeT yCTaHOBnTB onTNueckn SFP-Moynb. NcnoIb3yIte TOnbKO MoynuTina Laser class 1.
Pekomehnyemblte Tnbl SFP-Moynne
-3G-SDI:PL-4F20-311C-BMD
-6G-SDI:PL-8F10-311C-BMD
-12G-SDI:PL-TG10-311C-BMD
Гаразня
OrpaHnueHHa rapaHTnca pOKom 3 roda
KoMaHnBa Blackmagic Design rapaHTnpyET oTcYCTBVE B KOHBeptepax Teranex Mini deFeKTOB MaTePnana I npOn3BOODCTBEHHORO 6paKa B TeueHne 36 MeCAUeB C DaTb npOaJx. Jnra pa3bEmOB, KaBeJe, OxJaXdaUx HBeHTIATOPOB, ONTOBOLOKOHNbIX MOdyNe, npEdoxpaHNTeNe, KnaBuNAtpyB n AKKyMnyTAOpHBix 6aTapei rapaHTnO TcYCTBnI DeFeKTOB MaTePnana I npOn3BOODCTBEHHORO 6paKa CoCTaBnIeT 12 MeCAUeB C DaTb npOaJx. Ecn Bo BpeMra rapaHTnHOrO cPoKa 6dyT BblAbeHbI DeFeKTbI, Blackmagic Design no CBoemy yCMOTpeHIO BInONHIT pMeOH T HeNCpABHOrO n3dEJIa 6e3 OIIaTbI CTOnMOCTn 3aNuaCTe N TpyDo3aPat INI 3aMeHnT TaKoe n3dEJIe HObIM.
YtobbocnohbaTcnaHctoaeI rapaHTne, noTebteb oB3aH yBedeomMbKOMnHIO Blackmagic Design O depekeTo do OKOHuaHra rapAHTnHorO cpoKa I oBceNeHTyUCOBnI dIy npEOCTABHeHn HeoBXoIMbIX ycny. Iotpebteb Hecet OTBeCTBeHHocTb 3a yNakOBky I DoCTABKy HeNCnPabHOrO n3dEINBA COOTBeCTByIOuI cepBnchI cyENTpBlackmagic Design c onlatoi noTObix paXoOB. Iotpebteb OB3aH ONaATNb BCE pAcXoBbl NO DOCTABKe I CTpaXOBaHIO, NoJInHbI, HAnrN INHbI c6Opb B C8a3n C Bo3BaPOM N3dEINNA BHe 3aBnCmOCTN OT npUHNbl.
Hactoa rapaHTn He pacnpoctpaHreTc H daeKbI,OTka3bI NOBpeXdeHn,BO3HKwne 13-3a Headnaeauero nCnoBzOBAHn, HnpabInbHorO yXoDa nn OcbnykBaHn. KomnHaer Blackmagic Design He oba3aH npedocTabTb ycLytn no Hactoae rapaHTnn: a) dny UcTaPHeHH NOBpeXdeHn, BO3NKuX B pe3yIbTaTe DeCTBn No yctahOBke, pemOnTy nn OcbNyKBAHIO n3DeHn Inuamn, KOtOpBe He raJIOTcR nepcoHanom Blackmagic Design; b) dny UcTaPHeHH NOBpeXdeHn, BO3NKuX B pe3yIbTaTe HeaDnaeuaero nCnoBzOBAHn nn PNDKnUoyEHn K HecOBMeCTHMOMy OobpyDoBaHIO; B) dny UcTaPHeHH NOBpeXdeHn nn DeFeKToB, Bbl3BaHHbx nCNoBzOBAHm Eanpacte nn MATEpnaIOB dpYrN pON3BOIDTeNei; r) ecnn I3DeJIne 6blNO ModNFncipOBAHO nn INTEprpOBAHO C pyrIM OobpyDoAHmE, KOrDa TaKaM MoDfNkAciu nn INTEpauny YBeLnuHBaET Bpemn nn Noblaaet CNOxHOCbnyBaHnr n3denn.
HACTOJARI TAPAHTIN PPEIOCTABJIETC KOMPAHNEI BLACKMAGIC DESIGN BMECTO JIOBbIX DpynX IPRMO BbIPAXEHbIX INI NIOPA3YMEBAEMbIX TAPAHNTI. KOMPAHNAI BLACKMAGIC DESIGN IN EE INIEPBI OTKA3bIAOTcR OT JIObIX NIOPA3YMEBAEMbIX TAPAHNTI KOMMEPUECKOI CEHHOCTI INI INI INI IOHOCTN IJI KAKOI-JINBO ONPEDEJEHHOH CEJI. OTBETCTBEHHOCTBLACKMAGIC DESIGN NO PEMOHTY INI 3AMEHE HENCPABHBIX IN3DEJIIN RAJIETCPOJHBMIM NCKLIIOHTeBbIM CPEICTBOM BO3MEUEHNI, PPEIOCTABJREMbIM NOTPE6NTELIO BCB3NC KOCBEHHbIMN, FAKTNUECKIMN, CONTYCTBYIOUIMN INI NOCLEUYIOUIMN YbBITKAMN, BHE 3ABNCUMOCTN OT TOLO, BIIA INI HET KOMPAHNAI BLACKMAGIC DESIGN (JIN50 EE INJIEP) INPEdBAPITEbHO IN3BEUHEA O BO3MOXHOCTN TAKNX YbITKOB. BLACKMAGIC DESIGN HE HECET OTBETCTBEHHOCTH 3A INOTIBOPNPABHOE INCNOJIb3OBAHNE O6OPYJOBOAHNAI CO CTOPOHBIOTPE6NTIEL. BLACKMAGIC DESIGN HE HECET OTBETCTBEHHOCTH 3A YbBITKN, BO3NIKAIOJIIE BCJIEDCTBVE INCIOLb3OBAHNAI 3TOGO IN3DEJIIN. NOTPE6NTIEL INPIHIMAET HA CEBRA PICKN, CB3AHHbIE C EFO 3KCNLYATAUINEI.
Copyright 2020 Blackmagic Design. Boc npaba 3auiuohb. Blackmagic Design, DockLink, HDLink, Workgroup Videohub, Multibridge Pro, Multibridge Extreme, Intensity "Leading the creative video revolution" apernctpnoabha kak toapnbhe hckn cLHa npyhx cpanax. HazbanHH pnyx komnH n haMeHOBAHn npoykTOB moryT bIbTBcH TOBAPbMn 3hakm COOTBETCYbOxip npaboo6naateen
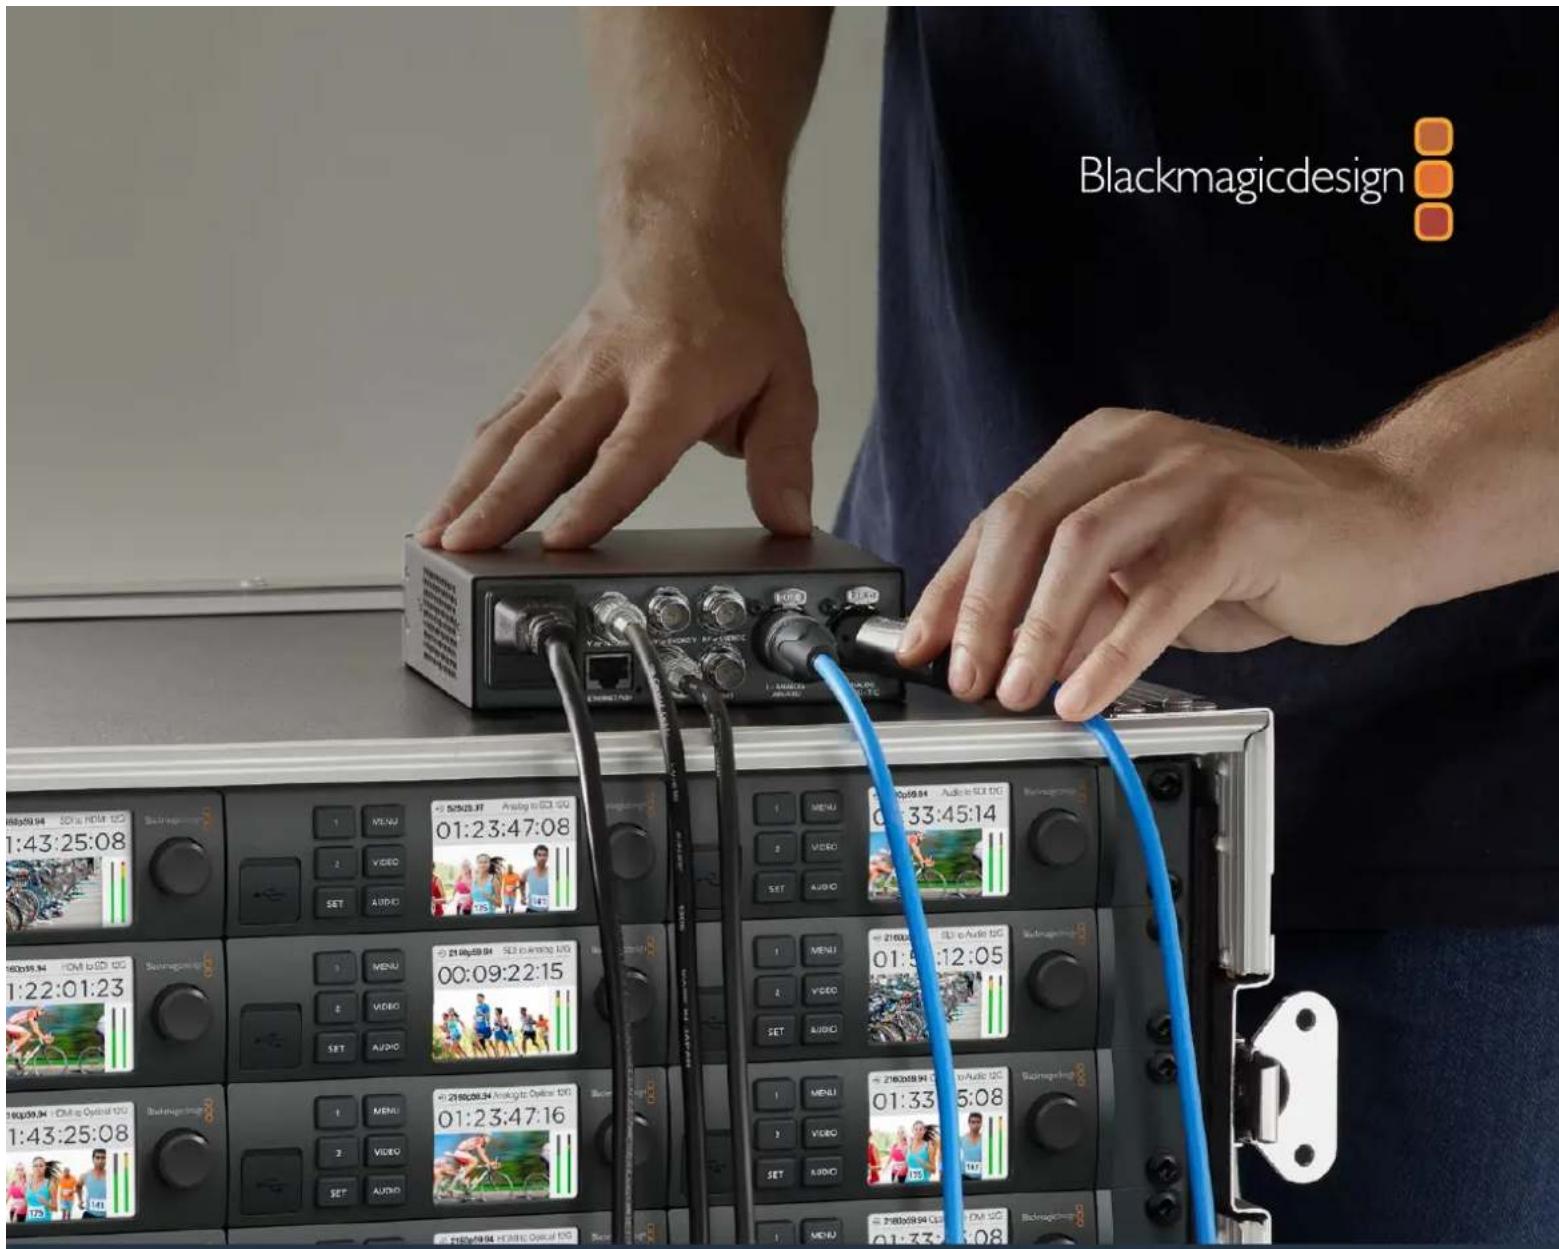
AD Blackmagic Design
Indices
A Anything to be done is not intended for public distribution.
Clip to legal levels
Dynamic Range Override
Please follow the instructions on your HDMI monitor to set Brightness Level correctly and then press Next.
Back
Next