Model One Digital Gen 3 - Radio TIVOLI AUDIO - Free user manual and instructions
Find the device manual for free Model One Digital Gen 3 TIVOLI AUDIO in PDF.

User questions about Model One Digital Gen 3 TIVOLI AUDIO
0 question about this device. Answer the ones you know or ask your own.
Ask a new question about this device
Download the instructions for your Radio in PDF format for free! Find your manual Model One Digital Gen 3 - TIVOLI AUDIO and take your electronic device back in hand. On this page are published all the documents necessary for the use of your device. Model One Digital Gen 3 by TIVOLI AUDIO.
USER MANUAL Model One Digital Gen 3 TIVOLI AUDIO
EU Declaration of Conformity....174
WELCOME
Thank you for your choosing Tivoli Audio!
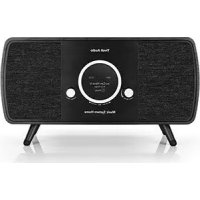
Model One Digital - Generation 3
Wi-Fi / DAB* / FM / Bluetooth® Radio
The Model One Digital Generation 3 allows you to easily connect to Wi-Fi and your favorite app based streaming services through AirPlay and Google Cast. Or enjoy something a little closer to home with local radio broadcasts on FM or DAB (where available). With all these listening options and room filling sound, the Model One Digital is a brilliant way to enjoy music and style with the latest technology built in.
Please take a moment to read this owner's manual and the safety instructions. If you have any questions, please do not hesitate to contact your dealer or Tivoli Audio.
*DAB/DAB+ is only available in supported countries.
Packed with your Model One Digital you should find:
(1) External Power Supply
(1) FM/DAB Telescopic Antenna (installed)
(1) Remote (battery installed)
Please contact your dealer or Tivoli Audio if any of these items are missing.
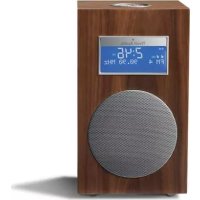
Guide to Features
Front Panel
text_image
Tivoli Audio MODEL ONE DIGITAL 1 2-
POWER/SOURCE/VOLUME KNOB: Single press to turn the unit on, press and hold to turn off. When powered on, single press to cycle between WiFi, FM, DAB (if available), Bluetooth, and Auxiliary sources. Rotate right to increase volume, rotate left to decrease volume.
-
BEZEL CONTROL:
In FM/DAB mode: Turn left to tune down. Turn right to tune up. Single press to add a station to your presets. Double press to scan or reload DAB station list or go to next FM station.
In Bluetooth mode: Turn left to go to previous track. Turn right to go to next track. Single press to play/pause. Press and hold to enter Bluetooth pairing mode.
In WiFi Streaming mode: Turn left to go to previous track. Turn right to go to next track. Single press to play/pause.
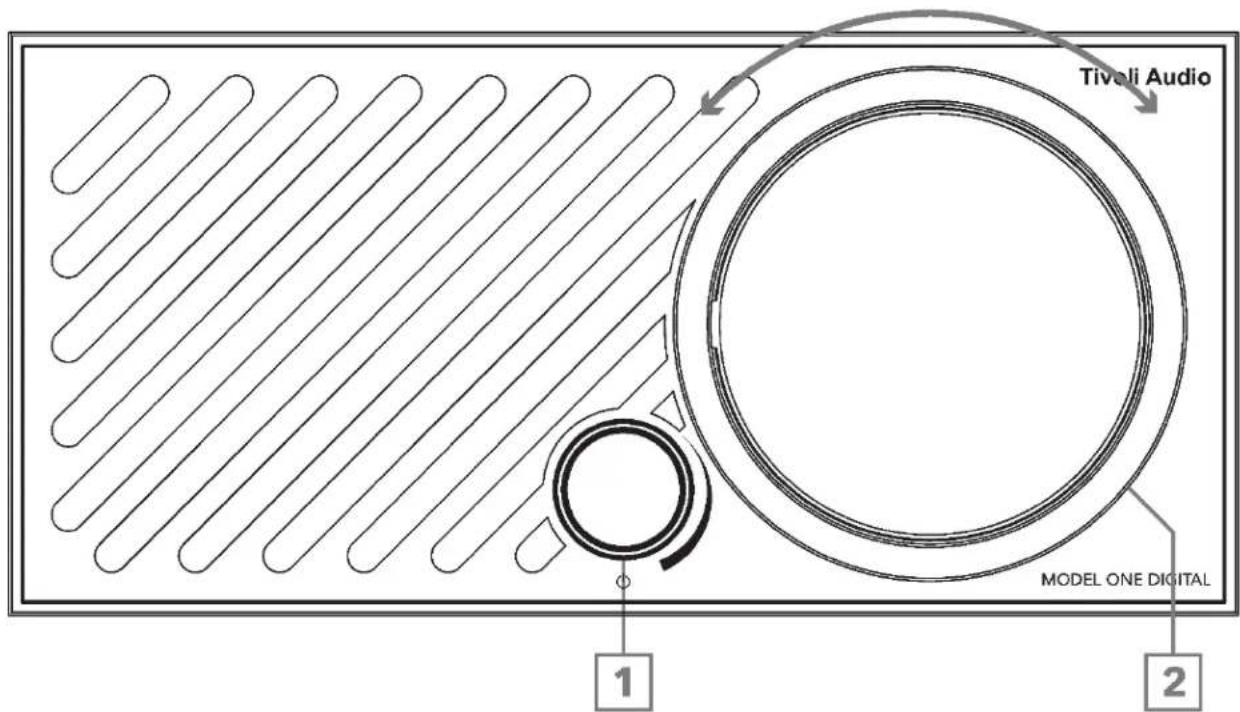
Rear Panel
text_image
Tivoli Audio Model One Digital Generation 3 Designed by Tivoli Audio in Boston, MA USA Produced in China AUX IN SERVICE SETUP MUTE 15V —— 1.5A 3 4 5 6 7- AUX IN: Plug in a 3.5mm stereo cable for a standalone experience.
- SERVICE: Micro USB service port. Only for use by an Authorized Tivoli service center.
- SETUP: Tap to enable your speaker to be connected to your home network.
- MUTE: Select to mute the volume of your Model One Digital.
- DC Power: Plug in the provided Tivoli Audio power adapter to power your Model One Digital.
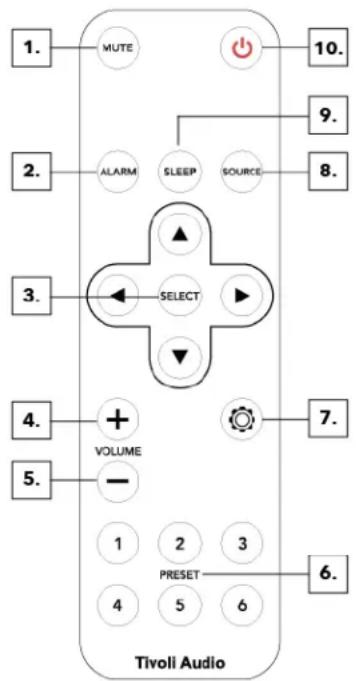
Remote Control
- MUTE: Mutes the radio.
- ALARM: Press to set the radio alarm.
- NAVIGATION ARROWS/SELECT: Use the arrows to navigate the on-screen options and confirm options with the SELECT button.
- VOLUME UP: Press to raise the volume.
- VOLUME DOWN: Press to lower the volume.
- PRESET BUTTONS: Press and hold to save a new radio station. Single press to recall a saved radio station.
- SETTINGS: Press to enter the full settings menu.
- SOURCE: Press to change the radio source.
- SLEEP: Press to set the sleep timer.
- POWER: Press to turn the radio on and off.
text_image
1. MUTE 2. ALARM SLEEP SOURCE 3. SELECT 4. + 5. VOLUME 1 2 3 4 5 6 PRESET Tivoli Audio 10. 9. 8. 7. 6.WARNING: DO NOT INGEST BATTERY, CHEMICAL BURN HAZARD. The remote control supplied with this product contains a coin/button cell battery. If the coin/button cell battery is swallowed, it can cause severe internal burns in just 2 hours and can lead to death. Keep new

and used batteries away from children. If the battery compartment does not close securely, stop using the product and keep it away from children. If you think batteries might have been swallowed or placed inside any part of the body, seek immediate medical attention.
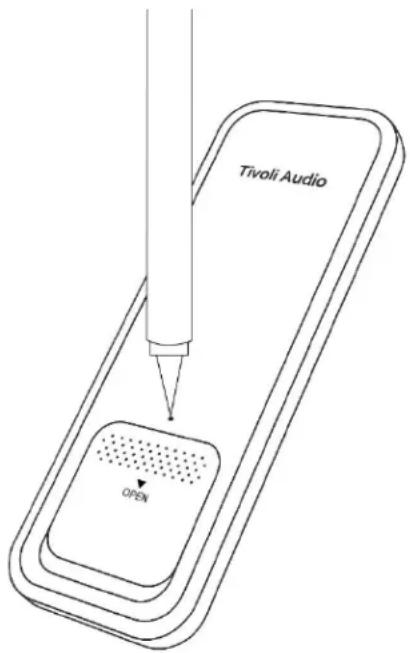
Remote Control Battery Replacement Procedure
- Insert the tip of a pin into the hole on the battery cover.
- Slide the battery cover in the direction indicated by "▼ OPEN" on the cover.
- Insert the button battery (CR2032) with the + positive side facing up.
- Push the battery cover back into place until you hear a click.
text_image
Tivoli Audio OPENAlarm Setup
Press the ALARM button on the remote. Select the hour by using the navigation arrows, and press SELECT to confirm. Do this again to select the minute, and whether you would like the alarm to be active. To confirm, select YES then press the SELECT button on the remote.
Sleep Time Set
Press the SLEEP button on the remote. Select the hour by using the navigation arrows, and press SELECT to confirm. Do this again to select the minute. To confirm, select YES then press the SELECT button.
WiFi Mode
Wi-Fi Setup with Apple AirPlay
- Turn on your unit by pressing the power knob or the power button on the remote.
- Set your speaker to Wi-Fi mode by short pressing the power knob until the screen displays WiFi source. The Model One Digital will automatically enter Wi-Fi Setup mode once the WiFi initializes. If your speaker is not in Wi-Fi Setup mode: press the "Setup" button on the rear of the speaker.
- On your iOS device, go to Wi-Fi Settings. Make sure to connect your iOS device to the network that you intend to use your Model One Digital.
- Scroll down to "Set Up New AirPlay Speaker..." and select "Tivoli Audio M1D3_XXXXXX".
- Rename your speaker (recommended) and create a password (optional).
- Select "Next" and wait for the connection.
- Wait for the connection confirmation, select "Done".
- Once connected the display will confirm with a "WiFi Connected" message.
- Your speaker is now ready to use with AirPlay. With AirPlay, you're in control of your audio.
For additional support, please visit support.apple.com
Wi-Fi Setup with Tivoli Audio Setup App
Required for Android devices to connect M1D3 to Wi-Fi. If you are connecting your speaker with an Apple iOS device, either download the Tivoli Audio Setup App or follow the "Wi-Fi Setup with Apple AirPlay" instructions.
- Install the Tivoli Audio Setup app by downloading app the on your Cast-enabled smart phone or tablet. The Tivoli Audio Setup app is available for free on the Google Play and Apple App stores.
- Allow permissions to Wi-Fi, Bluetooth, Nearby Devices and Location While Using.
- Make sure to connect your smart phone/tablet to the same network that you intend to use with your Model One Digital with Google Cast.
- If you have not already done so, turn on your phone's Bluetooth connection. This allows your WiFi information to be sent to the speaker reliably.
- Turn on your speaker by short pressing the power knob.
- Set your speaker to Wi-Fi mode by short pressing the power knob until the screen displays "WiFi".
- Once the WiFi initializes, the screen will indicate WiFi Setup Enabled mode. If your speaker is not in WiFi Setup mode, press the Setup button on the rear of the radio.
- Open the Tivoli Audio Setup app on your smart phone/tablet.
- Tap "Set Up new Device" or "+ Add" at the bottom of the screen and follow the on-screen directions.
- Wait for the app to scan for available speakers, then select the M1D3 you would like to setup.
- Confirm you heard the noise.
-
In the next screen, select the correct Wi-Fi address and enter the Wi-Fi password. You may also change the speakers' name. Then tap Next.
-
Wait for your device to connect to your wireless network and check for updates. This process may take a few minutes.
- You will now be prompted to activate Google Cast. See section "Activating Google Cast" to learn more.
- Your speaker is now ready to use with Spotify Connect, Tidal Connect or Apple AirPlay.
Activating Google Cast
The Tivoli Audio Setup App is required to activate Google Cast on Android and iOS Devices.
- Once your Model One Digital is connected to Wi-Fi, you may activate Google Cast.
- When first connecting a Model One Digital to Wi-Fi, you will be prompted to activate Google Cast. You may also activate Google Cast later by navigating to the Device Settings Menu and tapping on Google Cast setting.
- Review the Google Terms of Service, tap "Accept" to proceed.
- Decide whether or not you would like to opt into Google's crash reports, there is no wrong answer!
- You will now be directed to the Google Home app.
- Look for your Model One Digital in Devices tab under Local Devices.
- Add this speaker to the Home and Room of your choice.
- Your M1D3 is now ready to use with Google Cast. Stream the entertainment you love from your phone, tablet, or laptop to your speaker.
How to use Google Cast:
- Open any Cast-enabled app.
- Select the CAST button in the app.
- Select the Model One Digital.
- Press the PLAY button in the app.
For additional support, please visit support.google.com/chromecast
How to use Apple AirPlay:
- Connect your iOS device to the same network as your Model One Digital.
- On your iOS device, open the Control Center.
- Press and hold the audio card in the upper-right corner, then tap AirPlay.
- Select your Model One Digital from the list of available AirPlay devices and start playing.
For additional support, please visit support.apple.com
How to use Spotify Connect:
Use your phone, tablet or computer as a remote control for Spotify. Go to spotify.com/connect to learn how.
The Spotify Software is subject to third party licenses found here: https://www.spotify.com/connect/third-party-licenses
How to use TIDAL Connect:
- Play a song and tap on the 'Now Playing' bar.
- Tap on the device selector at the top right.
- Choose a TIDAL Connect-enabled device.
Bezel Control
While streaming any music source over WiFi, the Bezel wheel does the following:
Play/Pause: To play or pause music, short press the Bezel
Next Track: To go to the next track in an album or playlist, rotate the bezel right.
Previous Track: To go to the previous track in an album or playlist, rotate the bezel left.
Aux In Mode
Your Model One Digital can be used as a standalone speaker. Simply use a 3.5mm stereo cable to connect any line or headphone level source into the AUX input on the back of your radio. You can control the volume of the speaker using the volume control on the Model One Digital or with the volume control of your audio source.
Bluetooth Mode
Pairing
Your Model One Digital can act as a standalone Bluetooth speaker.
- On your radio, single press the POWER/SOURCE/VOLUME KNOB until the screen on the Model One Digital says "Bluetooth".
- On your radio, press and hold the BEZEL until the screen on the Model One Digital says "Pairing Enabled".
- Go to the Bluetooth settings screen on your phone or tablet.
- Select the device that has a name similar to "Tivoli M1D3_XXXXXX".
- Once the radio displays "Pairing Success" on its screen, you are paired to the radio.
- You can begin playing your music via Bluetooth.
Bezel Control
While streaming any music source over Bluetooth, the Bezel wheel does the following:
Play/Pause: To play or pause music, single press the Bezel
Next Track: To go to the next track in an album or playlist, rotate the bezel right.
Previous Track: To go to the previous track in an album or playlist, rotate the bezel left.
Enable Pairing: To enable pairing, press and hold the Bezel until screen displays "Pairing Enabled".
FM Mode
Bezel Control
Manual Tune Up: To manually tune up to a higher frequency station, rotate the bezel to the right.
Manual Tune Down: To manually tune down to a lower frequency station, rotate the bezel to the left.
Autoscan Up: To autoscan to a higher frequency, quickly double press the bezel.
Add a station to your preset stations: To add a station to your saved preset stations, press the bezel once. It is also possible to add presets by using your remote. Simply hold the number preset you would like to use and wait for on-screen confirmation. To delete the preset, either hold down the button on the remote or long press on the bezel control.
DAB Mode
Bezel Control
Manual Tune Up: To manually tune up to a higher frequency station, rotate the bezel to the right.
Manual Tune Down: To manually tune down to a lower frequency station, rotate the bezel to the left.
Rescan: To rescan for all stations, quickly double press the bezel.
Add a station to your preset stations: To add a station to your saved preset stations, press the bezel once.
Once added, you may access it using the remote. It is also possible to add presets by using your remote.
Simply hold the number preset you would like to use and wait for on-screen confirmation. To delete the preset, either hold down the button on the remote or long press on the bezel control.
Note: DAB is only available in supported countries.
Settings
Note: All of these functions are available through the remote using the Settings button. You can also access the Settings Menu by pressing and holding the Bezel and Power/Source/Volume knob together.
FM Scan Strength Set
In FM Mode, press the Settings button on the remote, then use the navigation arrows until "FM Scan Strength" appears onscreen. Press the SELECT button on the remote. Select the desired scan strength with the navigation arrows, then press the SELECT button to confirm.
Contrast
Press the Settings button on the remote, then use the navigation arrows until "Contrast" appears onscreen. Push the SELECT button on the remote. Use the navigation arrows until the desired Contrast is achieved, then press the SELECT button to confirm.
Auto Time Enable
To allow your Model One Digital to update the time via WiFi, FM, or DAB, set to "Enable". Selecting "Disable" will require you to manually set the time.
Manual Time Set
Press the Settings button on the remote, then use the navigation arrows until "Manual Time Set" appears onscreen. Push the SELECT button. Select the hour by using the navigation arrows, and press SELECT to confirm. Do this again to select the minute, meridiem, day, month, and year. To confirm, select YES then press the SELECT button.
Alarm Set
Press the Settings button on the remote, then use the navigation arrows until "Alarm Set" appears onscreen. Push the SELECT button on the remote. Select the hour by using the navigation arrows, and press SELECT to confirm. Do this again to select the minute, and whether you would like the alarm to be active. To confirm, select YES then press the SELECT button on the remote.
Sleep Time Set
Press the Settings button on the remote, then turn it until "Sleep Time Set" appears onscreen. Press the SELECT button on the remote. Select the hour by using the navigation arrows, and press SELECT to confirm. Do this again to select the minute. To confirm, select YES then press the SELECT button.
Auto Power Off
This allows your Model One Digital to shut itself off if it is idle for a period of time. Press the Settings button on the remote, then use the navigation arrows until "Auto Power Off" appears onscreen. Press the SELECT button on the remote. Use the navigation arrows until the confirmation appears, then press the SELECT button to confirm. "Enable" will set the model to turn off after it is idle for a period of time. "Disable" will turn this feature off and your unit will always stay on until you manually power it off.
FW Version
Press the Settings button on the remote, then use the navigation arrows until "FW Version" appears onscreen. Press SELECT to view the current firmware version.
Factory Reset
A Factory Reset will restore all features on Model One Digital to their default settings. Press the Settings button on the remote, then use the navigation arrows until "Factory Reset" appears onscreen. Push the SELECT button on the remote. Use the navigation arrows until the confirmation appears, then press the SELECT button to confirm.
Other Information
Firmware Updates
Your Model One Digital will have periodic software updates about every 4 months (and also possibly when you first use the product). The speaker will automatically update itself when it is connected to WiFi. No need to do anything!
Factory Reset
A factory reset will restore all features on your Model One Digital to their default settings. When your speaker is powered on, press and hold the Setup and Mute buttons until the screen confirms with a "Factory Resetting..." message. Release the buttons. The Model One Digital will automatically reboot once the factory reset is complete. You can also access Factory Reset through the Settings menu.
Standby Mode
If your Model One Digital is powered on and sitting idle, it will automatically enter a standby mode.
Normal Standby: When the Model One Digital has not been connected to WiFi, or paired to Bluetooth, the speaker will enter normal standby after 20 minutes of not playing audio. To wake the speaker, single press the Power/Source Knob. Power consumption in Normal Standby mode is less than 0.5W.
Network Standby: When the Model One Digital has been connected to WiFi and/or paired to Bluetooth, the speaker will enter network standby after 20 minutes of not playing audio. To wake the speaker, single press the Power/Source knob or select the speaker from the Control Center, CAST menu, Spotify Connect menu or Tidal Connect menu. Power consumption in Network Standby mode is less than 2W.
Care
A dry cloth is recommended to clean the back and wooden cabinet and metal grill of your Model One Digital. Do not expose to water.
Limited Warranty
Tivoli Audio manufactures its products to very high standards and we are confident our products will perform well. Accordingly, we warranty our products against manufacturing defects in material and workmanship to the original owner, for a period of one year in the United States and two years in the European Union from the original date of purchase. For countries where minimum warranty terms are determined by statute, the warranty term is the statutory period required. In all other locations, the warranty term is one year.
This warranty does not extend to damage caused by improper installation, faulty ancillary equipment, modifications, unauthorized repair, shipping damage or loss, abuse, accidents, use on improper voltage/current, lightning or other acts of God, normal wear and tear, commercial use, or purchase from unauthorized dealers. Proof of purchase as evidence the unit was purchased from an authorized dealer within the warranty period may be required for warranty service. Should service be necessary, please do NOT return the product without first contacting your dealer or Tivoli Audio.
This warranty is non-transferable. Tivoli Audio will not pay for loss of time, inconvenience, loss of use of the product, or damages caused by this product.
This warranty gives you specific legal rights and you may also have other rights which vary from state to state. Some states do not allow limitations on implied warranties or the exclusion of consequential damages, therefore, these restrictions may not apply to you.
For more warranty information please visit us at www.tivoliaudio.com
For European warranty information please visit www.tivoliaudio.eu
Licenses
Google, Google Home and Google Cast are trademarks of Google LLC.
Use of the Works with Apple badge means that an accessory has been designed to work specifically with the technology identified in the badge and has been certified by the developer to meet Apple performance standards.
The Spotify Software is subject to third party licenses found here: https://www.spotify.com/connect/third-party-licenses.
The Bluetooth® word mark and logos are registered trademarks owned by Bluetooth SIG, Inc. and any use of such marks by Tivoli Audio, Inc is under license. Other trademarks and trade names are those of their respective owners.
The Wi-Fi CERTIFIED™ Logo is a registered trademark of Wi-Fi Alliance®
WILLKOMMEN
text_image
Tivoli Audio Model One Digital Generation 3 Designed by Tivoli Audio in Boston, MA USA Produced in China AUX IN SERVICE SETUP MUTE 15V —— 1.5A 3 4 5 6 7text_image
Tivoli Audio OPENAlarm Einstellung
text_image
Tivoli Audio Model One Digital Generation 3 Designed by Tivoli Audio in Boston, MA USA Produced in China AUX IN SERVICE SETUP MUTE 15V 1.5A 3 4 5 6 7text_image
Tivoli Audio OPENhttps://www.spotify.com/connect/third-party-licenses
Cómo utilizar TIDAL Connect:
text_image
Tivoli Audio Model One Digital Generation 3 Designed by Tivoli Audio in Boston, MA USA Produced in China AUX IN SERVICE SETUP MUTE 15V 1.5A 3 4 5 6 7text_image
Tivoli Audio OPENtext_image
Tivoli Audio Model One Digital Generation 3 Designed by Tivoli Audio in Boston, MA USA Produced in China AUX IN SERVICE SETUP MUTE 15V —— 1.5A 3 4 5 6 7text_image
Tivoli Audio OPENhttps://www.spotify.com/connect/third-party-licenses
text_image
Tivoli Audio Model One Digital Generation 3 Designed by Tivoli Audio in Boston, MA USA Produced in China AUX IN SERVICE SETUP MUTE 15V 1.5A 3 4 5 6 7WAARSCHUWING: BATTERIJ NIET INSLIKKEN, GEVAAR VOOR CHEMISCHE
text_image
Tivoli Audio OPENAlarm Instellen
https://www.spotify.com/connect/third-party-licenses
text_image
Tivoli Audio Model One Digital Generation 3 Designed by Tivoli Audio in Boston, MA USA Produced in China AUX IN SERVICE SETUP MUTE 15V 1.5A 3 4 5 6 7text_image
Tivoli Audio OPENOppsett av Alarm
https://www.spotify.com/connect/third-party-licenses
Slik bruker du TIDAL Connect:
text_image
Tivoli Audio Model One Digital Generation 3 Designed by Tivoli Audio in Boston, MA USA Produced in China AUX IN SERVICE SETUP MUTE 15V 1.5A 3 4 5 6 7text_image
Tivoli Audio OPENHälytysasetukset
text_image
Tivoli Audio Model One Digital Generation 3 Designed by Tivoli Audio in Boston, MA USA Produced in China AUX IN SERVICE SETUP MUTE 15V —— 1.5A 3 4 5 6 7text_image
Tivoli Audio OPENAlarminställning
text_image
Tivoli Audio Model One Digital Generation 3 Designed by Tivoli Audio in Boston, MA USA Produced in China AUX IN SERVICE SETUP MUTE 15V —— 1.5A 3 4 5 6 7text_image
Tivoli Audio OPEN알람 설정
text_image
Tivoli Audio Model One Digital Generation 3 Designed by Tivoli Audio in Boston, MA USA Produced in China AUX IN SERVICE SETUP MUTE 15V —— 1.5A 3 4 5 6 7text_image
Tivoli Audio OPEN闹钟设置
text_image
Tivoli Audio Model One Digital Generation 3 Designed by Tivoli Audio in Boston, MA USA Produced in China AUX IN SERVICE SETUP MUTE 15V —— 1.5A 3 4 5 6 7text_image
Tivoli Audio OPENアラーム設定
| Type: | FM/WiFi Speaker |
| Driver: | 1x 3" Driver |
| Rated Output: | 20W |
| Rated Input: | 15Vdc, 1.5A |
| AC Adapter: | FJ-SW126G |
| Dimensions: | 222mm W x 112mm H x 140mm D |
| Weight: | 3.9 lbs / 1.8 kg |
| Operating Temperature: | 0-45°C |
| Operation Mode | Frequency Range (mHz) | Maximum EIRP (dBm) |
| Bluetooth | 2402 - 2480 | 7 |
| 802.11b/g/n | 2412 - 2472 | 15.9 |
| 802.11a/n/ac | 5180 - 5825 | 18.9 |
FCC REGULATORY CONFORMANCE
This device complies with Part 15 of the FCC Rules. Operation is subject to the following two conditions:
(1) This device may not cause harmful interference.
(2) This device must accept any interference received, including interference that may cause undesired operation.
NOTE: This equipment has been tested and found to comply with the limits for a Class B digital device, pursuant to part 15 of the FCC Rules. These limits are designed to provide reasonable protection against harmful interference in a residential installation.
This equipment generates uses and can radiate radio frequency energy and, if not installed and used in accordance with the instructions, may cause harmful interference to radio communications.
However, there is no guarantee that interference will not occur in a particular installation. If this equipment does cause harmful interference to radio or television reception, which can be determined by turning the equipment off and on, the user is encouraged to try to correct the interference by one or more of the following measures:
- Reorient or relocate the receiving antenna.
- Increase the separation between the equipment and receiver.
-Connect the equipment into an outlet on a circuit different from that to which the receiver is connected.
-Consult the dealer or an experienced radio/TV technician for help
NOTE: The manufacturer is not responsible for any radio or TV interference caused by unauthorized modifications to this equipment. Such modifications could void the user's authority to operate the equipment.
RF Exposure
This equipment complies with FCC radiation exposure limits set forth for an uncontrolled environment. This equipment should be installed and operated with minimum distance of 20 cm between the radiator and your body. This transmitter must not be co-located or operating in conjunction with any other antenna or transmitter.
IC REGULATORY CONFORMANCE
This device complies with CAN ICES-003 (B)/NMB-003(B).
This device contains licence-exempt transmitter(s)/receiver(s) that comply with Innovation, Science and Economic Development Canada's licence-exempt RSS(s). Operation is subject to the following two conditions:
(1) This device may not cause interference.
(2) This device must accept any interference, including interference that may cause undesired operation of the device.
This equipment complies with IC radiation exposure limits set forth for an uncontrolled environment. This equipment should be installed and operated with minimum distance of 20 cm between the radiator and your body. This transmitter must not be co-located or operating in conjunction with any other antenna or transmitter.
EU DECLARATION OF CONFORMITY
EU DECLARATION OF CONFORMITY
Equipment
Product: FM/WiFi Speaker
Model: Model One Digital Generation 3
Manufacturer
Name: Tivoli Audio, Inc.
Address: 28 Atlantic Ave Suite 133, Boston MA 02110, USA
Country: USA
This declaration of conformity is issued under the sole responsibility of the manufacturer:
Object of the declaration:

natural_image
Three electronic devices: a Spotify audio device with sound waves, a Model One German audio device, and a white USB drive with a ruler for scale (no visible text or symbols on devices)The object of the declaration described above is in conformity with the following relevant Union harmonisation legislation(s):
(RED) 2014/53/EU
(ERP) (EU) 2023/826
(LVD) 2014/35/EU
Conformity to the essential requirements of the legislation(s) have been demonstrated by using the following standards:
Health and Safety: EN 50665: 2017
EN IEC 62311: 2020
EN 62368-1:2014
EMC: EN 55032:2015
EN 55032:2015
EN 55035:2017
EN 301 489 - 1 V2.2.3
EN 301 489 - 17 V3.3.1
EN IEC 61000-3-2:2019
EN 61000-3-3:2013
RF Spectrum: EN 300 328 V2.2.2
EN 300 328 V2.2.2
EN 301 893 V2.1.1
EN 300 440 V2.2.1
EN 303 345 - 1 V1.1.1
EN 303 345 - 3 V1.1.1
EN 303 345 - 4 V1.1.1
ERP: EN 50564:2011
Signed for and on behalf of
Place and date of issue:
Signature:
Name, function:
Tivoli Audio, Inc.
Boston, MA, USA 10 November 2025

Sam Herec, VP of Product, Strategy & Sustainability
Manufactured by
Tivoli Audio, Inc
Boston, MA USA
European Importer
Tivoli Audio, Cooperatief
Mariaplaats 3
3511 LH Utrecht
The Netherlands
www.tivoliaudio.com

tivoliaudio

@tivoliaudio