— Radio — Mode d'emploi PDF")
PAL+ BT (Gen 3) - Radio TIVOLI AUDIO - Free user manual and instructions
Find the device manual for free PAL+ BT (Gen 3) TIVOLI AUDIO in PDF.

User questions about PAL+ BT (Gen 3) TIVOLI AUDIO
0 question about this device. Answer the ones you know or ask your own.
Ask a new question about this device
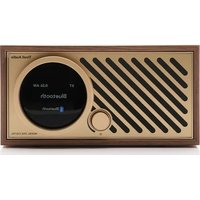
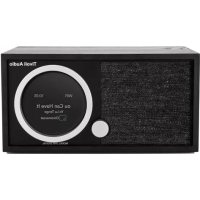
Download the instructions for your Radio in PDF format for free! Find your manual PAL+ BT (Gen 3) - TIVOLI AUDIO and take your electronic device back in hand. On this page are published all the documents necessary for the use of your device. PAL+ BT (Gen 3) by TIVOLI AUDIO.
USER MANUAL PAL+ BT (Gen 3) TIVOLI AUDIO
Guide to Features....6
Guide to Features (Rear Panel)....7
Remote Control 8
Menu and Specific Features.... 10
How to Set the Alarm ....12
DAB Mode....13
Bluetooth Operation....13
About The Battery Pack....14
Charging....14
Low Battery 14
DAB/FM Reception....15
Handling the PAL+BT 15
Limited Warranty....16
VELKOMMEN....17
Bluetooth-werking....73
Over de Batterij....74
Opladen....74
EU Declaration of Conformity 114
WELCOME
Congratulations on your purchase! We believe the PAL+BT Generation 3 to be one of the finest portable DAB/FM radios on the market today. With Bluetooth wireless technology, you can stream your music wirelessly to the PAL+BT.
We know you are eager to begin listening to your new radio, but in order to take full advantage of what your PAL+BT is capable of, please take a moment to read this owner's manual and the safety instructions. If you have any questions, please do not hesitate to contact your dealer or Tivoli Audio.
Please save the carton and original packing should you ever need to ship your radio, as shipping damage is not covered by the factory warranty.
On behalf of all of us, thank you for choosing Tivoli Audio and enjoy your new PAL+BT.
Packed with your PAL+BT you should find:
- One (1) USB-C to USB-C charging cable
- One (1) Remote Control (battery installed)
- One (1) Quick Start Guide
Please contact your point of purchase or Tivoli Audio if any of these items are missing.
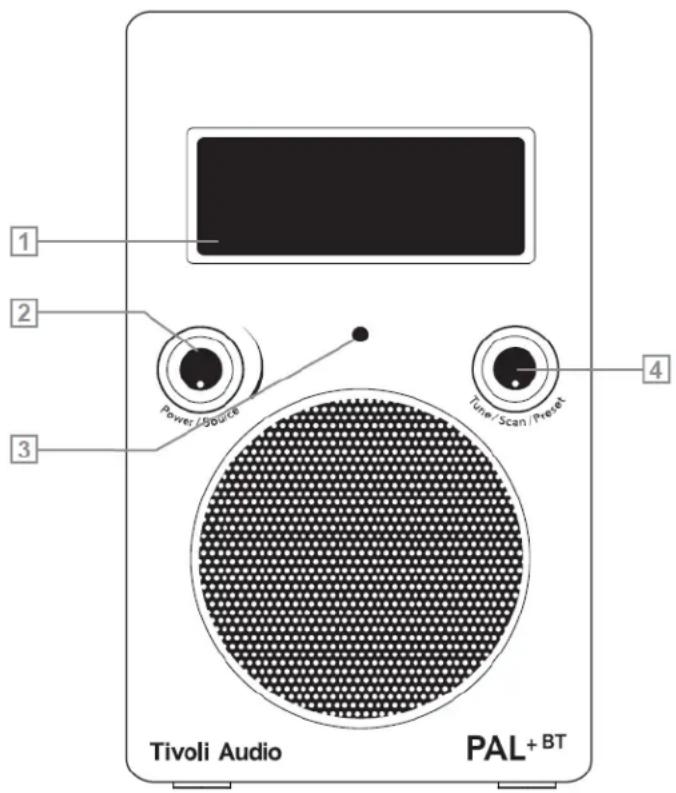
Guide to Features
- LCD: Displays important information on current source, time, radio, battery and charging status.
-
Power/Volume Knob: The Power/Volume Knob serves many functions:
-
Power: When the PAL+BT is off, press the knob briefly to power the unit on. When the PAL+BT is on in any source, press and hold the knob to power the unit off. (Note: the remote's Power button will not turn the PAL+BT on when the unit is off and not connected to the external power supply.)
- Volume: When the PAL+BT is on in any source, rotate the knob clockwise to increase the volume level and counterclockwise to decrease the volume level.
-
Source: When the PAL+BT is on in any source, single press the knob to switch between sources.
-
IR SENSOR: Receives signals from the included remote control. Do not obstruct this senor.
text_image
1 2 3 Power / Source Tivoli Audio PAL+BT 4 Tune / Scan / Preset-
Tuning Knob: The Tuning Knob serves many functions.
-
Tuning: When the PAL+BT is on in any source except Aux, rotate the knob clockwise to manually tune up and counter-clockwise to manually tune down.
- Snooze: When the alarm sounds, press the knob to engage Snooze. A icon will show on the display when Snooze is active. The Snooze time is fixed at 7 minutes. Press again during Snooze to cancel the Snooze. The Snooze function works when the PAL+BT is connected to the external power supply. When operating on battery-only power, pressing Snooze will have no effect.
- PRESETS: Press briefly to recall the station associated with that specific preset. In FM mode, the preset number will be indicated on the display. There are 10 presets for each band.
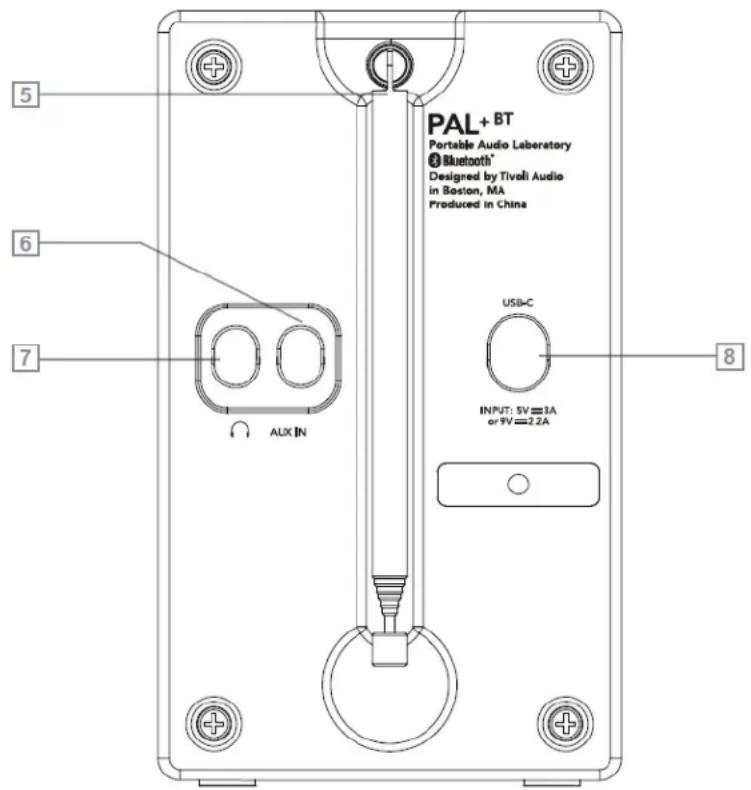
Guide to Features (Rear Panel)
- FM/DAB ANTENNA: When listening to FM, adjust this telescoping antenna and position it for best reception. In strong FM signal locations, reducing the antenna's length may provide better reception. When the unit is not in use keep the antenna retracted to protect it.
- AUXILIARY INPUT: To hear audio from another device (such as a portable CD or MP3 player) through the PAL+BT's main speaker, connect the device's audio output to this input and set the radio's source to Auxiliary Input. This jack accepts a 1/8" stereo male mini plug. Note that you may need to adjust the volume level differently for an auxiliary device than the level normally used for radio listening. Keep the rubber plug inserted when this input is not in use.
- HEADPHONE OUTPUT: Connect a headset to this stereo output for private listening. The headphone volume will be controlled by the PAL+BT's volume knob. Connecting a pair of headphones will mute the PAL+BT's main speaker. This jack accepts a stereo male mini plug. You may also record from the PAL+BT or use it as a high quality stereo tuner by using this output. Keep the rubber plug inserted when this output is not in use.
- DC INPUT: Use this input to charge the PAL+BT using a qualified USB-C adapter with PD capabilities. The power delivered by the charger must be between min 2.5 Watts required by the PAL+BT, and max 20 Watts in order to achieve the maximum charging speed.
NOTE: We suggest keeping the rubber covers in place over the rear jacks to protect them when not in use.
text_image
PAL + BT Portable Audio Laboratory Bluetooth® Designed by Tivoli Audio in Boston, MA Produced in China USB-C INPUT: 5V=3A or PV=2.2A ALX IN 5 6 7 8Remote Control
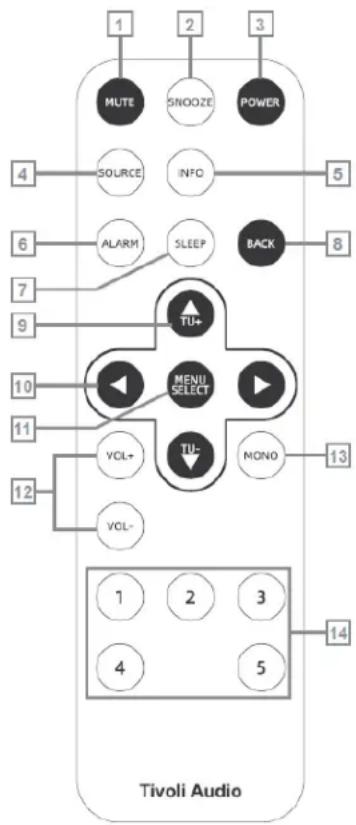
In addition to duplicating most of the front panel controls, the remote control adds the following functions:
- MUTE: Press to mute the audio while the unit is playing and press again to restore sound, or adjust the volume.
- SNOOZE: Press to mute the alarm after the alarm sounds. A icon will show on the display when Snooze is active. The Snooze time is fixed at 7 minutes and is not adjustable.
- POWER: Press briefly to power the PAL+BT on from Standby Mode. The radio will power on to the last source used. Press again to power off. The remote's Power button will not turn the PAL+BT on when the radio is off and not connected to an external power supply.
- SOURCE: Press repeatedly to change sources.
- INFO: Press repeatedly to cycle through the information available depending on the source mode. This function does not work in Auxiliary mode.
- ALARM: Use the ▲▼ and Select buttons to adjust and set the alarms. For very important notes and a complete step-by-step guide, refer to the section titled "How to set the Alarm".
- SLEEP: Press repeatedly to view the amount of time the radio will play before it turns off automatically and press the Select button to select that time. When the sleep timer is active you can check the remaining time by pressing the Sleep button on the remote. An icon
flowchart
graph TD
    A["MUTE"] --> B["SNOOZE"]
    B --> C["POWER"]
    D["SOURCE"] --> E["INFO"]
    E --> F["BACK"]
    G["ALARM"] --> H["SLEEP"]
    H --> I["TU+"]
    J["MENU SELECT"] --> K["TU-"]
    L["VOL+"] --> M["NONO"]
    N["VOL-"] --> O["1"]
    P["1"] --> Q["2"]
    R["3"] --> S["5"]
    T["4"] --> U["6"]
    V["7"] --> W["9"]
    X["10"] --> Y["11"]
    Z["12"] --> AA["13"]
    AB["1"] --> AC["2"]
    AD["4"] --> AE["5"]
    AF["14"] --> AG["13"]
will show on the display when the Sleep timer is active. To cancel Sleep, press the Sleep button until the display shows "Off". When operating on battery-only power (external adapter not plugged in), if Sleep is engaged and the alarm is set, after Sleep ends, the alarm will not sound. To use both Sleep and Alarm features, please be sure an external adapter is connected.
-
BACK: Press to go back to the previous menu page.
-
▲▼: Press to navigate within the menus. Use these same buttons to manually tune up or down when in FM mode and to Full Scan stations. Press for 1.5 seconds and release to Full Scan to the next station detected. In DAB Mode, the display will show "Scanning..." Refer to "Scan Setting" under the section "Menu and Specific Features".
-
◀▶: Press to navigate within the menus. Use these same buttons to manually tune up or down when in FM mode and to Full Scan stations. Press for 1.5 seconds and release to Full Scan to the next station detected. In DAB Mode, the display will show “Scanning...” Refer to “Scan Setting” under the section “Menu and Specific Features”.
-
MENU/SELECT: Press and hold to enter the main menu and press briefly to select items within the menu. For more, see the section marked "Menu".
-
VOL +/-: Press the "Vol +" button to raise the volume level or the "Vol -" button to lower the volume level. If the audio ever sounds distorted, lower the volume level to avoid damaging the speaker. Adjusting the volume while the PAL+BT is muted will cancel the muting.
-
MONO: Press to change the Stereo/Mono setting. "Mono" or "Stereo" will also be one of the fields shown when pressing the Info button on the remote in FM mode. If you are listening to a noisy FM station in stereo, switching to mono may improve reception. Note: only FM mode can be changed to Mono. Also see "Balance" under "Menu and Specific Features".
- PRESETS 1-5: Press and hold to store the currently tuned station. Press briefly to recall the station associated with that specific preset. In FM mode, the preset number will be indicated on the display. There are 5 presets for each band.
Remote Control Battery Replacement Procedure
- Insert the tip of a pin into the hole on the battery cover.
- Slide the battery cover in the direction indicated by "▼ OPEN" on the cover.
- Insert the button battery (CR2032) with the + positive side facing up.
- Push the battery cover back into place until you hear a click.

text_image
Tivoli Audio OPENMenu and Specific Features
Press and hold the Menu button on the remote to enter the main menu. Use the remote's ▲▼◀▶ buttons and the Menu/Select button to change the items within the menu. Use the Back button to navigate back, or wait for about 10 seconds until the timeout expires.
An asterisk (*) indicates the shown menu item is currently set.
Scan Setting (FM Mode Only)
Press the Select button and use the ▲▼ and Select button to choose between “Strong stations only” or “All stations” when performing an Full Scan (see #9 (▲▼) under “Remote Control”). Selecting “All stations” increases the sensitivity of the scan, possibly resulting in the Full Scan stopping on noise.
Full Scan (DAB Mode Only)
Searches the entire frequency range. If you move the PAL+BT to another location, you must perform a new scan so the radio will find stations in the new location. To cancel the auto scan, press the Back button on remote.
Manual Tune (DAB Mode Only)
Press the Select button and use the ▲▼ buttons to manually tune specific DAB/DAB+/DMB frequencies, then press Select to tune the displayed frequency.
DRC (DAB Mode Only)
Dynamic Range Control allows you change the sound level of stations to make quiet passages louder to compensate for a noisy environment, or when listening at a low volume level.
Sleep (Found Under Settings)
Press Select and use the ▲▼ buttons and the Select button to set the sleep timer to one of the available times. There is also a dedicated Sleep button on the remote control. A small clock face will show on the display when the Sleep timer is active.
Alarm (Found Under Settings)
Alarm 1 is shown first. Use the Alarm and Select buttons to choose between Alarm 1 and Alarm 2. Use the ▲▼ buttons and the Select button to set the Alarm to the desired time.
Time (Found Under Settings)
Set Time/Date: Press the Select button and use the ▲▼ and Select buttons to adjust the hour and then minutes, immediately followed by the date. You must set the Auto update to "No update" in order to set the time manually. For more, refer to "Auto update" below.
Auto Update: Press the Select button and use the ▲▼ and Select buttons to choose between "Update from any", "Update from DAB" (also DMB), "Update from FM" (RDS), or "No Update". For any of the auto
updates to work, you must have consistent reception of DAB or FM RDS with a time/date signal provided. It could take up to a minute or more for the clock to update. Tivoli Audio is not responsible for inaccurate time/date information provided by the auto update signal.
Backlight (Found Under Settings)
Press Select and use the ▲▼ and Select buttons to choose the intensity of the backlight.
Factory Resest (Found Under Settings)
Press Select and use the ▲▼ or ◀▶ and Select buttons to confirm (Yes) or reject (No) the factory reset. A factory reset will restore factory defaults and cancel all your personal settings, such as station presets and language. The Factory Reset may not be accessible when operating on battery-only power.
ID (Found Under Settings)
Press Select to view the ID. If you contact your dealer or Tivoli Audio with a question, you may be asked to provide the number shown in this field.
NOTE: When operating on battery-only power (external adapter not plugged-in), if Sleep is engaged and the alarm is set, after Sleep ends, the alarm will not sound. To use both Sleep and Alarm features, please be sure the external adapter is connected.
How to Set the Alarm
Access the alarm setting either through the main menu or by pressing the alarm button on the remote.
- Alarm 1 is shown first. Use the Alarm button to choose between Alarm 1 and Alarm 2. Note: At any point you can navigate through the alarm menu by using the Back and the Select buttons.
- Use the ▲▼ and Select buttons to set the alarm on or off. If the time and date are not set, the PAL+BT will prompt you to set the Time/Date first.
- Use the ▲▼ buttons to set/change the hour, then press Select. Repeat this process to set/change the minutes, then press Select.
- Use the ▲▼ buttons to select how long you want the alarm to sound, then press Select.
- Use the ▲▼ buttons to select the source you wish to wake to, then press Select. If you set the source to DAB (includes DAB+/DMB) or FM, the alarm will be set to the last station you listened to.
- Use the ▲▼ buttons to set how often the alarm should be set to wake, then press Select.
- Lastly, use the ▲▼ buttons to set the volume level of the alarm, then press Select.
- Repeat this process for Alarm 2 if desired.
If you make a mistake at any point in the process, press the Back button on the remote and begin again.
Your settings will not be saved unless you complete the entire process and the display shows “Alarm Saved”.
IMPORTANT NOTES:
- The alarm cannot sound if the PAL+BT is off and not connected to an external power supply.
- Should power be lost or the battery becomes discharged, the alarm time will be saved, but the alarm cannot sound without an external power supply connected to the PAL+BT.
ALARM OPTIONS
Alarm Quick Set: With the PAL+BT in standby mode, repeatedly press the alarm button briefly to toggle each alarm on or off.
Alarm Off: To stop the alarm, press the Alarm or Power button on the remote.
Snooze: To activate Snooze, press the Snooze button on the remote. The Snooze time is not adjustable. When operating on battery-only power, pressing Snooze will have no effect.
Note: When in Snooze mode, you can see the remaining Snooze time by pressing the Snooze button on the remote. If you press the Alarm or Power button on the remote, then the Snooze countdown will be cancelled and the PAL+BT will go into Standby or off if operating on battery-only power.
DAB Mode
Press and hold the Menu button on the remote to enter the main menu. Use the ▲▼ buttons and the Select button to change the items within the menu. Use the Back button to navigate back, or wait for 15 seconds until the timeout expires.
An asterisk (*) indicates the shown menu item is currently set.
NOTE: Upon entering DAB mode, if the Station list is empty, a full scan will initiate.
- FULL SCAN: Searches the entire frequency range. If you move the PAL+BT to another location, you must perform a new scan so the radio will find stations in the new location. To cancel the auto scan, press the Back button on remote.
- MANUAL TUNE: Press the ▲▼ buttons to manually tune specific DAB/DAB+/DMB frequencies, then press Select to tune the displayed frequency.
- DRC: Dynamic Range Control allows you change the sound level of stations to make quiet passages louder to compensate for a noisy environment, or when listening at a low volume level.
NOTE: When moving the PAL+BT to another location where there may be different DAB stations from the previous location, it is recommended to run another “Full Scan”.
Bluetooth Operation
Prior to pairing, verify your smart device is not connected to any other Bluetooth product. Devices may pair differently. Below is a general guide.
- Set the PAL+BT to Bluetooth source.
- To enter pairing mode, press and hold the Tune/Scan/Preset knob. The screen will confirm with a "Pairing Enabled" display.
- Go to the Bluetooth settings screen on your phone or tablet.
- Select the device that has a name similar to "Tivoli PAL+BT3|XXXXX".
- Once you hear the Bluetooth connection tone, you are paired to the PAL+BT. The screen will also confirm the connection with a "BT Connected" display.
NOTE:
If the audio drops out or stops during playback, move your device closer to the PAL+BT, or check to be sure another wireless device is not interfering with the signal.
When switching from Bluetooth to DAB or FM, you may need to re-adjust (lower) the radio's volume level.
About The Battery Pack
The PAL+BT uses a sealed pack of Lithium Ion cells. The LCD display serves as a power, battery power and charge status indicator. The estimated battery life on a full charge is 12 hours.
Note: battery life varies depending on the audio source and volume settings.
Charging
USB-C charging device NOT included with the PAL+BT.
The PAL+BT supports USB PD fast charging via the USB-C charge port. The power delivered by the charger must be between minimum 2.5 Watts required by the PAL+BT, and maximum 20 Watts in order to achieve the maximum charging speed. For the fastest charging, use a USB-C PD Charger capable of delivering 9V, 2.2A.
From full discharge, the battery will be completely charged in approximately 3 hours. Because the battery is new, it may take 4-5 full charge/discharge cycles until you experience average playback performance times. During charging, the battery icon on the LCD will flash. The battery icon will stop flashing and all 3 bars will be shown on the LCD once the battery is fully charged.
There is no harm in operating the PAL+BT with a power supply plugged in, however, charge time will be affected. The PAL+BT is always powered by the battery, even when plugged in to a power supply. FM and DAB reception may be impacted when the PAL+BT is powered on and charging.
Low Battery
When running solely on the battery, as the battery becomes discharged, the battery icon will drop from 3 bars, to 2 bars, to 1 bar, and finally show an empty battery. It is not necessary to wait until the battery is exhausted before recharging, although recharging from a discharged battery will not harm the battery. Leaving the PAL+BT plugged for long periods of time when not in use may cause premature wear to the batteries.
The audio may begin to sound distorted when the battery starts to reach a low level. You may also notice reduced battery playback time with your PAL+BT when using Bluetooth®.
DAB/FM Reception
When moving the PAL+BT to another location where there may be different DAB stations from the previous location, it is recommended to run a “Full Scan” to initiate a new scan to refresh the DAB station list.
FM: In strong signal locations, reducing the antenna's length may provide better reception.
RDS (FM band only)
The Radio Data System (RDS) transmits text data along with the audio broadcast. Not all FM stations utilize this service, thus text may not be present on some stations. For stations broadcasting RDS, the text still might not appear, or might appear scrambled if the signal is too weak. This is not a fault of the PAL+BT. In such cases, experiment with the position of the FM antenna. Note RDS content is determined by each individual FM station.
Handling the PAL+BT
The PAL+BT is weather resistant, but it is not weather proof. It should not be immersed in water or held under running water. It also should not be exposed to extreme temperatures.
The PAL+BT is designed to be portable, but it is not indestructible. Do not drop it, throw it, or subject it to strong impacts.
Always grip the PAL+BT using the side indentations to reduce the chance of it slipping out of your hand.
Cleaning
Never use any harsh cleansers or solvents on your radio. Normal everyday wear and tear or damage resulting from cleaning or chemicals is not covered under the factory warranty. To clean the PAL+BT use a soft cloth and do not rub hard.
Limited Warranty
Tivoli Audio manufactures its products to very high standards and we are confident our products will perform well. Accordingly, we warranty our products against manufacturing defects in material and workmanship to the original owner, for a period of one year in the United States and two years in the European Union from the original date of purchase. For countries where minimum warranty terms are determined by statute, the warranty term is the statutory period required. In all other locations, the warranty term is one year.
This warranty does not extend to damage caused by improper installation, faulty ancillary equipment, modifications, unauthorized repair, shipping damage or loss, abuse, accidents, use on improper voltage/current, lightning or other acts of God, normal wear and tear, commercial use, or purchase from unauthorized dealers. Proof of purchase as evidence the unit was purchased from an authorized dealer within the warranty period may be required for warranty service. Should service be necessary, please do NOT return the product without first contacting your dealer or Tivoli Audio.
This warranty is non-transferable. Tivoli Audio will not pay for loss of time, inconvenience, loss of use of the product, or damages caused by this product.
This warranty gives you specific legal rights and you may also have other rights which vary from state to state. Some states do not allow limitations on implied warranties or the exclusion of consequential damages, therefore, these restrictions may not apply to you.
For more warranty information please visit us at www.tivoliaudio.com
For European warranty information please visit www.tivoliaudio.eu
VELKOMMEN
text_image
PAL + BT Portable Audio Laboratory Bluetooth® Designed by Tivoli Audio in Boston, MA Produced in China USB-C INPUT: 5V=3A or PV=2.2A ALX IN 5 6 7 8Fjernbetjening
text_image
Tivoli Audio OPENtext_image
PAL + BT Portable Audio Laboratory Bluetooth® Designed by Tivoli Audio in Boston, MA Produced in China USB-C INPUT: 5V=3A or PV=2.2A ALX IN 5 6 7 8text_image
Tivoli Audio OPENtext_image
PAL + BT Portable Audio Laboratory Bluetooth® Designed by Tivoli Audio in Boston, MA Produced in China USB-C INPUT: 5V=3A or PV=2.2A ALX IN 5 6 7 8Télécommande
text_image
Tivoli Audio OPENRDS (bande FM uniquement)
text_image
PAL + BT Portable Audio Laboratory Bluetooth® Designed by Tivoli Audio in Boston, MA Produced in China USB-C INPUT: 5V=3A or 9V=2.2A ALIX IN 5 6 7 8text_image
Tivoli Audio OPENtext_image
PAL + BT Portable Audio Laboratory Bluetooth® Designed by Tivoli Audio in Boston, MA Produced in China USB-C INPUT: 5V=3A or 5V=2.2A 8 5 6 7 ALX INtext_image
Tivoli Audio OPENtext_image
PAL + BT Portable Audio Laboratory Bluetooth® Designed by Tivoli Audio in Boston, MA Produced in China USB-C INPUT: 5V=3A or 9V=2.2A ALIX IN 5 6 7 8text_image
Tivoli Audio OPENtext_image
PAL + BT Portable Audio Laboratory Bluetooth® Designed by Tivoli Audio in Boston, MA Produced in China USB-C INPUT: 5V=3A or 9V=2.2A ALX IN 5 6 7 8Kaukosäädin
text_image
Tivoli Audio OPENtext_image
PAL + BT Portable Audio Laboratory Bluetooth® Designed by Tivoli Audio in Boston, MA Produced in China USB-C INPUT: 5V=3A or 5V=2.2A 8 5 6 7 ALX INFjärrkontroll
text_image
Tivoli Audio OPENType: Portable FM/DAB Radio with Bluetooth
Driver: 1x 2.5" Neodymium Driver
Rated Input: 5Vdc, 3A / 9 Vdc, 2.2A
AC Adapter: Not Included
Operating Temperature: 0-40°C
RF Output Power: Bluetooth (Classic): 12.04 dBm
Bluetooth Low Energy: 4.95 dBm
EU DECLARATION OF CONFORMITY
EU DECLARATION OF CONFORMITY
Equipment
Product: Portable FM/DAB Radio with Bluetooth
Model: PAL+BT Generation 3
Manufacturer
Name: Tivoli Audio, Inc.
Address: 28 Atlantic Ave Suite 133, Boston MA 02110, USA
Country: USA
This declaration of conformity is issued under the sole responsibility of the manufacturer:
Object of the declaration:
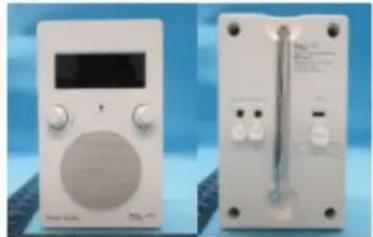
natural_image
Two white electronic devices with control knobs and a digital display, shown against a blue background (no visible text or symbols)The object of the declaration described above is in conformity with the following relevant Union harmonisation legislation(s):
(RED) 2014/53/EU
(ERP) (EU) 2023/826
(LVD) 2014/35/EU
Conformity to the essential requirements of the legislation(s) have been demonstrated by using the following standards:
Health and Safety: EN IEC 62311: 2020
EN 50665:2017
EN 62368-1:2014
EMC: EN 55032: 2015+A1: 2020
EN 55035: 2017+A11: 2020
EN IEC 61000-3-2: 2019+A2: 2024
EN 61000-3-3: 2013+A2: 2021
ETSI EN 301 489-1 V2.2.3 (2019-11)
ETSI EN 301 489-17 V3.3.1 (2024-09)
RF Spectrum: ETSI EN 303 345-1 V1.1.1 (2019-06)
ETSI EN 303 345-3 V1.1.1 (2021-06)
ETSI EN 303 345-4 V1.1.1 (2021-06)
Signed for and on behalf of
Place and date of issue:
Signature:
Name, function:
Tivoli Audio, Inc.
Boston, MA USA 14 November 2025

Samuel Herec, VP of Product, Strategy, and Sustainability
Manufactured by
Tivoli Audio, Inc 28 Atlantic Ave, Suite 133 Boston, MA USA