
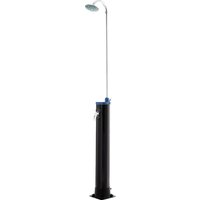
Magic 049000 - Shower system Steinbach - Free user manual and instructions
Find the device manual for free Magic 049000 Steinbach in PDF.

| Product Type | Outdoor Solar Shower |
| Brand | Steinbach |
| Model | Magic 049000 |
| Tank Capacity | 18 liters |
| Maximum Water Pressure | 5 bar (pressure reducer if necessary) |
| Water Supply | Hose connection (cold water), passive solar heating |
| Water Temperature | Varies with sunlight, adjustable by mixer |
| Main Functions | Outdoor shower with solar hot water, integrated mixer |
| Material | Matt black tank for solar absorption, plastic and metal |
| Installation | Floor fixing (screws and plugs) or optional grating (ref. 049028) |
| Package Contents | Upper tank part, screw ring, hose adapter, Teflon tape, lower tank part, mixer, shower head |
| Care and Cleaning | Mild bathroom cleaner, clear water, lint-free cloth |
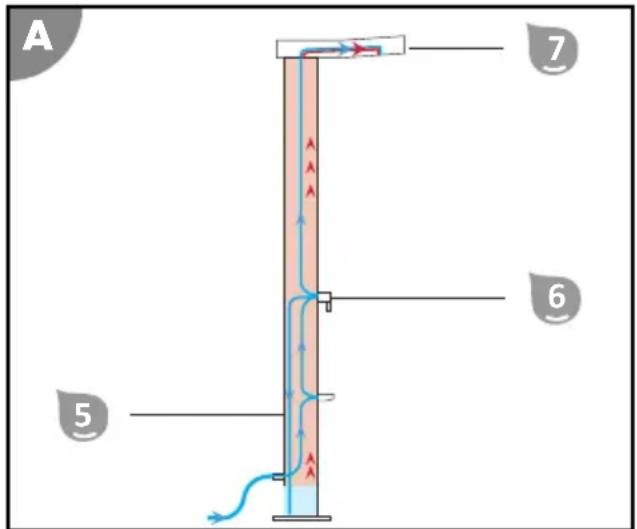
| Safety Instructions | Risk of burns (hot water), risk of infection (bacteria), do not drink the water, drain if not used for extended periods, dismantle if T<10°C |
| Frost Resistance | No, must be drained and stored frost-free (>=+5°C) |
| Available Spare Parts | Handle (049936), Mixer screw (049922), Hose adapter (049907), Sealing ring (099025), Shower head (049923) |
| Repairability | Have repairs carried out by a Steinbach after-sales service specialist |
| Intended Use | Private outdoor shower only, not for professional use |
Frequently Asked Questions - Magic 049000 Steinbach
User questions about Magic 049000 Steinbach
0 question about this device. Answer the ones you know or ask your own.
Ask a new question about this device
Download the instructions for your Shower system in PDF format for free! Find your manual Magic 049000 - Steinbach and take your electronic device back in hand. On this page are published all the documents necessary for the use of your device. Magic 049000 by Steinbach.
USER MANUAL Magic 049000 Steinbach
natural_image
Black industrial pipe fitting with a flanged end and outlet (no text or symbols visible)| de | Solardusche......4 | en | Solar shower......13 |
| fr | Douche solaire......22 | it | Doccia solare......31 |
| es | Ducha solar......40 | cs | Solární sprcha......49 |
| hu | Szolárzuhany......58 | sl | Solarna prha......67 |
| sk | Solárna sprcha......76 | pl | Prysznic solarny......85 |
| ro | Duş solar......94 | hr/bs | Solarni tuš......103 |
| bg | Соларен душ......112 | tr | Güneş enerjili duş......122 |
natural_image
Diagram showing two stages of a bottle being inserted into a conical flask, with arrows indicating the process (no text or symbols present)

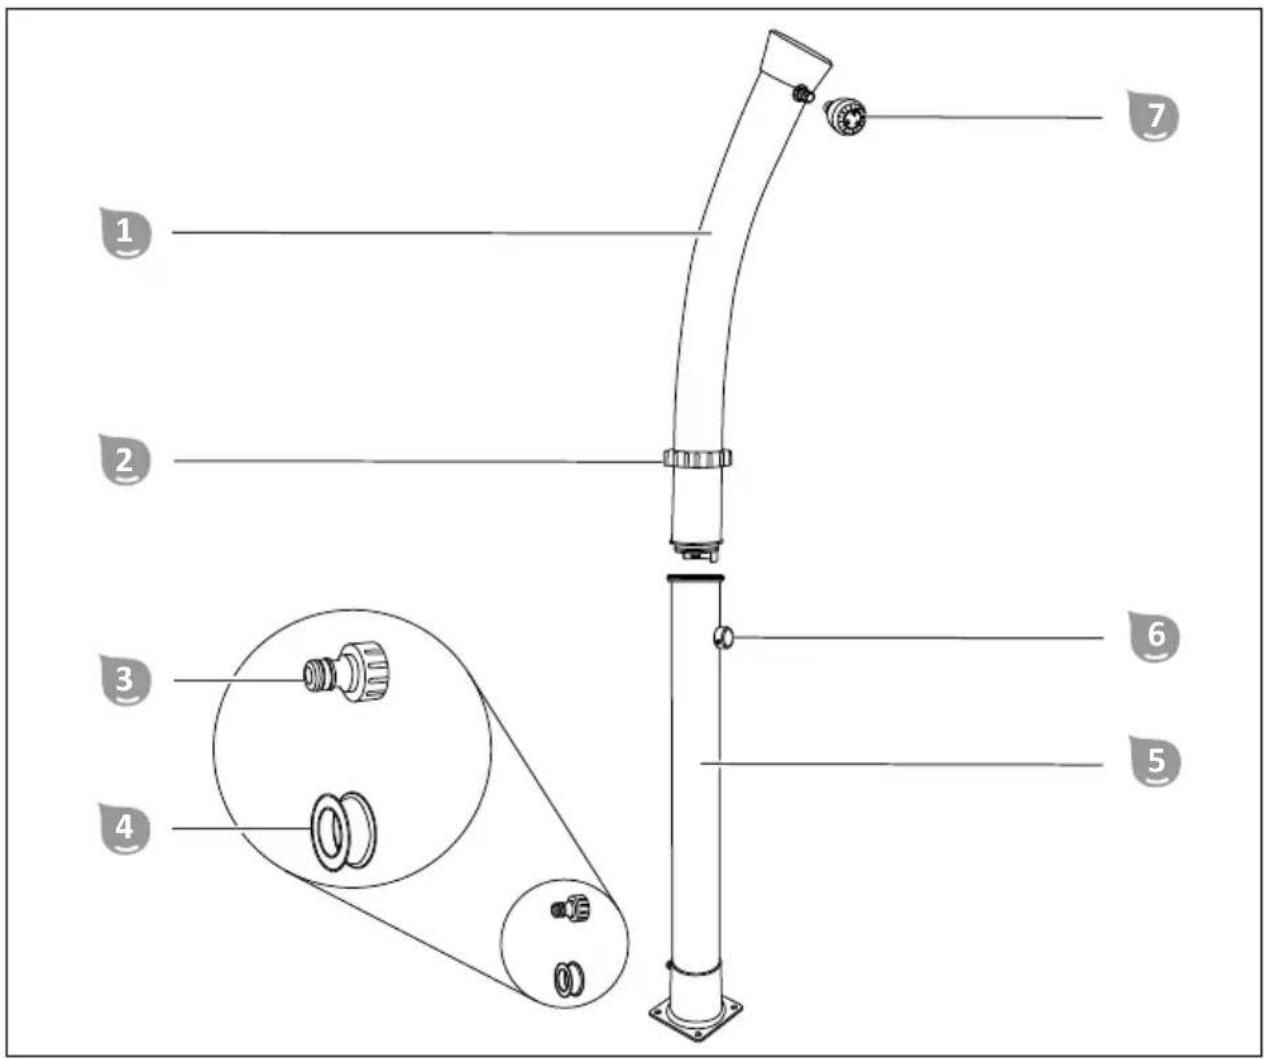
Package contents/components
1 Tank top part
2 Threaded ring
3 Hose adapter
4 Teflon tape
5 Tank bottom part
6 Faucet
7 Shower head
Operating instructions (no illustration)
Required tools/materials (not supplied)
8 Attachment material (screws and wall anchors for your stone, concrete or wooden floor) or the Steinbach outdoor floor element
Optionally available
9 Steinbach outdoor floor element including attachment material (item no. 049028)
Contents
Overview....2
Package contents/components.... 12
General Information....14
Read and keep the operating instructions.... 14
Explanation of Symbols....14
Safety....14
Description....16
Preparation.... 16
Preparing the setup location and the connections....16
Installation....17
Assembling the solar shower....17
Setting up the solar shower....17
Filling the tank....18
Operation....18
Using the solar shower....18
Cleaning....18
Disassembly....18
Dismantling the product....18
Storage....18
Troubleshooting....19
Technical data....19
Spare parts....20
Disposal....20
General Information
Read and keep the operating instructions

These operating instructions are a part of this solar shower (also referred to hereinafter as the "product"). They contain important information about start-up and operation.
Read the operating instructions and especially the safety instructions carefully before using the product. Non-observance of this operating instructions manual may lead to severe injuries or damage to the product.
Keep the operating instructions for further use. If you pass on the product to a third party, you must pass on operating instructions as well.
Intended use
This product is exclusively designed for outdoor showering.
This product is exclusively intended for private use and not suited for the commercial sector.
Only use the product as described in these operating instructions. Any other use is considered inappropriate and may lead to material damage or even injury. The product is not a toy.
The manufacturer or retailer will not assume any liability for damage caused by inappropriate or incorrect use.
Only use the product when it is firmly bolted down at a suitable location.
If the outdoor temperature drops below 50 °F ( 10 °C ), the tank must be drained and the shower must be dismantled and stored in a dry, frost-free place.
Foreseeable misuse
Never use the product as a climbing frame or as a post for suspending washing lines or hammocks.
Explanation of Symbols
The following symbols are used in this operating instructions, on the product or on the packaging.

Here you will find useful additional information.

Only tighten by hand, not with tools.

Not drinking water!

Risk of damage! Do not open the packaging with sharp or pointed objects, such as cutters.
Caution! Hot water.

The product is not frost-proof and must be disassembled if temperatures drop to below 10^ C.
Safety
The following signal words are used in these operating instructions.

WARNING!

CAUTION!
This signal symbol/word denotes a hazard with an average risk level that could lead to death or severe injury if it is not avoided.
This signal symbol/word denotes a hazard with a low risk level that could lead to mild or moderate injury if it is not avoided.
NOTICE!
This signal word provides a warning about potential material damage.
General safety instructions
Safety instructions for persons

WARNING!
Packaging materials pose a risk of suffocation!
Catching your head in the packaging foil or swallowing other packaging materials can cause death. There is a higher risk for children and mentally challenged persons who cannot estimate the hazard potential due to lack of knowledge and experience.
- Prevent children and mentally challenged persons from playing with the packaging materials.

CAUTION!
Risk of scalding!
In direct sunshine, the tank heats up and the water that comes out of the shower head can be very hot, depending on the faucet settings.
- Before showering, set the faucet between cold and hot.
- Check the water temperature before you stand under the shower head.
- Never leave children and persons with reduced physical, sensory or mental abilities (e.g. persons under the influence of alcohol) unattended in the vicinity of the product.

CAUTION!
Risk of infection!
Bacteria can multiply in the tank if the product is not used for longer periods.
- Drain the product before and after longer periods of non-use.
- Do not drink the water from the product.
NOTICE!
Improper use of the product may cause it to become damaged.
- Only use spare parts and accessories supplied or recommended by the manufacturer.
- Do not open the product. Leave repairs to a qualified service technician. Contact the service address on the back of the instruction manual for this purpose. All liability and warranty claims will be void when you carry out repairs yourself, the product is improperly connection or operated incorrectly.
- The shower head can become clogged with limescale. To prevent damage, check the shower head regularly and clean it if necessary.
Description
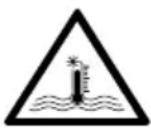
The tank 5 of the solar shower is filled with water via the connected garden hose. This water is heated by sunlight because the matt black surface of the tank reflects very little solar energy.
The solar shower has a cold water supply line leading directly to the faucet 6 so that the water can be adjusted to the perfect temperature for showering.
The illustration shows how a solar shower works:
The entire shower body is filled with water and works in a similar way to an electric water heater in which the heated water also collects at the top.
If hot water is needed, the faucet 6 at the base of the tank 5 is turned to let in cold water and the water in the top region, which has already been heated, is pushed out of the tank.
Any pressure that builds up due to the water heating up in the tank can therefore escape through the shower head 7. This causes water to drip from the shower head when the faucet is closed.
Preparation
Preparing the setup location and the connections
The shower must be anchored to the ground so that it can be used safely.
The safest place to use the shower is on a smooth, level concrete or wooden floor.
Careful selection and good preparation of the setup location makes it much easier to set up and use the shower. The following requirements must be met or considered:
- Water supply/drain, attachment and solar radiation
- Sturdy, level, waterproof and slip-proof floor, alternatively the floor element (item no. 049028)

CAUTION!
Risk of injury!
The product can topple.
- A second person who holds the product is required for installation.
To prepare the setup location, proceed as follows:
- The second person positions the shower at the desired location and secures it so that it cannot topple over. Mark the drilling points through the holes in the base of the shower.
- Detach the shower from the base.
- Drill suitable holes for the selected attachment materials into the floor with an electric drill.
- Put the attachment material (e.g. wall anchors) into the holes.
The setup location is prepared.
Installation
Assembling the solar shower
NOTICE!
- Tighten the individual parts by hand without using any tools to prevent the risk of damage during assembly.
The screw connections are self-sealing even before parts are screwed in so that you can align the individual parts properly. The openings of all water outlets (such as the shower head or cold water tap) should point downwards. If screw connections are not completely water-tight, wrap the thread in Teflon tape.
To assemble the solar shower, proceed as follows:
natural_image
Diagram showing two stages of a bottle being inserted into a conical flask, with arrows indicating the process (no text or symbols present)
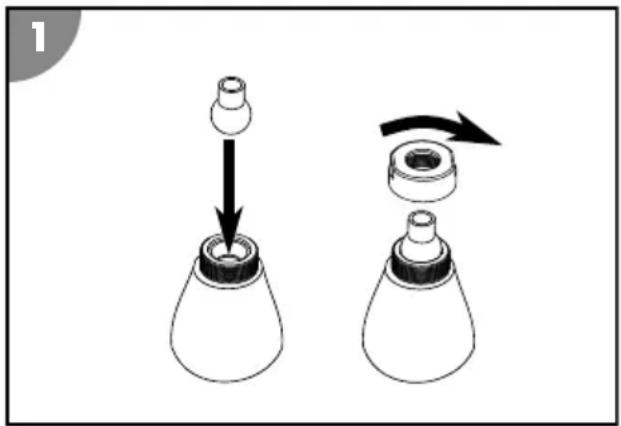
- Assemble the shower head 7.
- Screw the shower head 7 onto the tank top part 1.


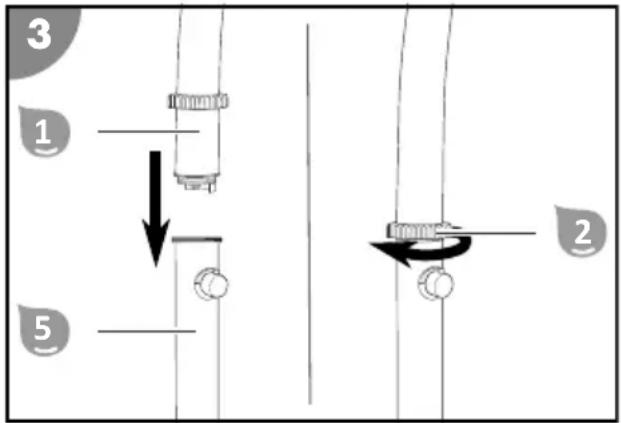
- Place the tank top part 1 onto the tank bottom part 5.
Note the coupler on the top part and the notch on the bottom part. Smear the coupler parts with lubricant or Vaseline (not included in the delivery) to make it easier to attach the top part to the bottom part. - Slide the threaded ring ② onto the connecting point and screw the top part and the bottom part together with the threaded ring.
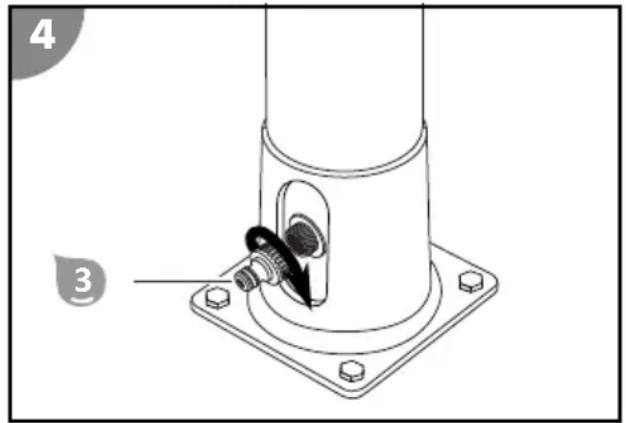
- Screw the hose adapter 3 onto the hose connection.
The solar shower is assembled.
Setting up the solar shower
Position the solar shower at the prepared setup location. Make sure that the solar shower is pointing in the correct direction.
The second person supports the shower while you screw the base of the shower into the floor with the correct attachment materials.
Filling the tank
To fill the tank 5 of your solar shower, proceed as follows:
- Connect a garden hose to the hose adapter ③ and the faucet of the water pipe. Position the garden hose so that no one can trip over it.
- Turn on the water supply faucet. Turn the faucet 6 all the way to the "hot" position and open it. In this position, the tank fills fastest. Water flows into the tank. It takes approx. 3 minutes for the tank to fill.
- As soon as water runs consistently out of the shower head 7, close the shower faucet.
- Turn off the faucet of the water pipe.
The tank is filled.
Operation
Using the solar shower
Observe the following before using your solar shower:
- Bacteria can multiply in warm water if the product is not used for longer periods. Risk of infection! The tank must be drained.
- The water temperature in the tank depends on the level of sunshine. In cloudy weather, the water will take longer to heat up. The water can become very hot in the case of intense sunlight.
- Remove obstacles from the showering area.
To use your filled solar shower, proceed as follows:
- Connect a garden hose to the hose adapter 3 and the faucet of the water pipe. Position the garden hose so that no one can trip over it. Turn on the water supply faucet.
- Turn the faucet 6 to the center position (between hot and cold). Open the shower faucet.
- Turn the faucet left or right to set your desired water temperature. Use the faucet to control the water temperature and quantity, and enjoy showering in warm water.
- After showering, close the shower faucet. Turn off the faucet of the water pipe.
The shower is finished.

Sometimes a little water runs out of the shower head, even if the faucet is shut. This is due to the heating of warm water in the depressurized tank and is not a defect.
Cleaning
Only clean the product with a standard bathroom cleaner, clear tap water and a lint-free cloth. Aggressive cleaning agents can damage the product. Dry the product with a lint-free cloth.
Disassembly
Dismantling the product
Disconnect the solar shower from the water pipe and open the faucet. Unscrew the top part of the tank from the bottom part of the tank. Remove the attachment screws from the base of the product while the second person supports the product. Drain the remaining water from the tank.
Storage
After thorough cleaning and drying, store the product in a dry and frost-free place (= +5 °C).
Troubleshooting
| Fault description Cause Remedy | ||
| Water is still coming out of the shower head even after the faucet has been closed. | This is caused by the water heating up in the unpressurized tank. | It is not a defect! |
| Water is leaking from a screw connection. | The screw connection is not water-tight. | Wrap the thread in Teflon tape. |
| There is no water coming out of the shower head. | No water is being supplied. Check the | water supply and the garden hose for damage and blocking. |
| The water coming out of the shower head is not hot. | The water temperature in the tank is too low. | Position the solar shower base in an area with plenty of sunlight. |
| The water has a bad smell or is discolored. | The filled solar shower has not been used for some time. | Drain the tank and refill it. |

If the fault cannot be rectified, please contact an authorized specialist or the Steinbach support team.
Technical data
Model: 049000
Maximum operating water pressure: 5 bar, use a pressure regulator if required
Tank volume: 18 l
Spare parts
049936 - Handle
2 049922 - Screw for mixing faucet
3 049907 - Hose adapter
4 099025 - Sealing ring for Magic solar shower
5 049923 - Shower head

Disposal
Disposing of the packaging
Sort the packaging before you dispose of it. Dispose of paperboard and cardboard with the recycled paper service and wrappings with the appropriate collection service.
Disposal of the product
Dispose of the product in line with the guidelines and regulations valid in your country.
natural_image
Diagram showing two stages of a bottle being inserted into a conical flask, with arrows indicating the process (no text or symbols present)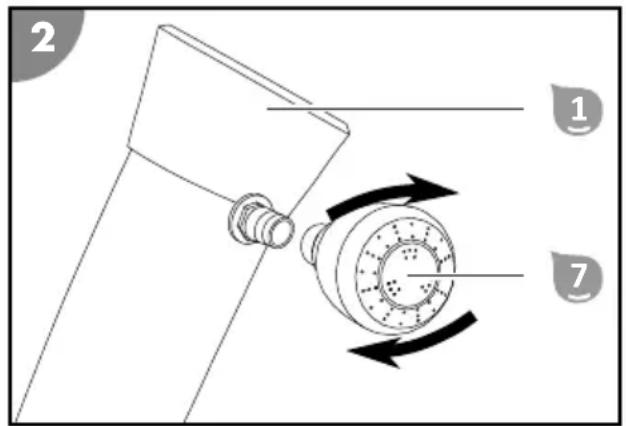

natural_image
Diagram showing two stages of a bottle being inserted into a conical flask, with arrows indicating the process (no text or symbols present)

natural_image
Diagram showing two stages of a bottle being inserted into a conical flask, with arrows indicating the process (no text or symbols present)
natural_image
Diagram showing two stages of a bottle being inserted into a conical flask, with arrows indicating the process (no text or symbols present)
natural_image
Diagram showing two stages of a bottle being inserted into a conical flask, with arrows indicating the process (no text or symbols present)
natural_image
Diagram showing two stages of a bottle being inserted into a conical flask, with arrows indicating the process (no text or symbols present)
- Sestavite glavo prhe 7.
- Glavo prhe 7 privijte na zgornji del rezervoarja 1.

- Nato zgornji del rezervoar 1 postavite na spodnji del rezervoarja 5.
Pri tem pazite na vtično pripravo na zgornjem delu in vdolbino na spodnjem delu. Dele vtične priprave namažite z mazivom/vazelinom (ni priloženo), da boste laže namestili zgornji del na spodnjega.
- Vijačni obroč 2 premaknite na spoj in z njim privijte skupaj spodnji in zgornji del.
- Cevni adapter 3 privijte na cevni priključek.
natural_image
Diagram showing two stages of a bottle being inserted into a conical flask, with arrows indicating the process (no text or symbols present)

natural_image
Diagram showing two stages of a bottle being inserted into a conical flask, with arrows indicating the process (no text or symbols present)

natural_image
Diagram showing two stages of a bottle being inserted into a conical flask, with arrows indicating the process (no text or symbols present)

natural_image
Diagram showing two stages of a bottle being inserted into a conical flask, with arrows indicating the process (no text or symbols present)
- Sastavite glavu tuša 7.
- Zavrnite glavu tuša 7 na gornji dio spremnika 1.


- Postavite gornji dio spremnika 1 na donji dio spremnika 5.
natural_image
Diagram showing two stages of a bottle being inserted into a conical flask, with arrows indicating the process (no text or symbols present)

natural_image
Diagram showing two stages of a bottle being inserted into a conical flask, with arrows indicating the process (no text or symbols present)


Ersatzteile/ Spare parts/ Pièces de rechange/ Parti di ricambio/ Nadomestni deli/ Piese de schimb/ Náhradní díly/ Zamjenski dijelovi/ Pótalkatrészek/ Náhradné diely/ Резервни части/ Yedek parçalar/ Części zamienne/ Piezas de recambio


- Package contents/components
- Required tools/materials (not supplied)
- Optionally available
- Contents
- General Information
- Read and keep the operating instructions
- Intended use
- Foreseeable misuse
- Explanation of Symbols
- Safety
- NOTICE!
- General safety instructions
- WARNING!
- Packaging materials pose a risk of suffocation!
- CAUTION!
- Risk of scalding!
- Risk of infection!
- Description
- The illustration shows how a solar shower works:
- Preparation
- Preparing the setup location and the connections
- Risk of injury!
- To prepare the setup location, proceed as follows:
- Installation
- Assembling the solar shower
- Setting up the solar shower
- Filling the tank
- To fill the tank 5 of your solar shower, proceed as follows:
- Operation
- Using the solar shower
- Observe the following before using your solar shower:
- To use your filled solar shower, proceed as follows:
- Cleaning
- Disassembly
- Dismantling the product
- Storage
- Troubleshooting
- Technical data
- Spare parts
- Disposal
- Disposing of the packaging
- Disposal of the product
Brand : Steinbach
Model : Magic 049000
Category : Shower system