ZENKAISUI EVO 6 AVC-640 - Vacuum Cleaner AIWA - Free user manual and instructions
Find the device manual for free ZENKAISUI EVO 6 AVC-640 AIWA in PDF.

User questions about ZENKAISUI EVO 6 AVC-640 AIWA
0 question about this device. Answer the ones you know or ask your own.
Ask a new question about this device
Download the instructions for your Vacuum Cleaner in PDF format for free! Find your manual ZENKAISUI EVO 6 AVC-640 - AIWA and take your electronic device back in hand. On this page are published all the documents necessary for the use of your device. ZENKAISUI EVO 6 AVC-640 by AIWA.
USER MANUAL ZENKAISUI EVO 6 AVC-640 AIWA
(EN) Vacuum cleaner- Instruction Manual
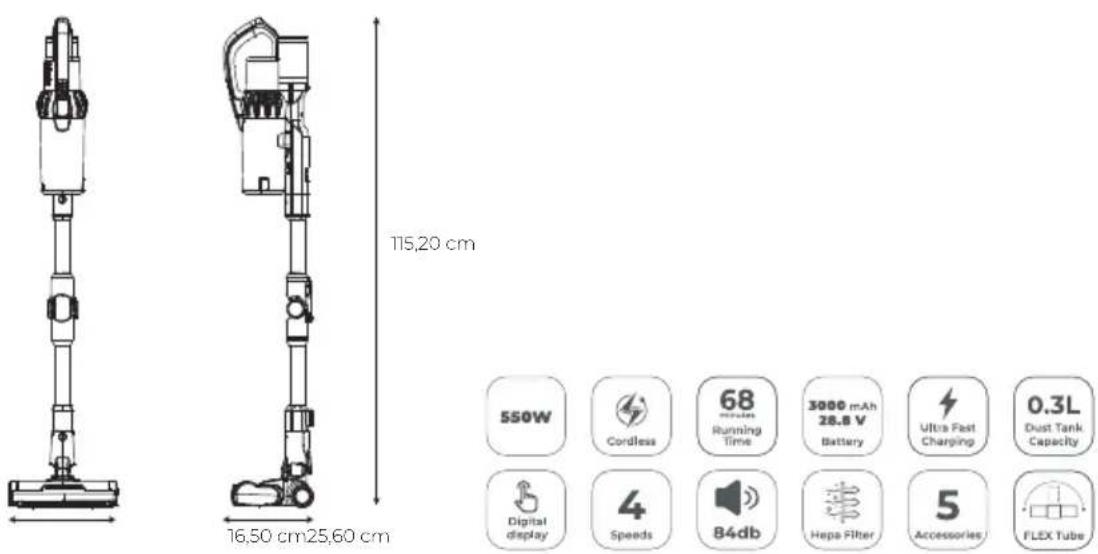
| Power | 550 W |
| Suction | 200AW |
| Ultra fast charging time | 1,5h |
| Battery | 28.8V Li-ion |
| Running time | 68 min |
| Noise Level (dB) | 84 |
| Accessories | 5 |
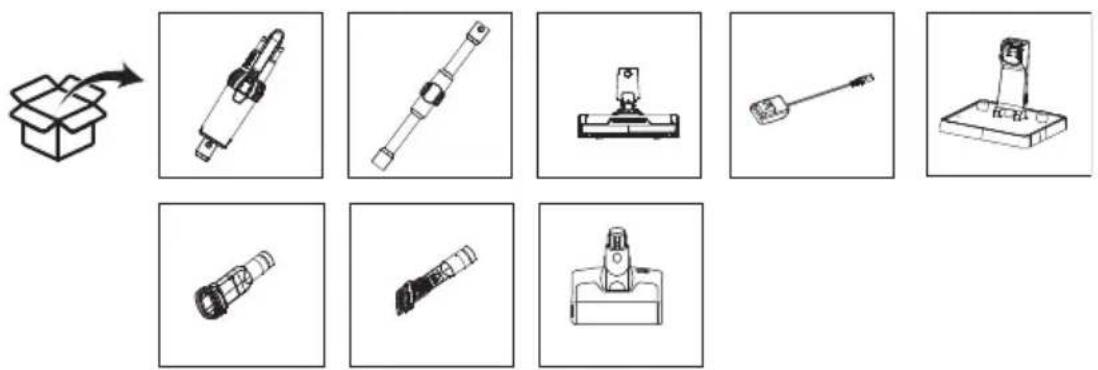
CONTENT
Contenido, Contenuto, Contenu, Inhalt, Conteudo, Inhoud, CbIbpxKaHne, IepiexoEvO, Zawartosc, Obsah, Continut, Tartalom, Caipxaj, icerik, CoepxKaHne,
MESURES
Measurements, Medidas, Misure, Mesures, MaBe, Medidas, Afmetingen, Mepkn, MTePnoεiç, Wymiary, Merania, MAsurātori, Meretek, Mepe, Olçümler, N3MepeHnra,
GETTING TO KNOW YOUR VACUUM CLEANER
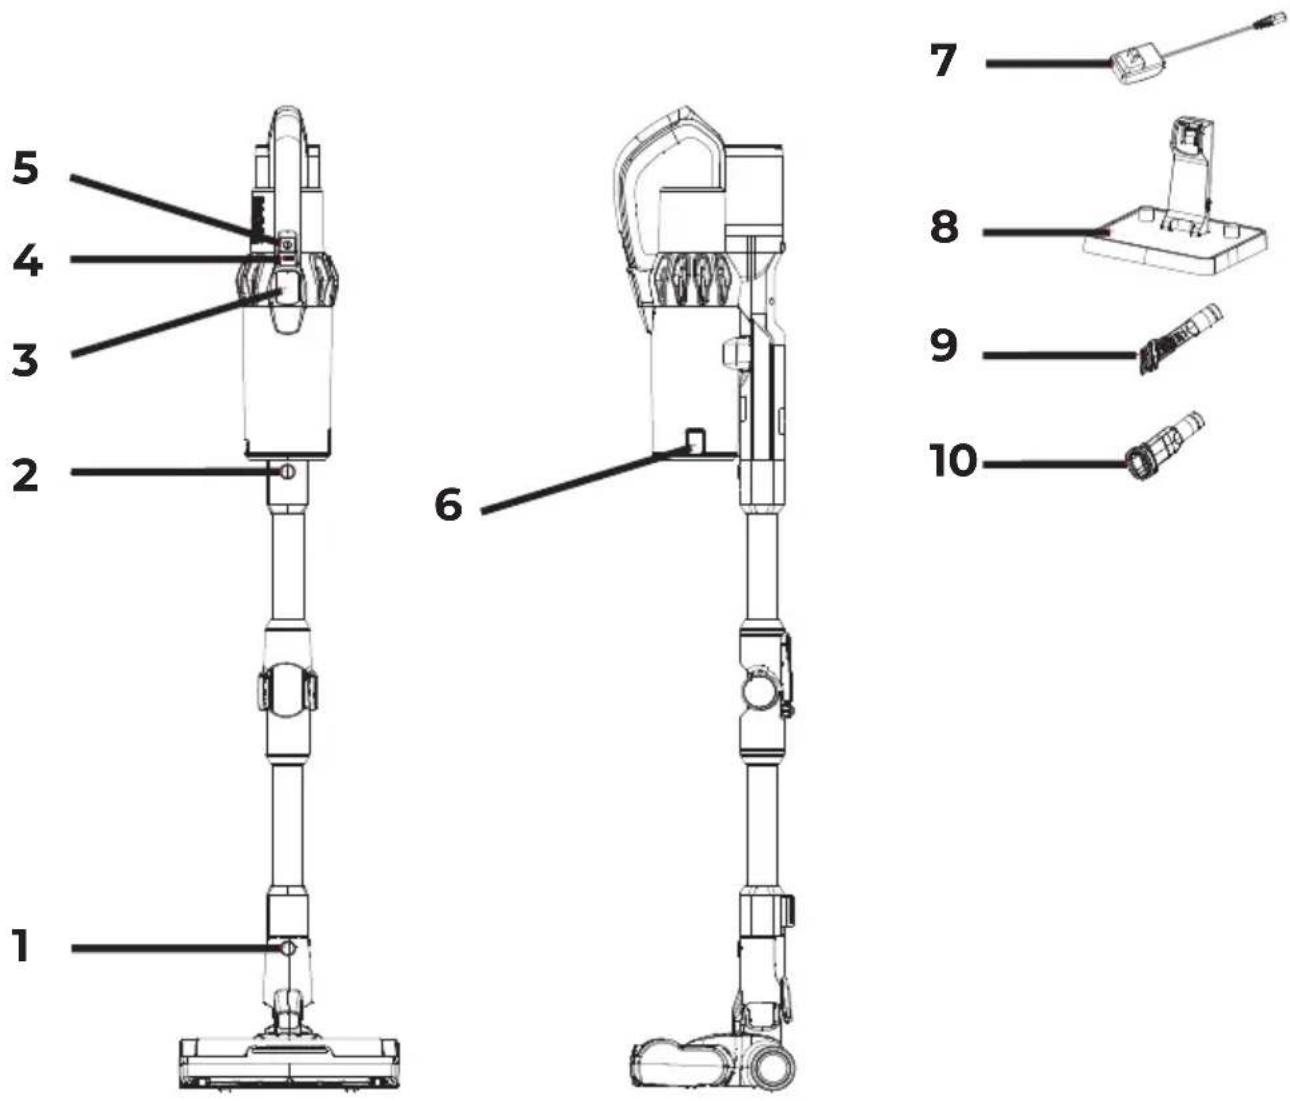
EN: 1-Floor brush release button 2-Metal tube release button 3-Display screen 4-Speed control button 5-Switch button 6-Unlock button for dust cup bottom cover 7-Adapter 8-Charging stand 9-Two-in-one flat suction 10-Two-in-one sofa suction
ES: 1-Botón de liberación del cepillo de sueño 2-Botón de liberación del tubo metálico 3-Pantalla de visualización 4-Botón de control de velocidad 5-Botón de encendido/apagado 6-Botón de desbloqueo de la cubierta inferior del deposito de polvo 7-Adaptador 8-Base de energia 9-Succion plana dos en uno10-Succion para sofa dos en uno
IT:1-Pulsante di rilascio della spazzola per pavimenti 2-Pulsante di rilascio del tubo in metallo 3-Schemo display 4-Pulsante di controllo della velocità 5-Pulsante di accensione 6-Pulsante di sblocco per il coperchio inferiore del contentatore della polvere 7-Adattatore 8-Base di ricarica 9-Aspirazione piatta due in uno 10-Aspirazione per divani due in uno
FR:1-Bouton de libération de la brosse de sol 2-Bouton de libération du tube métallique 3-Ecran d'affichage 4-Bouton de contrôle de vitesse 5-Bouton d'interrupteur 6-Bouton de déverrouillage pour le couvercle inférieur du bac à poussière 7-Adaptateur 8-Socle de charge 9-Aspiration plate deux en un 10-Aspiration canapé deux en un
DE:1-Bodenbürsten-Freigabetaste 2-Metalrohr-Freigabetaste 3-Anzeigebildschirm 4-Geschwindigkeitsregelknopf 5-Schalterknopf 6-Entriegelungstaste für den
This Operation Manual aims to familiarize you with the technical data, design, operating rules and storage of the Aiwa AVC-640 household electric vacuum cleaner (hereinafter referred to as the vacuum cleaner, device).
NOTE: The illustrations provided in this Operating Manual are general schematic images only.
UNPACKING THE DEVICE AND PREPARED FOR
OPERATION
- Open the Package: Open the package carefully on a flat, stable surface.
- Remove the polystyrene: Remove the polystyrene that protects the vacuum cleaner.
- Remove Accessories: Remove all accessories and integrated materials.
- Remove the Vacuum: Lift the vacuum out of the box.
- Remove the Plastic Bag: Remove the protective plastic bag from the vacuum cleaner.
- Save Packaging: Save the outer packaging for future transport.
Follow these steps to ensure that your vacuum cleaner and its accessories are safely unpacked and ready for use.
ASSEMBLING THE VACUUM CLEANER:

ATTENTION! The components of the vacuum cleaner are made of plastic and carefully assembled together. To avoid damaging the latches and pull buttons, do not use force during assembly. Make sure the parts are installed on the removal buttons without warping and that they are firmly in place with the latches.
INSTALLING THE ELECTRIC FLOOR BRUSH AND METAL PIPE
1. When connecting:
- Hold the electric floor brush with your left hand in the direction shown in the figure.
- Insert the brush mounting hole, located at the bottom of the metal tube, vertically into the brush connector with your right hand.
- Press firmly on the push rod portion until you hear a "clicking" sound, indicating that the installation is complete.
Note: When assembling, make sure that the direction of the handle is consistent with that of the floor brush. Align the driver pin with the plug. (IMAGE 1)
-
When packing and storing, or when cleaning and vacuuming:
-
If you need to remove the electric floor brush, press the brush release button as shown in the figure.
- Pull the electric toothbrush in the direction shown in the figure. (IMAGE 2)
- Remove it from the installation hole.
INSTALLING THE BATTERY AND HANDHELD VACUUM CLEANER
- Hold the handheld vacuum cleaner with one hand. (IMAGE 3: A- Battery guide rail)
-
With your other hand, hold the battery pack, align it with the guide slot on the body, and engage the battery pack in the direction of the arrow shown in the figure.
-
After installation, try pulling the battery pack down. If the battery pack does not move, it means that it is properly assembled.
Note: If you are not going to use the vacuum cleaner for a long period, remove the battery, pack the machine, and store it in a cool, dry place. Do not place in direct sunlight or in a humid environment.
INSTALLING THE FLOOR BRUSH AND METAL TUBE ASSEMBLY ON THE HANDHELD VACUUM CLEANER (IMAGE 4)
- First, follow the installation method of electric floor brush and metal pipe to complete your installation.
Installing the Floor Brush and Metal Tube Assembly on the Handheld Vacuum:
-
As shown in the figure, align the conductive needle of the metal tube with the pumpkin-shaped conductive tube of the suction nozzle.
-
Push it up until you hear a "click" sound indicating the lock.
CONNECTION OF ACCESSORIES (IMAGE 5)
For ease of use, this product comes specially equipped with some accessories for the hand part of the vacuum cleaner.
When using the handheld vacuum alone:
- You can connect the accessories directly.
You can make the connection between the handheld vacuum cleaner, two-in-one flat suction nozzle, electric mite removal brush, two-in-one suction nozzle for sofa as shown in the figure.
USING THE VACUUM CLEANER
CHARGING THE BATTERY
Notes:
-
When using this product for the first time, the battery capacity of the vacuum cleaner will not be fully charged. The machine needs to be placed on the charging dock to charge it. Otherwise, the battery will be too low and you may not be able to turn on the product at the high speed. It can be used normally after being fully charged.
-
During the first three times the vacuum cleaner is used, it is recommended that each charging time be up to 12 hours. After a full charge and discharge, the vacuum cleaner can be charged and used according to the normal charging method.
-
The charging time for this model is approximately 3.5 hours. After charging, remove the power supply in time and disconnect the charging dock plug from the AC outlet to stop charging.
-
If the power cord is damaged, to avoid hazards, it should be replaced by professionals from the manufacturer, its maintenance department, or similar departments.
CHARGING AND DISPLAYING THE VACUUM CLEANER DISPLAY
-
When the vacuum cleaner display shows that the battery power is less than or equal to 20% , the machine will automatically switch to the mode where the high speed is not found. If the battery indicator always remains red, the user is advised to recharge the vacuum cleaner.
-
Charging method: The battery pack is placed in the charging dock along with the charging machine to charge it, insert the adapter plug into the AC outlet and connect the other end of the adapter to the charging dock to charge it. During
the charging process, the battery pack indicator will be red and turn white when the power is full.
-Display Mode:(IMAGE6)
Note: In the state of charge, the battery indicator light is red and will turn white when the power is at 100% . (IMAGE 7) To see the loading method see IMAGE 8.
USING THE HANDHELD VACUUM CLEANER
1. On and off (IMAGE 9)
- Remove the vacuum cleaner from the charging dock.
- Press the On/Off button to start or stop the vacuum.
- Use the speed control button to toggle between low-medium-high-auto speeds.
2. Speed modes (IMAGE 10)
- ECO (Low): The display shows "ECO" and the red light comes on (1/3 length). (IMAGE: Figure A)
MED (medium): The display shows "MED" and the red light turns on (2/3 length). (IMAGE: Figure B)
MAX: The display shows "MAX" and the red light turns on (full). (IMAGE: Figure C) - AUTO (Smart): Adjusts the power according to the density of the dust and displays "AUTO" on the screen next to the battery percentage and the battery icon. Red light varies with dust density. (IMAGE: Figure D)
3. Low battery
- When 20% of the battery is left in "MAX" mode, it automatically switches to "MED". The high speed can be used again after charging.
4. Complete shutdown
- When you turn off, all the lights on the panel turn off and the screen goes black. (IMAGE: Figure E)
USING THE ELECTRIC FLOOR BRUSH:
- Applications: Ideal for removing dust on low-pile carpets, hard floors and tiles.
- Blockage Protection:
If the brush gets stuck by objects or fibers, it automatically stops to protect the motor and personal safety.
It also stops if a child accidentally dips their hand into the brush.
USE OF ACCESSORIES
2 in 1 flat nozzle: For narrow grooves and corners. (IMAGE 11)
2 in 1 sofa nozzle: For dust in cabinets, windows, sofas and countertops. (IMAGE 12)
- Bent aluminum tube: For cleaning under beds and tables. (IMAGE 13)
CLEANING AND REPLACEMENT OF PARTS (IMAGE 14)
- Dust container: Clean after each use. If HEPA is blocked, clean or wash it; replace if necessary.
Electric Brush: Clean the roller bristles if they become entangled with long plushs, such as hair, to ensure effective operation.
CLEANING THE DUST CONTAINER AND FILTER SYSTEM (IMAGE 15)
-
Press the unlock button to open the bottom lid of the dust container.
-
Empty the dust into the trash can.
- Rotate the dust container to remove it from the handheld vacuum.
- Lift the HEPA to separate the cyclone from the dust container. Twist the HEPA and pull it out to clean it.
- After cleaning or washing and drying (or replacing), reassemble in reverse order.
CLEANING THE ELECTRIC FLOOR BRUSH (IMAGE 16)
- Press the roller brush release button in the direction of the arrow and remove the cover from one side.
- Pull one end of the roller brush out in the direction indicated and remove the brush from the slot to clean it.
- After cleaning or replacing it, assemble it and install it in the reverse order of disassembly. (IMAGE 16 A- Rotary brush release button)
STORING THE BATTERY
- Press the battery release button.
- Remove the batteries in the direction indicated.
- Place the battery in a plastic bag and store it in a dry place.
MACHINE STORAGE
When you are not going to use the vacuum cleaner for a long period, remove the battery, pack the machine, and store it in a cool, dry place. Do not place in direct sunlight or in a humid environment. (IMAGE 17)
TROUBLESHOOTING
Before relying on the repair department, please check the following points:
| FAILURE | POSSIBLE CAUSE | SOLUTIONS |
| The engine does not rotate | Battery is discharged Ruby's metal pipes, floor brushes, battery packs, and handheld vacuums are not assembled in place. | Charge the vacuum cleaner Check if the parts and the handheld vacuum are properly assembled in place. |
| Reduced suction | The dust container is full of dust The filter is covered with dust The electric floor brush is blocked in the air intake duct or the roller brush is blocked | Pour dust into the dust cup Clean or replace the filter sponge Clean any debris attached to the electric roller brush |
| Insufficient use time after charging | Insufficient charging time Aging of the battery | Follow the instructions in the charging chapter to fully charge the battery. The battery is a consumable product, and you can purchase a new battery at the designated repair point. |
FAULT INDICATORS
-
When the air duct is blocked or the dust is full, the floor brush, dust canister, and HEPA icons will light up successively, and only one icon will light up for 1 second at a time, instructing the user to check in order. At the same time, the power level and speed button will be displayed; After the air duct is clear, the three icons will stop lighting up in a circle within 1 second.
-
If the machine is turned on under a low dust concentration or when no dust can be sucked up, the speed is changed to AUTO and the red light on the display
screen is always displayed, please clean the dust on the dust sensor lamp in time. (IMAGE 18)
Note: If there are other faults, special tools are required. Also, to avoid hazards, it should be replaced by professionals from the manufacturer, its maintenance department, or similar departments.
ALARM ALERTS
-
Disconnection Error: The vacuum cleaner suddenly shuts off and cannot be turned on. The digital tube shows "EI".
-
Charger Overvoltage: The charger voltage is too high ( >36.3V ), which causes the vacuum cleaner to be unable to charge. The digital tube shows "E2".
-
Unloaded Discharge: The vacuum suddenly turns off when not in use.
-
Main Motor Short Circuit: The vacuum cleaner suddenly shuts off due to a short circuit in the main motor. The digital tube shows "E3".
Second Level Overload of the Main Motor: The vacuum cleaner suddenly shuts off due to excessive current in the main motor. The digital tube shows "E5".
-
First Level Overload of the Main Motor: The vacuum cleaner suddenly shuts off due to excessive current in the main motor. The digital tube shows "E6".
-
High/Low Flush Temperature: The vacuum cleaner suddenly shuts off due to an abnormal temperature during use.
-
Serial Communication Error: The vacuum cleaner cannot be turned on due to a serial communication problem. The digital tube shows "E7".
NTC (Open Circuit) Error: The vacuum cleaner suddenly shuts down due to a problem with the temperature circuit. The digital tube shows "E8".
-
Overheating and Low Temperature at Flush: The vacuum cleaner suddenly shuts off due to extreme temperatures during use. The digital tube shows "E9".
-
First Level Protection when the Floor Brush is Locked: The floor brush automatically stops when locked. The digital tube shows the floor brush logo flashing.
-
Air Duct Lock Protection: The vacuum cleaner is operating normally, but the digital tube shows that the lock logo flashes cyclically to indicate a blockage in the air duct.
Note:
- The charging error is eliminated after the charger is removed.
- The discharge error (except for no-load shutdown) shows a 10-second release or press the ON/OFF button to release.
- The serial communication error and the NTC error show a 50-second release.
RECYCLING OF ELECTRICAL AND ELECTRONIC EQUIPMENT
This symbol indicates that, in accordance with applicable regulations, the product and/or battery must be disposed of separately from household waste. When this product reaches the end of its useful life, you must remove the batteries/accumulators and take it to a collection point designated by the local authorities.
For detailed information on the most appropriate way to dispose of their electrical and electronic equipment and/or batteries, the consumer should contact the local authorities. Adherence to the
above guidelines will help protect the environment.
CONNEXION DE ACCESORIOS (IMAGEN 5)
LIMPIEZA Y REEMPLAZO DE PARTES (IMAGEN 14)
LIMPIAR EL CEPILLO ELECTRICO PARA SUELOS (IMAGEN 16)
L'ASPIRATEUR A MAIN (IMAGE 4)
CONNEXION DES ACCESSOIRES (IMAGE 5)
NETTOYAGE ET REMPLACEMENT DES PIECES (IMAGE 14)
LIGAÇAO DE ACCESSIONS (IMAGEM 5)
- Modo de exibicao: (IMAGEM 6)
1. Ligado e desligado (IMAGEM 9)
ALARM WAARSCHUWINGEN
3APEXDAHE HBAATEPURA
Belenk:
A. Korato ИзпольВATE TO3I npOуКТ 3a nbpBn nbT, KaNaцNTeTbT Ha 6aTepeЯТа Ha npaxocmykaчkaTа Нма Да 6bde HAnbLHо 3apeДeH. MaunHaT a Tpr6Ba DA 6bde NOCTaBeHa Ha 3apJdHaT a CTAHcNIA, 3a Da J 3apeДи. B npOTINbEN cnyaH 6aTepeЯTa 7e 6bde TBbpIe HnCKa N MoKe Da He yCneEte Da BKIOUHTe npOуКТa CBvCOKa ckOpocT. MoKe Da ce ИЗПОЛЗВa HOpMaJIHo, CJIeД KaTO e HAnbLH0 3apeДeH.
6. Ппeз пьвITE Trп nbTи ce n3noJ3Ba npaxocMykaKaKaTa, ce npenopbUba BcяКoВрeme 3a 3apejdaHe da 6bde do 12 yaca.CleД nbInO 3apejdaHe npa3pejdaHe, npaxocMykaKaKaTa може дa ce 3apejda И n3noJ3Ba cnopeiHOpMaJIHHa MeToI Ha 3apejdaHe.
B. BpeMeTo 3a 3apeJdaHe Ha To3n MoJe e np6IIN3ntelHo 3,5 yaca.Cnei 3apeKdaHe n3BaTe 3axpaHbAHeTo HABpeMe n n3KIOUeTe UeNCEla Ha 3apAnHaTa CtAHcIIa OT KOHTaKTa 3a IpOMeHNIB TOK, 3a Da cnpTe 3apeJdaHeTo.
Ako 3axpaHbauT ka6e nOBpeH, 3a da ce n36eHaT onacHOCTn, Toi Tp8Ba da 6bJe 3aMeHEn OT npofoecnoHaJIncTH O T pON3BOJNTeJI, HeROBnO TdEe 3a NOdPbKka IIN NOD6H NOTdEIn.
3APEXDAHE IN NOKA3BAHE HA DnCJIe HA IPAXOCMYKAyKATA
Korato dincnpnert Ha npaxocmykaqkata nokaxe, ye MouHocTt ha 6aTepeyrae no-MaIka nn paBHa Ha 20% , MaunHaTa aBTOMaTuHNo ige npeBKnUoyn B peKIma, B KOHTo He ce HAmipa Bucoka T cKOpocT. Ako INHnKaToPbT Ha 6aTepeYra BInHarO octaba YepBeH, Ha notpe6ntela Ce npenopbUba da npesapei npaxocmykaqkata.
MeToJ Ha 3apeKdaHe: BaTePnraTa ce NoCTaB V 3apJaHaTa CTaHcN 3aeHNo CbC 3apeKdaaTa MaunHa, 3a Da J 3apeNi, Da NocTabN UeIceLa Ha aDaanTepa B KOHTaKaTa 3a PpOMeHnIB TOK I Da CBbpKe DpyrN KpaH aAnTepa KbM 3apeHaTa cTaNz, 3a Da rO 3apeNi. Po BpeMe Ha npoueca Ha 3apeKdaHe HndNKaTopbT Ha 6atePnraTa ige 6bJe uePBEN I Ze cTaHe 6yI, KOraTo 3axpaHbAHeTo e IIbIHO.
- Pekim Ha noka3BaHe: (N3OBPAKHEHNE 6)
3a6eJekka: B cbCToHne Ha 3apeKdaHe HndnKaTOpbT Ha 6aTepeH Ta e cepBeH n Ie cTaHe 6JI, KOrato 3axpaHbaHeTo e Ha 100%.(N3OBPAXKEHNE 7)3a Da BnIte MeToDa Ha 3apeKdaHe, BnIXe N3OBPAXKEHNE 8.
N3NOJ3BAHE HA PbUHATA INPAXOCMYKAUYKA
A. BклюваHeи n3КлюваHe (ИЗОБРАЖЕHп 9)
- ɪЗbaɪdTe npaxocMykaʊKaTa oT ᵠρaɪdHaTa cTaHцɪŋ.
HaTnchHeTe 6yToHa Bk.//N3KJI., 3a da cTapTnpaTe nnCnPeTe BaKyUMa. -
I3noI3BaIte 6yToHa 3a KOHTpoI Ha cKOpocTtA, 3a Da IpeBKnIOuBaTe MeJky HnCKO-CpeIHO-BnCOKo-aBTOMaTHH NcKOpocTn.
-
Pexmm Ha ckopocT (N3OBPAXKEHNE 10)
ECO (Low): Диспелей поka3Ba "ECO" и черва CBeТина CBeТВa (1/3дьлжина). (ИЗОБРАЖЕНЕ: Фитура A)
MED (cpeho):Диспелг.Tnoka3Ba "MED"ичepВeHaTa CBeTInHa ce BkIIOUvBa (2/3дьлжИнa). (ИЗОБРАЖЕHЯ:ФИгураВ)
MAX:ДисплелгпokаЗВа"MAX"ичepвeнота CBetлнHa ce BkLIOUyBa (Пьлнa). (ИЗОБРАЖЕHNE:ФигурС)
AUTO (Smart): Perylupa MOUHOCTTa Cnopei NbTHOCTTa Ha npaxa I noka3Ba "AUTO"Ha eKpaHa Do npoceHTa Ha 6aTePnraTaNkoHaTa Ha 6aTePnraT. YepBeHaTa CBeTIInHa Bapnpa B 3aBnCmOcT OT NbTHOCTTa Ha npaxa. (N3OBPAJKEHNE: Fnrypa D)
B. 3toeHa 6aTepe
Korato 20% ot 6aTepeyra e ocTaBeHa B peXIM "MAX", TЯ aBTOMaTHUHO npEeBKnIOuBa Ha "MED". Bucokata ckopoCT MoKe Ja ce n3IIOJ3Ba OTHOBcNei 3apeKdAHe.
I. NbJHo n3KJIIOUbaHe
Korato n3KJIIOUHTe, BCNUKn CBeTNIHn Ha naHeJa ce N3KJIIOUBya T n ekpaHbT cTaba uepeH. (N3O6PAXEHNrE: Dnrgya E)
ИЗПОЛЗВАЕ HA ELEKTPЧЕСКATA ПОДОВА YETKA:
m = 311 ;
To3n CnMBOJ NOKa3Ba, Ye B CbOTBeTCTBHe C npNIOXIMNTe pa3npopei6n npOyKtBT n/nn 6aTepyra Tp8Ba Da ce n3XBpbIaT OTdEJIHO OT bHTOBITE OTNaDbu. KOraTO To3n npOyKT DocTnRHe KpaHa POne3HnCn JxIBOT, Tpr6Ba Da n3BaInte
6aTepeHnTe/aKymyIaTopuTe I da rO 3aHeceTe B nyHKT 3a Cb6IpaHe, ONpeJeHr OTr MeCTHnTe Blaactn.
3a noippo6Ha HhOpMaun OTHoCHO Ha-NOXOJaNn Haun 3a n3XBbPJIHe Ha eJeKtpnueckOTO n eJeKtpoHHOTo o6OpyDbaHe N/Inn
6aTePnI, nOtpe6nteIaT Tp6Ba Ia ce CbpxKe c MeCTHnte BlaactN. Cna3BaHeTo Ha roPHnTE HAcOKN ige CNOMOrHe 3a ONa3BaHeTO Ha OKoJIHaTa cpeDa.
ENIZKONH2H
Auto to exyepidio aeitoupyia ctoxuei va aac eoikewoei me ta texvika deodoeva, to oxediao, touc kavovc aeitoupyiac kai tnv aoohkeuon tnc oukakn c nektpukn c oounac Aiwa AVC-640 (eefn "nEKTpkiokouna, ouokeu").
\SHMEIΩ\SH: OI EIKOvEc Nouv npexovtae auto To EYxepidio Ieitoupyiaeivai Movo Yevukec, OXnmuAtikEc EIKoVc.
ANOSYKEYAIA THS YSEKHYK KAI IPOETOIMAZIA FIA AEITOYPIA
- AvoiTe Tn ouokeuaoia: AvoiTe npooektuKa Tn ouokeuaoia oE μa einieδη, oταθερη επuφáveia.
- Aphiéotε tnv noluotepivn: Aphiéotε tnv noluotepivn nou πpoatéuει tnv nλektpikn skouπa.
- Aphiocn aEouap: Aphiote oλ ta aEouap ka t a evomegaatmeva uiká.
- Aphiéot to kevo: Avoikwote to kevo ao to kouti.
- Aphiéote tyn πλoτικ Μακούλα: Aphiéote tyn προστateutikπλoτικ σακούλα ano tny nλεκτρικ σούπα.
- AnoKeuon oukeuaia; AOnOKeUoTe Tnv EwTepiK oukeuaia yia eAovtikn 1eTaoopa.
AkoIouOhtoe auta ta Bnmuata yia va EbaIWtheta otu n nEeKtpikn Okouta kai ta aEooap tnc anooukeuaocvtai eaofoia kai evai etouma yia xpon.
SYNAPMOA'OrHsH THs HAEKTPiKHe 2KO'YnAs:

IPOSOXH! Ta eapntmaTnC nAekptknc oounac Eiva kataoekuaoueva ano naotko Kaouapmooyouvtai npoeektka. Ia va aonphiyeTe tnv kataoortpooh twv maVdeltaawv kaiv kwoumuw vEAnc, mV xnpoioponeite duvaun katn ouvapuoIoynon. Bebaowte ot ta eapntmaEiva EyKatoteTneva Ota Koumia aphipeonc Xwpic stpeBawon kal ot Eiva oTaepa otn Theon touc me ta avdaal.
ERKATAEHAEKTPIKHBOYPTEAADATEOY KAI METAAIKOY ΣΩ'HNA
- Kaτα τη συνδεοι:
XPHSH HAEKTPIKHE KOYNA XEIP'0
- Evepyonoinn kai anevepyonoin (EIKONA 9)
-AdapeoTe nV nEeKtpkN oKoUa ano tn baoon foptioC.
- Nañote to Koumi On/Off yia va ξεκινησετ ἡν σαταματησετο κενό.
Xpnouoote to koupi eayxou taxtntac yia evaalayn metao xanaw-v-oeaiuvuynwv autouatwv taxutntowv.
ANAKYKAΩΣH HAEKTPIKO'Y KAI HAEKTPONIKO'Y EONIAIΣMO'Y
AutoTo ouBoLo unOdeKvUeI oT, ouuWvaue Touc oxuovTe cavovioouc, to npoiov n/ka n mataia npenei va anoppinTovtaeXwpiota aTo ta oikiaKa anoppiuata. Otav auto To npoiov ftoaoe ITO TEAOCTC WefalmuC ZWC TOU, npEVE vaoafoepesTe TcNtEaepce /ouoopeutec kai va to etaepeTe e eva onmuio ulloync nou opizetai ano tic tonukcs apxec.
CONECTAREA ACCESORIILOR (IMAGINEA 5)
CURATAREA Şİ INLOCUIREA PIESELOR (IMAGINEA 14)
CURATAREA PERIEI ELECTRICE DE PARDOSEALA (IMAGINEA 16)
KOPNUTHeBepyHOr yCnCBAAU
A. OHaHDoΦΦ (CJIINA 9)
- YKNoHnTe ycncnBaay ca daoka 3a nyhbehe.
- Пи捜нITE дугme &qyot;ОH/Oфф&qyot;да бистпокруни плп 3ayctabniln BaKyyM.
Kopncntte dyrme 3a KOHTpOy 6p3nHe da 6nCTe ce nppe6aunn n3Mehy 6p3nHa HnCKoR cpeHBe r BnCOKOr ayTOMo6nla.
B. PekkMn 6p3nHe (CJIINKA 10)
ELO (IaB): Ha nucnnejy ce BnDn &qyoT; ELO&qyoT; n CpBeHo cBeTIO ce ynaII (1/3 duKnHe). (CNIKA: Cnka A)
MEI (cpeiHbN): Ha eKpaHy ce npka3yje &qyoT;MEI&qyoT,, a CpBeHo CBetIIO yKbUyJe (2/3 duXnHe). (CNIKA : Cnka B)
MAKC:Ha nscnnejy ce npka3yje &qyoT;MAX&qyoT,a cpBeHo cBeTno ce naIi (nyho).(CNIKA:Cnka L)
- AYTO (CmapT): ПодашаBA Chary y cKlaady ca rycTHHOM npaShHe n npiKa3yje &qyoT; AYTO&qyoT; Na ekpaHy nopeD npoceHTa 6aTepeJne n IkoHe 6aTepeJne. LpBeHo CBeTNo BapnPa ca rycTHHOM npaShHe. ( CJIINA: CnkaД)
B. BaTepeNuJa Ha N3MaKy
Kada 20% batepni je octane y &qyot; MAX&qyot; pekmy, oHa ce ayTomatckn npe6auyje Ha &qyot; MEД&qyot; BeIka 6p3nHa ce moKe noHOBO KOpNCHTIN HAKOH NByHeHa.
I. Notnyho NCKJbUyNBaHBe
- Kaça nckbuynte, cba cBeTla Ha naHeIy ce yrace n ekpaH noOpHn. (CJIINA: Cnka E)
KOPNHEHe ENEKTPnue HcETKE 3A NOI:
- IprnMeHa: NdeaHa 3a yKlaHbAbe npaHHe Ha TeNcMa ca HnCKOM ROMNJLOM, TBpDIM NOOBMa n PIOUncMa.
3aHTnTa o6Jokade: Ako ce yeTknca 3aIraBn npedMeTnMa nII BlaKnMa, ayTomatckn Ce 3ayctabba kaKO 6n 3aHTnTaMoTOp nInuHy 6e36eHocT. Takohe ppectaje aKO deTe clyuajHo yMoOn pyky uyeTKnUy.
YIOTPE6A IPNBOPA
2y1paBHa pe3Hnca:3a ycke Jne6OBe n yrnoBe. (CNIKA 11)
2y1cofape3Hnca:3a npaunHy y opMapma, npo3opMa, cofama N KOHTpaBpxOBmA. (CNIKA 12)
CABnjeHa aIyMHHjymcKa ueB: 3a quHHe He nCnoJ KpeBeTa H cTolOBa. (CNIKA 13)
CHINHEBEI3AMEHA DEJIOBA (CJIINA 14)
- Nocya 3a npaunHy : Yncta nocne cBaKe ynoTpe6e. Ako je XENA 6loKnupaHa, ouncntte je nnn onepuTe; 3amEnTu aKO je noTpe6Ho.
- EneKtpnHa YeTka: Ounchte ponep 6pncIe aKO ce ypeTbajy y dyre nnycObe, kao To je Koca, kaKO 6ncTe ocNpypaann eNkacan pad.
YINSHENBEIOCYDE3AIPALINHUYNCNCTEMAΦNJTEPA(CJNKA15)
- ПиTNCHNte IyIme 3a OTKbUyabAbe Ja 6nCTe OTBOpIN NOnH NOKJIONaI nocyuJe 3a npaunHy.
- Icnpa3Hn npaunHy y KaHTy 3a cMehe.
Potnapjte nocyda cnpaunHom da 6ncte je yknohniln n3 pyuHor BaKyyma.
IOnnHnTE XENA da oDBojnte uKloN od KOHTejHepa 3a npaunHy. YbpHn XENAn n3Byu ra da ra ouhctnU.
HaKoH uIshHeBa IIN IpaHa n cyseHa (IIN 3aMeHe), noHOBo ce ca6npaTn o6pHyTm peDocneDom.
YINSHENBE ENEKTPNHYE YETKE 3A NOI (CJNKA16)
- ПиTNCHNte Дугme 3a OTKlaHbAbe YeTknUe 3a poJIep y cMepy cTpeIuIe n yKIOHnTe POKlONaU ca jeIHe cTpaHe.
- I3ByuTe jeaH KpaJ YeTKnue 3a BaJaK y Ha3HaueHOM Cmepy N yKIOHHTe YeTKuCy ca KOHeKTopa da 6nCTe je OunchTnI.
HaKoH uNshHeBa nIIN 3aMeHe, caCTaBnTe ra N INcTaInpajTe o6pHyTm peOocLeIom paCTaBbEHor. (IMAΓE 16 A- Potapy 6pycx peneace 6yTTOn)
CKJADNIWTEHBE BATEPNJE
- Пи捜нITE дугme 3a ocno6ahahe 6aTepe nje.
- YkloHnte 6aTepejuye Ha3HaueHom cMepy.
CTaBnte 6aTepnjy y nlaactnHy keCy u ycknaIuNTte je Ha cyBO MeCTo.
MAUHCKO CKIADNIITEHe
Kaanda HeheTe KopnCTHTN yCNCBau Duxn nepnoi, yKNoHnte 6aTepnjy, cnaKyjTe MaunHy n ycknaDnHTte je Ha xnaIHO, cyBO MeTo. He ornaawajte ce Ha dInpeKTHoJ cyHueBoj CBETNOCTn IIN y BnaXHom OkpyKeHb. (CJIKA 17)
PEUABAHbA PPOBJEMA
Ipe Hero To Ce ocNoHte Ha OeJIbeHe 3a nonpaBKe, npOBepnte cJeHe TaUKe;
| HEYCIPEX | MÖГУTHY3POK | PESEHBA |
| Maшина се не оке"He | Батура ща сисьта из Рубинхmetалныцев, чеке за под,nakobа на ѳатура ща и ручниусисвачи се не скларajу на MeCTу . | Hangнite усановачПроберпесда ли с各项工作 ручни усановач правлиносклорльени у мосту. |
| Смањению усисвање | Посuya за пашиниу щсянипашинеФильтег щся пекри�енипашиномЕлковая пона чека щьокираза на усанов са налувадану ини щся рoled чекаБл_OKираза на | Сиап Ѯрашиниу ушόы за пашини Уочстни заменифильтег сунйер Оочст сбесотаные рinedчршени за[eilektpruchny рoled чеку |
| Heidobolyho Врemeha kopiiшениьа a | Heidobolyho Врeme пиhoeы Старенье bateprije | СледITE упунтва у полаву о пиhoeы за бiocteу notnyhoctnи нашили бatepriju. bateprija je notroшни розвди и Нову бatepriju можete куптей на odpeненом месту поразвке . |
HДИКATOPN KBAPA
A. KaJa je Ba3dUsha 6noknpaHa nJi je npaunHa nyHa, noHa qeTka, KaHnCTep npaunHe iXEPAn HKe He ce y3actOnHO OCBETnTn, a cAmo jeJaHa NkoHa he 3acBETne1 1ceKHyndy NcTOBpeMeHo, HalaJxHKnOPncNky da npOBepn peDom. NcTOBpeMeHo, 6nHe npKa3aHn HnBO HaJaBa iDyMe 3a 6p3nHy; HaKoH wTo Ba3dUsha 6eJbA 6yJe YnCtA, Tpr NKOHe h pjcTaTn da CBeTNe y Kpyrgy y Poky od 1 ceKynde.
6. Ako je MaunHa yKbUyeHa nOd HnCKOM KOHcHTpaunjom npaunHe nIi KaJa npaunHa He MoKe Da ce ycncsca, 6p3Ha ce MeBa y AYTO n YBeK ce npka3yJe CpBeHO CBeTIO Ha ekpaHy ekpaHa, MOnMo Bac Da ha BpeMe OuncHTte npaunHy Ha lamnn CeH30pa npaunHe. (CNIKA 18)
Hanomeha:Ako noctoje n npyru Kbapobu, nontpe6a h je noc6a h aal. Taokhe, da 6n ce n36eIne onacnoCTn, tpe6aNo 6n da ra 3ame He npocecnoHaun i3 npOn3Bohaua, HberOBor OedeBeHa 3a oDpKaBaHbe Nll cnUHNX OedeHeHa.
AJIAPMHA YI03OPEHbA
- TpeuKa npn npekny Be3e: YcncBau ce n3HeHaJa NCKbUyje n He MoKe ce NCKbUyHTn.ДиrntaHa ueB npka3yje &qyOT;El&qyOT;
- Пуньач OBERBOLTARE: Hanon pyнbaчaj pepebucok (&T;36,3V), wTo DoBOdNdo HEMOryHnocTN pyhbeha ycncnbaua.ДигntaHa ueb prnka3yje &qyoT;E2&qyoT;
- IcToBapen IpaXHeHBe: BaKyum ce n3HeHaJa NcKbUyje KaJa HnJe y yNoTpe6n.
- Галов моторн Крату сюл: усивач се Изега Исту ще 36ог Крату сюл у галов мотору. Дигитална сев ппkaуje &уOT;E3&quOT;
PpeonTepehebe pyror HnBOa TnABHor MoTopa: YcncnBaC ce n3HeHaia NCKbuyje 36or ppekomephe cTpyje y rnaBHom MOtOpy. DnurTaJHa ueB Poka3yje &qyoT;E5&qyoT; - PpeonTepehebe npBor HnBOa TnaBHOr MoTopa: YcncnBaC ce n3HeHaDa NCKbuyje 360r npekomepHe ctpyje y TnaBHOM MOTOpy. DnrttaHa ueB npka3yje &qyot;E6&qyot;.
BncoKa/Hncka TempepaTpaΦneHa: YncnBaU ce n3HeHaJa NCKbuyje 36or a6HopMaJIHe TempepaType TokOM ynoTppe6e. - Tpeuka y cepnjckoj komyhkaaunj: Hnje moryhe ykbuyntyncncbau 360 npo6lema ca cepnjckom komyhkaunjom. Dnrtalna ceB npka3yje &qyot;E7&qyot;
HTU (Oen LnpuyT) Ppeka: YcncnBaC ce n3HeHaia nckbvyje 360 npo6Iema ca TempepaTyprHm cKnIOnom. DnrtanHa ueB npika3yje &qyot;E8&qyOT; - IpejeaHe Hncka TemnepaTypa Koid ΦIeHa: YcncnBauch cE n3HeHaDa NCKbuyje 360r ekCTpeMHnx TemnepaTypa TOKOM yNoTpe6e. DnrttaHa CebN oka3yje &qyoT;E9&qyoT;
3aHTTa npBor HnBOa KaJa je YeTKa 3a noD 3aKJbUyHa: YeTKa 3a noD ce ayTOMatcKn 3ayCTaBJa KaJa ce 3akJbUyAb. NInrItaHa ueB noka3yje Ioro POnHe YeTKuIe KaKO TpeNepi.
3aHTTa OJ Ba3DyWHe KOMope: YcncnBauchpaHn HopMaHNo, aHn DnHTaHa 1eB noka3yje da Ioro 6paBe cuknHoo 6bEsche KaKo 6n 03NaHno 6IokaHy Ba3DyShoJ ceBV.
HoTa:
A.「pewka npnilkOM nyheBa ce eIIMnHnWe haKoH wTo je nyBaay yKIOHeH.
6. Гешикay npaxkbeby (ocn m nckbuyuBaHa 6e3 onTepeheha) npka3yje n3daBe od 10 cekyHn nn npntncnTe dyrme OH/OΦΦ da 6ncte ra OTnyCTnI.
B. Гешикay cepиjskoj komyнkauzijn n HTU rpeшka npiKa3yju n3daHbe od 50 ceKyuHn.
PEUKNJIAXA EJEKTPNUH N EJEKTPOHCKE ONPEME
Obaj cIM60J O3HaUaBa Da, yCKlaNy ca BaJkeHm npOINSCMa, npOn3BOD n/nn 6aTePnja Mopajy da ce oIaJky OoBOJeHO od KyHOr OTnada. KaJa OBaj npOn3BOD cTnIHe Do Kpaja CBOr KOpICHOR JKNBOTa, Mopate yKIOHHTN 6aTePnje/aKymuNaTope I Ondetra Ha MeCTO npNKynBaHa Koje cy OndPeDInle loKaJIHe Blaactn.
3a DeTaIbHe HOpMaunje O HajpnKlaHnjem HaunHy OndarHa cBoJe eKeTpnuH eKeKtpoHcKe onpeMe n/nn 6aTepnja, NotpoaTupe6a Da KOnTaKTnpa loKaHne BlaCTn. PnpJxBaHbe
Habe de Hx Cmepnua nomohn he y 3aHTTN JINBOTHe cpeHne.
GENEL BAKIŞ
NODKIOUeyE INPNAADJEXKHOCTEIN (PNC.5)
1.1 Solubility of gas
山
ii. N 1
12
S ADE = S COD + S_ BDE
图
wiiis 1 p
法:
11.111
左向右异
2x_2^3 + 5x - 1 = 0
d < 1,2,1 > 2,1 <
- a4 = a1 + 3 = 6,2d = - 2
( xt^2 + x) ( xt^2 - x) = 0 ( xt^2 + x) ( xt^2 - x) = 0
1 1
34
(6
C. AD = AQ, PAQ = 60^ PQA 为等边编形
4.1.1.2.1.1.1.1
12 × 5 个
jiej1 jbiyj
1
a_0 L b)
(原与
Jie 1.
2
ap a1 且 a2 ,则 1 ≤ a1 < 2( p - 1)
Lii b c j j 1
L
OE BC,OE = 1.OC = 2
m = 311
1
中
1
Local 1.
1
华
1 1
101 × 1.5
m = 311
1
13 × 13
S ACD = S COD + S_ DCE
SOL
1
iJ 1.
lg2g = lg1( x - 1)
ai = 1( sumi - 1) !
Lalal
aiwa
ZENKAISUI EVO 6 AVC-640
www.aiwa-industries.com
All Pictures shown are for illustration purpose only.
All Rights Reserved. All other trademarks are property of their respective owners.
All specifications are subject to change without prior notice.
Aiwa Europe S.L., Av. Siglo XXI, 34, ES-08840.
REV.10/06/2024V1