ZENKAISUI EVO 5 AVC-630 - Vacuum Cleaner AIWA - Free user manual and instructions
Find the device manual for free ZENKAISUI EVO 5 AVC-630 AIWA in PDF.

User questions about ZENKAISUI EVO 5 AVC-630 AIWA
0 question about this device. Answer the ones you know or ask your own.
Ask a new question about this device
Download the instructions for your Vacuum Cleaner in PDF format for free! Find your manual ZENKAISUI EVO 5 AVC-630 - AIWA and take your electronic device back in hand. On this page are published all the documents necessary for the use of your device. ZENKAISUI EVO 5 AVC-630 by AIWA.
USER MANUAL ZENKAISUI EVO 5 AVC-630 AIWA
natural_image
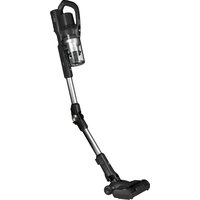
Technical line drawing of a mechanical device with no visible text or symbolsZENKAISUI EVO 5 AVC-630
25.2V\~ | 2500mAh | 500W
(EN) Vacuum cleaner- Instruction Manual
| Power | 500 W |
| Suction | 130AW |
| Charging time | 4-5h |
| Battery | 2500 mAh |
| Running time | 55 min |
| Noise Level (dB) | 80 |
| Accessories | 6 |
CONTENT
Contenido, Contenuto, Contenu, Inhalt, Conteúdo, Inhoud, Съдържание, Периєхо́ме́во, Zawartość, Obsah, Continut, Tartalom, Садржај, Іçerik, Содержание
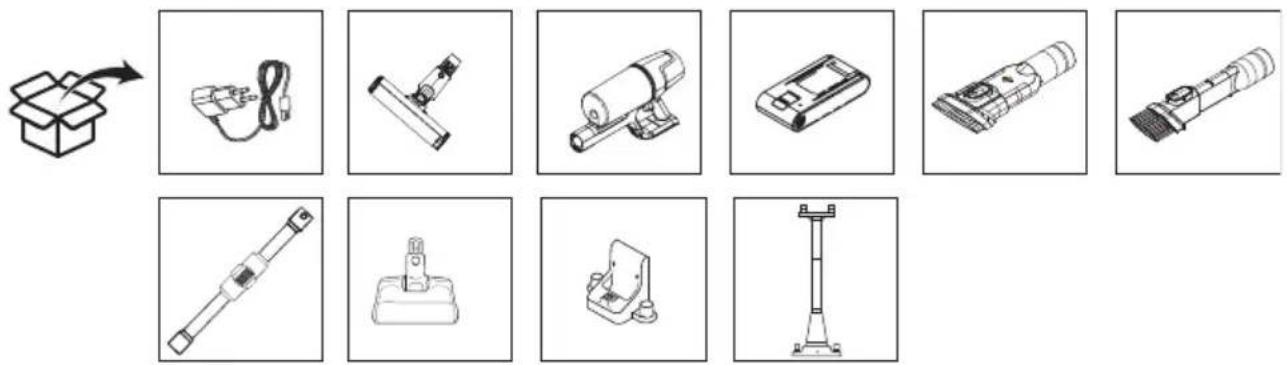
natural_image
Collection of ten different types of electrical connectors and tools, including a box, cable, motor, battery, and lamp (no text or labels visible)MESURES
Measurements, Medidas, Misure, Mesures, Maße, Medidas, Afmetingen, Merki, Metrήσεις, Wymiary, Merania, Măsurători, Méretek, Mepe, Ölçümler, Измерения
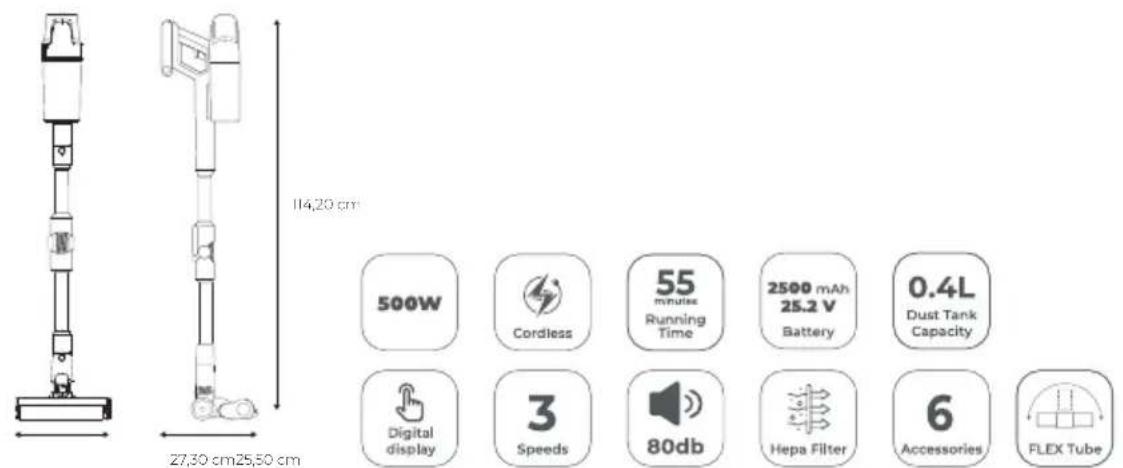
text_image
114,20 cm 27,30 cm 25,50 cm 500W Cordless 55 minutes Running Time 2500 mAh 25.2 V Battery 0.4L Dust Tank Capacity Digital display 3 Speeds 80db Hepa Filter 6 Accessories FLEX TubeGETTING TO KNOW YOUR VACUMM CLEANER
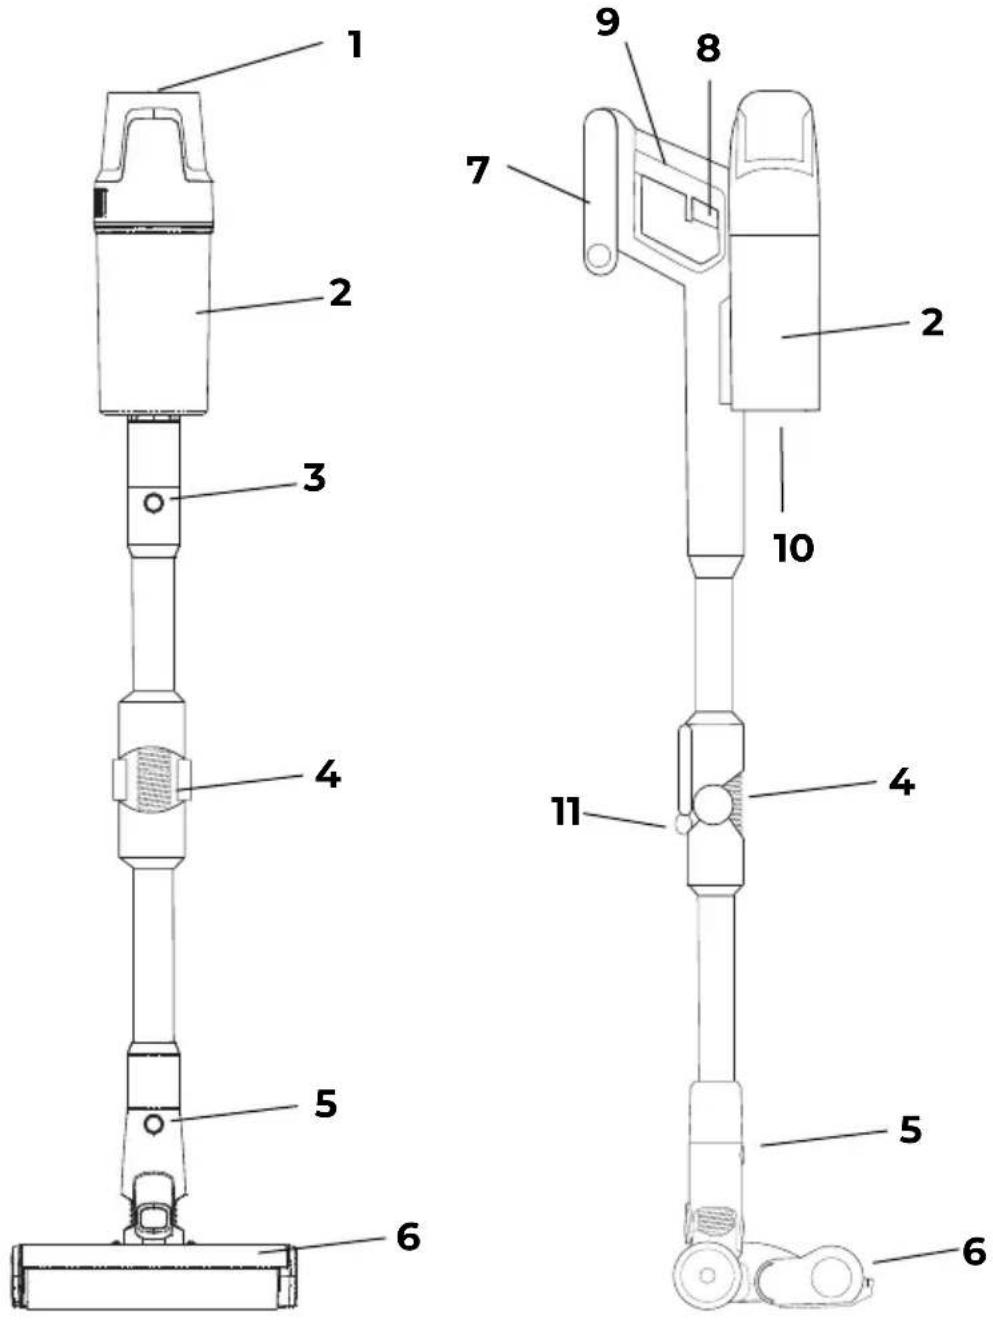
text_image
Technical diagram of a handheld device with numbered parts for identification and assembly reference.EN: 1-Display and power button 2-Dust collector 3-Tube release button 4-Ergoflex tube 5-Suction base release button 6-Suction base 7-Removable battery 8-On and off trigger 9-Ergonomic handle 10-Dust container release button 11-Ergoflex button
ES:1-Display y botón de encendido 2-Colector de polvo 3-Botón de liberación del tubo 4-Tubo ergoflex 5-Botón de liberación de la base de succión 6-Base de succión 7-Batería extraíble 8-Gatillo de encendido y apagado 9-Asa ergonómica 10-Botón de liberación del depósito de polvo 11-Botón ergoflex
IT:1-Display e pulsante di accensione 2-Aspiratore per la polvere 3-Pulsante di rilascio del tubo 4- Tubo Ergoflex 5-Pulsante di rilascio della base a ventosa 6- Base a ventosa 7- Batteria rimovibile 8- Grilletto di accensione e spegnimento 9- Maniglia ergonomica 10- Sblocco del contenitore della polvere pulsante 11-Pulsante Ergoflex
EN- A: Circular lighting B: Battery indicator C: Operating mode: -Automatic -Low speed -High speed D: Mode switch button E: Battery percentage.
natural_image
Technical line drawing of a mechanical component with an arrow indicating direction (no text or symbols)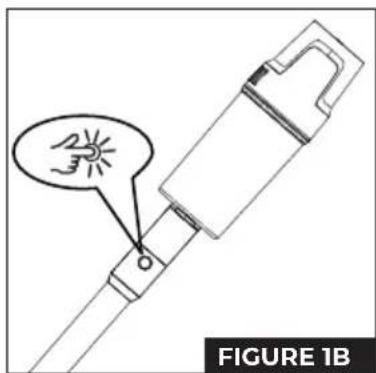
text_image
FIGURE 1B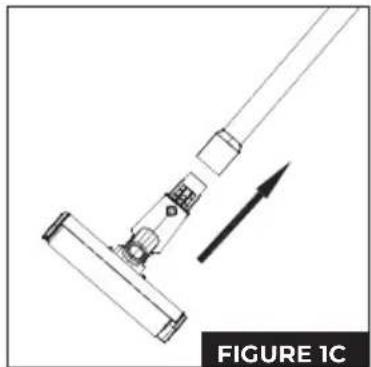
natural_image
Technical line drawing of a mechanical assembly with an arrow indicating direction (no text or symbols)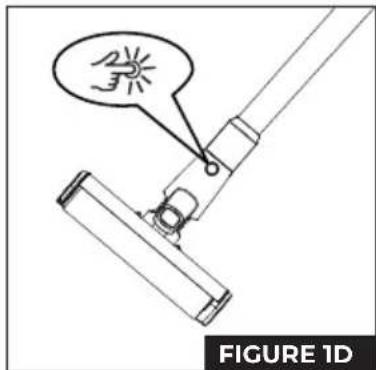
text_image
FIGURE 1D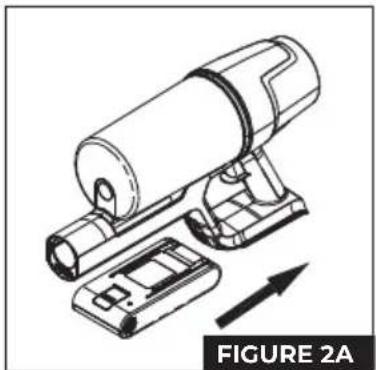
natural_image
Technical line drawing of a mechanical device with no visible text or symbols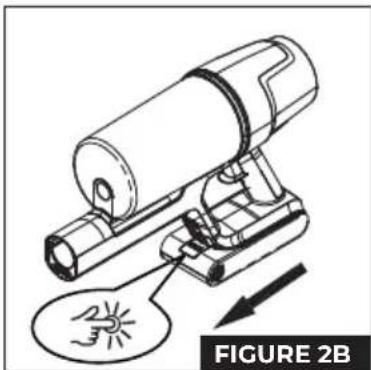
natural_image
Diagram of a scientific instrument with a light source and directional arrow, labeled 'FIGURE 2B' (no text or symbols on the diagram itself)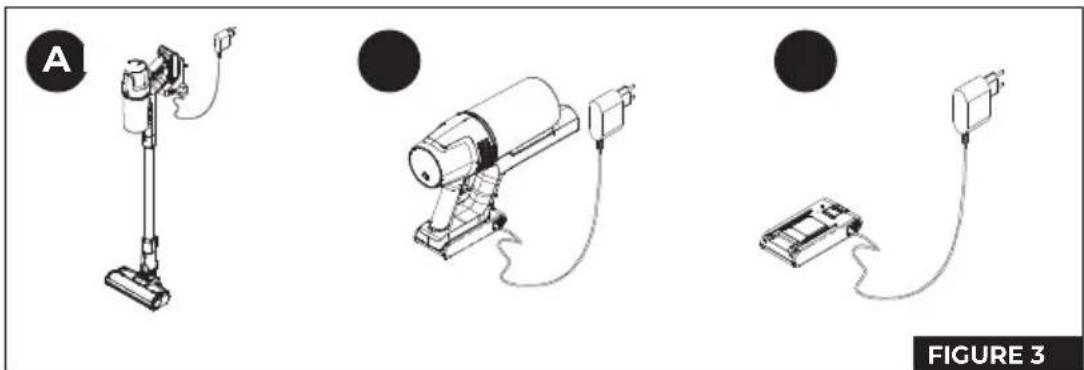
natural_image
Three technical illustrations of a vacuum cleaner with connected components, labeled A, B, and C (no text or symbols on the devices themselves)
text_image
STEP 1 A 3/6mm STEP 2 B C B A STEP 3 STEP 4 FIGURE 4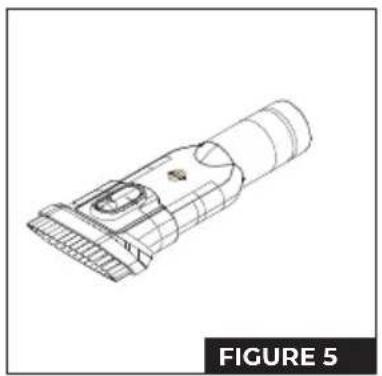
natural_image
Technical line drawing of a mechanical component (no text or symbols)
natural_image
Diagram of a mechanical device with an arrow indicating direction, no text or symbols present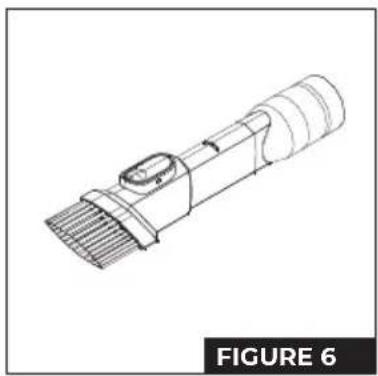
natural_image
Technical line drawing of a mechanical component with fins and a central hub (no text or symbols)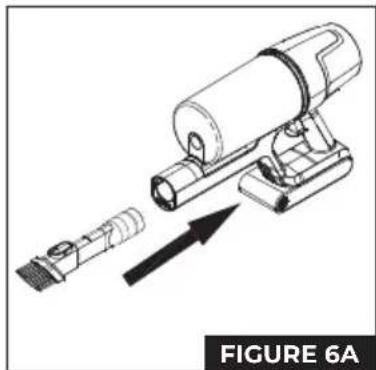
natural_image
Technical illustration of a mechanical device with exploded view and directional arrow (no text or symbols)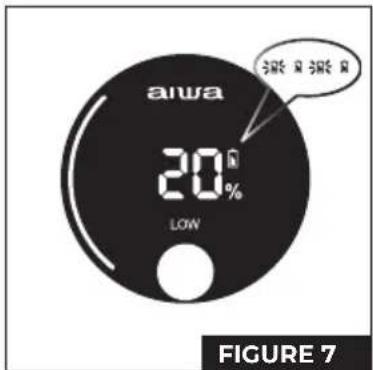
text_image
aiwa 20% LOW FIGURE 7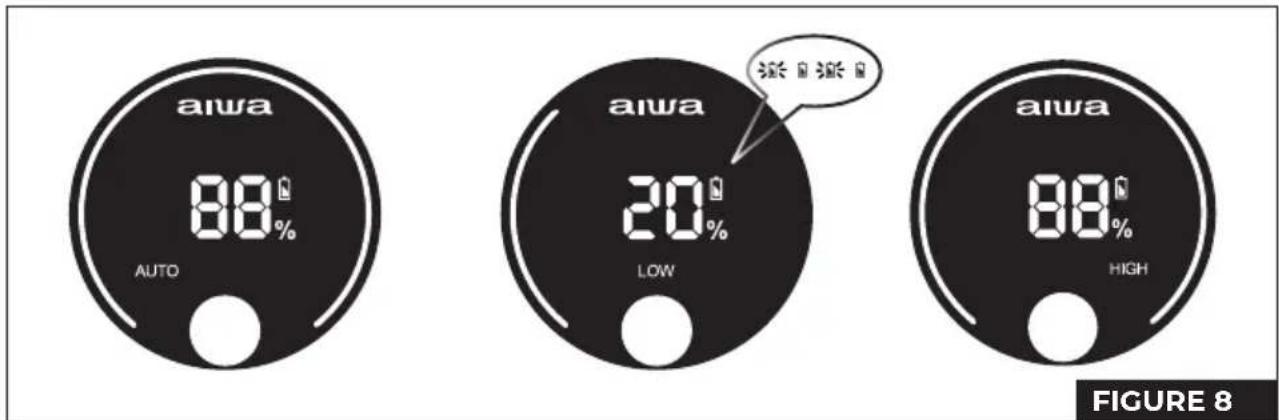
text_image
aiwa 88% AUTO aiwa 20% LOW aiwa 88% HIGH FIGURE 8
natural_image
Technical line drawing of a mechanical assembly with rods and a cylindrical component (no text or symbols)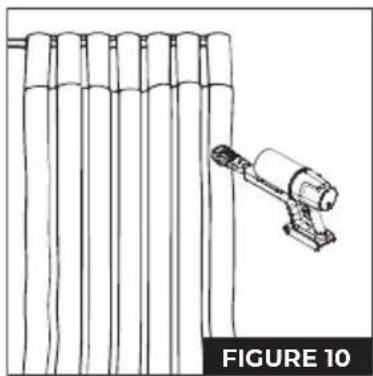
natural_image
Diagram of a robotic arm interacting with vertical cylindrical objects, labeled 'FIGURE 10' (no text on diagram itself)
natural_image
Diagram of a mechanical device with an inset showing a lock mechanism, labeled 'FIGURE 11' (no text or symbols on the diagram itself)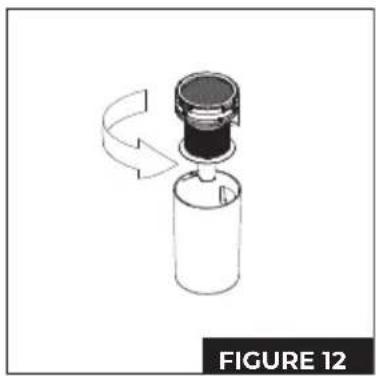
natural_image
Diagram of a mechanical device with a cylindrical body and a top component, showing a curved arrow indicating rotation or movement (no text or symbols)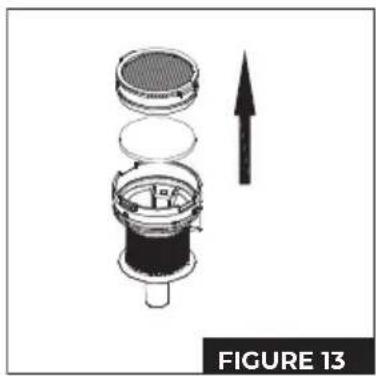
natural_image
Exploded view diagram of a mechanical device showing internal components and an upward arrow (no text or symbols)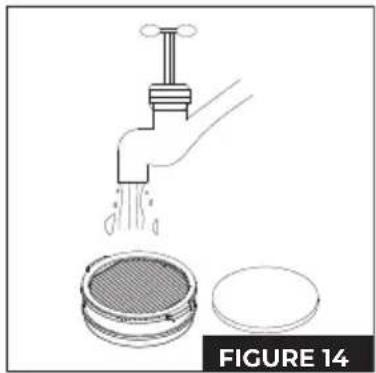
natural_image
Illustration of a faucet pouring liquid into a petri dish, with a blank circular plate nearby (no text or symbols)
natural_image
Diagram showing a sun icon above a circular filter or sieve, with no text or symbols present.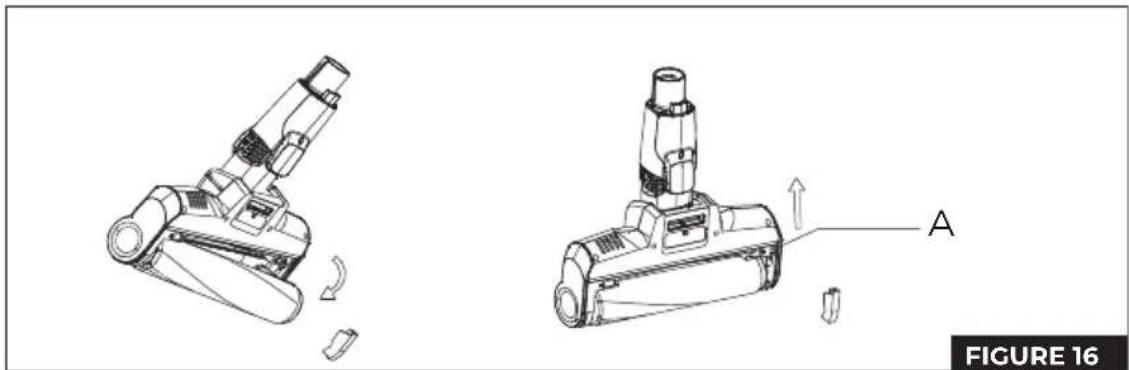
natural_image
Technical line drawing of a vacuum cleaner device with labeled component A, showing motion and assembly (no text or symbols beyond label)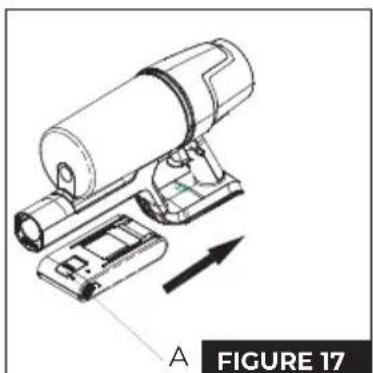
natural_image
Technical illustration of a mechanical device with a cylindrical component and a base, labeled 'A FIGURE 17' (no text or symbols on the diagram itself)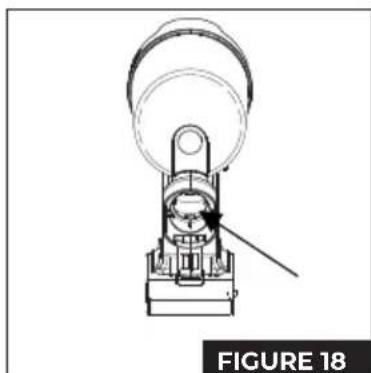
natural_image
Technical line drawing of a mechanical device with no visible text or symbolsOVERVIEW
This Operation Manual aims to familiarize you with the technical data, design, rules of operation and storage of the Aiwa AVC-630 domestic electric vacuum cleaner, model (hereinafter, the vacuum cleaner, device).
NOTE: The illustrations provided in this Operating Manual are general schematic images only.
UNPACKING THE DEVICE AND PREPARING FOR OPERATION
- Opening the Package: Carefully open the package on a flat, stable surface.
- Remove the polystyrene: Remove the polystyrene that protects the vacuum.
- Remove Accessories: Remove all built-in accessories and materials.
- Remove the Vacuum: Lift the vacuum out of the box.
- Remove the Plastic Bag: Remove the protective plastic bag from the vacuum.
- Save the Packaging: Save the outer packaging for future transports.
Follow these steps to ensure that your vacuum cleaner and accessories are safely unpacked and ready for use.
VACUUM ASSEMBLY:

ATTENTION! The components of the vacuum cleaner are made of plastic and carefully assembled together. To avoid damaging the latches and pull-out buttons, do not exert force during assembly. Make sure the parts are installed on the pull-out buttons without warping and are firmly in place with the latches.
PIPE INSTALLATION
- Insert the tube: Place the tube in the main unit until you hear a click. (IMAGE 1A)
- Uninstalling the Tube: To remove the tube, press the release button and pull it out. (IMAGE 1B)
INSTALLING THE SUCTION BASE
- Attach the Suction Base: Insert the suction base into the end of the tube until you hear a click. (IMAGE 1C)
- Uninstalling the Suction Base: To remove the suction base, press the release button and remove it. (IMAGE 1D)
BATTERY INSTALLATION
- Install the Battery: Place the battery on the bottom of the main unit until it clicks into place. (IMAGE 2A)
- Uninstalling the Battery: To remove the battery, press the release button and remove it. (IMAGE 2B)
WALL BRACKET
- Install the Wall Bracket: Place the bracket on the wall and mark the points where the holes will be drilled. Make sure the suction base touches the ground so that the stand doesn't support the full weight of the vacuum. (with a height of approximately 95 cm from the bottom of the charging dock to the floor)
- Attach the Stand: Drill the holes and secure the bracket with expansion screws to hang the vacuum cleaner. Note: Do not fix it on damp walls such as the kitchen.(IMAGE 4: A-Load Carrier B-Expansion Plug C-Screw)
ACCESSORY CHANGE
The accessories of the vacuum cleaner can be changed very simply. There are two accessories in total:
- 2-in-1 Sofa Brush (IMAGE 5)
- 2-in-1 Gasket Brush (IMAGE 6)
To change accessories:
- Gently press the release button on the current accessory. (IMAGE 1B)
- Remove the attachment without exerting excessive force.
- Attach the new fitting by pressing until it stops.
Remember not to apply too much force to avoid damaging the eyelashes or holding plastics.
BATTERY CHARGING
When the vacuum cleaner's display shows that the battery power is less than or equal to 20%, the machine's gear will automatically switch to the mode in which there is no high gear. It is recommended that the user recharge the vacuum cleaner. (IMAGE 7)
During the state of charge, the display shows the percentage of electricity. The outer circle will have a white line that will rotate clockwise
- Plug in the Charger: Plug the charger into a power outlet in any of the ways described below (IMAGEN3).
Note:
Charge the battery before using the appliance for the first time. It is recommended to charge the battery fully in the first three uses. It is recommended that each charging time be up to 12 hours.
Afterwards, do not charge the battery for long periods to avoid damage. The charging time of this model is about 6 hours.
-
During Charging: The battery indicator will flash and the charge percentage will increase. Once charging is complete, the indicator will turn off after 5 seconds.
-
During Use: When the battery is less than 10% charged, the indicator will flash. Recharge the battery with the appliance turned off.
CHARGING MODES (IMAGE 3)
There are three ways to connect and charge the battery:
1. Charging on the Wall Bracket (A)
Place the vacuum cleaner on its wall mount. Connect the bracket to the electrical power.
2. Charging with the Battery in the Vacuum(B)
Leave the battery installed in the vacuum. Connect the charger to the power supply.
3. Charging the Battery Alone(C)
Remove the battery from the vacuum. Connect the charger directly to the battery and electrical power.
HANDLING THE PORTABLE VACUUM CLEANER
To operate the handheld vacuum cleaner and adjust the display: (IMAGE 8)
- After removing the vacuum from its charging dock, press the power button to turn the vacuum on or off. The speed button allows you to switch between different suction levels. When the machine is in auto mode, you can use the speed button to toggle between low, high, and auto speed. To turn off the machine, simply press the power button again.
- When the machine is turned on, it goes into automatic mode. This mode automatically adjusts the suction power based on the amount of dust detected and the brush load. The display will show "AUTO" along with the battery level and a light indicator that shows the dust level. The redder the indicator, the more dust there is.
- If you prefer a gentle suction, press the speed button to switch to low mode. The display will show "LOW" along with the battery level. A partially illuminated white light indicator will tell you the selected speed.
- For a stronger suction, press the speed button again to activate the high mode. The display will show "HIGH" along with the battery level. The white light indicator will illuminate completely to indicate high speed.
- If the battery is low or the temperature is high, the machine will automatically adjust the speed to protect itself. In these cases, it will automatically switch between high-speed, auto-mode, or low-speed as needed.
- When you turn off the machine, all the lights on the screen will turn off and the vacuum will stop.
USING THE ELECTRIC FLOOR PLANER
This accessory is ideal for removing dust on pile carpets, hard floors, and tiles.
Explanation: What happens if the rotating brush gets blocked?
This is a safety feature designed to protect both the user and the brush motor. If the electric toothbrush detects excessive obstruction, such as foreign objects or fibre tangles, or if a child accidentally reaches into the brush chamber while playing, it will automatically stop its rotation and turn off the power supply to the floor brush.
USE OF ACCESSORIES
Two-in-one corner brush: ideal for cleaning nooks, hard-to-reach corners on doors and windows, as well as other tight spaces, as shown in IMAGE 9.
Two-in-one sofa brush – ideal for dusting cabinets, windowsills, sofas and countertops, as shown in PICTURE 10.
CLEANING AND REPLACEMENT OF PARTS
The air intake filter (HEPA) can be purchased from the vacuum cleaner supplier.
It is recommended to clean the dust container after each use. If there is excessive dust accumulation and the HEPA filter becomes clogged, it should be cleaned or washed. Replace it if necessary. After prolonged use of the electric toothbrush, it is common for the bristles to become entangled with hair or other long debris. Clean the bristles in time to maintain the efficiency of the vacuum.
CLEANING THE DUST CONTAINER AND HEPA FILTER
- Press the dust container release button and rotate the container in the direction indicated by the arrow in the diagram. This will allow the dust container to be removed. To install it again, gently snap it into the body of the machine following the arrow indicated and rotate it until you hear a clear "click". Make sure it's properly secured. (IMAGE 11)
- Hold the handle of the HEPA filter and turn it counterclockwise to the unlocked position. Then, pull upwards to separate the cyclone component from the dust container component. (IMAGE 12)
- As shown in the figure, rotate the HEPA component in the direction indicated and remove it for cleaning. (IMAGE 13)
- After cleaning or washing and drying (replace if necessary), reassemble the parts in the reverse order of disassembly and the vacuum is ready to use again. (IMAGE 14 & 15)
CLEANING THE ELECTRIC TOOTHBRUSH
- Use your finger to move the brush release button in the direction of the indicated arrow and remove the side cover of the brush, as shown in the enlarged figure. (IMAGE 16)
- Pull one end of the brush out in the direction shown in the figure, and then remove the brush from the compartment for cleaning.
- After cleaning or replacing the brush, reassemble and install it in the reverse order of disassembly.
VACUUM STORAGE
Battery Recall
- Press the battery release button and remove the battery in the direction shown in the figure. (IMAGE 17 A-Battery release button)
- Place the battery in a plastic bag and store it in a dry place.
Machine Storage
If you won't be using the vacuum for a long period of time, remove the battery, pack the machine, and store it in a cool, dry place. Avoid placing it in direct sunlight or in a humid environment.
TROUBLESHOOTING
Before taking the vacuum cleaner in for repair, please check the following points:
| FAILURE | POSSIBLE CAUSE | SOLUTION |
| The engine does not rotate | The battery is dead.Metal tubes, floor brushes, batteries, and handheld vacuums are not assembled in place | Charge the vacuum.Check if the parts and handheld vacuum cleaner are properly mounted in place. |
| Reduced suction | The dust container is full of dust.The filter is covered in dust.The electric floor brush is blocked in the air intake duct or the roller strip is blocked | Pour the powder into the dust container.Clean or replace the filter sponge.Clean debris attached to the electric roller brush. |
| Insufficient usage time after charging | Insufficient loading timeBattery aging | Follow the instructions in the charging chapter to fully charge the battery.The battery is a consumable product and you can purchase a new battery at the designated repair point. |
FAULT SIGNAL
- When the air duct is blocked or the dust bin is full, the machine does not work properly. The lock indicator keeps flashing. The air duct, dust bin, HEPA filter and machine restart need to be cleaned. (IMAGE 8)
- If the floor brush needs to be cleaned, the cleaning light on the floor brush will flash continuously, meanwhile, the battery level will be displayed.
- If the floor brush is blocked, the machine will automatically shut down. The energy display area will show "Er" and the warning and floor brush icons will flash.
- If the machine is turned on in conditions of low dust concentration or when it cannot suck up dust, the display always shows 100%. Please clean the dust from the dust sensor lamp in time.
Note: If other failures occur, special tools are required. In addition, to avoid hazards, it should be repaired by professionals from the manufacturer, its maintenance department, or similar departments.
RECYCLING OF ELECTRICAL AND ELECTRONIC EQUIPMENT
This symbol indicates that, in accordance with applicable regulations, the product and/or battery must be disposed of separately from household waste. When this product reaches the end of its useful life, you will need to remove the batteries/accumulators and take it to a collection point designated by the local authorities.
For detailed information on the most appropriate way to dispose of their electrical and electronic equipment and/or batteries, consumers should contact their local authorities.
Adhering to the above guidelines will help protect the environment.
INFORMACIÓN GENERAL
MODOS DE CARGA (IMAGEN 3)
MODALITÀ DI RICARICA (IMMAGINE 3)
MODES DE CHARGE (IMAGE 3)
MODOS DE CARREGAMENTO (IMAGEM 3)
OPLAADMODI (AFBEELDING 3)
MODURI DE ÎNCĂRCARE (IMAGINEA 3)
text_image
Symbol of a trash bin crossed out by a diagonal line, indicating no waste or disposal.www.aiwa-industries.com
All Pictures shown are for illustration purpose only.
All Rights Reserved. All other trademarks are property of their respective owners.
All specifications are subject to change without prior notice.
Aiwa Europe S.L., Av. Siglo XXI, 34, ES-08840.
REV. 10/06/2024 VI