CMMR-01 - Food Processor MPM - Free user manual and instructions
Find the device manual for free CMMR-01 MPM in PDF.

User questions about CMMR-01 MPM
0 question about this device. Answer the ones you know or ask your own.
Ask a new question about this device
Download the instructions for your Food Processor in PDF format for free! Find your manual CMMR-01 - MPM and take your electronic device back in hand. On this page are published all the documents necessary for the use of your device. CMMR-01 by MPM.
USER MANUAL CMMR-01 MPM

Battery powered -operating up to 50 minutes on a single charge
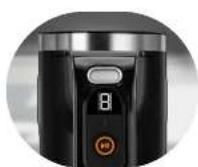
LED display with 8-stage speed adjustment

Protection against accidental activation
Whisking attachment/ dough kneading attachment. Dishwasher safe.
BEZPECNOSTNI POKNY PRIPOUZIVANI

Read the instructions carefully before use.
-
Take special care when children are near the appliance.
-
Do not use the appliance for purposes other than those for which it was intended.
-
Use of accessories not recommended by the manufacturer may cause damage to the device or personal injury.
-
Do not submerge the device in water or other liquids.
-
Do not leave the appliance unattended during operation.
-
Do not use a damaged device – in this case, return the device to an authorised service centre for repair.
-
Do not use the appliance outdoors.
-
Do not touch the appliance with wet hands.
-
The appliance is intended for domestic use only.
-
Remember to keep a safe distance from rotating components of the appliance during operation. Coming into contact with them may result in personal injury or (i) damage to property e.g. by pulling out loose hanging items of clothing/jewellery etc.
-
Clean the appliance, in particular parts being in direct contact with food, before first use, immediately after finishing work and if the appliance has not been used for a long time. The procedure is described in details in the "CLEANING AND MAINTENANCE" section.
-
Before cleaning the mixers, first disconnect the battery from the unit!
-
Do not place the appliance near other electric cookers, burners, ovens, etc.
-
Always ensure that all parts of the appliance are correctly fitted before starting work.
-
Do not place the appliance on a hot surface.
-
The appliance may be used by people with reduced physical, sensory or mental abilities, as well as those without prior knowledge or experience in using such types of appliance, provided that they either are supervised or have been instructed and fully understood the training content.
-
Children are forbidden to perform cleaning and maintenance activities.
- The appliance must be kept away from children. Keep the device out of the reach of children.
-
The device is not a toy and should not be used as such by children.
-
Turn off the appliance before making any changes in equipment or before approaching any moving parts during use.
-
Use the appliance on a smooth and stable surface.
-
For the safety of children, please do not leave freely accessible parts of the packaging (plastic bags, cardboard boxes, polystyrene, etc.).
-WARNING! Do not allow children to play with the film. Danger of suffocation!
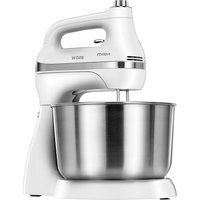
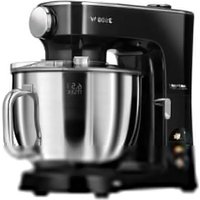
APPLIANCE DESCRIPTION
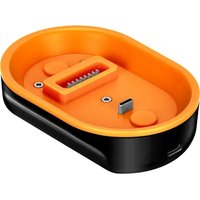
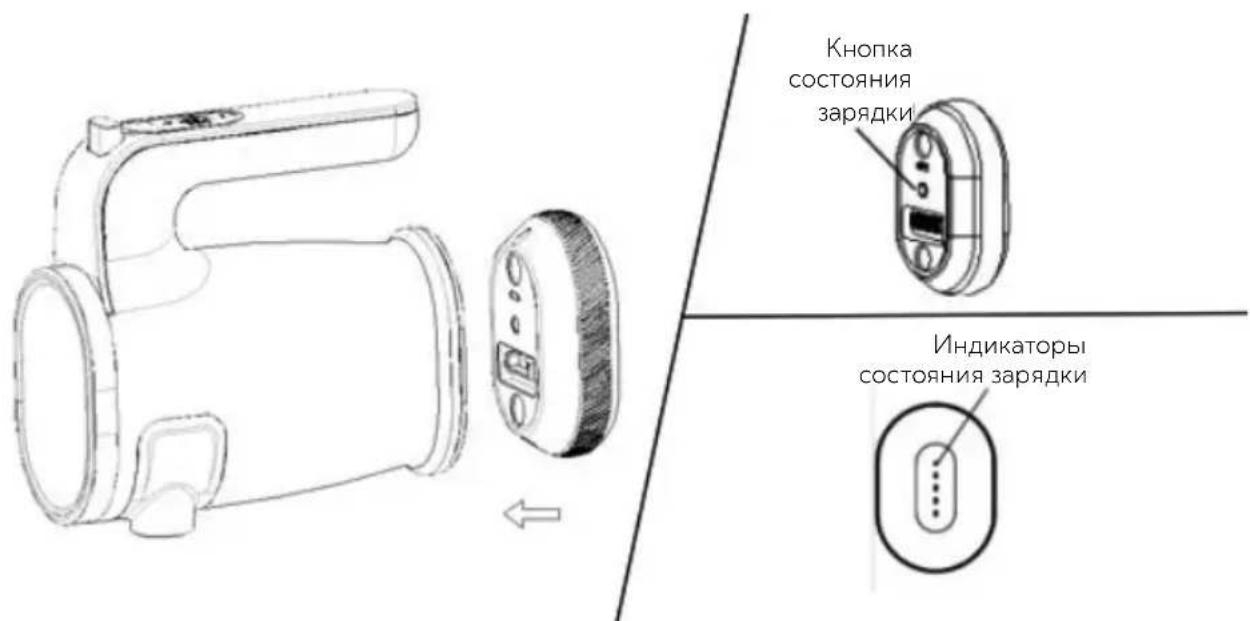
- Replaceable battery
- Battery mounting socket
- Mixer housing
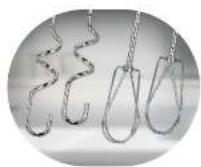
- Whisk mixers
- Hook mixers
-
Control panel
-
Mixer release button
- Display
- “+” button
- ON/OFF button
- “-” button
CAUTION! The kit does not include a rechargeable battery, USB-A/USB-C type cable or a base with charger. For the device to work, it is necessary to purchase a dedicated rechargeable battery with a USB-A/USB-C type charging cable (CAKU-01 model). AI -ternatively, you can buy a base with a charger (CAKU-02 model).
BEFORE FIRST USE
- Take the device out of the box and remove all protecting cardboard and foil.
- Check the device for damage that may have occurred during transportation. If you have any doubts contact the seller.
- Thoroughly wash and dry the parts that directly come into contact with food (see section: "CLEANING AND MAINTENANCE").
- Charge the battery until all the battery charge status lights are on continuously. When fully charged, 5 lights are lit.
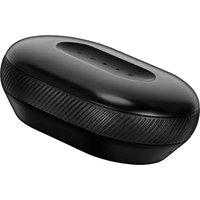
CHARGING THE BATTERY
The battery can be charged in two ways:
Using a USB-A/USB-C type cable connected directly to the battery:
- Connect the end of the cable (USB-A) to a 5V power source equipped with a USB-A port (such as a phone charger).
-
Connect the other end of the cable (USB-C) to the USB-C port on the battery.
-
During charging, the battery lights will flash. The progress of charging will be indicated by the lighting of successive lights, full charging will be indicated by the lighting of all 5 lights with a continuous light.
- The approximate time for this method of charging, with a current of 2A, is about 3 hours.
Using a dedicated base with CAKU-02 charger (fast charging):
- Connect the dedicated 12.6V = 4A charger to the mains and then to the charging base.
- Insert the battery into the charging base. Thanks to built-in magnets, the battery installs automatically when the battery is applied to the charging base.
- During charging, the battery lights will flash. The progress of charging will be indicated by the lighting of successive lights, full charging will be indicated by the lighting of all 5 lights with a continuous light.
- The approximate time required to fully charge the battery using the base with charger model CAKU-02 is about 30 minutes.
CAUTION! Optionally, you can connect the end of the cable (USB-C) to the charging base, and the other end to a 5V = power source (such as a phone charger). The approximate time for this method of charging, with a current of 2A, is about 3 hours.
CAUTION! The blender's operating time with a fully charged battery ranges from 20 minutes (for heavy weights) to 50 minutes (for light weights).
CAUTION! When charging is complete, disconnect the charger from the mains and the charger cable from the battery.
| Battery indicator light colours | Battery lights in % Note | |
| 1 white less than | 20% - | |
| 2 white 21-40% | - | |
| 3 white 41-60% | - | |
| 4 white 61-80% | - | |
| 5 white 81-100% | - | |
| blue - high engine temperature | ||
| Red - battery | protection function is enabled | |
The battery is compatible with all devices in the GoFree wireless series.
BATTERY INSTALLATION
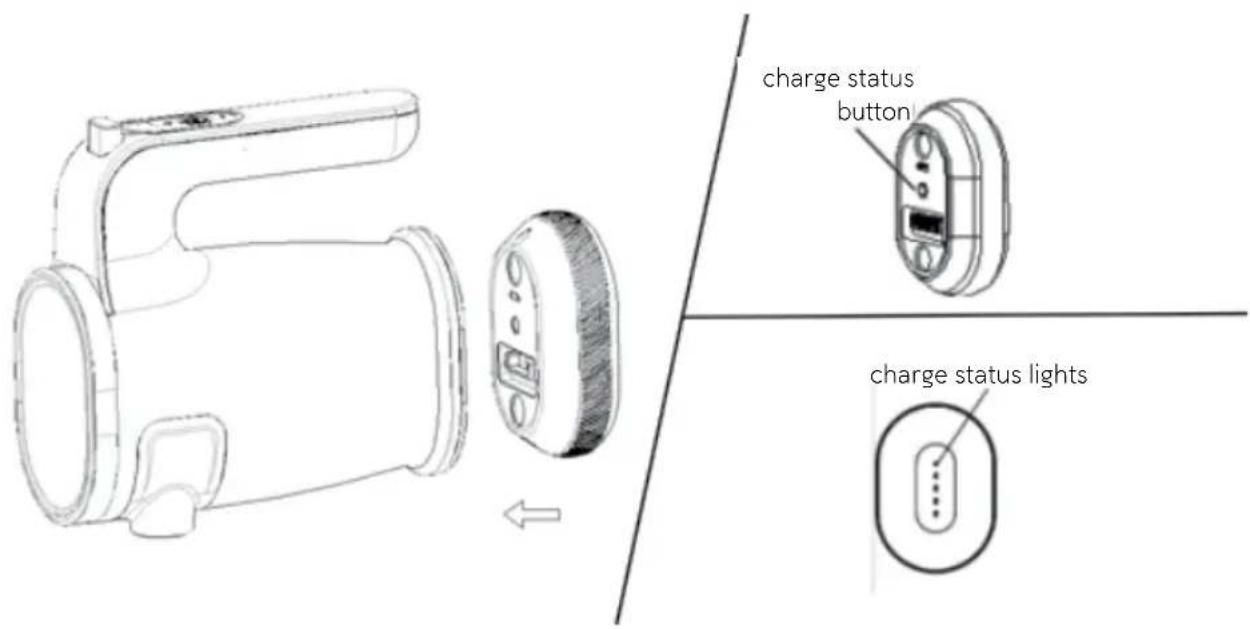
- To check the battery charge level, press the button on the inside of the battery.
- Pay attention to the correct position of the battery during installation, otherwise the battery cannot be installed in the device.
- The battery pack, thanks to built-in magnets, installs automatically when the battery is applied to the mixer housing.
- To remove the battery from the device, simply hold the mixer with one hand and pull the battery with the other.
USING THE MIXER
INSTALLATION OF MIXERS
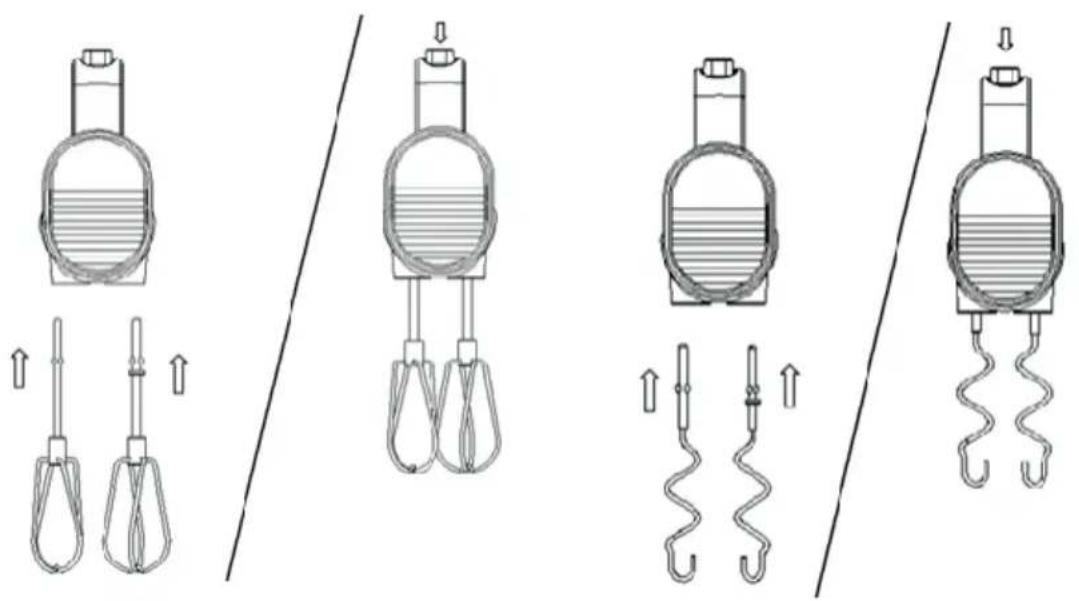
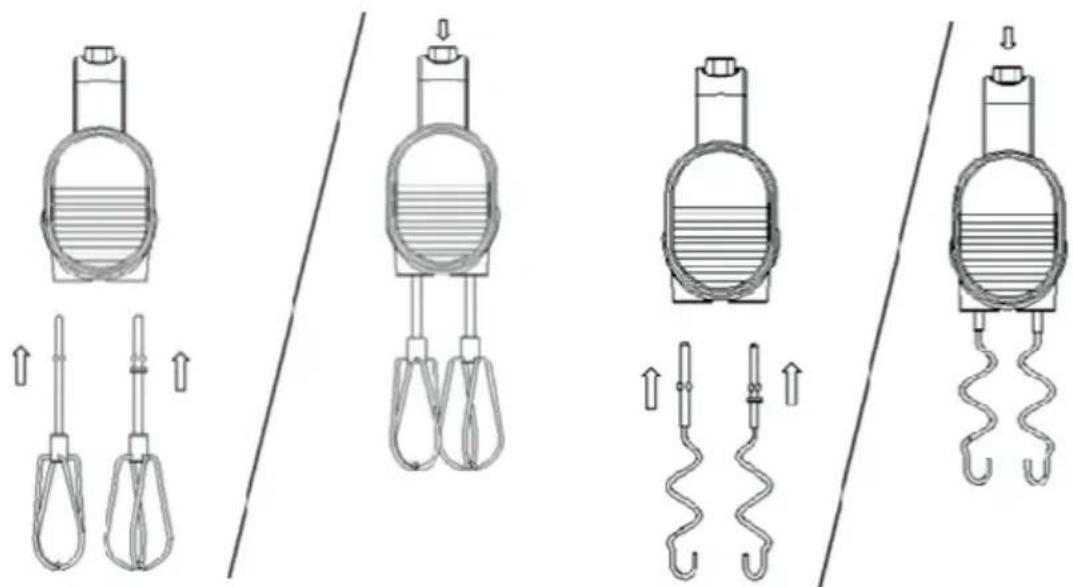
- Pay special attention to the whisk (4) and hook mixers (5). One of the mixers, both the whisk (4) and the hook (5), has a flange to be installed in the larger hole of the mixer housing (3).
- To attach the whisk (4) or hook (5) mixers, insert them into the corresponding holes in the main unit until you feel resistance and hear a distinctive click, which indicates proper attachment.
CAUTION! After each time the agitators are installed, check that they are installed accurately. Improper attachment of these parts causes them to fall out during operation.
- Depending on the amount of ingredients, place them in the appropriate container.
- Lower the mixers into the container and turn on the device by pressing the ON/OFF button (10), then use the "+" (9) and "-" (11) buttons to select the desired mixing speed and press the ON/OFF button (10) again.
CAUTION! When starting to mix, it is advisable to set the speed to the lowest, with a gradual increase in speed. Before pouring loose ingredients into the bowl, it is advisable to reduce the speed to lower to avoid spilling them.
- When you are done, press the ON/OFF button (10).
- Remove the whisk (4) or hook (5) mixers by pressing the mixer release button (7). The mixer release button (7) can only be pressed when the device is turned off."
CAUTION! When mixing with hook mixers for kneading dough, flour may be deposited on the edges of the bowl. It should be collected with a spatula after turning off the mixer.
The whisk (4) mixers are used, among other things, for blending egg yolks with sugar, making custards and dough for omelettes and pancakes.
Hook (5) mixers are used for mixing runny doughs, yeast doughs, cheeses, ginger bread, etc.
CAUTION! After 10 seconds of inactivity, the device goes off and enters sleep mode. To activate the device from sleep mode, simply press any button on the control panel (6).
CAUTION! The maximum continuous operation time of the device for whisk mixers is 10 minutes, while for hook mixers it is 5 minutes. After this time you should turn off the device and wait at least 30 minutes for it to cool down.
CLEANING AND MAINTENANCE
- Before cleaning, remove the battery (1) from the mounting socket (2).
- Wash the whisk or hook mixers under running water and wash them thoroughly in warm water with detergent, then rinse and dry.
- Never submerge the device in water. Disconnect the battery from the device, then wash the case with a damp cloth and wipe it dry.
- It is recommended to clean the accessories immediately after the operation is complete. This will remove any lingering deposits, prevents residue from drying up, making washing more efficient and easier, and prevents the proliferation of bacteria.
CAUTION! Do not use sharp objects, abrasive polishes, solvents or other strong chemicals for cleaning since their use may cause damage to the appliance.
MIXER SPEED GUIDE
| SPEEDDESCRIPTION | |
| 0 Device is off | |
| 1 | Good speed to start with the machine with a lot of ingredients or dry foods such as flour, butter. |
| 2 | Best speed for liquids and for blending sauce ingredients. |
| 3 Mixing cakes | |
| 4,5 | Cream and sugar, whipping unbaked cakes, desserts, etc. |
| 5,6 For whipping eggs, icing, whipping cream, etc. | |
| 7,8 | As with the speed "5,6" |
TECHNICAL DATA
Technical parameters are indicated on the nameplate of the product.
CE
ATTENTION! MPM agd S.A. reserves the right to make technical changes.
Proper disposal of the product (waste electrical and electronic equipment)
Marking on the product indicates that after the service-life of the product expires, it should not be disposed with other type of municipal waste. Used equipment may have a negative impact on the environment and health of people due to potentially containing hazardous substances, mixtures and components.
Mixing electric waste with other types of waste or disassembling those in an unprofessional manner may cause a release of substances that are hazardous to the environment and health. Used equipment should
be handed-over to a point for collection of electric waste. In order to obtain detailed information regarding the electric waste collection points, the user should contact the municipal point of electric waste collection or used equipment processing department.
BESCHRIJVING VAN HET APPARAAT
- Vervangbare batterij
- Batterij montage socket
- Mengerbehuizing
- Kloppermixers
- Haakmixers
-
Bedieningspaneel
-
Ontgrendelingsknop van roerstaafjes
- LCD-display
- n + n knop
- AAN/UIT-knop
- Knop "-"
AkumulatorUNCTaIOWAc na dwa spoSoby:
AkkymyIaTOp COBmCTnM CO BcEMN yCTpOJCTBaMn 6ecnpoBOHOH cepu GoFree.
YCTAHOBKA AKKUMYJIATOPA
- UTo6bl npOBepnTb yPoBeHb 3apJa 6aTapeN, HaxMnte KhoNky Ha BHyTppeHHei CTo- PoH e aKKyMyJrTopa.
- 06paTHe BnMaHne Ha npaBnIbHoe nIoXeHne aKKyMylrTopHO B apen BO BpeM yCTaHOBKn, B npOTnBHom Cnyuae Bbl He cMOxTe yCTaHOBtB aKKMyIrTopHyIO batapeIO B 6nok.
3.Бlaorodapra BCTpoeHHbIM MarHHTaAM aKKyMylrTop yCTaHaBnBaetc aBTOMaTneckn npn pa3MeIeHnn aKKyMylrTopa HAnpOTNB KOpnyca CmecnteJI. - UTo6bI n3Bnueb aKKyMnyJrOp n3 yCTpoiCTBa, DOCTaTOUHO OndHOn pyKoN dePkaTb MInKcep, a dpyroT rHyTB 6atapeio.
C IOMOUsbIO MINKCEPA
YCTAHOBKA MELLAJOK
- 06paTnte ocoboe BnmaHne Ha MeaJkn IJIy BeHunka (4) n KpOuKa (5). OHa n3 MeaJok, KaK BeHUnk (4), TaK n KpOuOK (5), NMeet PhaHeu, KOToPbI dOnJxeh 6bITb yCTaHOBJIeH B 6oJIbWeM OTBepCTm KOpNya CmeCInTeJr (3).
- UTo6bl npnKpeNTb MeaJAN C BeHcNkOM (4) nnn KpOuKOM (5), BCTaBbTe INx B COOTBeTCTByUoIe OTBepCTnHa OCHOBHom 6Ioke Do Tex Nop, NOka He NouyBCTByeTe CoInpOTnBJIeHne I He YcNbIWe Te XapaKTepHbI uenqok, yKa3bIBaIOUsn Ha npabINbHoe KpeJIeHne.
3AMEUAHNE! Nocne kaxdoy yctahOBKn MeaJOK npoBepnTe nx TOnHyO yctaHOBky. HenpaBnIbHa BCTabKa 3Tnx DeTaJe npNBOdnt K TOMy, YTO OHN BbInaAOT B npouecce 3KcnIpyatauinn.
- B 3aBcIMOCTN OT KOJIInueCTBa INHpeIeHToB NOMEcTHe INX B COOTBeTCTByIOUyIO EMKoCTb.
- Iorpy3nte MeaJKN B KOHTeHep N BKIOUHTe np6op, Haxab KhoNky BKJI/BblKJI (10), 3aTeM KhoNkN «+»" (9) n „" (11) BblBepuTE NOxOJaIyIO CKOpocTb HaIooxeHn HAxMNTe KhoNky BKJI/BblKJI (10) eue pa3.
3AMEUAHNE! Korda Bbl NaHHeTe CMeuBHaHne, XeJaTeJbHO yCTaHOBnTb CKOpOCTb Ha camyIO Hn3Kyo, NoCTepeHHo YBeJIuHBAra CKOpOCTb. Npep TeM, KaK BbcInaTb cbiny-ue INHpeDneHTb I B MnCKy, XeJaTeJbHO CHN3NTb CKOpOCTb DO 60Jee Hn3KoJ, UTO6bl n36ExaTb nx paccbinaHna.
- Korda onepaun 6ydt 3aBepseHa, HaxMnte KhONky BKJ/BblKJI (10).
- Chmnte Meaapan C BeHnKOM (4) nIe Meaapan C KpOyKom (5), Haxab KhoNky OcBO60XDeHnMaapan (7). KhoNky pa36JIOKInPOBKn Meaapan (7) MoxHO HaXImaTb TOnbKO npIN BbIKIoueHHom npi6ope>.
PYKOBODCTBOIPOCKOPOCTMNKCEPA
TEXHINUECKNEXAPAKTEPNUKNI
TexHHueckne napaMeTpbl yka3aHbI Ha 3abOdCKo Ta6nUcKe n3deJIny.

BHIMAHHE! Kompania MPM agd S.A. ocTabJraT 3a co6oB npabo BHocntb TexHnueckne n3MeHeHna.
To pyKOBOCTBO 6bIIO NOBBeprHyTO MaUHHOMy nepeBOy. B cnyae comHeHn CneJyET o6paTntbc K ero aHRNoa3bHOn BEpcuN.
Правильна утinueзацьnpodyкт(a3ношенhoe злекtpческoe n электорноhoe o6opudobahne)
MapknpoBka Ha npOkyTe yKa3bIaet Ha To, TTo npOdyKHe CJIeDyET Bbl6paCbIbTaB MecTe C dpYrIMN 6bITOBbIMN OTXoJamn NO OKOHuaHnn Cpoka Cnyk6bl. N3HOweHHe O6OpyIOBaHne MOKeT Oka3bIBaTB BpeIDHOE BO3dEiCTBne Ha OKpyKaIOUyIO CpeDy N3OpOBBe YEIOBEKA N3-3a NOTEHUNaHBOcoCpKaHHN ONaCHbIX BCuCECTB, CMcEe N KOMIOHcTob. CMeWnBaHnc OTXoJOB B VInc N3HOUsCHHOrO 3JIeKTPoHHORO IN 3JIeKTPnuCeCKOrO 6OpyIOBaHn C DpyrIMN OTXoJamn IN IN HEnpOFeCCNOHaJIbHa
pa360pka MOKeT npBecTN K Bb16pocy BeuecTB, BpeHbIX IJIa 3IopOBBa IN OkpyKaIOUe Cpebl. N3HOweHHe OCTPOcTBO Heo6xOIMMo cdaTb Ha nyHK T cbopa OTpa6OtaHHoro 3JekTpnueeCKoro IN 3JekTKPOHHoro 6OpuyoBAHnry. YTObI NOlyuHTb NoDpo6HyIO INHOFOpMaunIO O MeCe CdaH N3JekTpnueecknx IN 3JekTKPOHHix OTXoIOB, NOIb3ObaTeIb DOJKeH ObpaTuTBcBcR B MeCTHbI NyHK T cbopa 6OpuyoDaBHnRA JIn yTININ3aUNn INn Ha 3ABODNo nepepa60tke N3HOweHHOro 6OpuyoBaHnra.
POKNYA TIPY TYKAJUCE SA BEZPECNEHOPOUZIVANIA

TEXHIYHXAPAKTEPNUCTNKN
Texhi ni napametpn HabeedeHo Ha 3aBocbki Ta6nuci Bnpo6y.
CE
YBATA!ΦipMa MPM agd S.A.3aIiuae 3a co6oIO npaBO BHocHTn TexHiuHi 3miHn.
LcienocibnKpeeknaeHO MaunHHm peeknAOM.
KuO y BAC c CymHIBN, 6yNb NaCKa, 3BepHiTbc4 Do NOro aHrIOMOBHOi Bepci.
PpaBnIbHa yTnIIN3aun npOdykTa (n3HoWeHHoe 3JeKtpnuecKoe n 3JeKtpoHHe o6OpydoBaHne)
MapknpoBka Ha npOdykTe yKa3bIbAet Ha To, YTO npOdyKT He CJIeIyET Bbl6paCbIbTa BMeCTe C dpYrMMn 6bIToBBIM NO OXoDAmN NO OKOHuaHn Cpoka CnyK6bl. N3HOweHHoe o6OpDObAHne MOKeT OKa3bIBaTB BpCnHOC Bo3dCCTBNC HA OKpyKaHOUyO CpcDy N3OpOBbc CcIOBcKa N3-3a NOTCHUNaJIbHOr COJcP KAnOnaChbIX BCSECTB, CMEeN KOMNoHEtOB. CMeuBaHnE OTxOIOB B BnDE N3HOWeHHORO 3JIeKtpoHHOrN IN 3JIeKtpnueckoro 6OpDyOBaHn C DpyrMMn OTxOdaMn ININ IN HenpopeccnoHaJIbHa
pa360pka MoKet npBecT K Bb6pocy BeuecTB, BpeHbIX IaI 3doobBy n OkpyKaIOUeI cpebl. N3HOweHHoe yCTpoiCTBO Heo6xOIMo CdaTb Ha nyHK T cbopa Otpa6oTaHHoro 3eKtpnueckoro I 3eKtpoHHoro 60bpOBAHnry. YTO6bI NOUYtB NOpO6HyIO INHOpMaunio O MeTe CdaN 3eKtpnuecknx I 3eKtpoHHbIX OTXoOB, NOlb30BaTeJIb IOJKeH 6opatntbcra B MeCTbI PyHK T cbopa 60bpOyDObAHnry dIy YTNIN3aUNn IIN Ha 3aBOJ NO nepepa6OTke I3HOweHHORO 60bpOyDOBAHnry.
Szanowy Kliencie!
Legible signature of the buyer