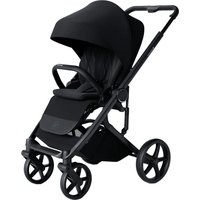
Sirius - Stroller Avionaut - Free user manual and instructions
Find the device manual for free Sirius Avionaut in PDF.


User questions about Sirius Avionaut
0 question about this device. Answer the ones you know or ask your own.
Ask a new question about this device
Download the instructions for your Stroller in PDF format for free! Find your manual Sirius - Avionaut and take your electronic device back in hand. On this page are published all the documents necessary for the use of your device. Sirius by Avionaut.
USER MANUAL Sirius Avionaut
text_image
Irius i Read Scan and find your language

- Инструкция за употреба & Гаранция
• Návod k obsluze & Záruka
• Bedienungsanleitung & Garantie
• Betjeningsvejledning & Garanti
• Οδηγίες χρήσης & Εγγύηση - User's manual & Warranty
- Instrucciones de uso y Garantía
- Kasutusjuhend ja garantiitingimused
- Käyttöohjeet ja takuu
• Manuel d'utilisation & Garantie
• אַרְׁעֹת אַרְׁעֹת & אַרְׁעֹת - Upute za uporabu i jamstvo
-
Használati útmutató és Garancia
-
Istruzioni d'uso e Garanzia
• Naudojimo instrukcija ir garantija
• Lietošanas pamācība & garantija
• Bruksanvisning og garanti - Instrukcja obstugi & Gwarancja
- Manual de instruções & Garantia
- Instructiuni de utilizare & Garantie
- Руководство по эксплуатации & Гарантия
• Bruksanvisning och garanti
• Návod na obsluhu & Záruka
• Navodila za uporabo in Garancija - Kullanım Kılavuzu ve Garanti
- Інструкція з експлуатації та гарантія
PL
text_image
Diagram of a mechanical device with labeled components A and B, showing directional arrows indicating motion or flow.Front Wheels/Rear Wheels
text_image
1 CLICK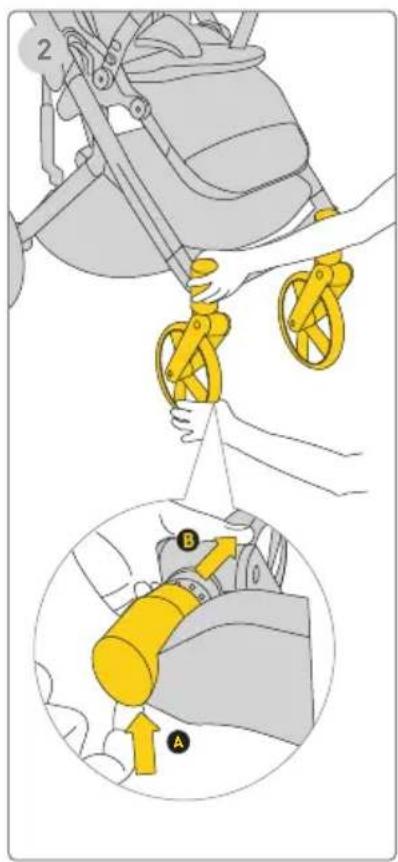
text_image
Diagram illustrating a mechanical device with labeled parts A and B, showing hand positioning and assembly steps.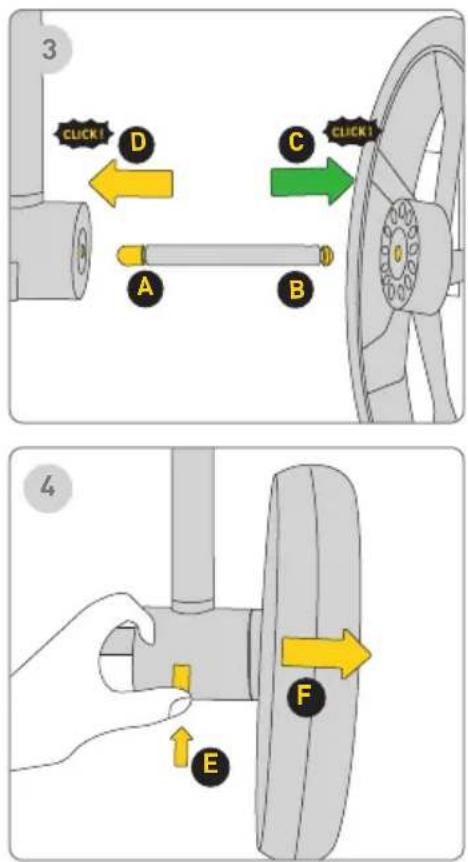
text_image
3 CLICK! D A B C CLICK! 4 EPrzednie koła
1 Krok
text_image
Diagram illustrating hand positioning and movement of a car steering wheel, labeled with points B and C and directional arrows.Barierka ochronna
natural_image
Illustration of a stroller with yellow railings and wheels, no text or symbols present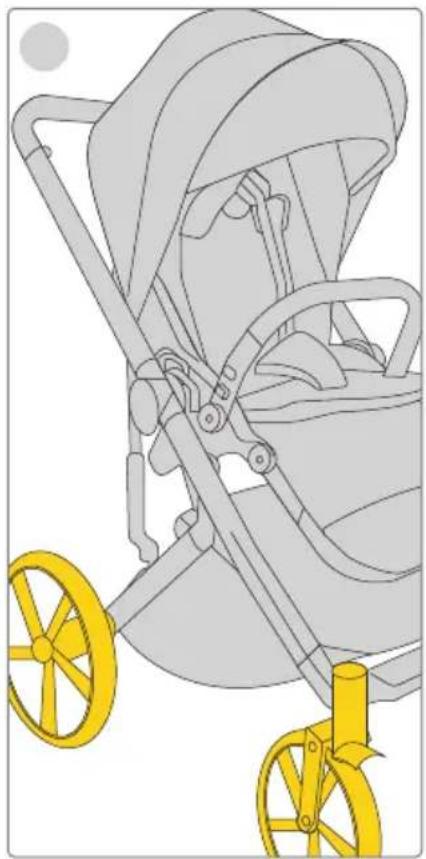
natural_image
Illustration of a stroller with yellow wheels and handlebars, no text or symbols present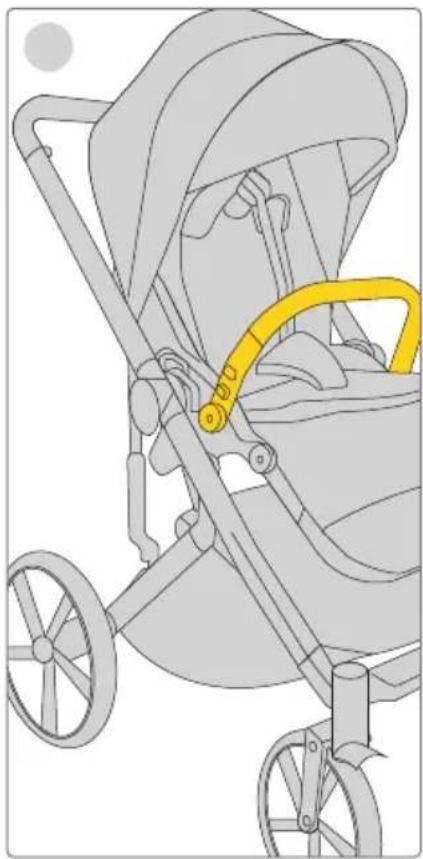
natural_image
Illustration of a stroller with yellow safety belt (no text or symbols)Sprawdź ustawienie
1 Krok
natural_image
Illustration of a bird's head with a yellow beak and patterned neck, no text or symbols presentDaszek
text_image
123 UNLOCK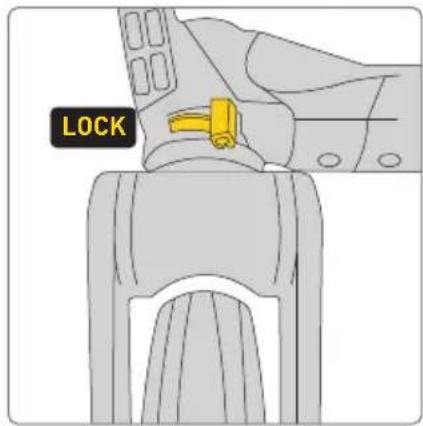
text_image
LOCK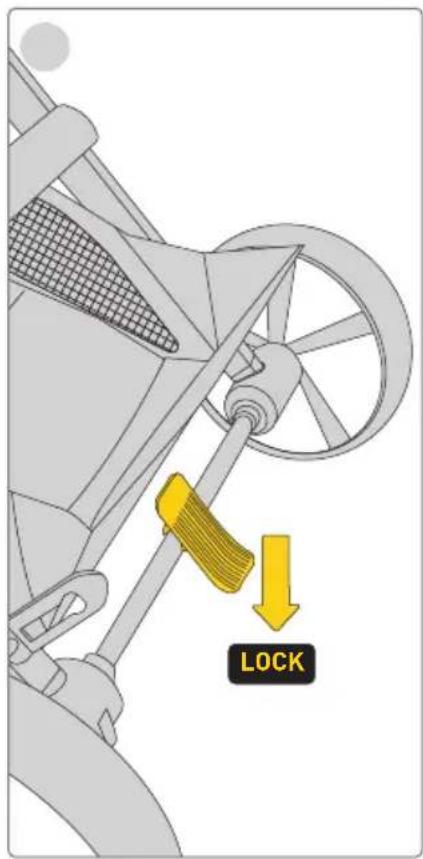
text_image
LOCK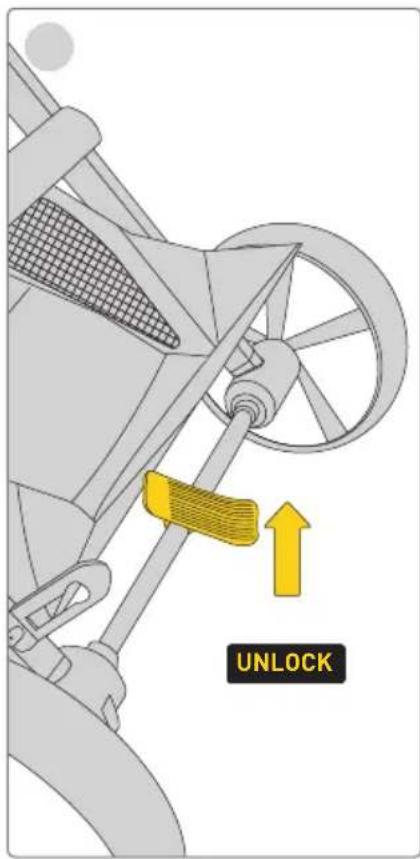
text_image
UNLOCKnatural_image
Diagram of a yellow and gray mechanical device with a directional arrow and label 'A' (no text or symbols on the device itself)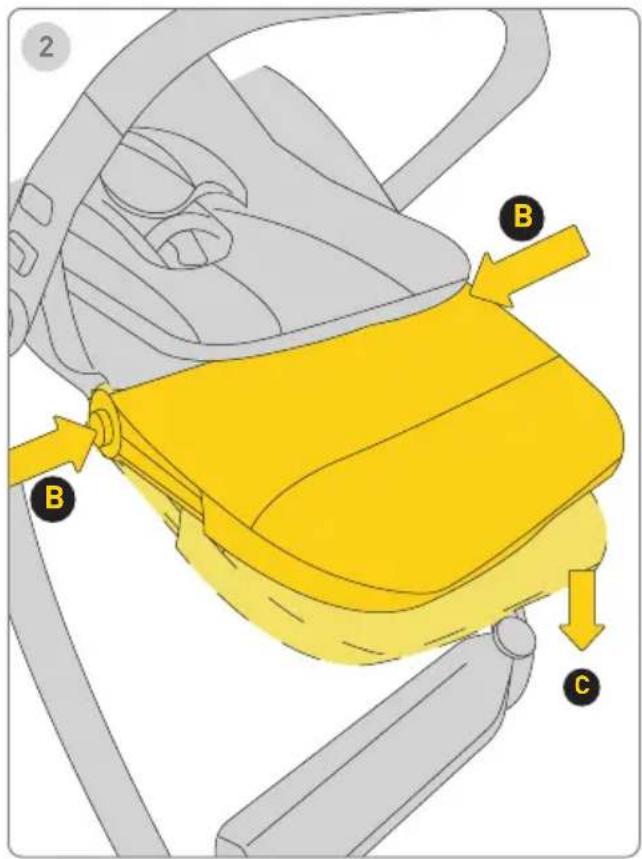
text_image
2 B B CPodparcie tydek
d l e Recline Adjustment
natural_image
Diagram of a curved pipe with a yellow arrow and labeled point A, no text or symbols present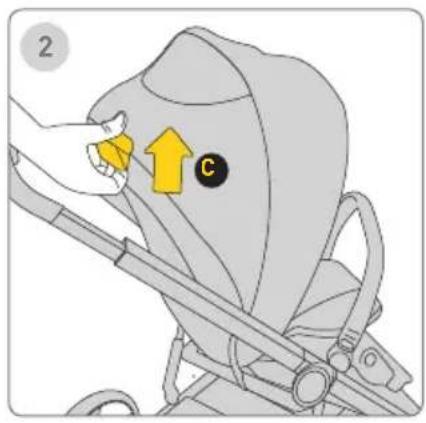
text_image
2 C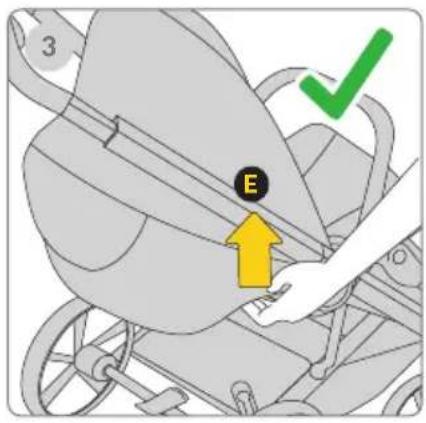
text_image
3 E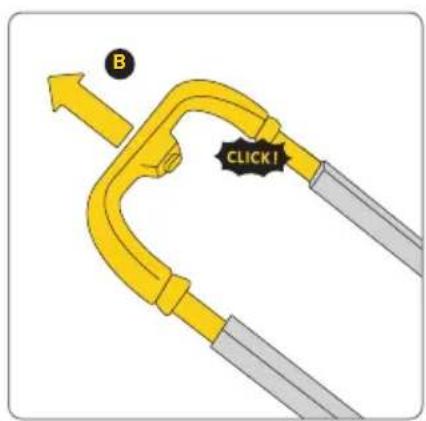
text_image
B CLICK!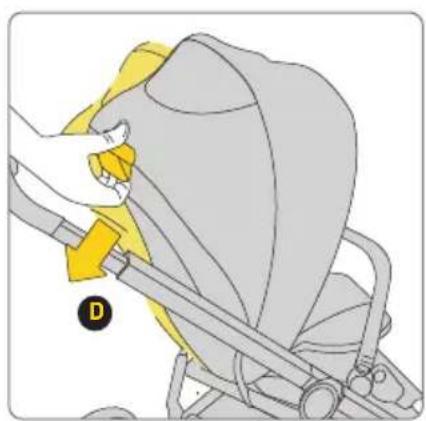
natural_image
Illustration of a hand adjusting a yellow belt switch on a gray car seatbelt (no text or symbols)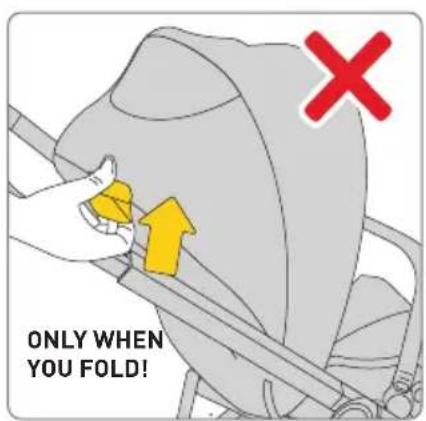
text_image
ONLY WHEN YOU FOLD!Uchwyt
text_image
Diagram showing mechanical components with yellow arrows indicating directional flow or movement, possibly illustrating a system or process.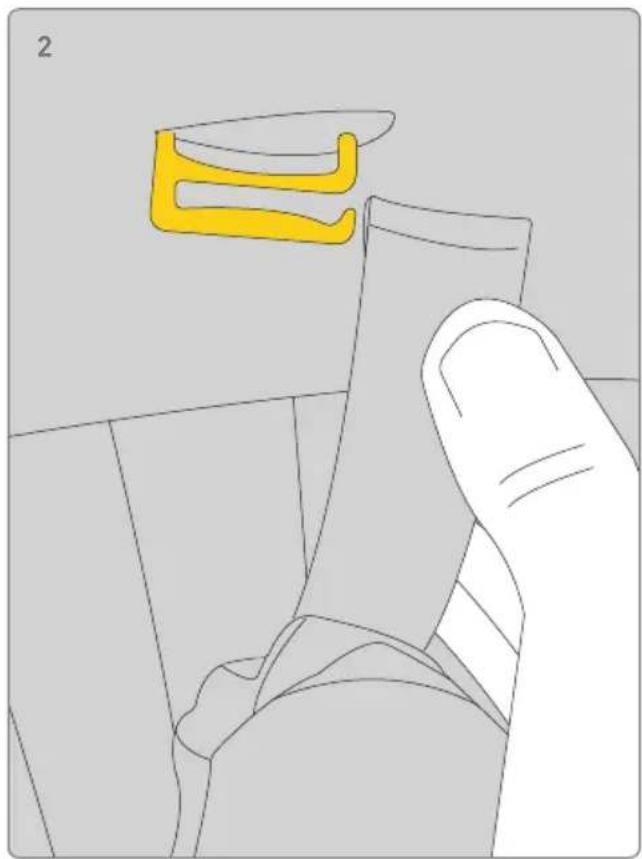
natural_image
Illustration of a hand holding a small object with a yellow abstract shape above it, no text or symbols present.Wkładka
text_image
Diagram showing a yellow mechanical clamp with labeled parts C and D, indicating assembly or positioning steps.Akcesoria
text_image
Diagram of a mechanical clamp or clamping mechanism with labeled components and directional arrowsProduct setup - unfolding carrycot
text_image
1 A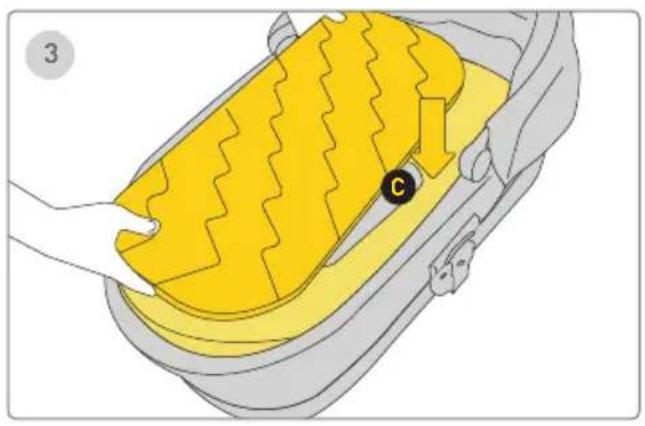
natural_image
Illustration of a car interior with yellow foam cushion and black circular marker (no text or symbols)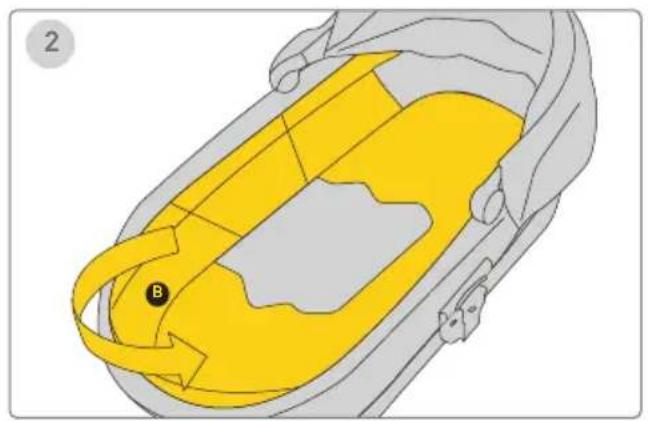
natural_image
Diagram of a car interior showing yellow and gray areas with a labeled point B (no text or symbols beyond label)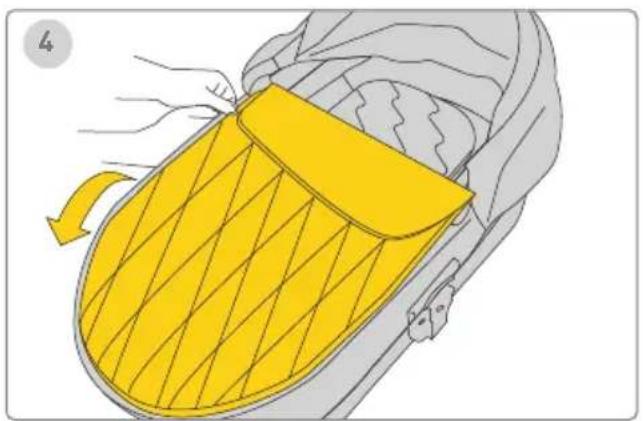
natural_image
Illustration of a yellow and gray object with a handle, possibly a device or container, being handled by hands (no text or symbols present)Product setup - folding carrycot
text_image
1 B A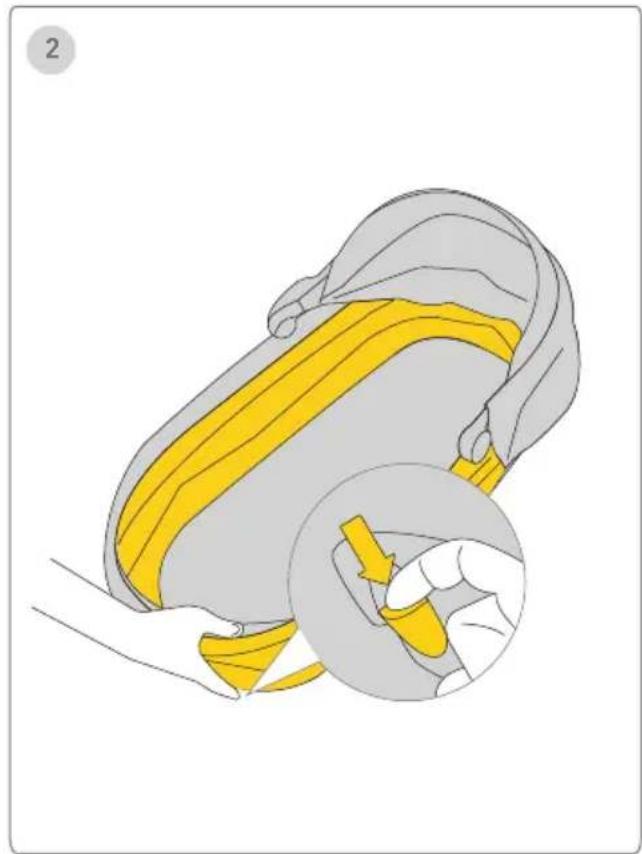
natural_image
Illustration of a yellow belt buckle being lifted, showing the seat and grip mechanism (no text or symbols)Złożenie gondoli:
1 Krok
wyjmij materac
Atoż budkę
B
2 Krok
Carry Cot Attachment on Stroller Frame Carry Cot Removal
text_image
123 A CLICK!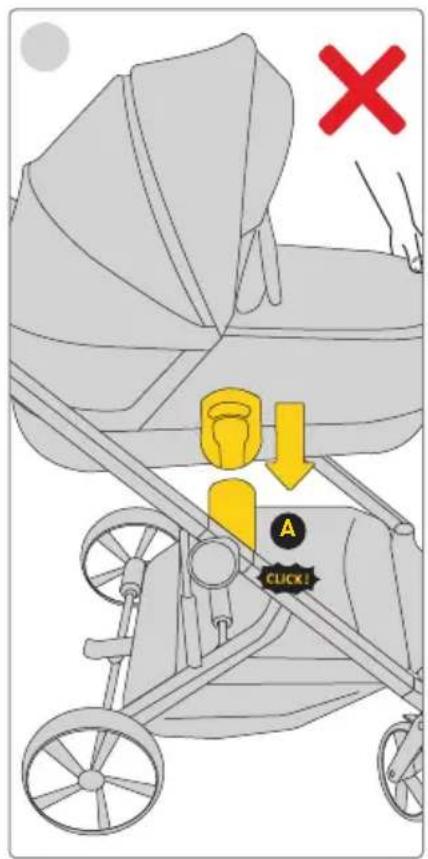
text_image
Diagram illustrating car seatbelt usage with a 'CLICK!' button and a red X mark indicating absence or rejection.
text_image
Diagram of a baby stroller with labeled parts C and B, showing hand positioning and directional arrows indicating movement or force.natural_image
Illustration of a yellow bag with a black circular mark labeled 'D' and an arrow indicating rotation (no text or symbols present)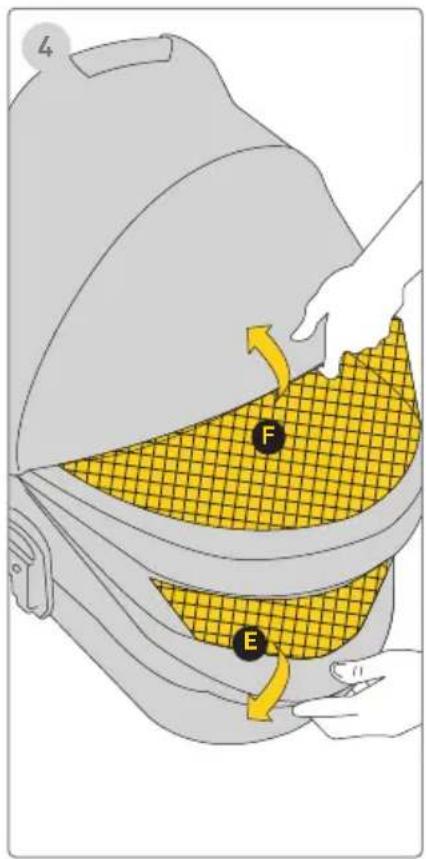
text_image
L F EDaszek
natural_image
Illustration of two baby strollers with different designs and seat compartments (no text or symbols)ВАЖНО!
text_image
Diagram of a mechanical device with labeled components A and B, showing directional arrows indicating motion or flow.Front Wheels/Rear Wheels
text_image
1 CLICK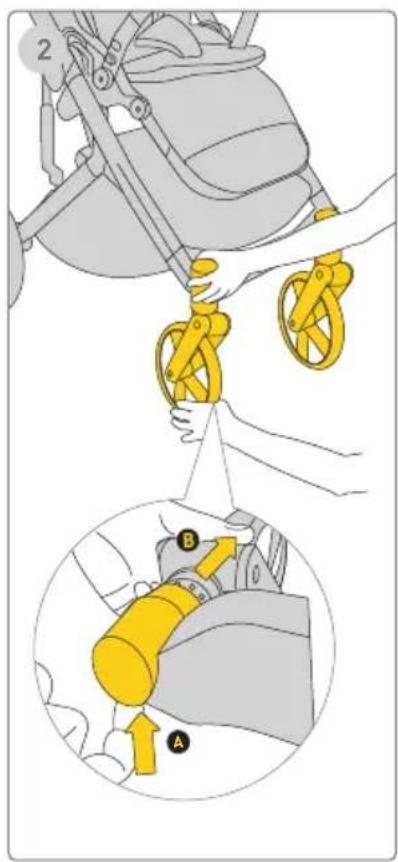
text_image
Diagram illustrating a mechanical device with labeled parts A and B, showing hand positioning and assembly steps.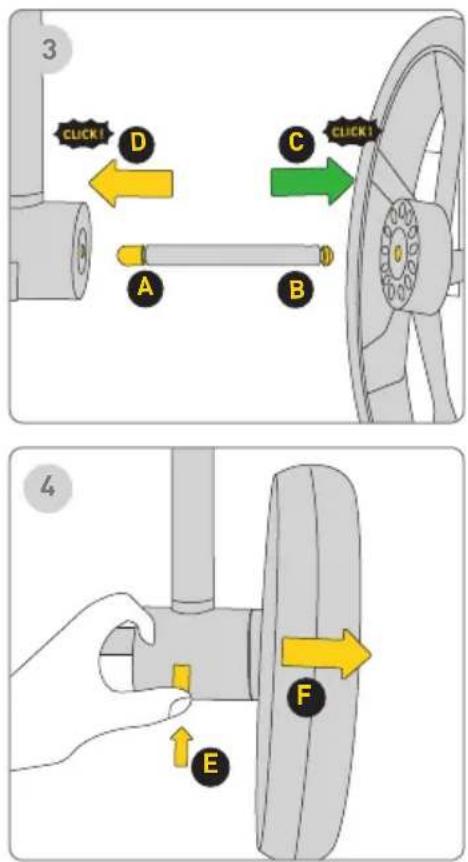
text_image
3 CLICK! D A B C CLICK! 4 EПредни колела
1 стъпка
text_image
Diagram illustrating hand positioning and movement of a vehicle's steering wheel, labeled with points B and C.Предпазна бариера
natural_image
Illustration of a stroller with yellow railings and wheels, no text or symbols present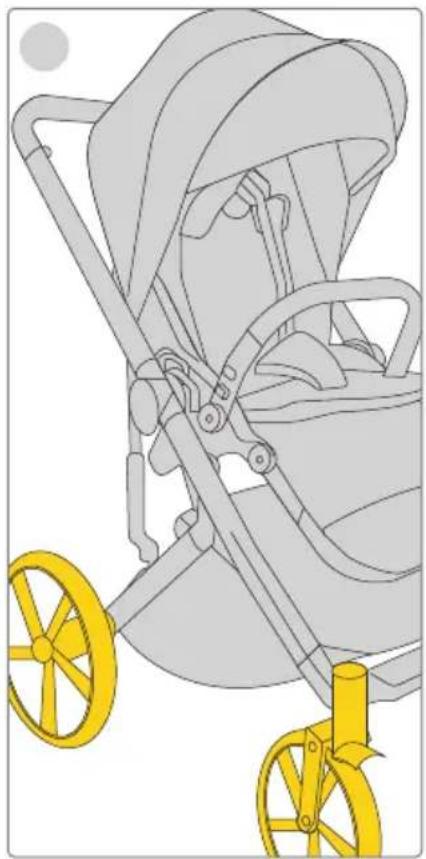
natural_image
Illustration of a stroller with yellow wheels and handlebars, no text or symbols present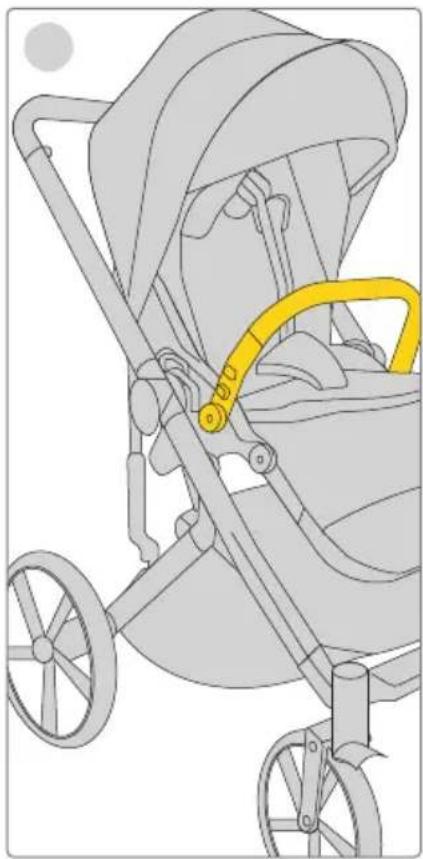
natural_image
Illustration of a stroller with yellow safety belt (no text or symbols)natural_image
Illustration of a bird's head with a yellow beak and patterned neck, no text or symbols presentСенник
text_image
123 UNLOCK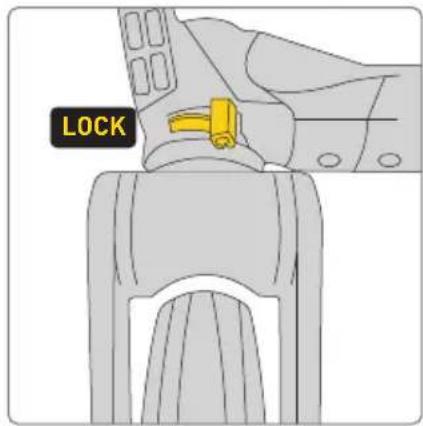
text_image
LOCK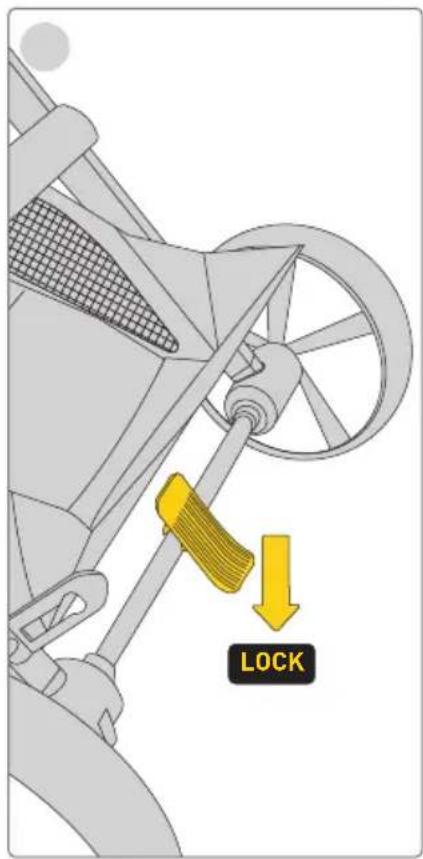
text_image
LOCK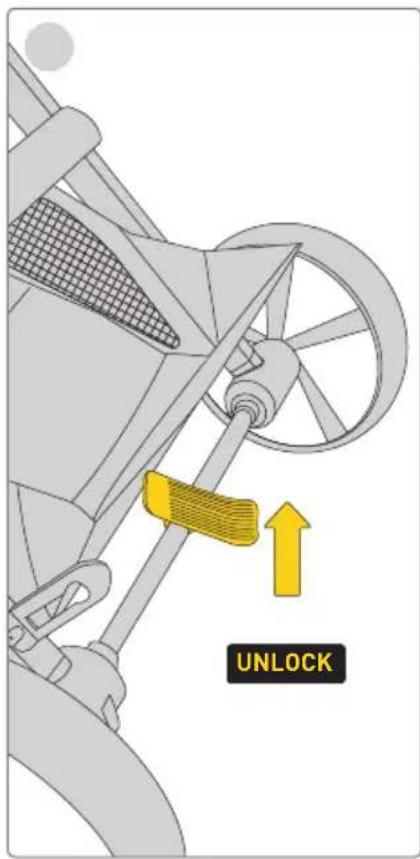
text_image
UNLOCKnatural_image
Diagram of a yellow and gray mechanical device with a directional arrow and label 'A' (no text or symbols on the device itself)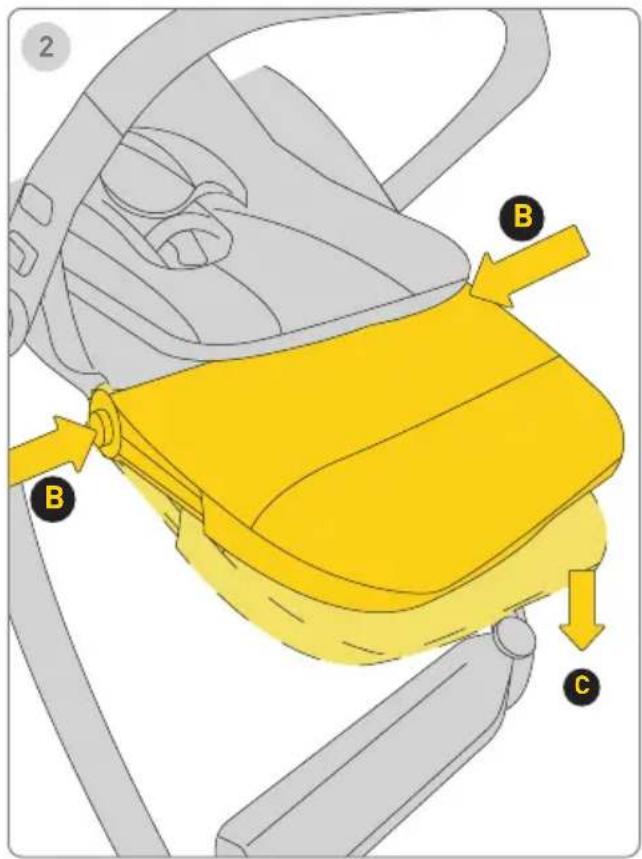
text_image
2 B B CПодложка за прасци
d l e Recline Adjustment
natural_image
Diagram of a curved pipe with a yellow arrow and labeled point A, no text or symbols present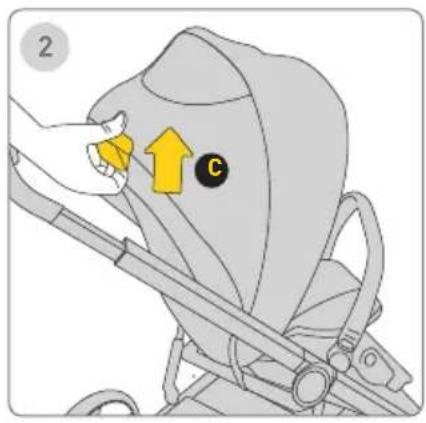
text_image
2 C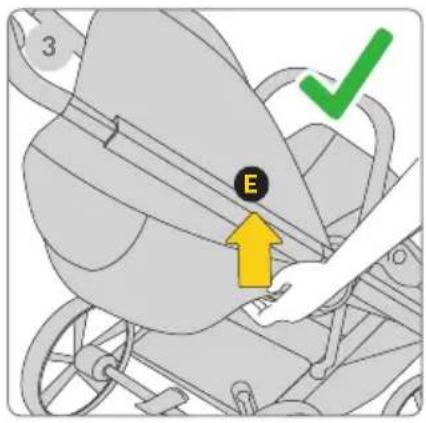
text_image
3 E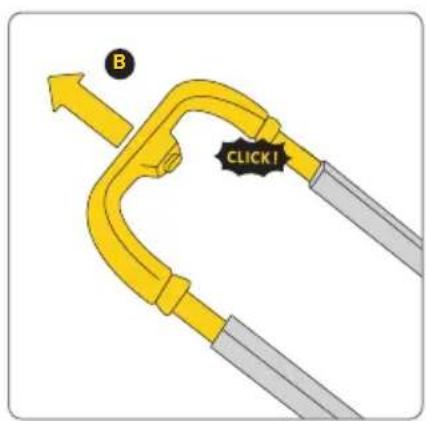
text_image
B CLICK!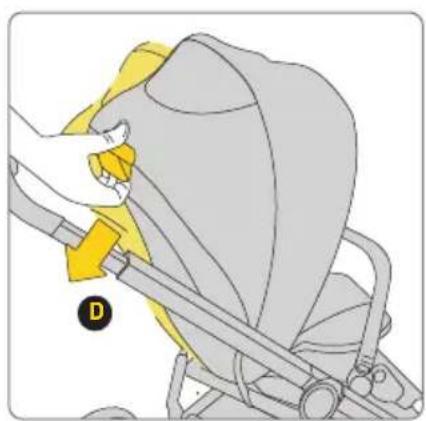
natural_image
Illustration of a person using a yellow belt switch to adjust the seatbelt (no text or symbols present)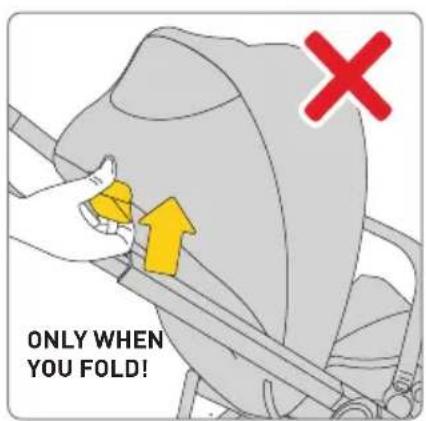
text_image
ONLY WHEN YOU FOLD!Дръжка
text_image
Diagram showing mechanical components with yellow directional arrows indicating flow or movement, possibly illustrating a fluid or fluid circulation system.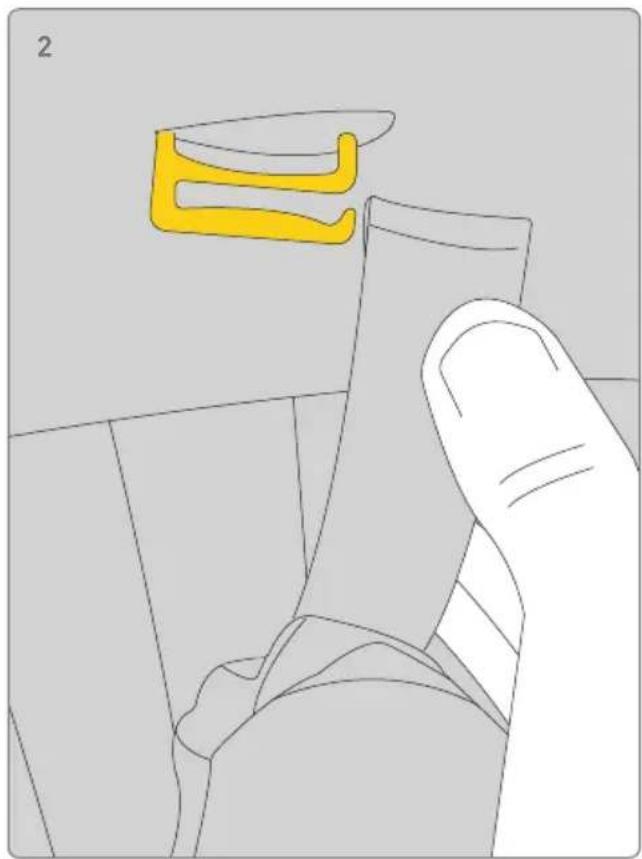
natural_image
Illustration of a hand holding a small object with a yellow abstract shape above it, no text or symbols present.Вложка
text_image
Diagram illustrating a mechanical assembly with labeled parts A and B, showing motion arrows indicating movement or rotation.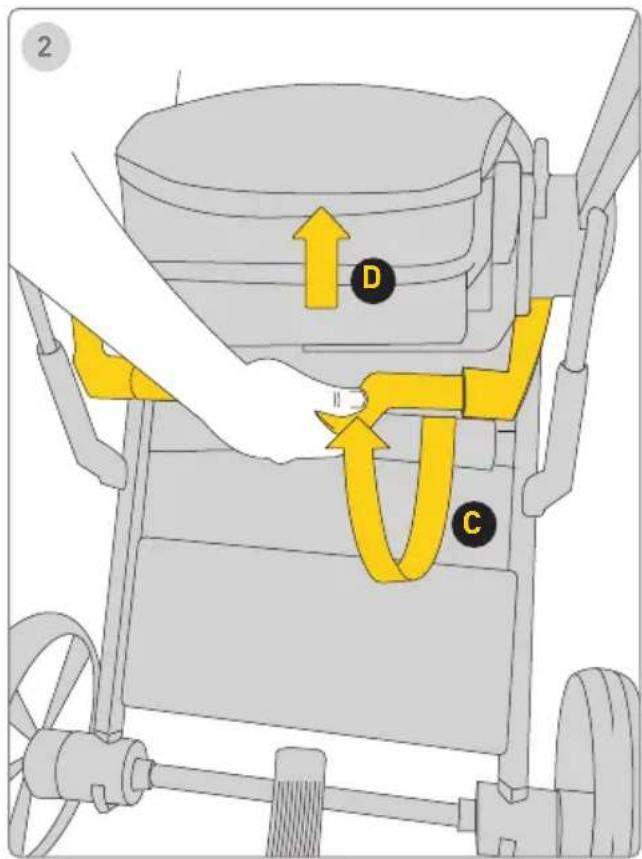
text_image
2 D CСтъване
text_image
Diagram showing a yellow mechanical device with labeled parts C and D, indicating assembly or positioning steps.Аксесоари
text_image
Diagram of a mechanical clamp or bracket with labeled parts and directional arrows indicating motion or forceАдаптери за столче за кола
1 стъпка
Product setup - unfolding carrycot
text_image
1 A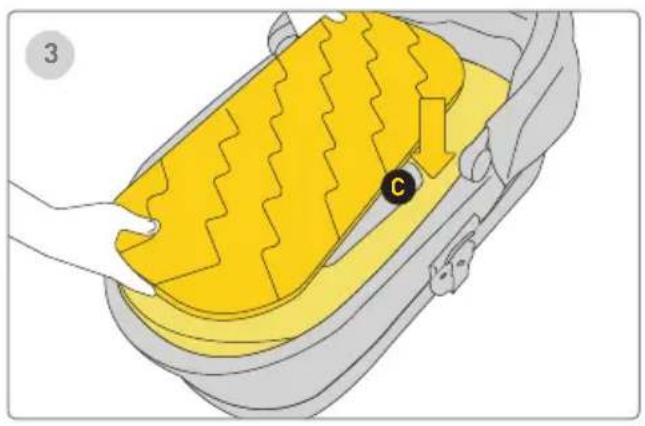
natural_image
Illustration of a car interior with yellow foam cushion and black circular marker (no text or symbols)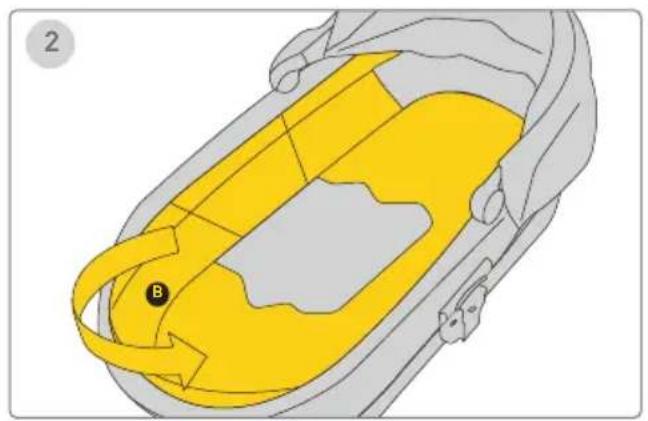
natural_image
Diagram of a car interior with yellow and gray areas, no text or symbols present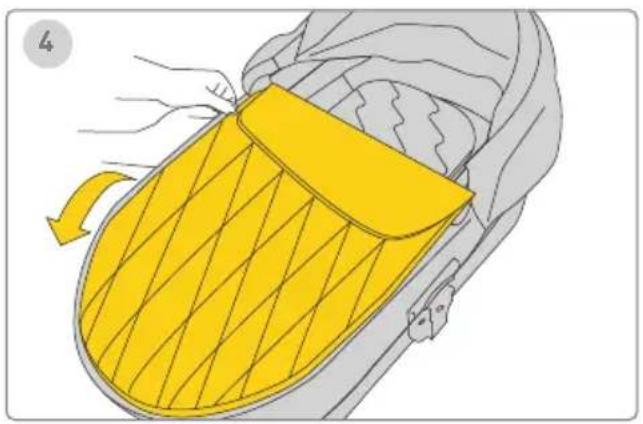
natural_image
Illustration of a yellow and gray car seatbelt with a handle, showing airflow direction (no text or symbols)Product setup - folding carrycot
text_image
1 B A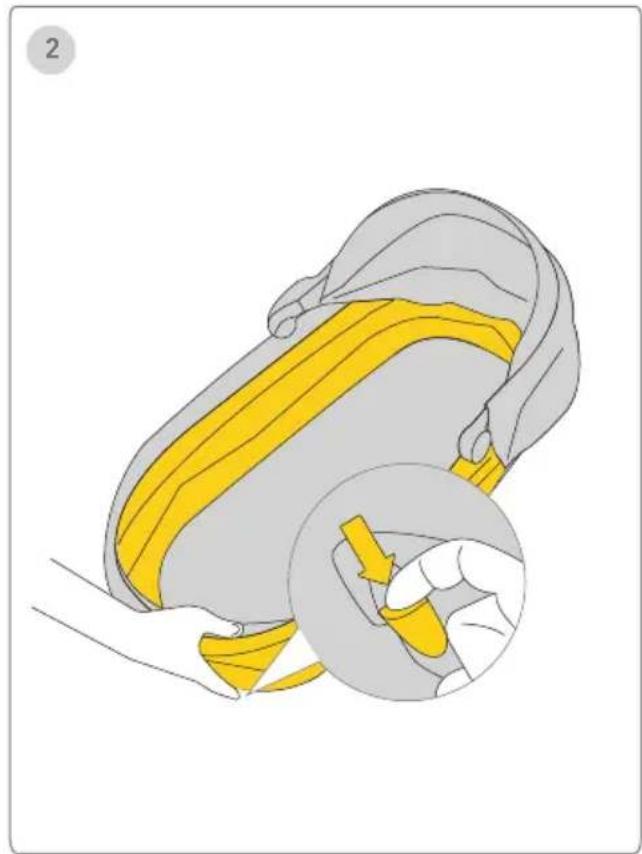
natural_image
Illustration of a yellow belt buckle being adjusted, showing the seat and grip mechanism (no text or symbols)Carry Cot Attachment on Stroller Frame Carry Cot Removal
text_image
123 A CLICK!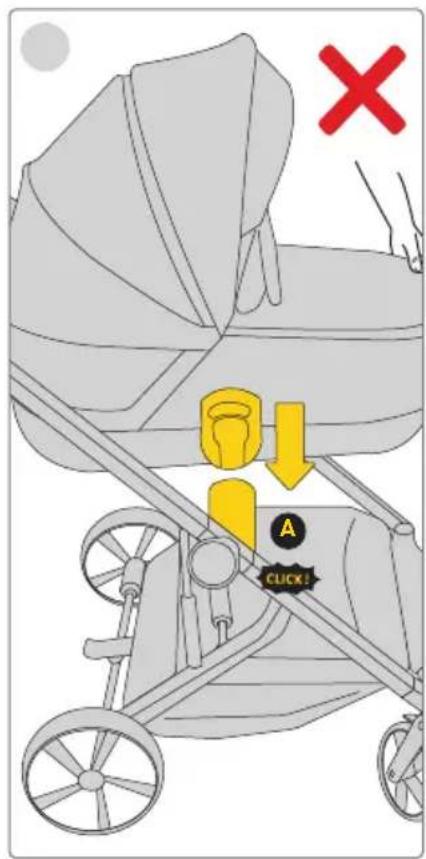
text_image
X A CUCK!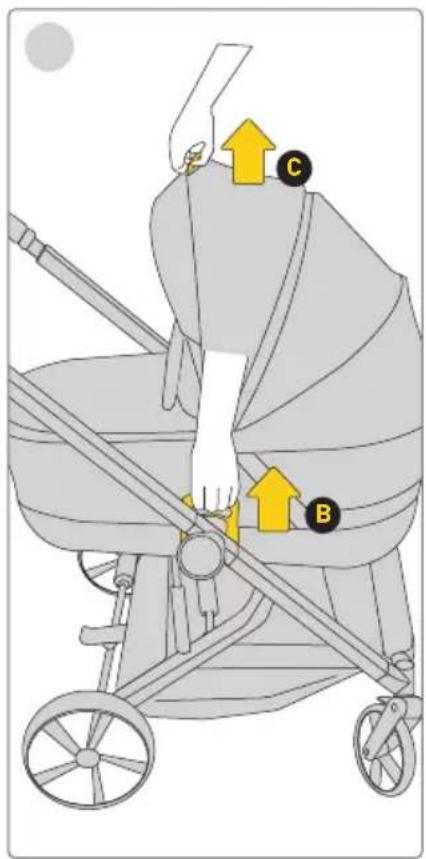
text_image
Diagram of a baby stroller with labeled parts C and B, showing hand positioning and directional arrows indicating movement or force.natural_image
Illustration of a yellow bag with a black circular mark labeled 'D' and an arrow indicating rotation (no text or symbols present)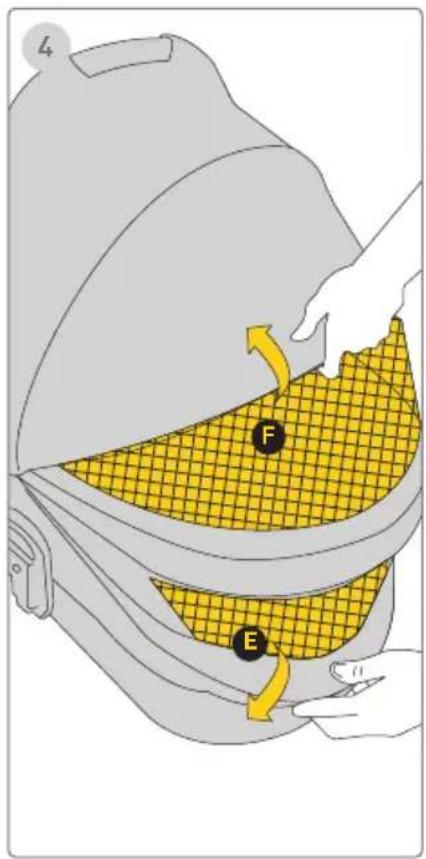
text_image
L F EСенник
natural_image
Illustration of two baby strollers with different designs and seat compartments (no text or symbols)DŮLEŽITÉ!
PŘEČTĚTE SI A UCHOVEJTE PRO BUDOUCNOST JAKO ODKAZ
UPOZORNĚNÍ!
text_image
Diagram of a mechanical device with labeled components A and B, showing directional arrows indicating motion or flow.Front Wheels/Rear Wheels
text_image
1 CLICK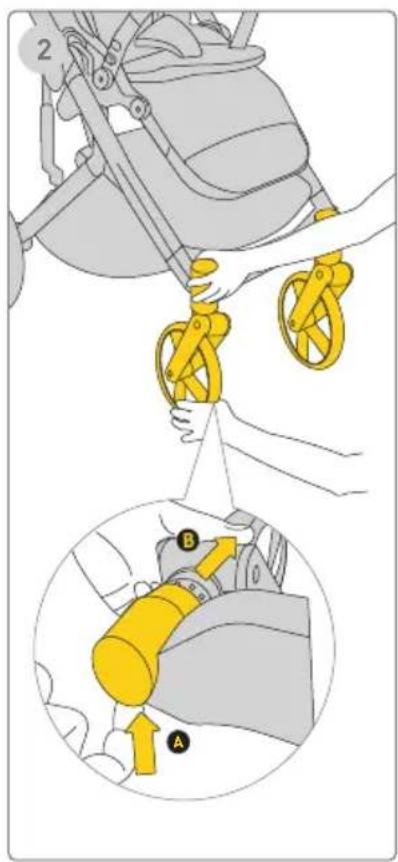
text_image
Diagram illustrating a mechanical device with labeled parts A and B, showing hand positioning and assembly steps.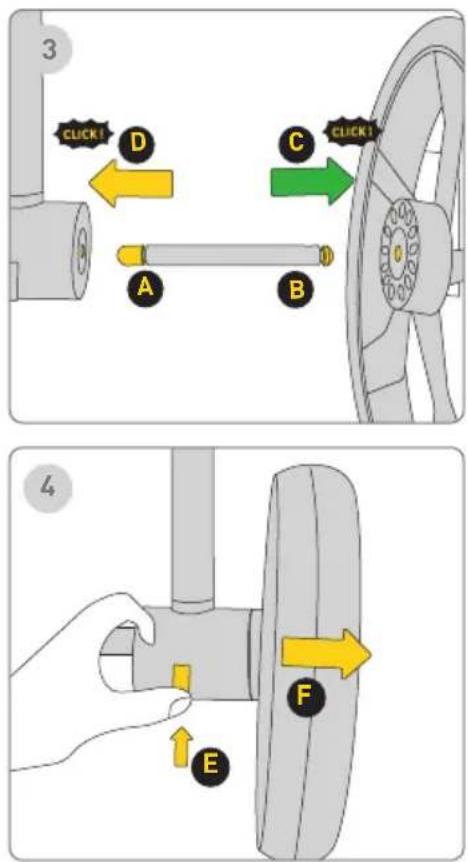
text_image
3 CLICK! D A B C CLICK! 4 EPřední kola
1 Krok
text_image
Diagram illustrating hand positioning and movement of a car steering wheel, labeled with points B and C and directional arrows.Ochranná bariérka
natural_image
Illustration of a stroller with yellow railings and wheels, no text or symbols present
natural_image
Illustration of a baby stroller with yellow wheels and handlebars (no text or symbols)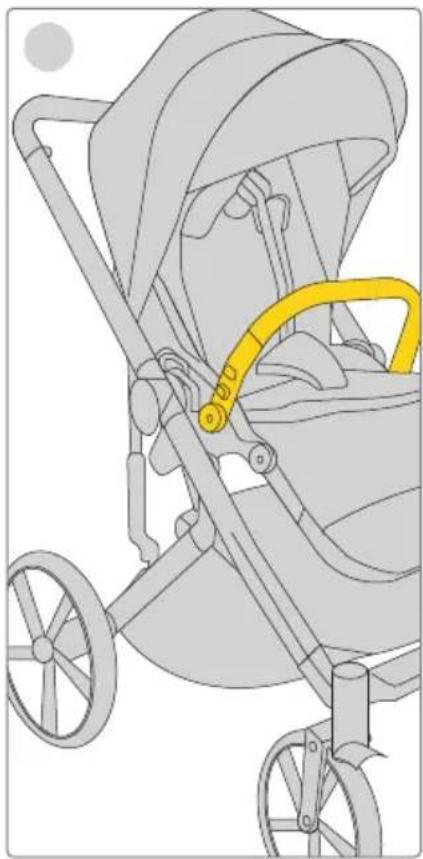
natural_image
Illustration of a stroller with yellow safety belt (no text or symbols)Kontrola nastavení
1 Krok
natural_image
Illustration of a bird's head with a yellow beak and patterned neck, no text or symbols presentStříška
text_image
123 UNLOCK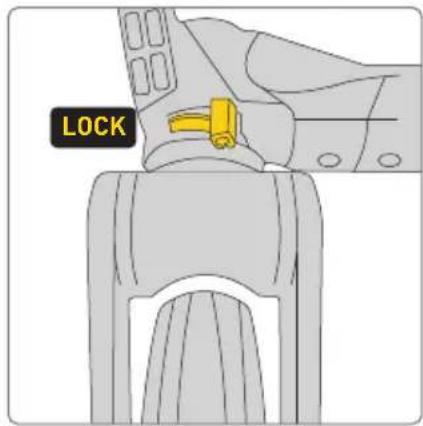
text_image
LOCK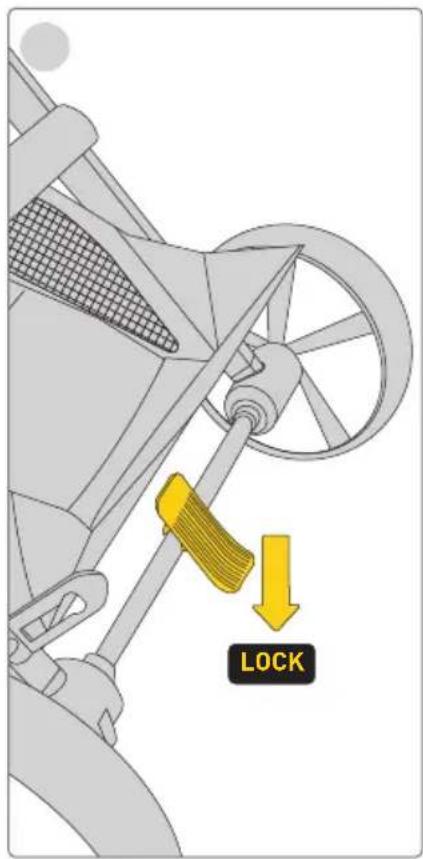
text_image
LOCK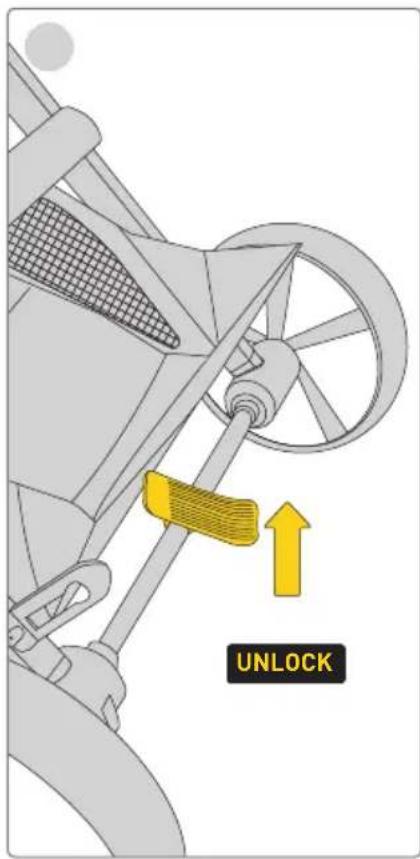
text_image
UNLOCKnatural_image
Diagram of a yellow and gray mechanical device with a directional arrow and label 'A' (no text or symbols on the device itself)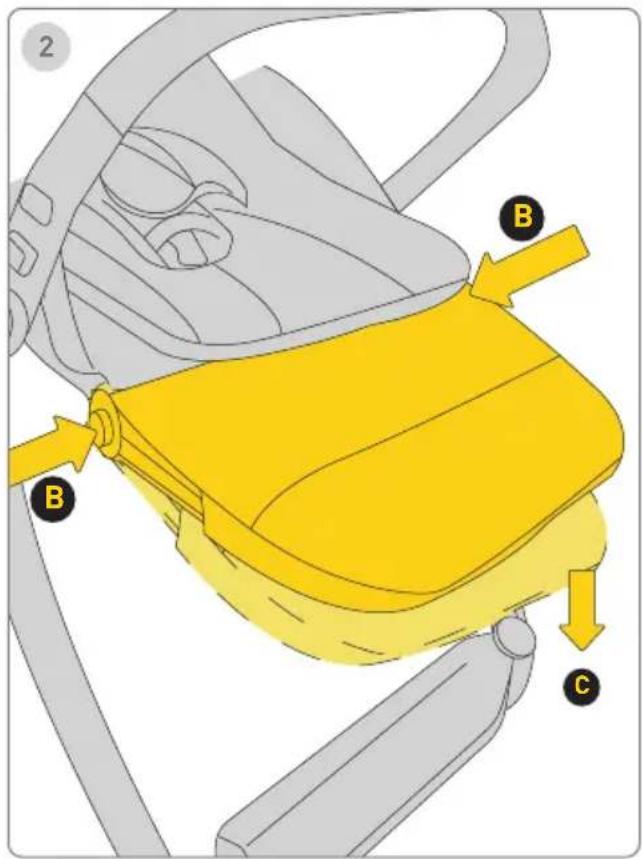
text_image
2 B B CPodpora lýtek
text_image
Diagram showing mechanical components with yellow directional arrows indicating movement or force, possibly illustrating a motion or flow system.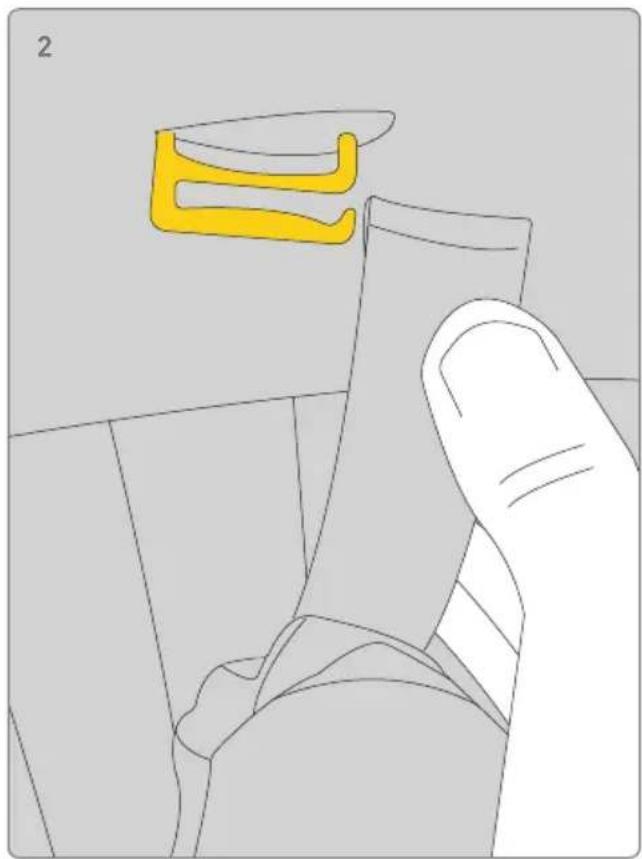
natural_image
Illustration of a hand holding a small object with a yellow abstract shape above it, no text or symbols present.Vložka
text_image
Diagram illustrating a mechanical assembly with labeled parts A and B, showing motion arrows indicating movement or force.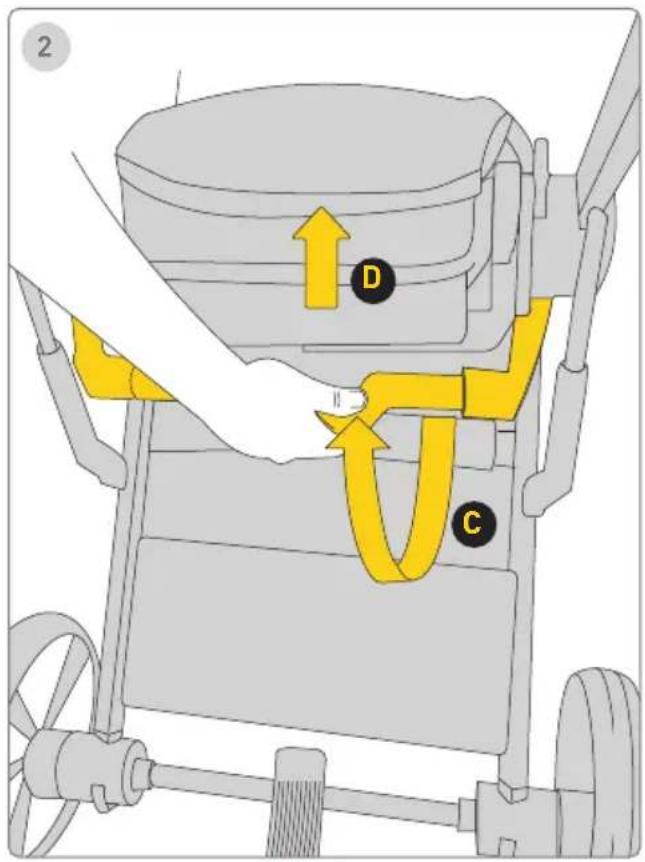
text_image
Diagram of a mechanical device with labeled parts D and C, showing directional arrows and componentsSkládání
text_image
Diagram showing a yellow mechanical clamp or bracket with labeled parts C and D, indicating assembly or positioning.Příslušenství
text_image
Diagram of a mechanical clamp or bracket with labeled parts and directional arrows indicating motion or forceAdaptéry pro autosedačku
1 Krok
Product setup - unfolding carrycot
text_image
1 A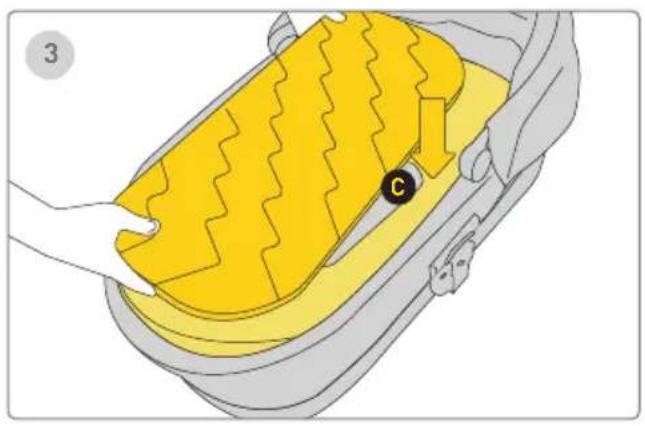
natural_image
Illustration of a car interior with yellow foam cushion and black circular marker (no text or symbols)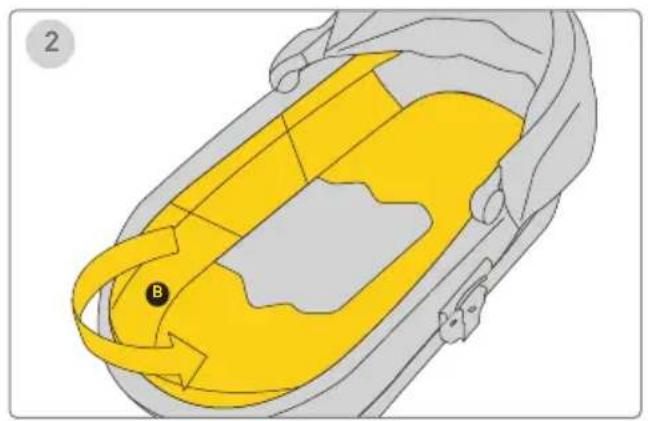
natural_image
Diagram of a car interior showing yellow and gray zones with a labeled point B (no text or symbols beyond label)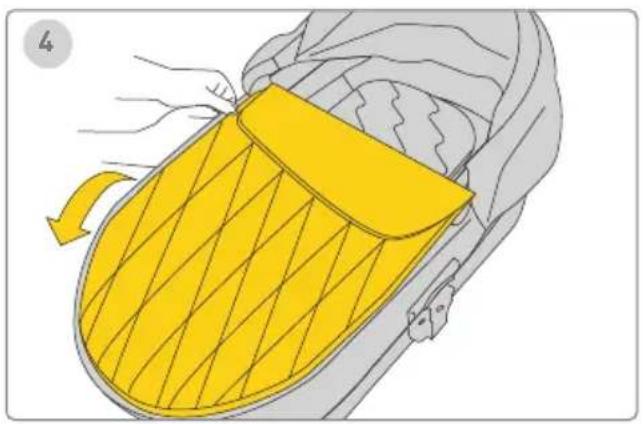
natural_image
Illustration of a yellow and gray object with a handle, possibly a device or container, being handled by hands (no text or symbols present)Product setup - folding carrycot
text_image
1 B A
natural_image
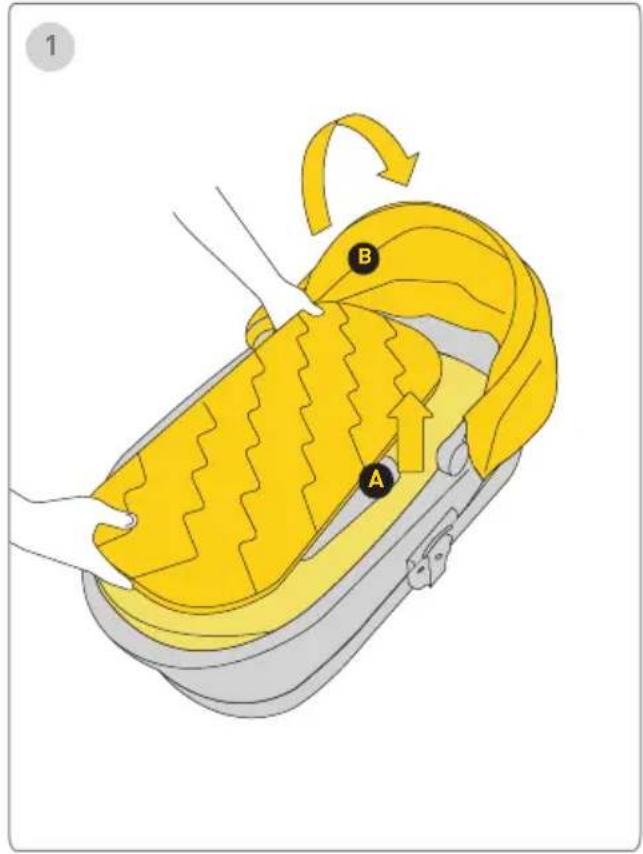
Illustration of a yellow belt buckle being adjusted, showing the seat and grip mechanism (no text or symbols)Skládání korbičky:

Krok
Vyjměte matraci

složte stříšku


Krok
Carry Cot Attachment on Stroller Frame Carry Cot Removal
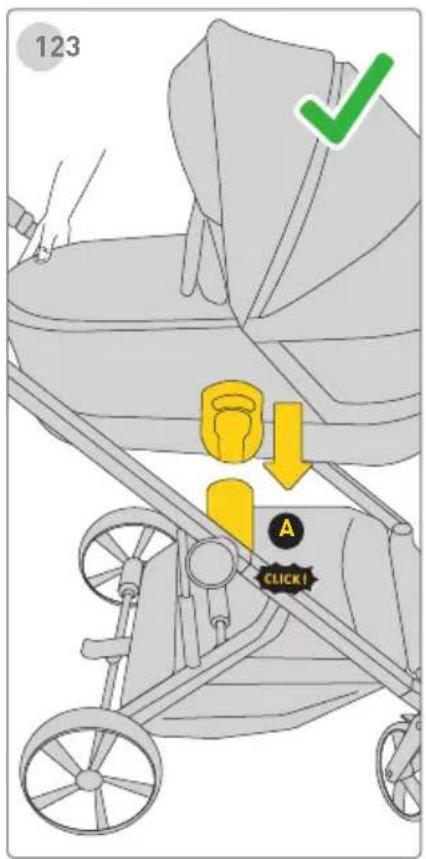
text_image
123 A CLICK!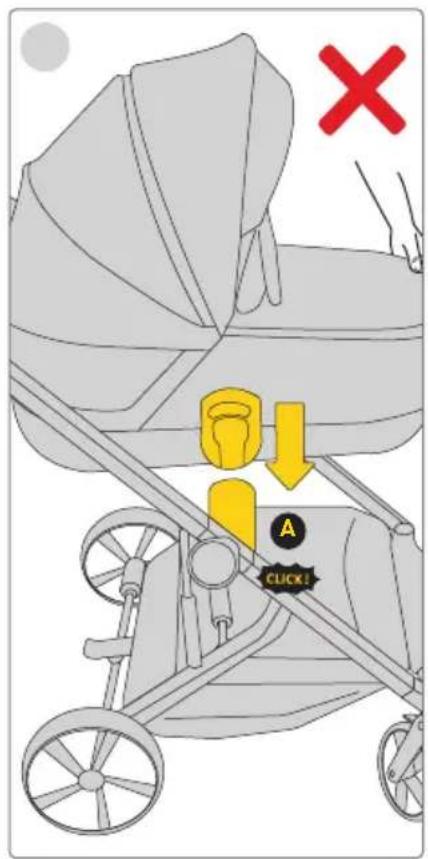
text_image
Diagram illustrating car seatbelt usage with a 'CLICK!' button and a red X mark indicating absence or rejection.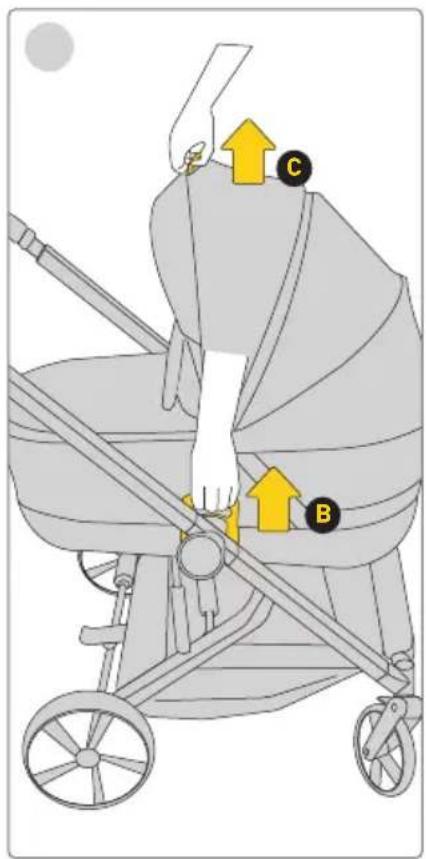
text_image
Diagram of a baby stroller with labeled parts C and B, showing hand positioning and directional arrows indicating movement or force.natural_image
Illustration of a yellow bag with a black circular mark labeled 'D' and an arrow indicating rotation (no text or symbols present)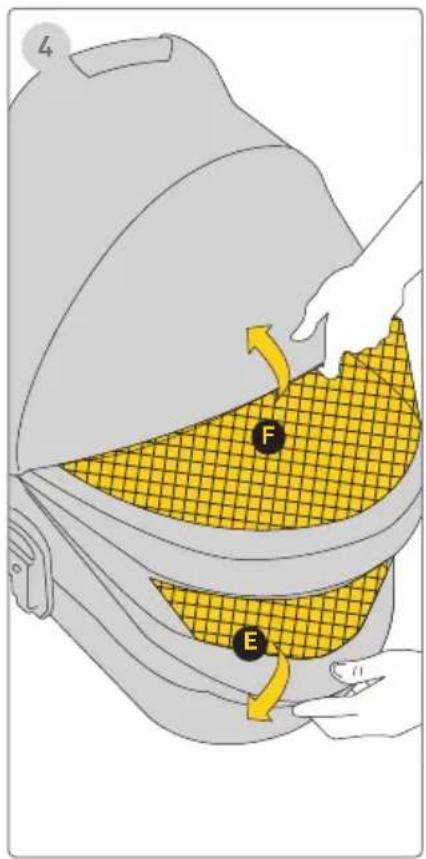
text_image
L F EStříška
natural_image
Illustration of two baby strollers with different seat designs (no text or symbols)WICHTIG! LESEN UND FÜR DIE ZUKUNFT ALS REFERENZ BEHALTEN
WARNUNG!
text_image
Labeled diagram of a stroller with numbered parts for identification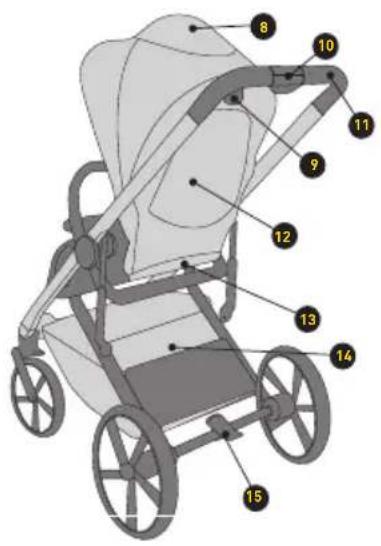
text_image
Diagram of a baby stroller with numbered parts for identification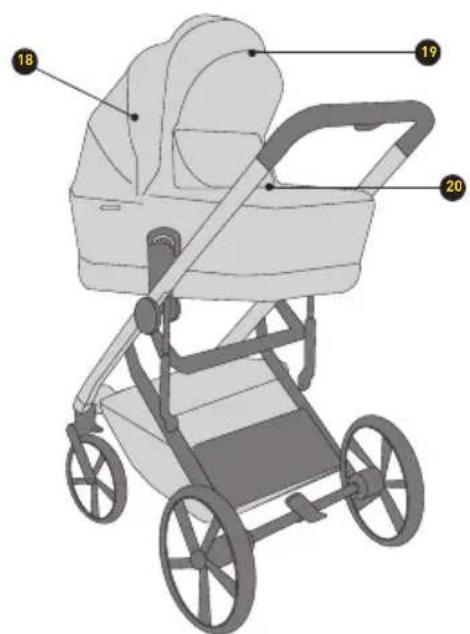
text_image
Diagram of a baby stroller with numbered parts labeled 18, 19, and 20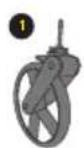
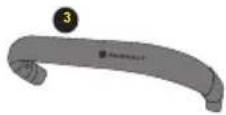
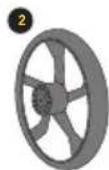
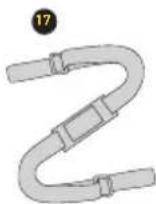
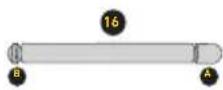
LISTE DER TEILE
text_image
Diagram of a mechanical device with labeled components A and B, showing directional arrows indicating motion or flow.Front Wheels/Rear Wheels
text_image
1 CLICK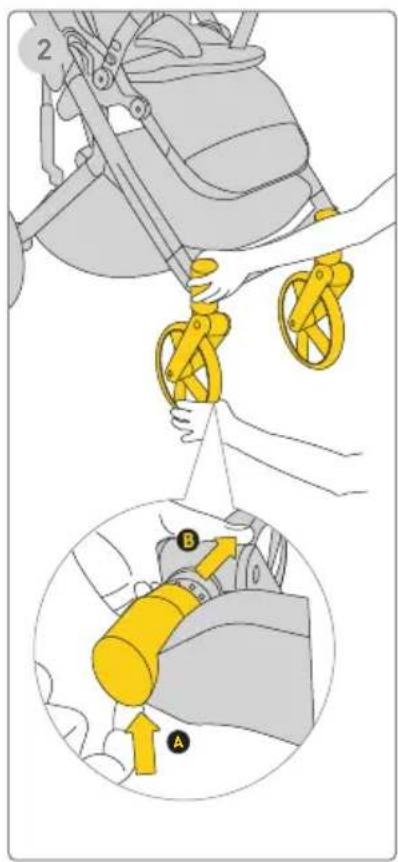
text_image
Diagram illustrating a mechanical device with labeled parts A and B, showing hand positioning and assembly steps.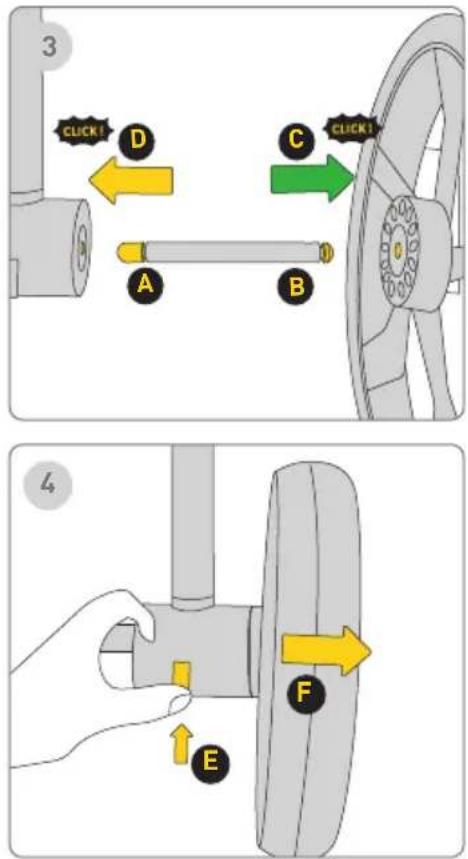
text_image
3 CLICK! D A B C CLICK! 4 EVorderräder
1 Schritt
text_image
Diagram illustrating hand positioning and movement of a car steering wheel, labeled with points B and C and directional arrows.Schutzbügel
natural_image
Illustration of a stroller with yellow railings and wheels, no text or symbols present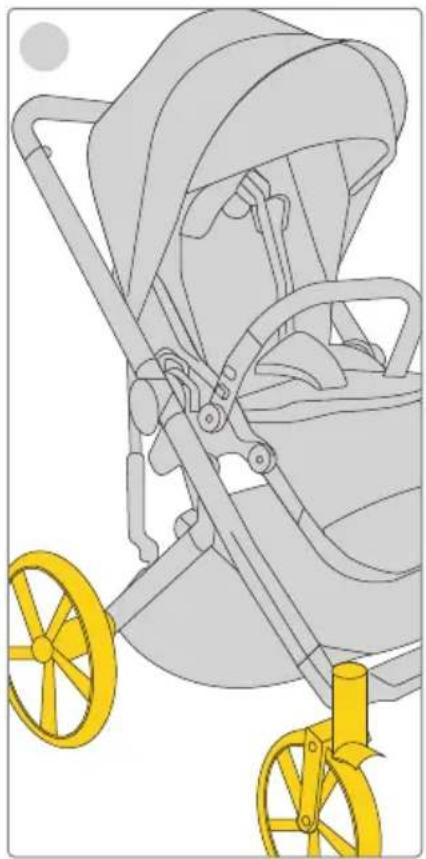
natural_image
Illustration of a baby stroller with yellow wheels and handlebars (no text or symbols)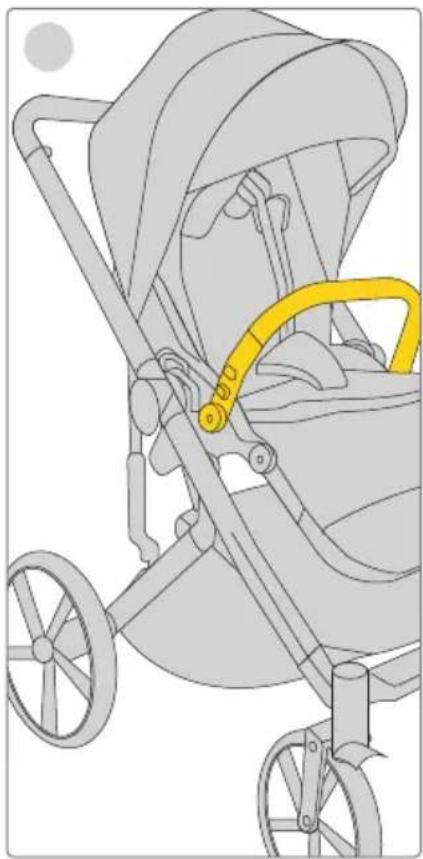
natural_image
Illustration of a stroller with yellow belt and wheels, no text or symbols presentnatural_image
Illustration of a baby stroller with a yellow arrow indicating rotation (no text or symbols)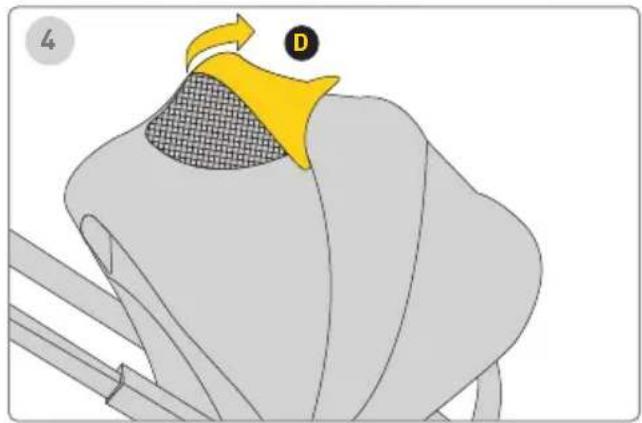
natural_image
Illustration of a bird's head with a yellow beak and patterned neck, no text or symbols presentVerdeck
text_image
123 UNLOCK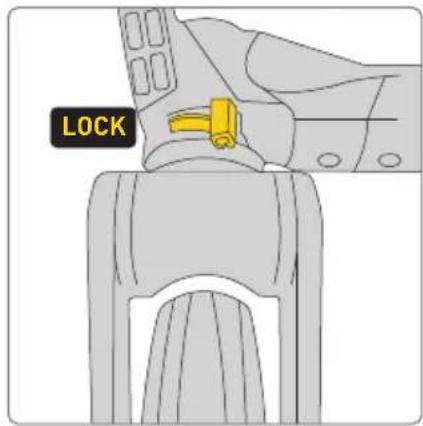
text_image
LOCK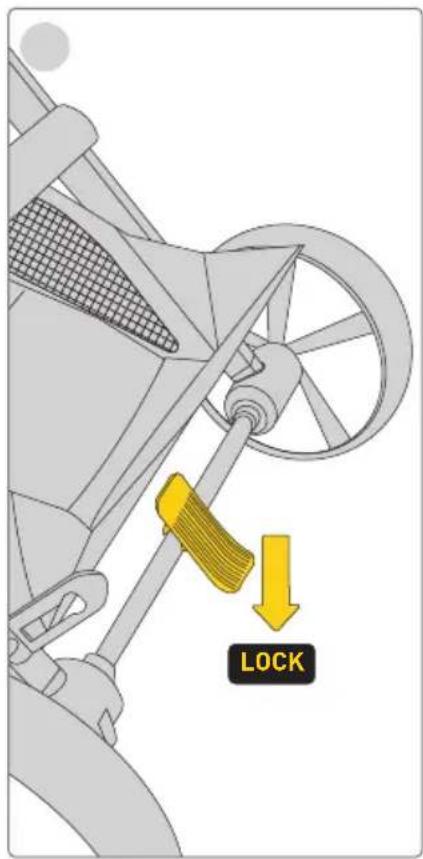
text_image
LOCK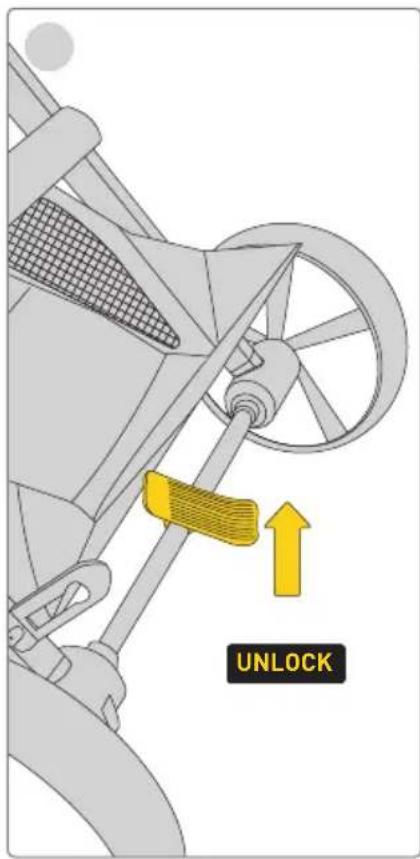
text_image
UNLOCKnatural_image
Diagram of a yellow and gray mechanical device with a directional arrow and label 'A' (no text or symbols on the device itself)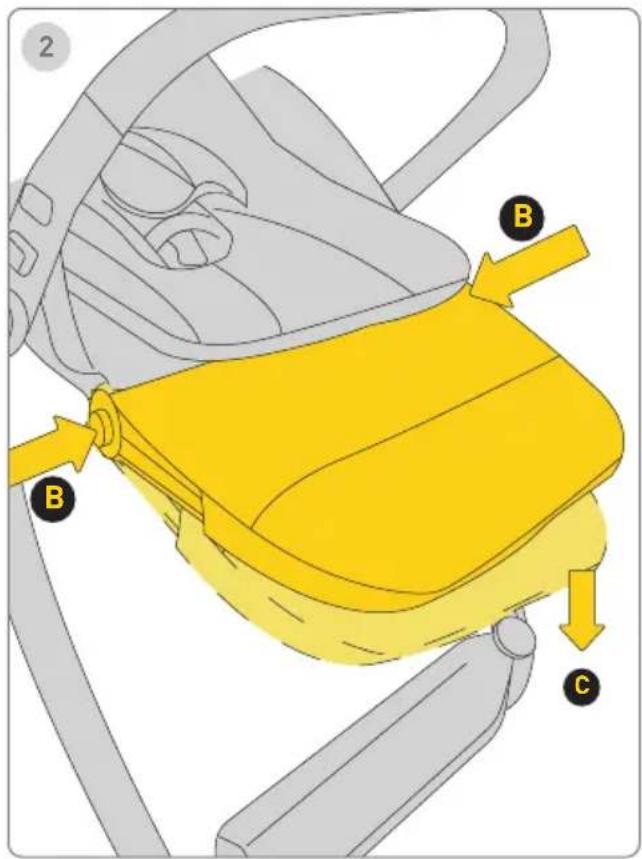
text_image
2 B B CWadenstütze
text_image
Diagram showing mechanical components with yellow directional arrows indicating movement or force, possibly illustrating a motion or flow system.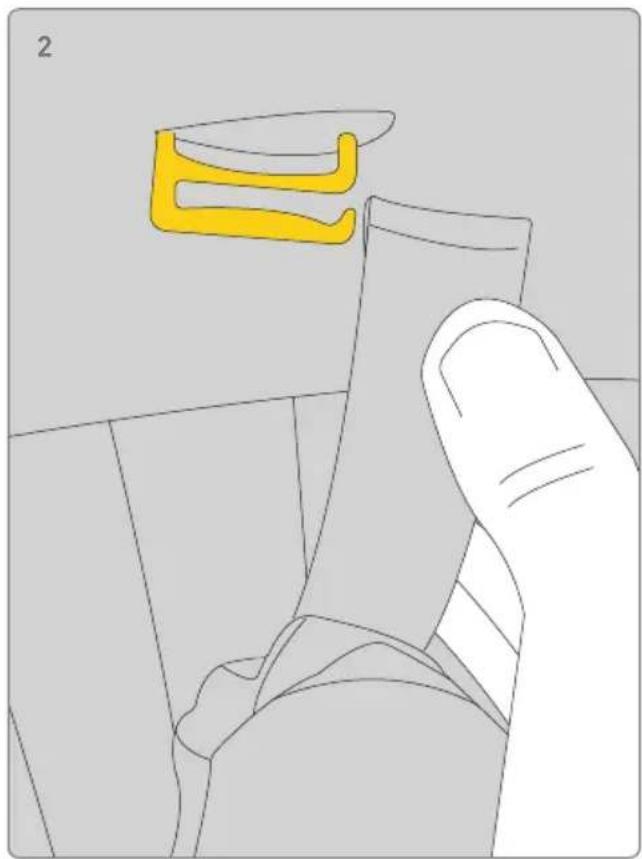
natural_image
Illustration of a hand holding a small object with a yellow abstract shape above it, no text or symbols present.Einlage
text_image
Diagram illustrating a mechanical assembly with labeled parts A and B, showing directional arrows indicating motion or movement.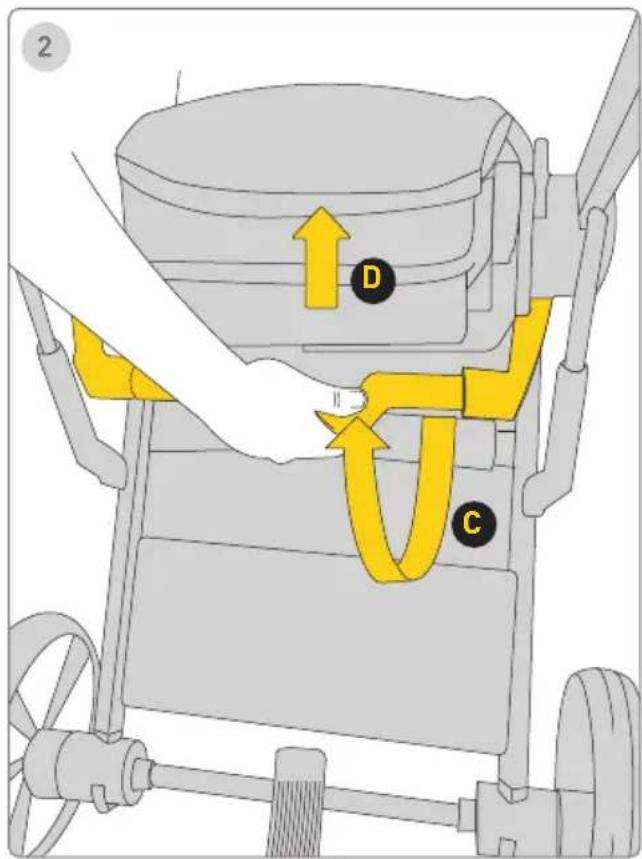
text_image
2 D CZusammenklappen
text_image
Diagram showing a yellow robotic arm with labeled parts C and D, indicating mechanical or robotic assembly steps.Zubehör
text_image
Diagram of a mechanical clamp or bracket with labeled parts and directional arrows indicating motion or forceProduct setup - unfolding carrycot
text_image
1 A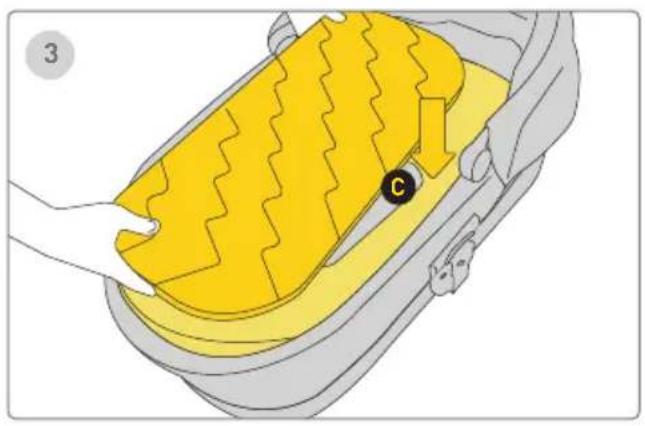
natural_image
Illustration of a car interior with yellow foam cushion and black circular marker (no text or symbols)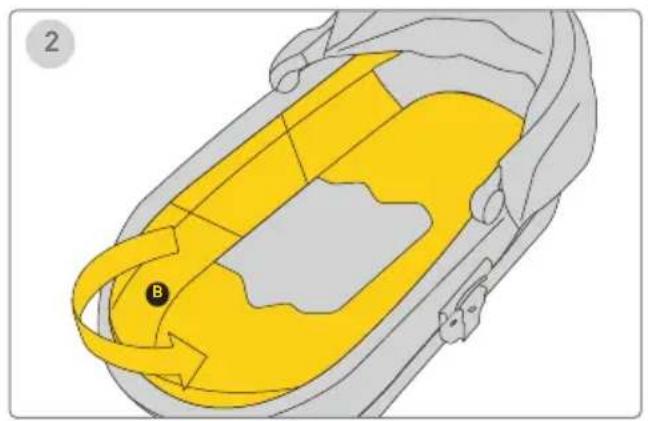
natural_image
Diagram of a car interior with yellow and gray areas, no text or symbols present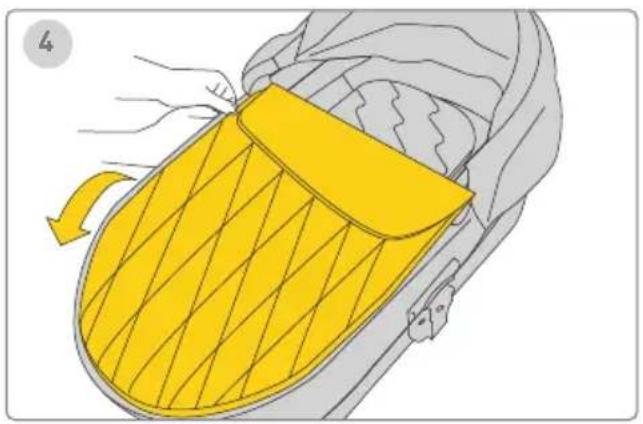
natural_image
Illustration of a yellow and gray car seatbelt with a handle, showing airflow direction (no text or symbols)Product setup - folding carrycot
text_image
1 B A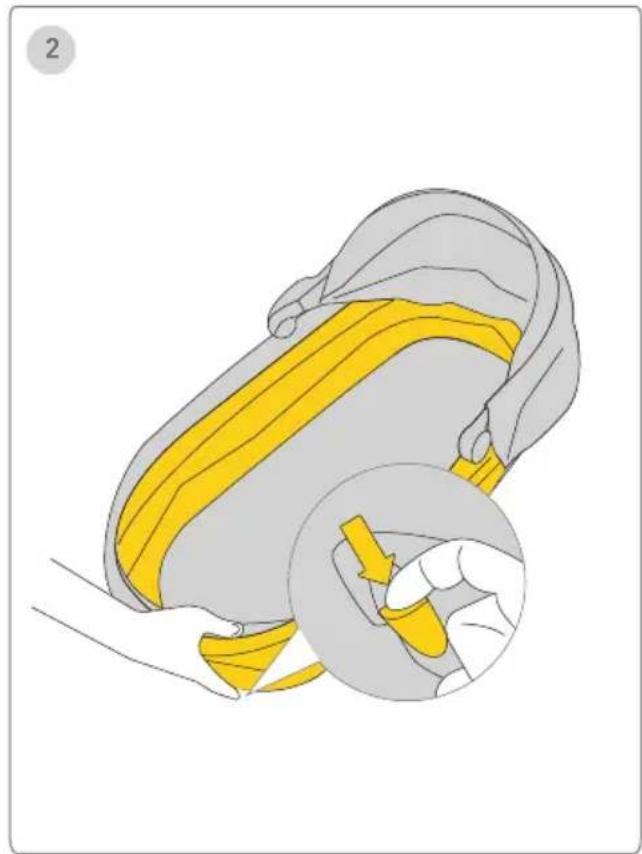
natural_image
Illustration of a yellow belt buckle being lifted, showing the seat and grip mechanism (no text or symbols)Carry Cot Attachment on Stroller Frame Carry Cot Removal
text_image
123 A CLICK!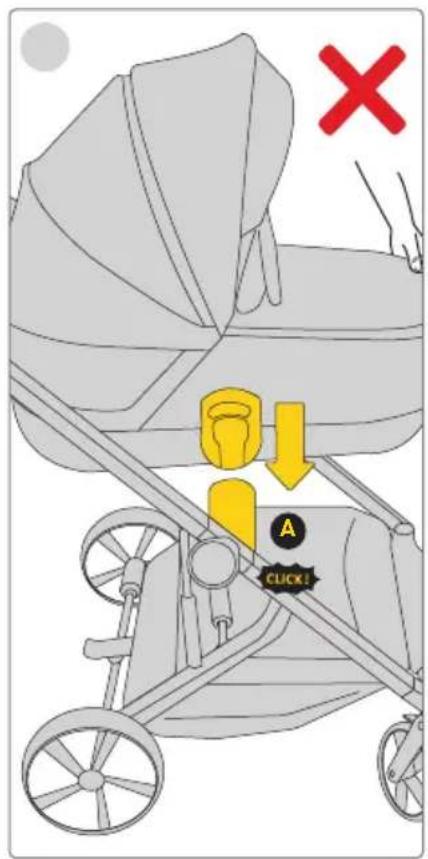
text_image
Diagram illustrating car seatbelt usage with a 'CLICK!' button and a red X mark indicating absence or rejection.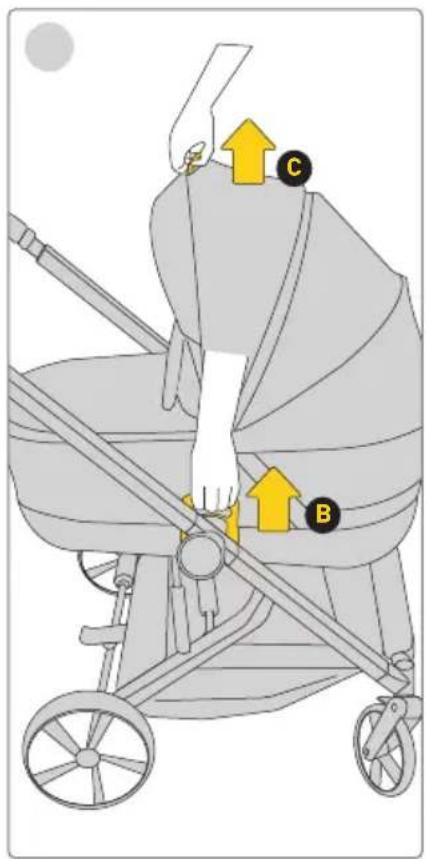
text_image
Diagram of a baby stroller with labeled parts C and B, showing hand positioning and directional arrows indicating movement or force.natural_image
Illustration of a yellow bag with a black circular mark labeled 'D' and an arrow indicating rotation (no text or symbols present)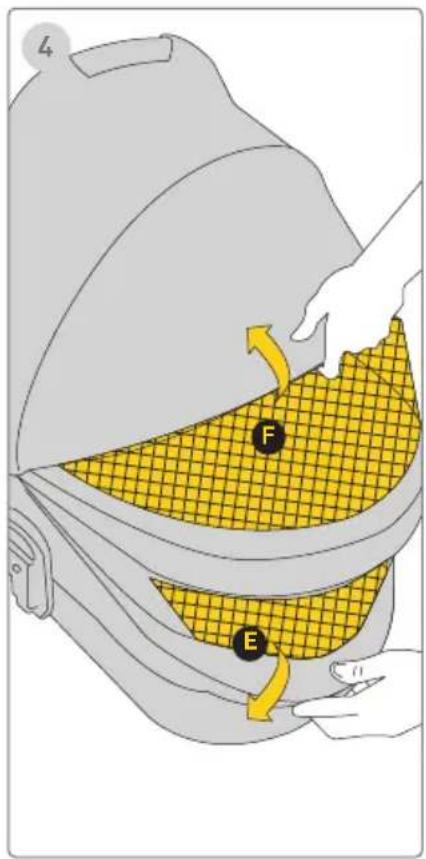
text_image
L F EVerdeck
natural_image
Illustration of two baby strollers with different designs and seat compartments (no text or symbols)IMPORTANT!
READ AND KEEP FOR FUTURE REFERENCE
WARNINGS!
⚠️ Never leave the child unattended.
⚠ Ensure that all the locking devices are engaged before use.
To avoid injury ensure that the child is kept away when unfolding and folding this product.
Do not let the child play with this product.
Use a harness as soon as the child can sit unaided
This seat unit is not suitable for children under 6 months.
Always use the resistant system.
Check that the pram body or seat unit or car seat attachment devices are correctly engaged before use.
This product is not suitable for running or skating.
No additional mattress other than the one provided by the manufacturer should be used.
The frame combined with the Avioanut carrycot constitutes a pushchair intended for one child from birth. This product is suitable for a child who cannot
sit up, turn over and move on their hands and knees. Maximum weight of the child: 9 kg. Do not use additional mattresses.
The frame combined with the Avionaut Sirius stroller seat forms a stroller designed for one child who has begun to sit up independently (over 6 months of age). Maximum child weight: up to 22 kg or 4 years of age, whichever comes first.
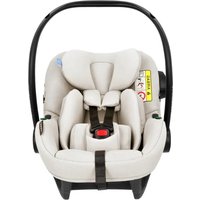
The frame, when combined with a car seat (using adapters only), is intended for one child from birth up to 13 kg (as per the car seat user manual).
Exercise extra caution when adjusting the backrest – do not exceed the highest backrest position while a child is seated!
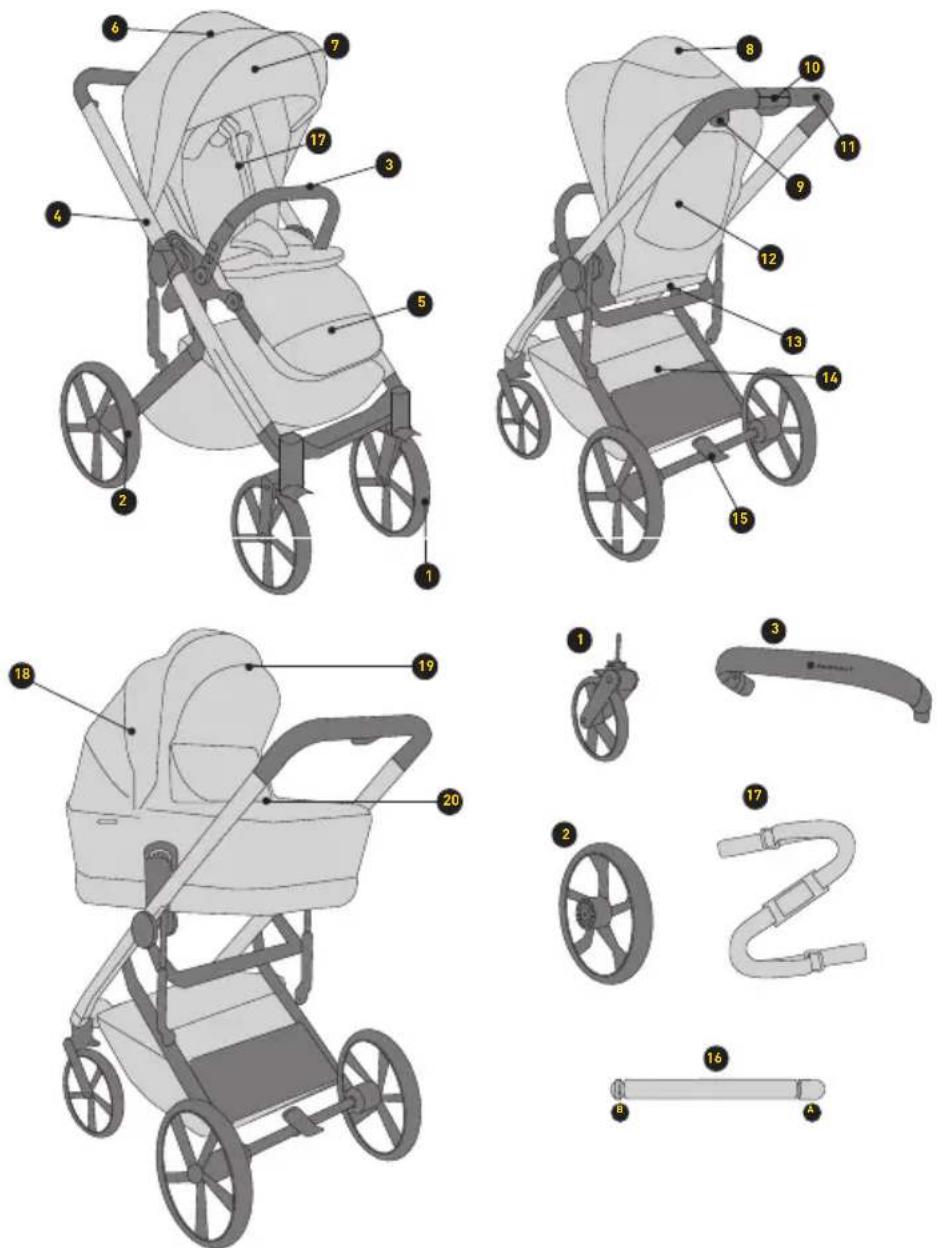
PARTS LIST
Make sure all parts are available before assembly. If any part is missing, please contact Avionaut(see last page for information). No tools are required for assembly.

!CHOCKING HAZARD:
Remove and immediately discard protective end caps from each wheel and wheel hub axle!
1 FRONT WHEEL(x2)
2 REAR WHEEL(x2)
3 ARM BAR
4 SEAT MODULE CANOPY ADJUSTER
5 CALF SUPPORT
6 SEAT MODULE CANOPY
7 SEAT MODULE CANOPY VISOR
8 SEAT MODULE TOP CANOPY
9 SEAT MODULE FOLDING HANDLE
10 BUTTON FOR FRAME HANDLE ADJUSTER
11 FRAME HANDLE
12 SEAT MODULE STORAGE POCKET
13 FRAME FOLDING HANDLE
14 STORAGE BASKET
15 BRAKE LEVER
16 REAR WHEEL AXLE(x2)
17 SEAT MODULE INSERT
18 CARRYCOT CANOPY
19 CARRYCOT CANOPY VISOR
20 CARRYCOT CANOPY ADJUSTER
Open Stroller
1
text_image
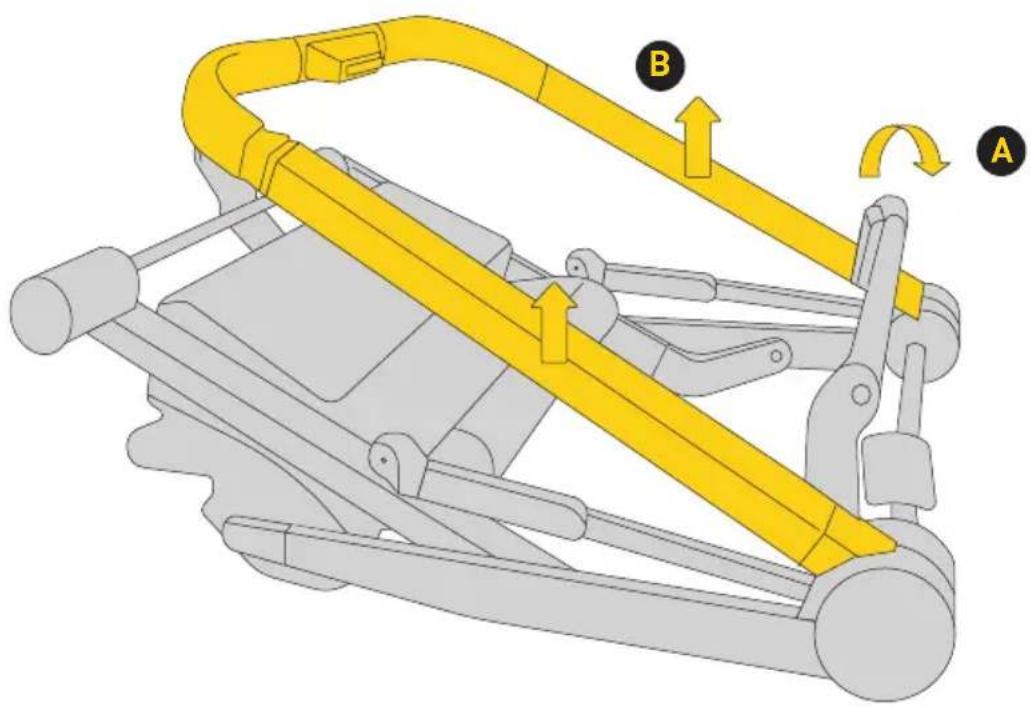
Diagram of a mechanical device with labeled components A and B, showing directional arrows indicating motion or flow.OPEN Stroller
1 Step
Rotate the folding handle and slide it upwards until the lock is released.

2 Step
Lift the handlebar until the frame is fully unfold and locks into the open position with a click.
!Check that the strolles is open completely before continuing!
Front Wheels/Rear Wheels
text_image
1 CLICK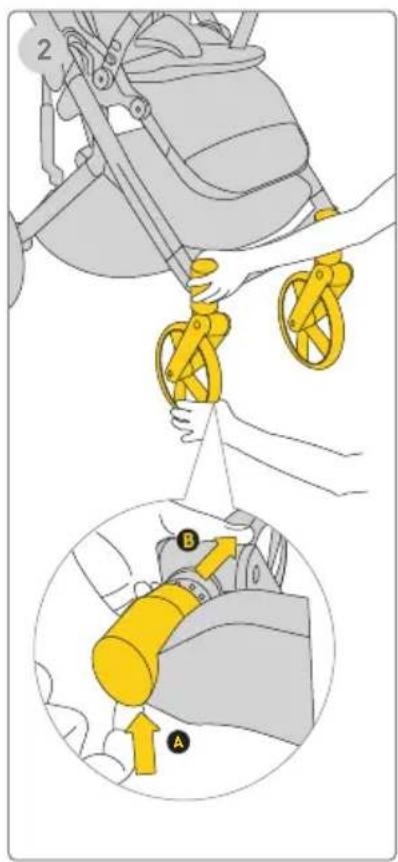
text_image
Diagram illustrating a mechanical device with labeled parts A and B, showing hand positioning and assembly steps.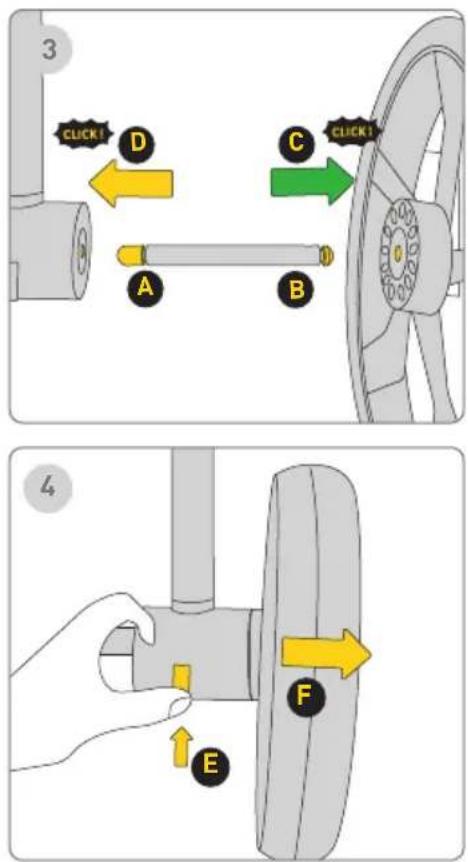
text_image
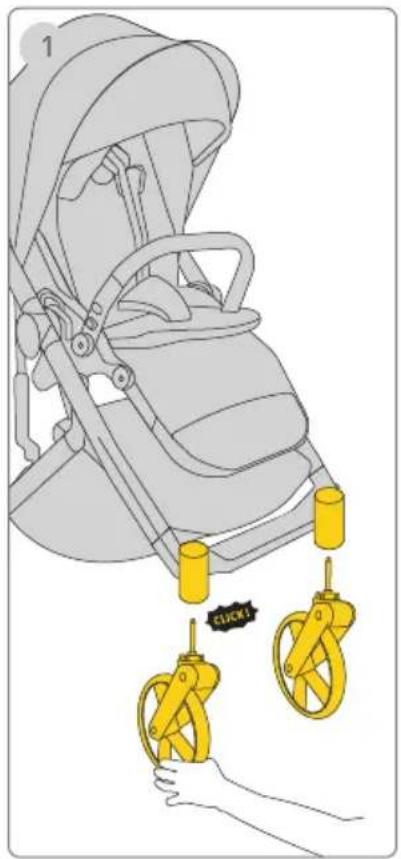
3 CLICK! D A B C CLICK! 4 EFront wheels
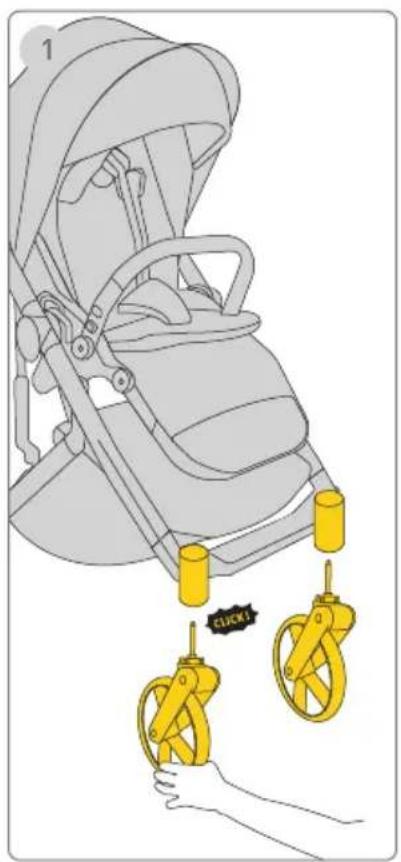
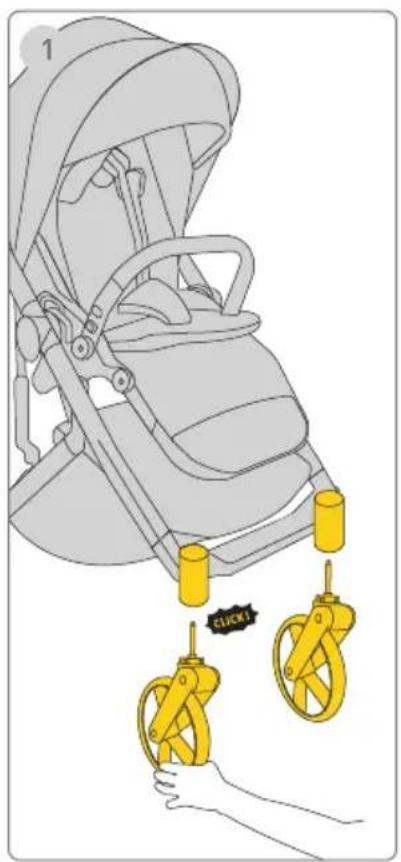
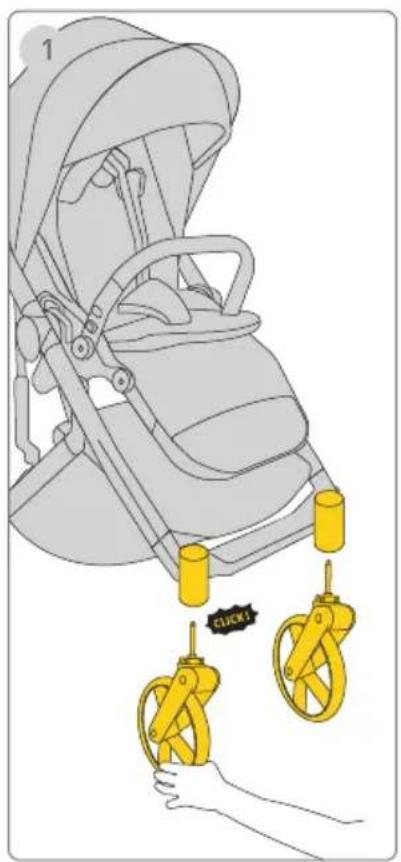
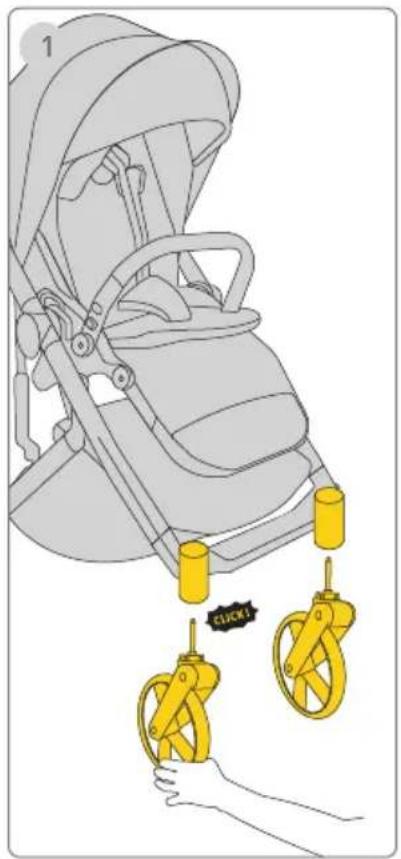
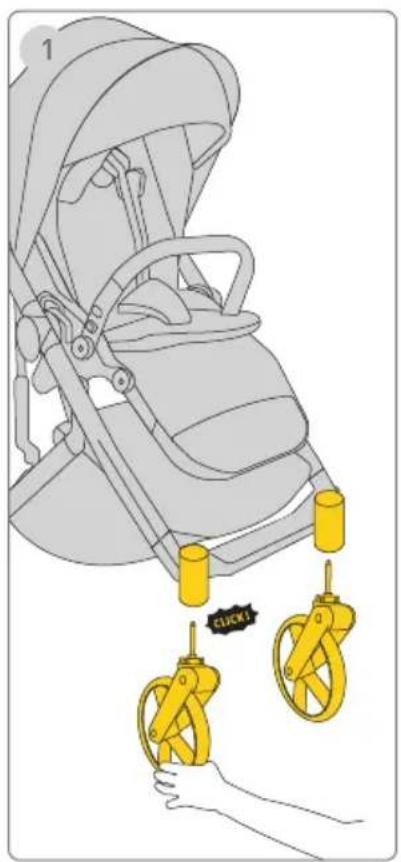
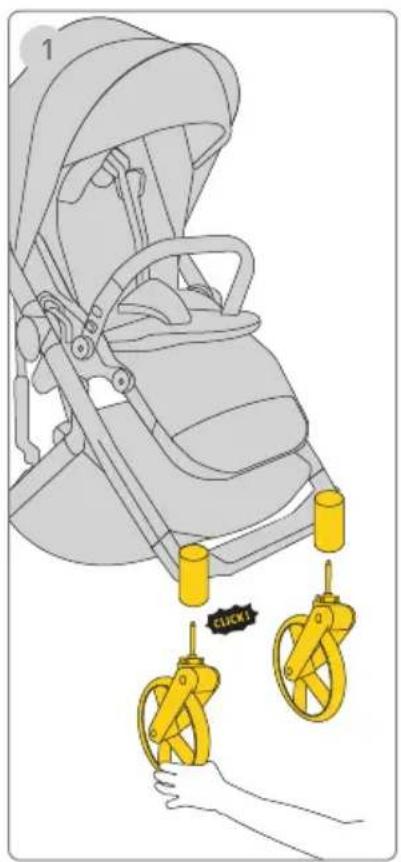
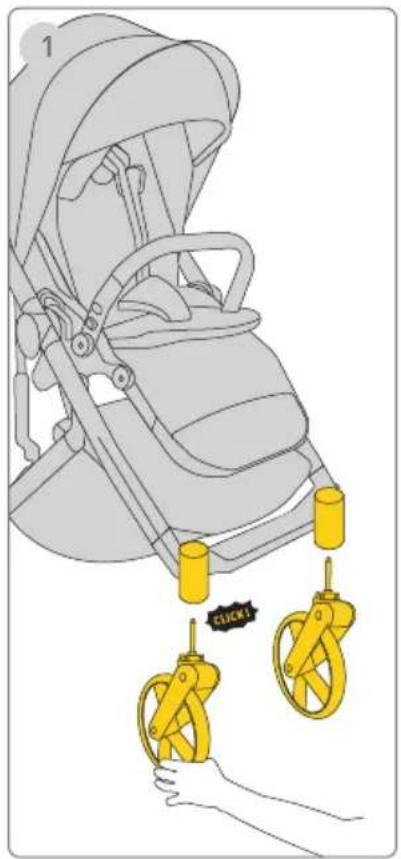
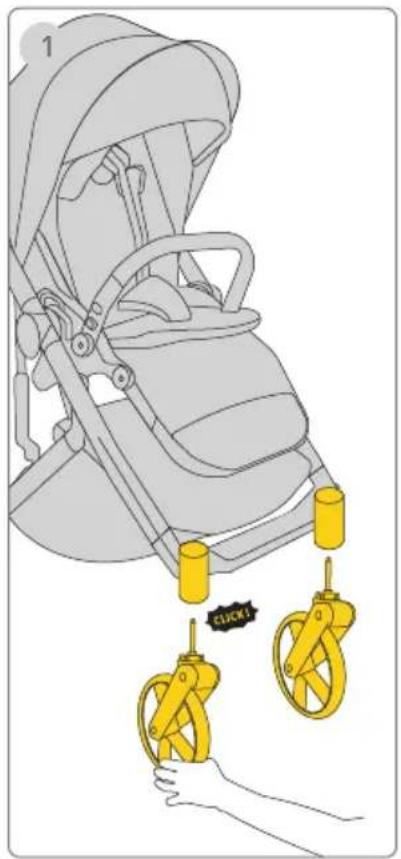
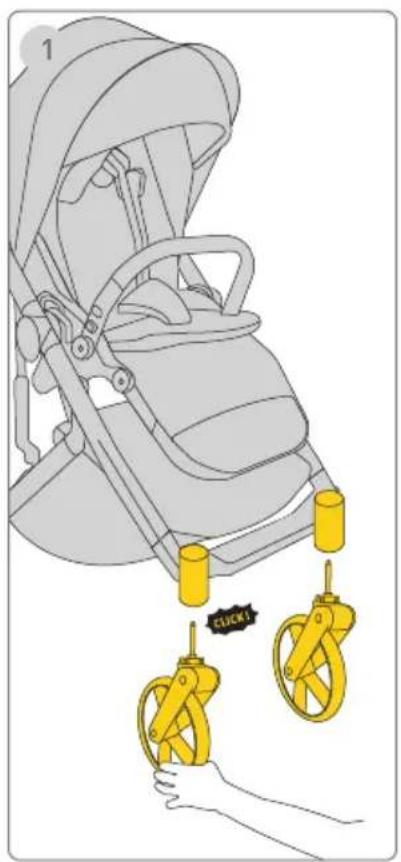
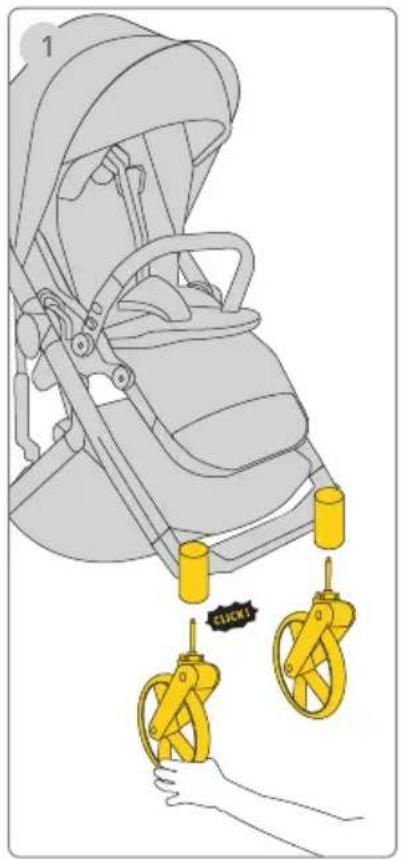
1 Step
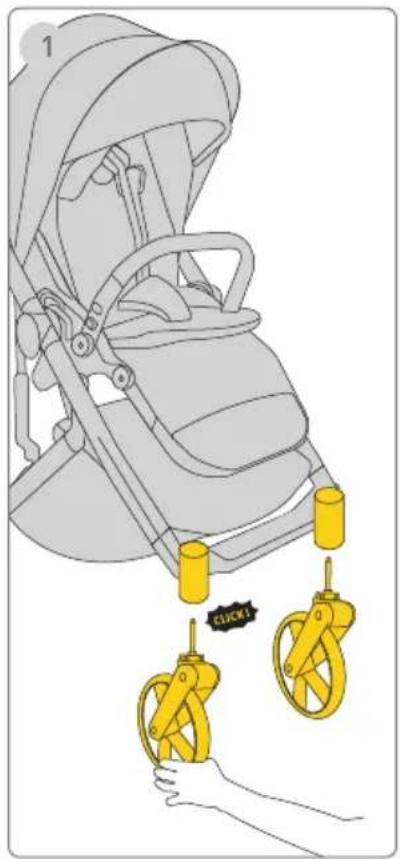
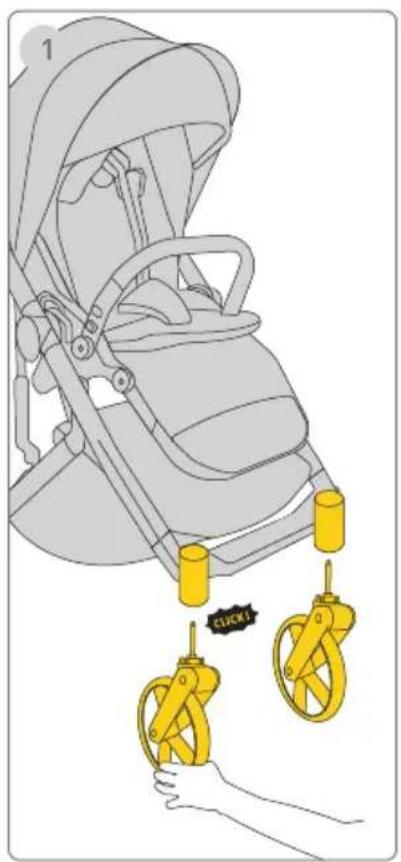
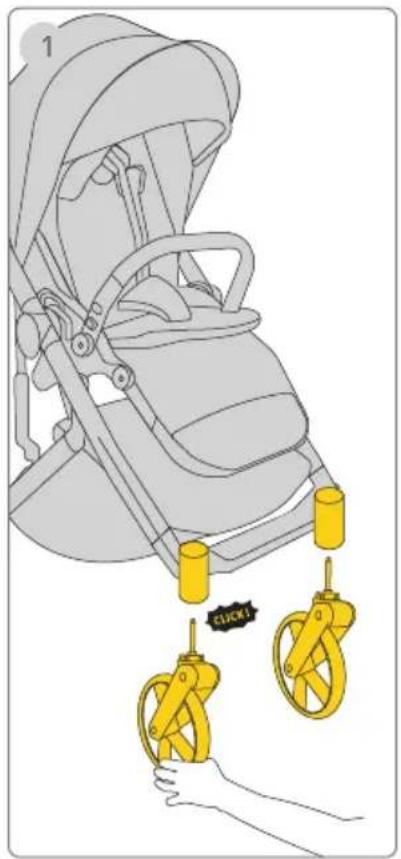
Insert the front wheel into front leg. A „click“ sound means the wheel is assembled completely. Repeat on the opposite side
!Check that the wheels are securely attached by pulling on them!
2 Step
To remove the front wheel, press release button A and detach the front wheel from the front leg B.
Rear wheels
3 Step
Insert axle in wheel(B' side) C and insert assembled wheel to rear leg(axle A' side) D. A „click" sound means the rear wheel is assembled completely. Repeat on opposite side.
!Check that the wheels are securely attached by pulling on them!
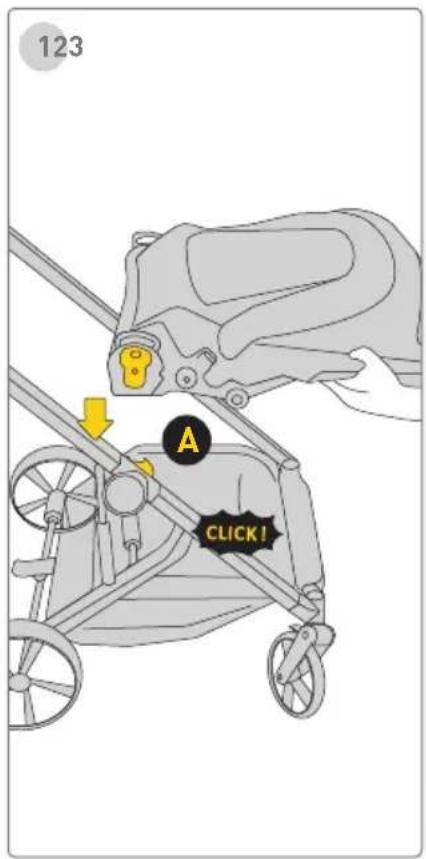
4 Step
To remove the rear wheel, press release button E and detach the front wheel from the rear leg F.
Seat Module
text_image
123 A CLICK!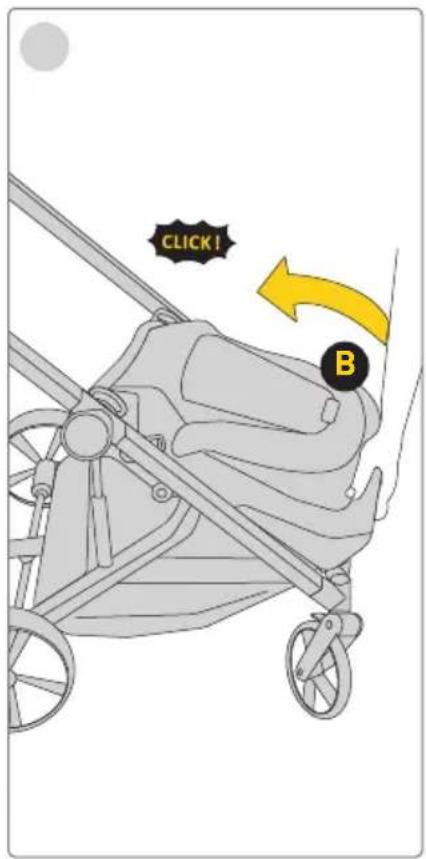
text_image
CLICK! B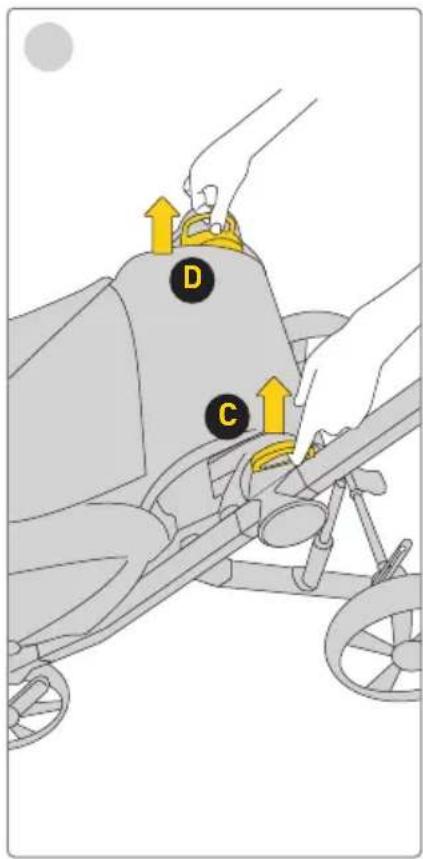
text_image
D CSeat module
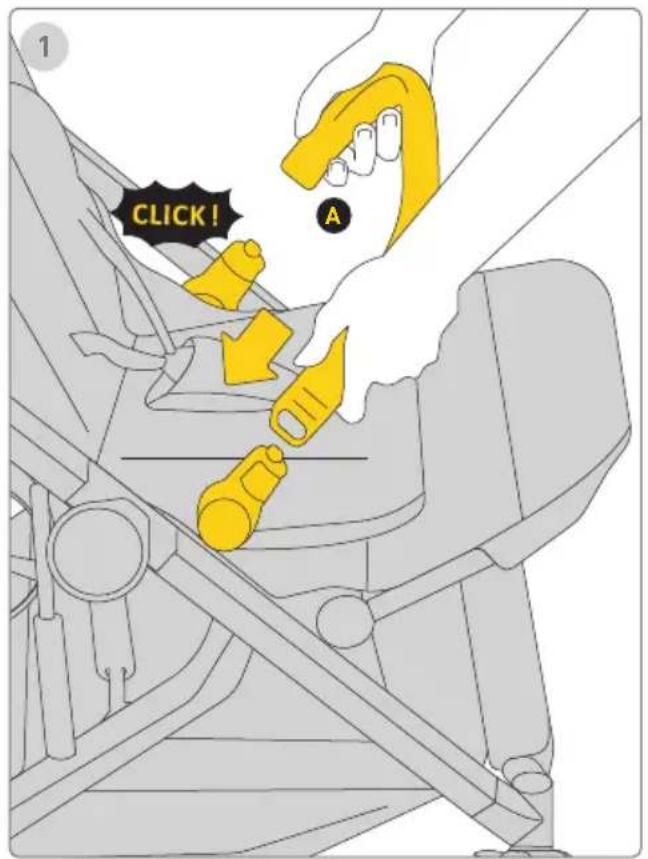
The seat can be used rear or forward facing.
1 Step
Place seat module on the seat mounts 📄util it clicks into place. A „click“ sound means the seat is attached.
!Check that the seat is securely attached by pulling up on it!
2 Step
Turn backrest in the upright position using hand . ,click" sound means the seat is in upright position
!Check that the seat is in upright position by turning seat to the front and back!
3 Step
To detach seat module, pull release handles and lift seat up. To place seat module rear facing, repeat point 1 and 2 with different orientation of seat module
Arm Bar
text_image
1 CLICK! A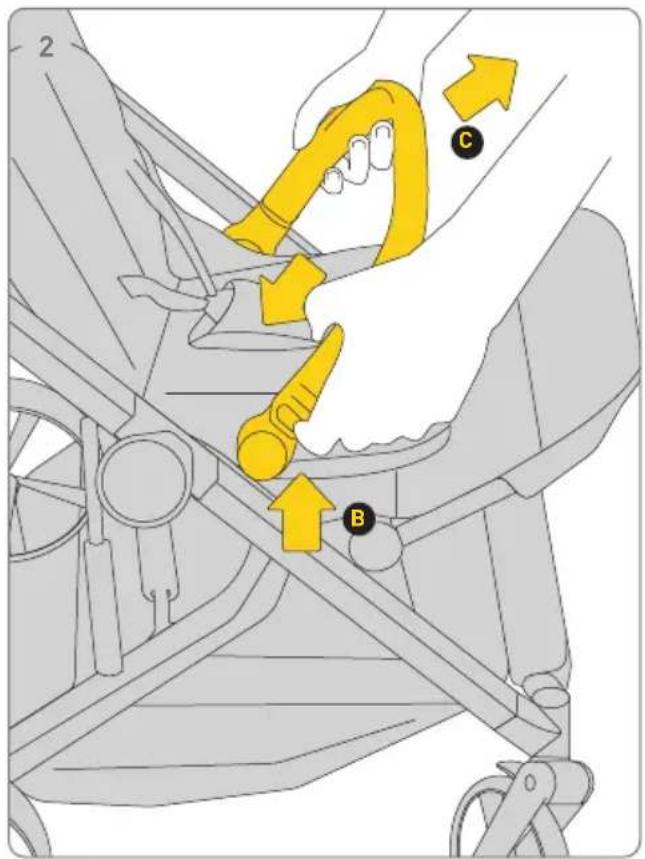
text_image
Diagram illustrating a mechanical assembly with labeled parts B and C, showing directional arrows indicating movement or force.Arm bar
!It is always recommended that the arm bar be used, but it is not restraint device. Always secure child with the harness!
1 Step
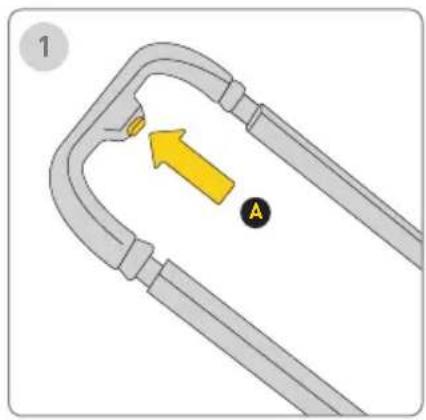
Align the arm bar ends with the bar mounts and instert until clicks into place A. A „click" sound means the arm bar is assembled completely.
2 Step
To remove the arm bar, press the arm bar release buttons a lift the arm bar up.
Do not lean on it, sit the child on it, or hang any objects on it. The bumper bar should be fastened and unfastened only by the caregiver.
Seat Module
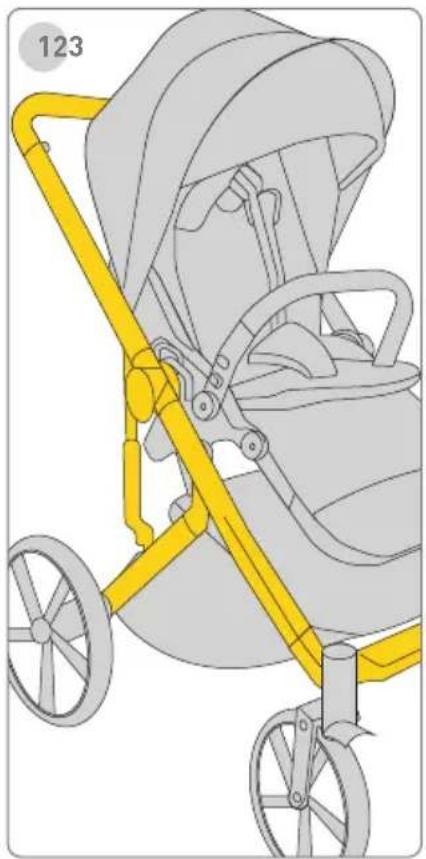
natural_image
Illustration of a stroller with yellow railings and wheels, no text or symbols present
natural_image
Illustration of a baby stroller with yellow wheels and handlebars (no text or symbols)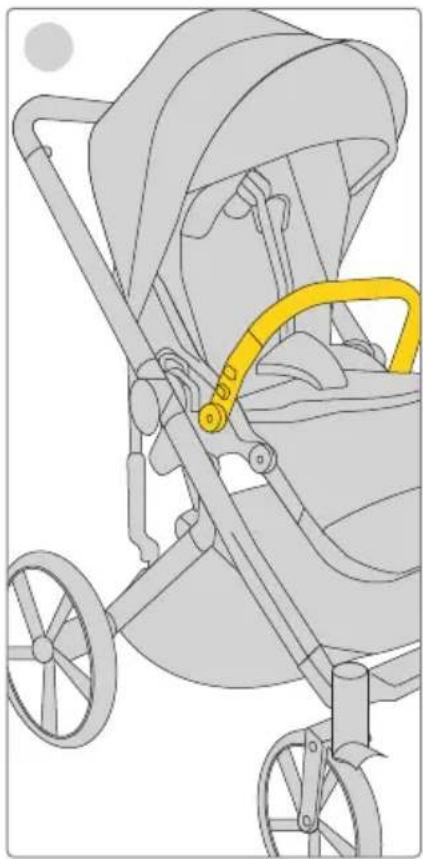
natural_image
Illustration of a stroller with yellow belt and wheels, no text or symbols presentCheck Set up
1 Step
Stroller frame is completely open.
2 Step
Front and rear wheels are securely attached.
3 Step
Arm bar is securely attached.
Securing Your Child
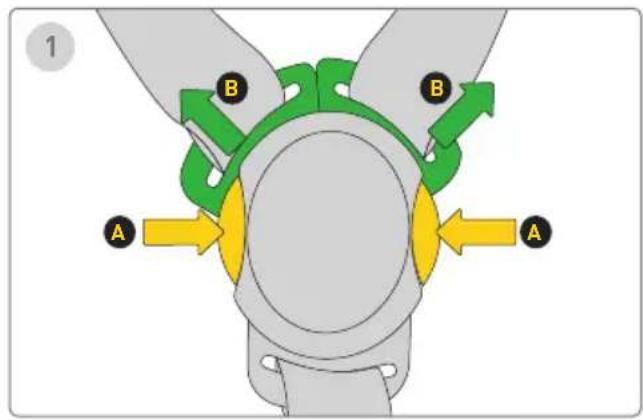
text_image
1 A B B A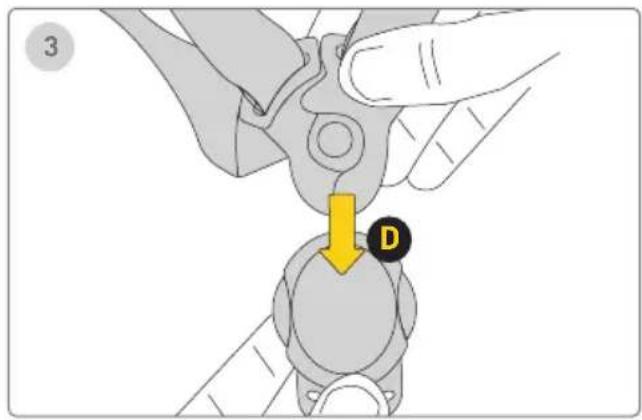
text_image
3 D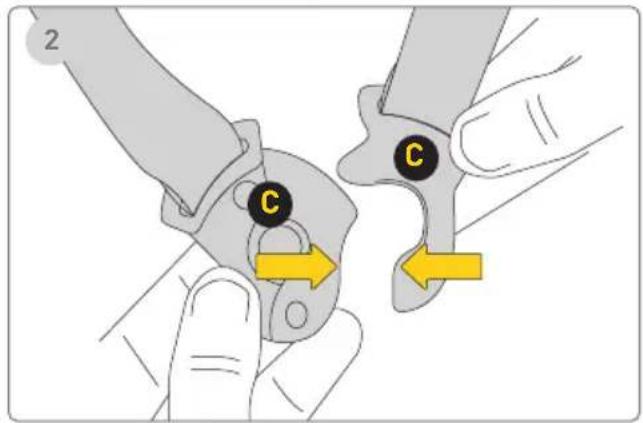
text_image
2 C C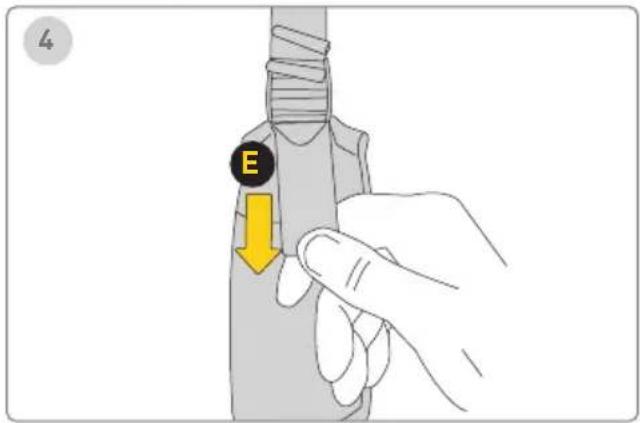
text_image
ESecuring Your Child
The locking device MUST be engaged when the stroller is stopped and while placing or removing the child!
1 Step
Push side buttons on the buckle release the buckle latch, remove the clips and Belize Your child in the stroller.
2 Step
Connect the shoulder buckle and hip buckle .C
3 Step
Secure the shoulder buckle and hip buckle to the buckle latch.
4 Step
The upper shoulder harness buckles can be moved up and down for added adjustment
Canopy
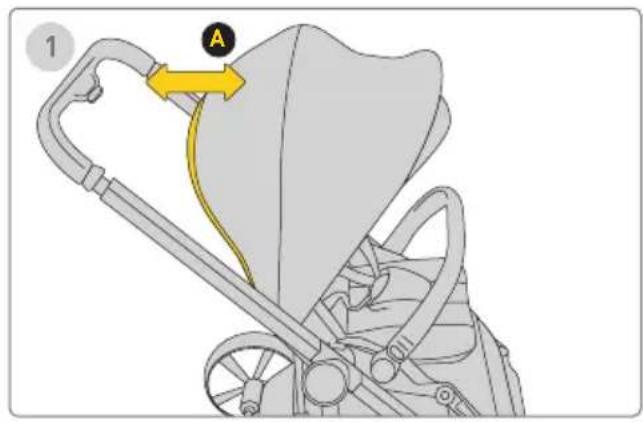
text_image
1 A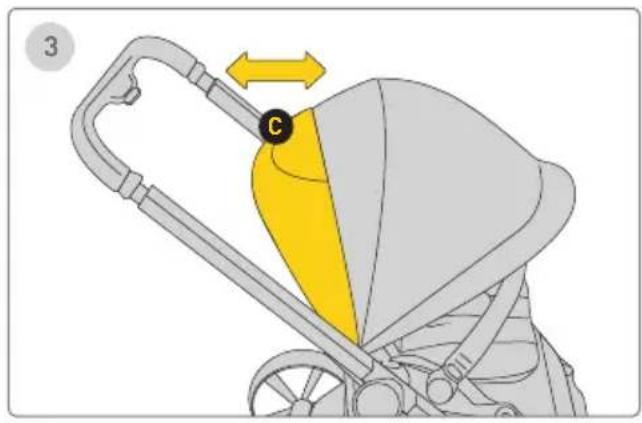
text_image
3 C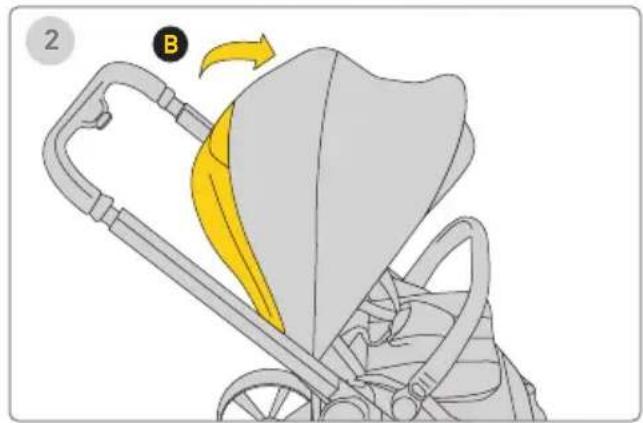
text_image
2 B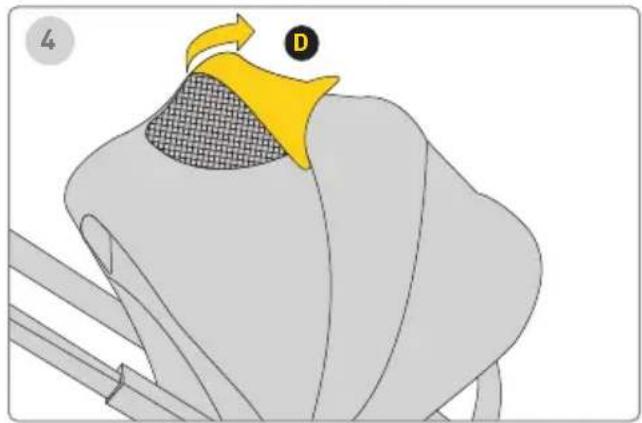
natural_image
Illustration of a bird's head with a yellow beak and patterned neck, no text or symbols presentCANOPY
The locking device MUST be engaged when the stroller is stopped and while placing or removing the child!
1 Step
To open the canopy, pull the canopy toward the front of the seat. To close the canopy, push it back A.
2 Step
Position the canopy visor forward or backward as needed. When not in use, fold the canopy visor under the canopy B.
3 Step
Open the zipper on the canopy for extra shade.
4 Step
For ventilation, flip up the top canopy window cover. The canopy is not removable.
Front Swivel Lock
Brake
text_image
123 UNLOCK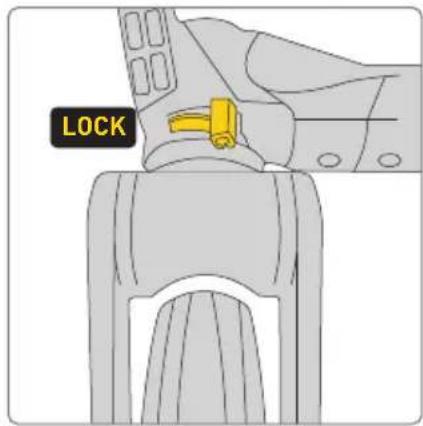
text_image
LOCK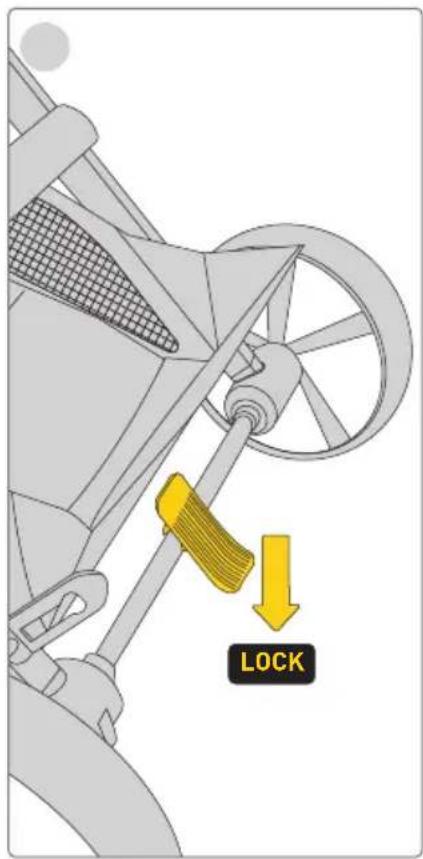
text_image
LOCK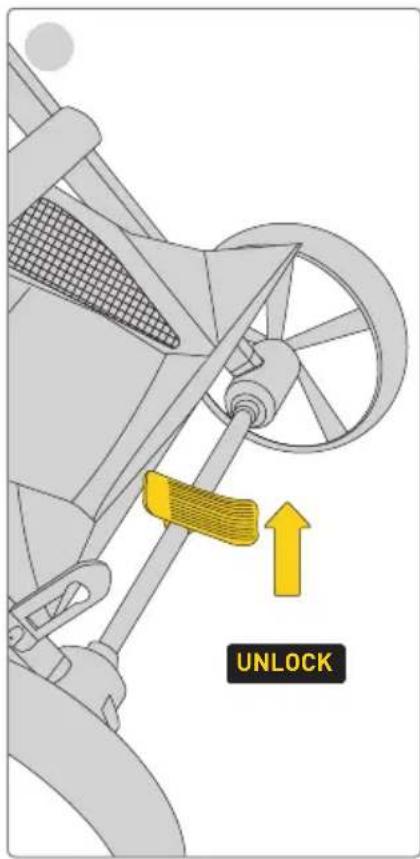
text_image
UNLOCKFront Swivel lock
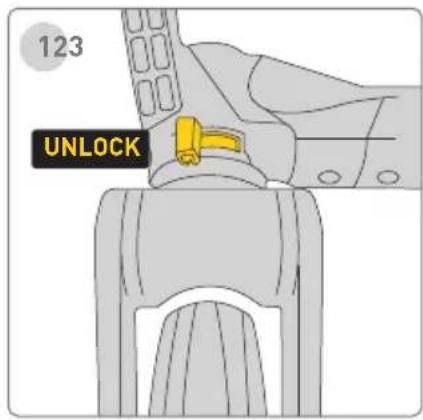
It is recommended to use the front swivel locks on uneven surfaces. You can lock wheels rear way facing and front way facing.
1 Step
Turn handle to inside of stroller to lock front wheel. Turn handle outside of stroller to unlock front wheels. You may need to move the wheel to get it to lock.
Locking Devices / Brake
!Always engage the locking device when the stroller is stopped. Gently push the stroller to ensure the brake is engaged!
2 Step
To lock the rear wheels, press down with your foot on the locking device lever area. You may need to move the wheel slightly to lock it.
3 Step
To unlock the rear wheels, press down with your foot on the locking device lever area.
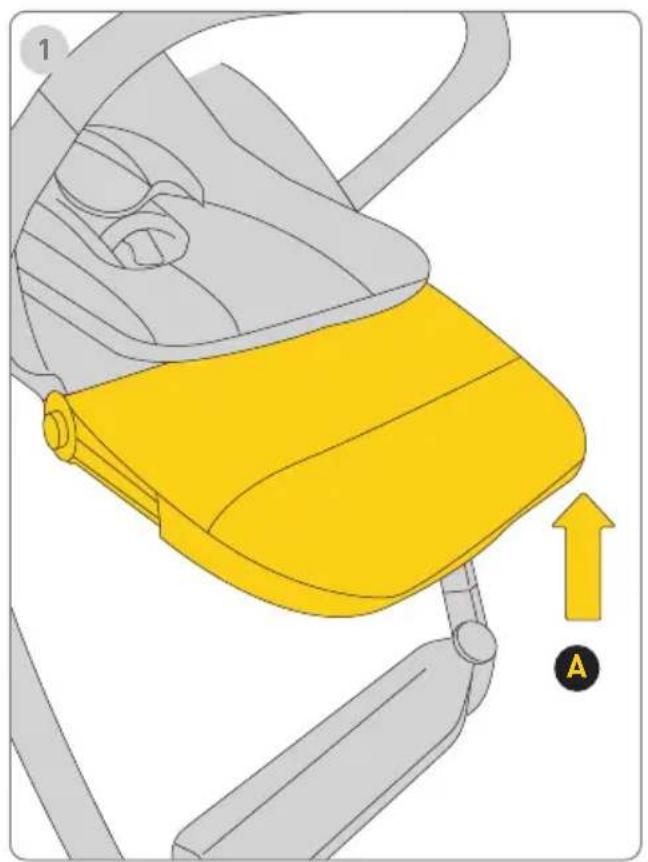
Calf Support
text_image
Diagram of a yellow robotic device with labeled parts and directional arrow, marked with letter A.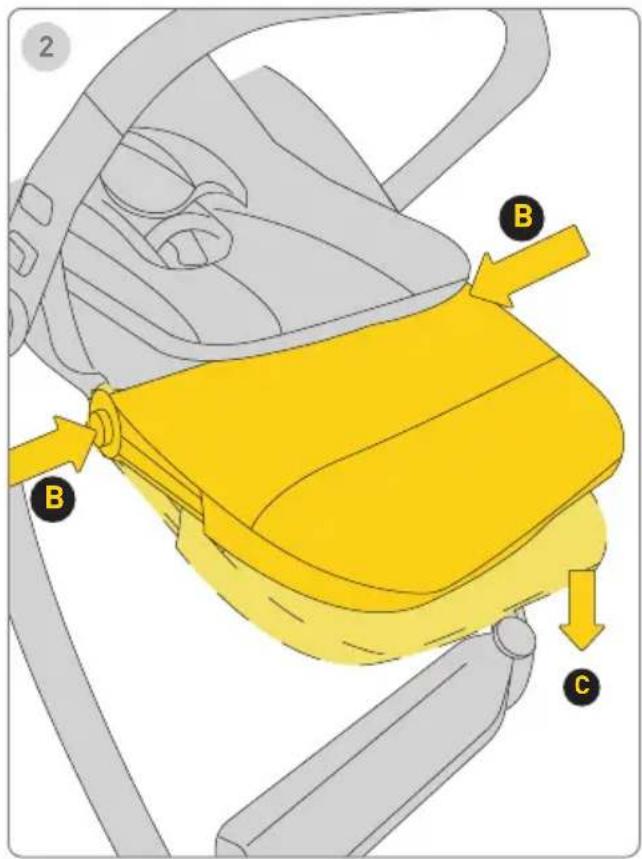
text_image
2 B B CCalf Support
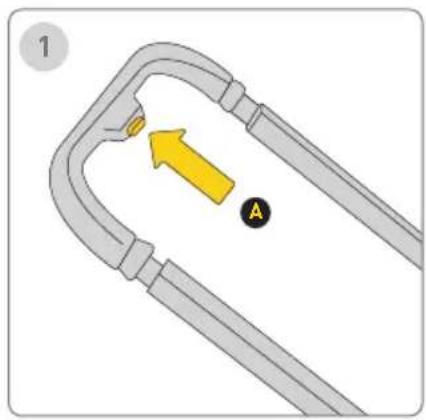
The calf support has 3 use positions.
1 Step
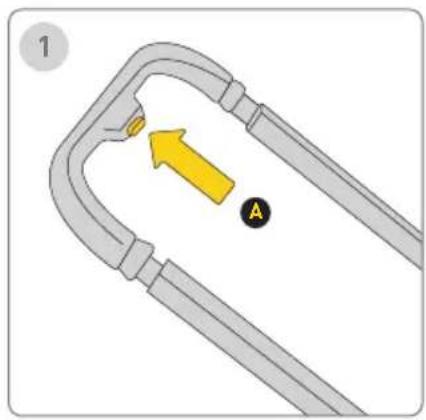
To raise the calf support, lift up .A
2 Step
To lower the calf support, press the adjustment buttons on the sides B and push down C.
H a n
d l e Recline Adjustment
natural_image
Diagram of a curved pipe with a yellow arrow and labeled point A, no text or symbols present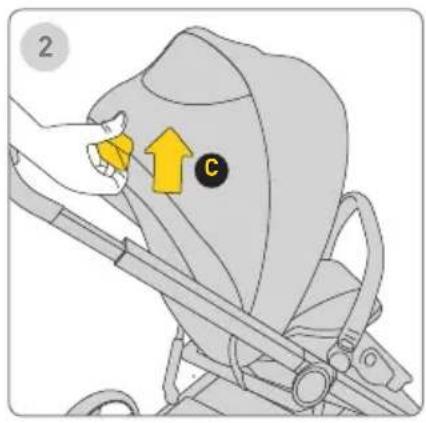
text_image
2 C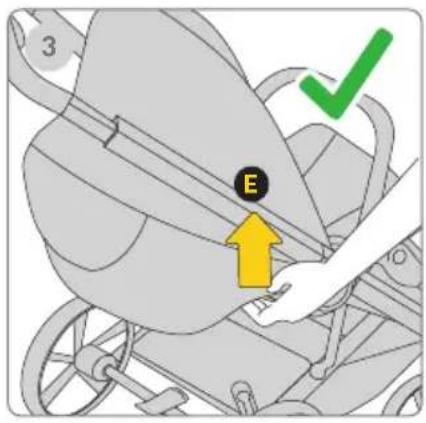
text_image
3 E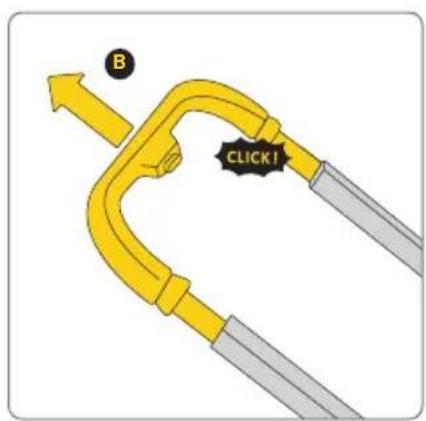
text_image
B CLICK!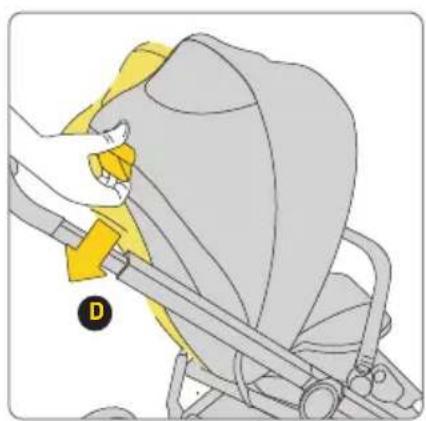
natural_image
Illustration of a hand adjusting a yellow belt switch on a gray car seatbelt (no text or symbols)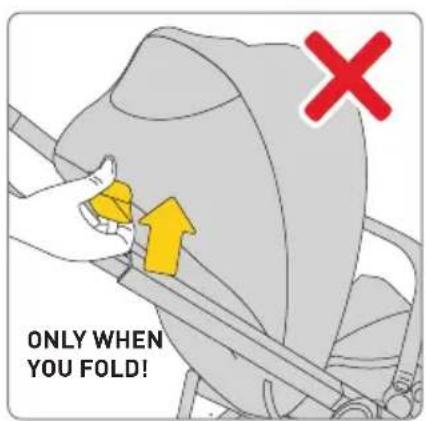
text_image
ONLY WHEN YOU FOLD!Handle
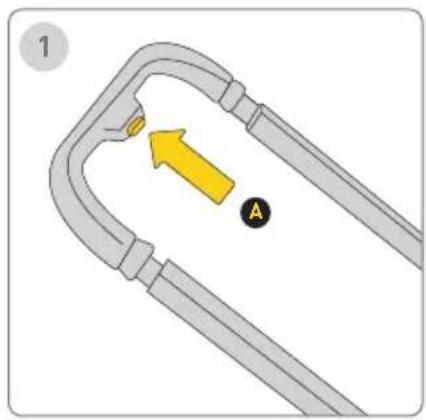
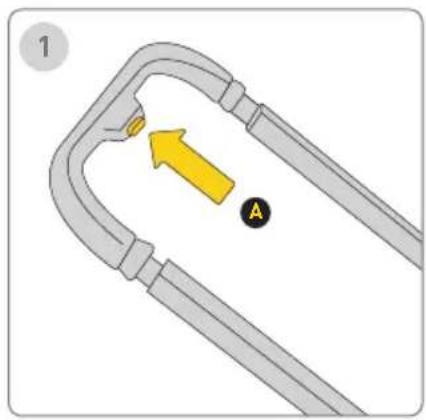
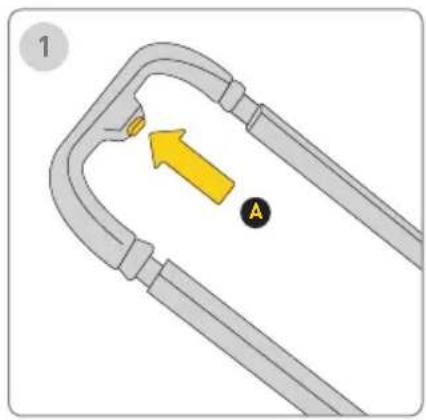
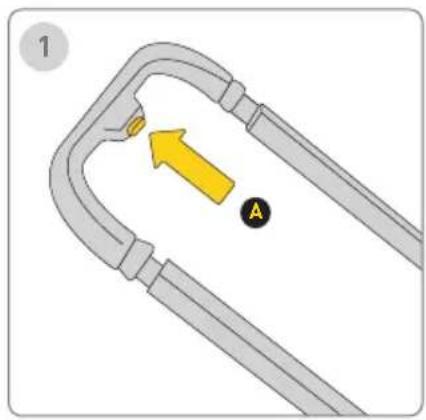
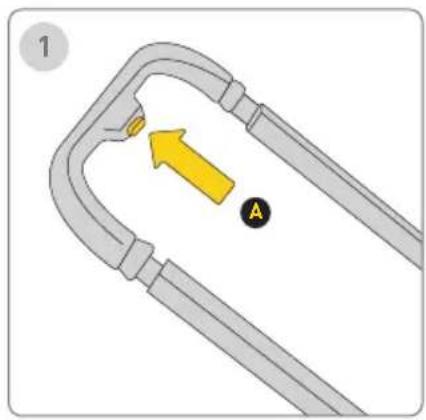
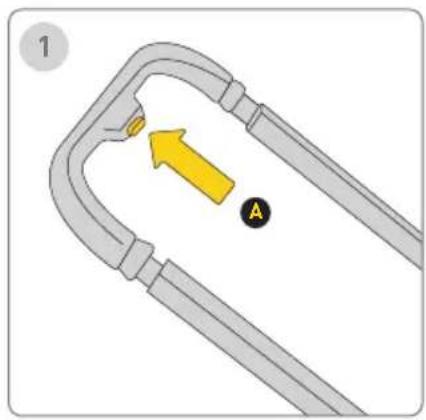
The handle has 5 positions
1 Step
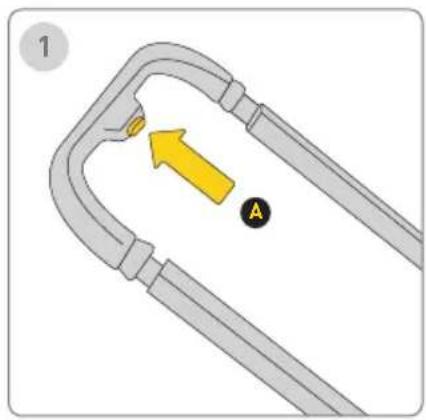
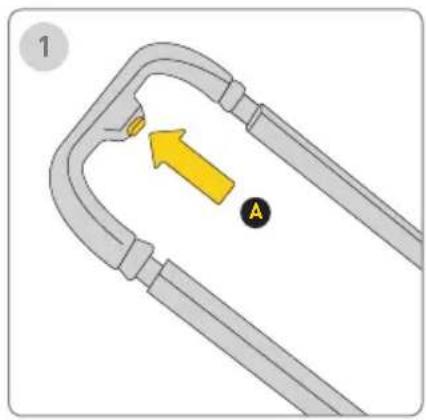
To adjust the height of the handle, press the handle adjustment buttons A and pull the handle up or down B the wheel to get it to lock.
Recline Adjustment
There are 3 recline positions for the backrest.
!Be especially careful when adjust reclined position to not fold seat module with child inside!
2 Step
To lower the backrest, pull the release handle upward, release the handle Ⓓ and push the backrest down Ⓓ. Use the handle only to release the backrest.
3 Step
To raise backrest pull seat backrest up E the wheel to get it to lock.
Insert
text_image
Diagram showing mechanical components with yellow directional arrows indicating flow or movement, possibly illustrating a fluid or fluid circulation system.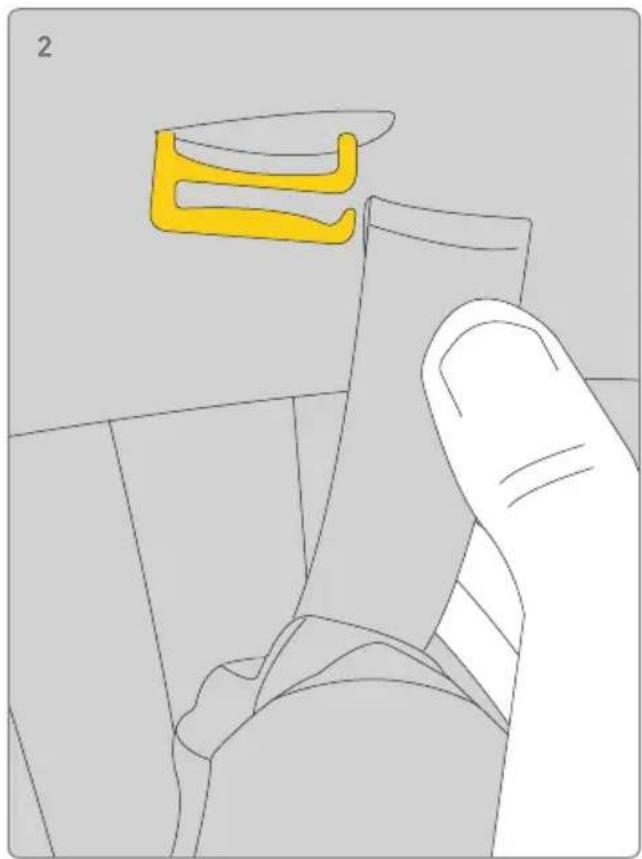
natural_image
Illustration of a hand holding a small object with a yellow abstract shape above it, no text or symbols present.Insert
You can use two sides of insert in different situations.
1 Step
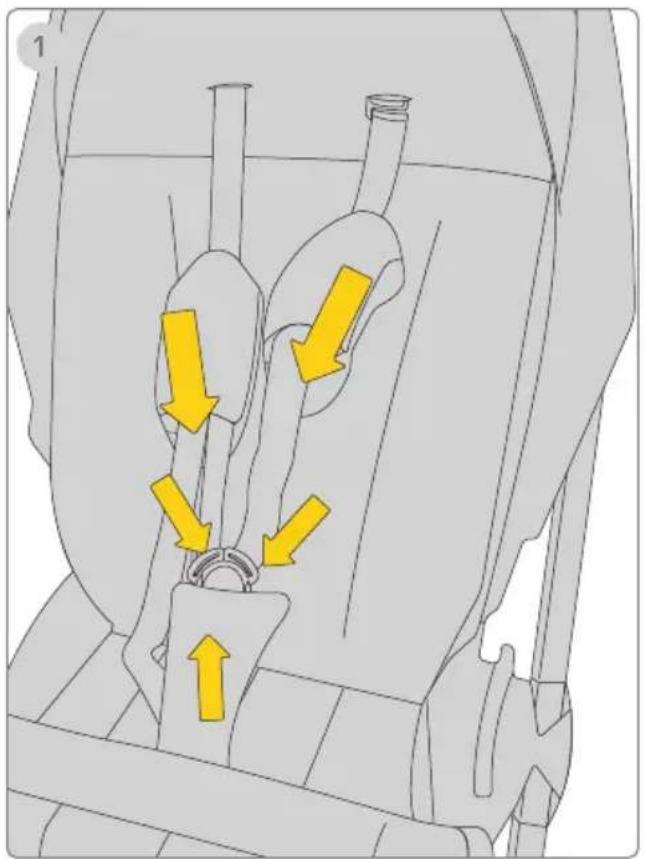
To assemble the insert, place the insert over the seat and thread the shoulder, waist and crotch harnesses through their respective slots.
2 Step
Attach shoulder harness to shoulder hooks
Fold
text_image
Diagram illustrating a mechanical assembly with labeled parts A and B, showing motion arrows indicating movement or rotation.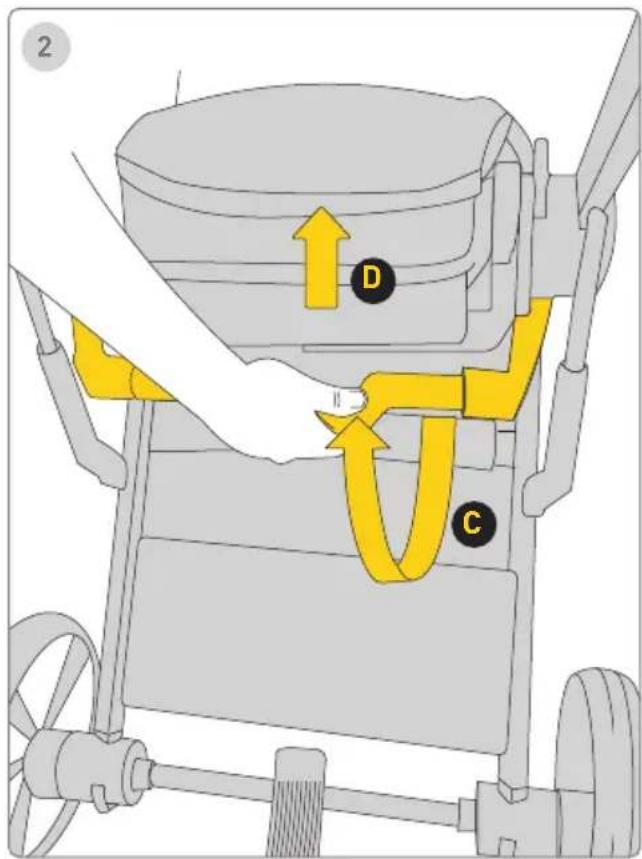
text_image
2 D CFold
Before folding, push the canopy to the rear of the stroller.
1 Step
Release by pulling the recline adjustment handle at the back of the seat A in one motion, and without holding the handle further, let go! Rotate the backrest into the folded position .The handle is used only to release the backrest.
2 Step
Rotate frame holding handle and pull handle upright to automatic fold a stroller.
Accesories
text_image
123 A CLICK!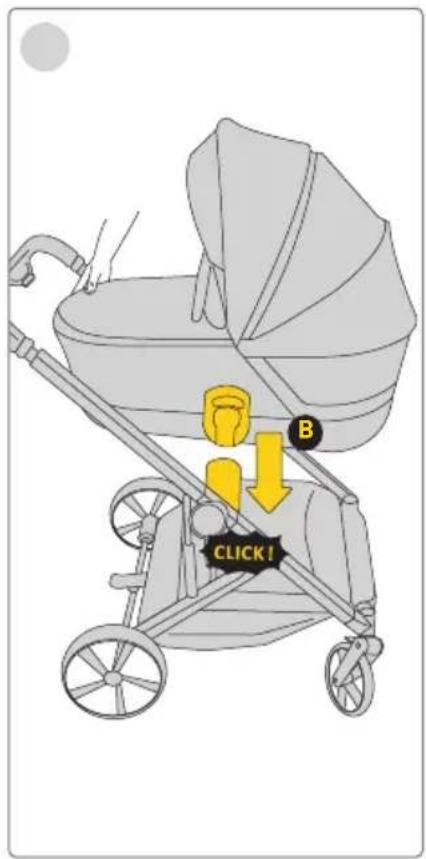
text_image
CLICK! B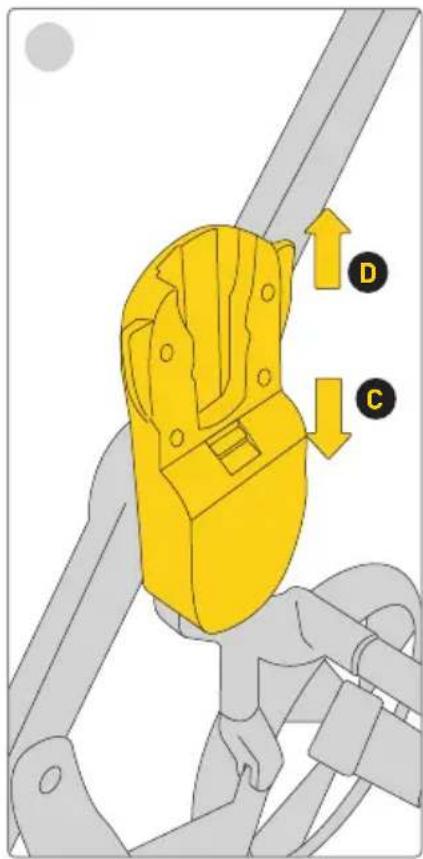
text_image
Diagram showing a yellow mechanical device with labeled parts C and D, indicating assembly or positioning steps.Accesories
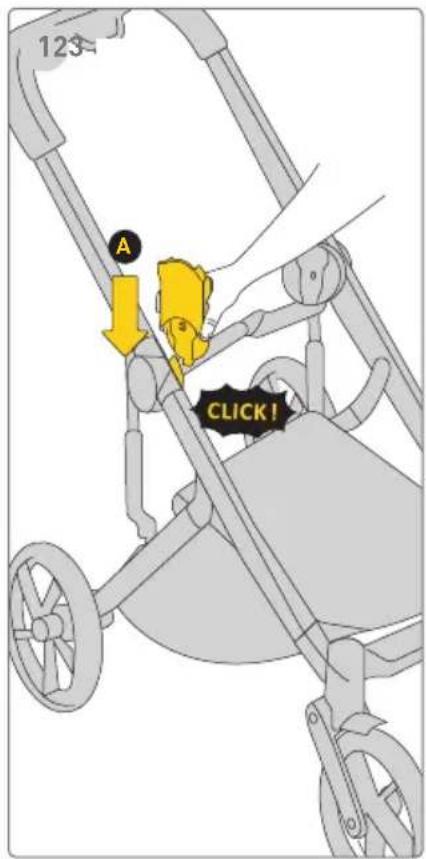
Carrycot higher adapters.
1 Step
Put carrycot adapter in seat mounting until it clicks Ⓐ. A „click“ sound means that adapter is attached. !Check that the adapters are mounted correctly by pulling them upright!
2 Step
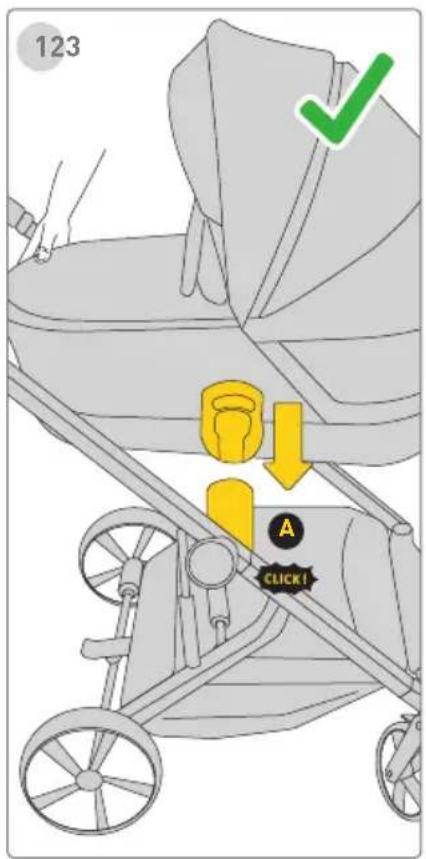
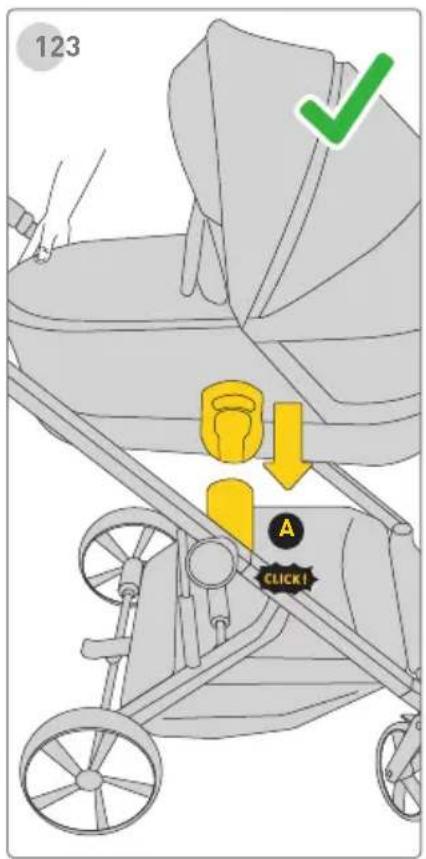
Put carrycot on carrycot adapter mounting until it clicks B. A „click” sound means that carrycot is attached. !Check that the carrycot is mounted correctly by pulling it upright!
3 Step
To dismount carrycot adapter, push button and pull out adapter. !Mount carrycot only in rear way facing position on stroller!
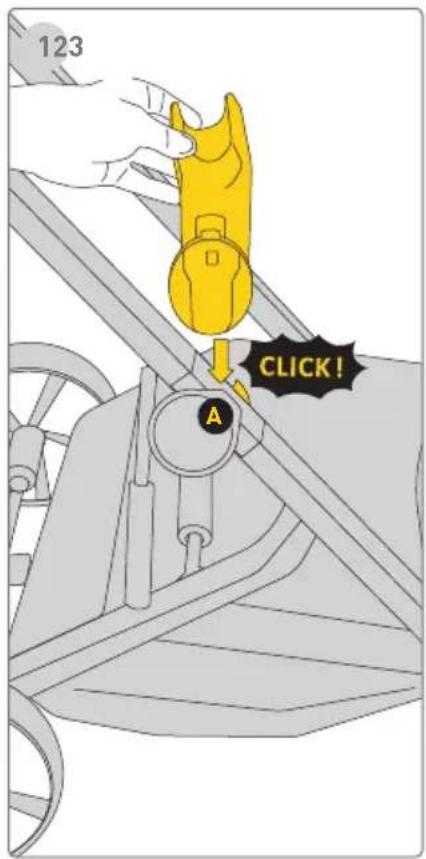
Car seat adapters
text_image
123 A CLICK!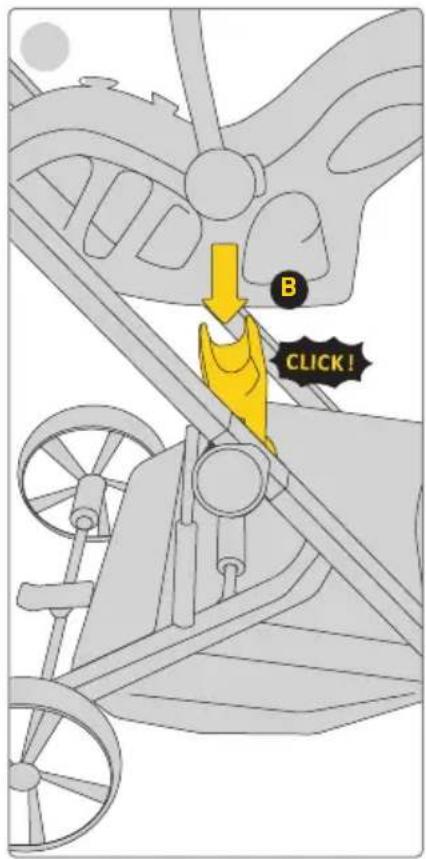
text_image
B CLICK!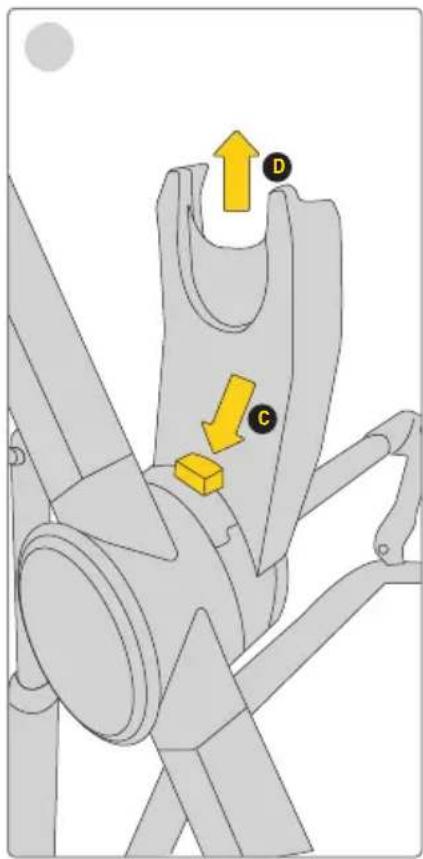
text_image
Diagram of a mechanical clamp or bracket with labeled parts and directional arrows indicating motion or forceCar seat adapters
1 Step
Put car seat adapter in seat mounting until it clics A. A „click“ sound means that adapter is attached. !Check that the adapters are mounted correctly by pulling them upright!
2 Step
Put carseat on carseat adapter mounting until it clicks B. A „click” sound means that carseat is attached. !Check that the carseat is mounted correctly by pulling it upright!
3 Step
To dismount carseat adapter, push button and pull out adapter !Mount carseat only in rear way facing position on stroller!
Product setup - unfolding carrycot
text_image
1 A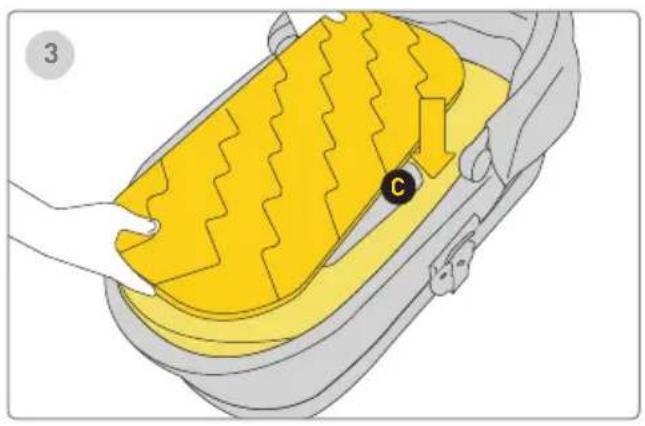
natural_image
Illustration of a car interior with yellow foam cushion and black circular marker (no text or symbols)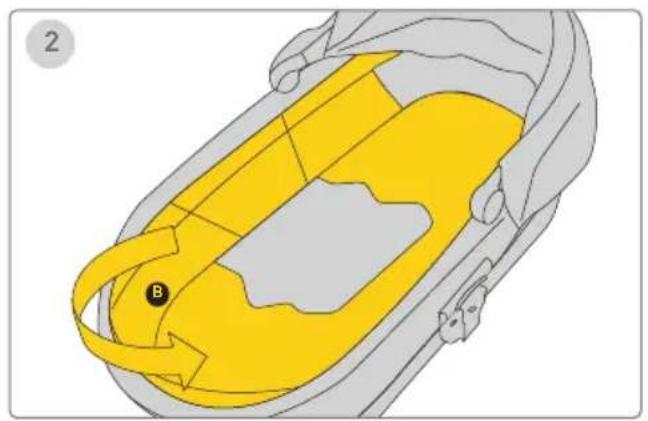
natural_image
Diagram of a car interior showing yellow and gray zones with a labeled point B (no text or symbols beyond label)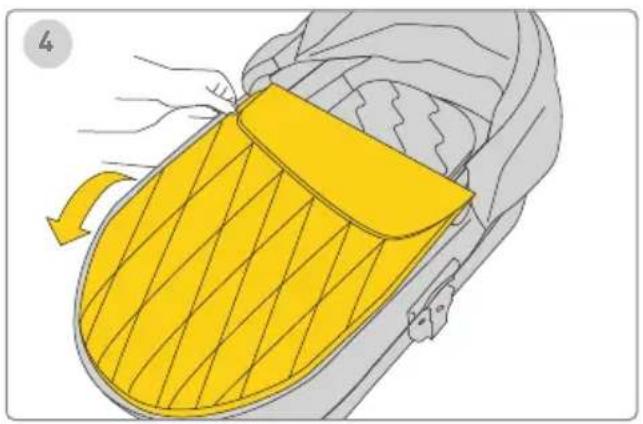
natural_image
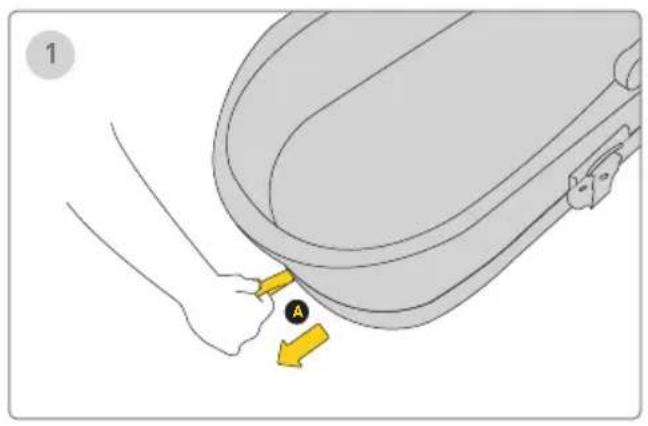
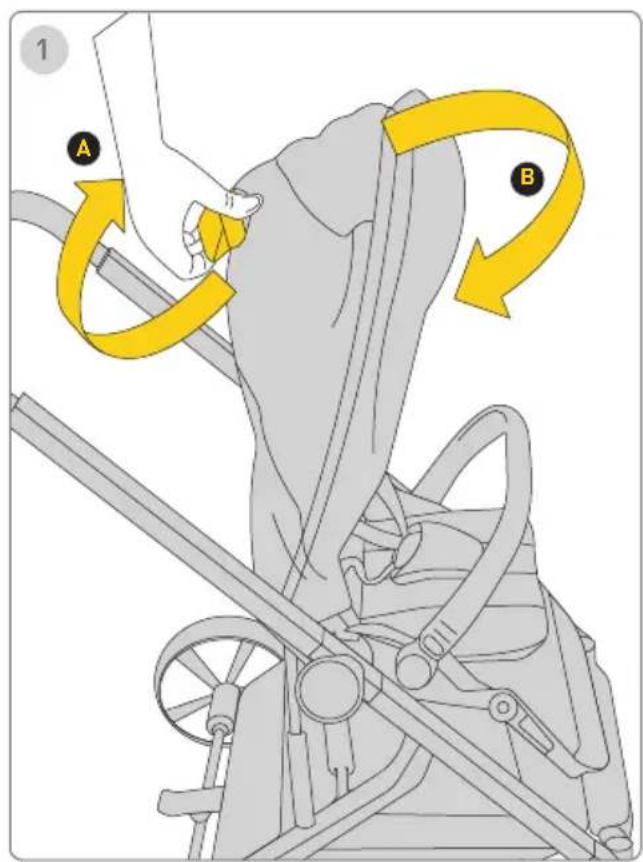
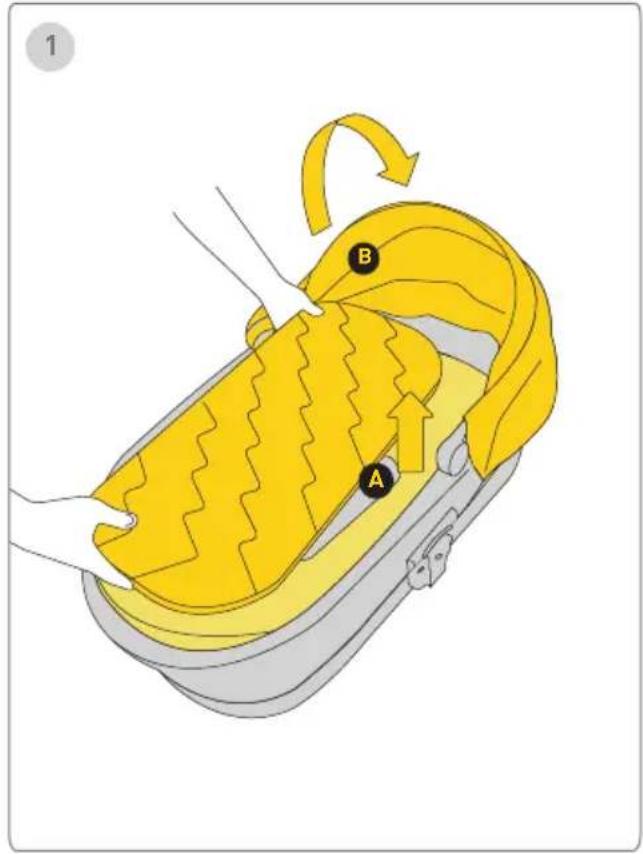
Illustration of a yellow and gray object with a handle, possibly a device or container, being handled by hands (no text or symbols present)Product setup- carrycot unfolding / carrycot folding
1 Step
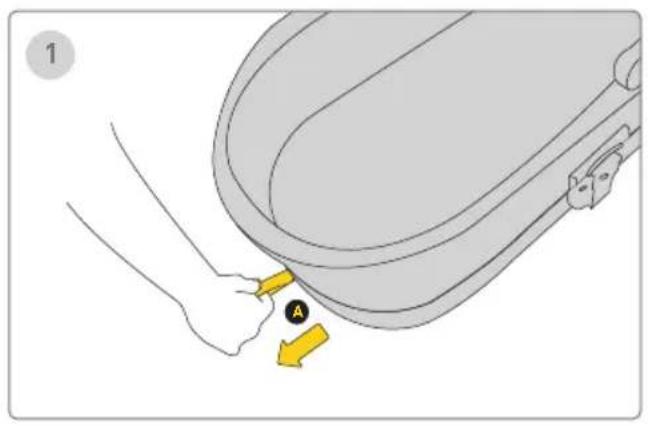
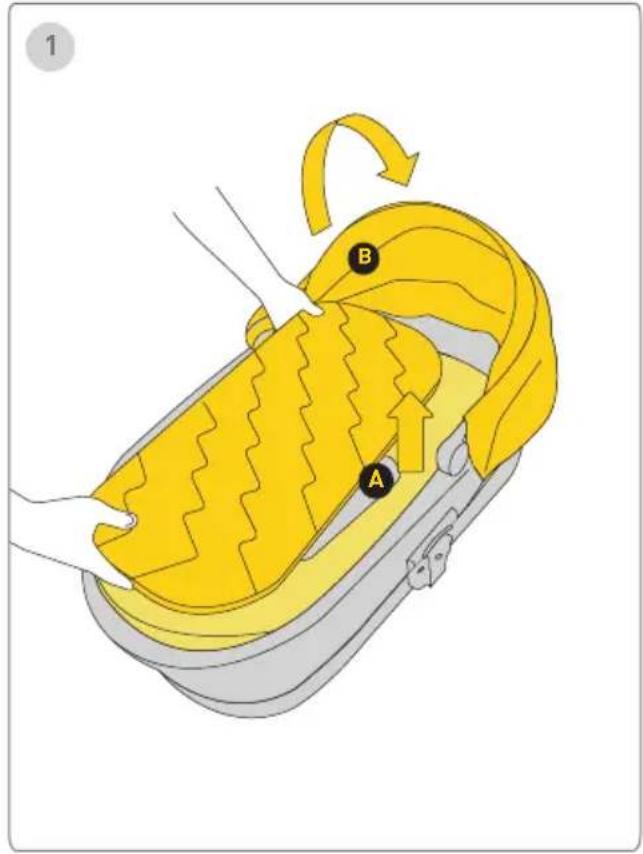
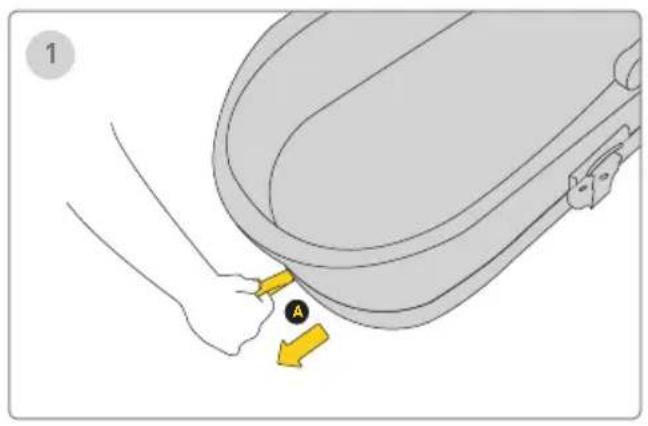
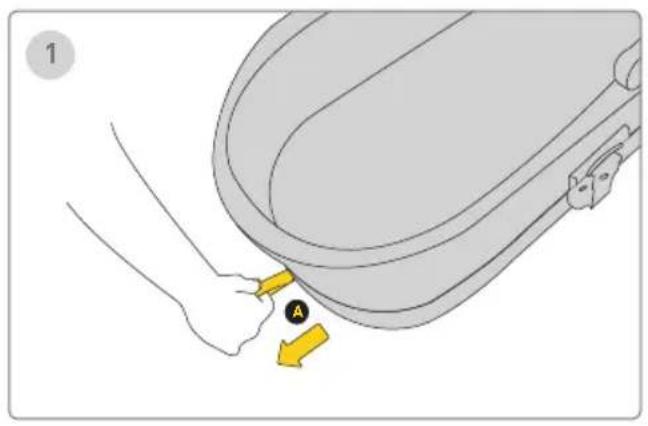
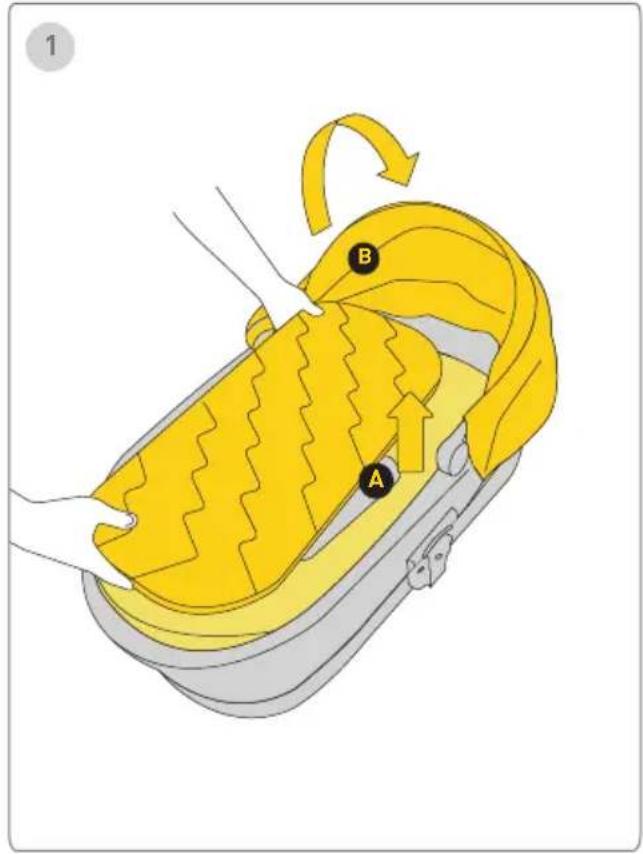
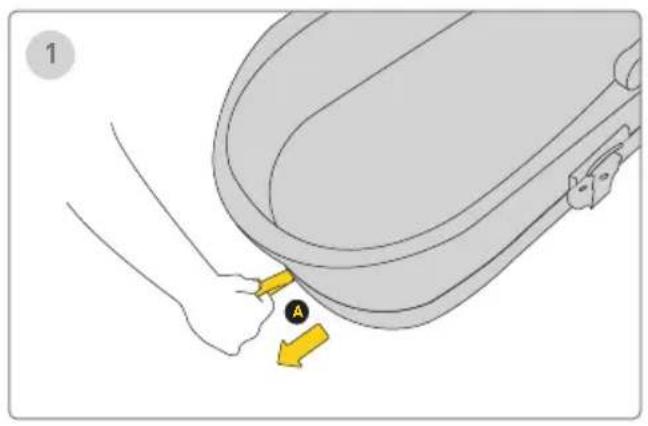
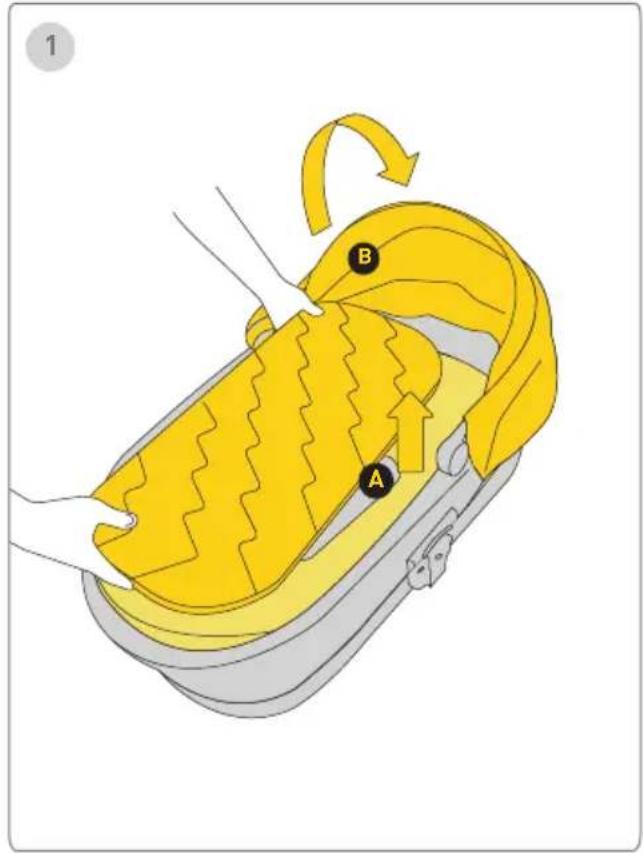
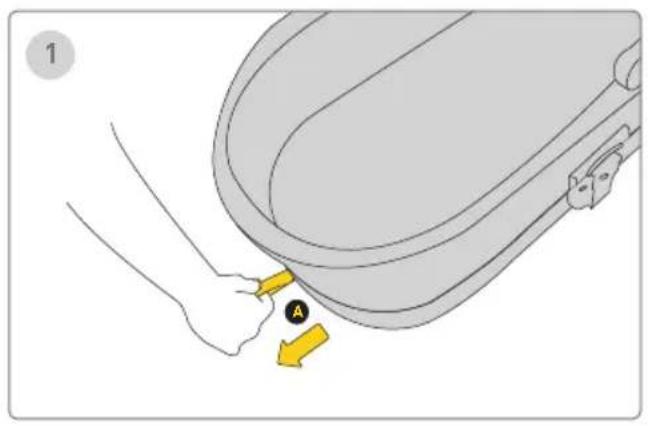
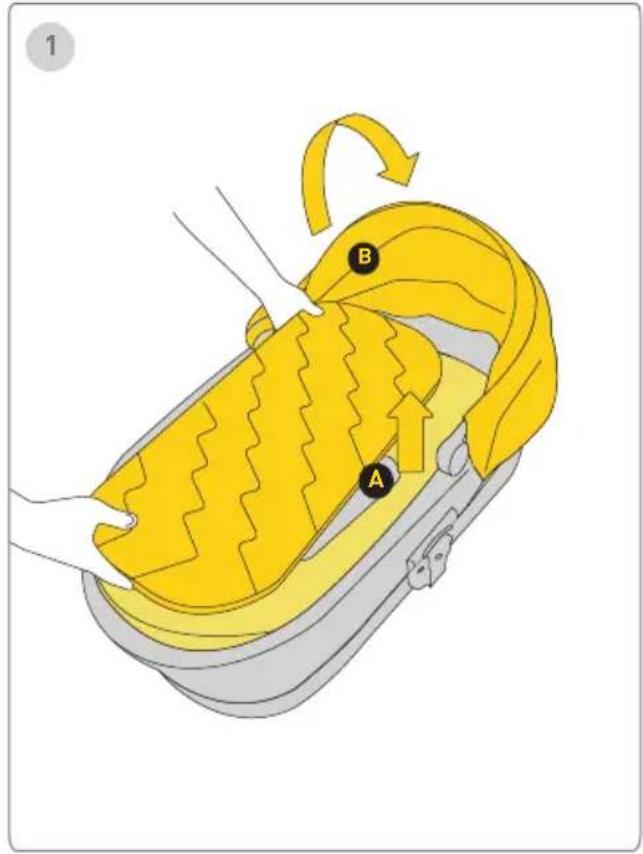
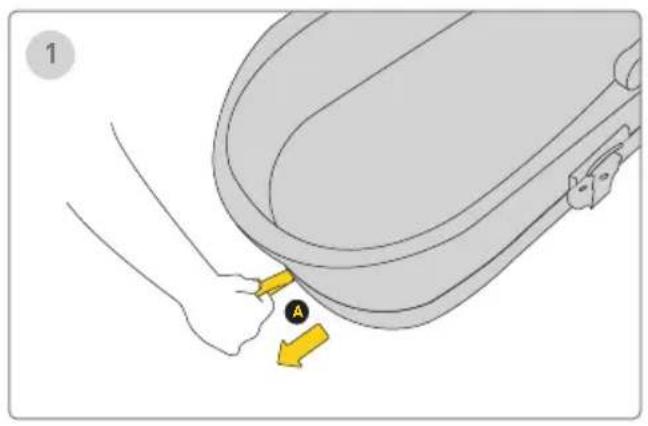
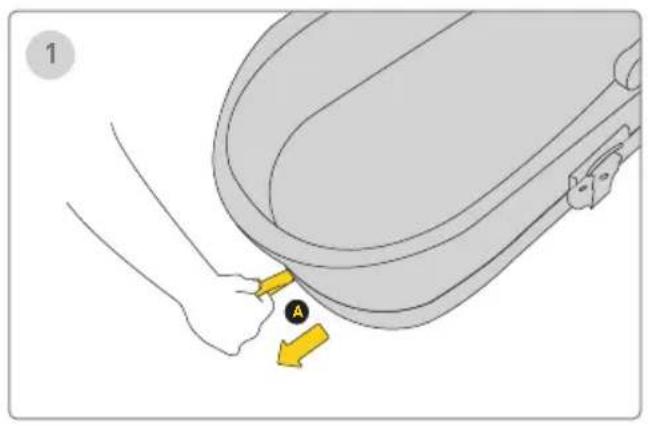
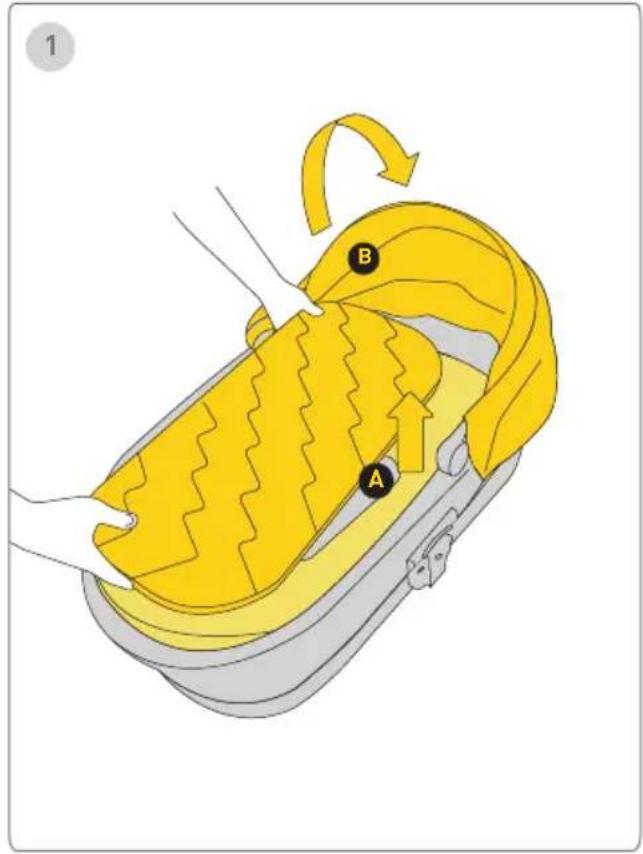
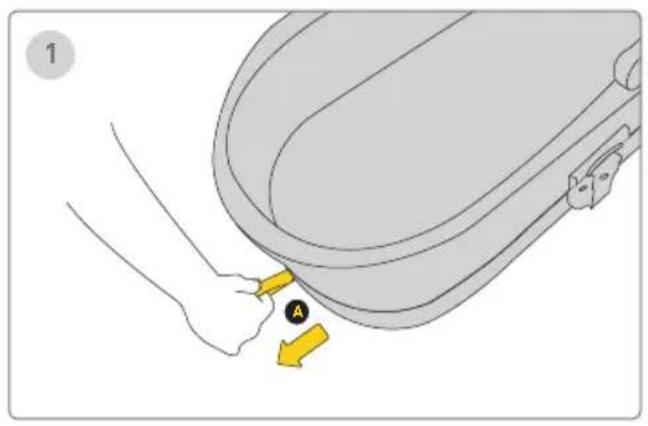
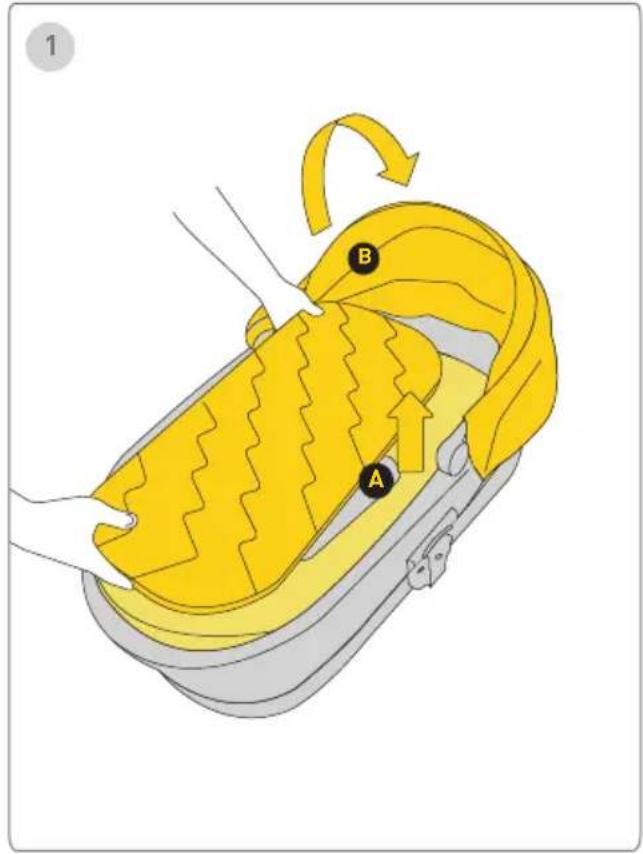
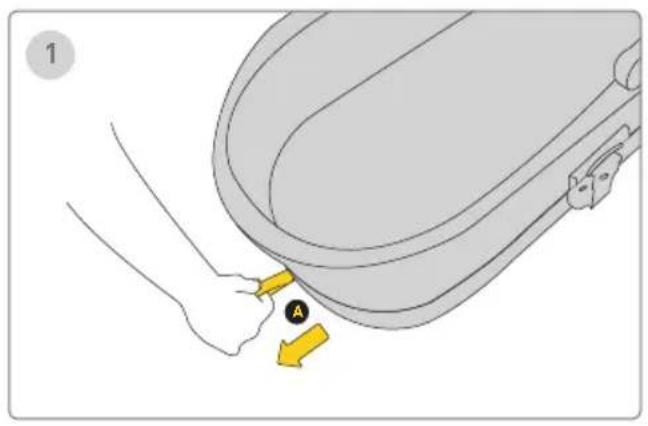
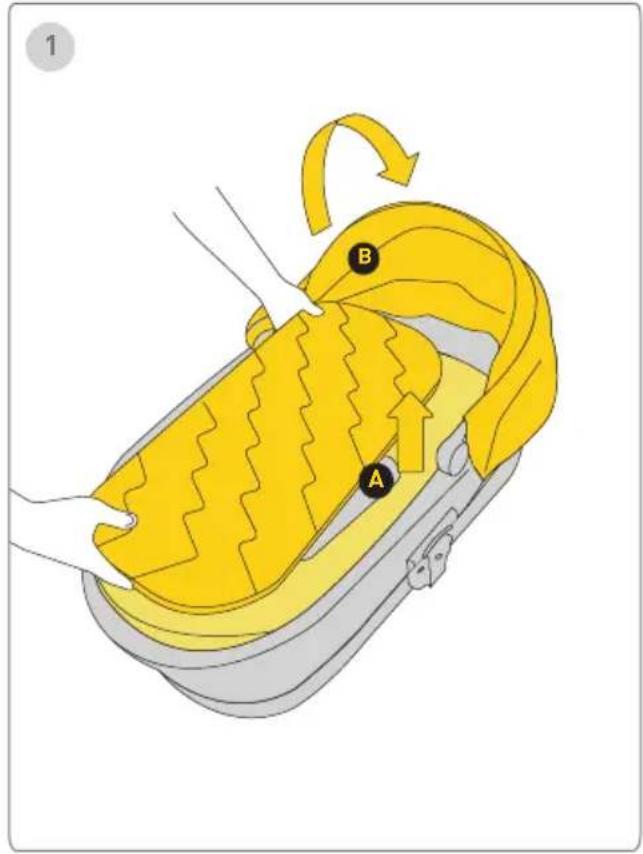
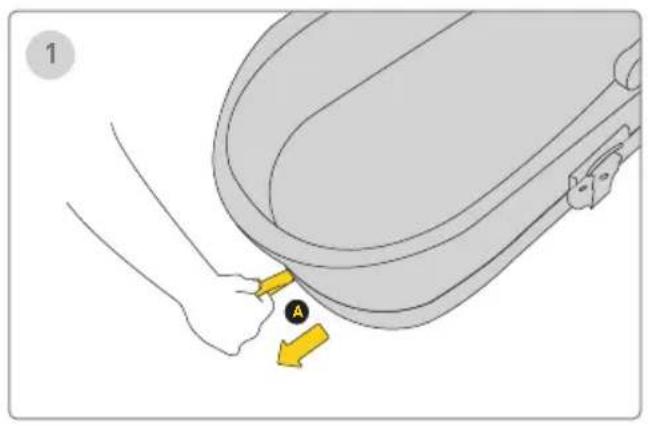
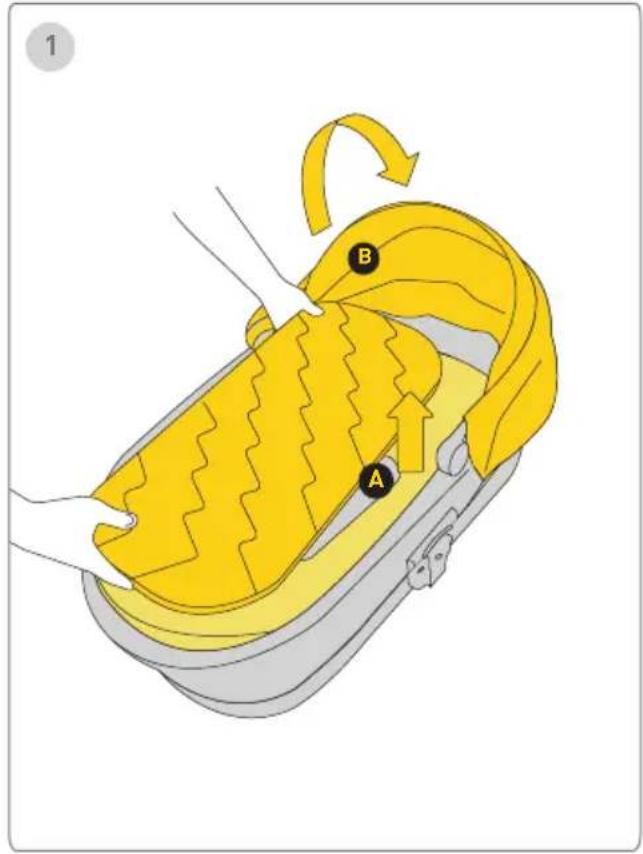
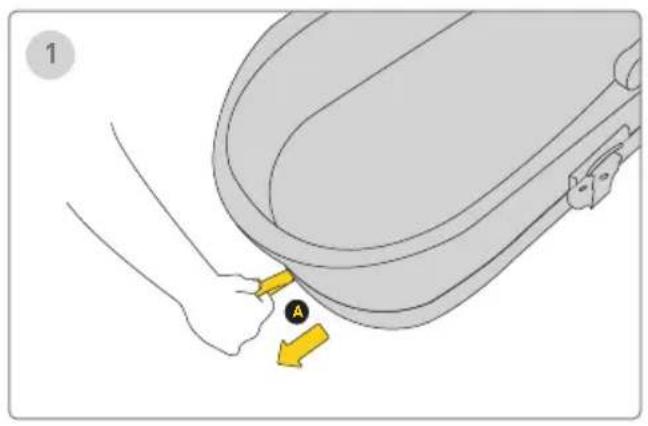
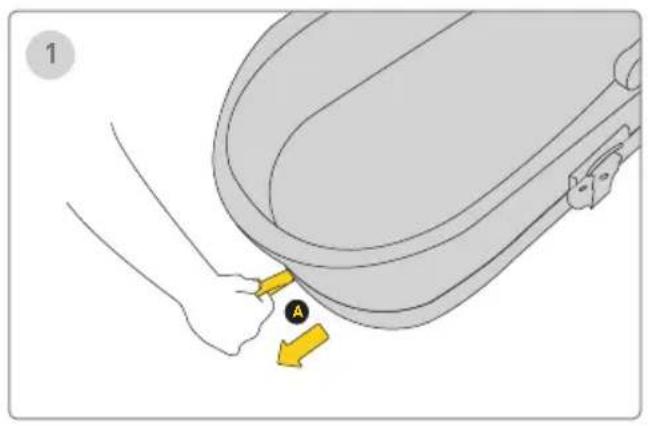
To unfold the carrycot, pull the strap located at the bottom of the carrycot until the sides are fully upright Ⓐ, holding the strap by both the upper and lower parts simultaneously. You can then adjust the level of unfolding using the upper or lower strap. The bassinet should be unfolded without the mattress.
!Ensure that the fastening wires are properly tightened by shaking the carrycot from side to side!
2 Step
Zipper carrycot filling around a carrycot .
3 Step
Place the mattress pad into the carry cot and smooth it down. . Always use the mattress pad when using the carry cot Mattress pad cover can easily be removed to wash.
4 Step
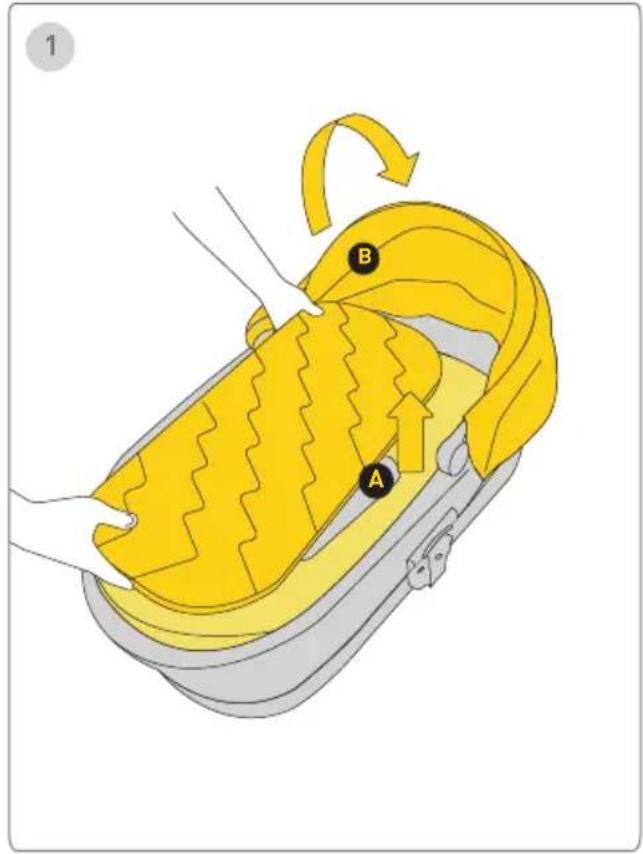
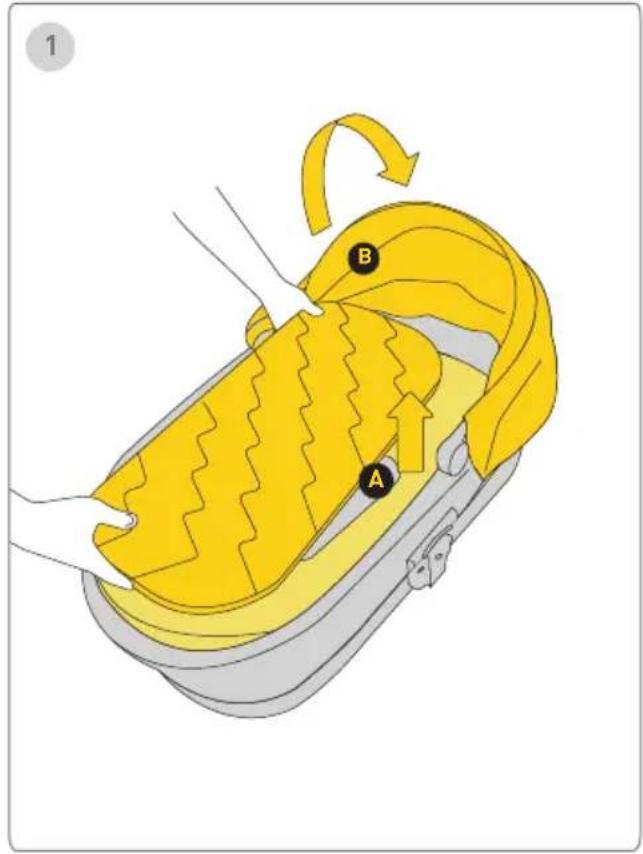
Attach the carry cot cover to the carry cot with the zippers on either side.
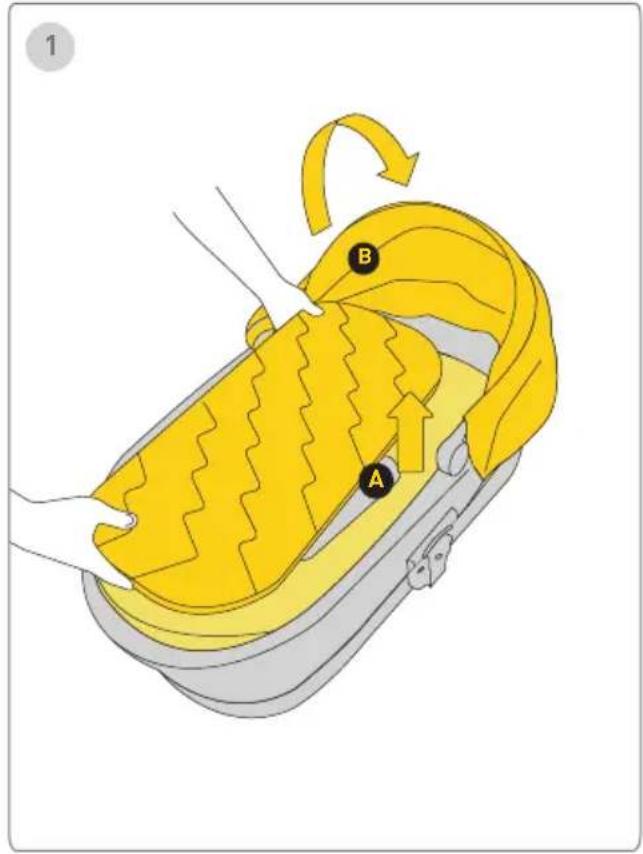
Product setup - folding carrycot
text_image
1 B A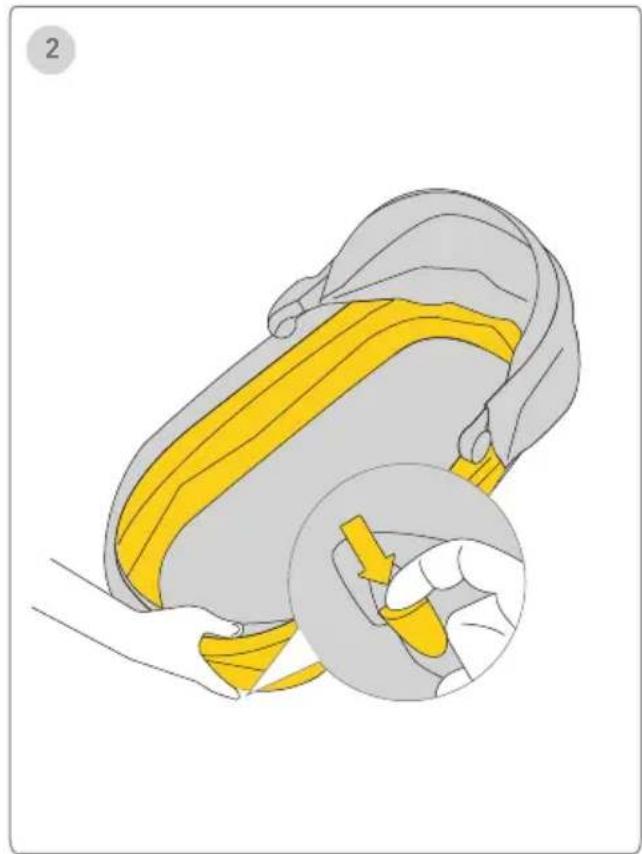
natural_image
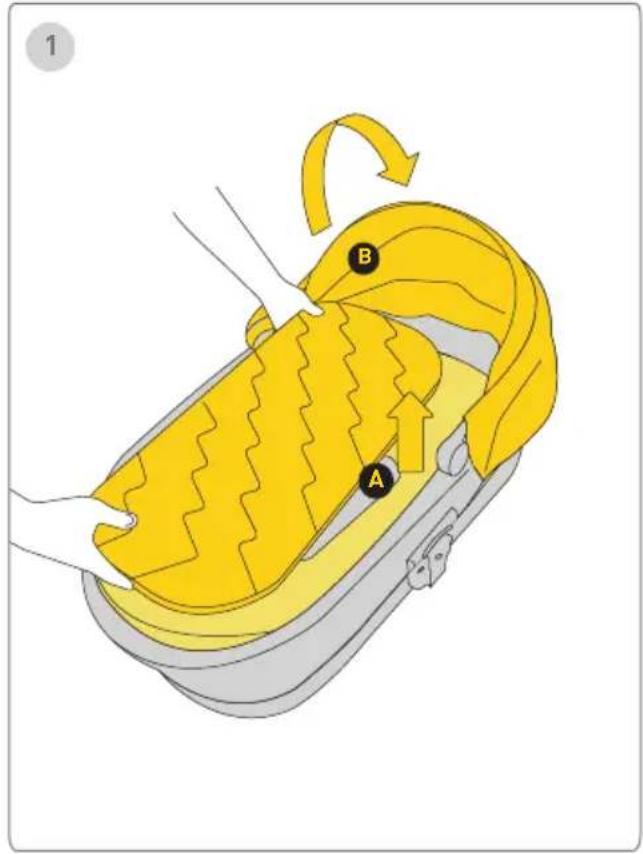
Illustration of a yellow belt buckle being lifted, showing the seat and grip mechanism (no text or symbols)Folding the Carrycot:
1 Step
Remove the mattress and fold the canopy.
2 Step
Release the strap using the button located at the bottom of the carrycot until the sides are completely folded down.
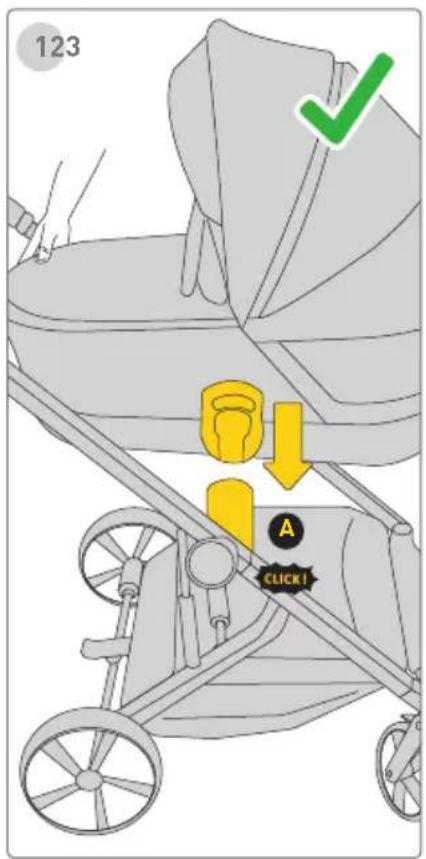
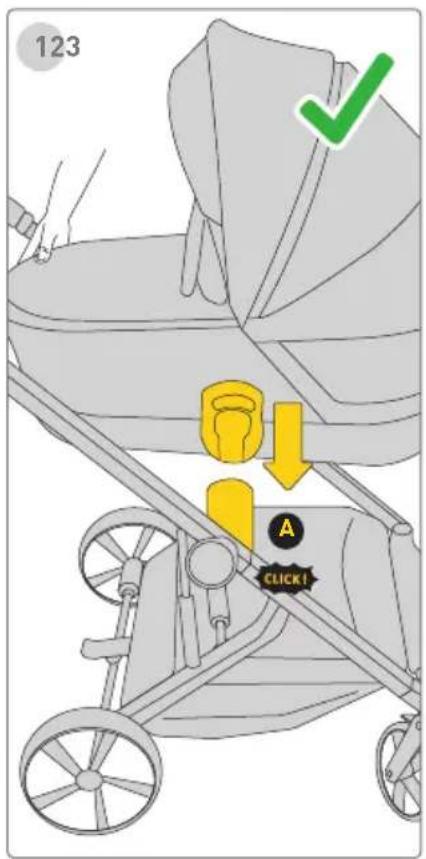
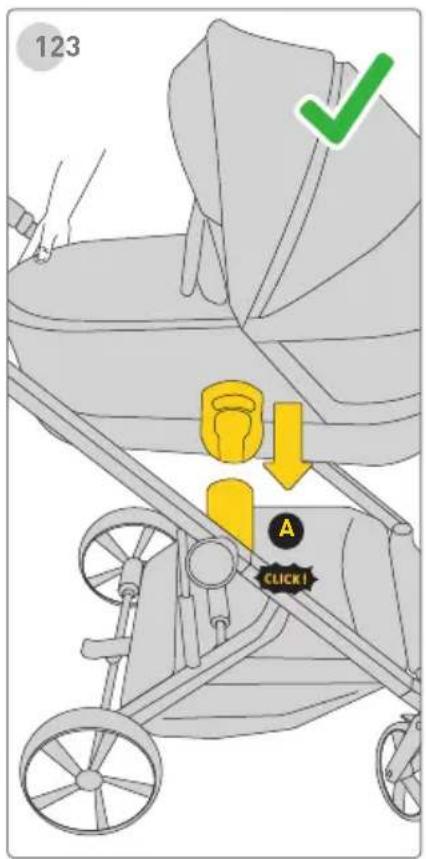
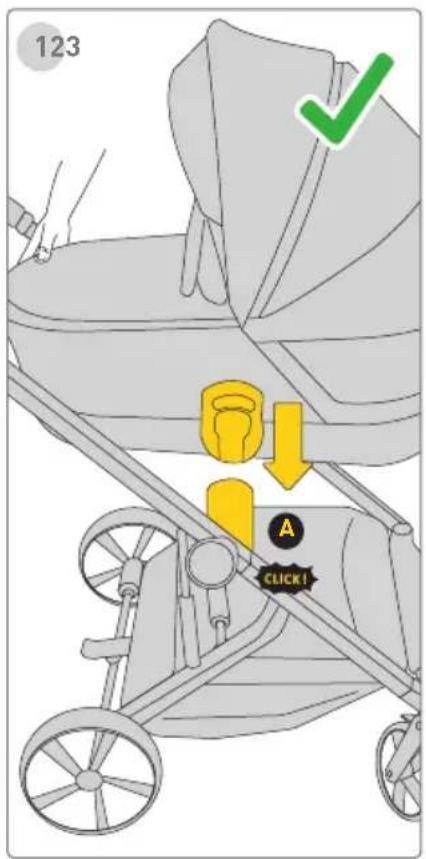
Carry Cot Attachment on Stroller Frame Carry Cot Removal
text_image
123 A CLICK!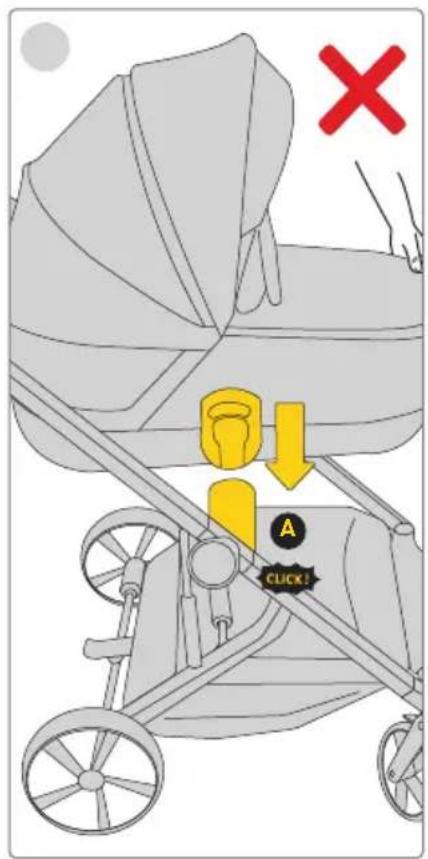
text_image
X A CLICK!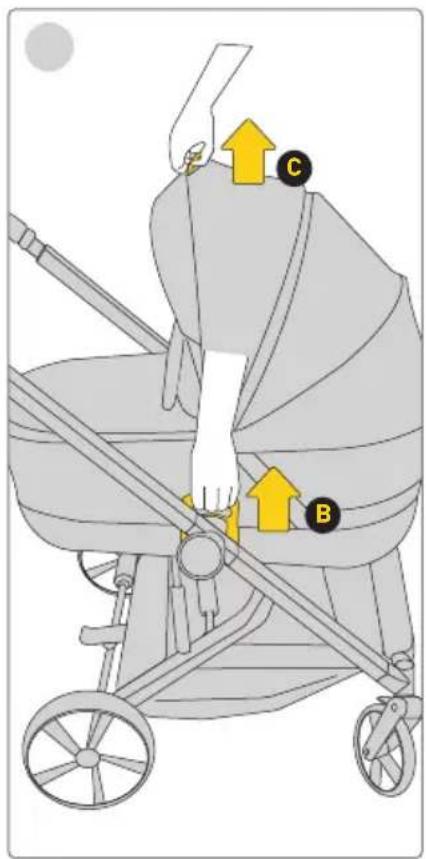
text_image
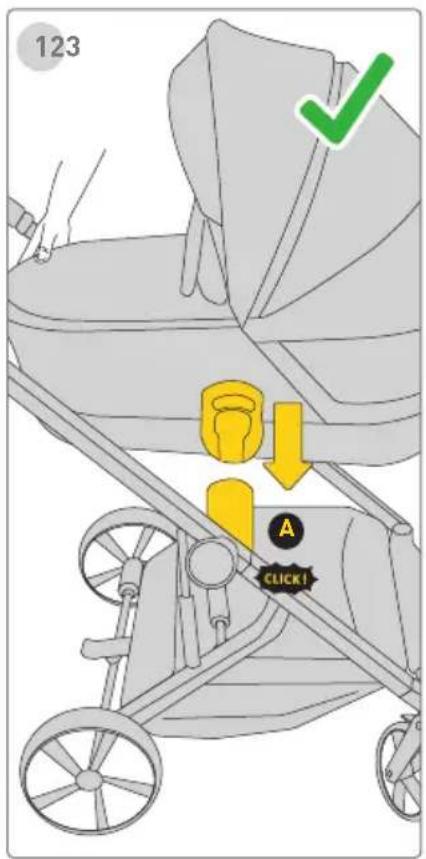
Diagram of a baby stroller with labeled parts C and B, showing hand positioning and directional arrows indicating movement or force.Carry Cot Attachment on Stroller Frame
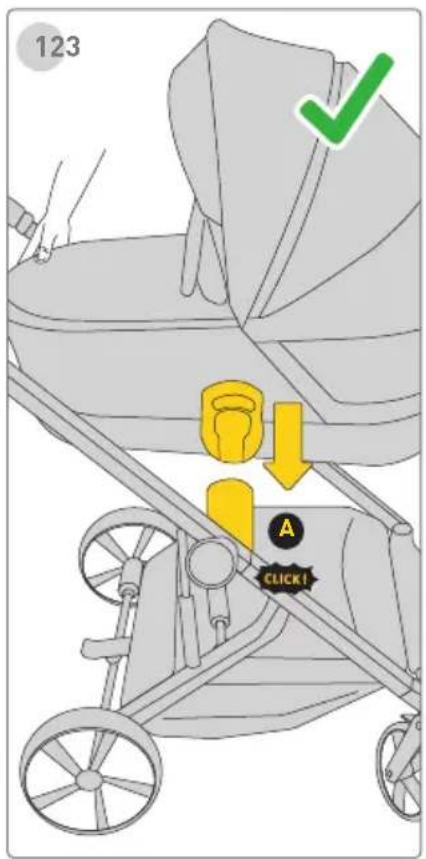
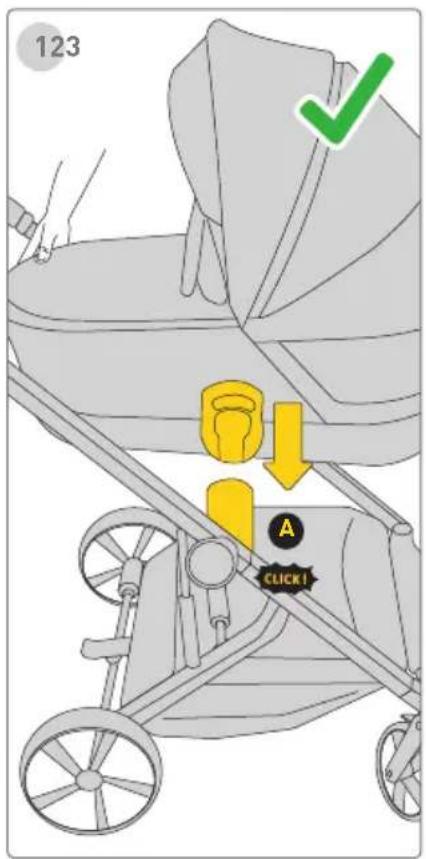
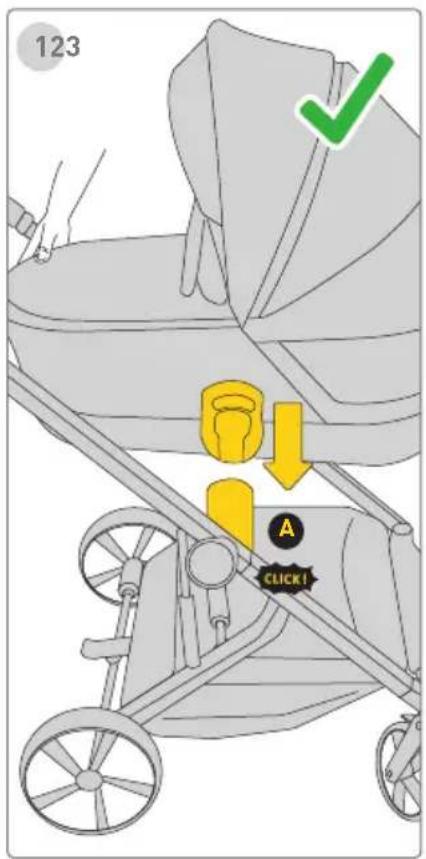
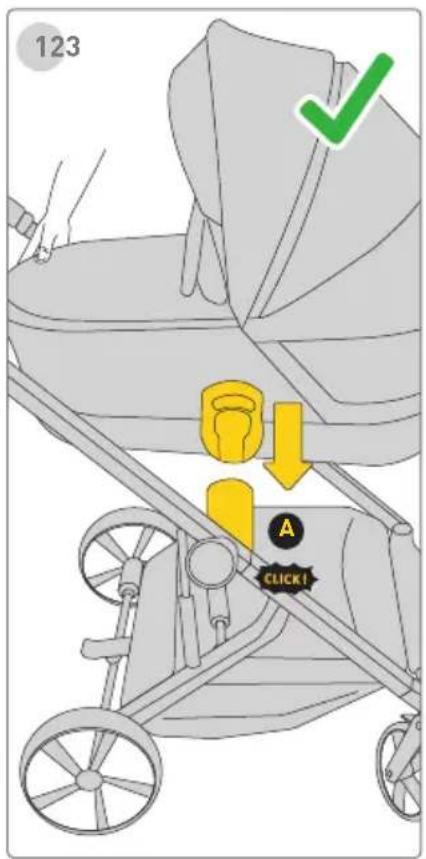
1 Step
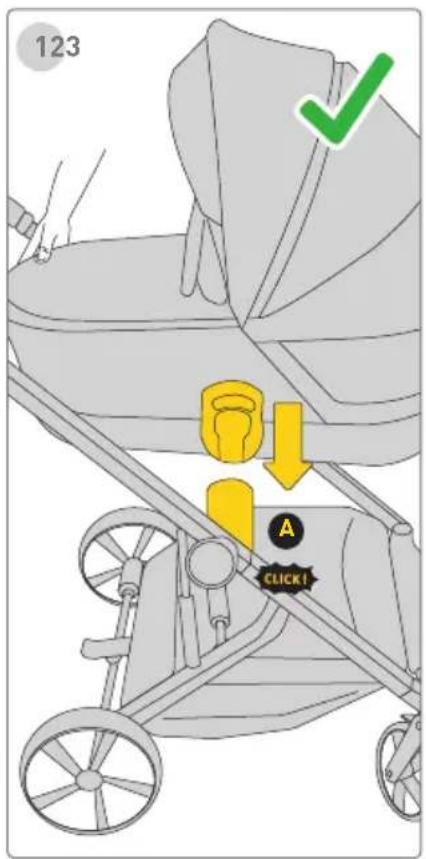
To attach carry cot to the stroller frame, align the sides of the carry cot with the seat mounts. Place the carry cot directly down until it clicks into place. A "click" sound means the carry cot is attached completely.
2 Step
Carrycot can be only attached rearward facing. Do not mount it other way.
Carry Cot Removal
3 Step
To dismount carrycot, please pull handles of adapters in both sides. A "click" sound means the carry cot adapters are open. Pull out carrycot from mounting in fram. Remove carrycot before folding a stroller.
Canopy Carrycot window
text_image
1 B A CLICK!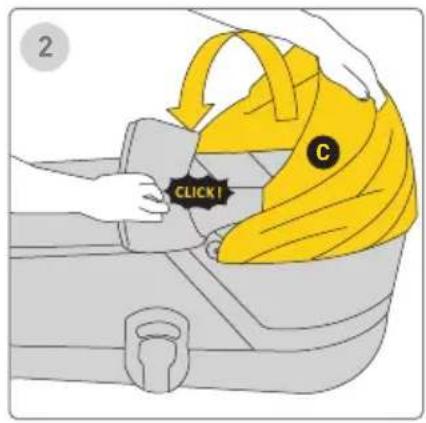
text_image
2 C CLICK!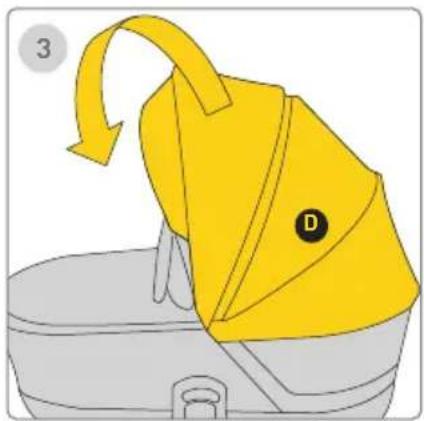
natural_image
Illustration of a yellow bag with a black circular mark labeled 'D' and an arrow indicating rotation, placed on a gray surface (no text or symbols)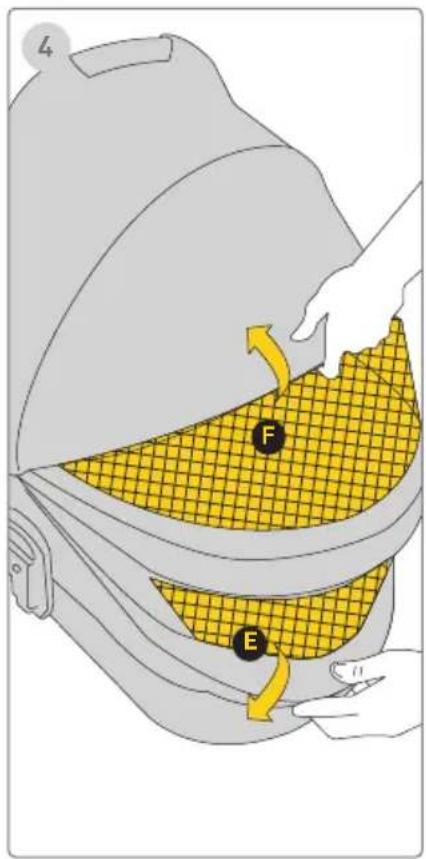
text_image
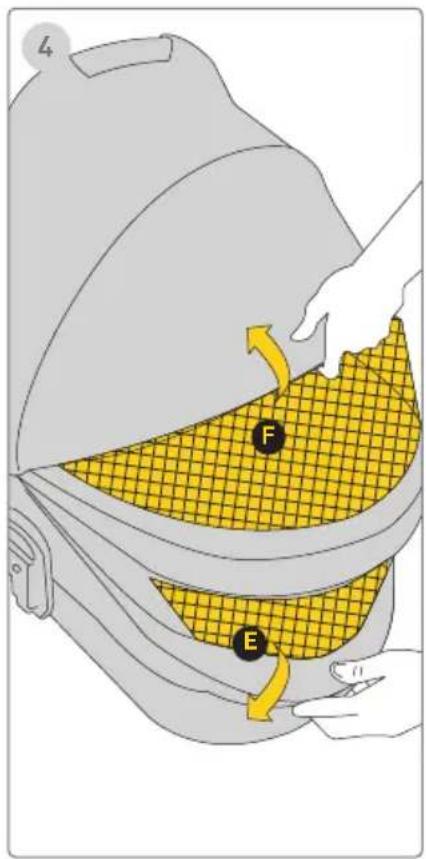
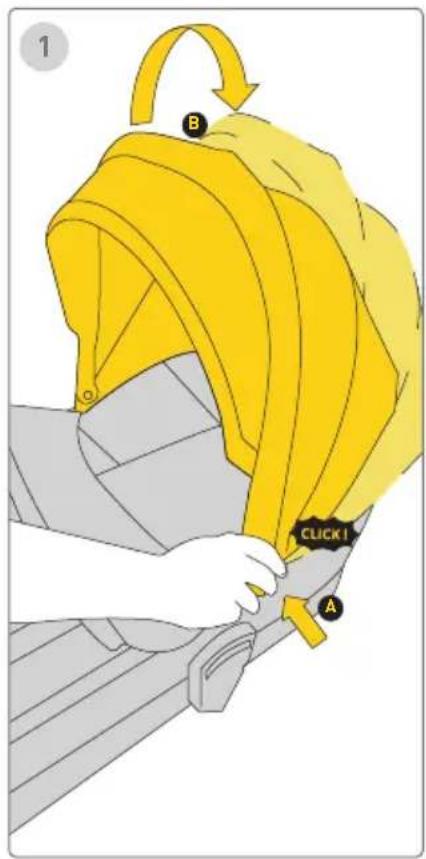
L F ECanopy
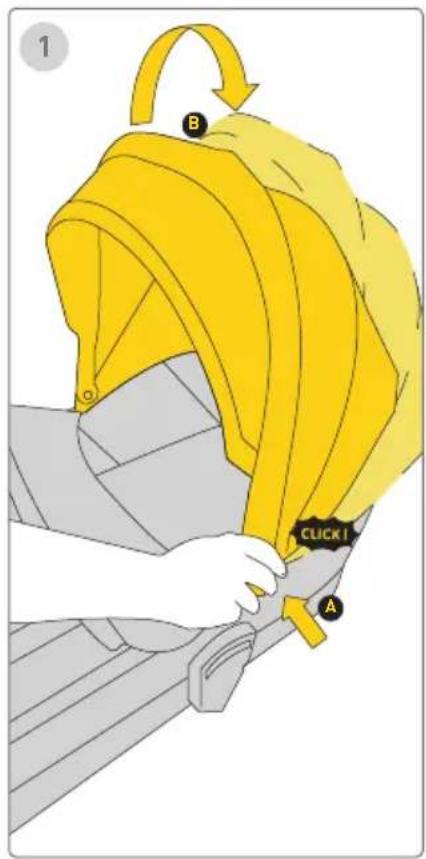
!!Check to make sure the handle is secure before placing the child in the carry cot!
1 Step
To fold canopy push canopy adjuster buttons and fold canopy back.
2 Step
To unfold canopy pull out canopy to upright position . "click" sound means that canopy is in upright position.
3 Step
To unfold canopy fully push canopy adjuster buttons a pull out canopy all the way out.
Carrycot window
4 Step
Unzip the carry cot window fabric and fold it down E and up F.
Safety, use and travel
- Any load attached to the handle, the backrest, or the sides of the stroller may affect its balance and stability. The maximum load for the bag is 1.5 kg, and for the shopping basket, it is 10 kg.
- The stroller is intended for only one child.
- Do not lift the stroller using the bumper bar in the stroller seat version or the canopy, as they are not carrying handles.
- The stroller seat version is not suitable for newborns.
- All locking devices and parking brakes should be engaged when placing the child in the stroller and when taking the child out of the stroller.
• Always use a parking device when parking.
• Always remove the child before folding the stroller. - Never park the stroller on a slope, slippery, and/or uneven surface.
- Do not carry the child in the stroller.
- Never use the product if any part of it is defective or damaged. Using a faulty product poses a risk to the child's safety. Contact a service center to resolve/repair the issue.
- Only use spare parts provided or recommended by the manufacturer/distributor.
- Regularly check the product for signs of damage or wear.
- Do not modify this product, as it may compromise the child's safety. The manufacturer is not responsible for any modifications made to the product.
- Ensure that the child's hands are not in areas where they could be pinched when the stroller or its parts are being folded, unfolded, adjusted, or modified.
- Do not place or seat the child on the footrest. The footrest is designed to support the legs and feet of only one child. Any other use may result in serious injury. The maximum weight capacity of the footrest is 5 kg.
- Make sure your child stays away from moving parts (e.g. wheels) as there is a risk of injury.
- This product is not a toy, so do not let your child play with it or climb on it. If the stroller tips over on your child, it could cause serious injury.
- Before use, check that all zippers, snaps and fasteners are securely fastened. Avoid situations where the use of the stroller is extreme and may reduce your control over the child and the stroller.
- Never use a pushchair/stroller on stairs or escalators, especially with a child in it. This may endanger the child's safety and damage the product.
-
Never pull the stroller behind you when the front swivel wheels are unlocked. The stroller can turn on its own, which can lead to a safety hazard if you are not careful and attentive.
-
Crossing railway/tram tracks can be particularly dangerous as the wheelchair wheels can become wedged in them. We recommend that you lock the swivel wheels. Be careful!
- Do not use or leave the carrycot or stroller near open flames or other heat sources such as radiators or other.
- When transporting the stroller in the trunk of a car, make sure that the trunk lid does not exert pressure on the product as this may damage the stroller.
- Please note that small parts such as axle covers may be swallowed by a child during transport, which may cause choking.
- Keep plastic packaging materials out of the reach of children to avoid danger of suffocation or choking.
- This product should not be used as a medical device. If your child has specific health needs related to transportation, you should consult a doctor.
- The safety instructions provided in this manual do not cover all possible conditions and unforeseen situations that may arise during use. It should be understood that common sense, caution, and care are factors that cannot be built into this product.
These factors are the responsibility of the caregiver using the stroller. - The chassis of the travel system - the car seat does not replace a carrycot or a crib. If the baby needs to sleep, after an outdoor walk, they should be placed in a carrycot or crib. Please limit the time the baby spends in the car seat to a minimum.
- For detailed information on installing the car seat, please refer to its instructions.
- Only the Avionaut Sirius carrycot, Avionaut Sirius stroller seat, and a car seat using special adapters can be mounted on the Avionaut Sirius frame.
- Do not use any additional accessories that are not recommended by the manufacturer.
- The carrycot with the child cannot be carried by the handle on the hood.
- The carrycot must be mounted on the frame only and exclusively towards the carer.
- The gondola is intended only for the Avionaut Sirius frame.
Maintenance and Cleaning:
Keeping the stroller clean and well-maintained is important for preserving its good condition.
- The upholstery of the Avionaut Sirius stroller can be washed at 30 degrees Celsius in a washing machine at up to 600 rpm.

- Keep your stroller clean. If it gets dirty or wet, dry it and clean the other parts with a dry cotton or flannel cloth.
- Remove dirt from the stroller as quickly as possible.
- Do not use moisturizers or harsh cleaning agents for washing or maintenance.
- The stroller upholstery can be cleaned using a mild detergent and a damp cotton or flannel cloth; there is no need to remove the upholstery.
- Keep the wheels and chassis clean; remove sand and mud as soon as possible after they become dirty using a soft brush and water. Check the wear level of the wheels regularly.
- It is recommended to use a rain cover over the entire stroller to prevent excessive soaking. Avoid overexposing the stroller to rain. If it gets wet, dry it as quickly as possible to prevent streaks and stains from forming on its surface due to exposure to rainfall.
Environment
Keep plastic packaging parts out of children's reach to avoid risk of suffocation or swallowing.
- For environmental protection reasons, at the end of your stroller's life, please dispose of it at an appropriate waste management facility in accordance with applicable local regulations.
Questions
If you have any questions, please call your dealer or authorized distributor.
Guarantee
- The Avionaut Sirius stroller is covered by a 24-month warranty.
• We hereby certify that the product has been manufactured in accordance with the current requirements of European safety and quality standards and that, at the time of purchase, the product is free from manufacturing and material defects. It complies with all the requirements of the EN 1888-2:2018+A1:2022 standard. - The warranty is valid in the country of purchase and is implemented by an authorized distributor. The warranty covers all manufacturing defects in materials and workmanship, provided that the product is used in accordance with the operating instructions, in normal conditions, by the first and end user and within 24 months from the date
of purchase. Avionaut assumes responsibility for repairing or replacing the defective product, but the guarantor decides on the method of removing the defect and handling the claim.
- The warranty does not cover damage caused by everyday use, such as fabric wear, natural loss of colour, deterioration of materials resulting from the natural ageing of the product and mechanical damage to the wheels.
- The warranty also does not apply in the event of product damage, accidental damage, abrasions, scratches. Failure to follow the operating instructions, improper use, defects resulting from negligence, caused by fire, contact with liquid or other external causes.
- At the time of filing a complaint, the Avionaut Sirius wheelchair must have all labels or identification number and may only be serviced by an authorized person.
- It is not recommended to use additional equipment not authorized by the manufacturer. In the event of damage, the manufacturer is not responsible for the consequences of using non-standard elements.
- The warranty is only valid if the product was purchased from an authorized dealer or distributor with the original proof of purchase.
Filing a complaint:
- Want to make a complaint? When you notice a defect and want to make a complaint, contact the dealer from whom you purchased the Sirius Avionaut stroller. When making a complaint, you must present proof of purchase, which must be made within 24 months preceding the service request.
- If it is necessary to send the product to a service point, the product must be returned to the distributor or seller. The method of shipping and its costs must also be agreed, because in the absence of such agreement the warrantor may refuse to cover the shipping costs.
- Damage and/or defects that are not covered by our warranty or consumer rights and/or damage and/or product defects that are not covered by our warranty may be repaired for an agreed fee.
Consumer rights
- The consumer has legal rights according to the applicable legislation, which may vary from country to country. This guarantee does not affect the consumer's legal rights which are subject to the applicable national legislation.
- This warranty was prepared by Ł. Karwala, a company registered in Poland.
Company address:
Ł.KARWALA
Szarlejka,
- Products purchased with removed labels or identification numbers are considered unauthorized. Since the authenticity of such products cannot be determined, the warranty does not cover them.
- If you decide to buy a used stroller choose one whose usage history you know.

natural_image
Illustration of two baby strollers with different seat designs (no text or symbols)¡IMPORTANTE!
text_image
Diagram of a mechanical device with labeled components A and B, showing directional arrows indicating motion or flow.Despliegue del chasis del cochecito
1 Paso
Front Wheels/Rear Wheels
text_image
1 CLICK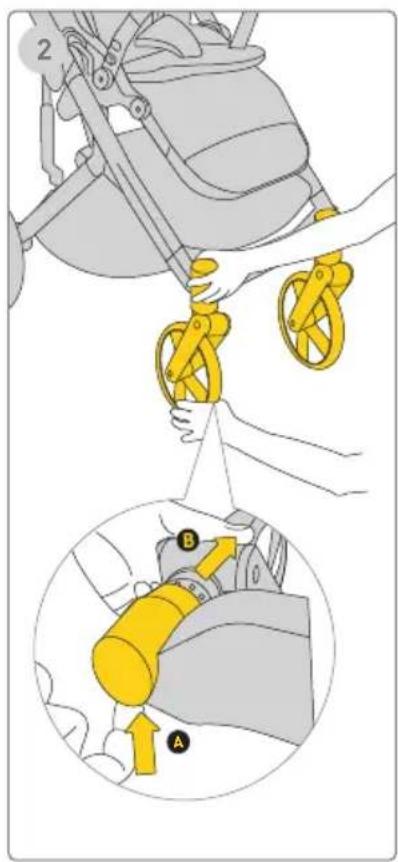
text_image
Diagram illustrating a mechanical device with labeled parts A and B, showing hand positioning and assembly steps.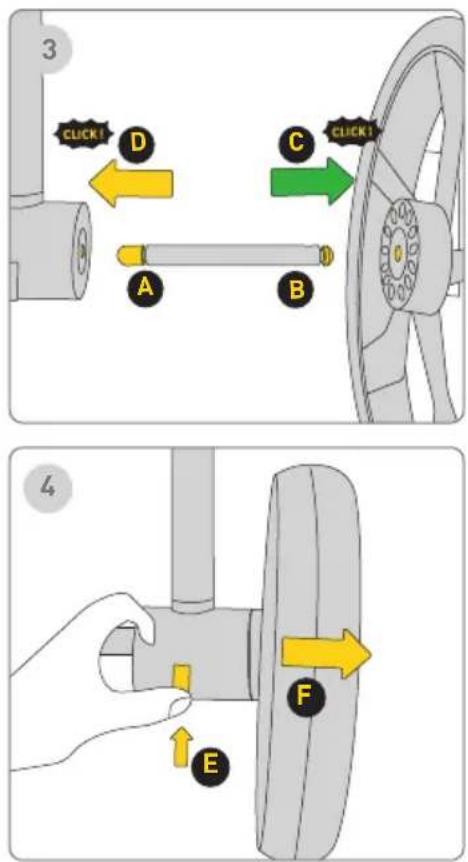
text_image
3 CLICK! D A B C CLICK! 4 ERuedas delanteras
1 Paso
text_image
Diagram illustrating a hand operating a car seatbelt with labeled parts B and C, showing yellow directional arrows indicating movement.Barra de protección
natural_image
Illustration of a stroller with yellow railings and wheels, no text or symbols present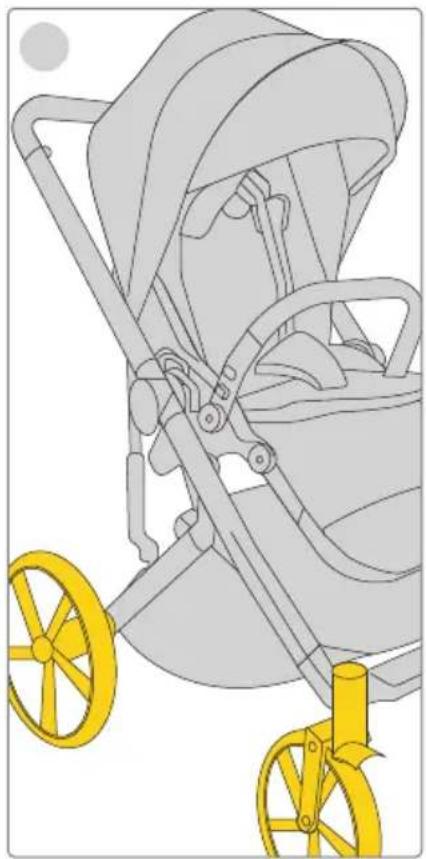
natural_image
Illustration of a stroller with yellow wheels and handlebars, no text or symbols present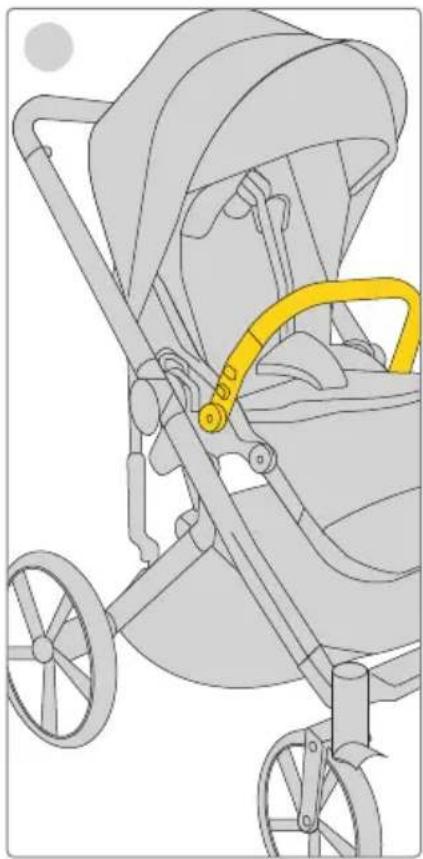
natural_image
Illustration of a stroller with yellow belt and wheels, no text or symbols presentnatural_image
Illustration of a bird's head with a yellow beak and patterned neck, no text or symbols presentCapota
text_image
123 UNLOCK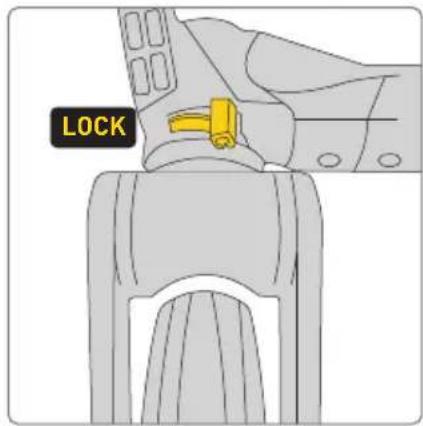
text_image
LOCK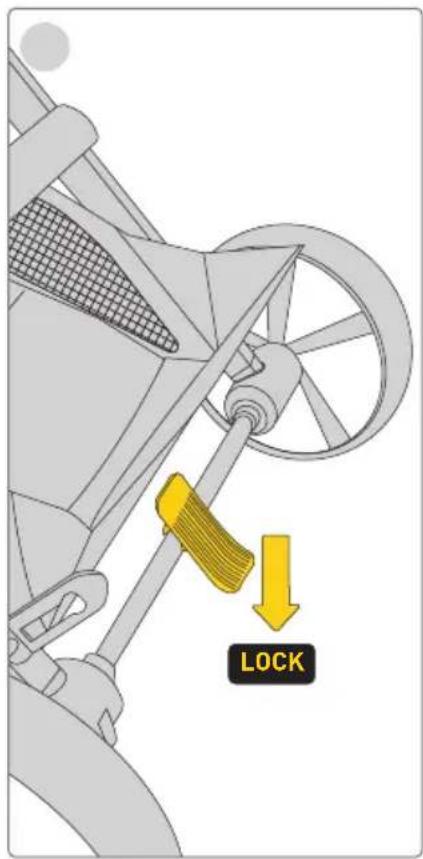
text_image
LOCK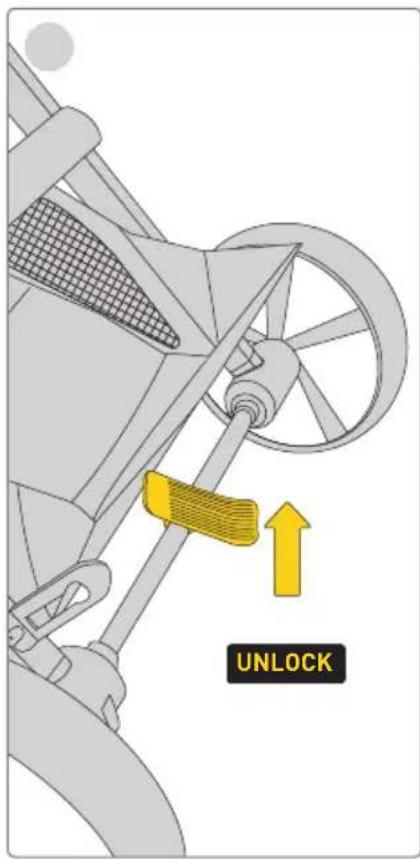
text_image
UNLOCKd l e Recline Adjustment
text_image
1 A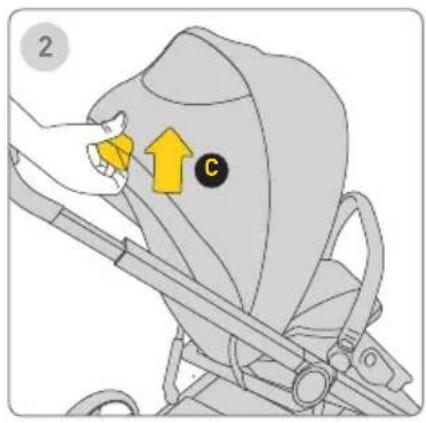
text_image
2 C
text_image
3 E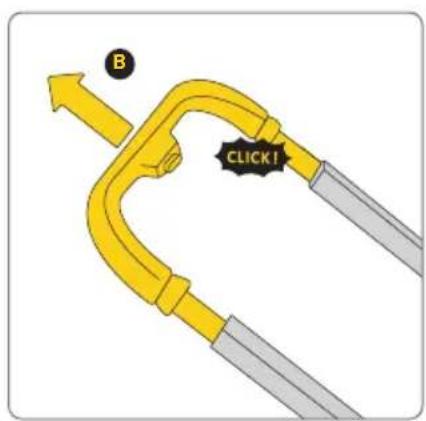
text_image
B CLICK!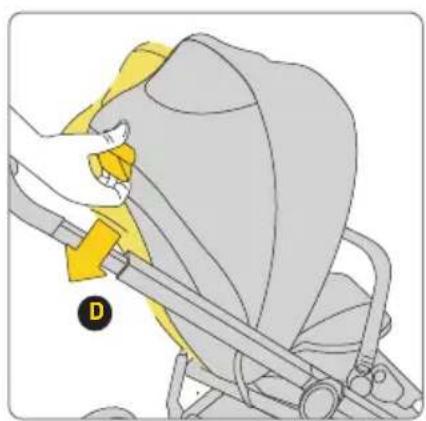
natural_image
Illustration of a hand adjusting a yellow belt switch on a gray seatbelt (no text or symbols)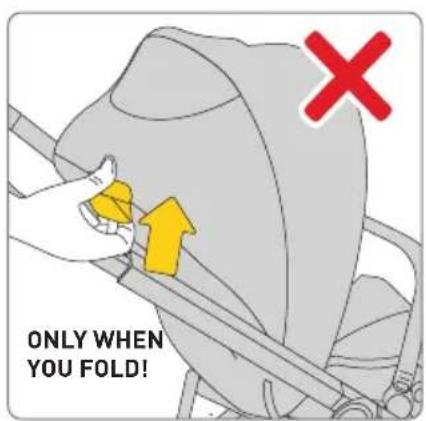
text_image
ONLY WHEN YOU FOLD!Manillar
text_image
Diagram showing mechanical components with yellow arrows indicating directional flow or movement, possibly illustrating a system or process.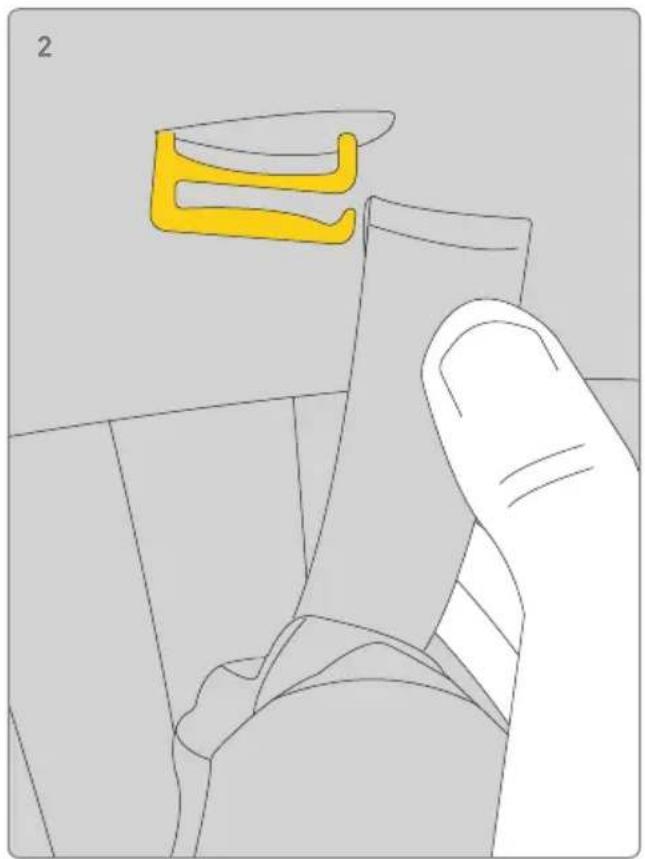
natural_image
Illustration of a hand holding a small object with a yellow abstract shape above it, no text or symbols present.Inserto
text_image
Diagram illustrating a mechanical assembly with labeled parts A and B, showing directional arrows indicating motion or movement.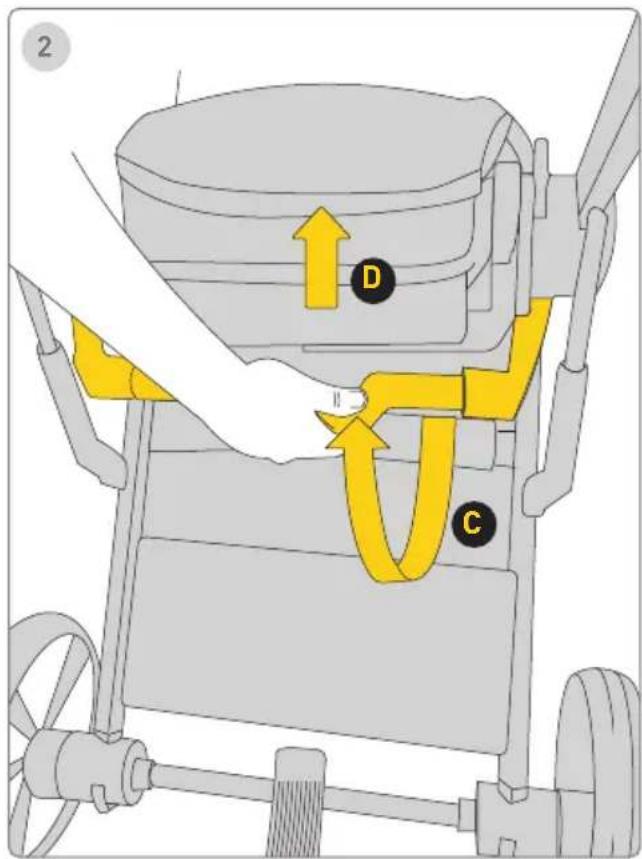
text_image
2 D CPlegado
text_image
Diagram showing a yellow mechanical device with labeled parts C and D, indicating assembly or positioning steps.Accesorios
text_image
Diagram of a mechanical clamp or bracket with labeled parts and directional arrows indicating motion or forceProduct setup - unfolding carrycot
text_image
1 A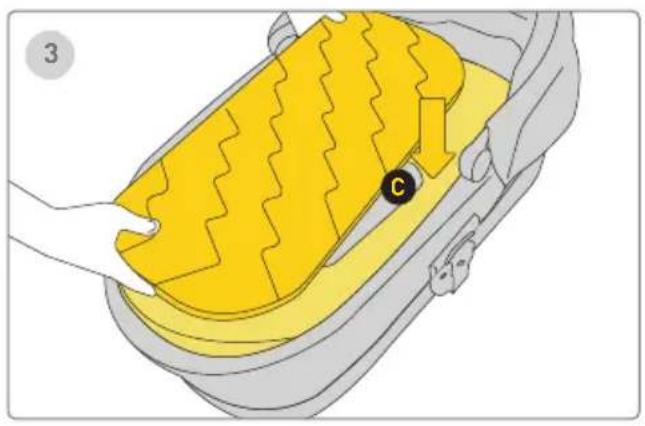
natural_image
Illustration of a car interior with yellow foam cushion and black circular marker (no text or symbols)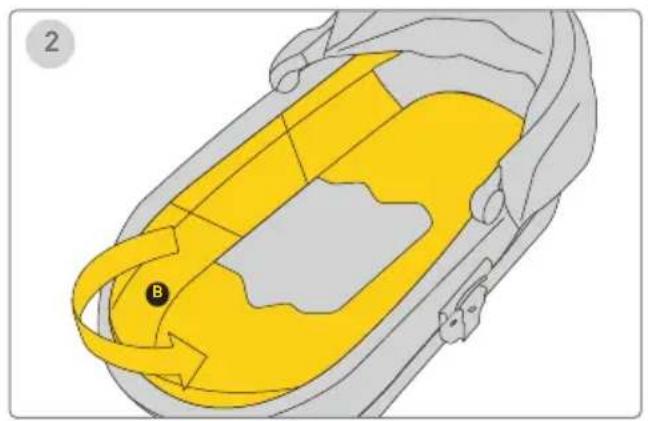
natural_image
Diagram of a car interior showing yellow and gray zones with a labeled point B (no text or symbols beyond label)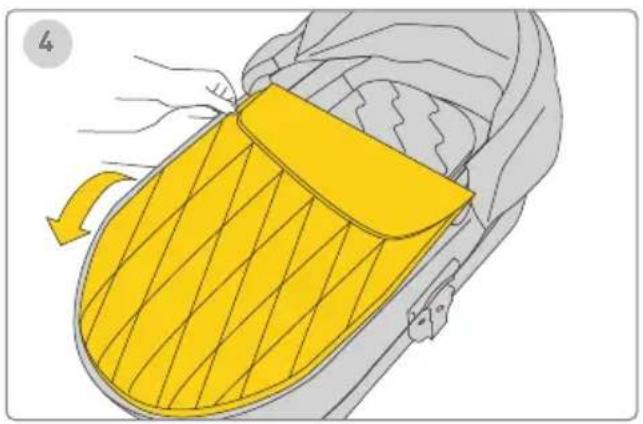
natural_image
Illustration of a yellow and gray car seatbelt with a handle, showing airflow direction (no text or symbols)Product setup - folding carrycot
text_image
1 B A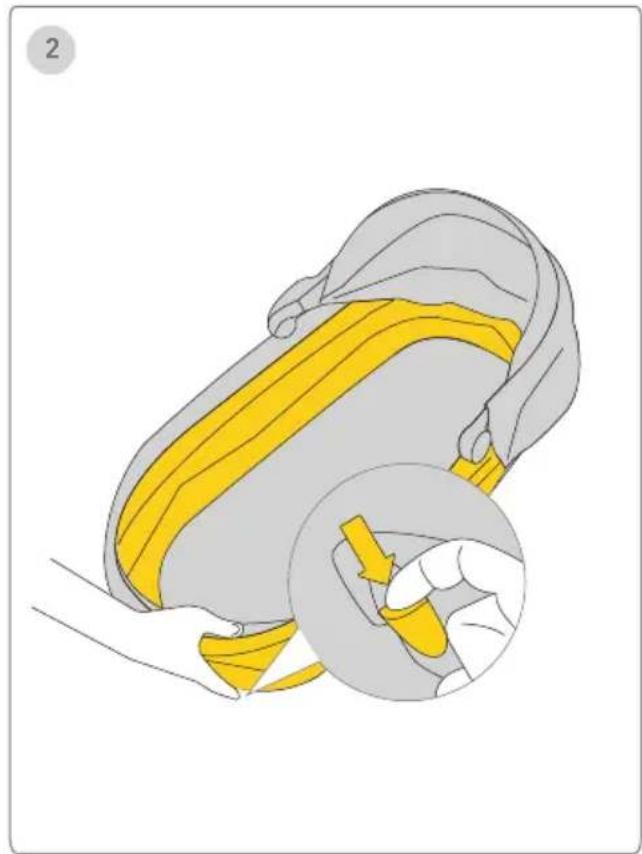
natural_image
Illustration of a yellow belt buckle being adjusted, showing the seat and grip mechanism (no text or symbols)Plegado del capazo:
1 Paso
Carry Cot Attachment on Stroller Frame Carry Cot Removal
text_image
123 A CLICK!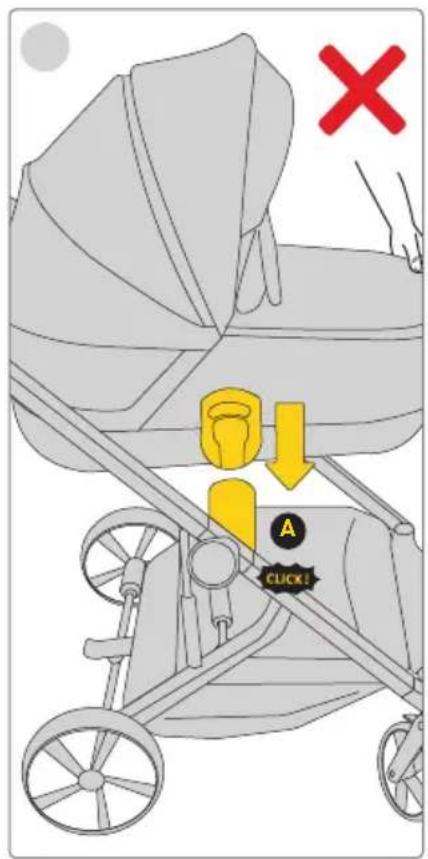
text_image
Diagram illustrating car seatbelt usage with a 'CLICK!' button and a red X mark indicating absence or rejection.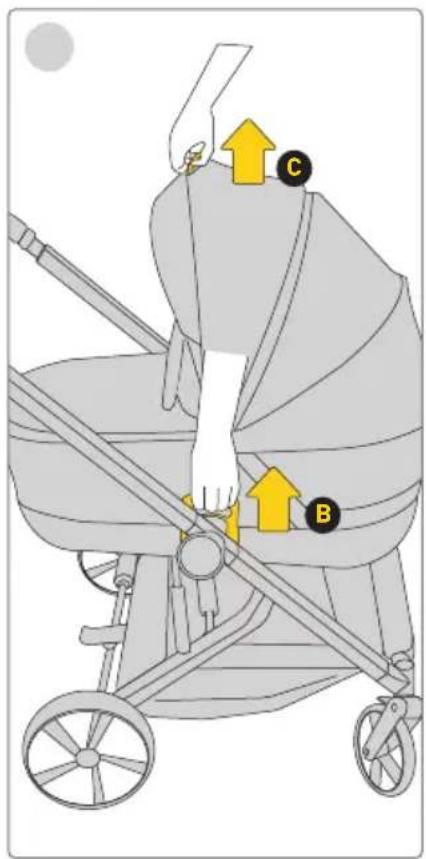
text_image
Diagram of a baby stroller with labeled parts C and B, showing hand positioning and directional arrows indicating movement or force.natural_image
Illustration of a yellow bag with a black circular mark labeled 'D' and an arrow indicating rotation (no text or symbols present)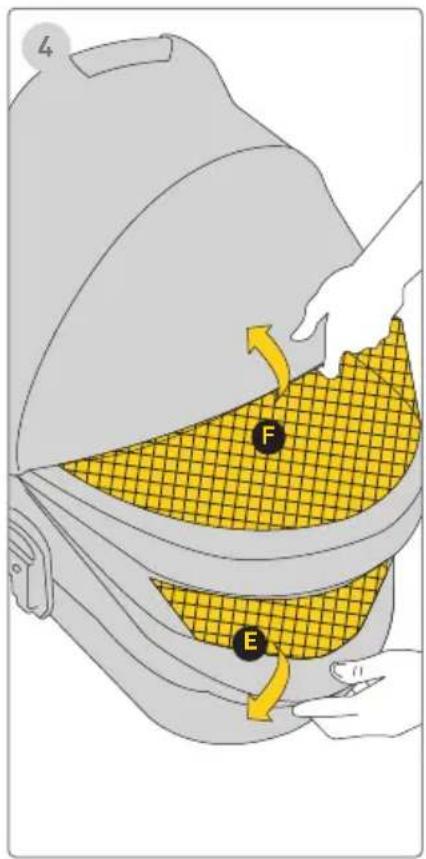
text_image
L F ECapota
natural_image
Illustration of two baby strollers with different seat designs (no text or symbols)IMPORTANT!
LISEZ ET CONSERVEZ POUR L'AVENIR COMME RÉFÉRENCE
AVERTISSEMENT!
text_image
Diagram of a mechanical device with labeled components A and B, showing directional arrows indicating motion or flow.Front Wheels/Rear Wheels
text_image
1 CLICK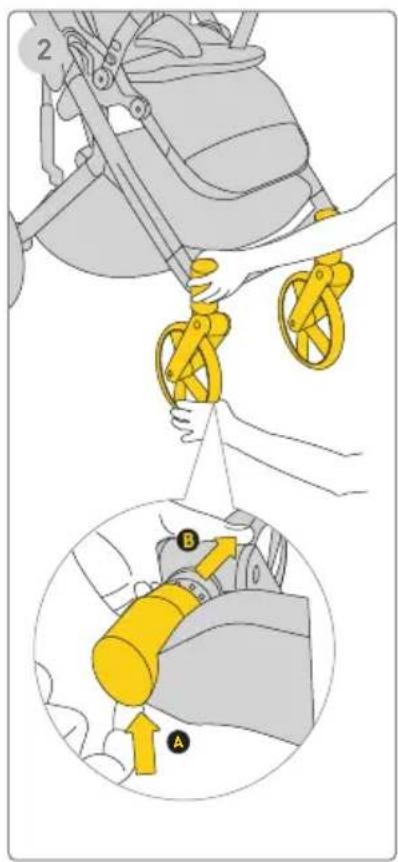
text_image
Diagram illustrating a mechanical device with labeled parts A and B, showing hand positioning and assembly steps.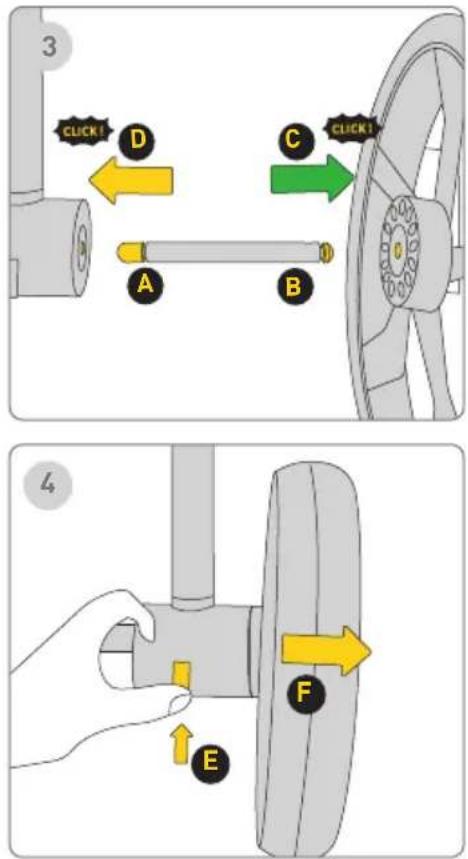
text_image
3 CLICK! D A B C CLICK! 4 ERoues avant
1 Étape
text_image
Diagram illustrating hand positioning and movement of a car steering wheel, labeled with points B and C and directional arrows.Barre de protection
natural_image
Illustration of a stroller with yellow frame and wheels, no text or symbols present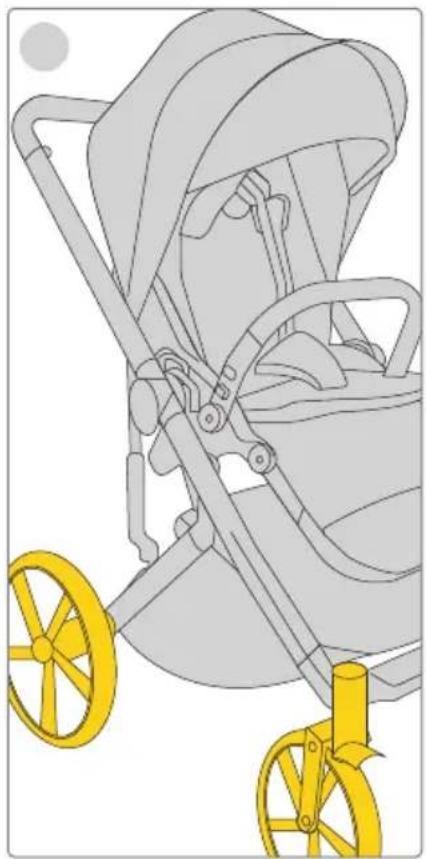
natural_image
Illustration of a stroller with yellow wheels and handlebars, no text or symbols present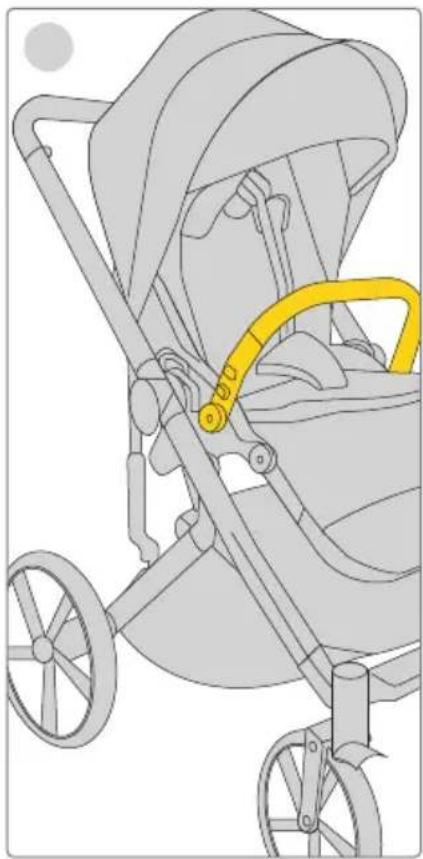
natural_image
Illustration of a stroller with yellow belt and wheels, no text or symbols presentnatural_image
Illustration of a bird's head with a yellow beak and patterned neck, no text or symbols presentCapote
text_image
123 UNLOCK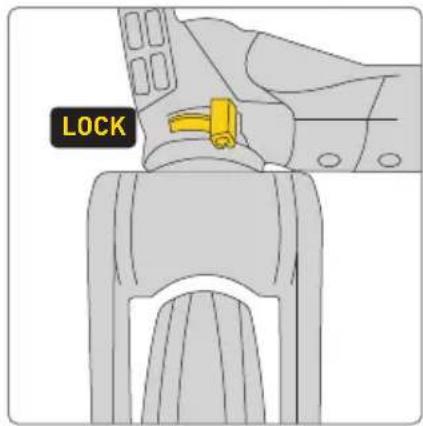
text_image
LOCK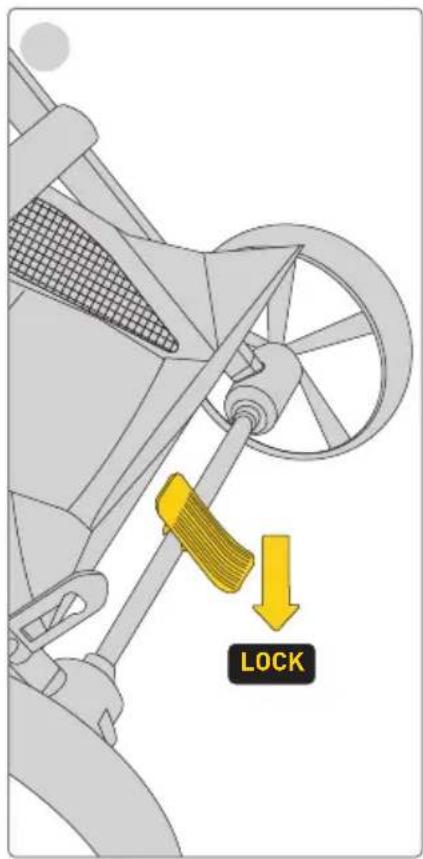
text_image
LOCK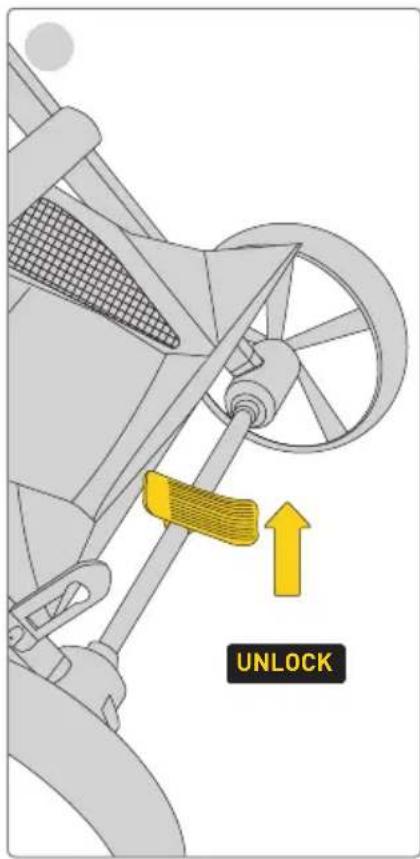
text_image
UNLOCKnatural_image
Diagram of a yellow robotic device with a handle and arm, showing a directional arrow labeled 'A' (no text or symbols on the diagram itself)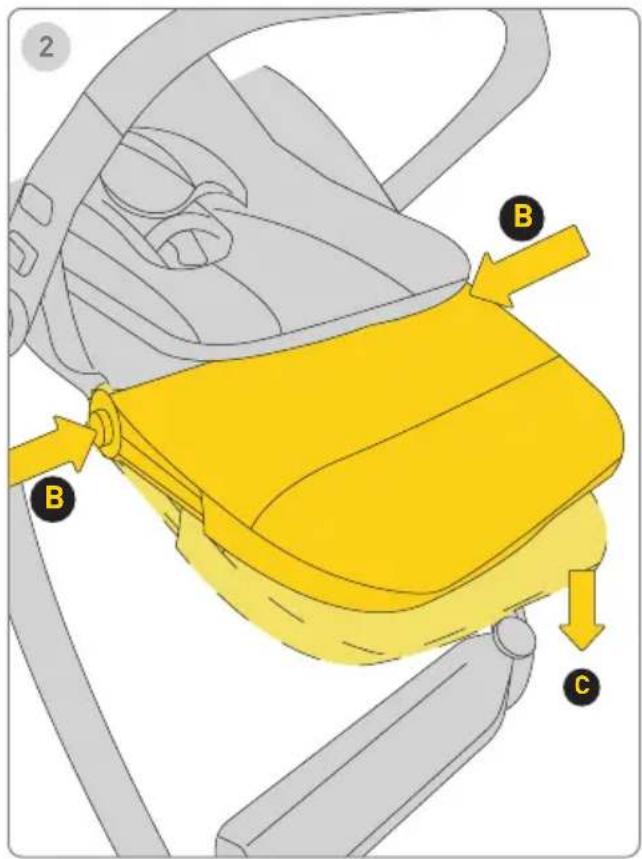
text_image
2 B B CRepose-mollets
d l e Recline Adjustment
natural_image
Diagram of a curved pipe with a yellow arrow and labeled point A, no text or symbols present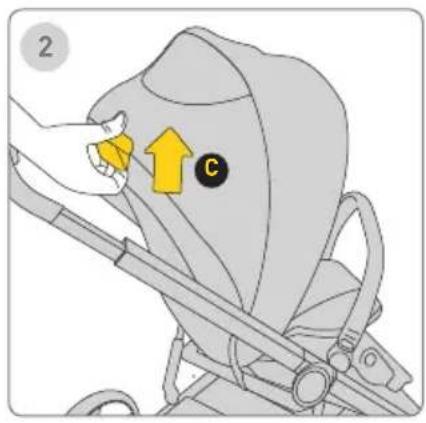
text_image
2 C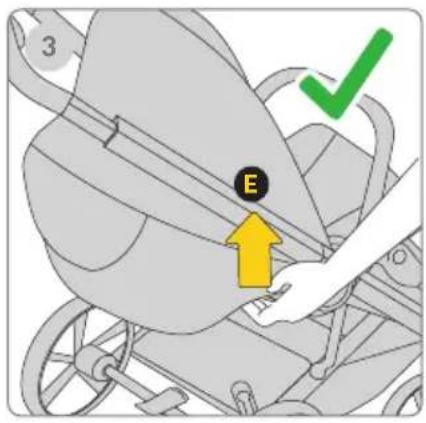
text_image
3 E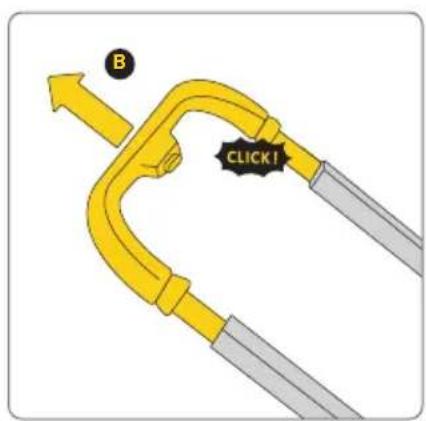
text_image
B CLICK!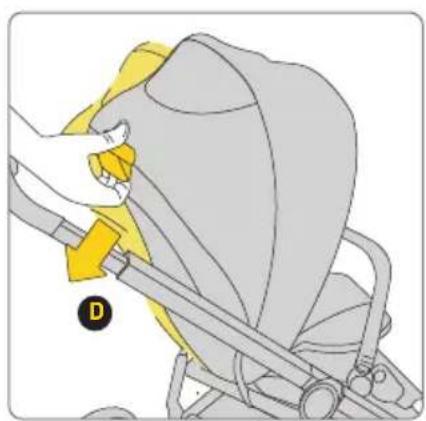
natural_image
Illustration of a hand adjusting a yellow belt switch on a gray car seatbelt (no text or symbols)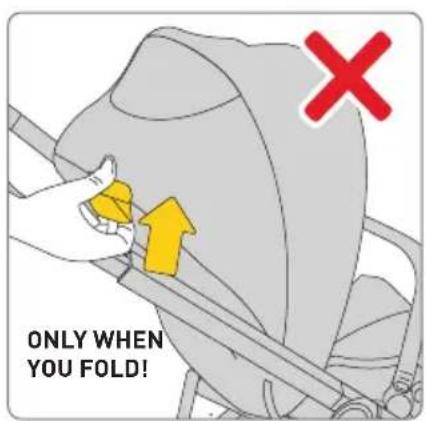
text_image
ONLY WHEN YOU FOLD!Poignée
text_image
Diagram showing mechanical components with yellow arrows indicating directional flow or movement, possibly illustrating a system or process.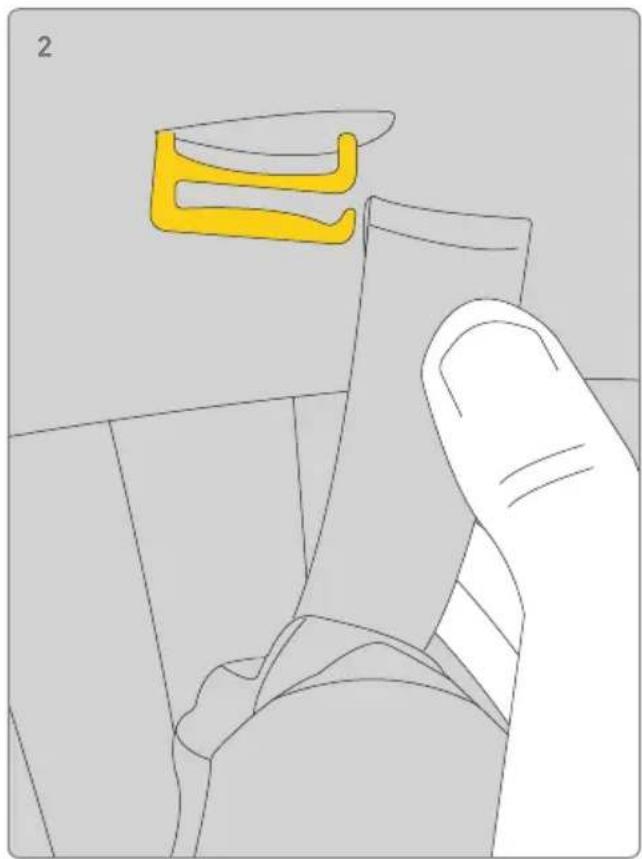
natural_image
Illustration of a hand holding a small object with a yellow abstract shape above it, no text or symbols present.Coussin réversible
text_image
Diagram illustrating a mechanical assembly with labeled parts A and B, showing motion arrows indicating movement or force.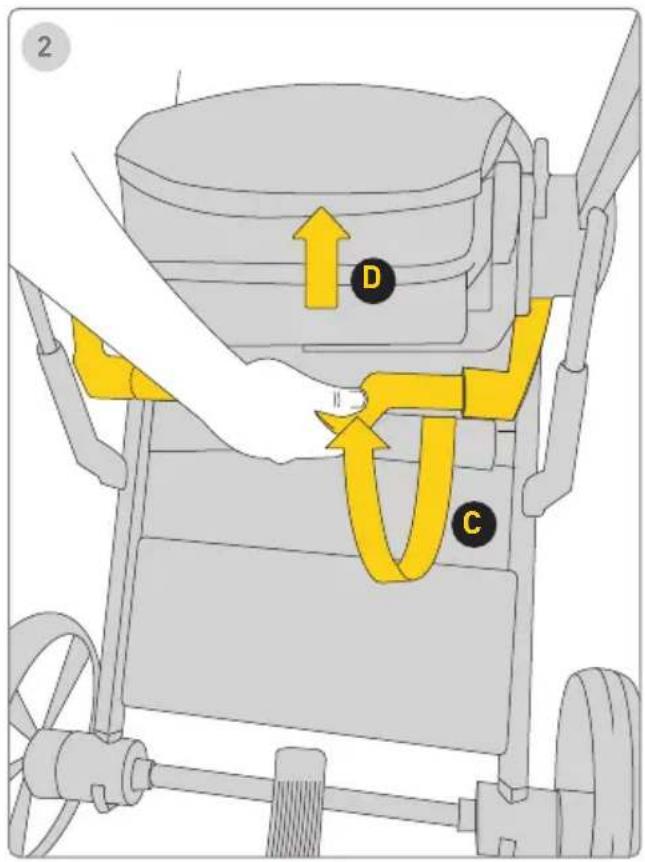
text_image
2 D CPliage
text_image
Diagram showing a yellow mechanical clamp with labeled parts C and D, indicating assembly or positioning steps.Accessoires
text_image
Diagram of a mechanical clamp or bracket with labeled parts and directional arrows indicating motion or forceProduct setup - unfolding carrycot
text_image
1 A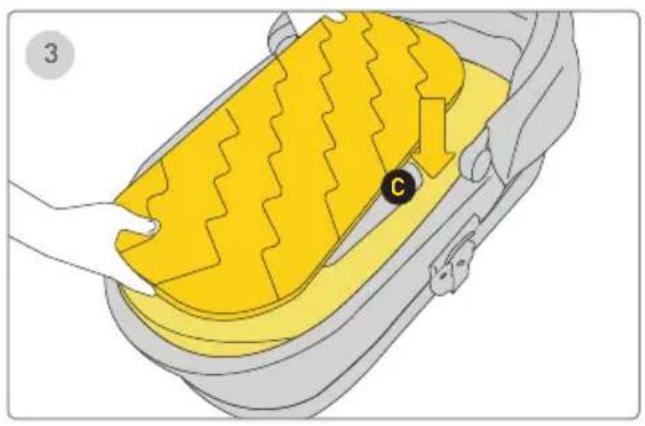
natural_image
Illustration of a car interior with yellow foam cushion and black circular marker (no text or symbols)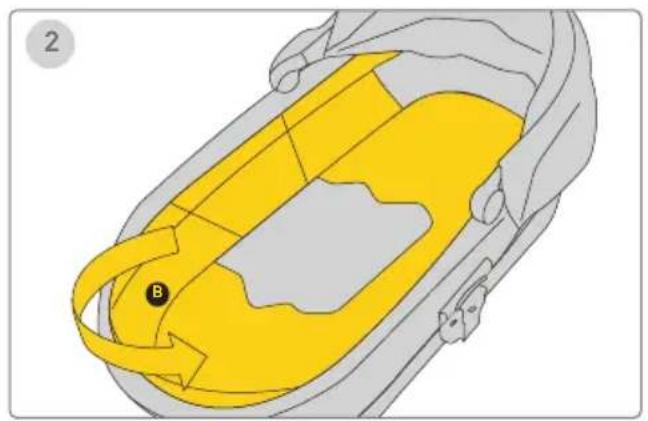
natural_image
Diagram of a car interior showing yellow and gray zones with a labeled point B (no text or symbols beyond label)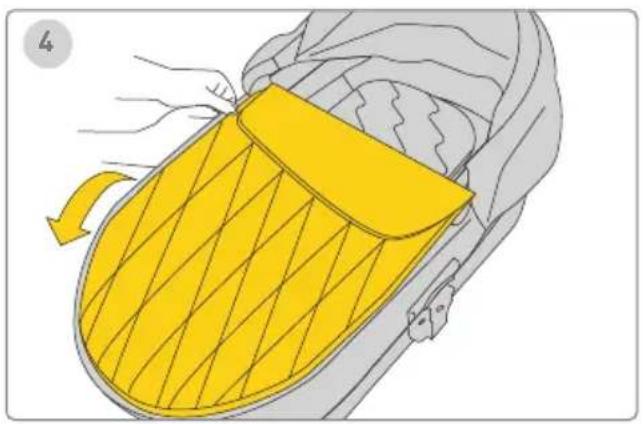
natural_image
Illustration of a yellow and gray object with a handle, possibly a device or container, being handled by hands (no text or symbols present)Product setup - folding carrycot
text_image
1 B A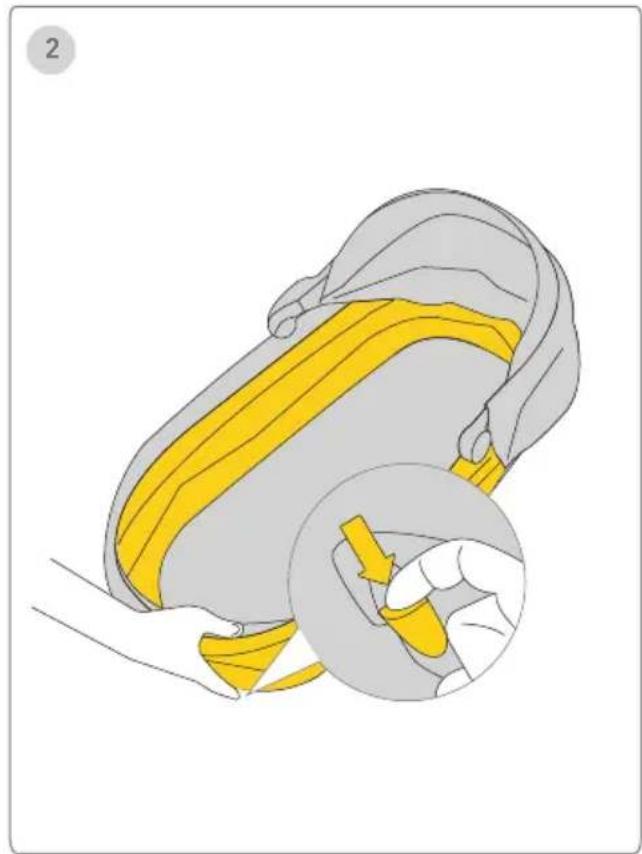
natural_image
Illustration of a yellow belt buckle being lifted, showing the seat and grip mechanism (no text or symbols)Pliage de la nacelle:

Étape
Retirez le matelas

pliez la capote


Étape
Carry Cot Attachment on Stroller Frame Carry Cot Removal
text_image
123 A CLICK!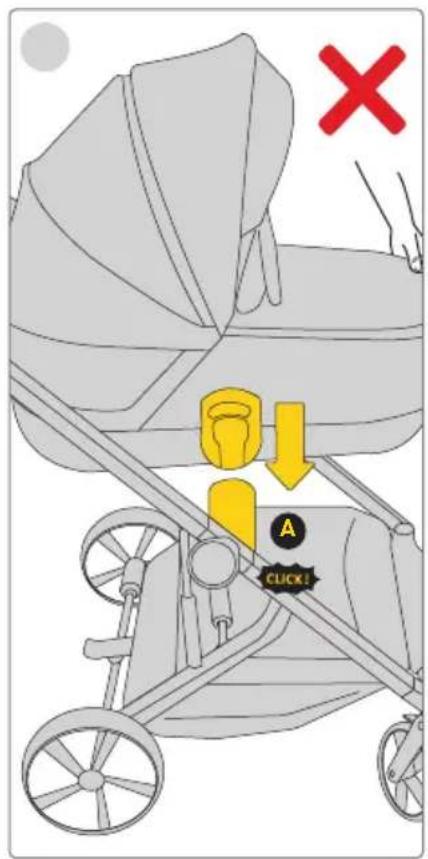
text_image
X A CLICK!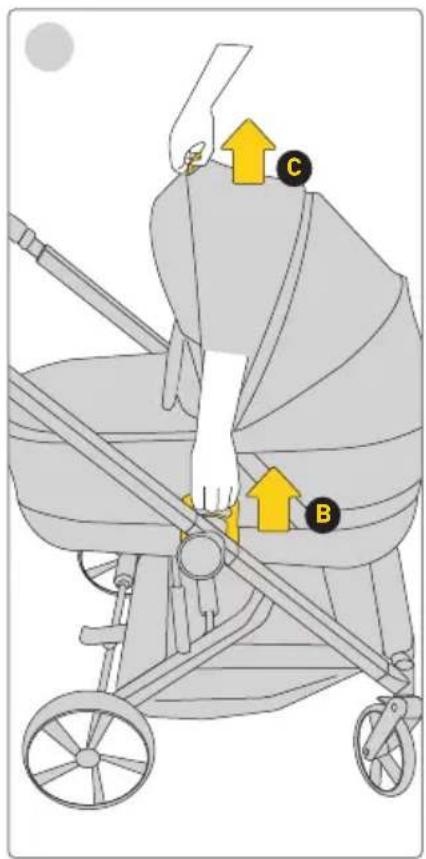
text_image
Diagram of a baby stroller with labeled parts C and B, showing hand positioning and directional arrows indicating movement or force.natural_image
Illustration of a yellow bag with a black circular mark labeled 'D' and an arrow indicating rotation (no text or symbols present)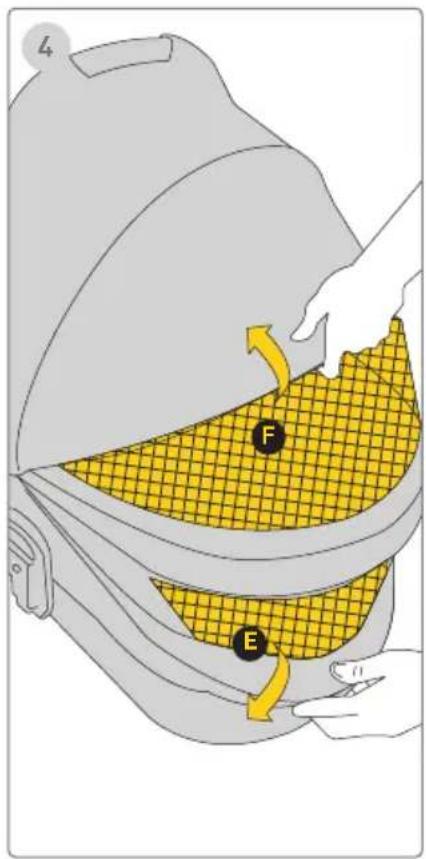
text_image
L F ECapote
natural_image
Illustration of two baby strollers with different designs and seat covers (no text or symbols)VAŽNO!
PROČITAJ I SAČUVAJ ZA BUDUĆNOST KAO REFERENCU
UPOZORENJE!
⚠ Nikada ne ostavljajte dijete bez nadzora.
text_image
Diagram of a mechanical device with labeled components A and B, showing directional arrows indicating motion or flow.Rasklapanje okvira kolica
1 Korak
Zakrenite ručku za sklapanje i povucite je prema gore dok se blokada ne otpusti.

2 Korak
Podignite upravljačku ručku dok se okvir potpuno ne rasklopi i ne zaključa u otvorenom položaju uz klik.

Front Wheels/Rear Wheels
text_image
1 LUCK!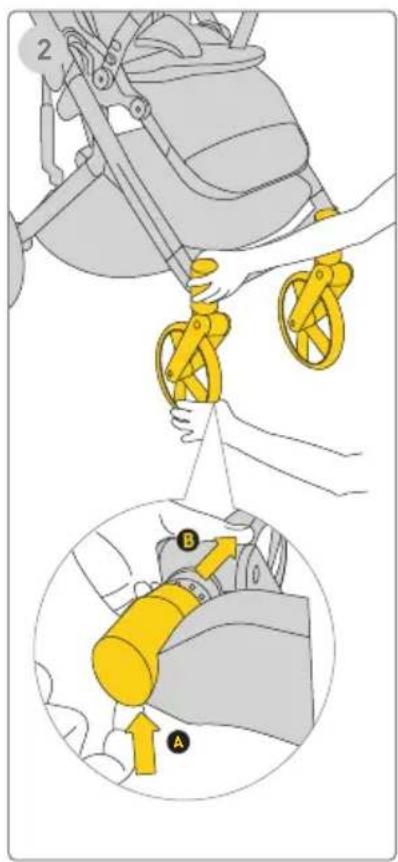
text_image
Diagram illustrating a mechanical device with labeled parts A and B, showing hand positioning and assembly steps.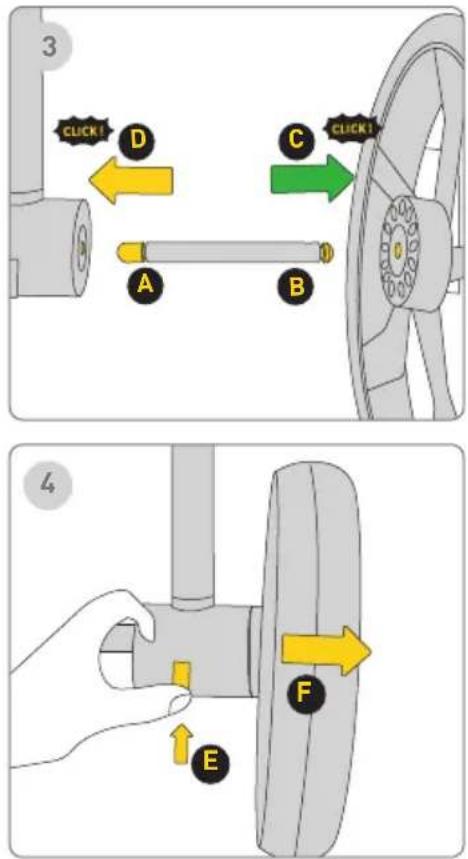
text_image
3 CLICK! D A B C CLICK! 4 EPrednji kotači
1 Korak
Umetnite prednji kotač u prednju nogu. Zvuk „klik” označava da je kotač potpuno montiran. Ponovite postupak s druge strane.
text_image
Diagram illustrating hand positioning and movement of a car steering wheel, labeled with points B and C and directional arrows.Zaštitna pregrada
natural_image
Illustration of a stroller with yellow frame and wheels, no text or symbols present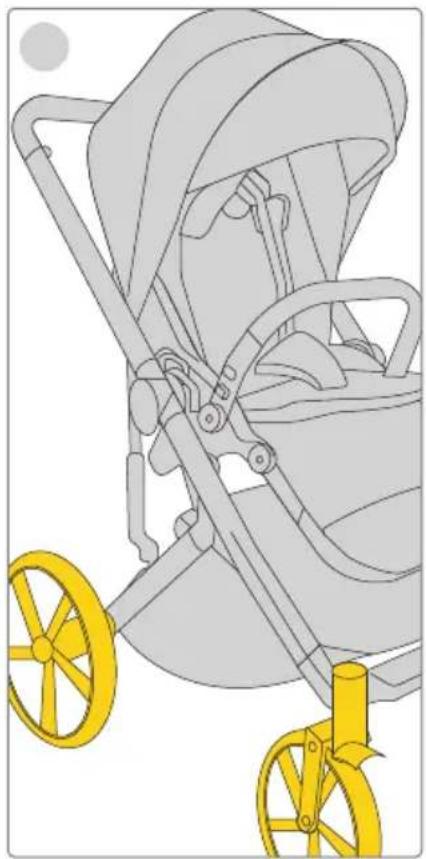
natural_image
Illustration of a stroller with yellow wheels and handlebars, no text or symbols present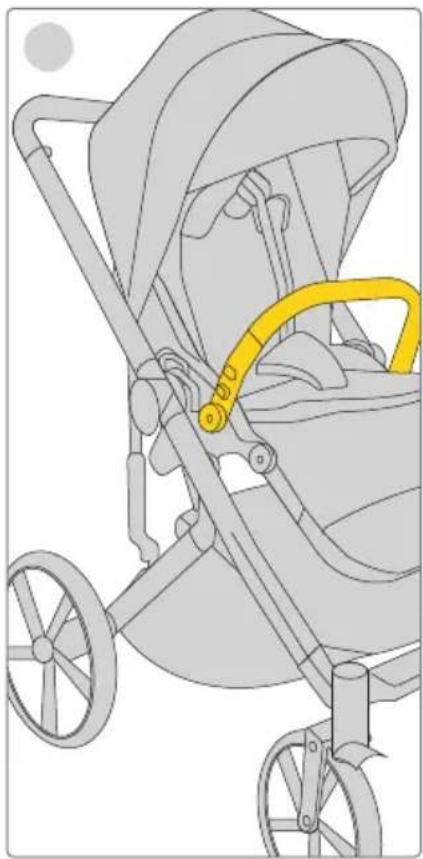
natural_image
Illustration of a stroller with yellow belt and wheels, no text or symbols presentProvjerite postavke
1 Korak
natural_image
Illustration of a bird's head with a yellow beak and patterned neck, no text or symbols presentKrović
Blokirajući uređaj MORA biti aktiviran kada su kolica zaustavljena i prilikom stavljanja ili vađenja djeteta!
1 Korak
text_image
123 UNLOCK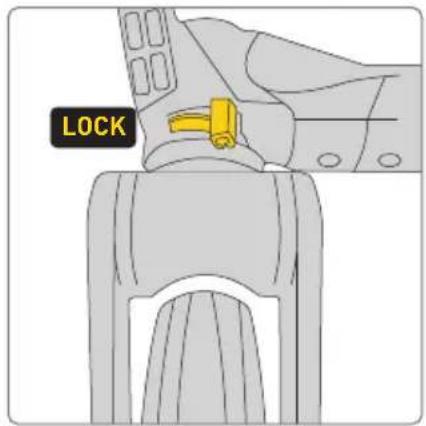
text_image
LOCK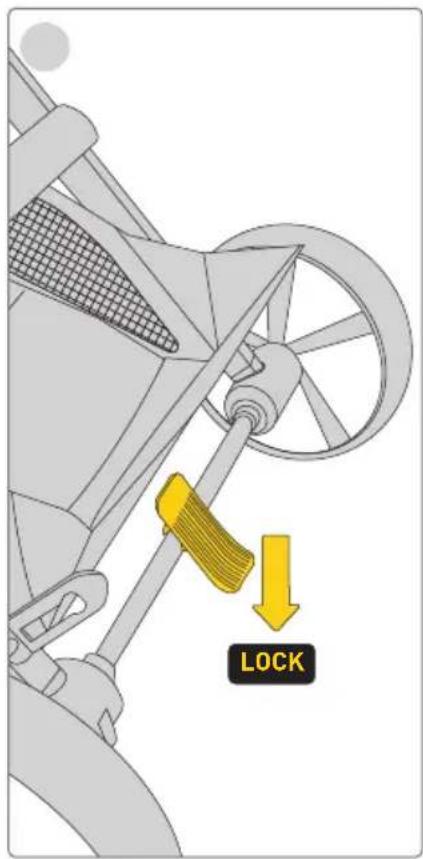
text_image
LOCK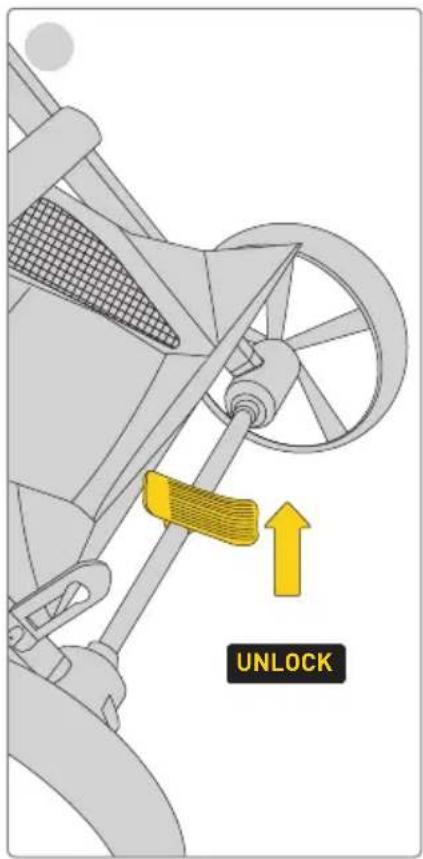
text_image
UNLOCKBlokada rotacije prednjih kotača
Preporučuje se koristiti blokadu rotacije prednjih kotača na neravnim površinama. Kotače možete blokirati u položaju okrenutom prema naprijed ili prema natrag.
1 Korak
natural_image
Diagram of a yellow robotic device with a handle and labeled component A, showing no text or symbols beyond labels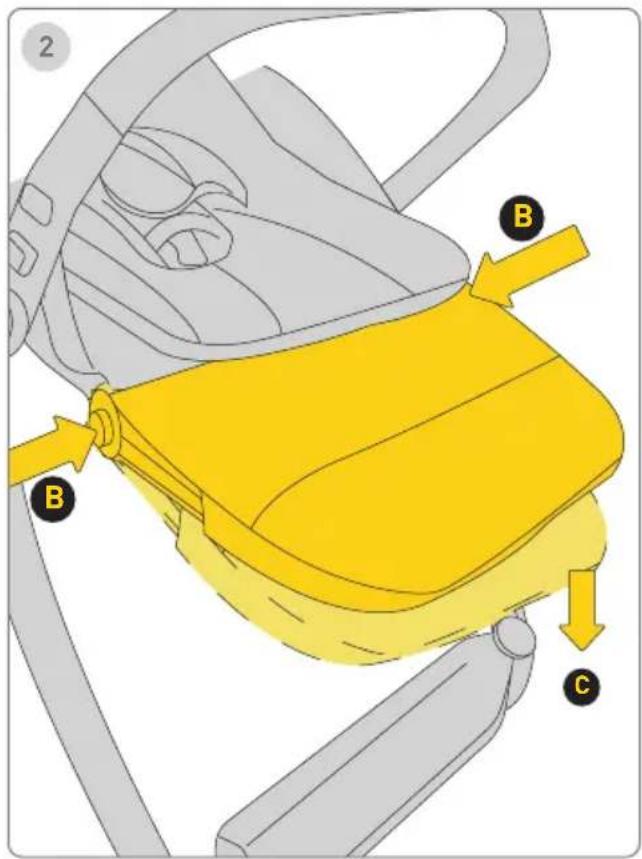
text_image
2 B B CPodrška za listove
Podrška za listove ima 3 položaja korištenja.
1 Korak
Za podizanje podrške za listove, podignite je prema gore

2 Korak
Za spuštanje podrške za listove, pritisnite tipke za podešavanje na bočnim stranama i spitite je prema dolje C.
H a n
d l e Recline Adjustment
natural_image
Diagram of a curved pipe with a yellow arrow and labeled point A, no text or symbols present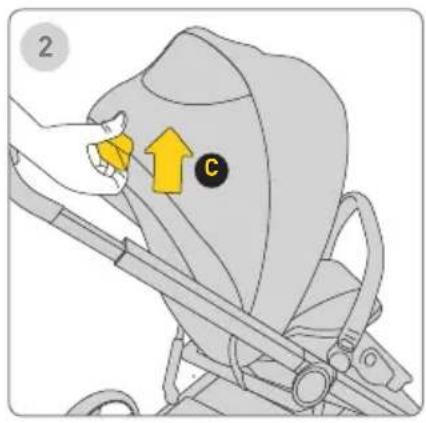
text_image
2 C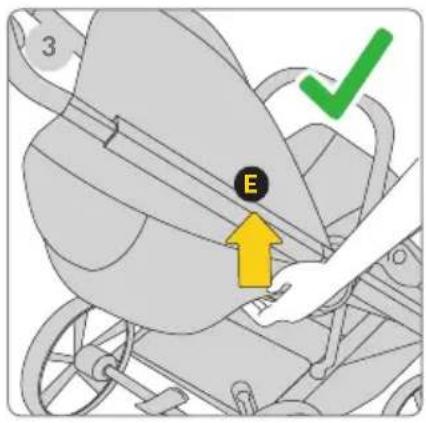
text_image
3 E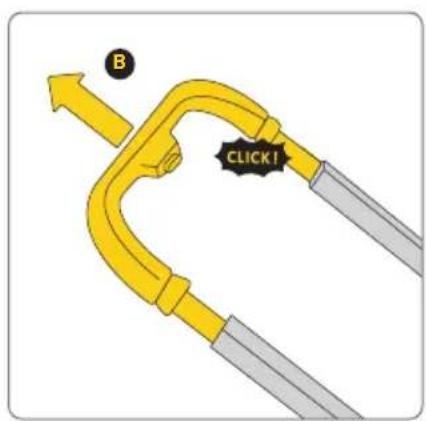
text_image
B CLICK!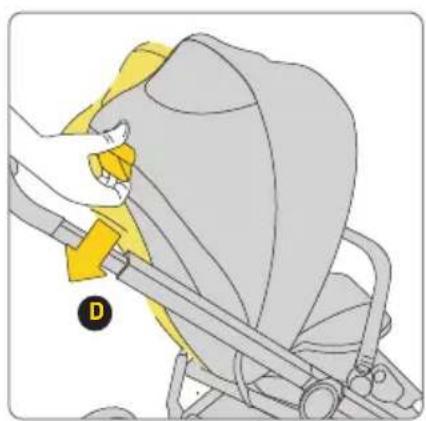
natural_image
Illustration of a hand adjusting a yellow belt switch on a gray car seatbelt (no text or symbols)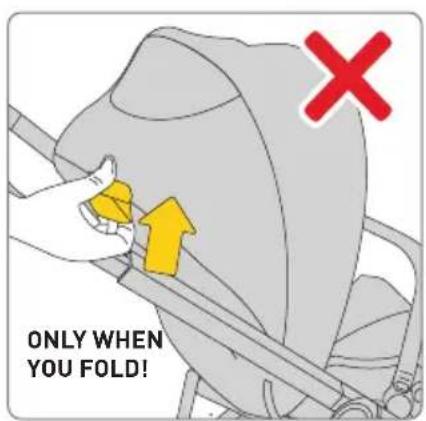
text_image
ONLY WHEN YOU FOLD!Ručka
Ručka ima 5 položaja.
1 Korak
Za podešavanje visine ručke, pritisnite tipke za podešavanje Ⓐ i pomaknite ručku gore ili dolje Ⓑ.
Podešavanje naslona
text_image
Diagram showing mechanical components with yellow arrows indicating directional flow or movement, possibly illustrating a system or process.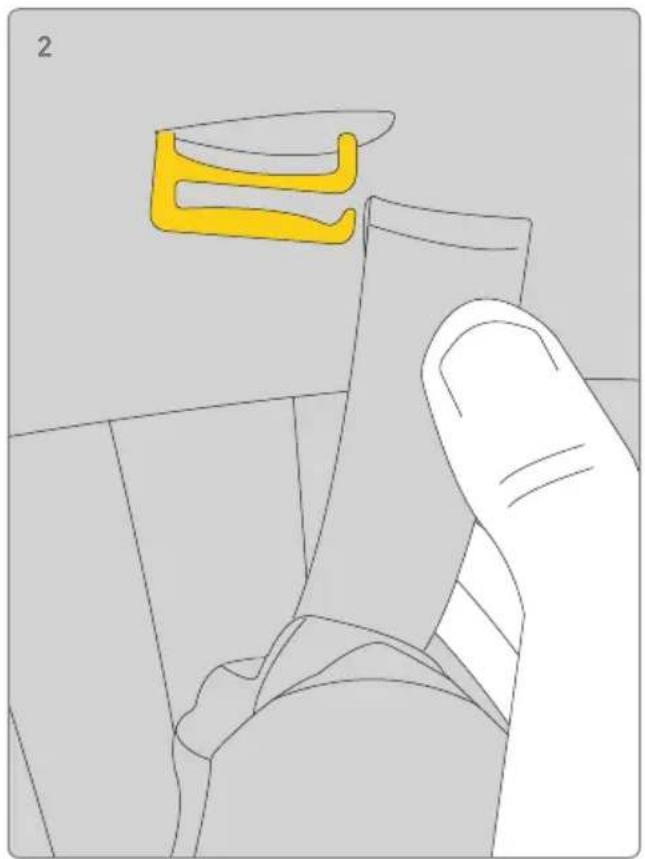
natural_image
Illustration of a hand holding a small object with a yellow abstract shape above it, no text or symbols present.Umetak
text_image
Diagram illustrating a mechanical assembly with labeled parts A and B, showing motion arrows indicating movement or rotation.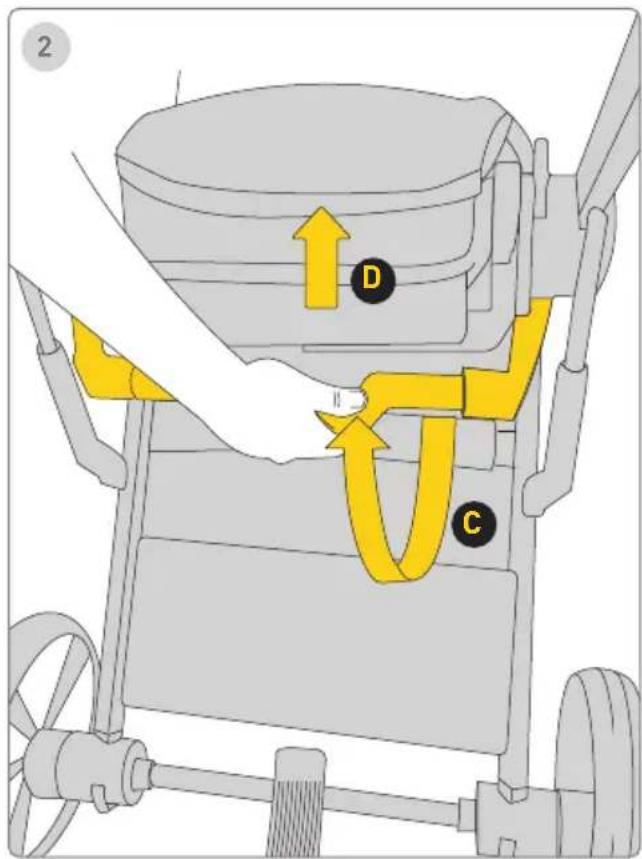
text_image
2 D CSklapanje
text_image
Diagram showing a yellow mechanical clamp with labeled parts C and D, indicating assembly or positioning steps.Dodaci
Adapteri za podizanje gondole
1 Korak
Postavite adapter gondole na nosač sjedala dok ne čujete zvuk „klik” . ZA k „klik” označava da je adapter pričvršćen.
!Provjerite jesu li adapteri ispravno pričvršćeni povlačenjem prema gore!
2 Korak
text_image
Diagram of a mechanical clamp or bracket with labeled parts and directional arrows indicating motion or forceAdapteri za autosjedalicu
1 Korak
Postavite adapter autosjedalice na nosač sjedala dok ne čujete zvuk „klik” . Zvuk „klik" označava da je adapter pričvršćen.
!Provjerite jesu li adapteri ispravno pričvršćeni povlačenjem prema gore!
2 Korak
Postavite autosjedalicu na nosač adaptera dok ne čujete zvuk „klik” . ZBK „klik" označava da je autosjedalica pričvršćena.
Product setup - unfolding carrycot
text_image
1 A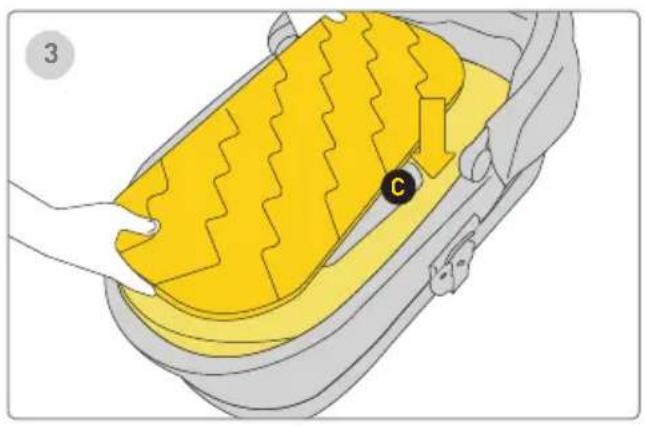
natural_image
Illustration of a car interior with yellow foam cushion and black circular marker (no text or symbols)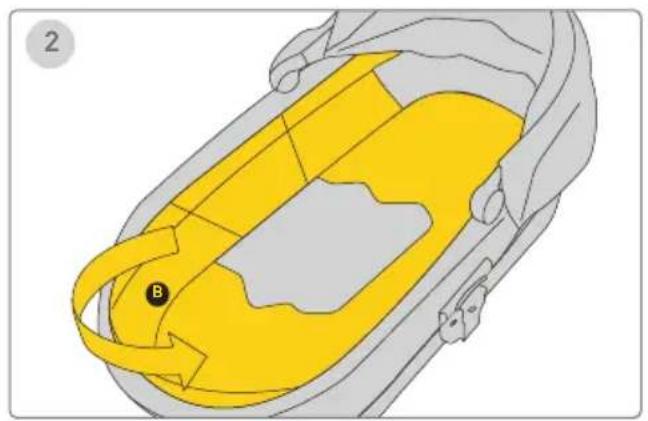
natural_image
Diagram of a car interior showing yellow and gray zones with a labeled point B (no text or symbols beyond label)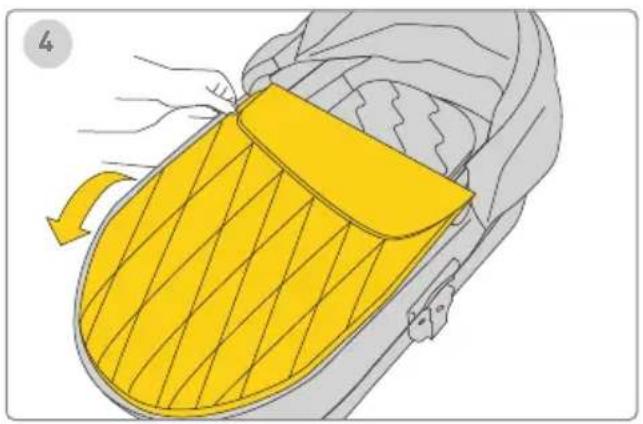
natural_image
Illustration of a yellow and gray car seatbelt with a handle, showing airflow direction (no text or symbols)Product setup - folding carrycot
text_image
1 B A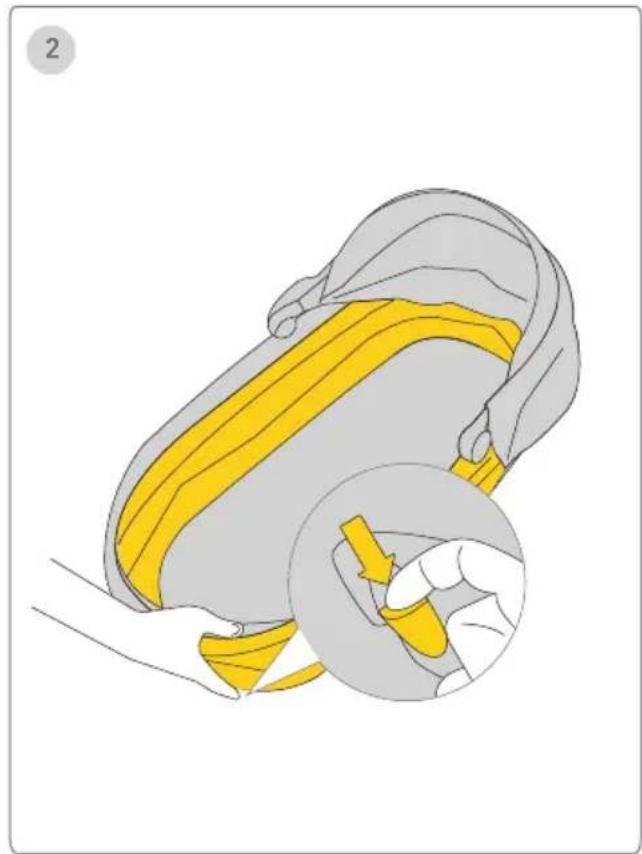
natural_image
Illustration of a yellow belt buckle being lifted, showing the seat and grip mechanism (no text or symbols)Carry Cot Attachment on Stroller Frame Carry Cot Removal
text_image
123 A CLICK!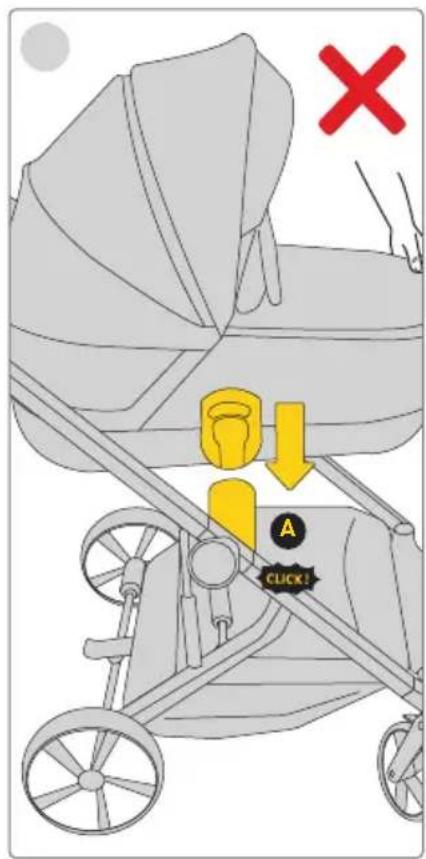
text_image
X A CLICK!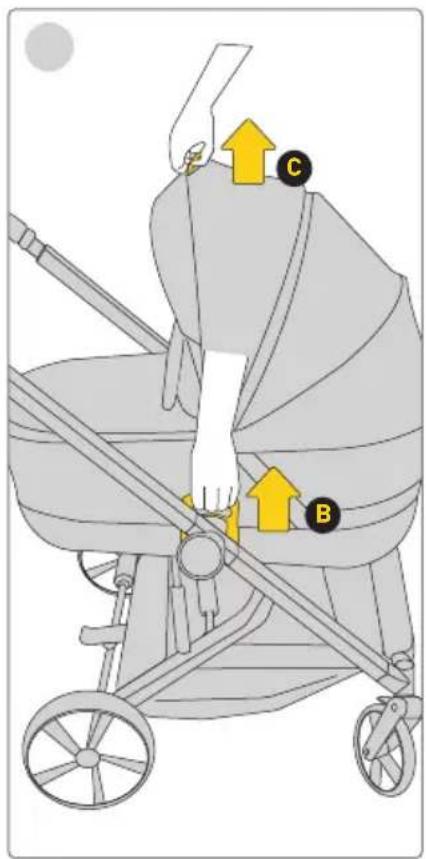
text_image
Diagram of a baby stroller with labeled parts C and B, showing hand positioning and directional arrows indicating movement or force.Postavljanje gondole na okvir kolica
1 Korak
natural_image
Illustration of a yellow bag with a black circular mark labeled 'D' and an arrow indicating rotation (no text or symbols present)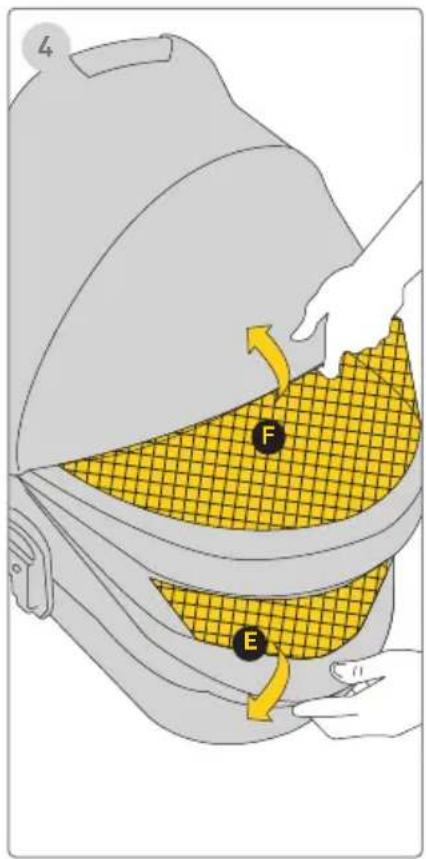
text_image
L F EKrović
natural_image
Illustration of two baby strollers with different designs and seat compartments (no text or symbols)FONTOS!
OLVASD EL ÉS ÓRIZD MEG A JÖVÖRE NÉZVE REFERENCIÁNAK
FIGYELMEZTETÉS!
text_image
Diagram of a mechanical device with labeled components A and B, showing directional arrows indicating motion or flow.Front Wheels/Rear Wheels
text_image
1 CLICK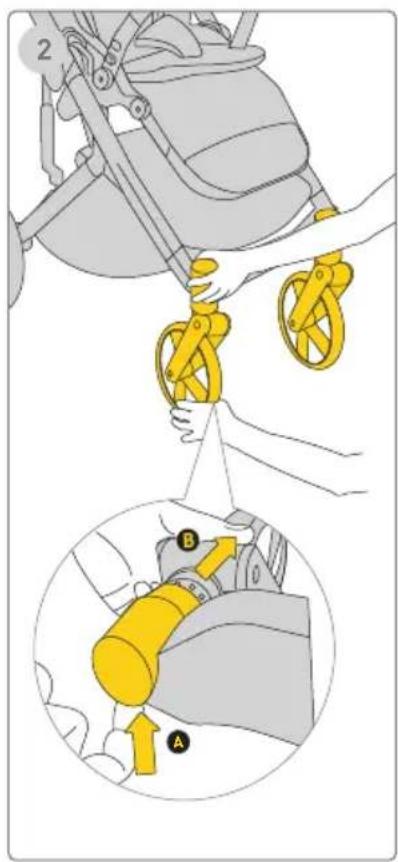
text_image
Diagram illustrating a mechanical device with labeled parts A and B, showing hand positioning and assembly steps.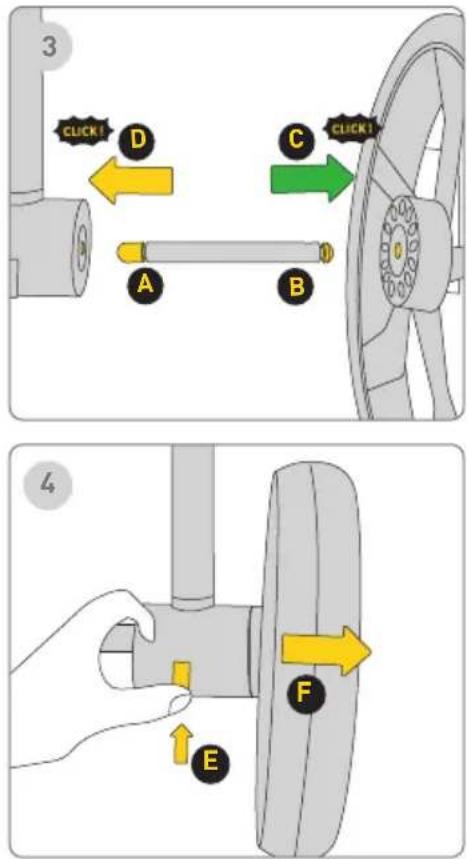
text_image
3 CLICK! D A B C CLICK! 4 EElső kerekek
1 Lépés
text_image
Diagram illustrating a mechanical assembly with labeled parts B and C, showing directional arrows indicating movement or force.Védőkorlát
natural_image
Illustration of a stroller with yellow railings and wheels, no text or symbols present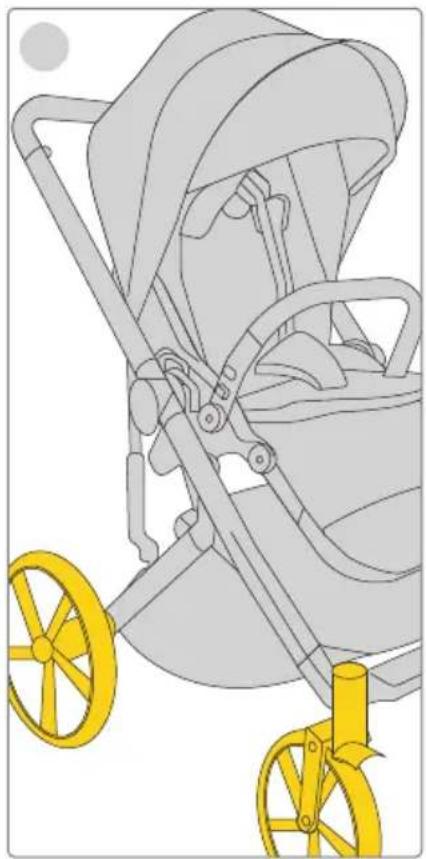
natural_image
Illustration of a stroller with yellow wheels and handlebars, no text or symbols present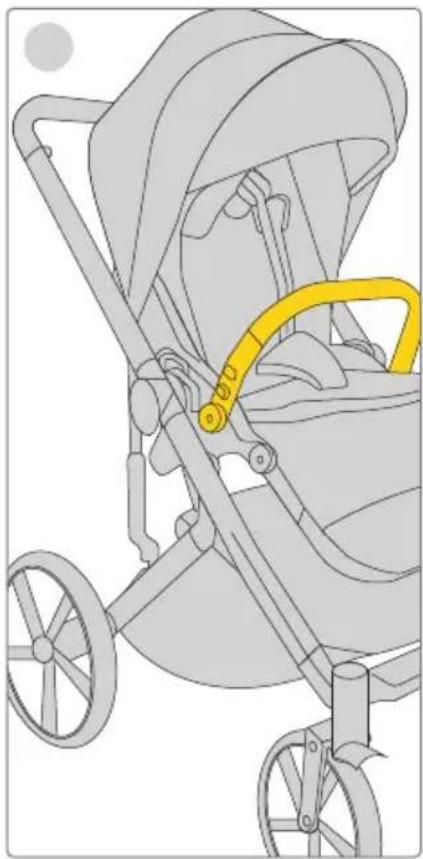
natural_image
Illustration of a stroller with yellow belt and wheels, no text or symbols presentnatural_image
Illustration of a baby stroller with a yellow arrow indicating motion (no text or symbols)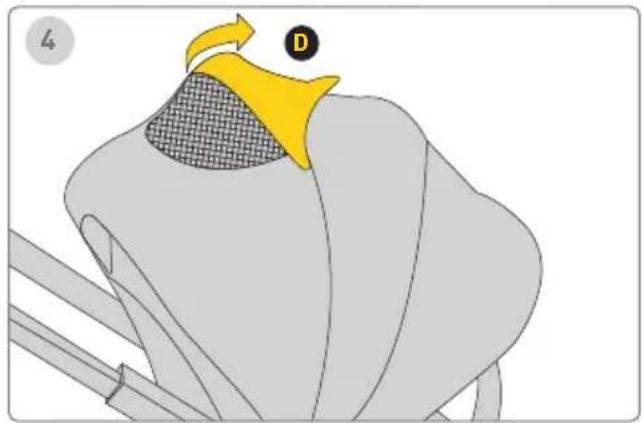
natural_image
Illustration of a bird's head with a yellow beak and patterned neck, no text or symbols presentNapellenzó
text_image
123 UNLOCK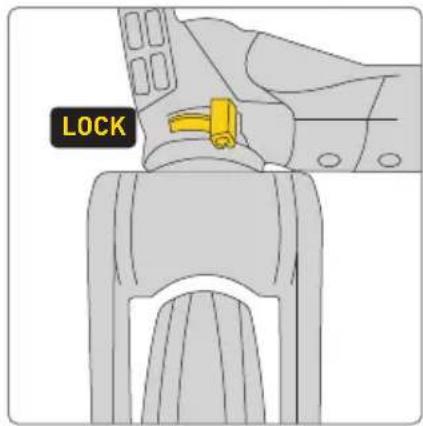
text_image
LOCK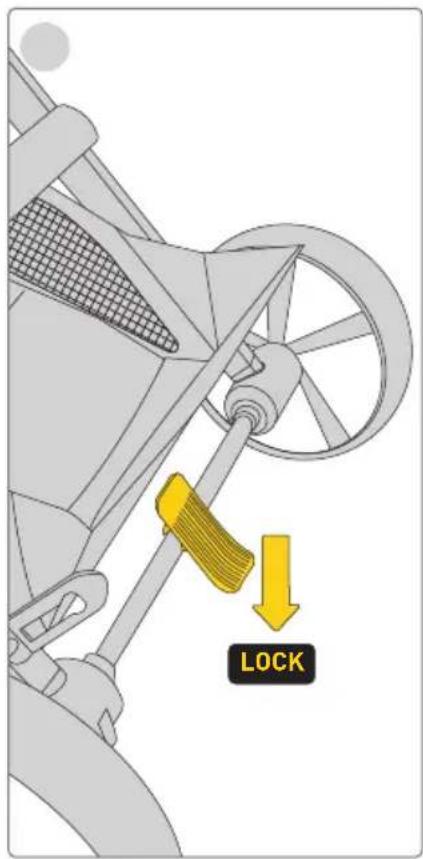
text_image
LOCK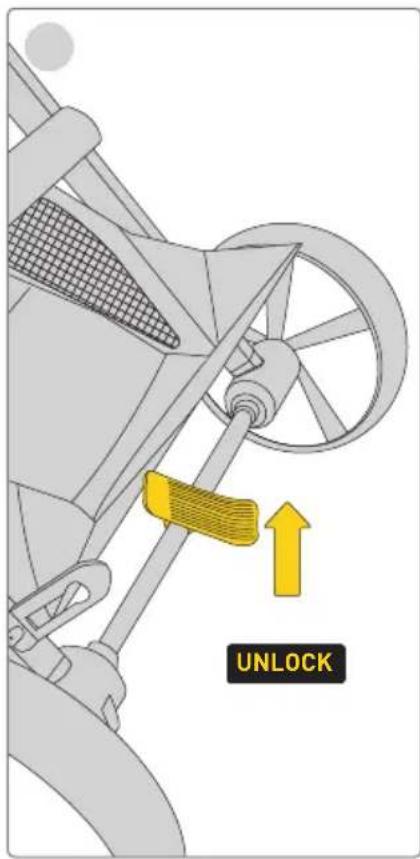
text_image
UNLOCKnatural_image
Diagram of a yellow robotic device with a handle and arm, showing a directional arrow labeled 'A' (no text or symbols on the diagram itself)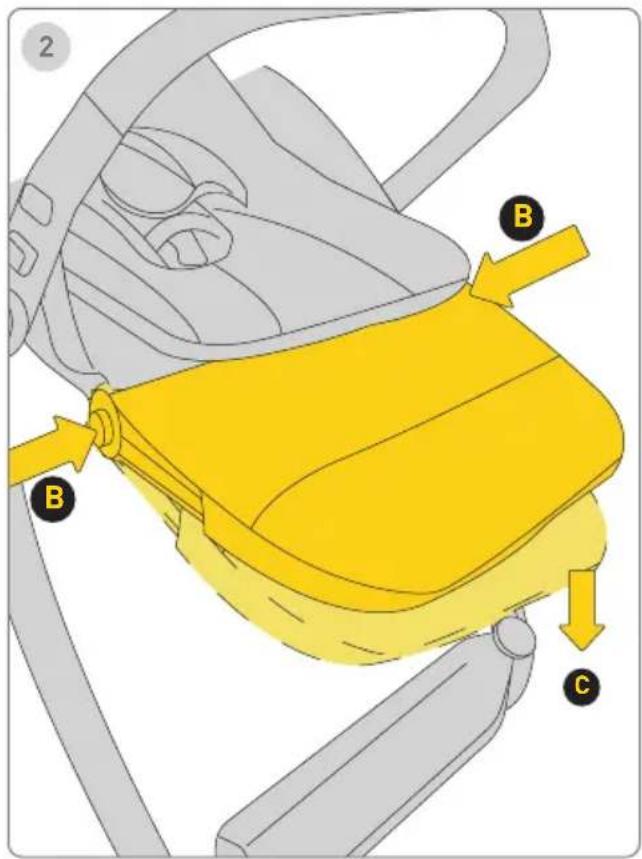
text_image
2 B B CLábtartó
d l e Recline Adjustment
natural_image
Diagram of a curved pipe with a yellow arrow and labeled point A, no text or symbols present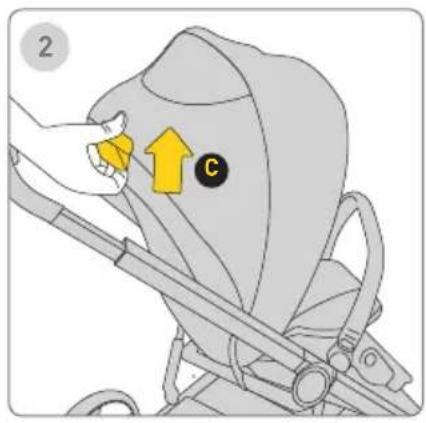
text_image
2 C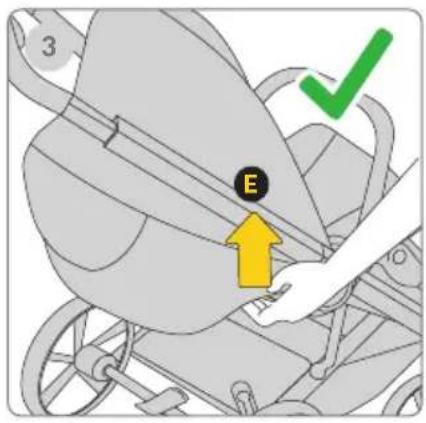
text_image
3 E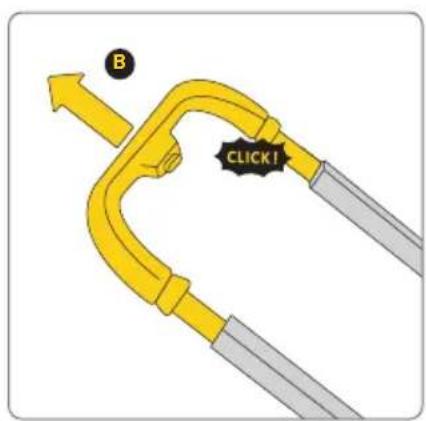
text_image
B CLICK!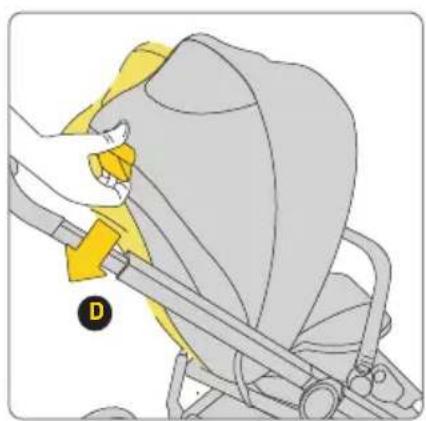
natural_image
Illustration of a hand adjusting a yellow belt switch on a gray baby stroller (no text or symbols)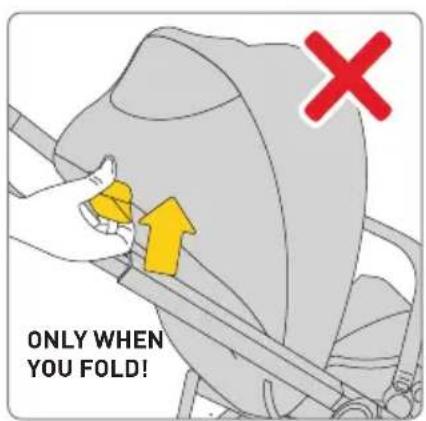
text_image
ONLY WHEN YOU FOLD!Fogantyú
text_image
Diagram showing mechanical components with yellow arrows indicating directional flow or movement, possibly illustrating a system or process.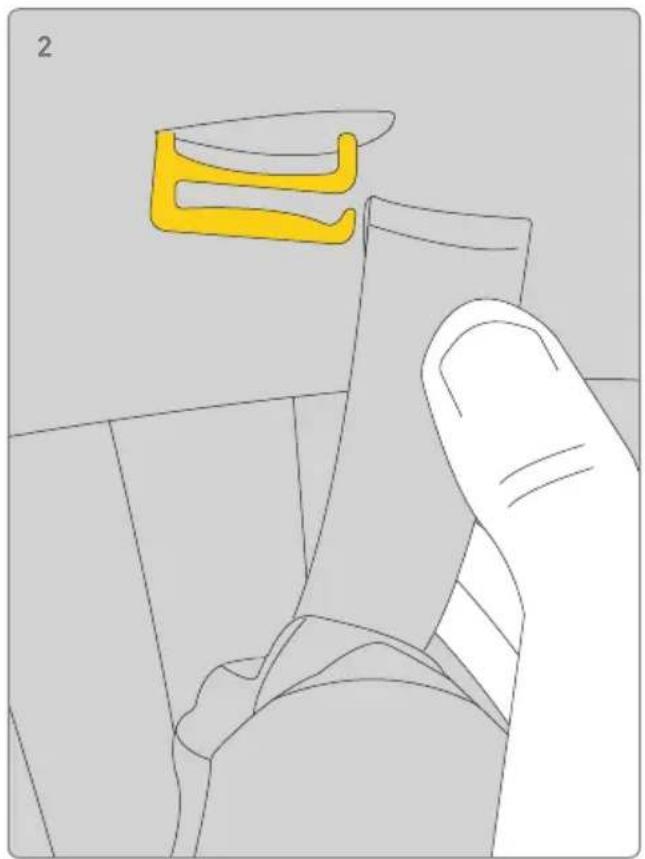
natural_image
Illustration of a hand holding a small object with a yellow abstract shape above it, no text or symbols present.Betét
text_image
Diagram illustrating a mechanical assembly with labeled parts A and B, showing motion arrows indicating movement or force.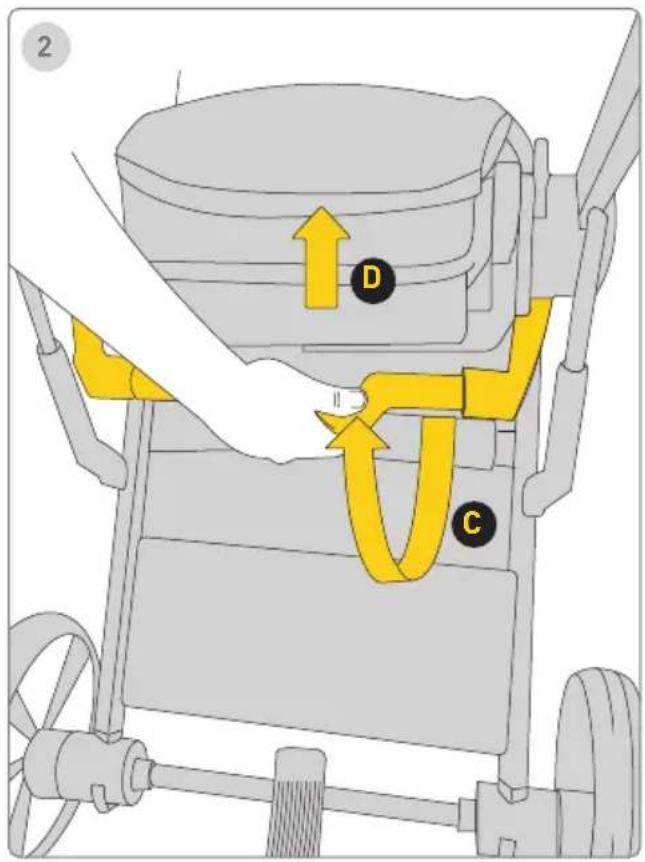
text_image
Diagram of a mechanical device with labeled parts D and C, showing directional flow arrows and components.Összecsukás
text_image
Diagram showing a yellow mechanical clamp with labeled parts C and D, indicating assembly or positioning steps.Kiegészítők
text_image
Diagram of a mechanical clamp or bracket with labeled parts and directional arrows indicating motion or forceAutósülés adapterek
1 Lépés
Product setup - unfolding carrycot
text_image
1 A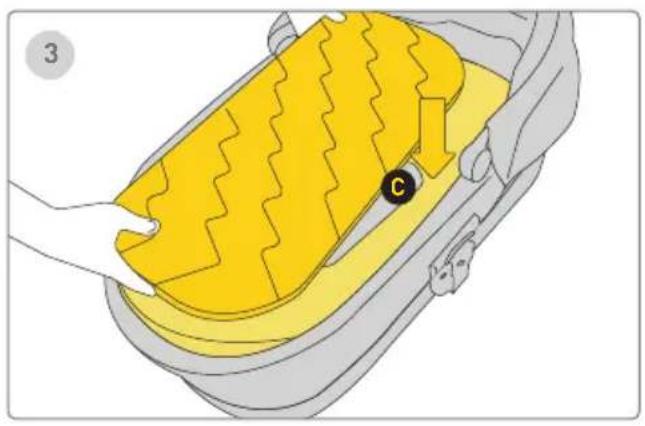
natural_image
Illustration of a car interior with yellow foam cushion and black circular marker (no text or symbols)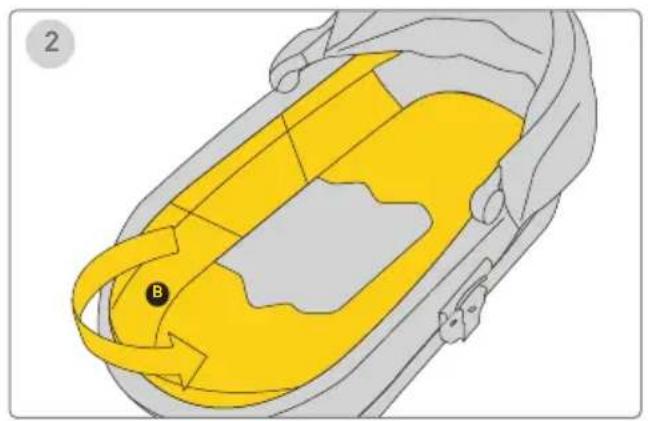
natural_image
Diagram of a car interior showing yellow and gray areas with a labeled point B (no text or symbols beyond label)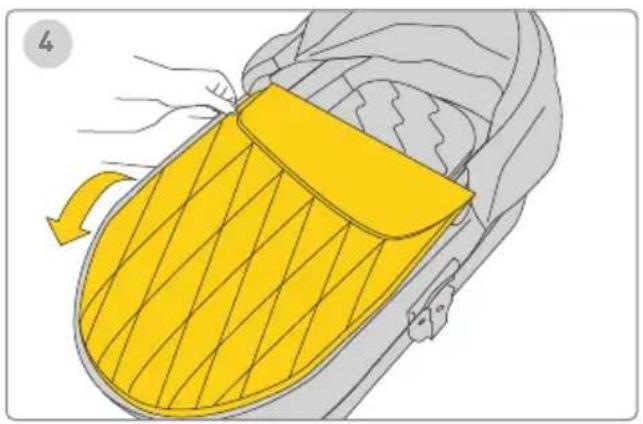
natural_image
Illustration of a yellow and gray object with a handle, possibly a device or container, being handled by hands (no text or symbols present)Product setup - folding carrycot
text_image
1 B A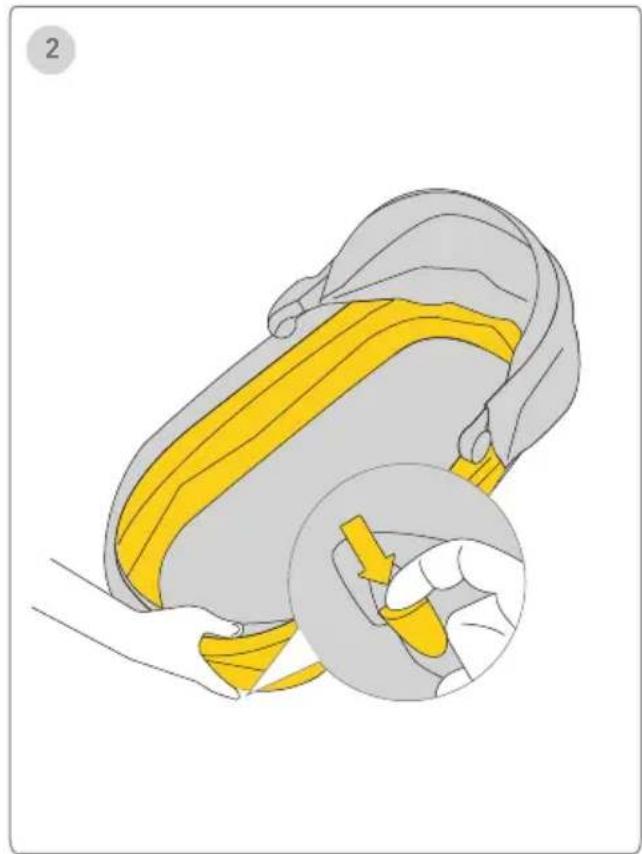
natural_image
Illustration of a yellow belt buckle being lifted, showing the seat and grip mechanism (no text or symbols)Carry Cot Attachment on Stroller Frame Carry Cot Removal
text_image
123 A CLICK!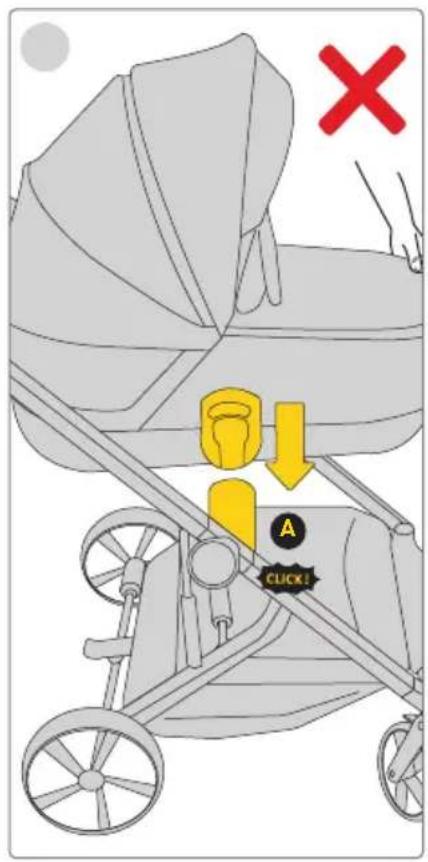
text_image
X A CLICK!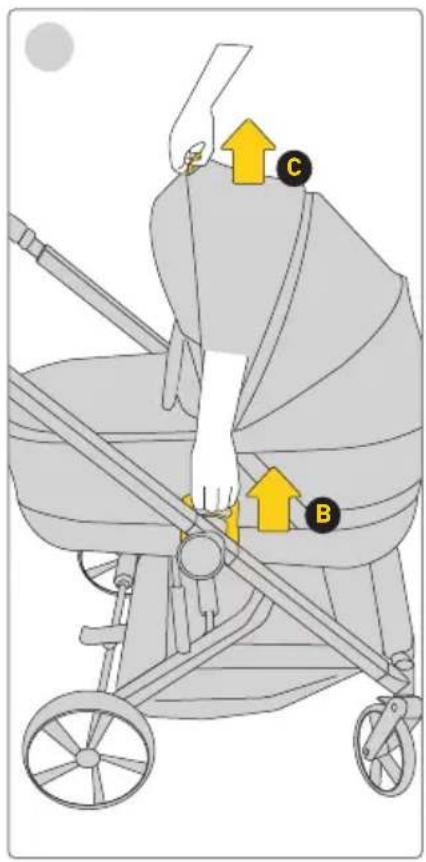
text_image
Diagram of a baby stroller with labeled parts C and B, showing hand positioning and directional arrows indicating movement or force.natural_image
Illustration of two baby strollers with different seat designs (no text or symbols)IMPORTANTE!
text_image
Diagram of a mechanical device with labeled components A and B, showing directional arrows indicating motion or flow.Front Wheels/Rear Wheels
text_image
1 CLICK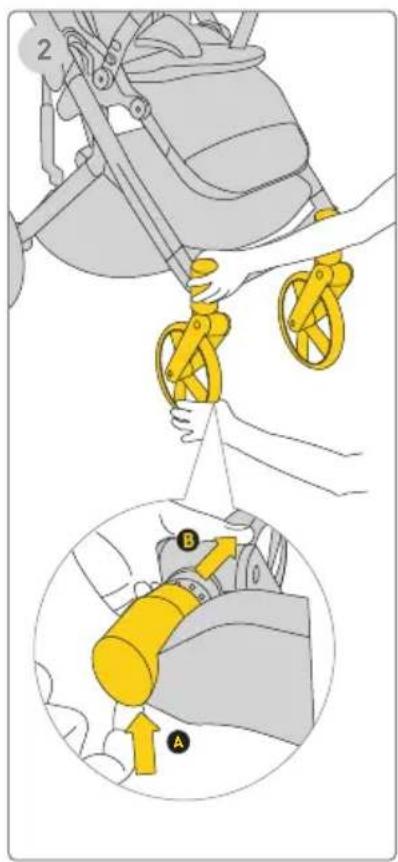
text_image
Diagram illustrating a mechanical device with labeled parts A and B, showing hand positioning and assembly steps.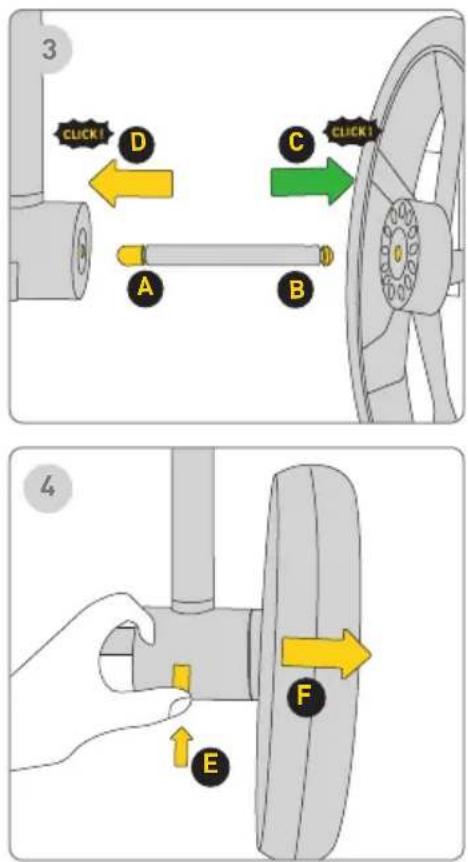
text_image
3 CLICK! D A B C CLICK! 4 ERuote anteriori
1 Passo
text_image
Diagram illustrating a mechanical assembly with labeled parts B and C, showing directional arrows indicating movement or force.Barra di protezione
natural_image
Illustration of a stroller with yellow railings and wheels, no text or symbols present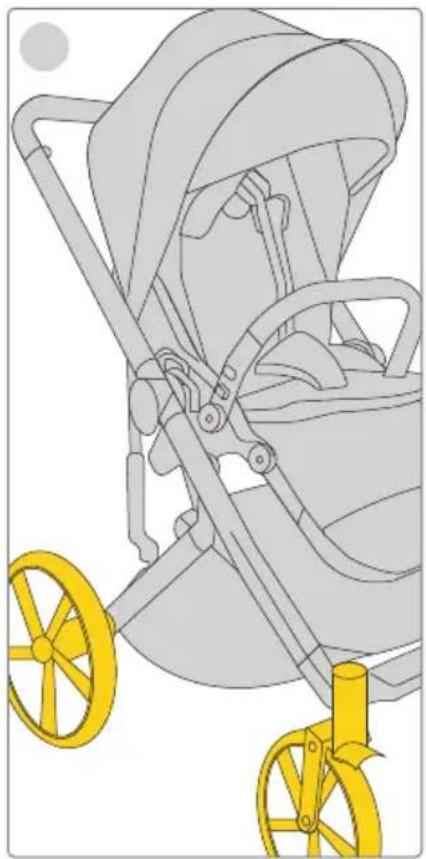
natural_image
Illustration of a stroller with yellow wheels and handlebars, no text or symbols present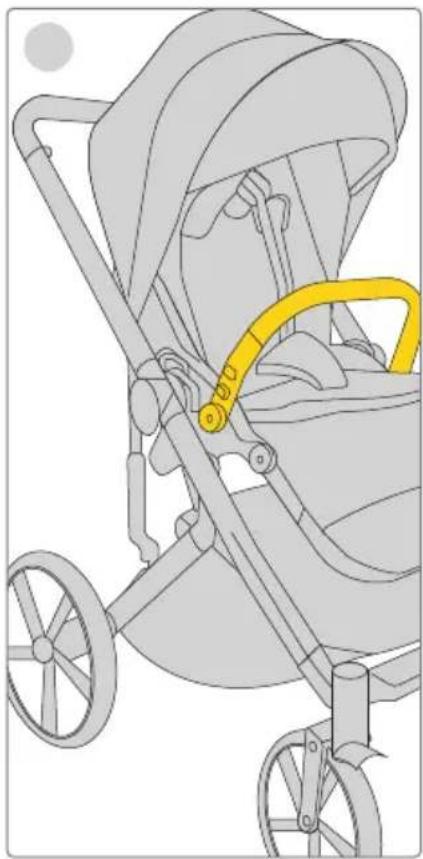
natural_image
Illustration of a stroller with yellow belt and wheels, no text or symbols presentnatural_image
Illustration of a bird's head with a yellow beak and patterned neck, no text or symbols presentCapottina
text_image
123 UNLOCK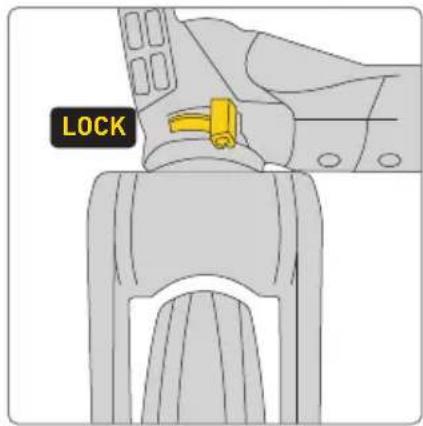
text_image
LOCK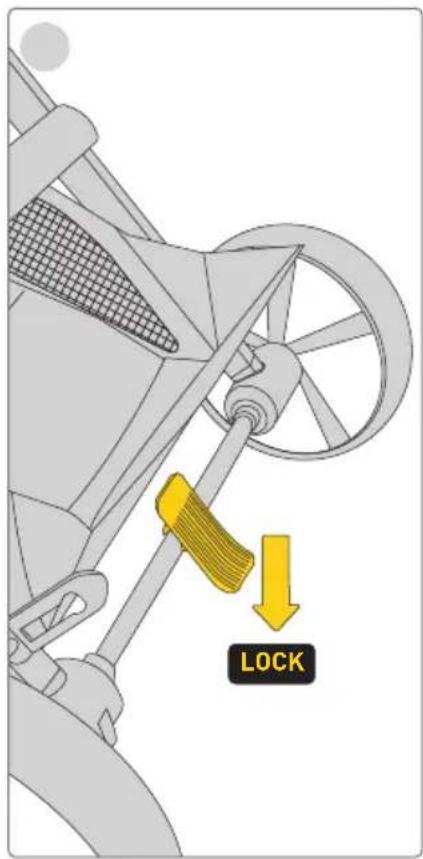
text_image
LOCK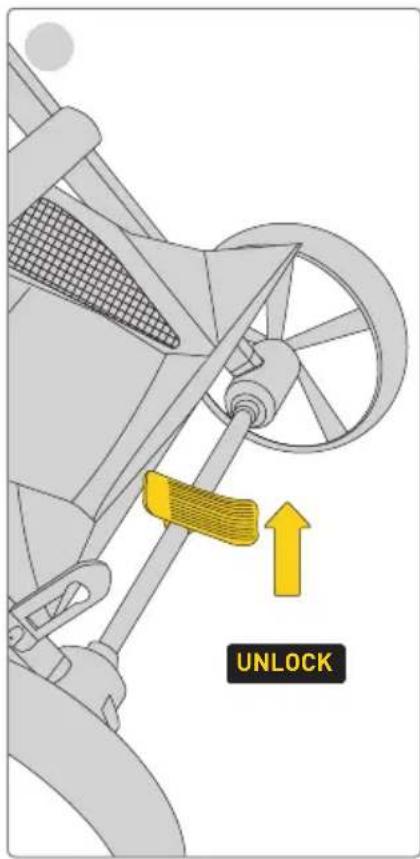
text_image
UNLOCKnatural_image
Diagram of a yellow robotic device with a handle and arm, showing a directional arrow labeled 'A' (no text or symbols on the diagram itself)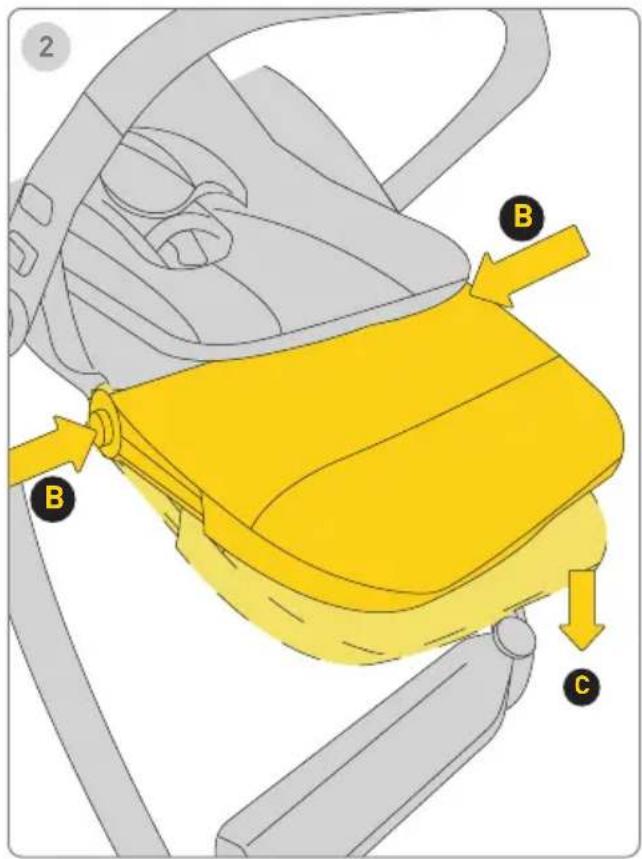
text_image
2 B B Cd l e Recline Adjustment
natural_image
Diagram of a curved pipe with a yellow arrow and labeled point A, no text or symbols present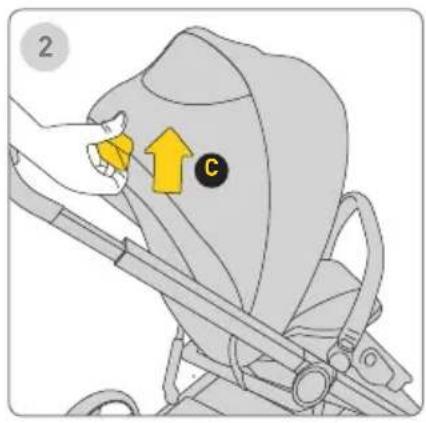
text_image
2 C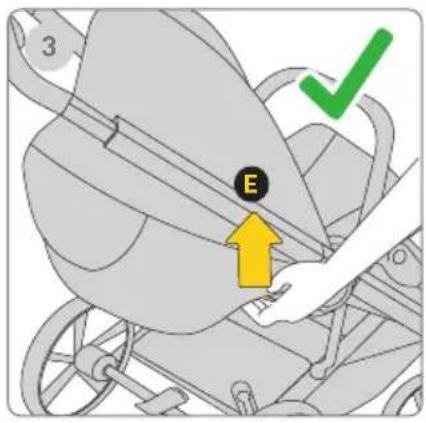
text_image
3 E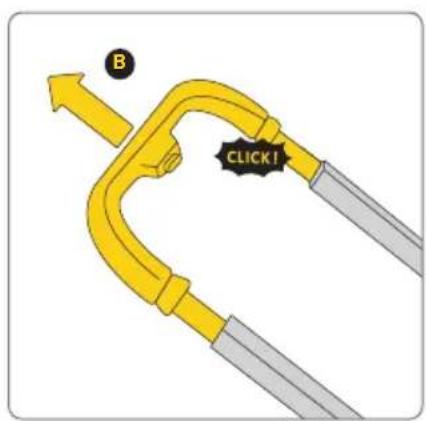
text_image
B CLICK!
natural_image
Illustration of a hand adjusting a yellow belt switch on a gray baby stroller (no text or symbols)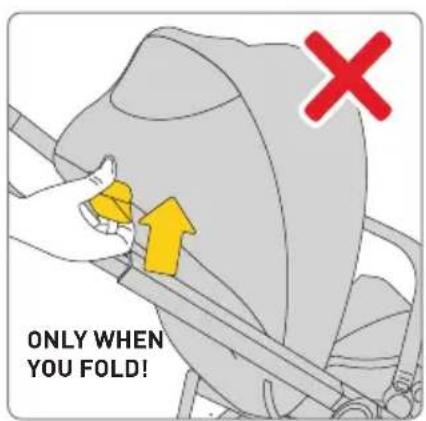
text_image
ONLY WHEN YOU FOLD!Maniglia
text_image
Diagram showing mechanical components with yellow directional arrows indicating flow or movement, possibly illustrating a fluid or fluid circulation system.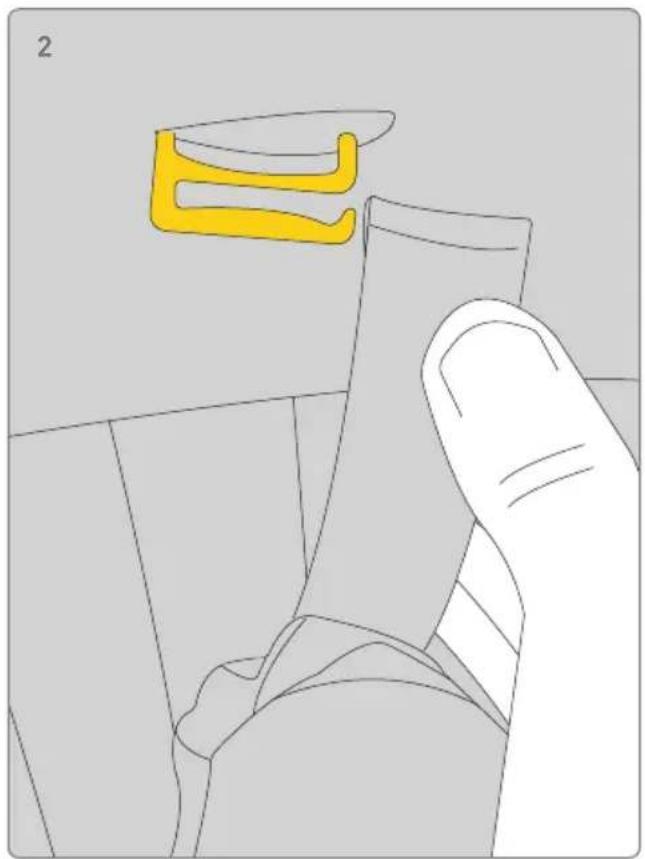
natural_image
Illustration of a hand holding a small object with a yellow abstract shape above it, no text or symbols present.Inserto
text_image
Diagram illustrating a mechanical assembly with labeled parts A and B, showing motion arrows indicating movement or force.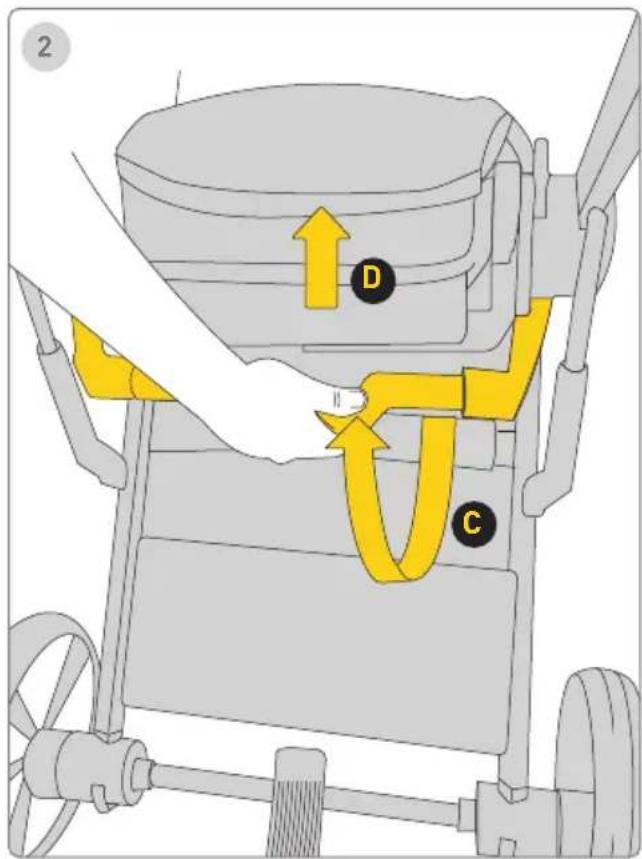
text_image
2 D CPiegatura
text_image
Diagram showing a yellow mechanical device with labeled parts C and D, indicating assembly or positioning steps.Accessori
text_image
Diagram of a mechanical clamp or bracket with labeled parts and directional arrows indicating motion or forceProduct setup - unfolding carrycot
text_image
1 A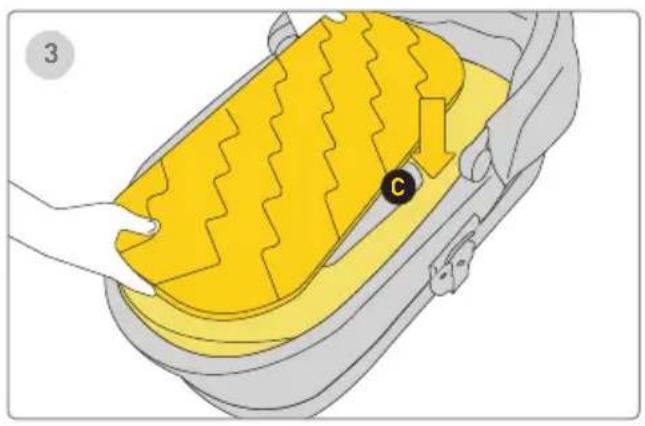
natural_image
Illustration of a car interior with a yellow cushion and a black circular marker labeled 'C' (no text or symbols on the cushion itself)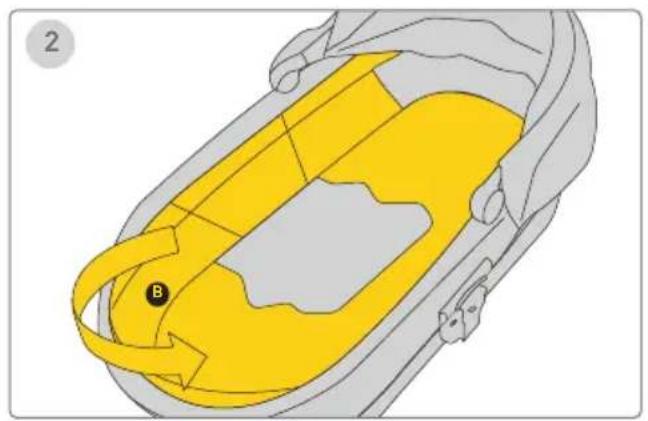
natural_image
Diagram of a car interior showing yellow and gray areas with a labeled point B (no text or symbols beyond label)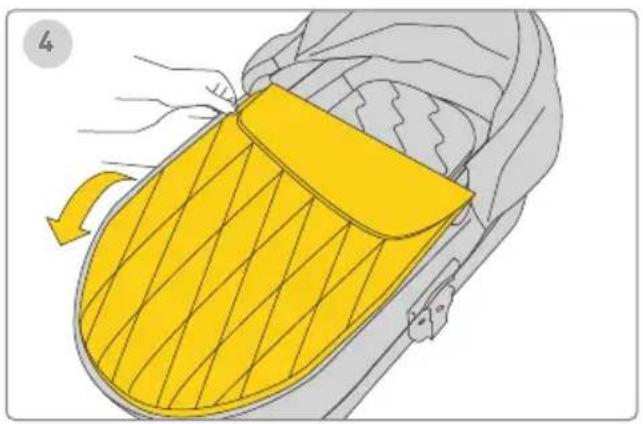
natural_image
Illustration of a yellow and gray car seatbelt with a handle, showing airflow direction (no text or symbols)Product setup - folding carrycot
text_image
1 B A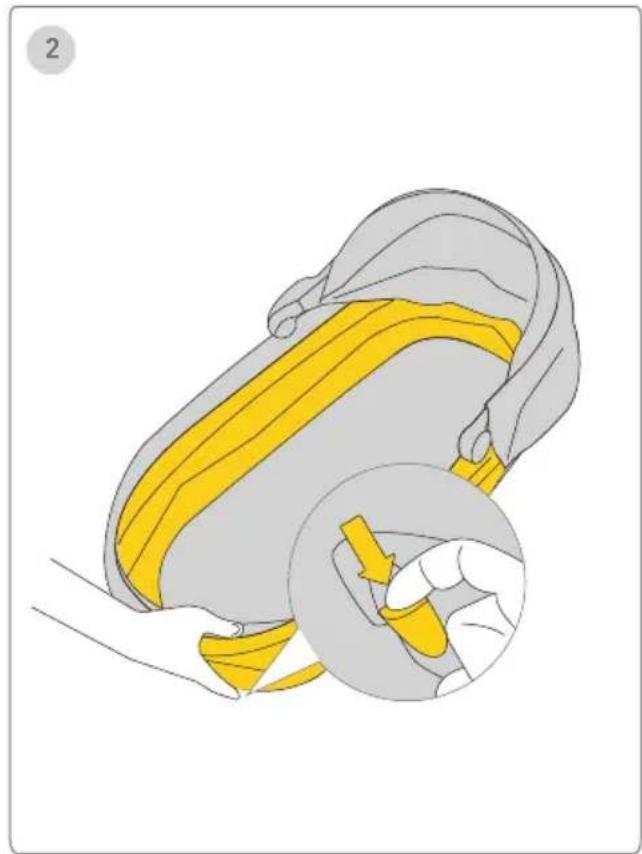
natural_image
Illustration of a yellow belt buckle being lifted, showing the seat and grip mechanism (no text or symbols)Carry Cot Attachment on Stroller Frame Carry Cot Removal
text_image
123 A CLICK!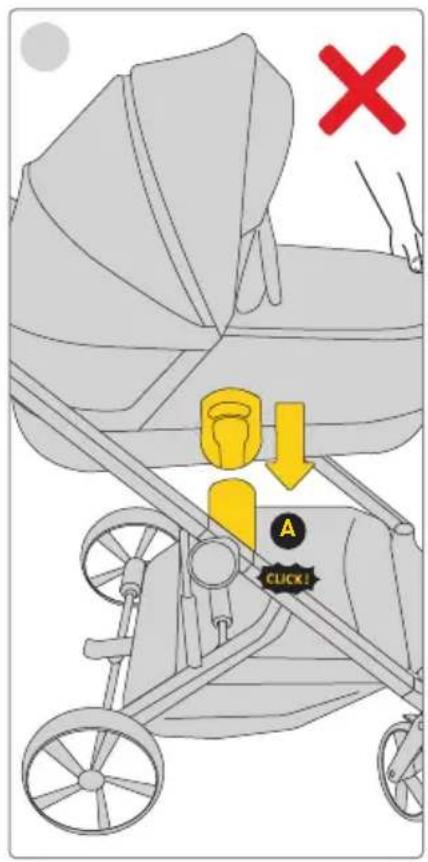
text_image
X A CLICK!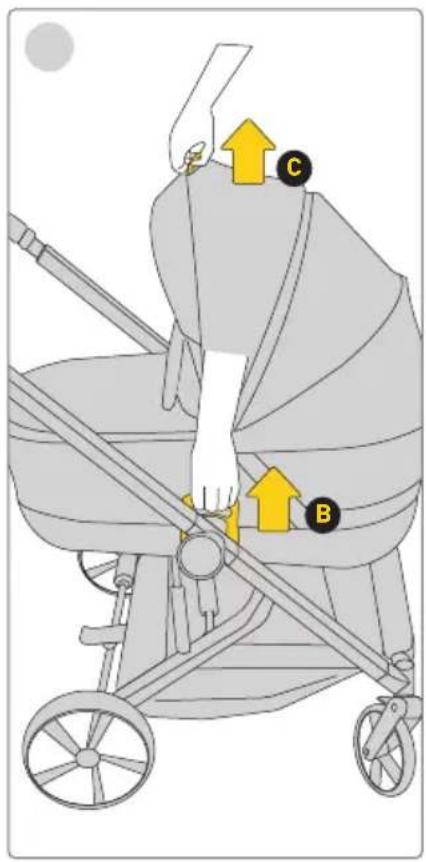
text_image
Diagram of a baby stroller with labeled parts C and B, showing hand positioning and directional arrows indicating movement or force.Removing the Bassinet
3 Passo
To remove the bassinet, pull the adapter handles on both sides. A "click" sound indicates that the bassinet adapters are unlocked. Lift the bassinet out of the frame mount.
Remove the bassinet before folding the stroller.
Canopy Carrycot window
text_image
1 B A CLICK!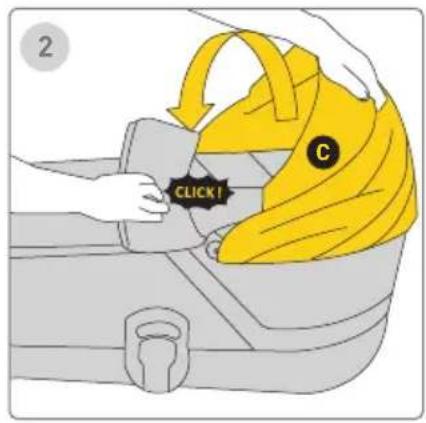
text_image
2 C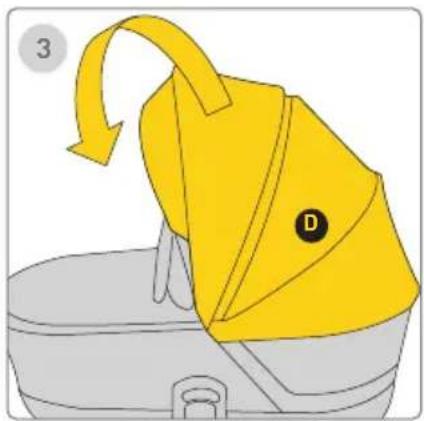
natural_image
Illustration of a yellow bag with a black circular mark labeled 'D' and an arrow indicating rotation (no text or symbols present)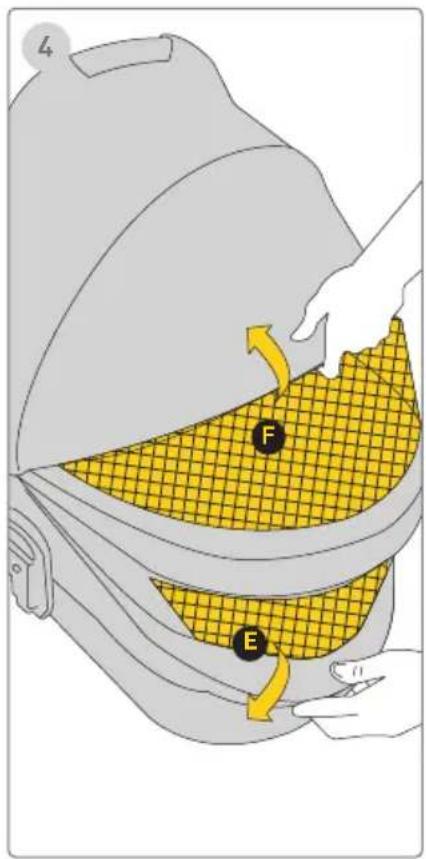
text_image
L F ECanopy
!Ensure the handle is stable before placing the child in the bassinet!
1 Passo
To fold the canopy, press the canopy adjustment buttons and fold it back.
2 Passo
natural_image
Illustration of two baby strollers with different seat designs (no text or symbols)SVARBU! PERSKAITYK IR IŠSAUGOK ATEIČIAI KAIP NUORODA
¡SPÉJIMAS!
text_image
Diagram of a mechanical device with labeled components A and B, showing directional arrows indicating motion or flow.Front Wheels/Rear Wheels
text_image
1 CLICK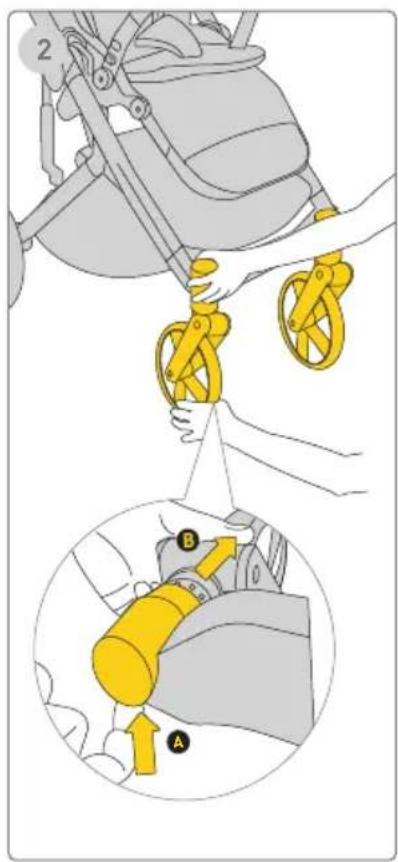
text_image
Diagram illustrating a mechanical device with labeled parts A and B, showing hand positioning and assembly steps.
text_image
3 CLICK! D A B C CLICK! 4 EPriekiniai ratai
1 Žingsnis
text_image
Diagram illustrating hand positioning and movement of a mechanical component with labeled parts B, C, and directional arrows indicating motion.Apsauginis buomelis
natural_image
Illustration of a stroller with yellow railings and wheels, no text or symbols present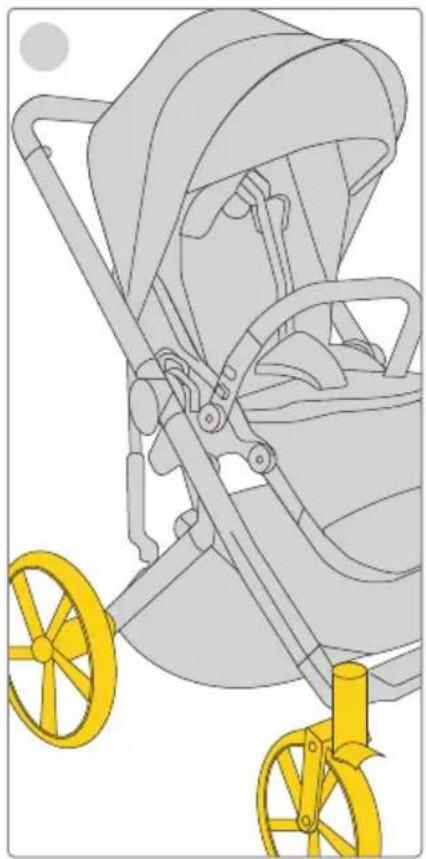
natural_image
Illustration of a stroller with yellow wheels and handlebars, no text or symbols present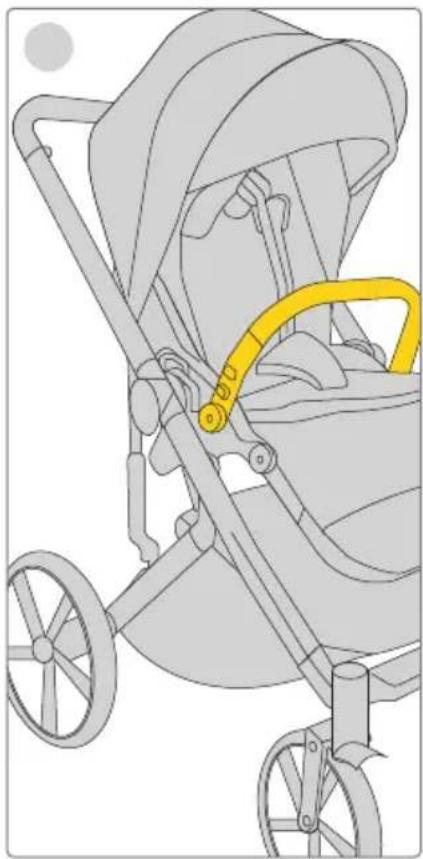
natural_image
Illustration of a stroller with yellow belt and wheels, no text or symbols presentnatural_image
Illustration of a bird's head with a yellow beak and patterned neck, no text or symbols presentStogelis
text_image
123 UNLOCK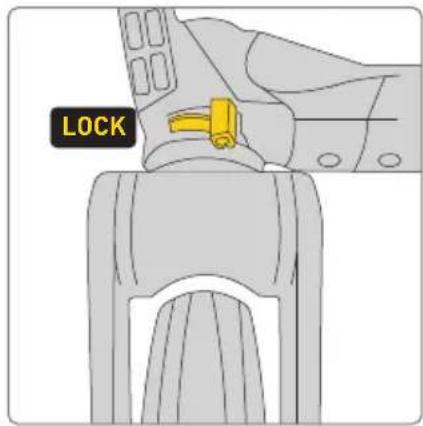
text_image
LOCK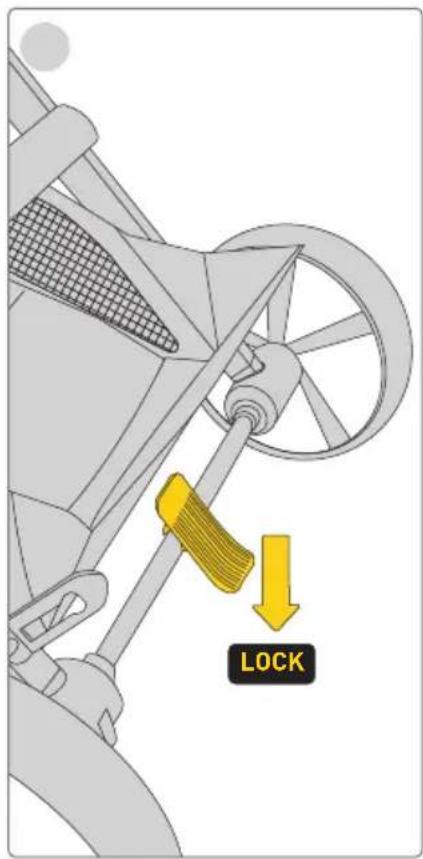
text_image
LOCK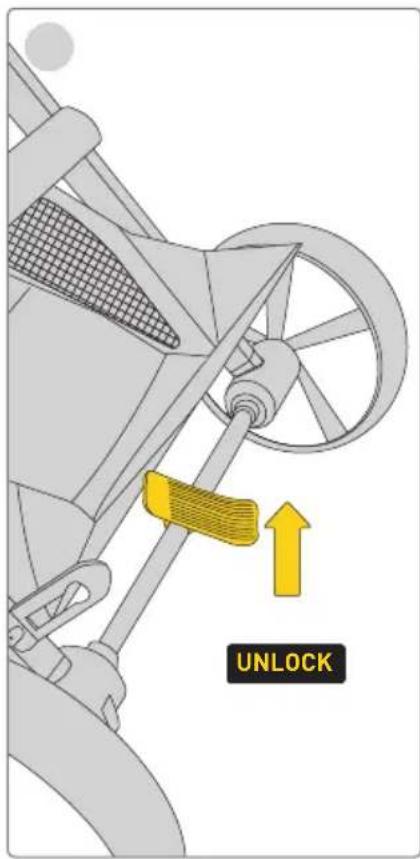
text_image
UNLOCKnatural_image
Diagram of a yellow robotic device with a handle and arm, showing a directional arrow labeled 'A' (no text or symbols on the diagram itself)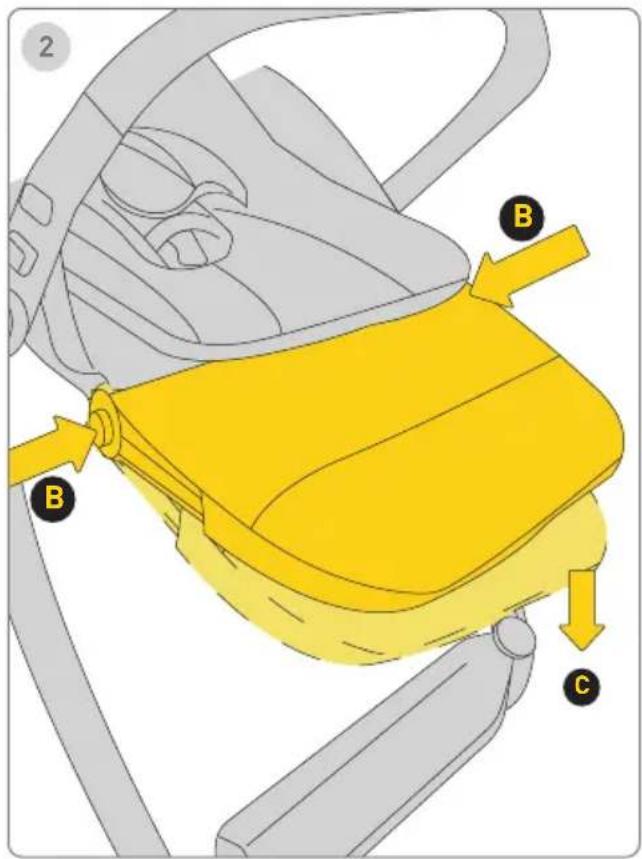
text_image
2 B B CBlauzdy atrama
d l e Recline Adjustment
text_image
1 A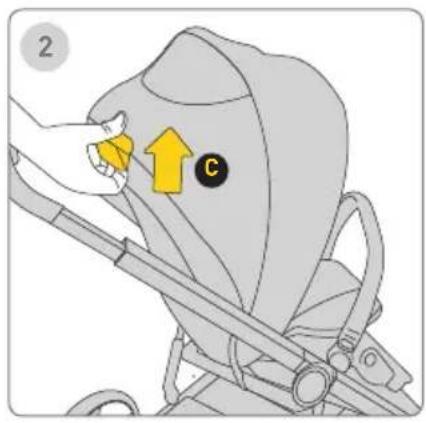
text_image
2 C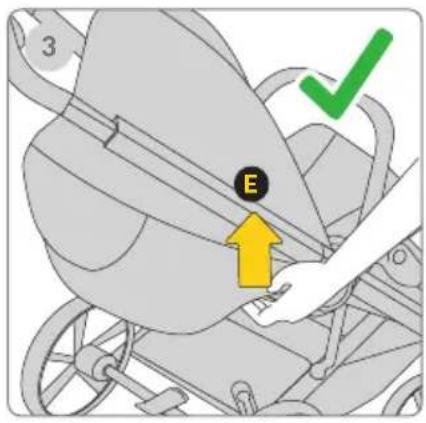
text_image
3 E
text_image
B CLICK!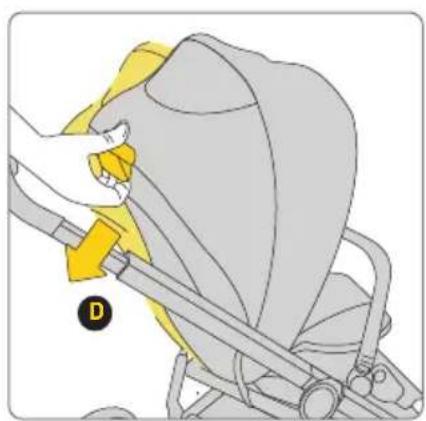
natural_image
Illustration of a hand adjusting a yellow belt buckle on a gray seatbelt (no text or symbols)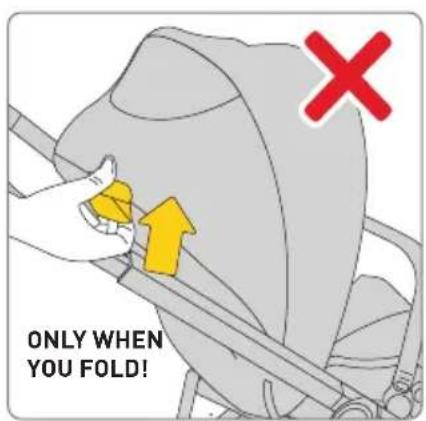
text_image
ONLY WHEN YOU FOLD!text_image
Diagram showing mechanical components with yellow arrows indicating directional flow or movement, possibly illustrating a system or process.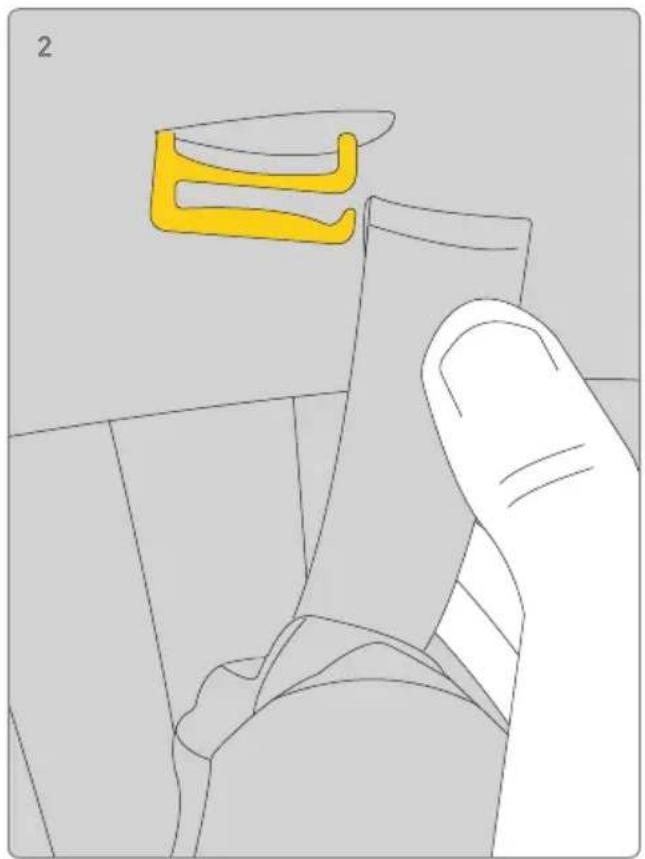
natural_image
Illustration of a hand holding a small object with a yellow abstract shape above it, no text or symbols present.Idéklas
text_image
Diagram illustrating a mechanical assembly with labeled parts A and B, showing motion arrows indicating movement or rotation.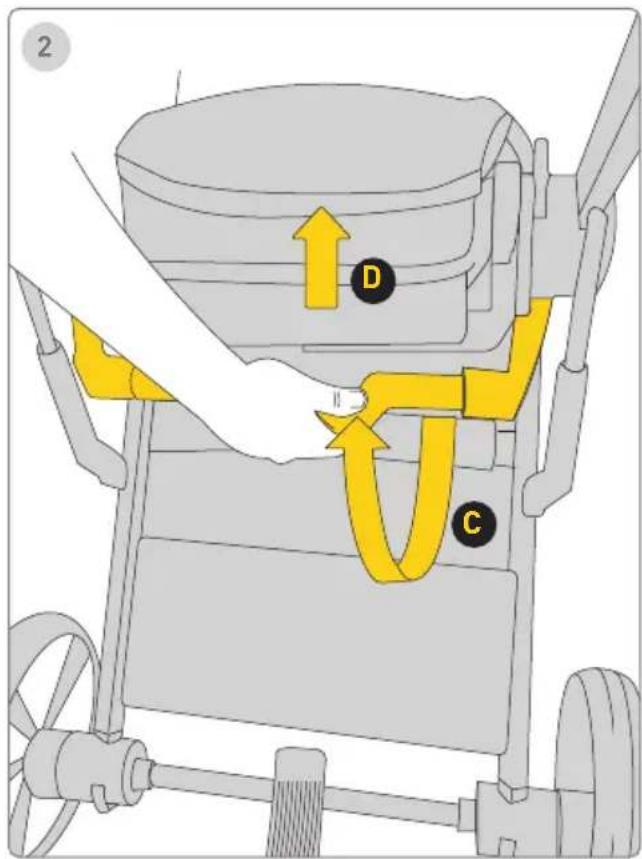
text_image
2 D CSulankstymas
text_image
Diagram showing a yellow mechanical clamp with labeled parts C and D, indicating assembly or positioning steps.Priedai
text_image
Diagram of a mechanical clamp or bracket with labeled parts and directional arrows indicating motion or forceProduct setup - unfolding carrycot
text_image
1 A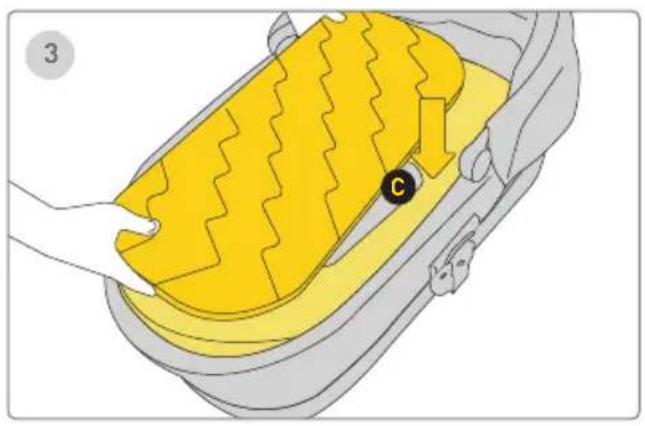
natural_image
Illustration of a car interior with yellow foam cushion and black circular marker (no text or symbols)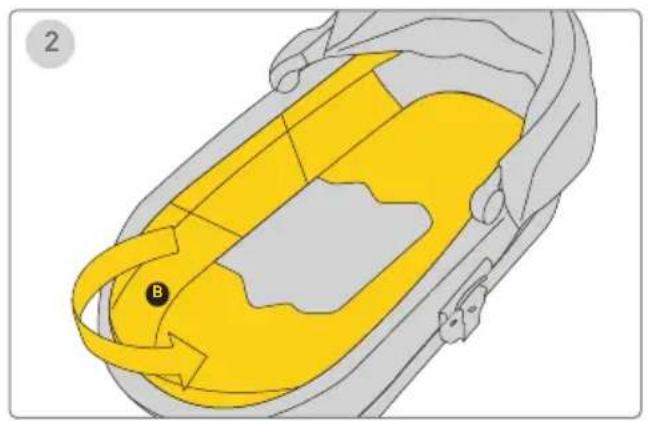
natural_image
Diagram of a car interior showing yellow and gray areas with a labeled point B (no text or symbols beyond label)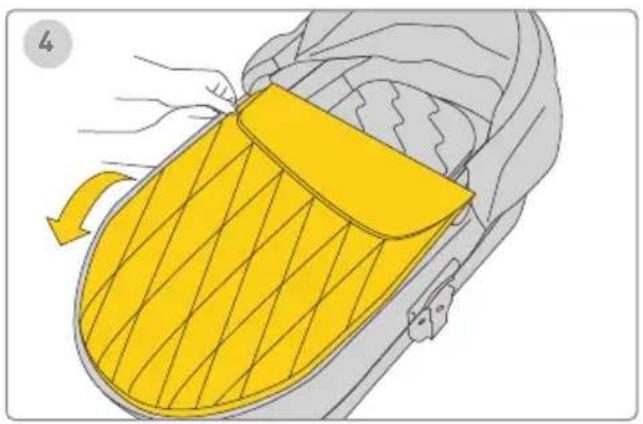
natural_image
Illustration of a yellow and gray object with a handle, possibly a device or container, being handled by hands (no text or symbols present)Product setup - folding carrycot
text_image
1 B A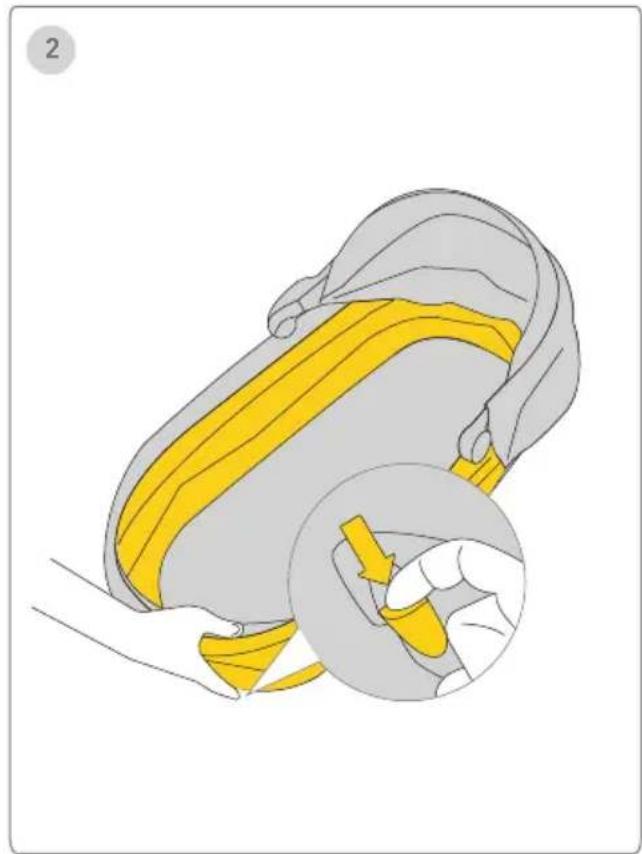
natural_image
Illustration of a yellow belt buckle being lifted, showing the seat and grip mechanism (no text or symbols)Carry Cot Attachment on Stroller Frame Carry Cot Removal
text_image
123 A CLICK!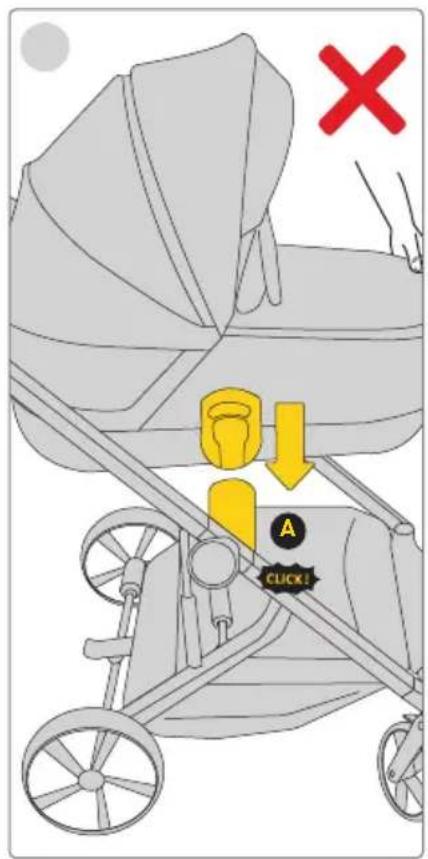
text_image
X A CLICK!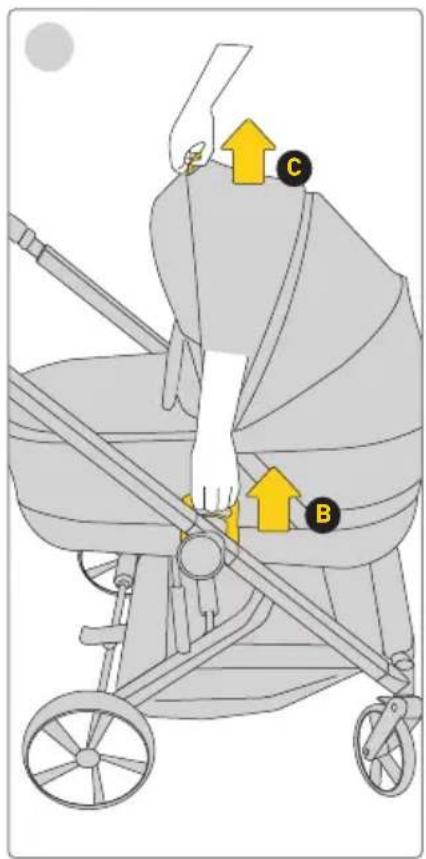
text_image
Diagram of a baby stroller with labeled parts C and B, showing hand positioning and directional arrows indicating movement or force.natural_image
Illustration of a yellow bag with a black circular mark labeled 'D' and an arrow indicating rotation (no text or symbols present)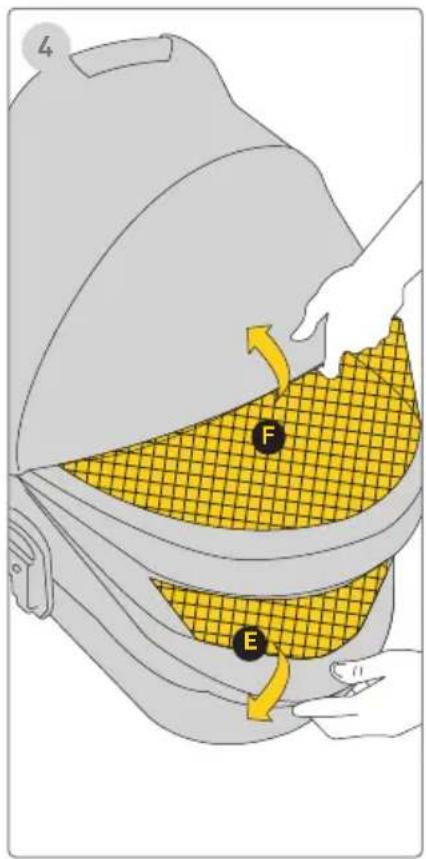
text_image
L F EStogelis
natural_image
Illustration of two baby strollers with different seat designs (no text or symbols)IMPORTANTE!
LEIA E GUARDE PARA O FUTURO COMO REFERÊNCIA
AVISOS!
text_image
Diagram of a mechanical device with labeled components A and B, showing directional arrows indicating motion or flow.Desdobramento do chassis do carrinho
1 Passo
Front Wheels/Rear Wheels
text_image
1 LUCK!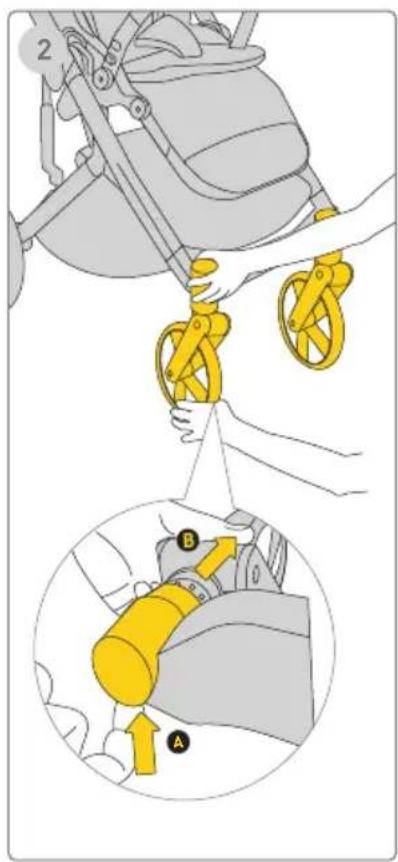
text_image
Diagram illustrating a mechanical device with labeled parts A and B, showing hand positioning and assembly steps.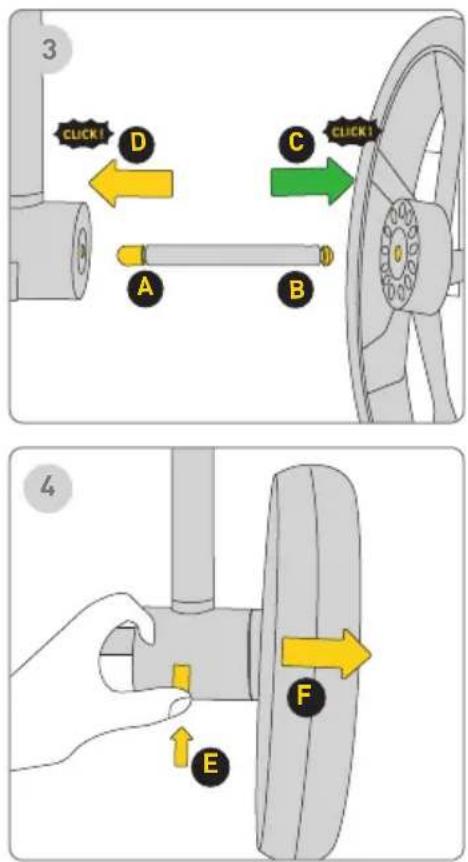
text_image
3 CLICK! D A B C CLICK! 4 ERodas dianteiras
1 Passo
text_image
Diagram illustrating hand positioning and movement of a car steering wheel, labeled with points B and C and directional arrows.Barra de proteção
natural_image
Illustration of a stroller with yellow railings and wheels, no text or symbols present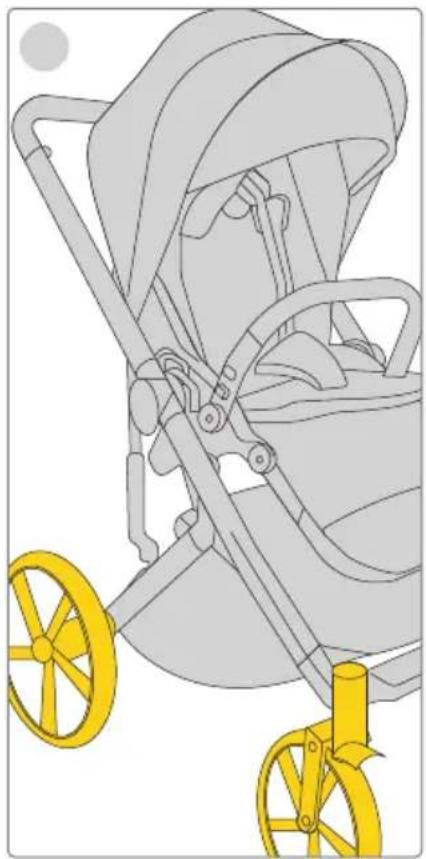
natural_image
Illustration of a stroller with yellow wheels and handlebars, no text or symbols present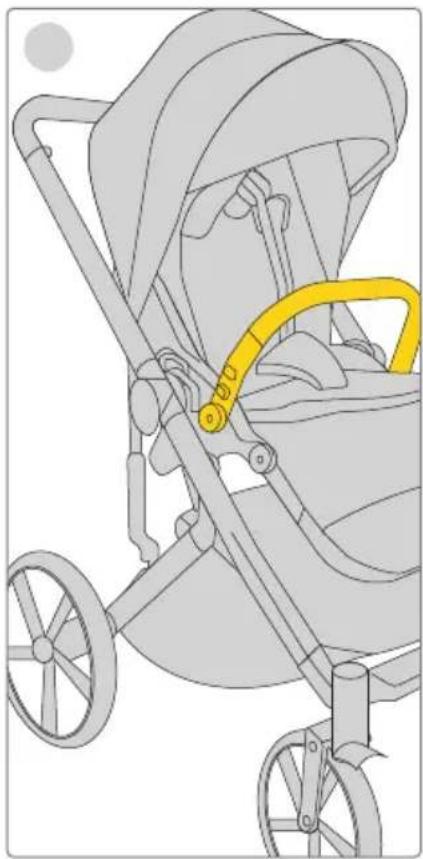
natural_image
Illustration of a stroller with yellow belt and wheels, no text or symbols presentnatural_image
Illustration of a bird's head with a yellow beak and patterned neck, no text or symbols presentCapota
text_image
123 UNLOCK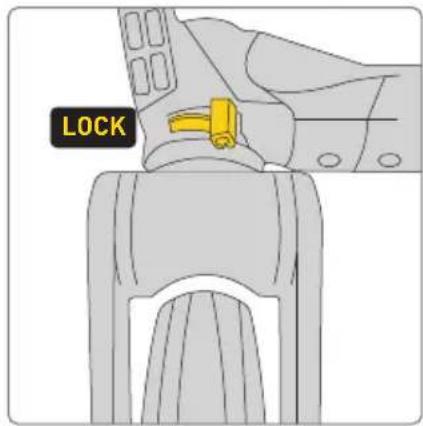
text_image
LOCK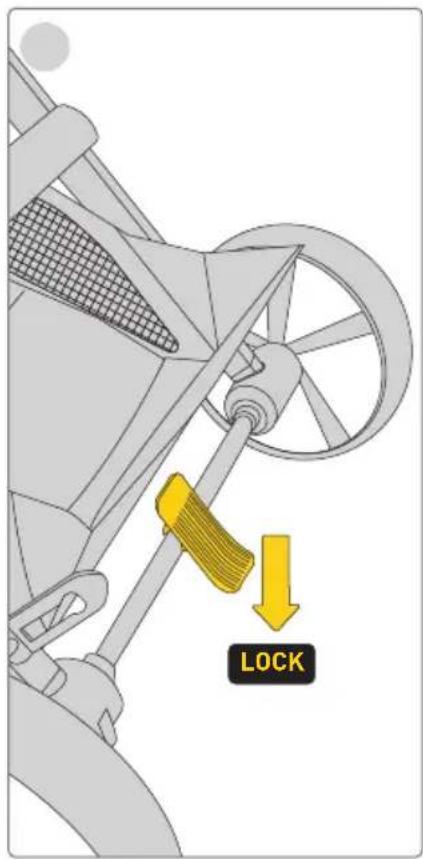
text_image
LOCK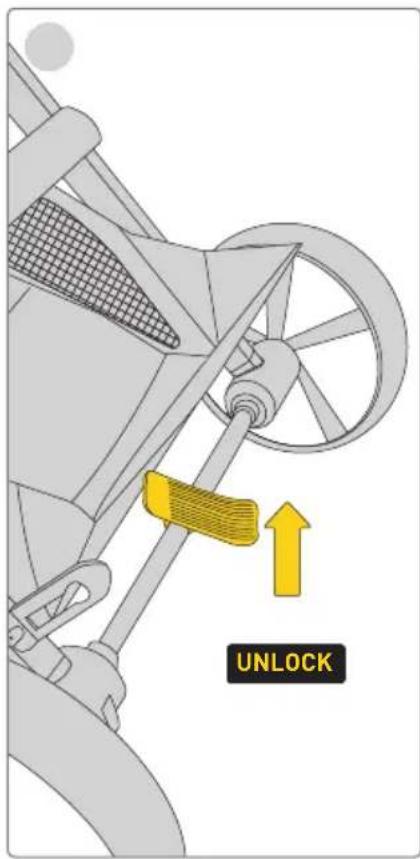
text_image
UNLOCKnatural_image
Diagram of a yellow robotic device with a handle and arm, showing a directional arrow labeled 'A' (no text or symbols on the device itself)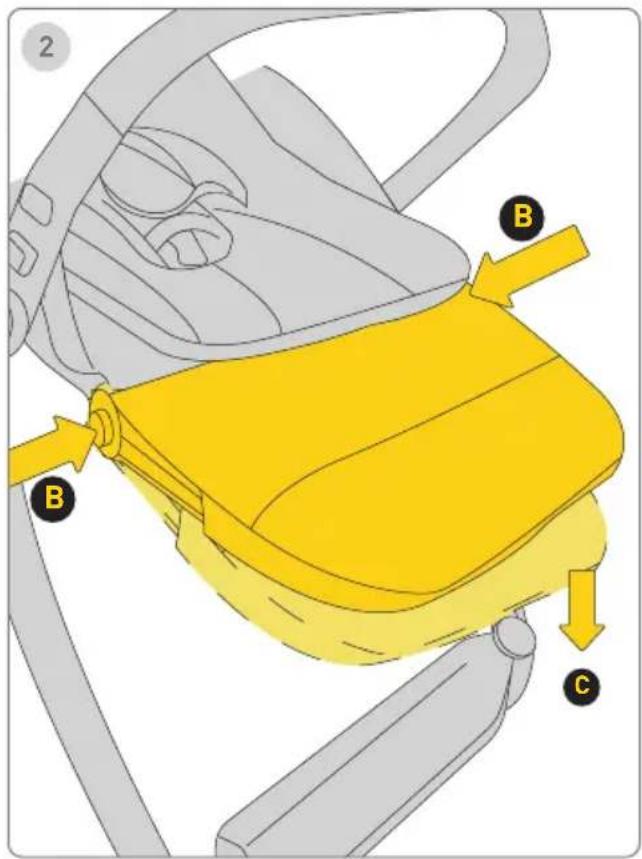
text_image
2 B B Cd l e Recline Adjustment
natural_image
Diagram of a curved pipe with a yellow arrow and labeled point A, no text or symbols present
text_image
2 C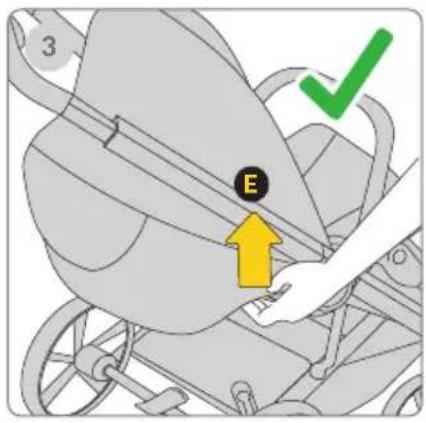
text_image
3 E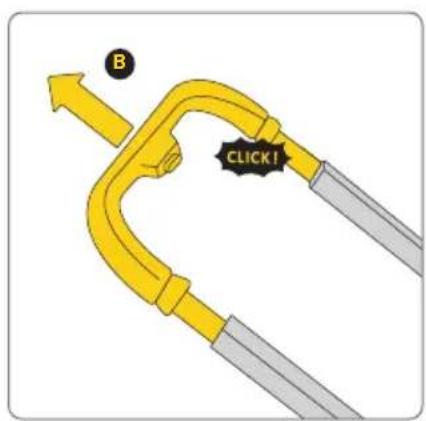
text_image
B CLICK!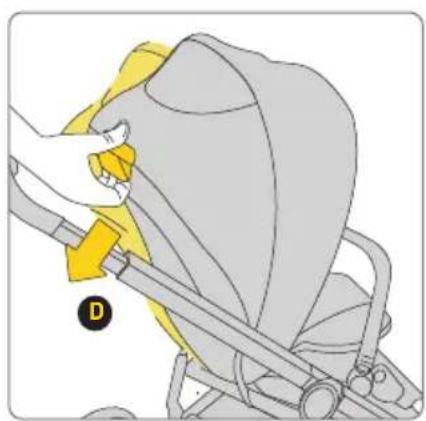
natural_image
Illustration of a hand adjusting a yellow belt switch on a gray car seatbelt (no text or symbols)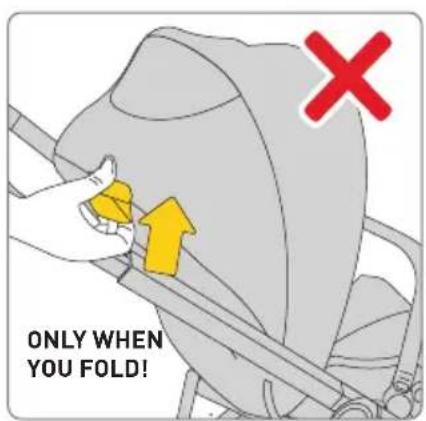
text_image
ONLY WHEN YOU FOLD!Alça
text_image
Diagram showing mechanical components with yellow directional arrows indicating movement or force, possibly illustrating a motion or flow system.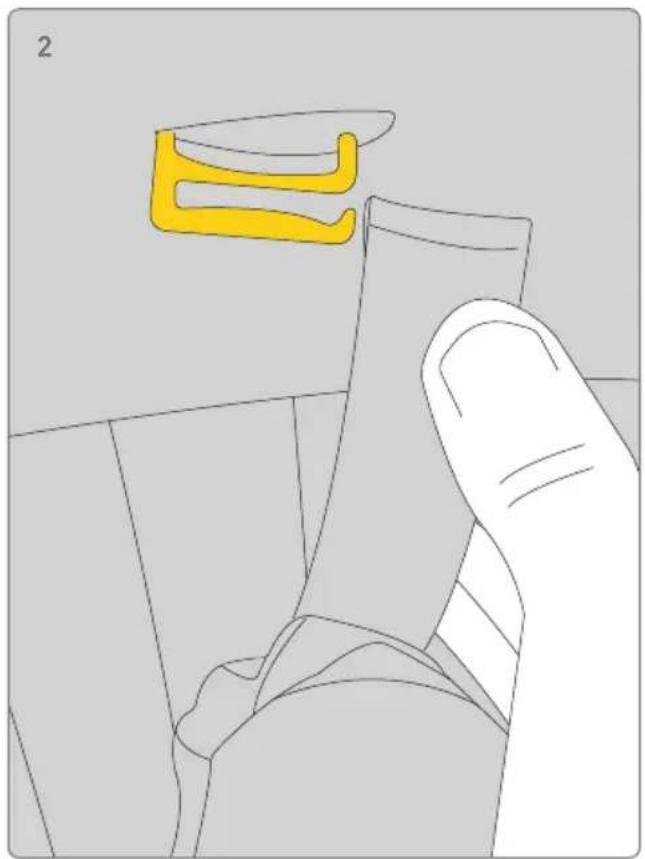
natural_image
Illustration of a hand holding a small object with a yellow abstract shape above it, no text or symbols present.Inserto
text_image
Diagram illustrating a mechanical assembly with labeled parts A and B, showing motion arrows indicating movement or force.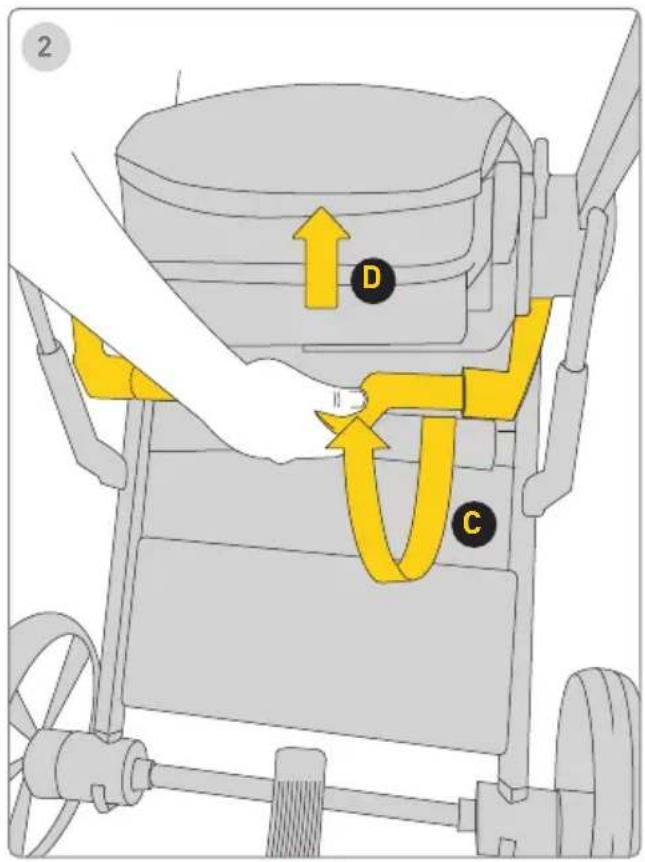
text_image
2 D CDobrar o carrinho
text_image
Diagram showing a yellow mechanical device with labeled parts C and D, indicating assembly or positioning steps.Acessórios
text_image
Diagram of a mechanical clamp or bracket with labeled parts and directional arrows indicating motion or forceProduct setup - unfolding carrycot
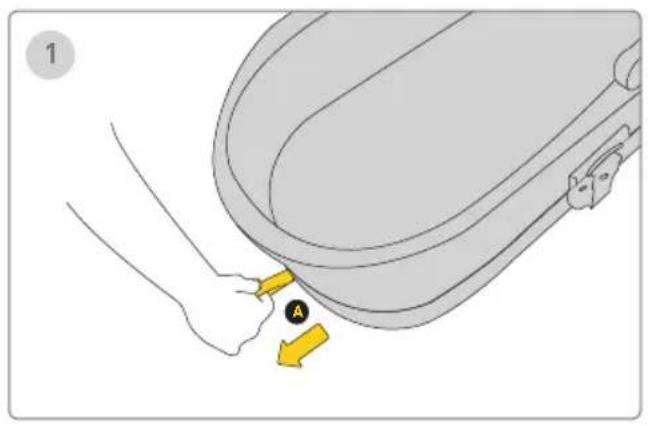
text_image
1 A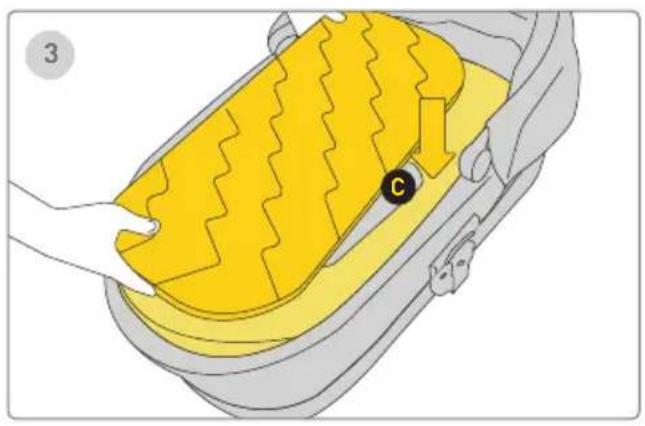
natural_image
Illustration of a car interior with yellow foam cushion and black circular marker (no text or symbols)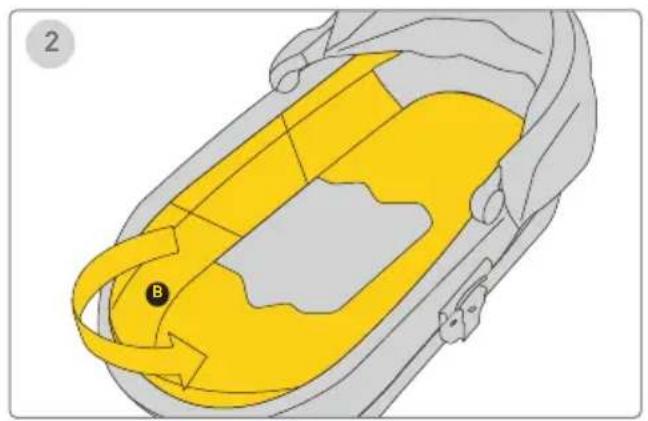
natural_image
Diagram of a car interior showing yellow and gray areas with a labeled point B (no text or symbols beyond label)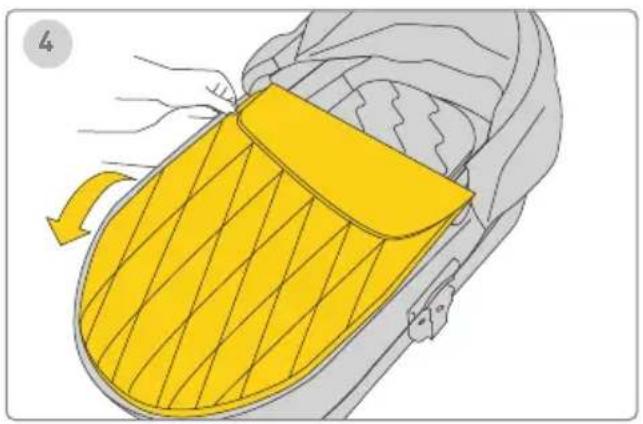
natural_image
Illustration of a yellow and gray car seatbelt with a handle, showing airflow direction (no text or symbols)Product setup - folding carrycot
text_image
1 B A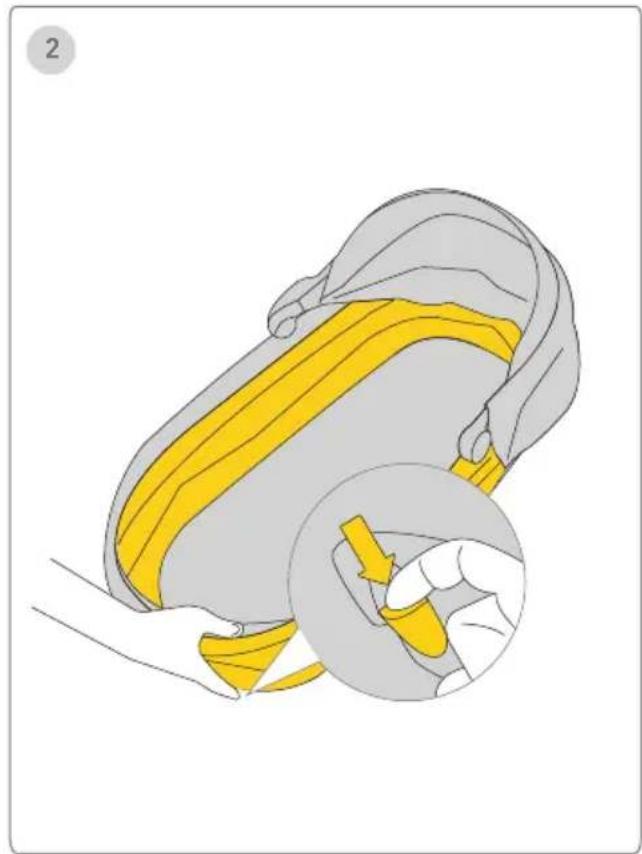
natural_image
Illustration of a yellow belt buckle being lifted, showing the seat and grip mechanism (no text or symbols)Dobrar o berço

Passo
Retire o colchão

lobre a capota


Passo
Carry Cot Attachment on Stroller Frame Carry Cot Removal
text_image
123 A CLICK!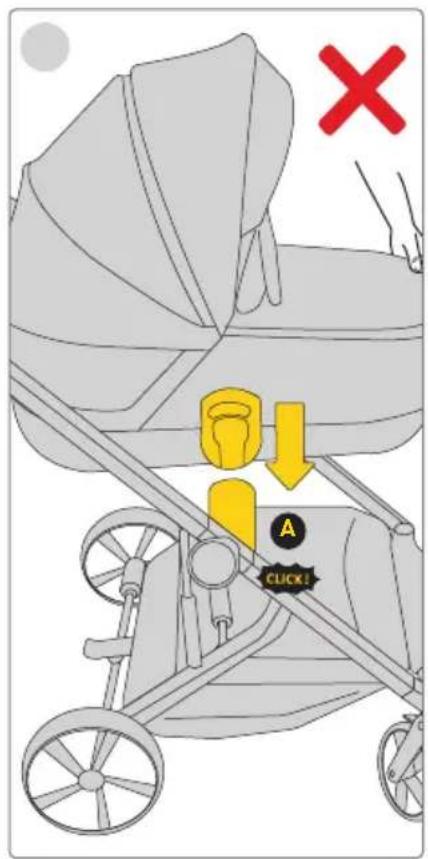
text_image
Diagram illustrating car seatbelt usage with a 'CLICK!' button and a red X mark indicating absence or rejection.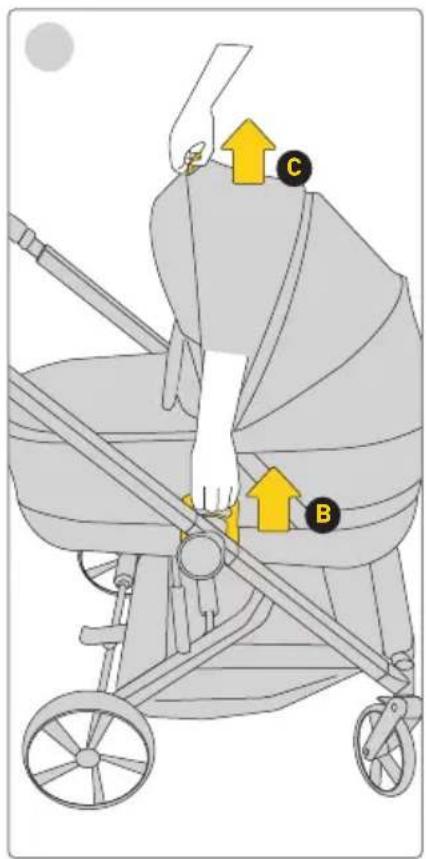
text_image
Diagram of a baby stroller with labeled parts C and B, showing hand positioning and directional arrows indicating movement or force.natural_image
Illustration of a yellow bag with a black circular mark labeled 'D' and an arrow indicating rotation (no text or symbols present)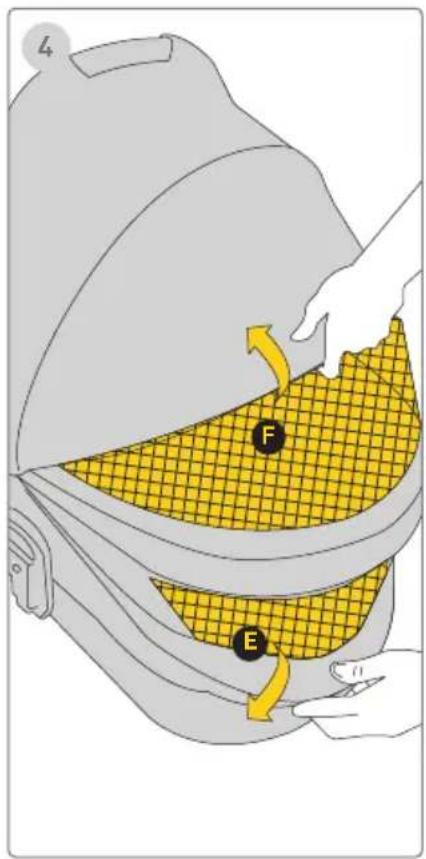
text_image
L F ECapota
natural_image
Illustration of two baby strollers with different seat designs (no text or symbols)IMPORTANT!
CITEŞTE ŞI PÄSTREAZÄ PENTRU VIITOR CA REFERINȚĂ
AVERTISMENT!
text_image
Diagram of a mechanical device with labeled components A and B, showing directional arrows indicating motion or flow.Front Wheels/Rear Wheels
text_image
1 CLICK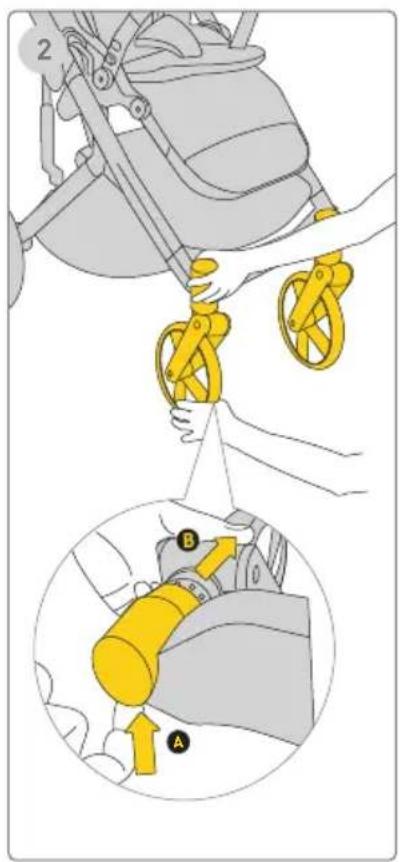
text_image
Diagram illustrating a mechanical device with labeled parts A and B, showing hand positioning and assembly steps.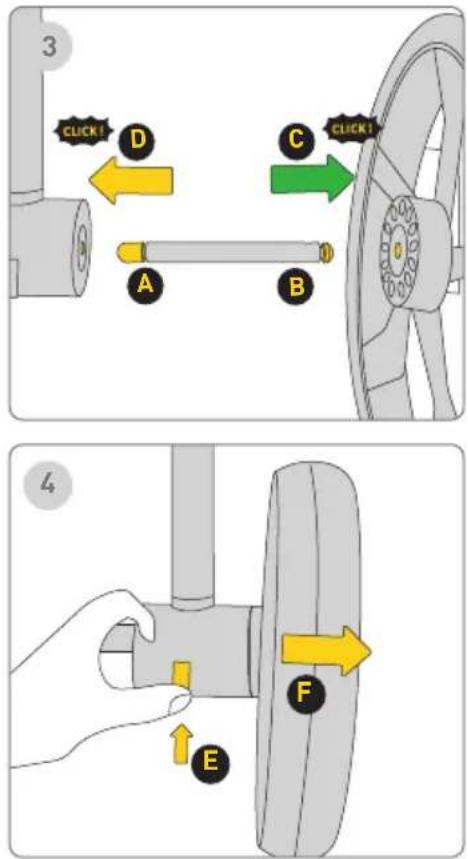
text_image
3 CLICK1 D A B C CLICK1 4 ERoțile din față
1 Pas
text_image
Diagram illustrating hand positioning and movement of a car steering wheel, labeled with points B and C and directional arrows.Bară de protectie
natural_image
Illustration of a stroller with yellow railings and wheels, no text or symbols present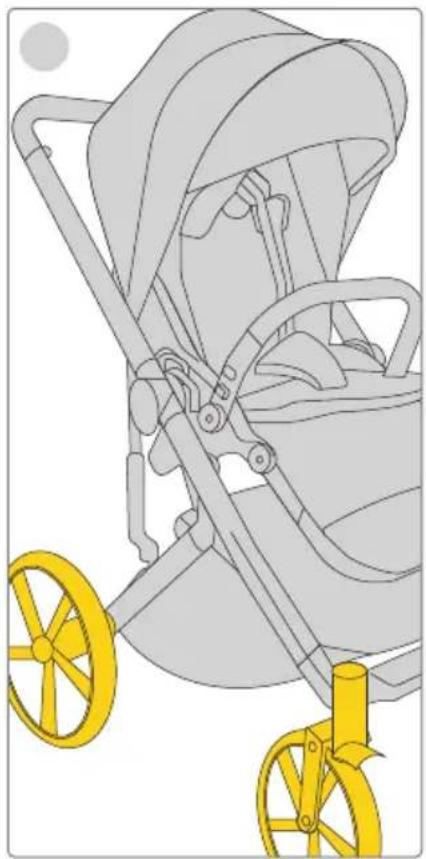
natural_image
Illustration of a stroller with yellow wheels and handlebars, no text or symbols present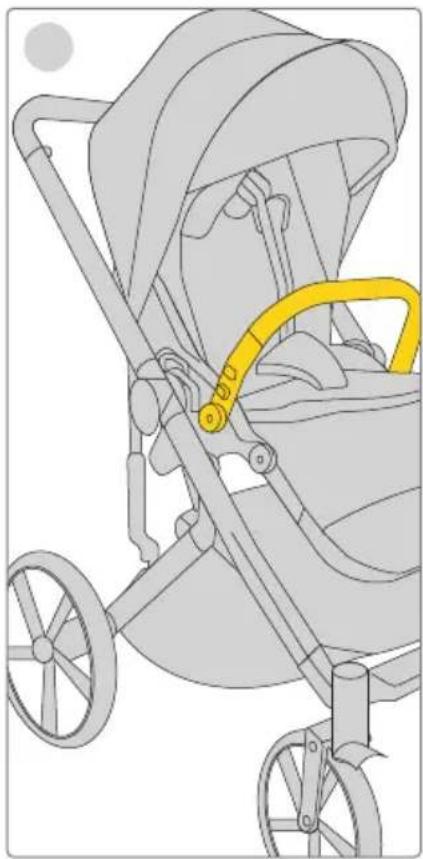
natural_image
Illustration of a stroller with yellow belt and wheels, no text or symbols presentnatural_image
Illustration of a bird's head with a yellow beak and patterned neck, no text or symbols presentCapotina
text_image
123 UNLOCK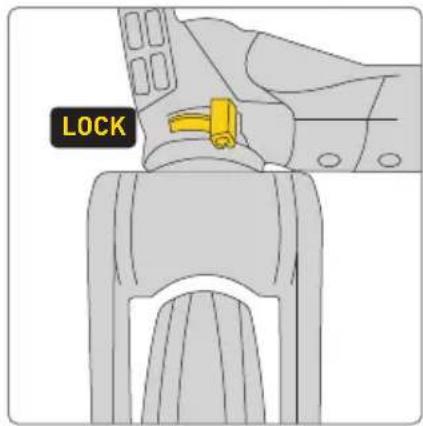
text_image
LOCK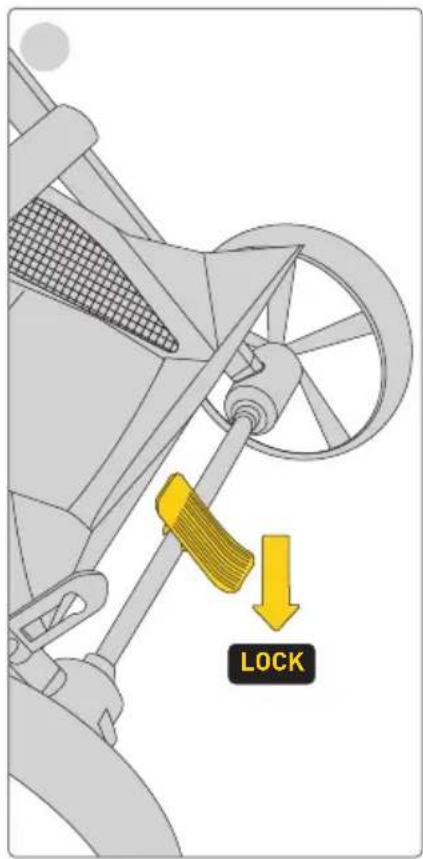
text_image
LOCK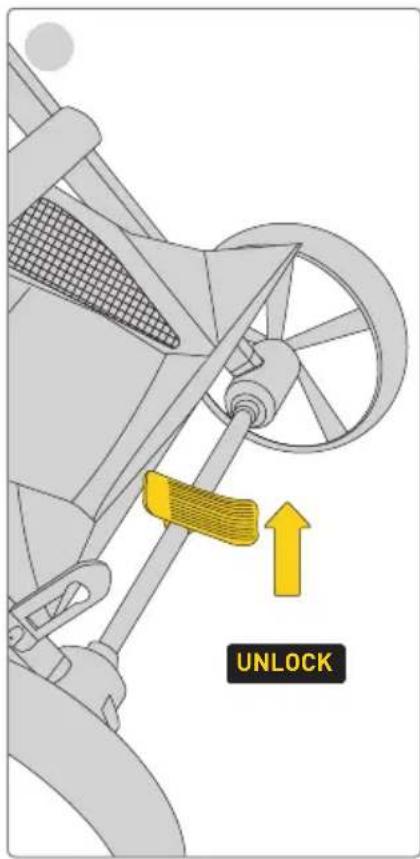
text_image
UNLOCKnatural_image
Diagram of a yellow robotic device with a handle and arm, showing a directional arrow labeled 'A' (no text or symbols on the diagram itself)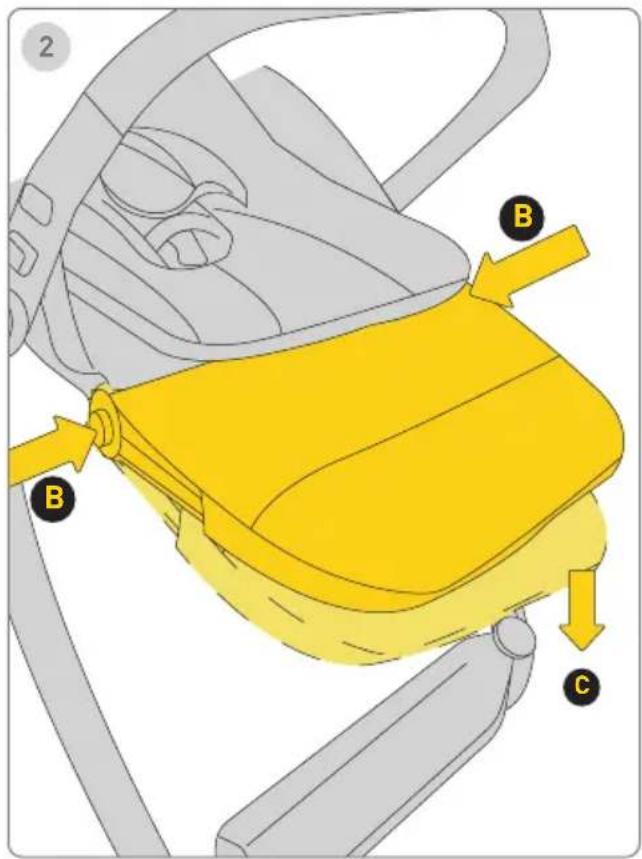
text_image
2 B B CSuport pentru gambe
d l e Recline Adjustment
natural_image
Diagram of a curved pipe with a yellow arrow and labeled point A, no text or symbols present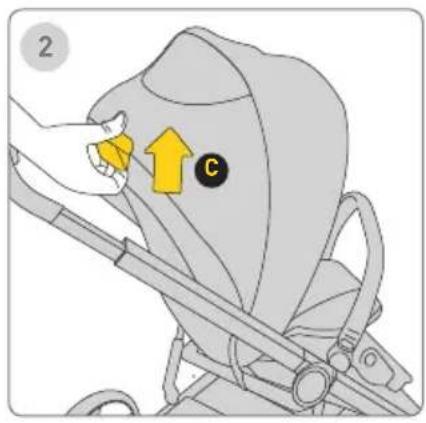
text_image
2 C
text_image
3 E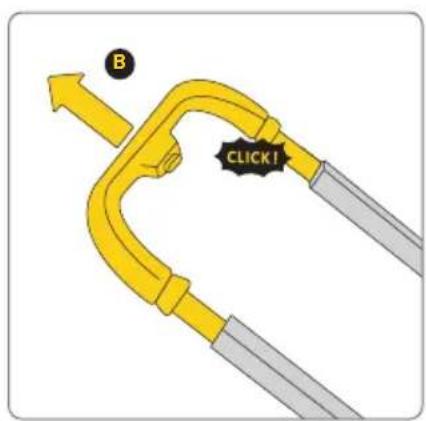
text_image
B CLICK!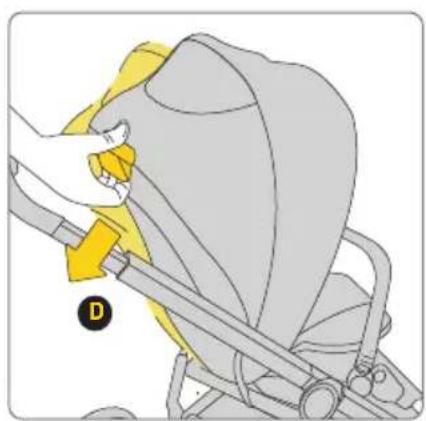
natural_image
Illustration of a hand adjusting a yellow belt switch on a gray seatbelt (no text or symbols)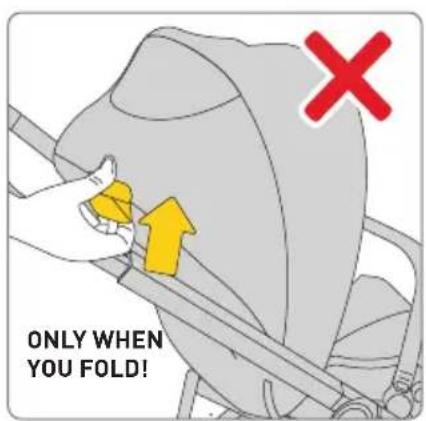
text_image
ONLY WHEN YOU FOLD!Mâner
text_image
Diagram showing mechanical components with yellow arrows indicating directional flow or movement, possibly illustrating a system or process.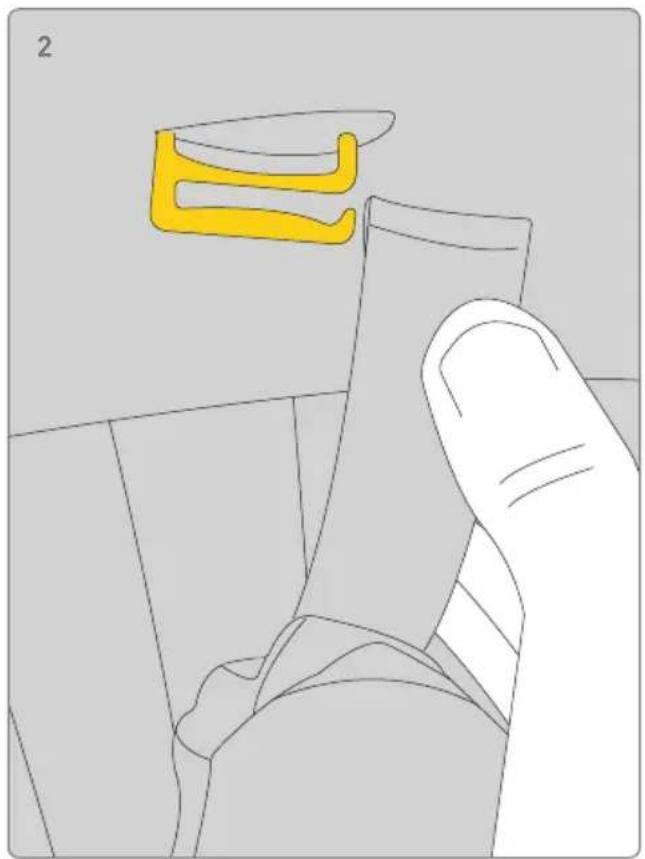
natural_image
Illustration of a hand holding a small object with a yellow abstract shape above it, no text or symbols present.Insertul
text_image
Diagram illustrating a mechanical assembly with labeled parts A and B, showing motion arrows indicating movement or force.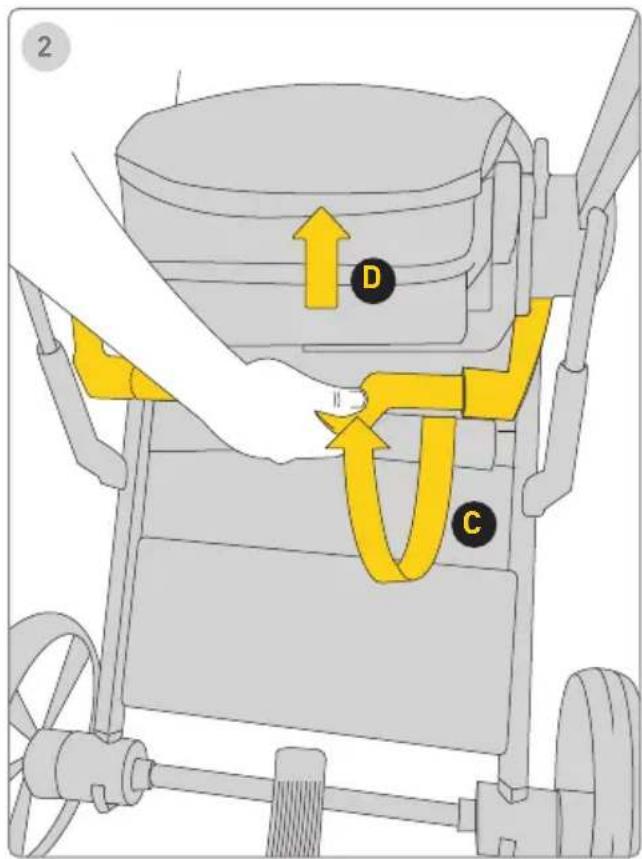
text_image
2 D Ctext_image
Diagram showing a yellow mechanical device with labeled parts C and D, indicating assembly or positioning steps.Accesorii
text_image
Diagram of a mechanical clamp or bracket with labeled parts and directional arrows indicating motion or forceProduct setup - unfolding carrycot
text_image
1 A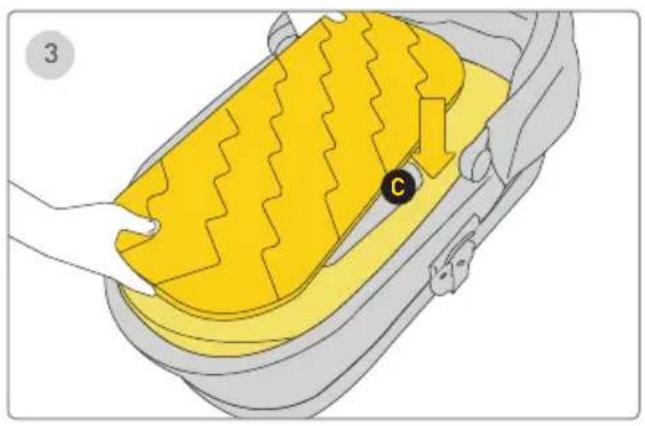
natural_image
Illustration of a car interior with yellow foam cushion and black circular marker (no text or symbols)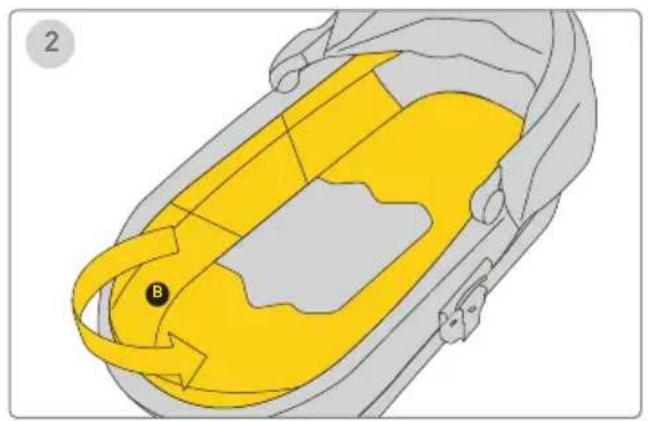
natural_image
Diagram of a car interior showing yellow and gray zones with a labeled point B (no text or symbols beyond label)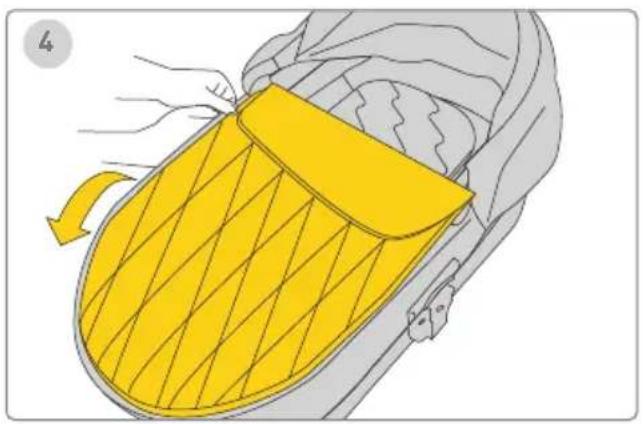
natural_image
Illustration of a yellow and gray object with a handle, possibly a device or container, being handled by hands (no text or symbols present)Product setup - folding carrycot
text_image
1 B A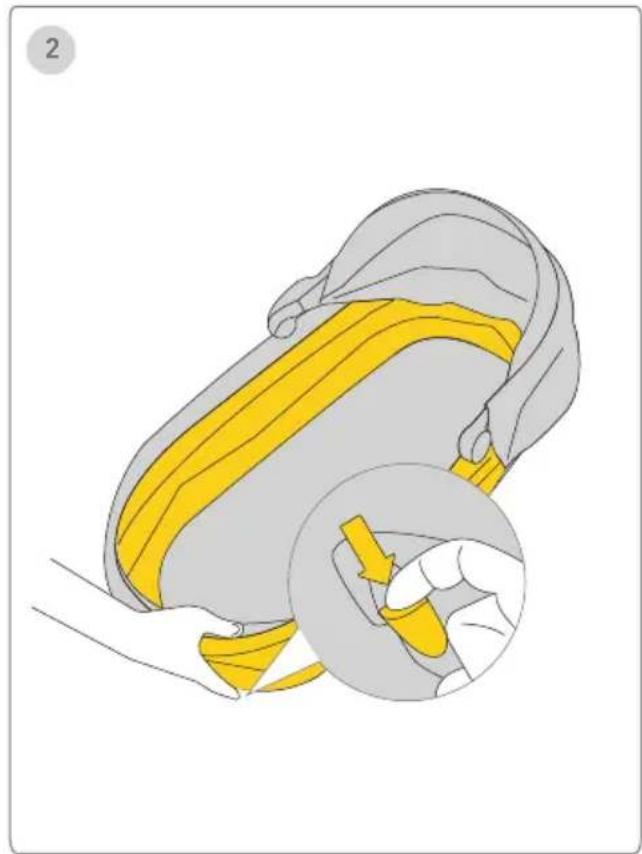
natural_image
Illustration of a yellow belt buckle being lifted, showing the seat and grip mechanism (no text or symbols)Plierea landoului:
1 Pas
Carry Cot Attachment on Stroller Frame Carry Cot Removal
text_image
123 A CLICK!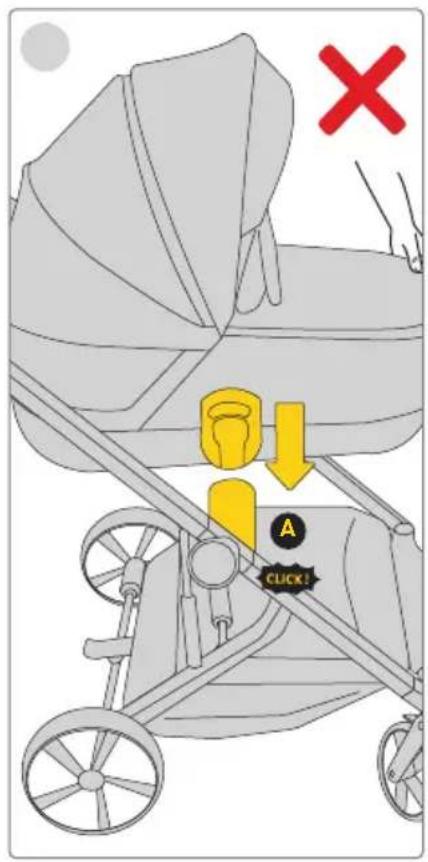
text_image
X A CLICK!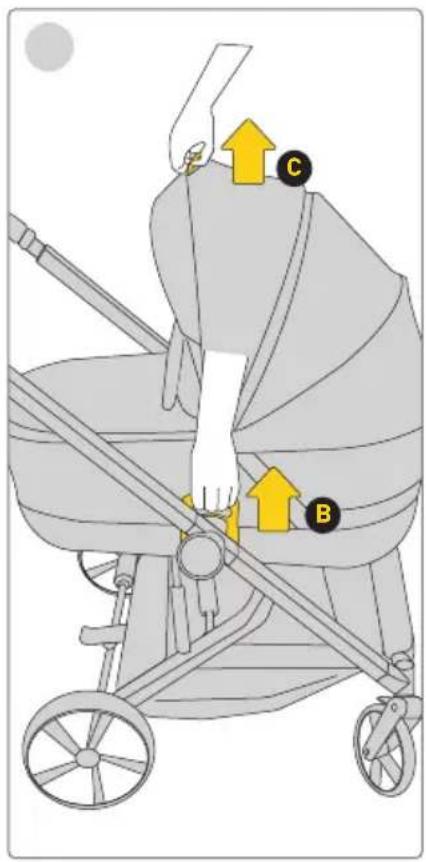
text_image
Diagram of a baby stroller with labeled parts C and B, showing hand positioning and directional arrows indicating movement or force.natural_image
Illustration of a yellow bag with a black circular mark labeled 'D' and an arrow indicating rotation (no text or symbols present)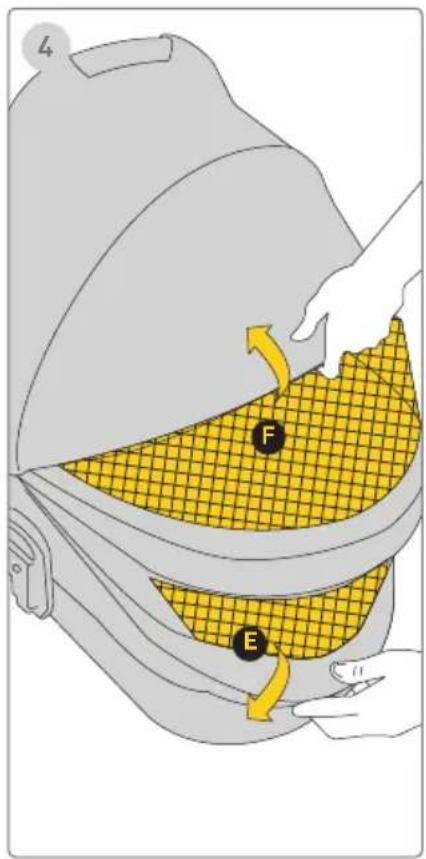
text_image
L F ECapotina
natural_image
Illustration of two baby strollers with different designs and seat compartments (no text or symbols)DÔLEŽITÉ!
PREČÍTAJTE SI A ULOŽTE NA BUDÚCNOSŤ AKO ODKAZ
UPOZORNENIE!
⚠ Nikdy nenechávajte dieta bez dozoru
text_image
Diagram of a mechanical device with labeled components A and B, showing directional arrows indicating motion or flow.Front Wheels/Rear Wheels
text_image
1 CLICK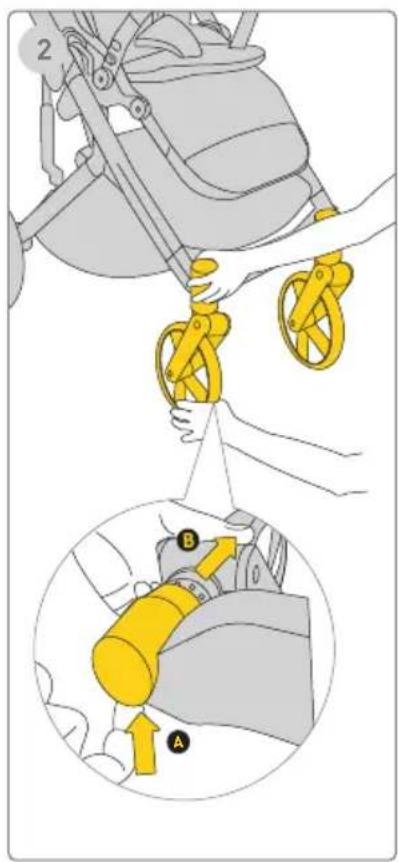
text_image
Diagram illustrating a mechanical device with labeled parts A and B, showing hand positioning and assembly steps.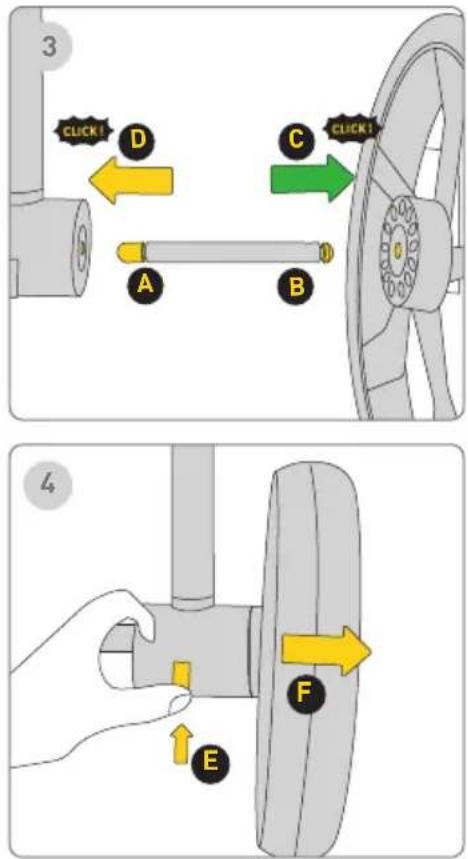
text_image
3 CLICK! D A B C CLICK! 4 EPredné kolesá
1 Krok
text_image
Diagram illustrating hand positioning and movement of a car steering wheel, labeled with points B and C and directional arrows.Ochranná bariéra
natural_image
Illustration of a stroller with yellow railings and wheels, no text or symbols present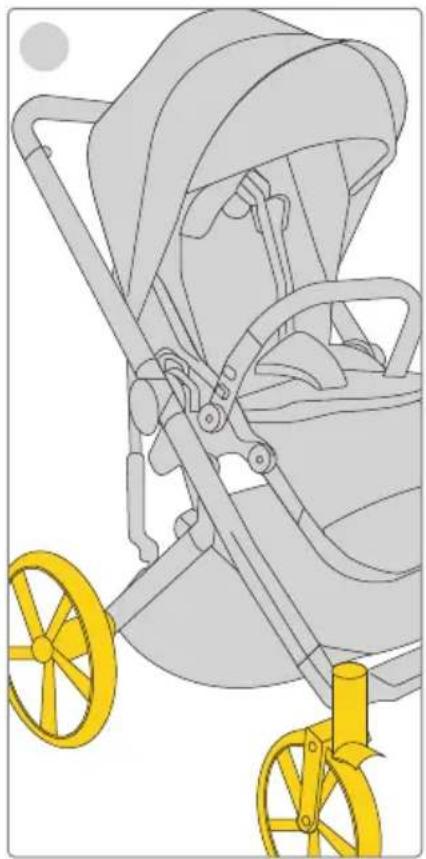
natural_image
Illustration of a stroller with yellow wheels and handlebars, no text or symbols present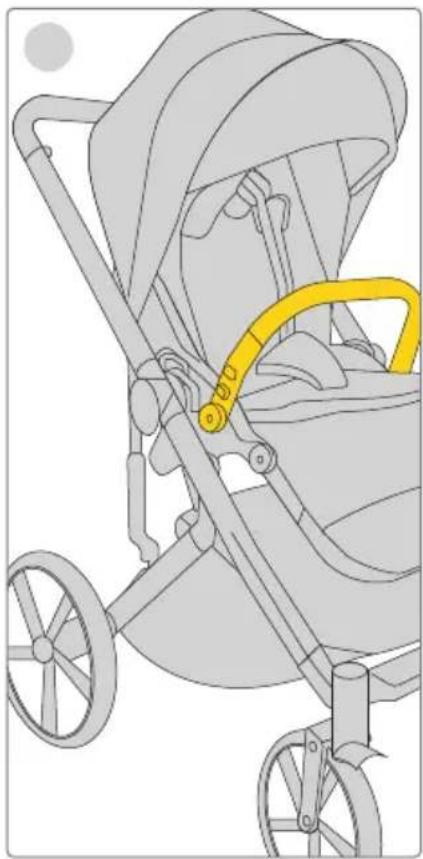
natural_image
Illustration of a stroller with yellow belt and wheels, no text or symbols presentSkontrolujte nastavenie
1 Krok
natural_image
Illustration of a baby stroller with a yellow arrow indicating motion (no text or symbols)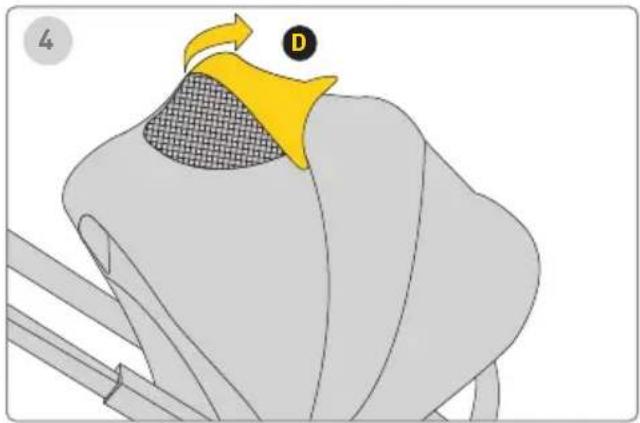
natural_image
Illustration of a bird's head with a yellow beak and patterned neck, no text or symbols presentStrieška
text_image
123 UNLOCK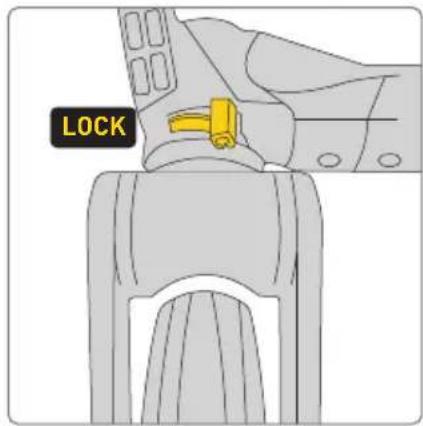
text_image
LOCK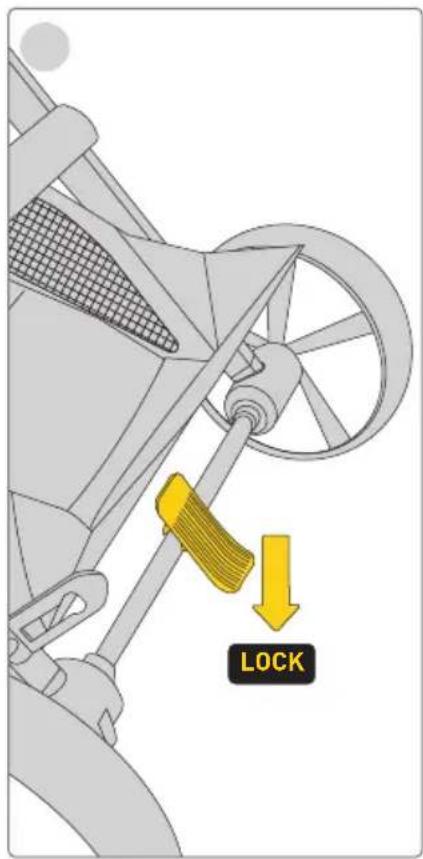
text_image
LOCK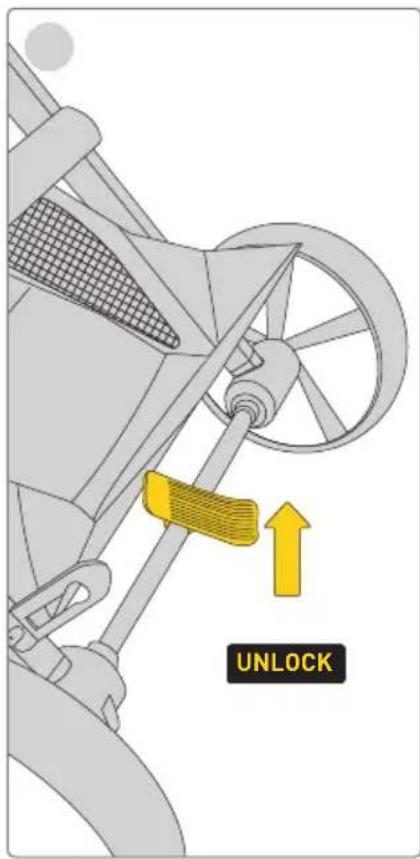
text_image
UNLOCKnatural_image
Diagram of a yellow robotic device with a handle and arm, showing a directional arrow labeled 'A' (no text or symbols on the diagram itself)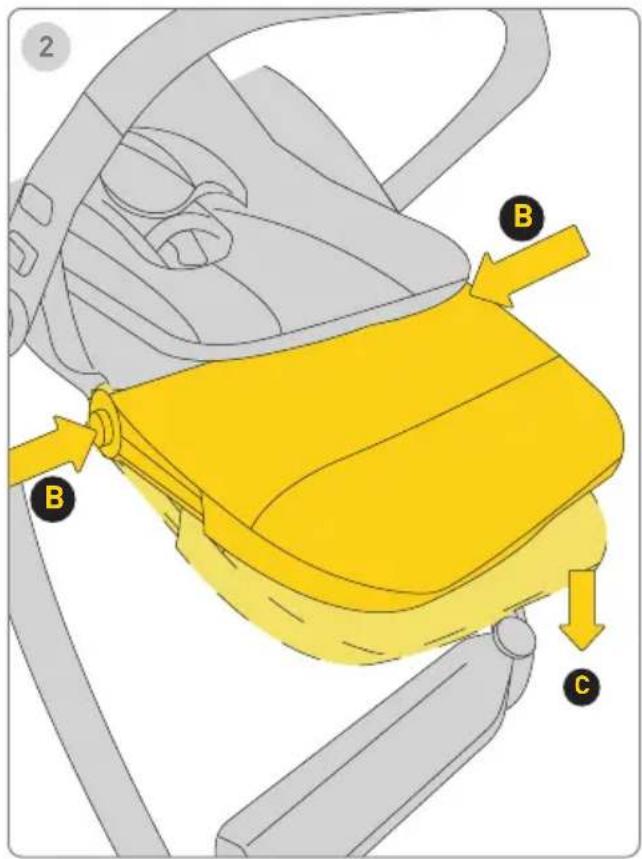
text_image
2 B B CPodpora lýtok
text_image
Diagram showing mechanical components with yellow directional arrows indicating movement or force, possibly illustrating a motion or flow system.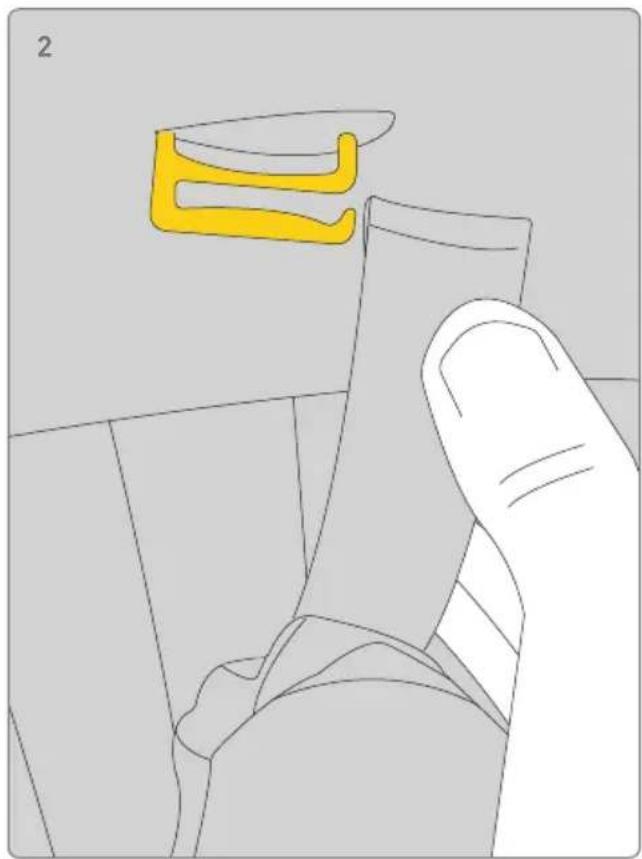
natural_image
Illustration of a hand holding a small object with a yellow abstract shape above it, no text or symbols present.Vložka
text_image
Diagram illustrating a mechanical assembly with labeled parts A and B, showing motion arrows indicating movement or force.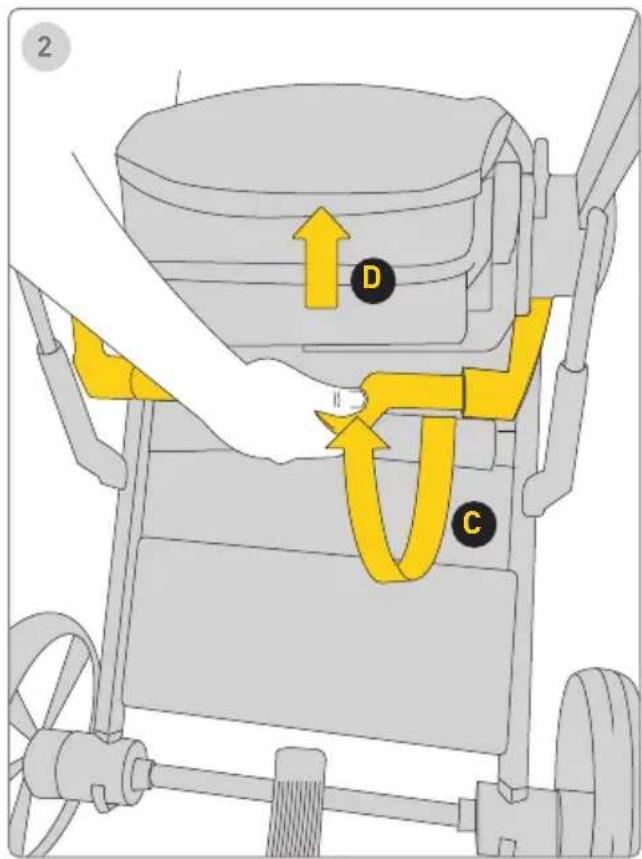
text_image
2 D CSkladanie
text_image
Diagram showing a yellow robotic arm with labeled parts C and D, indicating mechanical or robotic assembly steps.Príslušenstvo
text_image
Diagram of a mechanical clamp or bracket with labeled parts and directional arrows indicating motion or forceAdaptéry na autosedačku
1 Krok
Product setup - unfolding carrycot
text_image
1 A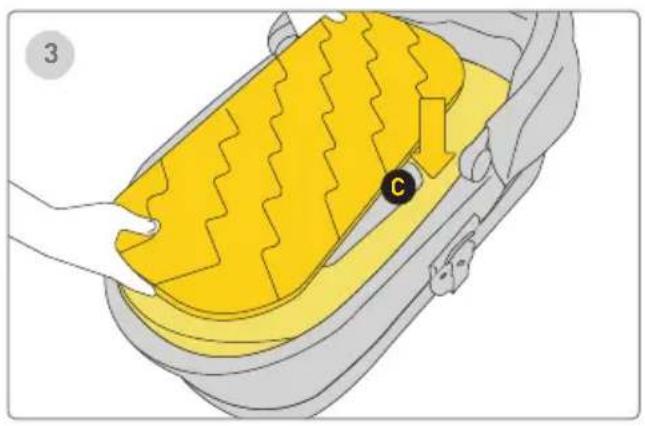
natural_image
Illustration of a car interior with yellow foam cushion and black circular marker (no text or symbols)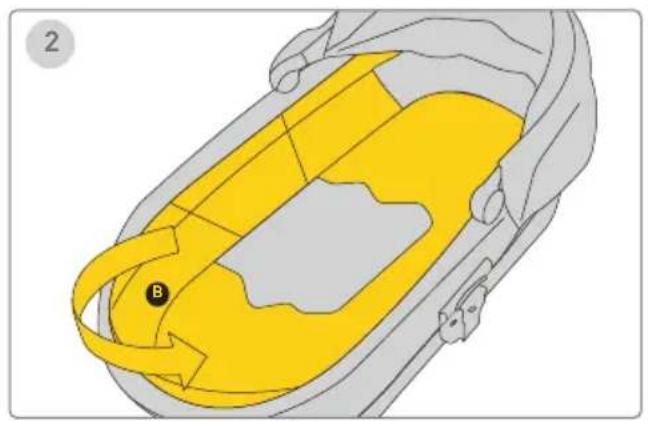
natural_image
Diagram of a car interior showing yellow and gray zones with a labeled point B (no text or symbols beyond label)
natural_image
Illustration of a yellow and gray car seatbelt with a handle, showing airflow direction (no text or symbols)Product setup - folding carrycot
text_image
1 B A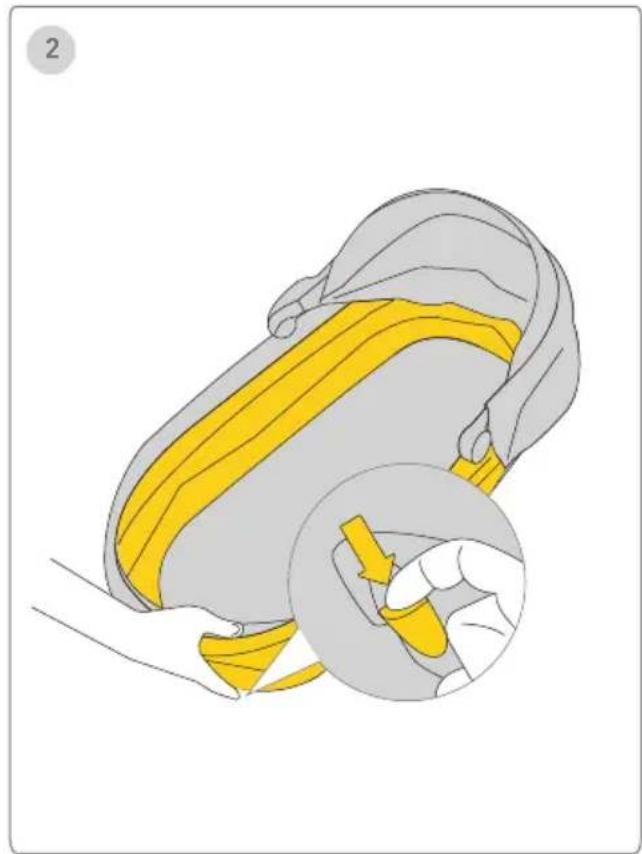
natural_image
Illustration of a yellow belt buckle being lifted, showing the seat and grip mechanism (no text or symbols)Skladanie vaničky:
1 Krok
Vyberte matrac
A sklopte striešku

2 Krok
Carry Cot Attachment on Stroller Frame Carry Cot Removal
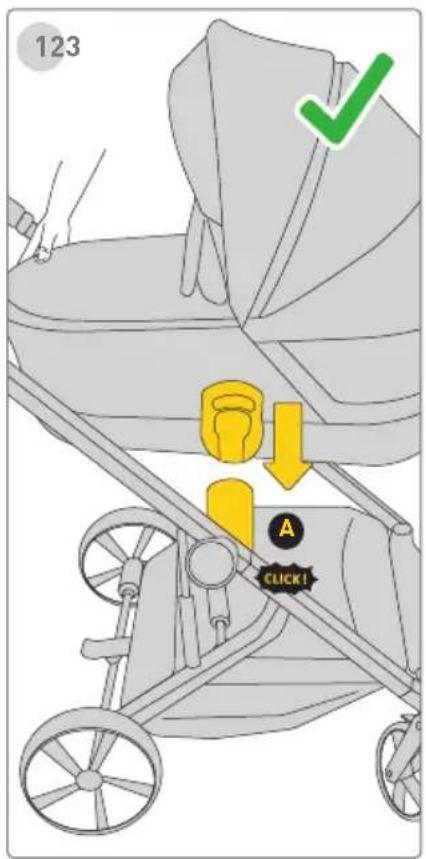
text_image
123 A CLICK!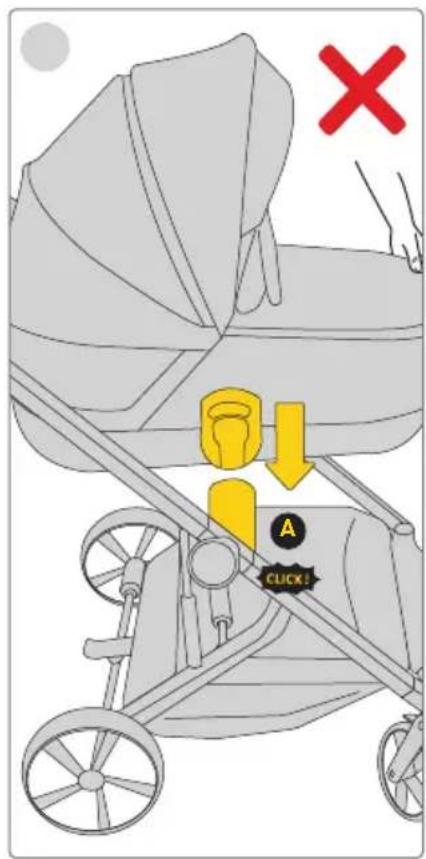
text_image
X A CUCK!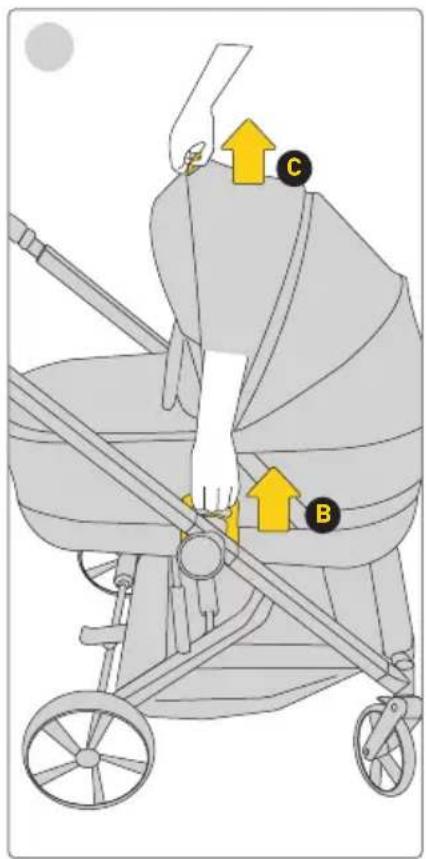
text_image
Diagram of a baby stroller with labeled parts C and B, showing hand positioning and directional arrows indicating movement or force.Uchytenie vaničky na rám kočíka
1 Krok
Na uchytenie vaničky na rám kočíka priložte boky vaničky s adaptérmi k úchytom na sedadlo. Posuňte vaničku priamo nadol, až kým nepočujete zvuk „klik”. Zvuk „klik” znamená, že vanička je pevne uchytená.
2 Krok
natural_image
Illustration of a yellow bag with a black circular mark labeled 'D' and an arrow indicating rotation (no text or symbols present)
text_image
L F EStrieška
natural_image
Illustration of two baby strollers with different designs and seat compartments (no text or symbols)ÖNEMLİ!
OKUYUN VE GELECEK İÇİN REFERANS OLARAK SAKLAYIN
UYARI!
text_image
Diagram of a mechanical device with labeled components A and B, showing directional arrows indicating motion or flow.Front Wheels/Rear Wheels

text_image
1 CLICK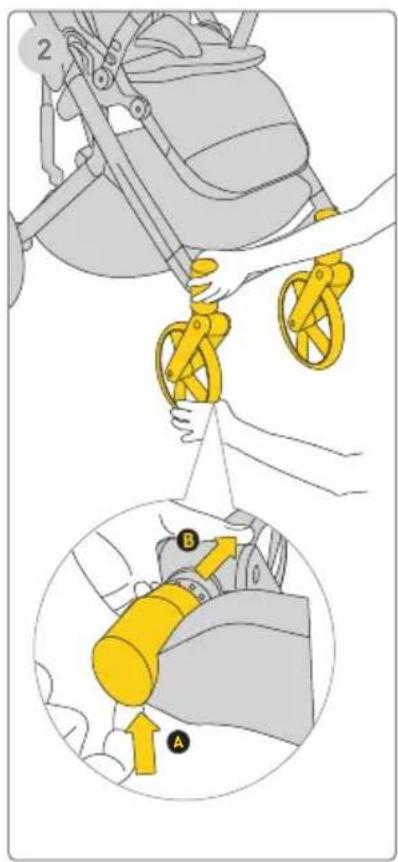
text_image
Diagram illustrating a mechanical device with labeled parts A and B, showing hand positioning and assembly steps.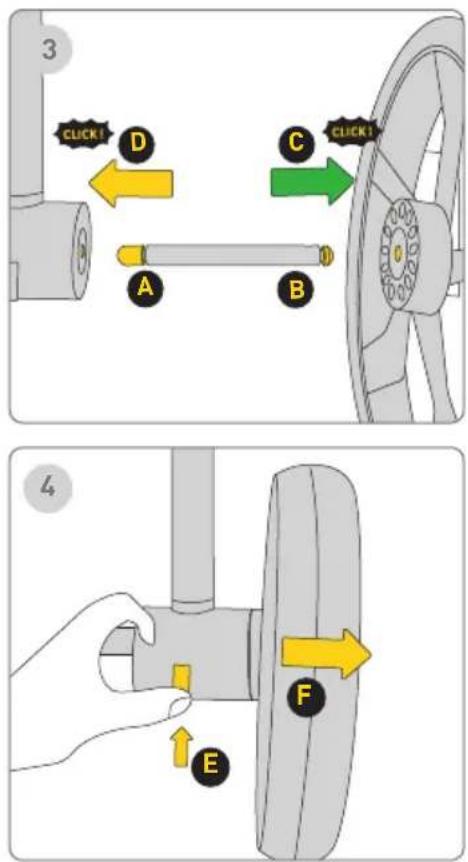
text_image
3 CLICK! D A B C CLICK! 4 EÖn Tekerlekler
1 Adim
text_image
Diagram illustrating a mechanical assembly with labeled parts B and C, showing directional arrows indicating movement or force.Koruyucu Bariyer
natural_image
Illustration of a stroller with yellow railings and wheels, no text or symbols present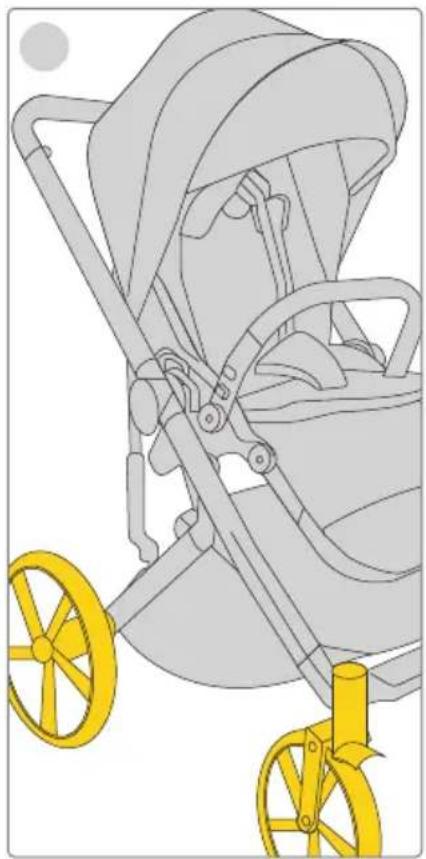
natural_image
Illustration of a baby stroller with yellow wheels and handlebars (no text or symbols)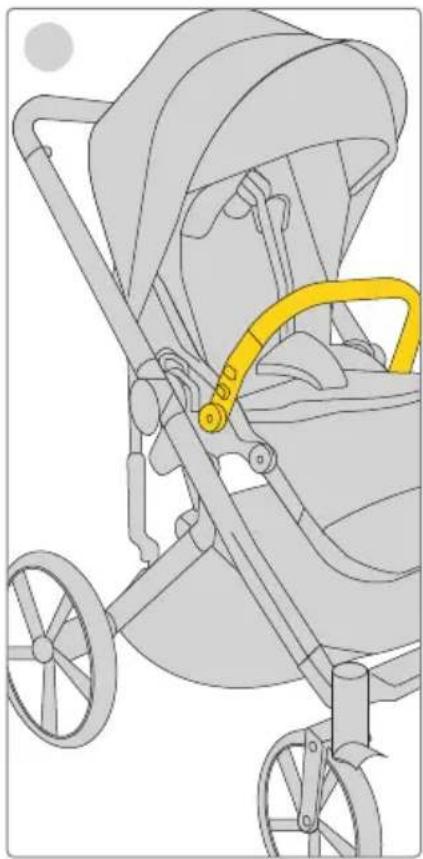
natural_image
Illustration of a stroller with yellow safety belt (no text or symbols)natural_image
Illustration of a bird's head with a yellow beak and patterned neck, no text or symbols presentTente
text_image
123 UNLOCK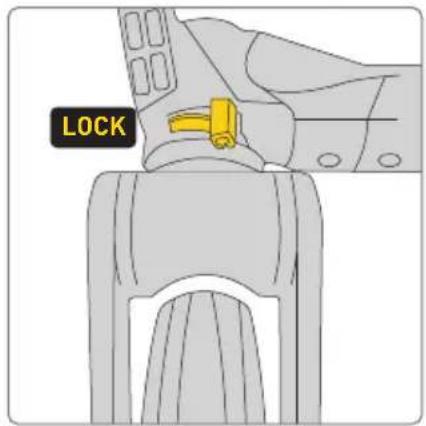
text_image
LOCK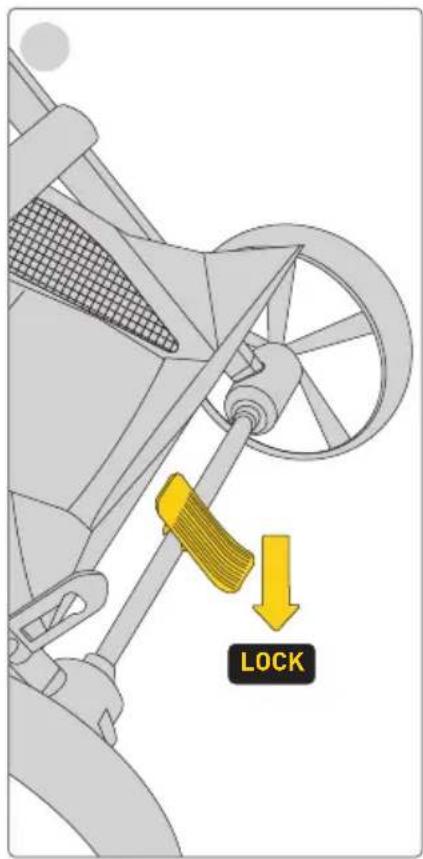
text_image
LOCK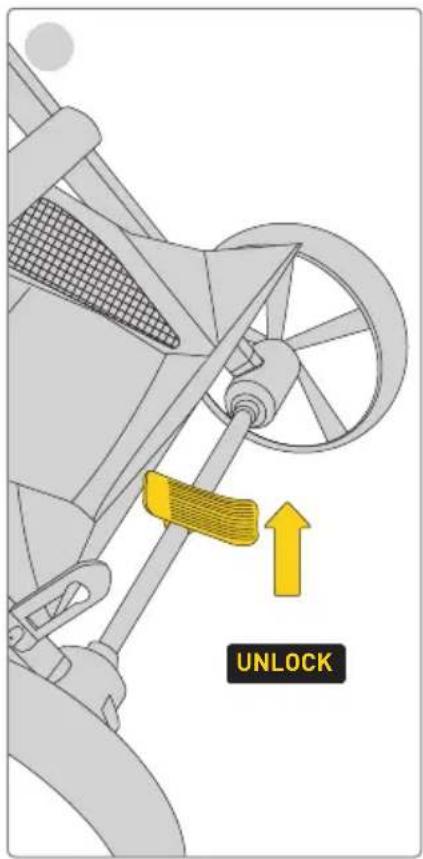
text_image
UNLOCKÖn Tekerlek Dönüş Kilidi
natural_image
Diagram of a yellow robotic device with a handle and arm, showing a directional arrow labeled 'A' (no text or symbols on the diagram itself)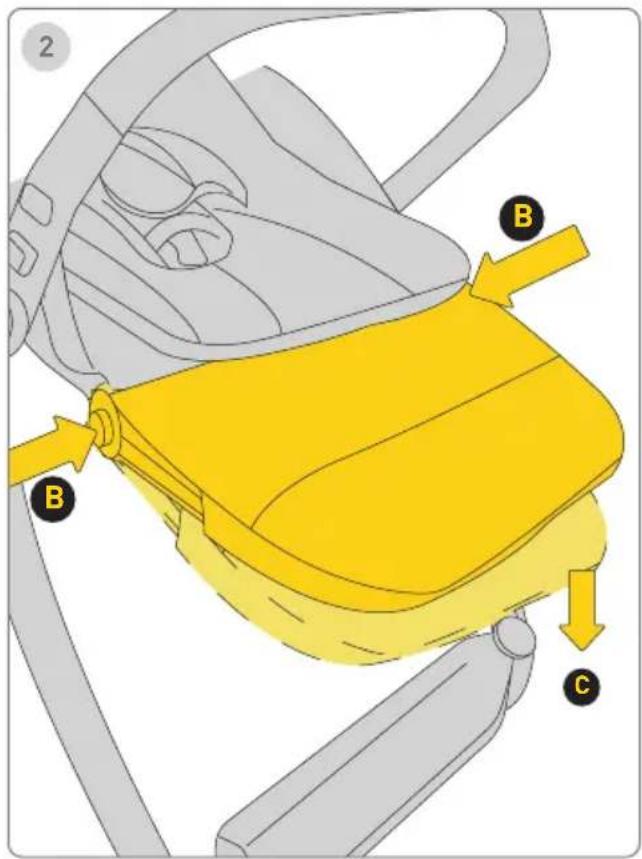
text_image
2 B B CBaldır Desteği
d l e Recline Adjustment
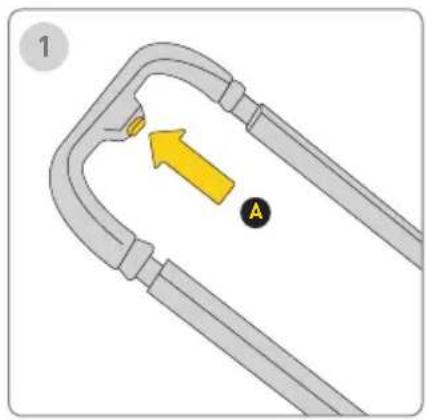
natural_image
Diagram of a curved pipe with a yellow arrow and labeled point A, no text or symbols present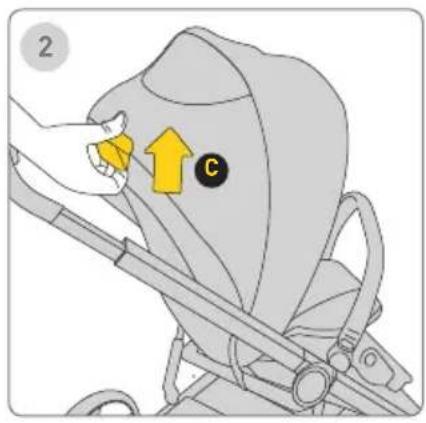
text_image
2 C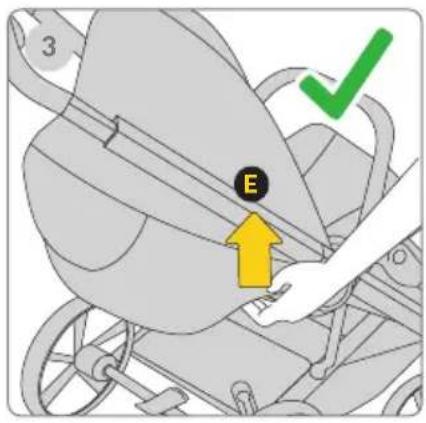
text_image
3 E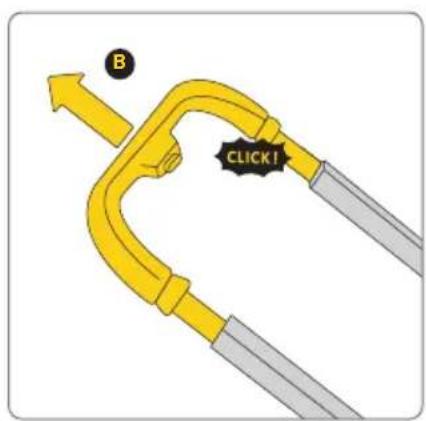
text_image
B CLICK!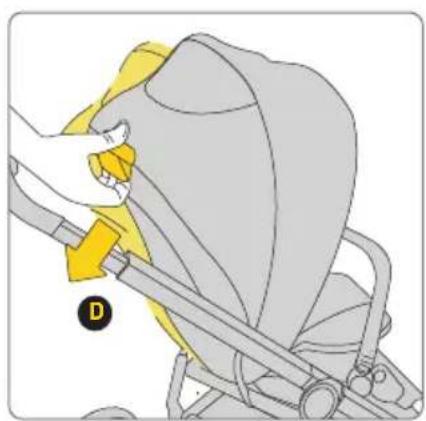
natural_image
Illustration of a hand adjusting a yellow belt switch on a gray seatbelt (no text or symbols)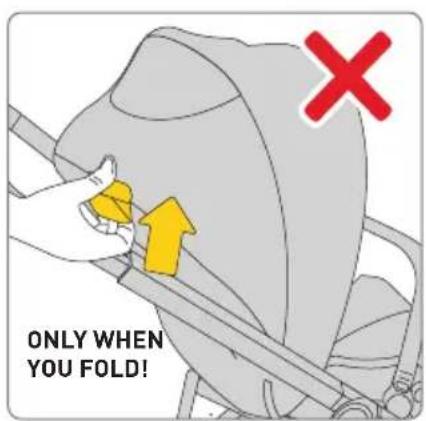
text_image
ONLY WHEN YOU FOLD!Tutamak
text_image
Diagram showing mechanical components with yellow arrows indicating directional flow or movement, possibly illustrating a system or process.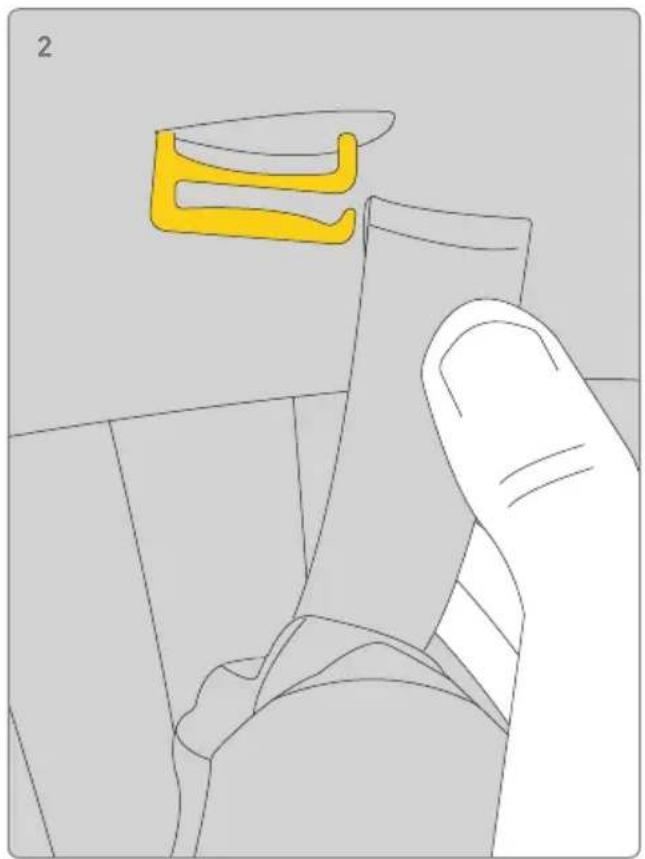
natural_image
Illustration of a hand holding a small object with a yellow abstract shape above it, no text or symbols present.Ped
text_image
Diagram illustrating a mechanical assembly with labeled parts A and B, showing motion arrows indicating movement or force.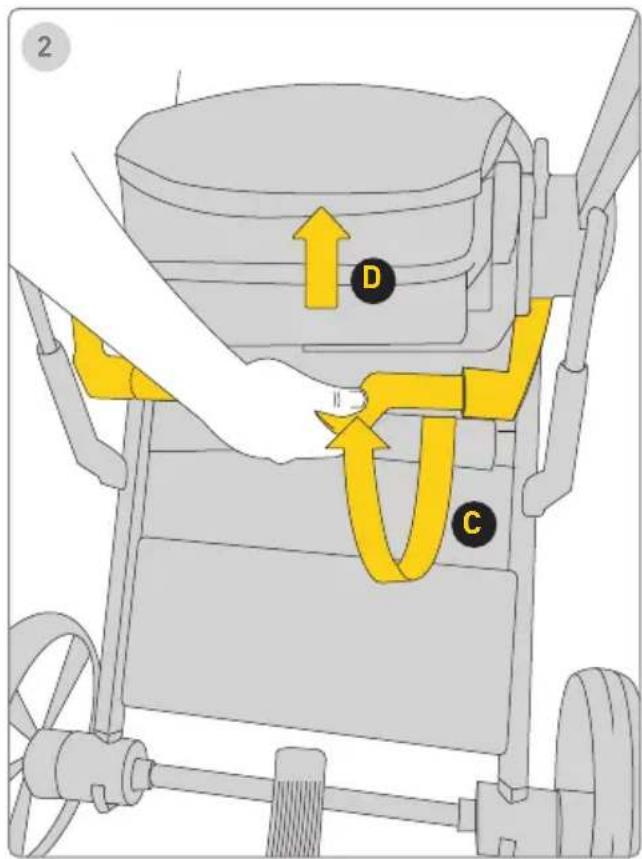
text_image
2 D CKatlama
text_image
Diagram showing a yellow mechanical device with labeled parts C and D, indicating assembly or positioning steps.Aksesuarlar
text_image
Diagram of a mechanical clamp or bracket with labeled parts and directional arrows indicating motion or forceProduct setup - unfolding carrycot
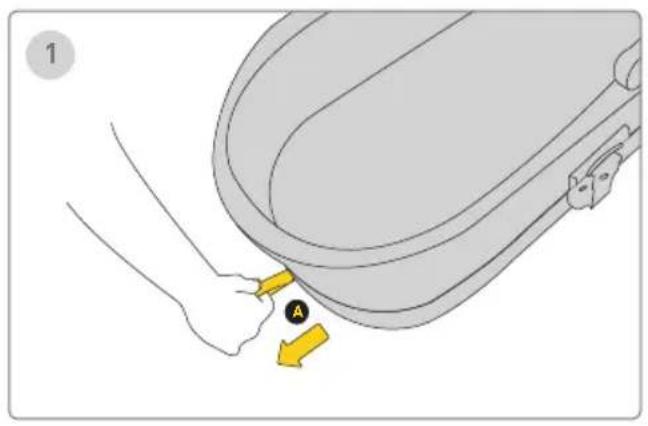
text_image
1 A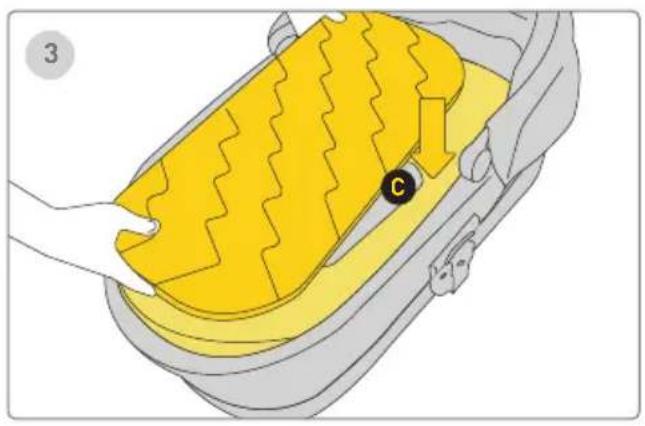
natural_image
Illustration of a car interior with yellow foam cushion and black circular marker (no text or symbols)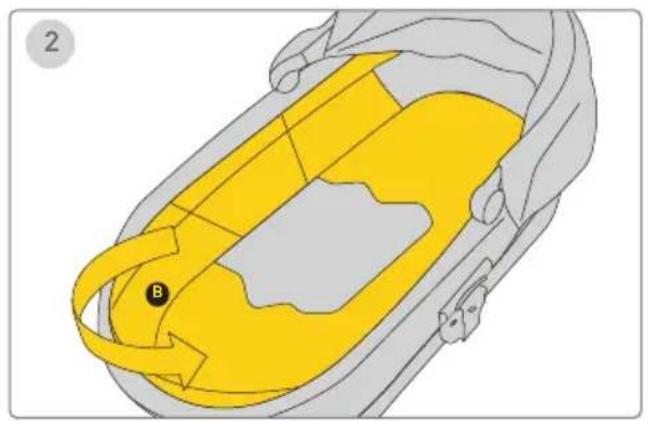
natural_image
Diagram of a car interior with yellow and gray areas, no text or symbols present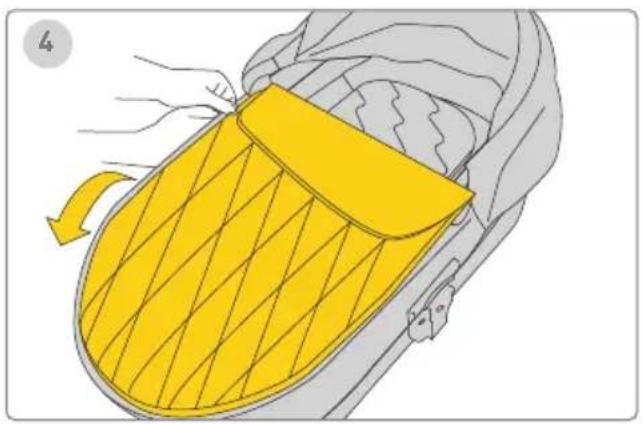
natural_image
Illustration of a yellow and gray car seatbelt with a handle, showing airflow direction (no text or symbols)Product setup - folding carrycot
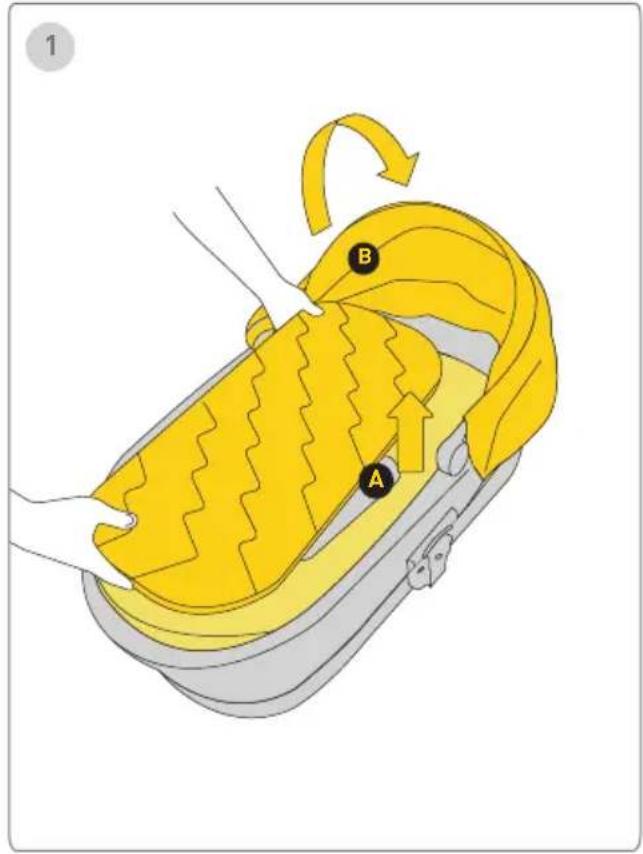
text_image
1 B A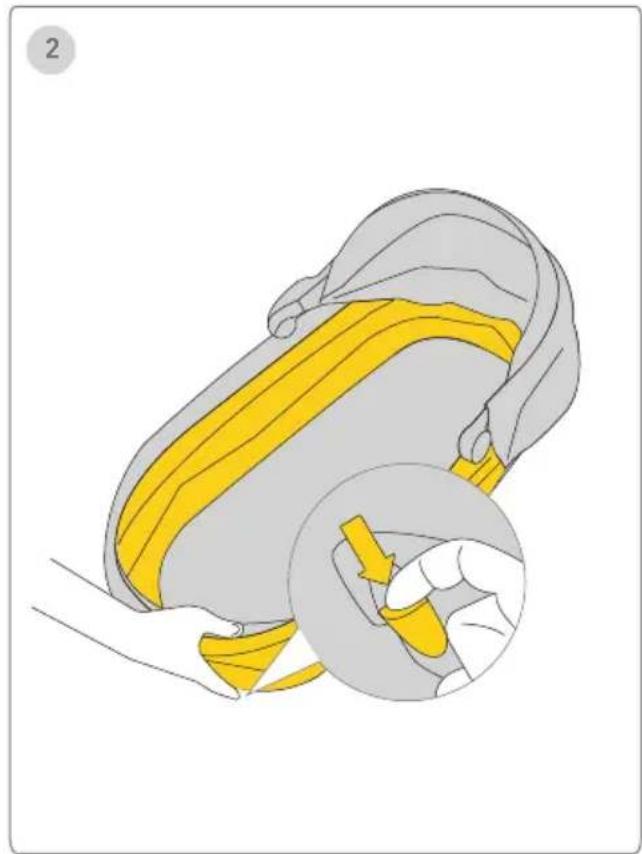
natural_image
Illustration of a yellow belt buckle being lifted, showing the seat and grip mechanism (no text or symbols)Carry Cot Attachment on Stroller Frame Carry Cot Removal
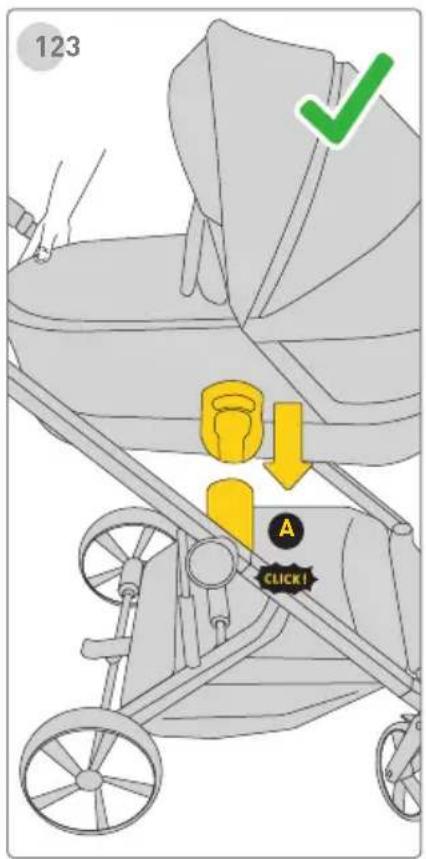
text_image
123 A CLICK!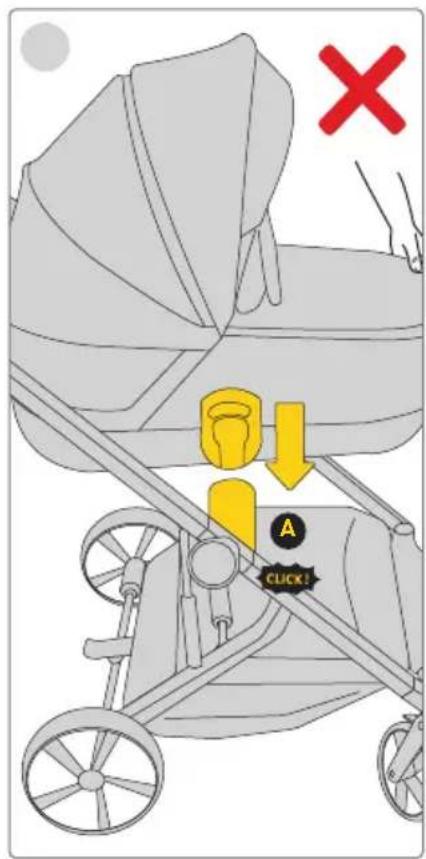
text_image
X A CLICK!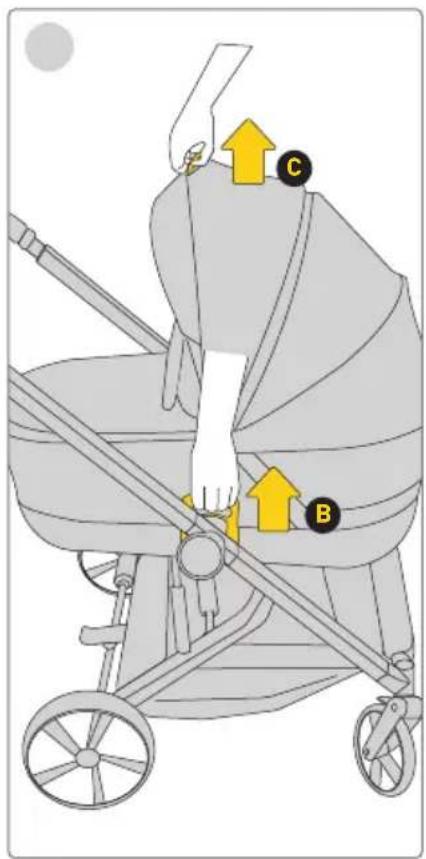
text_image
Diagram of a baby stroller with labeled parts C and B, showing hand positioning and directional arrows indicating movement or force.natural_image
Illustration of a yellow bag with a black circular mark labeled 'D' and an arrow indicating rotation (no text or symbols present)