EM 1 R - Muscle stimulators BEURER - Free user manual and instructions
Find the device manual for free EM 1 R BEURER in PDF.

User questions about EM 1 R BEURER
0 question about this device. Answer the ones you know or ask your own.
Ask a new question about this device
Download the instructions for your Muscle stimulators in PDF format for free! Find your manual EM 1 R - BEURER and take your electronic device back in hand. On this page are published all the documents necessary for the use of your device. EM 1 R by BEURER.
USER MANUAL EM 1 R BEURER
EN Digital TENS/EMS device Instructions for use....22
natural_image
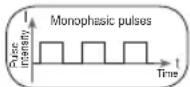
Illustration of an open book with a geometric window and horizontal lines, no text or symbols presentEN Unfold page 4 before reading the instructions for use.
text_image
Technical diagram showing two electrical or mechanical components with labeled parts and wiring connections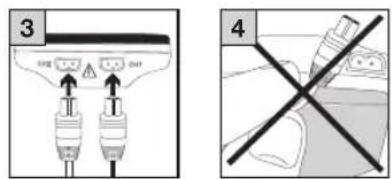
text_image
3 4
DEUTSCH

8.9 Doctor's Function
Carefully read these instructions for use and keep them for later use, make them accessible to other users and take note of the information they contain.
TABLE OF CONTENTS
- Included in delivery 22
- Getting to know your device 22
- Signs and symbols....23
- Intended use....24
- General warnings....25
- Device description....27
- Initial use 27
- Use 27
8.1 Notes on use....27
8.2 Starting use....27
8.3 Program overview 28
8.4 TENS program table 28
8.5 EMS program table....28
8.6 MASSAGE program table 29
8.7 Information on electrode positioning ....30
8.8 Customisable programs....30
8.9 Doctor's function 32
8.10 Therapy memory....32
8.11 Electric current parameters....33 - Cleaning and maintenance....33
- What if there are problems? 34
- Disposal....34
- Replacement items and replacement parts ....34
- Technical specifications ....35
- Guarantee / Service....36
1. INCLUDED IN DELIVERY
Check that the exterior of the cardboard delivery packaging is intact and make sure that all contents are included in the delivery. Before use, ensure that there is no visible damage to the device or accessories and that all packaging material has been removed. If you have any doubts, do not use the device and contact your retailer or the specified Customer Services address.
A 1 x Digital TENS/EMS device (with belt clip)
B 2 x connection cables
C 4 x adhesive electrodes (45 x 45 mm)
D 3 x AAA batteries
E 1 x Storage bag
2. GETTING TO KNOW YOUR DEVICE
What is this Digital TENS/EMS device and what can it do?
This digital TENS/EMS device falls into the category of electrostimulation devices. It delivers three basic functions which can also be combined:
- Electrical stimulation of nerve tracts (TENS)
- Electrical stimulation of muscle tissue (EMS)
- A massage effect triggered by electrical signals.
The device also features two independent stimulation channels and four self-adhesive electrodes. It offers a wide range of functions for increasing general well-being, pain relief, maintaining physical fitness, relaxation, muscle revitalisation and combatting tiredness. For these purposes, you can either choose from preset programs or specify your own to suit your individual needs.
Electrostimulation devices utilise the operating principle of imitating pulses in our bodies – these simulated pulses are transferred to nerve and muscle fibres
using electrodes, via our skin. The electrodes can be applied to many parts of the body, as the electrical impulses produced are completely harmless and virtually painless. In certain applications you may perceive just a slight tingling or vibrating sensation. The electrical pulses that are sent into the tissue influence the transmission of stimulation into nerves, nerve centres and muscle groups in the application area.
Electrical muscle stimulation (EMS) is a widely used and recognised method which has been used in sports and rehabilitation medicine for years.
Electrostimulation is generally only noticeably effective with regular use. Electrostimulation of muscles is not a substitute for regular training. However, it is a useful, supplementary training element.
Getting to know the TENS device
TENS (transcutaneous electrical nerve stimulation) is the electrical stimulation of nerves through the skin. TENS is an effective non-pharmacological method for treating different types of pain from a variety of causes. It has no side effects if administered correctly. The method has been clinically tested and approved and can be used for simple self-treatment. The pain-relieving or pain-suppressing effect is achieved by inhibiting the transfer of pain to nerve fibres (mainly by means of high-frequency pulses) as well as by increasing the secretion of endorphins in the body, because they have an effect on the central nervous system which reduces the sensation of pain. The method has been scientifically substantiated and approved as a form of medical treatment. Any symptoms that could be relieved using TENS must be checked by your GP. Your doctor will also give you instructions on how to carry out a TENS self-treatment regime.
Getting to know the EMS device
In sports and fitness, electrical muscle stimulation (EMS) is used to complement conventional muscle training, to increase the performance of muscle groups and to adjust physical proportions to achieve the desired aesthetic results, amongst other things. There are two different types of EMS application. One is for targeted strengthening of the muscles (activating application), and the other is to achieve a relaxing, restful effect (relaxing application).
Getting to know MASSAGE
Thanks to integrated massage technology, the device is also able to relieve muscle tension and combat fatigue with a program based on the sensation and effects of a real massage. The positioning suggestions and program tables in these instructions for use enable you to quickly and easily determine the appropriate application (depending on the affected area of the body) and set the device to achieve the desired effects. Thanks to the two separately adjustable channels, this Digital TENS/EMS device offers you the advantage of being able to set the intensity of the pulses independently from each other for two treatment areas on the body, for example to cover both sides of your body or to evenly stimulate larger areas of tissue. The option to individually set the intensity of each channel also enables you to treat two separate areas of the body simultaneously instead of having to treat the individual areas in turn. This saves you time.
3. SIGNS AND SYMBOLS
The following symbols are used on the device, in these instructions for use, on the packaging and on the type plate for the device:
 | WarningWarning indicating a risk of injury or damage to your health |
 | ImportantSafety note indicating possible damage to the device/accessory |
 | Product informationNote on important information |
 | Follow the instructionsRead the instructions before starting work and/or operating devices or machines |
 | Device protected against foreign objects ≥12.5 mm and against water dripping at an angle |
 | Serial number |
 | Applied parts type BF |
 | The electronic device must not be disposed of with household waste |
 | Do not dispose of batteries containing harmful substances with household waste |
 | CE markingThis product satisfies the requirements of the applicable European and national directives. |
 |
4. INTENDED USE
TENS
TENS/EMS purpose
The device is intended to treat pain using TENS technology (transcutaneous electrical nerve stimulation). As a non-medical purpose, the device can also be used, with EMS technology (electrical muscle stimulation), to strengthen the muscles, and for regeneration and relaxing massages.
TENS/EMS target group
This device is intended for self-treatment in the home, and not in professional healthcare facilities. It is generally suitable for use by all adults where no contraindications exist.
Clinical benefits
Treatment of pain arising from various causes.
Non-clinical benefits
- Muscle training to increase endurance and/or
- training to support the strengthening of specific muscles or muscle groups, and to achieve the desired changes to physical proportions.
- Acceleration of muscle regeneration after intense muscular output (e.g. after a marathon).
- Improving symptoms of muscular fatigue.
- Muscle relaxation for easing muscle tension.
Indications
- Back pain – pain at rest and on exertion
- Joint pain – pain at rest and on exertion
- Neuralgia, including phantom pain
- Menstrual cramps
- Pain due to circulatory disorders – pain at rest and on exertion
- Headaches
- Pain after musculoskeletal injuries – pain at rest and on exertion
- Chronic pain due to various causes – pain at rest and on exertion
Contraindications
- If you have implanted electrical devices (e.g. a pacemaker)
- If you have metal implants
- If you use an insulin pump
- If you have a high temperature (e.g. >39^ ).
- If you have any known or acute cardiac arrhythmias or disorders of the heart's impulse and conduction system
- If you suffer from a seizure disorder (e.g. epilepsy)
• If the patient is pregnant - If the patient has cancer
- After surgery, when severe muscle contractions may interfere with the healing process
- Never use the device near the heart:

the stimulation electrodes should not be placed on any part of the anterior chest (where the ribs and sternum are located), especially not on the two large pectoral muscles, as this may increase the risk of ventricular fibrillation and cause cardiac arrest
- Do not use on the skeletal structure of the skull or around the mouth, throat or larynx
- Do not use on the neck/carotid artery/carotid artery area
- Do not use on the genital area
- Do not use on acutely or chronically affected (by injury or irritation) skin (e.g. inflamed skin – whether painful or not; reddened skin; skin rashes, e.g. due to allergies; burns; bruising; swelling; open and healing wounds and post-operative scars where the healing process could be impaired)
- Do not use if you are connected to a high-frequency surgical device.
- Do not use if you have an acute or chronic disease of the gastrointestinal tract
- Do not use in the event of a known allergy to the electrode material

WARNING! UNDESIRABLE SIDE EFFECTS
- Skin irritation
- Feeling of pressure at the electrode location
- Slight redness, burning and pain of the skin after treatment
- Paraesthesia
- Discomfort
- Sleepiness
- Muscle vibrations
- Tension
- Headaches
- Increased menstrual bleeding
- Allergic inflammatory reactions to components
5. GENERAL WARNINGS

GENERAL WARNINGS
The device is not a substitute for medical consultation and treatment. Always consult your doctor first in the event of pain or illness. Before using the device, consult your doctor if any of the following apply to you:
- If you suffer from an acute medical condition, in particular if you suspect or have been diagnosed with high blood pressure, a blood coagulation disorder, propensity to thrombo-embolic conditions or recurrent malignant growths.
- If you have any skin conditions.
- If you have unexplained chronic pain in any part of the body.
• If you suffer from diabetes. - If you have any sensory impairment that reduces the feeling of pain (e.g. metabolic disorders).
- If you are receiving medical treatment.
- In the event of complaints linked to the stimulation treatment.
- If you suffer from persistently irritated skin due to long-term stimulation at the same electrode site.
Only use this Digital TENS/EMS device:
- On people.
- For the intended purpose and as specified in these instructions for use. Any form of improper use can be dangerous.
- For external use only.
- With the original accessories supplied, which can be re-ordered. Failure to do so invalidates the warranty.
- In a private/domestic environment – the device is not intended for commercial use.

General precautions
- This device is NOT intended for use by people with restricted physical, sensory or mental skills or a lack of experience and/or a lack of knowledge, unless they are supervised by a person who has responsibility for their safety or they receive instructions from this person on how to use the device.
- Not to be used after consumption of alcohol, drugs or medicines that impair awareness.
• Children must not play with the device. - Do not use in humid environments (e.g. in the bathroom) or when bathing or showering.
- Always pull gently on electrodes to remove them from the skin to prevent injuries in the unusual case of highly sensitive skin.
- Hold the device away from sources of heat and do not use it in close proximity (approx. 1 m) to shortwave or microwave devices (e.g. mobile phones), as doing so can result in unpleasant current peaks.
- Do not expose the device to direct sunlight or high temperatures.
- Protect the device from impact, dust, dirt and moisture.
- Never immerse the device in water or other liquids.
- The device is suitable for self-treatment.
- For hygiene reasons, the electrodes may only be used on one person.
- If the device does not work properly, or if you feel unwell or experience pain, stop using it immediately.
- Switch off the device or the respective channel first before removing or moving the electrodes to prevent unintentional stimulation.
- Do not modify electrodes (e.g. by cutting them). Doing so increases the current density, which is potentially hazardous (max. recommended output value for the electrodes is 9mA/cm^2 , an effective current density beyond 2 mA/cm² requires increased caution).
- Make sure that the electrodes are in full contact with the skin.
- Using worn-out electrodes can cause skin irritation to occur, because an even distribution of current over the entire surface is no longer guaranteed. For this reason, the electrodes should be replaced regularly.
- Do not use whilst asleep, driving a vehicle or operating machinery.
- Do not use whilst undertaking any activity where an unexpected reaction (e.g. strong muscle contractions even at low intensity) could be dangerous.
- Ensure that no metallic objects (e.g. belt buckles or necklaces) come into contact with the electrodes during stimulation. If you are wearing jewellery or have piercings in the area to be treated (e.g. a navel piercing), these must be removed before using the device; failure to do this could result in spot burns.
- Keep the device away from children to prevent potential hazards.
- Make sure not to confuse the electrode cables and their contacts with your headphones or other devices, and do not connect the electrodes to other devices.
- Do not use this device whilst using other devices that transmit electrical pulses to your body.
- Do not use in the vicinity of highly flammable substances, gases or explosives.
- Do not use rechargeable batteries and always use batteries which are all of the same type.
- During the initial few minutes, use the device while sitting or lying down to minimise the risk of accidental injuries as a consequence of isolated cases of vagal responses (feeling of faintness). If you feel faint, switch off the device immediately, lie down and support the legs in an elevated position (approx. 5–10 minutes).
- Treatment of the skin with moisturising lotions or ointments beforehand is not recommended as this considerably increases the electrode wear and may cause unpleasant current peaks.
- Keep packaging material away from children (risk of suffocation!).
- Store the device in a dry place (use indoors only). To avoid the risk of fire and/or electric shock, protect the device from high humidity and water.
Damage
- If the device is damaged, do not use it and contact your retailer or the specified Customer Services address.
- To ensure that the device functions effectively, do not drop it or dismantle it.
- Check the device for signs of wear and tear or damage. If there are such signs of wear and tear or damage or if the device was used improperly, it must be returned to the manufacturer or retailer before further use.
- Switch the device off immediately if it is faulty or not working properly.
- Never attempt to open and/or repair the device yourself. Repairs may only be carried out by Customer Services or authorised retailers. Failure to comply with this instruction will void the guarantee.
- The manufacturer is not liable for damage resulting from improper or incorrect use.
Measures for handling batteries
- If your skin or eyes come into contact with battery fluid, rinse the affected areas with water and seek medical assistance.
- Choking hazard! Small children may swallow and choke on batteries. Therefore, store batteries out of the reach of small children!
- Observe the plus (+) and minus (-) polarity signs.
- If a battery has leaked, put on protective gloves and clean the battery compartment with a dry cloth.
- Protect batteries from excessive heat.
- Risk of explosion! Do not throw batteries into a fire.
- Do not charge or short-circuit the batteries.
- If the device is not going to be used for a long period of time, remove the batteries from the battery compartment.
- Use identical or equivalent battery types only.
• Always replace all batteries at the same time.
- Never use rechargeable batteries!
- Do not disassemble, open, or crush the batteries.
6. DEVICE DESCRIPTION
Buttons:
The associated drawings are shown on page 4.

ON/OFF button ⏻

ENTER button

Setting buttons ( Ch1, V Ch2 A Right)

MENU button

Button lock
Display (full screen):

Menu TENS EMS MASSAGE

Program number

Pulse intensity, channel 2 (Ch2

Electrode positioning indicator

Pulse intensity, channel 1 (Ch1

Low-battery indicator

Button lock

Display for frequency (Hz) and pulse width ( s)

Timer function (remaining time display) or working time
7. INITIAL USE
- Remove the belt clip from the device, if it is attached.
- Press the battery compartment cover on the rear of the device and slide it downwards.
- Insert 3 alkaline AAA 1.5 V batteries. Make sure that the batteries are inserted the correct way round in accordance with the markings.
- Carefully close the battery compartment cover B 1.
- Reattach the belt clip, if required.
- Attach the connection cable to the electrodes B 2.

The electrodes feature clip closures to make attachment particularly easy.
-
Insert the connection cable plug into the socket on the top of the device B 3.
-
Do not pull, twist or sharply bend the cables B4.

Please note that when the batteries are replaced or removed, all settings are restored to the factory default settings.
8. USE
8.1 Notes on use
- The device switches itself off automatically if it is not used for one minute (automatic switch-off). When switched on again, the LCD screen of the menu selection appears with the most recently used menu flashing.
- A brief acoustic signal is output when a valid button is pressed. Two brief acoustic signals are output when an invalid button is pressed.
- You can pause the stimulation at any time by briefly pressing the ON/OFF button. To continue the stimulation, set your preferred pulse intensity again.
8.2 Starting use
Step 1: Find a suitable program in the program tables (see section "8.3 program overview").
Step 2: Place the electrodes on your chosen area (for positioning suggestions, see section "8.4 Information on electrode positioning") and connect them to the device.
Step 3: Press the ON/OFF button to switch the device on.
Step 4: Press the MENU button to navigate through the TENS / EMS / MASSAGE menus and confirm your choice by pressing the ENTER button.
Step 5: Use the A/V setting buttons to select your preferred program number and press the ENTER button to confirm your selection. At the start of the stimulation treatment, the pulse intensity of Ch1 is set by defaNo pulses are sent to the electrodes yet.
Step 6: Use the left and right A/V setting buttons as needed for Ch1 and Ch2 to select your preferred pulse intensity. The indicator for pulse intensity in the display changes accordingly.
GENERAL INFORMATION
If you wish to return to the previous selection menu, press the MENU button. By pressing and holding the ENTER button, you can skip individual setting steps and start stimulation treatment straight away.
Button lock
Lock the buttons to prevent accidental pressing of the buttons (for safety reasons, it is possible to pause the program even when the button lock is activated).
- To activate the button lock, hold down the ⏻ button for approx. 3 seconds, until the symbol appears on the display.
- To deactivate the button lock, hold down the button for approx. 3 seconds again, until the symbol disappears from the display.
8.3 Program overview
The Digital TENS/EMS device features a total of over 70 programs:
• 15 TENS programs
• 35 EMS programs
• 20 MASSAGE programs
In all programs you can individually set the pulse intensity of the two channels.
You can also set various parameters in TENS programs 13–15 and EMS programs 33–35 to adjust the stimulating effect to the application area.
8.4 TENS program table
| Prog. no. | Effective application areas, indications | Running time (min) | Possible electrode positioning |
| 1 Pain | in upper limbs 1 30 12–17 | ||
| 2 Pain | in upper limbs 2 30 12–17 | ||
| 3 Pain | in lower limbs 30 23–27 | ||
| 4 Ankle pain | pain 30 28 | ||
| 5 Shoulder pain | pain 30 1–4 |
| Prog. no. | Effective application areas, indications | Running time (min) | Possible electrode positioning |
| 6 Pain | in the back 30 4–11 | ||
| 7 Pain | in buttocks and back of thighs | 30 22, 23 | |
| 8 Pain | relief 1 30 1–28 | ||
| 9 Pain | relief 2 30 1–28 | ||
| 10 | Endorphin effect (burst) | 30 1–28 | |
| 11 | Pain relief 3 30 1–28 | ||
| 12 | Pain relief – chronic pain | 30 1–28 |
TENS programs 13–15 can be set individually (see section on “Customisable programs”). For correct electrode positioning, refer to the section “Information on electrode placement”.
8.5 EMS program table
| Prog. no. | Effective application areas, indications | Running time (min) | Possible electrode positioning |
| 1 | Warming up | 30 | 1–27 |
| 2 | Capillarisation | 30 | 1–27 |
| 3 | Strengthening the upper arm muscles | 30 | 12–15 |
| 4 | Maximising the strength of the upper arm muscles | 30 | 12–15 |
| 5 | Explosive force of the upper arm muscles | 30 | 12–15 |
| 6 | Tightening the upper arm muscles | 30 | 12–15 |
| 7 | Shaping the upper arm muscles | 30 | 12–15 |
| 8 | Tightening the forearm muscles | 30 | 16–17 |
| 9 | Maximising the strength of the forearm muscles | 30 | 16–17 |
| 10 | Shaping the forearm muscles 30 16–17 | ||
| 11 | Tightening the abdominal muscles 30 18–20 | ||
| 12 | Maximising the strength of the abdominal muscles | 30 18–20 | |
| 13 | Shaping the abdominal muscles 30 18–20 | ||
| 14 | Toning the abdominal muscles 30 18–20 | ||
| 15 | Strengthening the thigh muscles 30 23, 24 | ||
| 16 | Maximising the strength of the thigh muscles | 30 23, 24 | |
| 17 | Explosive force of the thigh muscles | 30 23, 24 | |
| 18 | Shaping the thigh muscles 30 23, 24 | ||
| 19 | Toning the thigh muscles 30 23, 24 | ||
| 20 | Strengthening the lower leg muscles | 30 26, 27 | |
| 21 | Maximising the strength of the lower leg muscles | 30 26, 27 | |
| 22 | Explosive force of the lower leg muscles | 30 26, 27 | |
| 23 | Shaping the lower leg muscles 30 26, 27 | ||
| 24 | Toning the lower leg muscles 30 26, 27 | ||
| 25 | Strengthening the shoulder muscles | 30 1–4 | |
| 26 | Maximising the strength of the shoulder muscles | 30 1–4 | |
| 27 | Tightening the shoulder muscles 30 1–4 | ||
| 28 | Strengthening the lower back muscles | 30 | 4–11 |
| Prog. no. | Effective application areas, indications | Running time (min) | Possible electrode positioning |
| 29 Maximising the strength of the lower back muscles | 30 | 4-11 | |
| 30 Tightening the gluteal muscles 30 | 22 | ||
| 31 Strengthening the gluteal muscles | 30 | 22 | |
| 32 Maximising the strength of the gluteal muscles | 30 | 22 | |
EMS programs 33–35 can be set individually (see section on “Customisable programs”). For correct electrode positioning, refer to the section “Information on electrode placement”.
Note: Refer to section 8.4 for correct electrode positioning.
8.6 MASSAGE program table
| Prog. no. | Effective application areas, indications | Running time (min) | Possible electrode positioning |
| 1 | Tapping massage 1 | 20 | 1-28 |
| 2 | Tapping massage 2 | ||
| 3 | Tapping massage 3 | ||
| 4 | Kneading massage 1 | ||
| 5 | Kneading massage 2 | ||
| 6 | Pressure massage | ||
| 7 | Relaxing massage 1 | ||
| 8 | Relaxing massage 2 | ||
| 9 | Relaxing massage 3 | ||
| 10 | Relaxing massage 4 | ||
| 11 | Spa massage 1 | ||
| 12 | Spa massage 2 | ||
| 13 | Spa massage 3 | ||
| 14 | Spa massage 4 | ||
| 15 Spa | massage 5 | 20 1–28 | |
| 16 Spa | massage 6 | ||
| 17 Spa | massage 7 | ||
| 18 Relaxing | massage 1 | ||
| 19 Relaxing | massage 2 | ||
| 20 Relaxing | massage 3 |

WARNING!
Do not apply the electrodes to the front wall of the chest, i.e. you must not massage the large left and right pectoral muscles
8.7 Information on electrode positioning
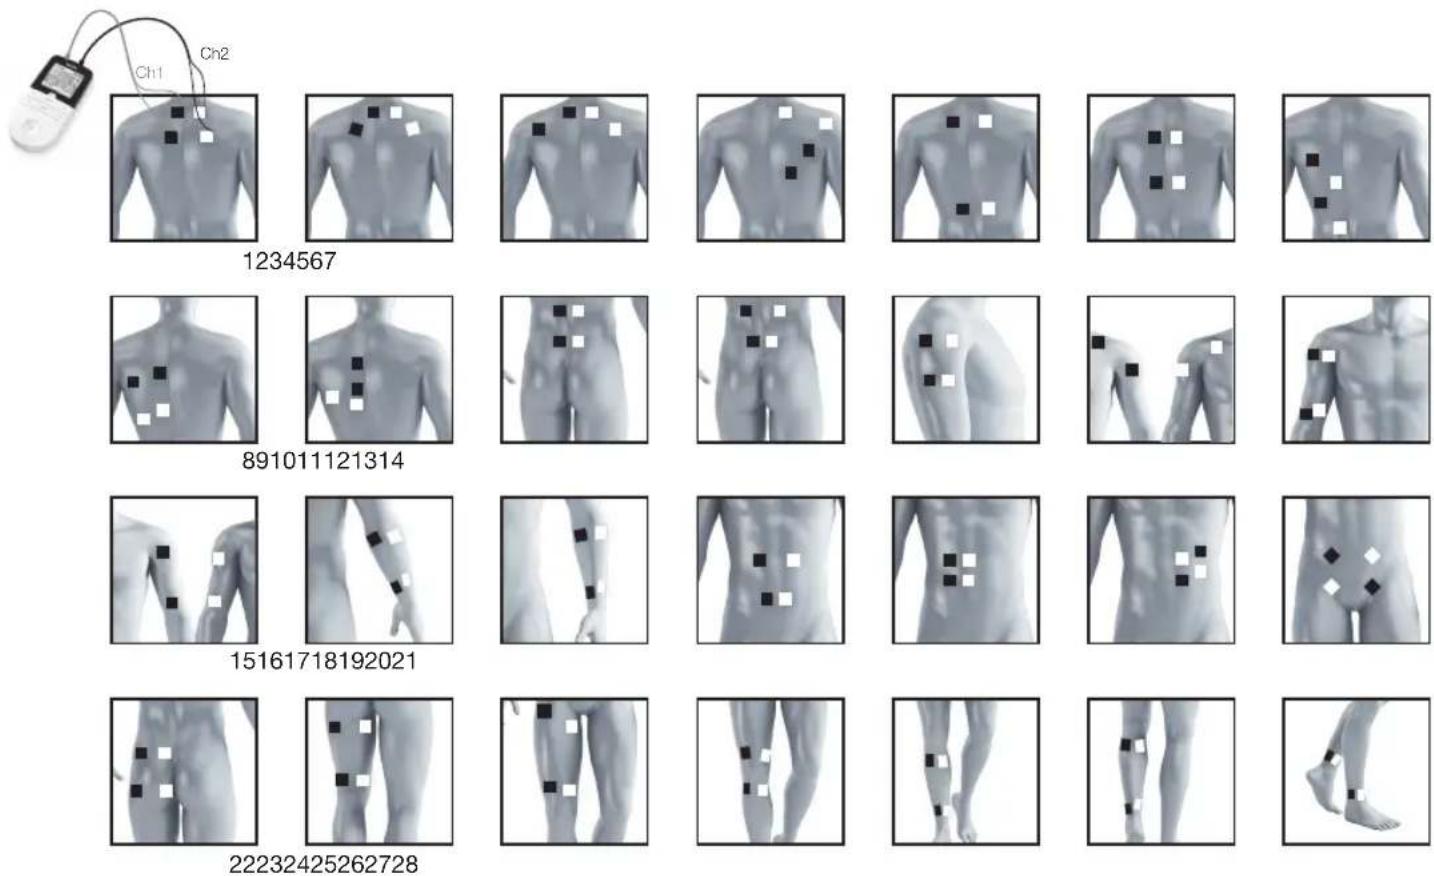
The associated drawings are shown on page 5.
It is fundamental to the intended success of electrostimulation applications that electrodes are properly placed.
We recommend that you consult your doctor to establish the ideal electrode positions for your intended application area.
The figure on the display is intended as an initial aid to help you position the electrodes.
The following applies to the selection of electrode positions:
Electrode spacing
The greater the distance between electrodes, the larger the volume of tissue stimulated. This applies to the area and depth of the tissue volume. At the same time, however, the stimulation intensity applied to the tissue decreases with more distance between electrodes. As a result, greater distances between electrodes mean a larger tissue volume is stimulated, but less intensively. As such, you must increase the pulse intensity to boost stimulation in this case.
The following guidelines apply when choosing the electrode distances:
• effective spacing: approx. 5–15 cm
- with spacing of less than 5 cm, the device will primarily apply strong stimulation to surface structures,
- with spacing in excess of 15 cm, large areas and deep structures will be very weakly stimulated.
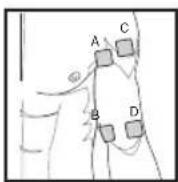
Relationship between electrodes and muscle fibre structures C
Adapt the current flow direction to the fibre structure of the muscle, according to the muscle layer you would like to treat. If you are targeting superficial muscles, position the electrodes parallel to the fibre structure (A - B / C - D) and if you are targeting deeper layers of tissue, position the electrodes across the fibre structure. You can do this by positioning electrodes as crosses (i.e. diagonally), such as A - D / B - C.
For pain relief treatment (TENS) with the Digital TENS/EMS device and its 2 separately adjustable channels with 2 adhesive electrodes each, it is advisable to position the electrodes of a channel either in such a way that the area affected by the pain is between the electrodes, or to position one electrode directly on the painful area and the other electrode at a distance of at least 2–3 cm. You may use the electrodes of the second channel to simultaneously treat additional areas affected by pain or use them in conjunction with the electrodes of the first channel to restrict the area affected by pain (position electrodes opposite). In this case, we again recommend positioning electrodes in a cross arrangement.
Tip for the massage function: always use all 4 electrodes for optimum treatment.
Use the electrodes on skin that is clean and preferably free from hair and grease in order to prolong the life of the electrodes. If required, clean the skin with water and remove hair prior to treatment.
If an electrode comes loose during use, the pulse intensity of the corresponding channel is reduced to the lowest level. Apply the electrode again and reset your preferred pulse intensity.
8.8 Customisable programs
(Applies to TENS 13–15, EMS 33–35)
The TENS 13–15 and EMS 33–35 programs can be set individually according to your needs.
TENS 13 program
TENS 13 is a program that you can also customise. In this program, you can set the pulse frequency to between 1 and 150 Hz and the pulse width to between 80 and 250 s.
- Place the electrodes on your chosen area (for positioning suggestions, see section "8.4 Information on electrode positioning") and connect them to the device.
- Select the TENS 13 program as described in section "8.2 Starting use" (step 3 to step 5).
- Use the A setting buttons to select your preferred pulse frequency and press the ENTER button to confirm.
- Use the A/V setting buttons to select your preferred pulse width and press the ENTER button to confirm.
- Use the A Setting buttons to select your preferred treatment time and press the ENTER button to confirm your selection.
- Use the left and right /V setting buttons as needed for Ch1 and Ch2 to select your preferred pulse intensity.
TENS 14 program
The TENS 14 program is a burst program that you can also customise. Various pulse sequences run in this program. Burst programs are suitable for all areas of application to be treated with changing signal patterns (to minimise the level of becoming accustomed to the treatment). In this program you can set a pulse width between 80 and 250 s.
- Place the electrodes on your chosen area (for positioning suggestions, see section "8.4 Information on electrode positioning") and connect them to the device.
- Select the TENS 14 program as described in section "8.2 Starting use" (step 3 to step 5).
- Use the A / V setting buttons to select your preferred pulse width and press the ENTER button to confirm.
- Use the A setting buttons to select your preferred treatment time and press the ENTER button to confirm your selection.
- Use the left and right A/V setting buttons as needed for Ch1 and Ch2 to select your preferred pulse intensity.
TENS 15 program
TENS 15 is a program that you can also customise. In this program, you can set the pulse frequency to between 1 and 150 Hz. The pulse width changes automatically during the stimulation treatment.
- Place the electrodes on your chosen area (for positioning suggestions, see section "8.4 Information on electrode positioning") and connect them to the device.
- Select the TENS 15 program as described in section "8.2 Starting use" (step 3 to step 5).
- Use the ⚠️ setting buttons to select your preferred pulse frequency and press the ENTER button to confirm.
- Use the A setting buttons to select your preferred treatment time and press the ENTER button to confirm your selection.
- Use the left and right A / V setting buttons as needed for Ch1 and Ch2 to select your preferred pulse intensity.
EMS 33 program
EMS 33 is a program that you can also customise. In this program, you can set the pulse frequency to between 1 and 150 Hz and the pulse width to between 80 and 320 s.
- Place the electrodes on your chosen area (for positioning suggestions, see section "8.4 Information on electrode positioning") and connect them to the device.
- Select the EMS 33 program as described in section "8.2 Starting use" (step 3 to step 5).
- Use the A setting buttons to select your preferred pulse frequency and press the ENTER button to confirm.
- Use the A/V setting buttons to select your preferred pulse width and press the ENTER button to confirm.
- Use the A setting buttons to select your preferred treatment time and press the ENTER button to confirm your selection.
- Use the left and right /V setting buttons as needed for Ch1 and Ch2 to select your preferred pulse intensity.
EMS 34 program
EMS 34 is a program that you can also customise. In this program, you can set the pulse frequency to between 1 and 150 Hz and the pulse width to between
80 and 450 s. You can also set the working time and pause time for this program to between 1 and 30 seconds each.
1. Place the electrodes on your chosen area (for positioning suggestions, see section "8.4 Information on electrode positioning") and connect them to the device.
2. Select the EMS 34 program as described in section "8.2 Starting use" (step 3 to step 5).
3. Use the A setting buttons to select your preferred working duration ("on time") and press the ENTER button to confirm your selection.
4. Use the A setting buttons to select your preferred pause duration ("off time") and press the ENTER button to confirm your selection.
5. Use the A setting buttons to select your preferred pulse frequency and press the ENTER button to confirm.
6. Use the A / V setting buttons to select your preferred pulse width and press the ENTER button to confirm.
7. Use the A setting buttons to select your preferred treatment time and press the ENTER button to confirm your selection.
8. Use the left and right A/V setting buttons as needed for Ch1 and Ch2 to select your preferred pulse intensity.
EMS 35 program
The EMS 35 program is a burst program that you can also customise. Various pulse sequences run in this program. Burst programs are suitable for all areas of application to be treated with changing signal patterns (to minimise the level of becoming accustomed to the treatment). In this program, you can set the pulse frequency to between 1 and 150 Hz and the pulse width to between 80 and 450 s. You can also set the working time and pause time for this program to between 1 and 30 seconds each.
- Place the electrodes on your chosen area (for positioning suggestions, see section "8.4 Information on electrode positioning") and connect them to the device.
- Select the EMS 35 program as described in section "8.2 Starting use" (step 3 to step 5).
- Use the A setting buttons to select your preferred working duration ("on time") and press the ENTER button to confirm your selection.
-
Use the ↑ setting buttons to select your preferred pause duration ("off time") and press the ENTER button to confirm your selection.
-
Use the ⚠️ setting buttons to select your preferred pulse frequency and press the ENTER button to confirm.
- Use the A/V setting buttons to select your preferred pulse width and press the ENTER button to confirm.
- Use the A setting buttons to select your preferred treatment time and press the ENTER button to confirm your selection.
- Use the left and right /V setting buttons as needed for Ch1 and Ch2 to select your preferred pulse intensity.
8.9 Doctor's function
The Doctor's function is a special setting to allow you to access your personal program even more easily and directly. Your individual program settings are instantly recalled and activated when the device is switched on. You may wish to set this individual program, e.g. following advice from your doctor.
Setting the Doctor's function
- Select your program and the corresponding settings as described in section "8.2 Starting use".
- At the start of the stimulation treatment, the pulse intensity of Ch1 Ch2 is set to 00 by default. No pulses are sent to the electrodes yet. Before setting your preferred pulse intensity using the intensity setting buttons, press and hold the Ch2 button for 5 seconds. Saving to the Doctor's function is confirmed by a long acoustic signal.
- When you switch the device on again, the program you saved using the Doctor's function will automatically be opened straight away.
Deleting the Doctor's function
To clear the device again and to re-enable access to other programs, press and hold the Ch1 ton again for approx. 5 seconds. To do this, the pulse intensity of Ch1 mu Ch2 set to 00. Deletion of the Doctor's function is confirmed by a long acoustic signal.
8.10 Therapy memory
The EM 1 R records the treatment time. To access the therapy memory, switch the device on using the ON/OFF button and press and hold the Ch2 button for 5 seconds. The elapsed treatment time appears in the display. The top two numbers represent the minutes; the hours are shown below. To reset the treatment time, press and hold the Ch2 ton for 5 seconds. When the batteries are replaced, the therapy memory is automatically reset. Press the
MENU button to return to selecting a program, or switch the device off. Info: the therapy memory cannot be accessed if the Doctor's function is activated.
8.11 Electric current parameters
Electrostimulation devices operate with the following electric current settings, which may affect the stimulation results differently, depending on the setting:
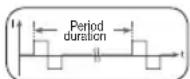
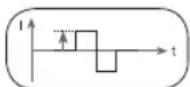
Pulse shape
This describes the time function of the stimulating current.
A distinction is made between monophasic and biphasic pulse currents. In monophasic pulse currents the current flows in one direction, and in biphasic pulse currents the electrical pulse alternates its direction.
The Digital TENS/EMS device only provides biphasic pulse currents as these relieve muscles, cause little muscle fatigue and offer safer use.
Pulse frequency
The frequency indicates the number of individual pulses per second and is displayed in Hz (Hertz). It can be calculated by determining the cyclic value for the time period.
The relevant frequency determines which types of muscle fibres react most favourably. Slow-reaction fibres react more easily to lower pulse frequencies of up to 15 Hz, whereas rapid-reaction fibres only respond from approximately 35 Hz up. Pulses of approx. 45–70 Hz are linked with constant tension in the muscles and quicker fatigue. Higher pulse frequencies are therefore better to use for speed strength and maximum power training.
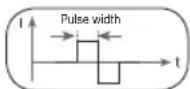
Pulse width
This indicates the duration of an individual pulse in microseconds. Among other aspects, the pulse width therefore determines the penetration depth of the electricity, where usually larger muscle mass requires a larger pulse width.
Pulse intensity
Adjusting the intensity level depends on the individual sensitivity of each user and is determined by a variety of variables, such as site of application, blood supply to the skin, skin thickness and the quality of the electrode contact. The settings should be effective but should never sensation, such as pain at the site of application. While
cates sufficient stimulation energy levels, any setting that causes pain should be avoided.
If using the device over an extended period, you may need to adjust the intensity level as your muscles start to adapt to the pulse intensity.
Cycled pulse parameter variation
In many cases it is necessary to cover the overall tissue structure at the site of application by applying several pulse parameters. In the Digital TENS/EMS device, this is achieved by the provided programs, which automatically make a cyclical pulse parameter change. This also prevents individual muscle groups at the site of application being affected by fatigue.
The Digital TENS/EMS device provides useful preset current parameters. You can change the pulse intensity at any time during use. In 6 programs you can also set various parameters for stimulation yourself.
9. CLEANING AND MAINTENANCE
Adhesive electrodes
- To ensure that the adhesive electrodes remain adhesive for as long as possible, clean them carefully with a damp, lint-free cloth or clean the underside of the electrodes under lukewarm running water and pat dry with a lint-free cloth.
Before cleaning with water, remove the connection cables from the electrodes.
- Following treatment, stick the electrodes back onto the carrier foil.
Cleaning the device
- Always remove the batteries from the device before cleaning.
- The number of uses possible depends on the environmental conditions and skin qualities. If the electrodes no longer adhere to the skin properly during use, please replace them.
- Clean the device after use with a soft, slightly damp cloth. If it is very dirty, you can also moisten the cloth with a mild soapy solution.
- Do not use any chemical or abrasive cleaning agents for cleaning.
⚠ Ensure that no water enters the device.
Reuse of the device
Once it has been properly prepared, the device can be used again. Preparation includes replacement of the treatment electrodes as well as cleaning of the surface of the device using a cloth moistened with a mild soapy solution.
Storage
- Remove the batteries from the device if you will not be using it for a prolonged period of time. Leaking batteries may damage the device.
- Do not make sharp bends in the connection cables or the electrodes.
- Disconnect the connection cables from the electrodes.
• After use, stick the electrodes back onto the carrier foil. - Store the device in a cool, well-ventilated location.
- Never place any heavy objects on the device.
10. WHAT IF THERE ARE PROBLEMS?
The device does not switch on when the ON/OFF button is pressed. Solution
(1) Ensure batteries have been inserted correctly and are in contact with the terminals.
(2) Remove the batteries if necessary.
(3) Contact Customer Services.
The electrodes do not stick to the body. Solution
(1) Clean the adhesive surface of the electrodes using a damp, lint-free cloth. If they still do not stick securely, the electrodes must be replaced.
(2) Clean the skin prior to any application; do not use skincare lotions or oils prior to treatment. Shaving may increase the life of electrodes.
There is no noticeable stimulation. Solution
(1) Press the ON/OFF button ⏻ to interrupt the program. Check that the connection cables are correctly connected to the electrodes. Ensure that the electrodes are in firm contact with the treatment area.
(2) Ensure the connection plug is firmly connected to the device.
(3) Press the ON/OFF button to restart the program.
(4) Check the electrode positions and ensure that the adhesive electrodes do not overlap.
(5) Gradually increase the pulse intensity.
(6) The batteries are almost flat. Replace the batteries.
The battery symbol is displayed. Solution
Replace all the batteries.
You are experiencing an uncomfortable sensation at the site of the electrodes. Solution
(1) The electrodes are not positioned correctly. Check their positions, and re-position them if necessary.
(2) The electrodes are worn. This may cause skin irritation, as even distribution of the current across the entire area is no longer guaranteed. They should therefore be replaced.
Skin in the treatment area turns red. Solution
Immediately stop treatment and wait until your skin has returned to its normal condition. If the redness is under the electrode and disappears quickly, there is no risk – this is caused by the locally stimulated, increased blood flow. However, consult your doctor before you continue treatment if the skin irritation persists and if it is accompanied by an itchy sensation or inflammation. This may be caused by a skin intolerance to the adhesive surface.
11. DISPOSAL
For environmental reasons, do not dispose of the device in household waste at the end of its service life. Dispose of the device at a suitable local collection or recycling point in your country. Dispose of the device in accordance with EC Directive Waste Electrical and Electronic Equipment (WEEE). If you have any questions, please contact the local authorities responsible for waste disposal.
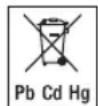
Batteries must not be disposed of in the household waste. They may contain poisonous heavy metals and are subject to special refuse treatment.
The codes below are printed on batteries containing harmful substances:
Pb = battery contains lead
Cd = battery contains cadmium
Hg = battery contains mercury
12. REPLACEMENT ITEMS AND REPLACEMENT PARTS
You can obtain the following replacement parts directly from Customer Services:
| Designation Item number and/or order number | |
| 8 x adhesive electrodes(45 x 45 mm) | Mat. no. 725.648 (Art. no. 661.02) |
| 4 x adhesive electrodes(50 x 100 mm) | Mat. no. 725.649 (Art. no. 661.01) |
13. TECHNICAL SPECIFICATIONS
| Name and model EM 1 R | |
| Type EM 49 | |
| Output waveform Biphasic rectangular pulses | |
| Pulse duration 50–450 μs | |
| Pulse frequency 1–150 Hz | |
| Output voltage max. 100 Vpp (at 500 Ohm) | |
| Output current max. 200 mApp (at 500 Ohm) | |
| Voltage supply 3 x AAA batteries (LR03) | |
| Treatment time adjustable from 5 to 100 minutes | |
| Intensity adjustable from 0 to 50 | |
| Operating conditions 5°C to 40°C (41°F to 104°F) at a relative humidity of 15% to 90% | |
| Storage conditions 0°C to 40°C (32°F to 104°F) at a relative humidity of up to 90% | |
| Transport conditions -25°C to 70°C (-4°F to 140°F) at a relative humidity of up to 90% | |
| Dimensions 6.3 x 13.2 x 2.7 cm (including belt clip) | |
| Weight | 83 g (including belt clip, excluding batteries), 117 g (including belt clip and batteries) |
| Altitude limit for use | 3,000 m |
| Maximum permissible atmospheric pressure | 700 to 1060 hPa |
The serial number is located on the device or in the battery compartment.
Note: If the device is not used according to the instructions specified, perfect functionality cannot be guaranteed!
We reserve the right to make technical changes to improve and develop the product.
This device conforms with the European standards EN 60601-1 and EN 60601-1-2 (compliance with IEC 61000-4-2, IEC 61000-4-3, IEC 61000-4-4, IEC 61000-4-5, IEC 61000-4-6, IEC 61000-4-8, IEC 61000-4-11) and is subject to particular precautions with regard to electromagnetic compatibility. Please note that portable and mobile HF communication systems may interfere with this device.
For more details, please contact Customer Services at the address indicated. The device complies with the respective national provisions.
For this device, a functional test and instruction in accordance with the German Medical Devices Operator Ordinance (MPBetreibV) is not required. It is also not necessary to carry out safety checks in accordance with the German Medical Devices Operator Ordinance (MPBetreibV).
Notes on electromagnetic compatibility
- The device is suitable for use in all environments listed in these instructions for use, including domestic environments.
- The device may not be fully usable in the presence of electromagnetic disturbances. This could result in issues such as error messages or the failure of the display/device.
- Avoid using this device directly next to other devices or stacked on top of other devices, as this could lead to faulty operation. If, however, it is necessary to use the device in the manner outlined above, this device as well as the other devices must be monitored to ensure they are working properly.
- The use of accessories other than those specified or provided by the manufacturer of this device can lead to an increase in electromagnetic emissions or a decrease in the device's resistance to electromagnetic interference; this can result in faulty operation.
- Failure to comply with the above could impair the performance of the device.
- Keep portable RF communication devices (including peripheral equipment, such as antenna cables or external antennas) at least 30 cm away from all device parts, including all cables included in delivery.
14. GUARANTEE / SERVICE
More information on the guarantee and guarantee conditions can be found in the guarantee leaflet supplied.
Notification of incidents
For users/patients in the European Union and identical regulatory systems, the following applies: if a major incident occurs during or through use of the product, notify the manufacturer and/or their representative of this as well as the respective national authority of the member state in which the user/patient is located.
FRANÇAIS

Mesures relatives aux piles
8.9 Doctor's Function
8.9 Doctor's Function
14. GWARANCJA/SERWIS
8.9 Doctor's Function
Ta bort Doctor's Function
E 1 x oppbevaringspose
2. BLI KJENT MED PRODUKTET
8.9 Doctor's Function
Slette Doctor's Function
6 Valikko TENS MASSAGE
7 Ohjelman numero
8.9 Doctor's Function 183
8.10 Therapiegeheugen 183
8.11 Stroomparameters....184
5. ALGEMENE WAARSCHUWINGEN
ALGEMENE WAARSCHUWINGEN
6. BESCHRIJVING VAN HET APPARAAT
Toetsen:
8.9 Doctor's Function
UK Importer: Beurer UK Ltd., Suite 16, Stonecross Place, Stonecross Lane North, WA3 2SH Lowton, United Kingdom

Beurer GmbH • Söflinger Str. 218 • 89077 Ulm, Germany • www.beurer.com www.beurer-healthguide.com • www.beurer-gesundheitsratgeber.com
CE0483