
Love your Pet PP 250 - Heated pet bed BEURER - Free user manual and instructions
Find the device manual for free Love your Pet PP 250 BEURER in PDF.

| Product type | Heated pet basket (dogs and cats) |
| Dimensions | 58 x 50 x 10 cm |
| Power supply | 12V DC, 2A power adapter; input 100-240 V AC, 50/60 Hz |
| Power consumption | 19 W (operating), 0.17 W (standby) |
| Temperature levels | 2 levels: low (I) and high (II) |
| Timer | Adjustable: 2, 4, 8 or 12 hours |
| Chew-resistant cable | Yes |
| Textile cover | Removable and washable |
| Washing textile cover | 30°C, gentle cycle; do not bleach, do not tumble dry, do not iron |
| Cleaning heating cushion | With a damp cloth; no chemical or abrasive cleaners |
| Cleaning switch | With a dry lint-free cloth |
| Thermal protection | Yes, automatic shut-off in case of overheating |
| Safety system | Disables the device in case of error |
| Intended use | For dogs and cats, not for humans |
| Spare parts | Cover PP 250 (ref. 110.229) |
| Included accessories | 1 heated basket with switch, 1 textile cover, 1 power adapter, 1 instruction manual |
| Warranty | Refer to the warranty card provided |
Frequently Asked Questions - Love your Pet PP 250 BEURER
User questions about Love your Pet PP 250 BEURER
0 question about this device. Answer the ones you know or ask your own.
Ask a new question about this device
Download the instructions for your Heated pet bed in PDF format for free! Find your manual Love your Pet PP 250 - BEURER and take your electronic device back in hand. On this page are published all the documents necessary for the use of your device. Love your Pet PP 250 by BEURER.
USER MANUAL Love your Pet PP 250 BEURER
Love YourPet by beurer
PP 250

natural_image
A gray pet bed with a coiled cord and a digital controller, no visible text or symbols.DE Wärmebett
Instructions for use....9
FR Panier chauffant
Mode d'emploi....13
ES Cama térmica
natural_image
Illustration of an open book with a geometric window and horizontal lines, no text or symbols presentEN Unfold page 3 before reading the instructions for use.
United Kingdom Conformity Assessed Mark

Importeur

natural_image
Illustration of a hand holding a pen with a magnified inset showing the tip of the pen (no text or symbols present)Read these instructions for use carefully. Observe the warnings and safety notes. Keep these instructions for use for future reference. Make the instructions for use accessible to other users. If the device is passed on, provide the next user with these instructions for use.
CONTENTS
- Included in delivery 9
- Signs and symbols....9
- Intended use....10
- Safety notes ....10
- Device description....11
- Operation....11
6.1 Safety....11
6.2 Initial use....11
6.3 Switching on the device....12
6.4 Setting the temperature....12
6.5 Timer....12
6.6 Switching off....12
- Cleaning and maintenance ....12
- Accessories and replacement parts....12
- What if there are problems? 12
- Storage....12
- Disposal....12
- Technical specifications ....12
- Guarantee/service 12
1. INCLUDED IN DELIVERY
Check that the exterior of the cardboard delivery packaging is intact and make sure that all contents are present. Before use, ensure that there is no visible damage to the device or accessories and that all packaging material has been removed. If you have any doubts, do not use the device and contact your retailer or the specified Customer Service address.
• 1 heated bed with control
- 1 textile cover
- 1 mains adapter
• 1 copy of these instructions for use
2. SIGNS AND SYMBOLS
The following symbols are used on the device, in these instructions for use, on the packaging and on the type plate for the device:

WARNING
Indicates a potentially imminent hazard. If it is not avoided, there is a risk of death or serious injury.

CAUTION
Indicates a potentially imminent hazard. If it is not avoided, slight or minor injuries may result.
NOTICE
Indicates a potentially harmful situation. If it is not avoided, the device or something in its vicinity may be damaged.

Device information
Note on important information

Read the instructions

The electronic device must not be disposed of with household waste

Manufacturer

CE labelling
The mains adapter satisfies the requirements of the applicable European and national directives.
| BA | Marking to identify the packaging material. A = Material code, B = Material number: 1-7 = Plastics, 20-22 = Paper and cardboard |
| Separate the device and packaging elements and dispose of them in accordance with local regulations. | |
| Protection class II device | |
| EAC | The devices demonstrably meet the requirements of the Technical Regulations of the EAEU |
| UKCA | United Kingdom Conformity Assessed Mark |
| Importer | |
| Wash at a maximum temperature of 30°C Gentle wash | |
| Do not wash | |
| Do not bleach | |
| Do not dry clean | |
| Do not insert pins! | |
| Do not iron | |
| Do not tumble dry | |
| Do not use when folded or bunched up! | |
| Must not be used by very young children (0-3 years old). | |
| IP20 | Protected against solid foreign objects 12.5 mm in diameter and larger |
| --- | Direct current |
| ◇◇ | Polarity of d.c. power connectorSafety isolating transformer, short-circuit proof |
| Switch mode power supply unit | |
| For indoor use only | |
| ta=40°C | Rated ambient temperature |
| Do not use the power adapter if the plug is damaged. | |
| Energy efficiency level 6 | |
| IPX7 | Protection against temporary submersion. Device can be immersed to a depth of 1 meter for up to 30 minutes. |
| Tested for safety in accordance with the requirements of the “Produktsicherheitsgesetz” (German Product Safety Act) |
3. INTENDED USE
CAUTION
This device is only designed to warm up cats and dogs, hereinafter referred to as the “animal”. The device is not intended for use by humans.
4. SAFETY NOTES
IMPORTANT INFORMATION RETAIN FOR FUTURE REFERENCE
WARNING
- Non-observance of the following notes may result in damage (electric shock, skin burns, fire). The following safety and hazard information is not only intended to protect your health and the health of your animal, it should also protect the device. For this reason, pay attention to these safety notes and include these instructions when handing over the product to others.
- For indoor use only.
- Heating device designed solely for animals.
-
Children must not play with the device.
-
Only use the device together with the textile cover. Do not allow the animal to lie directly on the device.
- Cleaning and maintenance must not be performed by children unless supervised.
- This device is not designed for use in veterinary clinics.
- The device is only intended for domestic/private use, not for commercial use.
- Do not insert pins.
- Do not use when folded or bunched up.
- Do not use if wet.
- This device must only be used in conjunction with the mains adapter specified on the label.
- This device must only be connected to the mains voltage that is specified on the label.
- If the device is being used over several hours, we recommend that you set the lowest temperature setting on the control to avoid overheating, which may lead to burns to the skin.
- Do not pull, twist or make sharp bends in the cables.
- If the cable and control of the device are not positioned properly, there may be a risk of becoming entangled in, being strangled by, tripping over, or stepping on the cable and control. The user must ensure that excess lengths of cable, and cables in general, are safely routed.
- Check this device frequently for signs of wear and tear or damage. If any such signs are evident, if the device has been used incorrectly or if it no longer heats up, it must be checked by the manufacturer before being switched on again.
- Under no circumstances should you open or repair the device yourself
(with the exception of the textile cover). If you do so, it may no longer function correctly. Failure to comply will invalidate the guarantee.
- If the mains connection cable of this device is damaged, it must be disposed of. If it cannot be removed, the device must be disposed of.
- Do not expose control and cables to direct sunlight.
- When this device is switched on:
- sharp-edged objects must not be placed on it,
- heat sources, such as hot-water bottles, heat pads or similar must not be placed on it.
- The electronic components in the control warm up when the device is in use. For this reason, the control must never be covered or placed on the device when it is in use.
- Allow the device to cool down before storing it away. Otherwise the device may get damaged.
- To avoid severe creasing in the device, do not place any objects on top of the device while it is being stored. Otherwise the device may get damaged.
- It is essential to observe the information relating to the following chapters: Operation, Cleaning and maintenance, Storage.
- If you should have any questions about using our devices, please contact our Customer Services department.
5. DEVICE DESCRIPTION
The associated drawings are shown on page 3.
1 Mains adapter
2 Heated bed with textile cover
3 Connection for mains adapter
4 Control
5 Bite-resistant cable
6 Timer LED (lights up when timer is active)
7 Timer duration (2, 4, 8 or 12 hours)
8 Timer button (to set the timer duration)
9 Temperature LED (lights up when heat is active)
10 Temperature setting I (low)
11 Temperature setting II (high)
12 Button for ON/OFF and temperature settings
6. OPERATION
6.1 Safety
NOTICE
- This device is equipped with a safety system that contains a built-in disposable temperature fuse to prevent overheating across the entire surface. In the event of a fault, the power supply is automatically switched off to prevent high temperatures. If the safety system has switched off the device, the temperature will gradually drop.
- Please note that for safety reasons, the device must no longer be operated after a fault has occurred and must be sent to the specified service address.
- Do not under any circumstances connect the defective device with another mains adapter of the same type. It may cause further damage.
- Install the device so that the cable cannot be reached or damaged by animals or objects.
- If you place the device in an enclosed area (e.g. a cat cave), make sure that the device does not cover more than half the area so that your animal can voluntarily choose whether it lies on the device.
6.2 Initial use
NOTICE
Before using the product, please make sure that you are using the upper side. The upper side is identified by the word "top" on the label of the cover and on the heating element.
NOTICE
Ensure that the device will not bunch up or become folded during use.
-
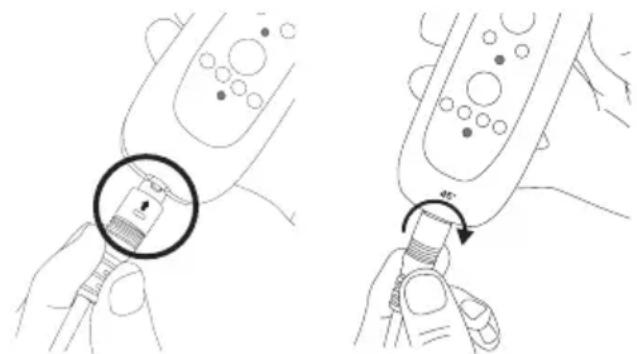
First, connect the control 4 to the mains adapter 1 by inserting the plug-in coupling.
-
Then turn the plug-in coupling until it clicks into place.
natural_image
Illustration showing two-step medical procedure: hand holding a pen with a magnified inset, then adjusting the pen tip (no text or symbols present)- Subsequently plug the mains adapter 1 into the socket.
6.3 Switching on the device
To switch on the device, hold down the button for ON/OFF 12 for 3 seconds. The red LED display for temperature setting II and the green LED display for the 2-hour timer light up.
6.4 Setting the temperature
Short press the ON/OFF button 12 to switch between the two temperature settings.
Setting I: Low heat
Setting II: High heat
6.5 Timer
To set the timer, press the timer button 8 repeatedly until you reach your preferred timer duration (2, 4, 8 or 12 hours). The colour of the LED indicates which timer duration you have set.
WARNING
If the device is being used over several hours, we recommend that you set the lowest temperature setting on the control to avoid overheating, which may lead to burns to the skin.
6.6 Switching off
To switch off the device, hold down the button for ON/OFF and temperature settings 12 for 3 seconds until the temperature LED 9 and timer LED 6 no longer light up.

If the device is not in use, pull the mains adapter 1 out of the socket. Then disconnect the mains adapter 1 from the control 4.
7. CLEANING AND MAINTENANCE
WARNING
Before cleaning, always remove the mains adapter from the socket first. Then disconnect the mains adapter 1 from the control 4. Otherwise there is a risk of electric shock.
Cleaning the heating element
NOTICE
Please note that the heating element must not be chemically cleaned, wrung out, tumble dried, put through a mangle or ironed. Otherwise the heating element may get damaged.
- To clean the plastic protective cover on the heating element, use a damp cloth.
- Before using the device again, make sure that the heating element is not covered with dirt or dust.
Cleaning the textile cover
- The textile cover can be cleaned in accordance with the symbols on the label and must be removed beforehand for this purpose.
- When washing the textile cover, place the heating element in a safe place out of reach of your animal.
- Do not use the device without the textile cover, and only use it with the original textile cover.
- Make sure that the textile cover is completely dry before using the device again.
Cleaning the control
NOTICE
The control must never come into contact with water or other liquids, as this may cause damage.
- To clean the control, use a dry, lint-free cloth. Do not use any chemical or abrasive cleaning agents.
8. ACCESSORIES AND REPLACEMENT PARTS
To purchase accessories and replacement parts, please visit www.beurer.com or contact the corresponding service address (according to the service address list) in your country. Accessories and replacement parts are also available from retailers.
| Designation Item number and/or | order number |
| PP 250 cover 110.229 |
9. WHAT IF THERE ARE PROBLEMS?
| Problem | The temperature settings are not illuminated while- the control is properly connected to the heating element- the mains adapter is connected to a working socket- a temperature setting and timer setting have been selected |
| Possible causes | The safety system has switched the device off. The heating cord and/or the cable is/are damaged. |
| Solution | Contact Customer Services or your retailer |
10. STORAGE
If you do not plan to use the device for a long period of time, we recommend that you store it in the original packaging. For this purpose, disconnect the mains adapter 1 from the device by unplugging the plug-in coupling.
11. DISPOSAL
For environmental reasons, do not dispose of the device in household waste at the end of its service life.
Dispose of the device at a suitable local collection or recycling point in your country. Dispose of the device in accordance with EC Directive – WEEE (Waste Electrical and Electronic Equipment). If you have any questions, please contact the local authorities responsible for waste disposal
12. TECHNICAL SPECIFICATIONS
| Product designation PP 250 | |
| Dimensions 58 x 50 x 10 cm | |
| Input 12 V | --- 19 W |
| Off-load power consumption | 0.17 W |
| Mains adapter Model: KA2401A-1202000EU Input: 100-240V AC, 50/60 Hz, 0.65 A Max Output: 12.0 V DC, 2.0 A, 24.0 W | |
13. GUARANTEE/SERVICE
Further information on the guarantee and guarantee conditions can be found in the guarantee leaflet supplied.
FRANÇAIS

Marque UKCA (UK Conformity Assessed)

natural_image
Illustration of a hand holding a device with a magnified inset showing the internal structure (no text or symbols)natural_image
Illustration showing two-step instructions for inserting a plug into a device, with no visible text or symbols.natural_image
Illustration showing two-step instructions for inserting a plug into a device, with no text or symbols present.natural_image
Illustration of a hand holding a pen with a magnified inset showing the tip of the pen (no text or symbols present)natural_image
Illustration showing two hands holding a device with a magnified inset of the cable (no text or symbols present)natural_image
Illustration showing two-step instructions for inserting a plug into a device, with no visible text or symbols.13. GWARANCJA/SERWIS
UKCA-markering (United Kingdom Conformity Assessed Mark)


Importeursymbool

5. BESCHRIJVING VAN HET APPARAAT
natural_image
Illustration of a hand holding a pen with a magnified inset showing the tip of the pen (no text or symbols present)natural_image
Illustration showing two-step medical procedure: hand holding a pen with a magnified inset, then adjusting a tool (no text or symbols present)- Sæt derefter netadapteren 1 i stikkontakten.
natural_image
Illustration showing two-step medical procedure: hand holding a device with a magnified inset, then adjusting the device's tip (no text or symbols present)natural_image
Illustration of two hands holding a device with a magnified inset showing the internal structure (no text or symbols)United Kingdom Conformity Assessed Mark

Maahantuojan symboli

natural_image
Illustration showing two-step medical procedure: one with a magnified inset of a tool, the other with a rotation arrow (no text or symbols)- Love YourPet by beurer
- CONTENTS
- INCLUDED IN DELIVERY
- SIGNS AND SYMBOLS
- WARNING
- CAUTION
- NOTICE
- Device information
- CE labelling
- INTENDED USE
- SAFETY NOTES
- IMPORTANT INFORMATION RETAIN FOR FUTURE REFERENCE
- DEVICE DESCRIPTION
- OPERATION
- Safety
- Initial use
- Switching on the device
- Setting the temperature
- Timer
- Switching off
- CLEANING AND MAINTENANCE
- Cleaning the heating element
- Cleaning the textile cover
- Cleaning the control
- ACCESSORIES AND REPLACEMENT PARTS
- WHAT IF THERE ARE PROBLEMS?
- STORAGE
- DISPOSAL
- TECHNICAL SPECIFICATIONS
- GUARANTEE/SERVICE
- FRANÇAIS
- GWARANCJA/SERWIS
- BESCHRIJVING VAN HET APPARAAT
Brand : BEURER
Model : Love your Pet PP 250
Category : Heated pet bed