
AD 1917 - Radio ADLER - Free user manual and instructions
Find the device manual for free AD 1917 ADLER in PDF.

User questions about AD 1917 ADLER
0 question about this device. Answer the ones you know or ask your own.
Ask a new question about this device
Download the instructions for your Radio in PDF format for free! Find your manual AD 1917 - ADLER and take your electronic device back in hand. On this page are published all the documents necessary for the use of your device. AD 1917 by ADLER.
USER MANUAL AD 1917 ADLER
natural_image
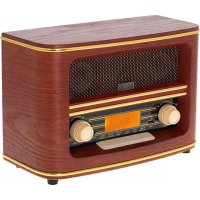
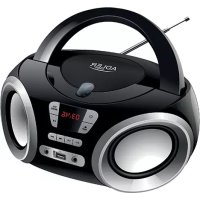
Black audio workstation with two speakers and a digital display (no visible text or symbols)AD 1917
| EN | User Manual | 4 | PL | Instrukcja obsługi | 125 |
| DE | Bedienungsanleitung | 10 | IT | Manuale d'uso | 133 |
| FR | Mode d'emploi | 19 | SV | Bruksanvisning | 141 |
| ES | Manual de usuario | 26 | BG | Ръководство за употреба | 148 |
| PT | Manual de Instruções | 34 | DA | Brugsanvisning | 156 |
| LT | Naudojimo instrukcija | 42 | SK | Používatel'ská príručka | 163 |
| LV | Lietošanas instrukcija | 49 | BS | Korisnički priručnik | 171 |
| ET | Kasutusjuhend | 56 | MK | Упатство за употреба | 178 |
| HU | Használati útmutató | 63 | HR | Korisnički priručnik | 186 |
| RO | Manual de utilizare | 71 | UK | Керівництво користувача | 194 |
| CS | Návod k použití | 78 | SR | Упутство за употребу | 202 |
| RU | Руководство пользователя | 86 | AR | دليل المستخدم | 209 |
| EL | Εγχειρίδιο χρήσης | 94 | AZ | İstifadəçi təlimatı | 214 |
| NL | Gebruikershandleiding | 103 | SQ | Manuali i përdorimit | 221 |
| SL | Navodila za uporabo | 110 | KA | Общегزجور | 228 |
| FI | Käyttöohje | 118 |


User Manual (EN)
GENERAL SAFETY CONDITIONS IMPORTANT SAFETY INSTRUCTIONS FOR USE READ CAREFULLY AND KEEP FOR FUTURE REFERENCE
- Before using the device, read the instruction manual and follow the instructions contained therein. The manufacturer is not responsible for damages caused by using the device contrary to its intended use or improper operation.
- The device is for domestic use only. Do not use for other purposes incompatible with its intended use.
- Take special care when using the device when children are around. Do not allow children to play with the device do not allow children or anyone unfamiliar with the device to use it.
- WARNING: This equipment may be used by children over 8 years of age and persons with limited physical, sensory or mental ability, or persons without experience or familiarity with the equipment, if it is done under the supervision of a person responsible for their safety or they have been given instructions on the safe use of the equipment and are aware of the dangers associated with its use. Children should not play with the equipment. Cleaning and maintenance of the equipment should not be performed by children unless they are over 8 years of age and these activities are performed under supervision.
- WARNING: Do not leave the device plugged into an outlet unattended.
- WARNING: Keep the device out of the reach of children.
- WARNING: Improper use of the device, may result in injuries, such as electric shock, among others.
-
WARNING: Always remove the plug from the power outlet after use by holding the outlet with your hand. DO NOT pull the power cord.
-
WARNING: Do not use the device near flammable materials.
- WARNING: Unplug the power cord from the outlet before cleaning and washing the unit.
- WARNING: Do not cover the ventilation holes in the device housing with other objects.
- Periodically check the condition of the power cord. If the power cord is damaged, it should be replaced by a specialized repair facility to avoid danger.
- Do not immerse the cable, plug and the entire device in water or other liquid. Do not expose the device to weather conditions (rain, sun, etc.) or use it in high humidity conditions.
- Do not use the device with a damaged power cord or if it has been dropped or damaged in any other way or is not working properly. Do not repair the device yourself, as there is a risk of electrocution. Return a damaged device to a competent service center for inspection or repair. All repairs may be made only by authorized service centers. Improper repair may cause serious danger to the user.
- Place the appliance on a cool stable, level surface, away from hot kitchen appliances such as electric stove, gas burner, etc..
- The power cord must not hang over the edge of the table or touch hot surfaces.
- To provide additional protection, it is advisable to install in the electrical circuit, a residual current device (RCD) with a rated residual current of not more than 30 mA. In this regard, consult a specialist electrician.
- Wipe the device only with a dry cloth. Do not use water or cleaning fluids.
- Store the device in a dry room.
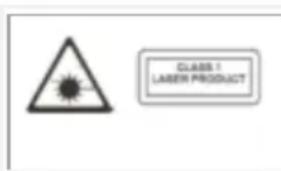
WARNING: The CD player emits invisible laser radiation. Improper handling of the device may cause eye damage from this radiation. Under no circumstances should you look inside an open CD pocket
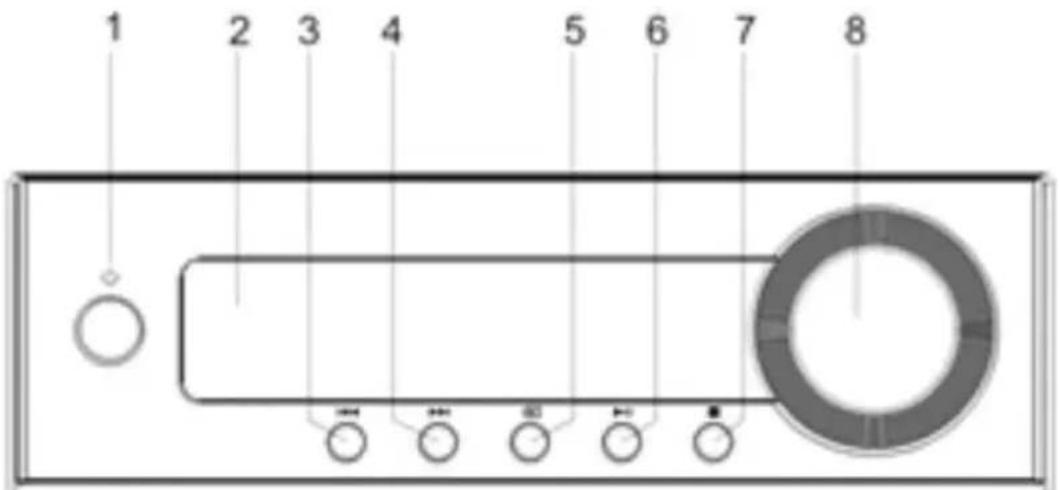
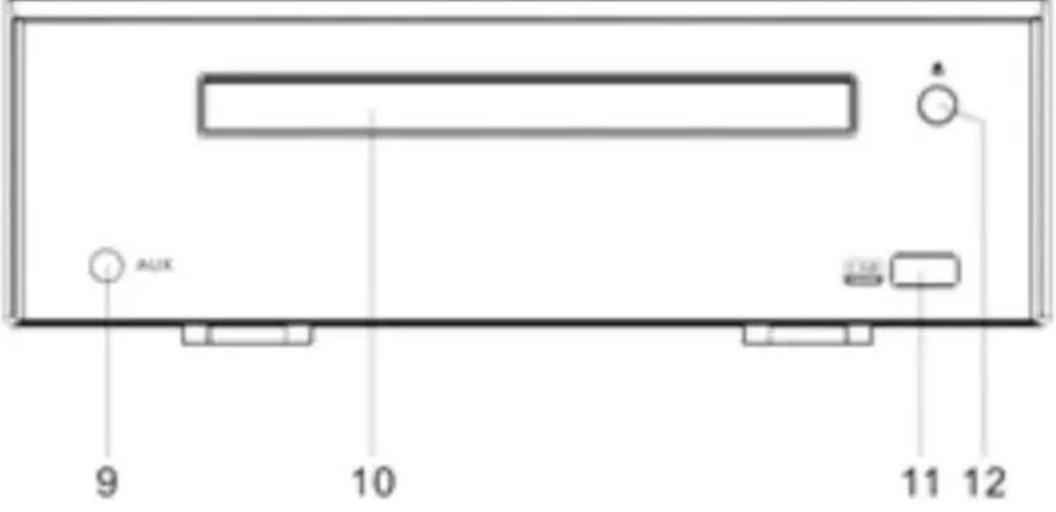
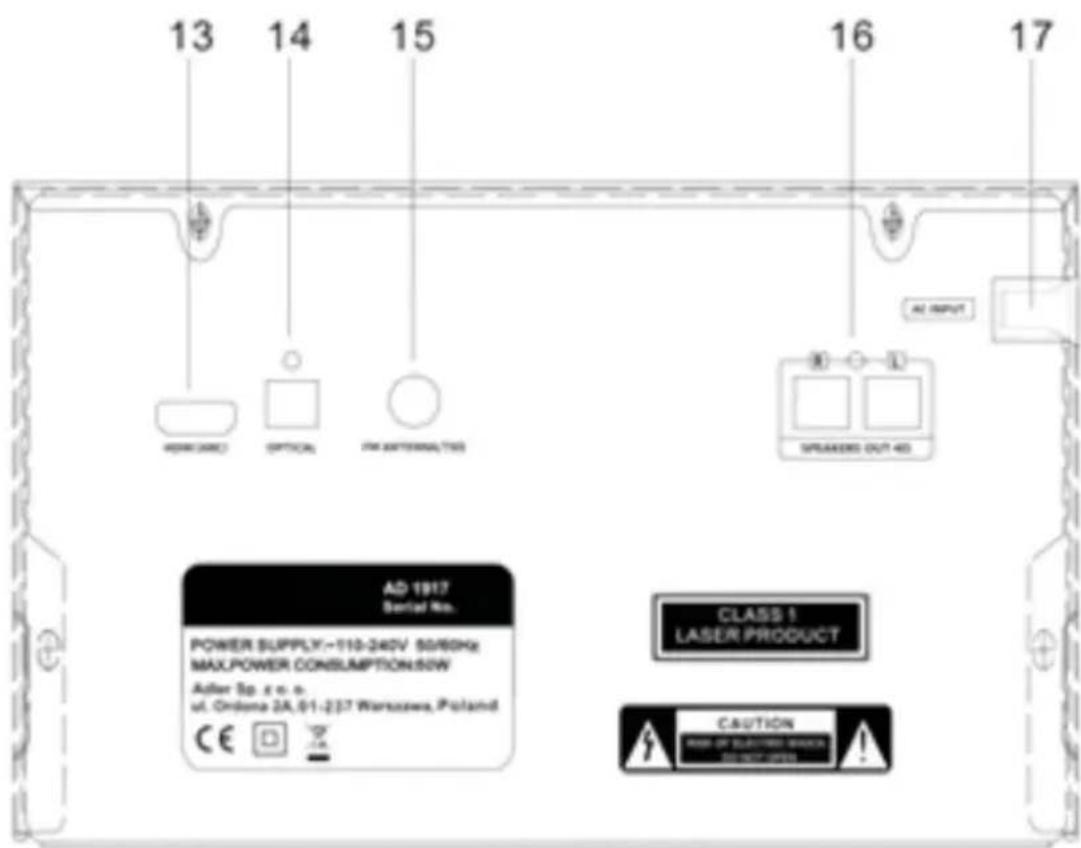
Device Description (A):
- Standby button 2. Display 3. Previous track button 4. Next track button
- Mode button 6. Play/Pause Button 7. Stop button 8. Volume knob
- AUX IN jack 10. CD drawer 11. USB port 12. CD drawer open button
- HDMI ARC input 14. Optical input 15. FM radio socket 16. L/R speaker output (4 Ohm)
- AC power source
Speaker description
-
Tweeter speaker
-
Woofer
-
Passive input terminal (Read positive and negative polarity carefully before connecting)
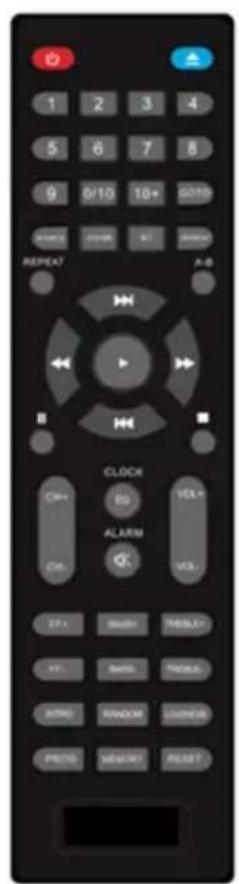
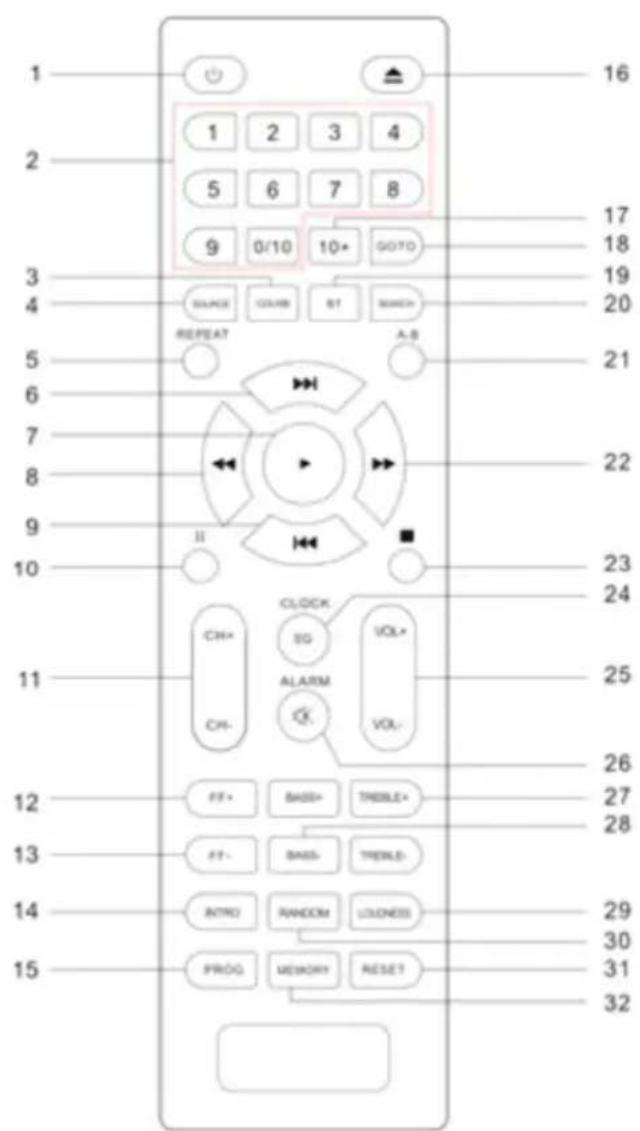
Remote control description (B):
| 1. On/off | 2. Numeric keypad | 3 .CD/USB | 4. Source |
| 5. Repeat(one/folder/all/off) | 6. Next track | 7. Playback | 8. Fast rewind |
| 9. Previous track | 10. Pause | 11. Channel+/- | 12. FM frequency add |
| 13. FM frequency subtract | 14. Introduction | 15. Programming | 16. CD ejection |
| 17. 10+ | 18. Transition (Go To) | 19. Bluetooth Mode | 20. FM Scanning |
| 21. A-B Repeat | 22. Fast forward | 23. Stop | 24. Clock and equalizer |
| 25. Volume+/- | 26. Mute and alarm | 27. Treble+/- | 28. Bass+/- |
| 29. Volume boost mode | 30. Random playback on/off | 31. Restore factory settings | 32. Memory (saving FM stations) |
Before first use:
- Remove any packing materials.
- Using a damp cloth, wipe all surfaces of the unit.
- Open the flap from the back of the remote control to insert the batteries.
- Insert the two AAA batteries into their place paying special attention to the polarity Plus to Plus, minus to minus.
General operations
- On/off and standby mode: The display will light up when successfully connected to the power supply; to completely turn off the power supply, remove the plug. Press the power button on the front panel (A1) or remote control (B1) to enable or disable standby mode.
- Mute: press the MUTE button (B26) on the remote control to mute the sound; press it again to resume playback.
You can also resume playback by pressing the +/- volume button (B25, A8).
- Selecting the playback mode: press the SOURCE button (A5, B4) repeatedly to switch the playback mode between CD/USB/radio FM/HDMI/Optical/AUX IN/Bluetooth. Press the CD/USB button (B3) on the remote control to switch between CD and USB playback mode. Press the mode button (A5) on the front panel for the same function.
- Volume control: press the VOL+/- button (B25) on the remote control or turn the volume knob (A8) on the front panel to increase or decrease the output volume.
- Equalizer: press the EQ button (B24) to switch the equalizer playback modes between Music / Game / News / Movie.
- Treble and bass adjustment: press the treble (B27)+/- or bass (B28) +/- button on the remote control repeatedly to adjust the treble and bass settings for the output sound.
- Digits 0\~9 (B2) and the 10+ button (B17): Enter the appropriate digits and wait a moment, and the unit will skip a track one higher than the current one. Pressing the 10+ button will skip a track by 10 in case there are more than 10 tracks in the middle and allow quick selection. This function is available in CD and USB playback mode.
- Play/Pause (B7, A6) and Stop (B23, A7): In CD/USB/Bluetooth mode, press the play and pause button to pause or resume playback; in CD and USB mode, press the stop button to stop playback and the play button to resume music playback.
- Previous (B6, A3) and Next (B9, A4), forward (B22) and rewind (B8): briefly press the Previous/Next button to skip to the last or next song for playback; Press and hold the forward/reverse button on the remote control to fast forward or rewind the currently playing song, and resume normal playback when you release the button.
- Repeat playback (B5): In CD and USB mode, press the repeat button to repeat one song, repeat all songs, repeat a folder or turn off the selected song;
- Shuffle playback (B30): press the shuffle button to enable or disable shuffle playback.
- CD loading: Press the eject button (B16, A12) to open the CD door and load a CD. Press it again to close the CD door.
- Volume (A8, B25): press the button briefly to boost the bass for sound output.
- Repeat playback of a specific song : in CD/USB mode, press the AB button (B21) on the remote control briefly to select the starting point of the expected song to repeat, press it again to select the end point. The unit will then repeat playback of the specified song until the AB button is pressed again to cancel and resume normal playback.
- Resetting the system: in CD mode, open the CD cover (without closing it), press and hold the reset button (B31) for 3 seconds until "reset" appears on the display, and the system is reset to factory settings.
- EQ (B24): The equalizer changes the playback of Radio, USB, CD, etc. Adding bass, treble depending on the selected setting. Available equalizers are: ROCK, JAZZ, CLASSIC, NORMAL, POP.
- Mute (B26): Mutes the tower, pressing the button again will return to the previous volume setting.
CD playback support
This product includes a CD playback function that can play CDs in CD/CD-R-RW/MP3/WMA audio format (DVD is not supported). Before playing a CD, check the CD for dirt or scratches, otherwise the CD may not be read or may hum.
- Press the source button (B4) or CD/USB button (B3) repeatedly to enter CD mode.
- Press the eject button (B16, A12) to open the CD door and load the CD; press the eject button (B16, A12) again to close the CD door. The unit will automatically start reading and playing the CD.
-
Create your own playlist (maximum programmed 20 songs for CD and MP3 discs, and up to 99 songs for WMA / MP3 disc files)
a. In CD playback mode, first press the stop button (A7, B23) and then the program button (B15) to start programming.
b. The display will show "XXX PXX", press the previous/next button (B6,B9) to select the track you want to program, and then press the programming button again to confirm.
c. After that, the display will show the programmed track and you will proceed to set the next program track. For example, "001 PO1" means that track number 1 has been programmed as track number 01.
d. Repeat step b and c above to set the rest of the tracks until the display shows "FULL".
e. Then press the play button (B7) to start playing the programmed song.
f. To cancel and delete the preset playlist, press the stop button (B23) twice or eject the CD. -
You can also get play and pause, stop, mute, repeat and shuffle, track selection, equalizer, fast forward and rewind function, input, etc. while playing a CD. Read the general operation section in this manual.
FM radio operation:
Before listening to FM radio, connect the supplied FM antenna to the FM jack (A15) / on the rear panel, or move the
unit near a window for better FM reception.
- Automatic scanning and saving of radio stations:
Press the source button (B4) repeatedly to enter FM radio mode; briefly press the search button (B20) on the remote control or the play/pause button (A6, B7) (2 seconds) on the front panel to automatically scan and save an available radio station. The unit can store up to 40 (max.) preset stations. Briefly press the previous and next buttons (A4, A3) on the front panel of the main unit, or press the channel +/- button (B6, B9, B11) or the digit button (B2) on the remote control to select a preset station.
-
Manually tune or auto scan: briefly press the FF+/- (B12,13) button to increase or decrease the frequency by 0.1 MHz per step based on the current station; press and hold the FF+/- (B12,13) button or the previous/next (A4,A3) button on the front panel for 2 seconds to automatically scan the available FM stations up or down in frequency; playback will stop and automatically play the available station.
-
Manually set station memory: when you have tuned in your favorite station by manual tuning or auto scan that you want to save; first press the memory button (B32) on the remote control, then the digits of the preset station will start flashing on the display, press the channel +/- button (B11) to change the location of the preset station you want to save; Then press the memory button (B32) to confirm it; and the current FM station will be saved. Repeat the operation to save another station.
-
Go to a specific frequency station: first press the GOTO button (B18) on the remote control, then enter the specific frequency of the FM station, such as 1-0-4-3 using the digital buttons. The unit will then go to the selected frequency and start playing.
USB operation
The product includes a USB playback function that can decode and play music from a USB storage device. Before starting the operation, copy music in MP3/WMA format to a USB memory stick. The maximum supported USB memory is 32 GB. The file format of the USB flash drive must be FAT32.
-
Before starting USB playback, make sure the USB flash drive is properly connected to the USB port (A11). Then switch to USB playback mode by pressing the source or CD/USB button (B3). The unit will then decode and automatically start playing music after a few seconds.
-
In USB mode, you can play and pause, stop, mute, repeat, select tracks, EQ, fast-forward and rewind, etc.
Familiarize yourself with the operation in the general section of this manual.
Notes:
a. Connecting a USB flash drive with a USB extension cable for playback is not recommended, as it may cause noise or intermittent sound due to loss of audio data during transmission.
b. We do not guarantee decoding and playback of all MP3/WMA format songs.
c. The maximum supported capacity of the USB device is 32 GB.
d. Some USB flash drives may take a little longer to play: kindly note that this is not a defect.
Bluetooth support
This product includes a Bluetooth function that allows you to wirelessly play music from other Bluetooth devices.
-
Press the source button (B4) repeatedly to enter Bluetooth mode, the display will show "BLUE-T" in Bluetooth mode. Turn on the Bluetooth function and start searching for available devices on your Bluetooth device (check your device's manual), then check the list of available Bluetooth devices on your device.
-
Select "AD 1917" for pairing; when the Bluetooth device is successfully paired, the display will show the solid text BLUE-T.
-
Select and play music from your Bluetooth device, then the music will be broadcast through the tower.
-
Press the previous/next button (B6,B9) to select the previous and next song during playback.
-
In Bluetooth mode, you can get play/pause, mute, equalizer, etc. functions. Read about the operation in the general operation section in this manual.
-
Long press (3 seconds) the play/pause button (A6) on the front panel to disconnect the pairing with the current Bluetooth device.
Notifications:
a. It is not guaranteed that all Bluetooth devices will pair correctly due to different design and brand.
b. The best Bluetooth operating range is 10 meters, with no obstructions in between.
c. The device can only pair and work with one Bluetooth device at a time.
d. Complete the current Bluetooth pairing before pairing with another device, otherwise "AD 1917" will not appear in the device list.
Digital input operation
The unit has an optical input (A14) and a digital HDMI (ARC) input (A13), which allows you to connect it digitally to a TV or other devices for audio playback.
Optical input (A14): Use an optical cable (not included) to connect the optical output port to a TV or other device, and connect the other end to the microsystem. Briefly press the mode button (A5, B4) several times to switch and enter the optical input mode will appear on the display "OPTI". Check and adjust the volume level on both the microsystem and the TV device, select and play the desired content, and you will get the sound from the microsystem.
HDMI (ARC) (A13): The microsystem supports HDMI with ARC (audio return channel); if your TV is HDMI ARC-compatible (check your TV's specifications for details), you can enjoy TV audio from the microsystem. Use the HDMI cable (not included) to connect the microsystem to the TV, press the mode button briefly to switch to HDMI mode, or it will automatically switch to HDMI mode when the TV is turned on and successfully connected. Check and select the volume level, select and play the content from the TV, and get the output sound from the microsystem.
Important notes:
a. In the digital input playback mode (optical and HDMI ARC), set the audio output mode to "PCM stereo" or "stereo 2.0" on the TV (see your TV's manual for details), otherwise there will probably be no sound.
b. Make sure your TV includes and supports HDMI ARC. Your TV may have several HDMI ports, but check and connect the HDMI ARC output port properly, there is usually HDMI ARC text next to the port (check your TV's manual or specifications).
c. When selecting and purchasing an HDM cable for connection, make sure that the HDMI cable supports HDIMV1.3 and later, and that it is a 19-conductor cable.
d. If there is no sound or intermittent output, please check the above notes and make sure the connection between the microsystem and another device is correct.
e. In playback mode with digital input, you can adjust the volume, set the equalizer, mute, etc. with the remote control.
Operation of AUX IN/line input/MP3 connection
To connect the unit wired and play music from another player or source, follow the steps below.
-
Using an audio cable (3.5mm to 3.5mm stereo), connect the AUXIN (A9) jack (3.5mm stereo type) on the front panel of the main unit, and connect the other 3.5mm stereo connector to the line output or headphone jack of an external player. Then switch to AUXIN mode by pressing the source button (A16).
-
Select music and play it on the player. The sound will be played from the microphone.
-
In AUXIN playback mode, the main control is on the external player side. But you can also control the volume, EQ and mute sound on the microsystem side.
Clock and alarm settings (play, wake and auto play)
The device has a clock and alarm setting function, so you can enjoy entertainment based on your individual wake-up time. Music will start playing automatically at the set time.
-
Setting the clock: in standby mode, press and hold the clock button (B24) on the remote control for a few seconds to start setting, and the display will show the 24-hour format; press the channel +/- button (B11) to select the 12/24 time format, and then press the clock button (B24) again to confirm the selection; hour digits will start flashing on the display; press the channel +/- button to add the hour, then press the clock button again to confirm; minute digits will start flashing on the display, press the channel +/- button to set the minutes, then press the clock button again to confirm and finish setting the clock.
-
Setting the wake-up time (alarm): in the clock interface, press and hold the alarm button (B26) on the remote control for a few seconds to start setting, and then the display will show the alarm time; press the channel +/- button (B11) to set the desired alarm hours, and then press the clock button again to confirm; then proceed to the alarm minutes/source setting (FM/CD/USB/wake volume), which is similar to setting the alarm hours; press the alarm button again to confirm and complete the selection.
Notes:
a. The clock and alarm settings are only available when the main power is on. In the event of a power outage, set the settings again.
b. The alarm icon "will appear on the display after successfully setting the alarm time. A short press on the alarm button in standby mode can turn off the alarm setting, a short press again can check the alarm setting.
c. When the alarm is on, the unit will automatically start playback (CD/ FM radio/USB). You can press the standby button to turn off playback.
Problems And Solutions:
-
The device cannot be turned on
a. Check that the AC power cord is properly plugged into the wall outlet.
b. Contact the service center if the problem persists. -
No sound.
a. Try adjusting the volume.
b. Check that you have selected the correct playback mode.
c. Contact the service center if the problem persists.
- The CD cannot be read or the sound is interrupted during playback.
a. Try replacing and playing another music CD in CD/CD-R-RW/MP3/WMA format.
b. Try cleaning the CD due to dirt or scratches.
c. Contact the service center if the problem persists.
- Background noise during FM playback.
a. Extend the FM antenna completely, try to adjust the direction of the antenna.
b. Move the device next to the window.
c. Switch to another station to listen to.
- Intermittent sound during Bluetooth playback.
a. Try placing the Bluetooth device closer to the unit.
b. Try to turn off the Bluetooth function and fix it again.
- The remote control does not work properly.
a. Point the sensor of the remote control toward the mini tower to make it work.
b. Replace the battery with a new one due to low battery power.
Specifications
Power source: AC110-240 V, 50/60 Hz.
Compatible with CD: CD/CD-R-RW/MP3/WMA.
FM frequency: 87.5-108.0 MHz.
Rated USB voltage: 5 V, 500 mA, 2.0 versions, supported storage devices up to 32 GB.
Bluetooth: V5.3 2,05 mW
Input:
HDMI ARC V 2.0,
1 optical input.
1 AUX In.
RMS output power: 2 x 25 watts (subwoofer)
Power consumption: 50 W total.
Remote control batteries: 2x AAA (Not included)
(Note: the above specifications are subject to change without prior notice.) Final Information:
Adler Sp. z o.o., 2a Ordona St., 01-237 Warsaw, Poland hereby declares that the AD 1917 complies with Directive 2014/53/EU. The full text of the EU Declaration of Conformity is available at the following web address:
For the sake of the environment. Dispose of cardboard packaging and polyethylene (PE) bags in the appropriate containers for separate collection of municipal waste according to their description. If there are batteries in the device, remove them and separately return them to the collection and storage facility. Return the used device to a suitable collection and storage facility, as the hazardous substances in it may pose a threat to health and the environment. The marking on the product indicates that the device should not be disposed of in the container with municipal waste. Waste electrical equipment, is waste that contains substances harmful to humans, animals and the environment. These substances can lead to contamination of the soil, water or air, and through this they can get into the human body and lead to numerous health ailments, such as: vision, hearing, speech disorders, they can also lead to kidney, liver and heart damage, and cause skin diseases. Harmful substances can also have adverse effects on the respiratory and reproductive systems and lead to cancerous changes. Consumption of plants growing on the complained of soils, and products made from them may risk the above-mentioned health effects. Do not dispose of the device in the municipal waste container!!!
Service If you wish to purchase spare parts or report any complaints, please contact directly with the seller who issued the receipt.
FM frekvence: 87,5-108,0 MHz.
Frequenza FM: 87,5-108,0 MHz.
UPOZORENJE: CD plejer emituje nevidljivo lasersko zračenje. Nepravilan rad uređaja može dovesti do oštećenja očiju zbog ovog zračenja. Ni pod kojim okolnostima ne biste trebali gledati u otvoreni pretinac za CD.
Opis uređaja (A):
| 1. Dugme za stanje pripravnosti | 2. Displej | 3. Dugme za prethodnu pjesmu | 4. Dugme za sljedeći zapis |
| 5. Dugme za način rada | 6. Dugme Play/Pause | 7. Dugme Stop | 8. Dugme za jačinu zvuka |
| 9. AUX IN utičnica | 10. CD fioka | 11. USB port | 12. Dugme za otvaranje CD fioke |
| 13. HDMI ARC ulaz | 14. Optički ulaz | 15. FM radio utičnica | 16. Izlaz zvučnika L/R (4 Ohma) |
| 17. Izvor napajanja izmjeničnom strujom |
Opis zvučnika
18. Visokotonac
19. Woofer
20. Pasivni ulazni terminal (pažljivo pročitajte pozitivni i negativni polaritet prije povezivanja)
Opis pilota (B):
| 1. Uključite/isključite | 2. Numerička tastatura | 3.CD/USB | 4. Izvor |
| 5. Ponovite (Jedan/Folder/Sve/Isključeno) | 6. Sljedeća pjesma | 7. Reprodukcija | 8. Brzo premotavanje unazad |
| 9. Prethodna pjesma | 10. Pauza | 11. Kanal+/- | 12. FM frekvencija dodaj |
| 13. Oduzimanje FM frekvencije | 14. Uvod | 15. Programiranje | 16. Vađenje CD-a |
| 17. 10+ | 18. Idi na | 19. Bluetooth način rada | 20. FM skeniranje |
| 21. AB ponavljanje | 22. Brzo naprijed | 23. Pritvor | 24. Sat i ekvilajzer |
| 25. Volume+/- | 26. Isključivanje zvuka i alarm | 27. Visoki tonovi+/- | 28. Bas+/- |
| 29. Način povećanja jačine zvuka | 30. Nasumičnouključivanje/isključivanje | 31. Vraćanje natvorničke postavke | 32. Memorija (čuvanje FM stanica) |
Prije prve upotrebe:
- Uklonite sav materijal za pakovanje.
- Koristeći vlažnu krpu, obrišite sve površine uređaja.
- Otvorite poklopac na poleđini daljinskog upravljača da ubacite baterije.
- Umetnite dvije AAA baterije na njihova mjesta, obraćajući posebnu pažnju na polaritet: plus na plus, minus na minus.
Opće operacije
- Uključivanje/isključivanje i stanje pripravnosti: Ekran će zasvijetliti nakon uspješnog povezivanja na napajanje; Da biste potpuno isključili napajanje, izvadite utikač. Pritisnite dugme za napajanje na prednjoj ploči (A1) ili daljinskom upravljaču (B1) da uključite ili isključite režim pripravnosti.
- Isključivanje zvuka: pritisnite dugme MUTE (B26) na daljinskom upravljaču da biste isključili zvuk; pritisnite ponovo da nastavite reprodukciju. Takođe možete nastaviti reprodukciju pritiskom na dugme za jačinu zvuka +/- (B25, A8).
- Odabir načina reprodukcije: pritiskajte tipku SOURCE (A5, B4) više puta da biste promijenili način reprodukcije između CD/USB/FM radija/HDMI/Optical/AUX IN/Bluetooth. Pritisnite dugme CD/USB (B3) na daljinskom upravljaču da biste promenili režim reprodukcije CD-a i USB-a. Pritisnite dugme za režim (A5) na prednjoj ploči da biste postigli istu funkciju.
- Podešavanje jačine zvuka: pritisnite dugme VOL+/- (B25) na daljinskom upravljaču ili okrenite dugme za jačinu zvuka (A8) na prednjoj ploči da povećate ili smanjite izlaznu jačinu zvuka.
- Audio ekvilajzer: Pritisnite dugme EQ (B24) za prebacivanje režima reprodukcije ekvilajzera između muzike / igre / vesti / filma.
- Podešavanje visokih tonova i basa: Pritisnite dugme Visoki tonovi (B27)+/- ili Bass (B28) +/- više puta na daljinskom upravljaču da biste podesili postavke visokih tonova i basa za izlazni audio.
- Brojevi 0\~9 (B2) i 10+ dugme (B17): Unesite odgovarajuće brojeve i sačekajte trenutak, uređaj će preskočiti numeru jedan iznad trenutne. Pritiskom na dugme 10+ preskočiće se numera 10 ako unutra ima više od 10 numera i omogućiti brz odabir. Ova funkcija je dostupna u načinu reprodukcije CD-a i USB-a.
- Reprodukcija/pauza (B7,A6) i Stop (B23,A7): U CD/USB/Bluetooth modu, pritisnite dugme za reprodukciju i pauzu da biste pauzirali ili nastavili reprodukciju; U CD i USB modu, pritisnite dugme za zaustavljanje da biste zaustavili reprodukciju i dugme za reprodukciju da biste nastavili reprodukciju muzike.
- Prethodno (B6, A3) i Sledeće (B9, A4), Premotavanje unapred (B22) i Premotavanje unazad (B8): Kratko pritisnite dugme Prethodno/Sledeće da biste prešli na poslednju ili sledeću pesmu za reprodukciju; Pritisnite i držite dugme za brzo premotavanje unapred/unazad na daljinskom upravljaču da premotate numeru koja se trenutno reprodukuje unapred ili unazad, a zatim otpustite dugme da biste nastavili normalnu reprodukciju.
- Reprodukcija ponavljanja (B5): U CD i USB modu, pritisnite dugme za ponavljanje da ponovite jednu pesmu, ponovite sve pesme, ponovite folder ili isključite izabranu pesmu;
- Nasumična reprodukcija (B30): Pritisnite dugme za nasumično reprodukciju da biste uključili ili isključili nasumično reprodukciju.
- Stavljanje CD-a: Pritisnite dugme za izbacivanje (B16, A12) da otvorite vrata CD-a i ubacite CD. Pritisnite ga ponovo da zatvorite vrata CD-a.
- Jačina zvuka (A8, B25): Kratko pritisnite dugme da pojačate bas za izlaz zvuka.
- Ponovite reprodukciju određene numere: U CD/USB režimu, kratko pritisnite dugme AB (B21) na daljinskom upravljaču da biste izabrali početnu tačku očekivane numere za ponavljanje, pritisnite je ponovo da odaberete završnu tačku. Uređaj će zatim ponavljati reprodukciju određene numere sve dok ponovo ne pritisnete dugme AB da biste
otkazali i nastavili normalnu reprodukciju.
-
Resetovanje sistema: U režimu CD-a, otvorite poklopac CD-a (bez zatvaranja), pritisnite i držite dugme za resetovanje (B31) 3 sekunde dok se na displeju ne prikaže "resetovanje", a sistem će biti resetovan na fabrička podešavanja.
-
EQ (B24): ekvilajzer menja kvalitet zvuka radija, USB-a, CD-a, itd. dodavanjem basa, visokih tonova u zavisnosti od izabranog podešavanja. Dostupni ekvilajzeri su: ROCK, JAZZ, CLASSIC, NORMAL, POP.
-
Isključivanje zvuka (B26): Isključuje toranj, ponovnim pritiskom na dugme vraća se na prethodnu postavku jačine zvuka.
AUX IN/Line In/MP3 Link Rad
AUX IN/Line In/MP3 Link rad
Da biste svoj uređaj povezali žično i reproducirali glazbu s drugog uređaja ili izvora, slijedite korake u nastavku.
- Upotrijebite audio kabel (3,5 mm do 3,5 mm stereo) za spajanje AUXIN utičnice (A9) (3,5 mm stereo tip) na prednjoj ploči glavne jedinice, a drugu 3,5 mm stereo utičnicu spojite na linijski izlaz ili utičnicu za slušalice vanjskog playera. Zatim prijeđite na AUXIN način rada pritiskom na gumb izvora (A16).
- Odaberite glazbu i pustite je na svom playeru. Zvuk će se reproducirati iz mikro sustava.
- U AUXIN načinu reprodukcije, glavna kontrola je na strani vanjskog playera. Ali također možete kontrolirati glasnoću, EQ i isključiti zvuk na strani mikro sustava.
Postavke sata i alarma (reprodukcija, buđenje i automatska reprodukcija)
Uređaj ima funkciju podešavanja sata i alarma, tako da možete uživati u zabavi na temelju vašeg individualnog vremena buđenja. Glazba će automatski početi svirati u postavljeno vrijeme.
- Podešavanje sata: U stanju pripravnosti, pritisnite i držite tipku sata (B24) na daljinskom upravljaču nekoliko sekundi za početak podešavanja, a zaslon će prikazati 24-satni format; Pritisnite tipku kanala +/- (B11) za odabir formata vremena 12/24, zatim ponovno pritisnite tipku sata (B24) za potvrdu; znamenke sata će početi treptati na zaslonu; pritisnite tipku kanala +/- za dodavanje sata, a zatim ponovno pritisnite tipku sata za potvrdu; Brojke minuta na zaslonu će treperiti, pritisnite tipku kanala +/- za postavljanje minuta, zatim ponovno pritisnite tipku sata za potvrdu i dovršetak podešavanja sata.
- Postavljanje vremena alarma: U sučelju sata, pritisnite i držite gumb alarma (B26) na daljinskom upravljaču nekoliko sekundi za početak podešavanja, a tada će se vrijeme alarma prikazati na ekranu; Pritisnite tipku kanala +/- (B11) za postavljanje željenih sati alarma, a zatim ponovno pritisnite tipku sata za potvrdu; zatim idite na postavke minuta alarma/izvora (FM/CD/USB/glasnoća buđenja), što je slično postavljanju sati alarma; ponovno pritisnite gumb za alarm kako biste potvrdili i dovršili svoj odabir.
Komentari:
AUX IN/Line In/MP3 Link 03965805
mg3g6o dmhymdommdol lsggbsbo gsslszs3d0mjdmsq qos lbzs 3mgg6oqs6 sb hysmqos6 dgtuozol gsslszsgsq, do3yg3on f3g4mon dmgjdym bsdoxjbl.
g_6g_6g_6m_2m_6b_6d_6s_6g_6a: b_6g_6m_250W.
: 2x AAA (s6 g o5)

- User Manual (EN)
- GENERAL SAFETY CONDITIONS IMPORTANT SAFETY INSTRUCTIONS FOR USE READ CAREFULLY AND KEEP FOR FUTURE REFERENCE
- Device Description (A):
- Speaker description
- Remote control description (B):
- Before first use:
- General operations
- CD playback support
- USB operation
- Digital input operation
- Important notes:
- Notes:
- Problems And Solutions:
- Prije prve upotrebe:
- Opće operacije
- AUX IN/Line In/MP3 Link Rad
- Postavke sata i alarma (reprodukcija, buđenje i automatska reprodukcija)
- Komentari:
Brand : ADLER
Model : AD 1917
Category : Radio