SMK 7000 B2 - Air-conditioner SILVERCREST - Free user manual and instructions
Find the device manual for free SMK 7000 B2 SILVERCREST in PDF.

| Product type | Portable air conditioner |
| Brand | SilverCrest |
| Model | SMK 7000 B2 |
| Cooling power | 2.06 kW (7000 BTU) |
| Rated voltage | 220-240 V ~, 50 Hz |
| Rated power | 785 W |
| Protection class | I |
| Refrigerant | R290 |
| Refrigerant quantity | 140 g |
| Dimensions (W x D x H) | 33.0 x 31.5 x 67.5 cm |
| Weight | 21.5 kg |
| Minimum room area | 7 m² |
| Maximum room volume | 30-45 m³ |
| Temperature range (cooling) | 16 °C - 31 °C |
| Functions | Cooling, dehumidification, ventilation, sleep mode, oscillation |
| Noise level | 65 dB(A) |
| Energy efficiency class | A |
| Water tank capacity | approx. 0.5 L |
| Power cord length | approx. 1.8 m |
| Hot air hose length | approx. 1.5 m |
| Remote control | Yes (2 AAA batteries included) |
| Air filter | Washable, clean every 2 weeks |
| Warranty | 3 years (Belgium), statutory in France |
| Standby consumption | 0.42 W |
| Minimum distance to walls | 50 cm on each side |
Frequently Asked Questions - SMK 7000 B2 SILVERCREST
User questions about SMK 7000 B2 SILVERCREST
0 question about this device. Answer the ones you know or ask your own.
Ask a new question about this device
Download the instructions for your Air-conditioner in PDF format for free! Find your manual SMK 7000 B2 - SILVERCREST and take your electronic device back in hand. On this page are published all the documents necessary for the use of your device. SMK 7000 B2 by SILVERCREST.
USER MANUAL SMK 7000 B2 SILVERCREST
PDF ONLINE
www.lidl-service.com
IE CYGB NI MT
Operation and Safety Instructions
BEFR CH
CLIMATISEUR LOCAL
Before reading, fold out the page with the images and familiarise yourself with all the features of the device.
DE ATCH
natural_image
Folded white fabric with a numbered label '17' pointing to its edge (no other text or symbols)
natural_image
Concentric circles diagram with a small number 16 at the bottom (no text or symbols on the circles)

natural_image
Line drawing of a hand pointing at a window frame (no text or symbols)
natural_image
Line drawing of a hand holding a pen, poised to write on a surface near a window (no text or symbols)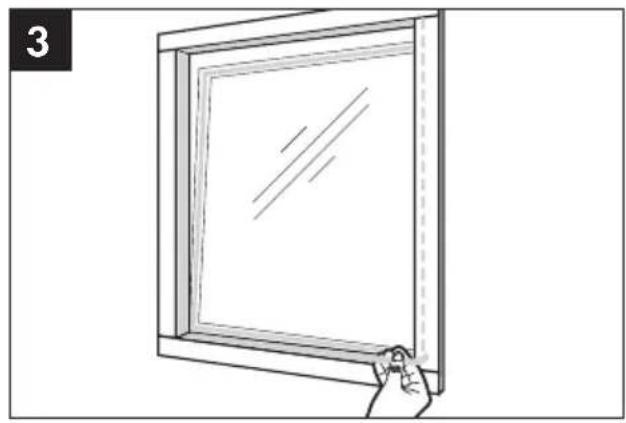
natural_image
Line drawing of a hand holding a blank rectangular frame with a diagonal line, no text or symbols present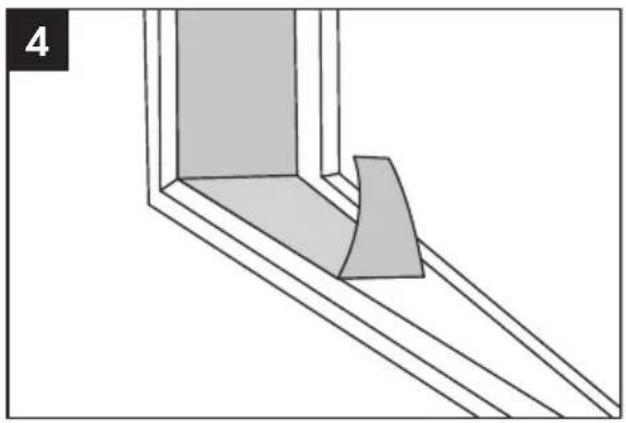
natural_image
Pure architectural line drawing of a corner detail with diagonal lines, no text or symbols present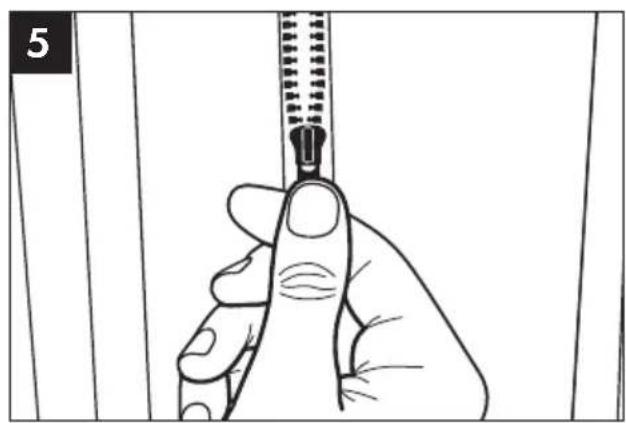
natural_image
Illustration of a hand holding a zipper with a needle inserted, no text or symbols present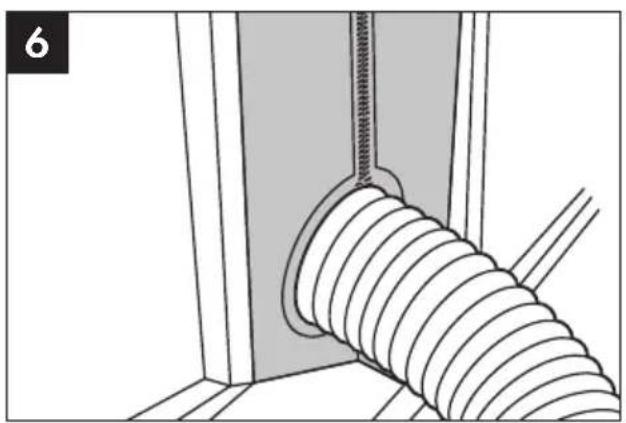
natural_image
Technical illustration of a mechanical assembly with threaded spring and mounting bracket (no text or symbols)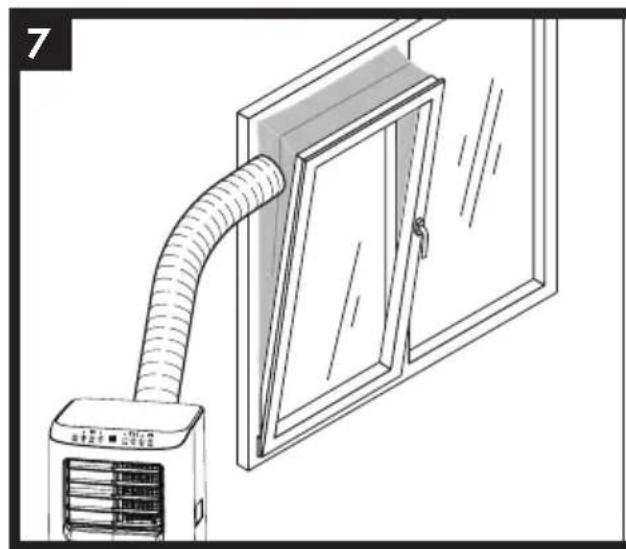
natural_image
Line drawing of an air conditioner unit connected to a door frame (no text or symbols)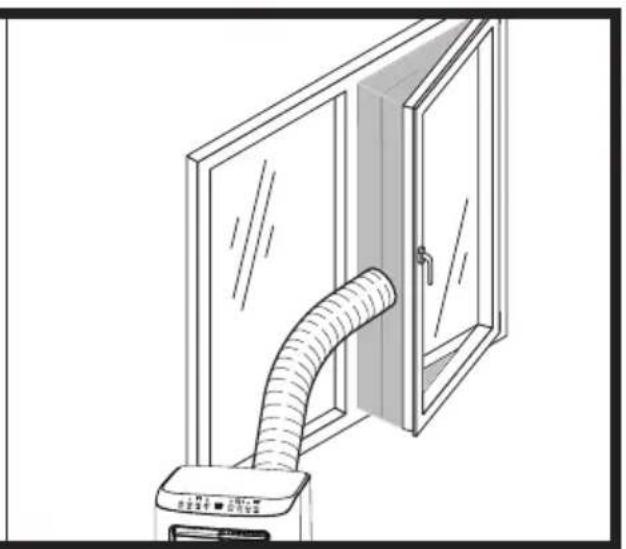
natural_image
Line drawing of a door with a hose inserted into the opening, connected to a printer (no text or symbols)1. Introduction 6
1.1 Intended use...6
1.2 Scope of delivery...6.
1.3 Equipment...6.....
1.4 Technical data...7
2. Safety Instructions 8
2.1 Information about batteries...13.....
3. Before starting up 15
3.1 Setting up the unit .15
3.2 Remote control: Insert/change battery...15.....
3.3 Mounting the hot air outlet hose 15
3.4 Installation of the window seal 15
4. Start-up 16
4.1 Select mode 16
4.1.1 Cooling mode.... 16
4.1.2 Dehumidification mode 16
4.1.3 Ventilation mode.... 16
4.1.4 Sleep mode 17
4.2 Timer setting 17
4.3 Adjust air flow 17
4.4 Oscillation function 17
4.5 Range of use of the remote control.... 18
4.6 Empty water tank 18
4.6.1 Use permanent water drainage 19
5. Protective function 19
5.1 Overflow protection function 19
5.2 Protective function of the compressor....19
6. Troubleshooting 20
7. Maintenance, cleaning and storage 21
7.1 Clean air filter 21
8. Disposal 21
9. ROWI Germany GmbH Warranty 22
10. Service 23
LOCAL AIR CONDITIONER SMK 7000 B2
1. Introduction
Congratulations for purchasing your new device. You have selected a high-quality product. The instruction manual is an integral part of this product. It contains important information regarding safety, device handling and disposal. Familiarise yourself with all operating and safety instructions before using the product. Only use the product as described and for the areas of use specified. Please make sure to hand over all documents when handing the product over to third parties.
1.1 Intended use
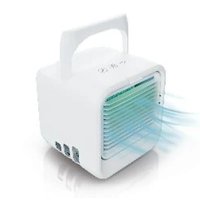
This product is a local air conditioner that is used exclusively to regulate the temperature, circulate and dehumidify air in dry indoor spaces. Any use other than that described above or any modification of the product is not permitted and will result in damage. The manufacturer accepts no liability for damage resulting from improper use. The product is not intended for commercial use.
1.2 Scope of delivery
1 Local air conditioner
1 Remote control
1 Hot air outlet hose
1 Hose connection (window)
1 Hose connection (air conditioner)
2 Fixing plugs
2 1.5 V batteries (type LR03 (AAA))
1 Window fabric
1 Velcro tape
1 Instruction manual
1.3 Equipment
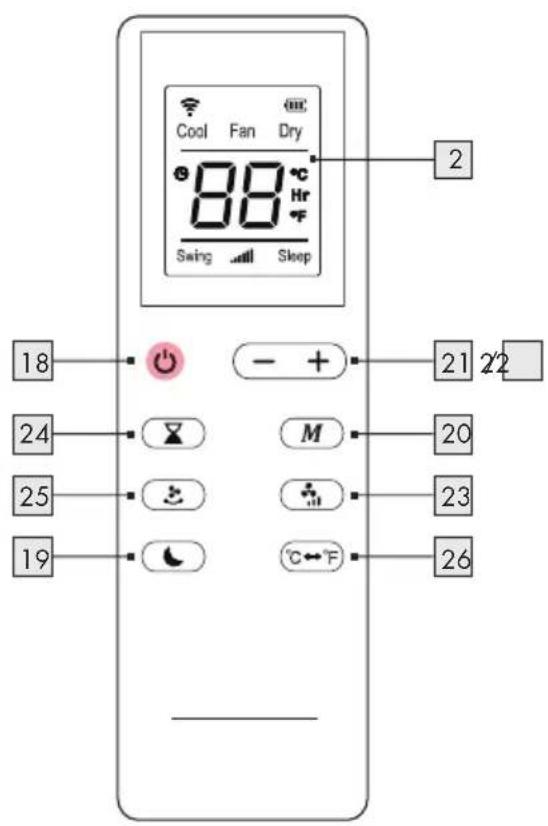
1 Control panel
2 Display
3 Air vents
4 Front air outlet
5 Recessed handles
6 Rollers (pre-mounted)
7 Drain plug
8 Rear air inlet
9 Rear air outlet
10 Drain plug
11 Cable winder
12 Air filter
13 Hose connection (air conditioner)
14 Hot air outlet hose
15 Hose connection (window)
16 Velcro tape
17 Window fabric with zip fastener
18 On/Off button
19 SLEEP button
20 MODE button M (COOL / DRY / FAN)
21 Minus button (-)
22 Plus button (+)
23 SPEED button
24 TIMER button
25 SWING button
26 Temperature unit ℃←℉
1.4 Technical data
Device designation: Local air conditioner
Model: SMK 7000 B2
Rated voltage: 220-240 V \~ (alternating current)
Rated frequency: 50 Hz
Rated power: 785 W
Protection class: I
Temperature
selection range: 16 °C - 31 °C
Energy efficiency class: A
Cooling capacity: 2.06 kW (7000 BTU)
Refrigerant: R290
Refrigerant: 140 g
Minimum room size
(floor area): 7 m^2
Maximum room volume: 30-45 m ^3
Dehumidification function: up to 1.5 l/hr(room 30°C / 80% rH*)
Noise level: 65 dB (A)
Battery (remote control): 2 x AAA 1.5 V (LRO3)
Weight: 21.5 kg
Protection class: IP20 (indoor use)
rH*: relative humidity
Permissible operating overpressure
| Discharge: | 1.8 MPa |
| Suction: | 0.6 MPa |
Maximum permissible pressure
| Discharge: | 3.0 MPa |
| Suction: | 3.0 MPa |
Length of mains cable: approx. 1.8 m
Length of hot air
drain hose: approx. 1.5 m
Capacity of the
water tank: approx. 0.5 l
Dimensions (L x W x H): approx. 33.0 x 31.5 x 67.5 cm
Required information on single-channel room air conditioners
Model identifier: SMK 7000 B2
| Description | Symbol | Value | Unit |
| Rated capacity for cooling | P_rated | 2.069 kW | |
| Rated capacity for heating | P_rated | - | kW |
| Rated power input for cooling | P_EER | 0.780 kW | |
| Rated power input for heating | P_COP | - | kW |
| Rated Energy efficiency ratio | EERd | 2.65 | - |
| Rated Coefficient of performance | COPd | - | - |
| Description | Symbol | Value | Unit |
| Power consumption in thermostat-off mode | P_TO | - | W |
| Power consumption in standby mode | P_SB | 0.42 | W |
| Electricity consumption of double duct appliances | Q_DD | - | kWh/a |
| Electricity consumption of singel duct appliances | Q_SD | 0.780 | kWh/h |
| Sound power level | L_WA | 63.78 | dB (A) |
| Global warming potential | GWP | 3 | kg Co_2 Äq. |
ROWI Germany GmbH
 | Read all safety information and instructions. |
 | If repairs are required, please contact the nearest service centre and follow the manufacturer's instructions exclusively and precisely. |
 | WARNING! FIRE HAZARD! |
2. Safety Instructions

Please read all safety information and instructions.

Failure to comply with the safety instructions and precautions may result in serious injury and/or property damage.
For future reference, keep all safety instructions and precautions in a safe place!
This appliance can be used by children aged from 8 years and above and persons with reduced physical, sensory or mental capabilities or lack of experience and knowledge if they have been given supervision or instruction concerning use of the appliance in a safe way and understand the hazards involved. Children must not play with the appliance. Cleaning and user maintenance must not be carried out by children without supervision.
- Do not carelessly leave the product or packaging material lying around. Plastic films / bags, plastic parts etc. could become a dangerous toy for children.
- Do not leave the product unattended during operation.
WARNING! RISK OF ELECTRIC SHOCK!
- Faulty electrical installation or excessive mains voltage can lead to electric shock.
-
Only connect the product if the mains voltage of the socket corresponds to the specification on the rating plate.
-
Only connect the product to an easily accessible socket so that you can quickly disconnect the product from the mains in the event of a fault.
- Do not operate the product if it has visible damage or if the mains cable or plug is defective.
If the product's power cord is damaged, it must be replaced by the manufacturer or its after-sales service or a similarly qualified person in order to avoid hazards. - Do not open the housing, but leave the repair to specialists. Contact a specialist workshop for this purpose. Liability and warranty claims are excluded in the event of repairs carried out independently, improper connection or incorrect operation.
- Only parts that correspond to the original appliance data may be used for repairs. There are electrical and mechanical parts in this product that are essential for protection against sources of danger.
- Do not operate the product with an external timer or a separate remote control system.
- Do not immerse the product, the power cord or the power plug in water or other liquids.
■ Never touch the mains plug with wet hands. - Never pull the mains plug out of the socket by the mains cable, always grasp the mains plug.
- Never use the power cord as a carrying handle.
- Keep the product, the mains plug and the mains cable away from open flames and hot surfaces.
- Lay the mains cable so that it does not become a tripping hazard.
- Do not bend the mains cable or place it over sharp edges.
- Only use the product indoors. Never operate it in damp rooms or in the rain.
■ Never use the product near a fireplace. - Never use the product in areas where oil or water could be splashed.
■ Never store the product so that it can fall into a tub or sink.
- Never reach for an electrical appliance if it has fallen into the water. In such a case, immediately pull the mains plug out of the socket.
- Ensure that children do not insert any objects into the product.
- When you are not using the product, cleaning it or if a malfunction occurs, always switch off the product and disconnect the mains plug from the socket.
- All sockets must comply with the safety regulations of the respective country.
WARNING! FIRE HAZARD!
- Parts of the product become hot during operation and can cause fires if not handled properly.
■ Never cover the product. This may cause a fire.
WARNING! RISK OF INJURY!
■ Improper handling of the product may result in injury.
- Do not touch the hot parts of the product with bare fingers during operation. Also point out the dangers to other users!
Note that certain parts of the product may still be hot after it has been switched off.
- Do not put hands, fingers or objects into the air inlets ^8 or outlets ^9 . Draw the attention of children in particular to this danger.
■ Always transport and store the product upright, never in an inclined position.
- Switch off the product and disconnect the mains plug from the socket before moving the product.
- Do not use the product in rooms where flammable gases may be present.
- Keep long hairs away from the product. These can be sucked in through the air inlets ^8 .
- Avoid using spray cans near the product.
- For safety reasons, do not leave the house with the windows open to let the hot air out of the product.
CAUTION! FIRE HAZARD!
■ Unit is filled with propane gas R290.
WARNING! HAZARDS DUE TO REFRIGERANT!
- The product contains 140 g of refrigerant gas R290, which is highly flammable and can cause health and environmental damage if not handled properly.
■ Note that refrigerants can be odourless. - Avoid contact with the refrigerant and do not damage the refrigerant circuit under any circumstances.
- Store the product only in rooms without continuously operating ignition sources (e.g. open flames, active gas appliances, active electric heaters, etc.).
- Operate the product only in adequately ventilated rooms with a floor area of at least 7m^2 .
- The area in which the product is located must be constructed in such a way that any escaping refrigerant gas cannot accumulate.
- Store the product in such a way that mechanical damage is avoided.
■ Repairs and maintenance work on the coolant circuit may only be carried out by specialist personnel certified for this purpose. - The refrigerant may only be charged or discharged by certified specialist personnel.
-
Maintenance work and repairs may only be carried out in accordance with the manufacturer's recommendation.
-
The locally applicable gas ordinances must be complied with.
- Ventilation openings must always be freely permeable and must not be blocked.
■ The product must not be drilled into or burnt. - Dispose of the product in accordance with the local ordinances of your place of residence.
CAUTION! RISK OF DAMAGE!
- Improper handling of the product may result in damage to the product.
- Place the product on an easily accessible, level, dry, heat-resistant and sufficiently stable work surface. Do not place the product at the edge or on the edge of the work surface.
The product is on castors. Make sure that it is always on a level surface and cannot roll away. - Avoid heat build-up by not placing the product directly against a wall or under wall cabinets or similar.
■ Never place the product on or near hot surfaces (hot plates, etc.). - Do not bring the mains cable into contact with hot parts.
- Never expose the product to high temperature (heating etc.) or weather conditions (rain etc.).
■ Never pour liquid into the product. - Never immerse the product in water for cleaning and do not use a steam cleaner for cleaning. The product may otherwise be damaged.
- Do not use the product if the plastic components of the product are cracked or deformed.
- Replace damaged components only with suitable original spare parts.
■ Always transport and store the product upright and avoid tipping it over.
■ Always place the product at least 50 cm away from walls, curtains, furniture and other obstacles on all sides.
- Operate the product in rooms with a maximum volume of 30-45 m ^3 .
■ The terminals must not be short-circuited.
- Do not use any objects, except those permitted by the manufacturer, to accelerate the defrosting process.
- Any person working on the refrigerant circuit must hold a certificate of competence from an industry accredited body that demonstrates their competence in the safe handling of refrigerants using a procedure known in the industry.
■ Service work should only be carried out in accordance with the manufacturer's instructions. If maintenance and repair work requires the assistance of other persons, the person trained in handling flammable refrigerants should supervise the work at all times.
2.1 Information about batteries

Keep out of the reach of children.
If swallowed, they may cause injuries and lead to the perforation of soft tissue and ensuing death. Severe burns may be incurred within 2 hours of intake. Consult a physician immediately.
- Incorrect handling of batteries may cause fire, explosions, the leakage of hazardous substances or further hazardous situations!
- Do not fling the batteries into a fire and do not subject them to high temperatures.
- Neither open, deform nor short-circuit batteries as this may cause the chemicals they contain to escape.
-
Do not try to recharge batteries. Only batteries marked as "rechargeable" may be recharged. There is danger of explosion!
■ Always remove rechargeable batteries from the appliance for recharging. -
Test the batteries regularly. Chemicals which leak may cause long-term damages to the appliance. Be particularly careful when handling damaged or leaking batteries.
■ Danger of chemical burn! Wear protective gloves.
■ Chemicals which leak from a battery may cause skin irritations.
In case of skin contact, rinse with ample water. If the chemicals have come into contact with the eyes, always rinse them with water, do not rub them and consult a physician immediately. - Neither use different battery nor rechargeable battery types nor mix old and new batteries.
■ Always insert batteries with the correct polarity, because otherwise the danger of bursting exists.
■ Remove the batteries from the appliance if you do not wish to use it for a longer period or wish to store it. - Insert the batteries using the correct polarity.
- Do not allow children to replace the batteries without adult supervision.
■ Always select the correct size and battery type for the intended use. The information provided with the appliance for supporting the correct battery selection should be kept as a reference. - Clean the battery contacts and also the equipment's contacts before installing the battery.
- Remove used batteries without delay and dispose of them in an environmentally responsible manner.
- Do not dismantle batteries.
If the battery compartment cover doesn't close properly, do not use the remote control any longer and keep it out of the reach of children. - Avoid extreme conditions and temperatures which can influence batteries / rechargeable batteries, e.g. placing them on radiators / direct insolation.
3. Before starting up
■ Remove all packaging material and transport locks from the unit. Check that the package contents are complete and undamaged.
3.1 Setting up the unit
For safe and fault-free operation of the unit, the installation site must meet the following requirements:
■ The floor must be firm, flat and horizontal.
Before use, leave the unit in an upright position for 2 hours.
■ Minimum distances of 50 cm to the side and 50 cm to the rear must be maintained from the enclosure.
- Do not place the unit in a hot, wet or very humid environment or near combustible material.
The power socket must be easily accessible so that the mains plug can be easily disconnected if necessary.
3.2 Remote control: Insert/change battery
■ Two batteries (type LR03 (AAA)) are supplied with the remote control.
- Carefully slide open the battery compartment to open it (see Fig. 1).
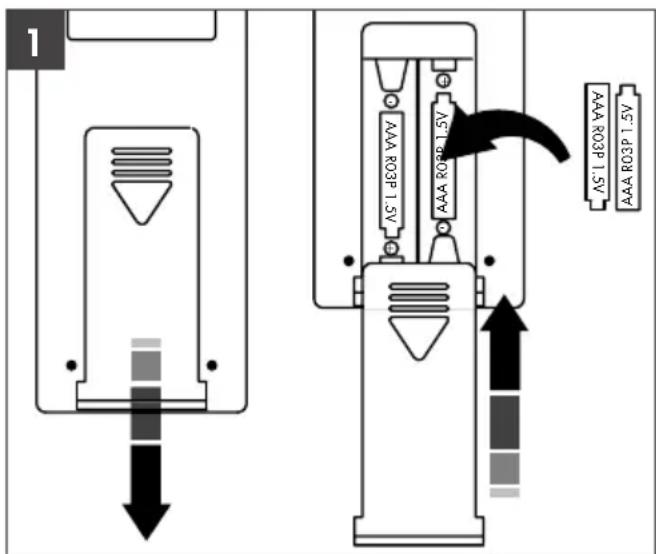
If the battery in the remote control needs to be replaced, insert two new 1.5 V batteries (type LR03 (AAA)).
Note: Make sure that the poles (+ and -) are correctly aligned. Incorrect insertion can lead to damage to the remote control.
- Carefully close the battery compartment by sliding it back.
3.3 Mounting the hot air outlet hose
Pull the hot air outlet hose 14 apart and screw the hose connector (window) 15 and the hose connector (air conditioner) 13 each to one end of the hot air outlet hose 14.
■ Push the hose connector (air conditioner) 13 into the rail provided on the rear air outlet 9.
3.4 Installation of the window seal
Note: Illustrations to help you can be found on the fold-out page (see Fig. 1-7).
Before starting the installation, first clean the window and window frame with soap or detergent. Make sure that the entire surface is free of dust and grease before attaching the Velcro tape to the window and window frame (see Fig. 1).
Measure the surfaces and cut the Velcro tape 16 to the required dimensions (see fig. 2). Then apply the Velcro tape 16 around the window frame and to the window (see fig. 3).
Note: Do not stick the Velcro tape 16 to the glass surface.
■ Attach the window fabric 17 to the Velcro tape 16 (see fig. 4).
Open the zip of the window fabric ^17 by approx. 50 cm (see fig. 5).
- Insert the hot air outlet hose 14 of the air conditioner into the opening. Then close the zip fastener so that it closes with the hot air outlet hose 14 and holds the hot air outlet hose 14 in the opening (see fig. 6).
4. Start-up
The product has 3 different operating modes: cooling mode, dehumidification mode and ventilation mode.
■ Connect the unit to a grounded, fused, freely accessible wall socket. A beep sounds.
4.1 Select mode
After switching on, press the MODE button Ⓜ 20 to switch between cooling → dehumidification → fan mode.
4.1.1 Cooling mode
Press the POWER button ⏻ 18 to switch the unit on.
■ Press the MODE button Ⓜ20 repeatedly until the "COOL" indicator lamp lights up. This lights up permanently during operation.
■Thedisplay 2 now shows the preset / last set temperature.
- You can now set the desired temperature using the plus button +22 and minus button -21 (temperature range: 16 °C - 31 °C).
Use the temperature unit 26 ℃→℉ button to change the temperature unit from degrees Celsius to degrees Fahrenheit.
By pressing the SPEED button 23 you can set the desired air speed. Here you can choose between HIGH and LOW.
■ The current setting is indicated by a lit indicator lamp.
To switch off the unit, press the POWER on/off button ⏻18, the display 2 remains lit.
4.1.2 Dehumidification mode
Note: In dehumidification mode, you can remove the hot air outlet hose 14 from the appliance.
■PressthePOWER button to switch the unit on.
Press the MODE button M 20 repeatedly until the "DRY" indicator light and "dh" on the display 2 light up. The control lamp and the display 2 light up permanently during operation.
The temperature cannot be set manually in this mode. The fan speed is automatically set to low (LOW) and displayed in the fan speed indicator. The fan speed cannot be set manually in this mode.
To switch off the unit, press the POWER on/off button ⏻ 18, the display 2 remains lit.
4.1.3 Ventilation mode
Note: In ventilation mode, you can remove the hot air outlet hose 14 from the appliance.
Press the POWER button ⏻ 18 to switch the unit on.
- Press the MODE button M 20 repeatedly until the "FAN" indicator light and "FA" on the display 2 light up. The control lamp and the display 2 light up permanently during operation.
The temperature cannot be set manually in this be set manually in this mode.
Press the SPEED button ⚙23 to set the desired air speed. The LED of the set air speed HIGH or LOW lights up.
To switch off the unit, press the POWER on/off button ⏻ 18, the display 2 remains lit.
4.1.4 Sleep mode
Note: The sleep function is only possible in cooling mode.
In cooling mode, press the SLEEP button to switch on sleep mode.
■ The fan automatically reduces the speed.
Sleep mode is activated for two hours and the set temperature automatically increases by one degree per hour. The target temperature remains unchanged even after the increase of two degrees. The appliance continues to run.
The appliance is energy-saving and quiet.
4.2 Timer setting
With the timer function, a switch-off time can be selected in hour increments (1-24). The unit then switches off automatically.
Press the TIMER button ☒ 24 when the appliance is switched on. The display 2 flashes.
Press the plus button + 22 to increase the timer by 1 hour.
Press the minus button ⏻ 21 to decrease the timer by 1 hour.
- Wait approx. 5 seconds. The entry is automatically accepted.
If a timer has been set that you want to cancel, press the TIMER button ⏻ 24 twice. The display 2 goes out.
4.3 Adjust air flow
You can adjust the airflow manually by moving the vents 3 at the front air outlet 4 up or down.
4.4 Oscillation function
Press the SWING button ⚙️25 when the unit is switched on to switch the oscillation of the unit on or off. If it is activated successfully, the control lamp lights up. The oscillation function causes the discharged air to be distributed from left to right.

4.5 Range of use of the remote control
When controlling with the remote control, please be sure to observe the range of use of the device shown below. To ensure that the unit responds to a button press on the remote control, make sure that the remote control is within the range of use shown when a button is pressed. Depending on the distance to the unit, the angle of use and radius change, resulting in the respective area of use. The most favourable positioning of the remote control in relation to the unit is in the centre at the height of the display 2.
Note: If there are objects, walls or other obstacles between the unit and the remote control, the control of the unit with the remote control may be obstructed.
4.6 Empty water tank
Note:
If the room temperature is low and the humidity is high, the product may not be able to evaporate the moisture quickly enough. In this case, water collects in the water tank.
If the product is in dehumidification mode "dh", it extracts moisture from the room air. Consequently, water accumulates in the water tank. When the water tank is full, the "FULL" indicator light lights up and the product stops operating.
Follow the steps below to empty the water tank:
Switch off the unit and disconnect the mains plug from the socket.
■ Remove the hose connector 13 from the rear air outlet 9 and remove the hot air outlet hose 14 from the appliance.
To empty the water tank, use a shallow bowl that can hold more than 0.5 l of water.
Rotate the drain plug 7 (as well as the inner plug underneath) out of the opening and let the water drain off.
- Rotate the drain plug 7 (and the inner plug underneath) properly back into the opening.
The product can now resume operation after the mains plug has been reconnected and the hot air outlet hose 14 has been refitted.
4.6.1 Use permanent water drainage
If the product is mainly operated in dehumidification mode, it is possible to let the water drain off continuously and thus empty the water tank automatically.
- Switch off the unit and disconnect the mains plug from the socket.
■ Rotate the drain plug 10 (and the inner plug underneath) out of the opening and let the water drain off.
Now connect a suitable drain hose (not included in the scope of delivery) to the opening. - Place the open end of the drain hose in a suitable collection vessel or drain.
Note: Make sure that the drain hose leads as directly as possible to the drain without kinks or knots. In this way, the water produced during the dehumidification process is automatically directed to the drain.
5. Protective function
5.1 Overflow protection function
When the water in the water tray exceeds the warning level, an alarm sounds automatically and the "FULL" indicator flashes. At this point, you must move the drain pipe connecting the machine or the water outlet to a drain pipe or other drain area to empty the water. After the water has been emptied, the machine automatically returns to its original state.
5.2 Protective function of the compressor
To prolong the compressor's life, it has a protection function with a 3-minute start delay after the compressor has been switched off.
6. Troubleshooting
| Fault Possible cause(s) Solution | ||
| The air conditioner does not work. | No or too low voltage. Make sure that the mains plug mains plug is inserted in the socket. Check the fuse and replace it if necessary. Check the mains voltage. | |
| Water tank is full. Empty the water tank. | ||
| The ambient temperature is too high or too low. | It is recommended to use the unit at a temperature of 7 to 35 °C (44 to 95 °F). | |
| In cooling mode, the room temperature is lower than the set temperature. | Change the set temperature. | |
| Air intake or air outlet is blocked. Remove blockage. | ||
| The product does not cool sufficiently. | Doors and windows are not properly closed. | Close doors and windows. |
| The hot air outlet hose14is not connected or is blocked. | Connect or clean the hot air outlet hose14. | |
| The temperature setting is too high. Adjust the temperature setting. | ||
| The air filter12is dirty. Clean or replace the air filter12. | ||
| The unit is very loud. The unit is not standing on a flat surface. | Place the appliance on a flat and hard surface. | |
| The compressor does not work. | The overheating protection is activated. | Wait 3 minutes until the temperature has dropped and then restart the appliance. |
| The remote control does not work. | The distance between the unit and the remote control is too great. | Hold the remote control near the air conditioner. Make sure that the remote control is pointed directly at the remote control receiver. |
| The remote control is not pointed at the receiver. | ||
| Batteries are empty. Replace batteries. | ||
| Error code E1 Malfunction of the room temperature sensor. | Contact the service hotline. | |
| Error code E2 Malfunction of the pipe temperature sensor. | Contact the service hotline. | |
7. Maintenance, cleaning and storage
RISK OF ELECTRIC SHOCK!
Improper handling of the product may result in electric shock.
■ Always disconnect the mains plug when the appliance is not in use and before any cleaning or in case of malfunctions!
■ Never immerse the unit in water or other liquids.
■ Make sure that no water or other liquids get into the housing.
■ CAUTION! RISK OF DAMAGE!
Improper handling of the product may result in damage to the product.
Do not use aggressive cleaning agents, brushes with metal or nylon bristles or sharp or metallic cleaning objects such as knives, hard spatulas and the like. These can damage the surfaces.
- Clean the housing and the remote control with a soft, dry cloth.
■ Always store the unit in a dry place.
■ Protect the unit from direct sunlight.
■ Store the product out of reach of children.
■ Empty the water tank as described in "Chapter 4.6".
7.1 Clean air filter
- Clean the air filter 12 every 2 weeks or when it is visibly dirty.
■ Disconnect the mains plug before cleaning.
■ Empty the water tank completely as described in "Chapter 4.6".
■ Wipe the unit with a slightly damp cloth. Allow all parts to dry completely afterwards.
■ Loosen the screw and pull the air filter 12 out of the housing. - Clean it with lukewarm water (max. 40 °C) and some neutral cleaner and let it air dry completely (without direct sunlight).
- Insert the air filter 12 into the housing and re-tighten the screw.
8. Disposal
The packaging is made of environmentally friendly materials that you can dispose of at your local recycling centres.

These logos are only valid for Spain.

The Triman logo is valid in France only.
This product is subject to the European Directive 2012/19/EU. Do not dispose of the product in household waste, but via municipal collection points for material recycling! Further information on how to dispose of the discarded device can be obtained from your local authority or city council.

Batteries must be recycled in accordance with Directive 2006/66/EC and may not be disposed of with domestic waste. Each consumer is legally obliged to return all batteries/rechargeable batteries to a collection point in his municipality/district or to the trade. This duty serves to ensure that batteries/rechargeable batteries can be directed to environmentally friendly disposal. Only return batteries/rechargeable batteries which are not charged. Batteries must be removed from the appliance prior to disposal.
Observe the labelling of the packaging materials when separating waste; these are marked with abbreviations (a) and numbers (b) with the following meaning: 1-7: Plastics/20-22: Paper and cardboard/80-98: Composites.
9. ROWI Germany GmbH Warranty
Dear Customer,
This appliance has a 3-year warranty valid from the date of purchase. If this product has any faults, you, the buyer, have certain statutory rights. Your statutory rights are not restricted in any way by the warranty described below.
Warranty conditions
The validity period of the warranty starts from the date of purchase. Please keep your original receipt in a safe place. This document will be required as proof of purchase.
If any material or production fault occurs within three years of the date of purchase of the product, we will either repair or replace the product for you or refund the purchase price at our discretion. This warranty service is dependent on you presenting the defective appliance and the proof of purchase (receipt) and a short written description of the fault and its time of occurrence.
If the defect is covered by the warranty, your product will either be repaired or replaced by us. The repair or replacement of a product does not signify the beginning of a new warranty period.
Warranty period and statutory claims for defects
The warranty period is not prolonged by repairs effected under the warranty. This also applies to replaced and repaired components. Any damage and defects present at the time of purchase must be reported immediately after unpacking. Repairs carried out after expiry of the warranty period shall be subject to a fee.
Scope of the warranty
This appliance has been manufactured in accordance with strict quality guidelines and inspected meticulously prior to delivery.
The warranty covers material faults or production faults. The warranty does not extend to product parts subject to normal wear and tear or fragile parts such as switches, batteries or those made of glass.
The warranty does not apply if the product has been damaged, improperly used or improperly maintained. The directions in the operating instructions for the product regarding proper use of the product are to be strictly followed. Uses and actions that are discouraged in the operating instructions or which are warned against must be avoided.
This product is intended solely for private use and not for commercial purposes. The warranty shall be deemed void in cases of misuse or improper handling, use of force and modifications/repairs which have not been carried out by one of our authorised Service centres.
Warranty claim procedure
To ensure quick processing of your case, please observe the following instructions:
Please have the till receipt and the item number (IAN 472089_2407) available as proof of purchase.
You will find the item number on the type plate on the product, on the front page of the instructions (bottom left), or as a sticker on the rear or bottom of the appliance.
If functional or other defects occur, please contact the service department listed either by telephone or by e-mail.
You can return a defective product to us free of charge to the service address that will be provided to you. Ensure that you enclose the proof of purchase (till receipt) and information about what the defect is and when it occurred.
At www.lidl-service.com you can download this manual as well as many other manuals, product videos and installation software. This QR code will take you directly to the Lidl service page (www.lidl-service.com) and allow you to open your operating instructions simply by entering the article number (IAN 472089_2407).
10. Service
If any problems occur during use of your ROWI Germany product, please proceed as follows:
Contact us
You can contact the service team of ROWI Germany at:
ROWI Germany GmbH
(free call from a German landline)
IAN 472089_2407
Most problems can be resolved with the skilled technical support of our Service Team.
Wassertanks: ca. 0,5 l
WAARSCHUWING! BRANDGEVAAR!
WAARSCHUWING! RISICO OP LETSEL!
WAARSCHUWING! GEVAREN DOOR KOELMIDDEL!
ID No.: SMK 7000 B2-112024-LB08-02