STLKS 12 A1 - Air-conditioner SILVERCREST - Free user manual and instructions
Find the device manual for free STLKS 12 A1 SILVERCREST in PDF.
| Product Type | Evaporative air cooler with mist function |
| Brand | SilverCrest |
| Model | STLKS 12 A1 |
| Power Supply | Mains adapter: 100-240 V~, 50/60 Hz, 0.4 A; Output: 12.0 V ⎓, 1.0 A |
| Power Consumption | 12.0 W (max); standby: 0.312 W |
| Water Tank Capacity | 450 ml (max) |
| Maximum Airflow | 2.45 m³/min |
| Noise Level | 56 dB(A) |
| Fan Speeds | 3 levels (low, medium, high) |
| Functions | Mist, oscillation (left-right rotation), LED lighting with 7 colors + gradient, timer (1 to 6 h) |
| Water Evaporation | 70 ml/h |
| Filter | Replacement recommended every 6 months |
| Maintenance | Clean tank every 3 days; use hot vinegar water |
| Protection Rating | IP20 (indoor use only) |
| Warranty | 3 years |
| Country of Origin | China (German brand) |
Frequently Asked Questions - STLKS 12 A1 SILVERCREST
User questions about STLKS 12 A1 SILVERCREST
0 question about this device. Answer the ones you know or ask your own.
Ask a new question about this device
Download the instructions for your Air-conditioner in PDF format for free! Find your manual STLKS 12 A1 - SILVERCREST and take your electronic device back in hand. On this page are published all the documents necessary for the use of your device. STLKS 12 A1 by SILVERCREST.
USER MANUAL STLKS 12 A1 SILVERCREST
natural_image
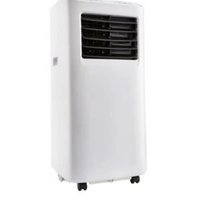
White industrial air conditioner unit with digital display and control panel (no visible text or symbols)TISCHLUFTKÜHLER MIT SPRÜHNEBELFUNKTION STLKS 12 A1 MINI AIR COOLER WITH MIST FUNCTION STLKS 12 A1 RAFRAÎCHISSEUR D'AIR DE TABLE AVEC FONCTION BRUMISATEUR STLKS 12 A1
GB Operating instructions
MINI AIR COOLER WITH MIST FUNCTION
For EU market: Imported for GB market by:
HOYER Handel GmbH Lidl Great Britain Ltd
Tasköprüstraße 3 Lidl House · 14 Kingston Road
22761 Hamburg Surbiton - KTS 9NU
GERMANY
Stand der Informationen - Status of information - Version des informations - Stand van de informatie Stan informacji - Stay informaci - Stay informacii - Estado de las informaciones - Informationernes stand:
12/2021 ID: STLKS 12 A1 21 V1.5
IAN 393753_2107 IAN 393753_2107

Deutsch.... 2
English.... 18
Français 34
Nederlands.... 54
Polski 70
Česky 86
Slovenčina 102
Español.... 118
Dansk 134
Übersicht / Overview / Aperçu de l'appareil / Overzicht / Przegląd / Přehled / Prehlad / Vista general / Oversigt
natural_image
Isometric view of a 3D mechanical housing or enclosure with internal geometric patterns (no text or symbols)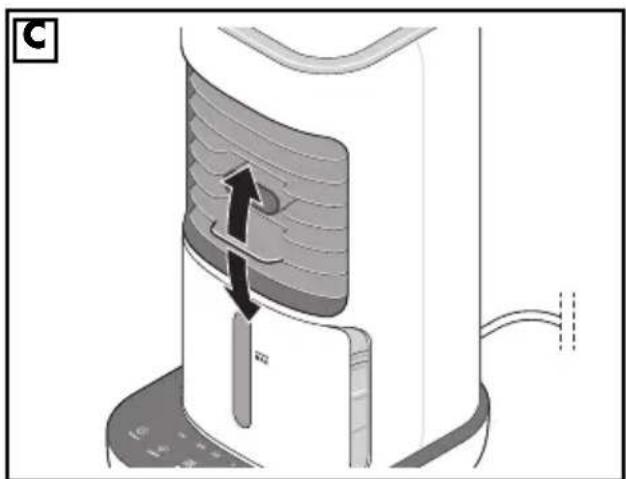
natural_image
Diagram of a device with a curved arrow indicating motion or force, showing internal layered structure (no text or symbols)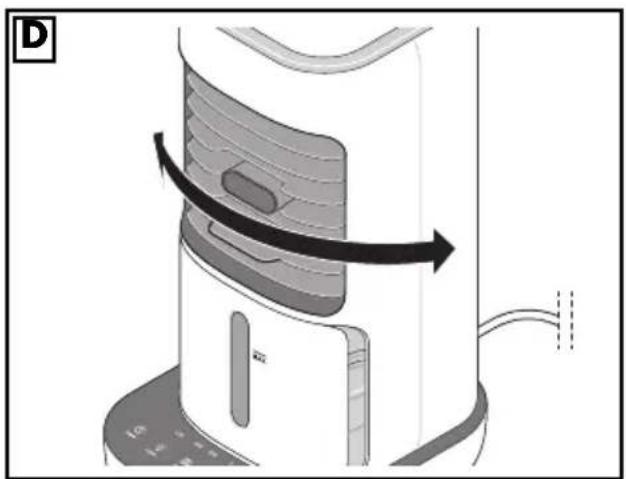
natural_image
Diagram of a device with a curved arrow indicating motion or force, showing internal components and a control panel (no text or symbols)Inhalt
natural_image
Mechanical component diagram showing a downward arrow indicating force or direction (no text or symbols present)natural_image
Diagram of a cylindrical mechanical component with an arrow indicating upward motion (no text or symbols)natural_image
Mechanical component diagram showing a piston-like shaft inserted into a housing with a curved arrow indicating force or motion (no text or symbols)- Overview 19
- Intended purpose 20
- Safety information 20
- Items supplied 23
- Operation 23
5.1 Transporting the device.... 23
5.2 Setting up the device 24
5.3 Connecting the device 24
5.4 Filling the water tank 24
5.5 Switching the device on/off 24
5.6 Regulating the air flow.... 25
5.7 Swivel function 25
5.8 Misting function 25
5.9 Switching on the light and selecting the colour.... 25
5.10 Timer function.... 26
- Cleaning and care 26
6.1 Cleaning the water tank.... 26
6.2 Replacing the filter 26
6.3 Housing.... 27
- Trouble-shooting 28
- Disposal 28
- Ordering accessories 28
- Technical specifications 29
- Warranty of the HOYER Handel GmbH 31
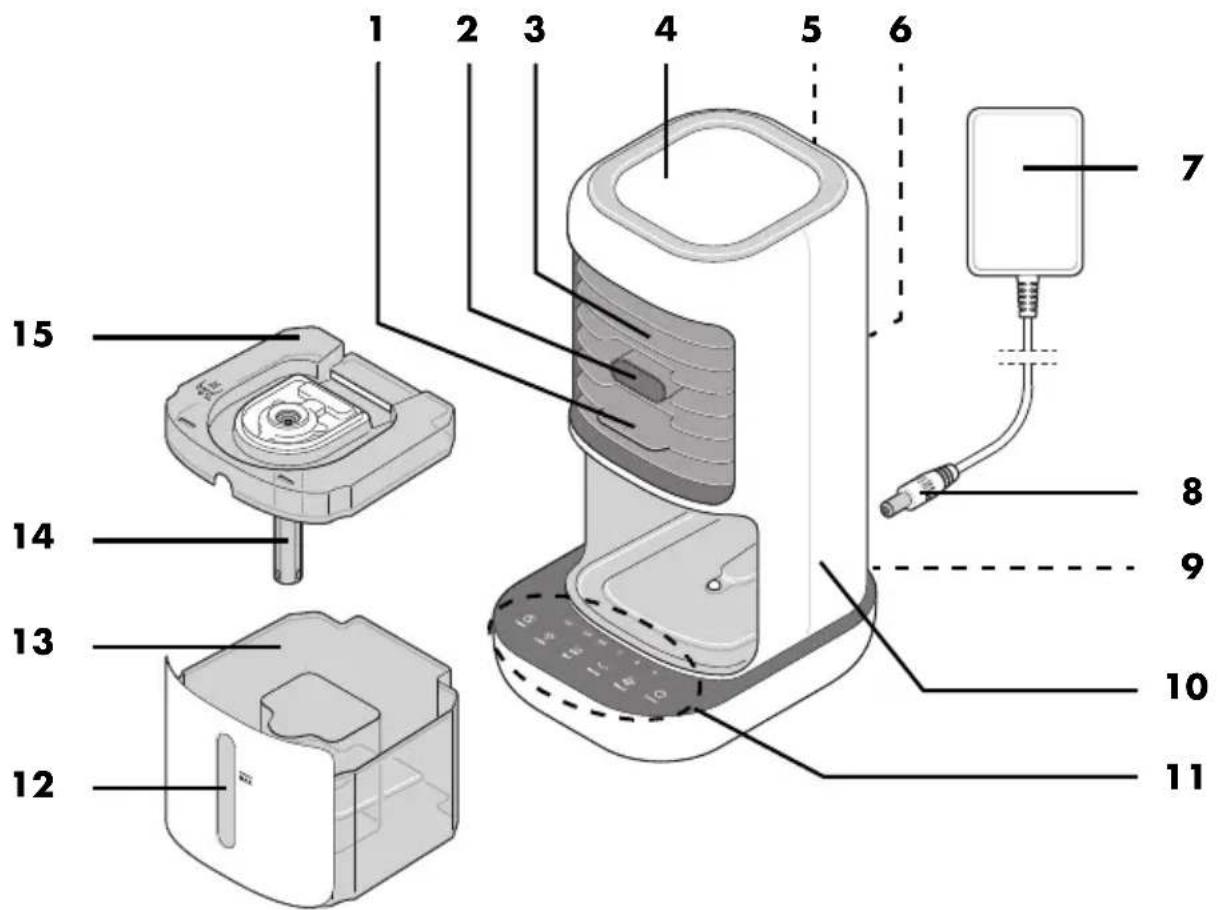
1. Overview
1 Handle (for tilting the protective grid)
2 Mist outlet
3 Front protective grid (pivoting, air outlet)
4 LED / mood light
5 Recess for carrying
6 Rear protective grid (air inlet)
7 Mains power cable with power supply unit
8 Jack plug (of the mains power cable)
9 Jack socket (for the mains power cable)
10 Desktop air cooler / device
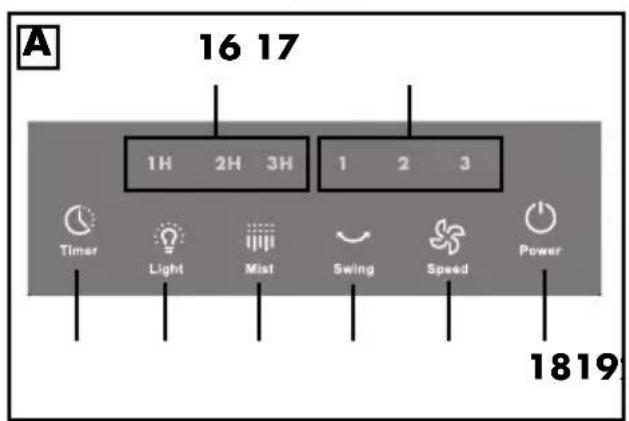
11 Operating panel
12 Viewing window for the water level
13 Water tank
14 Filter holder
15 Lid (of the water tank)
16 1H/2H/3H Timer function display (sum of LEDs: 1 - 6 hours)
17 1/2/3 Speed setting display
18 ⏻ Power On/Off switch
19 ✿ Speed Speed control:
speed 1 (low) / speed 2 (medium) / speed 3 (high)
20 Swing Switches the swivel function on/off
21 Mist Switches the misting function on/off
22 Light Light and colour selector switch: on / colour change / off
23 Timer Timer function: switch on (1 hour) / extend by 1 hour with each press of the button up to max. 6 hours / switch off
Thank you for placing your trust in our products!
Congratulations on your new desktop air cooler with misting function.
For safe handling of the device and in order to get to know the entire range of features:
- Read these user instructions thoroughly prior to initial use.
- Above all, observe the safety information!
- The device should only be used as described in this copy of the user instructions.
- Keep this copy of the user instructions for reference.
- If you pass the device on to someone else, please include this copy of the user instructions. The user instructions are a component of the device.
We hope you enjoy your new desktop air cooler with misting function!
Symbols on your device
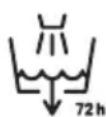
This symbol indicates that after 72 hours (3 days) at the latest, the water tank must be emptied, cleaned and refilled with fresh water to avoid health risks.
2. Intended purpose
The desktop air cooler with misting function is suitable for circulating and cooling air in dry indoor areas.
The device is designed for private, domestic use. The device must only be used indoors. The device is not suitable for use in environments where fine dusts, chemicals, solvents, etc. are present in the ambient air.
This device must not be used for commercial purposes.
3. Safety information
Warnings
If necessary, the following warnings are used in this copy of the user instructions:

DANGER! High risk: failure to observe this warning may result in injury to life and limb.
WARNING! Moderate risk: failure to observe this warning may result in injury or serious material damage.
CAUTION: low risk: ignoring this warning may result in minor injuries or damage to property.
NOTE: circumstances and specifics that must be observed when handling the device.
Instructions for safe operation
- This device can be used by children from the age of 8 and people with restricted physical, sensory or intellectual abilities or a lack of experience or knowledge if they are supervised or have been instructed in how to use this device safely and if they have understood the resulting dangers. Children must not play with the device. Cleaning and maintenance by the user must not be performed by children without supervision.
- The device may only be used with the supplied power supply unit (see "Technical specifications").
If the power supply unit or the mains power cable is damaged, a new power adapter must be reordered from the Service Center to avoid hazards (see "Ordering accessories").
- This device is not intended to be operated using an external timer or a separate remote control system.
- Make sure that the fan is disconnected from the power supply before removing the protective device.
- Note that increased humidity encourages the growth of mould (and other micro-organisms).
- Make sure that the area around the device does not become damp or wet. If moisture occurs, switch off the Mist function more often or operate the device more often without water. Absorbent materials such as carpets, curtains, drapes or tablecloths must not get wet.
- Unplug the power supply unit before filling the water tank and before cleaning.
- Empty the water tank when you are not using the device.
- Empty the water tank and clean the device before storing it. Clean the device before the next time you use it.
- WARNING: microorganisms that may be in the water or in the environment where the device is used or stored can grow in the water tank and be blown into the air. If the water is not renewed and the tank is not properly cleaned every 3 days, it may lead to serious health risks.
- After 3 days at the latest, the water tank must be emptied, cleaned and, if necessary, filled with fresh water to avoid health risks due to
microorganisms. When cleaning, any build-up, deposits or film of dirt that has formed on the surfaces of the tank or internal surfaces must be removed. All surfaces must be wiped dry.
- Please observe chapters "Filling the water tank" and "Cleaning and care".

DANGER for children!
- Packing materials are not children's toys. Children should not be allowed to play with the plastic bags. There is a risk of suffocation.
- Keep the device out of the reach of children.

DANGER to and from pets and livestock!
Electrical devices can represent a danger to pets and livestock. In addition, animals can also cause damage to the device. For this reason you should keep animals away from electrical devices at all times.

DANGER! Risk of electric shock due to moisture!
- The device, the mains power cable and the power supply unit must not be immersed in water or other liquids.
- Protect the device from moisture, water drops and water splashes: failure to observe this instruction may result in an electric shock hazard.
- If liquid gets into the device, immediately disconnect the power supply unit. Have the device checked before reusing.
- Never touch the device with wet hands.
- If the device has fallen into water, pull out the power supply unit immediately, and only then remove the device from the water. Do not use the device again, and have it checked by a specialist workshop.
-
Unplug the power supply unit before filling the water tank and before cleaning.
-
Fill the water tank at most up to the MAX marking. Dry the outside of the water tank before inserting it back into the device.
- Carefully insert the filled water tank into the device while ensuring that no water splashes out.
- Move the device carefully with the filled water tank inserted.

DANGER! Risk of electric shock!
- Do not operate the device if there is visible damage to the device, the power supply unit or the mains power cable, or if the device has previously been dropped.
- Only connect the power supply unit to a properly installed and easily accessible wall socket, whose voltage corresponds to the specifications on the rating plate. The wall socket must still be easily accessible after the device is plugged in.
- Ensure that the mains power cable cannot be damaged by sharp edges or hot points.
- When using the device, ensure that the mains power cable cannot be trapped or crushed.
- Even after it has been switched off, the device is not completely disconnected from the mains power supply. In order to fully disconnect it, pull out the power supply unit.
- When removing the power supply unit from the wall socket, always pull the power unit and never the cable.
- Unplug the power supply unit from the wall socket:
- when a malfunction occurs
- when you are not using the desktop air cooler
- before you insert or pull out the water tank
- before cleaning the desktop air cooler
- during thunderstorms
- To avoid any risk, do not make modifications to the product.
WARNING! Risk of material damage!
- Never place the device on hot surfaces (e.g. hot plates) or near to heat sources or open fire.
- Only use the original accessories.
- Do not clean using sharp objects or abrasive cleaning agents.
- Ensure that the ambient air is free of dust and dirt particles so that the device does not absorb them with the air.
- Do not cover or block the two protective grids (air inlet and outlet openings). Ensure that there is sufficient clearance around the device.
- Only use the original filter. A damaged or dirty filter must be replaced. You can reorder replacement filters.
- Do not insert any objects through the rear protective grid while the fan is running.
The device is fitted with non-slip plastic feet. As furniture is coated with a wide array of varnishes and synthetics, and is also treated with different care products, it cannot be fully ruled out that some of these materials contain components that could attack and soften the non-slip plastic feet. If necessary, place a non-slip mat under the device.
NOTES on health and hygiene:
- Only use cold, fresh tap water without additives.
- When you are not using the device, be sure ...
... that the water tank is empty,
... that the inside of the device and the filter are completely dry.
This helps to avoid the formation of mould or germs.
- Replace the filter regularly.
- Do not expose small children, persons with reduced physical, sensory or mental abilities and animals to direct air flow.
4. Items supplied
1 desktop air cooler 10
1 mains power cable with power supply unit 7
1 copy of the user instructions
Unpacking
- Remove all parts from the packaging.
- Check that all accessories are present and undamaged.
5. Operation
5.1 Transporting the device
- Above the rear protective grid 6 (on the rear of the device) there is a recess for carrying 5 the device.
- When the water tank 13 is full, take care when moving the device 10.
5.2 Setting up the device
- Place the desktop air cooler 10 on a flat surface where the device is secure and cannot be accidentally knocked over.
- Choose a place... ... with sufficient clearance around the device 10. ... at table height (e.g. on a desk or chest of drawers) for optimum air circulation. ... near the place you want cooled.
NOTE: When selecting the location, please note that the connected device will remind you via acoustic signals to change the water after up to 72 hours. These acoustic signals occur regardless of the time of day.
5.3 Connecting the device
- Plug the power supply unit 7 into a properly installed, easily accessible mains socket whose voltage corresponds to that specified on the rating plate. The wall socket must still be easily accessible after connection.
- Insert the jack plug 8 into the jack socket 9 on the back of the device 10.
The LED 4 flashes red and several acoustic signals sound. This is a reminder that the water tank 13 must be cleaned at least every 72 hours and filled with fresh tap water before each use. When you reinsert the water tank afterwards, the LED stops flashing.
5.4 Filling the water tank
If you want to use the misting function Mist 21, fill water into the water tank 13.
You can also use the device 10 without water. It then operates as a fan without the described cooling effect.
- Pull the water tank 13 out of the device 10.
- Remove the lid 15 from the water tank 13.
- Fill the water tank 13 no higher than the MAX marking (450 ml) next to the viewing window 12. Use cold, fresh tap water without additives.
NOTE: to increase the cooling effect, you can cool the tap water in the refrigerator beforehand.
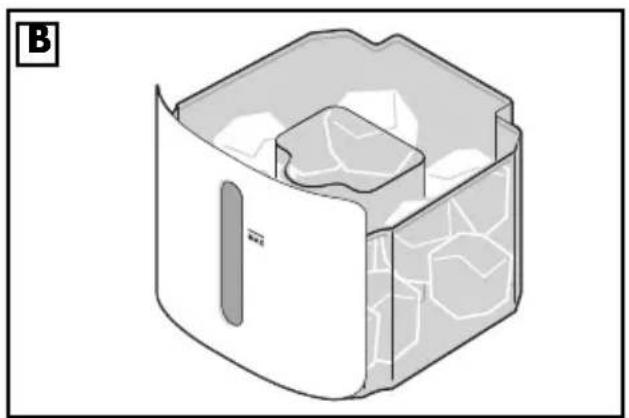
Figure B: the water tank 13 can also be filled with ice cubes in the outer section - for better cooling.
- Put the lid 15 back on the water tank 13.
- Dry the outside of the water tank 13.
- Push the water tank 13 back into the device 10. It clicks audibly.
Filling the water tank 13 to the MAX marking is sufficient for approx. 6 hours of operation with the misting function Mist 21. When the water is used up, the device reminds you to refill it by the LED 4 flashing red and sounding an acoustic signal. The device continues to run without the misting function.
5.5 Switching the device on/off
- Press the on/off switch ⏻ Power 18 for approx. 1 second to switch the device 10 on.
- An acoustic signal sounds.
- The fan starts at a low speed. The 1 on the display 17 lights up.
- Press the on/off switch ⏻ Power 18 again for approx. 1 second to switch the device 10 off again. An acoustic signal sounds.
- After each use, unplug the power supply unit 7, and empty and clean the water tank 13 if necessary.
5.6 Regulating the air flow
- With the device switched on, press the speed control ✿ Speed 19 several times in succession to switch between the 3 speed settings:
| Speed Display 17 | Speed |
| 1 low | |
| 2 medium | |
| 3 high | |
| Evaporation volume: 70 ml/h | |
An acoustic signal sounds each time the button is pressed.
• Figure C: you can influence the direction of the air flow by tilting the front protective grid 3 on the handle 1 upwards or downwards.
5.7 Swivel function
Figure D: the device has a swivel function. It causes the device to swivel back and forth, thus distributing the flowing air more evenly in the room.
- With the device switched on, switch on the swivel function by pressing the Swing 20 button. An acoustic signal sounds. The fan starts to swivel back and forth.
- Switch the swivel function off by pressing the ∼ Swing 20 button again. An acoustic signal sounds.
5.8 Misting function
With the misting function, water from the water tank 13 is finely misted and directed through the mist outlet 2. In this way, the air in the air flow is humidified.
NOTE: always make sure to clean the water tank 13 after 3 days at the latest and always use fresh tap water. If there is a bad or musty smell, be sure to clean the water tank.
- With the device switched on, press the Mist 21 button to switch on the function. An acoustic signal sounds.
- Press the Mist 21 button to switch the function off again. An acoustic signal sounds.
- The LED 4 flashes red and/or acoustic signals sound if there is no water in the water tank 13 or the water tank has been removed. Fill up the water and push the water tank into the device. Press the Mist 21 button again to restart the function.
5.9 Switching on the light and selecting the colour
- Switching on: press the light and colour selector switch Light 22 once to switch on the mood light in colour change mode. You will see smooth transitions of all available colours until it is switched off.
-
By pressing the light and colour selector switch Light 22 again, while the colour change mode is active, you can select one of seven colours (press the light and colour selector switch Light 22 again for each colour). This is then permanently displayed. If no colour appears after pressing the light and colour selector switch Light 22, the light/colour display is switched off again.
-
Press the light and colour selector switch Light 22 again to switch the mood light back on in colour change mode. An acoustic signal sounds each time the button is pressed.
5.10 Timer function
With the timer function, you can set a time after which the fan automatically switches off. You can set a time between 1 and 6 hours in 1-hour increments.
- With the device switched on, press the Ⓐ Timer 23 button repeatedly. 1 hour is added each time the button is pressed. The lit LEDs of the display 16 show the set time. Add up the times of the lit LEDs to get the set time:
- 1 H: 1 hour
- 2 H: 2 hours
- 3 H: 3 hours
Example:
The following LEDs are lit:
$$ 1 H + 3 H. $$
This means that the timer is set to:
$$ 1 + 3 \text { hours } = 4 \text { hours. } $$
- While the timer is running, the remaining time is displayed.
- After the set time has elapsed, the device switches off.
6. Cleaning and care

DANGER! Risk of electric shock!
- Always disconnect the power supply unit 7 before cleaning.
- Never immerse the device 10 in water.
- Do not let water or cleaning agent run into the device 10.
WARNING! Risk of material damage!
- Do not clean using sharp objects or abrasive cleaning agents.
NOTES:
- To ensure that your device 10 always functions hygienically, clean the water tank 13 regularly (after 72 hours at the
latest) and replace the filter in a timely manner. Also ensure that all accessories are dry and clean when the device 10 is not in use.
• After 72 hours at the latest, the device 10 reminds you to clean the water tank 13 by the LED 4 flashing red and sounding an acoustic signal.
6.1 Cleaning the water tank
• After each use, rinse the water tank 13 thoroughly with tap water.
• After 3 days (72 hours) at the latest, rinse the water tank 13 with warm vinegar water. Then rinse thoroughly with clear tap water.
• Dry the outside of the water tank 13.
- If you do not immediately use the device 10 again, allow the water tank 13 and the filter to dry completely.
6.2 Replacing the filter
Every 6 months or so you should replace the filter with a new one. You can reorder new filters (see "Ordering accessories" on page 28).
- Check the filter regularly for damage, dirt or odours. A damaged, dirty or unpleasant smelling filter must be replaced.
NOTE: the misting function Mist 21 does not work without the filter inserted.
-
Pull the water tank 13 out of the device 10.
-
Remove the lid 15 from the water tank 13.
-
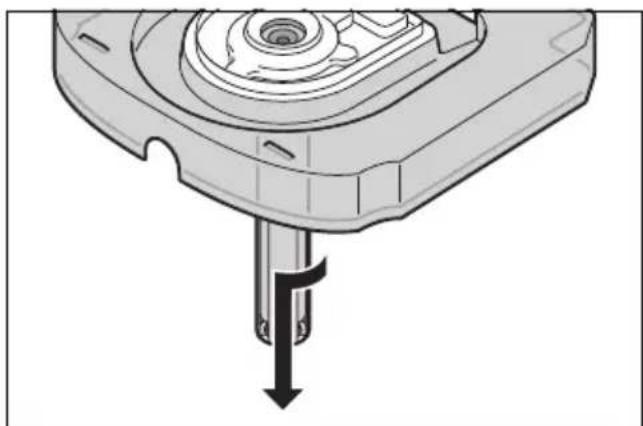
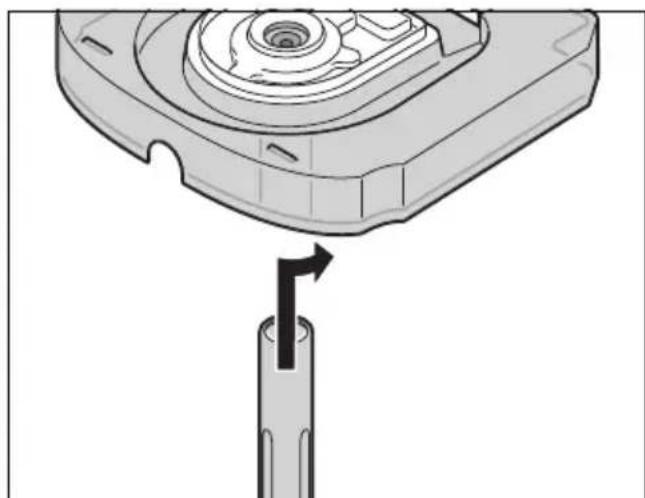
Remove the filter holder 14 from the lid 15 by turning it slightly downwards (as shown).
natural_image
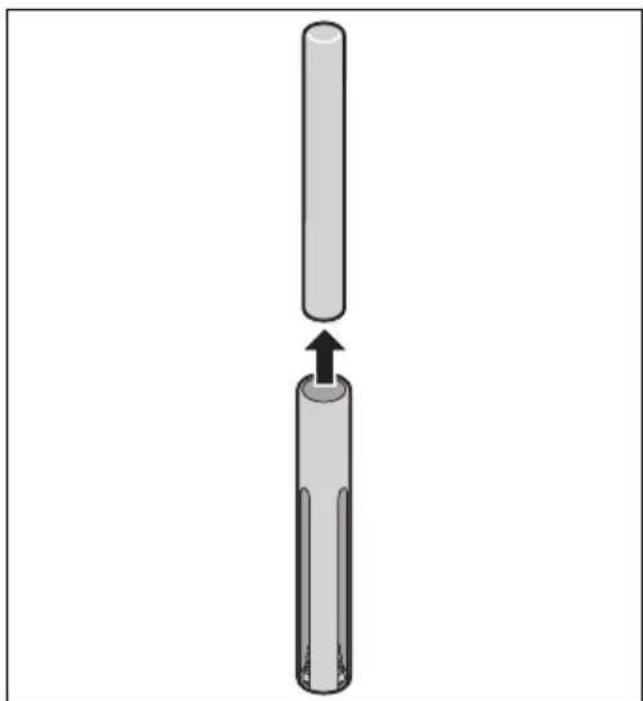
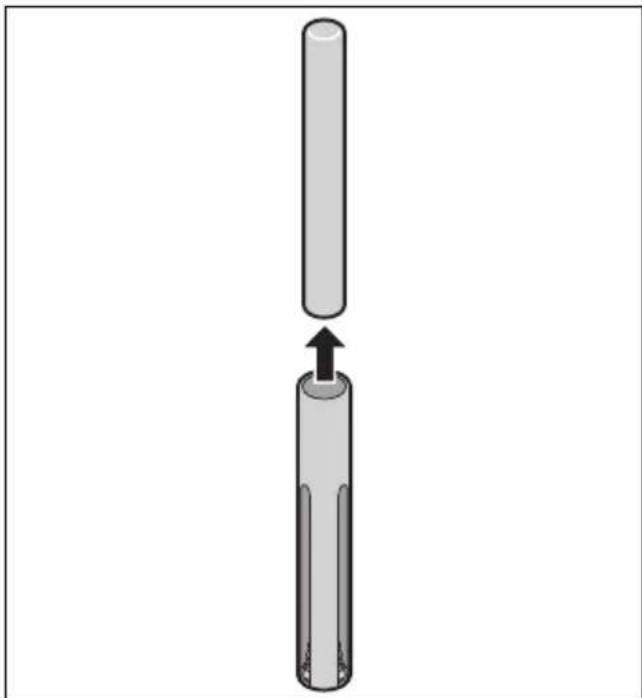
Mechanical component diagram showing a shaft inserted into a housing (no text or symbols visible)- Pull the filter upwards out of the filter holder 14 and dispose of it.
natural_image
Diagram of a cylindrical object with an arrow indicating upward movement, no text or symbols present-
Place the new filter in the filter holder 14.
-
Place the filter holder 14 under the lid 15 from below and turn it (as shown) until it is firmly seated.
natural_image
Mechanical component diagram showing a piston-like shaft inserted into a housing with a curved arrow indicating force or motion (no text or symbols present)-
Put the lid 15 back on the water tank 13.
-
Push the water tank 13 back into the device 10. It clicks audibly.
6.3 Housing
-
Clean the housing from time to time with a damp cloth using a small amount of detergent.
-
Dry with a soft cloth.
7. Trouble-shooting
If your device fails to function as required, please try this checklist first. Perhaps there is only a minor problem, and you can solve it yourself.

DANGER! Risk of electric shock!
- Do not attempt to repair the device yourself under any circumstances.
| Problem | Possible causes/ Troubleshooting |
| No function | - Has the device been connected to the power supply?- Check the connection. |
| Bad, musty smell | - Clean the water tank 13.- Always use fresh tap water. |
8. Disposal
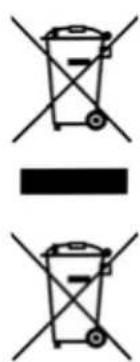
This product is subject to the provisions of European Directive 2012/19/EC. The symbol showing a wheelie bin crossed through indicates that the product requires separate refuse collection in the European Union. This applies to the product and all accessories marked with this symbol. Products identified with this symbol may not be discarded with normal household waste, but must be taken to a collection point for recycling electric and electronic appliances.
This recycling symbol marks e.g. an object or parts of the material as valuable for recycling. Recycling helps to reduce the consumption of raw materials and protect the env

Packaging
When disposing of the packaging, make sure you comply with the environmental regulations applicable in your country.
9. Ordering accessories
On our website you will find information on which accessories can be reordered.
Ordering online
shop.hoyerhandel.com

- Scan the QR code with your Smartphone/Tablet.
- The QR code will take you to a website where you can place the reorder.
10. Technical specifications
| Model: STLKS 12 A1 | |
| Desktop air cooler: Input:12.0 V =±0 A | |
| Power adapter:Dong Guan Qiangde Electronics Technology Co., Ltd.(MODEL AC05-1201000EU-Z)Protection class:Protection type: | Input:100 - 240 V ~50 - 60 Hz; 0.4 AOutput:12.0 V =±0 A12.0 WIIIP20 |
| Filling volume of the water tank: max. | 450 ml |
| Evaporation volume: | 70 ml/h |
| Operating temperature: +5 °C to | +40 °C |
Power adapter
| Published data | Value and accuracy | Unit |
| Dong Guan Qiangde Electronics Technology Co., Ltd.;91441900065116354D;143-2 B, Zhuoye, Puxinhu Commercial Street, Tangxia Town, Dongguan, Guangdong, CHINA | - | - |
| Model identification:AC05-1201000EU-Z / AC05-1201000UK-Z | - | - |
| Input voltage 100 - | 240 | V |
| Input AC frequency 50 - 60 Hz |
| Published data | Value and accuracy | Unit |
| Output voltage 12.0 V | ||
| Output current 1.0 A | ||
| Output power | 12.0 | W |
| Average efficiency in operation | 83.0 | % |
| Efficiency at low load (10 %) | 78.0 | % |
| Power consumption at no load | 0.08 | W |
Mandatory specifications for electrical fans
| Designation | Symbol | Value | Unit |
| Maximum volume flow | F | 2.45 | m^3/min |
| Fan power consumption | P | 3.99 | W |
| Service value | SV 0.61 | (m^3/min)/W | |
| Power consumption in standby mode | P_SB | 0.312 | W |
| Fan sound power level | L_WA | 56 | dB(A) |
| Maximum speed | c | 1.61 | m/s |
| Measurement standard for service value | IEC 60879:2019 | ||
Symbols used
 | Safety isolating transformer short circuit proof |
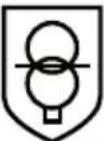
| Double insulation | |
| Geprüfte Sicherheit (certified safety): devices must comply with the generally acknowledged rules of technology and the German Product Safety Act (Produkt-sicherheitsgesetz - ProdSG). (Not for UK) | |
| CE | With the CE marking, HOYER Handel GmbH declares the conformity with EU guidelines. |
| Devices with this symbol may only be operated indoors (dry environment). | |
| Switched-mode power supply | |
| This symbol reminds you to dispose of the packaging in an environmentally friendly manner. | |
| Recyclable materials are marked with the recycling symbol (3 arrows). The material can be specified by the recycling number in the centre (here: 21) and/or an abbreviation (here: PAP). | |
| Direct current | |
| AC voltage |
| Symbol for polarity | |
 | It is a recyclable product which is subject to an extended producer responsibility and for which the rules of waste separation apply. |
 | Note that the power unit may not be used if the contact pins of the plug are damaged. |
Subject to technical modifications.
11. Warranty of the HOYER Handel GmbH
Dear Customer,
your device is provided with a 3 year warranty starting with the purchase date. In the event of product defects, you are entitled to statutory rights against the vendor. These statutory rights are not restricted by our warranty presented in the following.
Warranty conditions
The warranty period starts with the purchase date. Please keep the original purchase receipt in a safe place. This document is required to verify the purchase.
If within three years from the purchase date of this product a material or factory defect occurs, the product will be repaired or replaced by us – at our discretion – free of charge to you, or the purchase price will be refunded. This warranty implies that within the period of three years the defective device and the purchase receipt are presented, including a brief written description of the defect and the time it occurred.
If the defect is covered by our warranty, the repaired or a new product will be returned to you. No new warranty period starts with a repair or replacement of the product.
Warranty period and statutory claims for defects
The warranty period is not extended when the warranty has been claimed. This also applies to replaced and repaired parts. Any damages and defects already existing at the time of purchase must be reported immediately upon unpacking. Repairs arising after the expiration of the warranty period are subject to a charge.
Warranty coverage
The device was produced carefully according to strict quality guidelines and tested diligently prior to delivery. The warranty applies to material or factory defects.
Excluded from the warranty are wear parts subject to normal wear and damages to fragile parts, e.g. switches, lamps or other parts manufactured from glass.
This warranty expires if the product is damaged, not used as intended or not serviced. For the proper operation of the product, all instructions listed in the operating instructions must be observed carefully. Any form of use and handling that is advised against in the operating instructions or warned against must always be avoided.
The product is only intended for private and not for commercial use. In the case of incorrect and improper treatment, use of force and interventions not performed by our authorised Service Centre, the warranty shall cease.
Handling in case of a warranty claim
In order to ensure prompt processing of your matter, please observe the following notes:
- Please keep the article number IAN: 393753_2107 and the purchase receipt as a purchase verification for all inquiries.
- The article number can be found on the rating plate, an engraving, the title page of your instructions (in the bottom left), or as a label on the rear or underside of the device.
- If faulty operation or other defects occur, first contact the Service Centre listed in the following by telephone or email.
- Then, you are able to send a product reported as defective free of charge to the service address specified to you, including the purchase receipt and the information on the defect and when it occurred.
At www.lidl-service.com you can download this and many other manuals, product videos and installation software.

This QR code takes you directly to the Lidl Service website (www.lidl-service.com), where you can enter the article number (IAN)
393753_2107 to open your user instructions.

Service Centre
GB Service Great Britain
Tel.: 0800 404 7657
E-Mail: hoyer@lidl.co.uk
IE Service Ireland
Tel.: 1890 930 034
(0,08 EUR/Min., (peak))
(0,06 EUR/Min., (off peak))
E-Mail: hoyer@lidl.ie
MT Service Malta
Tel.: 80062230
E-Mail: hoyer@lidl.com.mt
CY Service Cyprus
Tel.: 8009 4409
E-Mail: hoyer@lidl.com.cy
IAN: 393753_2107
Supplier
Please note that the following address is no service address. First contact the aforementioned Service Centre.
HOYER Handel GmbH
Tasköprüstraße 3
22761 Hamburg
GERMANY
Sommaire
natural_image
Mechanical component diagram showing a downward arrow indicating force or direction (no text or symbols present)natural_image
Diagram of a cylindrical mechanical component with an arrow indicating upward motion (no text or symbols)natural_image
Mechanical component diagram showing a piston-like shaft inserted into a housing with a curved arrow indicating force or motion (no text or symbols present)

Emballage
natural_image
Mechanical component diagram showing a water reservoir with a downward arrow indicating flow or movement (no text or symbols)natural_image
Diagram of a cylindrical mechanical component with an arrow indicating upward motion (no text or symbols)natural_image
Mechanical component diagram showing a piston-like shaft inserted into a housing with a curved arrow indicating force or motion (no text or symbols present)shop.hoyerhandel.com

natural_image
Mechanical component diagram showing a downward arrow indicating force or direction (no text or symbols present)natural_image
Diagram of a cylindrical mechanical component with an arrow indicating upward motion (no text or symbols)natural_image
Mechanical component diagram showing a piston inserted into a housing with an arrow indicating force direction (no text or symbols)shop.hoyerhandel.com

natural_image
Mechanical component diagram showing a shaft inserted into a housing (no text or symbols visible)natural_image
Diagram of a cylindrical mechanical component with an arrow indicating upward motion (no text or symbols)natural_image
Mechanical component diagram showing a mechanical assembly with a pin inserted, no text or symbols presentshop.hoyerhandel.com

natural_image
Mechanical component diagram showing a downward arrow indicating force or direction (no text or symbols present)- Filter vytiahnite nahor z držiaka filtra 14 a zlikvidujte ho.
natural_image
Diagram of a cylindrical mechanical component with an arrow indicating upward motion (no text or symbols)natural_image
Mechanical component diagram showing a piston-like shaft inserted into a housing with a curved arrow indicating force or motion (no text or symbols present)-
Znovu nasadte veko 15 na nádržku na vodu 13.
-
Nádržku na vodu 13 znovu zasuňte do prístroja 10. Počutelne zapadne.
6.3 Kryt
-
Kryt prístroja občas vyčistite navlhčenou handrou s malým množstvom prostriedku na umývanie.
-
Následne osušte mäkkou handrou.

Obal
shop.hoyerhandel.com

natural_image
Mechanical component diagram showing a downward arrow indicating force or direction (no text or symbols present)natural_image
Diagram of a cylindrical mechanical component with an arrow indicating upward motion (no text or symbols)natural_image
Mechanical component diagram showing a piston-like shaft inserted into a housing with a curved arrow indicating force or motion (no text or symbols present)shop.hoyerhandel.com

5.1 Transport of apparatet
natural_image
Mechanical component diagram showing a downward arrow indicating force or direction (no text or symbols present)natural_image
Diagram of a cylindrical mechanical component with an arrow indicating upward motion (no text or symbols)-
Sæt det nye filter i filterholderen 14.
-
Sæt filterholderen 14 nedefra under låget 15, og drej det (som vist), til det sidder fast.

natural_image
Mechanical component diagram showing a piston-like shaft inserted into a housing with a curved arrow indicating force or motion (no text or symbols present)shop.hoyerhandel.com