FX-AF152 - Rototiller Fuxtec - Free user manual and instructions
Find the device manual for free FX-AF152 Fuxtec in PDF.

| Product Type | Gasoline Tiller |
| Brand | FUXTEC |
| Model | FX-AF152 |
| Engine | 2-stroke engine, air-cooled |
| Displacement | 51.7 cm³ |
| Maximum power | 1.46 kW at 6500 rpm |
| Maximum engine speed | 11000 rpm |
| Fuel consumption at max power | 0.78 kg/h |
| Working width | 230 mm |
| Maximum working depth | 152 mm (6 inches) |
| Milling tool height | 70 mm |
| Number of milling tools | 2 |
| Fuel tank capacity | 0.9 L |
| Engine oil capacity | 0.6 L (40:1 mixture) |
| Weight | 14 kg |
| Guaranteed sound power level (LWA) | 93 dB(A) |
| Sound pressure level (LPA) | 81.5 dB(A) |
| Vibrations (left / right hand) | 7.92 / 7.85 m/s² |
| Fuel/oil mixture ratio | 40:1 (unleaded gasoline + synthetic 2-stroke oil) |
| Recommended spark plug | RCJ6Y |
| Main functions | Loosen and turn soil, up to 152 mm deep |
| Routine maintenance | Clean air filter, check spark plug, drain fuel for storage |
| Safety | Emergency stop, thermal protections, spark arrestor, outdoor use only |
| Spare parts and repairability | Original FUXTEC parts recommended; repairs by qualified technician |
| Warranty | 24 months from date of purchase |
Frequently Asked Questions - FX-AF152 Fuxtec
User questions about FX-AF152 Fuxtec
0 question about this device. Answer the ones you know or ask your own.
Ask a new question about this device
Download the instructions for your Rototiller in PDF format for free! Find your manual FX-AF152 - Fuxtec and take your electronic device back in hand. On this page are published all the documents necessary for the use of your device. FX-AF152 by Fuxtec.
USER MANUAL FX-AF152 Fuxtec
natural_image
Line drawing of a manual tiller machine with visible blade and bushing (no text or symbols)
natural_image
Orange icon of a person reading a book on black background (no text or symbols)
VERSION FRANCAISE....61
POLSKA WERSJA JEZYKOWA....219
-
Introduction and security....37
-
Symbols 39
-
Safety....40
-
Assembly....45
-
Product....47
-
Service 48
-
Maintenance....51
-
Long-term storage....54
-
Accessories and spare parts ....58
-
General description....58
-
Specifications....58
Manual\_FX-AF152\_Int24\_rev01
- Warranty....59
- Disposal 59
- Customer service ....59
- Copyright 60
VERSION FRANCAISE....61
POLSKA WERSJA JEZYKOWA....219
natural_image
Simple line drawing of a house with a window and a robot icon showing a moving arrow (no text or symbols)natural_image
Technical line drawing of a vehicle chassis with two wheels and mounting brackets (no text or symbols)Griff Montage
natural_image
Technical line drawing of a mechanical lever assembly (no text or symbols)5. Produkt

TEILEBESCHREIBUNG
natural_image
Close-up of a mechanical component with arrows indicating direction (no readable text or symbols)natural_image
Close-up of a medical or laboratory instrument with a circular lens and control buttons (no visible text or symbols)natural_image
Close-up of a mechanical clamp or bracket with a coiled cable or spring, no visible text or symbolsnatural_image
Hand turning a mechanical component with a tool (no text or symbols visible)natural_image
Close-up of a mechanical component with threaded shaft and clamping mechanism, no visible text or symbols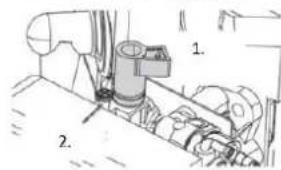
natural_image
Technical line drawing of a mechanical device with two wheels and a handle (no text or symbols)natural_image
Line drawing of a mechanical tool with handle and lever (no text or symbols)16. Introduction and security
General information
Read this original user manual carefully before using it for the first time and follow the instructions. Keep the document safe for future reference or for future owners. Familiarize yourself with the controls and the correct operation of the device. Adhere to all safety measures specified in the service manual. Act responsibly towards third parties. The operator is responsible for accidents or hazards to third parties.
Intended use
The petrol-powered tiller is used exclusively for loosening or digging up clay-like soil in the garden area, up to a maximum working depth of the hoe tool. The machine may only be used in the open garden area. Before each use, the user manual must be read. Sufficient protective equipment must be provided during use in accordance with the operating instructions and the warning pictograms attached to the machine. Only original spare parts designated by the manufacturer may be used. If other components and attachments to the tiller are used, this leads to the extinction of the manufacturer's liability for persons and property damage.
All other applications, uses, places of use that are not mentioned above, as well as failure to comply with the operating instructions for petrol-powered tillers, are considered to be non-intended use of the machine. For damage or injury resulting from misuse, the user/operator is liable and not the manufacturer.
Residual dangers
Even if the machine is used properly, there is always a certain residual risk that cannot be ruled out. Due to the above-mentioned use of the machine, the following potential hazards can be derived during use.
- Bumping body parts or running over feet during transport
- Contact with the open hoe tool
- Contact with the running hoe tool
- Unforeseen movement of the machine (hooking in roots or similar)
- Throwing away stones or lumps of clay
- Damage to hearing if adequate hearing protection is not worn
- inhalation of clay soil dust; Exhaust gases from the combustion engine
- Contact with gasoline or lubricants on the skin
Warning: The actual vibration emission value present during the use of the machine may differ from that stated in the user manual or by the manufacturer. This can be caused by the following influencing factors, which are preceded by each or the following: During use, the following should be observed:
- Is the machine used correctly
- Is the way of cutting the material or how it is processed, is done correctly
- Is the use condition of the machine okay?
- Sharpness of the cutting tool or correct cutting tool
- Are the grab handles optionally mounted and are they fixed to the machine body?
If you notice an unpleasant sensation or skin discoloration on your hands while using the machine, stop working immediately. Take sufficient breaks from work. If sufficient work breaks are not observed, a hand-arm vibration syndrome can occur.
An estimate of the degree of stress should be made depending on the work or use of the machine and appropriate breaks should be taken. In this way, the level of stress during the entire working time can be significantly reduced.
be reduced. Minimize your risk of vibration. Maintain this machine according to the instructions in the owner's manual. If the machine is used or used frequently, you should consult your
Contact specialist dealers and, if necessary, get anti-vibration accessories (handles). Avoid using the machine at temperatures of t=10^ or less. Make a work plan that can limit vibration exposure.
The device complies with the state of the art in science and technology, as well as the safety regulations in force at the time of placing on the market in the context of its intended use.
This device may only be used with the approved original tiller wheels for working lawns and arable land outdoors. The device is not designed for commercial use. Any other use is contrary to its intended purpose. Unforeseeable damage can occur due to unintended use, changes to the device or through the use of parts that have not been tested and approved by the manufacturer!
Any non-intended use or activities on the device not described in this instruction manual are unauthorized misuse outside the legal limits of the manufacturer's liability.
Responsibility of the user
- Correct installation and safe, efficient use are the responsibility of the user.
- Read and follow all safety instructions.
- Follow all installation instructions.
- Care for the device as described in this guide, following the service plan.
- Make sure that every person operating the device is familiar with the controls and safety precautions.
- The tiller must always be used according to the manufacturer's instructions in the instruction manual.
This is the security icon. It is used to alert you to potential dangers to your personal safety. Follow all safety instructions that follow this symbol to avoid injury or death.
△ DANGER
Indicates a dangerous situation that, if not avoided, will result in death or serious injury.
WARNING
Indicates a dangerous situation that, if not avoided, could result in death or serious injury.
NOTE / CAUTION The refers to procedures that are not associated with personal injury.
Hint:
- Read the instructions carefully. Familiarize yourself with the controls and how to use the device correctly.
- Never allow children or people who are not familiar with these instructions to use this machine. Local regulations may limit the age of an operator.
• Never work with the device if there are people, especially children, or pets nearby. - Note that the operator or user is responsible for accidents and damage suffered by other persons or their property.
17. Symbols
Symbols are used in this manual and on the product to alert you to potential hazards. The safety symbols and accompanying explanations must be fully understood. The warnings themselves do not eliminate any danger and cannot replace suitable measures for accident prevention.

Read the user manual before operating this device.

WARNING: Risk of fire when handling fuel. Do not smoke while handling fuel.

WARNING The risk of hearing loss. Wear hearing protection.

WARNING: Risk of eye injury. Wear ANSI-certified goggles with side protection.

WARNING Bight wear non-slip safety shoes.

WARNING The wear sturdy gloves.

WARNING The feet keep your feet away from the fast-spinning blades.

WARNING: Highly flammable

Impurities do not inhale.

WARNING about hot components

License plate – Guaranteed noise level complies with legal guidelines

CE mark
The product complies with the requirements and regulations of the European Community.
18. Safety
⚠ WARNING! Failure to follow all instructions below may result in fire, severe injury and/or death. The warnings and precautions discussed in this guide may not cover all conditions and situations that may occur. The operator must understand that common sense and caution are factors that cannot be built into this product but must be applied by the operator himself. KEEP THESE INSTRUCTIONS!
Precautions when setting up
- Thoroughly inspect the area where the device will be used and remove any foreign objects.
- Loosen all clutches and shift to neutral before starting the engine.
- Gasoline and gasoline vapors are flammable and potentially explosive. Take the following precautions:
a. Store fuel in specially designated containers.
b. Only refuel outdoors and do not smoke while refueling.
c. Top up fuel before starting the engine.
d. Never remove the fuel cap or refill fuel while the engine is running or hot. If fuel spills, do not attempt to start the engine, but move the machine away from the spill area and avoid sources of ignition until the fuel vapors have dissipated.
e. Close all tank and Container lids securely.
- Have several ABC class fire extinguishers nearby.
- Do not operate the device without appropriate protective clothing. Wear protective shoes that improve grip on slippery surfaces.
-
Never attempt to adjust while the engine is running.
-
The operation of this device can generate sparks that can ignite fires near dry vegetation. Spark arrest may be required. The operator should check with local fire departments for fire prevention laws or regulations.
-
Only set up and use the device on a flat, flat and well-ventilated surface.
-
Wear ANSI-certified goggles, heavy-duty work gloves, and a dust mask/respirator during setup.
-
Use only lubricants and fuels recommended in the specification table of this manual.
-
NEVER operate the appliance over or near electrical cables, gas lines, or other utility lines. Contact your local utility company before using the tiller.
-
Thoroughly inspect the area where the tiller will be used. Watch out for any buried obstructions such as cables, plumbing, irrigation pipes, and landscape fabrics. Remove any larger sticks, rocks, wires, or other foreign objects.
Precautions in operation
- DANGER FROM CARBON MONOXIDE

Running an engine indoors CAN KILL YOU IN MINUTES. Engine exhaust fumes contain carbon monoxide, an invisible and odorless poison.
NEVER use the device in a home or garage, EVEN when doors and windows are open.
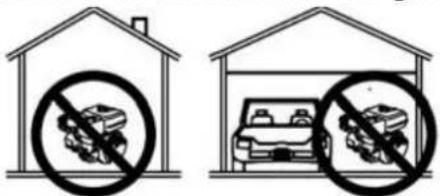
Use the device only OUTDOORS and far away from windows, doors, and vents.

natural_image
Simple line drawing of a house with a window and a robot icon showing a right-pointing arrow (no text or symbols)-
Keep hands and feet away from rotating parts.
-
Take extra care when driving over or crossing gravel paths, sidewalks, or roads. Watch out for hidden dangers or traffic. Do not carry passengers.
-
After encountering a foreign object, stop the engine, remove the spark plug cable, inspect the machine thoroughly for damage, and repair any damage before restarting and continuing to operate the machine.
-
If the device begins to vibrate abnormally, turn off the engine immediately and check the cause. Vibrations are usually a warning sign of a problem.
-
Stop the motor when you leave the working position, before unclogging the tines, and during any repairs, adjustments, and inspections.
-
Take all possible precautions when leaving the machine unattended. Stop the engine and remove the spark plug cable.
- Before cleaning, repairing or inspecting, turn off the engine and ensure that all moving parts have come to a stop. Disconnect the spark plug cable and keep it away from the plug to prevent accidental starting.
- Do not operate the engine in an enclosed space where dangerous carbon monoxide gas can be produced.
- Never operate the machine without proper guards, covers, or other safety devices.
- Never operate the tiller without good visibility or sufficient light.
- Do not use the tiller on steep slopes. Use it only on flat floor surfaces.
- Keep a safe distance from the edges and banks of ditches. Avoid any actions that could cause tiller to tip over.
- Be careful when using it on hard ground. The tines could get caught in the ground and propel the machine forward. If this happens, let go of the handlebars and do not try to hold the machine.
- Keep children away from the device, especially while it is in use.
- Keep all spectators at least 1.5 m away from the engine while the device is in operation.
- Fire hazard! Do not refuel the fuel tank while the engine is running. Do not operate the appliance if gasoline has been spilled. Clean up any spilled gasoline before starting the engine. Do not operate the appliance near a pilot light or open flame.
- Do not touch the motor during operation. Let it cool down after use.
- Do not store fuel or other flammable materials near the engine.
- When transporting the device, use only suitable means of transport and lifting devices with sufficient load capacity.
- Secure the device on transport vehicles to prevent rolling, slipping, and tipping.
- Industrial applications must comply with OSHA requirements. (excluding European market)
- Do not leave the device unattended when it is running. Turn off the device (and remove the safety sockets, if any) before leaving the work area.
- The device can generate high noise levels. Long-term noise exposure above 70 dBA is harmful to hearing. Wear hearing protection when operating the device or when working nearby during operation.
- Wear ANSI-certified goggles, hearing protection, durable work gloves, and steel-toe shoes while in use.
- People with pacemakers should consult their doctor before using it. Electromagnetic fields near a pacemaker can cause interference or malfunction. Caution is advised near the magnet or the rope starter of the motor.
- Only use accessories that are recommended by FUXTEC for your model. Accessories that are suitable for one device can be dangerous when used with another device.
- Do not operate the device in hazardous areas, such as near flammable liquids, gases, or dust. Gasoline-powered engines can ignite dust or fumes.
- Stay alert, pay attention to your actions, and use common sense when operating this device. Do not use the device if you are tired or under the influence of drugs, alcohol, or medications.
-
Don't overstretch. Always keep a secure footing and balance. This allows for better control of the device in unexpected situations.
-
Use this device with both hands only. Using the device with only one hand can easily lead to loss of control.
- Dress appropriately. Do not wear loose clothing or jewelry. Keep hair, clothing, and gloves away from moving parts. Loose clothing, jewellery or long hair can get caught in moving parts.
- Parts, especially exhaust system components, get very hot during use. Keep your distance from hot parts.
- Do not cover the device during operation.
- Keep the machine and engine clean at all times.
- Do not operate the device with known leaks in the engine's fuel system.
- If fuel or oil spills occur, they must be cleaned immediately. Dispose of liquids and cleaning materials in accordance with local, state, or federal regulations. Store oily rags in a ventilated, sealed metal container.
- Before use, check for misalignment or jamming of moving parts, damaged parts, and any other conditions that may affect the operation of the device. Have damaged equipment repaired before use. Many accidents are caused by poorly maintained equipment.
- Use the right device for the application. Do not modify or use the device for purposes for which it is not intended.
Attention:
- Replace defective mufflers.
• Make sure you stand securely on slopes. Go with the machine, never run. - Be extremely careful when changing direction on slopes.
• Exercise special caution when reversing or pulling the machine in your direction. - Do not change the motor speed control settings or exceed the permissible engine speed.
- Start the engine carefully according to the manufacturer's instructions, keeping your feet away from the tool.
- Keep hands and feet away from rotating parts. Never lift or carry the machine while the engine is running.
- Reduce the speed before stopping the engine. Replace worn or damaged parts for your safety.
- To reduce fire hazards, keep the engine, muffler, battery compartment, and gasoline storage area free of vegetable material and excessive grease.
Maintenance precautions
- Before service, maintenance or cleaning:
a. Switch the motor switch to "OFF".
b. Allow the engine to cool completely.
c. Then remove the spark plug cap from the spark plug.
-
Keep the machine, attachments and accessories in a safe working condition. Keep all guards in place and in proper condition. Safety devices include silencers, air filters, mechanical guards and heat shields, and other protective devices.
-
Do not modify or adjust any part of the device or motor that is sealed by the manufacturer or dealer. Only a qualified service technician is allowed to adjust parts that could affect the speed of the engine.
-
Check shear bolts, motor mounting bolts, and other bolts at regular intervals for proper fit to ensure the unit is in safe working condition.
-
Never store the machine with fuel in the tank in a building where ignition sources are present, such as hot water and space heaters, tumble dryers, etc. Allow the engine to cool down in an enclosed space before storage.
- If the fuel tank needs to be emptied, do so outdoors.
- Do not store fuel or other flammable materials near the engine.
- Wear ANSI-certified goggles, heavy-duty work gloves, and a dust mask/respirator during maintenance.
- Maintain labels and nameplates on the device. These contain important information. If illegible or lost, contact our customer service for replacement.
- Have the device serviced by a qualified professional who uses only identical replacement parts. This ensures the safety of the device. Do not attempt maintenance or repair work that is not explained in this manual or that you are unsure whether you can perform safely and correctly.
- Keep the device out of the reach of children.
- Perform regular maintenance on the engine and equipment according to plan.
Refuel
- Do not refuel while the engine is running or hot.
- Do not smoke and avoid sparks, flames or other sources of ignition near the device, especially when refueling.
- Do not fill the fuel tank to the brim. Leave some room for the fuel to expand – at least 1 inch (2.5 cm) below the edge. TO AVOID FUEL LEAKAGE AND FIRE HAZARD, do not fill fuel over the bottom edge of the threads.
- Only refuel in well-ventilated areas.
- Wipe off any spilled fuel and allow excess fuel to evaporate before starting the engine. To prevent FIRES, do not start the engine if there is still a smell of gasoline in the air.
Furnishings
Read the entire IMPORTANT SAFETY INSTRUCTIONS section at the beginning of this guide, including any subheadings contained therein, before you begin setting up or using this product.

TO AVOID SERIOUS INJURY: Only operate the device with a properly installed spark arrestor. The operation of this device can generate sparks that can cause fires near dry vegetation. Spark arrestor may be required. The operator should check with local fire departments for
fire prevention laws or regulations.
TO PREVENT SERIOUS INJURY FROM UNINTENTIONAL STARTING: Turn the power switch of the unit to "OFF", wait for the engine to cool down, and disconnect the spark plug cable before assembling or making any adjustments to the unit.
Machine starting position: Always start the machine outside of shaded areas to avoid injury!
At high altitudes, the engine's carburetor, speed controller (if present) and any other parts that control the fuel-to-air ratio must be adjusted by a qualified mechanic to allow efficient use at high altitudes and to prevent damage to the engine as well as any other equipment used with this product.
19. Assembly
Note: For more information about the parts listed on the following pages, please refer to the assembly diagram at the end of this guide.
Mounting the axle/tie rod and wheels
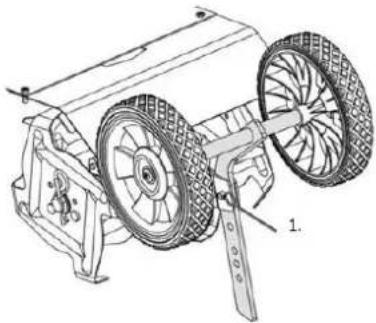
- Remove the R-clip (1st) from the pin (2nd) that holds the axle/tie rod assembly (3rd) in place.
- Remove the pin (2.) from the axle/tie rod assembly (1.).
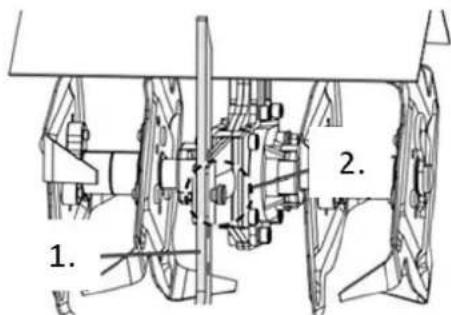
- Remove the axle/tie rod assembly (1st) from the bracket (2nd) on the cultivator.
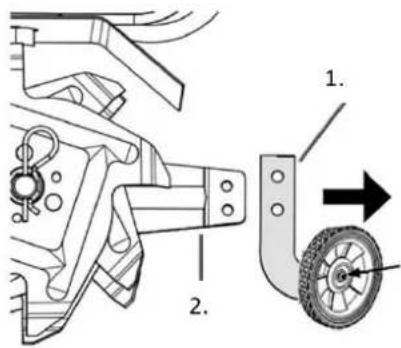
- Attach the two wheels to the axle/tie rod assembly in the orientation shown. To do this, use one M6x12 screw and one ∅6 washer per wheel.
natural_image
Technical line drawing of a vehicle chassis with two wheels and mounting brackets (no text or symbols)Handle Assembly
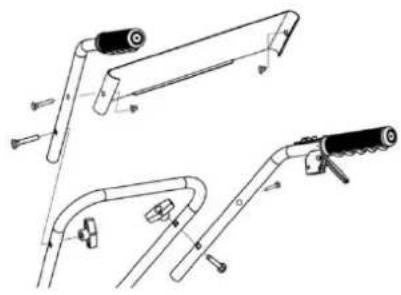
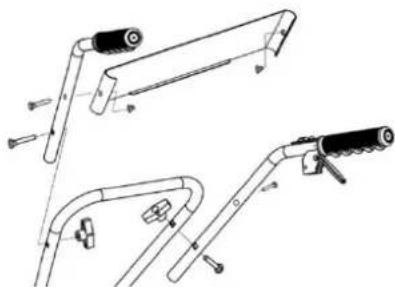
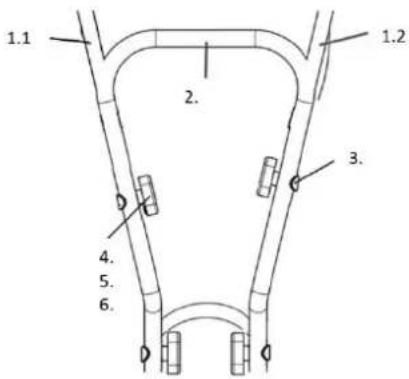
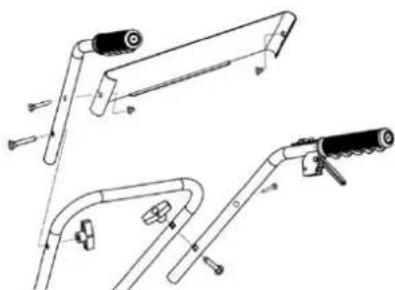
- Attach the center handle (1st) to the underhandle (2nd) with four M8x45 screws (3rd), ∅8 washers (4th), ∅8 locking washers (5th) and knobs (6). Make sure that the knobs are attached inside.
- Attach the right handle (1.1) and the left handle (1.2) to the center handle (2.) with four M8x45 screws (3.), ∅8 washers (4.), ∅8 locking washers (5.) and knobs (6). Make sure that the knobs are attached inside.

- Assemble the decorative plate. After aligning the trim according to the hole on the handle, fasten the trim with the M6x35 screws and secure it with nuts.
natural_image
Technical line drawings of three different bicycle support structures (no text or symbols)- Product

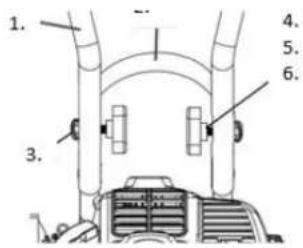
PART DESCRIPTION
- Start/stop switch
- Gas control
- Air filter
- Starter Griff
- Power Tank
- Tines
21. Service
Read the entire IMPORTANT SAFETY INSTRUCTIONS section at the beginning of this guide, including any subheadings, before you begin to set up or use this product.
Pre-start checks
Check the engine and equipment for damaged, loose, or missing parts before starting setup and startup. If problems are found, do not use the device until they are properly resolved.
Checking and filling the fuel
⚠ WARNING! TO PREVENT SERIOUS INJURY FROM FIRE: Fill the fuel tank in a well-ventilated area, away from ignition sources. If the engine is hot, turn it off and let it cool down before adding fuel. Do not smoke.
- Clean the fuel cap and the area around the cap.
- Unscrew and remove the fuel cap.
Note: Do not use gasoline with more than 10% ethanol (E10). Do not use E85 ethanol. Add a fuel stabilizer to the gasoline, otherwise the warranty will be void.
Note: Do not use gasoline that has been stored in a metal fuel container or in a dirty container. This can introduce particles into the carburetor and affect engine performance or cause damage.
IMPORTANT: Your warranty will be void if the engine's fuel tank is not filled with the correct mixture (40:1) of stabilizer-treated unleaded gasoline and 2-Cycle Oilbefore each use. The 2-Cycle Oilmust meet either the requirements of JASO M345 FD or ISO-LEGD for air-cooled engines and must be synthetic.
Check the fuel level before each use. Do not run the engine with an incorrect mixture of unleaded gasoline and two-stroke oil. Operating the engine with the wrong mixture WILL permanently damage the engine.
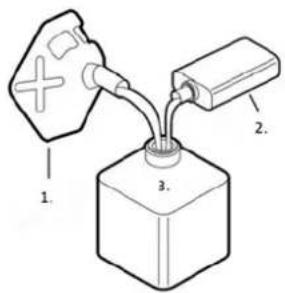
Fuel-oil mixture
- Unleaded gasoline
- 2-Cycle Oil
- Approved container

- To get the correct mixing ratio of gasoline and two-stroke oil, mix 40 ml of 2-Cycle Oil with 1 liter of stabilizer treated unleaded gasoline in an approved container. Then gently shake the reservoir to mix the gasoline/2-Cycle Oil thoroughly.
- If necessary, fill the fuel tank with the premixed mixture of unleaded gasoline and 2-Cycle Oil to about 25 mm below the filler neck of the tank.
- Then put the fuel cap back on.
- Wipe off any spilled fuel and allow excess fuel to evaporate before starting the engine. To prevent FIRES, do not start the engine if there is still a smell of gasoline in the air.
Starting the engine
Before starting the engine:a. Inspect the device and the engine.b. Fill the engine's fuel tank with the correct amount and mixing ratio of stabilizer-treated unleaded gasoline, and two-stroke oil.
A "cold start" occurs when the engine is no longer hot, usually at least 30 minutes after the last operation.
- To start a cold engine, turn the choke knob clockwise to the START position (closed).
natural_image
Close-up of a mechanical component with arrows indicating direction (no readable text or symbols)- Press the primer pump 7-10 times until fuel is visible in the fuel line.

natural_image
Close-up of a medical device with a circular dial and glass lens (no visible text or symbols)- Turn the motor switch to ON.
Note: Do not pull the throttle when starting the engine.
natural_image
Close-up of a mechanical clamp or bracket with a coiled cable, no visible text or symbols-
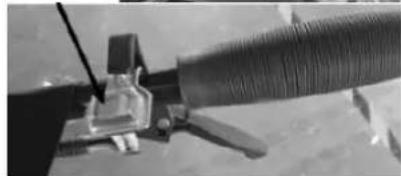
Hold the motor's starter handle loose and pull it slowly until you feel resistance. Allow the starter rope to slide back completely, then pull it quickly. Repeat this process until the engine starts. Note: Do not allow the starter handle to snap back against the engine. Hold it as it slides back so it doesn't damage the engine.
-
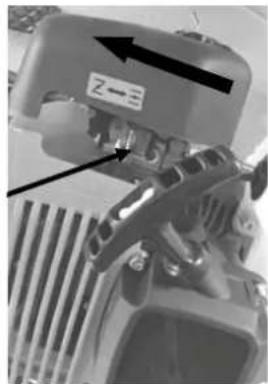
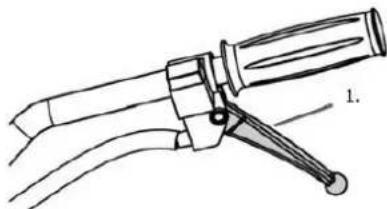
Run the motor with the choke in the START position for 10-15 seconds. Lightly press the lock handle with your finger, then pull the throttle to automatically move the choke lever (1st) to the RUN (open) position. Release the throttle.

IMPORTANT: Allow the engine to idle for 2-3 minutes after each start to allow it to stabilize.
⚠ WARNING! TO AVOID SERIOUS INJURY: If
the tines continue to rotate while the engine is idling and with the throttle fully released, turn the idle adjustment screw (2nd) counterclockwise to reduce the idle speed until the tines stop turning.
To restart a warm engine
Leave the choke in the RUN position. If the choke is not in the RUN position, pull and release the throttle to return the choke to the RUN position and follow steps 3 and 4 of the starting guide above. If the engine does not start, use the starting procedure for a cold engine.
Turn off the engine
-
To stop the engine in case of emergency: Release the throttle and turn the motor switch to OFF.
-
Under normal conditions, use the following procedure:
a. Release the throttle.
b. Let the engine idle for 1-2 minutes.
c. Turn the motor switch to OFF.
d. Clean the outer parts with a clean cloth, remove dirt and debris from the tine blades and shaft, and cover the device. Store it in a dry, level and well-ventilated place out of the reach of children. Under normal operating conditions, further maintenance will follow the schedule described in the MAINTENANCE section.
See Long-Term Storage for complete storage instructions
Operation of the cultivator
TO AVOID SERIOUS INJURY: Keep hands, fingers, feet, and loose clothing away from the rotating prongs. Watch out for any buried obstructions such as cables, pipes, irrigation systems, and landscape fabrics. DO NOT operate the unit over or near electrical cables, gas lines, or other utility lines. Check with your
local utility before using the cultivator.
- Before starting the engine: Place the axle/tie rod assembly in the working position and set the
desired working depth (maximum 6 inches deep) by
adjusting the axle/tie rod assembly:
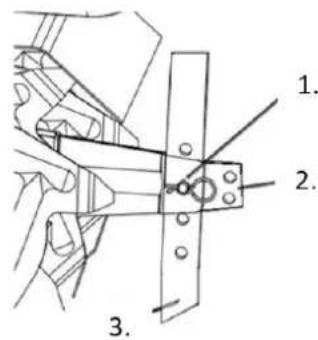
Remove the R-clip and cotter pin (1.) that hold the assembly in place.
Lower the assembly to increase the working depth or raise it to decrease the depth.
Replace the cotter pin and the R-clip (1st).
Note: The optimal working depth (typically 4-6 inches) varies depending on the soil conditions. If the cultivator vibrates or
natural_image
Technical line drawing of a mechanical device with two wheels and a handle (no text or symbols)is difficult to control, the axle/tie rod assembly is not correctly adjusted to the conditions.
Adaptation by trial and error is required to find the right setting.
- WARNING! TO AVOID SERIOUS INJURIES:
Before using it for the first time, practice using the cultivator's controls while the tines are lifted from the ground. Make sure you can stay in control at all times, know how to stop the tines and turn off the engine. For use in the field, work at a slow pace until you are familiar with the handling of the cultivator.
-
Start the engine according to the instructions in the "Starting the engine" section
-
Hold the handles with both hands.
-
With the engine running, pull the throttle on the handlebar (1st) up to rotate the tines and move forward. Release the throttle to stop the rotation of the tines and the forward movement.
-
The following soil conditions can affect the results of milling:
natural_image
Line drawing of a mechanical tool with handle and lever (no text or symbols)a. Hard and/or parched soil:
If the soil is too hard or dried out for the tines to penetrate, the cultivator will vibrate strongly and jump over the soil surface. Moisten dry, hard soil before tilling, use shallow depth adjustment and low motor speed.
b. Very wet soil:
Very wet soil forms clumps during milling and clogs the tines. Allow wet soil to partially dry before milling, and use a low engine speed to improve results.
NOTE: If the tines jam or the cultivator encounters a foreign object during operation, immediately release the throttle and turn off the motor. Wait until the machine has come to a complete stop. Disconnect the spark plug cap, remove any debris and inspect the cultivator. If any damage is detected, have it repaired before continuing to use the device.
22. Maintenance
TO PREVENT SERIOUS INJURY FROM UNINTENTIONAL STARTING:
Turn the power switch of the unit to "OFF", wait for the engine to cool down, and disconnect the spark plug cap before performing any inspection, maintenance, or cleaning.
TO PREVENT SERIOUS INJURY DUE TO EQUIPMENT FAILURE:
Do not use damaged devices. If you experience unusual noise, vibration, or excessive smoke, have the problem resolved before continuing to use the device.
Follow all maintenance instructions in this manual. The engine can suffer serious damage if it is not properly maintained.
Many maintenance procedures, including those not detailed in this manual, must be performed by a qualified technician for safety reasons. If you have any doubts about your ability to safely maintain the device or motor, have the device serviced by a qualified technician.
Cleaning, maintenance and lubrication plan
Note: This maintenance plan is for general guidance only. If the power decreases or the device works abnormally, check the systems immediately. The maintenance needs of each device vary depending on factors such as frequency of use, temperature, air quality, fuel quality, and other influences.
Note: The following procedures are in addition to the periodic checks and maintenance required as part of the normal operation of the engine and equipment.
| Procedure | Before each use | After each Use | Monthly or all 20 Hours of use | At 3 Month or 50 hours of benefits | At 6 am or 100 hours of benefits | Yearly or every 300 hours of use | Every 2 years |
| Brush the outside of the motor | X | X | X | X | X | X | |
| Check the engine's fuel/oil mixture | X | X | X | X | X | X | |
| Check for loose hardware | X | X | X | X | X | ||
| Check/adjust idle speed | X | ||||||
| Clean dirt from the tooth knives and shaft | X | X | X | X | X | X | |
| Sauberer Air Filter | X* | X | X | X | |||
| Check the sediment cup | X | X | X | ||||
| Check and clean the spark plug | X | X | |||||
| 1. Clean the fuel tank, strainer and carburetor | X** | X** | |||||
| 2. Clean carbon deposits from the combustion chamber | |||||||
| Replace fuel line if necessary | X** |
*More frequent service when used in dusty areas.
**These items should be serviced by a qualified technician.
Checking and filling the fuel
WARNING! TO AVOID SERIOUS INJURY FROM FIRE:
Fill the fuel tank in a well-ventilated area and away from ignition sources. If the engine is hot, turn it
off and let it cool down before adding fuel. Do not smoke.
- Clean the fuel cap and the area around the cap.
- Unscrew and remove the fuel cap.
Note: Do not use gasoline with more than 10% ethanol (E10). Do not use E85 ethanol. Add a fuel stabilizer to the gasoline, otherwise the warranty will be void.
Note: Do not use gasoline that has been stored in a metal container or a dirty container. This could introduce particles into the carburetor that affect engine performance or cause damage.
IMPORTANT: Your warranty will be void if the engine's fuel tank is not filled with the correct mixture (50:1) of stabilizer-treated unleaded gasoline and 2-Cycle Oil before each use.
The 2-Cycle Oil must meet either the JASO M345 FD or ISO-L-EGD requirements for air-cooled engines and must be synthetic.
Check the fuel level before each use. Do not run the engine with an incorrect mixture of unleaded gasoline and two-stroke oil. Operating the engine with an incorrect compound will cause permanent damage to the engine.
Fuel-oil mixture
- Unleaded gasoline
- Two-stroke oil
- Approved container
- To make the correct gasoline-2-Cycle Oil mixture, mix 40 ml of 2-Cycle Oil with 1 liter of stabilizer treated unleaded gasoline in an approved container. Then gently shake the reservoir to mix the gasoline and 2-Cycle Oil thoroughly.
- If necessary, fill the fuel tank to about 1 inch (2.5 cm) below the filler neck with the pre-mixed gasoline-2-Cycle Oil mixture.
- Put the fuel cap back on.
- Wipe off any spilled fuel and allow excess fuel to evaporate before starting the engine. To prevent FIRES, do not start the engine while the smell of gasoline is still perceived.
Spark Plug Maintenance
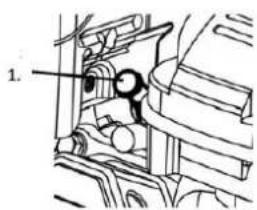
- Disconnect the spark plug cap (1.) from the end of the spark plug. Remove dirt and debris around the spark plug.
- Remove the spark plug with a spark plug wrench. NOTE: Do not remove the spark plug when the engine is hot, as this could damage the threads.
- Check the spark plug:
• If the electrode is oily, clean it with a clean, dry cloth.
• If the electrode has any debris, polish it with sandpaper.
• If the white insulator is cracked or chipped, the spark plug must be replaced.
Recommended spark plug: RCJ6Y
NOTE: Using the wrong spark plug can damage the engine.
- When installing a new spark plug, adjust the electrode spacing according to the specifications in the specification table. Do not pry against the electrode, as the spark plug may be damaged.
-
Install the new or cleaned spark plug into the engine:
-
Spark plugs with gasket: Screw in the spark plug with your fingers until the gasket touches the cylinder head. Then tighten it about 1/2 to 2/3 turn further.
- Spark plugs without gasket: Screw in the spark plug with your fingers until it touches the cylinder head. Then tighten it about 1/16 turn further.
NOTE: Tighten the spark plug properly.
If the spark plug is too loose, this will cause the engine to overheat.
If the spark plug is too tight, the threads in the engine block can be damaged.
- Apply a dielectric protector for the spark plug connector (not included) to the end of the spark plug and secure the cable.
Air Filter Maintenance
- Remove the air filter cover and air filter(s) and check for dirt. Clean them as described below.
- Cleaning:
For paper filters:
- To avoid injury from dust and dirt, wear ANSI-certified goggles, a NIOSH-certified dust mask/respirator, and heavy-duty work gloves. In a well-ventilated area and away from other people, use compressed air to blow dust out of the filter.
For foam filters:
- Wash the filter several times in warm water with mild detergent. Rinse it out. Squeeze out excess water and let it dry completely. Soak the filter briefly in light oil and squeeze out the excess oil.
- Reinsert the cleaned filter(s). Secure the air filter cover securely before using the device.
23. Long-term storage
If the device is not used for more than 20 days, prepare the motor for storage as follows:
- CLEANING:
Wait for the engine to cool down, then clean it with a dry cloth.
NOTE: Do not use water for cleaning. Water can enter the engine and cause rust damage.
Apply a thin layer of anti-rust oil to all metal parts.
- FUEL:
WARNING! TO AVOID SERIOUS INJURY FROM FIRE:
Empty the fuel tank in a well-ventilated area and away from ignition sources. If the engine is hot, turn it off and let it cool down. Do not smoke.
a. Remove the fuel tank cap and empty the remaining fuel into an approved container.
b. Press the primer pump 8 times.
c. Drain the remaining fuel into the container.
d. Start the engine and let it idle until it dies due to lack of fuel.
e. Put the fuel cap back on and tighten it.
- LUBRICATION:
a. Clean the area around the spark plug. Remove the spark plug and add 1/2 tablespoon of 2-Cycle Oilthrough the spark plug hole into the cylinder.
b. Replace the spark plug, but leave the spark plug cap removed.
c. Pull the starter handle to distribute the oil in the cylinder. Stop after one or two turns when you feel the piston start the compression stroke (if you feel resistance).
4. STORAGE LOCATION:
Cover the device and store it upright in a dry, level and well-ventilated area, out of the reach of children. The storage location should also be away from ignition sources such as water boilers, tumble dryers and heaters.
5. AFTER STORAGE:
Before starting the engine after storage, follow the procedures in the pre-start checks. If premixed fuel that has been stored is used, be aware that during storage, some of the gasoline in the fuel evaporates, while the 2-Cycle Oildoes not evaporate, which changes the gasoline-oil mixing ratio. Operating the engine with an incorrect compound will cause permanent damage to the engine. Use freshly mixed fuel when starting the engine after storage.
⚠️ Follow all safety precautions when diagnosing or maintaining the device or motor.
| Problem | Possible cause | Possible solution |
| Engine won't start | FUEL-RELATED ISSUES:1. No fuel in the tank.2. Choke not in the START position (closed) when the engine is cold.3. Gasoline with more than 10% ethanol used (e.g. E15, E20, E85, etc.).4. Inferior or deteriorated/stale gasoline-oil mixture. | FUEL-RELATED SOLUTIONS:1. Fill the fuel tank only with fresh 87+ octane stabilizer treated unleaded gasoline-2-Cycle Oilmixture. Do not use gasoline with more than 10% ethanol (e.g. E15, E20, E85, etc.).2. Set the choke to the START position (closed).3. Remove ethanol-rich gasoline from the fuel system. Replace damaged components with new ones. Use only fresh 87+ octane stabilizer treated unleaded gasoline-2-Cycle Oilmixture. Do not use gasoline with more than 10% ethanol (e.g. E15, E20, E85, etc.).4. Use only fresh 87+ octane stabilizer treated unleaded gasoline-2-Cycle Oilmixture. Do not use gasoline with more than 10% ethanol (e.g. |
| 5. Carburetor not prepared (not pumped).6. Dirty fuel lines.7. Carburetor is flooded.8. Clogged fuel filter.9. Idle speed set too low. | E15, E20, E85, etc.).5. Press the primer pump several times to prepare the system.6. Clean the fuel lines with a fuel additive. Heavy deposits may require more intensive cleaning.7. Turn the choke knob to the RUN (open) position. Pull the starter handle 10-20 times to clean the carburetor, then try to start the engine as usual.8. Replace the fuel filter.9. Turn the idle adjustment screw clockwise to increase the idle speed. Do not rotate them so far that the tines rotate at idle. | |
| IGNITION (SPARK) RELATED PROBLEMS:1. Spark plug cap not securely connected.2. Electrode of the spark plug is wet or dirty.3. Incorrect electrode spacing of the spark plug.4. Spark plug cap damaged.5. Incorrect ignition timing or faulty ignition system. | SOLUTIONS FOR IGNITION (SPARK) RELATED PROBLEMS:1. Connect the spark plug cap properly.2. Clean the spark plug.3. Set the correct electrode spacing of the spark plug.4. Replace the spark plug cap.5. Have the ignition system diagnosed and repaired by a qualified technician. | |
| SEAL-RELATED PROBLEMS:1. Cylinder not lubricated (problem after long storage periods).2. Loose or defective spark plug (A hissing sound occurs when trying to start the engine). | SOLUTIONS TO SEAL-RELATED PROBLEMS:1. Add a tablespoon of 2-Cycle Oilto the spark plug hole. Operate the engine a few times and try to start it again.2. Tighten the spark plug firmly. If the problem persists, replace the spark plug. If the problem persists, there could be a problem with the cylinder head gasket – see point 3. | |
| 3. Loose cylinder head or damaged cylinder head gasket (A hissing sound occurs when trying to start the engine). | 3. Tighten the cylinder head firmly.If this does not resolve the problem, replace the cylinder head gasket. | |
| Engine misfires | 1. Spark plug cap loose.2. Incorrect spark plug electrode spacing or damaged spark plug.3. Defekte Zündkerzenkappe.4. Old or inferior petrol-oil mixture.5. Incorrect compression. | 1. Check the connections of the spark plug cap and the cable.2. Adjust the electrode spacing correctly or replace the spark plug.3. Replace the spark plug cap.4. Use only fresh 87+ octane stabilizer treated unleaded gasoline-2-Cycle Oilmixture.Do not use gasoline with more than 10% ethanol (e.g. E15, E20, E85, etc.).5. Diagnose and repair compression.Follow the instructions in the "Engine Won't Start: COMPACTION RELATED ISSUES" section. |
| Engine suddenly stops | 1. Fuel tank empty or filled with contaminated or low-quality gasoline-oil mixture.2. Faulty vent valve causes a vacuum that obstructs the flow of fuel.3. Defects Magnet4. Spark plug cap is loose or not properly connected. | 1. Fill the tank with fresh 87+ octane stabilizer treated unleaded gasoline-2-Cycle Oilmixture. Do not use gasoline with more than 10% ethanol (e.g. E15, E20, E85, etc.).2. Test and replace the bleed valve if necessary.3. Have the magnet serviced by a qualified technician.4. Secure the spark plug cap securely. |
| Engine stops under high load | 1. Dirty air filter.2. Engine was cold. | 1. Clean the air filter insert.2. Allow the engine to warm up before operating the device. |
| Engine knocking | 1. Old or inferior petrol-oil mixture.2. Engine overloaded.3. Incorrect ignition timing, deposits, worn engine or other mechanical problems. | 1. Refuel the engine with fresh 87+ octane stabilizer-treated unleaded gasoline-2-CycleOilmixture. Do not use gasoline with more than 10% ethanol (e.g. E15, E20, E85, etc.).2. Do not exceed the load limit of the device.3. Have the engine diagnosed and serviced by a qualified technician. |
| Engine struggles or stops during milling | 1. Engine speed too low.2. Milling at too great a depth. | 3. Adjust the throttle to increase the engine speed.4. Adjust the axle/tie rod assembly to the working position to achieve a shallower milling depth. |
| Excessive vibration/cultivator difficult to control | 1. Soil is too hard and/or dried out.2. Axle/tie rod assembly not properly adjusted to the ground conditions. | 1. Moisten the soil before milling.2. Adjust the axle/tie rod assembly in the working position to achieve the correct setting. |
| After a sudden impact: engine is running, but the tines do not turn | 2. Shaft wedge or other shear bolts were damaged by the impact to separate the engine and limit damage. | 2. Have a qualified technician inspect and replace the defective shaft wedge or damaged shear bolts. |
24. Accessories and spare parts
Use only original accessories and spare parts to ensure the safety and proper functioning of the device. For more information, see www.FUXTEC.com.
25. General description
Article number: FX-AF152
Product name: FUXTEC Petrol tiller FX-AF152
26. Specifications
| Description | Tiller |
| Brand | FUXTEC |
| Model | FX-AF152 |
| Engine | 2-stroke engine |
| Hubraum (cm3) | 51,6 |
| Cooling type | Air |
| Maximum power (kW) / revolutions (min) | 1,46 / 6500 |
| Maximum speed (motor) (min) | 11000 |
| Fuel consumption at maximum power (kg/h) | 0,78 |
| Number of milling tools | 2 |
| Milling tool height (mm) | 70 |
| Working width (mm) | 230 |
| Oil capacity (l) | 0,6 |
| Guaranteed sound power level LWA | 93 |
| Measured Sound Power Level (LWA) | 92,6 |
| Vibration links / rechts (m/s2) | 7,92 / 7,85 |
| Uncertainty of oscillation (m/s2) | 1,5 |
| Sound pressure level LPA | 81,5 |
| Weight (kg) | 14 |
| Tankvolumen (l) | 0,9 |
27. Warranty
We meet the legal warranty requirements for all our products. This is 24 months from the date of purchase and includes your rights in the event of defects in materials or workmanship. Please keep the proof of purchase carefully. Excluded from the warranty are wearing parts as well as damage caused by improper use, violence, technical modifications, the use of unsuitable accessories or non-original spare parts and repair attempts by unqualified personnel. Warranty repairs may only be carried out by FUXTEC technicians.
28. Disposal
The packaging material is made of recyclable materials and should be disposed of in accordance with the applicable disposal regulations. Please contact your local municipality for information on how to properly dispose of the device. Make sure to properly remove and dispose of all operating materials such as gasoline and oil beforehand.
29. Customer service
If you have any questions about warranty, repair, or spare parts, please contact:
FUXTEC GmbH
Kappstraße 69
71083 Herrenberg
Deutschland
Telefon: 070329560888
Note: Please do not send returns or repairs to this address. For returns in the event of a warranty claim,
please contact our customer service.
30. Copyright
All rights reserved. The contents of this manual are protected by copyright. Their use is permitted within the scope of operation. Any further use or duplication is not permitted without the written permission of FUXTEC GmbH. FUXTEC GmbH reserves the right to make changes within this operating manual without prior communication.
VERSION FRANCAISE
natural_image
Simple line drawing of a house with a door and a robot icon showing a moving arrow (no text or symbols)natural_image
Technical line drawing of a vehicle chassis with two wheels and mounting brackets (no text or symbols)Poignée Montage
natural_image
Technical line drawings of three different bicycle support structures (no text or symbols)35. Produit

DESCRIPTION DES PIÈCES
natural_image
Close-up of a mechanical component with arrows indicating direction (no readable text or symbols)natural_image
Close-up of a mechanical device with a circular aperture and a small inset component (no visible text or symbols)natural_image
Close-up of a mechanical clamp or bracket with a coiled cable and metal components (no visible text or symbols)natural_image
Hand turning a mechanical component with a tool (no text or symbols visible)natural_image
Close-up of a mechanical component with threaded shaft and clamping mechanism, no visible text or symbolsnatural_image
Technical line drawing of a mechanical device with two wheels and a handle (no text or symbols)natural_image
Line drawing of a mechanical tool with a handle and lever, no text or symbols presentnatural_image
Simple line drawing of a plow or cutter (no text or symbols)
natural_image
Symbolic icon of a person pushing a circular arrow, representing waste or disposal (no text or symbols)ÉLÉMENTS D'EMBALLAGE À SÉPARER ET À DÉPOSER DANS LE BAC DE TRI

44. Service clientèle
natural_image
Technical line drawing of a mechanical tricycle with two wheels and mounting brackets (no text or symbols)


natural_image
Technical line drawings of three mechanical components with no visible text or symbols50. Prodotto

natural_image
Close-up of a mechanical component with arrows indicating direction (no readable text or symbols)natural_image
Close-up of a mechanical device with a circular light source and control panel (no visible text or symbols)natural_image
Close-up of a mechanical clamp or tool with a coiled spring and handle (no visible text or symbols)natural_image
Hand turning a mechanical component with a tool (no text or symbols visible)natural_image
Close-up of a mechanical component with threaded end and directional arrows indicating motion (no text or symbols)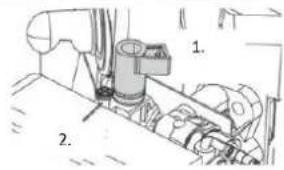
natural_image
Technical line drawing of a tool with handle and base, no text or symbols presentnatural_image
Technical line drawing of a wheeled vehicle with two wheels and mounting brackets (no text or symbols)

natural_image
Technical line drawings of mechanical components including a lever, handle, and lever (no text or symbols)65. Producto

natural_image
Close-up of a mechanical component with arrows indicating direction (no readable text or symbols)natural_image
Close-up of a mechanical device with a circular aperture and surrounding components (no visible text or symbols)natural_image
Close-up of a mechanical clamp or bracket with a coiled cable or wire, no visible text or symbolsnatural_image
Hand turning a mechanical component with a tool (no text or symbols visible)natural_image
Close-up of a mechanical clamp or connector with threaded tube and directional arrows indicating motion (no text or symbols)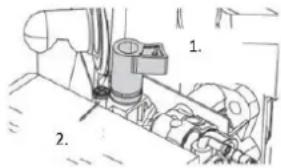
natural_image
Technical line drawing of a mechanical device with two wheels and a handle (no text or symbols)natural_image
Line drawing of a mechanical tool with a handle and lever, no text or symbols presentnatural_image
Technical line drawing of a wheeled vehicle with two wheels and mounting brackets (no text or symbols)
natural_image
Technical line drawings of three mechanical components with no visible text or symbols80. Produto

DESCRIÇÃO DAS PEÇAS
natural_image
Close-up of a mechanical component with arrows indicating direction (no readable text or symbols)natural_image
Close-up of a mechanical device with a circular aperture and surrounding components (no visible text or symbols)natural_image
Close-up of a mechanical component with a coiled cable or spring, no visible text or symbolsnatural_image
Hand turning a mechanical component with a tool (no text or symbols visible)natural_image
Close-up of a mechanical component with threaded shaft and mounting bracket, showing directional arrows (no text or symbols)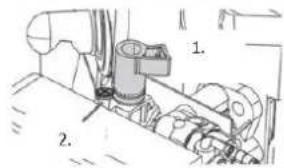
natural_image
Technical line drawing of a mechanical device with two wheels and a handle (no text or symbols)natural_image
Technical line drawing of a mechanical tool or device with a handle and lever, labeled '1.' (no text or symbols on the diagram itself)⚠ WAARSCHUWING! Lees alle instructies.
natural_image
Simple line drawing of a house with a window and a robot icon showing a moving arrow (no text or symbols)natural_image
Technical line drawing of a vehicle chassis with two wheels and mounting brackets (no text or symbols)


natural_image
Technical line drawings of three mechanical components with no visible text or symbols95. Product

BESCHRIJVING VAN ONDERDELEN
1 Start-/stopschakelaar
2 Gashendel
3 Luchtfilter
4 Startgreep
5 Brandstoftank
6 Tanden
96. Service service
natural_image
Close-up of a mechanical component with arrows indicating direction (no readable text or symbols)natural_image
Close-up of a mechanical device with a circular dial and a small component, no visible text or symbols.natural_image
Close-up of a mechanical clamp or bracket with a coiled cable or spring, no visible text or symbolsnatural_image
Hand turning a mechanical component with a tool (no text or symbols visible)natural_image
Close-up of a mechanical component with threaded shaft and connectors, showing directional arrows (no text or symbols)natural_image
Technical line drawing of a wheeled robotic vehicle with two wheels and a handle (no text or symbols)natural_image
Technical line drawing of a mechanical tool or device with a handle and lever (no text or symbols)○ Harde en/of droge grond:
natural_image
Simple line drawing of a house with a window and a robot icon showing a moving arrow (no text or symbols)natural_image
Technical line drawing of a vehicle chassis with two wheels and mounting brackets (no text or symbols)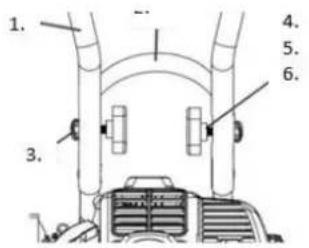
natural_image
Technical line drawings of three different bicycle support structures (no text or symbols)110. Produkt

BESKRIVNING AV DELAR
natural_image
Close-up of a mechanical component with arrows indicating direction (no visible text or symbols)natural_image
Close-up of a mechanical device with circular components and a central lens (no visible text or symbols)natural_image
Close-up of a mechanical clamp or tool with a coiled spring and handle, no visible text or symbolsnatural_image
Technical line drawing of a mechanical device with two wheels and a handle (no text or symbols)natural_image
Line drawing of a mechanical tool with a handle and lever, no text or symbols presentPOLSKA WERSJA JEZYKOWA
natural_image
Simple line drawing of a house with a window and a robot icon showing a right-pointing arrow (no text or symbols)natural_image
Technical line drawing of a vehicle chassis with two wheels and mounting brackets (no text or symbols)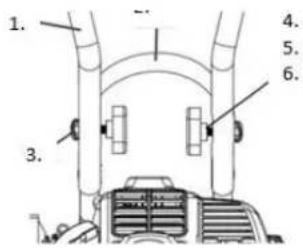
natural_image
Technical line drawings of mechanical components including a lever, handle, and bracket (no text or symbols)125. Produkt

OPIS CZĘŚCI
natural_image
Close-up of a mechanical component with arrows indicating direction (no readable text or symbols)natural_image
Close-up of a medical or laboratory instrument with a circular lens and control panel (no visible text or symbols)natural_image
Close-up of a mechanical clamp or bracket with a coiled cable or wire, no visible text or symbolsnatural_image
Hand turning a mechanical component with a tool (no text or symbols visible)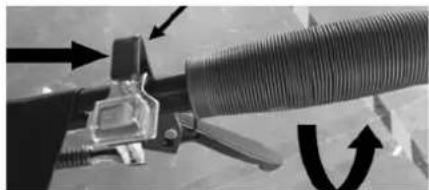
natural_image
Close-up of a mechanical component with threaded handle and directional arrows indicating motion (no text or symbols)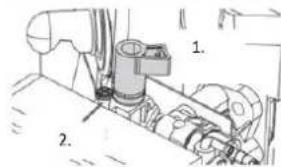
natural_image
Technical line drawing of a mechanical device with two wheels and a handle (no text or symbols)natural_image
Technical line drawing of a mechanical tool or device with a handle and lever (no text or symbols)○ Twarda i/lub sucha gleba: