FX-AF1212 - Rototiller Fuxtec - Free user manual and instructions
Find the device manual for free FX-AF1212 Fuxtec in PDF.
| Product type | Gasoline tiller |
| Brand | Fuxtec |
| Model | FX-AF1212 |
| Weight (without fuel) | 59.5 kg |
| Dimensions (L x W x H) | 1250 x 570-850 x 1210 mm |
| Engine | 212 cm³, 4.0 kW (3600 rpm) |
| Recommended fuel | Unleaded gasoline SP98 |
| Engine oil | SAE-30 (not pre-filled) |
| Working width | 36-57-85 cm |
| Working depth | 33 cm |
| Speeds | 1 forward, 1 reverse |
| Handle | Adjustable (3 positions) |
| Gearbox | Factory lubricated, do not open |
| Guaranteed sound level | LWA 101 dB(A) |
| Regular maintenance | Oil change after 5h then annually; air filter and spark plug |
| Safety | Emergency stop, guards, read manual |
| Warranty | 2 years (private), 1 year (professional) |
| Wear parts not covered | Blades, cables, belt, switches, seals, spark plug, filters |
Frequently Asked Questions - FX-AF1212 Fuxtec
User questions about FX-AF1212 Fuxtec
0 question about this device. Answer the ones you know or ask your own.
Ask a new question about this device
Download the instructions for your Rototiller in PDF format for free! Find your manual FX-AF1212 - Fuxtec and take your electronic device back in hand. On this page are published all the documents necessary for the use of your device. FX-AF1212 by Fuxtec.
USER MANUAL FX-AF1212 Fuxtec
natural_image
Line drawing of a tiller machine with no visible text or symbols
natural_image
Orange icon of a person reading a book on black background (no text or symbols)
Inhalt
DEUTSCHE / ENGLISH VERSION 3
VERSION FRANCAISE....22
POLSKA WERSJA JEZYKOWA 103
DEUTSCHE / ENGLISH VERSION

natural_image
Blue circular icon with a white open book symbol (no text or symbols)
natural_image
Blue circular icon with a white stylized face wearing glasses (no text or symbols)
natural_image
Blue circular icon with a white hand symbol (no text or numbers)
natural_image
Blue circular icon with a white sneaker and sole, no text or symbols present.GB
Warning:
Pay attention to rotating blades!
Please read the user
manual carefully before operating the machine.
Always wear eye and ear
protection.
Wear safety gloves.
Wear nonskid safety
footwear.
D
Warnung:
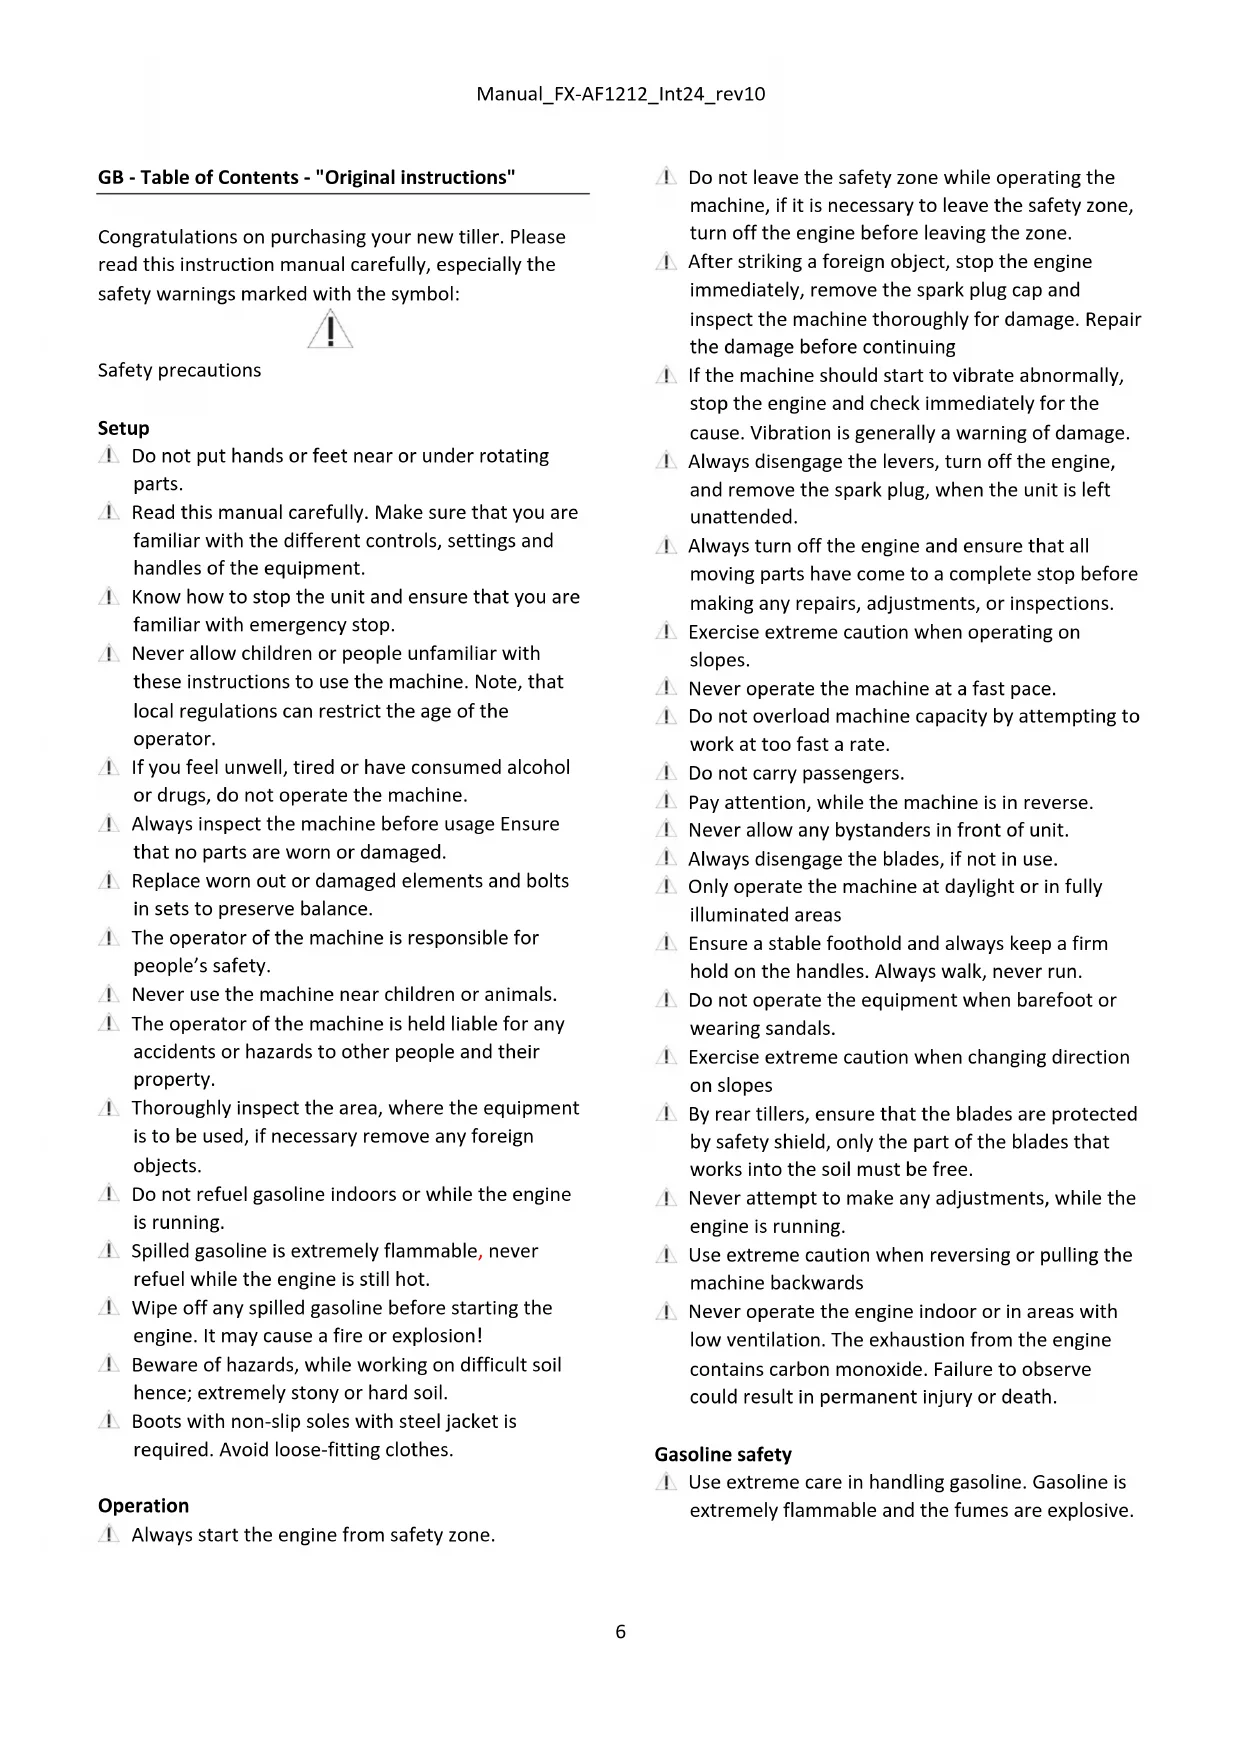
GB - Table of Contents - "Original instructions"
Congratulations on purchasing your new tiller. Please read this instruction manual carefully, especially the safety warnings marked with the symbol:

Safety precautions
Setup
Do not put hands or feet near or under rotating parts.
Read this manual carefully. Make sure that you are familiar with the different controls, settings and handles of the equipment.
Know how to stop the unit and ensure that you are familiar with emergency stop.
Never allow children or people unfamiliar with these instructions to use the machine. Note, that local regulations can restrict the age of the operator.
If you feel unwell, tired or have consumed alcohol or drugs, do not operate the machine.
Always inspect the machine before usage Ensure that no parts are worn or damaged.
Replace worn out or damaged elements and bolts in sets to preserve balance.
The operator of the machine is responsible for people's safety.
⚠️ Never use the machine near children or animals.
The operator of the machine is held liable for any accidents or hazards to other people and their property.
Thoroughly inspect the area, where the equipment is to be used, if necessary remove any foreign objects.
Do not refuel gasoline indoors or while the engine is running.
Spilled gasoline is extremely flammable, never refuel while the engine is still hot.
⚠ Wipe off any spilled gasoline before starting the engine. It may cause a fire or explosion!
⚠ Beware of hazards, while working on difficult soil hence; extremely stony or hard soil.
Boots with non-slip soles with steel jacket is required. Avoid loose-fitting clothes.
Operation
Always start the engine from safety zone.
Do not leave the safety zone while operating the machine, if it is necessary to leave the safety zone, turn off the engine before leaving the zone.
After striking a foreign object, stop the engine immediately, remove the spark plug cap and inspect the machine thoroughly for damage. Repair the damage before continuing
If the machine should start to vibrate abnormally, stop the engine and check immediately for the cause. Vibration is generally a warning of damage.
Always disengage the levers, turn off the engine, and remove the spark plug, when the unit is left unattended.
Always turn off the engine and ensure that all moving parts have come to a complete stop before making any repairs, adjustments, or inspections.
Exercise extreme caution when operating on slopes.
Never operate the machine at a fast pace.
Do not overload machine capacity by attempting to work at too fast a rate.
Do not carry passengers.
Pay attention, while the machine is in reverse.
Never allow any bystanders in front of unit.
Always disengage the blades, if not in use.
Only operate the machine at daylight or in fully illuminated areas
4 Ensure a stable foothold and always keep a firm hold on the handles. Always walk, never run.
Do not operate the equipment when barefoot or wearing sandals.
Exercise extreme caution when changing direction on slopes
A By rear tillers, ensure that the blades are protected by safety shield, only the part of the blades that works into the soil must be free.
Never attempt to make any adjustments, while the engine is running.
Use extreme caution when reversing or pulling the machine backwards
A. Never operate the engine indoor or in areas with low ventilation. The exhaustion from the engine contains carbon monoxide. Failure to observe could result in permanent injury or death.
Gasoline safety
Use extreme care in handling gasoline. Gasoline is extremely flammable and the fumes are explosive.
Serious personal injury can occur, when gasoline is spilled on yourself or your clothes. Rinse your skin and change clothes immediately!
Use only an approved gasoline container. Do not use soft drink bottle or similar!
Extinguish all cigarettes, cigars, pipes and other sources of ignition.
⚠️ Never refuel your machine indoors.
Let the engine cool down before refilling
Never fill the fuel tank to more than 2.5 cm below bottom of filler in order to provide space for fuel to expansion.
After refueling, ensure that the cap tighten securely.
Never use the lock-function on the gasoline gun, when refueling.
Do not smoke while refueling.
Never refuel inside a building or where gasoline fumes may get in contact with an ignition source.
Keep gasoline and engine away from appliance, pilot lights, barbecues, electric appliances, power tools, etc.
⚠️ If the fuel tank has to be drained, this shall be done outdoors
Maintenance and storage
The engine shall be stopped when carrying out maintenance and cleaning operations, when changing tools and when being transported by means other than under its own power.
Check regularly that all bolts and nuts are tightened. Retighten if necessary.
The engine must be completely cooled before storing indoors or covered.
⚠️ If the machine unused for a period of time, please refer to the instructions in this manual.
Maintain or replace safety and instruction labels, as necessary.
Only use originalspare parts or accessories. If not original parts or accessories is used, the liability is no longer applied.
⚠️ Replace faulty silencers.
Miscellaneous
The gears are delivered pre-greased. However, always ensure they are well greased before each use.
⚠ The motor is not pre-filled with oil.
Factory-fitted control devices, such as the handle-mounted clutch cable, must not be removed or exposed.
Only drain the fuel tank outdoors. Gasoline is extremely flammable and the fumes are explosive.
⚠ Ensure that the machine is properly secured when transported on a flatbed etc.
⚠️ Reduce the throttle during engine shutdown and close the fuel valve.
Due to vibrations, it is recommended to take a break for every 30 minutes use to avoid fatigue in your arms.
Assembly
Please follow the steps in figure:
(Actual model may vary from the illustration shown.)
1. Box content
A. Extension blades
B. Tiller with cables and support wheels
C. Blades Outer
D. Side guards
E. Handlebar
F. Depth skid
G. CE handle
H. Mounting bracket for handlebar
- Fit the handle into the bracket (H) fasten with hand wheel.
NB: Ensure the bolt goes through the spring.
- Mount clutch handle as shown on the picture.
- Mount the side guards using the bolts and nuts supplied. Note the side guard has to go under the body.
- Mount the blades using the cotter bolts and pins.
Fill the motor with oil. See changing the oil section for more details.
Clothing
When using the machine, wear close-fitting work clothes, hard-wearing work gloves, ear defenders and non-slip boots with steel toecaps.
Operating the tiller
⚠ Ensure the machine is placed on a level surface with the support wheels lowered prior to start.
Remove all foreign objects from the work area before using the machine. Stones, glass, branches and similar items may damage the tiller. Also check the bolts on the tiller are tightened.
Start the motor as per the instructions below. Stand clear of the machine's moving parts.
Never attempt to move the machine in any way other than intended for normal use while the motor is running.
The tiller is designed for use in vegetable gardens and flowerbeds. Ensure that you are familiar with these instructions before operating the machine, in particular the motor start and stop procedures.
Fig 7: To use the black handle the control stick must first be activated. By tilting the control stick to the right or left side and then activate the black handle lever, the tiller will move forward or backwards.
Pay attention while reversing. It is important that the area is cleared, for any obstacle before reversing.
Never reverse the tiller against a wall, tree or any other fixed obstacle.
Operation zone
While the machine is being operated and the motor is running, do not leave the operation zone marked fig 10. If it is necessary to leave the operation zone, for example to attach an accessory, first stop the engine.
It is normally necessary to drive the tiller over a section of earth 2-3 times from different directions. Do not till very wet soil, as clods of earth will form that are difficult to break up.
Adjusting the handle
Loosen the red handle and move the handlebar like shown on fig. 8 and 9.
Adjusting the wheel/ depth skid
Fig 12. During operation, it may be necessary to raise the wheel assembly, as it is connected to the depth skid. Depress the pedal to the right of the support wheels to adjust the wheel assembly/depth skid to one of the 3 available positions.
The depth skid can be set to 3 different depths. The deeper it extends into the soil, the deeper the tilling blades will work and the slower the machine will advance. Setting the correct tilling depth will significantly reduce the effort required. The depth skid should always be adjusted to suit the ground conditions. We recommend testing several depths to see which works best.
Lubrication of gearbox
The gearbox is permanently lubricated at the factory, never open the gearbox.
Starting and stopping the engine
Remember: Always check the oil level prior to use!
The oil level must always be between the min. and max. Mark on the dipstick. Always use SAE-30 oil. Use only unleaded 95 octane gas. Never over-fill the gas tank.
Warning: Stay out of dashed zone, while starting the engine!
Always start the engine from dotted operation zone See Figure 11.
Starting the engineSee fig. 6
- Set the throttle control on the handle to max.
- Position the choke at max. Move the choke lever fully to the left. The choke is not required if the motor is hot.
- Pull the start cord to start the motor. Always feed the start cord back into the motor by hand.
- When the motor is started, set the choke to minimum (fully to the right) Engage the throttle slightly.
Stopping the engine
-
Set the throttle control to "low" and let the motor run for approx. 30 seconds.
-
When the motor idles, set the throttle control to full stop.
Use the toolbox underneath the breastplate to keep tools handy.

Vibrations may travel up into the handle during use. We therefore recommend taking a break every 30 minutes.
Cleaning the tiller
The tiller should be cleaned after use. Use a garden hose to wash off soil and dirt. Remove any grass, etc. from the rotor shaft. The chassis number should only be cleaned with a damp cloth to avoid unnecessary wear. Avoid using a high-pressure washer during cleaning.
Changing the oil
The oil should initially be changed after the first 5 hours of use, and thereafter once per year.
- Let the motor run for 5 minutes to heat up the oil. This allows the oil to run more freely and makes for a more complete oil change.
- After 5 minutes, stop the motor. Remove the spark plug cap. Drain the oil by unscrewing the sump plug. Remember to drain the oil into a container of sufficient capacity. NB: The motor must not be tipped backwards more than 45 degrees.
- Screw the sump plug back in and pour new oil into the motor. Do this by removing the dipstick and pouring in the recommended quantity of oil.
- Refit the spark plug cap.
Alternatively, use an oil extractor kit.
- Suck the oil up through the oil filler hole using the syringe. Use the hose to reach the sump.
- Transfer the used oil to the container.
- Fill the engine with new SAE-30 oil.
- Check the oil level using the dipstick.
Remember to dispose of used oil in a safe way. Oil and oil extractor kit are not included
Air filter maintenance
Please inspect and clean the air filter on a regular basis. If the filter has not been cleaned for a longer period, this will have influence on the engines power take-off and the exhaustion.
- Clean around the air filter before it is removed.
- Carefully remove the paper filter and check it. Brush it with a soft brush. If it is very dirty, it must be changed. Take care that no dirt gets into the intake of the engine.
- Wash the black foam element on the right side in warm soapy water.
- Press the water out of the foam element and let it dry. Put a few drops of SAE-30 oil on the filter to moisten it lightly with oil. Carefully squeeze out any surplus oil. Remount the element.
- Check that all parts are fitted correctly and the cover closed as shown in the picture.
Spark plug maintenance
- Remove the spark plug cap.
- Brush away any dirt and deposit of the spark plug.
- Loosen the spark plug using a spark plug socket.
- Check the insulation is intact.
- Clean the spark plug using a wire brush.
- Measure the electrode gap 0.7–0.8 mm. Avoid damaging the electrode.
- If it is damaged, replace it with a new one.
- Refit the spark plug.
- Refit the spark plug cap.
Storage
- If the machine is likely to be stored unused for prolonged periods, follow the instructions below. This will ensure longer machine lifetime.
- Use a garden hose to wash off soil and dirt. Remove any grass, etc. from the rotor shaft. The chassis number should only be cleaned
with a damp cloth to avoid unnecessary wear. Avoid using a high-pressure washer during cleaning.
- Wipe the tiller with a damp cloth so that all surfaces are clean. Wipe the surfaces down with an oily cloth to prevent rust.
• Always store the machine in a dry, clean location.
Noise, vibration and precautionary measures
- Long-term exposure to noise levels exceeding 85 dB (A) are damaging. Always use ear defenders when the machine is being used.
- Reduce the running speed of the motor to reduce vibration and noise levels.
- To reduce noise levels further, only use the machine in an open environment.
- Vibrations can be reduced further by holding the handle firmly.
- To avoid disturbing others, the machine should only be used during the daytime.
- Always wear close-fitting work clothes, hard-wearing work gloves, ear defenders and non-slip boots with steel toecaps.
- Take a 30-minute break every 2 working hours.
- A worn belt has to be replaced/ serviced by a authorized dealer
Troubleshooting
The motor will not start
- Check the fuel control is set correctly.
- Check the spark plug.
- Check there is fresh gas in the tank.
- See separate motor instructions for further troubleshooting.
The motor is not running smoothly
- Ensure the throttle control is not set to max.
- Check there is fresh gas in the tank.
The blades will not rotate
- Check for stones lodged between the blades.
- Release any stones by removing the blades.
- Check the cables are in good working order and fitted correctly.
- Check the belt is in good working order and fitted correctly.
- Ensure the belt tensioner is adjusted correctly.
The blades will not stop
- Stop the engine and contact your dealer.
| Side guards: used for tilling in between crops, such as carrots/potatoes, to avoid covering the crops in soil. Side guards can also be used for tilling along a wall or stone path, or in soft soil. | Fig. 25 |
| Scarifier: used to aerate the lawn and remove underlying dead grass from the lawn. The grass grows greener and stronger, which prevents the grown of moss. | Fig. 18Fig. 30 |
| Push hoe: this accessory is not available | Fig. 17Fig. 30 |
| Harrow: used to loosen the soil between crops and thus remove weeds.The rear bracket is necessary for fitting. | Fig. 16Fig. 30 |
| Rake: used to rake paths and entrances with loose stones, for instance pebbles. The rear bracket is necessary for fitting. | Fig. 15Fig. 30 |
| Ridge plough: used to plough up ground for potatoes, carrots and other root crops. The rear bracket is necessary for fitting. | Fig. 20Fig. 30 |
| Digging claws: used if the soil is loose and the machine is to be operated with a ridge plough or harrow instead of wheels. | Fig. 22 |
| Snow scraper: used to scrape snow from a solid surface, such as paving slabs. Can be tilted to the left/right. The assembly plate is necessary for fitting. | Fig. 24Fig. 23Fig. 21 |
| Snow chains:used withsnow bladeifitis very slipperytothe machinegives abettergrip. | Fig. 28 |
| Weight blocks: used to give the machine a better grip when operating with a trailer or snow scraper. Can only be fitted with wheels. | Fig. 26Fig. 21 |
| Intermediate blades:usedto givethe machinea largertillerwidth. They also give themachinea smootherride andcan be advantageously usedbyveryloose soil. | Fig. 27 |
| Wheels: used to mountaccessories, such as rake. | Fig. 21 |
| Rear bracket: used to fit accessories. | Fig. 30 |
Zubehör

natural_image
Blue circular icon with a white open book symbol (no text or numbers)
natural_image
Blue circular icon with a white stylized human head wearing glasses (no text or symbols)
natural_image
Blue circular icon with a white hand symbol (no text or numbers)
natural_image
Blue circular icon with a white sneaker symbol (no text or numbers)FR
Directives CE applicables
Directive 2016/1628/RG
Directive CEM 2004/108/CE
Directive Bruit 2000/14/CE
L. Zirkler, Direction
VERSIONE ITALIANA
Illustrazioni
| 1 | 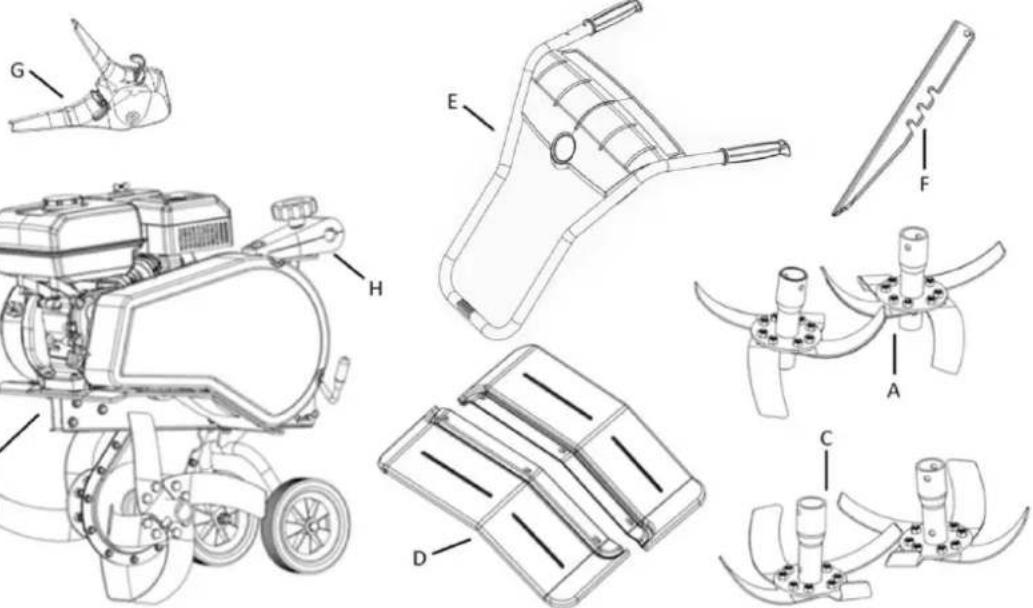 |
| 2 | 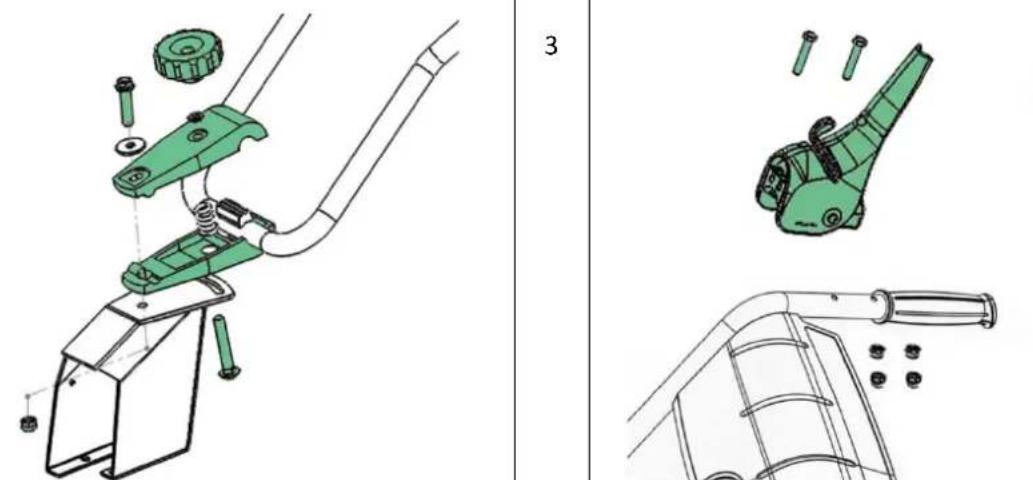 |
| 4 | 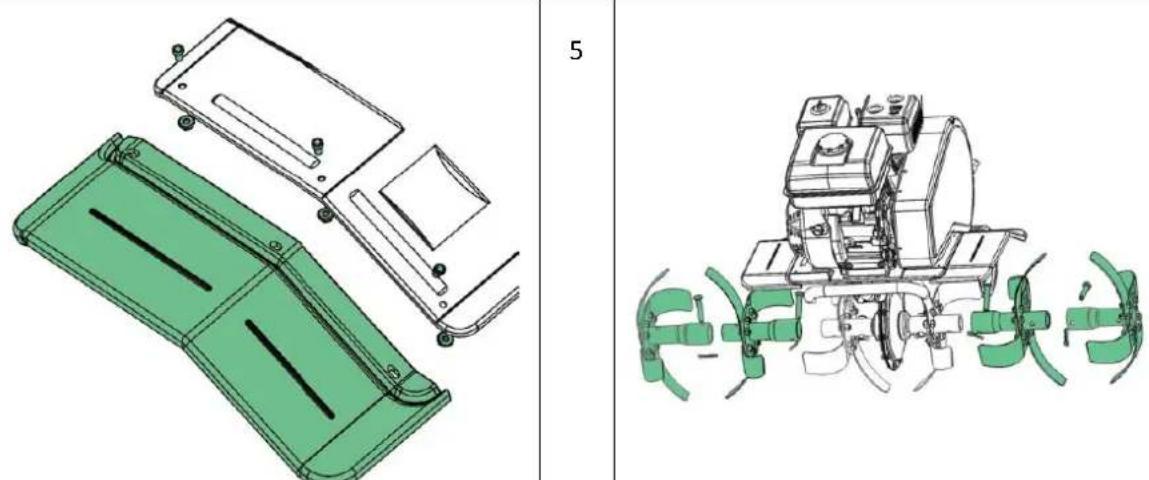 |
| 6 | 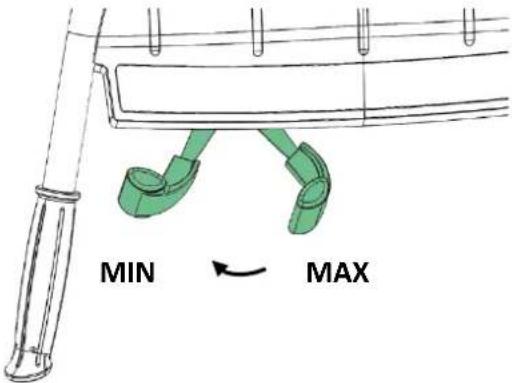 | 7 | 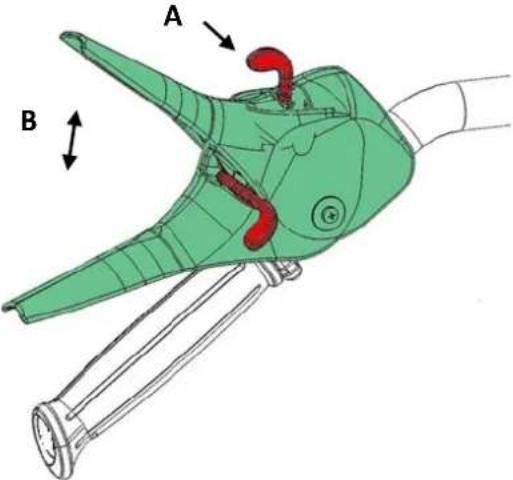 |
| 8 | 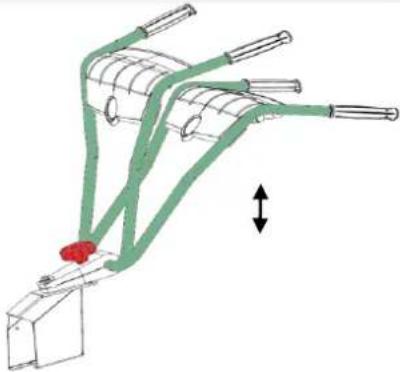 | 9 | 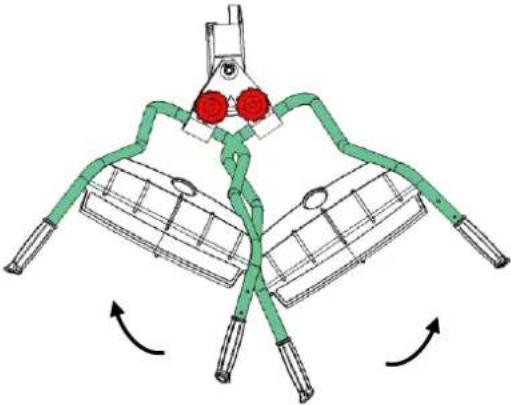 |
| 10 | 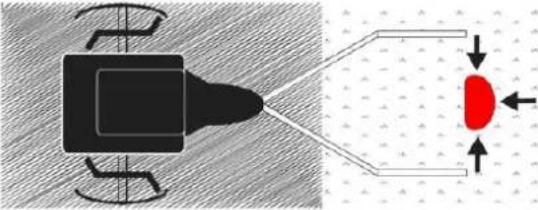 | 11 | 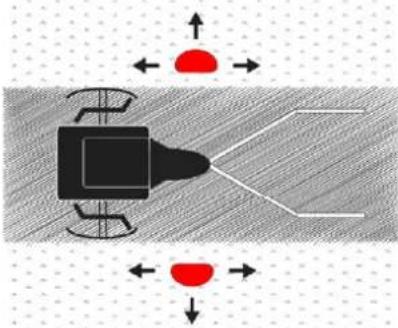 |
| 12 | 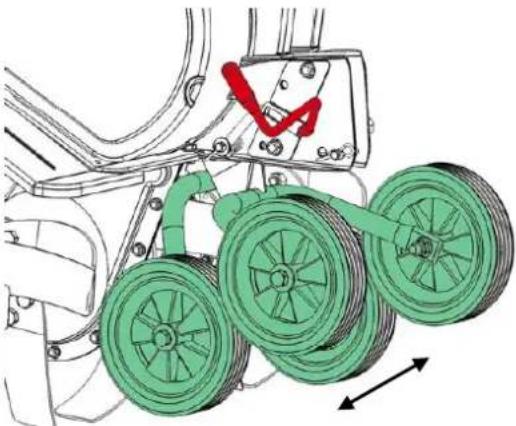 | 13 | 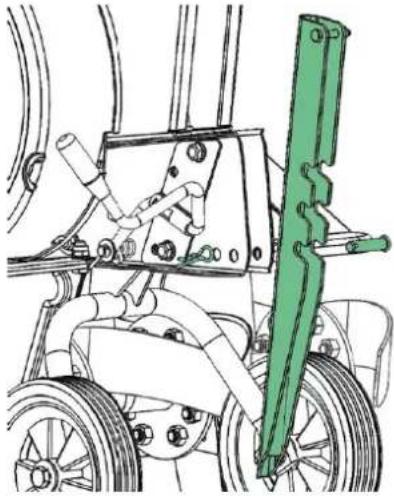 |

natural_image
Blue circular icon with a white open book symbol (no text or symbols)
natural_image
Blue circular icon with a stylized person wearing glasses (no text or symbols)
natural_image
Blue circular icon with a white hand symbol (no text or numbers)
natural_image
Blue circular icon with a white sneaker and sole, no text or symbols present.IT

natural_image
Blue circular icon with a white open book symbol (no text or symbols)
natural_image
Blue circular icon with a white stylized person wearing glasses (no text or symbols)
natural_image
Blue circular icon with a white hand symbol (no text or numbers)
natural_image
Blue circular icon with a white sneaker symbol (no text or numbers)FR
Atención:
Directiva CEM 2004/108/CE

natural_image
Blue circular icon with a white open book symbol (no text or symbols)
natural_image
Blue circular icon with a white stylized face wearing glasses (no text or symbols)
natural_image
Blue circular icon with a white hand symbol (no text or numbers)
natural_image
Blue circular icon with a white sneaker and sole symbol (no text or numbers)FR

natural_image
Blue circular icon with a white open book symbol (no text or symbols)
natural_image
Blue circular icon with a white stylized face wearing glasses (no text or symbols)
natural_image
Blue circular icon with a white hand symbol (no text or numbers)
natural_image
Blue circular icon with a white sneaker symbol (no text or numbers)FR
L. Zirkler, Management
SVENSK VERSION
Etablering

natural_image
Blue circular icon with a white open book symbol (no text or symbols)
natural_image
Blue circular icon with a white stylized person wearing glasses (no text or symbols)
natural_image
Blue circular icon with a white hand symbol (no text or numbers)
natural_image
Blue circular icon with a white sneaker symbol (no text or numbers)FR
flowchart
graph TD
    A["30: Tractor with two parts"] --> B["15: Radial cutter"]
    B --> C["16: Tractor with blade"]
    C --> D["17: Tractor with blade"]
    D --> E["25: Turbine blade"]
    E --> F["23: Blade with cutout"]
    F --> G["24: Blade with blade"]
    G --> H["21: Turbine blade"]
    H --> I["27: Turbine blade"]
    I --> J["21: Turbine blade"]
    J --> K["26: Turbine blade"]
    K --> L["28: Track/Frame"]
    L --> M["18: Turbine blade"]
    M --> N["21: Turbine blade"]
    N --> O["27: Turbine blade"]
    O --> P["20: Turbine blade"]
    P --> Q["21: Turbine blade"]
    Q --> R["22: Turbine blade"]
    R --> S["30: Tractor with two parts"]
    S --> T["21: Turbine blade"]
    T --> U["20: Turbine blade"]
    U --> V["30: Tractor with two parts"]
Tillbehör

natural_image
Blue circular icon with a white open book symbol (no text or symbols)
natural_image
Blue circular icon with a white stylized face wearing glasses (no text or symbols)
natural_image
Blue circular icon with a white hand symbol (no text or numbers)
natural_image
Blue circular icon with a white sneaker symbol (no text or numbers)FR
Ostrzeżenie: