
SS-7720 - Kettle Sogo - Free user manual and instructions
Find the device manual for free SS-7720 Sogo in PDF.
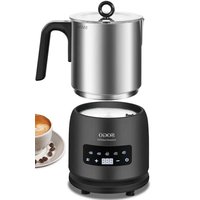


| Product type | Milk frother |
| Brand | Sogo |
| Model | SS-7720 |
| Power supply | AC 220-240V, 50-60Hz, 550W |
| Maximum capacity (hot milk) | 300 ml |
| Maximum capacity (cold foam) | 150 ml |
| Minimum capacity | 75 ml |
| Functions | 5: hot milk thick foam, hot milk light foam, cold milk foam, hot milk, hot cocoa |
| Adjustable temperatures | 45°C, 55°C, 65°C |
| Dimensions (height x diameter) | 22 x 12 cm (approx.) |
| Weight | 0.6 kg (approx.) |
| Pot material | Stainless steel (approx.) |
| Control type | Digital panel with on/off, menu, +/- buttons |
| Included accessories | Whisk, transparent lid |
| Safety | Automatic shut-off, overheat protection, safety device (code E1) |
| Cleaning | Washable with water (except motor base), do not immerse |
| Maintenance | Clean with a soft sponge and mild detergent |
| Spare parts | Replaceable whisk (mixing head) |
| Certifications | CE, RoHS, Low Voltage Directive 2014/35/EU |
| Usage | Household use only |
Frequently Asked Questions - SS-7720 Sogo
User questions about SS-7720 Sogo
0 question about this device. Answer the ones you know or ask your own.
Ask a new question about this device
Download the instructions for your Kettle in PDF format for free! Find your manual SS-7720 - Sogo and take your electronic device back in hand. On this page are published all the documents necessary for the use of your device. SS-7720 by Sogo.
USER MANUAL SS-7720 Sogo
Download your manual
MILK WARMER AND FROTHER
Declaration of conformity, Responsibility of Electronic products disposal, Importers Details and After-sales service on the last pages.
• Always read the instruction book carefully before using. - This manual can be downloaded from our web page www.sogo.es - Keep these instructions for future reference.
2. Safety instructions for the user
GENERAL PRECAUTIONS
General precautions during the use of electrical equipment
- Do not use the appliance for any other purpose than described in this manual.
- Do not use or store the appliance outdoors.
- This product is intended for indoor, non-industrial, non-commercial and only for household use. Do not use the item outdoors or for any other purpose. Misuse or improper handling may cause problems in the appliance and cause injury to the user.
- Ensure that the voltage indicated on the nameplate matches the mains voltage before plugging in the appliance.
- Always remove the plug from the power socket when the appliance is not in use. Do not leave the appliance unattended when switched on.
- Close supervision is necessary when any appliance is being used by or near children.
- The appliances are not intended to be operated by means of an external timer or separate remote-control system.
- Avoid spillage on the connector
- This appliance is intended to be used in household and similar applications such as:
- Staff kitchen areas in shops, offices and other working environments;
- Farm houses and by clients in hotels, motels and other residential type environments;
- Bed and breakfast type environments;
- Catering and similar non-retail applications.

Restrictions on use to avoid personal injury
- Do not let the appliance operate unattended.
- Do not place or operate this appliance near water sources.
- Do not place or operate the appliance and its power cord on or near hot surfaces (e.g., stove plates) or open flames
- Do not leave the power cord hanging from sharp edges and keep away from hot objects and flames. Do not wind the cord around the
appliance and do not bend it.
- Never use accessories that are not recommended by the manufacturer.
- The use of accessories not recommended or sold by the appliance manufacturer may result in fire, electric shock or injury to persons.
- To avoid electric shock, make sure your hands are dry before plugging or unplugging.
- Do not use the device with wet hands, on damp floors or when the atmosphere is humid, there is a risk of electric shock.
- Never immerse the appliance or the plug in water or any other liquid. In the event of the appliance falling in water, disconnect immediately from the mains supply and take it to an authorized service agent for repair before reusing.
- Do not use the appliance if it has fallen on the floor, if there are visible signs of damage, or if it has a leak.
- Do not use the appliance if the cable or plug is damaged. If the cord is damaged, it must be replaced only by the manufacturer, its service agent, or similarly qualified persons in order to avoid a hazard.
- In case of appliance malfunction, or if it has been damaged in any manner, return the appliance to the nearest authorized service facility for examination, repair, or adjustment.

Restrictions on use when used with children and elders
- The appliance is not to be used by persons (including children) with reduced physical, sensory, or mental capabilities, or lack of experience and knowledge, unless they have been given supervision or instruction.
- Children should be supervised to ensure that they do not play with the appliance.
- Appliances can be used by persons with reduced physical, sensory, or mental capabilities or lack of experience and knowledge if they have been given supervision or instructions concerning use of the appliance in a safe way and understand the hazards.
- This appliance can be used by children aged from 8 years and above and persons with reduced physical, sensory, or mental capabilities or lack of experience and knowledge if they have been given supervision or instruction concerning use of the appliance in a safe way and understand the hazards involved.
- Cleaning and user maintenance shall not be made by children unless they are older than 8 and supervised.
- Keep the appliance and its cord out of reach of children less than 8 years.
- Do not allow children to use the appliance without supervision.

Instructions to follow when using the appliance
- Do not place the appliance on a polished wood surface, as it could damage the wood.
- ⚠️ WARNING: Do not touch hot surfaces.
- ⚠️ WARNING: This equipment shall be used with CAUTION as this electrical appliance contains a heating function. The surface of this appliance is also different from other functional surfaces which can produce high temperatures. Since temperatures are perceived differently by different persons, the equipment must be touched only at intended handles and gripping surfaces with the help of heat protectors like gloves or similar type of clothing. Otherwise, let it cool down for sufficient time before touching the hot surface.
- ⚠️ WARNING: This appliance must be used with an earthed socket.
- Use caution when pouring warmed milk from the Milk Frother as hot milk can scald.
- Remove and safely discard any packaging material and promotional labels before using the Milk Frother for the first time.
- To eliminate a choking hazard for young children, remove and safely discard the protective cover fitted to the plug of this appliance.
- Ensure the Milk Frother is properly assembled before use.
- Do not touch the metal parts, housing, or its accessories when the appliance is in use, as this may cause burns or scalding.
- During the use of the milk froth machine, which has a certain temperature, keep it away from children to avoid burns.
- Do not touch the cup body and heating plate during or after the use of the milk froth machine to avoid burns.
- Do not operate without milk in the jug.
- Never touch rotating parts. Risk of injury!
- By exceeding the filling capacity, the milk may overflow.
- Do not insert any objects and/or fingers into the appliance apertures.
- To avoid a circuit overload when using this product, do not operate another high-wattage product on the same electrical circuit.
- Avoid spillage on the connector.
- This milk frother is only used to froth milk, warm milk, and make hot cocoa at home. It is not suitable for commercial use or other uses, which may cause harm. The manufacturer shall not be liable for failures or accidents caused by not using the equipment in accordance with the instructions.
- Do not operate the appliance without liquid.
- It is strictly prohibited to fill milk above the maximum water level or
below the minimum water level.
- The amount of milk poured should not exceed the maximum position marked inside the cup body, but also pay attention to the amount of milk poured not less than the minimum amount marked position.
- The following situations must ensure that the power is disconnected:
- When there is no water in the cup, when adding water,
- cleaning or moving the milk froth machine,
- when there is a problem with the milk froth machine.
- Always disconnect the appliance from the mains when it is left unattended and before assembling, disassembling or cleaning.
- It is recommended to use refrigerated milk at a temperature of 5~10 degrees Celsius for the best taste.
CLEANING AND MAINTENANCE
- Kindly refer to the cleaning and maintenance section for details on how to clean surfaces that come into contact with food.
3. TECHNICAL SPECIFICATIONS
| Voltage Frequency Power | ||
| AC 220-240V | 50-60Hz 550W | |
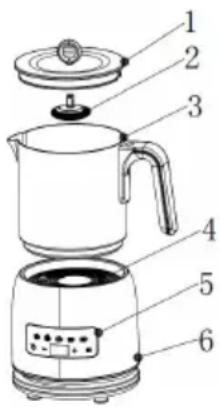
4. PARTS DESCRIPTION
- Transparent lid
- Whisk
- Milk jug
- Power connector base
- Control panel
- Motor body
Digital control panel functions:
- On/Off button: With the help of this button, we can turn the appliance on and off. By pressing it once, the appliance turns on and the indicator light also turns on.
- Menu function button: This milk frother has 5 different menu functions. By simply pressing the Menu function button, we can change to the function that we want to use.
- + / - Button: With the help of the + / - button, we can increase or decrease the temperature value as per our requirement. This unit works with 3 different temperatures: the lowest is 45°C, then 55°C, and the highest is 65°C.
- Menu function icons: As mentioned above, this milk frother has 5 menu functions. I. Hot milk with thick froth
(Note: The minimum amount of milk to use this function is 75 ml and the maximum is 300 ml)
II. Hot milk with light froth
(Note: The minimum amount of milk to use this function is 75 ml and the maximum is 300 ml)
III. Cold milk with froth
(Note: Min. amount of milk to use this function is 75 ml and max. is 150 ml)
IV. Warm milk V. Hot cocoa
To prepare froth with the first frothing function, press the Menu function button and the first frothing function "Hot milk with thick froth" icon indicator light will illuminate and the milk frother is ready for frothing. To change the menu function, press the Menu function button again and the second menu icon indicator light illuminates. In this way, you can keep pressing the Menu function button until your desired menu function icon light illuminates.
1.5 in 1 Menu functions:
This milk frother has 5 different frothing functions. Below you can find how to prepare the froth in all the menu functions.
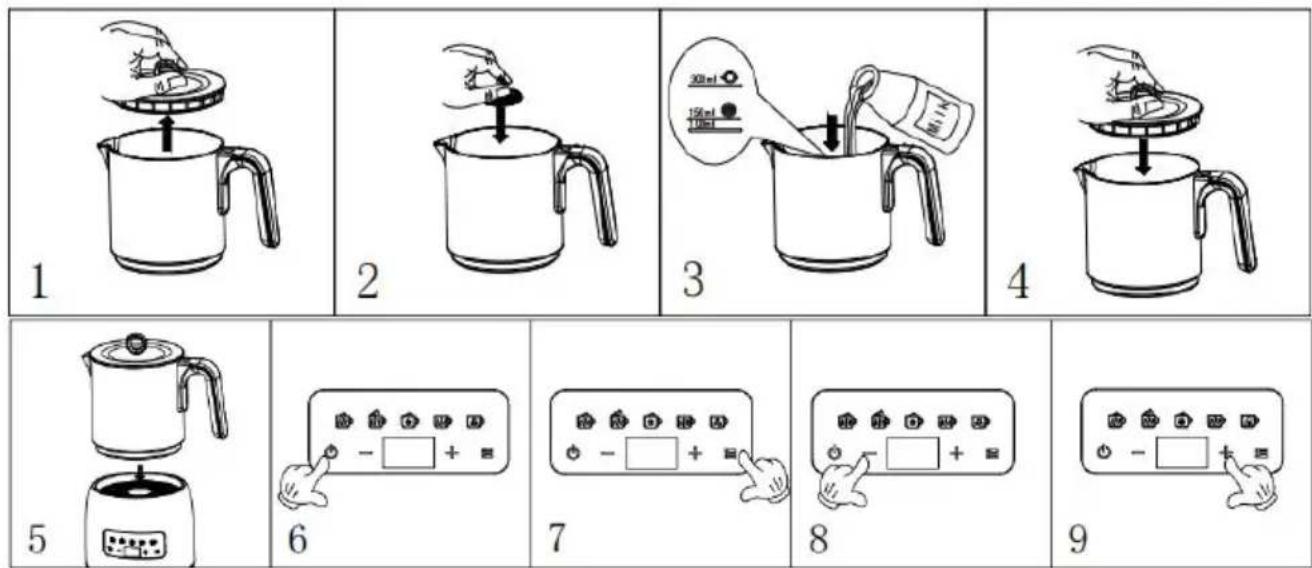
I. Hot milk with thick froth: This kind of froth is suitable to prepare Cappuccino café.
- Remove the lid of the frothing cup as shown in Figure 1.
- Place the mixing head into the rotating shaft of the cup body and install it to the end, as shown in Figure 2.
- Pour pure milk into the cup, making sure that the milk amount should not exceed the MAX mark
otherwise the milk froth may overflow. Also, the minimum milk amount should not be less than the

MIN marking, as shown in Figure 3.
- Place the lid back on the top of the jug as in Figure 4.
- Place the jug back on the power connector base, as shown in Figure 5.
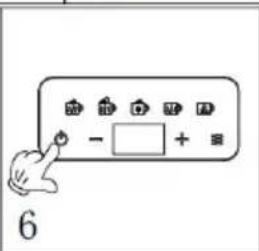
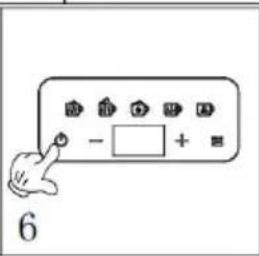
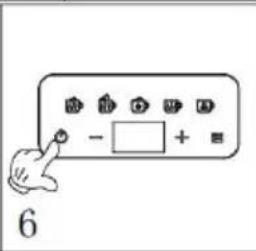
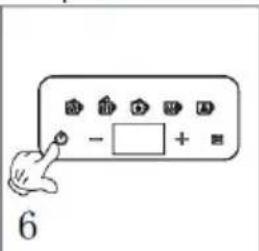
- Press the power button as shown in Figure 6.
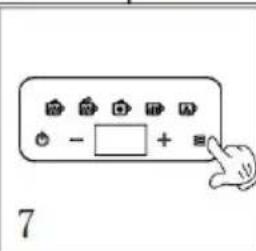
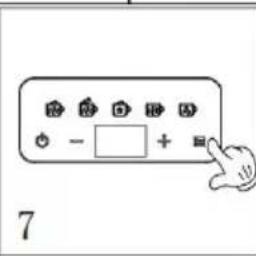
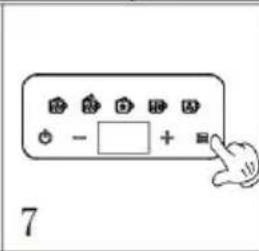
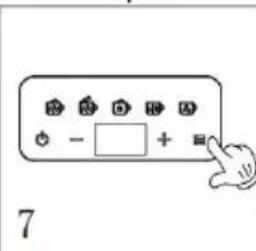
- Press the menu function button 🔔 and select the first menu function and first menu function icon.

The light illuminates as shown in figure 7.
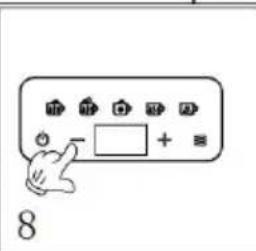
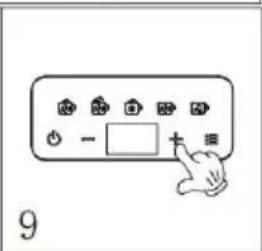
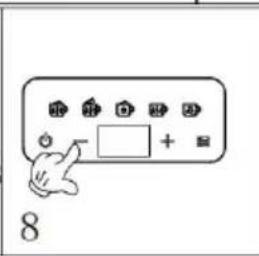
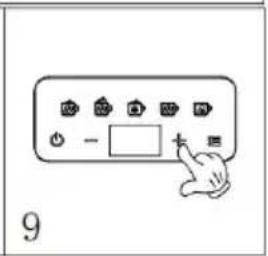
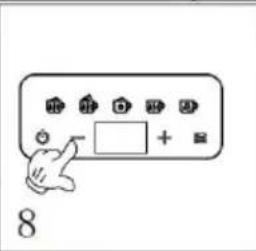
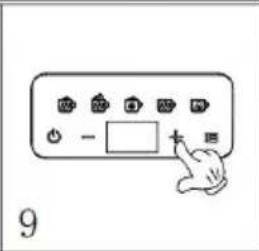
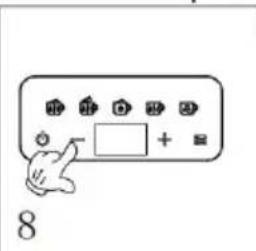
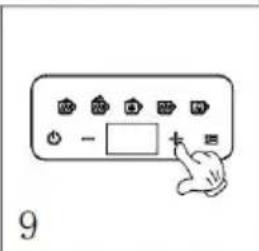
- The default temperature of this menu function is 65°C. If you need to change the temperature, press the + / - buttons to select the desired temperature and unit, then start frothing as shown in figures 8 and 9.
- Once the frothing function finishes, remove the jug from the power connector base and press the power button to switch off the appliance.
II. Hot milk with thin froth: The same way as explained above, we can prepare hot milk with thin or low froth. The only difference will be that instead of pressing the menu function button once, we need to press it twice until the second menu function icon indicator light illuminates.
Note: This kind of froth is suitable to prepare Latte café.
III. To make cold milk froth:
- Remove the lid of the frothing cup as shown in figure 1.
- Place the mixing head into the rotating shaft of the cup body and install it to the end, as shown in Figure 2.
- Pour pure milk into the cup, making sure that the milk amount does not exceed the MAX mark, otherwise the milk froth may overflow. Also, the minimum milk amount should not be less than the
MIN marking, as shown in Figure 3.
- Place the lid back on the top of the jug as in figure 4.
- Place the jug back on the power connector base, as shown in Figure 5.
- Press the power button as shown in figure 6.
- Press the menu function button ⚙ and select the third menu function until this icon 📋 lights up, as shown in figure 7.
- Once the frothing function finishes, remove the jug from the power connector base and press the power button to switch off the appliance.
IV. To make warm milk:
- Remove the lid of the frothing cup as shown in figure 1.
- Place the mixing head into the rotating shaft of the cup body and install it to the end, as shown in figure 2.
- Pour pure milk into the cup, making sure that the milk amount does not exceed the 300 ml MAX mark, otherwise the milk froth may overflow. Also, the minimum milk amount should not be less than the
MIN marking, as shown in figure 3.
- Place the lid back on top of the jug as shown in figure 4.
- Place the jug back on the power connector base, as shown in figure 5.
- Press the power button as shown in figure 6.
- Press the menu function button and select the fourth menu function until the fourth icon light illuminates, as shown in Figure 7.
- The default temperature for this menu function is 65°C. If you need to change the temperature, press the + or - button to select the desired temperature, and the unit will start frothing as shown in Figures 8 and 9.
- Once the frothing function finishes, remove the jug from the power connector base and press the power button to switch off the appliance.
V. To make hot cocoa:
- Remove the lid of the frothing cup as shown in Figure 1.
- Place the mixing head onto the rotating shaft of the cup body and install it to the end, as shown in Figure 2.
- Pour pure milk into the cup, making sure that the milk amount does not exceed the 300 ml MAX mark, otherwise the milk froth may overflow. Also, the minimum milk amount should not be less than the
MIN marking, as shown in Figure 3.
- Add cocoa powder in the ratio of 0.15g to 100ml of milk.
- Place the lid back on top of the jug as shown in Figure 4.
- Place the jug back on the power connector base, as shown in Figure 5.
- Press the power button as shown in figure 6.
- Press the menu function button and select the fourth menu function until the fourth icon lights up.
It illuminates as shown in figure 7.
- The default temperature of this menu function is 65°C. If you need to change the temperature, press the + / - button to select the desired temperature and unit, then start frothing as shown in figures 8 and 9.
- Once the frothing function finishes, remove the jug from the power connector base and press the power button to switch off the appliance.
Note 1: Cocoa powder can be added more or less according to taste.
Note 2: If the cocoa powder floats on the milk surface, please stir the cocoa powder with a spoon. It can also be used during preparation. Add cocoa powder in 3-4 batches.
5. CLEANING AND MAINTENANCE
- Please use sponges, easy-to-clean cloths, or mild household cleaners and water for cleaning. Do not use corrosive substances for cleaning and do not use metal hard objects to assist cleaning.
- When cleaning the outside of the stand, only use a cloth to clean. Be careful not to get any electronic parts wet. Do not use the dishwasher to clean the stand.
Note: 1. The mixer can be cleaned directly with water.
- The cup body can be cleaned directly with water.
- The motor part cannot be washed in water.
- Do not flush the frame with water.
6. TROUBLESHOOTING
| Problems Reason Solution | ||
| Machine doesn’t work Not connected to power | Check if the power supply is loose; Check that the power supply is connected. | |
| The E1 code appears on the display | Activate safety device Place the cup body. | |
| There is little or no milk froth | Wrong warming milk function selected | Select the correct milk froth function |
| The amount of milk in the cup is below the minimum mark | Fill the cup with milk as Per min. And max. Marking | |
| Mixer head is not loaded properly or not installed in its place | Insert the whisk into the rotating shaft inside the cup | |
| The whisk head has been damaged | Replace the mixing head with a new one | |
| Milk spills | The milk in the cup is Above the maximum mark | The amount of milk poured at one time should not exceed max. Mark. |
| Motor body and jug is tilted | The machine must be placed on a flat surface when in use. | |
| Power indicator flashin | Cup body temperature too high | Wait for the container to cool, and for a quick cooling, pour refrigerated milk into the cup body container |
| Cocoa powder floats t the surface | Mix it properly with a spoon works better | |

Digital control panel functions:
Digital control panel functions:
DECLARATION OF CONFORMITY
DECLARATION OF CONFORMITY
This device complies with EU Low Voltage Directive 2014/35/EC, Electromagnetic Compatibility Directive 2014/30/EU, Directive 2015/863/EU on the restriction of the use of certain hazardous substances in electrical and electronic equipment, and Directive 2009/125/EC on the eco-design requirements applicable to energy-related products.
This symbol on the product or on the packaging indicates that this product cannot be disposed of as normal rubbish or household waste. All electrical and electronic equipment and battery-operated units must be recycled in a proper manner and according to local municipal laws. You can recycle them by taking them to government-authorized disposal centers or specialized bins, which you can find in any nearby large supermarkets, electronics or electro-domestic products stores, or malls that have these types of facilities available.
Designed by: SOGO based on European quality standards. Imported by: Sanysan Appliances S.L, NIF: B98753056, C/ Barcas 2, 2, 46002 Valencia, Spain. Product manufactured in CHINA. After-sales service: www.sogosat.com, sogosat@sogosat.com / 0034 902 222 161

- SAFETY INSTRUCTIONS FOR THE USER
- GENERAL PRECAUTIONS
- GENERAL PRECAUTIONS DURING THE USE OF ELECTRICAL EQUIPMENT
- RESTRICTIONS ON USE TO AVOID PERSONAL INJURY
- RESTRICTIONS ON USE WHEN USED WITH CHILDREN AND ELDERS
- INSTRUCTIONS TO FOLLOW WHEN USING THE APPLIANCE
- CLEANING AND MAINTENANCE
- TECHNICAL SPECIFICATIONS
- PARTS DESCRIPTION
- DIGITAL CONTROL PANEL FUNCTIONS
- COLD MILK WITH FROTH
- IN 1 MENU FUNCTIONS
- TO MAKE COLD MILK FROTH
- TO MAKE WARM MILK
- TO MAKE HOT COCOA
- TROUBLESHOOTING
- DECLARATION OF CONFORMITY
Brand : Sogo
Model : SS-7720
Category : Kettle