
FST DRIP-FREE 60 X/2 KL - Basket FRANKE - Free user manual and instructions
Find the device manual for free FST DRIP-FREE 60 X/2 KL FRANKE in PDF.

| Product type | Extractor hood |
| Brand | Franke |
| Model | FST DRIP-FREE 60 X/2 KL |
| Width (cm) | 60 |
| Minimum distance to hob (mm) | 650 |
| Exhaust duct diameter (mm) | 120 |
| Power supply | 220-240 V, 50/60 Hz |
| Electrical class | I (earth connection required) |
| Control type | Capacitive touch with 5 keys (T1 to T5) |
| Suction speeds | 3 speeds + intensive speed (6 min) |
| Anti-drip system | Zero Drip System (condensate recovery tray) |
| Grease filters | Dishwasher-safe metal (every 2 months) |
| Activated charcoal filter | Optional, saturation alarm (200 h) |
| Lighting | LED, adjustable intensity (high/medium/off) |
| Connectivity | K-Link (pairing with induction hob and remote control) |
| Automatic mode | Yes (adjusts speed according to induction hob) |
| Saturation alarms | Grease filters (100 h) and charcoal filter (200 h) |
| Cleaning the condensate tray | At least once a week |
| Outer material | Stainless steel |
| Weight (kg) | Approximately 10 |
Frequently Asked Questions - FST DRIP-FREE 60 X/2 KL FRANKE
User questions about FST DRIP-FREE 60 X/2 KL FRANKE
0 question about this device. Answer the ones you know or ask your own.
Ask a new question about this device
Download the instructions for your Basket in PDF format for free! Find your manual FST DRIP-FREE 60 X/2 KL - FRANKE and take your electronic device back in hand. On this page are published all the documents necessary for the use of your device. FST DRIP-FREE 60 X/2 KL by FRANKE.
USER MANUAL FST DRIP-FREE 60 X/2 KL FRANKE
natural_image
Technical line drawing of a mechanical assembly with a cylindrical component mounted on a base (no text or symbols)IT 3
EN 10
DE 16
FR 23
TR 30
ES 36
PT 43
GR 50
RU 57
NL 64
SI 71
SV 77
PL 83
CZ 90
HR 96
HU 102
SR 108
LT 115
LV 121
ET 127
FI 133
UK 139
RO 146
DA 153
NO 159
AR 165
IT
natural_image
Illustration of hands holding a curved object with an arrow indicating rotation (no text or symbols)natural_image
Illustration showing a hand using a tool to clean or store material on a metal rack, with no visible text or symbols.4. COMANDI
For your own safety and to ensure proper operation of the appliance, please read this manual carefully before installation and operation. Keep these instructions together with the appliance, even if it is sold or transferred to third parties. It is important that users know all the appliance's operating and safety characteristics.
The cables must be connected by a trained technician.
- The manufacturer shall not be considered responsible for any injury or damage caused by improper installation or use.
- The minimum safety distance between the hob and the suction hood is 650 mm (some models may be fitted at a lower height; please see the paragraph relating to working dimensions and installation).
- If the instructions for installation of the gas hob specify a distance greater than the one indicated, this must be taken into account.
- Check that the mains power supply corresponds to the one indicated on the data plate affixed inside the hood.
-
The cut-out devices must be installed in the fixed system according to wiring system regulations.
-
For Class I appliances, check that the domestic power supply is adequately earthed.
- Connect the hood to the flue using a pipe with a minimum diameter of 120 mm. The fumes must travel the shortest distance possible.
- All the air venting regulations must be complied with.
- Do not connect the ducting hood to flues that also carry combustion fumes (e.g. boilers, chimneys, etc.).
- If the hood is used in combination with non electric appliances (e.g. gas appliances), a sufficient level of ventilation must be guaranteed in the room to prevent any exhaust backflow. If the kitchen hood is used in combination with appliances that are not electrically powered, the negative pressure in the room must not exceed 0.04 mbar to avoid any risk of the fumes being sucked back into the room by the hood.
- The air must not be extracted through a flue that is also used as an exhaust flue for fumes from gas or other fuel powered combustion devices.
- If it is damaged, the power cable must be replaced by the manufacturer or by a service technician.
- Connect the plug to a socket that complies with current regulations and is in an accessible position.
- As regards the technical and safety measures to be taken for exhausting of fumes, it is important that the regulations set by local authorities be complied with scrupulously.
CAUTION: remove the protective films before installing the hood.
- Only use screws and hardware of a sort suitable for the hood.
CAUTION: failure to install the screws or fixing devices as described in these instructions may mean there is a risk of electric shocks.
- Do not look directly at the light through optical devices (binoculars, magnifying glasses...).
- Do not flambé food under the hood: you might cause a fire.
- This appliance may be used by children over the age of 8 years and by persons with limited psycho-physical and sensory abilities or with insufficient experience and knowledge, provided they are carefully supervised and instructed on how to use the appliance safely and on the dangers that it involves. Make sure that children are not allowed to play with the appliance. Cleaning and maintenance to be performed by the user must not be carried out by children, unless they are under supervision.
- Supervise children, to make sure they do not play with the appliance.
- The appliance must not be used by persons (including children) with limited psychophysical or sensory capacities or with insufficient experience and knowledge, unless they are carefully supervised and instructed.
Accessible parts may become extremely hot during the use of cooking appliances
- Clean and/or replace the fil- ters after the period of time in- dicated (danger of fire). See the paragraph on Mainten- ance and cleaning.
- The room must be adequately ventilated when the hood is used simultaneously with appliances that use gas or other fuels (not applicable to appliances that only discharge air into the room).
- The symbol on the product or on its packaging indicates that the product must not be disposed of with the normal domestic waste. The product must be disposed of at a specialist re-cycling centre for electrical and electronic components. By making sure that this product is disposed of properly, you will help prevent possible negative consequences for the environment and for health that might result from its improper disposal. For more detailed in-
formation on how to re-cycle this product, please contact your local municipal offices, local waste disposal service or the shop in which the product was purchased.
Declaration of Conformity
The manufacturer declares that this device with wireless radio functionality complies with directive 2014/53/EU.
The complete text of the EU declaration of conformity is available at the following link by searching for the product code:
“https://www.franke.com”
This code can be found on the label located inside the product.
| Fre-quency bands | Maximum transmit-ted power |
| 2.4 GHz 100 mW max. | |
2. USE
- The suction hood has been designed exclusively for domestic use, to eliminate kitchen odours.
- Never use the hood for purposes other than those for which it was designed.
- Never leave high flames under the hood when it is in operation.
- Adjust the intensity of the flame so that it is directed onto the bottom of the cooking pan, making sure it does not wrap around the sides.
- Deep-fryers must be kept under constant supervision when in use: the oil may catch fire if it gets too hot.
- The ZERO DRIP SYSTEM offers the best performance when the hood is used at maximum suction power (third speed with hood in suction
mode, Intensive speed with hood in filtering mode, see CONTROLS paragraph).
- It is advisable to leave the hood on for a few minutes after the end of cooking.
- It is advisable not to remove the grease filters as soon as cooking is finished to allow time for any condensate that has collected in the grease filter to settle in the tray.
• Always open the flap as far as it will go. - If the hood is installed in filtering mode, it is advisable to carry out the following procedure: by holding button B pressed for approximately two seconds, when all the loads are off (motor+lights), the activated carbon filters alarm is activated and the Intensive speed is no longer timed to 6 minutes but has an infinite duration (like the other speeds).
3. CLEANING AND MAINTENANCE
- For maintenance of the activated carbon filter, refer to the instruction sheet inside the kit.
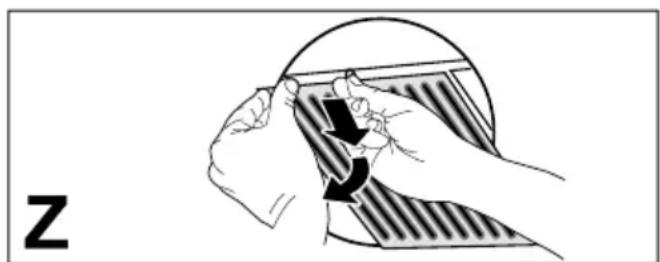
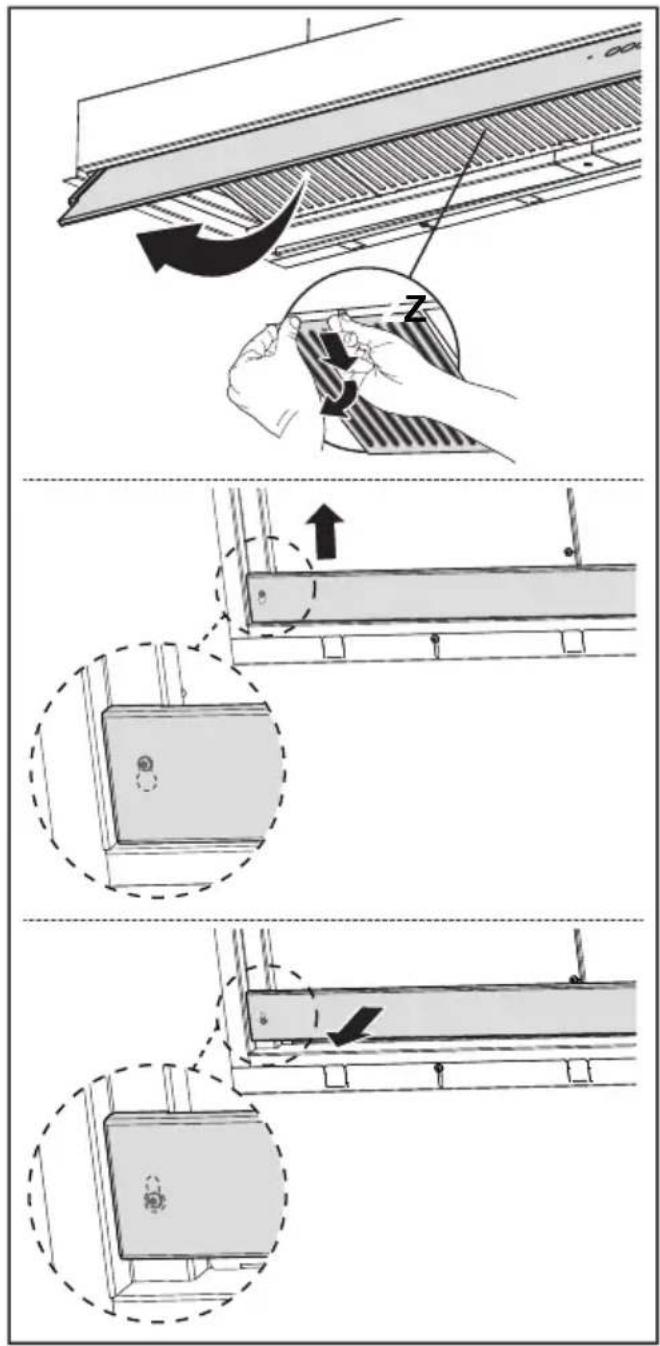
- The grease filters must be cleaned every 2 months of operation or more frequently in case of very intense use and can be washed in a dishwasher (Z).
- When washing in the dishwasher, the metal mesh of the grease filter may darken but its filtering characteristics do not change.
- Be careful not to compress the metal filters.
natural_image
Illustration of hands holding a curved object with an arrow indicating direction (no text or symbols)- Clean the hood using a damp cloth and a neutral liquid detergent.
- For external and internal cleaning of the hood avoid alcoholic or silicone products.
If the product or one of its parts is made of stainless steel, use specific non-ab-rasive products for cleaning and follow the lines of the satin finish during cleaning.
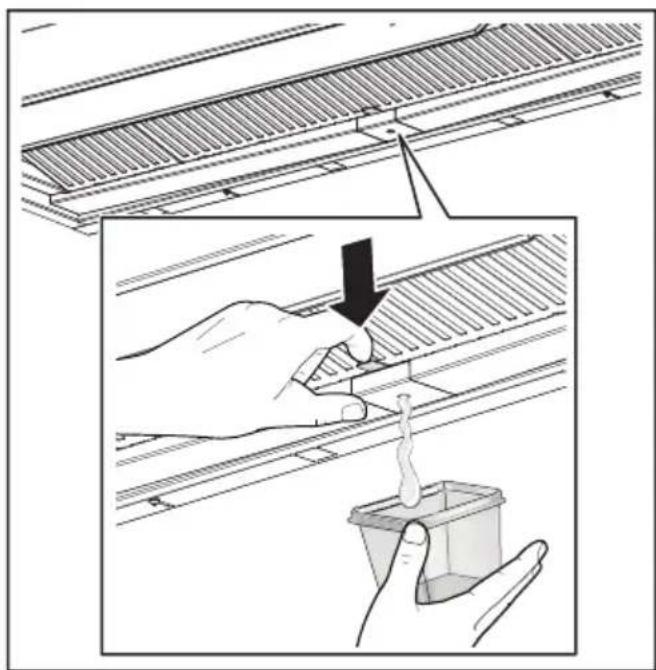
Maintenance of the condensate tray
- The tray should be emptied and cleaned AT LEAST once a week or more frequently depending on the use of the hood.
natural_image
Illustration showing a hand using a tool to clean or store items on a metal rack, with a container partially visible (no text or symbols)- Dry the hood once it has been switched off.
- Attention! Residual condensate may remain inside the tray even after performing the emptying operation.
- ATTENTION: Once the tray has been removed, it is possible to use a cloth to remove any residual condensate but be careful with the springs.

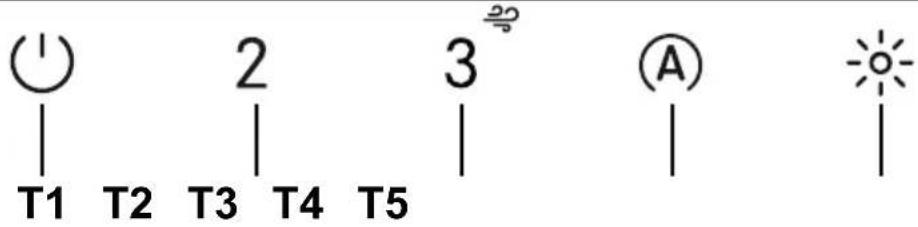
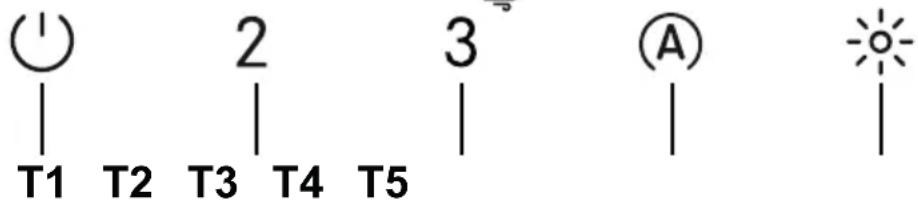
4. CONTROLS
 | |||
| Key Key press Function LED | |||
| T1 | Short Turns the motor on/off at the first speed. On / Off | ||
| Long press with all loads off (motor and lights) | K-Link uncouplingStarts the procedure for the cancellation of all compatible K-Link devices previously coupled with the K-Link coupling function. | Upon successful completion of the procedure LEDs T1 and T2 flash 5 times. | |
| T2 | Short Turns the motor on/off at the second speed.T1 and T2 On / Off | ||
| Long press with light on | Activates/Deactivates the Activated Carbon Filters alarm. | T1 flashes twice:alarm activated.T1 flashes once:alarm deactivated. | |
| T3 | Short Turns the motor on at the third speed.T1 and T3 On / Off | ||
| Long press with light or motor on | Turns the motor on at the Intensive speed.This speed is timed for 6 minutes. At the end of this time, the system automatically returns to the previously selected speed. If activated with the motor off, once the time has passed it switches to OFF mode.When the carbon filters alarm is activated, the Intensive speed is no longer timed to 6 minutes but has an infinite duration. | Flashing | |
| Long press with all loads off (motor and lights) | The Filter saturation alarm is reset. | T1 flashes 3 times. | |
| Signals the saturated Metal Grease Filters alarm and the need to wash them. The alarm is activated after 100 hours of effective hood operation. | T1 flashes slowly | ||
| Signals the Activated Charcoal Odour Filter saturation alarm. The alarm is activated after 200 hours of effective hood operation. | T1 flashes fast | ||
| T4 | Short Activates/Deactivates the Automatic operating mode.AUTO mode is deactivated whenever any other keys are pressed.AUTO mode is activated when the key is pressed or the Coupled Induction Cooktop is turned on. The hood speed is automatically set using the highest power level present on the hob. When the induction cooktop is turned off the last activated speed is held for 5 seconds, then speed 1 for 15 minutes. Once the 15 minutes have passed the motor turns off. The light status does not change. | Fixed light:AUTO mode activated.Off:AUTO mode temporarily deactivated. | |
| Long press with all loads off (motor and lights) | K-Link couplingBefore starting the procedure follow the specific instructions of the manuals of the devices to be coupled.For the remote control, see “connected mode”.Starts the pairing procedure between the hood and compatible K-Link devices (induction cooktop or remote control). Up to 3 induction cooktops can be paired and only one remote control. See the manual of the devices for details of the operations that need to be performed on these.The coupling procedure takes 2 minutes. If no devices are recognised within this time check that you have previously activated the procedure for the devices to be coupled. The maximum number of linkable devices may have been reached. | LEDs T1 and T2 flashing:coupling in progress.Upon successful completion of the procedure LEDs T1 and T2 will light up for 2 seconds. | |
| T5 | Short | The lights alternate between high intensity, medium intensity (if present), off. | On / Off |
Recommended device coupling sequence:
1 - K-Link Mode (See "connected mode" of remote control manual)
2 - K-Link Coupling (See hood manual)
3 - Remote Control-Hood Coupling (See remote control manual)
4 - K-Link Coupling (See hood manual)
5 - Cooktop-Hood Coupling (See induction cooktop manual)
5. LIGHTING
- Please contact the Service Department to change it ("Please contact the service department to purchase it").
- Lamps in risk group 1 under IEC/EN62471 at a distance of 20cm and in exempt from risk group under IEC/EN62471 at a distance of 30cm.
DE
natural_image
Illustration of hands holding a curved object with an arrow indicating rotation (no text or symbols)natural_image
Illustration showing a hand using a tool to clean or inspect a container of material on a metal grate (no text or symbols present)4. STEUERBEFEHLE
natural_image
Illustration of hands holding a curved object with an arrow indicating direction (no text or symbols)natural_image
Illustration showing a hand using a tool to clean or inspect a container of material on a metal shelf (no text or symbols present)4. COMMANDES
natural_image
Illustration of hands holding a curved object with a striped pattern, no text or symbols presentnatural_image
Illustration showing a hand using a tool to clean or inspect a container of contents, with no visible text or symbols.4. KOMUTLAR
natural_image
Illustration of hands holding a curved object with an arrow indicating rotation (no text or symbols)natural_image
Illustration showing a hand using a tool to clean or inspect a tiled roof structure, with no visible text or symbols.4. MANDOS
natural_image
Illustration of hands holding a curved object with a circular outline and a black arrow indicating rotation (no text or symbols)natural_image
Illustration showing a hand using a tool to clean or inspect a container of contents, with no visible text or symbols.4. COMANDOS
natural_image
Illustration of hands holding a tool with a curved arrow indicating motion (no text or symbols)natural_image
Illustration showing a hand using a tool to clean or store material on a metal rack, with a container partially visible (no text or symbols)4. ΣΤΟΙΧΕΙΑ ΕΛΕΓΧΟΥ
natural_image
Illustration of hands holding a curved object with a striped pattern, no text or symbols presentnatural_image
Illustration showing a hand using a tool to clean or inspect a tiled roof structure, with a magnified inset highlighting the process (no text or symbols present)natural_image
Illustration of hands holding a curved object with a black arrow indicating rotation (no text or symbols)natural_image
Illustration showing a hand using a tool to clean or inspect a container of material on a metal shelf (no text or symbols present)4. BEDIENINGSELEMENTEN
natural_image
Illustration of hands holding a curved object with an arrow indicating motion (no text or symbols)natural_image
Illustration showing a hand using a tool to clean or inspect a tiled roof structure, with a magnified inset highlighting the process (no text or symbols present)4. UKAZI
natural_image
Illustration of hands performing a circular motion or maneuvering motion with arrows indicating direction (no text or symbols)natural_image
Illustration showing a hand using a tool to clean or store items on a tiled roof, with a container being inserted (no text or symbols present)4. MANÖVERDON
natural_image
Illustration of hands holding a circular object with a curved arrow indicating motion (no text or symbols)natural_image
Illustration showing a hand using a tool to clean or inspect a container of material, with no visible text or symbols.4. POLECENIA
natural_image
Illustration of hands holding a ruler and measuring a surface with a curved arrow indicating direction (no text or symbols)natural_image
Illustration showing a hand using a tool to clean or inspect a tiled roof structure, with a container partially visible (no text or symbols)4. PŘÍKAZY
natural_image
Illustration of hands holding a curved object with an arrow indicating motion (no text or symbols)- Očistite napu vlažnom krpom i neutralnim tekućim deterdžentom.
- Za vanjsko i unutarnje čišćenje nape izbjegavajte alkoholna ili silikonska sredstva.
natural_image
Illustration showing a hand using a tool to clean or inspect a tiled roof structure, with a magnified inset highlighting the process (no text or symbols present)- Osušite napu nakon što je isključena.
- Pozor! Ostaci kondenzacije mogu ostati u spremniku i nakon pražnjenja.
- PAŽNJA! Nakon što uklanjanja la-dice, krpom možete ukloniti ostat-ke kondenzacije, ali obratite pažnju na opruge.
4. NAREDBE
| |||
| Tipka P | ritisak na tipku | Funkcija Led | |
| T1 | Kratki Uključuje/isključuje motor na prvoj brzini. Uključivanje / isključiva- | nje | |
| Dugo kada su sva opterećenja ugašena (motor i svjetla) | K-Link razdvajanjeZapočinje postupak brisanja svih K-Link kompatibilnih uređaja koji su prethodno bili povezani s funkcijom K-Link uparivanje. | Nakon uspješnog završetka postupka, LED T1 i T2 trepere 5 puta. | |
| T2 | Kratki | Uključuje/isključuje motor na drugoj brzini. | T1 i T2 Uključivanje / isključivanje |
| Dugo dok je svjetlo ugašeno | Aktiviranje/deaktiviranje alarma filtera s aktivnim ugljenom. | T1 treperi 2 puta:alarm aktiviran.T1 treperi 1 put:alarm deaktiviran. | |
| T3 | Kratki | Uključuje motor na trećoj brzini. | T1 i T3 Uključivanje / isključivanje |
| Dugo dok su svjetla i motor ugašeni | Uključuje motor na Intenzivnoj brzini.Ova brzina ograničena je na 6 minuta. Po isteku vremena sustav se automatski vraća na prethodno odabranu brzinu. Ako se aktivira s isključenim motorom, nakon isteka vremena prebacuje se u način IS-KLJUCENO.Kad se aktivira alarm filtra s aktivnim ugljem, Intenzivna brzina više nije ograničena na 6 minuta, već ima beskonačno trajanje. | Trepereće | |
| Dugo kada su sva opterećenja ugašena (motor i svjetla) | Vrši se resetiranje alarma zasićenja filtara. | T1 treperi 3 puta. | |
| Signalizira alarm zasićenja metalnih filtara za mast i potrebu za njihovim pranjem. Alarm se aktivira nakon 100 sati stvarnog rada nape. | T1 polako treperi | ||
| Signalizira alarm zasićenja filtra mirisa s aktivnim ugljenom. Alarm se aktivira nakon 200 sati stvarnog rada nape. | T1 brzo treperi | ||
| T4 | Kratki Aktivira/deaktivira automatski način rada.Svaki put kad pritisnete druge tipke, AUTO način rada se deaktivira. AUTO način rada aktivira se pritiskom na tipku ili prilikom uključenja spojene indukcijske ploče. Brzina nape postavit će se automatski koristeći najvišu razinu snage prisutnu u zonama ploče za kuhanje. Kad je indukcijska ploča isključena, zadnja primijenjena brzina održava se 5 sekundi, a zatim brzina 1 u trajanju od 15 minuta. Nakon 15 minuta motor se isključuje. Stanje svjetla se ne mijenja. | Uključen fiksno:Aktiviran način AUTO.Isključen:način AUTO privremeno onemogućen. | |
| Dugo kada su sva opterećenja ugašena (motor i svjetla) | K-Link uparivanjePrije započinjanja postupka, slijedite posebne upute u uputama za uređaje koje želite upariti.Za daljinski upravljač pogledajte “povezani način rada”.Započinje se postupak uparivanja nape s uređajima kompatibilnim s K-Linkom (indukcijska ploča za kuhanje ili daljinski upravljač). Mogu se povezati do 3 indukcijske ploče i jedan daljinski upravljač. Pogle-dajte upute uređaja za radnje koje se moraju izvršiti na njima.Postupak uparivanja traje 2 minute. Ako u tom roku nije prepoznat ni-jedan uređaj, provjerite jeste li prethodno pokrenuli postupak za uparivanje uređaja. Moguće je da je dosegnuta maksimalna količina uređaja koji se mogu povezaři. | LED T1 i T2 trepere:postupak uparivanja je u tijeku.Nakon uspješnog završetka postupka, LED di-ode T1 i T2 uključuju se na 2 sekunde. | |
| T5 | Kratki | Svjetla se zamjenjuju između visokog intenziteta, srednjeg intenziteta (ako je nazočno), ugašeno. | Uključivanje / isključivanje |
natural_image
Illustration of hands performing a manual task with a curved tool, no text or symbols presentnatural_image
Illustration showing a hand using a tool to clean or inspect a container of material on a metal grate (no text or symbols present)4. KEZELŐSZERVEK
natural_image
Illustration of hands holding a curved object with an arrow indicating rotation (no text or symbols)natural_image
Illustration showing a hand using a tool to clean or inspect a tiled roof structure, with a magnified inset showing the process (no text or symbols present)4. КОМАНДЕ
natural_image
Illustration of hands performing a finger manipulation or adjustment task, with no visible text or symbolsnatural_image
Illustration showing a hand using a tool to clean or inspect a container of liquid, with no visible text or symbols.4. VALDIKLIAI
natural_image
Illustration of hands holding a curved object with an arrow indicating motion (no text or symbols)natural_image
Illustration showing a hand using a tool to clean or store items on a tiled roof, with a container being inserted (no text or symbols present)4. VADĪBAS IERĪCES
natural_image
Illustration of hands holding a curved object with a striped pattern, no text or symbols presentnatural_image
Illustration showing a hand using a tool to clean or store items on a tiled roof, with a container partially visible (no text or symbols)4. KÄSUD
natural_image
Illustration of hands performing a finger manipulation or adjustment task on a striped object (no text or symbols)natural_image
Illustration showing a hand using a tool to clean or inspect a container of liquid, with no visible text or symbols.4. OHJAIMET
natural_image
Illustration of hands holding a curved object with a directional arrow, no text or symbols presentnatural_image
Illustration showing a hand using a tool to clean or inspect a component on a metal grate (no text or symbols present)4. КОМАНДИ
natural_image
Illustration of hands holding a curved object with an arrow indicating rotation (no text or symbols)natural_image
Illustration showing a hand using a tool to clean or store material on a metal rack, with no visible text or symbols.4. COMENZI
natural_image
Illustration of hands holding a curved object with an arrow indicating rotation (no text or symbols)natural_image
Illustration showing a hand using a tool to clean or inspect a container of liquid, with no visible text or symbols.4. KOMMANDOER
natural_image
Illustration of hands performing a manual task with a tool, no text or symbols presentnatural_image
Illustration showing a hand using a tool to clean or inspect a tiled roof structure, with a magnified inset highlighting the process (no text or symbols present)4. KOMMANDOER
natural_image
Illustration showing a hand using a tool to clean or inspect a tiled roof structure, with no visible text or symbols.وَنْ كَل٠
natural_image
Illustration of hands holding a curved object with a ruler, no text or symbols presentZ

- IT
- COMANDI
- Declaration of Conformity
- USE
- CLEANING AND MAINTENANCE
- Maintenance of the condensate tray
- CONTROLS
- Recommended device coupling sequence:
- LIGHTING
- DE
- STEUERBEFEHLE
- COMMANDES
- KOMUTLAR
- MANDOS
- COMANDOS
- ΣΤΟΙΧΕΙΑ ΕΛΕΓΧΟΥ
- BEDIENINGSELEMENTEN
- UKAZI
- MANÖVERDON
- POLECENIA
- PŘÍKAZY
- NAREDBE
- KEZELŐSZERVEK
- КОМАНДЕ
- VALDIKLIAI
- VADĪBAS IERĪCES
- KÄSUD
- OHJAIMET
- КОМАНДИ
- COMENZI
- KOMMANDOER
- Z
Brand : FRANKE
Model : FST DRIP-FREE 60 X/2 KL
Category : Basket