
DTI 6/20 - Thermal camera ZEISS - Free user manual and instructions
Find the device manual for free DTI 6/20 ZEISS in PDF.

| Product type | Thermal camera |
| Brand | ZEISS |
| Model | DTI 6/20 |
| Dimensions (L x W x H) | 230 x 62 x 68 mm |
| Weight | 690 g |
| Power supply | Rechargeable lithium-ion battery (6.5 h battery life) |
| Sensor resolution | 640 x 480 px (12 µm pitch) |
| Display | AMOLED 1024 x 768 px |
| Optical magnification | 1.5x |
| Max. digital zoom | 10x (in steps of 0.1 to 1.0) |
| Focal length | 20 mm |
| Detection range (1.8 m x 0.6 m object) | 1,000 m |
| Field of view (horizontal x vertical) | 22° x 16° |
| Protection rating | IP65 / IP67 |
| Operating temperature range | -20 °C to +50 °C |
| Connectivity | USB-C (charging & data), WLAN (2.4 GHz), Bluetooth |
| Internal memory | 16 GB |
| Functions | Photo, video, live streaming via ZEISS Hunting app |
| Package contents | DTI 6/20 thermal camera, neoprene carrying strap, case with shoulder strap, USB cable, cleaning cloth, lithium-ion battery, quick guide, safety instructions, warranty card, EULA document |
| Care and cleaning | Clean the optics with a special cloth; do not clean the sensor yourself; clean the sealing gasket with a lint-free cloth |
| Safety | Use chargers compliant with USB and USB-C® specifications; do not expose to high temperatures; follow the provided safety instructions |
| Spare parts and repairability | User-replaceable 20 mm and 40 mm lenses; other parts (lens cap, battery, strap) via dealer or ZEISS customer service; sensor cleaning only by ZEISS after-sales service |
| General information | 2-year manufacturer warranty, extendable to 3 years if registered within 4 weeks; firmware updates via ZEISS Hunting app; AVC license included |
Frequently Asked Questions - DTI 6/20 ZEISS
User questions about DTI 6/20 ZEISS
0 question about this device. Answer the ones you know or ask your own.
Ask a new question about this device
Download the instructions for your Thermal camera in PDF format for free! Find your manual DTI 6/20 - ZEISS and take your electronic device back in hand. On this page are published all the documents necessary for the use of your device. DTI 6/20 by ZEISS.
USER MANUAL DTI 6/20 ZEISS
natural_image
Line drawing of two identical medical or electronic device setups with no visible text, numbers, or symbols.TECHNISCHE DATEN
6/20 6/40
natural_image
Black background with a white circular button containing the power symbol (no text or numbers)Navigation
natural_image
Technical line drawing of a device with a magnified view showing internal components and a labeled component (18), no text or symbols present.Instructions for use

WARNING!
Please note the safety instructions and regulatory information.
They can also be accessed at:
http://www.zeiss.com/hunting/manuals

Observation with and without glasses
Thanks to the extendible eyecup (9), the thermal imaging camera can be used with or without glasses. It offers a full field of view in both cases.
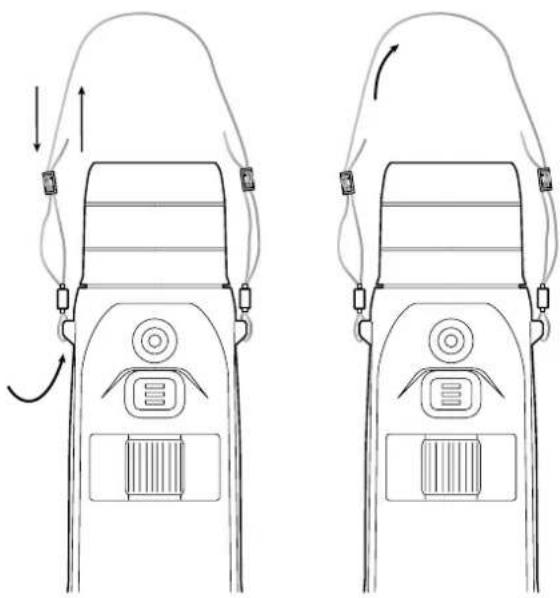
Attaching the carrying strap
Instructions for use
ZEISS products are famous for outstanding optical performance, precision engineering and a long service life.
Please observe the following instructions for use in order to obtain the best from your thermal imaging camera and to ensure that it remains your constant companion for many years to come.
Scope of supply
| Product Order no. | Scope of supply | ||
| ZEISS DTI 6/20 527020-9901-000 | DTI 6 Thermal imaging cameraLens 20 mm or lens 40 mmNeoprene strapCarrying case incl. shoulder strapUSB cableOptics cleaning clothLithium-ion batteryQuick GuideSafely notesWarranty cardEULA document | ||
| ZEISS DTI 6/40 527020-9902-000 | |||
Installing/removing the battery
To change the battery, pull the grooved slide button (13) towards the tripod thread (15), hold the sides of the cover and open the cover (14). The cover (14) is permanently connected to the device by a hinge. The battery is inserted at an angle with the contacts facing inwards towards the tripod thread (15). Then press the battery completely into the compartment. Then close the cover (14) and let it snap into place. When closing the cap, make sure that the red removal strap is not caught between the seal and the cover. This ensures the seal tightness of the device.
natural_image
Line drawing of two identical medical or electronic device setups with attached sensors and tubing (no text or symbols)TECHNICAL DATA 6/20 6/40
| Optics | |||
| Focal length mm 20 / F1.0 40 / F1.0 | |||
| Lens type Germanium | |||
| Detection range (object size 1.8 m × 0.6 m; 2 yd × 0.7 yd) | m (yd) 1,000 (1,090) 2,000 (2,180) | ||
| Subjective angle of view ° | 40 (diagonal) | ||
| Field of view at 100 m (field of view at 100 yd) | m (ft) | 38 (114) | 19 (57) |
| Field of view | ° horizontal x vertical | 22 × 16 | 11 × 8.2 |
| Optical magnification | 1.5x | 3.0x | |
| Maximum digital zoom | 10x | ||
| Zoom increments | variable | 0.1 - 1.0 | |
| Sensor | |||
| Sensor resolution | px | 640 × 480 | |
| Sensor pixel pitch | μm | 12 | |
| Frame rate | Hz | 50 | |
| Display | |||
| Display resolution | px | 1,024 × 768 | |
| Display type | AMOLED | ||
| Electronics | |||
| Interfaces | USB: charging + data transferWLAN: data transferBluetooth: data transfer | ||
| Battery | Lithium-ion | ||
| Battery life | h | 6.5 | |
| External power supply | 9 V/2 A, 12 V/1.5 A (USB) | ||
| Internal memory | GB | 16 | |
| Video/image/live-streaming feature | √ | ||
| WLAN frequency | GHz | 2.4 | |
| WLAN standard | IEEE 802.11/b/g/n | ||
| Connection with other devices | ZEISS Hunting app, USB | ||
| General | |||
| Ingress protection rating | IP65 / IP67 | ||
| Operating temperature range | °C (°F) | -20 / +50 (-4 / +122) | |
| Charging temperature range | °C (°F) | 0 / +50 (+32 / +122) | |
| Length × width × height | mm (inch) | 230 × 62 × 68 (9.06 × 2.44 × 2.68) | 228 × 69 × 73 (7.36 × 2.72 × 2.87) |
| Weight | g (oz) | 690 (24.3) | 755 (26.6) |
Subject to changes in design and scope of supply due to technical improvements.
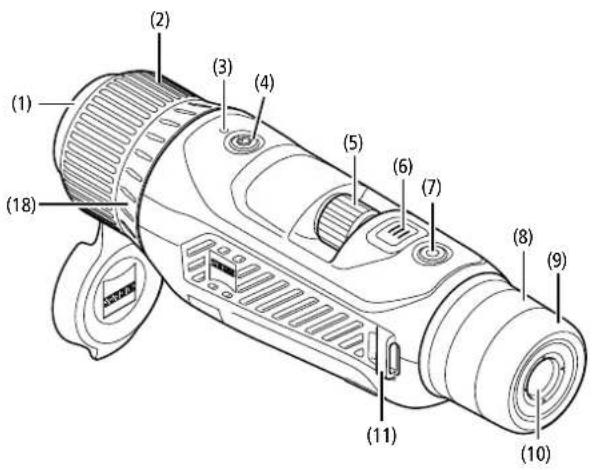
Press the on/off button (4) for a longer time to switch on the device. The LED (3) is green. The LED (3) lights up red when the charge level is low. Press the on/off button (4) for a longer time to switch off the device again. The LED is then off.
Note: The on/off button (4) must be pressed until the OFF symbol appears on the display. Only then can the on/off button (4) be released and the device switches off. If the on/off button (4) is released before the OFF symbol is displayed, the device does not switch off but switches to standby mode.

natural_image
Black background with a white circular button containing the power symbol (no text or numbers)Navigation
Press and hold the menu button (6) to show the main menu on the display. Look through the viewfinder (10). The rotary wheel (5) and the menu button (6) are used to navigate in the main menu. Turn the rotary wheel (5) to the right to scroll right or down. Turn the rotary wheel (5) to the left to scroll left or up. Briefly press the menu button (6) to select a menu item. This opens the submenu. Make your settings using the rotary wheel (5). Briefly press the menu button (6) to confirm your selection and return to the main menu. Press and hold the menu button (6) to exit the main menu and return to observation mode. Alternatively, navigate to "Exit". Briefly press the menu button (6) to return to observation mode.
Automatic standby
A built-in proximity sensor (17) on the viewfinder (10) offers a touchless auto standby. When the function is enabled, the standby is activated automatically after a few seconds as soon as the viewfinder (10) is removed from the eye. When the viewfinder (10) is placed against the eye again, the device automatically switches to observation mode.
To deactivate automatic standby, select "Settings" from the main menu. Then navigate to "Settings Device Menu". Briefly press the menu button (6) to open the submenu. Navigate to "Automatic Standby" and briefly press the menu button (6). Select a time after which the device switches to standby as soon as the viewfinder (10) is removed from the eye. Briefly press the menu button (6) to confirm the selection.
Standby
Briefly press the on/off button (4) to switch the device to standby mode. The LED (3) blinks green. Briefly press the on/off button (4) again to switch the device back to observation mode. The LED (3) is permanently green. In standby mode, the LED (3) flashes red when the charge level is low.
Observation mode
Look through the viewfinder (10) to observe the scene. Turn the diopter wheel (8) to focus the screen. Turn the focus ring (2) on the lens (18) to focus on the scene.
Zoom
In observation mode, the rotary wheel (5) can be used to zoom in and zoom out the scene. You can zoom between 1.0x and 10x. The zoom speed can be set via the ZEISS Hunting App. The currently set digital magnification is shown in the upper right corner of the display.

Shooting mode
You have the possibility to capture a photo or record a video. Press and hold the Shutter button (7) to switch between the two shooting modes. The symbol at the top left of the display changes to indicate the selected mode. Briefly press the Shutter button (7) once to capture a photo or record a video. Briefly press the Shutter button (7) again to stop a video recording in progress.

Photo mode

Video mode
Menu
The main menu offers the following options:
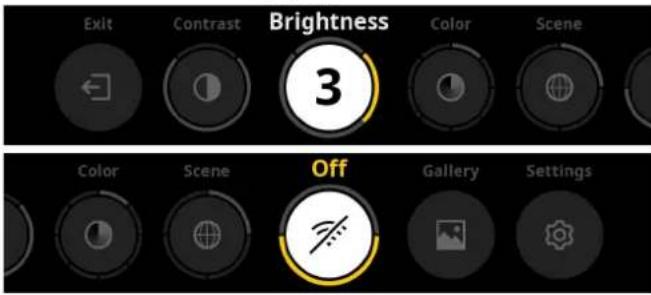
■ Exit: Select Exit to get from the menu to observation mode.
■ Contrast: Adjust the contrast of the scene here. There are nine contrast levels to choose from. The contrast is lowest at level 1. The contrast is highest at level 9.
■ Brightness: Set the brightness of the display here. There are nine brightness levels to choose from. The brightness is lowest at level 1. The brightness is highest at level 9.
■ Color: Set the color modes for the observation mode here and create a selection for the color mode shortcut.
■ Scene: Select from four different scenes: Universal, Fog, Discover, Identify.


Universal IdentifyDiscoverFog
■ Connectivity: Turn the connectivity "On" or "Off" to enable a connection to another device (e.g. smartphone) through Bluetooth or WLAN if necessary.
■ Gallery: View all your captured photos here. Videos can only be retrieved via the ZEISS Hunting App.
■ Settings: Make all system-relevant settings for the device here.
Color
The scene can be displayed in five pre-defined and three user-defined color modes. The following color modes can be selected:
■ White Hot: Cold areas are displayed here in black and warm areas in white.
■ Black Hot: Cold areas are displayed here in white and warm areas in black.
■ Red Hot: Cold areas are displayed here in black and warm areas in white. In addition, the warmest areas are shown in yellow to red.
■ Rainbow: A varied color palette displays cold areas in black to blue and warm areas in yellow to white.
■ Night Eye: Cold areas are displayed here dark and warm areas yellowish.
■ User 1-3: Select a color mode previously created in the ZEISS Hunting App.
To change the color modes, select "Color" in the main menu. Then navigate to the desired color mode. Briefly press the menu button (6) to confirm your selection and return to the main menu.
Alternatively, color modes can be created through a shortcut in observation mode. To switch between the color modes, briefly press the menu button (6).
The shortcut list can store up to three color modes. The following color modes are preset: White Hot, Black Hot, Red Hot. It is possible to swap the preset color modes as you like.
To swap, select the color mode to be swapped in the observation mode. Then select "Color" from the main menu. Briefly press the menu button (6) to open the submenu. Select the color mode to be added. Briefly press the menu button (6) to confirm the selection. The color mode for the shortcut was changed.
Connectivity
With the ZEISS DTI 6 you can connect your smartphone with your device via Bluetooth, and if needed, additionally via WLAN by means of the ZEISS Hunting App. To do this, switch on the Bluetooth function on both your smartphone and your device.
To set the Bluetooth function on your device, select "Connectivity" in the main menu. Then select "On" or "Off". Briefly press the menu button (6) to confirm the selection.
Then select "Settings" from the main menu and navigate to "Settings Pairing Menu". Briefly press the menu button (6) to open the submenu. Here you find a list of the devices already known.
Note: Switch the connectivity on so that the ZEISS DTI 6 is visible for a short time via Bluetooth. Alternatively, switch the connectivity on and navigate to "Settings Pairing Menu". The ZEISS DTI 6 is visible as long as you are in the submenu "Settings Pairing Menu".
Use the ZEISS Hunting App on your smartphone to connect with the ZEISS DTI 6.
Note: The Bluetooth connection must only be established when first connecting with a new smartphone. After that, an automatic connection is made if the connectivity is enabled.
With connectivity enabled and a connection to the ZEISS Hunting App, the following functions are now available to you:
Livestream
■ Make device settings via the app
■ View captured photos and videos
When transferring data of videos and photos or when transferring a livestream, an additional WLAN function is required. The connection is established automatically by the device as needed. Follow the instructions on your smartphone to connect it to the device.
Settings

The "Settings" submenu has the following options:
■ Profile: Choose from user-defined profiles here.
■ Calibration: Set automatic calibration or manual calibration here.
■ Location: Set the GPS function "On" or "Off" here.
■ Device: Make all system-relevant settings here, including standby and language.
■ Pairing: Here you find a list of all devices already known for connecting to Bluetooth.
■ Reset: Format your device memory here or reset the device to factory settings.
■ Information: Here you find information on regulations and current firmware.
Settings Profile Menu
With the ZEISS Hunting App you have the option of creating various user-defined profiles and to transfer these to the ZEISS DTI 6. In the profiles the same settings can be made as on the device. Since the ZEISS DTI 6 can store up to live profiles, several profiles for different ambient conditions and users can be created. In this way, the settings of the device can be quickly adapted to the changing environment with a change of profile.
To store profiles and transfer them to the ZEISS DTI 6, go to the ZEISS Hunting App and follow the instructions.
To set and change the profiles on the ZEISS DTI 6, select "Settings" in the main menu. Then navigate to "Settings Profile Menu". Briefly press the menu button (6) to open the submenu. Select one of the stored profiles. Here you can choose between storing the current settings on the profile or to load an existing profile. Briefly press the menu button (6) to confirm the selection. Press and hold the menu button (6) to return to observation mode.
Settings Calibration Menu
With this device you can select two calibration modes: automatic or manual.
In automatic mode, the device automatically performs a calibration by closing and opening an internal shutter when necessary. A gentle click should be heard. In this mode, you also have the option of performing the calibration yourself by pressing the Shutter button (7) and the Menu button (6) simultaneously.
Another option is to select manual mode. Close the lens cap (1) in manual mode. Now press the Shutter button (7) and the menu button (6) simultaneously. The device is now calibrated again.
Note: Always cover the lens with the protective cap when performing a manual calibration. Otherwise the sensor cannot calibrate correctly and the image will deteriorate, e.g. ghost images. If you forget to cover the lens during a manual calibration, repeat the calibration procedure with the lens covered.
Settings Location Menu
Set the GPS function "On" or "Off" here.
Settings Device Menu
Language
To change the language, select "Settings" in the main menu. Then navigate to "Settings Device Menu". Briefly press the menu button (6) to open the submenu. Navigate to "Language" and briefly press the menu button (6). Choose between one of six languages and confirm your selection by briefly pressing the menu button (6). Press and hold the menu button (6) to return to observation mode.
Date
To set the date, select "Settings" in the main menu. Then navigate to "Settings Device Menu". Briefly press the menu button (6) to open the submenu. Navigate to "Date" and briefly press the menu button (6). Set the current date and confirm the selection by briefly pressing the menu button (6). Press and hold the menu button (6) to return to observation mode.
Note: The date adjusts itself automatically if GPS is enabled.
Time
To set the time, select "Settings" in the main menu. Then navigate to "Settings Device Menu". Briefly press the menu button (6) to open the submenu. Navigate to "Time" and briefly press the menu button (6). Set the current time and confirm the selection by briefly pressing the menu button (6). Press and hold the menu button (6) to return to observation mode.
Time Format
The "Time Format" setting allows you to choose between 24-hour and 12-hour display. Be sure to set the current date and time, as your photos and videos will be time stamped.
To set the time format, select "Settings" in the main menu. Then navigate to "Settings Device Menu". Briefly press the menu button (6) to open the submenu. Navigate to "Time Format" and briefly press the menu button (6). Select the desired time format and confirm the selection by briefly pressing the menu button (6). Press and hold the menu button (6) to return to observation mode.
Settings Pairing Menu
To pair devices, select "Settings" in the main menu. Then navigate to "Settings Pairing". Briefly press the menu button (6) to open the submenu. Here you find a list of all devices already known. To switch between the various paired devices, select the desired device and confirm the selection by briefly pressing the menu button (6).
To connect a device for the first time, go to "Connected Products" in the ZEISS Hunting App. Select the ZEISS DTI 6 and confirm the "Connect" displayed on the screen. Compare the PIN on the smartphone and on the ZEISS DTI 6. By selecting "Pair" in the ZEISS Hunting App as well as on the ZEISS DIT 6, you confirm the connection.
If the smartphone was already paired at an earlier date, no further steps are necessary.
Press and hold the menu button (6) to return to observation mode.
Note: An active connectivity is required for pairing.
Settings Reset Menu
To format the device memory, select "Settings" in the main menu. Then navigate to "Settings Reset Menu" and briefly press the menu button (6). Navigate to "Format Memory". Select "Format" and confirm your selection. A second security prompt follows, which must be confirmed with "Yes". Select "No" if you do not want to perform the formatting.
Note: Formatting deletes all videos and photos saved on the device. The device settings are retained.
To perform a factory reset, select "Settings" in the main menu. Then navigate to "Settings Reset Menu" and briefly press the menu button (6). Navigate to "Reset to Factory Settings". Select "Reset" and confirm your selection. A second security prompt follows, which must be confirmed with "Yes". Select "No" if you do not want to perform a factory reset.
Note: When resetting the device to factory settings, the settings and all data saved on the device, including images and videos, are deleted.
Note: After resetting the device to the factory settings, delete the ZEISS DTI 6 from the Bluetooth overview on your smartphone.
Note: If the battery is discharged or if the battery is removed, the device loses the set date and time. Reset the date and time so that your images and videos get a correct timeslamp.
Furthermore, the date and time can be received by connection via the Hunting App or GPS.
Troubleshooting
Fault Possible reasons Solution
Will not boot. Battery is empty. Charge the device.
| The device is not charging. | The USB cable is defective. Replace the USB cable. | |
| External power supply is not sufficient. | Check if the external power supply is fine.This must be ensured by means of a USB-C® to USB-C® cable with a USB-C® PD (Power Delivery) power supply.* | |
| The USB cable is not properly connected to the device. | Unplug the USB cable and check that the connector and port are undamaged and free from dirt. | |
| The device switches itself off at high temperatures. | Automatic deactivation to protect the battery from overheating. | Let the device cool down while switched off. |
| The image is unclear.The image has streaks.The background is not uniform. | The device must be recalibrated. | Follow the instructions when performing the calibration procedure. |
| The image is too dark. The screen brightness is set too low. Adjust the screen brightness. | ||
| The image on the display is flat. The contrast is set too low. Adjust the contrast. | ||
| The computer does not recognize the device (internal memory). | The device is not switched on. Transfer the images after turning on the power. | |
| The USB cable is not connected properly. | Please read the notes in the section "USB port". | |
| The required software has not been installed. Install the software required for your system. | ||
| The time information on the images is incorrect. | The time information (time/date) in the device is not yet set. | Follow the instructions to set the time information. |
| Image quality is poor.The detection range is too short. | Poor weather conditions may have adverse effects (e.g. heavy snowfall, rain, fog, etc.). | |
| The smartphone does not connect to my ZEISS DTI 6. | The WLAN password is incorrect. Enter the correct password. | |
| There are too many WLAN networks in the immediate vicinity of the device. There may be adverse effects. | Move the device to a location with few or no direct WLAN networks. | |
| The WLAN signal is repeatedly lost or interrupted. | The ZEISS DTI 6 is too far away or there are too many other WLAN networks nearby. | Change the location of the device so that a WLAN signal is detected directly. |
| There is an obstruction between the device and the receiver. | ||
Personal data when you pass on or dispose of your ZEISS device
Remember that there may be personal photos and videos on the internal device memory. Before passing on the device to a third party, please perform the factory reset to delete this data and verify it has been deleted. By doing so, you help maintain your privacy and data security.
Participating in IT security
Please take an active role in protecting the IT security of your device by using the ZEISS Hunting App and installing new firmware updates as soon as they become available.
Firmware update
A firmware update can be carried out using the ZEISS Hunting App. Follow the instructions for this in the ZEISS Hunting App.
Note: Make sure that the device is fully charged before updating the firmware. Do not switch off the device during the update, otherwise it may be damaged.
Note: If you initiate an update via the ZEISS Hunting App, you may need to confirm this again on the device for security reasons.
ZEISS Hunting App
Install the ZEISS Hunting App on your smartphone and open the app. Follow the steps shown there to connect to the ZEISS DTI 6.
The ZEISS Hunting App allows you to transfer images and videos to your smartphone, view the live image, make settings and use other functions. A more detailed description can be found in the help function of the app.
Note: To use the ZEISS Hunting App and its functions, ensure that your smartphone is connected to the ZEISS DTI 6.
Note: Every time you connect to the ZEISS Hunting App, the current date and time are automatically transferred from your smartphone to the device.
Note: Please note that you are not connected via the normal WLAN if you have established a WLAN connection to your ZEISS DTI 6. To return to the normal WLAN, disconnect your ZEISS DTI 6 from your smartphone.
USB port
Use the USB port (16) on the left side to charge your device or to transfer data (photos and videos) to your PC.
The ZEISS DTI 6 functions as a mass storage device here.
Tripod thread
A 1/4-inch standard thread (15) for standard tripods is located on the bottom of the device. Screw the device onto a tripod for more steady shooting.
Status LED
To set the LED display, select "Settings" in the main menu. Then navigate to "Settings Device Menu". Briefly press the menu button (6) to open the submenu. Navigate to "Status LED" and briefly press the menu button (6). Choose between manual or disabled and confirm the selection by briefly pressing the menu button (6). Press and hold the menu button (6) to return to observation mode.
In the "Manual" mode you can adjust the brightness level of the LED by means of the App.
Note: To avoid fading in the dark, the brightness of the LED is kept low. The LED may therefore sometimes be only barely visible in daylight.
| Operating status | Charge state | LED color | LED status |
| Normal operating condition | Does not charge | Green | Constant |
| Does not charge (low charge level) | Red | Flashing | |
| Charging | Red | Constant | |
| Charging (fully charged) | Green | Constant | |
| Charging power too low | Blue | Flashing | |
| Standby mode | Does not charge | Green | Flashing |
| Does not charge (low charge level) | Red | Flashing | |
| Charging | Red | Constant | |
| Charging (fully charged) | Green | Constant | |
| Charging power too low | Blue | Flashing | |
| Off | Does not charge | - | - |
| Charging | Red | Constant | |
| Charging (fully charged) | Green | Constant | |
| Charging power too low | Blue | Flashing | |
| All | No battery inserted | Blue | Constant |
Charging the device
Charge the device via the USB port (16) when the battery is empty. The battery charge level of the device is shown in the lower right corner of the display. When the charge level is low, the display changes to red. When the device is being charged, the LED (3) lights up red when the device is switched on and off. When the battery is fully charged, the LED (3) lights up green. Only use chargers that meet the USB-C ^® and USB Power Delivery specification.
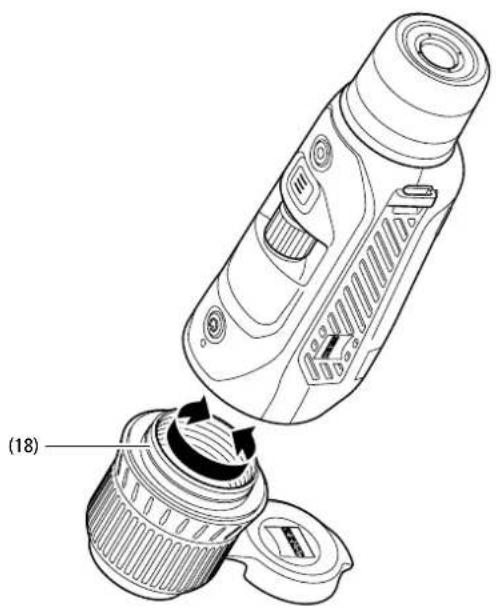
Changing the lens
The ZEISS DTI 6 can be used with a lens of 20 mm focal length and with a lens of 40 mm focal length.
The device's sensor is very sensitive to dirt. To protect the sensor from contamination, switch off the device before changing the lens (18). Do not clean the sensor yourself as this may easily damage the sensor. The sensor must only be cleaned by ZEISS customer service.
Change the lens (18) in a clean environment. Do not leave the device without a lens (18). It is recommended to keep the duration of the lens change as short as possible and to point the open front part down while doing so.
To change the lens (18), unscrew the lens (18) by turning it counter-clockwise and remove it from the device. Insert the new lens (18) into the device and attach the lens (18) hand-tight by turning it clockwise.
Then go to the main menu and select "Settings". Navigate to "Settings Device Menu" and briefly press the menu button (6). This opens the submenu. Navigate to "Lens" and briefly press the menu button (6). Select between 20 mm and 40 mm and confirm the selection by briefly pressing the menu button (6). Press and hold the menu button (6) to return to observation mode.
natural_image
Technical line drawing of a device with a highlighted internal component, showing no text or symbols.Replacing the lens cap
The lens cap (1) is attached to the lens (18) and has a tight fit. To replace the defective lens cap (1), pull it off the lens (18) with a little force. Then put the new lens cap (1) on the lens (18) until it is firmly in place.
Care and maintenance of the device
Do not wipe off coarse dirt particles (e.g. sand) from the lenses, rather blow them away, or use a fine brush to remove them! Over time, fingerprints can corrode the lens surface.
Breathing on the lens and polishing it with a clean optical cleansing cloth is the easiest method of cleaning the lens surface.
Dry storage and keeping the outer lens surfaces well ventilated, especially in the tropics, helps to prevent a possible mold film forming on the optics.
Care and cleaning of the seal
Please make sure the seal is free from dirt and damage at all times. Use a lint-free cloth for cleaning if needed.
Care and maintenance of the battery
Follow these steps to extend the battery life:
■ Avoid storing the device at high temperatures.
■ Avoid storing the device with a fully charged battery.
■ Avoid complete discharging of the device.
Spare parts
Should you require spare parts for your device, e.g. a lens cap (1), please contact your specialist retailer, your local distributor or our after-sales service.
For after-sales requests please contact our after-sales service at: www.zeiss.com/cop/service
ZEISS is a byword for reliability and a high level of quality. Therefore, quite independently of the seller's warranty obligations to the customer, we the manufacturer offer a two year warranty on this ZEISS product, which can be extended for a further year upon registration of the product if registration is made within four weeks of purchase.
The extended three-year warranty does not apply to the supplied battery. The scope of the warranty can be seen by accessing the following link: www.zeiss.com/cop/warranty
Register your product at: www.zeiss.com/cop/register
Manufacturer's address
Carl Zeiss AG
www.zeiss.com/nature and www.zeiss.com/hunting
Subject to changes in design and scope of supply due to technical improvements. No liability for mistakes and printing errors.
Data protection notice
Personal data is processed when using the ZEISS DTI 6.
Our information on data protection and the processing of personal data can be found in our download center: www.zeiss.com/hunting/manuals
This product is licensed under the AVC Patent Portfolio License for personal and non-commercial use by a consumer to (i) encode video in compliance with the AVC standard ("AVC VIDEO") and/or (ii) decode AVC video encoded by a consumer for personal purposes and/or video provided by a licensed video distributor. No license, implied or otherwise, is granted for any other use. Further information is available from MPEG LA, L.L.C., see: http://www.MPEGLA.com
Updates
Download the ZEISS Hunting App now to receive the latest updates:

Hunting App

Download on the App Store

GET IT ON
Google Play
natural_image
Line drawing of two identical medical device setups with arrows indicating motion or force direction (no text or symbols)CARACTÉRISTIQUES TECHNIQUES 6/20 6/40
natural_image
Black background with a white circular button containing the power symbol (no text or numbers)Navigation
natural_image
Technical line drawing of a device with a cylindrical component and a separate cylindrical component, showing internal components and a labeled section (18) (no text or symbols on the diagram itself)www.zeiss.com/nature et www.zeiss.com/hunting
natural_image
Line drawing of two identical medical device setups with attached sensors and tubing, no text or symbols presentDATOS TÉCNICOS 6/20 6/40
natural_image
Black background with a white circular button containing the power symbol (no text or numbers)Navegación
natural_image
Technical illustration of a device being folded into a cylindrical container, showing internal components and a labeled component (18) (no text or symbols beyond label)www.zeiss.com/cop/warranty
www.zeiss.com/nature y www.zeiss.com/hunting
natural_image
Line drawing of two identical medical device setups with arrows indicating motion or force (no text or symbols)DATI TECNICI 6/20 6/40
natural_image
Black background with a white circular button containing the power symbol (no text or numbers)Navigazione
natural_image
Technical line drawing of a device with a cylindrical component and a separate view showing internal components (no text or symbols)www.zeiss.com/nature e www.zeiss.com/hunting

DISPONIBLE TO Google Play
ZEISS DTI
6/20 | 6/40
Gebruiksaanwijzing

WAARSCHUWING!
natural_image
Line drawing of two identical medical or electronic device setups with attached sensors and tubing, no text or symbols present.natural_image
Black background with a white circular button containing a white power symbol (no text or numbers)Navigatie
natural_image
Pure electrical circuit lines without any symbolsnatural_image
Technical line drawing of a device with a magnified view showing internal components (no text or symbols)Registreer uw product op: www.zeiss.com/cop/register

Download in de App Store

ONTOORUST OF Google Play
ZEISS DTI 6/20 | 6/40 Brugsanvisning

ADVARSEL!
natural_image
Line drawing of two identical medical device setups with attached sensors and tubing, no text or symbols presentTEKNISKE DATA 6/20 6/40
natural_image
Black background with a white circular button containing the power symbol (no text or numbers)Navigation
I undermenuen "Settings" har du følgende valgmuligheder:
natural_image
Technical line drawing of a device with a cylindrical component and a separate view showing internal components (no text or symbols)natural_image
Line drawing of two identical medical or electronic device setups with attached sensors and tubing (no text or symbols)TEKNISET TIEDOT 6/20 6/40
natural_image
Black background with a white circular button containing the power symbol (no text or numbers)Navigointi
natural_image
Technical line drawing of a device with a magnified view showing internal components (no text or symbols)natural_image
Line drawing of two identical medical device setups with attached sensors and tubing, no text or symbols presentMÜSZAKI ADATOK 6/20 6/40
natural_image
Black background with a white circular button containing a white power symbol (no text or numbers)Navigáció
natural_image
Line drawing of a device being inserted into a container, showing internal components and motion arrows (no text or symbols)natural_image
Line drawing of two identical medical device setups with arrows indicating motion or force direction (no text or symbols)DANE TECHNICZNE 6/20 6/40
natural_image
Black background with a white circular button containing a white power symbol (no text or numbers)Nawigacja
natural_image
Technical illustration of a device being inserted into a cylindrical container, showing internal components and a labeled component (18) (no text or symbols beyond label)natural_image
Line drawing of two identical medical or electronic device setups with attached sensors and tubing, no text or symbols present.TEKNISKA DATA 6/20 6/40
| Optik | |||
| Brännvidd mm 20/F1.0 40/F1.0 | |||
| Objektivtyp Germanium | |||
| Detekteringsräckvidd (Objektstorlek 1,8 m × 0,6 m; 2 yd × 0,7 yd) | m (yd) 1 000 (1 090) 2 000 (2 180) | ||
| Subjektiv siktvinkel | ° | 40 (diagonal) | |
| Synfält på 100 m (synfält på 100 yard) | m (ft) | 38 (114) | 19 (57) |
| Synfält | ° horisontell x vertikal | 22 × 16 | 11 × 8,2 |
| Optisk förstoring | 1,5x | 3,0x | |
| Maximal digital zoom | 10x | ||
| Zoom-sleg | variabel | 0,1-1,0 | |
| Sensor | |||
| Upplösning sensor | px | 640 × 480 | |
| Pixelavständ sensor | μm | 12 | |
| Bildfrekvens | Hz | 50 | |
| Display | |||
| Upplösning display | px | 1 024 × 768 | |
| Displaytyp | AMOLED | ||
| Elektronik | |||
| Gränssnitt | USB: ladda + dataoverföringWLAN: dataoverföringBluetooth: dataoverföring | ||
| Batteri | Lithiumjon | ||
| Batteritid | h | 6,5 | |
| Extern spänningsförsörjning | 9 V/2 A, 12 V/1,5 A (USB) | ||
| Internt minne | GB | 16 | |
| Video-/bild-/live stream-funktion | √ | ||
| WLAN-frekvens | GHz | 2,4 | |
| WLAN-standard | IEEE 802.11b/g/n | ||
| Anslutning till andra apparater | ZEISS Hunting-app, USB | ||
| Allmänt | |||
| Kapslingsklass | IP65 / IP67 | ||
| Driftstemperaturområde | °C (°F) | -20 / +50 (-4 / +122) | |
| Laddningstemperaturområde | °C (°F) | 0 / +50 (+32 / +122) | |
| Längd × bredd × höjd | mm (inch) | 230 × 62 × 68 (9,06 × 2,44 × 2,68) | 228 × 69 × 73 (7,36 × 2,72 × 2,87) |
| Vikt | g (oz) | 690 (24,3) | 755 (26,6) |
natural_image
Black background with a white circular button containing the power symbol (no text or numbers)Navigation
natural_image
Pure electrical circuit lines without any symbolsnatural_image
Technical line drawing of a device with a highlighted internal component, showing no text or symbols.Byta ut objektivskyddet
natural_image
Line drawing of two identical medical device setups with attached sensors and tubing, no text or symbols presentnatural_image
Black background with a white circular button containing the power symbol (no text or numbers)Навигация
natural_image
Technical line drawing of a device being inserted into a cylindrical container, showing internal components and a labeled component (18) (no text or symbols beyond label)www.zeiss.com/cop/warranty
Регистрация изделия: www.zeiss.com/cop/register
Адрес производителя
Carl Zeiss AG
www.zeiss.com/nature v www.zeiss.com/hunting
natural_image
Line drawing of two identical medical device setups with arrows indicating motion or force direction (no text or symbols)テクニカルデータ
6/20 6/40
natural_image
Black background with a white circular button containing the power symbol (no text or numbers)ナビゲーション
natural_image
Line drawing of a device with a lid and internal components, showing a step labeled (18) indicating a process or operation (no text or symbols on the diagram itself)レンズカバーの交換
www.zeiss.com/cop/warranty
natural_image
Line drawing of two identical medical device setups with arrows indicating motion or force (no text or symbols)技术数据
6/20 6/40
natural_image
Black background with a white circular button containing the power symbol (no text or numbers)导航
natural_image
Technical line drawing of a device with a magnified view showing internal components (no text or symbols)更换镜头保护盖
www.zeiss.com/nature 和 www.zeiss.com/hunting
www.zeiss.com/nature
www.zeiss.com/hunting
- Navigation
- WARNING!
- Observation with and without glasses
- Instructions for use
- Installing/removing the battery
- Automatic standby
- Standby
- Observation mode
- Zoom
- Shooting mode
- Menu
- Color
- Connectivity
- Settings
- Settings Profile Menu
- Settings Calibration Menu
- Settings Location Menu
- Settings Device Menu
- Language
- Date
- Time
- Time Format
- Settings Pairing Menu
- Settings Reset Menu
- Troubleshooting
- Personal data when you pass on or dispose of your ZEISS device
- Participating in IT security
- Firmware update
- ZEISS Hunting App
- USB port
- Tripod thread
- Status LED
- Charging the device
- Changing the lens
- Replacing the lens cap
- Care and maintenance of the device
- Care and cleaning of the seal
- Care and maintenance of the battery
- Spare parts
- Manufacturer's address
- Data protection notice
- Updates
- Navegación
- Navigazione
- ZEISS DTI
- 6/20 | 6/40
- Gebruiksaanwijzing
- WAARSCHUWING!
- Navigatie
- ZEISS DTI 6/20 | 6/40 Brugsanvisning
- ADVARSEL!
- Navigointi
- Navigáció
- Nawigacja
- Byta ut objektivskyddet
- Навигация
- www.zeiss.com/cop/warranty
- Адрес производителя
- Carl Zeiss AG
- ナビゲーション
- レンズカバーの交換
- 导航
- 更换镜头保护盖
Brand : ZEISS
Model : DTI 6/20
Category : Thermal camera