
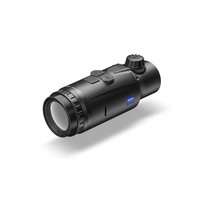
DTC 3/25 - Binoculars ZEISS - Free user manual and instructions
Find the device manual for free DTC 3/25 ZEISS in PDF.

| Product type | Thermal imaging add-on device |
| Brand | ZEISS |
| Model | DTC 3/25 |
| Dimensions (L × W × H) | 150 × 60 × 65 mm |
| Weight | 560 g |
| Power supply | Rechargeable lithium-ion battery (integrated) |
| Battery life | 10 h |
| Sensor resolution | 384 × 288 pixels |
| Pixel pitch | 12 µm |
| Frame rate | 50 Hz |
| Display type | AMOLED, resolution 1024 × 768 pixels |
| Focal length | 25 mm |
| Field of view (H × V) | 10.5° × 7.9° |
| Optical magnification | 1x |
| Range (object 1.8 × 0.6 m) | 1300 m |
| Protection rating | IP65 / IP67 |
| Operating temperature | -10°C to +50°C |
| Interfaces | USB-C (charging), Bluetooth |
| Main functions | Auto/manual calibration, color modes (White Hot, Black Hot, Red Hot, Rainbow), contrast amplification, shooting profiles, intelligent standby, reticle correction, pixel correction |
| App | ZEISS Hunting (smartphone) |
| Package contents | Device, lens cap, eyecup, case, cleaning cloth, USB cable, quick guide, safety instructions, warranty card, EULA document |
| Maintenance and cleaning | Blow or use a brush for large particles; clean lenses with an optical cloth after fogging; store dry to prevent mold |
| Safety | Follow safety instructions and applicable regulations (available at www.zeiss.com/hunting/manuals) |
| Spare parts and repairability | Lens cap and USB port cap replaceable; external adapter (not included) for mounting on riflescope |
| General information | Legal warranty 2 years; ZEISS customer service |
Frequently Asked Questions - DTC 3/25 ZEISS
User questions about DTC 3/25 ZEISS
0 question about this device. Answer the ones you know or ask your own.
Ask a new question about this device
Download the instructions for your Binoculars in PDF format for free! Find your manual DTC 3/25 - ZEISS and take your electronic device back in hand. On this page are published all the documents necessary for the use of your device. DTC 3/25 by ZEISS.
USER MANUAL DTC 3/25 ZEISS
For United States patents which may cover this product see our website. Patents: www.zeiss.com/cop/patents
DE EN FR ES IT NL DK FI HU PL SE RU JP CN 06.2024

WARNING!
www.zeiss.com/cop/warranty
1050 Worldwide Blvd.
Hebron, KY 41048-8632, USA
Telefon: 1-800-441-3005
E-Mail: info.sportsoptics.us@zeiss.com
Herstelleradresse
Carl Zeiss AG
Carl-Zeiss-StraBe 22
D-73447 Oberkochen
www.zeiss.com/nature und www.zeiss.com/hunting
Instructions for use
For United States patents which may cover this product see our website. Patents: www.zeiss.com/cop/patents
DE EN FR ES IT NL DK FI HU PL SE RU JP CN 01.2022

WARNING!
Please note the safety instructions and regulatory information.
They can also be accessed at:
www.zeiss.com/hunting/manuals

INSTRUCTIONS FOR USE
ZEISS products are famous for outstanding optical performance, precision workmanship, and long service life. Please observe the following instructions for use to obtain the best results from your thermal imaging attachment and to ensure it remains as your preferred gear for many years to come.
Scope of supply
| Product order no. | Scope of supply | ||
| ZEISS DTC | 3/38 527031 | DTC 3/38 or DTC 3/25 thermal imaging attachmentProtective lens capEyepiece protectionCarrying caseOptics cleaning clothUSB cableQuick GuideSafety instructionsWarranty cardEULA document | |
| ZEISS DTC | 3/25 527030 |
Installing/removing the battery
The ZEISS thermal imaging attachment is equipped with a battery. It cannot be removed.
Attaching the thermal imaging attachment
An adapter is required to attach it to an optical device, e.g. a filrescope. To expose the thread for attaching the adapter, turn the lock ring (6) as far clockwise as possible in the direction of the thermal imaging attachment. Handtighten your external adapter clockwise onto the device. Secure the connection by turning the lock ring (6) counterclockwise in the direction of the external adapter. Please also observe the mounting instructions enclosed with your adapter.
Note: Check the legal and regional regulations in your country before using the ZEISS DTC 3 in combination with an optical sight.
TECHNICAL DATA DTC 3/38 DTC 3/25
| Optics | |||
| Focal length 38 mm / F1.0 25 mm / F1.0 | |||
| Lens type Germanium | |||
| Range | m (object 1.8 m × 0.6 m) | 1,950 | 1,300 |
| yd (object 2 yd × 0.7 yd) | (2,130) | (1,420) | |
| Field of view in m at 100 m | m | 12.3 | 18.4 |
| (Field of view in m at 100 yd) | (ft) | (36.9) | (55.2) |
| Field of view in degrees (horizontal × vertical) ° 7 × 5 10.5 × 7.9 | |||
| Optical magnification | 1 | ||
| Maximum image adjustment X to 100 m | cm | ± 205 | ± 307 |
| (Maximum image adjustment X to 100 yd) | (ft) | (6.7) | (10.1) |
| Maximum image adjustment Y to 100 m | cm | ± 154 | ± 230 |
| (Maximum image adjustment Y to 100 yd) | (ft) | (5.1) | (7.5) |
| Adjustment per click at 100 m | cm | 1.6 | 2.4 |
| (Adjustment per click at 100 yd) | (in) | (0.58) | (0.86) |
| Sensor | |||
| Sensor resolution | px | 384 × 288 | |
| Sensor pixel pitch | μm | 12 | |
| Frame rate | Hz | 50 | |
| Display | |||
| Display resolution | px | 1,024 × 768 | |
| Display type | AMOLED | ||
| Electronics | |||
| Interfaces | USB: charging | ||
| Bluetooth: data transfer | |||
| Battery | Lithium-ion | ||
| Battery life | h | 10 | |
| External power supply(not included in the delivery package) | 5V/2A (USB) | ||
| Connection with other devices | ZEISS Hunting App, Bluetooth | ||
| General | |||
| Protection type | IP65 / IP67 (protected from heavy rain) | ||
| Operating temperature range | °C (°F) | -10/+50 (+14/+122) | |
| Length × width × height | mm (in) | 164 × 60 × 65 (6.5 × 2.4 × 2.6) | 150 × 60 × 65 (5.9 × 2.4 × 2.6) |
| Weight | g (oz) | 650 (22.9) | 560 (19.8) |
Subject to changes in design and scope of delivery and as a result of ongoing technical development.
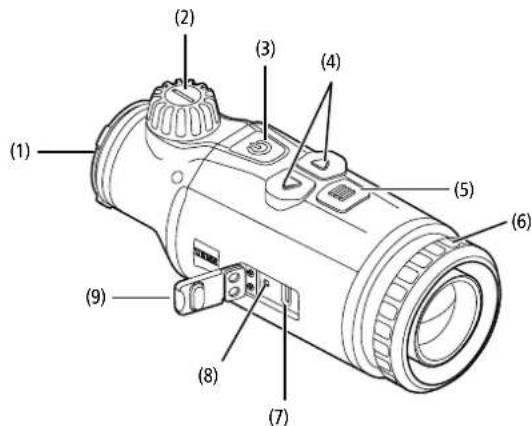
Power on/off
Press and hold the on/off button (3) (approx. 1.5 seconds) to switch on the device. Press and hold the on/off button (3) to switch off the device again.
Note: The on/off button (3) must be pressed until the OFF symbol appears on the display. Only then can the on/off button (3) be released and the device switches off. If the on/off button (3) is released before the OFF symbol is displayed, the device does not switch off but switches to standby mode.

Standby mode
Briefly press the on/off button (3) to switch the device to standby mode. Briefly press the on/off button (3) again to switch the device back to observation mode.
To further conserve battery power and extend running time, the ZEISS DTC 3 offers Smart Standby with a built-in motion sensor. This automatically detects the position of the thermal imaging attachment and activates standby mode at 45^ lateral inclination or 70^ downward or upward inclination. As soon as the thermal imaging attachment returns to its normal position, the device automatically switches back to observation mode. You can deactivate this function in the menu under "Smart Standby".
Calibration
The device can be calibrated automatically (Auto Calibration - On) or manually (Auto Calibration - Off). This can be set in the main menu or via the right arrow button (4) in observation mode.
In automatic mode, the device automatically performs a calibration by closing and opening an internal shutter when necessary. A gentle click should be heard. In this mode, you also have the option of performing the calibration manually. Brieflypress the right arrow button (4). The device activates the shutter and calibrates itself. The device is now calibrated again.
To perform a manual, silent calibration, first switch to observation mode by pressing and holding the right arrow button (4) in manual mode. To calibrate, cover the lens and then briefly press the right arrow button (4).
Note: Always cover the lens when performing a manual calibration. Otherwise the sensor cannot calibrate correctly and the image will deteriorate, e.g. ghost images. If you forget to cover the lens during a manual calibration, repeat the calibration procedure with the lens covered.
Observation mode
Turn the focusing turret (2) to bring the scene into focus.
Color modes
The scene can be displayed in four different color modes. Briefly press the menu button (5) to change the observation mode. When changed, the selected mode is shown on the display as text for about 2 seconds. The following color modes can be selected:
- White Hot: Cold areas are displayed here in black and warm areas in white.
Black Hot: Cold areas are displayed here in white and warm areas in black. - Red Hot: Cold areas are displayed here in black and warm areas in white. In addition, the warmest areas are shown in yellow to red.
Rainbow: A varied color palette displays cold areas in black to blue and warm areas in yellow to white.
Menu
Press and hold the menu button (5) to show the main menu on the display. The main menu gives you the following options:
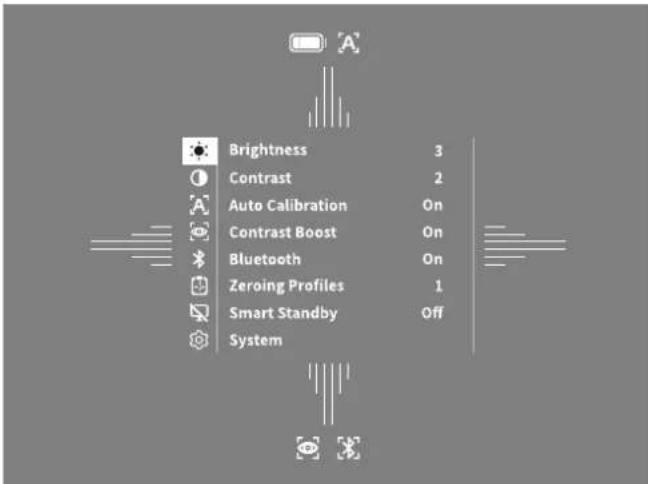
- Brightness: Set the brightness of the display here. There are four brightness levels to choose from. The brightness is lowest at level 1. The brightness is highest at level 4.
- Contrast: Adjust the contrast of the scene here. There are four contrast levels to choose from. The contrast is lowest at level 1. The contrast is highest at level 4.
Auto Calibration: Set manual (Auto Calibration = Off) or automatic calibration (Auto Calibration = On) here.
Contrast Boost: Activate this mode for better visibility in high humidity or fog. - Bluetooth: Enable Bluetooth (Bluetooth = On) or disable (Bluetooth = Off)
- Bluetooth. With Bluetooth turned on, the device can be connected to your smartphone and the app.
- Zeroing Profiles 1-4: Select the zeroing profile you created for the rifscope you are currently using.
Smart Standby: Activate (Smart Standby = On) or deactivate (Smart Standby = Off) the automatic standby mode.
System: Make all system-relevant settings here, including zeroing, language, time and factory reset.
The arrow buttons (4) and the menu button (5) are used to navigate in the main menu. Press the right arrow button (4) to scroll down. Press the left arrow button (4) to scroll up.
Briefly press the menu button (5) to select a menu item. This opens the submenu. Make your settings using the arrow buttons (4).
Briefly press the menu button (5) to confirm your selection and return to the main menu.
Press and hold the menu button (5) to exit the main menu and return to observation mode.
Contrast Boost
The contrast boost enables you to display the image in an improved way in high humidity or fog. This highlights edges so that structures can be recognized better. To activate the contrast boost on your device, select "Contrast Boost" in the main menu. Then select "On" or "Off". Briefly press the menu button (5) to confirm the selection.
Note: It is recommended to use this mode only in the above-mentioned conditions and to disable this mode in normal conditions.
Zeroing Profile 1-4
Up to four different zeroing profiles can be stored on your device. To change the profile, select "Zeroing Profile 1-4" in the main menu. Select the desired profile and confirm the selection by briefly pressing the menu button (5).
System
The "System" submenu has the following options:
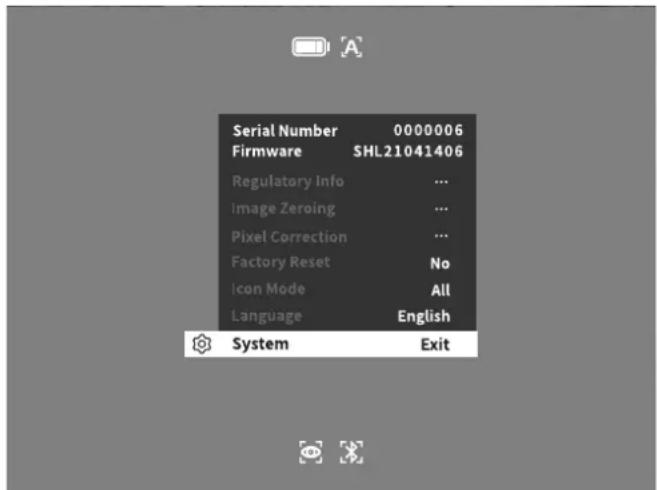
Regulatory Info: Here you can find information about the licenses used and regulatory information.
- Image Zeroing: Adjust the thermal imaging attachment to perfectly fit your riflescope here.
Pixel Correction: Remove defective pixels for a perfect field of view.
Factory Reset: Select "Factory Reset" to reset the device to the factory settings. This also deletes all settings saved on the device.
Note: If you perform a factory reset, all zeroing profiles will be deleted. Only
perform a factory reset if you want to delete all settings on the ZEISS DTC 3.
- Icon Mode: Select the number of icons to be shown on your display.
Language: Select a menu language here.
You can also view the following information:
Serial Number: The serial number of your device is shown here.
Firmware: The current firmware version is displayed here.
Image Zeroing
Select "System" in the main menu to set the selected zeroing profile. Navigate to "Image Zeroing" and start the zeroing procedure by briefly pressing the menu button (5). Setting the X axis: Press the left arrow button (4) for minus and the right arrow button (4) for plus. Each time you press the button, the image shifts in the corresponding direction: at 25 mm focal length by 2.4 cm at 100 m, at 38 mm focal length by 1.6 cm at
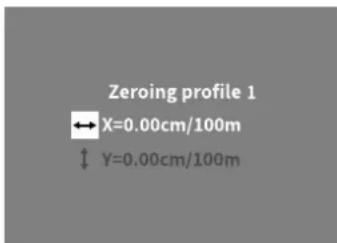
100 m. Confirm the setting by briefly pressing the menu knob (5). Now make the settings for the Y axis in the same way. Switch between the setting for the X and Y axis by briefly pressing the menu button (5).
To correct the impact point, move the image opposite to the direction to which you detected the deviation, i.e.:
Shot placement too far to the left: Correction to the right
Shot placement too far to the right: Correction to the left
Shot placement too far to the bottom: Correction to the top
Shot placement too far to the top: Correction to the bottom
To save the settings, press and hold the menu button (5). Confirm the query whether you want to save or discard the calibration by briefly pressing the menu button (5).
To change an already saved zeroing profile, select "System" in the main menu. Then navigate to "Image Zeroing". Briefly press the menu button (5) to restart the zeroing procedure. Proceed as described above.
To save the settings, press and hold the menu button (5). Confirm the query whether you want to save or discard the calibration by briefly pressing the menu button (5).
Note: The currently selected profile will always be changed.
Simplified Zeroing Mode
The ZEISS Hunting App offers you a zeroing assistant for zeroing in. Navigate to the "Zeroing Profiles" menu item in the app and enter the deviations in relation to the distance of the respective axis. The device then performs the calibration automatically. For more information, please contact ZEISS Hunting App.
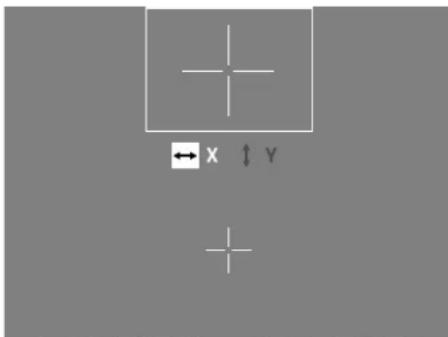
Pixel Correction
If individual pixels fail, you can locate them here and fix the error.
Select "System" in the main menu to start the correction. Navigate to "Pixel Correction" and start the correction by briefly pressing the menu button (5). A crosshairs appear, which you use to capture the affected pixel. For more precise detection, the area around the crosshairs is

displayed enlarged in an additional window. Setting the x axis: Press the left arrow button (4) for minus and the right arrow button (4) for plus. Every time you press the button, you move one pixel further. To jump several pixels further, hold down the arrow button (4) longer. Confirm the setting by briefly pressing the menu button
(5). Now make the settings for the Y axis in the same way. Switch between the setting for the X and Y axis by briefly pressing the menu button (5).
To save the settings, press and hold the menu button (5). Confirm the query whether you want to save or discard the calibration by briefly pressing the menu button (5).
Factory Reset
To perform a factory reset, select "System" in the main menu. Then navigate to "Factory Reset". Select "Yes" and confirm your selection. A second security prompt follows, which must also be confirmed with "Yes".
Note: If you perform a factory reset, all zeroing profiles will be deleted. Only perform a factory reset if you want to delete all settings on the ZEISS DTC 3.
Note: The device must be restarted for the reset of the settings to be completed successfully.
Icon Mode
With the ZEISS DTC 3, you have the option of having various icons shown on the display: battery icon, calibration mode, Bluetooth, contrast boost. To set the icon mode, select "Icon Mode" in the System menu. Then choose between the following modes and confirm your selection by briefly pressing the menu button (5):
Non: No icons are displayed.
- Bat: Only the battery symbol with the current charge status is displayed.
All: All icons are displayed.
Personal data when you dispose of or pass on your ZEISS device
Before passing on the device to a third party, please perform the factory reset to delete data and verify it has been deleted. By doing so, you help maintain your privacy and data security.
Cooperation on device safety
Please take an active role in protecting the IT security of your device by using the ZEISS Hunting App and installing new firmware updates as soon as they become available.
Firmware update
A firmware update can be carried out using the ZEISS Hunting App. Follow the instructions for this in the ZEISS Hunting App.
Note: If you initiate an update via the ZEISS Hunting App, you must confirm this again on the device for security reasons.
Note: Make sure that the device is fully charged before updating the firmware. Do not switch off the device during the update, otherwise it may be damaged.
LED status
Note: The LED is located under the cover for the USB charging socket.
Charge state LED color LED status
Does not charge--
Does not charge (low charge level) Red Flashing
Charging Red Constant
Charging (fully charged) Green Constant
ZEISS Hunting App
Install the ZEISS Hunting App on your smartphone and open the app. To connect to the thermal imaging attachment, activate Bluetooth on your thermal imaging attachment and follow the steps displayed in the app. The app enables you to make settings, use the ZEISS DTC 3 via remote control mode and use the simplified zeroing mode. A more detailed description can be found in the help function of the app.
Charging the device
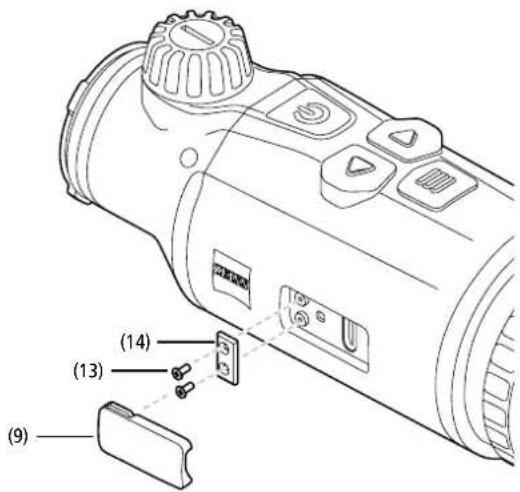
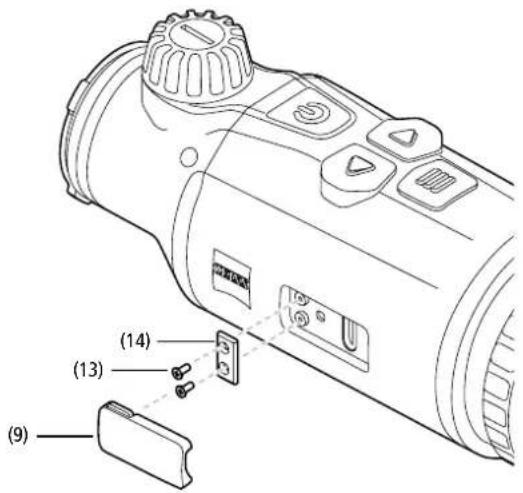
Charge the device via the USB port (7) when the battery is empty. To do this, first open the rubber cover on the side of the device (9).
The battery charge level is shown in the upper left corner of the display. When the charge level is low, the display changes to red. When the device is being charged, the LED (8) lights up red when the device is switched on and off. When the battery is fully charged, the LED (8) lights up green.
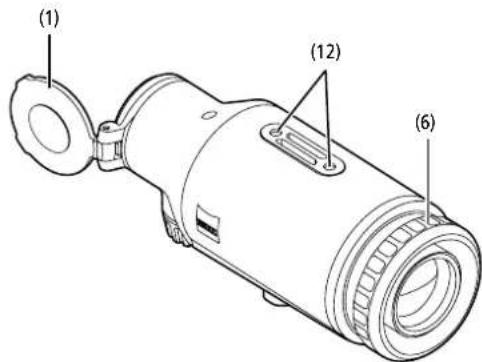
Replacing the lens cap
To replace the protective lens cover (1), loosen the front part of the lens cover by turning it counterclockwise. Unscrew the lens cover completely. Then screw the new lens cover back on.
Replacing the USB cover
To replace the USB cover (9), unscrew the screws (13) using a screwdriver. Remove the retaining plate (14) and the defective USB cover (9). Insert the new USB cover (9) and the retaining plate (14). Tighten the screws (13) using a screwdriver.
Adapter
Two M5 threads (12) are located on the bottom of the device. These offer you the option of attaching an adapter here, e.g. for a Picatinny rail.
Care and maintenance of the device
Do not wipe off coarse dirt particles (e.g. sand) from the lenses, rather blow them away, or use a fine brush to remove them! Over time, fingerprints can corrode the lens surface, Breathing on the lens and polishing it with a clean optical cleansing cloth is the easiest method of cleaning the lens surface. Dry storage and keeping the outer lens surfaces well ventilated, especially in the tropics, helps to prevent a possible mould film forming on the optics. Your thermal imaging attachment requires no further special care.
Software updates
Within the scope of the statutory warranty (2 years from the transfer of risk of the goods - according to German law), we will provide appropriate updates to remedy defects. Generally, updates are used for security-related aspects or to eliminate functional impairments and do not include new functions of the software. Insofar as the provision of new functions is necessary to remedy security aspects, this shall not in principle constitute a claim to new functions as such.
After the legal warranty period has expired, we will of course endeavor to provide you with appropriate further updates. However, there is no entitlement to this.
Troubleshooting
| Fault | Possible reasons Solution | |
| Will not boot. Battery is empty. Charge the device. | ||
| The device is not charging. | External power supply is not sufficient. Check if the external power supply is fine. | |
| The USB cable is not properly connected to the device. | Unplug the USB cable and check that the connector and port are undamaged and free from dirt. | |
| The image is unclear.The image has streaks.The background is not uniform. | The device must be recalibrated. | Follow the instructions when performing the calibration procedure. |
| The image is blurred. The contrast boost is activated despite normal conditions. Deactivate the contrast boost. | ||
| The image is too dark. The screen brightness is set too low. Adjust the screen brightness. | ||
| The image on the display is flat. The contrast is set too low. Adjust the contrast. | ||
| Image quality is poor.The detection range is too short. | Poor weather conditions may have adverse effects (e.g. heavy snowfall, rain, fog, etc.). | |
Care and maintenance of the battery
Follow these steps to extend the battery life:
Only store the device at temperatures ranging between 0 and 35^
- Avoid storing the device with a fully charged battery.
- Avoid complete discharging of the device.
Customer Service and Warranty

For service questions or obtaining the warranty terms, please see
our website
www.zeiss.com/cop/warranty
For service inquiry or a free copy of the warranty terms for your region, please contact:
ZEISS Customer Service
Zeiss Sports Optics GmbH
Gioelstr. 3-5, 35576 Wetzlar, Germany
Phone: +49 800 934 77 33
E-mail: consumerproducts@zeiss.com
ZEISS Customer Service USA
Carl Zeiss SBE, LLC
Consumer Products
1050 Worldwide Blvd
Hebron, KY 41048-8632, USA
Phone: +1-800-441-3005
E-mail: info.sportsoptics.us@zeiss.com
Manufacturer's address
Carl Zeiss AG
Carl-Zeiss-StraBe 22
D-73447 Oberkochen
www.zeiss.com/nature und www.zeiss.com/hunting
Subject to changes in design and scope of delivery and as a result of ongoing technical development. No liability for mistakes and printing errors.
Data protection notice
Personal data is processed when using the thermal imaging attachment.
Our information on data protection and the processing of personal data can be
found in our download center: www.zeiss.com/hunting/manuals
ZEISS DTC
3/38 | 3/25
Mode d'emploi
For United States patents which may cover this product see our website. Patents: www.zeiss.com/cop/patents
DE EN FR ES IT NL DK FI HU PL SE RU JP CN | 01.2022

AVERTISSEMENT!
www.zeiss.com/cop/warranty
1050 Worldwide Blvd.
Hebron, KY 41048-8632, Etals-Unis
Telephone: 1-800-441-3005
E-mail: info.sportsoptics.us@zeiss.com
www.zeiss.com/nature et www.zeiss.com/hunting
www.zeiss.com/hunting/manuals
ZEISS DTC
3/38 | 3/25
For United States patents which may cover this product see our website. Patents: www.zeiss.com/cop/patents
DE EN FR ES IT NL DK FI HU PL SE RU JP CN 01.2022

ADVERTENCIA
www.zeiss.com/cop/warranty
1050 Worldwide Blvd.
Hebron, KY 41048-8632, EE. UU.
TelEfo:1-800-441-3005
E-Mail: info.sportsoptics.us@zeiss.com
www.zeiss.com/nature y www.zeiss.com/hunting
For United States patents which may cover this product see our website. Patents: www.zeiss.com/cop/patents
DE EN FR ES IT NL DK FI HU PL SE RU JP CN 01.2022

AVVERTENZAI
DATI TECNICI DTC 3/38 DTC 3/25
www.zeiss.com/cop/warranty
1050 Worldwide Blvd.
Hebron, KY 41048-8632, USA
Telefon:1-800-441-3005
E-mail: info.sportsoptics.us@zeiss.com
For United States patents which may cover this product see our website. Patents: www.zeiss.com/cop/patents
DE EN FR ES IT NL DK FI HU PL SE RU JP CN 01.2022

WAARSCHUWINGI
www.zeiss.com/cop/warranty
1050 Worldwide Blvd.
Hebron, KY 41048-8632, USA
Telefoon: 1-800-441-3005
E-mail: info.sportsoptics.us@zeiss.com
www.zeiss.com/hunting/manuals
ZEISS DTC
3/38 | 3/25
Brugsanvisning
For United States patents which may cover this product see our website. Patents: www.zeiss.com/cop/patents
DE EN FR ES IT NL DK FI HU PL SE RU JP CN 01.2022

ADVARSEL!
www.zeiss.com/cop/warranty
For servicehenvendelse erer et Gratis ekemplar af garantibetingelsene, der er gyldige for dit omrade, bedes du kontakte:
ZEISS Customer Service
Zeiss Sports Optics GmbH
Gioelstr. 3-5, 35576 Wetzlar, Germany
Telefon: +49 800 934 77 33
E-mail: consumerproducts@zeiss.com
ZEISS Customer Service USA
Carl Zeiss SBE, LLC
Consumer Products
1050 Worldwide Blvd.
Hebron, KY 41048-8632, USA
Telefon: +1-800-441-3005
E-mail: info.sportsoptics.us@zeiss.com
For United States patents which may cover this product see our website. Patents: www.zeiss.com/cop/patents
DE EN FR ES IT NL DK FI HU PL SE RU JP CN 01.2022

VAROITUSI
TEKNISET TIEDOT DTC 3/38 DTC 3/25
www.zeiss.com/cop/warranty
1050 Worldwide Blvd.
Hebron, KY 41048-8632, USA
Puhelin: 1-800-441-3005
Sahköposti: info.sportsoptics.us@zeiss.com
Valmistajan osoite
Carl Zeiss AG
Carl-Zeiss-StraBe 22
D-73447 Oberkochen
www.zeiss.com/nature ja www.zeiss.com/hunting
www.zeiss.com/hunting/manuals
ZEISS DTC
3/38 | 3/25
Használati utasítás
For United States patents which may cover this product see our website. Patents: www.zeiss.com/cop/patents
DE EN FR ES IT NL DK FI HU PL SE RU JP CN 01.2022

FIGYELMEZTETESI
- Behaviors of the treatment of gomb rowl (5) megnyomasaval.
1050 Worldwide Blvd.
Hebron, KY 41048-8632, USA
Telefon: 1-800-441-3005
E-mail: info.sportsoptics.us@zeiss.com
Gyartó cime
Carl Zeiss AG
www.zeiss.com/nature es www.zeiss.com/hunting
For United States patents which may cover this product see our website. Patents: www.zeiss.com/cop/patents
DE EN FR ES IT NL DK FI HU PL SE RU JP CN | 01.2022

OSTRZEZENIE!
For United States patents which may cover this product see our website. Patents: www.zeiss.com/cop/patents
DE EN FR ES IT NL DK FI HU PL SE RU JP CN 01.2022
BRUKSANVISNING
Firmware-upppatering
www.zeiss.com/cop/warranty
1050 Worldwide Blvd.
Hebron, KY 41048-8632, USA
Telefon: 1-800-441-3005
E-post: info.sportsoptics.us@zeiss.com
For United States patents which may cover this product see our website.
Patents: www.zeiss.com/cop/patents

NPEyIpyKDEHNE!
OBaPHTe BINIMAHHE H8 k33AHH NO TEXIMKE BESONACHCTN
UOPHNECKYIOHNOPMADNO.IXMOKHOHNI NO aepcy
www.zeiss.com/hunting/manuals

HHTPYKUINIIOIPIMMEHEHIO
M3eIMMaKpK ZEISS OTNnHOTcBENIKoJIeHOB ONTKO,TOHNO6paGtKoI 60bnllm CPOKOM CNYbI.
CobnoiaIe npnaedHHe Hnke yka3nn No OTHMaHbMy npmeHnIO npoe6paB0aTeNaTepnoBoro 3o6paKeHnV, n OH CTaHET BaUM HAeKbHM CNYTHAKOM HA DOTIVcFO
KOMNNEKT noCTABKN
YcTaHOBKa/IN3BJeueHHe aKKyMnyTota
Ppe6pa3oBareTENIOBOrNIO6paXeHnZEISSOCHaueHAKyMyIATOPOM. Bo3MOxHOCTbN3BHeNeHnAKyMylITOpA He npedyCMOTpeHa.
YctahOBKa npeo6pa3ObaTeNa TEnIOBOro 306paXeHn
IyctaHOBKa Ha onTnueckn npBcP (Haepmep Ha onTnueckn npuien) Tpebyer aanTep.
Tt06bOc0600nBpe36yDnyycAHOBNaAANTepa, npOKpyNTe KOHTpKoNlO (6) no cAcBOB CTPEK KAK MOXHO DaJIbWe B HAPPAEHNmnpoe6pa0BaTeIeN TERIOBOrO N3O6paKeHn. BpyHy oPnKpyNTe BHeuHnAnAANTep K yCTPOCTBy No CAcBOB CTPEK. PnpOBte CoeINHnE, NOBepHyKOHTP-KoNlTO (6) nptINB cAcBOB CTPEKn B HAPPAEHNnBHeUHero aanTepaCoNIOaIte pinnaraemle K aadantepy INCHPTPKUIN no erO qnkauu.
PnmeaHne. PnxJe HcNpOb3oBAt ZEISS DTC 3 Bmte C oNTAeCKIMn PnIeAMn, O3HakOMbTeC BcCTByOoiMMn B CTpaHe 3aKOHoDaTeJIbHbIMn POIOXeHANm n perHOAIbHbIMn TpeBOBaHnMn.
TEXHUNHECKNE XAPAKTEPNCNTNK DTC 3/38 DTC 3/25
YTO6bI OTpyIIMPOBaT ToKy nonaHaHnA, npeMeCTte N3o6paXHeHcB HAnpaJIeHN, npOTABNOIOxHOM ToM, B KOTOpM O6HApYKeHO OTKnOHeHcE:
NoIOXKeHMe TOOKI NOJaDAHNR CImuKOM CMeUeHO BHeBO -peynpOBKa BnpBO;
NIOJXeHHe TOckn NOnaHaHn CmUKOM CMeUeHO BnpaBO -peyIInpOBABNEBO;
IIOLOXeHHe TOCKI IONaHaHnCINUKOM CMeUeHO BHN3-peyuPobKa BBepx;
NOIOXeHNE NOJaDaHnCmUkOM CMeUeHO BBePx -peyIIpOBKa Bn3
Дя coханги NaHcTpoK HaxMnte N yIepxNbaIte KhoNky MeH0 (5).
NoTaePnTe 3anpoc coxapHaHry KaJIn6pOBKn HaxTaNEm KhoNkn MeH0 (5).
YTO6bIM3MeHHTyXe COxpaEHHHI IIOPOHb BbICTpeJIaBIIABHOM MeHIO Bb6epTe CnCTeM).3aTe MEPNEIeK TpyKOTy KOpEklN BmHPOJ NINHM. HAKATME KONHI MEHO (5) PPOUcDpy BbCTpeMOKHO3aYCTNTb 3aHOBO, DeCTByB COoETBeTCBN C BIuienPpBEHNBMIA Yk3aHNNM
Дл coхангь HabToe KaHmTe N yedexnBaiTe KhoNky MeHIO (5).
NoTaepeDITE 3anpoc coxapHaHry KaJIn6poBk HaxaTNEM KHOKNMeHIO (5)
PpmeaHne. Bcerga MeHnEeTc BbIpaHHB TkUyMIMoMeH NTpoqunl.
YnpoueHHbI pexm BbICtpena
B npINOJOHHe ZEISS DnO OXOTHNKOB BCTPOeH NOMOUIHK NO BCTPcIaM. HAIINTE BnpINOJOHCHN NHYKT MEIOIIOPOJINNA BbCTPcJIaN ykAKINTE B HEM OTKOHOHMR B OTHOWEH NyanE HONOT COOTBECTCYKUeE ONC. PpNOBOP ABOTMAtuueckn BInIOHReT KAnIb6pOky. DaJIbHNeUHy INHOpMaIIIO MOXHO NLIyHTB pIMMO B npINOJOHCHN ZEISS DnO OXOTHNKOB.
Koppekua nkkcei
B Cnyae BbyiadeHnE
OTdEnbHix NIKCeNEX
MOKHO JIOKAN3OaTb
U yCTpaHbTb OUY6k.
TTo6b3aNyCTnB KOppeKTIPOBky, Bbl6epNTB R TABHOM MeHO pa3dE «CnTeMa).HaJnte nyHKT«KoppeKUIn NIKCEENI N 3aNcyCTne KOppeKTIPOBKy.HXABK KHOPK MEHO (5)
IIOBINTCRPnJIeN, C NMOOJIbKO KOTOPORO
MOXHO 3aXBaTb HkyHbI NIKCeNb.ДЯ TOHOrO 3aXBaTb OHa BOKpy npuIeLa OTObpaXaTeB C bdoNJIHrTeMbOH OKe H byeINHeHOM BnDE. HAcPToNE OcX HaxkMaiNe lyBO KNOKy CO CTpeKo (4) mNHyCuA nPpAByKO KHONKY cOt pEnKo (4) dNIIIOCA. PnI KAXMO HxAKxTHm COOTBeTcTBQouEi KONKBr BblIOJHReTcRApeXeO HaOn NIKCeNb. YTo6bI npOnyCTb HecKOBko NKCEne, DOnbIe yDeopKBaIte HaxAtOI KNOKy CO tpeKo (4).NoITBePdnte HactPOKy, Haxab KNOKMy MeHO (5).AHAIoNIMbIM Obpa3OM BInONHITE HACTPOKy dNcOY, IpeKJIOnOaIeTcB MeKdy HAcTpoKaMa DN oCen X nY, HaxkMai KNOKMy MeHO (5).
Дл coхранн haCTpoek haxmnte u ydpcknBaNTe KONKY MCHIO (5)
POnTBePdnte 3anpoc coxpaHnKaJn6pOBKn HaxaTneM KHOKN MeHIO (5)
C6pocdo3aBODcKnxHacTpoek
Ia Cbpoca do 3abOckHX HcTPOeK BbEpeNTB RnABHOM MeHO pa3den
CVCTeMa).3aTeM BbEpeNTe NHTK TcBoc Do 3abOckHX HcTPOeK).BbEpeNTe
BaHApNTD aN oNDBepNTe cBOA bIDop. Ha nobTOpHb 3anPoc cncTeMb
CnDEyET TAKKE OTBETINB (Ja).
PnmeHne. Pn c6pOe do 3a0oCKHX HAcTPOeK ydaJIIOCTR CBe npOHHB BbICTePA. BbIIOHHTe c6pOc do 3a0oCKHX HAcTPOeK ToJIbKO bTom CIyAe, eCNI TpeyoeTr ydaJIbTHA yctPOJCTBE ZEISS DTC 3 BCE HAcTPOeKn.
PpmeaHne. yCNEuHO 3aepueHc6pocHaCTpoek HeoXOIMMa nepearpy3ka ycTpoctaa.
NtKtorpMapeKMa
YCTPOKTBZEISS DTC 3 BBBOHT Ha NcNne paanHbte NKTORpAMMBn CnBnA kkyMnATopa, peKIM KANBpOKn BluTooth, yCnHeHKe KOHTpaCTa. TObbl HAcPToBV NIKTOPAMMY peKIMMA, BbIbePte B MeHIO CNTeMBI NyHK T"NNKTOPPAMMA pEXMMa. 3AtEM BbIbePte OIN H nPbBeDEHbIX HNXe peKIMMOB I NOITBCPINTe BbIOp, HAKaB KHONKY MEHO (5).
«HeT»: He OToBpaXaEeTcHIVKaKIN NIKTOrpamM.
«Akkym»:OTobpaKaTcTOnbKO CnBON AkkMyrTOpa C TeKyUIM COCTOHHM 3apFKn.
«Bce»: BBIOBqTCA BCE INKTOPaMMbI.
NepcohaNbHbIe daHbIe npu yTnJIn3aun nnnepeDaue BaUero yCTPOCTBa ZEISS
PnEeHcpeHepaTbYcTPOBTOpeTbIMIJIAMCOTPNTaANHbHeCmONUbOyHKUcOoD3BOAOckNtHactPoTeKu yb6dTeCb,TO OHn bHydaNEb. 3TO POMOXET BAM 3auiHTbCBOQ YacTHyX43HB&Be3OaNCHObTaAHbX.
CopeCTBn6e3onacHocTHyctPOIcTBA
PcNBMACKNTBNO CODIECTBOAaTb 3aJmtpe6eONTAHOCTIN TBAWERO yctpoiCTBa: nnoBtce npnIOxHeM dnn OOXTHNKOB ZEISS yctaHANMAIte kAynJIbhe oOHOENHBACTPOCHNOI IIO, ccnOn OHIO doCTYbI.
06HOBHeHnBcTpoEHnHO IIO
PpOpaMmHoe 60eCHeHne MoKet 6bTb 6oHOaNEc NOMOuHIO pIPOKCHNn I dx OXTHNKOB ZEISS. nO bOHOJIeHN cNeyIte HCTpyKUAM, COepPKAUMMC B npOKeHHn dOxTHNKOB ZEISS.
PnmeHne. Ecn noBHeHne 3aYcKaTeC n nomoub npnooxHe H ZEISS dOxOTHKOB, Heo6XoNDMO eue pa3 noTBePdNt bto H yctpoiCTbe dno 6ceCehn6e30nacHOCTN.
PnmeHne, HepaHANOM 6OBNEHBNCTPOEHNHOI yBdmtcB, YTO yctpoCTBO nnoHCTBO 3apaeKe. He BkIOuayeYCTPOECTBO a npouce 6OBHbENH, TAK KAC 30 MoKet pInpBeCTKN BNOpeKTeJHnAM.
CBeToOnoHnHnKaua
PpmeaHne. HndkaTop paonnoXeH noKpbIkwOJ ot pa3bema dA USB
| CoctoHne 3apJdkn | Liet HdNkKatopa | CoctoHne HdNkKatopa |
| 3apJdka He BvIoiJHetaTcR -- | ||
| 3apJdka He BvIoiJHetaTcR (Hn3kn yroBHe b 3apJda) | Kpachny Miraet | |
| BvIoiJHetaTcR 3apJdka Kpachny TogPrt | ||
| BvIoiJHetaTcR 3apJdka (yCTpoiCtBO noJIHOCTbO 3apJKeHo) | 3elenhny TogPrt |
PpnooxeHne nOxOTHKOB ZEISS
YcTaHOBiTe Ha CmApTfoH N OTKpOte I npIooKeHHe nO OxTHNKoB ZEISS. TObbNoIOKIOHCTBa KnpoeBaOBeTnO TeNtOBOrIO 3IObPaeHHa, AKINBBPOHTe HEM Bluetooth H cNOyITc oOpDpKaMmCB R pIIOKHeHHNCHETpykUHM.C NOMOuBo npIooKeHHo MxHO BblnoJHrTa HAcToPoiKn PO ypaJIeHHOMy npApaNEHnO YcPoTcBOM ZEISS DTC 3,aTakKe No nCtONb3oBAHNO yIpoueHnHO pekMHa BbICptena. IpOpoBHeO nncAHne EtnX BO3MOxHKeTe CM. Bcappe KnpoeHHa.
3apaKa yctpOCTBa
EcnnakkymynpoppapnHex,3apndteyctpoactBO,nonbnycUSB-paemom (7).IurTOrOOTKpOHTpeCINHOByKO KpbUkYc60Ky yctpoCTBa(9).
YpOBCH3aPda aKKMyNtopa OTObpaKaTcB BepXHe NcBoHactn DnCnner YcPOACTBa. Pnp H3KOM ypOB He 3apzJa UEB INDKAToPA Ha DnCnnee MEHETCA HA KpaChBn BO BpEma 3apzKn CBETNC KpaChBn INDKAToP (8) HA BKIOHcHOM NBIKIOHcHOM YcPOCTBe. Pnp NOH3 apzKe AKKMyNtopa CETB INDKAToPA (8) INMeHETcHa 3eneHb.
3aMeHa 3aUHTHO KnbUKN 06BeKTnBa
Tb6b3aMeHHTb 3aunTHyO kbpUkO obekETBnA (1), oCBA6te KpeIeHHe ee nepEHN HAcT NOBOPoTm PocNTB NacOBN TcPknN. IIOHOCtBIO OKpyTnTe 3aunTHyO KbpUkO obekTBA. 3ATEm PNKpyNTne HObyO KbpUkO.
3aMeHa KpbIuKn nopTa USB
ДлгЗаменгькршкиноротаUSB(9)БыктупгЕВиHTь(13)СnomоцьюOTверТКИ. 13BnEkeNTe кpeneshky nplaactHy(14)инспарныкpenshky npotra USB(9). 13BtавпуНу кршкиноротаUSB(9)иpeneshky nplaactHy(14).Cnomоцью OTaepurtkEkakpynte BnHTb(13).
AanTep
B HnKHe Nacty yctpoCTBa pacnoonKeHO Da rHc3Na c pe3b60i M5 (12). OHn daIOT BaM BO3MOKHOCTbAkapnITb 3deCb aanTep, HanpIMeP dIa IINHb Picatinny.
YxOa 3a yCtpoNCTBOM n erO6cnyKnBaHne
KpyTHBe 3aRpa3HHeHHaHINIMpeNecHHaHaJIN3ax CnEuyET He CTnpaB, aCdyBbN yuDyT BDOACHO KMCTOOc. CnEbyoT NaIbueB MOnT Yepe3 HOKOTOPOE BPOMA OKA3bHerATBHO BDOJICTBcHc HA NIOBepXHOH JINHb. PPOcteH CNOC6 ONUCTKN IINH3 NOUYb HA INH3y NpOTopeB e ee KCTbM nIaNtKom HN DNOxOJeero MaTePmJa. Jnra 3auNTb OT oOpazOBaHnr pRIOKOBO HO HAnetHa ONTNKe, OCOeHNo A TpONUeCKHX YCNOBHX, CnEuyET XPAHHT b npOop B CYXOM MCeTe C XopoWBeHTNIaRee BHeUNHX NOpEphXOCTeINH3. PneOpBaOaBteBtenIOBoro NIOBpaKeHn He TpeSyer DonONHITeBHOYxoJa.
06HOBHeHnIpoPpAMMHorO 06eCneHnI
B pAMKAX 3aKOHHO rapaHTN (2 roa C MmOHTA nepexoDA PCKOB TOBaPA B COOTBCTBnC 3AKOHDAENTBCTOM TepMaHn) Mbl npjEOCTABM COOTBCTBYOUHc OBHOBENH NJIyDCTPAAHENHENOCTATKB. KAK npabIO, OBOHOBHENKACAOCTAR cAeKTOB 6eONACHOCHTN HJYCTPAHENH FHKMOHAHBx HApUeHN H He OXBtBAHOT HOBX fHyKUNI pORpAMMHOro oBeCNueHN. B ToH Mepe, B KOtopoJ DNPEHNN BONPOCO 6eONACHOCTN HEOXbDMnpEOEETAAHNC HOBX fHyKUNI, 3TO B INPHUNIE HE RAJIETCR OCHOBAHEM Dn3APPOCA HOBX fHyKUNI KAK TAKOBHX.
IIOVCTeHnYcTaHOBHeHOrO No 3aKOHy CpOKa RapaHTmHOro 06CNYKBaHH Mb,pa3yeMeTcR,PIPOXKM Bce YcNtIN,OTObI pPeOCTABMb COOTBeCTBYouHe 6dyuue O6OBHeHn. Ondako HNKAKNX npetEHnB C B3N C 3TNM KHAM He MoxTe 6bI ppeBnHeNo.
YcTpaHeHne HEnCnpaBHOCTe
www.zeiss.com/cop/warranty
No Bonpocam 6cbnykbaHn nn nnn noynyeHHn 6ecnnaTHo KOnnn yCIOBm
rapaHTnKOTOpBle DeIcTByOT B BaUeM perNoE, oBauaaIteCb no aDpecy,
PnPBEneHHOMy HIXKe.
ZEISS Customer Service
Zeiss Sports Optics GmbH
Gioelstr.3-5,35576 Wetzlar,Germany
Tepeoh: +49800 9347733
3n. novTa: consumerproducts@zeiss.com
CepBnchbI ueHtp ZEISS B CIIJA
Carl Zeiss SBE, LLC
Consumer Products
1050 Worldwide Blvd
Hebron, KY 41048-8632.CHA
Tepeh+1-800-441-3005
3n.nouTa:info.sportsoptics.us@zeiss.com
Adepcn npounBodnte
Carl Zeiss AG
Carl-Zeiss-StraBe 22
D-73447 Oberkochen
www.zeiss.com/nature/ www.zeiss.com/hunting
BO3MOKHyI 3MeHeHnB I NCNOHHeHn N KOMNKeTALn, KOToPbIe IPOIN3BOJATC
CcIeJIbTOxHnueckoro CoBepueHCTBOBaHn npu6opa.MbI He 6epem Ha ce6
OTBETCEBHHOCTN3aOwIOKINONEATKN.
PnmeaHne no 3aunTe daHHbIX
Ppncnolb3oBaHnn npeo6pa3oBaTeIa TEnIOBOrn03o6paXeHN npOxCoxOIT
06pa6oTka nepcoHaJIbHbIX daHHbIX.
Haun yka3aHnno 3aunTe daHbix n o6pa6oTke nepcoHaNbHbix daHbix MoXHO
Hainu B pa3ene 3arpy3ok: www.zeiss.com/hunting/manuals
ZEISS DTC
3/38 | 3/25
取掇說明書
For United States patents which may cover this product see our website. Patents: www.zeiss.com/cop/patents
DE EN FR ES IT NL DK FI HU PL SE RU JP CN | 01.2022

警告!
www.zeiss.com/hunting/manuals

取极説明書


- WARNING!
- Herstelleradresse
- INSTRUCTIONS FOR USE
- Installing/removing the battery
- Attaching the thermal imaging attachment
- Power on/off
- Standby mode
- Calibration
- Observation mode
- Color modes
- Menu
- Contrast Boost
- Zeroing Profile 1-4
- System
- Image Zeroing
- Simplified Zeroing Mode
- Pixel Correction
- Factory Reset
- Icon Mode
- Personal data when you dispose of or pass on your ZEISS device
- Cooperation on device safety
- Firmware update
- LED status
- ZEISS Hunting App
- Charging the device
- Replacing the lens cap
- Replacing the USB cover
- Adapter
- Care and maintenance of the device
- Software updates
- Care and maintenance of the battery
- Customer Service and Warranty
- ZEISS Customer Service
- ZEISS Customer Service USA
- Manufacturer's address
- Data protection notice
- AVERTISSEMENT!
- ADVERTENCIA
- AVVERTENZAI
- WAARSCHUWINGI
- ADVARSEL!
- VAROITUSI
- Valmistajan osoite
- FIGYELMEZTETESI
- Gyartó cime
- OSTRZEZENIE!
- BRUKSANVISNING
- Firmware-upppatering
- NPEyIpyKDEHNE!
- HHTPYKUINIIOIPIMMEHEHIO
- YcTaHOBKa/IN3BJeueHHe aKKyMnyTota
- YctahOBKa npeo6pa3ObaTeNa TEnIOBOro 306paXeHn
- YnpoueHHbI pexm BbICtpena
- Koppekua nkkcei
- C6pocdo3aBODcKnxHacTpoek
- NtKtorpMapeKMa
- NepcohaNbHbIe daHbIe npu yTnJIn3aun nnnepeDaue BaUero yCTPOCTBa ZEISS
- CopeCTBn6e3onacHocTHyctPOIcTBA
- 06HOBHeHnBcTpoEHnHO IIO
- CBeToOnoHnHnKaua
- PpnooxeHne nOxOTHKOB ZEISS
- 3apaKa yctpOCTBa
- 3aMeHa 3aUHTHO KnbUKN 06BeKTnBa
- 3aMeHa KpbIuKn nopTa USB
- AanTep
- YxOa 3a yCtpoNCTBOM n erO6cnyKnBaHne
- 06HOBHeHnIpoPpAMMHorO 06eCneHnI
- CepBnchbI ueHtp ZEISS B CIIJA
- Adepcn npounBodnte
- PnmeaHne no 3aunTe daHHbIX
- 警告!
- 取极説明書
Brand : ZEISS
Model : DTC 3/25
Category : Binoculars