FX-BZ30 - Gardening tool Fuxtec - Free user manual and instructions
Find the device manual for free FX-BZ30 Fuxtec in PDF.

| Brand | Fuxtec |
| Model | FX-BZ30 |
| Product type | Manual tying tool for gardening |
| Main use | Attach and tie branches with adhesive tape and staples |
| Staple magazine capacity | Up to 200 staples |
| Compatible staple type | Type 604C |
| Adhesive tape | Tape roll to insert into guide |
| Cutting blade | Interchangeable, very sharp |
| Drive mechanism | Manual, by pressing handle |
| Main material | Steel and plastic |
| Power supply | None (manual tool) |
| Weight | Approximately 0.8 kg |
| Dimensions (L × W × H) | Approximately 30 × 5 × 15 cm |
| Routine maintenance | Clean after use, check for blockages |
| Blade replacement | Possible, remove old blade with needle-nose pliers |
| Staple jam clearance | Remove reload pin and extract jammed staple |
| Number of pages in manual | 34 pages |
| Available languages | French, German, English, Spanish, Italian, Dutch, Polish, Portuguese, Swedish |
Frequently Asked Questions - FX-BZ30 Fuxtec
User questions about FX-BZ30 Fuxtec
0 question about this device. Answer the ones you know or ask your own.
Ask a new question about this device
Download the instructions for your Gardening tool in PDF format for free! Find your manual FX-BZ30 - Fuxtec and take your electronic device back in hand. On this page are published all the documents necessary for the use of your device. FX-BZ30 by Fuxtec.
USER MANUAL FX-BZ30 Fuxtec
natural_image
Line drawing of a mechanical device with no visible text or symbols
natural_image
Orange icon of a person reading a book on black background (no text or symbols)
Inhalt
DEUTSCHE VERSION 5
VERSION FRANCAISE 9
POLSKA WERSJA JEZYKOWA 32
Inhalt
DEUTSCHE VERSION 5
POLSKA WERSJA JEZYKOWA....32
natural_image
3D cutaway view of a mechanical device showing internal components and directional arrows (no text or symbols)natural_image
Close-up of a hand using a power tool to adjust or install a component, with arrows indicating direction (no text or symbols visible)natural_image
Hand holding a metal clamp or tool with a green base, measuring a curved wire or arc (no text or symbols visible)natural_image
Mechanical assembly diagram showing a clamp tool interacting with a rail track, with arrows indicating movement (no text or symbols present)natural_image
Close-up of hands using a power tool to adjust a small electronic component (no visible text or symbols)natural_image
Person using a clamp or tool to lift a green object, with a black arrow indicating the process (no text or symbols visible)VERSION FRANCAISE
natural_image
3D cutaway view of a mechanical device with green housing and internal components (no text or symbols visible)natural_image
Close-up of a hand using a manual tool to adjust or install a component, with two red-circled arrows highlighting the tool area (no text or symbols visible)natural_image
Hand holding a metal clamp or tool with a green base, pointing upward with an arrow (no text or symbols visible)natural_image
Mechanical assembly diagram showing a lever mechanism with arrows indicating movement or force (no text or symbols present)7. Recharge des agrafes
natural_image
Close-up of hands using a power tool to adjust a small electronic component (no text or symbols visible)natural_image
Close-up of hands using a mechanical tool to adjust or install a component, with a black arrow indicating the process (no visible text or symbols)11. Recyclage

FR
natural_image
Two simple line drawings of shovels, one with a handle and the other with a fork (no text or symbols)
ÉLÉMENTS D'EMBALLAGE À SÉPARER ET À DÉPOSER DANS LE BAC DE TRI

VERSIONE ITALIANA
natural_image
3D cutaway view of a cleaning or cleaning device with green plastic casing and mechanical components (no text or symbols visible)natural_image
Close-up of a hand using a tool to adjust or install a component, with red circles highlighting specific parts (no text or symbols visible)natural_image
Hand holding a metal clamp or tool with a green handle, pointing upward with an arrow (no text or symbols visible)natural_image
Mechanical assembly diagram showing a lever mechanism with arrows indicating motion direction (no text or symbols present)13. Caricare le graffette
natural_image
Close-up of hands using a power tool to adjust a small electronic component (no text or symbols visible)natural_image
Close-up of hands using a mechanical clamp or tool to adjust a component, with a black arrow pointing to the part (no visible text or symbols)ENGLISH VERSION
Original manual

natural_image
3D cutaway view of a cleaning or cleaning device with green plastic casing and mechanical components (no text or symbols visible)17. Use
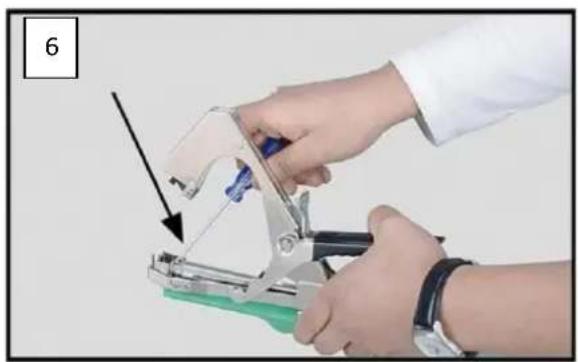
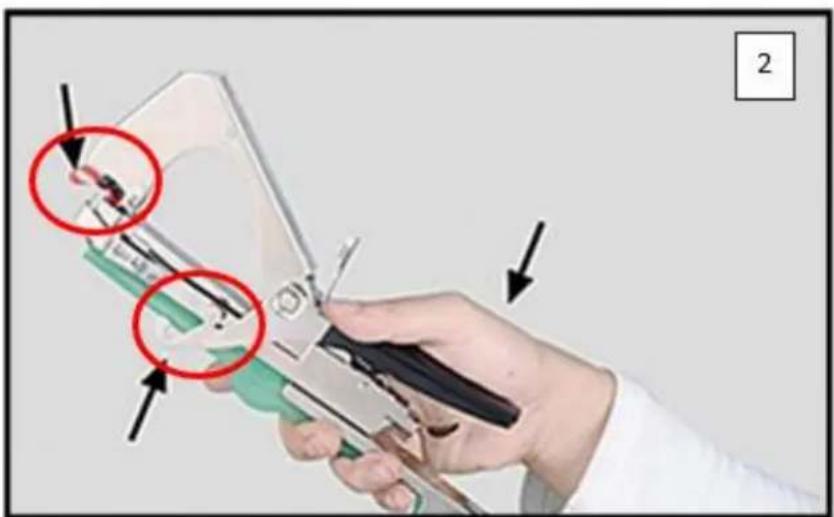
• The Tape tool is supplied with staples and tape in the compartments provided.
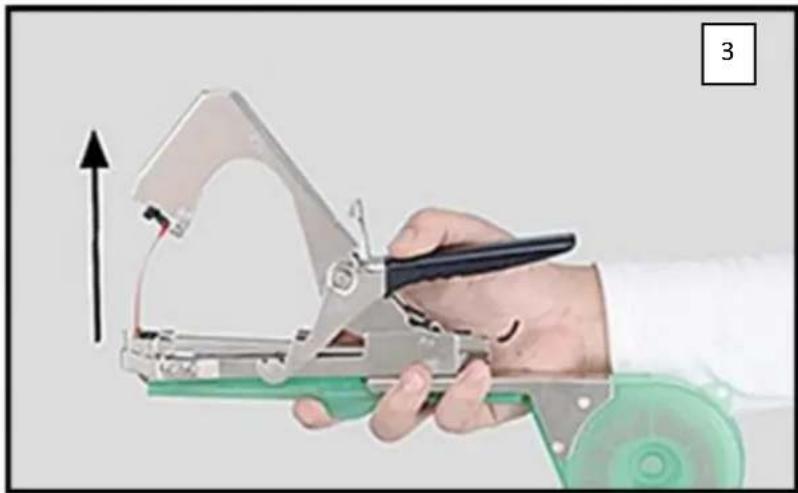
- For the first use, pull the tape slightly upwards by hand and then push the handle in about half way until you hear the first clicking sound (picture 2). The tape gripper engages and grips the tape. When the handle is released, the tape is pulled upwards out of the guide by the tape gripper (picture 3).
natural_image
Close-up of a hand using a tool to adjust or install a small component, with red circles highlighting specific parts (no text or symbols visible)- If the tape gripper does not grip the tape at the first attempt, this is not a malfunction. It may take several attempts before the tape gripper grips the tape. If you have already heard the clicking sound and the tape is still not gripped by the gripper, we recommend that you first
remove the staples from the relevant chamber (see point: Refilling the staples). Then press the handle all the way down once. The tape gripper will then return to its original position and you will not waste any staples by repeatedly trying to grip the tape.
- As soon as the tape has been gripped by the gripper, reload the staples into the chamber provided. Please make sure that the two pointed ends of the staple point towards the black handle when filling. If the staples are positioned incorrectly, the tape cannot be fastened.
natural_image
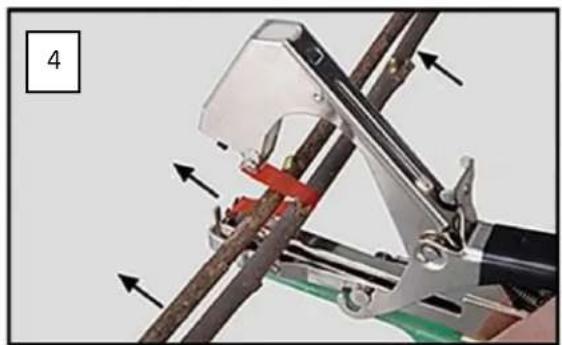
Hand holding a metal clamp or measuring tool with a pointer and green base, no visible text or symbols- To tie branches together, hold the tying pliers against the branches as shown in picture 4. Then push the handle all the way through. By means of the clamps, the ribbon is "stapled" together and separated from the ribbon roll by the blade.
natural_image
Mechanical assembly diagram showing a robotic arm with arrows indicating motion or force direction (no text or symbols present)18. Refilling the staples
- To refill the staples, please push the black curved holder of the clamping device all the way down and pull out the reloading pin together with the clamping spring to the back (see picture 1 - circle marking).
- Fill up to 200 staples of type 604C into the chamber provided. Please pay attention to the correct positioning of the staples. The pointed ends must point upwards towards the black handle when filling, otherwise the staples will not grip the band when the binding pliers are operated.
19. Refill the tape
- Open the plastic tape guide and insert a new roll of tape. Pull the tape through to the front opening and then pull the tape out slightly upwards (see point: Use).
20. Changing the blade
- If the blade no longer cuts the tape cleanly, you can change the blade. To do this, press down the magazine of the clamps with one hand and carefully pull the blade upwards with a pair of needle-nose pliers. Then carefully insert the new blade. The blade is very sharp, so please take care to handle it correctly.

natural_image
Close-up of hands using a power tool to adjust a small electronic component (no text or symbols visible)21. What to do if the clamps jam
If a staple does not release correctly and causes a jam, remove the reloading pin (see point: Refilling the staples) and then try to remove the defective staple using a metal pin or a small screwdriver.