RC X1 Quadrocopter - Drone CARRERA - Free user manual and instructions
Find the device manual for free RC X1 Quadrocopter CARRERA in PDF.

User questions about RC X1 Quadrocopter CARRERA
0 question about this device. Answer the ones you know or ask your own.
Ask a new question about this device
Download the instructions for your Drone in PDF format for free! Find your manual RC X1 Quadrocopter - CARRERA and take your electronic device back in hand. On this page are published all the documents necessary for the use of your device. RC X1 Quadrocopter by CARRERA.
USER MANUAL RC X1 Quadrocopter CARRERA
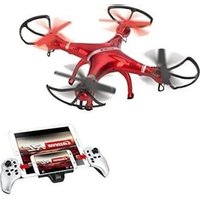
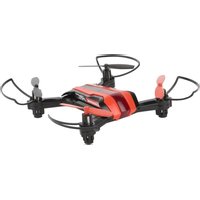
370503013 Carrera RC Quadrocopter CRC X1
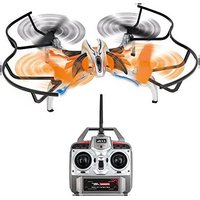
# 370503014 Carrera RC Quadrocopter Police
Montage- und Betriebsanleitung
GB USA Assembly and operating instructions
F Instructions de montage et d'utilisation
E Instrucciones de montaje y de serviceo
Istruzioni per il montaggio e l'uso
NL Montage- en gebruiksaanwijzing
P Instruções de montagem e modo de'utilisation
Monterings- och bruksanvisning
FIN Asennus- ja käyttoohje
PL Instrukcja montazu i obslugi
H Szerelési es használatiutasítás
S10 Navodila za montažo in uporabo
Cz Navod k montáži a obsluze
SK Návod na montáž a obsluhu
HR Uputa za montažu i uporabu
Montajse- og bruksanvisning
DK Monterings- og driftsvejledning
TR Montaj ve,isletme kilavuzu
Arabic


Sehr geehrter Kunde
Congratulations! You bought a Carrera RC Quadrocopter which has been manufactured according to today's state-of-the-art technology. As it is our constant endeavour to develop and improve our products, we reserve the right to make modifications, either of a technical nature or with respect to features, materials and design, at any time, and without prior notice. For this reason, no claims will be accepted for any slight deviations in your product from the data and illustrations contained in these instructions. These operating and assembly instructions are an integral part of the product. Non-observation of these operating instructions and the safety instructions they contain will render the guarantee null and void. These instructions are to be kept for future reference and in the event that the product is passed on to a third party.
For the latest version of these operating instructions and information on replacement and spare parts available, please visit carrera-rc.com in the service area.
WARNING! Before you first fly the model, find out whether there is a legal requirement to insure model aeroplanes such as this in your country.
Guarantee conditions
Carrera products are technically advanced products (NO TOYS) which should be handled with care. It is important to follow the directions given in the operating instructions. All components have been subjected to careful inspection (technical modifications and alterations to the model for the purpose of product improvement are reserved).
Should any faults nevertheless occur, guarantee is assumed within the scope of the following conditions:
In accordance with the following provisions, Stadlbauer Marketing + Vertrieb GmbH (hereinafter referred to as "manufacturer") warrants
to the endconsumer (hereinafter referred to as "customer") that the Carrera RC-model-Quadrocopter (hereinafter referred to as "product") delivered to the customer shall be free from defects in material or workmanship for two years from the date of purchase (guarantee period). Such defects will, at the manufacturer's option, either be repaired by the manufacturer or fixed by delivering new or refurbished parts free of charge. The warranty does not cover failure due to normal wear and tear, (e.g. to batteries, rotor blades, cabin covering, gear wheels etc.), or damage as a result of improper handling/misuse or unauthorised interference. Any other customer's claims asserted against the manufacturer, especially action for damages, shall be excluded.
The contractual and statutory rights of the customer against the seller (supplementary performance, rescission of the contract, abatement, compensation) which exist with the product not having been free from defects at the time of the passing of risk, shall remain unaffected by this warranty.
Claims from this special warranty shall only be valid if:
- the defect reported has not arisen by damage caused by unintended use or misuse as specified in the instruction manual,
the failure of the product is not due to normal wear and tear - the product does not show any signs resulting from repairs or other interferences carried out by workshops not having been authorised by the manufacturer,
- the product has only been operated with accessories authorised by the manufacturer. Guarantee cards cannot be replaced.
Note for EU countries: Reference is hereby made to the seller's statutory guarantee obligation, to the extent that this guarantee obligation is not restricted by the product guarantee.
The manufacturer shall bear the costs for sending in and returning the product.
This warranty shall be valid to the extent aforementioned and under the above-named
circumstances (including the submittal of the original proof of purchase also in case of resale) for any future owner of the product.
Declaration of conformity
Stadlbauer Marketing + Vertrieb GmbH hereby declares that this model including the controller conforms with the fundamental requirements of the following EC directives: EC Directives 2009/48 and 2004/108/EC regarding electromagnetic compatibility and the other relevant regulations of Directive 2014/53/EU (RED). The original declaration of conformity can be requested from carrera-rc.com.


Maximum radio-frequency power transmitted < 10 dBm
Warning!
WARNING! This toy contains small parts which can be swallowed and is therefore not suitable for children 3 years of age.
WARNING! Danger of pinching during operation! Remove all packaging materials and wire fastenings before handing the toy over to the child. For information and to answer any questions, please retain packaging, address and instructions in a safe place for future reference. Keep the instructions for use for later reference.
Note for adult supervisors: Check if the toy is assembled as instructed. The assembly shall be performed under the supervision of an adult.
WARNING! Not suitable for children under 12 years old!
This product is not intended for use by children without supervision of a parent. Flying the helicopter requires skill and children must be trained under the direct supervision of an adult. Before first use: Read the user's information together with your child.
Inappropriate use may result in severe injuries and/or damage to property.
It has to be operated with care and caution and requires both mechanical and mental skills. The operating instructions contain notes on safety and technical regulations as well as information on maintaining and operating the product. It is indispensable to read these instructions thoroughly before the first usage. Only this helps to avoid accidents with injuries and damage.
Hands, hair and loose clothing, including other objects such as pens and screwdrivers must be kept away from the propeller (rotor). Do not touch the rotating rotor. Especially take care that your hands DO NOT get close to the rotor blades!
WARNING: Do not fly near your face to avoid injuries. For use only outdoors – not to be used indoors. Risk of eye injuries. Start and fly only when the area is appropriate for the intended use (free area, no obstacles) and only within direct visual contact. As user of this product you are solely responsible for handling it safely in order to ensure that neither you nor other persons or their property suffer damages or are endangered.
- Never use your model with weak remote control batteries.
- Avoid busy areas. Always make sure that there is enough space.
- Preferably do not use your model on an open street or in public areas in order not to endanger or hurt anyone.
- CAUTION: Do not start up and fly when persons, a nimals or any obstructions are within the flying range of the Quadrocopter.
- Start and fly is strictly forbidden near high voltage poles, railway tracks, roads, swimming pools or open water.
- Only operate under good visibility and calm weather conditions.
-
Exactly observe the instructions and warnings for this product and for any possible additional equipment (battery charger, rechargeable batteries etc.) being used by you.
-
Should the Quadrocopter come into contact with any living thing or solid object, immediately return the gas control to zero, in other words the left-hand joystick must be at the stop at the bottom of the slide!
- Avoid any moisture as this might do damage to the electronics.
- There is a risk to suffer severe injury or even death if you put parts of your model into your mouth or lick them.
- Do not change or modify anything on the Quadrocopter.
If you do not agree to these terms please immediately return the complete Quadrocopter model in new and unused condition to the retailer.
Important information concerning Lithium Polymer rechargeable batteries
Lithium-Polymer (LiPo) rechargeable batteries are significantly more sensitive than traditional alkali- or NiMH-rechargeable batteries normally used with radio control units. Therefore the instructions and warnings have to be observed in detail. In case of improper use of LiPo rechargeable batteries there is a danger of fire. Always follow the manufacturers' instructions if you dispose of LiPo rechargeable batteries.
Regulations on disposal for waste electrical and electronic equipment (WEEE)
This symbol, showing refuse bins with a cross through them, denotes that empty batteries, rechargeable batteries, button
cells, recharge able battery packs, equipment batteries, disused electrical equipment, etc. should not be disposed of in domestic refuse, as they are harmful to the environment and health. Please help to preserve environment and health and talk to your children about the correct disposal of used batteries and disused electrical equipment. Batteries and disused electrical equipment should be handed in to the usual collection points where they can be properly recycled.
Do not mix dissimilar battery types or employ new and used batteries together. Empty batteries should be removed from the product. Do not attempt to recharge non-rechargeable batteries. WARNING!
The charger unit and the USB cable may be used by children eight (8) years and upwards and by persons with with restricted physical, sensory or mental faculties, inexperience or lack of knowledge provided they are supervised or have been adequately trained in the safe use of the unit and have a proper understanding of the dangers it poses. Children must not be allowed to treat the charger or the USB cable as a toy. Cleaning and user maintenance may only be carried out by children if they are over eight years old and supervised.
Children under eight years old must be kept away from the charger and the connecting cable. Never leave the battery unattended while it is charging. Exhausted batteries are to be removed from the toy. Rechargeable batteries should be removed from the product before charging. Supply terminal are not to be short-circuited. Only use the batteries recommended or equivalent types.
If in regular use the charger must be examined for damage to the cord, plug, covers and all other parts. If any signs of damage are found the charger may only be used again after repair work has been completed.
The toy is only to be connected to Class II equipment bearing the following symbol.
FCC statement
This device complies with Part 15 of the FCC Rules. Operation is subject to the following two conditions:
(1) this device may not cause harmful interference, and
(2) this device must accept any interference received, including interference that may cause undesired operation.
Guidelines and warnings for the use of LiPo rechargeable batteries
- You have to charge the attached 3.7V - 380 mAh/1,41 Wh LiPo rechargeable battery in a safe place and at a safe distance to flammable material.
- Never leave the battery unattended while it is charging
- After a flight, the rechargeable battery has to cool down to the ambient air temperature before charging it.
- You must always use the corresponding LiPo charging unit (USB cable / remote control). In case of non-compliance with these directions there is a danger of fire resulting in a health risk and/or damage to property. NEVER use any other battery charger.
- Should the rechargeable battery swell or deform while discharging or recharging, you have to immediately stop charging or discharging the battery. Take the battery out as quickly and carefully as possible and place it in a safe and open area offside any in-flammable material and watch it for at least 15 minutes. In case you continue charging or discharging a battery which has already started to swell or deform there is a danger of fire! Even in case of slight deforming or ballooning the rechargeable battery has to be taken out of operation.
- Store the rechargeable battery at ambient temperature in a dry place.
- Always recharge the battery immediately after use to prevent its becoming deep discharged. Please make sure to allow a pause of about 20 minutes between finishing the flight and recharging the battery. Recharge the battery occasionally (suggested every 2-3 months). Failure to treat the battery as described above can lead to its becoming defective.
- When transporting or temporarily storing the rechargeable battery the temperature should be between 5 - 50^ . If possible, do not store the battery or the model in a car and do not expose it to direct sunlight. In case the battery is broiled it can be damaged or catch fire.
Note: If the battery voltage/output is low you will recognise that a considerable trim and/or controlling is necessary to avoid that the Quadrocopter starts trundling. This usually occurs before reaching a battery voltage of 3 V and it is a good moment to end the flight.
Instruction Manual
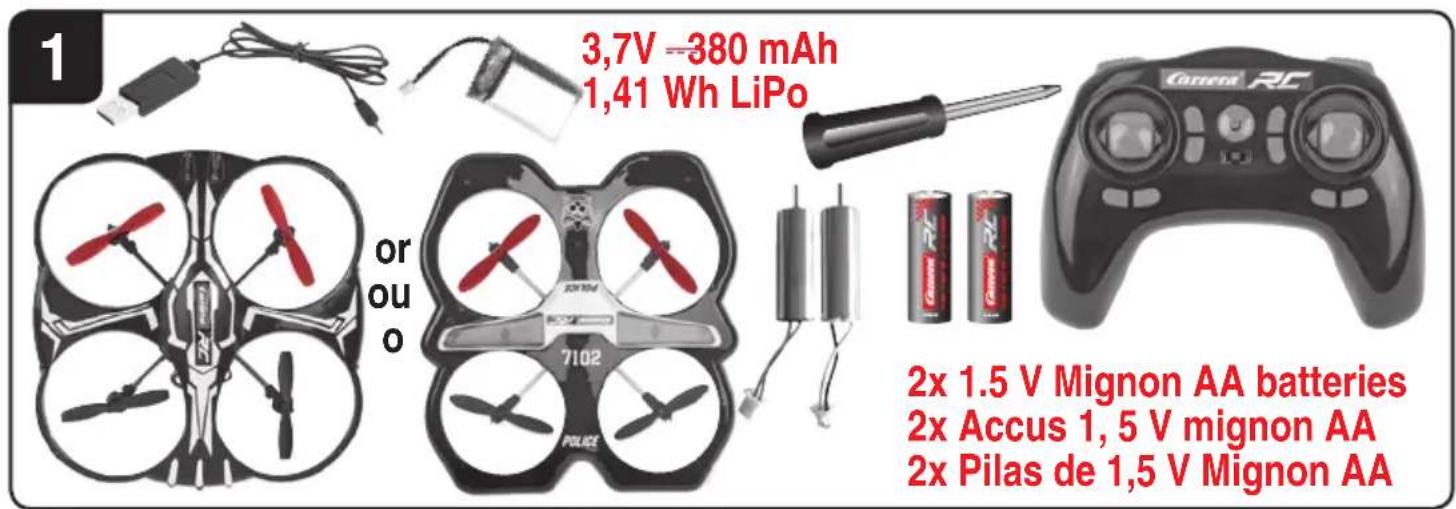
Contents of package
1 x Quadrocopter
1 x Controller
1 x USB charging cable
1x Rechargeable Battery
2 x Replacement motor (right/left)
1x Screwdriver
2 x 1.5 V Mignon AA batteries
(non-rechargeable)
Recharging the LiPo rechargeable battery
Make sure you only charge the LiPo rechargeable battery supplied with the LiPo charging unit also supplied (USB cable and remote control). If you try to charge the rechargeable battery with a different LiPo battery charger or any other battery charger, this might cause serious damage. Please carefully read the previous chapter with warnings and guidelines on the usage of rechargeable batteries before proceeding. Supply terminals are not to be short-circuited.
You can charge the rechargeable battery fitted in the Quadrocopter with its USB charging cable from a USB port on a computer:
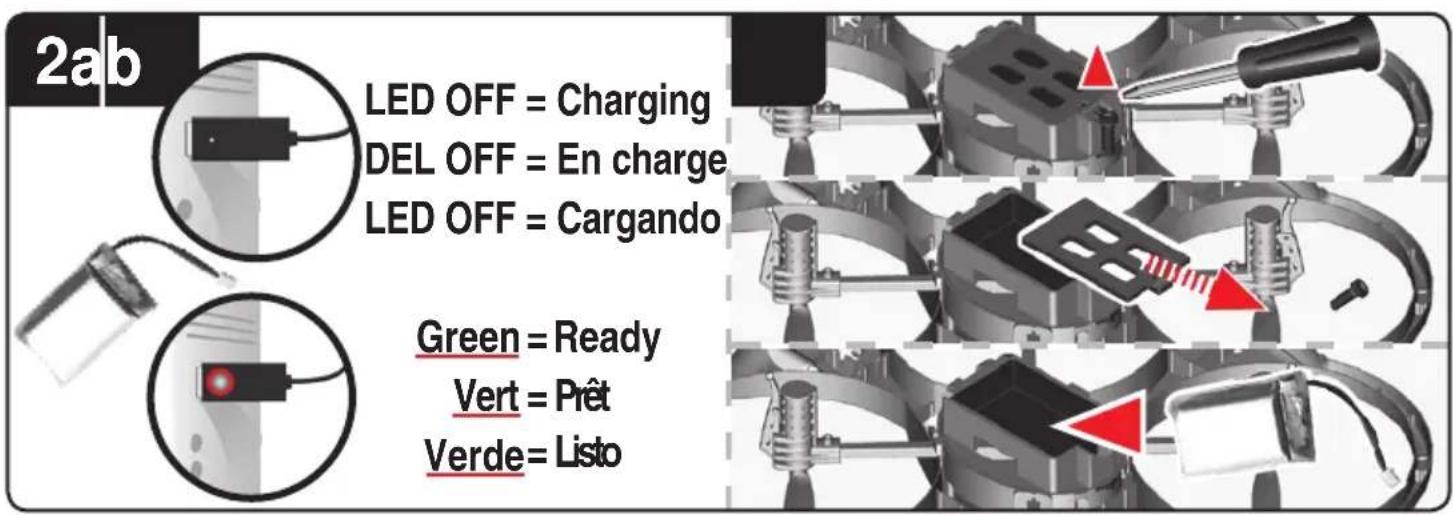
2a Charging via computer:
- Rechargeable batteries are to be removed from the model before being charged.
- Connect the USB charging cable with the USB port of a computer. The LED on the USB charger cable lights green indicating that the charger unit is correctly connected to the computer. If you plug in a Quadrocopter with a discharged battery, the
ENGLISH
LED on the USB charging cable no longer lights up, showing that the Quadrocopter battery is being charged. The USB charging cable and the charging socket on the Quadrocopter are designed to make incorrect connection impossible.
- It takes about 60 minutes to recharge a discharged battery (but NOT a deep-discharged one). When the battery is fully charged, the LED display on the USB charger cable lights up green again.
Note: when supplied, the lipo-battery is already partially charged. So the first charging cycle may well take less time.
It is essential to follow the connection sequence given above!
Undo the plugged connection on the Quadrocopter when you are not using the Quadrocopter. Failure to observe this precaution may cause battery damage!
2b Insertion of the rechargeable batteries into the Quadrocopter
- Open the cover of the battery compartment with the aid of the enclosed screwdriver. Insert the battery. Close the battery compartment.
- If the LED on the Quadrocopter flashes slowly, you must change the battery.
Inserting the batteries in the remote control
3 Open the battery compartment with a screwdriver and insert the batteries in the remote control. Please keep in mind the correct polarity. Different types of batteries or new and used batteries are not to be mixed. After having closed the compartment you can check all functions of the remote control with the help of the power-switch on the front. With the power switch turned ON and functioning correctly, the top centre LED on the remote control will light up red. If the LED control flashes slowly and an acoustic signal is heard, the batteries in the controller must be changed.
Frequency bind between model and remote control
4 The Carrera RC Quadrocopter and the controller automatically link up renewed with every operational start-up. If initially there are any problems with communication between the Carrera RC Quadrocopter and the remote control, please carry out a new frequency bind.
- Connect the battery in the model.
-
The LEDs on the quadrocopter now flash rhythmically.
-
Switch on the controller at the power switch.
-
Slide the left joystick, thus the gas lever, completely up and down again into the zero position.
The binding has now been successfully established. - The LED on the controller now lights continuously.
- After approx. 5 12 minutes, the controller switches off. Please repeat the link procedure for renewed use.
WARNING! Immediately after switching it on, place the Quadrocopter on a flat and level surface. The gyro-system will then set itself automatically.
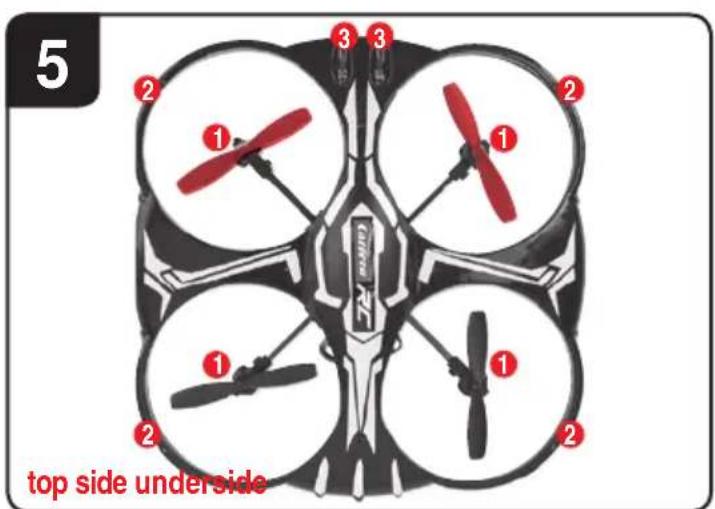
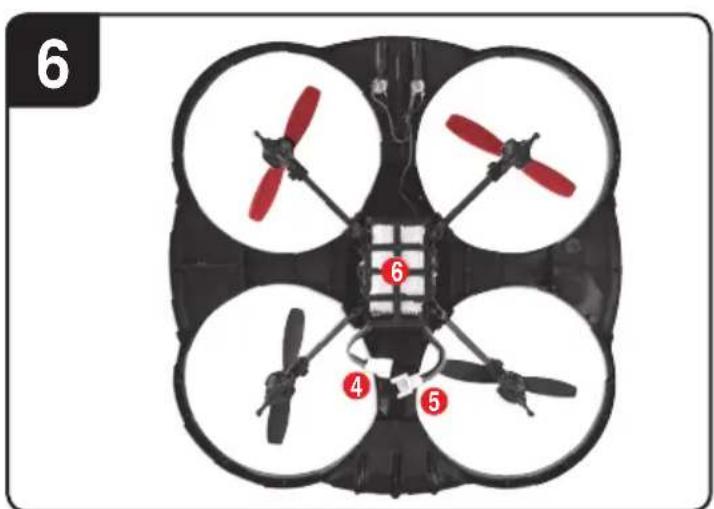
Description of the Quadrocopter
5 1. Rotor system
- Rotor protection cage
- LEDs
6 4. Battery cable
- Quadrocopter connecting plug
- Battery compartment
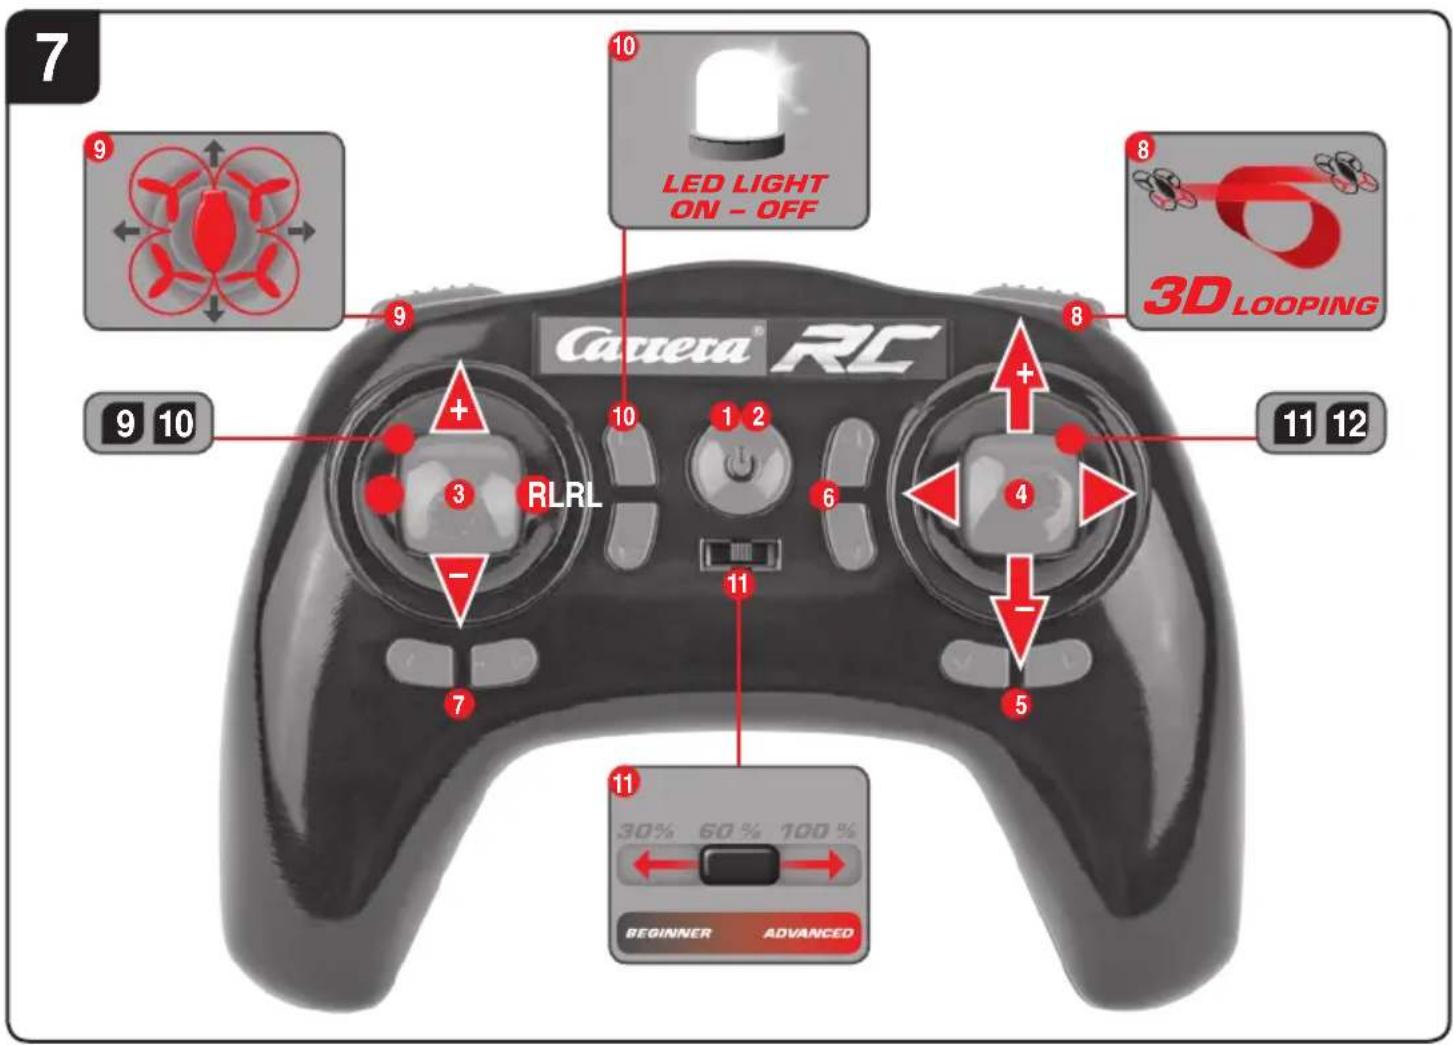
Range of functions of the remote control
-
Power (ON/OFF)
-
Control LED
- Gas Circlin
-
Forwards / backwards right / left banking
-
Trimmer for right / left banking
- Trimmer for forwards / backwards
- Trimmer for rotation
- Looping Button
- Headless Mode
- Light (on/off)
- Beginner/Advanced switch (30%/60%/100%)
3 12. Battery compartment
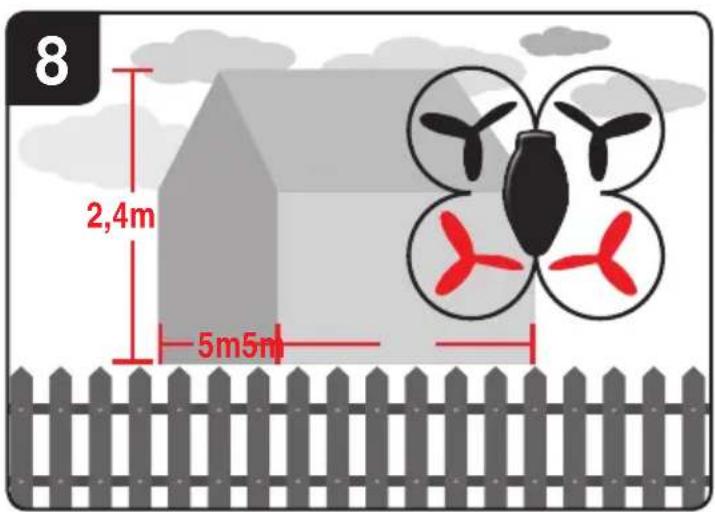
Choosing the flight area
8 When being prepared for the first flight you should choose a closed room which is as large as possible without any persons or obstacles. Due to its size and controllability, experienced pilots may be able to fly the Quadrocopter in relatively small rooms. For your first flights we strongly recommend you choose a room with a minimum floor space of 5 × 5 metres and 2.40 metres in height. After having trimmed your Quadrocopter for flight and made yourself familiar with the controller and its functions you may start flying in smaller and less open environments.
To be used in domestic area (house and garden) only. There must be no persons or objects such as pillars between the controller and the Quadrocopter to obstruct direct connection.
Checklist for flight preparation
This checklist is not a substitute for the contents of the operating instructions. Although it can be used as a quick-start-guide, we strongly recommend you first to read the operating instructions in detail before you proceed.
- Check the contents of the package.
- Connect the charging unit to the source of power.
- Charge the lipo-battery as described in the section "Recharging the LiPo rechargeable battery".
-
Fit 2 AA batteries in the controller, making sure their polarity is correct.
-
Look for a suitable environment for flying.
- Slide the battery into the battery bay on the bottom of the Quadrocopter.2b
- Connect the battery in the model.
WARNING! Immediately after switching it on, place the Quadrocopter on a flat and level surface. The gyro-system will then set itself automatically. - The LEDs on the quadrocopter flash.
- Switch on the controller at the ON/OFF switch. Be sure to check the Beginner-Advanced switch (186). Push the left-hand joystick, i.e. the throttle lever, right to the top, then fully downwards into the zero position.
- Allow the Quadrocopter a few moments until the system is correctly initialised and is ready for operation. The LED in the Quadrocopter now lights continuously. The LED on the controller now lights continuously.
- Repeat the above points as required, if you wish to fly more Quadroicopters at the same time.
- Important note! Please perform the auto-trimming 14 before each flight without fail!
- Check the control system.
- Make yourself familiar with the control system.
- Trim the Quadrocopter as necessary as described under 14 15 16 7, so that when hovering it no longer moves from the spot without a command from the controller.
- The Quadrocopter is now ready to be flown.
- If the Quadrocopter displays no functions, retry the above binding procedure.
- Fly the model.
- Land the model.
- Disconnect the battery plug connection.
- Always switch off the remote control last.
Flying the 4-channel Quadrocopter
NOTE!
Take care particularly in the first few flights to move the lever on the controller very gently and not over-hurriedly. As a rule, only very small movements of the respective levers are necessary to carry out the desired control commands!
If you notice that the Quadrocopter moves forwards or to the side without your touching the respective lever, please adjust the trim of the Quadrocopter as described in 14 15 16 7.
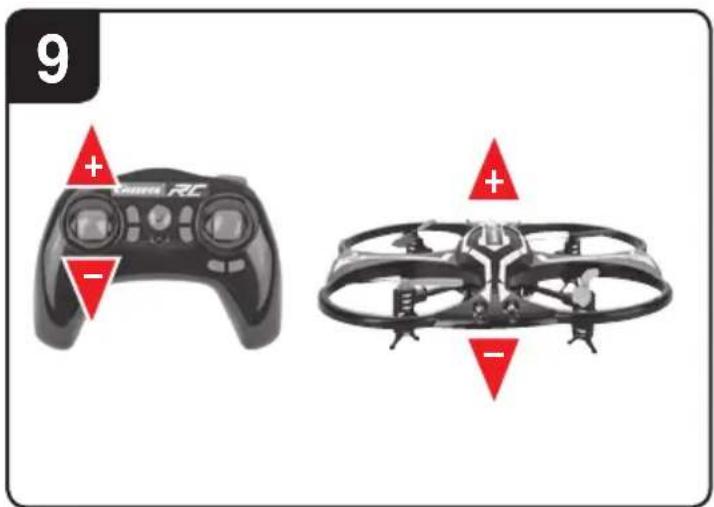
9 +/- Gas (up / down)
To start or to fly higher, push the gas lever on the left cautiously forwards. To land or fly lower, push the gas lever on the left cautiously backwards.
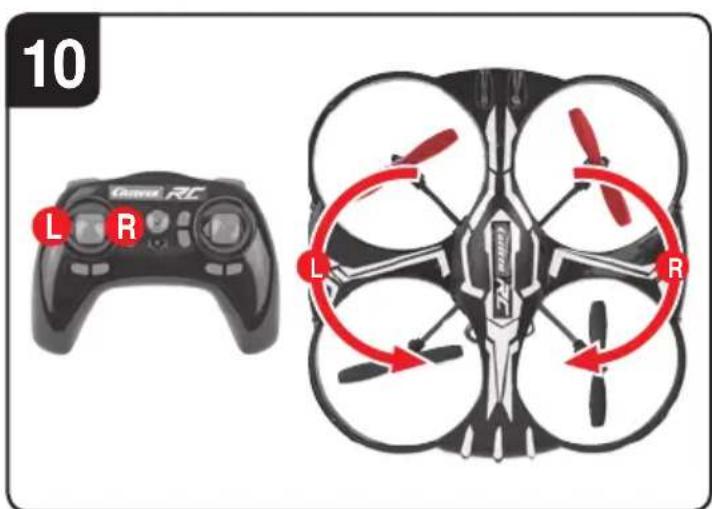
10 To make the Quadrocopter circle to the left or the right on the spot, move the lever on the left cautiously to the left or the right.
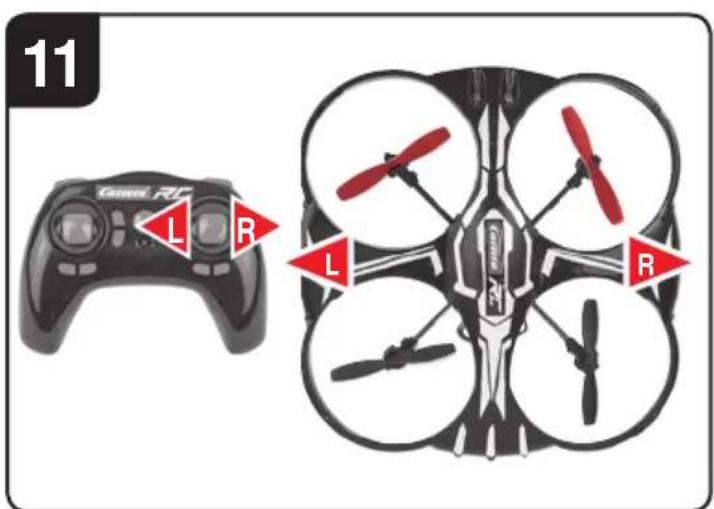
11 To fly the Quadrocopter to the left or the right, push the lever on the right cautiously to the left or the right.
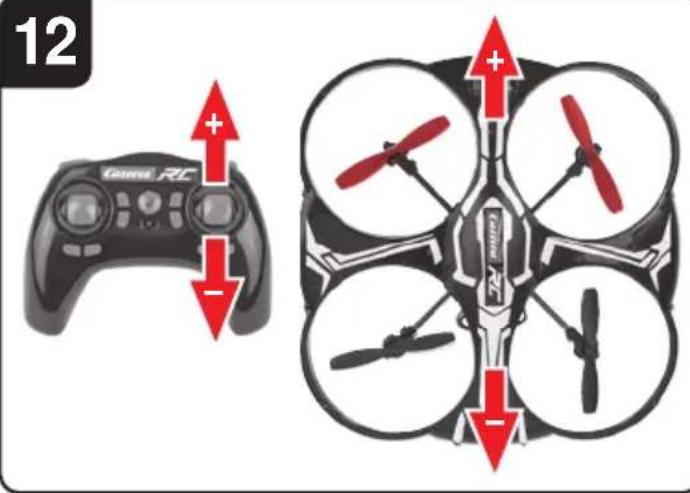
12 To fly the Quadrocopter forwards or backwards, push the lever on the right cautiously forwards or backwards.
Looping function
WARNING!
ONLY FOR EXPERIENCED PILOTS!
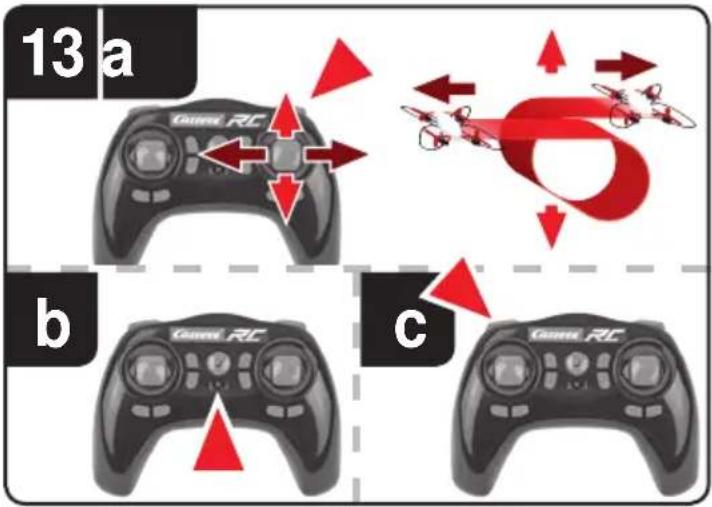
13 a If you press the "Looping Button", then an acoustic signal sounds 5x times. As long as the acoustic signal sounds, slide the right-hand joystick up, down, to the right or to the left. The Quadrocopter then carries out the loop or roll in the respective direction. Before you do this, make sure you have ample room on all sides (about 2.5m - 8^ ).
Beginner/Advanced switch
WARNING!
100% IS ONLY FOR EXPERIENCED PILOTS!
13 b 30% = beginner mode
Signal sounds once on switching over.
60% = medium mode
The quadrocopter reacts more sensitively than in 30% mode. Signal sounds twice on switching over.
100% = Advanced Modus -> 3D Modus
The Quadrocopter reacts very sensitive
ly to joystick movements. Signal sounds three times on switching over.
Headless Mode
13 c The headless mode helps beginners learn how to fly. Regardless of which direction the Quadrocopter is rotated, the flight direction always corresponds exactly to the flight direction implemented on the controller. Therefore a beginner no longer has to steer mirror-imaged when he flies e.g. to himself.
If you press the "Headless Mode Button" 9, an acoustic signal sounds for as long as you are in the Headless mode. To deactivate the Headless mode, press the button renewed.
Trimming the Quadrocopter
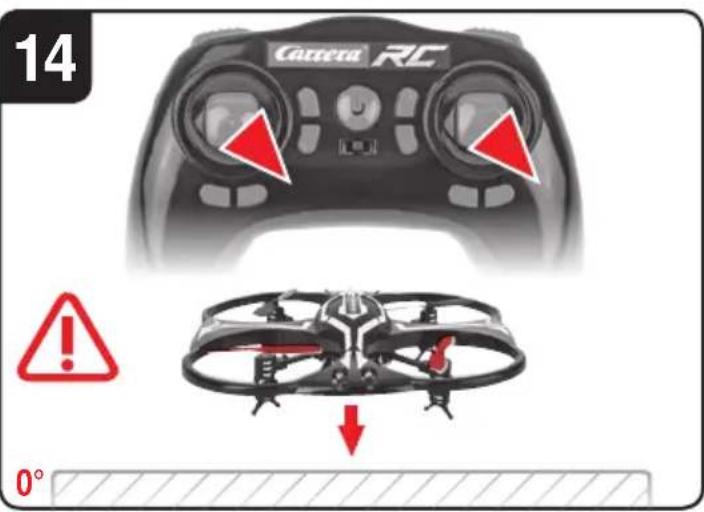
14 Auto-trimming
- Place the Quadrocopter on a horizontal surface.
- Link the Quadrocopter with the controller as described in "Linking the model with the controller".
- Slide the gas lever and the lever for forward / back simultaneously into the right lower corner. The LED on the Quadrocopter flashes on briefly and then lights up continuously. The signalling tone will sound once.
- The neutral setting is completed.
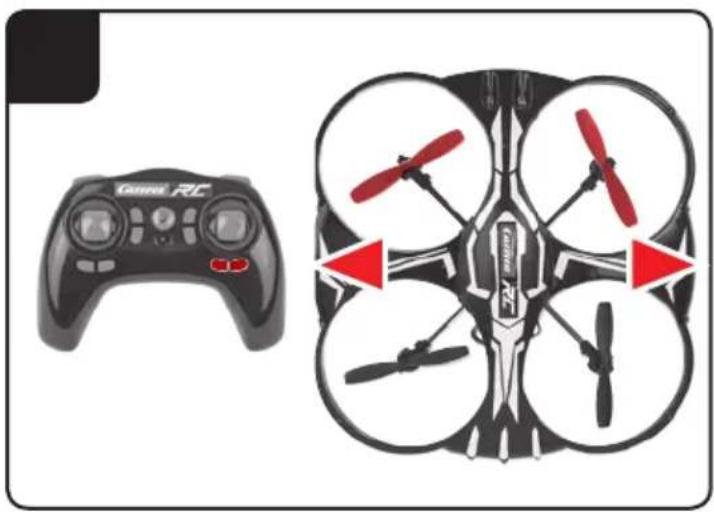
15 When hovering, if the Quadrocopter flies to the left or right without you moving the lever for left / right movement, please proceed as follows:
If the Quadrocopter moves on its own fast or slow sideways to the left, press the lower right trimmer for right / left tilt in steps to the right. If the Quadrocopter moves right, press the trimmer for right / left tilt in steps to the left.
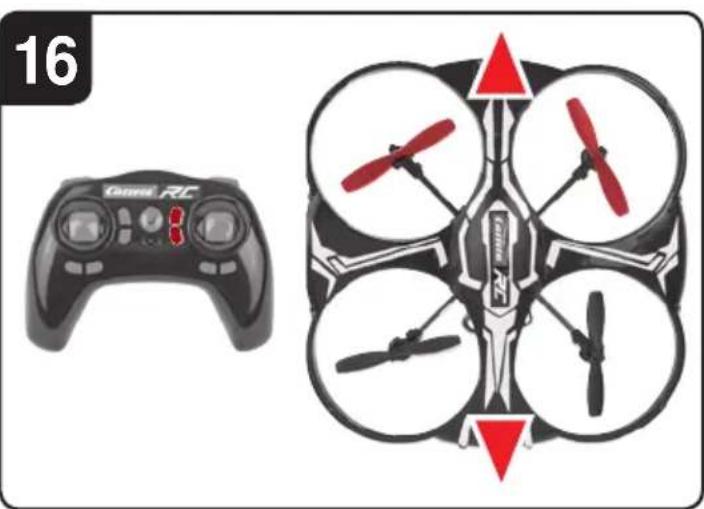
16 When hovering, if the Quadrocopter flies forwards or backwards without you moving the lever for forwards or backwards movement, please proceed as follows:
If the Quadrocopter moves on its own fast or slow forwards, press the upper right trimmer for forwards / backwards in steps downwards. If the Quadrocopter moves backwards, press the trimmer for forwards / backwards in steps upwards.
17 When hovering and without you moving the lever for circling on the spot, if the quadrocopter rotates to left or right, proceed as follows: If the Quadrocopter rotates quickly or slowly to the left around its own axis, press the trimmer for rotation below left in steps to the right. If the Quadrocopter rotates to the right, press the trimmer for rotation in steps to the left.
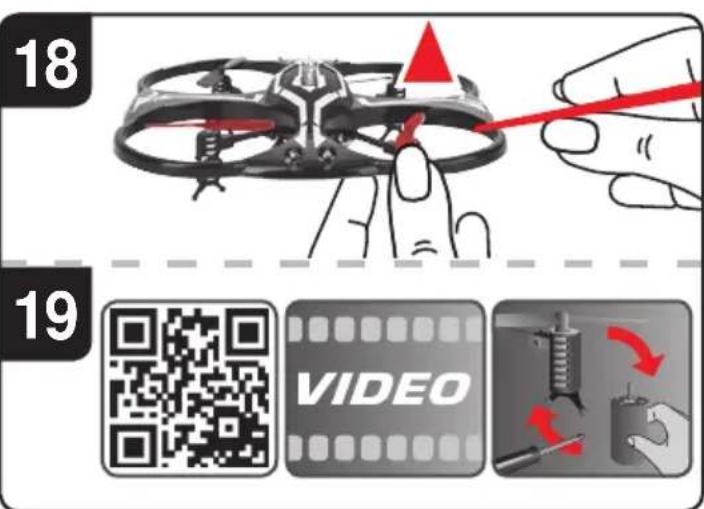
Changing the rotor blades
18 Use a smooth narrow object to help draw off a rotor blade if necessary. Make sure that you draw the rotor blade with great care vertically upwards, and hold the motor from below to stabilise it.
19 QR code for motor-change system, spare parts and further information.
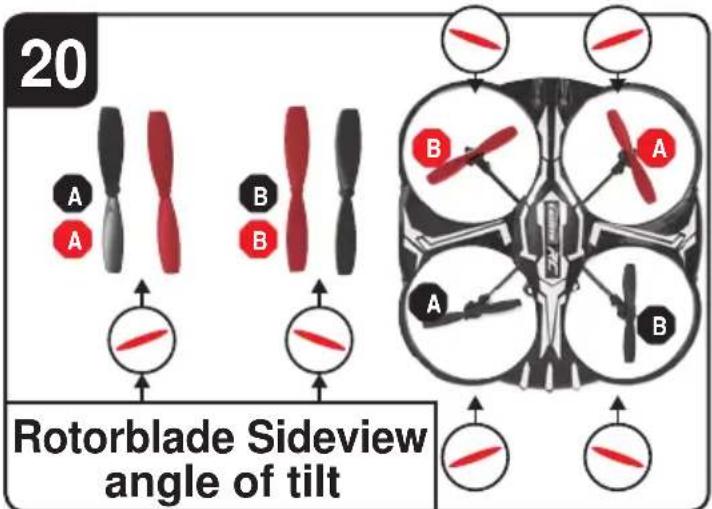
20WARNING!
Be sure to note the marking and colour, also the tilt angle of the rotor blades!
Front left: red - marking “B”
Front right: red - marking “A”
Rear right: black - marking “B”
Rear left: black - marking “A”
Troubleshooting
Problem: Remote control does not work.
Cause: The ON/OFF-power switch is turned "OFF".
Solution: Turn the ON/OFF-power switch "ON".
Cause: The batteries have been wrongly inserted.
Solution: Check if the batteries have been correctly inserted.
Cause: The batteries do not have enough power.
Solution: Insert new batteries.
Problem: The Quadrocopter cannot be controlled with the remote control
Cause: The power switch on the remote control is turned "OFF".
Solution: First turn the power switch on the remote control "ON".
Cause: The remote control is possibly not correctly frequency bound with the receiver on the Quadrocopter.
Solution: Please carry out the binding procedure as described in "Checklist for flight preparation".
Problem: The Quadrocopter does not lift.
Cause: The rotor blades rotate too slowly.
Solution: Slide the gas lever up.
Cause: The battery's power is not sufficient.
Solution: Charge the battery (see chapter "Charging the battery").
Problem: During flight, the Quadrocopter loses speed and height without any obvious reason.
Cause: The battery is too weak.
Solution: Charge the battery (see chapter "Charging the battery").
Problem: The quadrocopter only flies in a circle or turns over on starting.
Cause: Rotor blades incorrectly fitted or damaged.
Solution: Fit rotor blades / replace rotor blades as described in 18 19 20.
Errors and changes excepted
Colours / final design - changes excepted
Technical changes and design-related changes excepted
Pictograms = symbolic photos

Chere client! Cher client!
2b Insertion of the rechargeable batteries into the Quadrocopter
Con性和 design are the two main components of a control program. Con may be used to control the behavior of a system, or it may be used to control the behavior of a particular system. Con is used to control the behavior of a particular system. Con may be used to control the behavior of a particular system. Con may be used to control the behavior of a particular system. Con may be used to control the behavior of a particular system. Con may be used to control the behavior of a particular system. Con may be used to control the behavior of a particular system. Con may be used to control the behavior of a particular system. Con may be used to control the behavior of a particular system. Con may be used to control the behavior of a particular systems. Con may be used to control the behavior of a particular system. Con may be used to control the behavior of a particular system. Con may be used to control the behavior of a particular system. Con may be used to control the behavior of a particular system. Con may be used to control the behavior of a particular system. Con may be used to control the behavior of a particular system. Con may be used to control the behavior of a particular system. Con may be used to control the behaviors of different types of systems. Con may be used to control the behaviors of different types of systems. Con may be used to control the behaviors of different types of systems. Con may be used to control the behaviors of different types of systems. Con may be used to control the behaviors of different types of systems. Con may be used to control the behaviors of different types of systems. Con may be used to control the behaviors of different types of systems. Con may be used to control the behaviors of different types of systems.
Vooraan links: rood - marking 'B'
Vooraan rechts: rood - marking 'A'
60% = medium-lage
Lade opp LiPo-akkumulator
Se til at den medleverte LiPo-akkumulatoren kun lades med medlevert LiPo-ladeapparat (USB-kabel). Hvis du forsoker a lade akkumulatoren med et annet LiPo-akkumulator ladeapparat ell er annet ladeapparat kan dette fere til alvorlige skader. Les vennligst grundig gjennom forrige avsnitt med varselhenvisninger og direktiver for bruk av akkumulator, for du fortsetter. Akkumulatorer far kun lades opp av voksne. Ladeapparater og nettdeler ma ikke kortsluttes.
Akkumulatoren som er installiert i Quadrocopter kan lades opp med tilhorende USB-ladekabel over et USB-sted:
2a Lade via datamaskin:
7 1. Power bryter (ON / OFF)
- Kontroll LED-lampe
- Gass
sirkeldreining
- Frem/tilbake
hôyre/venstre helling - Trimmer for hoyre/venstre helling
- Trimmer for frem/tilbake
- Trimmer for sirkeldreining
- Looping knapp
- Headless mode
-
Lys (pa/av)
-
Beginner/Advanced bryter (30%/60%/100%)
3 12. Batterirom
Valg av flyområde
8 Når du er klar for Förste flyvning bør du velge et lukket rom som er sö stort som mulig og uten personer eller hindringer. På grunn av störrelsen og styrbarheten til Quadrocopter er det mulig for erfarne piloter Å ogsä fly i relativ v små, lukkede rom. For dine Förste flyvninger anbefaler vi absolutt en min. rom-störrelse pa 5 ganger 5 meter grunnflate og 2,40 meter hóyde. Etter at du har trimmet ditt Quadrocopter og har blitt kjent med styringen og evnene, kan du ogsä våge Å fly i små og mindre frie områder.
9 " + " /"-" gass (opp/ned)"
Beginner/Advanced bryter
OBS! 100% KUN FOR ERFARNE PILOTER!
13 b 30% = begynner modus
Signaltone ved omkoping hores en gang.
60% = medium modus
100% = advanced modus -> 3D modus
100% = advanced modus -> 3D modus
Quadrocopteren reagerer meget folsomt pa styrebevagelser. Der hores tre signallyde ved omskiftning.
Headless-Mode
JaaalbIaIaIaIaIaIaIaIaIaIaIaIaIaIaIaIaIaIaIaIaIaIaIaIaIaIaIaIaIaIaIaIaIaIaIaIaIaIaIaIaIaIaIaIaIaIaIaIaIaIaI aai Iaaia Iaaia Iaaia Iaaia Iaaia Iaaia Iaaia Iaaia Iaaia Iaaia Iaaia Iaaia Iaaia Iaaia Iaaia Iaaia Iaaia Iaaia Iaaia Iaaia Iaaia Iaaia Iaaia Iaaia Iaaia Iaaia Iaaia Iaaia Iaaia Iaaia Iaaia Iaaia Iaaia Iaaia
a|b|
Jg j 1111111111111111111111111111111111111111111111111111111111111111
()
.carrera-rc.com
CE
AGE 12
2.4 GHz
10>
1 L 后
JbU 3 J
1 1 1 1 1 1 1 1 1 1 1 1 1 1 1 1 1 1 1 1 1 1 1 1 1 1 1 1
J 1 J 1 J 1 J 1 J 1 J 1 J 1 J 1 J 1 J 1 J 1 J 1 J 1 J 1 J 1 J 1 J 1 J 1 J 1 J 1 J 1 J 1 J 1 J 1 J 1 J 1 J 1 J 1 J 1 J 1 J 1 J 1 J 1 J 1 J
Quadrocopter 12 jn Jn nn nnnn nnnn nnnn nnnn nnnn nnnn nnnn nnnn nnnn nnnn nnnn nnnn nnnn nnnn nnnn nnnn nnnn nnnn nnnn nnnn nnnn nnnn nnnn nnnn nnnn nnnn nnnn nnnn nnnn nnnn nnnn nnnn nnnn nnnn nnne
1g 1 g 1 g 1 g 1 g 1 g 1 g 1 g 1 g 1 g 1 g 1 g 1 g 1 g 1 g 1 g 1 g 1 g 1 g 1 g 1 g 1 g 1 g 1 g 1 g 1 g 1 g 1 g 1 g 1 g 1 g 1 g 1 g 1 g 1 g
.
5golglalil gaii 5le 2 8 jlllgl 00001 Jlaillgblalllg 1
1
. 15 15
Jg Jg JgJgJgJgJgJg
y
aalgl baa aal al 10 10 10 10 10 10
JU 1 JU U JU U JU U JU U JU U JU U JU U JU U JU U JU U JU U JU U JU U JU U JU U JU U JU U JU U JU U JU U JU U JU U JU U JU U JU U JU U JU U JU U JU U JU U JU U JU U JU U JU UJU UJU UJU UJU UJU UJU UJU UJU UJU UJU UJU UJU UJU UJU UJU UJU UJU UJU UJU UJU UJU UJU UJU UJU UJU UJU UJU UJU UJU UJU UJU UJU UJU UJUUUUUUUUUUUUUUUUUUUUUUUUUUUUUUUUUUUUUUUUUUUUUUUUUUUUUUUUUUUUUUUUUUUUUUUUUUUUUUUUUUUUUUUUUUUUUUUUUUUUUUUUUUUUUUUUUUUUUUUUUUUUUUUUUUUUUUUUUUUUUUUUUUUUUUUUUUUUUUUUUUUUUUUUUUUUuuuuuuuuuuuuuuuuuuuuuuuuuuuuuuuuuuuuuuuuuuuuuuuuuuuuuuuuuuuuuuuuuuuuuuuuuuuuuuuuuuuuuuuuuuuuuuuuuuuuuuuuuuuuuuuuuuuuuuuuuuuuuuuuuuuuuuuuuuuuuuuuuuuuuuuuuuuuuuuuuuuuuuuuuuuuuuuuuuuuuuuuuuuuuuuuuuuuuuuu uu u u u u u u u u u u u u u u u u u u u u u u u u u u u u u u u u u u u u u u u u u u u u u u u u u u u u u u u u u u u u u u u uu uu uu uu uu uu uu uu uu uu uu uu uu uu uu uu uu uu uu uu uu uu uu uu uu uu uu uu uu uu uu uu uu uu uu uu uu uu uu uu uu uu uu uu uu uu uu uu uu uu uu uu uu uu uu uu uu uu uu uu uu uu uu uu uu uu uu uu uu uu uu uu uu uu uu uu uu uu uu uu uu uu uu uu uu uu uu uu uu uu uu uu uu uu uu uu uu uu uu uu uu ku k k k k k k k k k k k k k k k k k k k k k k k k k k k k k k k k k k k k k k k k k k k k k k k k k k k k k k k k k k k K K K K K K K K K K K K K K K K K K K K K K K K K K K K K K K K K K K K K K K K K K K K K K K K K K K K K K K K K K K K K K K K K K K K K K K K K K K K K K K K K K K K K K K K K K K K K K K K K K K K
S OBC = S COD + S_ BOC
yI 60 yI yI yI yI yI yI yI yI yI yI yI yI yI yI yI yI yI yI yI yI yI yI yI yI yI yI yI yI yI yI yI yI yI yI yI yI yI yI yI yI yI yI yI yI yI yI yI yI yI yI y
JbLg 1
. 11111111111111111111111111
LiPo aRbJgJgJgJgJgJg
中
p 11 10 11 11 11 11 11 11 11 11 11 11 11 11 11 11 11 11 11 11 11 11 11 11 11 11 11 11 11 11 11
g a g o g 1 Loo. . 11
J 11
J 11
J 11
J 11
J 11
J 11
J 11
J 11
J 11
J 11
J 11
J 11
J 11
J 11
J 11
2b
.
.1b11 1b11
1
J 1
3
Carrera RC-Modell-Quadrocopter Jus Jus Jus Jus Jus Jus Jus Jus Jus Jus Jus Jus Jus
JyjI JyJy
Quadrocopter s jll LED s LjL J L L
aill 1
jaiil aai jie Jaii 11 piaai iie ggi jggi jgi
JLALI JALI p. p. bila K j 1LED sLj 2
LED
5
Juaauiy! 1le! aie jll
Jg Jg Jg Jg Jg Jg Jg Jg Jg Jg Jg Jg Jg Jg Jg Jg Jg Jg Jg Jg Jg Jg Jg Jg Jg Jg Jg Jg Jg Jg Jg Jg Jg Jg Jg Jg Jg Jg Jg Jg Jg Jg Jg Jg Jg Jg Jg Jg Jg Jg Jg
i 11111111111111111111111111111
Quadrocopter
zgssg 1
Jg 2
LED 三 _ 3 ^ = 日 _ 3 ^ + 日 _ 3 ^ + 日 _ 3 ^ + 日 _ 3 ^ .3
zuruljL.4
Quadrocopter 5.5
LJ.6
jwwll ole jbi

(OFF/ON)
LED. 2
2c yu1.3
( x,y) = ( ab,52xy)
1/1031 4
Jlll/
Jll/111 5
111/111 111 6
125 1.7
8.8
(Headless Mode)
(1)/(1).10
(100%/60%/30%) 1/10
yJ1.12

Quadrocopter
136
aaii i 1
joo jolil g jilie 1000000000000000000000000000000000000000000
lll cui yjy jy
J 1 J 1 1 1 1 1 1 1 1 1 1 1 1 1 1 1 1
17 16 51

(Jusu/sjcsu)jz-+1
1,2,3,4,5,6,7,8
1 2
aill gai jj jllg j

Quadrocopter 10
a aae e ae aee aee aee aee aee aee
i
Sul 1d oosu 1uall j1 jao
/15 1 1 1 1 1 1 1 1 1 1 1 1 1 1 1 1 1 1
abai ge jaiy all p aai y gai gai y jai y jai (13c) paai
.
Jgauag gauu Jkai pailll qnnn llall Qadrocopter joi
LED.
yennn Jnnn nn nnnnnnnnnnnnnnnnnnnnnnnnnnnnnnnnnnnnnnnnnnnnnnnnnnnnnnnnnnnnnnnnnnnnnnnnnnnnnnnnnnnnnnnnnnnnnnnnnnnnnnn
S =
-
1234567890
-
2.3/12
a. llll llll llll
Lagulabla la jai jao jao jao jao jao
1/(s)
isall 100%

_i = 1^na_ij = 30%
Jillie 8alg yol jai j
kwgs kbi = 60%
30% 30% 30% 30% 30% 30% 30% 30% 30% 30% 30% 30% 30% 30% 30% 30% 30% 30% 30% 30% 30% 30%
J 1
3D 已 = -12 100%
a aaa aee aae e ae aee aee aee aee aee
3j 3
(Headless Mode)

Li Li. (Headless Mode)
a a a a a a a a a a a a a a a a a a a
aill 111 111 111 111 111 111
jie baiallp. aaiol jai jil 1i jll i j
9 "Headless-Mode-Button"
Headless-Mode. Headless-Mode
Quadrocopter
14
1 2
1
3
4
Lallll llll llll 124. Quadropter slll llll 124.
Lallll llll llll 124.
Lallll llll llll 124.
Lallll llll llll 124.
Lallll llll llll 124.
Lallll llll llll 124.
Lallll llll llll 124.
P 100000000000000000000000000000000000000000000000000000000000000000000000000000
Qadrocopter 10000000000000000000000000000000000000000000000000000000000000000000000000000
Jd
a 1 a 1 1 1 1 1 1 1 1 1 1 1 1 1 1 1 1 1 1 1 1 1 1 1
18
19
20
Jg 1
"B" 0xle - yaxi: Jwll gai pLsU
a4 = a1 + 3d a_4 = 13
S OBC = S COD + S BOC - S BOC
"A" aale- jswi: jswi
Lg
Jia 3 jaiul :Kui
"OFF" ON/OFF sall g j
ON/OFF C
1
y
1
.
Jauuui Juaa quo 10000000000000000000000000000000000000000000000000
"OFF" 10000000000000000000000000000000000000000000000000000
"ON" 1
jie jie jie jie jie jie jie jie jie jie jie jie jie jie jie jie jie jie jie jie jie jie jie jie jie jie jie jie jie jie jie jie jie jie
- Quadroceptor
1 1
Quadrocopter
L
1 1111111111111111
1
()
g jn 11111111111111111111111111111111
1
.("jaii jaii jaii jaii jaii jaii jaii jaii jaii jaii jaii jaii jaii jaii jaii jaii jaii jaii jaii jaii jaii jaii jaii jaii jaii jaii jaii jaii jaii jaii jaii jaii jaii jaii jali jali jali jali jali jali jali jali jali jali jali jali jali jali jali jali jali jali jali jali jali
aill l jai g s jia quadropter sll
aai 1
20198 5a
12g 1juiy
10
1 1
jJyJyJyJyJyJyJyJy
DISTRIBUTORS
AUSTRIA
Stadlbauer [HK] Ltd.
Room 1917, North Tower
Concordia Plaza
1. Science Museum Road
Tsimshatsui East·Kowloon
Hong Kong
Phone:+85237320820
Fax+85223670792
Internet www.cancer-nc.com
USA/CANADA
Carrera of America Inc.
2 Corporate Drive
Cranbury, NJ 08512 USA
Phone +16094098510
Fax+16094098610
Email reception@carrera-toys.com
Internet www.cartera.cn
BENELUX
Stadlbauer Marketing + Vertrieb GmbH
Landsheerlan 33
61 14 MP Susteren, Netherlands
Email service.beneflux@carrera-toys.
com
Internet www.carnerac.com
FRANCE
Stadlbauer Marketing + Vertrieb GmbH
21B. Route Natio/ale
Domeine de L'Hancardrie
59320 Ennetieros-En-Woppes - France
Phone +33 3 20084893
Fax:33320384693
Email carrera-toys@orange.fr
Internet www.carnerac.com
SPAIN/PORTUGAL/LATINAMERICA
Stadlbauer Iberia SLU
Calle Fluvia 97.1°2
08019 Barcelona·Spain
Phone +34 93 3038335
Email contacto@carrera-toys.com
Internet www.carnerac.com
HUNGARY
Magyarország Importer
Stadlbauer Marketing + Vertrieb GmbH
Rennbahn Allee 1
5412 Puch / Salzburg, Austria
Phone +36 305556 502
Email office@stadlbauer-toys.hu
Internetwww.candara.com
Service:
GAME PARK - VINCZE ZOLTÁN
BerklyLurca36-1171Budapest
Hungary
Phone+361258-7809
Email vinzolat-online.hu