
RCWK-8L-AUT - Kettle Royal Catering - Free user manual and instructions
Find the device manual for free RCWK-8L-AUT Royal Catering in PDF.

| Product type | Automatic filling kettle |
| Brand | Royal Catering |
| Model | RCWK-8L-AUT |
| Supply voltage | 230 V ~ / 50 Hz |
| Rated power | 2100 W |
| Capacity | 8 L |
| Hot water output | 30 L/h |
| Max water pressure | 0.4 MPa |
| Temperature range | 0 – 100 °C |
| Dimensions (W x D x H) | 200 x 400 x 600 mm |
| Weight | 6.3 kg |
| Water connection | Threaded inlet for supply tube |
| Material | Stainless steel |
| Control panel | LED display with SET, UP/DOWN, RESERVATION, ON/OFF buttons |
| Functions | Heating, keep warm, automatic filling, timer programming |
| Temperature mode 100 °C | Fixed display at 100 °C even if set temperature is lower |
| Timer | On/off programming on time slots |
| Protection | Overheat thermostat, water level sensor |
| Electrical safety | Grounding, residual current device recommended |
| Maintenance | Regular descaling, cleaning with soft cloth and non-caustic products |
| Repairability | Repair by authorized service only, original parts |
| Ambient temperature | Max 40 °C, relative humidity < 85 % |
| Intended use | Heat and keep water at temperature for professional use |
| Package contents | Unit, supply tube, water tray, instruction manual |
Frequently Asked Questions - RCWK-8L-AUT Royal Catering
User questions about RCWK-8L-AUT Royal Catering
0 question about this device. Answer the ones you know or ask your own.
Ask a new question about this device
Download the instructions for your Kettle in PDF format for free! Find your manual RCWK-8L-AUT - Royal Catering and take your electronic device back in hand. On this page are published all the documents necessary for the use of your device. RCWK-8L-AUT by Royal Catering.
USER MANUAL RCWK-8L-AUT Royal Catering
natural_image
Abstract white line drawing of a mythical creature on a blue background (no text or symbols)| DE | Produktname | WASSERBOILER MIT AUTOMATISCHER BEFÜLLUNG 8L |
| EN | Product name | AUTO FILL WATER BOILER 8L |
| PL | Nazwa produktu | WARNIK DO WODY AUTOMATYCZNY 8L |
| CZ | Název výrobku | BOJLER NA VODU S AUTOMATICKÝM PLNĚNÍM 8L |
| FR | Nom du produit | CHAUFFE-EAU A REMPLISSAGE AUTOMATIQUE 8L |
| IT | Nome del prodotto | BOILER CON RIEMPIMENTO AUTOMATICO 8L |
| ES | Nombre del producto | CALDERA DE AGUA CON LLENADO AUTOMÁTICO 8L |
| HU | Termék neve | FORRÓVÍZ ADAGOLÓ - 8 L |
| DA | Produktnavn | VARMTVANDSDISPENSER - 8 L - VANDTILSLUTNING |
| FI | Tuotteen nimi | KUUMAVESIANNOSTELIJA - 8 L - VESILIITÄNTÄ |
| NL | Productnaam | HEETWATERDISPENSER - 8 L - WATERAANSLUITING |
| NO | Produktnavn | VARMTVANNSDISPENSER - 8 L - VANNTILKOBLING |
| SE | Produktnamn | VARMVATTENDISPENSER - 8 L - VATTENANSLUTNING |
| PT | Nome do produto | CHALEIRA DE ÁGUA QUENTE - 8 L - LIGAÇÃO DE ÁGUA |
| SK | Názov produktu | VARNÝ TERMOS - 8 L - PRÍPOJKA VODY |
| DE | Modell | RCWK-8L-AUT |
| EN | Product model | |
| PL | Model produktu | |
| CZ | Model výrobku | |
| FR | Modèle | |
| IT | Modello | |
| ES | Modelo | |
| HU | Modell | |
| DA | Model | |
| FI | Tuotteen malli | |
| NL | Productmodel | |
| NO | Produktmodell | |
| SE | Produktmodell | |
| PT | Modelo do produto | |
| SK | Model | |
| DE | Hersteller | expondo Polska sp. z o.o. sp. k. |
| EN | Manufacturer | |
| PL | Producent | |
| CZ | Výrobce | |
| FR | Fabricant | |
| IT | Produttore | |
| ES | Fabricante | |
| HU | Termelő | |
| DA | Producent | |
| FI | Valmistaja | |
| NL | Producent | |
| NO | Produsent | |
| SE | Tillverkare | |
| PT | Fabricante | |
| SK | Výrobca | |
| DE | Anschrift des Herstellers | ul. Nowy Kisielin – Innowacyjna 7, 66-002 Zielona Góra | Poland, EU |
| EN | Manufacturer Address | |
| PL | Adres producenta | |
| CZ | Adresa výrobce | |
| FR | Adresse du fabricant | |
| IT | Indirizzo del produttore | |
| ES | Dirección del fabricante | |
| HU | A gyártó címe | |
| DA | Producentens adresse | |
| FI | Valmistajan osoite | |
| NL | Adres producent | |
| NO | Produsentens adresse | |
| SE | Tillverkarens adress | |
| PT | Endereço do fabricante | |
| SK | Adresa výrobcu |

Kontrolllampen:
This User Manual has been translated for your convenience using machine translation. Reasonable efforts have been made to provide an accurate translation; however, no automated translation is perfect nor is it intended to replace human translators. The official User Manual is the English version. Any discrepancies or differences created in the translation are not binding and have no legal effect for compliance or enforcement purposes. If any questions arise related to the accuracy of the information contained in the User Manual, please refer to the English version of those contents which is the official version.
Technical data
| Parameter description | Parameter value |
| Product name | Auto Fill Water Boiler 8l |
| Model | RCWK-8L-AUT |
| Supply voltage [V~] / frequency [Hz] | 230/50 |
| Rated power [W]. | 2100 |
| Capacity [l] | 8 |
| Water efficiency [l/h] | 30 |
| Maximum inlet water pressure [MPa] | 0.4 |
| Temperature range[°C] | 0 – 100 |
| Dimensions (width x depth x height) [mm] | 200 x 400 x 600 |
| Weight [kg] | 6.3 |
1. General Description
The manual is intended to assist in safe and reliable use. The product is designed and manufactured strictly according to technical specifications using the latest technology and components and maintaining the highest quality standards.
CAREFULLY READ AND UNDERSTAND THIS MANUAL BEFORE STARTING THE WORK.
To ensure the long and reliable operation of the device, make sure to operate and maintain it properly following the guidelines in this instruction manual. The technical data and specifications in this manual are up-to-date. The manufacturer reserves the right to make changes to improve the quality. Taking the technical progress and the possibility of reducing noise into account, the unit is designed and built in such a way that risks resulting from noise emissions are reduced to the lowest possible level.
Explanation of symbols

The product complies with applicable safety standards.
Read the manual before use.
Recyclable product.
CAUTION! or WARNING! or REMEMBER! A general warning sign that describes a given situation.
CAUTION! Warning of electric shock!
Caution! Hot surface can cause burns!

For indoor use only.

CAUTION! The figures in this manual are illustrative only and may vary in some details from the actual appearance of the product.
2. Safety of use

CAUTION! Read all safety warnings and instructions. Failure to follow the warnings and instructions may result in electric shock, fire, and/or serious injury or death.
The term "device" or "product" in the warnings and the description of the instructions refers to Auto Fill Water Boiler 8l
2.1. Electrical safety
a) The plug of this device must fit into the outlet. Do not modify the plug in any way. Original plugs and matching outlets reduce the risk of electric shock.
b) Avoid touching grounded parts, such as pipes, heaters, ovens, and refrigerators. There is an increased risk of electric shock if your body is grounded and touches the device while exposed to direct rain, wet pavement, or while working in a damp environment. If water enters the device, there is an increased risk of damage to the unit and electric shock.
c) Do not touch the device with wet or damp hands.
d) Do not use the cord in an unintended manner. Never use it to carry the device or to pull the plug out of the socket. Keep the cord away from heat sources, oil, sharp edges, or moving parts. Damaged or tangled cords increase the risk of electric shock.
e) If you cannot avoid using the product in a wet environment, use a residual current device (RCD) to connect it to electrical mains. Using an RCD reduces the risk of electric shock.
f) Do not use the device if the power cord is damaged or shows signs of wear. A damaged power cord should be replaced by a qualified electrician or the manufacturer's service department.
g) To avoid electric shock, do not immerse the cable, plug, or the device itself in water or other liquid. Do not use the product on wet surfaces.
2.2. Safety in the workplace
a) Keep the work area tidy and well-lit. Disorder or poor lighting can lead to accidents. Be foresighted, watch what you are doing and use common sense when using the device.
b) If you find any damage or irregularities in the operation of the product, immediately turn it off and report it to an authorized person.
c) Repairs to the device may only be carried out by the manufacturer's service. Do not attempt to repair the product on your own!
d) In the event of ignition or fire, use only powder or snow (CO2) fire extinguishers to suppress the live device.
e) Keep this manual for future reference. If the product is to be handed over to a third party, hand it over with this user manual.
f) Keep the device away from children and animals.
g) When using this product together with other devices, also follow the other instructions for use.
Remember! Keep children and other bystanders safe while operating the appliance.

2.3. Personal safety
a) Do not operate this device if you are tired, ill, or under the influence of alcohol, drugs, or medication that could impair your ability to operate the device.
b) The device is not intended to be used by persons (including children) with reduced mental, sensory or intellectual functions or persons who lack experience and/or knowledge unless they are supervised or have been instructed by a person responsible for their safety on how to operate the device.
c) To prevent accidental start-up, make sure the switch is in the off position before connecting to a power source.
d) The product is not a toy. Children should be watched to ensure that they do not play with the product.
e) Do not place your hands or any objects inside the running device!
2.4. Safe use of the device
a) Do not use the device if the ON/OFF switch does not function properly (does not turn on and off). Units that cannot be controlled by the switch are unsafe, cannot operate, and must be repaired.
b) Disconnect the device from the power supply before adjusting, cleaning, or servicing. This precaution reduces the risk of accidental start-up.
c) Keep unused product out of the reach of children and anyone unfamiliar with the device or this manual. Products are dangerous when used by inexperienced users.
d) Keep the product in good working order. Check before each use for general damage or damage to moving parts (cracks in parts and components or any other condition that may affect the safe operation of the device). If damaged, return the device for repair before use.
e) Keep the product out of the reach of children.
f) Repairs and maintenance should be carried out by qualified personnel using only original spare parts. This will ensure the safety of use.
g) To ensure the designed operational integrity of the device, do not remove factory-installed covers or loosen screws.
h) Do not move, shift, or rotate the device while in operation.
i) Clean the device regularly to prevent permanent dirt build-up.
j) The product is not a toy. Cleaning and maintenance must not be performed by children without adult supervision.
k) Do not start up an empty unit.
I) Do not tamper with the device to alter its performance or design.
m) Keep the unit away from sources of fire and heat.
n) Do not overload the device.
o) Do not block the ventilation openings of the unit!

CAUTION! Although the product has been designed to be safe, with adequate safeguards, and despite the additional safety features provided to the user, there is still a slight risk of accident or injury when handling the unit. Caution and common sense are advised when using the product.
3. Instructions for use
The device is designed only for heating and maintaining the set water temperature.
The user is responsible for any damage resulting from misuse.
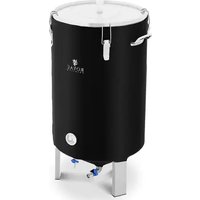
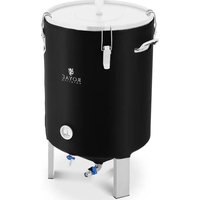
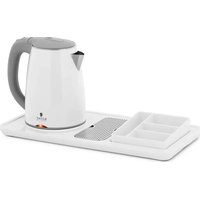
3.1. Product overview
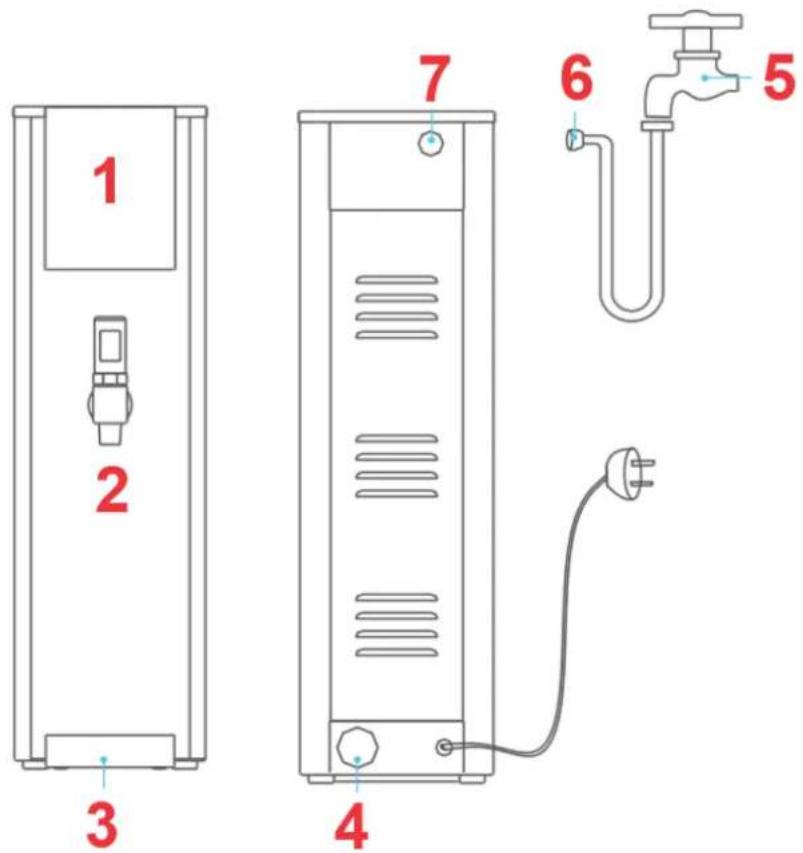
1 - Control panel
2 - Tap
3 - Water tray
4 - Water outlet
5 - Supply tap
6 - Water inlet tube
7 - Water inlet
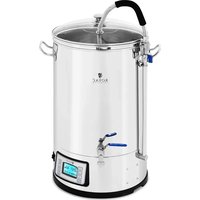
Control panel:
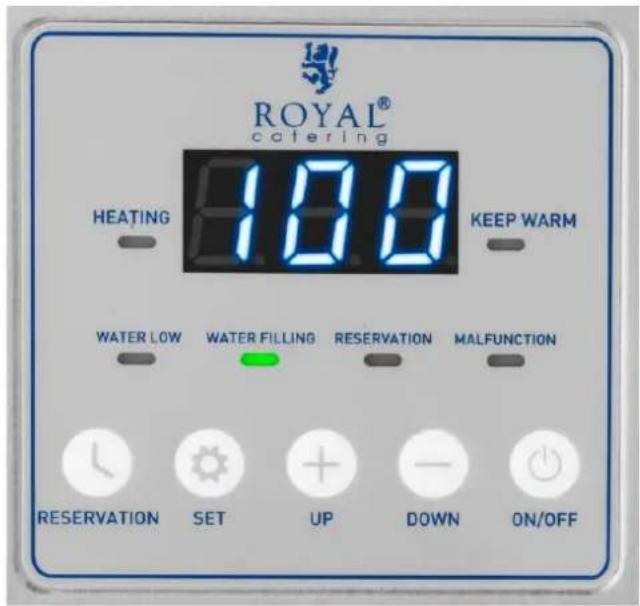
Indicator lights:
HEATING - The device heats the water.
KEEP WARM - The water has reached the set temperature; temperature maintenance mode.
WATER LOW - No water in the unit - the water supply may be cut off or the water has not reached the required level (display code: ELL).
WATER FILLING - The device refills the water.
RESERVATION - The unit is operating in the set time mode.
MALFUNCTION - The unit is malfunctioning. Solve the problem according to the error code
Buttons:
RESERVATION - button for setting the device operation time.
SET - Settings button.
UP/DOWN - Buttons for increasing/decreasing the set temperature and time values.
ON/OFF - the main switch of the device
3.2. Preparation for operation
POSITIONING OF THE UNIT
The ambient temperature must not exceed 40^ C and ambient humidity should not exceed 85%. Place the unit in a way that ensures good air circulation. Maintain a minimum clearance of 10 cm from any wall of the unit.
Keep the unit away from any hot surfaces. Always operate the unit on a level, stable, clean, fireproof, and dry surface and out of the reach of children and persons with impaired mental, sensory, and intellectual functions. Place the unit in such a way that the main plug can be reached at any time. Ensure that the power supply to the unit corresponds to that specified on the identification plate!
Before using the unit for the first time, disassemble all parts and wash them as well as the entire unit.
- Place the unit as described above. Place the water tray on the bottom.
- Screw one end of the inlet tube into the water inlet on the back of the unit.
- Screw the other end of the inlet tube to a water source or threaded tap.
- Open the water supply.
- Connect the device to the power supply.
3.3. Working with the device
To turn on the device, press the "ON/OFF" button. To turn off the device, press and hold the "ON/OFF" button for 3 seconds.
When the bolier is turned on for the first time, the appliance will automatically heat up and boil the water until the keep warm indicator turns on, indicating that the water temperature has reached the set value.
Press and hold the "RESERVATION" button to activate or deactivate the timer operation mode.
To check the set temperature, press and hold the "DOWN" button for 3 seconds.
3.3.1. Setting the filling time
The machine has a default setting of water refilling for 1 second, while the pause time cannot be changed. If you want to change the filling time, please follow the instructions below.
For example: set the filling time to 2 seconds and stop for 17 seconds.
Filling the tank with high-temperature water takes 1 second, then it stops for 17 seconds (1 second = code "20").
If you need to set 2 seconds to fill the water tank (2 seconds = code "40") at high temperature, press SET for
3 seconds in standby mode, select code "di" and press SET to display "40," then press SET to select OFF or wait 20 seconds to automatically return to OFF, then press ON/OFF lightly to complete the setting.
3.3.2. Setting the temperature
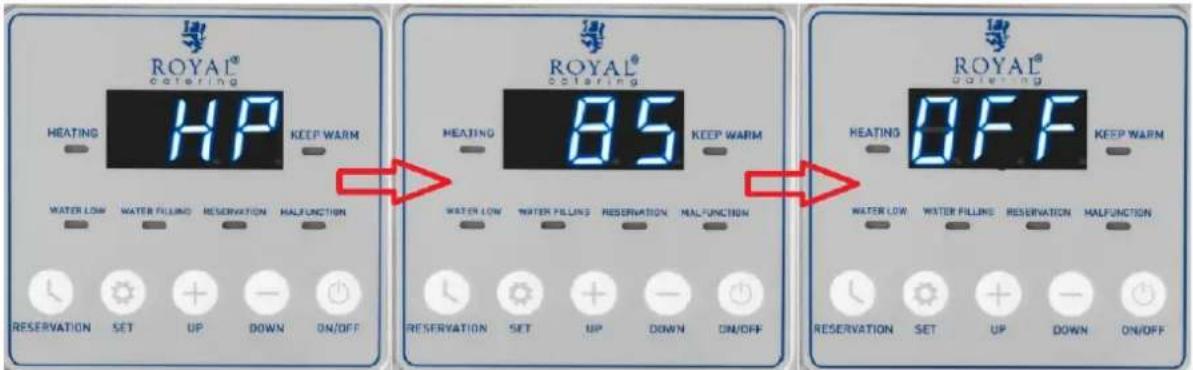
- Press the SET button for 3 seconds until "OFF" appears on the display. Then press "UP" for a few seconds until the display shows the code "HP."
- Set the temperature with the "UP/DOWN" buttons.
- Wait a few seconds until the device displays "OFF."
- When the device reaches the set temperature, it will go into the mode of keeping it.
There are two temperature display modes. One is the real-time temperature mode, which means the display will always show the actual temperature of the water inside. The second is the 100°C mode, which means that regardless of the set temperature, when the water inside reaches the set temperature, the display will always show 100°C.
3.3.3. Setting the 100^ mode
- Press the SET button for 3 seconds until "OFF" appears on the display.
- Press the SET button for 3 seconds, then press the "SET" button to select the "I."
- Press "UP" until the display shows "ON."
- Heating to set temperature - the keep warm light is on and the display screen shows 100^ C (if 80^ C is set as the temperature to keep, when the water temperature reaches 80^ C, the display screen will show 100^ C).
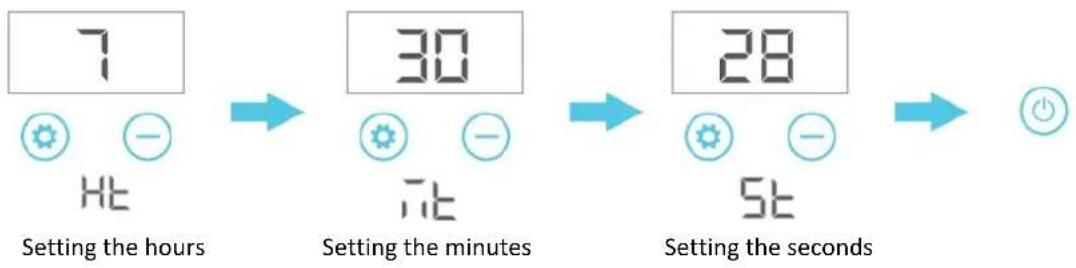
3.3.4. Time setting
The factory default setting is 24 hours a day. If the user has a local time difference, please select the code setting according to the local time: hour - minute - second.
Example: 7:30:28:
- Press the "ON/OFF" button for 3 seconds until the display shows "OFF."
- Press the "SET" button for 3 seconds, select the time code HE", Then set the value "7" with the "UP/DOWN" buttons.
- Press "SET," select the minute code "TIE" and set the minute value to "30."
- Press "SET," select the seconds code "52" and Set the value to "28".
- Press "ON/OFF" to save the settings.
flowchart
graph LR
    A["7"] --> B["30"]
    B --> C["28"]
    style A fill:#f9f,stroke:#333
    style B fill:#ccf,stroke:#333
    style C fill:#cfc,stroke:#333
3.3.5. Factory reset
Press the "ON/OFF" button for 3 seconds until the display shows "OFF." Then press the "RESERVATION" and "SET" buttons simultaneously for 3 seconds - all the display lights will illuminate and the display screen will move "in a circle," which means that the factory settings have been successfully restored.
3.3.6. Setting the temporary operating mode
Press the "ON/OFF" button for 3 seconds until the display shows "OFF." Then select the time code of the operating mode:
 | Turn on hour | Timer on: hours (0-23) |
 | Turn on minute | Timer on: minutes (0-59) |
 | Turn off hour | Timer off: hours (0-23) |
 | Turn off minute | Timer off: minutes (0-59) |
 | Hour, Time of day: hour | |
 | Minute Time of day: minutes | |
 | Second Time of day: seconds |
Example:
Set the switch-on time to 8:30 am.
- Press the "ON/OFF" button for 3 seconds until the display shows "OFF." Press "SET" to select the " ," then use the" UP/DOWN" buttons to set the hour to "8."
HoП
- Press "SET" to select the "10H," then use the "UP/DOWN" buttons to set the prompts to "30."

Set the turn off time to 22:30
- Press "SET" to select the "Hof," then use the "UP/DOWN" buttons to set the hour to "22."
- Press "SET" to select the "TioF," then use the "UP/DOWN" buttons to set the minutes to "30."

- Press "SET" to select the "OFF" code or wait 20 seconds until the display shows "OFF."
- Press "ON/OFF" to turn on the device, press and hold the "RESERVATION" button until the "RESERVATION" indicator light comes on. Setting is complete.
3.4. Troubleshooting
| Error code | Cause of the error | Possible solution |
 | No water in the tank, water flows slowly, water pressure low. | When the unit is turned on, there is no water in the tank. The ELL code appears during the water filling process. Please open the water outlet tap and check if the water inlet pressure is sufficient. |
 | Open circuit or short circuit of the temperature sensor. | Please check if the sensor cable is disconnected or if the motherboard is working properly. |
 | The water in the tank cannot reach a low level after filling with water for 20 minutes. | The water pressure is low or the inlet valve is blocked by debris.1) Check that the water pressure is adequate.2) Clean the limestone regularly.3) Check that the inlet switch is turned on.4) Check if there is no water in the area. |
 | The water cannot reach the set temperature after heating for 35 minutes | |
| The display is not working | Malfunction on the motherboard or protection of the thermostat against overheating. | 1) Check whether the appliance can heat the water normally after switching on.2) Check whether the display screen connection is not loose or disconnected.3) Check if the motherboard is working properly. |
3.5. Cleaning and maintenance
a) Pull the mains plug and let the unit cool down completely before cleaning, adjusting or replacing accessories and when the unit is not in use.
b) Use only non-corrosive cleaning agents for cleaning the surfaces.
c) Only mild detergents designed for cleaning food contact surfaces may be used to clean the unit.
d) After each cleaning, all parts should be thoroughly dried before the device is reused.
e) Store the unit in a dry and cool place protected from moisture and direct sunlight.
f) Do not spray the unit with a stream of water or immerse it in water.
g) Make sure that no water enters through the ventilation openings in the casing.
h) Perform regular inspections of the unit checking technical fitness and any damages.
i) Use a soft, damp cloth for cleaning.
j) Do not use sharp and/or metal objects (e.g. wire brush or metal spatula) as they may damage the surface of the material from which the appliance is made.
k) Do not clean the unit with acidic substances, medical agents, thinners, fuel, oils, or other chemicals. It may cause damage to the device.
DISPOSAL OF USED UNITS.
At the end of its useful life, this product should not be disposed of with normal household waste but should be taken to a collection point for the recycling of electrical and electronic equipment. This is indicated by the symbol on the product, operating instructions, or packaging. The materials used in this appliance are recyclable according to their marking. By reusing, recycling, or applying other forms of use of waste machines, you make a significant contribution to the protection of our environment.
Your local administration will provide you with information about the appropriate disposal point for used appliances.

Lampki kontrolne:
Kontrolky:
Témoins lumineux :
Spie luminose:
Pilotos:
Jelzőlámpák:
Kontrollamper:
OPVARMNING - Enheden opvarmer vandet.
APPARATETS PLACERING
Merkkivalot:
Indicatie lichten:
Indikatorlamper:
SET - Innstillinger-knapp.
Indikator lampor:
PLACERING AV APPARATEN
Luzes indicadoras:
Kontrolky:
KÚRENIE - Zariadenie ohrieva vodu.
UDRŽUJTE TEPLU - Voda dosiahla nastavenú teplotu; režim udržiavania teploty.
- Stlačte tlačidlo SET na 3 sekundy, kým sa na displeji nezobrazí „OFF“. Potom na niekolko sekúnd stlačte tlačidlo „UP“, kým sa na displeji nezobrazí kód „HP“.
- Nastavte teplotu pomocou tlačidiel „UP/DOWN“.
- Počkajte niekol'ko sekúnd, kým sa na zariadení nezobrazí „OFF“.
- Ked' prístroj dosiahne nastavenú teplotu, prejde do režimu jej udržiavania.
For the disposal of the device please consider and act according to the national and local rules and regulations.
CONTACT
expondo Polska sp. z o.o. sp. k.
- Kontrolllampen:
- General Description
- CAREFULLY READ AND UNDERSTAND THIS MANUAL BEFORE STARTING THE WORK.
- Explanation of symbols
- Safety of use
- Electrical safety
- Safety in the workplace
- Personal safety
- Safe use of the device
- Instructions for use
- Product overview
- Control panel:
- Indicator lights:
- Buttons:
- Preparation for operation
- POSITIONING OF THE UNIT
- Working with the device
- Setting the filling time
- Setting the temperature
- Setting the 100°C mode
- Time setting
- Example: 7:30:28:
- Factory reset
- Setting the temporary operating mode
- Example:
- Set the turn off time to 22:30
- Troubleshooting
- Cleaning and maintenance
- DISPOSAL OF USED UNITS.
- Lampki kontrolne:
- Kontrolky:
- Témoins lumineux :
- Spie luminose:
- Pilotos:
- Jelzőlámpák:
- Kontrollamper:
- APPARATETS PLACERING
- Merkkivalot:
- Indicatie lichten:
- Indikatorlamper:
- Indikator lampor:
- PLACERING AV APPARATEN
- Luzes indicadoras:
- CONTACT
Brand : Royal Catering
Model : RCWK-8L-AUT
Category : Kettle