RCBM-30CF - Kettle Royal Catering - Free user manual and instructions
Find the device manual for free RCBM-30CF Royal Catering in PDF.

| Product type | Brewing Kettle / Beer Fermenter |
| Brand | Royal Catering |
| Model | RCBM-30CF |
| Capacity | 30 liters |
| Rated voltage | 230 V ~ 50 Hz |
| Rated power | 2500 W |
| Temperature range | from 25 °C to 100 °C (adjustable in 0.1 °C increments) |
| Operating time range | 0 to 180 minutes |
| Dimensions (with lid) | ∅ 360 × 600 mm |
| Net weight | 9.6 kg |
| Material | Stainless steel (kettle and strainer) |
| Main functions | Beer brewing (mashing, lautering, boiling) |
| Operating modes | Manual and automatic (up to 9 programmable steps) |
| Centrifugal pump | Integrated, allows wort circulation |
| Hop addition reminders | Up to 9 programmable reminders in the boiling cycle |
| Recipe programming | Up to 10 storable recipes |
| Display | Digital screen (temperature, power, timer) |
| Safety | Overheating protection (safety thermostat), hot surface warning |
| Maintenance and cleaning | Clean after each use; rinse pump with water; do not immerse unit |
| Included accessories | Top and bottom strainers, central tube, overflow tube, extended filter, drain valve |
| Standards | CE, food contact |
Frequently Asked Questions - RCBM-30CF Royal Catering
User questions about RCBM-30CF Royal Catering
0 question about this device. Answer the ones you know or ask your own.
Ask a new question about this device
Download the instructions for your Kettle in PDF format for free! Find your manual RCBM-30CF - Royal Catering and take your electronic device back in hand. On this page are published all the documents necessary for the use of your device. RCBM-30CF by Royal Catering.
USER MANUAL RCBM-30CF Royal Catering
natural_image
Abstract line drawing of stylized human figures and foliage (no text or symbols)| Deutsch | 3 |
| English | 10 |
| Polski | 16 |
| Česky | 22 |
| Français | 28 |
| Italiano | 35 |
| Español | 41 |
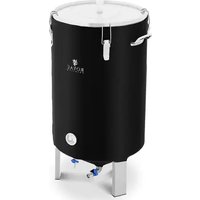
PRODUKTNAME BIERBRAU SET MAISCHEKESSEL 50L BIERBRAU SET MAISCHEKESSEL 30L
PRODUCT NAME HOME BREW MESH TUN 50L HOME BREW MESH TUN 30L
NAZWA PRODUKTU KOCIOŁ WARZELNY DO PIWA 50L KOCIOŁ WARZELNY DO PIWA 30L
NÁZEV VÝROBKU MLADINOVÝ KOTEL 50L MLADINOVÝ KOTEL 30L
NON DU PRODUIT FERMENTEUR DE BIERE SOL FERMENTEUR DE BIERE SOL
NOME DEL PRODOTTO FERMENTATORE PER BIRRA 50L FERMENTATORE PER BIRRA 30L
| Parameter description | Parameter value | |
| Product name | HOME BREWMESH TUN 50L | HOME BREWMESH TUN 30L |
| Model | RCBM-50N | RCBM-30CF |
| Rated voltage [V/-]/ Frequency [Hz] | 230/50 | |
| Rated power [W] | 3000 | 2500 |
| volume (l) | 50 | 50 |
| Temperature range | from 25°C to 100°C, increments of 6.1°C | |
| Time range (min) | 0-180 | |
| Dimensions [mm] | ∅360x670 with lid | ∅360x600 with lid |
| Weight [kg] | 11 | 9,6 |
- GENERAL DESCRIPTION
The user manual is designed to assist in the safe and trouble-free use of the device. The product is designed and manufactured in accordance with strict technical guidelines, using state-of-the-art technologies and components. Additionally, it is produced in compliance with the most stringent quality standards.
DO NOT USE THE DEVICE UNLESS YOU HAVE THOROUGHLY READ AND UNDERSTOOD THIS USER MANUAL.
To increase the product life of the device and to ensure trouble-free operation, use it in accordance with this user manual and regularly perform maintenance tasks. The technical data and specifications in this user manual are up to date. The manufacturer reserves the right to make changes associated with quality improvement. The device is designed to reduce noise emission risks to a minimum, taking into account technological progress and noise reduction opportunities.
LEGEND
CE The product satisfies the relevant safety standards.
Read instructions before use.
The product must be recycled.
WARNING | or CAUTION | or REMEMBER Applicable to the given situation (general warning sign).
Electric shock warning
The product is intended for contact with food. ATTENTION! Hot surface, risk of bums!
PLEASE NOTE! Drawings in this manual are for illustration purposes only and in some details may differ from the actual product.
The original operation manual is written in German. Other language versions are translations from the German.
2. USAGE SAFETY
ATTENTION! Read all safety warnings and all instructions. Failure to follow the warnings and instructions may result in electric shock, fire and/or serious injury or even death.
The terms "device" or "product" are used in the warnings and instructions to refer to HOME BREW MESH TUN. Do not use in very humid environments or in the direct vicinity of water tanks. Prevent the device from getting wet. Risk of electric shock! Do not put your hands or other items inside the device while it is in use! Do not cover the ventilation openings!
2.1. ELECTRICAL SAFETY
a) The plug must fit the socket. Do not modify the plug in any way. Using original plugs and matching sockets reduces the risk of electric shock.
b) Avoid touching earthed elements such as pipes, heaters, boilers and refrigerators. There is an increased risk of electric shock if the earthed device is exposed to rain, comes into direct contact with a wet surface or is operating in a clamp environment. Water getting into the device increases the risk of damage to the device and of electric shock.
c) Do not touch the device with wet or damp hands. d) Use the cable only for its designated use. Never use it to carry the device or to pull the plug out of a socket. Keep the cable away from heat sources, oil, sharp edges or moving parts. Damaged or tangled cables increase the risk of electric shock.
c) If using the device in a damp environment cannot be avoided, a residual current device (RCD) should be applied. The use of an RCD reduces the risk of electric shock.
f) Do not use the device if the power cord is damaged or shows obvious signs of wear. A damaged power cord should be replaced by a qualified electrician or the manufacturer's service centre.
g) To avoid electric shock, do not immerse the cord, plug or device in water or other liquids. Do not use the device on wet surfaces.
h) The socket to which the device is connected must be grounded.
i) Before disconnecting the device's plug from the power supply, first switch off the device.
j) The electrical socket must be secured with a 16 A fuse.
2.2. SAFETY IN THE WORKPLACE
a) Make sure the workplace is clean and well lit. A messy or poorly lit workplace may lead to accidents. Try to think ahead, observe what is going on and use common sense when working with the device.
b) Do not use the device in a potentially explosive environment, for example in the presence of flammable liquids, gases or dust. The device generates sparks which may ignite dust or fumes.
c) If you discover damage or irregular operation, immediately switch the device off and report it to a supervisor without delay.
d). If there are any doubts as to the correct operation of the device, contact the manufacturer's support service.
c) Only the manufacturer's service point may repair the device. Do not attempt any repairs independently!
In case of fire, use a powder or carbon dioxide (CO₂) fire extinguisher (one intended for use on live electrical devices) to put it out.
g) Regularly inspect the condition of the safety labels. If the labels are illegible, they must be replaced.
h) Please keep this manual available for future reference. If this device is passed on to a third party, the manual must be passed on with it.
i) Keep packaging elements and small assembly parts in a place not available to children.
REMEMBER! When using the device, protect children and other bystanders.
2.3. PERSONAL SAFETY
a) Do not use the device when tired, ill or under the influence of alcohol, narcotics or medication which can significantly impair the ability to operate the device.
b) The device is not designed to be handled by persons (including children) with limited mental and sensory functions or persons lacking relevant experience and/or knowledge unless they are supervised by a person responsible for their safety or they have received instruction on how to operate the device.
c) When working with the device, use common sense and stay alert. Temporary loss of concentration while using the device may lead to serious injuries.
d) To prevent the device from accidentally switching on, make sure the switch is on the OFF position before connecting to a power source.
e) Do not overestimate your abilities. When using the device, keep your balance and remain stable at all times. This will ensure better control over the device in unexpected situations.
f) The device is not a toy. Children must be supervised to ensure that they do not play with the device.
2.4.SAFE DEVICE USE
a) Do not use the device if the ON/OFF switch does not function properly (does not switch the device on and off). Devices which cannot be switched on and off using the ON/OFF switch are hazardous, should not be operated and must be repaired.
b) Disconnect the device from the power supply before commencement of adjustment, cleaning and maintenance. Such a preventive measure reduces the risk of accidental activation.
c) When not in use, store in a safe place, away from children and people not familiar with the device who have not read the user manual. The device may pose a hazard in the hands of inexperienced users.
d) Keep the device in perfect technical condition. Before each use check for general damage and especially check for cracked parts or elements and for any other conditions which may impact the safe operation of the device. If damage is discovered, hand over the device for repair before use.
e) Keep the device out of the reach of children.
f) Device repair or maintenance should be carried out by qualified persons, only using original spare parts. This will ensure safe use.
g) To ensure the operational integrity of the device, do not remove factory fitted guards and do not loosen any screws.
h) When transporting and handling the device between the warehouse and the destination, observe the occupational health and safety principles for manual transport operations which apply in the country where the device will be used.
i) Do not move, adjust or rotate the device in the course of work.
j: Do not leave this appliance unattended while it is in use.
k) Clean the device regularly to prevent stubborn grime from accumulating.
I) The device is not a toy. Cleaning and maintenance may not be carried out by children without supervision by an adult person.
m) Do not run the device when empty.
n) it is forbidden to interfere with the structure of the device in order to change its parameters or construction.
o) Keep the device away from sources of fire and heat. p) Do not remove the lid during cooking.
q) During operation of the device, hot steam gathers inside it. Be careful when being near the device and opening the lid. There is a high risk of burns.
ATTENTION! Despite the safe design of the device and its protective features, and despite the use of additional elements protecting the operator, there is still a slight risk of accident or injury when using the device. Stay alert and use common sense when using the device.
3. SCOPE OF APPLICATION
Home brew mesh tun is designed for preparing mash and wort. Do not use the device to:
• cook soups or other drinks:
- warm or heat flammable, noxious, particularly volatile, or any other toxic substances.
The user is liable for any damage resulting from non-intended use of the device!
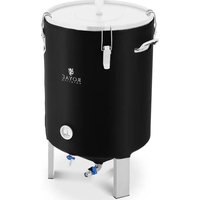
3.1 THE DEVICE
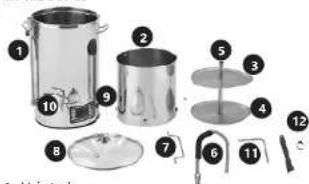
1. Main tank
-
Tank with sieves
-
Top sieve
-
Bottom sieve
-
Central tube
-
Overflow tube (curved)
-
Handle on tank with sieves
-
Lid
-
Pump and device ON / OFF buttons
10 Drain tap
-
Bottom pipe
-
long filter
-
BREWING PREPARATION
- Ensure the device is standing on a safe, stable horizontal surface.
- When full, the device holds hot, boiling liquid, and may weigh up to 40 kg. A stable horizontal position is required to ensure successful pumping during the brewing process. Avoid unstable surfaces.
- Do not move the device during the brewing process. The handles are only designed to transport an empty device.
• Always clean all device elements as hygiene is essential for a successful brewing process.
• To sterilise the accessories, heat up some hot water in the boiler before use.
-
OVERFLOW CHANNEL ASSEMBLY
-
Install the connector B to the bottom sieve.
-
Install the connector A to the connector B.
-
Install the central pipe to the connector A.
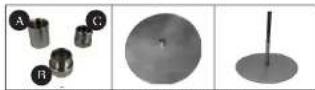
- Install the connector C on the central pipe.
- Install the white cap on the central pipe.
- Place the connected elements in the tank.
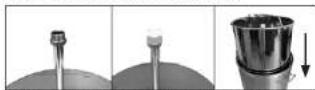
-
After adding water and ingredients, remove the white cap and the connector C.
-
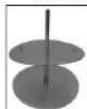
Install the upper sieve with the handles facing up on the central pipe.
- PROGRAMMING SETTINGS
6.1. MANUAL MODE SETTINGS
-
Turn the power on and then press the MANUAL button.
-
Use the TEMP button to set the temperature, POWER button to set the power and the TIMER button to set the process timer - all 3 parameters have to be configured to start the device. You can configure them in any order.
-
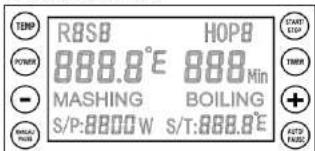
Once all 3 parameters have been configured, press the START button to activate manual mode. The flashing ,H* letter in the top left corner means the device has begun heating up.
-
The pre-programmed default boiling temperature is 100°C, and the Timer will not start before the temperature reaches 100°C. To do that cover with a lid for 1-2 minutes for the display to reach 100°C.
-
When the device begins boiling, but a lower temperature is displayed, perform the following temperature configuration to set the temperature to 100°C and start the Timer.
-
Press the , " and , +" buttons simultaneously until C1/F1 appears on the display. The temperature can be adjusted by between -10°C and +10°C or -50°F to +50°F.
-
Press the Manual/Pause button during the heating process to restore the device to its initial settings. Then the temperate, power and timer settings can be changes. Press the Manual button to continue heating up.
-
To change the temperate units from Celsius to Fahrenheit press and hold the TEMP button for 5 seconds. This stetting can be changed only directly after the device is turned on, before changing any other parameters.
6.2. MEMORY FUNCTION IN MANUAL MODE
-
Press and hold the MANUAL/PAUSE button for 5 seconds in programming mode and then release. This will store the last settings to the memory. A bell will sound once the most recent settings have been saved to memory.
-
Press the START button after performing the above sequence and the device will be ready to be used according to the most recently saved parameters.
-
Press the STOP button to stop the device.
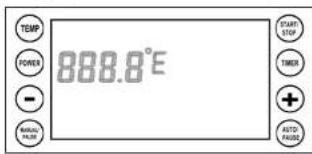
- To restore factory settings, press and hold the AUTO/PAUSE button for 5 seconds in standby mode, as shown below (only the current temperature is shown on the display). A slower bell sounds confirms this operation.
MANUAL/PAUSE
| TEMP | POWER | TIMER |
| To start the device, press the START button. The letter „H“ will flash in the top right corner. | ||
Press the Manual/Pause button during the heating process. The device will restore its initial settings. Now set the temperature, power and time then press the MANUAL button to confirm the new settings.
Press and hold the MANUAL/PAUSE button for 5 seconds and then release. Once the settings have been saved you will hear the sound of a bell.
Press MANUAL once again Press STOP to stop the device and the device will start.
6.3 AUTO MODE SETTINGS
-
Turn on the device then press the AUTO button.
-
ROS1 will be displayed in the top right corner of the display. Enter the following parameters: temperature, time, and power (as above).
-
Once the first step (RDS1) has been configured, press the AUTO button, and configure the second step (RDS2). Programme subsequent steps (3 to 9) analogously to step one and two. The factory settings of the device are such that step 3 is the BOILING procedure and it is the last step of the entire process - once boiling is over the device will stop working. If any additional steps are required between step 2 and the boiling step, then change the temperature setting in step 3 and configure one of the subsequent steps as the boiling process. Remember for the temperature ins subsequent steps to be higher than in the preceding step. In the BOILING stage, POWER and TIMER may also be set. The default temperature is set to 100^ . After setting the power and timer press AUTO - the device will switch to hop adding reminder mode - described in section 9 below.
-
Once all the needed steps have been configured (as required - up to 9 steps), press the START button to confirm all settings. The device will start with ROS1, the first configured step. ROS1 will flash on the display during that time and the device will heat up the water to the temperature set for that step (ROS1). Once the pre-set temperature has been reached, an acoustic signal will sound, ROS1 and MASHING will flash on the display - this is a reminder to add ingredients. Once the ingredients have been added, press AUTO and the device will continue with step ROS1 - heating at a pre-set temperature and for a pre-set time. Once step ROS1 ends, the device will move onto the next step - ROS2 and so on until the last configured step which should entail BOILING.
-
Only one boiling process may be programmed – once complete no more steps will be performed. The boiling POWER can be set during operation.
-
When the ROS1 step is completed, the device will sound a reminder. The program will not go to the next step until the AUTO button is pressed. This is a reminder to add ingredients.
-
The reminder in the BOILING step works on a similar principle to the reminder to add ingredients. Once the device ends the step before boiling – an acoustic signal will sound. Press the AUTO button to confirm start of the boiling step. This is a reminder for spraying (sparging).
-
The PAUSE button will stop the device and timer. Now the parameters can be adjusted. Press the AUTO button again to continue operation.
9 To skip the current step in auto mode and go to the next step press the START button.
-
To set a reminder to add hops during the boiling process: during step R053 (BOILING) (according to factory settings, stop R053 is one-set as the boiling step, but any other out of the 9 available steps can be configured as boiling) a reminder to ass hops may be configured (and also its boiling time) once the heating power and boiling time on step R053 (BOILING) have been set, "HOP 1" will be shown on the display and a flashing time value. Use - or - buttons to set the time. In order to add further hop reminders, press the TIMER button - 9 such reminders can be set, however remember that the boiling time (BOILING) has to be longer than the first hop boiling time (HOP1), and the first hop boiling time (HOP1) has to be longer than the second hop boiling time (HOP2) and so on. Therefore, boiling time (BOILING) > hop boiling time HOP1 > hop boiling time HOP2 > hop boiling time HOP3 > hop boiling time HOP4 > hop boiling time HOP5 > hop boiling time HOP6 > hop boiling time HOP7 > hop boiling time HOP8 > hop boiling time HOP9. Press the START button to begin heating.
-
Press and hold the POWER and TIMER buttons for 5 seconds with the display empty to switch to recipe selection mode. Press "or "to choose the required recipe. Up to 10 recipes may be pre programmed. Press the Start button to select the chosen recipe, the display will be empty, then press the AUTO/PAUSE button to enter recipe edition mode. Press the START button to begin the selected recipe immediately or press the AUTO/PAUSE button to edit or check the pre-set programme step-by-step.
-
Press the STOP button to skip all steps and the device will turn off. END will be displayed and a bell will sound for 30s. Press the STOP button again to go into stand-by-mode (empty display).
6.4 MEMORY FUNCTION IN AUTO MODE
-
Once all parameters have been set in Auto mode, press the STOP button until the display is empty. Do not turn the device off! Follow the step below to save a programme.
-
Press the MANUAL button to enter manual editing mode, then press and hold the MANUAL button for 5 seconds. This will store the last settings to the memory both in manual and auto mode. A bell will sound to confirm that the programme has been saved.
-
Turn the device off and on, then press the AUTO button and step one from the most recently selected programme will appear on the display.
-
Press the START button to activate the device.
- This device does not remember programmes in batches. Each save has to be performed in accordance with the steps described above.
EN
EN
Press AUTO/PAUSE to edit a recipe. Temp/Power/Timer may be set
Press AUTO again to edit/check the next step
Press START (not applicable to the BOILING step), and the device will begin the heating up process. RXSX in top right corner of the display will begin flashing when the device is in use.
Press AUTO during boiling to set the hops reminder.
If you want to skip the hop reminder, press START once again - the device will start heating up.
Press -12 or -12 to set the first reminder (Timer) to add hops. Then press the TIMER button to set the second hop reminder. Press the Timer button again for the third, fourth, fifth, ninth reminder. Given reminders should be set so that the time for the first reminder is shorter than the boiling time but longer that the second reminder time, the second longer than the third, and so on: BOILING>HOP1>HOP2>HOP3>HOP4>HOP5>HOP6>HOP7>HOP8>HOP9 Press the START button to begin heating.
6.5. RECIPE SELECTION IN AUTO MODE
- Press and hold the Power and Timer buttons for 5 seconds when the display is empty to enter recipe selection mode
- Press , " or , +" to choose a recipe. - Press Start/Stop to select the chosen recipe. Do not turn the device off.
- Press the Auto/Pause button to enter options for the selected recipe. Power/Timer/Temp can be edited or press the Start/Stop button to start the device.
7. THE BREWING PROCESS (SAMPLE)
- Clean the device before and after every use - Attach the long filter to the discharge tap (inside the boiler) and pour the required volume of water into the tank.
long filter
- Place the bottom pipe in the pump hole before starting the device to prevent the hole from becoming blocked by malt.
- Heat up the water to 66°C, 60°C, add malt to the tank and then stir gently.
- Activate the circulation pump and once the required temperature has been reached, set the flow stream (follow the steps in the subsequent paragraph).
- The standard heating time for the first mash is 60 minutes (depending on the recipe).
- The temperature and time for the second mash are 76 80^ , and 20 min (depending on the recipe).
- Once the mash is made, gently lift the container with the sieves and place it on the support rings on the ring on the main tank.
- Cool the malt in the basket by spraying it with water. Leave the bask to drip for 10 minutes after spraying.
- Heat up water to boiling temperature (you can do this whilst the basked is dripping) – boiling time is 90 min (depending on the recipe).
- Add hops etc at the correct moment (according to recipe). - Once the wort has boiled, cool it to 20°C. The pour it into the fermentation tank using the tap with the long filter on the front of the tank.
8. CIRCULATION PUMP
- Do not start the pump without water! - Using the pump to pump out wort after cooling is NOT recommended, as there is no filter at pump inlet. This could lead to the brew contaminating the pump, which might potentially damage and clog the system. - Make sure there is water in the boiler before activating the pump.
- Do not activate the pump during wort heating process.
- Close the (blue) valve on the circulation tube. - Insert the curved overflow tube. Press two handles on the connector to lock it in place.
- Now you can start the pumping process. - Use the blue valve to set an appropriate flow rate (if the flow rate is too high, the malt will flow from the sieve to the sieve to the central tube and that might cause the ingredients to burn and the heating element may overheat).
- Select a correct flow rate. - Activate the pump once the mash is ready. Do not remove the (curved) flow tube before closing the valve and switching off the pump!
9. MAINTENANCE
- Clean the device after use. Dry ingredients may adhere to the metal and the pump interior.
- Pour SL 10L of 60°C water into the device for 15 min. Activate the pump when cleaning.
- Do not use sharp tools for scraping leftovers. To clean the device, use a soft cloth or sponge (you may use vinegar)
- Make sure all leftovers are removed before next use. - Rinse the pump by connecting the water hose to the (curved) overflow tube – do not activate the pump
• Appropriate detergents may be used (makes sure to use them in accordance with manufacturer's recommendations)
- Ensure no electrical part of the device get wet
- Do not submerge the device in water.
- Store the device in a dry room.
- Unplug the mains plug and allow the device to cool completely before each cleaning, adjustment or replacement of accessories, or if the device is not being used.
- Use only mild, food-safe detergents to wash the device. - After cleaning the device, all parts should be dried completely before using it again.
10. TROUBLESHOOTING
Ingredients clog up in the pump
A: Flush the pump by connecting the tube to the curved hose
B: Dismantle the pump to remove blockage.
The temperature does not reach 100°C
A: Cover with lid for 1 – 2 minutes. B: Adjust temperature settings.
C1 temperature adjustment in Celsius
A: Press, ^* and ^+ simultaneously in C1 temperature adjustment mode. Temperature can be adjusted by between -10^ and +10^ .
F1- temperature adjustment in Fahrenheit
A: Press and simultaneously in F1 temperature adjustment settings. Temperature can be adjusted by between -50°F to +50°F.
ERR-1 appears on the display
A: The temperature is below -20^ low temperature warning B: The sensor connection is not tight. C: Open the bottom and check the sensor if it is not connected, then re-connect it.
ERR-2 appears on the display
A. The temperature exceeds 120°C – boiler overheated/dry warning. B. Sensor damage – contact your nearest service.
The device switches off by itself during the heating up stage
A: Reduce the heating power. B. Replace safety thermostat (protecting against overheating).
DANE TECHNICZNE
2.2 BEZPIECZENSTWO W MIEJSCU PRACY
- SOLUTIONS AUX PROBLÈMES
NAMEPLATE TRANSLATIONS
| 1 Importer: expondo Polska sp. z o.o. sp. k. ul. Nowy Kielelin-Innowacyjna 7, 66-002 Zielona Góra Poland, EU | |
| 2 Product Name: | |
| 3 Model | |
| 4 Voltage | |
| 5 Frequency | |
| 6 Power | |
| 7 Volume | |
| 8 Production Year | |
| 9 Serial No. | |
| 12345 | ● | ● | ● | ● | |
| DE | Importeur | Produktname | Modell | Spannung | Frequenz |
| EN | importer | Product Name | Model | Voltage | Frequency |
| PL | Importer | Nazwa produktu | Model | Zasilianic | Czystotliwość |
| CZ | Dovuzce | Název vyrobku | Model | Napěti | Frekvence |
| FR | Importateur | Nom du produit | Modèle | Tension | Fréquence |
| IT | Importatore | Nome del prodotto | Modello | Tensione | Frequenza |
| ES | Importador | Nombre del producto | Modelo | Voltaje | Frecuencia |
| 678 | 9 | ● | ● | ||
| DE | Leistung | Kapazität | Produktionsjahr | Ordnungsnummer | |
| EN | Power | Volume | Production Year | Serial No. | |
| PL | Moc | Pojemność | Rok produkcji | Numer serii | |
| CZ | Vykon | Objem nádrže | Rok výroby | Sériowe čista | |
| FR | Puissance | Capacité | Année de production | Numero de serie | |
| IT | Potenza | Capacità | Anno di produzione | Numero di serie | |
| ES | Potencia | Capacidad | Año de producción | Número de serie | |

For the disposal of the device please consider and act according to the national and local rules and regulations.
CONTACT
expondo Polska sp. z o.o. sp. k.