
ER-CDT1 - Lawn mower PANASONIC - Free user manual and instructions
Find the device manual for free ER-CDT1 PANASONIC in PDF.

| Product type | Multi-use trimmer (eyebrows, beard, precision shaver) |
| Brand | Panasonic |
| Model | ER-CDT1 |
| Usage | Household |
| Power supply | Rechargeable battery (quick charge) |
| Run time (quick charge) | Approximately 5 minutes after 3 minutes of charging |
| Interchangeable heads | 3 heads: eyebrow trimmer, beard trimmer, precision shaver |
| Included accessories | Eyebrow comb (4/3/2 mm), eyebrow guard, beard comb (1 mm), protective cap, cleaning brush, lubrication oil |
| Blades | Precision stainless steel |
| Cleaning | Washable with water (head, blade, accessories) |
| Maintenance | Lubrication after each cleaning |
| Safety | Do not use on sensitive or damaged skin, do not share, keep out of reach of children |
| Spare parts | Inner blade, outer blade, frame, head |
| Repairability | Panasonic authorized service center |
| Noise | 68 dB(A) |
| User manual | 107 pages, multilingual (FR included) |
Frequently Asked Questions - ER-CDT1 PANASONIC
User questions about ER-CDT1 PANASONIC
0 question about this device. Answer the ones you know or ask your own.
Ask a new question about this device
Download the instructions for your Lawn mower in PDF format for free! Find your manual ER-CDT1 - PANASONIC and take your electronic device back in hand. On this page are published all the documents necessary for the use of your device. ER-CDT1 by PANASONIC.
USER MANUAL ER-CDT1 PANASONIC
Operating Instructions
(Household use) Detail Shave/Trim Set
Model No. ER-CDT1

1
A
B
natural_image
Line drawing of a mechanical component with a numbered label (3) pointing to a feature on the top surface.©
D
E
G
natural_image
Illustration of hands performing a compression or lifting operation on a cylindrical object (no text or symbols present)F
2
3
4
natural_image
Three-step illustration showing a tool interacting with a brush and a container, no text or symbols present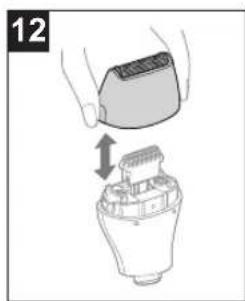
natural_image
Illustration of a hand holding a small electronic component with an arrow indicating rotation (no text or symbols)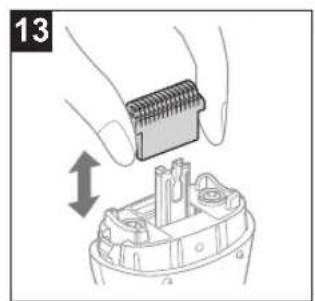
natural_image
Illustration of a hand holding a connector into a mechanical housing (no text or symbols)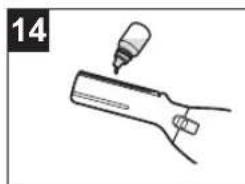
natural_image
Simple line drawing of a hand holding a tool, no text or symbols present
natural_image
Two line drawings of a hand holding a small object, one with a dropper tip and the other with a cap (no text or symbols)| English | 5 | Dansk | 41 | Česky 77 | |
| Deutsch | 11 | Português | 47 | Slovensky 83 | |
| Français | 17 | Norsk | 53 | Magyar 89 | |
| Italiano | 23 | Svenska | 59 | Română 95 | |
| Nederlands | 29 | Suomi | 65 | Türkçe 101 | |
| Español | 35 | Polski | 71 |
Panasonic
Operating Instructions
(Household use) Detail Shave/Trim Set
Model No. ER-CDT1
Contents
Safety precautions.... 6 Maintenance....9
Important information....6 Troubleshooting....10
Parts identification....7 Specifications....10
How to use ....7
Thank you for purchasing this Panasonic product.
Before operating this unit, please read these instructions completely and save them for future use.
Safety precautions
Make sure to follow these instructions.
To prevent accidents, injuries or damage to property, please follow the instructions below.
■ The following chart indicates the degree of damage caused by improper operation.

WARNING
Indicates potential hazard that could result in serious injury or death.

CAUTION
Indicates potential hazard that could result in minor injury or property damage.

WARNING
▶ Preventing accidents
- Do not place within reach of children or infants. Do not let them use it.
- Putting parts or accessories in the mouth may cause an accident or injury.

CAUTION
▶ To protect your skin
- Do not use excessive pressure to apply the system outer foil to your lip or other part of your face.
- Do not apply the system outer foil directly to blemishes or injured skin.
- Do not touch the blade section (metallic section) of the inner blade.
- Doing so may cause injury to skin or hand.
- Do not use in the following cases:
• People with sensitive skin
• People with skin allergies
- On the area with pimples, etc.
- Doing so may result in injury to the skin.
- Use the product only for trimming your eyebrows or beard.
- Failure to do so may cause injury.
- Check the system outer foil for cracks or deformations before use.
- Failure to do so may cause injury to the skin.
- Do not forcefully press the system outer foil.
Also, do not touch the system outer foil with fingers or nails when in use. - Doing so may cause injury to skin or reduce the life of the system outer foil.
▶ Note the following precautions
- To trim your eyebrows, use the eyebrow cover or eyebrow comb.
- Failure to do so may cause eyelashes to be cut.
- Do not share with your family or other people.
- Doing so may result in infection or inflammation.
Important information
- Apply the lubrication oil after each cleaning for it will keep the movement of the blade smooth and maintain a comfortable shave.
-
Note the following precautions to avoid malfunction or deformation.
-
Do not bring the system outer foil into contact with hard objects.
- Do not drop or hit against other objects.
- Store the appliance in a place with low humidity after use.
- Be sure to place the protective cap, eyebrow comb and beard comb on the head when carrying around or storing.
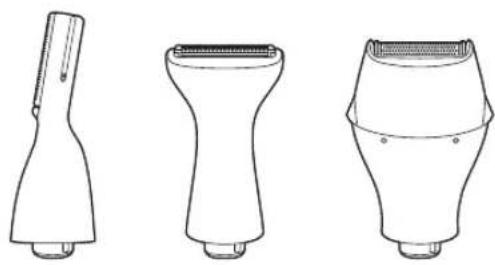
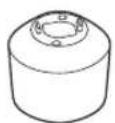
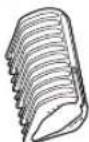
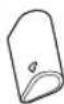
Parts identification (Fig. 1)
▶ Head
A Eyebrow trimmer
① Blade
② Blade locker
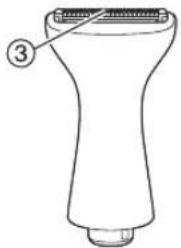
B Beard detail trimmer
③ Blade
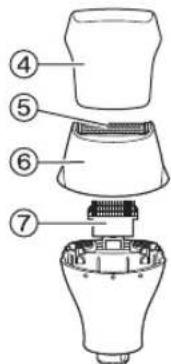
© Detail shaver
④ Protective cap
⑤ Outer foil
⑥ Outer foil frame
⑦ Inner blade
D Connector
▶ Attachments
E Eyebrow comb (4/3/2 mm)
F Eyebrow cover
G Beard comb (1 mm)
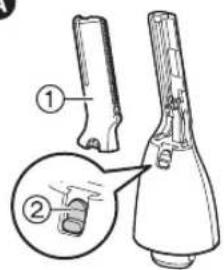
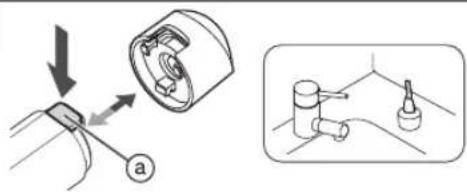
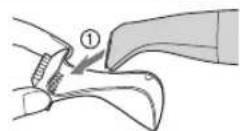
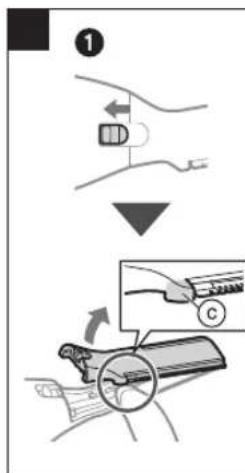
Removing and mounting the connector (Fig. 2)
Remove the connector while pushing the head release button (a).
- Stand the connector when it is removed.
Mount the connector to the main body until it clicks.
Removing and mounting the head (Fig. 3)
- Make sure that the main body is turned off.
Rotate the head in the direction of the arrow to remove or mount it.
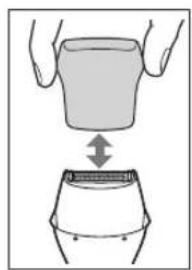
Removing and mounting the attachment (Fig. 4)
- Make sure that the main body is turned off.
Eyebrow comb and eyebrow cover
▶ Removing
Remove it straightly.
▶ Mounting
Align the “● on the eyebrow comb or the “” on the eyebrow cover with the groove (⑥) of the blade, and insert it directly into the blade until a click is heard.
- Clean the appliance after use.
1 Mount the connector to the main body until it clicks.
2 Mount the desired head.
- Mount the desired attachment as needed.
3 Turn on the power.
Note
- The use time after a full charge is as follows.
ER-CBL1: Approximately 70 minutes
ER-CBN1: Approximately 40 minutes
(Based on dry using at 20 °C – 30 °C)
The operating time may differ depending on the frequency of use and the operating method.
Quick charge (ER-CBL1 only)
Even though the battery runs out, you can use for approximately
5 minutes after 3-minute charge.
(This will differ depending on usage.)
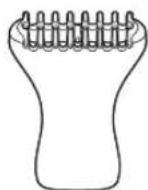
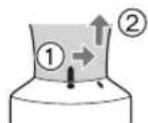
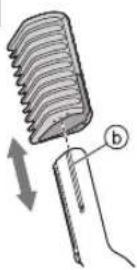
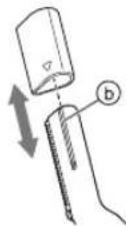
Beard comb
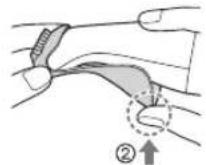
▶ Mounting
1 Insert the head into the beard comb until the edge of blade stops.
2 While securing the beard comb, push it into the head firmly with your fingers until it clicks.
- Make sure that the beard comb does not come off.
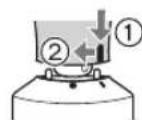
▶ Removing
Pull out the beard comb.
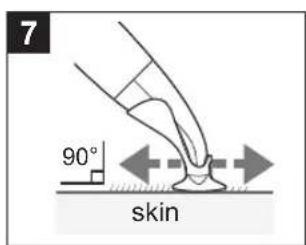
To get a better shave, stretch the skin firmly with your free hand, apply the head or attachment to the skin gently and move the appliance slowly.
- If your hair lies flat on the skin, stroke the hair against the flow to make it stand while shaving.
- Dry trimming is recommended. If the hair is wet, it may be difficult to trim to uniform a length as the hair sticks to the skin or tangles together.
- When trimming your eyebrows, if you change the shape too much, your face will look very different, so adjust it gradually.
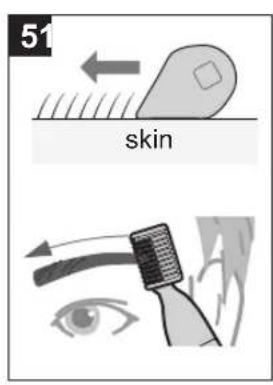
Eyebrow comb (Fig. 5)
Align the eyebrow comb with your eyebrow, and move it from the tail to the start of eyebrow.
Repeat this step until the eyebrows are trimmed to the desired length.
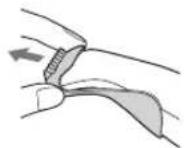
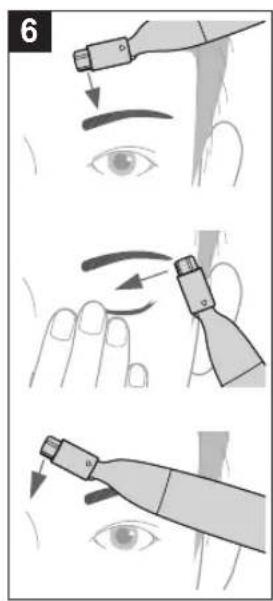
Eyebrow cover (Fig. 6)
- Above the eyebrows
Stop trimming at about 2 mm to 3 mm to the side of the eyebrow.
• Below the eyebrows
Press the eyelid gently and stretch the skin while trimming.
- Between eyebrows
Trim in the direction of the arrow.
- It is easier to trim the eyebrows if you paint the eyebrows before trimming.
Move in the direction of the arrow to trim the hair.
- The illustration shows how to use with the attachment.
- It can also be used without the attachment.
Move in the direction of the arrow to trim the hair.
- If your hair is long, it may be difficult to get a close shave. Please cut the hair to 1.5 ~mm or less with the beard detail trimmer.
Maintenance
- Make sure that the main body is turned off.
• After cleaning, store the head with protective cap, eyebrow comb and beard comb attached.
How to clean
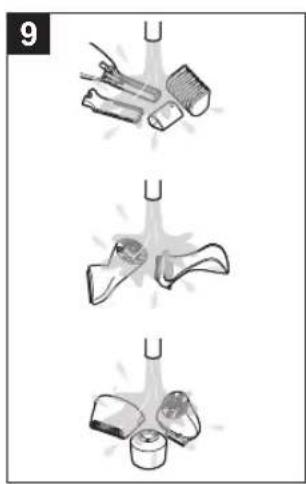
▶ With water
- Remove the connector, head, attachment, outer foil frame and blade*. *Blade : For eye brow trimmer
- Rinse them with running water. (Fig. 9)
- Shake up and down several times to remove the water.
- Be careful not to hit the appliance on the sink or any other object while draining the water.
- Wipe off the water with a dry cloth and dry it well.
- Allow the head to dry in the shade, avoid direct sunlight.
- Do not dry the appliance with a dryer or a fan heater.
Notes
- Do not wipe with thinners, benzine, alcohol etc. Doing so may cause malfunction, or cracking or discoloration of the parts.
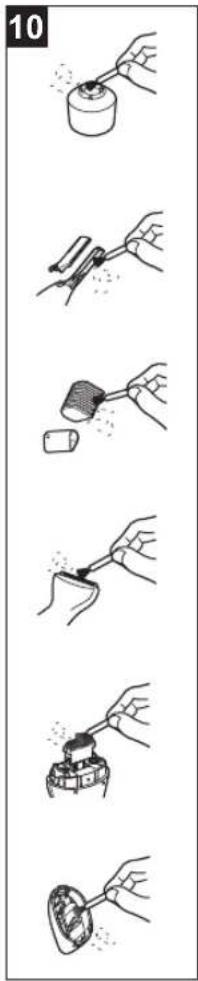
▶ With the cleaning brush
- Remove the attachment, outer foil frame and blade*. *Blade : For eye brow trimmer
- Brush off any hair trimmings. (Fig. 10)
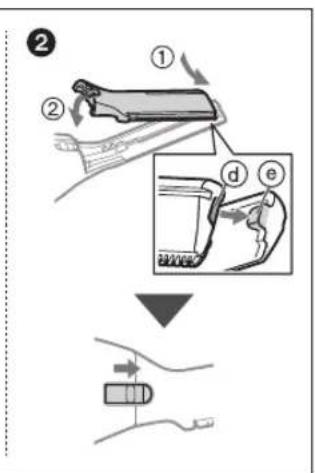
Removing and mounting the blade
- Make sure that the main body is turned off.
▶ Removing (Fig. 11-①)
1 Slide the blade locker as indicated by the arrow.
- It is easier to slide it with your nail.
2 Remove it in the arrow direction.
- You can remove it easily by raising the protrusion (c) with your fingernail.
- Be careful not to drop the blade.
▶ Mounting (Fig. 11-②)
1 Insert the tiny hook (e) on the top of the head into the hole (d) of the blade.
2 Slide the blade locker as indicated by the arrow.
- It is easier to slide it with your nail.
Removing and mounting the frame (Fig. 12)
- Make sure that the main body is turned off.
Remove the frame from the head.
Mount frame to the head until it clicks.
Removing and mounting the inner blade (Fig. 13)
- Make sure that the main body is turned off.
Remove the inner blade from the head.
Mount frame to the head until it clicks.
Lubrication
- Apply one drop of lubrication oil to each of the blade and outer foil. (Fig. 14)
- Turn on the power and allow it to run for a few seconds.
- Turn off the power and wipe off any excess lubrication oil from the blade and outer foil with a soft cloth.
Troubleshooting
| Problem Action | |
| The appliance has become blunt. | Until problems are solved, please follow each procedure as follows;1. Charge the appliance.2. Clean the blade and apply lubrication oil.(See page 9.) |
| Operating time is short. | |
| Appliance stopped functioning. | |
| Blade gets hot. | Clean the blade and apply lubrication oil. (See page 9.) |
| Makes a loud sound. | Confirm that the blade is properly attached. |
| The odor is getting stronger. | This can be improved by cleaning every time after shaving. |
| Shavings fly out in all directions. | This can be improved by cleaning every time after shaving.Clean the inner blades with the brush when shavings are adhering to the inner blades. |
If the problems still cannot be solved, contact your dealer or a service centre authorized by Panasonic for repair.
Specifications
| Airborne Acoustical Noise 68 (dB (A) re | 1 pW) |
This product is intended for household use only.
Panasonic
Bedienungsanleitung
ER-CBL1: Environ 70 minutes
ER-CBN1: Environ 40 minutes
Couvre-sourcils (Fig. 6)
▶ Montage (Fig. 11-2)
Rumore aereo 68 (dB (A) re 1 pW)
© Detailscheerapparaat
④ Beschermkap
⑤ Scheerblad
⑥ Scheerbladframe
⑦ Messenblok
D Connector
▶ Opzetstuk
E Wenkbrauwkam (4/3/2 mm)
F Wenkbrauwafdekking
G Baardkam (1 mm)
Bediening
ER-CBL1: Ongeveer 70 minuten
ER-CBN1: Ongeveer 40 minuten
Snelladen (alleen ER-CBL1)
ER-CBL1: Cirka 70 minutter
ER-CBN1: Cirka 40 minutter
Trimming / barbering
▶ Montering (Fig. 11-2)
ER-CBL1: Omtrent 70 minutter
ER-CBN1: Omtrent 40 minutter
Trimming / barbering
Akusticky hluk 68 (dB (A) re 1 pW)
ER-CBL1: Aproximativ 70 minute
ER-CBN1: Aproximativ 40 minute
Panasonic Manufacturing
(Thailand) Co., Ltd.
Navanakorn Industrial Estate Zone 3 No.106 Moo 18
Khlong 1, Khlong Luang, Pathum Thani, 12120, Thailand
YETKILI TEMSILCI
İthalatçı Firma:
Tesan İletişim A.Ş.
© Panasonic Corporation 2024
⑤ EN, DE, FR, IT, NL, SP, DA, PT, NB, SV, FI, PL, CZ, SK, HU, RO, TR
Printed in Thailand
SERCDT130103W A0724-0