AD 7751 - Heating ADLER - Free user manual and instructions
Find the device manual for free AD 7751 ADLER in PDF.

| Brand | Adler |
| Model | AD 7751 |
| Product type | Ceramic heated air curtain |
| Usage | Indoor household only |
| Maximum power | 2000 W (two levels: 1000 W and 2000 W) |
| Supply voltage | 220-240 V ~ 50 Hz |
| Protection rating | IP22 |
| Adjustable thermostat | Yes, from 10 °C to 49 °C |
| Timer | Yes, from 0 to 12 hours (delayed on/off) |
| Weekly programmer | Yes, up to 6 periods per day |
| Open window mode | Yes, temperature drop detection |
| Remote control | Yes (CR2025 battery not included) |
| Overheat protection | Yes |
| Automatic shutdown | After 12 hours of continuous operation |
| Safety distance | 1 meter from flammable materials |
| Wall mounting | Yes (screws and wall plugs provided) |
| Recommended mounting height | 1.8 m from floor |
| Maintenance | Clean with a soft, damp cloth after unplugging and cooling |
| Included accessories | Remote control, 2 screws, 2 wall plugs, instruction manual |
| Required power supply | Grounded socket 220-240 V |
Frequently Asked Questions - AD 7751 ADLER
User questions about AD 7751 ADLER
0 question about this device. Answer the ones you know or ask your own.
Ask a new question about this device
Download the instructions for your Heating in PDF format for free! Find your manual AD 7751 - ADLER and take your electronic device back in hand. On this page are published all the documents necessary for the use of your device. AD 7751 by ADLER.
USER MANUAL AD 7751 ADLER
natural_image
White ADLER electric heater with digital display and ventilation grille (no text or symbols on body)AD 7751
(GB) user manual 10 (BIH) upute za rad 61
natural_image
Technical line drawing of a mechanical component with a curved top and two side protrusions (no text or symbols)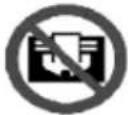 | GB | DO NOT COVER« INSCRIPTION IMPORTANCE The inscription on the device means that the device is not to be covered with clothing, blankets and other textile products which could cause ignition. |
| DE | NICHT ABDECKEN" - BESCHRIFTUNG WICHTIGKEIT Die Beschriftung auf dem Gerät bedeutet, dass das Gerät nicht mit Kleidungsstücken, Decken und anderen Textilien bedeckt werden darf, die eine Entzündung verursachen können. | |
| FR | NE PAS COUVRIR" - IMPORTANCE DE L'INSCRIPTION L'inscription sur l'appareil signifie que l'appareil ne doit pas être recouvert de vêtements, couvertures ou autres produits textiles pouvant provoquer une inflammation. | |
| ES | "NO CUBRIR": IMPORTANCIA DE LA INSCRIPCIÓN La inscripción en el dispositivo significa que el dispositivo no debe cubrirse con ropa, mantas y otros productos textiles que podrían causar una ignición. | |
| PT | "NÃO COBRE" - IMPORTÂNCIA DA INSCRIÇÃO A inscrição no dispositivo significa que o dispositivo não deve ser coberto com roupas, cobertores e outros produtos têxteis que possam causar ignição. | |
| LT | "NEGALIMA" - IRAŠYMAS SVARBU Jrašas ant prietaiso reiškia, kad prietaisas neturi būti padengtas drabužiais, antklodémis ir kitais tekstilès gaminiais, kurie gali sukelti uždegimą. | |
| LV | "NEIZMANTOJIET" - UZRAUDŽIBAS SVARIBA leraksts uz ierices nozímė, ka ierice nav pärklāta ar apgērbu, segām un citiem tekstilizstrādājumiem, kas var izraisīt aizdegšanos. | |
| EST | "ÄRGE KASUTADA" - SISSEJUHATUS TÄHELEPANU Seadmel olev pealkiri tähendab, et seadet ei tohi kanda riideid, tekke ega muid tekstiltooteid, mis võivad põhjustada süttimist. | |
| HU | "NE HASZNÁLÖN" - FELHASZNÁLÁSI FONTOSSÁG A készülék felirata azt jelenti, hogy a készüléket nem borítja ruházat, takaró és egyéb textiltermékek, amelyek gyulladást okozhatnak. | |
| BS | "NEMOJTE POKLOPITI" - NAPOMENA ZNAČAJ Natpis na uređaju znači da se uređaj ne smije prekriti odjećom, dekama i drugim tekstilnim proizvodima koji bi mogli izazvati paljenje. | |
| RO | "NU ĪNTREȚI" - IMPORTANTĂ INSCRIPTIE Inscriptia pe dispozitiv înseamnă că dispozitivul nu trebuie acoperit cu îmbrăcăminte, pături și alte produse textile care ar putea provoca aprinderea. | |
| CZ | NEKLIDUJTE" - DÜLEŽITÉ NÁPRAVY Nápis na zařízení znamená, že zařízení nesmí být pokryté oděvy, přikrývkami a jinými t extilními výrobky, které by mohly způsobit vznícení. | |
| RU | "НЕ ПОКРЫВАЙТЕ" - ВНИМАНИЕ НАДПИСЬ Надпись на устройстве oзначает, что устройство не должно быть покрыто одеждой, одеялами и другими текстильными изделиями, которые могут вызвать возгорание. | |
| GR | "MHN KALYTEPATE" - ЕГГРАФН Σημασία Η επιγραφή στη συσκευή σημαίνει ότι η συσκευή δεν πρέπει να καλύπτεται με ρούχα, κουβέρτες και άλλα κλωτοϊφαντουργικά προϊόντα που θα μπορούσαν να προκαλέσουν ανάφλεξη. | |
| MK | "НЕ ПОВРЗАНИ" - ВАЖНОСТ ЗА НАПРЕДУВАНЬЕ Написот на уредот знани дека уредот не треба да се покрива со облека, їебиња и други текстилни производи што може да предизвикаат палење. | |
| NL | "DO NOT covers" - opschrift BELANG De inscriptie op het apparaat betekent dat het apparaat niet te worden bedekt met kleding, dekens en andere textielproducten die ontbranding kan veroorzaken. | |
| SL | Ne pokrivajte - NAPISNI POMEMBNI napis Napis na napravi pomeni, da naprave ne prekrivajte z oblačili, odejami in drugimi tekstilnimi izdelki, ki bi lahko povzročili vžig. | |
| FI | "ÄLÄ KÄÄNTÄ" - KUVAUS TÄRKEÄÄ Laitteen merkintä tarkoittaa, että laitetta ei saa peittää vaatteilla, peitteillä ja muilla tekstilituotteilla, jotka voivat aiheuttaa syttymistä. | |
| PL | OSTRZEŽENIE: W celu uniknięcia przegrzania – nie przykrywać ogrzewacza Napis na urządzeniu oznacza, že urządzenia nie należy przykrywać odzieżą, kocami i innymi wyrobami tekstylnymi, które mogą spowodować zaplon. | |
| IT | "Non coprire" - ISCRIZIONE IMPORTANZA L'iscrizione sul dispositivo significa che il dispositivo non deve essere coperta con vestiti, coperte e altri prodotti tessili che potrebbero causare l'accensione. | |
| HR | "NEMOJTE POKLOPITI" - NAPISI VAŽNOST Natpis na uređaju znači da uređaj ne smije biti prekriven odjećom, pokrivačima i drugim tekstilnim proizvodima koji bi mogli izazvati paljenje. | |
| SV | "INTE SKYDD" - INSCRIPTION IMPORTANCE Inskriften på enheten innebär att enheten inte ska täckas med kläder, filtar och andra textilprodukter som kan orsaka tändning. | |
| DK | "DÆKK IKKE" - INSCRIPTION IMPORTANCE Indskriften på enheden betyder, at enheden ikke skal være dækket af tøj, tæpper og andre tekstilvarer, der kan forårsage tænding. | |
| UA | "НЕ ПОКРИТТЯ" - ВАЖЛИВІСТЬ ВІДЗНАЧЕННЯ Напис на пристрої означає, що пристрій не повинен бути покритий одягом, ковдрами та іншими текстильними виробами, які можуть викликати займання. | |
| SR | "HEMAOJTE ПОКЛОПИТИ" - НАПОМЕНА ЗНАЧАЛ Натпис на уређају значи да уређај не треба да буде прекривен одећом, ћебадима и другим текстилним производима који могу изазвати пальење. | |
| SK | "NEZAPŘÍNAJE" - DŐLEŽITÉ UPOZORNENIE Nápis na prístroji znamená, že zariadenie by nemalo był pokryté oblečením, prikrývkami a inými textilnými výrobkami, ktoré by mohli spôsobit zapálenie. | |
| AR | "لات tightي "اهمية кни tabanie" يعчи Thenقش المzeugود على الجهاز反之卻 يجب تغطliche الجهاز بالملابس والبHLATANIES ومتتجات المنسوجات الأ franchises qui قد تسبّ الاشتعال. | |
| BG | НЕ ПОКРИВАЙТЕ «ВАЖНОСТ НА НАДПИСА Надписът на устройството означава, че устройството не трябва да бъде покрито с дрехи, одеяла и други текстилни продукти, които могат да причинят запалване. | |
| AZ | "ОРÜLMAYİN" YAZIĞININ ӘHĂMİYBYTÍ Cihazin üzarindaki yazı cihazin alışmağa sabab ola bilacak paltar, adyal va digar tekstil mahsullari ila әrtülmamasi demakdir. | |
| ALB | MOS MBUSH « RÊNDÈSIA E MBISHKRIMIT Mbishkrimi në pajisje do të thotë që pajisja nuk duhet të mbulohet me veshjie, batanije dhe produkte të tjera tekstili që mund të shkaktojnë ndezje. | |
| PL | Ten produkt jest odpowiedni tylko do sporadycznego użytku lub do stosowania w dobrze izolowanych pomieszczeniach. | |
| GB | This product is suitable only for occasional use or for use in well insulated rooms. | |
| D | Dieses Produkt ist nur für den gelegentlichen Gebrauch oder für die Verwendung in gut isolierten Räumen geeignet. | |
| F | Ce produit ne convient que pour une utilisation occasionnelle ou pour une utilisation dans des pièces bien isolées. | |
| E | Este producto es adecuado solo para uso ocasional o para uso en habitaciones bien aisladas. | |
| P | Este produto é adequado apenas para uso ocasional ou para uso em salas bem isoladas. | |
| LT | Šis produktas tinka tik retkarčiais naudoti arba naudoti gerai izoliuotose patalpose. | |
| LV | Šis produkts ir piemērots tikai neregulārai lietošanai vai izmantošanai labi izolētās telpās. | |
| EST | See toode sobib ainult aeg-ajalt kasutamiseks või hästi soojustatud ruumides kasutamiseks. | |
| RO | Acest produs este recomandat doar pentru utilizare ocazionalā sau pentru utilizare în încaperi bine izolate. | |
| BIH | Ovaj proizvod je pogodan samo za povremenu upotrebu ili za upotrebu u dobro izoliranim prostorijama. | |
| H | Ez a termék csak alkalmi használatra vagy jól szigetelt helyiségekben való használatra alkalmas. | |
| GR | To προϊόν αυτό είναι κατάλληλο μόνο για περιστασιακή χρήση ή για χρήση σε καλά μονωμένα δωμάτια. | |
| MK | Овој производ е погоден само за повремена употреба или за употреба во добро изолирани простории. | |
| CZ | Tento výrobek je vhodný pouze pro příležitostné použití nebo pro použití v dobře izolovaných pokojích. | |
| RUS | Этот продукт подходит только для случайного использования или для использования в хорошо изолированных помещениях. | |
| NL | Dit product is alleen geschikt voor incidenteel gebruik of voor gebruik in goed geïsoleerde ruimtes. | |
| SLO | Izdelek je primeren samo za občasno uporabo ali za uporabo v dobro izoliranih prostorih. | |
| HR | Ovaj proizvod je pogodan samo za povremenu upotrebu ili za uporabu u dobro izoliranim prostorijama. | |
| FIN | Tämä tuote sopii vain saturnaiseen käyttöön tai hyvin eristettyihin tiloihin. | |
| S | Denna produkt är endast lämplig för tillfällig användning eller för användning i välisolerade rum. | |
| SK | Tento výrobok je vhodný len na príležitostné použitie alebo na použitie v dobre izolovaných miestnostiach. | |
| I | Questo prodotto è adatto solo per uso occasionale o per l'uso in stanze ben isolate. | |
| SR | Овај производ је погодан само за повремену употребу или за употребу у добро изолираним просторијама. | |
| DK | Dette produkt er kun egnet til lejlighedsvis brug eller til brug i velisolerede rum. | |
| UA | Цей виріб підходить тільки для випадкового використання або для використання у добре ізольованих приміщеннях. | |
| AR | heذا المنتج مناسب فقط للاستخدام العرضي أو للاستخدام في الغرف المعزولة جⁱذاً. | |
| BG | Този продукт е подходящ само за случайна употреба или за използване в добре изолирани помещениях. | |
| AZ | Bu møhsul yalnız təsadüfi istifade üçün və ya yaxşı izolyasiya edilmiş otaqlarda istifade üçün uyğundur. | |
| ALB | Ky produkt është i përshtatshëm vetëm për përdorim të rastësishëm ose për përdorim në dhoma të izoluara mirë. |
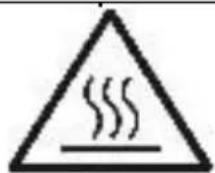
Attention! Hot Surface
| GB | The temperature of the accessible surfaces of the working device can be high. Do not touch the hot surfaces of the device |
| DE | Die Temperatur der zugänglichen Oberflächen des Arbeitsgeräts kann hoch sein. Berühren Sie nicht die heißen Oberflächen des Geräts |
| FR | La température des surfaces accessibles du dispositif de travail peut être élevée. Ne touchez pas les surfaces chaudes de l'appareil |
| ES | La temperatura de las superficies accesibles del dispositivo de trabajo puede ser alta. No toque las superficies calientes del dispositivo. |
| PT | A temperatura das superficies acessíveis do dispositivo de trabalho pode ser alta. Não toque nas superficies quentes do dispositivo |
| LT | Prieinamų darbinio įrenginio paviršių temperatūra gali būti aukšta. Nelieskite karštų prietaiso paviršių |
| LV | Darba ierīces pieejamo virsmu temperatūra var būt augsta. Nepieskarieties ierīces karstajām virsmām |
| EST | Tööseadme ligipääsetavate pindade temperatuur vöib olla körge. Ärge puudutage seadme kuumi pindu |
| HU | A munkaeszköz hozzáférhető felületeinek hōmérséklete magas lehet. Ne érintse meg a készülék forró felületeit |
| BS | Temperatura pristupačnih površina radnog uređaja može biti visoka. Ne dodirujte vruće površine uređaja |
| RO | Temperatura suprafetelor accesibile ale dispozitivului de lucru poate fi ridicată. Nu atingeți suprafetele fierbinti ale dispozitivului |
| CZ | Teplota přistupných povrchů pracovního zařizení může být vysoká. Nedotýkejte se horkých povrchů zařizení |
| RU | Temпература доступных поверхностей рабочего устройства может быть высокой. Не прикасайтесь к горячим поверхностям устройства |
| GR | Η θερμοκρασία των προσβάσιμων επιφανειών της συσκευής εργασίας μπορεί να είναι υψηλή. Μην αγγίζετε τις καυτές επιφάνειες της συσκευής |
| MK | Η θερμοκρασία των προσβάσιμων επιφανειών της συσκευής εργασίας μπορεί να είναι υψηλή. Μην αγγίζετε τις καυτές επηφάνειες της συσκευής |
| NL | De temperatuur van de toegankelijke oppervlakken van het werkende apparaat kan hoog zijn. Raak de hete oppervlakken van het apparaat niet aan |
| SL | Temperatura dostopnih površin delovne naprave je lahko visoka. Ne dotikajte se vročih površin naprave |
| FI | Työlaitteen käsiksipäästävissä olevien pintojen lämpötila voi olla korkea. Älä kosketa laitteen kuumia pintoja |
| PL | Temperatura dostępnych powierzchni działającego urządzenia može być wysoka. Nie dotykać gorących powierzchni urządzenia |
| IT | La temperatura delle superfici accessibili del dispositivo funzionante può essere elevata. Non toccare le superfici calde del dispositivo |
| HR | Temperatura dostupnih površina radnog uređaja može biti visoka. Ne dodirujte vruće površine uređaja |
| SV | Temperaturen på arbetsanordningens tillgängliga ytor kan vara hög. Rör inte vid enhetens heta ytor |
| DK | Temperaturen på arbejdsanordningens tilgængelige overflader kan være høj. Rør ikke ved de varme overflader på enheden |
| UA | Temпература доступних поверхонь робочого пристрою може бути високою. Не торкайтеся гарячих поверхонь пристрою |
| SR | Temпература приступачних површина радног уређаја може бити висока. Не додируйте вруће површине уређаја |
| SK | Teplota pristupných povrchov pracovného zariadenia može byť vysoká. Nedotýkajte sa horúcich povrchov zariadenia |
| AR | يمكن أن تكون درجة حرارة الأسطح التي يمكن الوصول إبهاً لجهاز العمل egالية. لا تلمس الأسطح الساخنة للجهاز |
| BG | Temпературата на достъпните повърхности на работещото устройство може да бъде висока. Не докосвайте горещите повърхности на устройството |
| AZ | İşçi cihazın əlçatan sathlarinin temperaturu yüksak ola bilar. Cihazın isti sathlarina toxunmayın |
| ALB | Temperatura e sipërfaqeve të aksesueshme të pajisjes së punës mund të jetë e lartë. Mos prekni sipërfaqet e nxehta të pajisjes |
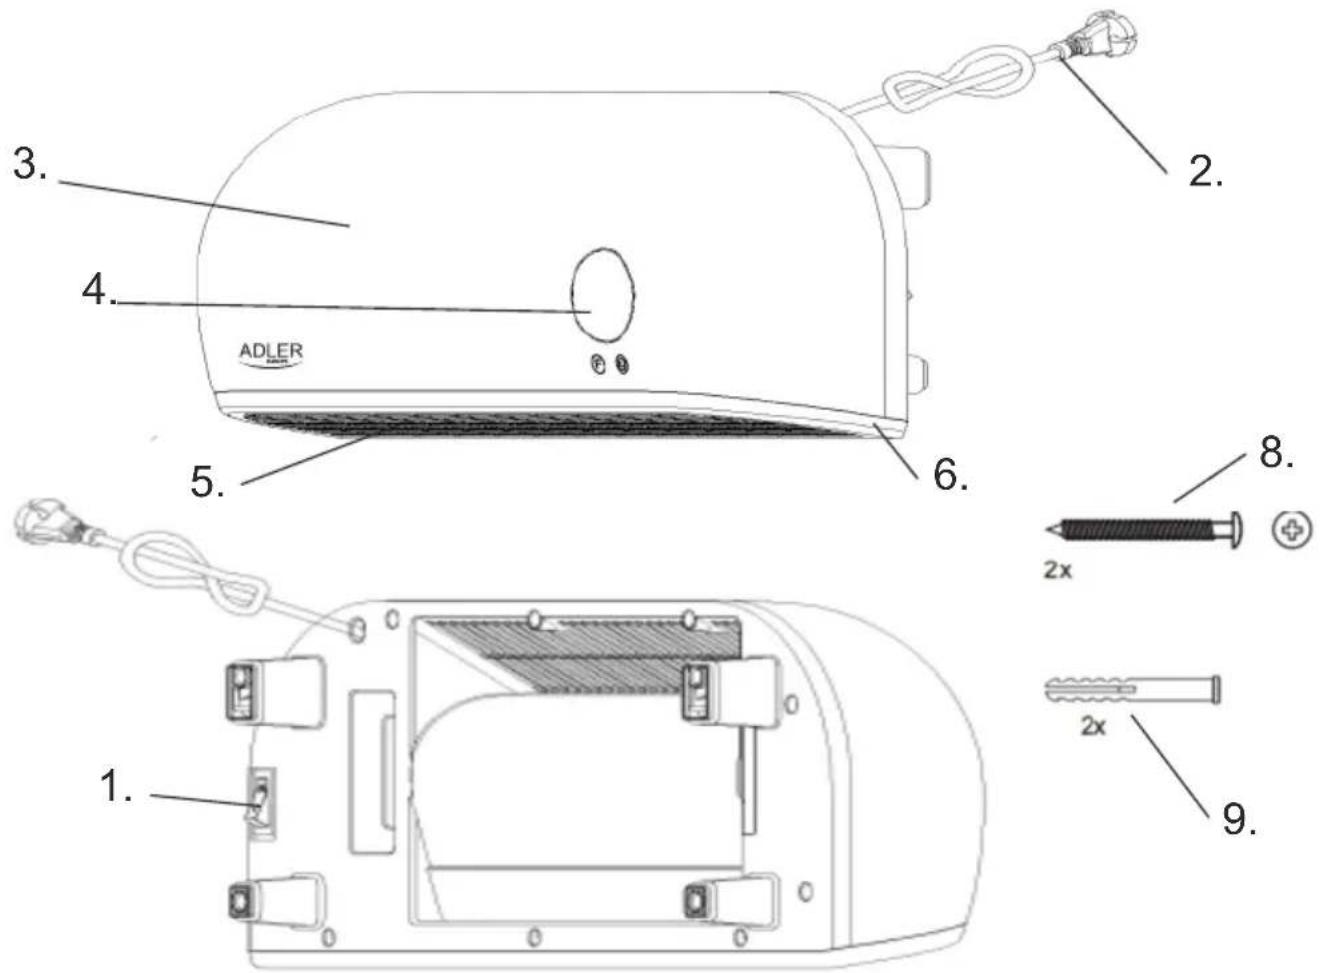
Figure 1
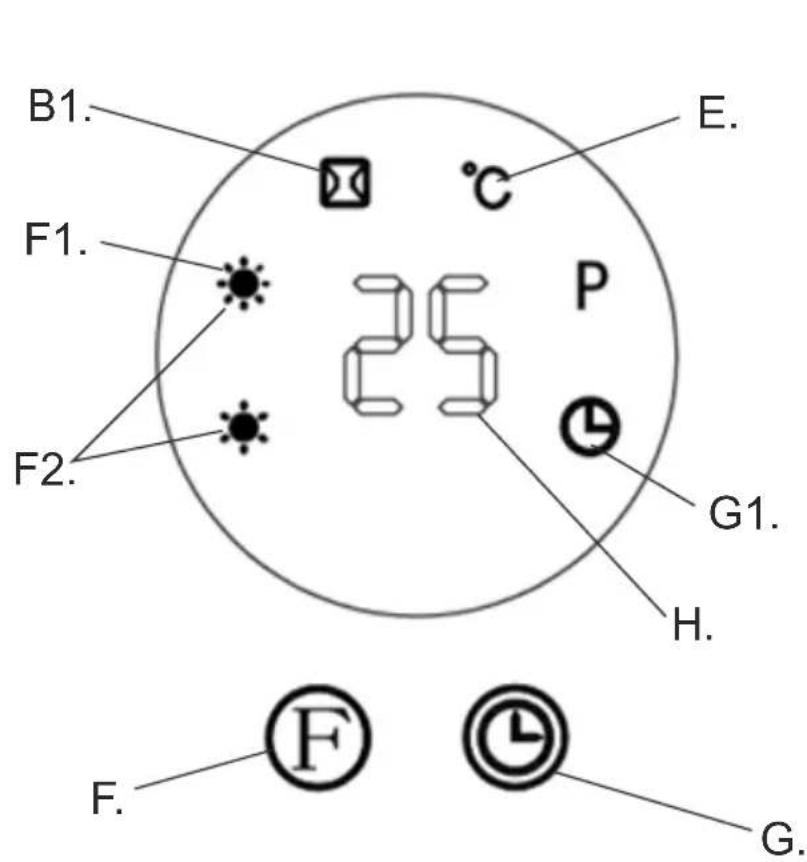
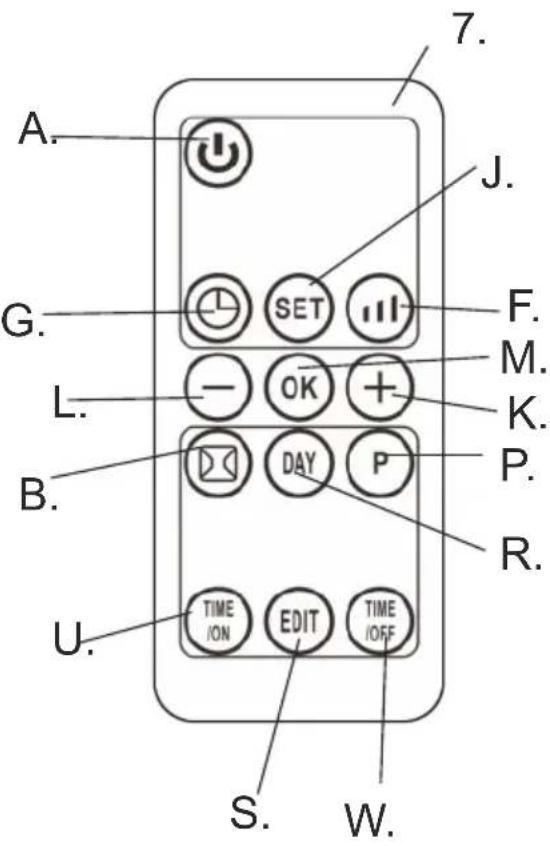
Figure 2
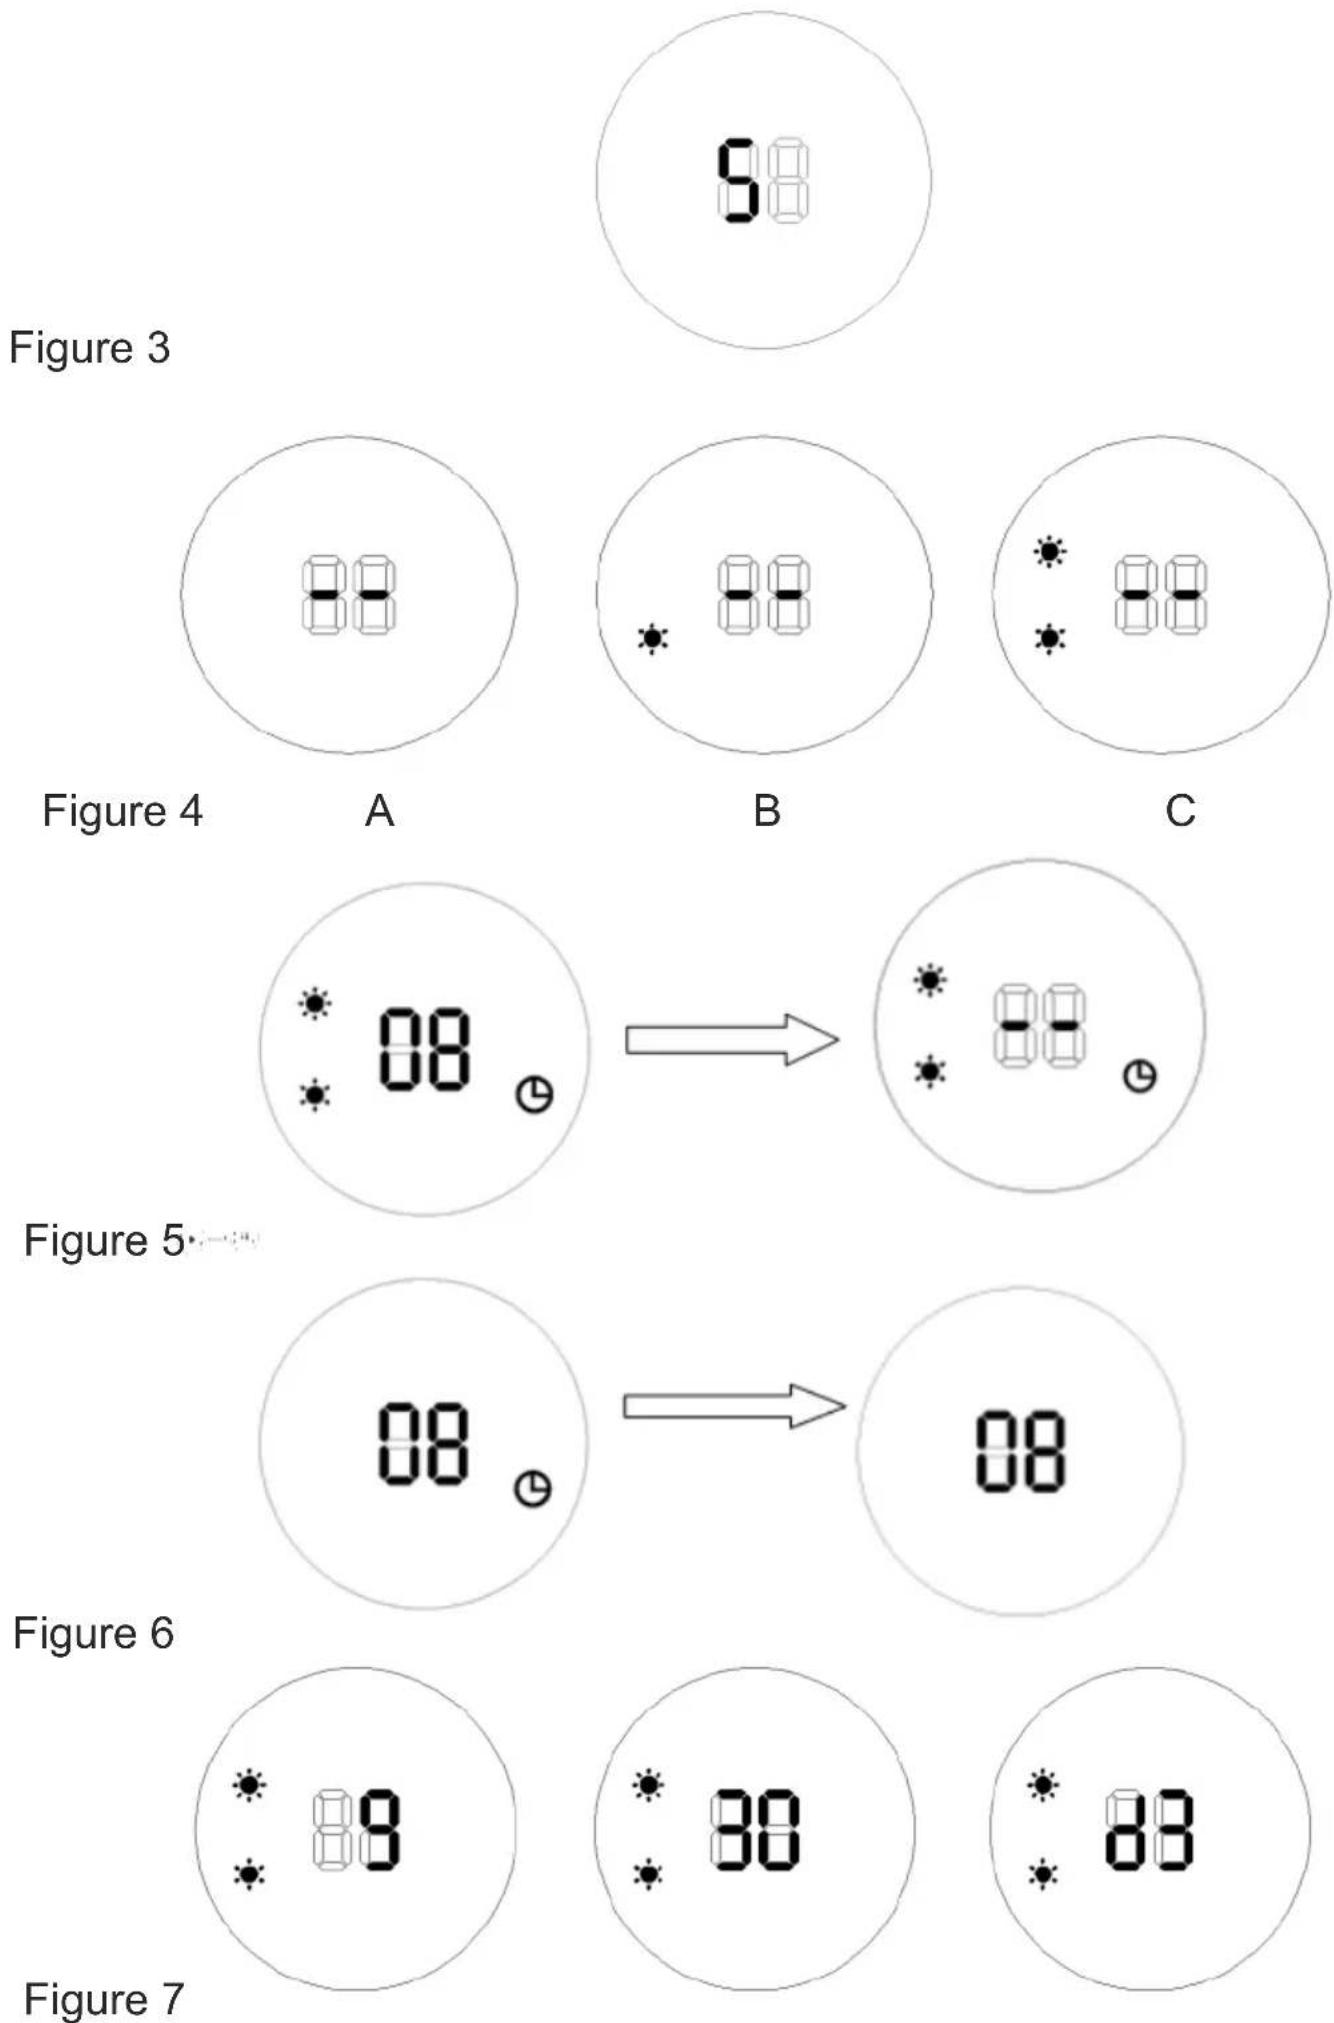
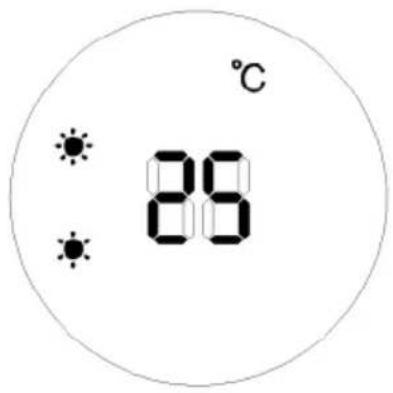
Figure 8
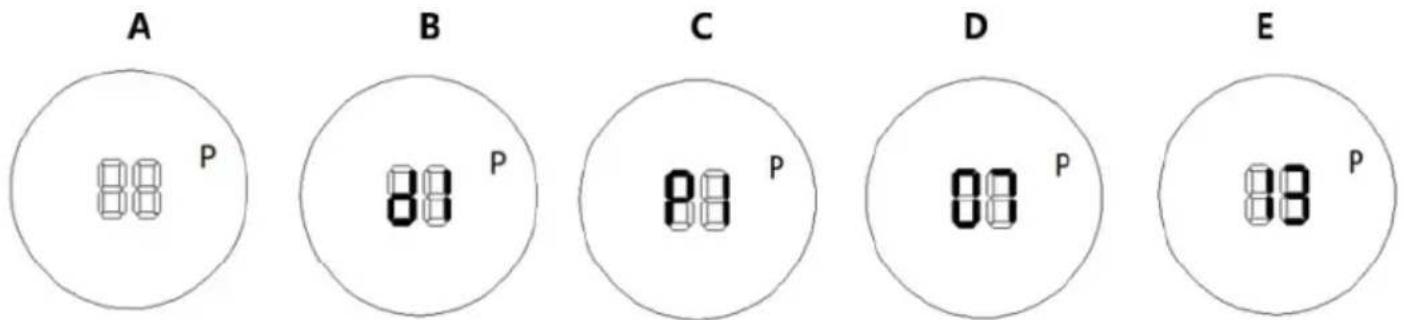
Figure 9
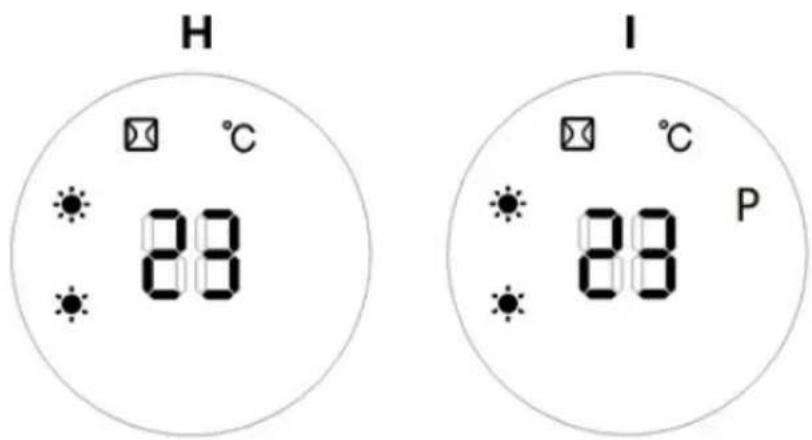
Figure 10
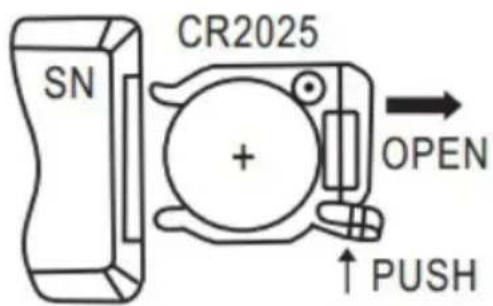
Figure 11
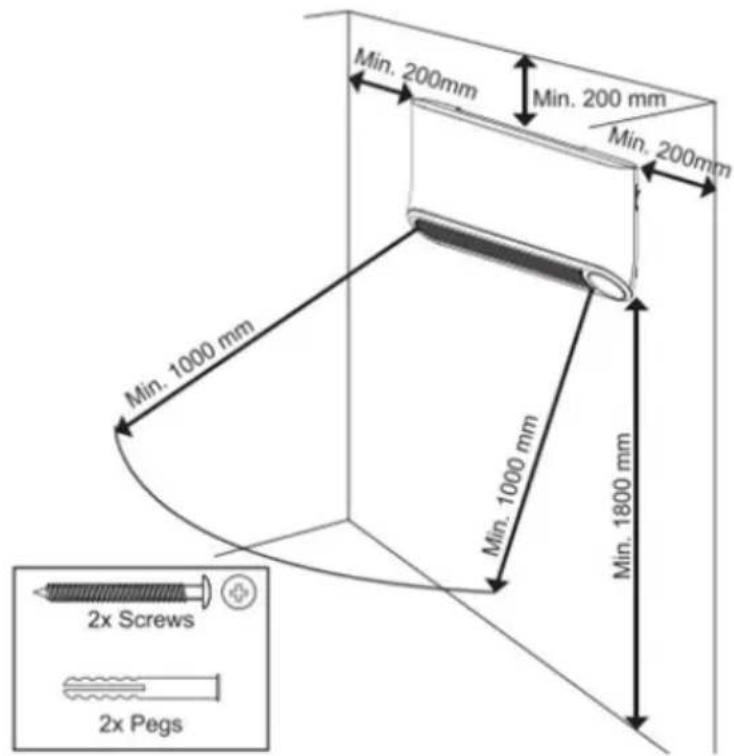
Figure 12
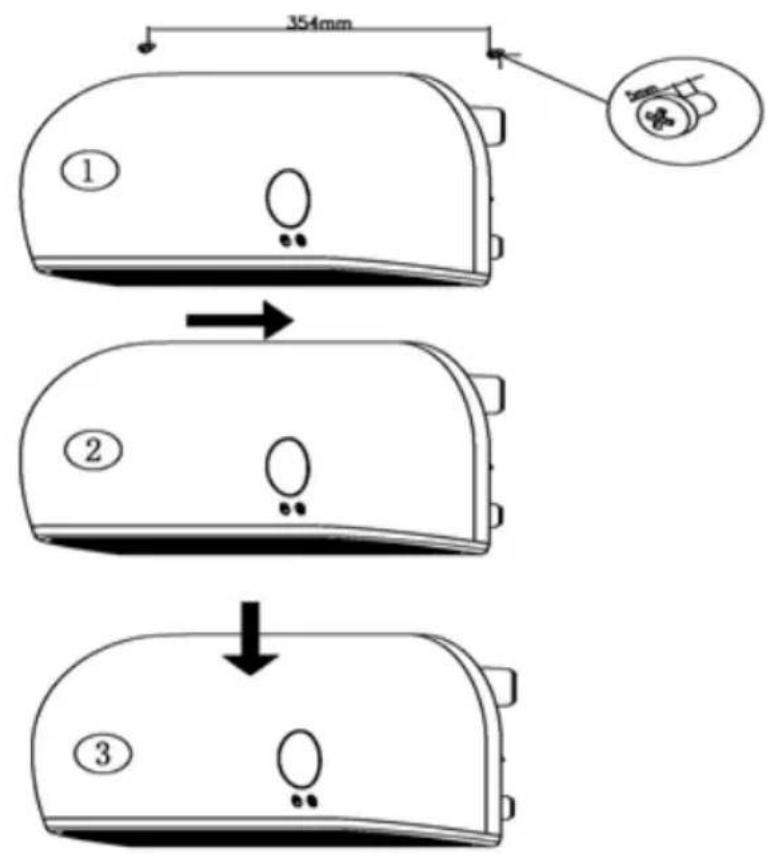
Figure 13
(GB) ENGLISH
ATTENTION:
The device is intended for domestic use only.
The device is NOT intended for commercial / professional use.
The device is NOT suitable for use outdoors.
Attention! Before use, it is essential that you read these operating instructions to avoid accidents and for the correct use of the device. Keep this manual and keep it so that you can easily use it.
I. GUIDELINES FOR SAFETY OF USE
- Before use, check that the voltage specified on the nameplate corresponds to the local parameters of salinity, but remember that the marking: AC- is alternating current and DC is DC.
- Connect the device only to a 220-240V \~ 50/60 Hz grounded outlet.
- Before use, unroll and straighten the power cord
- Make sure that the power cord and plug have no visible damage
- Before and during use, make sure that the power cord is not stretched over an open flame or other source of heat and sharp edges that can damage the insulation of the cable.
- Before first use, remove all packaging components. Attention! In the case of a casing with metal parts, on these elements a slightly visible protective foil can be stretched, which should also be removed.
- The device should not be used by children, persons with limited physical, sensory or mental capacity without the supervision of authorized or experienced persons and always in accordance with these instructions.
- The equipment is not intended for use with external time switches or a separate remote control system.
WARNING: This equipment may be used by children over 8 years of age and persons with limited physical, sensory or mental ability, or persons who have no experience or knowledge of equipment, ONLY if this is done under the supervision of a person responsible for their safety or have been given instructions about the safe use of the device and are aware of the dangers associated with its use.
Children should not play with the equipment. Cleaning and maintenance of the device should not be performed by children unless they are over 8 years of age and are supervised
- Do not leave the device unattended during operation.
- Do not immerse the appliance and the power cord in water or any other liquids.
- When the device is not in use, it should always be disconnected from the power outlet.
-
When pulling the plug from the socket, never pull the power cord by the plug only.
-
Do not put NO METAL ITEMS inside the device
- The manufacturer is not liable for damages resulting from improper use of the device.
- It should be remembered that some parts of the device and the cabinet during work get very hot, so be careful and do not touch them, you can get burned.
- NEVER cover the device during operation or when it does not cool down completely
- Remember that the heating elements of the device take time to cool down completely.
- When using the device, ensure adequate space above and around. The device must not touch any easily flammable objects during work, such as decorations, paper towels, curtains, clothing, etc.
- The heater installed in the bathroom should be installed so that connectors and other regulators can not be touched by a person in the bathtub or under the shower.
- In heaters for high-altitude fixtures, the positions of the different positions of the connectors should be visible from a distance of 1 m
- The labeling for covering the heater should be visible after installing the heater
- You can not place the heater directly under the socket, and near flammable materials such as curtains, curtains, etc.
- The device can not be used with external time switches or other separate remote control systems
- Do not expose the device to atmospheric conditions (rain, sun, etc.) or use in conditions of high humidity (bathrooms, damp camping houses)
- Periodically check the condition of the power cord. If the power cord is damaged, it should be replaced by a specialist repair facility in order to avoid a hazard
- Do not use the device near flammable materials
- The heater must be installed at a height not less than 1.8 m above the floor
- Do not use this heater in the immediate vicinity of a bathtub, shower or swimming pool
- Do not use this heater if it has been dropped
- Do not use if there are visible signs of damage to the heater
- Use the heater on a level and stable surface or attach it to the wall, if provided for by the manufacturer.
WARNING: Do not use this heater in small rooms where there are people who are unable to leave them by themselves, unless constant supervision is ensured.
WARNING: To reduce the risk of fire, keep textiles, curtains or other flammable materials at least 1 m away from the heater air outlet.
It is recommended that the electrical installation be equipped with an automatic residual current circuit breaker with a 30mA starting current for increased safety.
Note: If the power cord or power plug is damaged, it should always be replaced or repaired by a specialized repair shop.
II. WARNINGS
- Never use the device if it is damaged or does not function properly.
- Never use the device if it has fallen from a height before and shows visible signs of damage.
- Do not use extension cords or other electrical outlets that do not meet the applicable standards and electrical regulations.
- Any repairs, dismantling or replacement of any parts should always be made by a specialized facility.
- If the device and elements such as electrical contacts are wet, the plug or cable should be dried before using the device and its components.
- Do not use the device with wet hands.
- When there is a risk that the device has been damaged NEVER try to repair the device yourself.
- Never wash the device under running water or in such a way that water drips into it.
- Do not use accessories that are not recommended by the manufacturer. They may pose a danger to the user and may cause damage to the device.
- Ensure that the device has cooled down before storing.
- Do not touch the housing during use. During operation, use only knobs and switches. After switching off, wait for the device to cool down.
- CAUTION: Some parts of this device may become very hot during operation and cause burns.
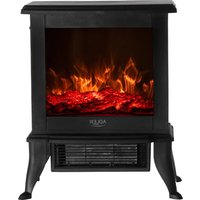
Description of device: air curtain ceramic heater AD7751 – look at Figure 1
1.Main power switch 2.Power cord
3.Front cover 4.Display panel
5.Air outlet 6.Base
7.Remote control 8.Wall mounting screw
- Wall pegs
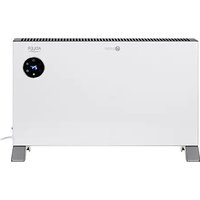
Description of buttons and indicators – look at Figure 2
A. Power button B.Open window mode button E.Temperature setting indicator B1.Open window mode indicator
F.Fan mode selection button F1.Low heating level mode 1000W indicator—one the Sun icon
F2. High heating level mode 2000W indicator – two the Sun icons G. Timer button
G1. Timer indicator indicator H. Digital display
J."SET" button K.Plus button
L.Minus button M.Confirmation button "OK"
P.Weekly programme button R."Day" button
S."Edit" button U. "Time/ON" button
W. "Time/OFF" button
III. Function operation (touch display – manual operation)
-
Plug in and switch on the device by pressing the main power switch (1). Position O – means switch off. Position I means switch on. After switch on, the device enters into standby mode and digital display (H) shows letter S – look at Figure 3.
-
To set up fan mode:
-
press the button (F) first time for room temperature fan operation – display will looks as at Figure 4A.
- press the button (F) second time to heat on low power 1000W - display will looks as at Figure 4B, one the Sun icon is visible.
- press the button (F) third time to heat on high power 2000W - display will looks as at Figure 4C, both the Sun icons are visible.
- press the button (F) forth time to enter into standby mode - display will looks as at Figure 3, letter S (that means standby mode) is visible.
On standby mode the device will operate by 30 seconds with cool fan blowing to let the device cool down inside to ensure long lifetime and switch off the fan.
NOTE: IF OVERHEAT PROTECTION CAUSES THE DEVICE TO SHUT OFF, PLEASE DISCONNECT IT FROM THE PLUG FOR A FEW MOMENTS BEFORE STARTING IT AGAIN.
3. Timer function – manual operation
- To set up the time of device operation before automatic switch off press the button (G) in working status. Repeating pressing the button (G) one time increases one hour timer operation from 00 to 12 hours. After setting desired period, the display will show it for 5 seconds, then resume to previous display and the indicator (G1) will show on the display panel (4). On Figure 5 is shown an example of setting 8 hours.
- To set up the delayed start function, the device need to be in standby mode. Then press the button (G) repeatedly to set up delayed start time in range of 00-12 hours. After completing setting, the display (4) shows the turn-on time and the indicator (G1). When the turn-on time arrived, the device will automatically turn on - start to operate. On Figure 6 is shown an example of set turn-on time to 8 hour.
NOTE: if no setting the temperature and no setting the weekly program, the device will turn off AUTOMATICALLY after 12 hours of continuous operation.
IV. Function operation by remote control (7)
NOTE: During the operation of the remote control (7), the transmitting head must be aligned with the receiving area of the product to avoid insensitivity.
The remote control (7) can be normally used within 3 meters in front of the device and in the left and right angles of 60 degrees.
-
After plug in and switch on the device by pressing the main power switch (1), the device enters into standby mode and digital display (H) shows letter S – look at Figure 3.
-
To set up fan mode:
-
press the button (A) first time for room temperature fan operation – display will looks as at Figure 4A.
- press the button (F) second time to heat on low power 1000W - display will looks as at Figure 4B, one the Sun icon is visible.
- press the button (F) third time to heat on high power 2000W - display will looks as at Figure 4C, both the Sun icons are visible.
- press the button (F) forth time for room temperature fan operation – display will looks as at Figure 4A.
- press the button (F) fifth time to work over and over again, starting with low power 1000W heating.
To switch off the fan mode, press button (A) on remote control (7), then the device enters in standby mode and display will looks as at Figure 3.
- Timer function:
It is operated same way for manual operation and remote control operation. Read point 3 in Chapter III Function operation (touch panel – manual operation).
- Time/Day setting – it is obligatory to set up present time and day to let the device operate in weekly program mode.
The Time/Day setting can be set up on both status when the device is working as well as when the device is on standby mode.
4.1 Press the "SET" button (J) for one time, the display shows "12" as default, press the PLUS button (K) or the MINUS button (L) to set current hour (00 to 23). Next press the "SET" button (J) again, the display shows minute "30" as default, next press the PLUS button (K) or the MINUS button (L) to set current minutes "00 to 59".
4.2 Press the "SET" button (J) again to display the day of week, press the PLUS button (K) or the MINUS button (L) to set current day. You will chose between: d1=Monday, d2=Tuesday, d3=Wednesday, d4=Thursday, d5=Friday, d6=Saturday, d7=Sunday. Then press "OK" button (M) to confirm the setting. The displays show the content before final confirmation. Figure 7 shows an example: Setting to Wednesday, 9:30 a.m.
- Temperature setting
During working status, press the PLUS button (K) or the MINUS button (L), the display shows "23" as default. Press the PLUS button (K) or the MINUS button (L) to set desired temperature (in range 10-49 degree of Celsius), next press "OK" button (M) to confirm the setting. Then the temperature setting indicator (E) will occur on the display. An example: the current ambient temperature is 15 degree of Celsius, after set temperature to 25 degree of Celsius the display is shown at Figure 8.
The temperature level is adjusted by the device automatically according to below working rule is:
-When the temperature different between desired temperature you set up and present room temperature is more than 2 degree of Celsius, the device operates with high heating level power 2000W.
-When the temperature different between desired temperature you set up and present room temperature is less or equal 2 degree of Celsius, the device operates with low heating level power 1000W.
- When the desired temperature you set up and present room temperature are same, the device operates with cool fan for 30 seconds to let it cool down inside and next the device stops operation.
To cancel the temperature setting press fan mode selection button (F) to choose the heating level 1000W or 2000W. The device will
operate without the temperature setting and the temperature setting indicator (E) will disappear from the display and the display will show “--”.
NOTE: when the temperature is not set, the device after 12 hours of continuous operation will cool down itself by cool fan blowing by 30 seconds and the device enters into standby mode automatically.
6. Weekly program setting
After complete setting the current TIME/DAY, below are the steps to set weekly program:
STEP 1: Press the power button (A) on the remote control (7), the device enters into working status.
STEP 2: Press the weekly program button (P), the display (4) shows letter "P" to communicate it enters into weekly program setting.
STEP 3: Press the "DAY" button (R), the display (4) shows "d1", again press "DAY" button (R) repeatedly to set to working day, choose Monday-Sunday: d1\~d7. Example setting for Monday – look at Figure 9B.
STEP 4: Press the “EDIT” button (S), the display shows P1 (first period) as default, again press the “EDIT” button (S) to set time period between P1-P6.
NOTE: The device can only remember 6 time periods as maximum for each working day, while setting any time and adjust temperature. Follow steps 5-7 below to set turn on time and turn off time and desired temperature for each time period (P1-P6).
Example setting P1 – look at Figure 9C:
STEP 5: Press the "TIME/ON" button (U), the display shows "00" as default. Repeatedly press the "TIME/ON" button (U), one pressing increase the time by one hour, to set the turn-off time between 00-24 hours. Example of setting the turn-on time 7:00 a.m. is shown at Figure 9D.
STEP 6: Press the "TIME/OFF" button (W), the display shows the previous turn-on time by default. Repeatedly press the "TIME/OFF" button (W), one pressing increase teh time by one hour to set the turn-off time between 00-24 hours. Example of setting the turn-off time 13:00 p.m. is shown at Figure 9E.
NOTE: Set up time off cannot be earlier than set up time on. When fixed“TIME/ON” is the same as“TIME/OFF”, the device enters into standby mode.
STEP 7: Press the PLUS button (K) or the MINUS button (L) to set the desired temperature from range 10-49 degree of Celsius.
STEP 8: Repeating steps 3-7 above, you can set the weekly program for the working days you want.
STEP 9: Then press the "OK" button (M) to confirm the setting.
10). To cancel the weekly program function, press the weekly program button (P) again, the light "P" on the display will disappear. The weekly program is off.
After the above setting are completed and weekly program is working, you can check with all set up parameters by pressing the "DAY" button (R) to check set working day (d1-d7), by pressing the "EDIT" button (S) to check time periods (P1-P6), by pressing "TIME/ON" button (U) to check the set turn-on time (hour), press "TIME/OFF" button (W) to check desired turn-off time for each period.
NOTE: The device has not got the memory function. After cut the power supplied, the device needs to be reset.
7. Open-window detection mode setting
7.1 Press the power button (A) on remote control (7), the device enters into working status. Let the device to heating, for a moment until stable.
7.2 Press the open window mode button (B), the open window mode indicator (B1) will lighted up, the temperature "23" is displayed by default. Press the PLUS button (K) or the MINUS button (L) to set target temperature. If detected temperature decrease, the device will stop working. Then press the power button (A) to turn on the device.
7.3. Press the open window mode button (B) again to turn off the open-window detection, the open window mode indicator (B1) will disappear from display (4) and the device will resume to previous working mode. An example to set 23 degree of Celsius during open-window detection is shown at Figure 10H.
7.4. When turn on open-window detection mode and weekly program at the same time, during the OFF period of weekly program, the device is designed to doesn't work.
7.5. During the working status of weekly program, the temperature is subject to the setting temperature of open-window detection mode. An example at Figure 10.1.
V. Installation
-
Fix the device horizontally on a vertical wall, the display toward the ground without inclining it. Other position is hazardous.
-
Keep minimum distance without other object / obstruction around installed device as shown at Figure 12.
-
The screws and wall plugs supplied are suitable for solid walls. For all other types of wall, please use suitable screws and wall plugs.
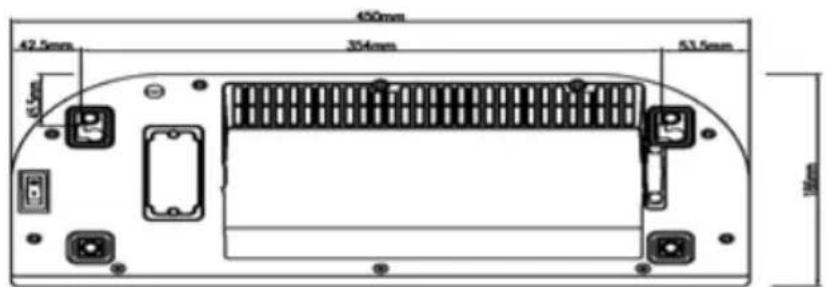
-
Drill two holes in wall and have a distance 354mm and follow up the Figure 13 to hang the device on the wall correctly.
VI. Battery replacement
BATTERY WARNING: KEEP OUT OF REACH OF CHILDREN
The remote control requires 1 piece of CR2025 3V lithium battery (not included).
- Open the battery compartment by sliding the cover down.
- Insert the battery into the battery's chamber – look at Figure 11.
- Close the battery's chamber.
IMPORTANT: Follow the instructions of use and the recycle rules given on the battery packaging.
VII. Cleaning and Maintenance
- Always unplug the device from the power socket and let it cool down before cleaning.
- To prevent risk of fire or electrocution, do not pour water or any other liquid inside the device.
- Do not use aggressive detergents in the form of emulsions, lotions, pastes, etc. to clean the housing. They can, among other things, remove the information graphic symbols, such as signs, warning, etc. Clean the outside wall of the device by rubbing it gently with a soft, damp cloth, either with or without soap.
- Regularly clean the air inlet and outlet vents of the fan.
TECHNICAL DATA:
Voltage: 220-240V \~50Hz
Power: 2000W
IP22: Protected against vertically falling drops of water (condensation).
In set: remote control, 2 wall mounting screws, 2 wall pegs, instruction manual.

WARNING: Do not use this equipment near bathtubs, showers, swimming pools and similar water tanks.
To protect your environment: please separate carton boxes and plastic bags and dispose them in corresponding waste bins. Used appliance should be delivered to the dedicated collecting points due to hazarsous components, which may effect the environment. Do not dispose this appliance in the common waste bin.
(DE) DEUTSCH
BEACHTUNG:
U. Time/ON-painike W. Time/OFF-painike
U. "Time/ON"-knapp W. "Time/OFF"-knapp
III. Funktionsmanövrering (pekskärm – manuell drift)
U. Gumb "Time/ON". W. Gumb "Time/OFF".
ال Consolidный Employment Without The Work (R) (d1-1) -م ------------- : "DAY" (R) -زر على Calibration Information Generation, Ministry of the United States, Ministry of the People's Republic of China, Ministry of the People's Republic of China, Ministry of the People's Republic of China, Ministry of the People's Republic of China, Ministry of the People's Republic of China, Ministry of the People's Republic of China, Ministry of the People's Republic of China, Ministry of the People's Republic of China, Ministry of the People's Republic of China, Ministry of the People's Republic of China, Ministry of the People's Republic of China, Ministry of the People's Republic of China
. Patient from the money of the people who are going to get money.