
PerfectView MC 402 - Rear Camera DOMETIC - Free user manual and instructions
Find the device manual for free PerfectView MC 402 DOMETIC in PDF.

User questions about PerfectView MC 402 DOMETIC
0 question about this device. Answer the ones you know or ask your own.
Ask a new question about this device
Download the instructions for your Rear Camera in PDF format for free! Find your manual PerfectView MC 402 - DOMETIC and take your electronic device back in hand. On this page are published all the documents necessary for the use of your device. PerfectView MC 402 by DOMETIC.
USER MANUAL PerfectView MC 402 DOMETIC
Please read this instruction manual carefully before first use, and store it in a safe place. If you pass on the product to another person, hand over this instruction manual along with it.
Notes on safety, installation and operation can be found in this comprehensive installation and operating manual on our website at dometic.com
1 Safety information
The manufacturer accepts no liability for damage in the following cases:
- Damage to the product resulting from mechanical influences
• Alterations to the product without express permission from the manufacturer - Use for purposes other than those described in the operating manual
1.1 Operating the device safely

WARNING!
- Never play videos while you are driving to avoid dangerous situations in road traffic. Adhere to the country-specific laws and regulations.
- Only use the device in its function as a reversing video system while driving. The driver must not look at the monitor under any circumstances while driving along. This could distract the driver and lead to a serious accident.
- Adjust the volume of the device so that noise from traffic, particularly horns and beeps, are still able to be heard.
- Protect the device from humidity and moisture to prevent sparks, fire or electric shocks.
- Switch off the power immediately if water gets into the device, if smoke is coming out of the device or if it is emitting an unusual smell. Contact the manufacturer (see addresses on the back of the operating manual).
- This reader is certified according to the laser protection class 1. The accessible laser radiation is safe under reasonably foreseeable conditions. Avoid looking directly into the laser beam. Never open the housing of the device. Do not make any repairs to the device. Contact the manufacturer (see addresses on the back of the operating manual).

NOTICE!
- If you use the monitor in vehicles, the vehicle should be running during operation to prevent the vehicle battery from discharging.
- Only insert round discs into the device. Do not use any other shaped discs.
- Only clean the discs with a soft dry cloth from the middle to the outer edge. To remove dirt, use a mild cleaning agent.
- New discs may have flaking on the edges. Remove these by carefully running the side of a ballpoint pen around the edge.
2 O v e r v i e w
2.1 Control elements on the moniceiver
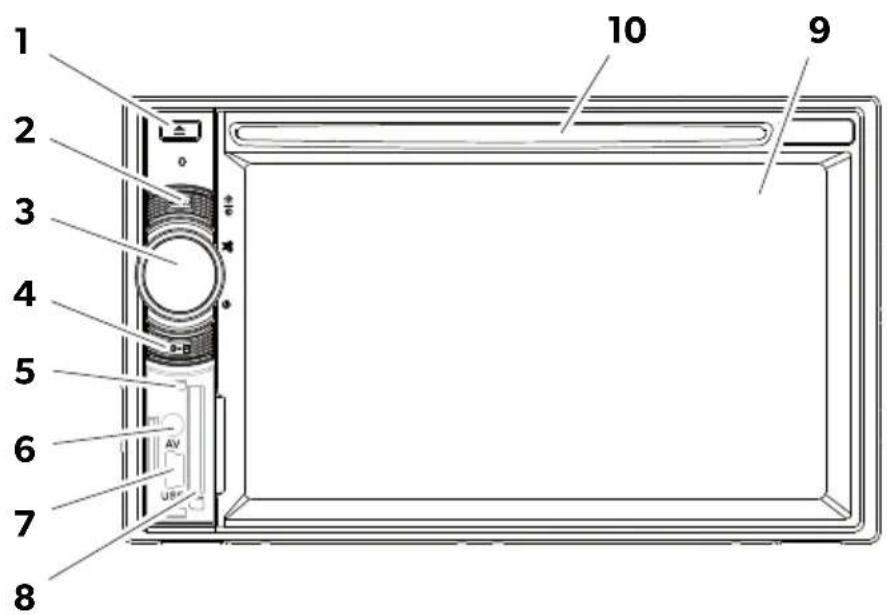
No. Description
1 EJECT button Ejects the disc from the disc
compartment
2 MENU button • Switches between the main menu
and the audio/video source menu
3 ON/OFF/VOLUME knob • Switches the device on and off
- Controls the volume
- Switches to mute
• Controls the brightness
4 BRIGHTNESS button Activates the setup mode for the
brightness of the display
5 RESET button Resets the device
6 AV input
Audio/video input for external device,
3.5 mm stereo jack
7 USB port
Port for USB flash drive
8 Slot for SD or MMC memory card
Slot for memory cards
9 Touchscreen
Display with touch input
10
Disc compartment
Slot for CDs, VDCs and DVDs
2.2 Remote control for the moniceiver
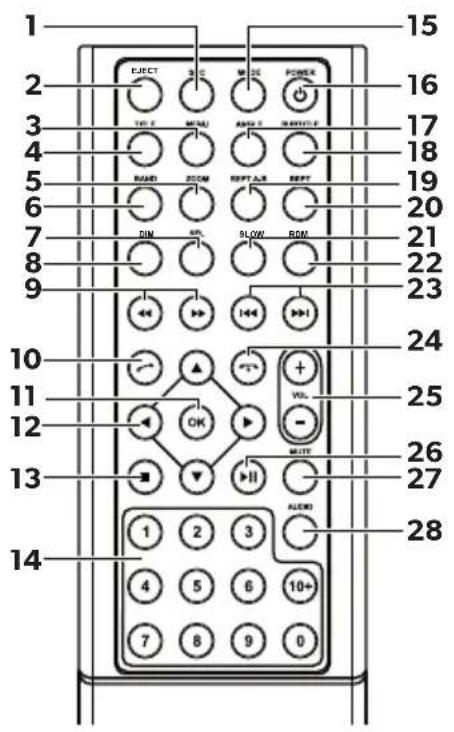
No. Description
1 SRC Selects the audio/video source
- Radio
• Disc - SD/MMC memory card
•USB
• AV-IN 1 (audio input on the front of the device)
• AV-IN 2 (audio input on the back of the device) - Bluetooth
2 EJECT Ejects the disc
3 MENU Displays the DVD menu
4 TITLE Opens the title and chapter list of a DVD
5 ZOOM Zooms (DVD/VCD)
6 BAND Selects the frequency band
7 SEL Opens the EQ SETTINGS menu
8 DIM Sets the brightness
9 << / >> Fast search forwards/backwards
| No. | Description |
| 10 | Making/receiving a call |
| 11 | OK Enter |
| 12 | Navigate on the display▲/▼ |
| 13 | •Stops play•Back |
| 14 | 0-9, 10+ Number pad |
| 15 | MODE Displays the SOURCE menu |
| 16 | POWER Switches on and off |
| 17 | ANGLE Selects the viewing angle for a DVD |
| 18 | SUBTITLE Displays the subtitles on a DVD |
| 19 | REPT A-B Repeats from A - B of a title |
| 20 | REPT Plays again |
| 21 | SLO Plays slowly |
| 22 | RDM Plays tracks in a random order |
| 23 | ◄◄ / ►►Set the radio stationSkip/select track (CD/DVD/VCD) |
| 24 | ○ Hangs up/cancels a call |
| 25 | VOL +/- Adjust the volume |
| 26 | ►II Starts/interrupts playback |
| 27 | MUTE Switches the sound off |
| 28 | AUDIO Sets the language (DVD) |

NOTE
The moniceiver can be operated using the buttons on the device display or using the remote control.
The remote control has an operating range of 3 to 5 metres.
2.3 Initial settings
The moniceiver functions can be opened on three menu pages.
▶ Scroll back and forth on the display with or. The following functions are available:
- R a d i o
- D i s c
- B l u e t o o t h
- R - U S B
- USB/iPod
- A V - I N 1
- A V - I N 2
- SD
- DAB
- SWC
- S e t t i n g s
▶Press the symbol to select the required moniceiver function.
Setting the language
▶ Press SETTINGS to view the settings menu.
▶ Press GENERAL to define the language.
Setting the date and time
▶Press the time twice on the display to change the display.
You select one of two displays:
▶ Press SETTINGS to view the settings menu.
▶ Press TIME to make the settings for the date and time.
▶ Press 📁 on the display or the SEL button on the remote control to set the equalizer.
You can define the EQ mode using parameters such as Bass, Mid, Treble and settings for Fader/Balance.
3 Operating the moniceiver

NOTE
- The moniceiver can be operated using the buttons on the device display or using the remote control.
- An acoustic signal acknowledges the function that is selected. The acoustic signal can be deactivated using the SETTINGS menu. You can find additional information on the settings for this device in the installation and operating manual.
Switching the device on and off
▶ Press the ON/OFF/VOLUME knob or the POWER button on the remote control to switch on the device.
√ The device switches on with the settings which were activated the last time it was used.
▶ Press and hold down the ON/OFF/VOLUME knob for two seconds or press the POWER button on the remote control to switch off the device.
Selecting the audio/video source
▶ Press the MENU button on the device.
√The menu for the required source appears on the display.
You can also select the audio/video source via the remote control. To do this, press the SRC button on the remote control until you have selected the required source.
You can also select the audio/video source via the display. To do this, touch the required source on the display.

NOTE
A source cannot be selected if it is not ready to play. After inserting the storage medium, wait a few seconds until the device has read the available files automatically and shows it on the display.
3.1 Inserting and ejecting a disc
Inserting a disc

NOTE
- The device immediately switches to the correct audio/video source when you insert a disc.
- For discs which contain MP3 or other file formats, it can take a bit longer than a minute to read.
▶ Insert the disc into the disc compartment.
√ LOADING appears on the display while the device is automatically reading the files available on the storage medium.
√ ERROR appears on the display if the disc cannot be played or if an error has occurred when trying to read it.
√ The menu of the respective audio/video source is shown on the display.
Ejecting a disc

NOTE
- You can eject a disc once the device has been switched off.
- The device automatically switches to the previous input source once the disc is ejected.
▶Press the button.
√The disc is ejected from the disc compartment.
√ If the disc is not removed from the device within 10 seconds, it is drawn back into the disc compartment again automatically.
3.2 Inserting and removing a storage medium
Inserting a memory card
▶Open the cover and insert an SD or MMC memory card into the slot until it clicks into place.
√The device reads the files on the memory card and shows them on the display.
Removing a memory card
▶Change the audio/video source.
▶Press the memory card in and release it again.
▶Take the memory card out of the slot and close the cover.
Inserting a USB flash drive
You can connect a USB flash drive to the device.

NOTE
The device can play MP3 files which are stored on a USB flash drive.
▶Open the cover and plug the USB flash drive into the USB port.
√ The device reads the files on the USB flash drive and shows them on the display.
Removing a USB flash drive
▶Change the audio/video source.
▶Take the USB flash drive out of the slot and close the cover.
4 Listening to the radio
The radio has the FM1, FM2, FM3, AM1 and AM2 frequency bands. Six presets are available for each frequency band.
Selecting the radio as audio/video source
▶Select the audio/video source, see chapter "Selecting the audio/video source" on page 9.
Selecting the radio station
▶ Touch one of the P1 to P6 station presets on the display to select the required station.
Searching for a radio station
You can set a radio station manually by using the cursor keys or via the number pad to set the required frequency.
▶Press the button to search for a station manually.
▶ Hold down the ◀◀ / ▶ button for 2 seconds to search for a station automatically.
▶ Press SELECT to enter a radio frequency via the number pad.
Saving the radio station
▶ Press MEMORY to save the currently set station.
▶ Press the SCAN button to search for, and then save, the stations with the strongest signals for the 6 presets of the activated frequency band.
√The station list is displayed.
▶Press the preset for the station to be saved on.
Changing frequency
▶ Press the BAND button to change the frequency band.
5 Coupling Bluetooth devices
The coupling establishes the Bluetooth connection between your Bluetooth device (e.g. mobile phone or audio/video device) and the monicever.
▶ Press the SRC button on the remote control until you have selected Bluetooth.
or
▶ Open the SOURCE menu on the display and select Bluetooth.
▶Switch on the Bluetooth function on your Bluetooth device.
▶ Start searching for available Bluetooth devices by pressing +.
√ The moniceiver starts searching for Bluetooth devices automatically and shows the available devices in a list.

NOTE
Refer to the operating manual of your Bluetooth device.
√ At the same time, your Bluetooth device shows the monoceiver as available in the settings for Bluetooth.
▶Select the moniceiver in the event list on your Bluetooth device.
√ The code for the coupling (factory setting: 0000) is requested.
▶Enter the code in your Bluetooth device.
√The connection is made.
√The Bluetooth symbol lights up.

NOTE
Some mobile phones need to be preset for the Bluetooth connection to be made automatically or not. You need to set your mobile phone so that it connects automatically.
This is how to disconnect Bluetooth connection:
▶ Hold down the Bluetooth button.
√The connection is disconnected.
6 Technical data

NOTE
You can find additional technical data on the individual functions of the moniceiver in the installation and operating manual on our website at dometic.com
| PerfectView MC402 | |
| Ref. no.: 9600000350 | |
| Operating voltage: | 12 V= (10.5 V-15.8 V) |
| Maximum output power: 40 W x 4 channels | |
| Constant output power: 25 W x 4 channels | |
| Fuse: 15 A | |
| Dimensions (W x H x D): 178 x 101.5 x 169 mm | |
| Weight: Approx. 1.9 kg |
Approvals
The device has E4 certification.

| Nr. | Bezeichnung | |
| 10 Anrufen/Anruf annehmen | ||
| 11 OK Eingabe | ||
| 12 Auf dem Display navigieren▲/▼ | ||
| 13 • Wiedergabe stoppen• Zurück | ||
| 14 0–9, 10+ Ziffernbereich | ||
| 15 MODE Menü SOURCE anzeigen | ||
| 16 POWER Ein-/Ausschalten | ||
| 17 ANGLE Betrachtungswinkel für eine DVD auswählen | ||
| 18 SUBTITLE Untertitel einer DVD anzeigen lassen | ||
| 19 REPT A–B Bereich A – B eines Titels wiedergeben | ||
| 20 REPT Erneut wiedergeben | ||
| 21 SLO | Langsam wiedergeben | |
| 22 RDM Titel in zufälliger Reihenfolge wiedergeben | ||
| 23 | ◀◀ / ▶◀ ◆ ◆ ◆ ◆ ◆ ◆ ◆ ◆ ◆ ◆ ◆ ◆ ◆ ◆ ◆ ◆ ◆ ◆ ◆ ◆ ◆ ◆ ◆ ◆ ◆ ◆ ◆ ◆ ◆ ◆ ◆ ◆ ◆ ◆ ◆ ◆ ◆ ◆ ◆ ◆ ◆ ◆ ◆ ◆ ◆ ◆ ◆ ◆ ◆ ◆ ◉ ◉ ◉ ◉ ◉ ◉ ◉ ◉ ◉ ◉ ◉ ◉ ◉ ◉ ◉ ◉ ◉ ◉ ◉ ◉ ◉ ◉ ◉ ◉ ◉ ◉ ◉ ◉ ◉ ◉ ◉ ◉ ◉ ◉ ◉ ◉ ◉ ◉ ◉ ◉ ◉ ◉ ◉ ◉ ◉ ◉ ◉ ◉ ◉ ◉ ◎ ◎ ◎ ◎ ◎ ◎ ◎ ◎ ◎ ◎ ◎ ◎ ◎ ◎ ◎ ◎ ◎ ◎ ◎ ◎ ◎ ◎ ◎ ◎ ◎ ◎ ◎ ◎ ◎ ◎ ◎ ◎ ◎ ◎ ◎ ◎ ◎ ◎ ◎ ◎ ◎ ◎ ◎ ◎ ◎ ◎ ◎ ◎ ◎ ◎ ◞ ◞ ◞ ◞ ◞ ◞ ◞ ◞ ◞ ◞ ◞ ◞ ◞ ◞ ◞ ◞ ◞ ◞ ◞ ◞ ◞ ◞ ◞ ◞ ◞ ◞ ◞ ◞ ◞ ◞ ◞ ◞ ◞ ◞ ◞ ◞ ◞ ◞ ◞ ◞ ◞ ◞ ◞ ◞ ◞ ◞ ◞ ◞ ◞ ◞ ◎ ◎ ◎ ◎ ◎ ◎ ◎ ◎ ◎ ◎ ◎ ◎ ◎ ◎ ◎ ◎ ◎ ◎ ◎ ◎ ◎ ◎ ◎ ◎ ◎ ◎ ◎ ◎ ◎ ◎ ◎ ◎ ◎ ◎ ◎ ◎ ◎ ◎ ◎ ◎ ◎ ◎ ◎ ◎ ◎ ◎ ◎ ◎ ◎ ◉ ◎ ◎ ◎ ◎ ◎ ◎ ◎ ◎ ◎ ◎ ◎ ◎ ◎ ◎ ◎ ◎ ◎ ◎ ◎ ◎ ◎ ◎ ◎ ◎ ◎ ◎ ◎ ◎ ◎ ◎ ◎ ◎ ◎ ◎ ◎ ◎ ◎ ◎ ◎ ◎ ◎ ◎ ◎ ◎ ◎ ◎ ◎ ◎ ◉ ◉ ◉ ◉ ◉ ◉ ◉ ◉ ◉ ◉ ◉ ◉ ◉ ◉ ◉ ◉ ◉ ◉ ◉ ◉ ◉ ◉ ◉ ◉ ◉ ◉ ◉ ◉ ◉ ◉ ◉ ◉ ◉ ◉ ◉ ◉ ◉ ◉ ◉ ◉ ◉ ◉ ◉ ◉ ◉ ◉ ◉ ◉ ◉ ○ ◎ ◎ ◎ ◎ ◎ ◎ ◎ ◎ ◎ ◎ ◎ ◎ ◎ ◎ ◎ ◎ ◎ ◎ ◎ ◎ ◎ ◎ ◎ ◎ ◎ ◎ ◎ ◎ ◎ ◎ ◎ ◎ ◎ ◎ ◎ ◎ ◎ ◎ ◎ ◎ ◎ ◎ ◎ ◎ ◎ ◎ ◎ ◎ ◎ ◌ ◎ ◎ ◎ ◎ ◎ ◎ ◎ ◎ ◎ ◎ ◎ ◎ ◎ ◎ ◎ ◎ ◎ ◎ ◎ ◎ ◎ ◎ ◎ ◎ ◎ ◎ ◎ ◎ ◎ ◎ ◎ ◎ ◎ ◎ ◎ ◎ ◎ ◎ ◎ ◎ ◎ ◎ ◎ ◎ ◎ ◎ ◎ ◎ ◎ ◂ ◎ ◎ ◎ ◎ ◎ ◎ ◎ ◎ ◎ ◎ ◎ ◎ ◎ ◎ ◎ ◎ ◎ ◎ ◎ ◎ ◎ ◎ ◎ ◎ ◎ ◎ ◎ ◎ ◎ ◎ ◎ ◎ ◎ ◎ ◎ ◎ ◎ ◎ ◎ ◎ ◎ ◎ ◎ ◎ ◎ ◎ ◎ ◎ ◎ ◅ ◎ ◎ ◎ ◎ ◎ ◎ ◎ ◎ ◎ ◎ ◎ ◎ ◎ ◎ ◎ ◎ ◎ ◎ ◎ ◎ ◎ ◎ ◎ ◎ ◎ ◎ ◎ ◎ ◎ ◎ ◎ ◎ ◎ ◎ ◎ ◎ ◎ ◎ ◎ ◎ ◎ ◎ ◎ ◎ ◎ ◎ ◎ ◎ ◎ ◾ ◎ ◎ ◎ ◎ ◎ ◎ ◎ ◎ ◎ ◎ ◎ ◎ ◎ ◎ ◎ ◎ ◎ ◎ ◎ ◎ ◎ ◎ ◎ ◎ ◎ ◎ ◎ ◎ ◎ ◎ ◎ ◎ ◎ ◎ ◎ ◎ ◎ ◎ ◎ ◎ ◎ ◎ ◎ ◎ ◎ ◎ ◎ ◎ ◎ ◵ ◎ ◎ ◎ ◎ ◎ ◎ ◎ ◎ ◎ ◎ ◎ ◎ ◎ ◎ ◎ ◎ ◎ ◎ ◎ ◎ ◎ ◎ ◎ ◎ ◎ ◎ ◎ ◎ ◎ ◎ ◎ ◎ ◎ ◎ ◎ ◎ ◎ ◎ ◎ ◎ ◎ ◎ ◎ ◎ ◎ ◎ ◎ ◎ ◎ ◦ ◎ ◎ ◎ ◎ ◎ ◎ ◎ ◎ ◎ ◎ ◎ ◎ ◎ ◎ ◎ ◎ ◎ ◎ ◎ ◎ ◎ ◎ ◎ ◎ ◎ ◎ ◎ ◎ ◎ ◎ ◎ ◎ ◎ ◎ ◎ ◎ ◎ ◎ ◎ ◎ ◎ ◎ ◎ ◎ ◎ ◎ ◎ ◎ ◎ ● ◎ ◎ ◎ ◎ ◎ ◎ ◎ ◎ ◎ ◎ ◎ ◎ ◎ ◎ ◎ ◎ ◎ ◎ ◎ ◎ ◎ ◎ ◎ ◎ ◎ ◎ ◎ ◎ ◎ ◎ ◎ ◎ ◎ ◎ ◎ ◎ ◎ ◎ ◎ ◎ ◎ ◎ ◎ ◎ ◎ ◎ ◎ ◎ ◎ ◚ ◎ ◎ ◎ ◎ ◎ ◎ ◎ ◎ ◎ ◎ ◎ ◎ ◎ ◎ ◎ ◎ ◎ ◎ ◎ ◎ ◎ ◎ ◎ ◎ ◎ ◎ ◎ ◎ ◎ ◎ ◎ ◎ ◎ ◎ ◎ ◎ ◎ ◎ ◎ ◎ ◎ ◎ ◎ ◎ ◎ ◎ ◎ ◎ ◎ ◯ ◎◆◆◆◆◆◆◆◆◆◆◆◆◆◆◆◆◆◆◆◆◆◆◆◆◆◆◆◆◆◆◆◆◆◆◆◆◆◆◆◆◆◆◆◆◆◆◆◆◆◆◆◆◆◆◆◆◆◆◆◆◆◆◆◆◆◆◆◆◆◆◆◆◆◆◆◆◆◆◆◆◆◆◆◆◆◆◆◆◆◆◆◆◆◆◆◆◆◆◆◆►◆◆◆◆◆◆◆◆◆◆◆◆◆◆◆◆◆◆◆◆◆◆◆◆◆◆◆◆◆◆◆◆◆◆◆◆◆◆◆◆◆◆◆◆◆◆◆◆◆◆◆◆◆◆◆◆◆◆◆◆◆◆◆◆◆◆◆◆◆◆◆◆◆◆◆◆◆◆◆◆◆◆◆◆◆◆◆◆◆◆◆◆◆◆◆◆◆◆◆>◆◆◆◆◆◆◆◆◆◆◆◆◆◆◆◆◆◆◆◆◆◆◆◆◆◆◆◆◆◆◆◆◆◆◆◆◆◆◆◆◆◆◆◆◆◆◆◆◆◆◆◆◆◆◆◆◆◆◆◆◆◆◆◆◆◆◆◆◆◆◆◆◆◆◆◆◆◆◆◆◆◆◆◆◆◆◆◆◆◆◆◆◆◆◆◆◆◆◆▶◆◆◆◆◆◆◆◆◆◆◆◆◆◆◆◆◆◆◆◆◆◆◆◆◆◆◆◆◆◆◆◆◆◆◆◆◆◆◆◆◆◆◆◆◆◆◆◆◆◆◆◆◆◆◆◆◆◆◆◆◆◆◆◆◆◆◆◆◆◆◆◆◆◆◆◆◆◆◆◆◆◆◆◆◆◆◆◆◆◆◆◆◆◆◆◆◆◆◆◇ | |

HINWEIS
3 Betjene Moniceiver

MERK
- Moniceiver kan betjenes med knappene, på displayet eller med fjernkontrollen.
- Et akustisk signal kvitterer for valg av ønsket funksjon. Det akustiske signalet kan deaktiveres i menyen SETTINGS. Mer informasjon om innstillingene du kan foreta for enheten, finner du i monterings- og bruksanvisningen.
(Zap/Vyp/Hlasitost')
dometic.com/sales-offices


- Safety information
- Operating the device safely
- WARNING!
- NOTICE!
- O v e r v i e w
- Control elements on the moniceiver
- No. Description
- Remote control for the moniceiver
- NOTE
- Initial settings
- Setting the language
- Setting the date and time
- Operating the moniceiver
- Switching the device on and off
- Selecting the audio/video source
- Inserting and ejecting a disc
- Inserting a disc
- Ejecting a disc
- Inserting and removing a storage medium
- Inserting a memory card
- Removing a memory card
- Inserting a USB flash drive
- Removing a USB flash drive
- Listening to the radio
- Selecting the radio as audio/video source
- Selecting the radio station
- Searching for a radio station
- Saving the radio station
- Changing frequency
- Coupling Bluetooth devices
- or
- Technical data
- Approvals
- HINWEIS
- Betjene Moniceiver
- MERK
Brand : DOMETIC
Model : PerfectView MC 402
Category : Rear Camera