
ICM10W - Ice machine GORENJE - Free user manual and instructions
Find the device manual for free ICM10W GORENJE in PDF.

User questions about ICM10W GORENJE
0 question about this device. Answer the ones you know or ask your own.
Ask a new question about this device
Download the instructions for your Ice machine in PDF format for free! Find your manual ICM10W - GORENJE and take your electronic device back in hand. On this page are published all the documents necessary for the use of your device. ICM10W by GORENJE.
USER MANUAL ICM10W GORENJE
natural_image
White rectangular electronic device with a circular top and label 'DAVANU' on its side (no readable text or symbols beyond branding)- Motor
- Prozorni pokrov
- Mešalna lopatica
- Posoda za sladoled
- Zgornji pokrov
- Ohišje
- Podstavek
UPRAVLJALNA PLOŠČA
natural_image
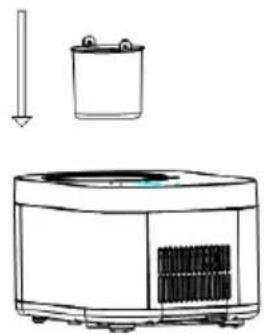
Simple line drawings of a cylindrical object, a 3D cube, and a battery-like container (no text or symbols)2. korak
Nato vstavite posodo v aparat za izdelavo sladoleda. Oba roba posode za sladoled morata biti poravnana z utorom v zgornjem pokrovu.
natural_image
Line drawing of a kitchen appliance with a side panel and a downward arrow (no text or symbols)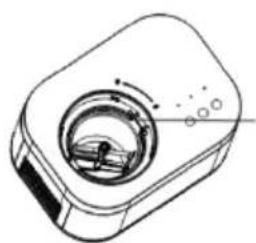
natural_image
Technical line drawing of a mechanical device with no visible text or symbolsnatural_image
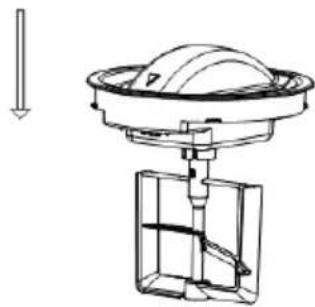
Technical line drawing of a mechanical assembly with a dome-shaped component and circular base (no text or symbols)4. korak
natural_image
Mechanical assembly diagram showing a valve or pump assembly with a downward arrow indicating force (no text or symbols present)5. korak
natural_image
Technical line drawings of a microwave oven and its internal air purifier (no text or symbols)Recepti za sladoled
VANILJEV SLADOLED
| 160 g | polnomastnega mleka |
| 76 g | belega kristalnega sladkorja |
| 120 g | sladke smetane, temeljito ohlajene |
| 0,5–1,5 čajne žličke | čistega vaniljevega ekstrakta, po okusu |
V srednje veliki posodi z ročnim mešalnikom ali metlico stepite mleko in kristalni sladkor, dokler se sladkor ne stopi – približno minuto do dve na nizki hitrosti stepanja. Vmešajte sladko smetano in vaniljev ekstrakt po okusu.
OSNOVNI ČOKOLADNI SLADOLED
| 160 g | polnomastnega mleka |
| 76 g | belega kristalnega sladkorja |
| 160 g | temne grenke ali polgrenke čokolade (izberite svojo najljubšo), nalomljeno na koščke, velike približno 1,2 cm160 g sladke smetane, temeljito ohlajene |
| 160 g | sladke smetane, temeljito ohlajene |
| 0,6 čajne žličke | čistega vaniljevega ekstrakta |
- Motor
- Prozirni poklopac
- Lopatica za miješanje
- Posuda za sladoled
- Gornji pokrov
- Kućište
- Postolje
natural_image
Simple line drawings of a cylindrical object, a 3D cube, and a battery (no text or symbols)2. korak
Zatim umetnite posudu u aparat za izradu sladoleda. Oba ruba posude za sladoled moraju biti poravnani s utorom u gornjem pokrovu.
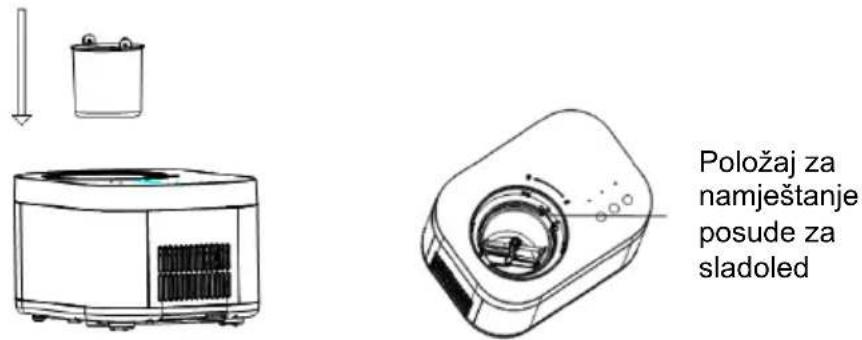
Položaj za namještanje posude za sladoled
3. korak
Sastavite prozirni poklopac i sklop (komponente) motora.
natural_image
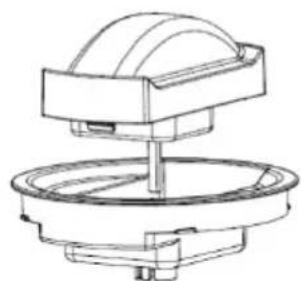
Technical line drawing of a mechanical assembly with a dome-shaped component and circular base (no text or symbols)4. korak
Namjestite lopaticu za miješanje na prozirni poklopac i sklop (komponente) motora.
natural_image
Mechanical assembly diagram showing a rotating component with a curved housing and internal structure (no text or symbols)5. korak
Komponente koje ste sastavili u 4. koraku umetnite u aparat za sladoled. Pri tome pazite da središte izbočine na posudi za sladoled i sklop motora (komponente) lopatice za miješanje budu poravnati u istoj ravnoj liniji. Zaključajte komponente tako da ih okrenete u smjeru kazaljki na satu i provjerite je li trokutasta oznaka na sklopu motora okrenuta u položaj za zaključavanje ("LOCK").

6. korak
Spojite aparat na električnu mrežu, a zatim dodirnite tipku za UKLJUČENJE/ISKLJUČENJE i držite je pritisnutu 1 sekundu. Uređaj se uključi, a signalna lampica trepće crveno. Dodirnite tipku START/STOP . Signalna lampica zasvijetli zeleno i aparat započne s izradom sladoleda.
7. korak
Kada je sladoled pripremljen, dodirnite tipku za UKLJUČENJE/ISKLJUČENJE i držite je pritisnutu 1 sekundu, čime isključujete aparat.
8. korak
natural_image
Technical line drawings of a microwave oven and its internal air purifier (no text or symbols)SLADOLED OD VANILIJE
| 160 g | punomasnog mlijeka |
| 76 g | bijelog kristalnog šećera |
| 120 g | slatkog vrhnja, dobro ohlađenog |
| 0,5–1,5 čajne žličice | čistog ekstrakta vanilije, po ukusu |
- Motor
- Providni poklopac
- Lopatica za mešanje
- Posuda za sladoled
- Gornji poklopac
- Kućište
- Postolje
Kontrolna tabla
natural_image
Simple line drawings of a cylindrical object, a 3D cube, and a battery (no text or symbols)2. korak
Zatim umetnite posudu u aparat za izradu sladoleda. Obe ivice posude za sladoled moraju da budu poravnate s utorom u gornjem poklopcu.
natural_image
Technical line drawing of a mechanical assembly with a dome-shaped component and central shaft (no text or symbols)4. korak
Namestite lopaticu za mešanje na providni poklopac i sklop (komponente) motora.
natural_image
Mechanical assembly diagram showing a rotating component with a downward arrow indicating force or direction (no text or symbols present)5. korak
Komponente koje ste sastavili u 4. koraku ubacite u aparat za sladoled. Pri tome pazite da centar izbočine na posudi za sladoled i sklop motora (komponente) lopatice za mešanje budu poravnati u istoj ravnoj liniji. Zaključajte komponente obrnuvši ih u smeru kazaljki na satu, a nakon toga proverite da li je trouglasta oznaka na sklopu motora obrnuta u položaj za zaključavanje ("LOCK").
6. korak
Spojite aparat na električnu mrežu, a zatim dodirnite taster za UKLJUČENJE/ISKLJUČENJE i držite ga pritisnutog 1 sekund. Aparat se uključi, a signalna lampica trepće crveno. Dodirnite taster
START/STOP . Signalna lampica zasvetli zeleno i aparat započinje s izradom sladoleda.
7. korak
Kada je sladoled pripremljen, dodirnite taster za UKLJUČENJE/ISKLJUČENJE i držite ga pritisnutog 1 sekund, čime isključujete aparat.
8. korak
Obrnite providni poklopac i sklop motora (komponente) u smeru suprotnom od kazaljki na satu. Možda ćete tokom rotacije čuti stružući zvuk, što je uobičajeno. Kada je trouglasta oznaka poravnata s oznakom položaja za otključavanje, uklonite komponente iz posude, a zatim izvadite i posudu iz aparata.
natural_image
Technical line drawings of a microwave oven and its internal air conditioner unit (no text or symbols)SLADOLED OD VANILIJE
| 160 g | punomasnog mleka |
| 76 g | belog kristalnog šećera |
| 120 g | slatke pavlake, dobro ohlađene |
| 0,5–1,5 čajne kašičice | čistog ekstrakta vanile, po ukusu |
U srednje velikoj činiji, ručnim mikserom ili mutilicom umutite i umutite mleko i kristal šećer sve dok se šećer ne rastvori – oko minut do dva minuta na najmanjoj brzini. Umešajte slatku pavlaku i ekstrakt vanile po ukusu.
OSNOVNI SLADOLED OD ČOKOLADE
| 160 g | punomasnog mleka |
| 76 g | belog kristalnog šećera |
| 160 g | tamne gorke ili polugorke čokolade (odaberite svoju najdražu čokoladu), izlomljene na komadiće velike približno 1,2 cm160 g slatke pavlake, dobro ohlađene |
| 160 g | slatke pavlake, dobro ohlađene |
| 0,6 čajne kašičice | čistog ekstrakta vanile |
Zagrejte punomasno mleko dok ne počnu da se stvaraju mehurići duž oboda (to možete da uradite na ringli ili u mikrotalasnoj peći). Čokoladu i šećer isceckajte u blenderu ili mikseru sa metalnom oštricom u uzastopnim kratkim okretima (pulsirajući rad) dok se čokolada ne isecka na veoma sitne komade. Dodajte vruće mleko i ponovo izmiksajte ili isceckajte da smesa bude glatka i dobro izmešana. Stavite u srednju činiju i sačekajte da se čokoladna mešavina potpuno ohladi. Umešajte slatku pavlaku i ekstrakt vanile po ukusu. Preporučujemo da mešavinu najpre ohladite u frižideru približno petnaestak minuta, a zatim krenete u izradu sladoleda.
SLADOLED OD SVEŽIH JAGODA
| 167 g | svežih zrelih jagoda, očišćenih i isečenih na kriške |
| 35 g | sveže istisnutog limunovog soka |
| 76 g | belog kristalnog šećera |
| 160 g | punomasnog mleka |
| 160 g | slatke pavlake |
| 0,6 čajne kašičice | čistog ekstrakta vanile |
U manju činiju stavite jagode, limunov sok i 76 g kristal šećera. Lagano promešajte i ostavite da se jagode natapaju u soku 2 sata.
Старт/Стоп
Копче за вклучување
Избор на режим
Работа
natural_image
Simple line drawings of a cylindrical object, a 3D cube, and a battery (no text or symbols)Чекор 2.
natural_image
Line drawing of a kitchen appliance with a side panel and a downward arrow (no text or symbols)
natural_image
Technical line drawing of a mechanical component with no visible text or symbolsnatural_image
Technical line drawing of a mechanical assembly with a dome-shaped component and circular base (no text or symbols)Чекор 4.
natural_image
Mechanical assembly diagram showing a valve or pump component with internal structure and directional arrow (no text or labels)Чекор 5.
natural_image
Technical line drawings of a microwave oven and its internal air purifier (no text or symbols)Рецепти за сладолед
СЛАДОЛЕД ОД ВАНИЛА
| 160 g | полномасно млеко |
| 76 g | гранулиран шекер |
| 120 g | полномасна павлака, добро оладена |
| 0,5–1,5 кафено лажиче | чист екстракт од ванила, по вкус |
Important safeguards:
When using an electrical appliance, basic safety precautions should always be followed to reduce the risk of fire, electric shock, and/or injury, including the following:
- Please read the instruction manual carefully before use.
- Remove all packing material and carefully check your ice-cream maker to ensure it is in good condition and that the appliance, its power cord and the plug are not damaged.
- Before using the ice cream maker for the first time, please wait 2 hours after positioning it, and keep the transparent lid open for at least 2 hours.
- Do not use tap water in this unit; we recommend using spring water.
- The power cord plug and air outlet should not be drenched in water or other liquid. To prevent electric shock, do not immerse the machine in water or other liquid.
- If the supply cord is damaged, it must be replaced by the manufacturer or its service agent or a similarly qualified person in order to avoid a hazard.
- When not in use or before cleaning, the power plug shall be disconnected from the power socket.
- Do not turn this product upside down or incline it over a 45^ angle.
- To protect against risk of electric shock, do not pour water on cord, plug and vents, and do not immerse the appliance in water or any other liquid.
- Unplug the appliance after use or before cleaning.
- When using, the inlet and outlet should be kept at a certain distance (about 8 cm) from other items, so as not to affect the heat dissipation effect of the machine.
- Any accessories not recommended by the manufacturer may not be used.
- This appliance can be used by children aged 8 years and above and persons with reduced physical, sensory or mental capabilities or lack of experience and knowledge if they have been given supervision or instruction concerning the use of the appliance in a safe way and if they understand the hazards involved. Children shall not play with the appliance. Cleaning and user maintenance shall not be done by children without supervision.
- Do not use the appliance close to flames, hot plates or stoves.
- Do not switch on the power frequently (ensure a 5 min. interval at least) to avoid damaging the compressor.
- To avoid fire and short circuit, do not insert sheet metal or other conductive objects into the appliance.
- When taking out the ice cream, do not knock the surface or the edge of the container to avoid damage to the container.
- Do not start the machine when the ice cream container barrel is not properly installed, or the mixing paddle is not placed properly.
- The initial temperature for making ice cream mixture is 20 ± 3 °C. Do not put the
prepared ice cream mixture into the refrigerator or freezer, and then into the ice cream maker since in this way, the ice cream will solidify ahead of time and the motor will lock. Motor operation will be cut off because the protection circuit will be activated ahead of time.
- After the machine starts freezing, do not remove the motor and transparent cover during the working process.
- This product cannot be used outdoors.
- Do not use chemical washing liquids and hard tools to clean the product. The bowl is not dishwasher safe, do not wash the evaporator directly under water.
- After the operation, please unplug the power plug in time.
- When the indicator light is on red and flashes, this indicates that the appliance is in standby state; when the green light is on, the appliance is operating (in working state); when the green light flashes, the appliance is in insulation state.
- When you turn the ice cream maker on without adding ice cream ingredients, you will hear the mixing paddle slightly scratching the loading bowl, which is a normal phenomenon.
- There are two round copper plates at the motor assembly of the transparent cover installed on the upper cover. When using, please wipe the water stains on the transparent cover and on the copper plates. If the machine is in use and the two copper plates are connected by water, this will lead to power failure of the motor. Disconnect the appliance from power supply, wipe the water stains, and restart it.
- Retain the instruction manual.
- Warning: Do not store explosive substances such as aerosol cans with a flammable propellant in this appliance.
- This appliance is intended to be used in households and similar applications such as:
– staff kitchen areas in shops, offices and other working environments;
– farmhouses and by clients in hotels, motels and other residential type environments;
- bed and breakfast type environments;
– catering and similar non-retail applications.
- When positioning the appliance, ensure the supply cord is not trapped or damaged.
- Do not place multiple portable socket-outlets or portable power supplies at the rear of the appliance
- The refrigerant and insulation blowing gas are flammable. Dispose of the appliance only at an authorized waste disposal centre. Do not expose to flame. R600a.
This symbol indicates that the refrigerant R600a and the non-metallic
materials of the appliance are flammable. It's a warning symbol. Warning: Risk of fire / flammable materials.
WARNING: When positioning the appliance, ensure the supply cord is not trapped or damaged.
WARNING: Do not place multiple portable socket-outlets or portable power supplies at the rear of the appliance.
Children should be supervised to ensure that they do not play with the appliance.
To avoid contamination of food, please respect the following instructions:
- Regularly clean the surfaces that can come in contact with food, and accessible drainage systems.
- If the refrigerating appliance is left empty for long periods, switch it off, defrost, clean, dry, and leave the door open to prevent mould from growing within the appliance.
Regarding the information pertaining to the use of the appliance, please refer to the paragraphs below.
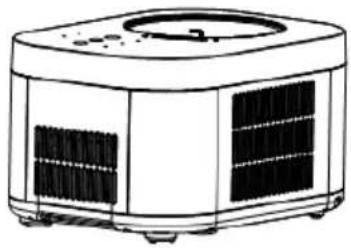
FUNCTIONS & OPERATION
Know your product
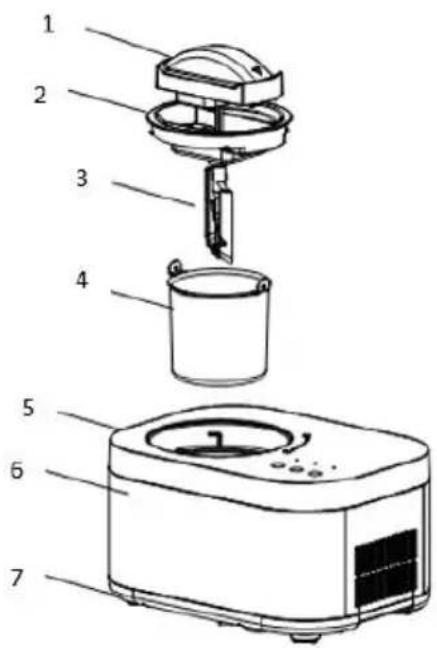
- Motor
- Transparent lid
- Mixing blade
- Loading bowl
- Top lid
- Housing
- Base
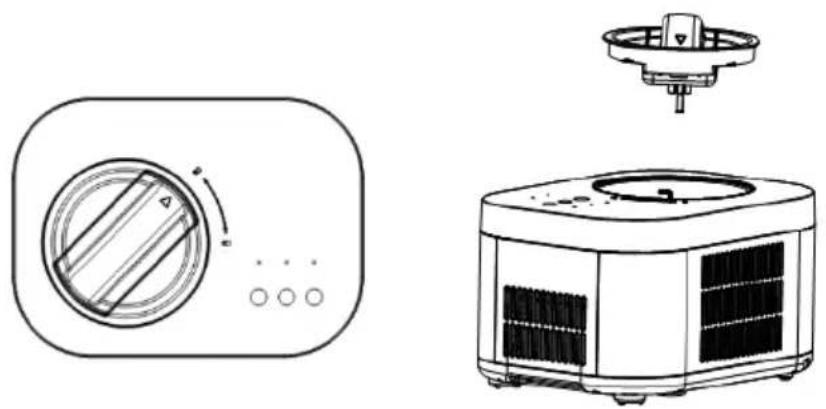
INTRODUCTION OF CONTROL PANEL
(The silkscreen is subject to change without prior notice.)
Ice cream mode
Mixing only mode
Cooling only mode

Start/Stop
Power button
Mode selection
Operation
-
Connect the power supply and plug the power cord into a suitable socket. The shape and voltage of the socket shall be the same as those indicated.
-
Touch control functions
1). Function description of touch buttons
Plug in the power supply and touch the POWER button for 1 second to turn on the machine. The indicator light of ice cream mode flashes red. Then, touch the POWER button for 1 second again to switch off the machine.
② START/STOP TOUCH BUTTON

When the machine is in the start-up state, the indicator light flashes red. If you touch the START/STOP button, the indicator light will switch to green. If you touch the button again, the machine will stop working and the indicator light will flash red. When the machine is in normal working state under ice cream mode, it has not entered the insulation state. At this time, if you touch this button, the indicator light will flash red, the mixing motor of the machine will stop working, and the refrigeration function will stop working after one minute. If you touch this button within one minute, the machine will return to the working state.
③ MODE SELECTION TOUCH BUTTON

When the indicator light of the machine is flashing red, you can select one of three modes by touching this button. However, when the indicator light is green, other modes cannot be selected.
DESCRIPTIONS OF MODES
① Mixing only mode:
When the mixing only mode is selected, the mixing motor starts to operate and the mixing function is activated. The default time is 30 minutes. When the time or hardness reaches the set value, there will be 10 beeps to remind you that mixing is completed. After completion, the machine will enter the standby mode, and the indicator light will flash red. Please select another mode or shut down.
② Cooling only mode
The compressor and cooling fan are started and the refrigeration function is activated. The default time is 10 minutes. After completion, there will be 10 beeps to remind you that the refrigeration is completed. After completion, the machine will enter the standby state, and the indicator light will flash red. Please select another mode or shut down.
③ Ice cream mode
The compressor, mixing motor and cooling fan are started. When the ice cream is ready, there will be 10 short beeps. At this time, you can enjoy the ice cream. If there is no operation, the appliance will enter the insulation function automatically. The indicator light of ice cream mode will flash green, and the appliance will shortly beep 10 times after the insulation is completed. The machine will enter the standby mode and the indicator light will flash red. Please select another mode or shut down.
DESCRIPTION OF THE INDICATOR LIGHT
When the machine is in standby state, the indicator light flashes red. When the machine is in working state, the indicator light is on green. When the machine is in the insulation state, the indicator light flashes green.
KEEP COOL FUNCTION
Ice cream insulation function: If you cannot attend the appliance during the ice cream making process or if you cannot begin to enjoy or store your ice cream when it is ready, another function was added to the appliance to prevent the freshly made ice cream from melting. When the ice cream making process is complete but the appliance is left idle without any operation, the compressor will automatically turn off for 10 minutes and turn on for 6 minutes to maintain the fresh taste and texture of the ice cream. The holding time is 1 hour. During this period, the indicator light of ice cream mode flashes green. When the ice cream mode is finished, there are 10 short beeps, the indicator light flashes red, and the machine is in standby mode.
MOTOR SELF-PROTECTION FUNCTION
The motor has overcurrent protection function. For example, when the hardness of the ice cream reaches a set value, it will stop automatically.
In the ice cream mode and single mixing mode, if the motor components are not installed in place, the buzzer will sound a 10-beep alarm every 30 s, a total of 10 times. If motor components are not installed in place after that, the machine will enter the standby state.
COMPRESSOR SELF-PROTECTION FUNCTION
If the compressor stops from ice cream mode or cooling only mode, and the ice cream mode or cooling only mode is then selected again, the compressor will have a protection time of about 3 minutes. However, after the power cord is plugged in, the machine is restarted by default. At this time, there is no delay in selecting ice cream mode or cooling only mode.
CONTROLLING THE VOLUME OF THE INGREDIENTS
To avoid overflow and waste, please make sure that the ingredients do not exceed 60% of capacity of the removable bowl (Ice cream expands during the ice cream making process).
How to make ice cream
NOTE: Please thoroughly clean all parts that will be in contact with ice cream before use, including the cooling bowl, loading bowl, mixing blade, transparent lid etc.
Before cleaning, you must ensure that the power cord plug is disconnected from the outlet. When making ice cream, keep the machine flat on a level surface to ensure that the compressor of the machine is working properly.
Here are the steps to make ice cream:
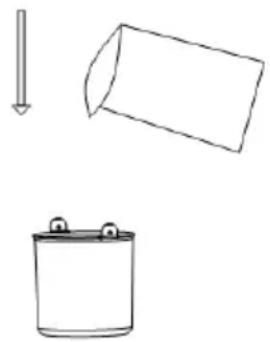
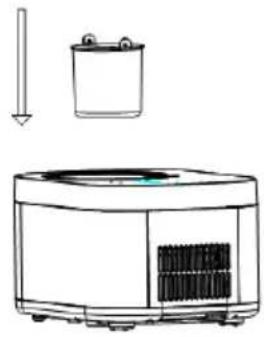
Step 1.
Pour the well-prepared ice cream mixture into the removable bowl and mix it thoroughly.
natural_image
Simple line drawings of a cylindrical object, a 3D cube, and a battery (no text or symbols)Step 2.
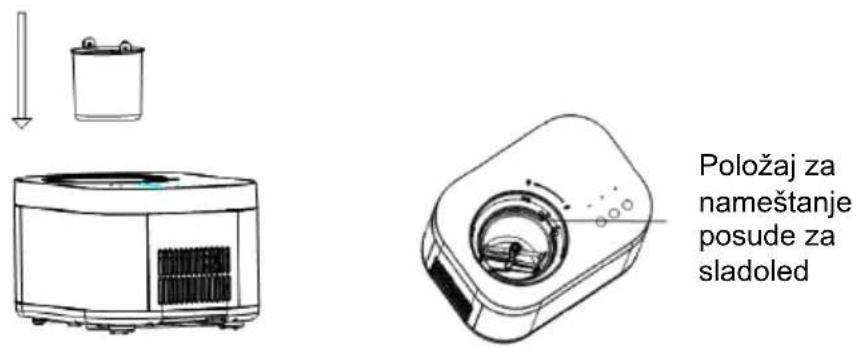
Then, insert the loading bowl into the ice cream machine. Both ends of the loading bowl handle should be aligned with the groove of the upper cover.
natural_image
Line drawing of a portable air conditioner unit with a side-view inset showing its height and base (no text or symbols)
natural_image
Line drawing of a mechanical device with a central circular component and mounting holes (no text or symbols)Installation position of loading bowl
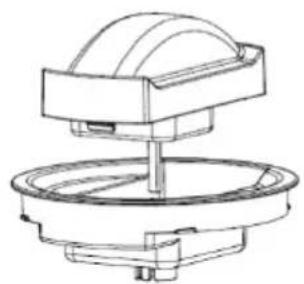
Step 3.
Install the transparent lid and motor components.
natural_image
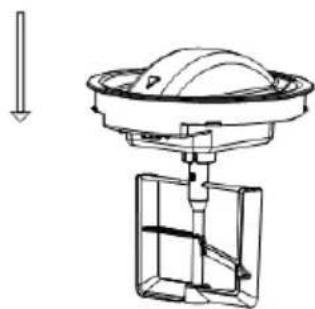
Technical line drawing of a mechanical assembly with a dome-shaped component and a circular base (no text or symbols)Step 4.
Install the mixing blade, transparent lid, and motor components.

natural_image
Technical line drawing of a mechanical assembly with a dome-shaped component and internal components (no text or symbols)Step 5.
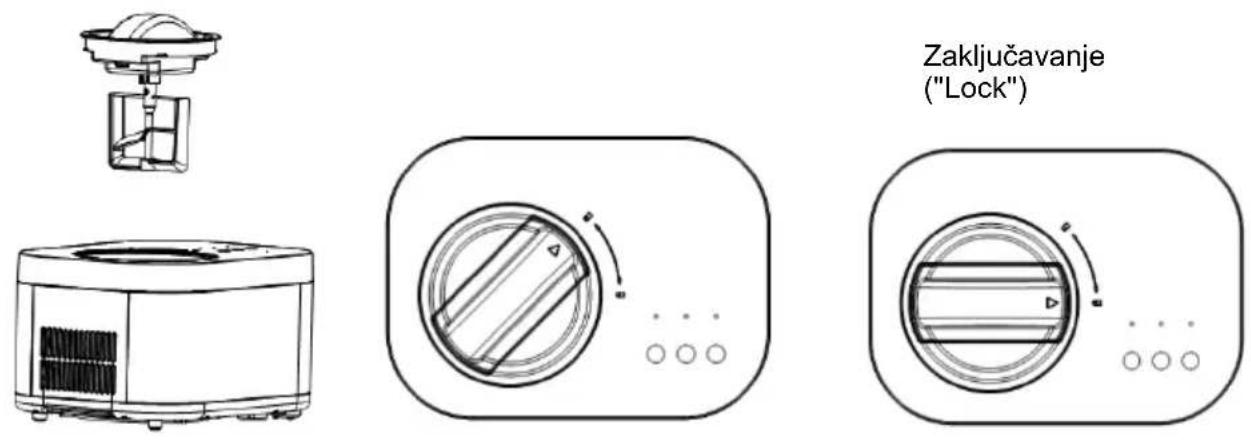
Put the components installed in step 4 into the ice cream machine, making sure that the centre of the convex hull of the loading bowl and the motor components of the mixing blade are in the same straight line. Lock the components by rotating them clockwise, and make sure that the triangle mark on the components rotates to the "LOCK" mark.
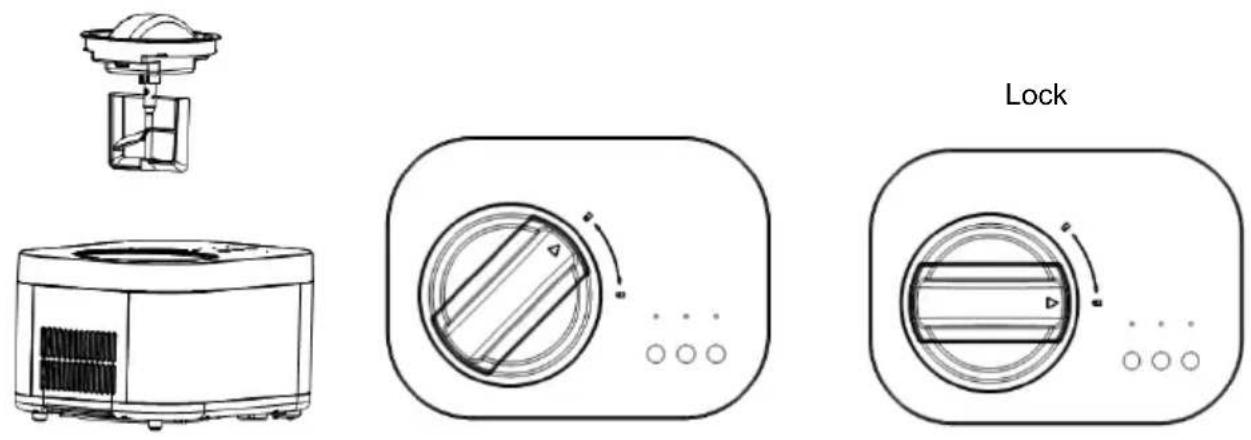
Step 6.
Connect the appliance to power supply, then touch the POWER button ⏻ for 1 second. The machine
starts up, the ice cream mode indicator light flashes red. Touch the START/STOP button . The indicator light is on green and the appliance starts making ice cream.
Step 7.
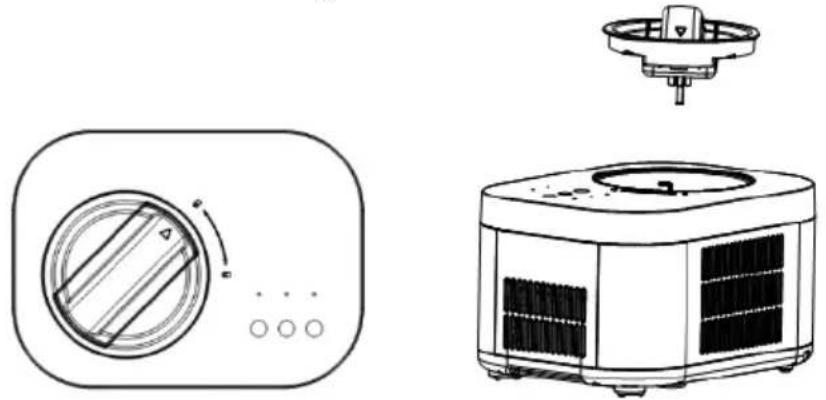
When the ice cream is finished, touch the POWER button ⏻ for 1 second to switch off the machine.
Step 8.
Turn the transparent lid and motor components anticlockwise. In the process of spinning out, there will be a slight friction sound, which is normal. When the triangle mark is aligned with the unlocking mark, take out the components and then take out the loading bowl.
natural_image
Technical line drawings of a microwave oven and its internal air conditioner unit (no text or symbols)Ice cream recipes
VANILLA ICE CREAM
| 160 g | whole milk |
| 76 g | granulated sugar |
| 120 g | heavy cream, well chilled |
| 0.5–1.5 teaspoons | teaspoons pure vanilla extract, to taste |
In a medium bowl, use a hand mixer or a whisk to combine the milk and granulated sugar until the sugar is dissolved, about 1–2 minutes on low speed. Stir in the heavy cream and vanilla to taste.
BASIC CHOCOLATE ICE CREAM
| 160 g | whole milk |
| 76 g | granulated sugar |
| 160 g | bittersweet or semi-sweet chocolate (your favourite), broken into 1.2-cm pieces160 g heavy cream, well chilled |
| 160 g | heavy cream, well chilled |
| 0.6 teaspoon | pure vanilla extract |
Heat the whole milk until it is just bubbling around the edges (this may be done on the stovetop or in a microwave oven). In a blender or food processor fitted with a metal blade, pulse to process the sugar with the chocolate until the chocolate is very finely chopped. Add the hot milk, process until well blended and smooth. Transfer to a medium bowl and let the chocolate mixture cool completely. Stir in the heavy cream and vanilla to taste. It is best to pre-cool the mixture in the refrigerator for about 15 minutes before making ice cream.
FRESH STRAWBERRY ICE CREAM
| 167 g | fresh ripe strawberries, stemmed and sliced |
| 35 g | freshly squeezed lemon juice |
| 76 g | granulated sugar |
| 160 g | whole milk |
| 160 g | heavy cream |
| 0.6 teaspoon | pure vanilla extract |
In a small bowl, combine the strawberries with the lemon juice and 76 g granulated sugar. Stir gently and allow to the strawberries to macerate in the juices for 2 hours.
In a medium bowl, use a hand mixer or a whisk to combine the milk and granulated sugar until the sugar is dissolved.
Stir in the heavy cream plus any accumulated juices from the strawberries and vanilla.
FRESH LEMON SORBET
| 235 g | granulated sugar |
| 280 g | pure water |
| 80 g | freshly squeezed lemon juice |
| 0.5 | tablespoon finely chopped lemon zest |
Combine the granulated sugar and water in a medium saucepan and bring to a boil over medium-high heat. Reduce heat to low and simmer without stirring until the sugar dissolves, about 3 – 5 minutes. Cool completely. This is called a simple syrup, and may be made ahead in larger quantities to have on hand for making fresh lemon sorbet. Keep refrigerated until ready to use. After cooling, add the lemon juice and zest; stir to combine.
CHOCOLATE FROZEN YOGURT
| 160 g | whole milk |
| 180 g | bittersweet or semisweet chocolate, chopped |
| 268 g | low-fat vanilla yogurt |
| 33 g | granulated sugar |
Combine the milk and chocolate in a blender or food processor fitted with a metal blade and process until well-blended and smooth, 15 seconds. Wait until the mixture cools down completely.
Cleaning and maintenance
Caution: The plug must be removed from the socket before cleaning to avoid electric shock.
- Take out the mixing blade and wipe it with a dampened cloth.
- Take out the removable bowl and clean it with a dampened soft cloth.
- Wipe the transparent lid and refill lid with a dampened cloth.
- Remove the dirt on the body or other places with a dampened cloth, but do not pour water on the cord, plug and the vents. Do not immerse the appliance in water or any other liquid.
- Dry thoroughly with a dry cloth, then return the component to the home position.
Troubleshooting
| PROBLEM | REASON | SOLUTION |
| Not easy to take out loading bowl after the ice cream is finished. | There are water drops between the refrigeration barrel and the loading bowl that have not been wiped clean and have frozen. | Wait 3-8 minutes before taking out the ice cream bucket. |
| The transparent lid is lifted by the mixing blade, and it cannot be rotated into place. | The mixing blades are not in place. Observe the alignment of the convex hull at the bottom. | Put the mixing blade in place and rotate the transparent cover into place. |
| The loading bowl cannot be placed into the cold bucket. | Deformation caused by improper use of loading bowl | Buy a new loading bowl. |
| At the beginning of making ice cream, the mixing fan is scratching the bowl heavily or it is jammed. | Deformation caused by improper use of loading bowl | Buy a new loading bowl. |
Environment
Do not throw away the appliance with regular household waste at the end of its life. Rather, hand it in at an official collection point for recycling. By doing this, you help preserve the environment.
Guarantee & service
If you need information or if you have a problem, please contact the Gorenje Customer Care Centre in your country (you can find its phone number in the worldwide guarantee leaflet). If there is no Customer Care Centre in your country, go to your local Gorenje dealer or contact the Service department of Gorenje domestic appliances.
For personal use only!
GORENJE WISHES YOU A LOT OF PLEASURE WHEN USING YOUR APPLIANCE.
We reserve the right to any modifications!
natural_image
Simple line drawings of a cylindrical object, a 3D cube, and a battery (no text or symbols)2.lépés
natural_image
Line drawing of a portable air purifier with a side-mounted lid and cooling unit (no text or symbols)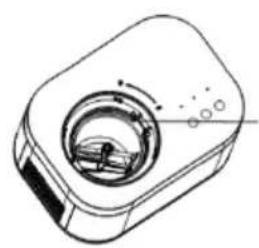
natural_image
Technical line drawing of a mechanical component with no visible text or symbolsnatural_image
Technical line drawing of a mechanical assembly with a dome-shaped component and central shaft (no text or symbols)4.lépés
natural_image
Mechanical assembly diagram showing a rotating component with a curved housing and internal structure (no text or symbols)5.lépés
natural_image
Line drawings of a microwave oven and its internal air purifier (no text or symbols)Fagylalt receptek
VANÍLIA FAGYLALT
Start/Stop
Przycisk Power
Wybór trybu
Obstuga
③ PRZYCISK WYBORU TRYBU

natural_image
Simple line drawings of a cylindrical object, a 3D cube, and a battery (no text or symbols)Krok 2
natural_image
Line drawing of a microwave oven with a side panel and a downward arrow indicating airflow (no text or symbols)
natural_image
Technical line drawing of a mechanical device with no visible text or symbolsnatural_image
Technical line drawing of a mechanical assembly with a dome-shaped component and circular base (no text or symbols)Krok 4
natural_image
Mechanical assembly diagram showing a rotating component with a downward arrow indicator (no text or symbols)Krok 5
Start/Stop
Buton pornire
Buton selectie
Functionare
natural_image
Simple line drawings of a cylindrical object, a 3D cube, and a battery (no text or symbols)Pasul 2.
natural_image
Line drawing of a portable air conditioner unit with a side panel and cooling tower (no text or symbols)
natural_image
Line drawing of a mechanical device with a central circular component and mounting holes (no text or symbols)natural_image
Technical line drawing of a mechanical device with a dome-shaped top component and circular base (no text or symbols)Pasul 4.
natural_image
Technical diagram of a mechanical assembly with a cylindrical component and internal components (no text or labels)Pasul 5.
natural_image
Simple line drawings of a cylindrical object, a 3D cube, and a battery (no text or symbols)Krok 2.
natural_image
Line drawing of a portable air conditioner unit with a side view showing its lid and cooling unit (no text or symbols)
natural_image
Technical line drawing of a mechanical device with no visible text or symbolsnatural_image
Technical line drawing of a mechanical assembly with a dome-shaped component and circular base (no text or symbols)Krok 4.
natural_image
Mechanical assembly diagram showing a valve or actuator with a cylindrical component and internal components (no text or labels)Krok 5.
natural_image
Technical line drawings of a microwave oven and its internal air purifier (no text or symbols)Recepty na zmrzlinu
VANILKOVÁ ZMRZLINA
natural_image
Simple line drawings of a cylindrical object, a 3D cube, and a battery (no text or symbols)Krok 2.
natural_image
Line drawing of a kitchen appliance with a side panel and a downward arrow (no text or symbols)
natural_image
Technical line drawing of a mechanical device with no visible text or symbolsnatural_image
Technical line drawing of a mechanical assembly with a dome-shaped component and circular base (no text or symbols)Krok 4.
natural_image
Mechanical assembly diagram showing a valve or pump component with internal structure and directional arrow (no text or labels)Krok 5.
natural_image
Technical line drawings of a microwave oven and its internal air purifier (no text or symbols)Recepty na zmrzlinu
VANILKOVÁ ZMRZLINA
natural_image
Simple line drawings of a cylindrical object, a 3D cube, and a battery-like container (no text or symbols)Крок 2.
natural_image
Line drawing of a microwave oven with a cylindrical lid and cooling unit (no text or symbols)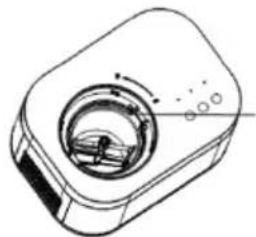
natural_image
Line drawing of a camera lens with no text or symbolsnatural_image
Technical line drawing of a mechanical assembly with a dome-shaped component and circular base (no text or symbols)Крок 4.
natural_image
Mechanical assembly diagram showing a valve or pump component with internal structure and directional arrow (no text or labels)Крок 5.
natural_image
Simple line drawing of a circular object with internal diagonal lines and a small dot pattern inside, enclosed in a rounded rectangle (no text or symbols)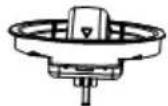
natural_image
Line drawing of a portable air conditioner unit with cooling fins and a top vent (no text or symbols)Рецепти морозива
ВАНІЛЬНЕ МОРОЗИВО
Старт/Стоп
Кнопка питания
Выбор режима работы
natural_image
Simple line drawings of a cylindrical object, a tilted cylinder, and a battery (no text or symbols)War 2
natural_image
Line drawing of a microwave oven with a cylindrical container and a downward arrow indicating airflow (no text or symbols)
natural_image
Line drawing of a camera lens with no text or symbolsnatural_image
Technical line drawing of a mechanical assembly with a dome-shaped component and circular base (no text or symbols)War 4
natural_image
Technical line drawing of a mechanical assembly with a dome-shaped component and internal components (no text or symbols)War 5
natural_image
Line drawing of a portable air conditioner unit with a top-mounted fan (no text or symbols)War 8
natural_image
Simple line drawing of a circular object with diagonal lines and a small dot pattern inside, enclosed in a rounded rectangle (no text or symbols)Рецепты мороженого
ВАНИЛЬНОЕ МОРОЖЕНОЕ
Старт/Стоп
Бутон за захранване
Избор на режим
Работа
natural_image
Simple line drawings of a cylindrical object, a 3D cube, and a battery (no text or symbols)Стъпка 2.
natural_image
Line drawing of a portable air purifier with a side panel and top outlet (no text or symbols)
natural_image
Technical line drawing of a mechanical device with no visible text or symbolsnatural_image
Technical line drawing of a mechanical assembly with a dome-shaped component and circular base (no text or symbols)Стъпка 4.
natural_image
Mechanical assembly diagram showing a rotating component with a curved housing and a downward arrow indicator (no text or symbols)Стъпка 5.
Start/Stop
Power-Taste
Modus-Auswahl
Betrieb
natural_image
Simple line drawings of a cylindrical object, a 3D cube, and a battery (no text or symbols)Schritt 2:
natural_image
Line drawing of a portable air purifier with a side panel and downward arrow (no text or symbols)
natural_image
Technical line drawing of a mechanical device with no visible text or symbolsnatural_image
Technical line drawing of a mechanical device with a dome-shaped top component and circular base (no text or symbols)Schritt 4.
natural_image
Technical diagram of a mechanical assembly with a cylindrical component and internal components (no text or labels)Schritt 5.
natural_image
Simple line drawing of a circular object with diagonal lines and a small dot pattern inside, enclosed in a rounded rectangle (no text or symbols)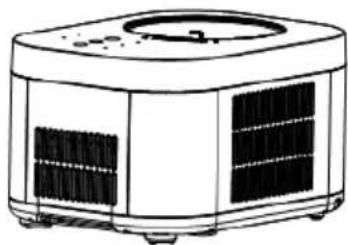
natural_image
Line drawing of a portable air conditioner unit with vented doors and cooling fans (no text or symbols)Eiscreme-Rezepte
VANILLEEIS
Marche/Arrêt
natural_image
Simple line drawings of a cylindrical object, a 3D cube, and a battery (no text or symbols)Étape 2.
natural_image
Line drawing of a portable air conditioner unit with a side-view inset showing its lid and cooling unit (no text or symbols)
natural_image
Technical line drawing of a mechanical device with no visible text or symbolsnatural_image
Technical line drawing of a mechanical assembly with a dome-shaped component and circular base (no text or symbols)Étape 4.
natural_image
Mechanical assembly diagram showing a rotating component with a curved housing and a downward arrow indicator (no text or symbols)Étape 5.
Start/Stop
natural_image
Simple line drawings of a cylindrical object, a 3D cube, and a battery (no text or symbols)Hapi 2.
natural_image
Line drawing of a microwave oven with a side-mounted lid and cooling unit (no text or symbols)