DKS 120 - Saw LUX TOOLS - Free user manual and instructions
Find the device manual for free DKS 120 LUX TOOLS in PDF.


User questions about DKS 120 LUX TOOLS
0 question about this device. Answer the ones you know or ask your own.
Ask a new question about this device
Download the instructions for your Saw in PDF format for free! Find your manual DKS 120 - LUX TOOLS and take your electronic device back in hand. On this page are published all the documents necessary for the use of your device. DKS 120 by LUX TOOLS.
USER MANUAL DKS 120 LUX TOOLS
GB Operating instructions
natural_image
Industrial sewing machine with coiled tubing and mechanical components (no visible text or symbols)text_image
Labeled diagram of a sewing machine with numbered parts for identification
2
text_image
14 8 10 9 13
text_image
b a 11 12




text_image
4 12 115
text_image
5 3 2 2 5 4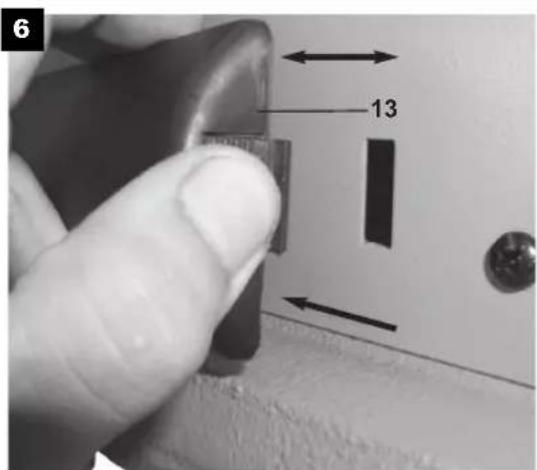
text_image
6 137
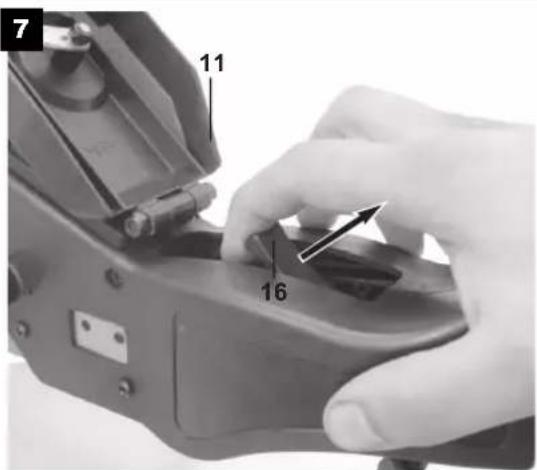
text_image
7 11 16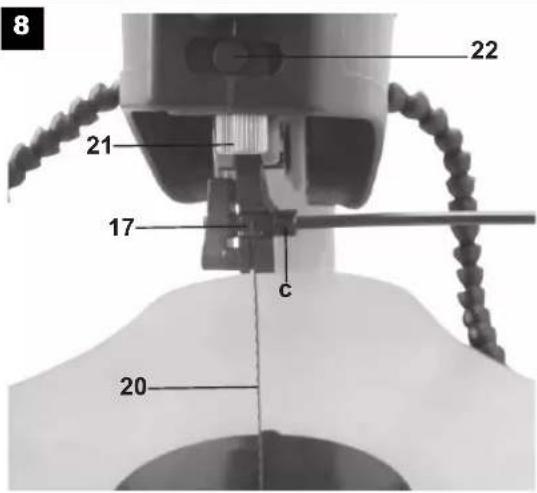
text_image
8 22 21 17 c 20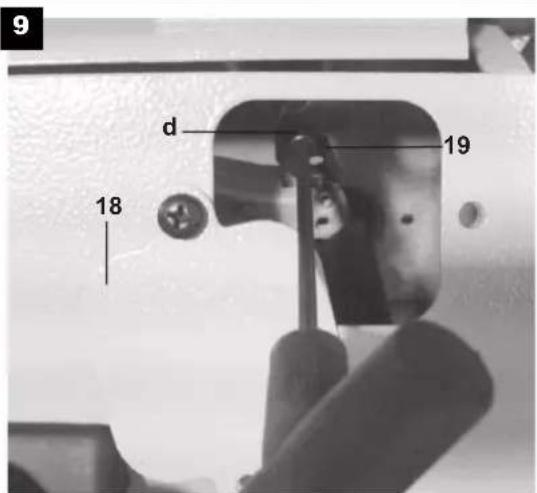
text_image
9 d 18 19DE
Leistung Laser: < 1 mW
Einschaltdauer:
Translation of the original instructions
GB
Table of contents
-
Safety instructions .... 25 Safety Regulations Fretsaw .... 26
-
Technical manual (Picture 1-2) ..... 28 Scope of delivery ..... 28
-
Intended use 29
-
Technical data .... 30 Switched-on time: .... 30 Noise emission levels .... 30
-
Before putting the machine into operation 31 5.1 General 31 5.2 Mounting the saw on a workbench 31 5.3 Installation 31
-
Operation .... 32 6.1 Please note: .... 32 6.2 On- Off switch (Fig. 5/Pos. 2) .... 32 6.3 Blade speed regulator (Fig. 5/Pos. 3) .... 32 6.4 Carrying out internal cuts .... 32 6.5. Operating LED light .... 33 6.6. Operating Laser (Fig. 8/Pos. 21) .... 33 6.7 Saw blade-Storage (Fig. 6) .... 33
-
Cleaning, maintenance and ordering replacement parts 33
7.1 Cleaning 33
7.2 Carbon brushes 33
7.3 Maintenance 33
7.4 Ordering replacement parts: 33 - Disposal and Reuse 34
Appendix 179
Claims for defects 180

Caution!
Some safety measures must be taken while using devices in order to prevent injuries and damages. Thus, read these operating instructions carefully. Keep them properly, so that the information is available at any time. If you give the device to other personnel, hand over these operating instructions along with the device. We do not accept any liability for accidents or damages caused due to the failure to observe these instructions and the safety instructions.
1. Safety instructions

Please read and keep in a safe place.

Wear safety goggles!
Table of contents
GB

Wear ear muffs!

Wear a breathing mask!

Caution: Laser beam
Do not look directly into the beam
Laser class 2
Protect yourself and environment by taking suitable precautionary measures for risks of accident.
- Do not look directly into the laser beam without wearing eye protection.
- Never look directly into the course of beam.
- Do not point the laser beam at reflective surfaces, people or animals. Even a laser beam with low output can cause damage to the eyes.
- Caution – if procedures other than those described are used, this may expose yourself to hazardous radiation.
- Do not open the laser module.
Laserspezifikation
nach EN 60825-1:1994+A2:2001+A1:2002
Laser Klasse 2 RLM-08
λ: 650 nm P: ≤ 1 mW
Safety Regulations Fretsaw
- Important: Whenever you use electric tools it is imperative to take basic safety precautions in order to reduce the risk of fire, electric shock and personal injury. Essential safety precautions include:
- In an emergency, switch off the machine directly and pull out the power plug.
- Follow all these instructions before and while you are working with the saw.
- Keep these instructions in a safe place.
- Always pull out the power plug before adjusting or servicing the machine.
- Give these safety regulations to all persons who work on the machine.
- Do not use this saw to cut fire wood.
- Never use the saw to cross-cut round timber unless it is equipped with a suitable holding device.
- The machine is equipped with a safety switch to prevent it being switched on again accidentally after a power failure.
- Before you use the machine for the first time, check that the voltage marked on the rating plate is the same as your mains voltage.
- If you need to use an extension cable, make sure its conductor cross-section is big enough for the saw's power consumption. Minimum cross-section: 1 mm ^2 .
- If you use a cable reel, the complete cable has to be pulled off the reel.
- Never carry the saw by its cable.
- Check the power cable. Never use a faulty or damaged power cable.
Table of contents
GB
-
Do not use the cable to pull the plug out of the socket-outlet. Protect the cable from heat, oil and sharp edges.
-
Do not leave the saw in the rain and never use it in damp or wet conditions.
-
Provide good lighting.
-
Never saw near combustible liquids or gases.
-
Wear suitable work clothes! Never wear loose garments or jewellery.
-
Keep long hair in a hair net.
-
Avoid abnormal working postures.
-
Keep children away from the machine when it is connected to the power supply.
-
Keep your workplace clean of wood scrap and any unnecessary objects.
-
Do not allow other persons, particularly children, to touch the tool or the power cable. Keep them away from your workplace.
-
Persons working on the machine should not be distracted.
-
After you have switched off the motor, never slow down the saw blade by applying pressure to its side.
-
Fit only blades which are well sharpened and have no cracks or deformations.
-
Faulty saw blades have to be replaced immediately.
-
Never use saw blades which do not comply with the data specified in this manual.
-
It is imperative to make sure that all the devices used to cover the saw blade are in good working order.
-
Never dismantle the machine's safety devices or put them out of operation.
-
Damaged or faulty safety devices have to be replaced immediately.
-
Never cut workpieces which are too small to hold securely in your hand.
-
Never load the machine so much that it cuts out.
-
Always press the workpiece firmly against the work top.
-
Never remove loose splinters, chips or jammed pieces of wood when the saw blade is running.
-
To rectify faults or remove jammed pieces of wood, always switch off the machine first. – Pull out the power plug!
-
Conversions, adjustments, measurements and cleaning jobs are to be performed only when the motor is switched off. – Pull out the power plug!
-
Before you switch on the machine, check that all wrenches and adjustment tools have been removed.
-
When you leave your workplace, switch off the motor and pull out the power plug.
-
Electric installation work, repairs and maintenance are to be carried out only by specialists.
-
All guards and safety devices have to be refitted immediately after completion of any repairs or maintenance.
-
It is imperative to observe the manufacturer's safety, operating and maintenance instructions as well as the dimensions quoted in the technical data.
-
It is imperative to observe the accident prevention regulations in force in your area as well as all other generally recognized rules of safety.
-
Note the information published by your professional associations (VBG 7j).


GB
2. Technical manual (Picture 1-2)
- The machine is designed for indoor installation only.
- Workpieces smaller than the blade guard may lead to injuries to your hands and fingers. Use suitable aids!
- When guiding the workpiece do not place your hands in cramped or awkward positions where they may slip directly against the blade.
- Always insert the blade so that the teeth point down toward the table.
- To avoid broken blades, always set the correct blade tension.
- Be particularly careful when sawing material with irregular cutting profiles.
- Take special care when cutting round workpieces such as rods or tubes as they may roll away from the blade and cause the teeth to jam. Secure such workpieces with a wedge.
- When you withdraw the workpiece the teeth may get caught in the kerf, particularly if the gap is blocked by sawdust. If this happens you should switch off the saw, pull out the power plug, open the kerf with a wedge and pull the workpiece free.
- Never leave your workplace without switching off the saw first. Wait until the saw stops.
- Never arrange, glue or assemble any parts on the work table while the saw is running.
- Do not switch on the saw until you have cleared all material remnants and tools from the work table. Only the workpiece and any essential aids (wedge) are to be left on the workpiece.
- Always wear safety goggles.
- Keep your fingers a safe distance from the blade.
- Guide the workpiece securely and firmly and do not loosen your grip at any time.
- Never leave your workplace without switching off the saw first.
- DO NOT ALLOW YOUR FAMILIARITY WITH THE SAW TO TURN INTO CARELESSNESS. IT TAKES ONLY FRACTIONS OF A SECOND FOR CARELESSNESS TO RESULT IN SERIOUS INJURIES.
2. Technical manual (Picture 1-2)
-
Dust extraction adapter
-
Saw blade-Storage cabinet
-
Switching On/Off
-
Saw table
-
Blade speed regulator
-
Saw table-Insertion
-
Off/On switch LED-Light
-
Saw blade-clamping lever
-
Switching On/Off Laser
-
Saw blade holder top
-
Air blowing unit
-
Access panel
-
LED light
-
Saw blade holder bottom
-
Locking screw
-
Saw blade
-
Scale
-
Laser
-
Indicator
-
Laser-Calibration screw
-
Saw blade protection
-
Mounting-Holes
-
Fixing-Screw
-
Rubber feet
Scope of delivery
- Scroll saw
- Saw blade protection
3. Intended use
GB
- Mounting-Tool
3. Intended use
The scroll saw is used to cut edged timber or wood-like components. Round materials may be cut only with suitable clamping systems.
The machine must be used only in accordance with the intended purpose. Any other use is not intended. The user/operator and not the manufacturer shall bear the liability for caused damages or injuries of all type.
Please note that our devices has not been designed for the commercial, technical or industrial use. We do not cover any warranty, if the device is used in trade, handicraft or industrial businesses as well as in case of similar activities.
Only saw blades suitable for the machine may be used. The use of cutting discs of any type is prohibited. Components of the intended use is also the compliance with the safety instructions, as well as the installations instructions and operating instructions in the operating manual.
Personnel operating and maintaining the machine must be familiar with this and must be informed about possible dangers. Moreover, the applicable accident prevention regulations should be strictly observed.
Other general regulations related to occupational health and safety areas are to be observed.
Changes in the machine and damages resulted because of it will completely exclude liability of the manufacturer.
In spite of intended use, certain residual risk factors are not completely eliminated. Due to construction and set-up of the machine, following points may appear:
- Harmful emissions from wood dust when using the product in enclosed rooms.
- Risk of accident through the hand contact in uncovered cutting range of the tool.
- Risk of injuring while changing the tool (risk of cutting).
- Crushing of the finger.
- Hazard due to rebound.
- Tilting of the tool due to inadequate workpiece supporting surface.
- Touching the cutting tool.
- Ejection of branch parts and tool parts.
4. Technical data
GB
4. Technical data
AC motor: 230–240 V \~ /50 Hz
Power: 70 / 120 W
Operating mode: S1 / S2 5 min
Idle speed n_0 : 400–1600 min -1
Type of protection: IP 20
Hoisting movement: 15 mm
Footprint: 470 × 190 mm
Table swivel-mounted: -45^/0^/45^
Table size: 420 × 270 mm
Saw blade length: 127 mm
Cutting height max. at 90°: 50 mm
Cutting height max. at 45°: 20 mm
Weight: 17 kg
Wave length Laser: 650 nm
Laser output: < 1 mW
Switched-on time:
The switched-on time S2 5 min (Short-term operation) reveals, that the motor with the rated output of 120 Watt must be loaded constantly only for the time (5 min) specified on the data plate. Otherwise, it is unduly heated up. During the interval, the motor cools down again to its initial temperature.
Noise emission levels
The noise of this saw is measured in accordance with DIN EN ISO 3744; 11/95, DIN EN 11201. The noise at the work-centre can exceed 85 dB(A). In this case, noise protection measures are required for the user. (Wear hearing protection!)
| Operation | Idle speed | |
| Sound pressure level L_pa : | 82.6 dB | 72.2 dB |
| Sound power level L_wa : | 92.4 dB | 81.8 dB |
„The specified values are emission values and thus do not also have to represent other safe workplace values. Although there is a correlation between emission and immission levels, it is not possible to reliably derive whether additional precautions are necessary or not. Factors, which can influence current immission level available at work centre, include the duration of the effects, the nature of the workroom, other noise sources, e.g. the number of machines and other adjacent processes. The reliable workplace values can also vary from country to country. With this information the user should at least be able to make a better assessment of the dangers and risks involved."


5. Before putting the machine into operation
GB
5. Before putting the machine into operation
5.1 General
- All coverings and security devices have to be properly fitted before putting the machine into operation.
- It must be possible for the saw blade to run freely.
- When working with wood that has been processed before, watch out for foreign bodies such as nails or screws etc.
- Before you actuate the On/Off switch, make sure that the saw blade is correctly fitted and that the machine's moving parts run smoothly.
- Before you connect the machine to the power supply, make sure the data on the rating plate is the same as that for your mains.
5.2 Mounting the saw on a workbench
- It is better to mount the saw on a solid wood workbench rather than on a weak plywood stand, where vibrations and noise are certain to be a nuisance.
- The tools needed to mount the saw on a workbench are not supplied with the saw. Be sure to use equipment of at least the following size:
Description: Quantity:
| Hexagon screws M8: 4 |
Gaskets ∅ 8 mm: 4
| Washers ∅ 8 mm: 4 |
Hexagon nuts M8: 8
- Use only provided mounting-holes (23) for the mounting. Do not over tighten the screws. Leave enough scope for the rubber feet (24) to develop a good absorbing effect.
5.3 Installation

Caution!
Pull out the power plug before carrying out any maintenance and conversion work on your scroll saw.
5.3.1 Mounting the Saw blade protection (Fig. 3-4)
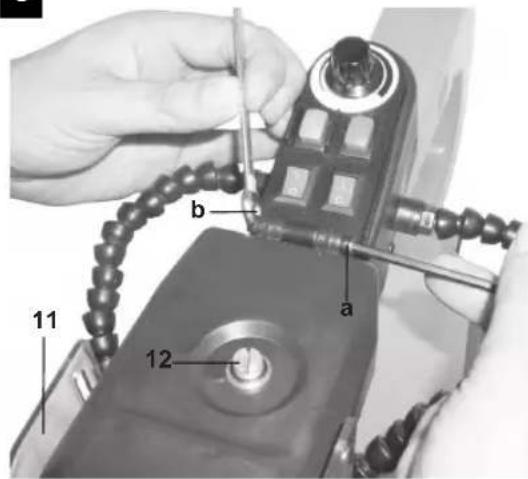
- Mount the saw blade protection (11) using the socket screws (a) and the nut (b), as shown in figure 3.
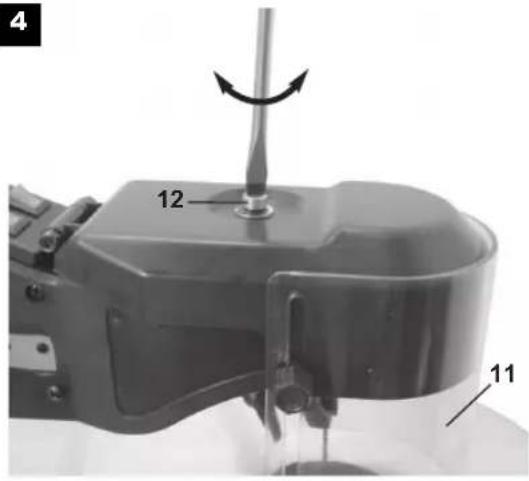
- Lock the saw blade protection (11) subsequently with the Fixing-Screw (12), as shown in Figure 4.
5.3.2 Changing saw blade (Fig. 7-9)
- Unlock the saw blade protection (11), as described in 5.3.1. Fold up the saw blade protection (11) backwards. Pull the saw blade-clamping lever (16) upwards to take the tension off the saw blade (20).
- Loosen the socket screw (c) on upper saw blade holder (17). Open the access panel (18). Loosen the socket screw (d) on bottom saw blade holder (19). Pull the saw blade (20) up and out through the table insert (15).
• Install the saw blade in reverse order.
GB
6. Operation
- Through the Universal-saw blade holder (17/19) both scroll saw blades and fretsaw blades can be used.

Caution!
Always insert the blade so that the teeth point toward the saw table (14)!
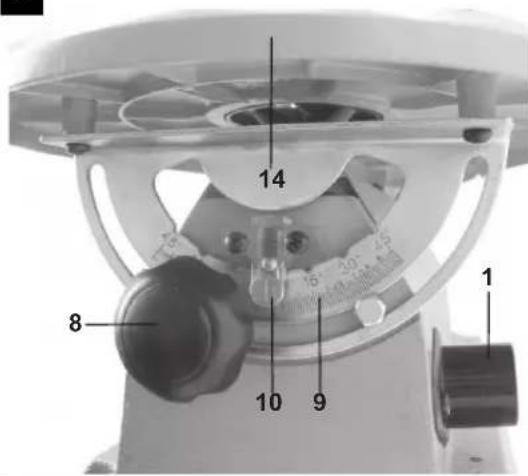
5.3.3 Tilting the saw table (Fig. 2)
- Loosen the locking screw (8).
- Tilt the saw table (14) to the left or right, till the indicator (10) points to the required angle value on the scale (9).

Caution:
For precision work you should first carry out a trial cut and then re-adjust the tilt angle as required.
6. Operation
6.1 Please note:
- The saw will not cut wood automatically. The user must guide the wood into the moving the saw blade to enable the machine to cut it.
- The teeth cut the wood only on the downstroke of the sawblade.
- The user must guide the wood slowly against the saw blade because the teeth are very small.
- Every person using the saw needs certain training period. During this period, some blades are prone to break.
- When cutting thick timber, be particularly careful not to bend or twist the saw blade. This will help to prolong saw blade life.
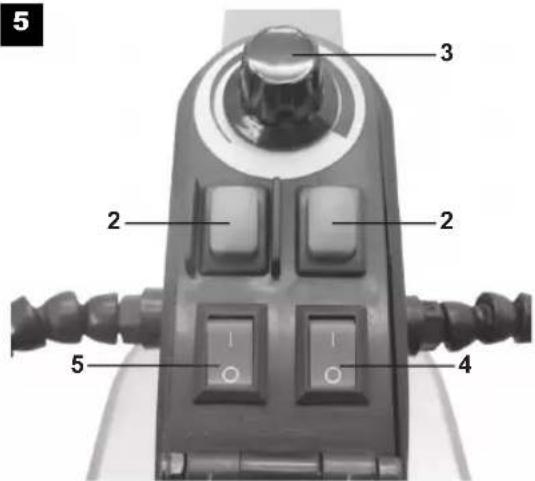
6.2 On- Off switch (Fig. 5/Pos. 2)
- For switching on press the green button.
- For switching off press the red button.

Caution:
The machine is equipped with a safety device to prevent it being switched on again accidentally after a power failure.
6.3 Blade speed regulator (Fig. 5/Pos. 3)
Using the blade speed regulator, you can set the blade speed appropriate to the material to be cut.
6.4 Carrying out internal cuts
- A feature of this scroll saw is that it is possible to carry out internal cuts in a panel without damaging the external side or the circumference of the panel.

WARNING:
TO PREVENT INJURIES DUE TO THE SAW STARTING UP ACCIDENTLY: SET THE SWITCH TO "O" POSITION AND PULL THE PLUG OUT OF THE SOCKET BEFORE YOU REMOVE OR CHANGE THE SAW BLADE.
- To carry out internal cuts in a panel: Remove the saw blade, as described in section 5.3.2.
- Drill a 6.3 mm hole in the panel.


7. Cleaning, maintenance and ordering replacement parts
GB
- Place the panel on the saw table with the drilled hole above the access hole.
- Install the saw blade through the hole in the panel and adjust the blade tension.
- After completing the internal cut, remove the saw blade from the blade holders (as described in section 5.3.2) and take the panel off the table.
6.5. Operating LED light
- Switch on the machine, as described in 6.2
- The LED-Light (7) can be switched on/off using the switch (4).
6.6. Operating Laser (Fig. 8/Pos. 21)
- Switch on the machine, as described in 6.2.
• The Laser (21) can be switched on/off using the switch (5). - Unlock the saw blade protection (11), as described in 5.3.1. Fold up the saw blade protection (11) backwards.
- Using the Laser-Calibrated screw (22), the laser line projected on the workpiece can be calibrated. For this, loosen the Laser-Calibrated screw (22) and set the Laser (21) accordingly. Afterwards, retighten the Laser-Calibration screw (22).

Caution!
Set the laser line only with the Laser-Calibration screw (22), not on the laser itself! Risk of injuries due to running saw blade!
6.7 Saw blade-Storage (Fig. 6)
Non-required saw blades can be stored in the saw blade storage cabinet (13). Open and close the saw blade storage cabinet (13), as shown in Figure 6.
7. Cleaning, maintenance and ordering replacement parts
At first pull the power plug before any cleaning work.
7.1 Cleaning
- Keep safety devices, louvre and engine housing as dust and dirt-free as possible. Rub the device with clean piece of cloth or blow it clean with compressed air with low pressure.
- We recommend to clean the device immediately after each use.
- Clean the device regularly with wet cloth and some soft soap. Do not use any detergents or solvents; these could damage the synthetic material of the device. Ensure that water do not enter into the interior of the device.
7.2 Carbon brushes
In case of excess spark formation, get the carbon brushes checked by a certified electrician. Caution! Only a certified electrician is allowed to change the carbon brushes.
7.3 Maintenance
The interior of the device do not contain any parts that require servicing.
7.4 Ordering replacement parts:
Please quote the following data when ordering replacement parts:
- Type of the device
• Article number of the device



GB
8. Disposal and Reuse
• Identification-Number of the device
- Replacement part number of the part required Current price and Info, you can find under www.isc-gmbh.info
8. Disposal and Reuse
Devices marked with the symbol shown here must not be disposed of in normal household waste. You are obliged to dispose of such electrical and used electronic products separately.
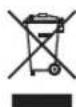
The device is packed in order to prevent transport damages. This packaging is made of raw material and is thus reusable or can be reintegrated into the raw material cycle. The device and its accessories consists of different materials such as metal and plastic. Deliver defective components for the special waste disposal. Enquire in the specialised shop or in the local government!
NL
Prosimo preberite in shranite

Ohutusjuhised Vineerisaag
natural_image
Pure geometric diagram with intersecting lines and a circular pattern (no text or symbols)GB Claims for defects
Dear customer,
Our products are manufactured in modern production plants, and are subject to an internationally recognised quality process.
Nevertheless, if you have cause for dissatisfaction, please bring the item together with the proof of purchase to the store from which you bought it.
For our products, legal claims for defects are valid from the date of purchase.
NL Reclamaties
Geachte klant,